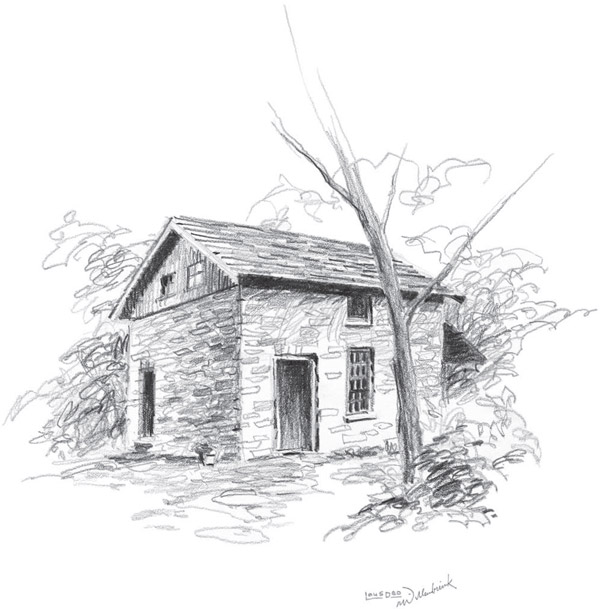
Good drawing does not come just from having a skilled or trained hand, but also from your ability to observe your subject matter. In fact, one of the things we love most about art is being able to see how each artist interprets a subject. What is it that gives someone the ability to draw well? It is a matter of learning basic principles, applying them consistently and training the eye to observe the subject. Observing involves noticing the basic shapes, proportions and values of objects rather than thinking of them as “buildings,” “trees” or “people.”Once you have an understanding of the principles and have trained yourself to observe, it is then only a matter of telling your hand to draw what your eye sees, not what your mind thinks the subject should look like.

Before you pick up a pencil to begin drawing, take time to observe your subject matter. Look for the basic shapes, then sketch them lightly on your drawing paper, working out the correct proportions of those shapes and determining where each should be in relation to one another. If you have questions about the composition, do a few quick thumbnail sketches at this point. Once you decide where to place the major elements of your composition, take your sketch to the next step, adding structural details. Finally, add the values. This method of drawing will help ensure that the results will be proportionally correct.
HB graphite pencil
Drawing paper
Kneaded eraser
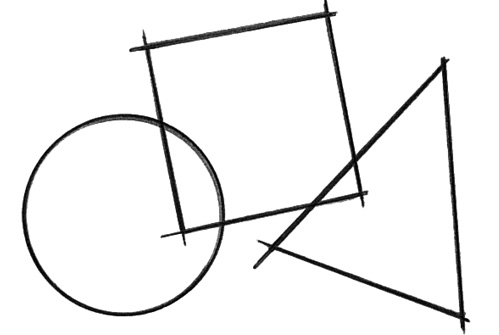
the Basic Shapes Look for circles, squares, triangles, ovals and rectangles in your subject before you sketch.
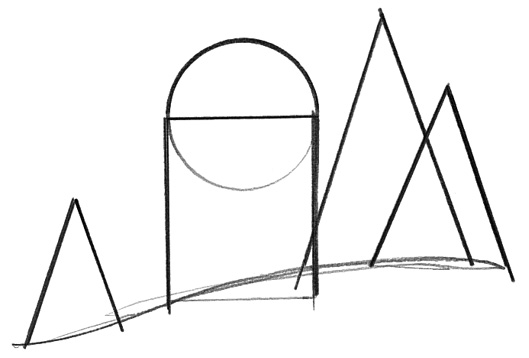
Start with the basic shapes and use them to work out proportions (see Gauging Proportions) and composition (see Chapter 5).

Add the details including the columns and trim to the building, define the shape of the trees and add a row of shrubs in front of the building.

Add values over the lines to give the scene depth and definition, and to make it look more realistic.
Gauging proportions is as simple as making sure that the width and height of the objects in your drawing are proportionally similar to those in your reference. Believable art starts with correct proportions, so learning how to gauge proportions accurately will be invaluable. You don't need to know the actual inches or centimeters; instead, measure the relative sizes of the elements to achieve an accurate representation of your subject.
There are many tools available for gauging proportions, from a simple pencil to tools made specifically for measuring, such as sewing gauges or dividers. Dividers, both standard and proportional, are used to gauge proportions of two-dimensional reference materials, such as photographs, rather than of three-dimensional objects, such as those in a still-life setup. Proportional dividers enable you to enlarge or reduce by measuring the reference with one end of the tool and then using the other end to determine the size of the image in your drawing.
Proportioning can be done loosely for a quick sketch or more precisely for a finished drawing. The subject also influences how accurate the drawing needs to be. You may be less concerned about the proportions of a tree than you are about the proportions of an automobile.
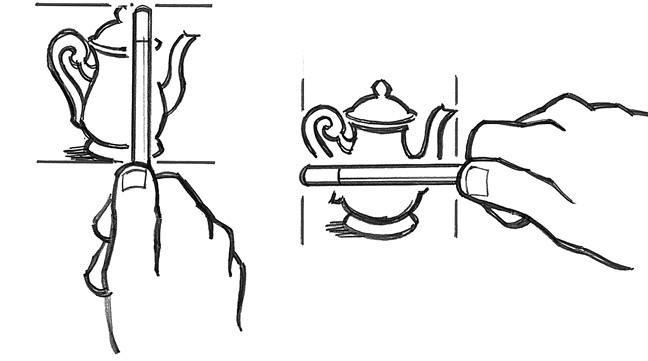
Gauging Proportions can be done by “measuring” each part of the subject with a pencil. Use the top of your thumb to make the distance from the end of the pencil. Now compare this measurement with those of other parts of the image. In this example, the teapot's height is equal to its width.

To correctly gauge proportions in this manner, lock your arm straight in front of you, holding the pencil straight up. Look at the pencil and the subject you're measuring through one eye. A bent arm may result in inaccurate measurements because you may bend your arm at different angles from one measurement to another.
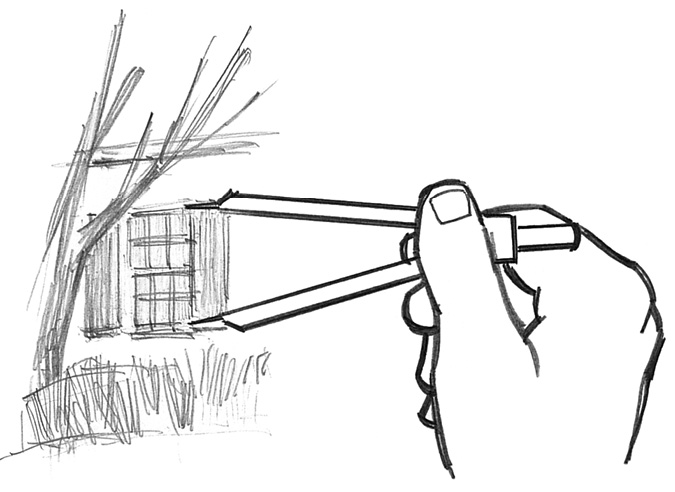
Measure the subject in your reference with the dividers and transfer the length to your surface. You can only measure a one-to-one ratio with standard dividers. If you wanted to enlarge this window to twice its size, you would have to double the divider's measurement.
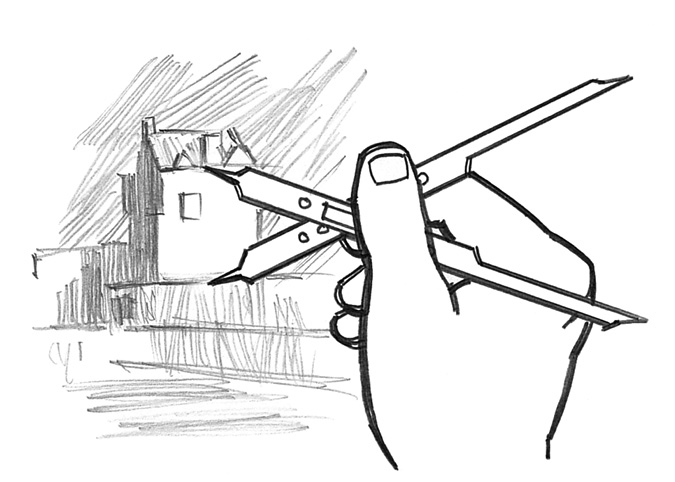
Proportional dividers are used not only to compare proportions but also to enlarge or reduce. Measure the subject in your reference with one end of the dividers, then use the other end to mark the measurement for your drawing. The notches in the center of the dividers let you determine just how much you want to enlarge or reduce the size of the image.
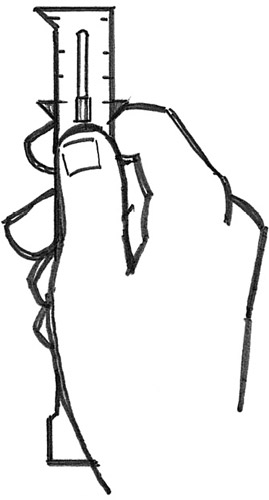
Align the edge of the object with the end of the sewing gauge, then move the slider up or down to mark the other edge. Transfer that measurement to your drawing.
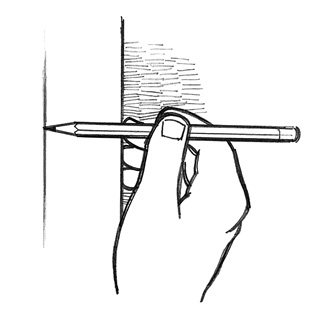
Straight lines can be drawn using a straightedge or ruler. Another method is to place the side of the hand holding your pencil against the edge of your drawing surface, then glide your hand along the edge.
Measuring angles sounds technical, but drawing angles mostly involves observation. If you want to take the guesswork out of drawing angles, use an angle ruler. Correct angles will make your drawings more successful.
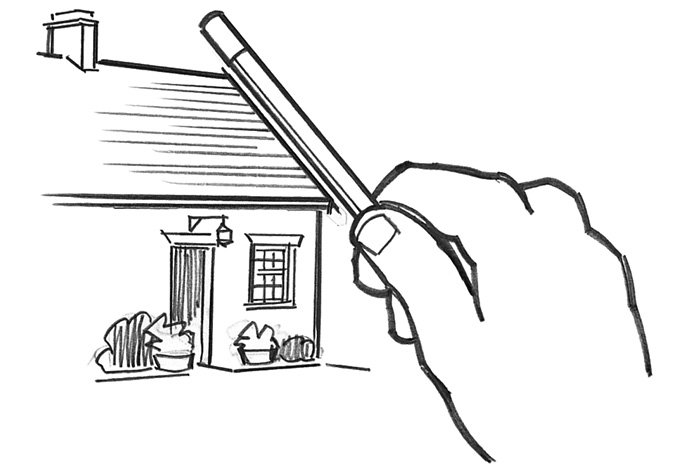
First, duplicate the angle of the subject by aligning a pencil with it.
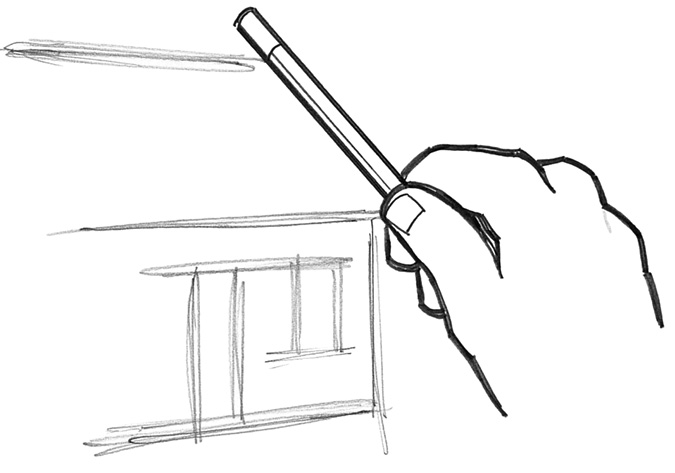
Keeping the pencil at the same angle, hold it over the drawing and adjust the sketch as needed.
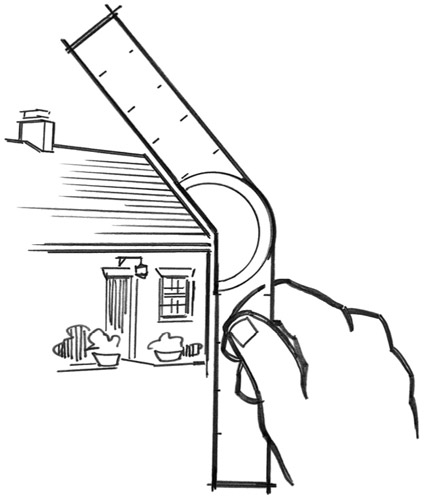
An angle ruler also can be used for duplicating angles. Line up the angle ruler with the subject, then hold it over the drawing. Then transfer the angle to the drawing by placing the angle ruler on the relevant area of the drawing and marking along it.
Images from books, magazines, greeting cards or the Internet that allow you to observe a particular subject are called reference materials. It is good to practice observing actual subjects such as the birds in your backyard. Firsthand observation will help you to capture the essence and nature of your subject. The problem with observing from life is that the subject, especially an animal, may not stay still for you. Moreover, the lighting and colors will constantly change. A still life, in which you set up your subject matter with a consistent light source, is another option. You can sit down and take your time observing your subject at your leisure—be sure to warn your family that the fruit bowl is being used for study, or your reference may be eaten by mistake!
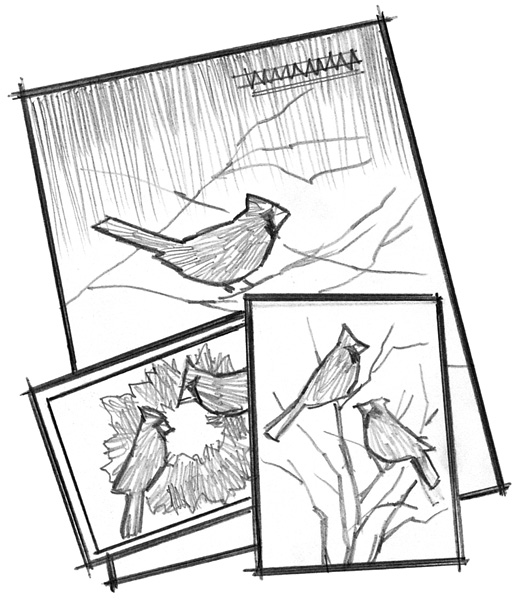
Observation of a subject can be enhanced with reference material. Start a reference file by categorizing photos and magazine pictures in an accordion folder.
Some subjects may seem so daunting, you may not know where to begin. Even finding the basic shapes, which is the best place to begin, may be hard. The following method may help.

Lay a piece of tracing paper over your reference and trace the basic shapes of the image.
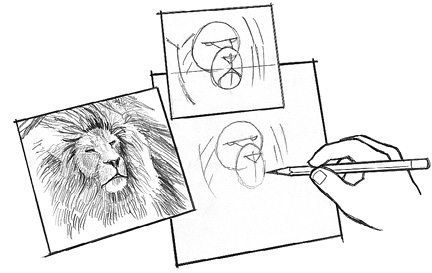
Use the tracing as another reference to determine the placement of the shapes and their proportions as you begin the drawing.
Perspective is what gives the illusion of depth to a picture. It affects almost everything we see, if only in subtle ways, which is why it is important to have an understanding of how perspective works. Artists employ two types of perspective: linear and atmospheric (also called aerial). Linear perspective involves the use of converging lines and the manipulation of the size and placement of elements within a composition to create the illusion of depth and distance. Atmospheric perspective relies not on lines but on variations in value and detail to achieve similar effects.
The first step in using linear perspective is to establish a horizon line where the land or water meets the sky. The placement of the horizon influences the viewer's perception of a scene and determines where its sight lines should converge. Even when the horizon line is not actually visible, its location must be clear or the perspective of the scene may not be correct (see Hidden Horizons and Vanishing Points).
Vanishing points occur where parallel lines appear to converge, usually on the horizon. For example, when you look down a train track, the rails seem to converge in the distance. The place where the rails appear to meet is the vanishing point. A single drawing may contain several vanishing points—or none at all—depending on the location of elements within a scene and the vantage point of the viewer.
The best way to describe the vantage point is to say that it is the point from which the viewer observes a scene. In a drawing, the relationship between the location of subject elements (such as trees and buildings) and the horizon line will determine the eye level of the vantage point. In addition, the vantage point can influence the mood of a scene.
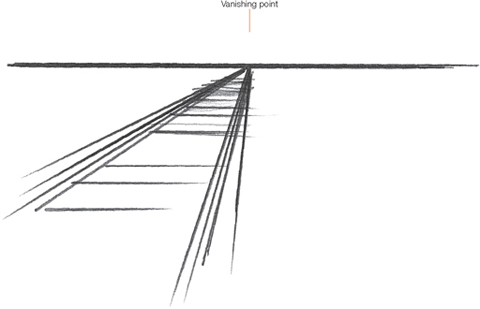
A vanishing point occurs where parallel lines appear to meet in the distance. For instance, when you look down train tracks, the parallel lines of the rails seem to converge at a point on the horizon.
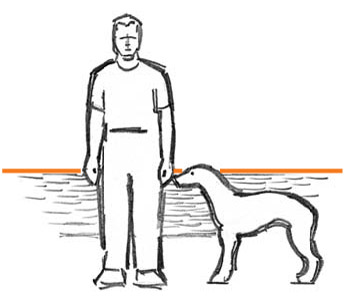
Placing the horizon low makes the vantage point seem low. In this example, the vantage point is at the dog's eye level. Notice that the horizon line goes through the eye of the dog.
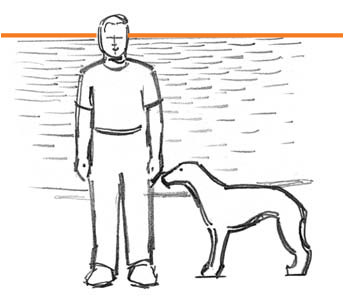
Placing the horizon at the same level as the eyes of the man in the scene puts the vantage point also at the man's eye level. In this example, the horizon line runs through the man's eyes.
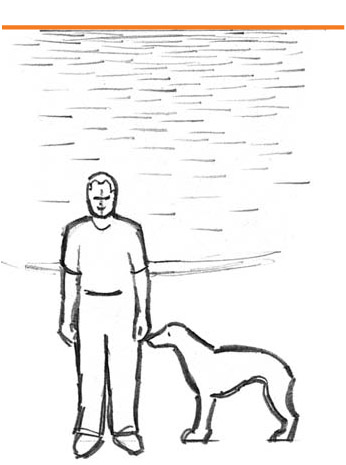
With the horizon placed well above the man and dog, the vantage point is also very high. This creates the feeling that the viewer is looking down on both of them.
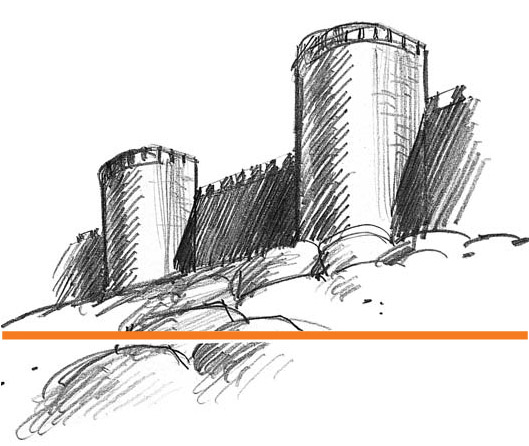
With the horizon placed low, the subject may look taller and more massive than normal.
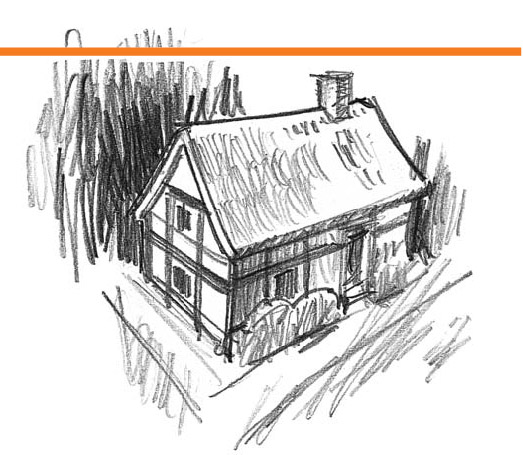
A high horizon can give an unnatural feel to a subject that is normally viewed from eye level. Instead, bring the horizon line down to a more natural vantage point.
The placement of the horizon can influence the mood of a scene by creating a variety of sensations in the viewer. Placing the horizon unnaturally low will make the viewer feel as if he were looking up at the subject from a very low vantage point. Placing the horizon unnaturally high will make the viewer feel as if he were looking down on the subject from a great height.
One-point perspective is a simple form of linear perspective with only one vanishing point. Remember to always draw the horizon line first, then determine the placement of the vanishing point on the horizon, which should not be far from the center of the scene. First draw the horizon line, then determine the placement of your two vanishing points on either side of the paper on the horizon line. As you work out the perspective of the elements in the scene, extend the parallel lines either up or down toward the vanishing point, depending on the vantage point you want to create for the viewer.
Use a T-square or triangle with your drawing board. These tools will make technical and perspective drawings easier to do and more accurate.
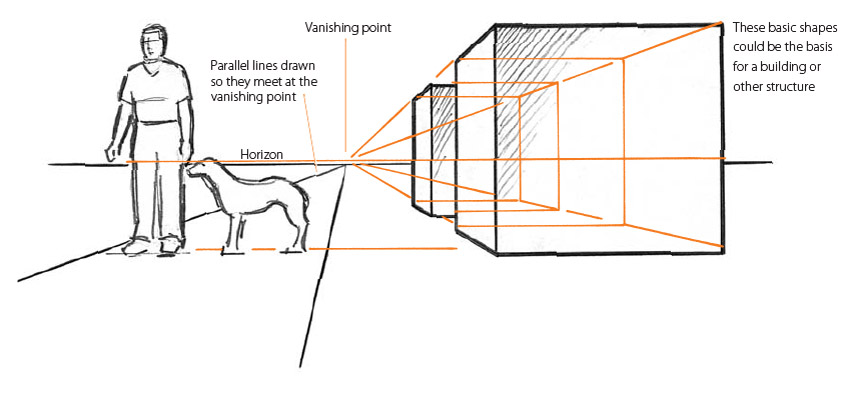
Here the horizon line and vanishing point are both at the dog's eye level. Notice that all parallel lines below the dog's eye level angle up toward the vanishing point and all lines above the dog's eye level angle down.
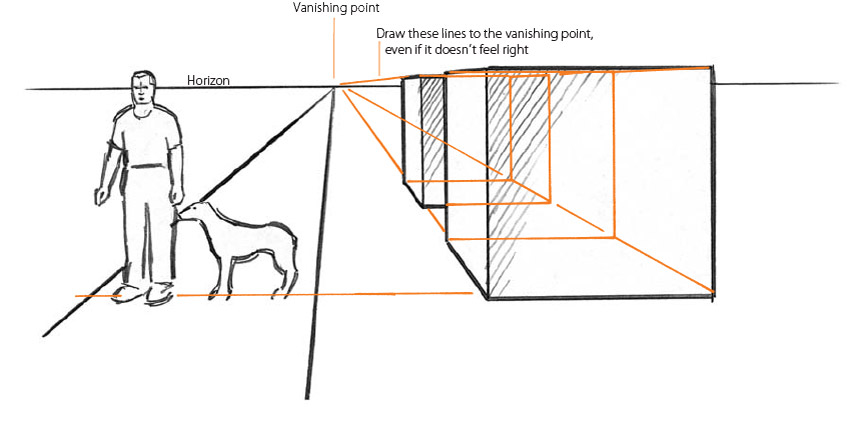
Here the horizon line is at the man's eye level, so this view shows a vantage point at the same height as his eye level. All parallel lines below the man's eye level angle up toward the vanishing point and those above it angle down.
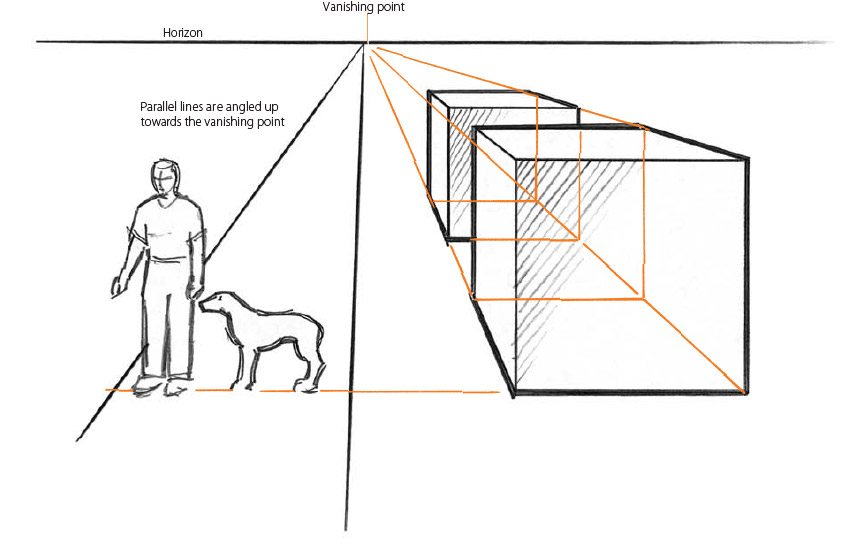
In this view, the horizon is above both the man and the dog. The vantage point is somewhere above the man and the dog creating the feeling that the viewer is looking down on the scene. All parallel lines angle up to converge at the vanishing point.
There are three important principles to keep in mind when you render linear perspective:
Two-point perspective employs the same principles as one-point perspective but with an additional vanishing point. Two-point perspective can give a scene more depth than one-point perspective. The first object you draw will help you determine the relative sizes of any other objects in the composition.
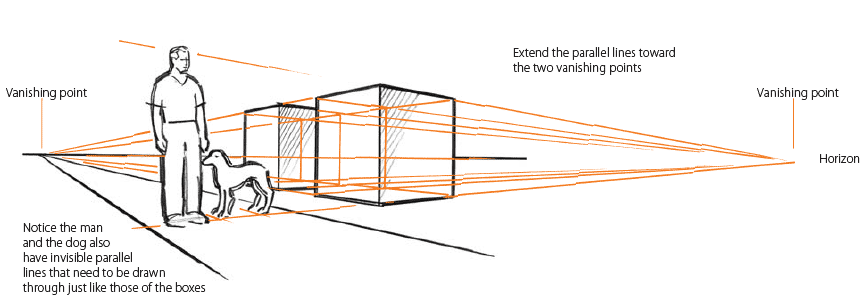
Here, the horizon line is at the dog's eye level. The vantage point is also at the same level as the dog's eye. Just as in one-point perspective, all lines above the dog's eye level angle down toward the vanishing points and all lines below the dog's eye level angle up toward the vanishing points.
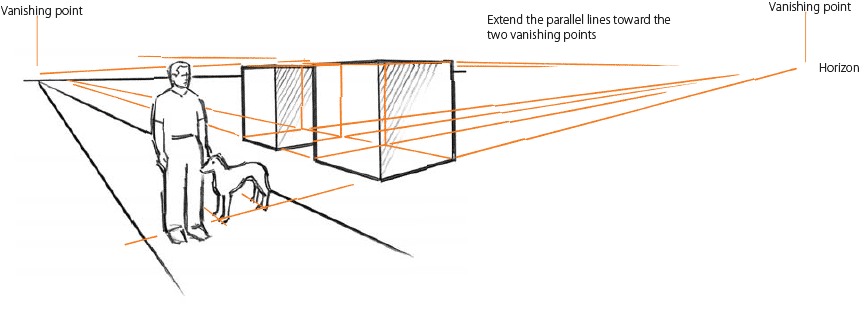
Here, the horizon line is at the man's eye level; the vantage point is at the same level. All parallel lines above him angle down toward the vanishing points and all parallel lines below him angle up toward the vanishing points.
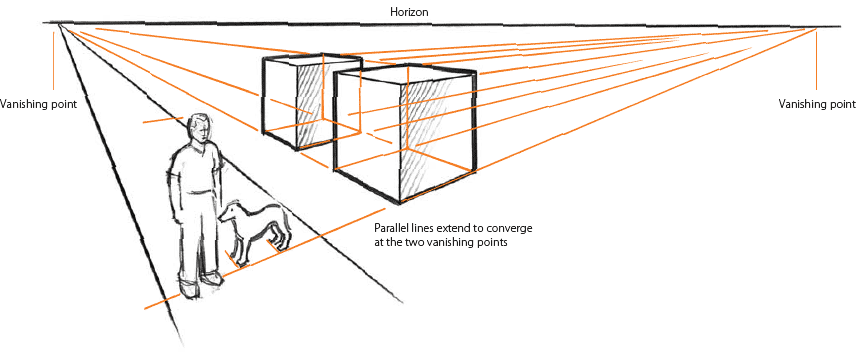
Here, the horizon is above the man and his dog, creating the impression that the viewer is looking down on them. The vantage point is above the man and the dog. In this case all of the parallel lines are angled up toward the vanishing points.
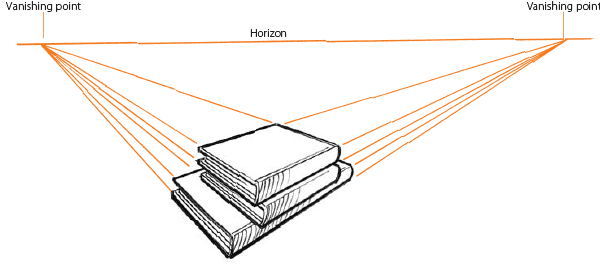
These books are neatly stacked and lined up, so they share the same two vanishing points.
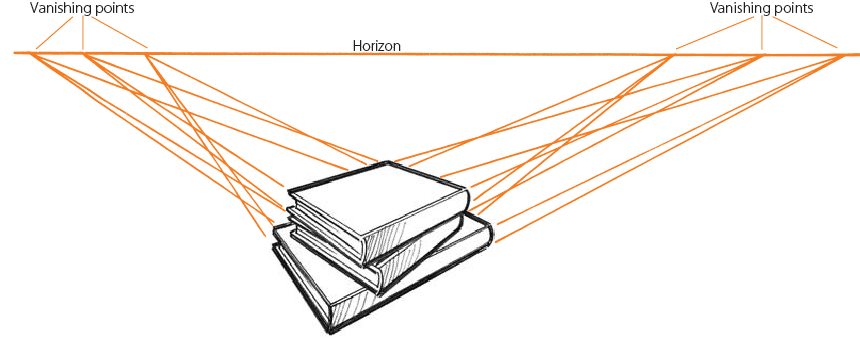
A simple stack of books may have many vanishing points. Each of these books has its own set of two vanishing points.
Linear perspective may include many vanishing points, as shown by the staggered books shown under Two-Point Perspective. When you add more vanishing points to a scene, you also add drama and complexity to your composition. If you take a vanishing point and move it high above or far below the horizon, you will create three-point perspective.
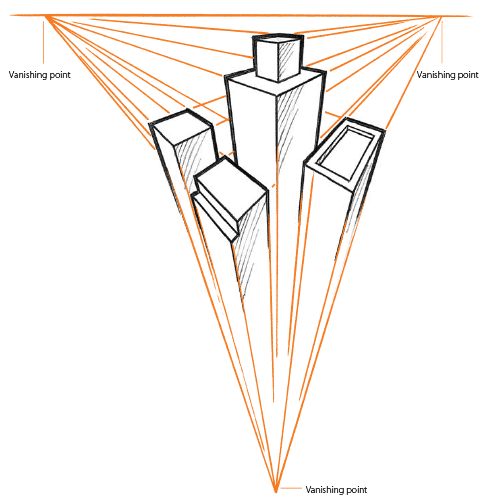
This drawing of tall buildings employs three vanishing points and a high horizon. The resulting perspective is extremely dramatic. point
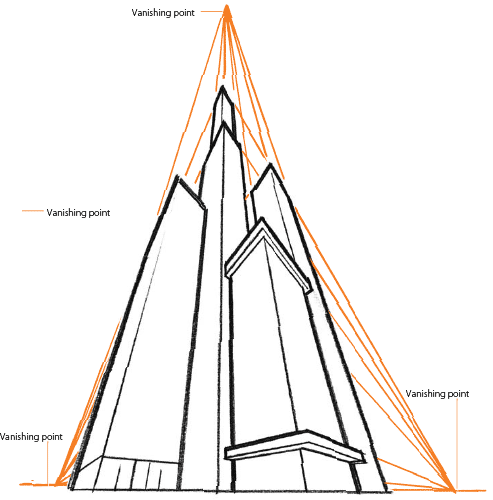
Reversing the placement of the vanishing points and horizon line gives the viewer the impression of looking up at the buildings. Once again, every line is directed to one of the three vanishing points.
Applying the principles of perspective to all objects in a scene is important, even though horizons and vanishing points aren't always noticeable. They may be hidden behind other elements in the composition, but understanding where they are will help to keep your perspective accurate. If necessary, sketch the horizon and vanishing points lightly with a pencil to make sure perspective is applied to everything in your drawing. Once you've established perspective, erase your guidelines and finish the drawing.
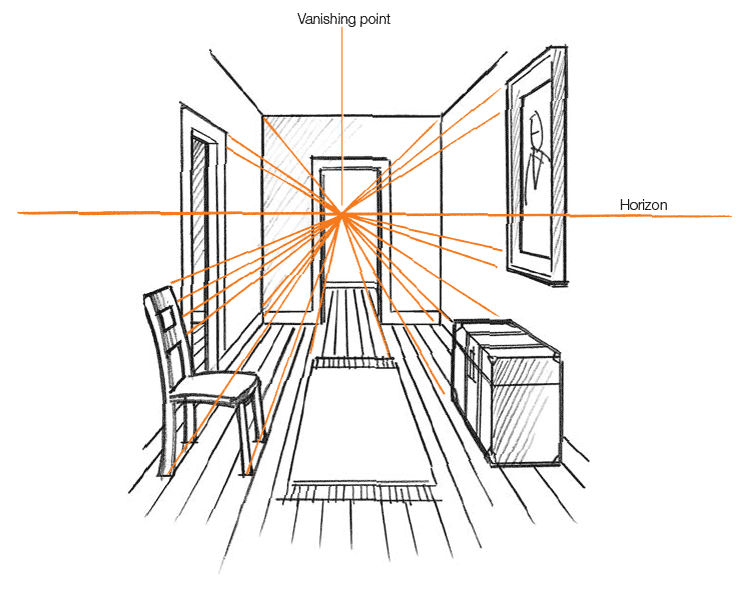
Even when the horizon or vanishing points in a scene are hidden, they still affect your drawing. You can easily find your horizon line and vanishing points. If you draw lines from all the parallel elements in this room, they will converge at the vanishing point. Now that you have discovered the vanishing point, you know the horizon line goes through that point in the scene.
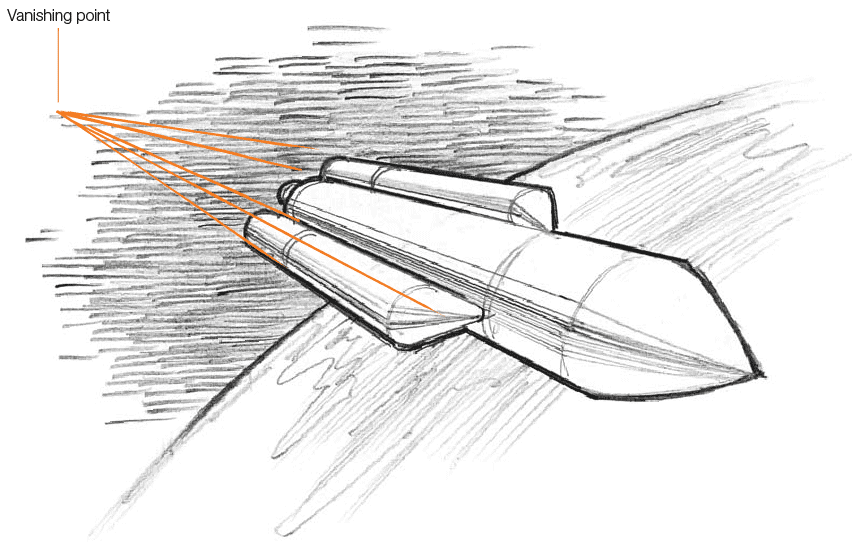
Though the subject is not bound to a horizon, this scene still uses the principles of linear perspective.
The location of your vanishing points has an important effect on the vantage point of your drawing. The closer the vanishing points are to each other, the closer the object will appear to the viewer. The farther apart they are, the more distant the object will appear to the viewer.
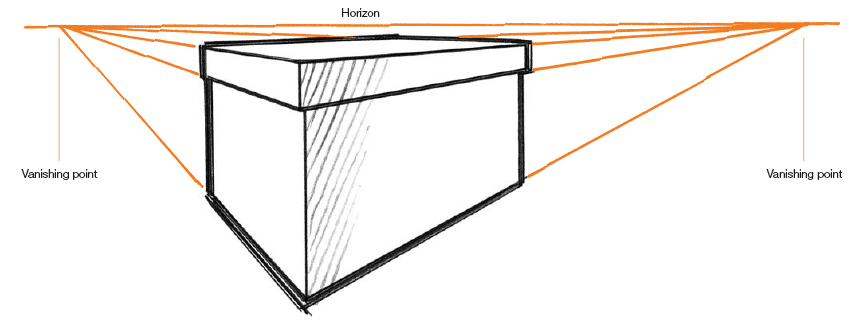
The vanishing points are close together, making the box appear close to the viewer. Notice how the sharp angles create a more exaggerated perspective.
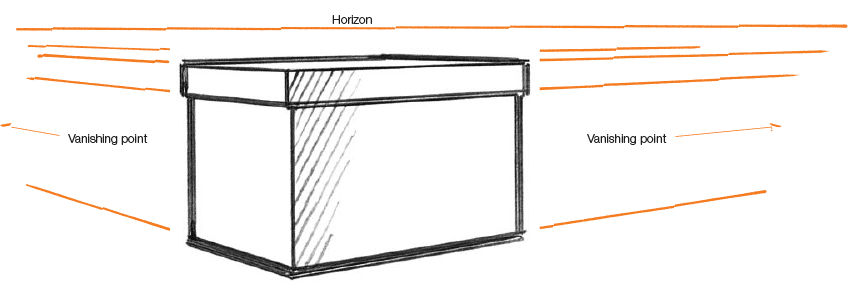
The vanishing points are farther apart, making the angles less extreme.

With the vanishing points far apart, the box looks flat, almost without perspective. This will give the viewer the impression that the box is in the distance.
Atmospheric perspective, also referred to as aerial perspective, uses definition and values to create the illusion of depth and distance. Atmospheric perspective relies on the idea that the closer something is to the viewer, the more it is defined and the more its values contrast. For instance, trees close to the viewer will show more detail and more color variation than trees farther away.
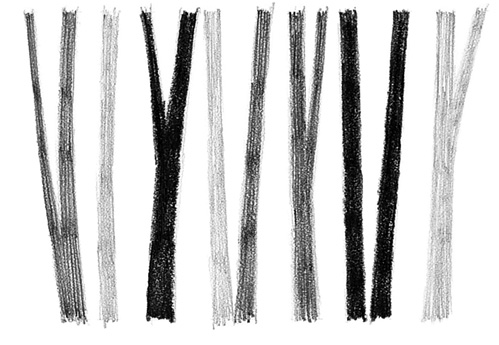
In this grouping of trees, the value of the closest trees contrasts more against the background than those farther away.
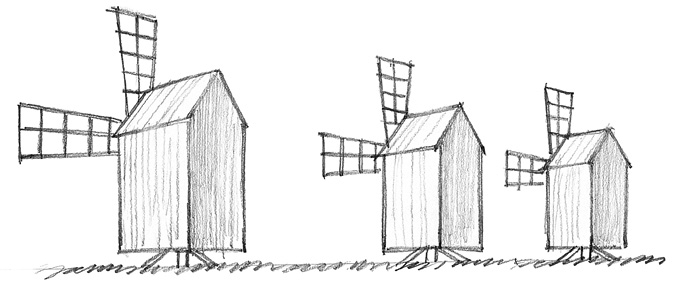
Depth in this scene relies on the size differences established by linear perspective. The larger windmill seems closer to the viewer than the smaller ones. Atmospheric perspective is not used to show the distance between the windmills.
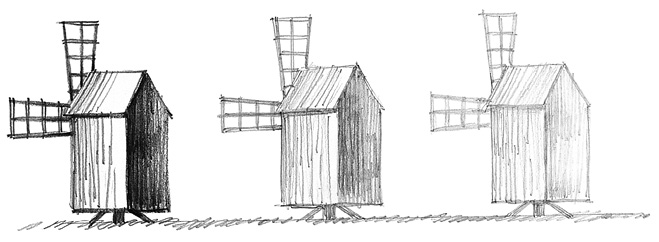
All three windmills are the same size, so no linear perspective is used. The only difference is the intensity of their values, which makes them look like they are progressively more distant, going from left to right.
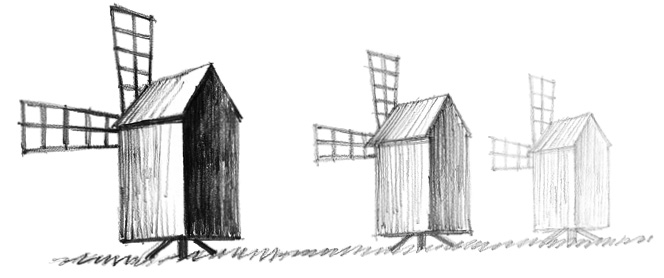
By combining linear and atmospheric perspectives, the depth of the scene is expressed through size and value contrast.
A circle drawn in perspective becomes an ellipse because it follows the same principles as other shapes drawn in linear perspective. An ellipse can be made by first sketching a square in perspective. The lines of the square will be used as the boundaries for the ellipse, because both a circle and a square are equally as wide as they are tall.
4H graphite pencil
Drawing board
Drawing paper
Kneaded eraser
White vinyl eraser
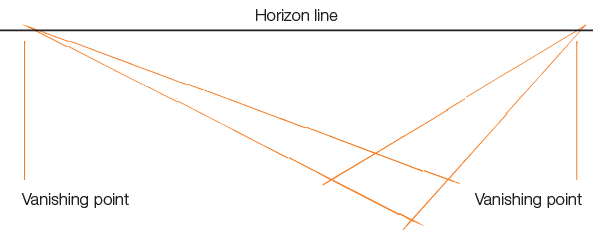
Sketch the horizon line, then place the vanishing points on the horizon. Now sketch a square in perspective by using those vanishing points.
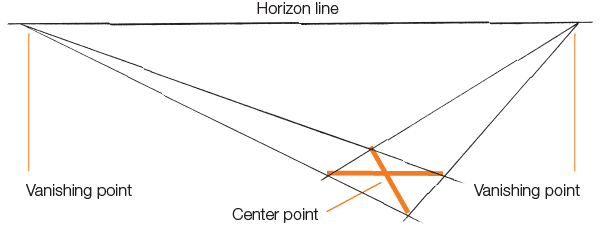
Sketch lines connecting the opposite ends of the square. Each line will define the widest and narrowest parts of the ellipse. The intersection of these two lines is the center point of the ellipse.
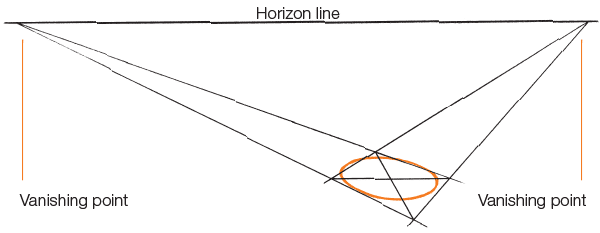
Sketch in the shape of the ellipse. Notice that the ellipse is longest in relation to the longest center line.
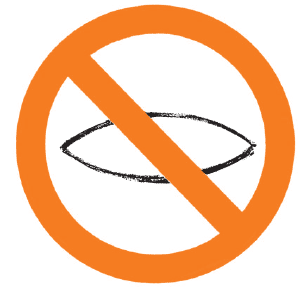
Ellipses do not have points on the end. Their ends are round, even if the ellipse is rather flat.
Ellipses can be drawn as vertical, horizontal and angled, but still use the same perspective principles. Remember the first step in drawing an ellipse is to sketch a square in linear perspective.
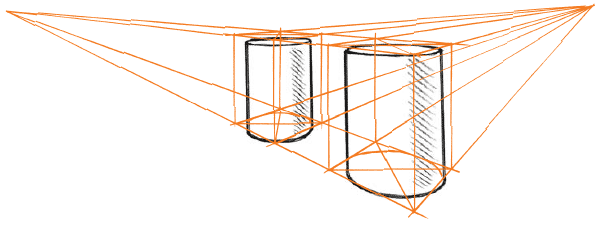
The ends of cylinders drawn in perspective are ellipses. First establish the horizon and vanishing points, then sketch the boxes. The ends of the boxes will be the boundaries for the ellipses. Connect the ellipses to create the cylinders.
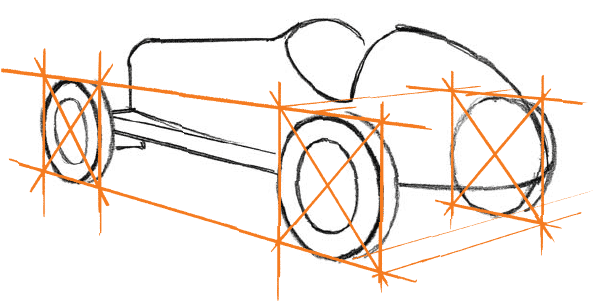
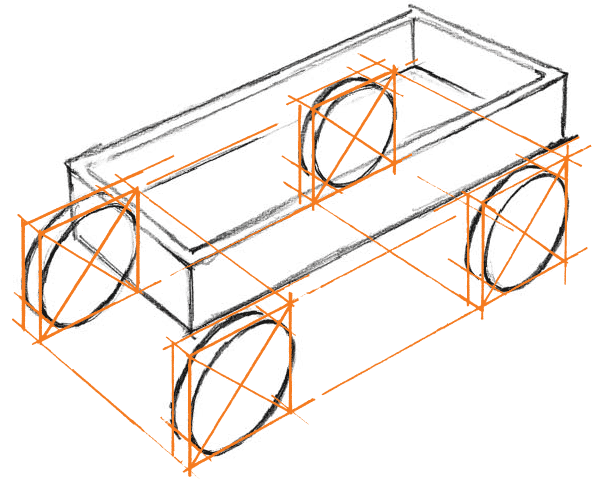
Ellipses that stand vertically can be drawn in a similar manner. Notice how the center lines direct the shape of each ellipse.
Circles are not the only curved objects you must draw in perspective. Arches are also quite common and need to follow the rules of perspective to look accurate. The peak of an arch is centered over the space between its supporting walls. The same is true of most roofs. To draw a roof in proper perspective, you will need to know how to find its the center point. Measuring with a ruler will not give you the correct center point as far as perspective is concerned, which is why knowing how to find the center point is important. Try this little exercise to learn how to find the center point for a roof.
4H graphite pencil
Drawing board
Drawing paper
Kneaded eraser
White vinyl eraser
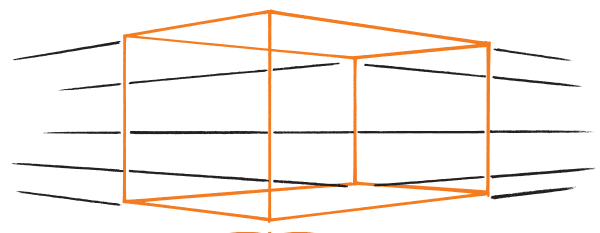
Establish the horizon line, then the vanishing points (which are far off to the left and right). Sketch a rectangle in perspective. This will become the walls that support the roof.
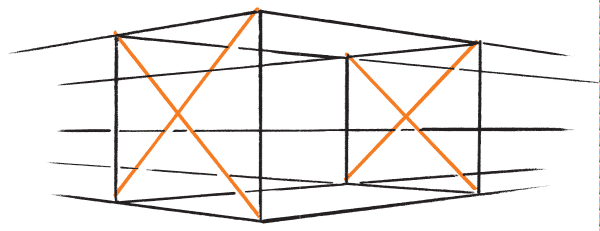
Sketch lines connecting the opposite corners of the sides of the rectangle, making two Xs. The intersection of these lines are the center points for the sides.
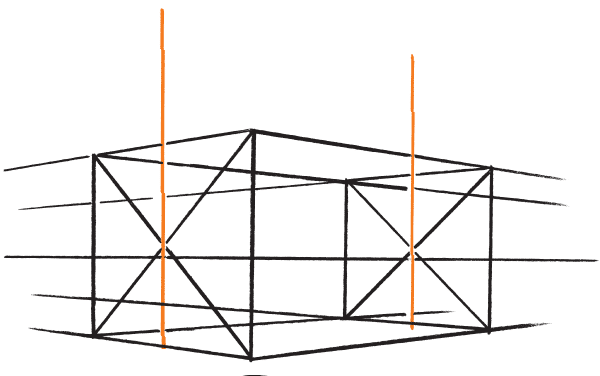
Sketch vertical lines up through the center of the Xs. These lines designate the center of the box's side walls.
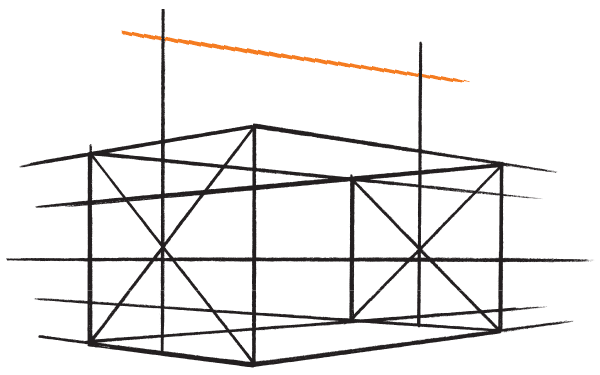
Sketch a line for the top of the roof. If completely drawn, this line would converge with the other lines on the right side of the box at the vanishing point far off to the right.
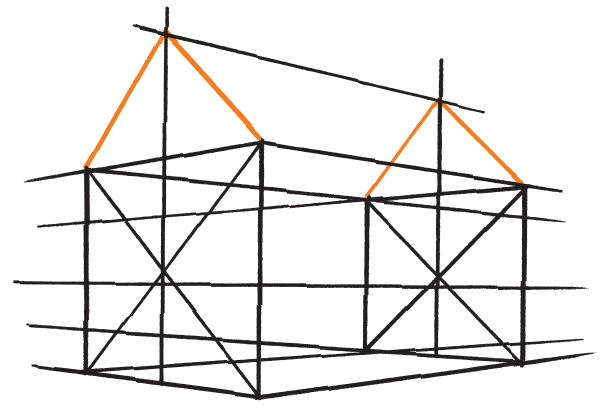
Connect the lines from the top of the roof to the side points. These lines will make the roof ends.
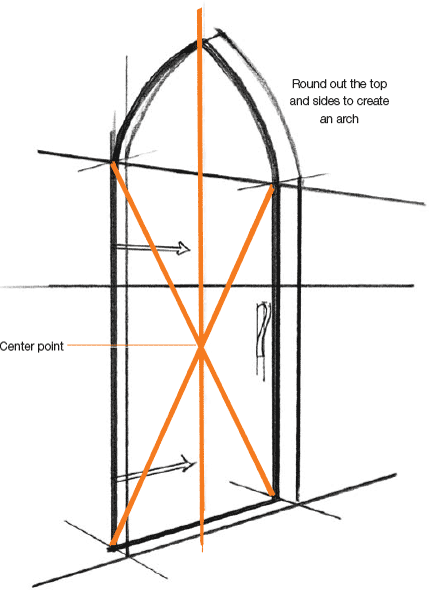
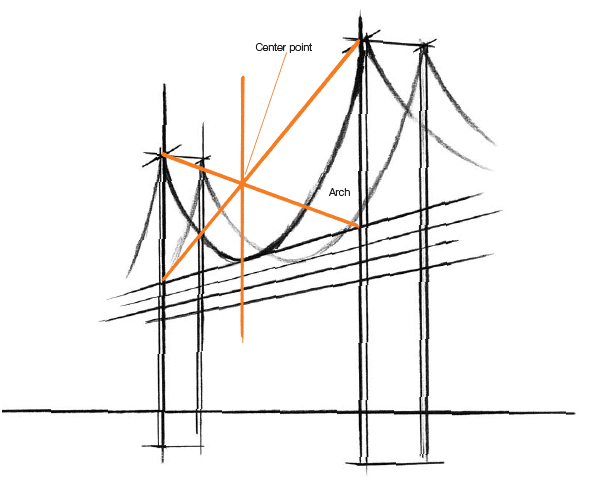
Drawing the arch of a doorway or the bottom curve of a suspension bridge is similar to drawing the roof of a building. For the doorway, find the center point of the rectangle by connecting the opposite corners of the rectangle. Make a vertical line straight up to establish the peak of the arch. The curve of a suspension bridge can be thought of as an arch with the curve at the bottom instead of at the top, so apply the same principles.
Reflections are an exciting element to draw because they double the beauty of a scene. The reflection shares the very same horizon and vanishing points as the images they are reflecting.
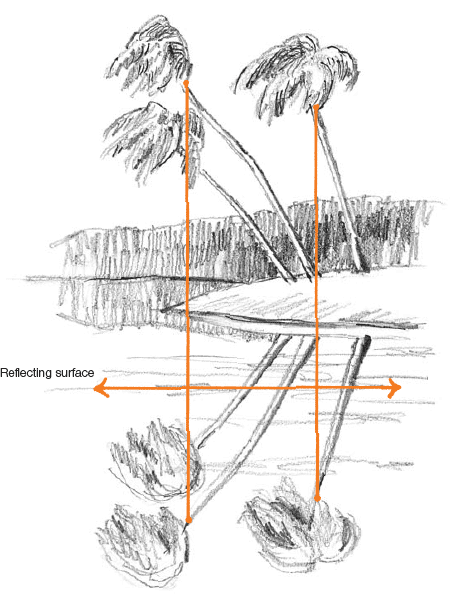
Reflected images are perpendicular to the reflecting surface. The vertical lines show how both the trees and their reflected images are perpendicular to the surface of the water. This is most noticeable when the reflecting surface is smooth.
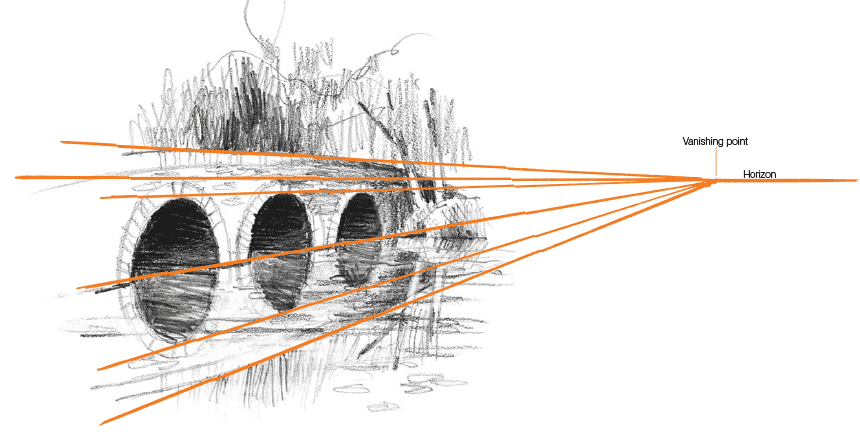
In this pond scene, the same horizon and vanishing points are used for both the bridge and its reflection. It is not a repeat or reverse of the bridge, but a continuation.
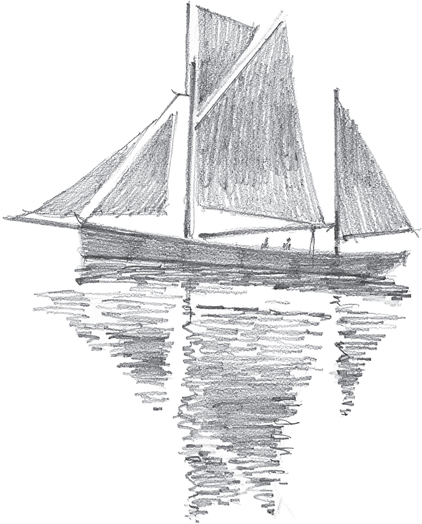
When the reflection surface is rough, such as when there are waves on the surface of the water, the reflected image is broken up. This occurs because some of the waves are not perpendicular to the image, causing distortion to the image's reflection.
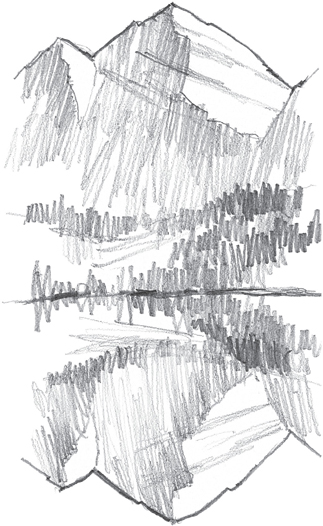
The image reflected doesn't have to be near or directly over the reflecting surface. The mountains are far away from the water, yet their image is still reflected on its surface.
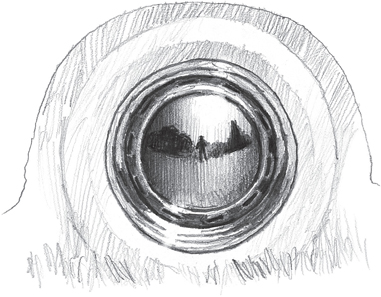
In this example, the reflection on a car's wheel cover shows the sky, ground and trees. Even the person viewing it is visible in the center.