You can use gears to transfer motion from one rotating axle to the next. For example, you can transfer the motion of a rotating motor to the wheels of a robot to make it drive. Gears can also be used to change the output speed and torque of a rotating axle.
A series of gears used to transfer motion is called a gear train. In this chapter, you’ll begin learning how gears work as you experiment with a basic gear train. You’ll then see how the gear ratio controls the performance of the gear train. Finally, you’ll explore each of the gears in the EV3 set and discover how you can use them effectively in your own robots.
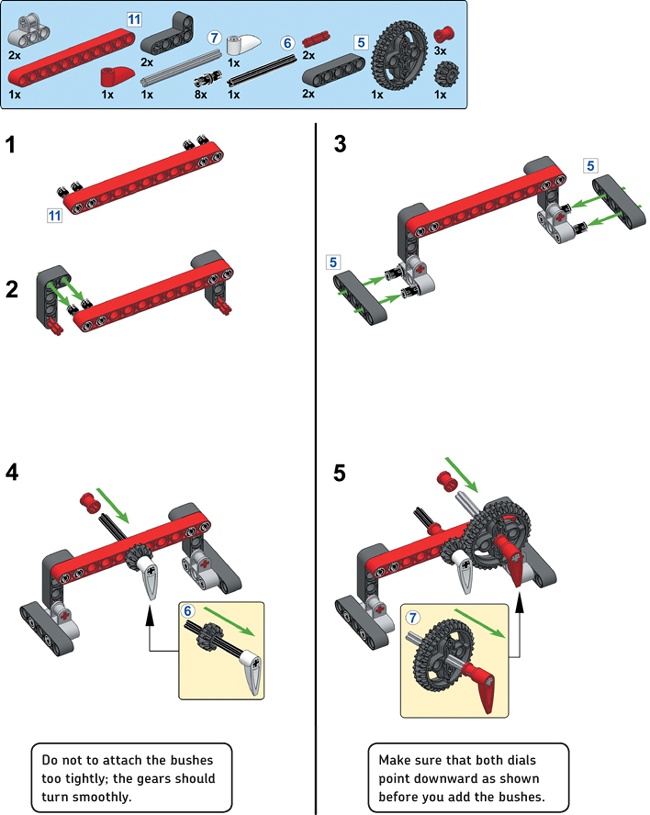
To begin, create a mechanism with two gears, as shown in the following steps. You’ll use this mechanism to experiment with the essentials of gears. Be sure to try out the other examples as you read on—it’s the best way to really understand how gears work.
Before we look at gears in detail, let’s rotate the gears manually and observe what happens:
Turning one gear makes the other gear turn. Regardless of which gear you turn, the other gear always rotates in the opposite direction.
For every turn of the red dial, the white dial completes precisely three turns. (To see this, have both dials point down at first and then count how many times the white dial goes round as you rotate the red dial once.)
The small gear always rotates faster than the big gear. In fact, the small gear turns three times as fast as the big gear.
If you try to block the grey axle (attached to the big gear) with your hand, you’ll find that you can still turn the black axle (attached to the small gear) with some effort. On the other hand, if you block the black axle, it’s very difficult to turn the grey axle.
You’ll find explanations for each of these observations as you read on.
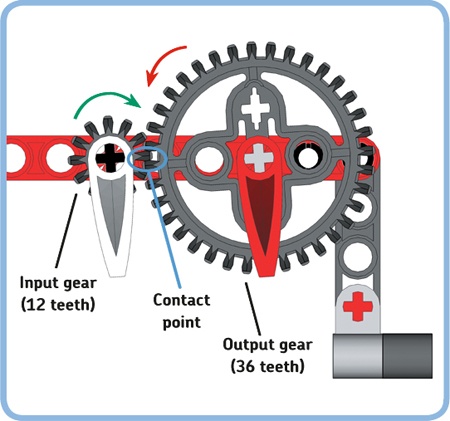
If you look at the gears in our example more closely, you’ll see that the small gear has 12 teeth (we’ll call it a 12T gear), while the big gear has 36 teeth (36T). At the contact point, the teeth of both gears mesh, as shown in Figure 11-1. If you turn the small gear manually, its teeth force the teeth of the big gear to follow, causing the big gear to turn, in the opposite direction. We’ll refer to the gear that we turn manually as the input gear. The gear that follows as a result is the output gear.
For each tooth of the small gear passing through the contact point, there is one tooth of the big gear that follows. As the small gear (12T) makes three complete rotations, each of its teeth passes through the contact point three times so that a total of 36 teeth pass through the contact point (3 × 12 = 36). During this time, all 36 teeth of the big gear (36T) are pushed through the contact point so that the big gear completes one turn.
As you’ve just seen, three rotations of the 12T gear (the white dial) result in one rotation of the 36T gear (the red dial). You can describe this configuration with the gear ratio. The gear ratio is the factor by which output speed decreases relative to the input speed. The gear ratio is also the factor by which output torque increases relative to the input torque. (More torque makes it easier for a vehicle to drive up a hill. We’ll talk more about what torque means in a moment.)
You calculate the ratio as follows:
The output has 36 teeth and the input has 12 teeth, so in our example, the formula gives us 36 ÷ 12 = 3. The gear ratio is the factor by which the output speed decreases so that the output gear spins 3 times as slow as the input gear. In other words, 3 rotations of the input result in just 1 rotation of the output.
Gear ratios are sometimes written as the number of teeth on the output and the input separated by a colon—in this case, for example, 36:12. If you simplify this ratio to its lowest terms, you get 3:1, which has the same meaning. (Reading from left to right, you see again that 3 rotations of the input result in 1 rotation of the output.)
Once you’ve calculated the gear ratio of an existing design, you can use the ratio to calculate the output speed if you know the input speed:
If the gear ratio is 3 and if you rotate the input gear at 30 rotations per minute (rpm), the output gear will turn at 30 ÷ 3 = 10 rpm, which confirms that the speed decreases by a factor of 3.
You can rewrite the previous formula to calculate the required gear ratio for your design if you know the input speed and the output speed you want to achieve:
For example, if you want an output gear with a wheel to rotate at 120 rpm while you have a motor rotate the input gear at a constant speed of 72 rpm, you need the following gear ratio: 72 ÷ 120 = 0.6. You can accomplish this ratio with a 20T gear as the input and a 12T gear as the output (12 ÷ 20 = 0.6).
Not every gear ratio can be realized with the gears in the EV3 set, so you may want to use one of the gear combinations given in this chapter and use formula [2] to calculate whether the resulting output speed is satisfactory for your design.
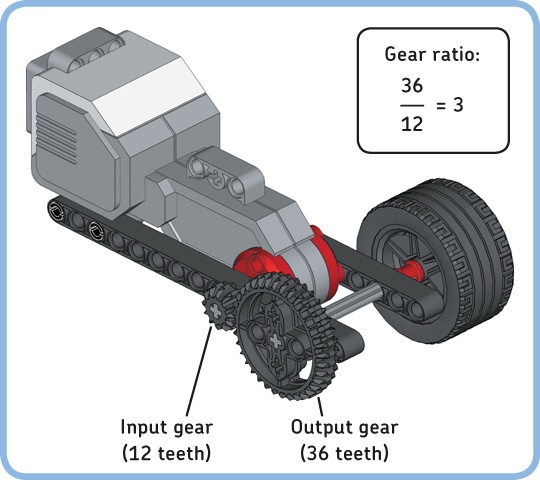
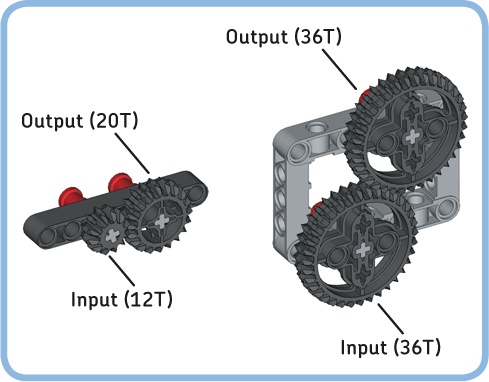
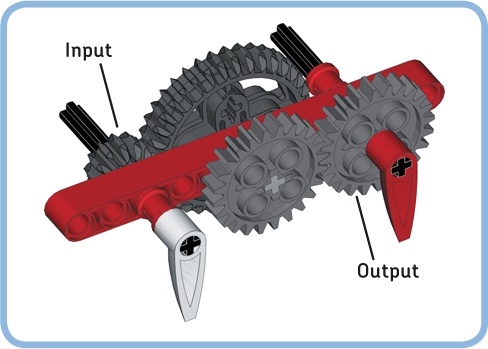
Now let’s look at how the example gear train could be used in a robot. You can use gears to change the rotational speed of an output, such as a wheel, relative to the speed of an input, such as a motor. To gear down, or decrease the speed, the output gear should have more teeth than the input gear so that the gear ratio is greater than 1, as shown in Figure 11-2.
This configuration decreases the wheel speed by a factor of 3. As a result, the output torque is increased by a factor of 3.
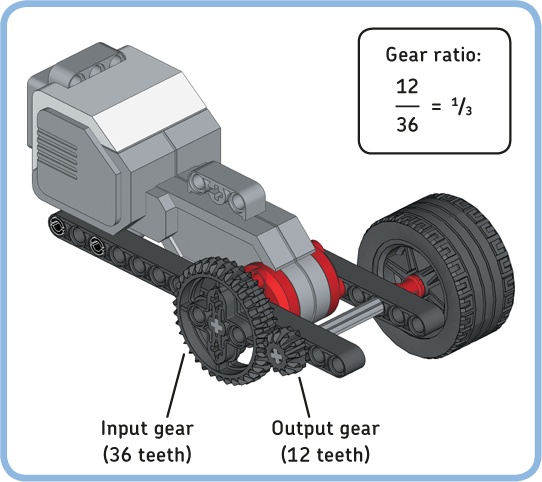
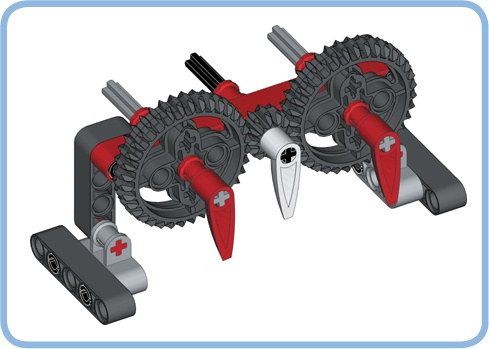
Now let’s look at what happens if you interchange the two gears, as shown in Figure 11-3. The 36T gear is the input driven by a motor, and the 12T gear is the output connected to a wheel.
Figure 11-2. Decreasing the rotational output speed by a factor of 3 while increasing the torque by a factor of 3. The gear ratio is 3 (or 3:1).
Figure 11-3. Increasing the rotational output speed by a factor of 3 while decreasing the torque by a factor of 3. The gear ratio is ⅓ (or 1:3).
The gear ratio is 12 ÷ 36 = ⅓, or approximately 0.333. Therefore, the speed decreases by a factor of ⅓, but that’s the same as saying that the speed increases by a factor of 3. (If you rotate the input at 30 rpm, formula [2] gives you 30 ÷ 0.333 = 90 rpm as the output speed, which is indeed three times as fast.)
Increasing the output speed is called gearing up. Increasing the output speed means that the output torque decreases, so it will be harder to drive up a hill.
If you use two gears with the same number of teeth, the gear ratio is 1, and both speed and torque remain unchanged.
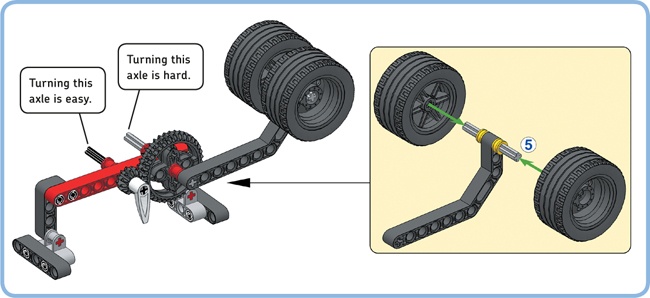
You’ve just seen how you can increase torque, but what exactly is torque? Why can increasing it be useful? To experience the concept of torque, replace the red dial with a weight consisting of two wheels, as shown in Figure 11-5. Now try to lift the weight by turning the grey axle manually. When you do this, your hand has to apply torque to the axle in order to counterbalance the torque created by the weight of the wheels placed at a distance from the axle.
Torque is the product of a force and the distance between the force and the axle. In this case, the force is gravity acting on the wheels. If you increase the weight by adding more wheels, or if you place the wheels farther from the axle using a longer beam, the torque created by the wheels will increase, and you’ll need to apply a greater torque to the grey axle to lift them.
Figure 11-5. Lifting the weight by turning the black axle is easier because the required torque is just a third of the torque required to turn the grey axle.
Now try to lift the weight by turning the black axle. When you do this, the gears increase the torque you apply with your hands by a factor of 3 so that lifting the weight is considerably easier. However, you have to turn the black axle farther, compared to the grey axle, to fully lift the weight. (You have to turn it three times as far to accomplish the same effect.)
Increasing torque with gears is useful if a motor cannot provide sufficient torque for a certain application, such as lifting a heavy weight. If your motor has difficulty making certain movements required in your program, you can use gears to increase the output torque and reduce the load on the motor (see Figure 11-2).
The maximum torque provided by the Large Motor is about three times the maximum torque provided by the Medium Motor, so it’s easier to use Large Motors for heavy-duty tasks. If both of the Large Motors are already in use—say, to drive your robot—you can use gears to increase the output torque of the Medium Motor. Visit http://ev3.robotsquare.com/ for details about the relationship between torque and rotational speed in EV3 motors.
Sometimes you’ll want to decrease a motor’s output torque to protect a fragile mechanism. While you can decrease the output torque with gears using the technique shown in Figure 11-3, it’s easier to limit the output torque in your program by using an Unregulated Motor block at a low power level, such as 30%, as you learned in Chapter 9. When you use this block, the motor does not significantly increase torque when an external force slows it down.
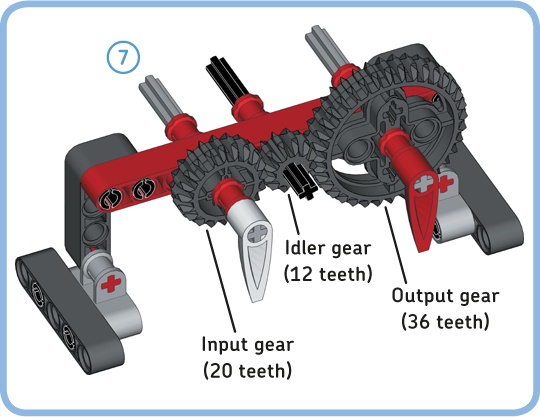
The gear train you’ve seen so far has only two gears, but you can extend it with more gears to transfer motion across a greater distance. For example, add a 20T gear, as shown in Figure 11-6, and use it as the input. Let’s look at this new mechanism in more detail.
Figure 11-6. Remove the white dial from the black axle, and add a 7M axle with a 20T gear as shown. Make sure that both dials point downward.
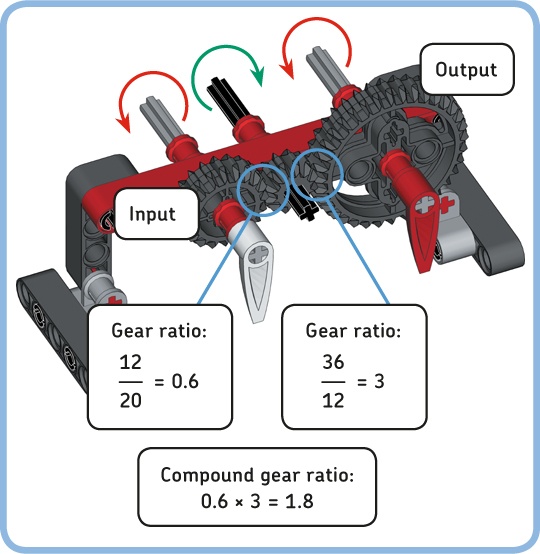
The gear train now consists of an input gear (20T), an output gear (36T), and an idler gear (12T) in the middle. The idler gear transfers the motion of the input gear to the output gear. In addition, it reverses the direction in which the output gear rotates so that the input and the output rotate in the same direction (see Figure 11-7).
Note
Each gear in a gear train rotates in the direction opposite to the one next to it. Consequently, the input and output of a gear train with an odd number of gears rotate in the same direction; the input and output of a gear train with an even number of gears rotate in the opposite direction.
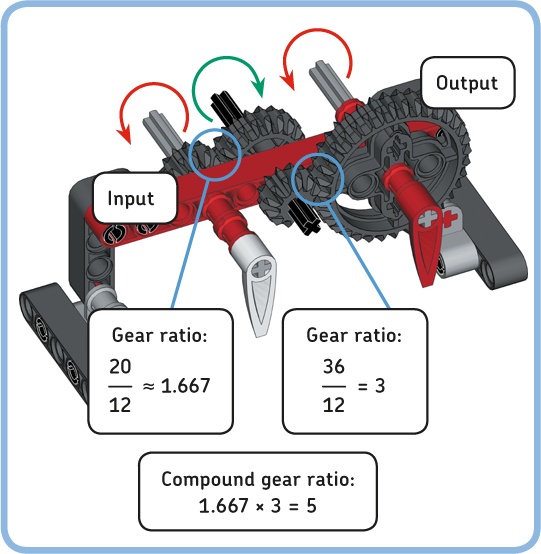
You can determine the relationship between the input speed and the output speed of a gear train by calculating the overall gear ratio, or compound gear ratio. To calculate it, first determine the gear ratio of each pair of adjacent gears and then multiply these ratios, as shown in Figure 11-7.
The example mechanism has two pairs of adjacent gears. First, the input gear transfers motion to the idler gear with a gear ratio of 0.6. Next, the idler gear transfers motion to the output gear with a gear ratio of 3. Notice that the idler gear serves as the output of the first pair, while it serves as the input of the second pair.
If we calculate the compound ratio here, we get 0.6 × 3 = 1.8. This means that the output speed is decreased by a factor of 1.8 and the torque is increased by a factor of 1.8.
Therefore, 1.8 rotations of the input gear equals 1 rotation of the output. To see this, make both dials point downward, as shown in Figure 11-7, and rotate the white dial 9 times. The red dial should rotate 5 times (9 ÷ 1.8 = 5), after which both dials should point downward again.
Interestingly, because the central gear is an idler gear, it does not affect the compound gear ratio. You get the same ratio by dividing only the output and the input gear, which gives you 36 ÷ 20 = 1.8. This is because the number of teeth on the idler gear (12T) cancels out when calculating the compound gear ratio:
Sometimes the torque increase provided by two gears is not enough. You can further increase the gear ratio, and therefore torque, by coupling multiple pairs of gears that have a gear ratio greater than 1. To see how this works, modify your gear train so it looks like the one shown in Figure 11-8.
Figure 11-8. Coupling two pairs of gears to attain a larger gear ratio. If you don’t round the intermediate gear ratio values, the compound gear ratio is exactly 5 in this example.
In the example, the first pair of gears has a gear ratio of 20 ÷ 12 ≈ 1.667. The second pair has a ratio of 36 ÷ 12 = 3. You get the compound gear ratio of the gear train by multiplying these numbers, which gives you 1.667 × 3 = 5. Consequently, the output is 5 times as slow as the input. Put another way, rotating the white dial 5 times makes the red dial complete 1 rotation.
As a result, the torque increases by a factor of 5. If you replace the red dial with the weight you built in Figure 11-5, it should be easy to lift the weight by turning the white dial because of the increased torque.
If you use the gear with the red dial in Figure 11-8 as the mechanism’s input, the white output dial will rotate five times as fast. In principle, you can increase the output speed further by adding even more gears, but doing so reduces the output torque, too. Eventually, you’ll reach the point where the output torque is no longer sufficient to overcome the friction in the gear train and the gears won’t move at all. Similarly, you can’t use gears to increase the speed of a race car indefinitely because there would not be enough torque to make the car accelerate from standstill.
In general, you’ll have to experiment with various gear combinations to find the proper balance between torque and speed in your design:
First, consider whether it’s necessary to use gears at all. You may be able to accomplish the required speed and torque by changing the Power settings of the blocks in your program.
If the maximum speed of your motor isn’t high enough, try increasing the speed using a gear ratio less than 1, while making sure that enough torque remains for your robot to work properly.
If a motor struggles to perform a heavy task, you can increase the torque using a gear ratio greater than 1, at the cost of a reduction in speed.
There are two important aspects of gears that can reduce the performance of your gear train. First, each gear introduces some friction to the mechanism. Friction causes rotating objects to slow down as they slide against other objects, and it reduces the output torque. You can experience friction by pushing the gears and bushes in Figure 11-8 tightly against the beam. You should find that it now takes more torque to turn the axles than when the bushes and gears were connected loosely. You can reduce friction in your design by bracing gears between two beams, as you’ll see in constructing sturdy gear trains.
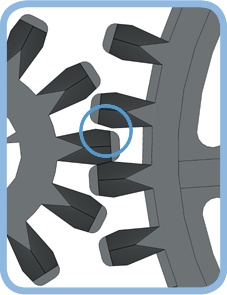
Second, each gear introduces some play, or backlash, as shown in Figure 11-11. Even if you block the gear on the left, the gear on the right can still turn by a tiny amount because of the space between the teeth. This means that you lose some control over the exact position of the output. Regardless of how accurately you move the input gear, the output gear can always move back and forth a little. The longer your gear train is, the more backlash you will see.
The output shafts of the EV3 motors also experience some backlash, caused by the gear train inside each motor.
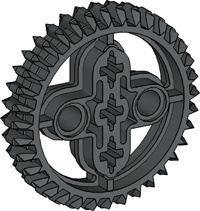
The EV3 set contains spur gears, bevel gears, double-bevel gears, knob wheels, and worm gears, as shown in Table 11-1. Spur gears can be used to transfer motion between parallel axles, while bevel gears can be used to transfer motion between perpendicular axles. Double-bevel gears can be used for both parallel and perpendicular configurations. (Perpendicular means that the axles are placed at a right angle to one another.)
Table 11-1. the technic gears
Category | Qty | Gear | Teeth | Radius |
|---|---|---|---|---|
Spur gear | 0[a] | 8 | 0.5M | |
0[a] | 16 | 1M | ||
2 | 24 | 1.5M | ||
0[a] | 40 | 2.5M | ||
Bevel gear | 1 | 12 | N/A | |
1 | 20 | N/A | ||
Double-bevel gear | 2 | 12 | 0.75M | |
4 | 20 | 1.25M | ||
5 | 36 | 2.25M | ||
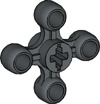
Knob wheel | 4 | N/A | N/A | |
Worm gear | 2 | 1 | N/A | |
[a] These gears are not included in the EV3 set, but knowing their properties can be handy when combining your EV3 set with other Technic sets. | ||||
When you combine gears to create a gear train, it is essential to place them at the right distance to make their teeth mesh properly. If you place the gears too close together, then they can’t turn; if you place them too far apart, then the teeth will slip. When a gear slips, it turns without catching the teeth from the other gear, and you’ll hear a rattling sound.
Assuming you space them properly, you can use any combination of two spur gears to create a gear train. Similarly, you can combine all of the double-bevel gears. In fact, you can combine spur gears with double-bevel gears.
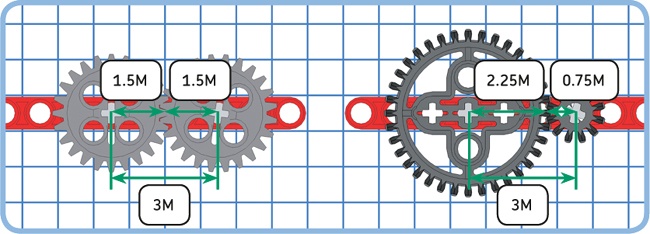
The required distance between the center points of two gears is the sum of their radii, as shown in Figure 11-12. The radii of spur gears and double-bevel gears, measured in LEGO units (M), are given in Table 11-1. For example, the radius of a 12T gear is 0.75M, and the radius of a 36T gear is 2.25M, so the distance between the center points of the gears must be 0.75M + 2.25M = 3M. Because 3 is a whole number, it’s easy to mount these gears on a beam using axles, exactly 3M apart.
Adding the radii of two gears will sometimes result in a number between two whole numbers, such as 1.5M or 2.5M. For example, the distance between two 20T gears is 1.25M + 1.25M = 2.5M. You can use connector blocks to achieve such a distance, as shown in Figure 11-13.
Note
Instead of calculating the required distance between gears yourself, you can use the gear ratio calculator at http://gears.sariel.pl/. You can choose where you’ll place the gear axles on the unit grid, and the calculator will tell you which gears you can use to bridge this distance.
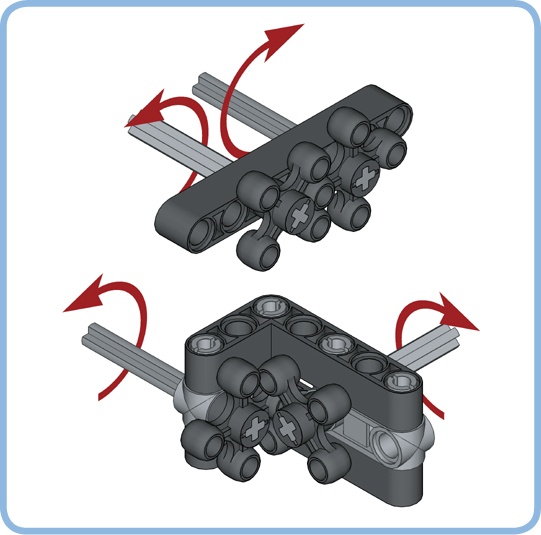
You can extend a gear train along the corner of an angled beam by placing one gear at the corner hole, as shown in Figure 11-14. When you do this, it’s best to brace the gear train between two beams, as you’ll see later in this chapter.
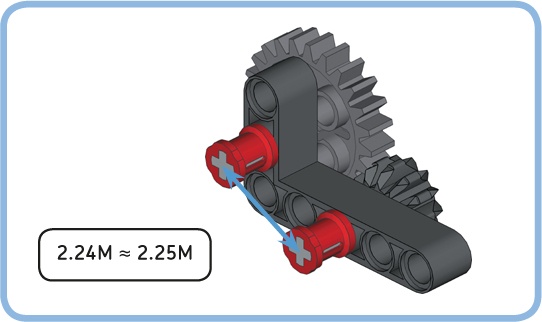
You can combine spur gears with double-bevel gears, but placing them at the proper distance can be tricky because their radii do not add to a whole number or a number halfway between two whole numbers. For example, the 12T double-bevel gear and the 24T spur gear must be placed 0.75M + 1.5M = 2.25M apart.
This distance cannot be accomplished on the unit grid or with a 0.5M offset, but you can get close to this distance using the corner of a right-angled beam, as shown in Figure 11-15. You can calculate the distance between holes on an angled beam using the Pythagorean theorem or measure the distance with a ruler (1M equals 8 mm, or approximately 5/16 inches).
You should always test your gear train carefully if the gears are not placed at precisely the proper distance. Gears should turn smoothly, and they should never slip, even if you block one gear with your hands. If you’re not sure whether a particular improper combination will work, it’s better to simply choose a combination of gears whose radii add up to a whole number.
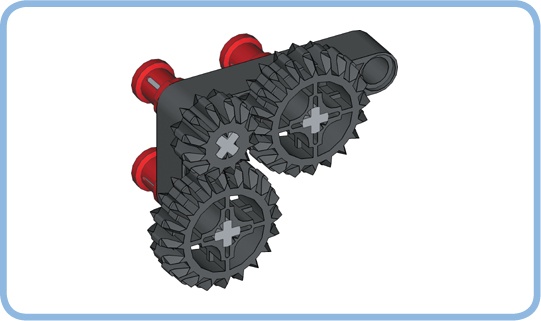
You can use bevel gears and double-bevel gears to transfer motion between two perpendicular axles, as shown in Figure 11-16.
A double-bevel gear is actually a combination of a spur gear and two bevel gears. So far, we’ve used only the spur gear teeth to transfer motion between two parallel axles, but you can use the bevel teeth on either side to create perpendicular connections. In fact, the 20T bevel gear is the same as the beveled section of the 20T double-bevel gear, and the 12T bevel gear is the same as the beveled section of the 12T double-bevel gear, so each combination in Figure 11-16 has the same gear ratio.
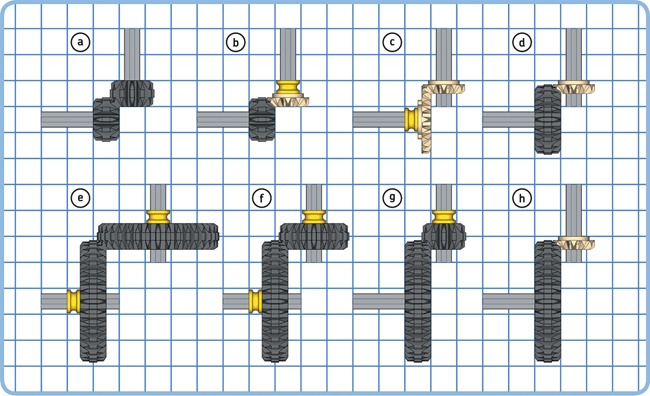
Every combination of bevel and double-bevel gears can be made to fit on the unit grid, but Figure 11-17 shows some particularly useful combinations. To transfer motion between perpendicular axles in your design, you can choose one of these examples and use the unit grid as a reference to design a construction that holds the axles in place.
Note
The method for calculating the distance between two gears using their radii works only for parallel gear configurations, as shown in Figure 11-12. For perpendicular configurations, use the unit grid, as shown in Figure 11-17.
Figure 11-15. While you cannot easily accomplish a 2.25M distance between two gears, this configuration achieves a distance of 2.24M, which is close enough. This combination of gears is useful because the gear ratio is exactly 2, allowing you to double the torque and reduce the speed by a factor of 2 (or vice versa).
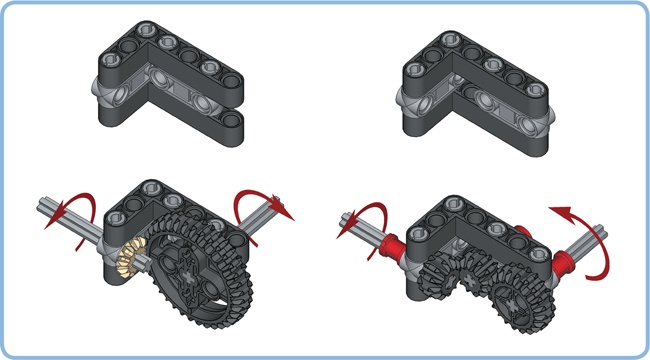
When transferring motion between two perpendicular axles, it is important to create a sturdy construction so that the gears do not slip. Figure 11-18 demonstrates how you can accomplish this using angled beams and connector blocks.
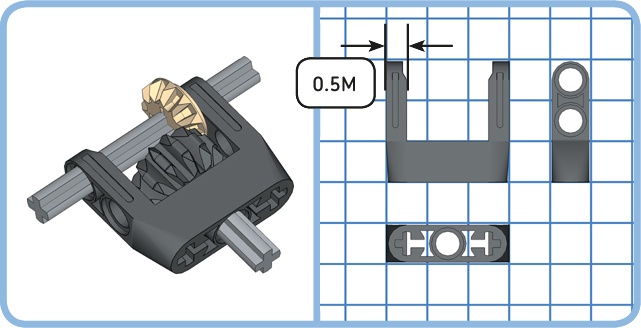
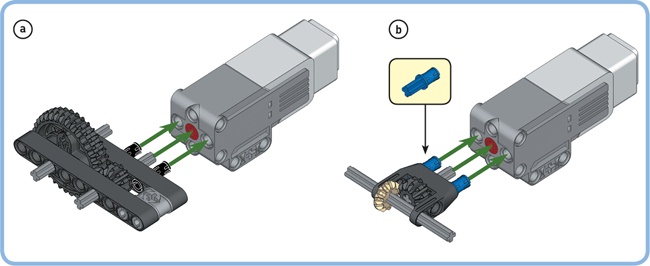
The EV3 set also contains a specialized element for connecting two small gears on perpendicular axles, as shown in Figure 11-19. This element can easily be connected to the Medium Motor (see Figure 11-28b, later in the chapter). You can also securely connect perpendicular axles using a frame, as shown in Figure 11-20.
The knob wheel can be used to transfer motion between two parallel axles or between two perpendicular axles, as shown in Figure 11-21. The knob wheel can handle greater torques than bevel gears without slipping, making it suitable for use with highly loaded perpendicular axles. Due to its unique shape, a knob wheel can be used to drive only another knob wheel; it cannot drive spur, bevel, or double-bevel gears. The gear ratio between two knob wheels is always 1.
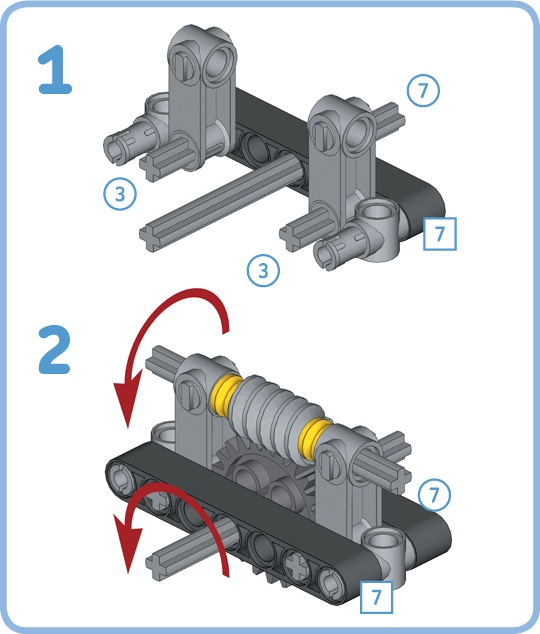
The worm gear can drive spur gears to achieve substantial speed reduction, as shown in Figure 11-22. In calculating the gear ratio, you may consider the worm as an input gear with just one tooth. When the output is a 24T gear, the resulting gear ratio is 24 ÷ 1 = 24, thereby reducing the output speed by a factor of 24. In principle, the torque increases by a factor of 24 as well, but because this gear configuration has more friction than gear trains with normal gears, some of the torque gain is lost.
Figure 11-22. You can drive a 24T gear using a worm gear to reduce the output speed by a factor of 24. The specialized grey connector blocks place the worm gear at just the right distance while allowing the 24T gear to turn. You can use this geometry as a starting point for your own constructions with a worm gear.
Unlike with the other gear configurations you’ve seen so far, the motion transfer works only one way: You can rotate the worm gear to make the spur gear turn, but you cannot turn the spur gear to make the worm gear turn. This can be an advantage in your design. For instance, if you use the worm gear to control a robotic arm, the arm won’t move back down when you stop applying power to the motor. If you used normal gears, gravity acting on the arm would cause the gears to turn in the opposite direction and lower the arm.
Once you’ve selected the gears for your gear train, you’ll need to mount them on your robot. The possibilities for mounting axles with gears are different for every robot, but it is always important to mount the axles securely so that the axles do not bend or twist and so that the gear teeth do not slip.
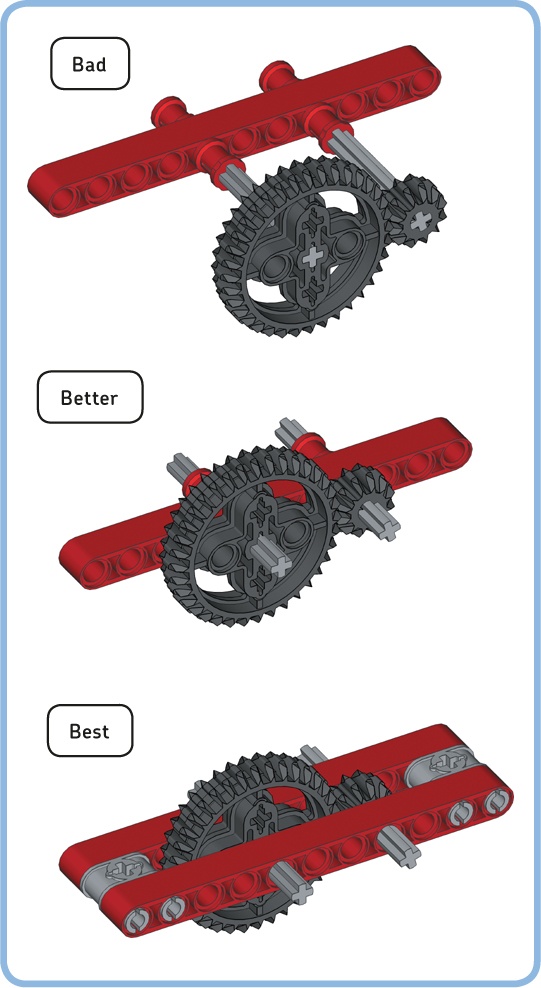
The force between the teeth of two gears pushes the axles on which they are mounted away from each other. If the distance between the gears increases too much because of this force, they no longer mesh properly, and their teeth slip. You can reduce the deflection of the axles by placing the gears next to a beam, as shown in Figure 11-23. Your gear train becomes even more robust if you brace the gears between two beams. The force between the gear teeth is still there, but the beams keep the axles with the gears in place so that the gears can’t slip.
If bracing the gears with a second large beam is not possible in your design, you can add a short beam or a connector block (see Figure 11-24). The solution is not as robust, but it does prevent the gears from slipping.
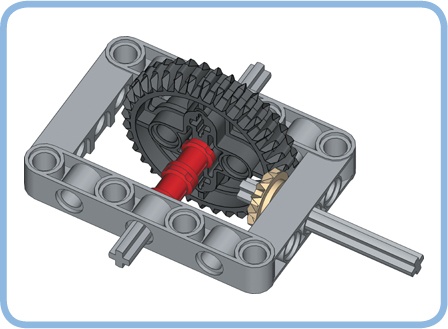
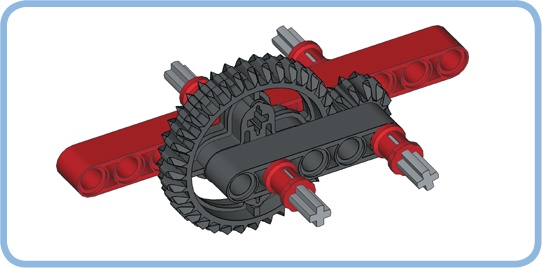
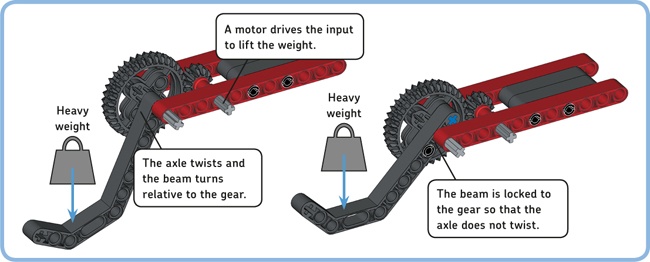
When you increase torque using gears, it is possible to achieve torques that can twist axles, as shown on the left of Figure 11-25. You can avoid twisting the output axle by attaching the part of the mechanism that carries a heavy load directly to a 36T double-bevel gear instead of to the axle, as shown on the right.
For the same reason, it’s a good idea to connect beams directly to the holes on the motor shaft rather than connecting them only with an axle (see Figure 10-29).
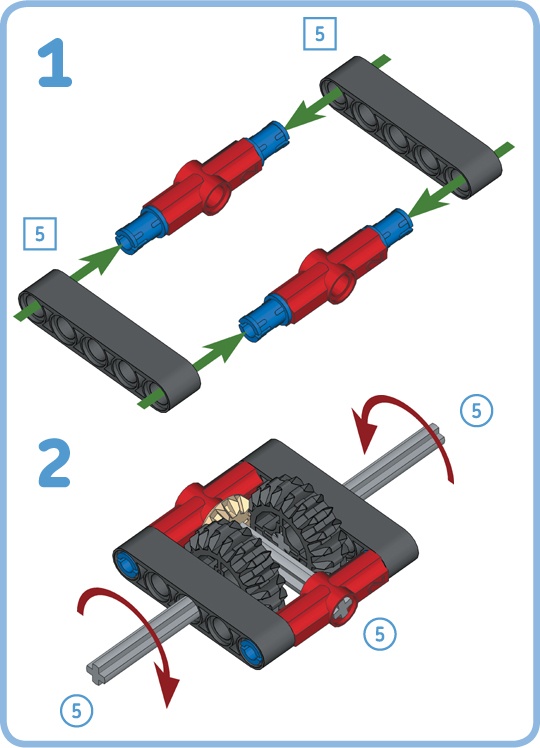
You can reverse an axle’s direction of rotation by reversing the motor on the input, but you can also reverse the direction using gears, as shown in Figure 11-26. This is useful if a single motor drives two mechanisms on the same axle, but the mechanisms should turn in opposite directions.
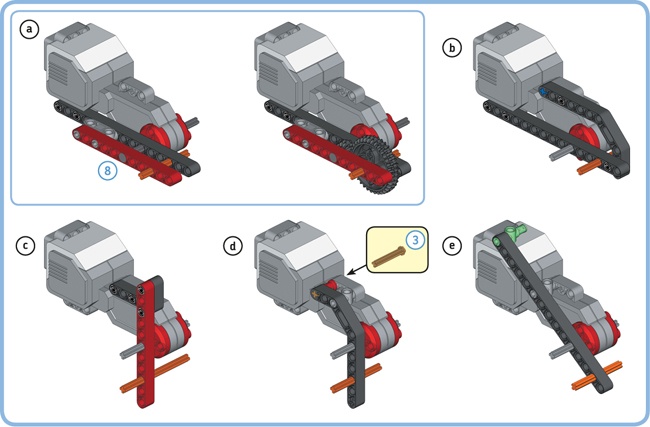
You’ll often use gears to transfer motion from a motor to a mechanism, such as a robotic arm. The Large Motor does not have many attachment points near the rotating shaft, but you can add those yourself using beams, as shown in Figure 11-27.
Figure 11-28 shows how you can drive axles parallel (a) and perpendicular (b) to the Medium Motor shaft.
Figure 11-27. You can add beams to the Large Motor to create attachment points for axles and gears. The grey axles are connected to the motor shaft, while the orange axles show where you can connect the 36T gear to achieve a gear ratio of 3, as in example a. The beam in example e is placed at the 53.13 degree angle, as discussed in Chapter 10. The connector shown in green aligns with the unit grid.
In this chapter, you’ve learned how gears work and how you can use them to change the speed and torque provided by EV3 motors. You’ve also learned how the gear ratio, friction, and backlash affect the performance of the gear train. In addition, you’ve seen how to create sturdy gear trains with spur gears, bevel gears, and double-bevel gears. In the next part of the book, you’ll put your building and programming skills to work as you create a race car and a robotic insect, but first, solve some of the following Design Discoveries to gain more experience with gears.
If you want to learn more about gearing principles and other building techniques, I highly recommend that you read The Unofficial LEGO Technic Builder’s Guide by Paweł “Sariel” Kmieć (No Starch Press, 2012), which covers LEGO Technic elements in much more detail.
