HOME ENTERTAINMENT
Digital technology is increasingly blurring the boundaries between familiar devices, such as TVs and radios, hi-fi, and recording equipment. But many basic components—screens and speakers, connectors and cables—remain central to any home setup and can be kept in top condition without the need for professional help.
TV AND HOME VIEWING
Optimizing your TV set’s picture and sound, and configuring it to work seamlessly with other equipment, such as a DVD player, home theater system, and satellite receiver, can be taxing. A few simple tips will help you achieve the best viewing experience.

My TV won’t turn on
Check the power and the inputs
If the TV’s power indicator is not illuminated, make sure the set is connected to a working power outlet (test it with a table lamp or other small appliance).
- • Try selecting a channel or switching on the TV using the controls within the set rather than those on your remote. If this works, you probably need to change the batteries in your remote control.
- • If the TV appears to have power but there’s no picture or sound, it’s possible that someone has set the TV to receive its input from an attached DVD player or another source. Select the correct source using your remote control: the button you need may be labeled TV/VIDEO or INPUT, though this varies from model to model. If your remote control doesn’t work, you can sometimes access the TV’s on-screen menu by simultaneously pressing the “Volume up” and “Volume down” buttons on the set itself. Then use the P+ and P- buttons on the set to navigate through the menu until you reach the input control. Select the correct input and press both volume buttons together repeatedly until you exit the menu system.
- • The cables that connect your TV to your DVD or satellite box can come loose—check that all the plugs are firmly connected.
The TV strains my eyes
Set up a light behind the TV
Eye strain or headache is sometimes the result of watching TV in a darkened room. This is because your TV’s two-dimensional image appears to “float” in the darkness, and your eyes and brain work harder trying to deal with this odd perception.
- • You can reduce the problem by adding just a little ambient lighting to the room. Place a lamp near your TV screen, or even behind it. Fit the lamp with a daylight-balanced bulb (available from electrical stores). Choose a low-wattage bulb, so that the intensity of its light around the screen is a little lower than that of the screen itself.
The image on my TV looks squashed
Correct the aspect ratio
Do actors appear too fat or thin on-screen, or is part of your picture or text obviously missing? If so, you have probably selected the wrong aspect ratio for the input. You can change the setting easily, usually through a button on the remote control labeled “Aspect” or “Ratio.”
The picture on my TV is garish
Change the default settings
TVs in a showroom compete against one another for your attention, and for this reason, many manufacturers produce them with default settings in which the image is bright and colorful. When you buy a TV and take it home, it’s easy to adjust its settings for a truer picture.
- • Set up the lighting in your room for optimum viewing (see here).
- • Using your TV’s remote control, navigate to the on-screen menu and select “Picture Settings.” On modern sets you’ll usually find a number of preset options, such as “Vivid,” “Standard” and “Movie.” “Movie” mode usually reduces color saturation and brightness and is ideal for watching DVDs or Blu-ray disks; “Standard” mode is a reasonable compromise for watching normal broadcast TV; while “Vivid” mode boosts colors, and may be a good choice if you use the TV primarily for playing games.
- • Tweak the defaults or create your own unique picture quality by changing the “Brightness,” “Color,” “Contrast,” and “Sharpness” settings. Set the brightness so that pure black tones on-screen appear black, but you can still discern detail in shadowy areas. Reduce the sharpness so that halos do not appear around objects on screen, and try turning down the contrast, which is typically set far too high by default. Color is more subjective, but try to set the TV so that skin tones and foliage appear realistic—if these colors differ widely from nature, the image will look “wrong.”
- • Make any changes gradually and let your eyes get accustomed to the new settings before further tweaking.
- • A more objective way to adjust the picture quality is to use a tool such as THX Optimizer on your DVD player (see box, below).

JARGON BUSTER
THX Optimizer THX is a set of quality standards defined by the movie industry. Some of these standards have worked their way into home cinema equipment. THX Optimizer software guides you through a series of test screens that appear on your TV and lets you adjust picture and sound quality with reference to these standards. Once completed, these adjustments will make the picture and sound on your TV much closer to that intended by the film’s producers. THX Optimizer is loaded free on DVDs and Blu-ray disks that carry the THX logo—it is likely that you already have one in your collection. To use the THX Optimizer, insert a THX DVD into your player, navigate to the THX Optimizer menu from the DVD’s main menu, then follow the on-screen instructions.
The TV’s picture and sound break up
Carry out a reboot and check the antenna
Your TV may be connected directly to the aerial, but it is more likely that the antenna first enters a satellite box, a free-to-air box, or a cable box, which in turn links to the TV and other components, such as a DVD player or home theater system. Any interruption in this daisy chain of boxes can cause the picture to stutter, break up, or disappear completely.
- • Make sure all the cables between the components and to the antenna are fully connected.
- • Do a little housekeeping—untangle the cables that carry electrical power to the components from those that carry signals between the components or from the antenna. This will help minimize any possible electrical interference. Make sure that cables run straight, with no kinks along their length.
- • Check with your neighbors; if they also lack TV reception, it may be that your satellite or cable supplier is carrying out tests or work that is affecting your signal.
- • Reboot your TV. Press the menu button on your remote control and navigate to the tuning section. Most sets will automatically tune in to the strongest signals for each channel.
- • Check the antenna or satellite dish on the outside of your home for damage—birds may have nested on the antenna, it may have been knocked out of alignment, or its connecting cable may have been damaged. If so, call a professional.
The picture is fuzzy
Use the best connectors for optimal performance
If the image on your TV is consistently blurry, first check and adjust the picture settings (see above). If these measures don’t work, you may need to look at the way your equipment is connected. Turn your TV around and you will see numerous sockets that allow you to connect to a DVD or Blu-ray player, satellite box, surround-sound system, and games console. Some of these ports support the most up-to-date digital standards, such as high-quality audio and high-definition TV, while others are “legacy” connectors that allow you to hook up older equipment, usually at the cost of picture and sound quality.
- • Always choose the most modern connector possible (listed in descending order and pictured, below) to link together two pieces of equipment.
- • The latest flat-screen TVs will have HDMI connectors, which allow high-quality digital signals (including high-definition TV) to pass through a single cable; if it is available, use this option to connect your audiovisual components.
- • If you don’t have HDMI connectors, the next best standard for video quality is Component Video; here, the video signal is carried by three cables (colored red, blue, and green). A separate connection is needed for the audio signal.
- • Older sets lack HDMI connectors, but may have an RCA connector that requires three cables—a yellow cable to carry the video signal, and red and white cables to carry stereo sound.
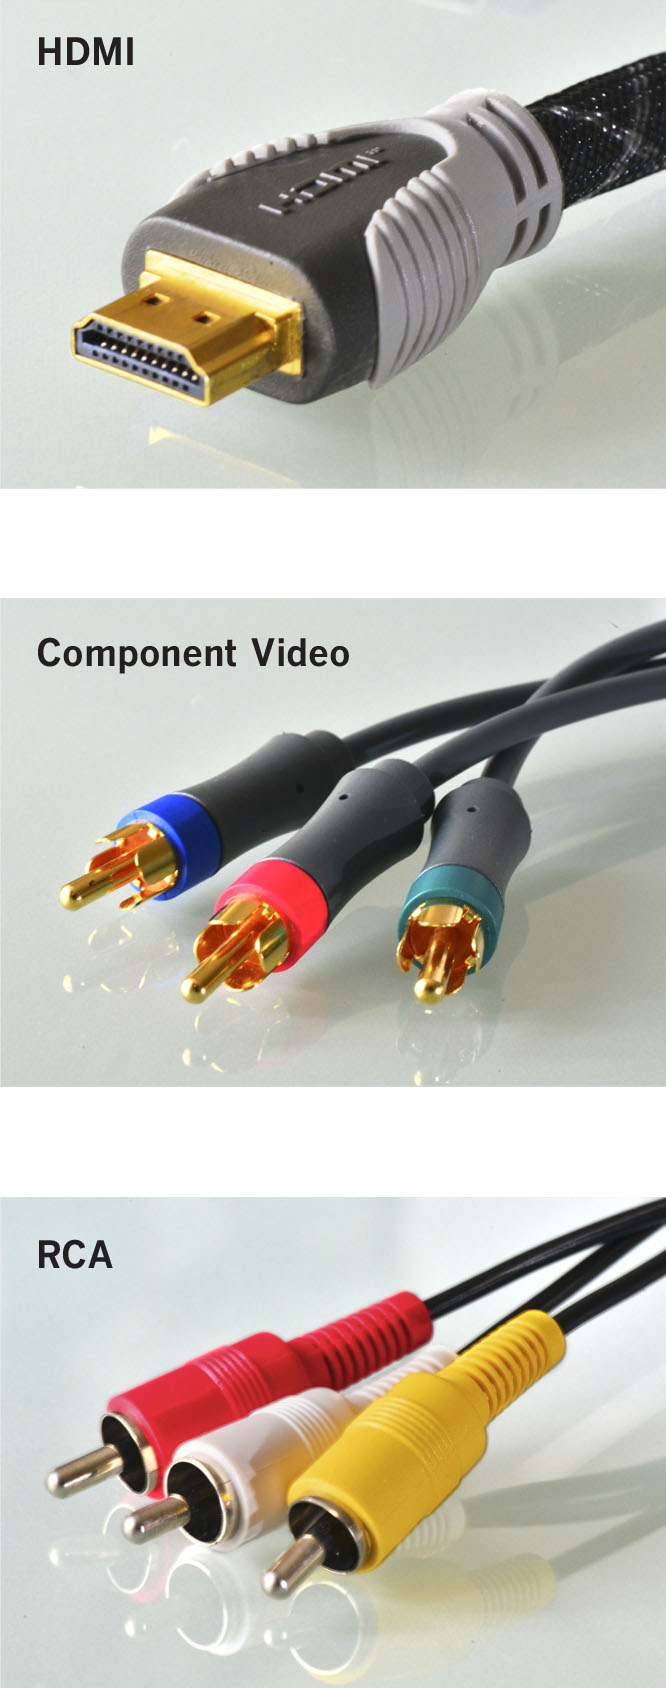
Identify the connectors fitted to your TV set and other equipment, and use the most recent standard available to maximize picture and sound quality.
My 3-D TV images look ghosted
Master the settings and that extra dimension will be yours
At present, there are two main systems available for 3-D TV—one is termed “active,” the other “passive.” With active 3-D, the user needs to wear quite heavy glasses containing electronic “shutters” that let light pass into one eye at a time. In passive systems, users wear lighter polarized glasses. If your 3-D images look ghosted or unclear, there are a few steps you can take.

Glasses for active 3-D TV systems contain a small battery that will need to be replaced when it runs down.
- • In your TV menu, switch off the ambient light sensor (this makes the TV screen brighter if the room is well lit, and darker if light levels fall). Then, toggle through the TV’s picture settings (see here) while wearing your glasses and select the mode that gives the best 3-D image. You’ll probably need to set your TV to a brighter level than for 2-D, because the glasses absorb some light.
- • If you have an active system, check that there is nothing blocking the infrared emitters that tell the glasses when to flip their shutters. These emitters often take the form of a “wand” that plugs into the TV, or they may be built into the TV itself.
- • Make sure that the batteries in the glasses are fully charged. Some recharge via a port on the TV; others employ a button-type lithium battery, which you’ll need to replace once in a while.
I find it hard to hear dialogue on the TV
Reposition the set and tweak the menu settings
If you rely on your TV’s built-in speakers, you may find that their sound is muddy or faint—especially when it comes to reproducing dialogue in movies. That’s because movie sound is often designed to be listened to on a surround-sound system and suffers in quality when forced through a TV’s small stereo speakers.
- • Using your TV’s remote control, navigate to the on-screen menu and select “Sound Settings.” Most modern sets will have a number of options suited to different types of sound (movies, sports and so on). Try these first, and choose one that suits your ear.
- • You can then tweak the settings to refine the sound: reduce the bass level—excessive bass can cause cabinets to rattle and introduce unpleasant distortion at higher listening levels. If the sound lacks “sparkle,” try increasing the treble.
- • Some TVs have a “Virtual Surround” mode that attempts to emulate the sound of a multi-speaker home cinema system. Unfortunately, these modes often tend to muddy the sound, so try switching them off and listen for an improvement.
- • Try positioning your TV in the corner of a room, rather than flat against a wall. This creates an effect similar to cupping your hands around your mouth when speaking, and may help to intensify the TV’s sound.
- • If you have a hi-fi system in the same room as the TV, try routing the TV’s audio signals to the stereo for superior results. Many TVs (and set-top boxes) have audio output ports. Connect an RCA cable of appropriate length from this to one of the spare auxiliary inputs of your hi-fi system.
- • Buying and installing a surround-sound system will give you the best audio experience when watching TV, but these systems are expensive and include multiple speakers, which make them unsuitable for small rooms. A cheaper and neater solution is a “soundbar”—a narrow array of speakers that fits neatly beneath a TV and gives you some of the benefits of a full home theater system.
The keys on my remote control are sluggish
A quick cleanup will get it working like new
Do you have to push harder on the buttons of your remote control to change channels? Over time, grease and gunk build up under the keypad. Fortunately, there’s a simple fix.
Time needed 30 minutes
You will need screwdriver, blunt flat-bladed knife, cotton swab, isopropyl alcohol, detergent, damp cloth
- 1 Remove the batteries from the remote and undo any screws holding the two halves of the unit together. Keep the screws in a bowl to stop them from rolling away. Insert the blade of the blunt knife into the joint between the upper and lower plastic casing and gently pry open the unit (see below, left).
- 2 Remove the rubber key panel and, using a cotton swab dipped in alcohol, clean the contacts beneath each key (see below, center). Work gently so you do not damage the delicate contacts. Clean the upper surface of the key panel with a damp cloth and mild detergent.
- 3 Now clean the circuit board by gently wiping it with a damp cloth and mild detergent (see below, right). Wipe with a clean cloth and leave both halves to dry completely. Reassemble the remote by reversing the previous steps.

My remote control doesn’t work
Check it with your phone
If pressing keys on your remote control doesn’t have any effect on your TV, the problem could lie with the remote unit or the set. There’s a simple way to check if your remote is working.
- • Switch on your cell phone’s camera and point the remote control toward the camera’s lens. Press a button on the remote, and you should see a blue glow from the remote’s emitter on the camera’s screen. This is because digital cameras pick up the infrared radiation of remote handsets.
- • If the remote doesn’t work, first try changing its batteries and cleaning the battery contacts. You can do this by rubbing the contacts with a pencil eraser or some fine-grade sandpaper.
- • If the remote does work, the fault may lie within the TV set. But before you call for a repair, turn off any room lights and try again. Some types of fluorescent bulbs can interfere with the signal from a remote. Try repositioning the light or consider replacing its bulb with one of another type (see here).
My TV screen is dirty
Wipe it with a microfiber cloth and vinegar
Today’s LCD and plasma TVs have screens faced with plastic that is easily marked by abrasive cloths and chemicals, so try this low-tech cleaning method.
- • First, switch off the TV, then wipe the screen with a microfiber cloth, which won’t leave behind traces of lint. Don’t press too hard. If marks remain on the screen, moisten the microfiber cloth with a fifty-fifty mixture of white vinegar and water and lightly rub any spots. Dry the screen immediately with a clean microfiber cloth to avoid smudge marks.
DVDs take too long to load
Clean the disk and the lens
A dirty disk is the most common cause of slow loading. Try cleaning the disk with a dry microfiber cloth; wipe gently from the inner hole out to the edge, not around its circumference. If this doesn’t work, moisten the cloth with a little window-cleaning fluid and wipe as above. Allow the disk to dry before inserting it into the DVD player.
- • Buy a cleaning disk from an electronics shop; insert it into the DVD player and follow the on-screen instructions to clean the player’s lens. This is particularly important if your DVD player is used in a room where people smoke.