
Greenhouse Companion Projects
The projects in this section all contribute to the function of a greenhouse. Some, such as planters and trellises, can be used either inside or outside the greenhouse. Others, such as the cold frame or the Seed Starter Rack, are independent but can be used in tandem with the greenhouse to garden year-round. All of the projects will make your garden a more productive and enjoyable place to work. Keep in mind that many of these projects can be executed with materials left over from a greenhouse project. It’s often wisest to start out by building the greenhouse you want, and then you can turn to the structures that best support that particular greenhouse.
• Planter with Hanging Trellis
Cold Frame Box
An inexpensive foray into greenhouse gardening, a cold frame is practical for starting plants six to eight weeks earlier in the growing season and for hardening off seedlings. Basically, a cold frame is a box set on the ground and topped with glass or plastic. Although mechanized models with thermostatically controlled atmospheres and sashes that automatically open and close are available, you can easily build a basic cold frame yourself from materials you probably already have around the house.
The back of the frame should be about twice as tall as the front so the lid slopes to a favorable angle for capturing sunrays. Build the frame tall enough to accommodate the maximum height of the plants before they are removed. The frame can be made of brick, block, plastic, wood, or just about any material you have on hand. It should be built to keep drafts out and soil in.
If the frame is permanently sited, position it facing south to receive maximum light during winter and spring and to offer protection from wind. Partially burying it takes advantage of the insulation from the earth, but it also can cause water to collect, and the direct soil contact will shorten the lifespan of the wood frame parts. Locating your frame near a wall, rock, or building adds additional insulation and protection from the elements. Keep an inexpensive thermometer in a shaded spot inside the frame for quick reference. A bright spring day can heat a cold frame to as warm as 100 degrees Fahrenheit, so prop up or remove the cover as necessary to prevent overheating. And remember, the more you vent, the more you should water. On cold nights, especially when frost is predicted, cover the box with burlap, old quilts, or leaves to keep it warm inside.

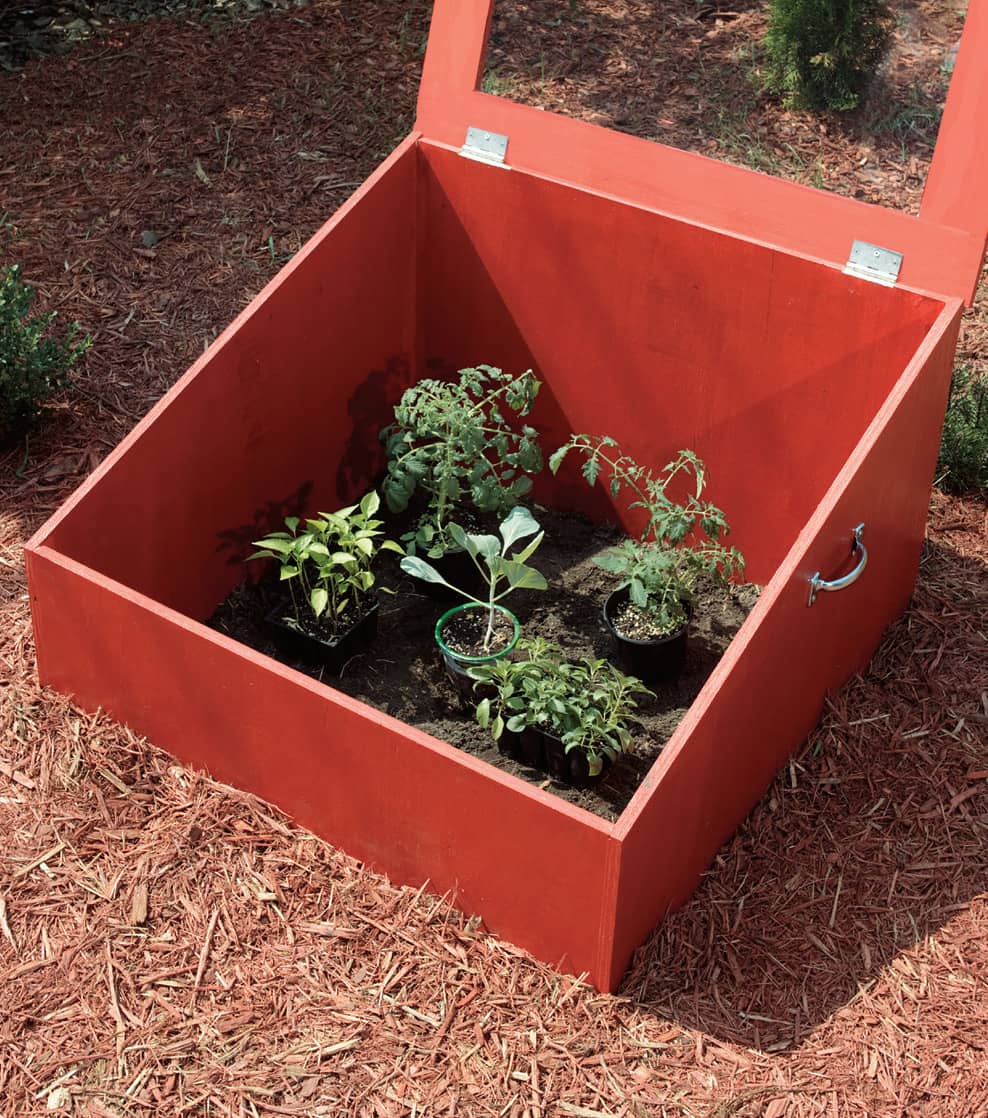
A cold frame is positioned over tender plants early in the growing season to trap heat and moisture so they get a good, strong start. This cold frame doesn’t rely on finding old windows for the top, so anyone can build it.
 COLD FRAME BOX
TOOLS & MATERIALS
(2) 3 × 3" butt hinges (ext.)
Exterior paint
(2) 4" utility handles
Deck screws (2" or 21/2")
(4) Corner L-brackets (3/4 × 21/2")
#8 × 3/4" wood screws
(1) 3/4" × 4 × 8' plywood (ext.)
Circular saw
1/8 × 37 × 38" clear Plexiglas
Drill/driver
Exterior caulk/adhesive
Caulk gun
Pipe clamps
Exterior wood glue
Straightedge cutting guide
Eye and ear protection
Work gloves
CUTTING LIST
KEY |
PART |
NO. |
DIMENSION |
MATERIAL |
A |
Side |
2 |
3/4 × 16/28 × 36" |
Ext. Plywood |
B |
Front |
1 |
3/4 × 16 × 36" |
Ext. Plywood |
C |
Back |
1 |
3/4 × 28 × 36" |
Ext. Plywood |
D |
Lid frame |
2 |
3/4 × 4 × 31" |
Ext. Plywood |
E |
Lid frame |
2 |
3/4 × 4 × 38" |
Ext. Plywood |
F |
Cover |
1 |
1/8 × 37 × 38" |
Plexiglas |
 How to Build a Cold Frame Box
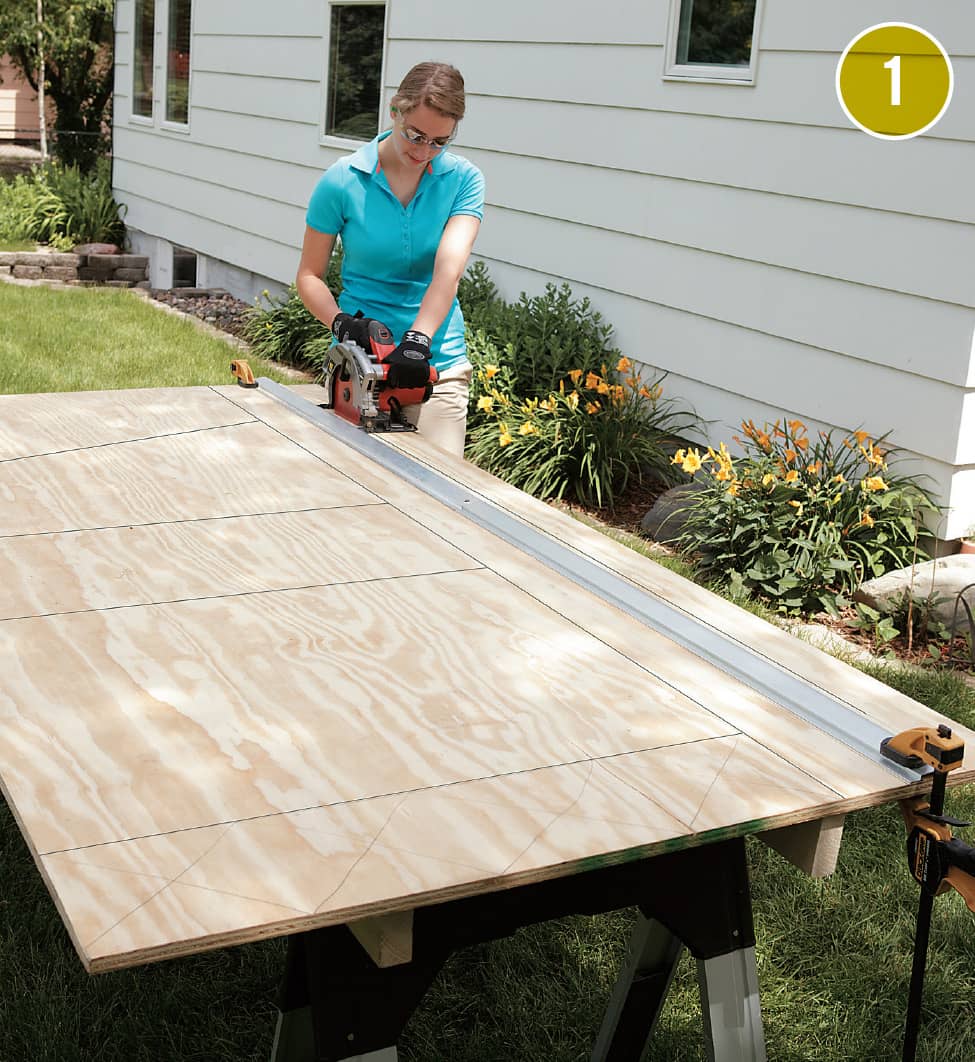
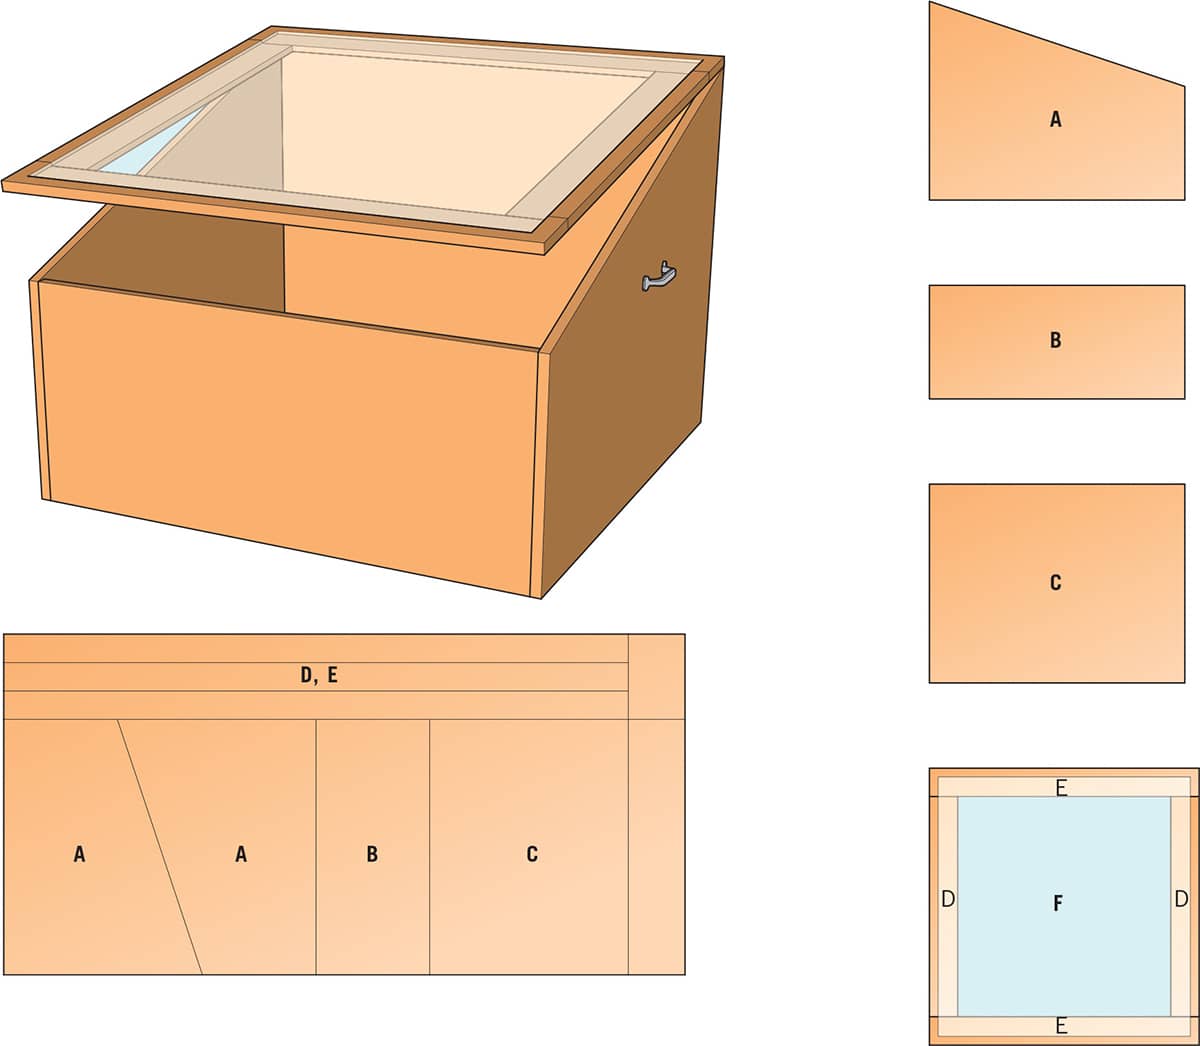
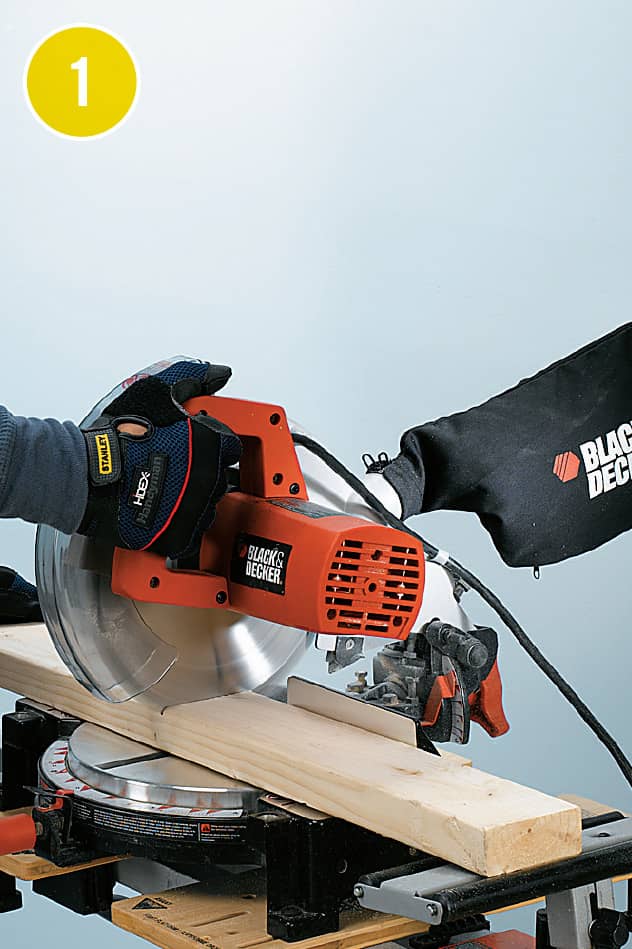
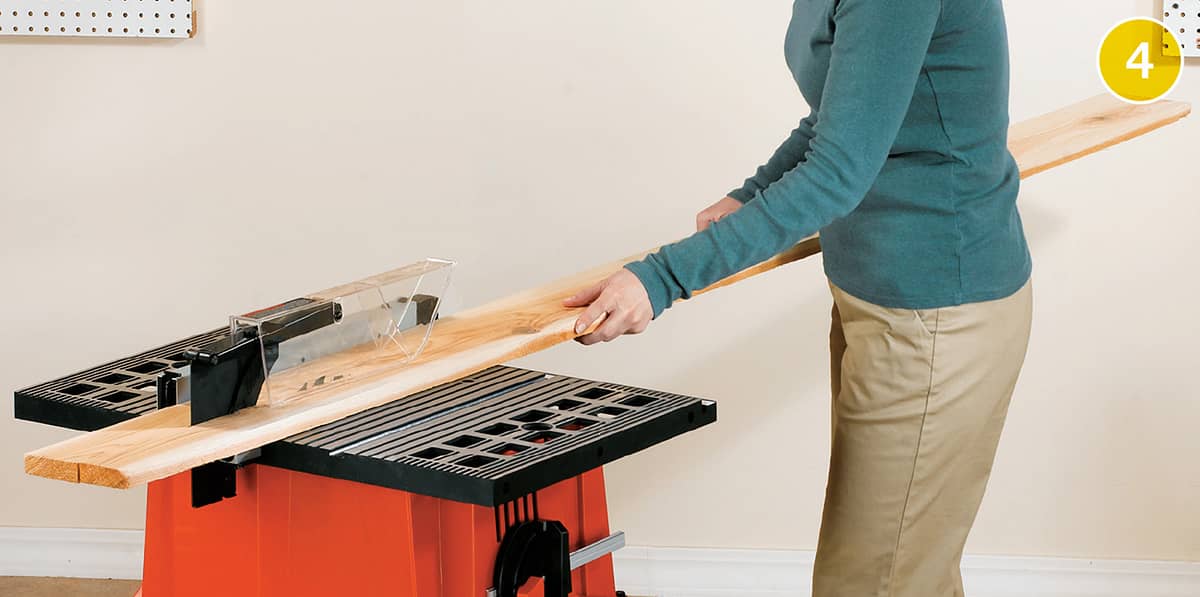
Cut the parts. This project, as dimensioned, is designed to be made entirely from a single 4 × 8 sheet of plywood. Start by cutting the plywood lengthwise to make a 36"-wide piece.
TIP: Remove material in 4" wide strips and use the strips to make the lid frame parts and any other trim you may want to add.
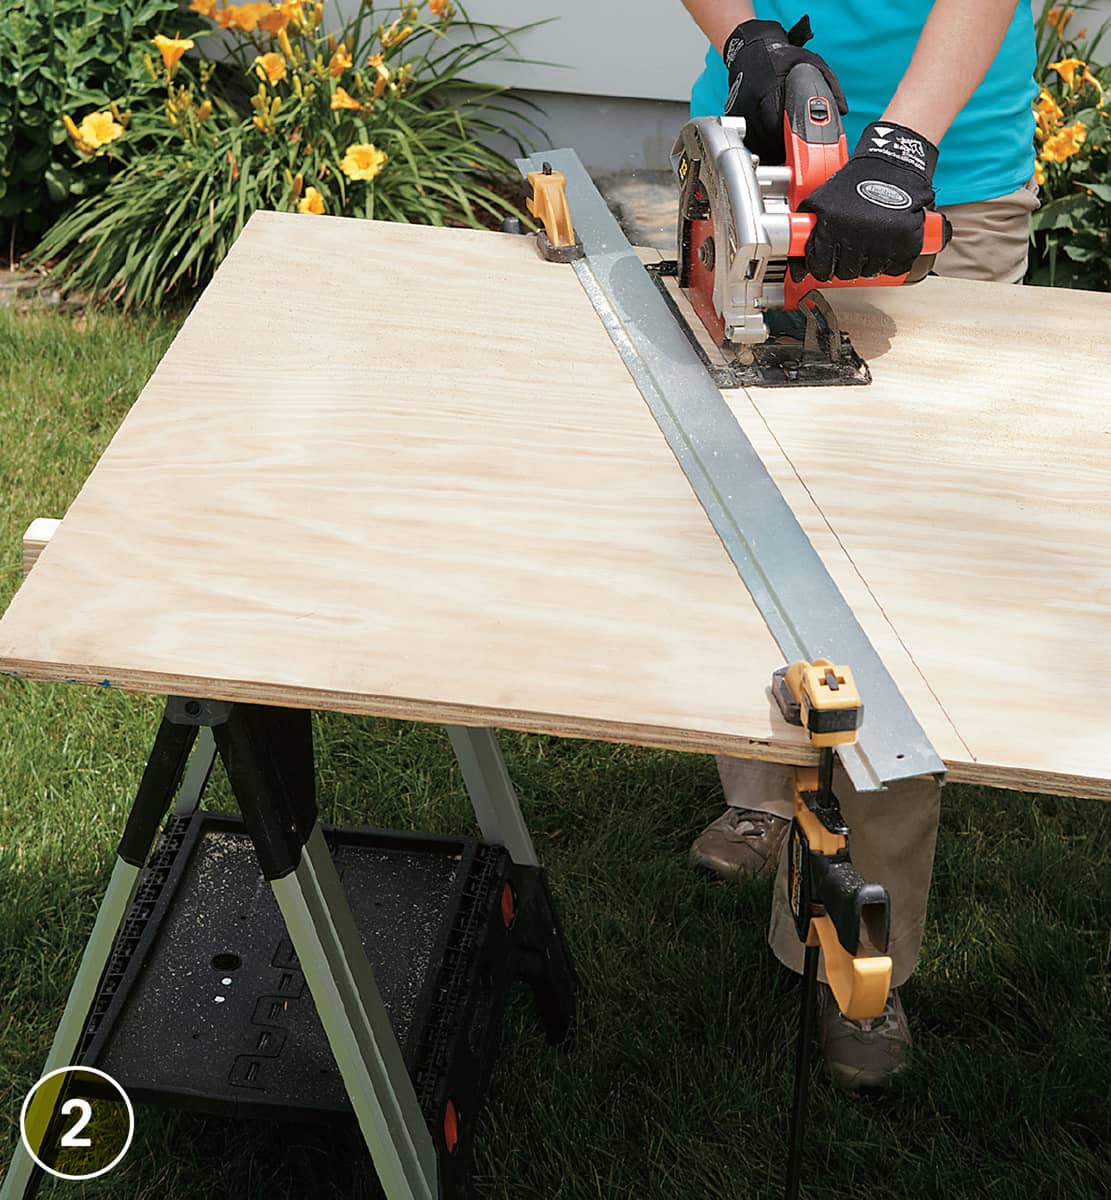
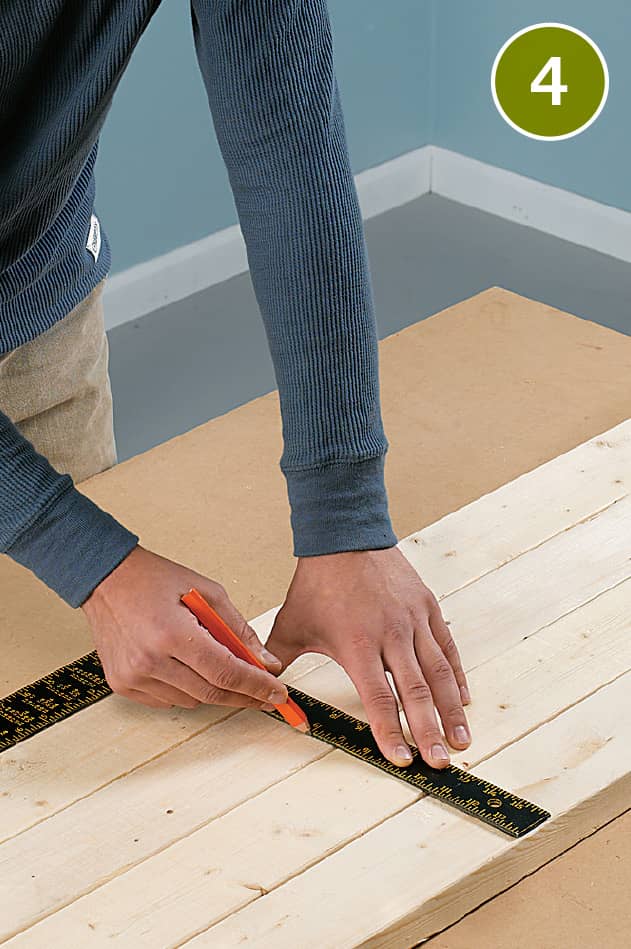
Cut the parts to size with a circular saw or jigsaw and cutting guide. Mark the cutting lines first (See Diagram).

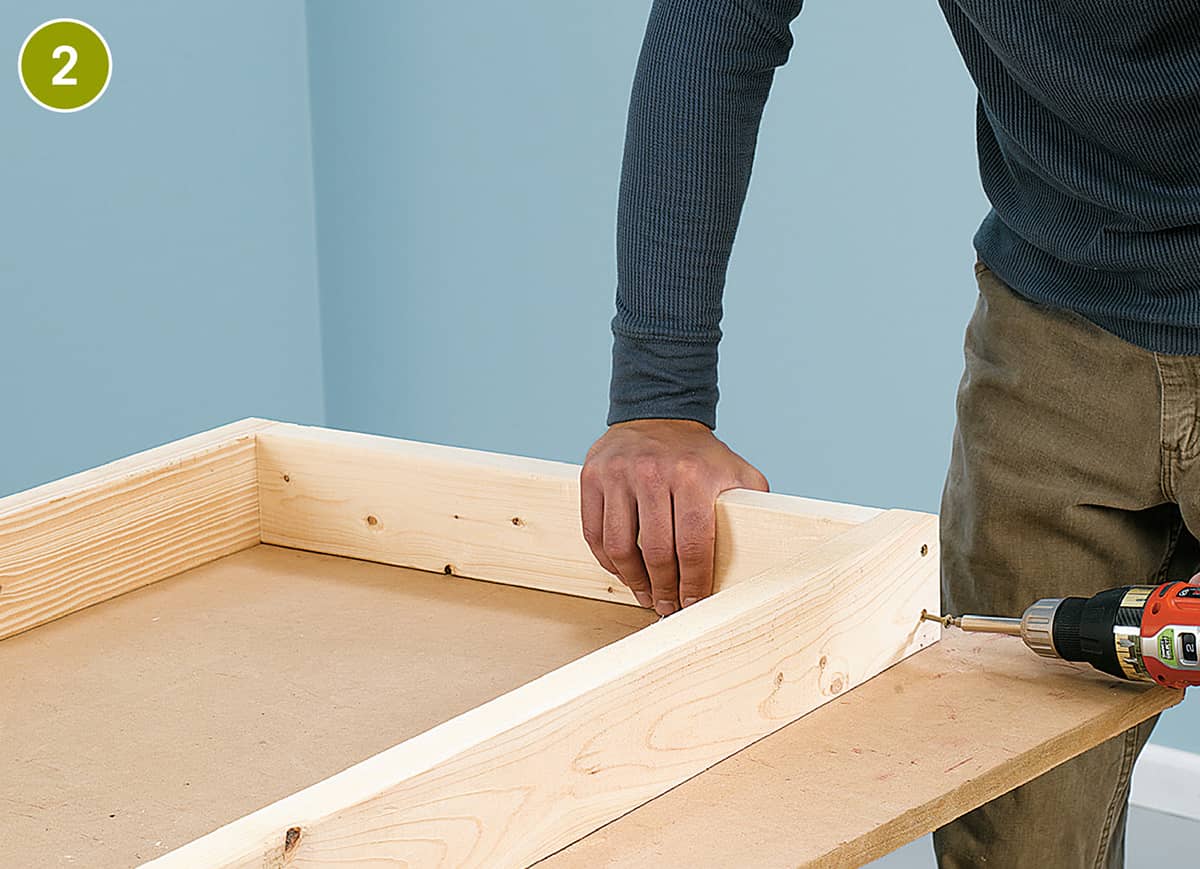
Assemble the front, back and side panels into a square box. Glue the joints and clamp them together with pipe or bar clamps. Adjust until the corners are square.
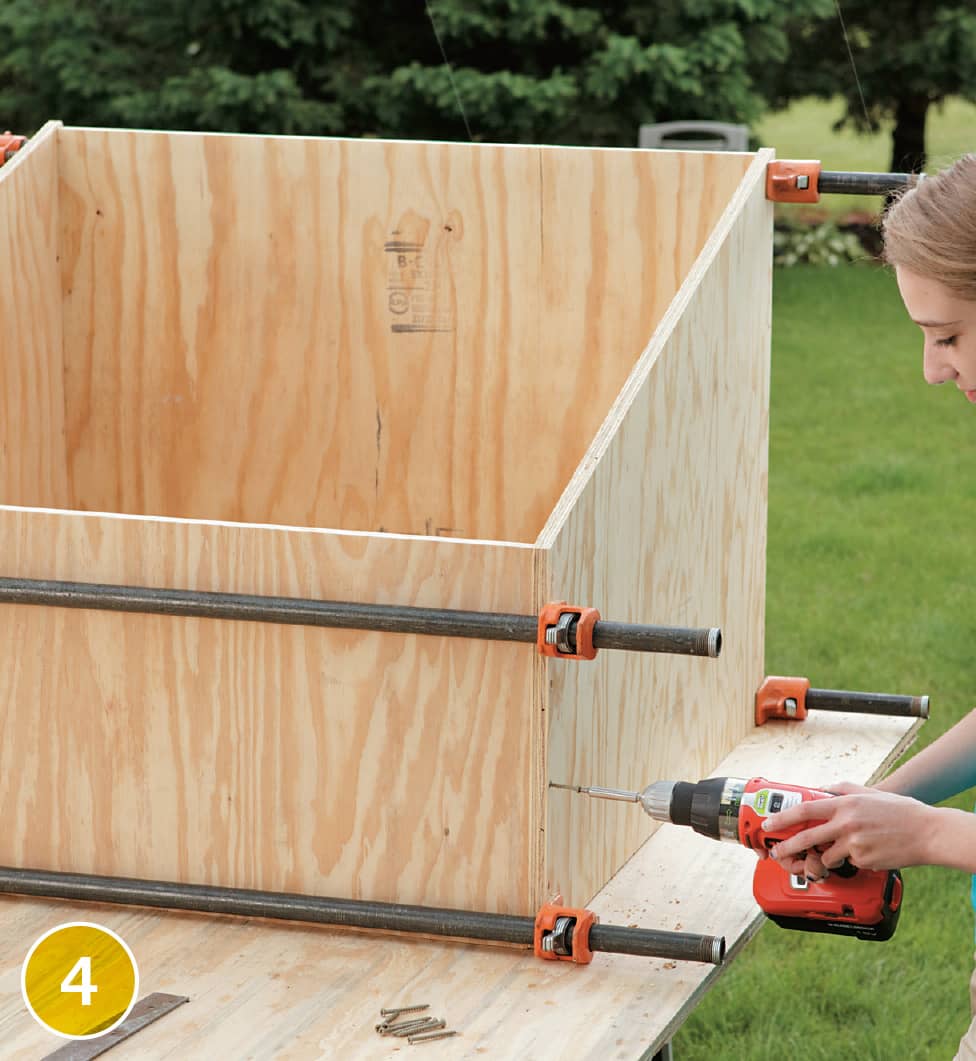
Reinforce the joints with 2 or 21/2" deck screws driven through countersunk pilot holes. Drive screws every 4 to 6" along each joint.
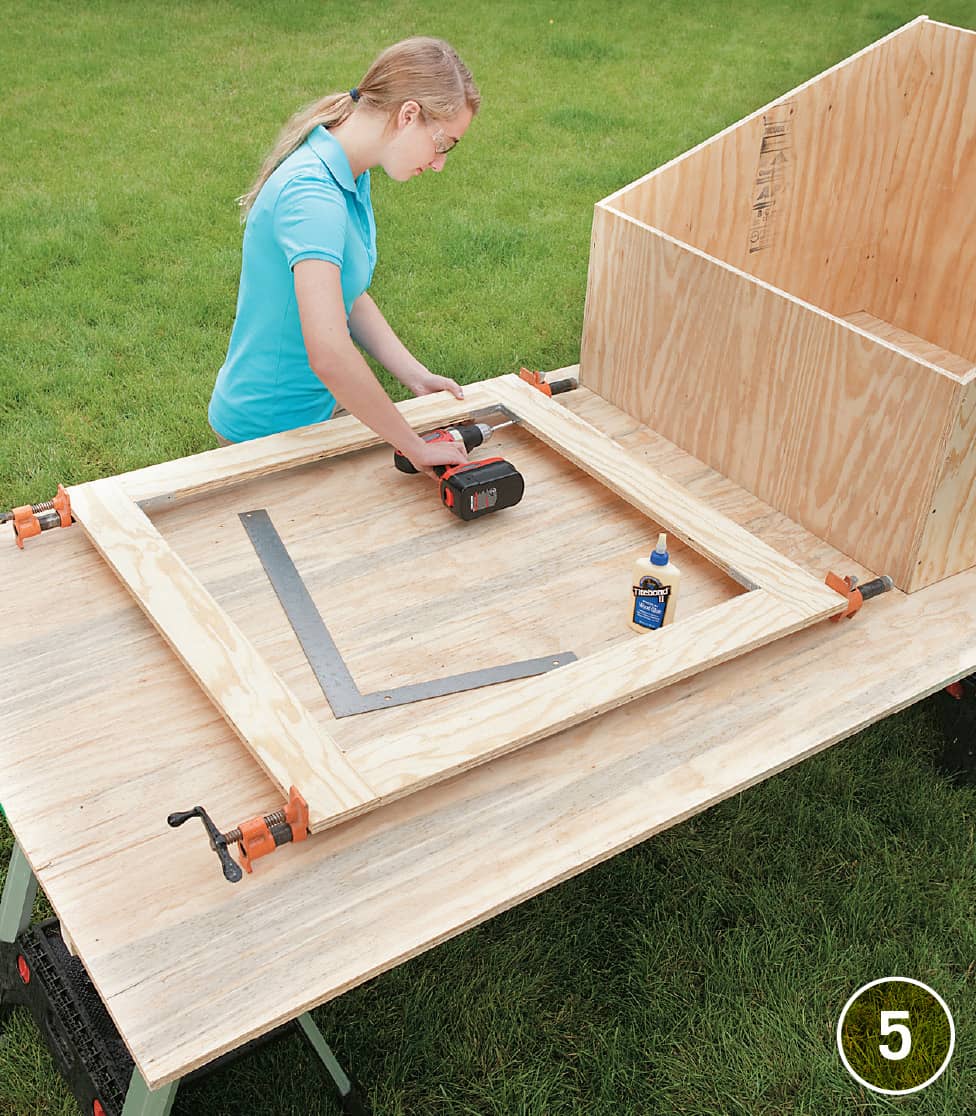
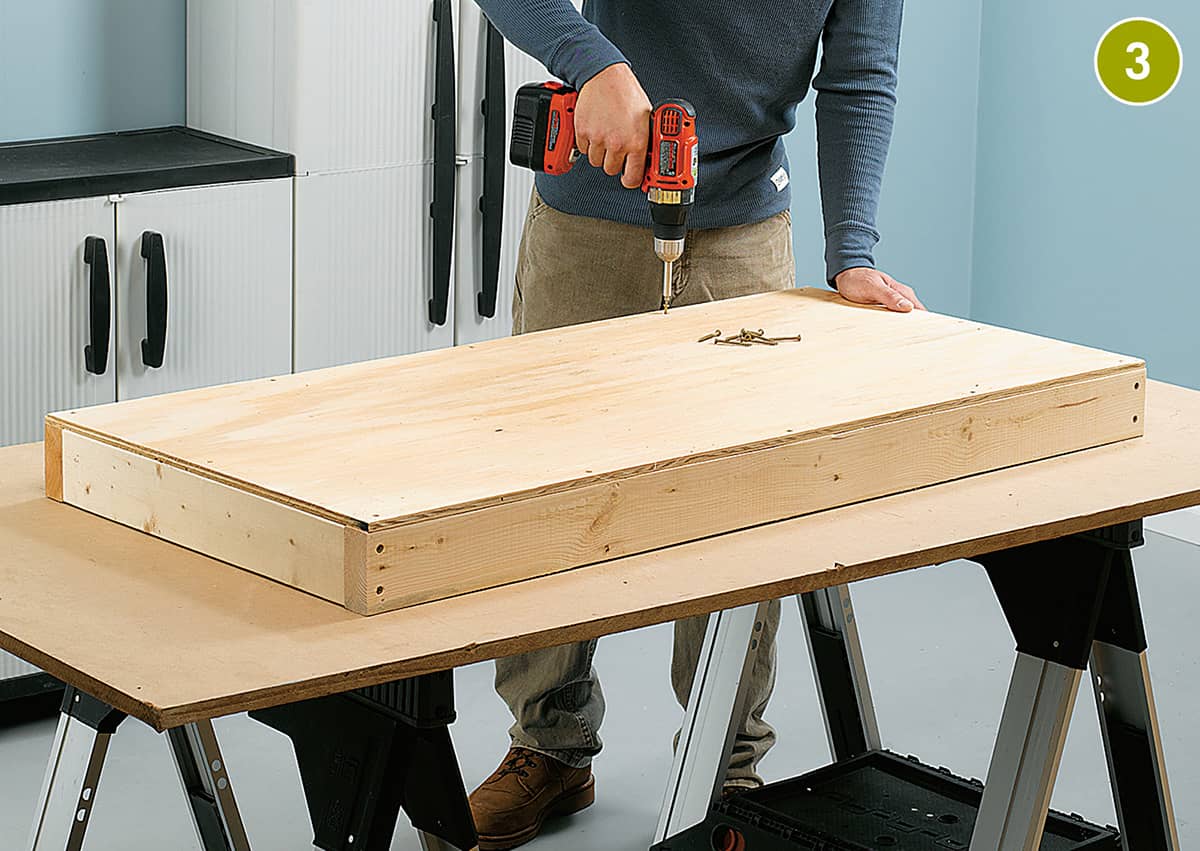
Make the lid frame. Cut the 4"-wide strips of 3/4" plywood reserved from step 1 into frame parts (2 @ 31" and 2 @ 38"). Assemble the frame parts into a square 38 × 39" frame. There are many ways to join the parts so they create a flat frame. Because the Plexiglas cover will give the lid some rigidity, simply gluing the joints and reinforcing with an L-bracket at each inside corner should be more than adequate structurally.
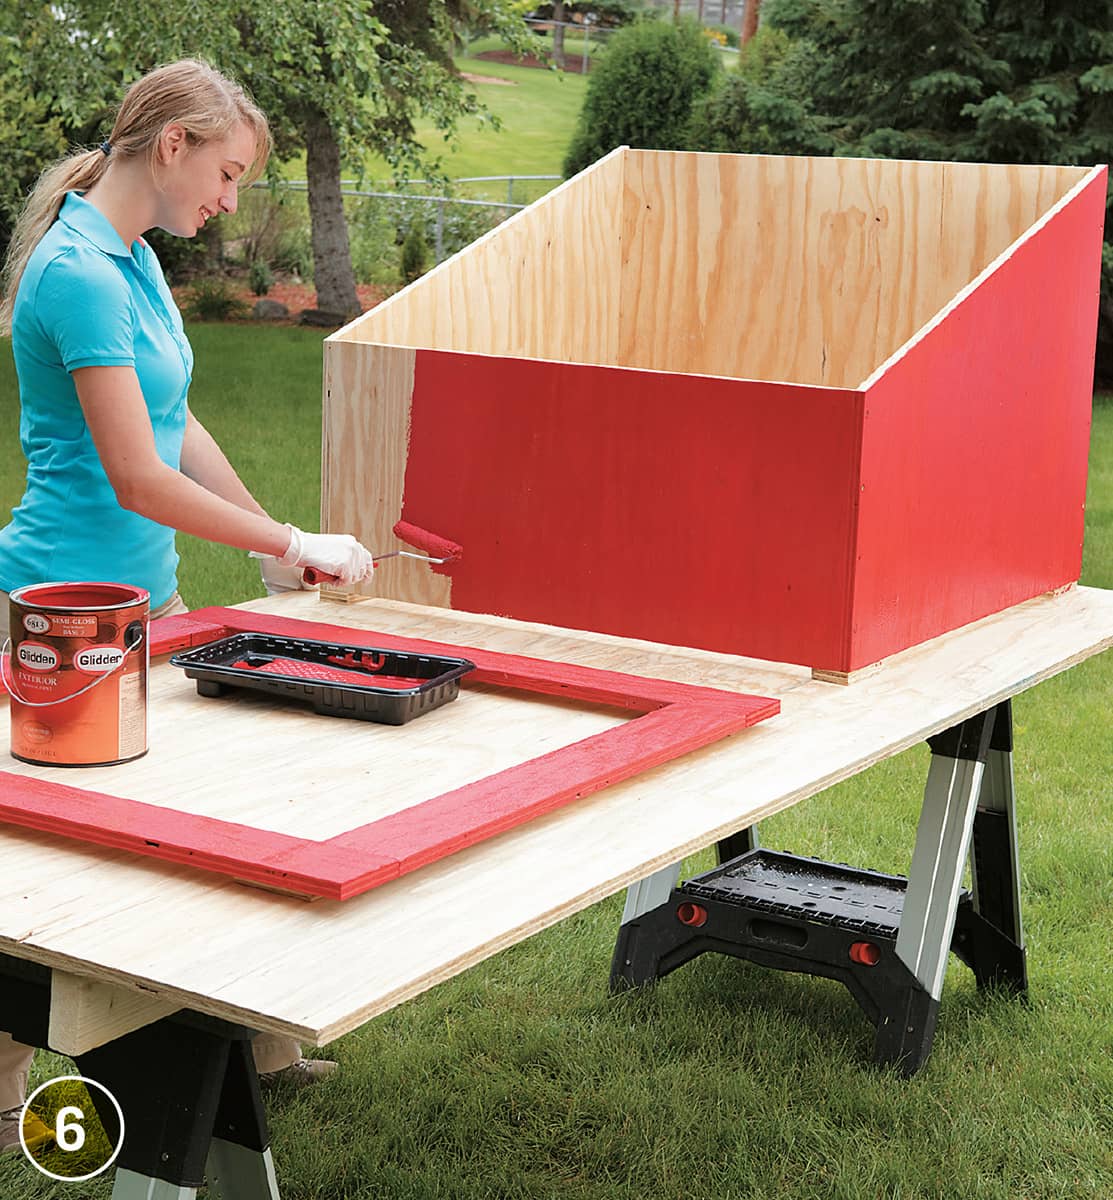
Paint the box and the frame with exterior paint, preferably in an enamel finish. A darker color will hold more solar heat.
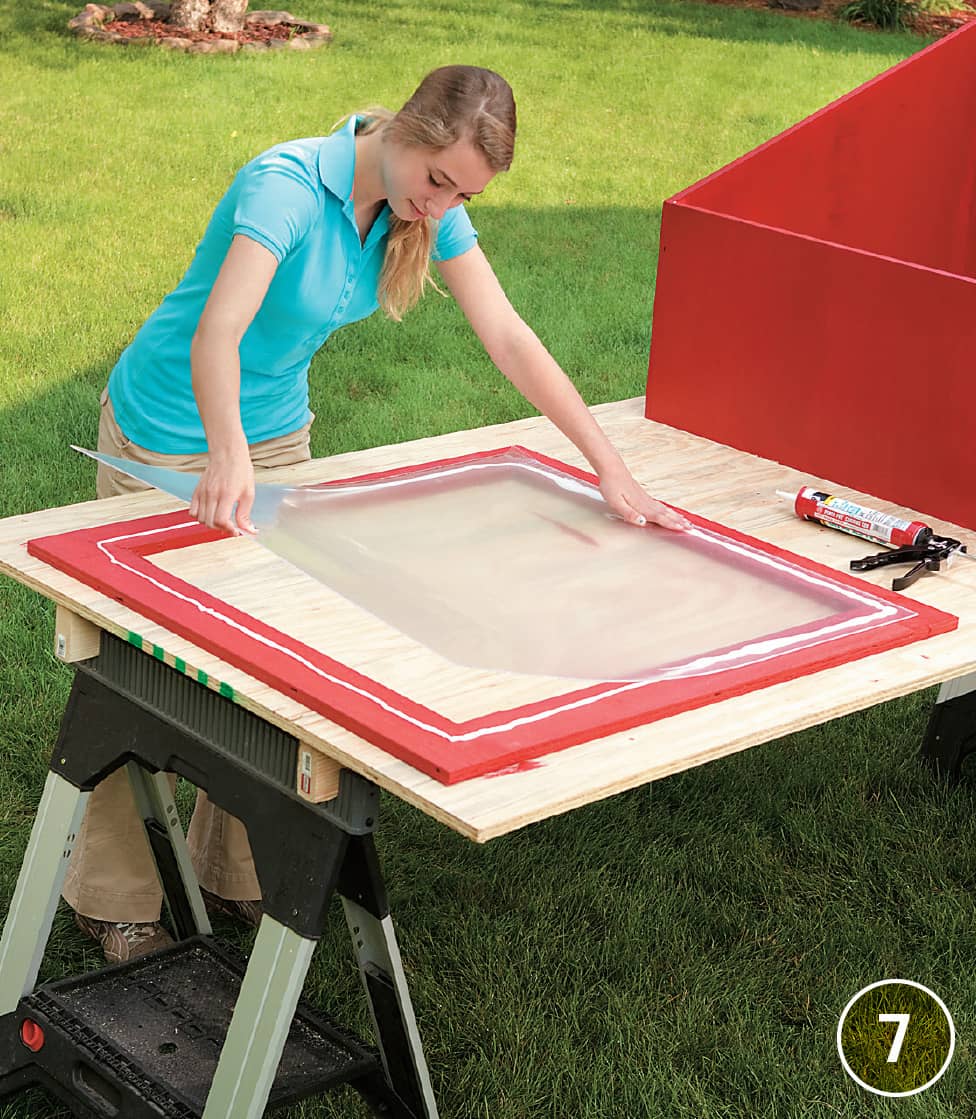
Lay thick beds of exterior adhesive/caulk onto the tops of the frame and then seat the Plexiglas cover into the adhesive. Clean up squeeze-out right away. Once the adhesive has set, attach the lid with butt hinges and attach the handles to the sides.
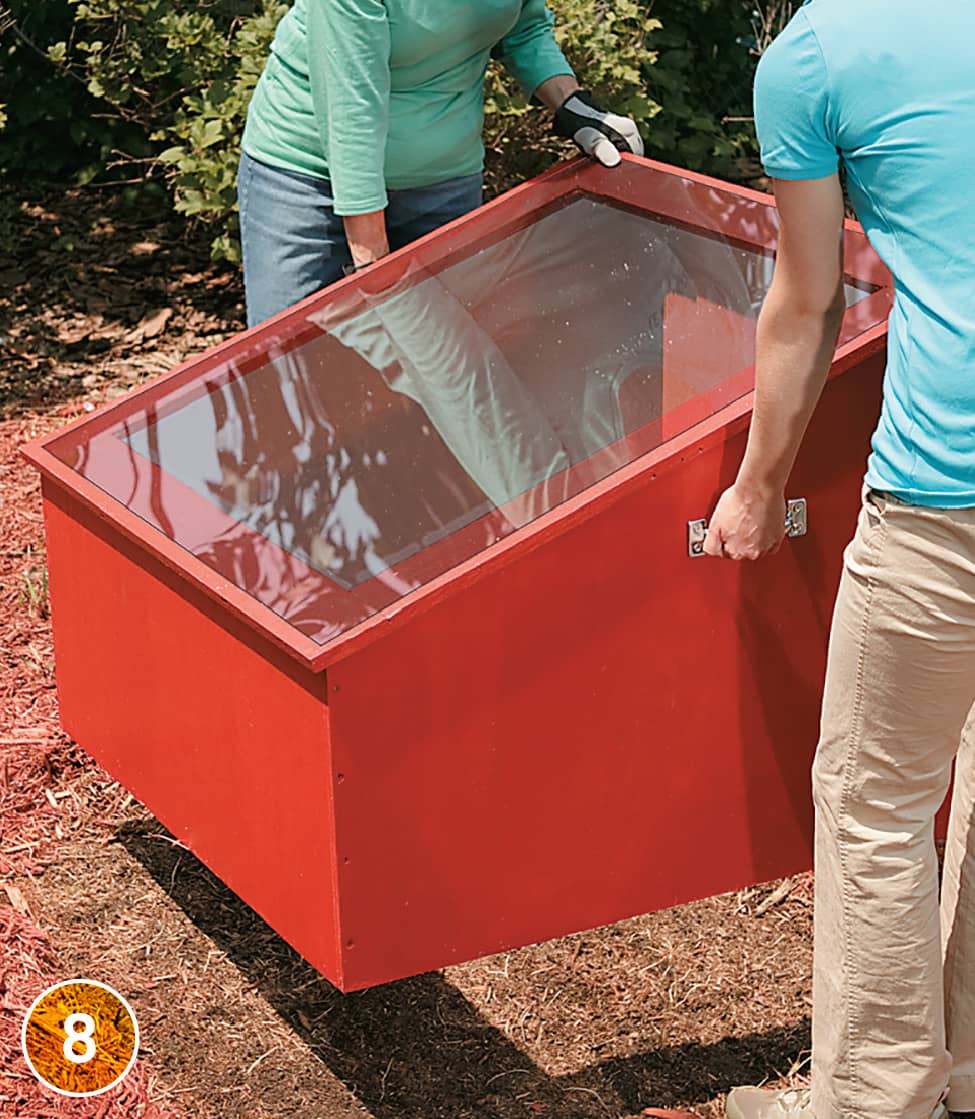
Move the cold frame to the site. Clear and level the ground where it will set if possible. Some gardeners like to excavate the site slightly.
Jumbo Cold Frame
A cold frame of any size works on the same principle as a greenhouse, capturing sunlight and heat while protecting plants from cold winds and frost. But when your planting needs outgrow a basic backyard cold frame with a window-sash roof, it makes sense to look to the greenhouse for more comprehensive design inspiration. This jumbo version offers over 17 square feet of planting area and combines the convenience of a cold frame with the full sun exposure of a greenhouse. Plus, there’s ample height under the cold frame’s canopy for growing taller plants.
The canopy pivots on hinges and can be propped all the way up or partially opened to several different positions for ventilating the interior to control temperature. The hinges can be separated just like door hinges (in fact, they are door hinges), so you can remove the canopy for the off season, if desired. Clear polycarbonate roofing panels make the canopy lightweight yet durable, while admitting up to 90 percent of the sun’s UV rays (depending on the panels you choose).
The base of the cold frame is a simple rectangle made with 2 × 6 lumber. You can pick it up and set it over an existing bed of plantings, or give it a permanent home, perhaps including a foundation of bricks or patio pavers to protect the wood from ground moisture. For additional frost protection and richer soil for your seedlings, dig down a foot or so inside the cold frame and work in a thick layer of mulch. Because all sides of the canopy have clear glazing, you don’t have to worry about orienting the cold frame toward the sun; as virtually all of the interior space is equally exposed to light.
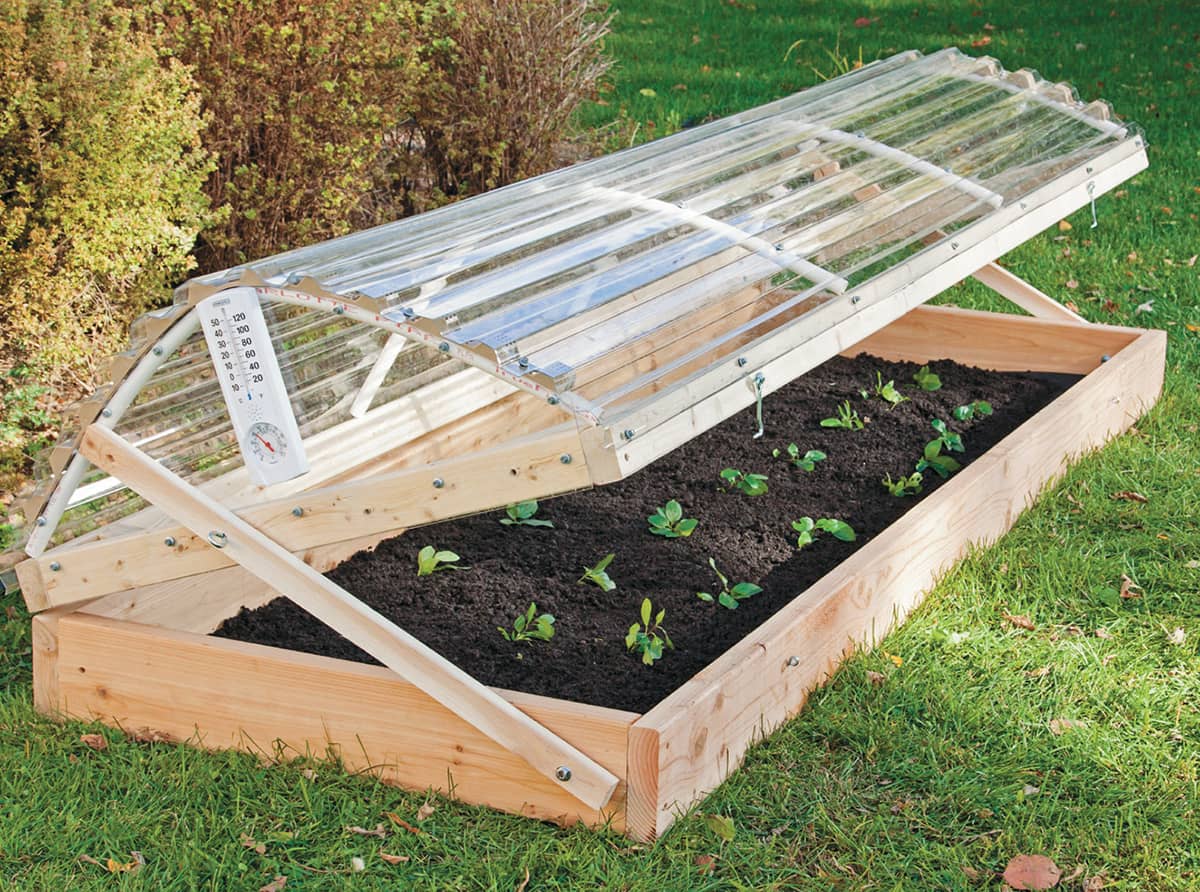
A cold frame can extend the growing season in your garden to almost—or truly—year-round. Use an oversized cold frame like the one in this project and there may be no need to put up vegetables in the fall, because you’ll have all the fresh produce you can handle.
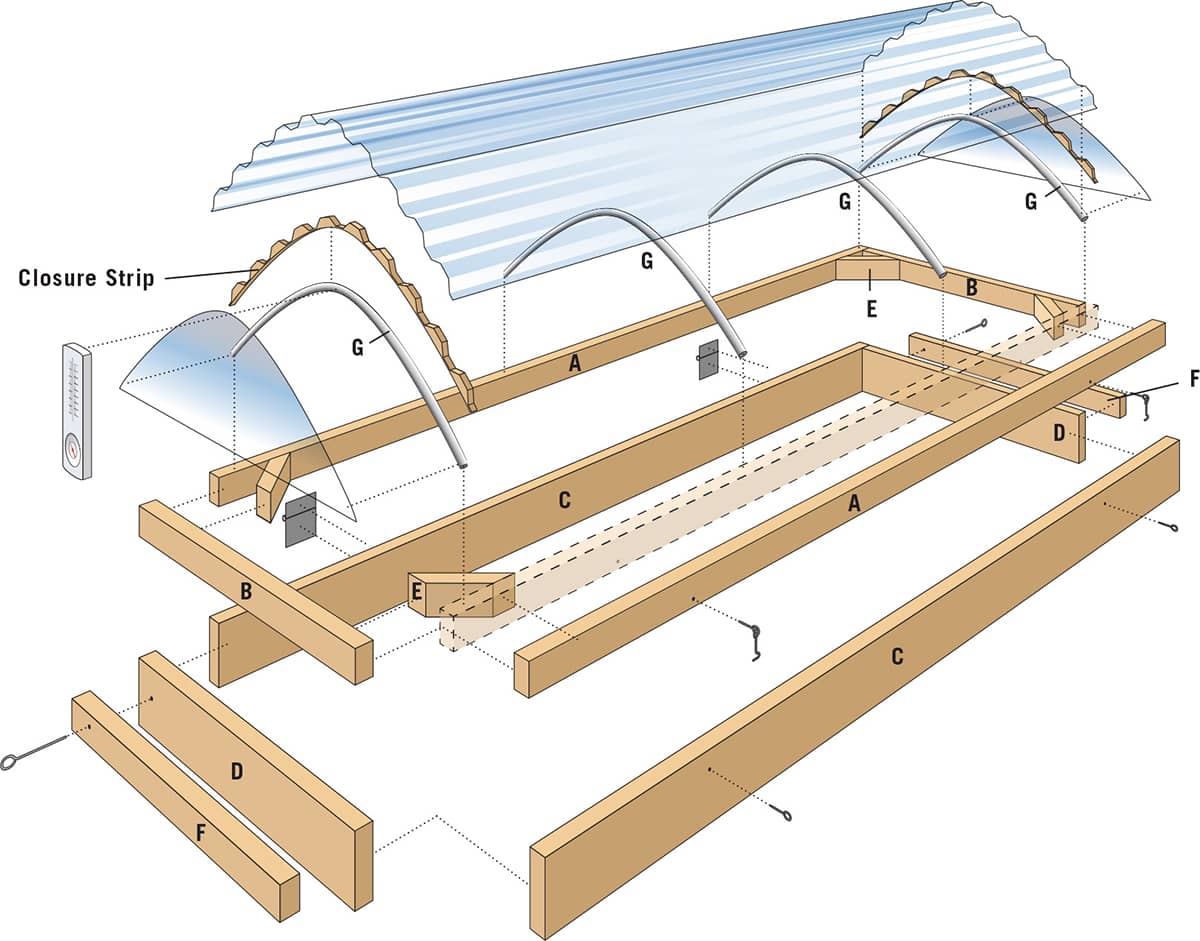
BUILDING A JUMBO COLD FRAME
CUTTING LIST
KEY |
PART |
NO. |
DIMENSION |
MATERIAL |
A |
Frame side |
2 |
11/2 × 21/2 × 94" |
2 × 3 |
B |
Frame end |
2 |
11/2 × 21/2 × 30" |
2 × 3 |
C |
Base side |
2 |
11/2 × 51/2 × 94" |
2 × 6 |
D |
Base end |
2 |
11/2 × 51/2 × 30" |
2 × 6 |
E |
Frame brace |
4 |
11/2 × 21/2 × 8" |
2 × 3 |
F |
Prop stick |
2 |
3/4 × 11/2 × 30" |
1 × 2 |
G |
Rib |
4 |
1/2 × 1/2 × 37" |
1/2 PVC tubing |
How to Build a Jumbo Cold Frame
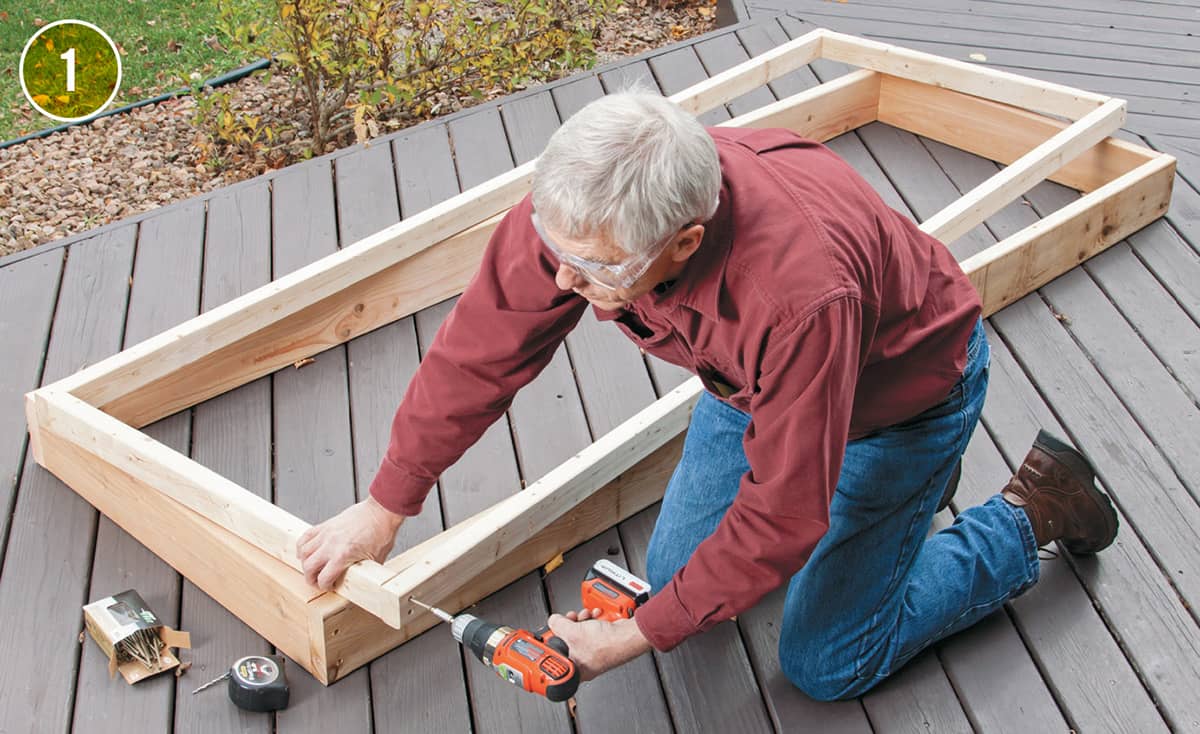
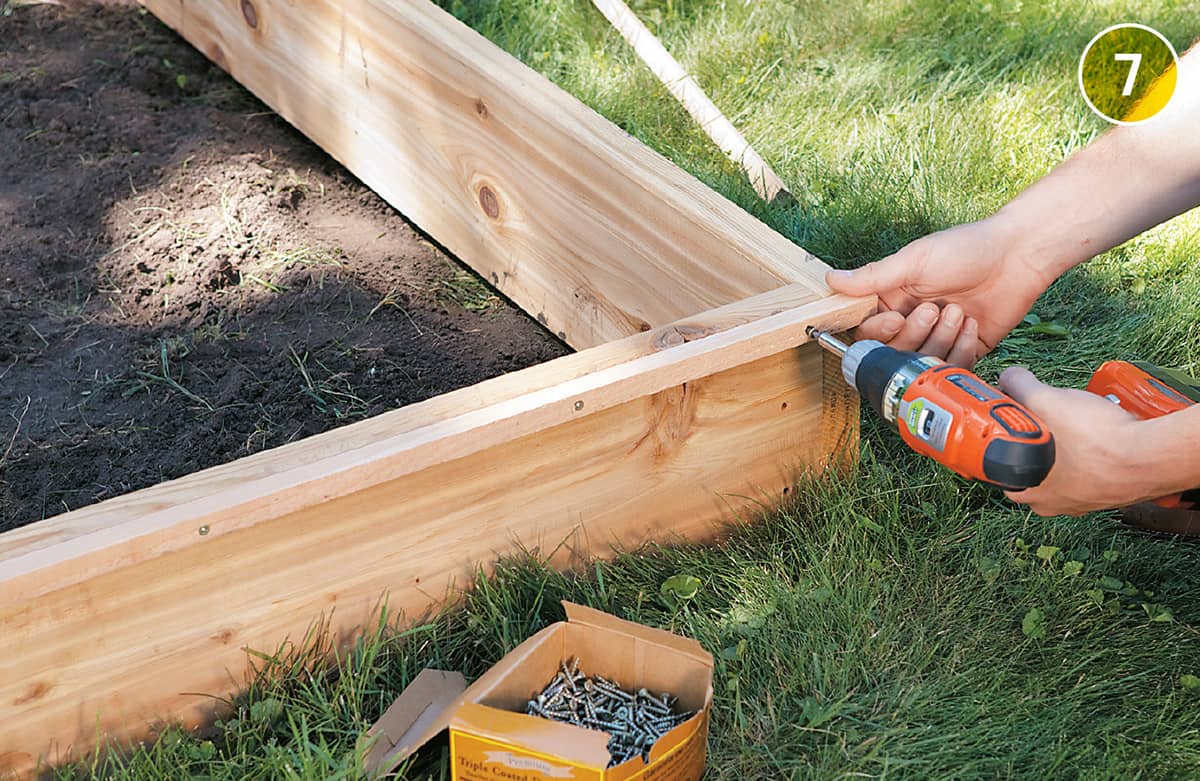
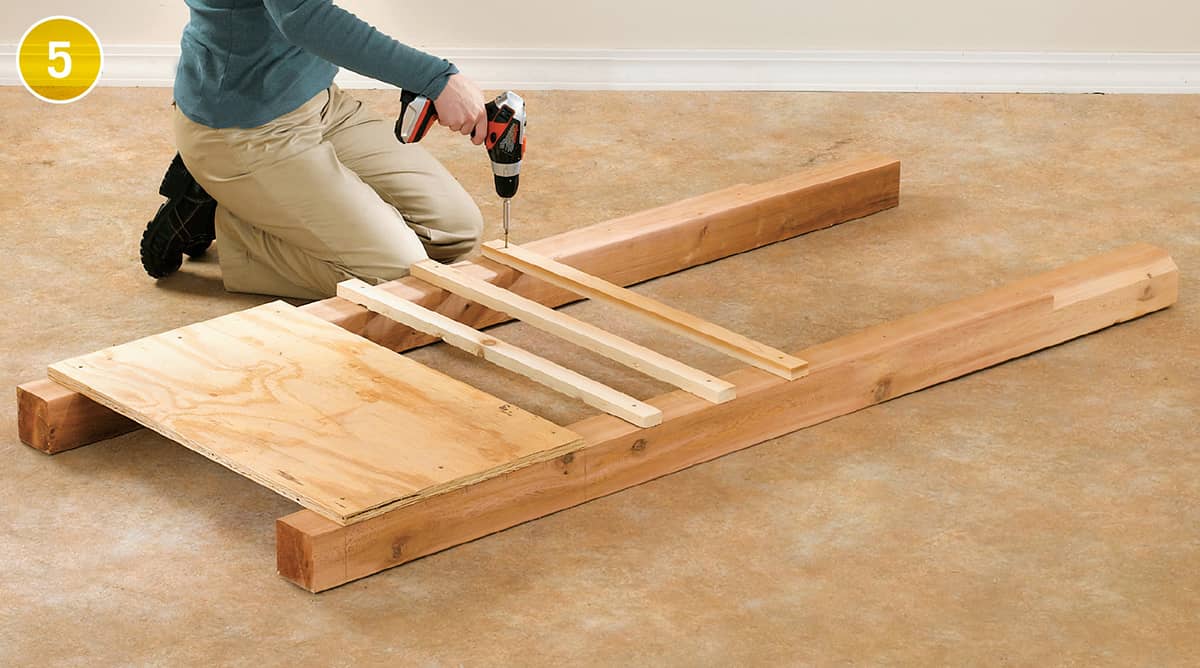
Drill pilot holes and fasten the frame end pieces between the frame side pieces with 3" deck screws to create the rectangular frame. Do the same with the base pieces to create the base. Use two screws for each joint.
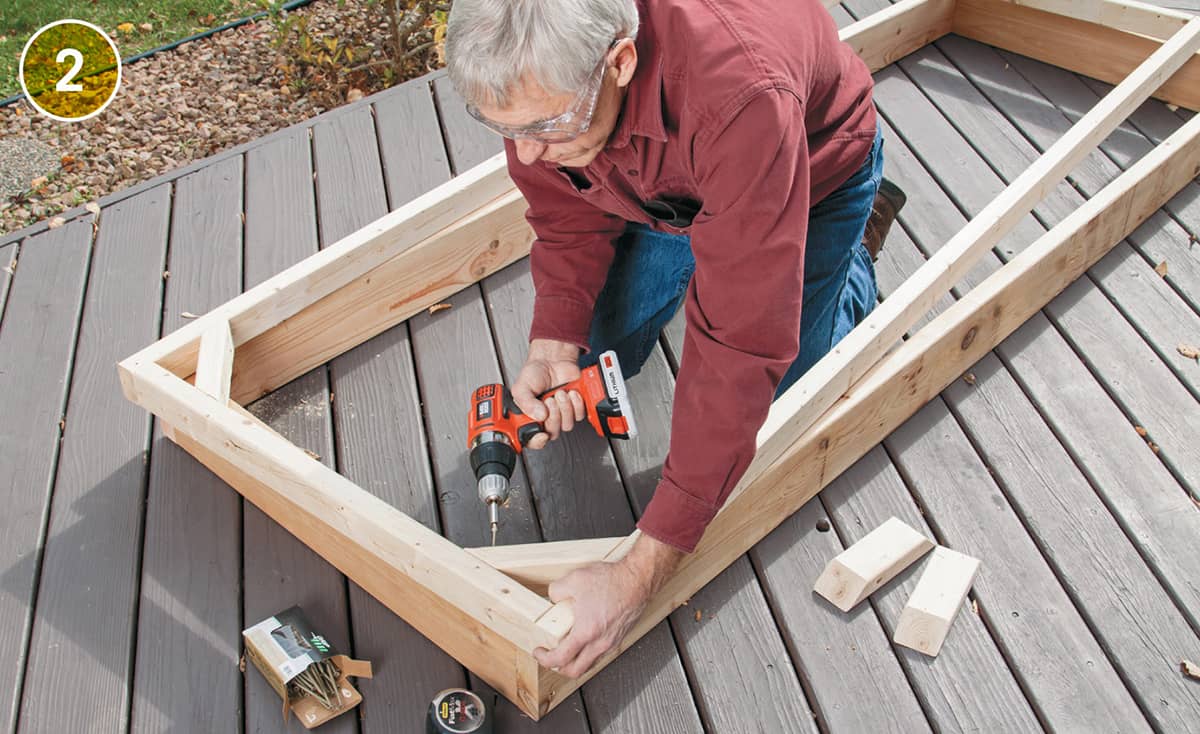
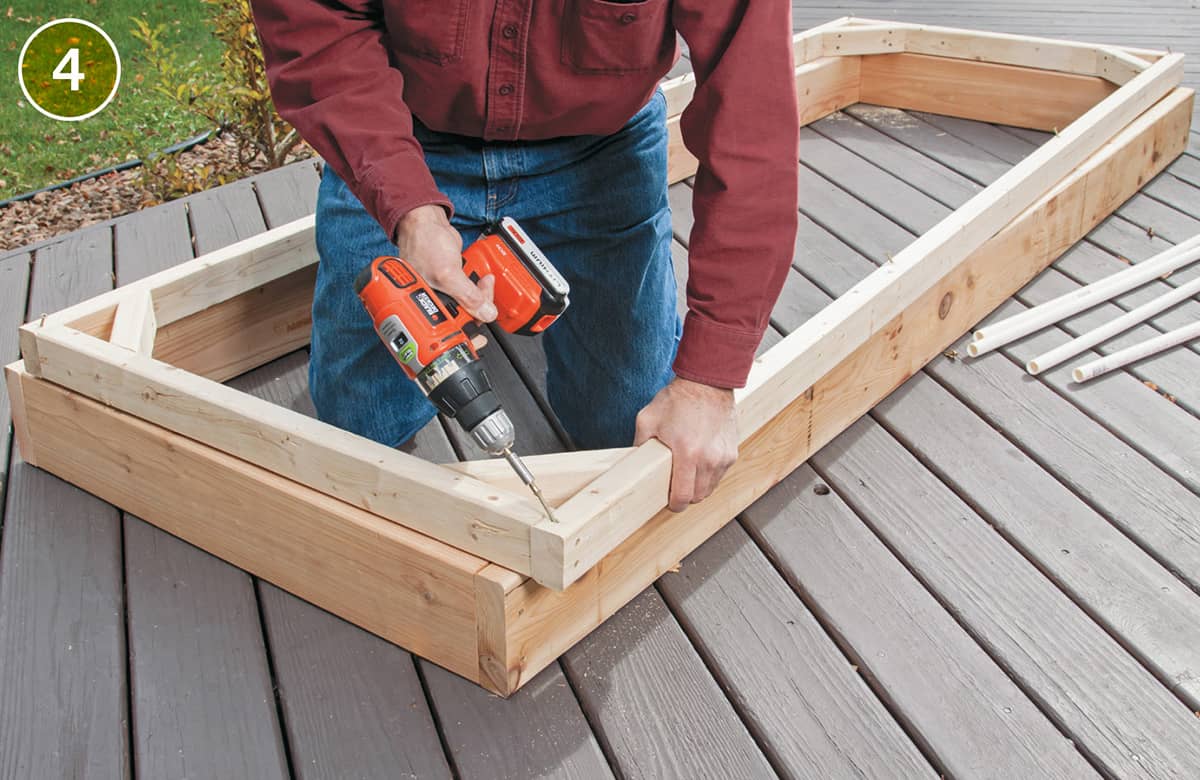
Stabilize the corners of the canopy frame with braces cut to 45° angles at both ends. Install the braces on-the-flat, so their top faces are flush with the tops of the canopy frame. Drill pilot holes and fasten through the braces and into the frame with one 21/2" screw at each end. Then, drive one more screw through the outside of the frame and into each end of the brace. Check the frame for square as you work.
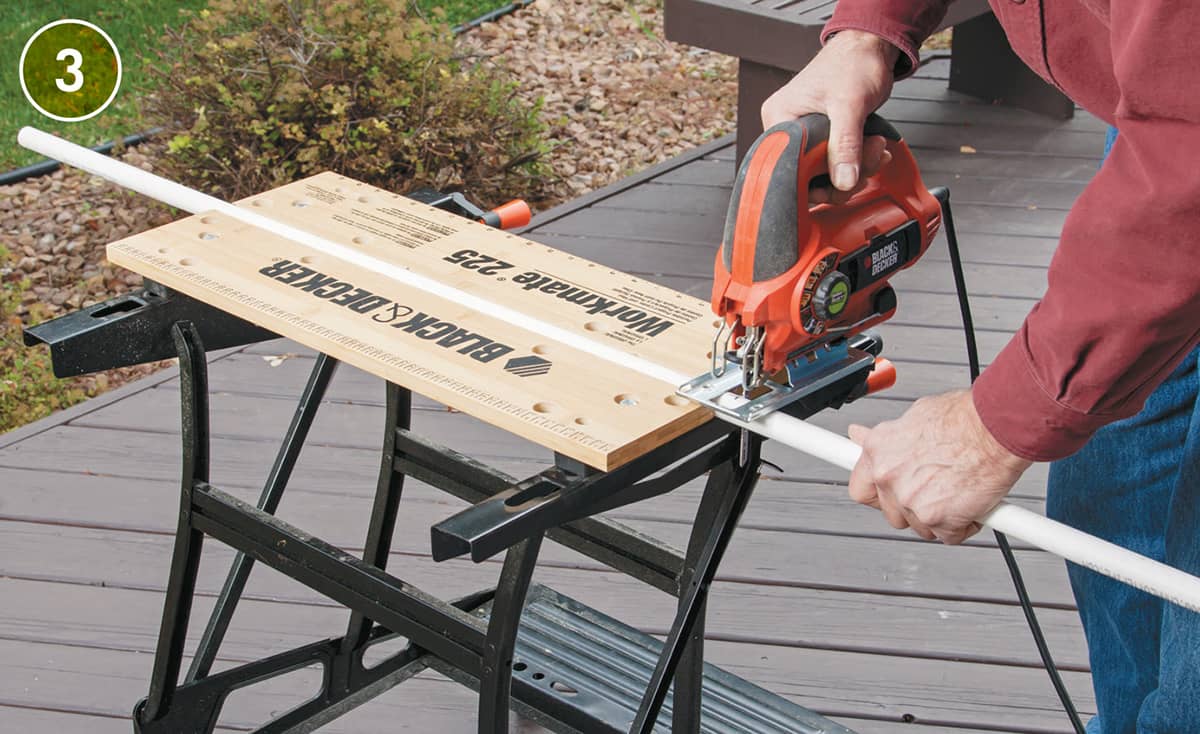
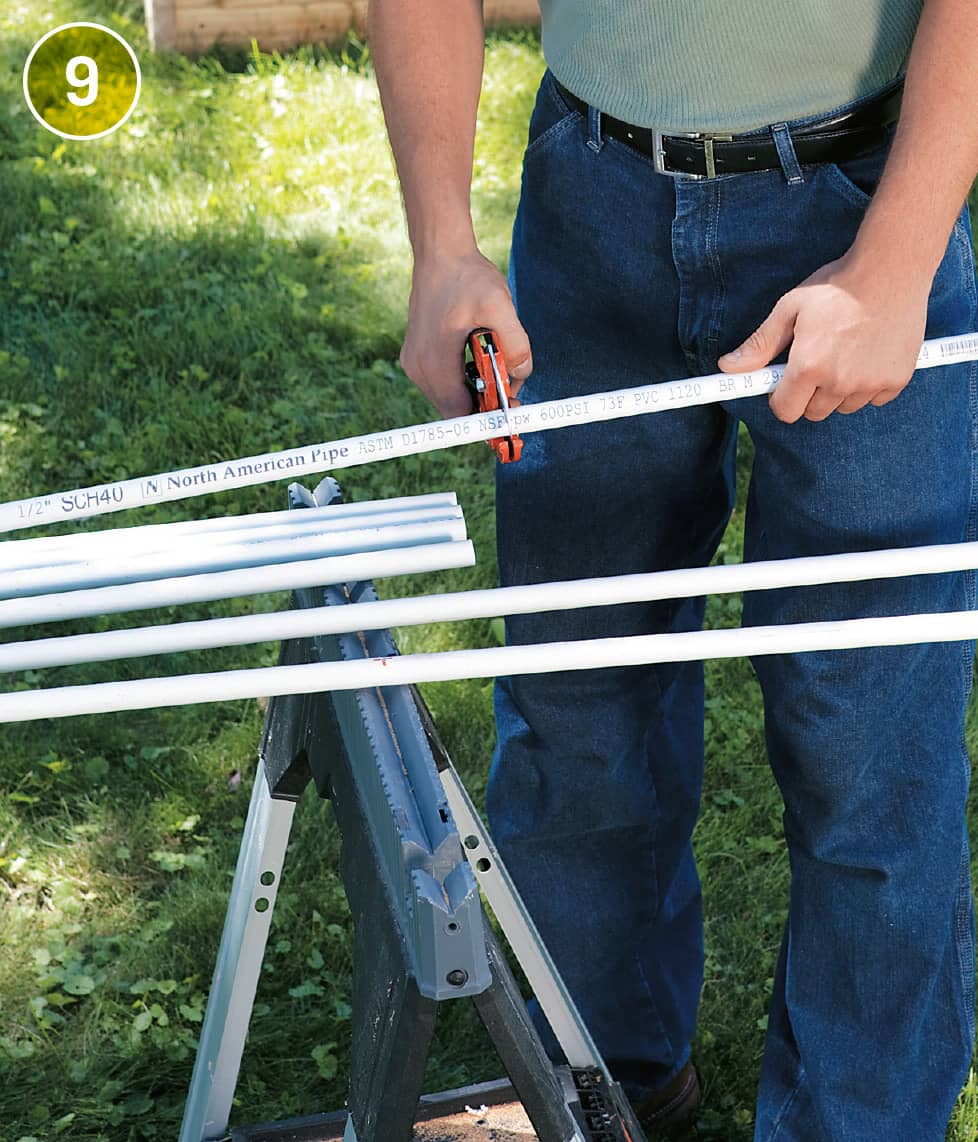
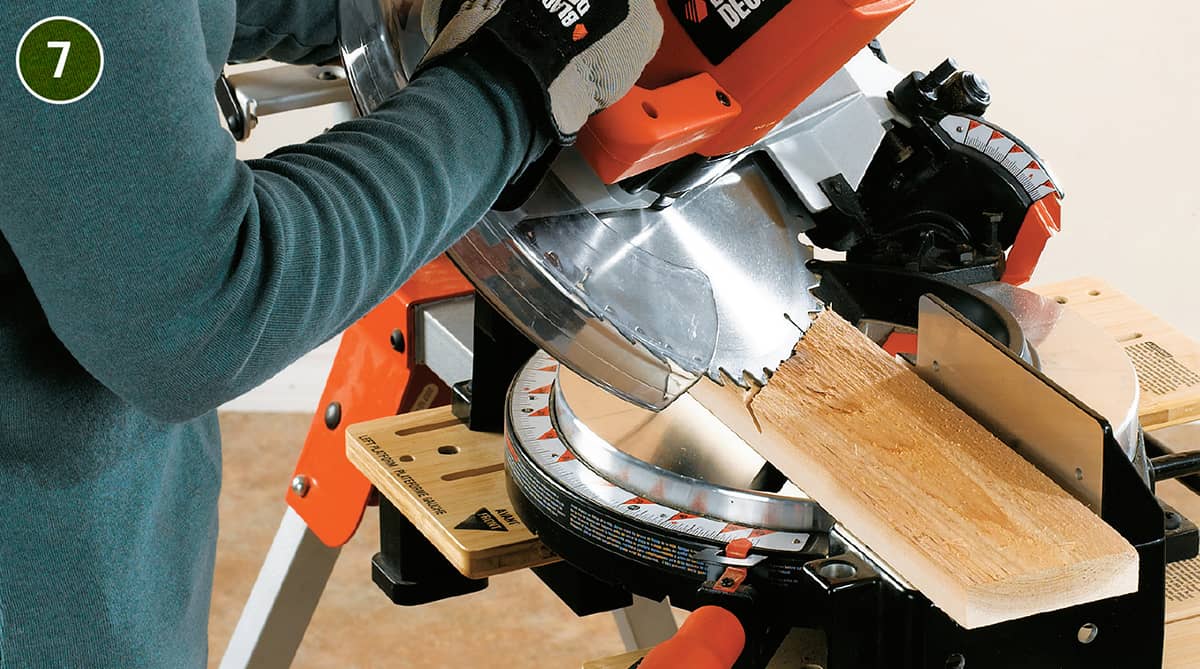
Assemble the canopy glazing framework using 1/2" PVC pipe. Cut all the ribs 37" long. You can cut these easily with a miter saw, hacksaw, or jigsaw.
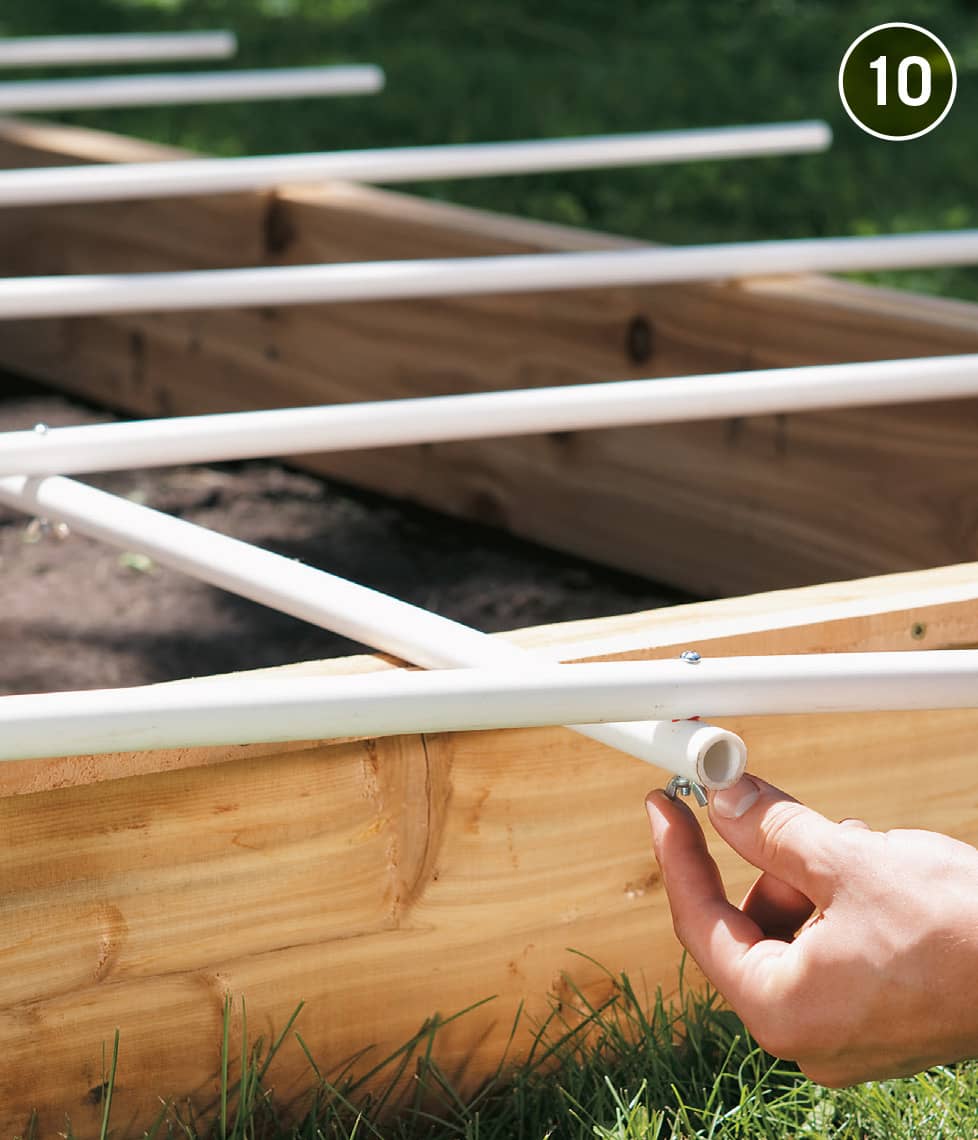
Use 2" deck screws as receptors for the PVC pipes. Drive the screws in 1" from edge and 3/4" from the ends, angling the screws at about 35 to 45° toward the center. Leave about 3/4" of the screw exposed. Drive two additional screws in at 321/4" from each end.
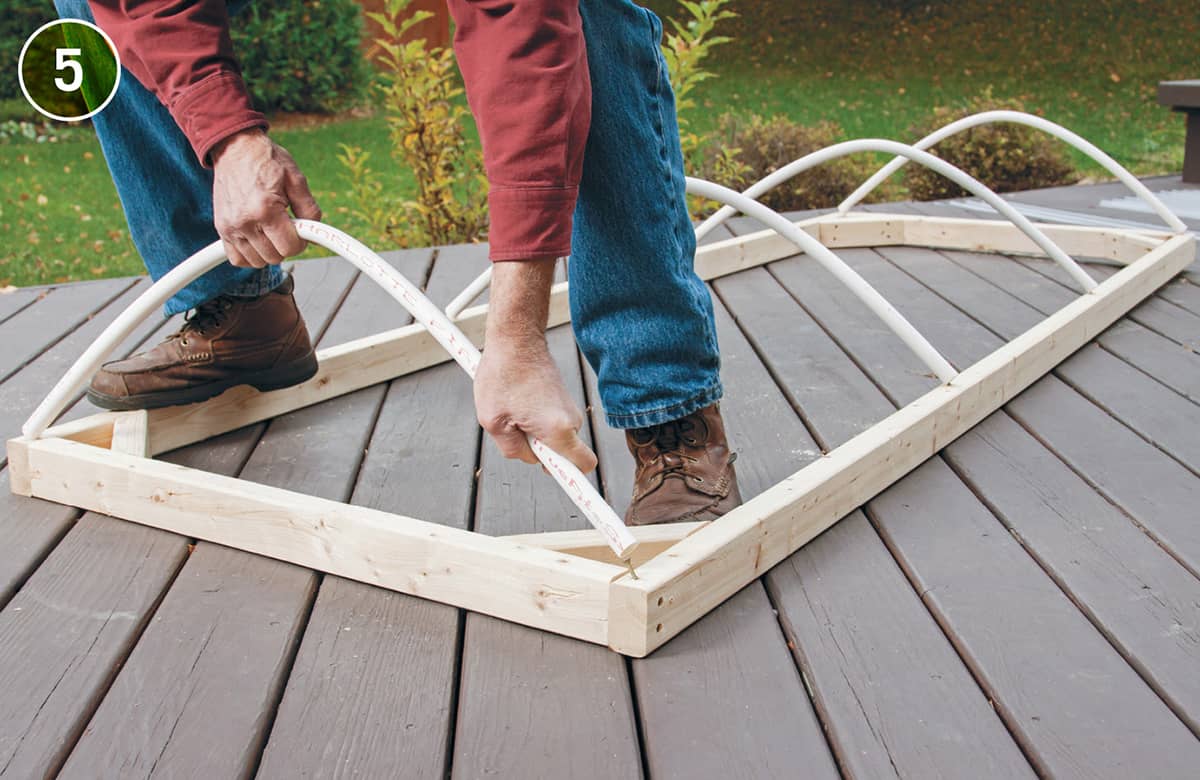
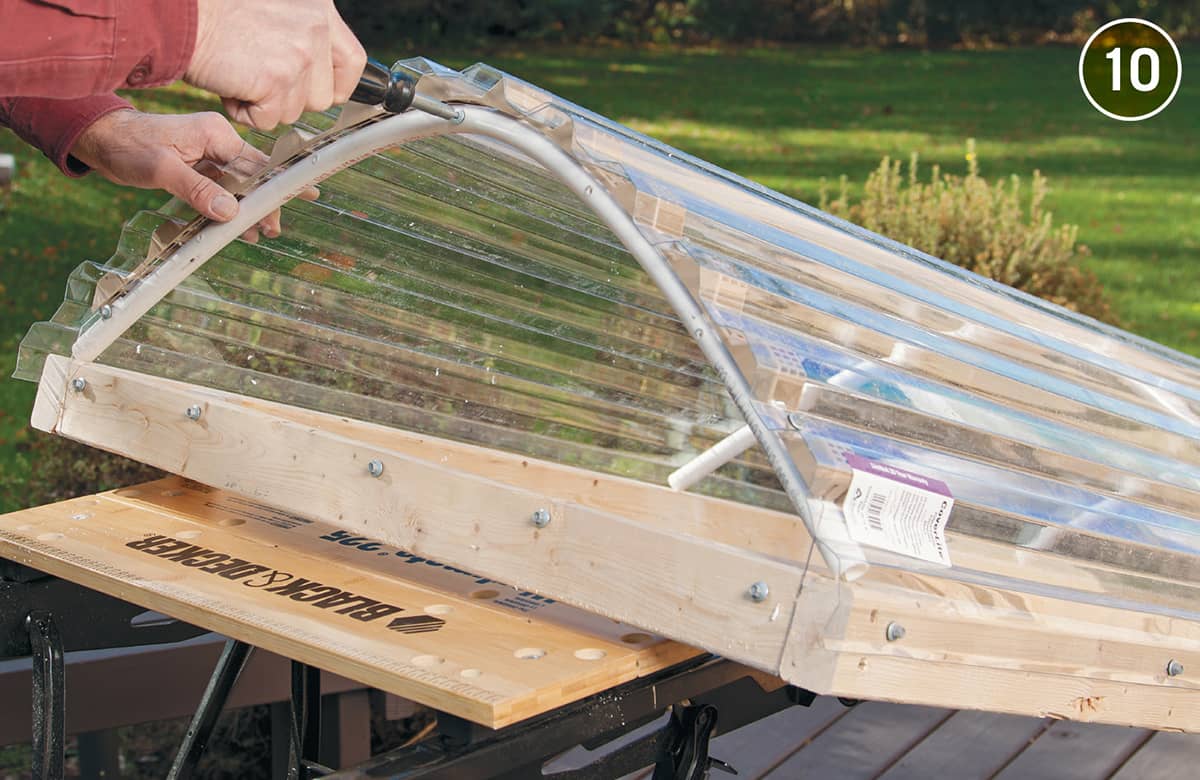
Install the PVC ribs by putting one end over the 2" screw, then curving the PVC until the other end fits over the opposite screw. Take your time with this, and use a helper if you need.
NOTE: Hopefully you’ve remembered to buy the flexible PVC, not the Schedule 40 type used for indoor plumbing.
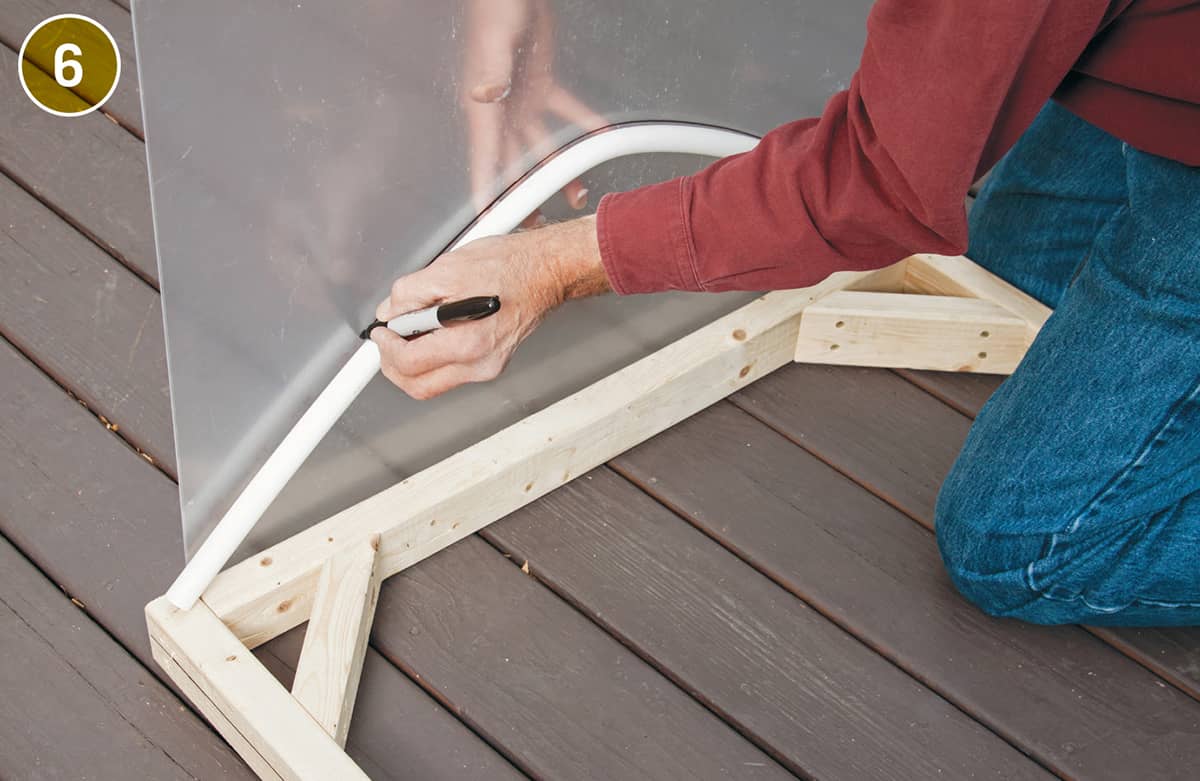
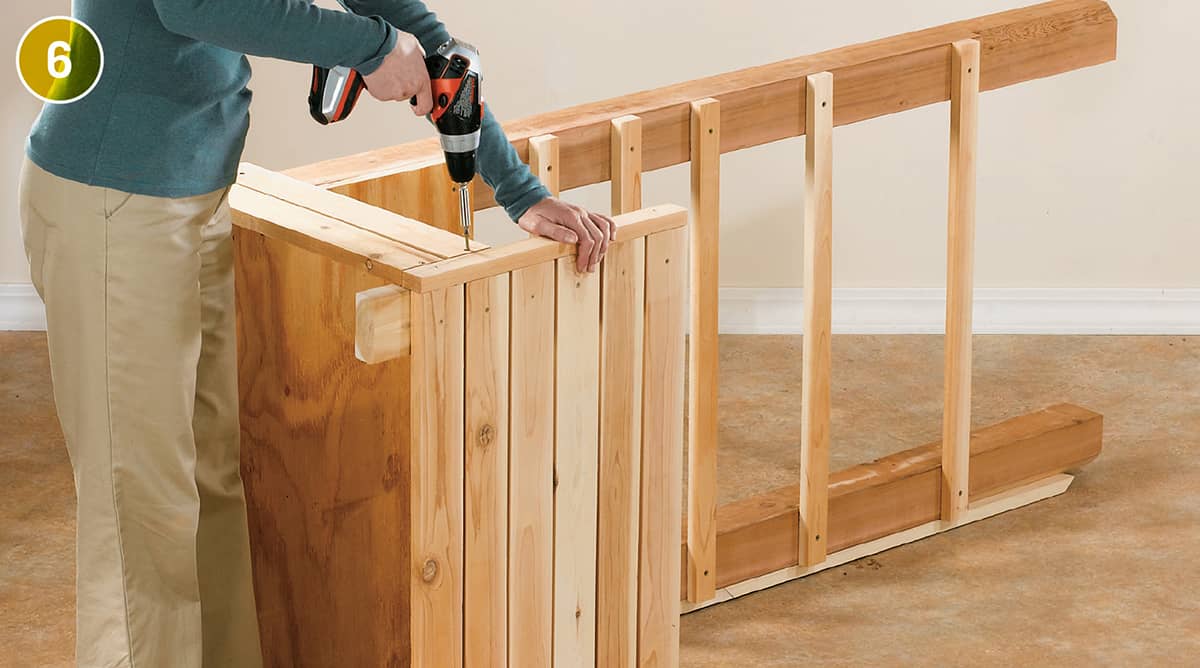
Hold up and mark a smooth piece of clear acrylic for the end panels. The clear acrylic should cover the 2 × 3 and follow the curving top of the PVC. Cut the clear acrylic with a plastic-cutting jigsaw blade.

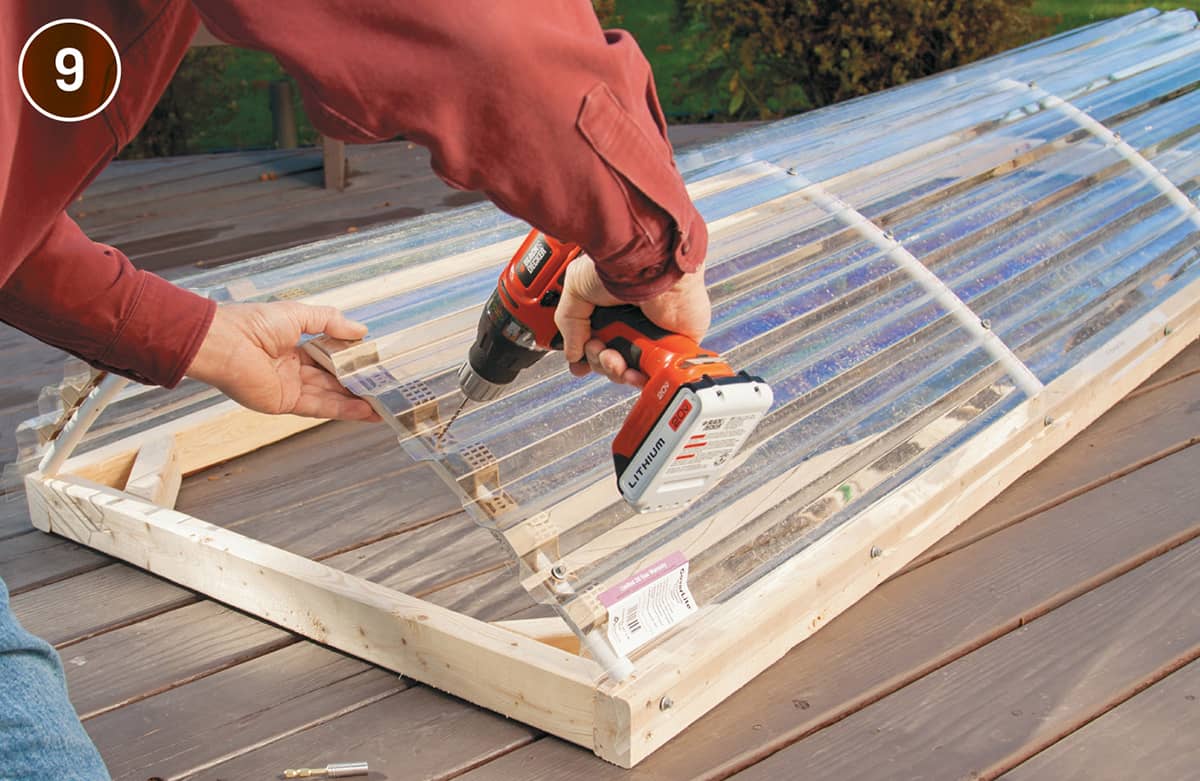
Drill 1/4" holes along the bottom of both panels about 5/8" up from the edge of the panel. Space the holes 21/2" from ends, then every 16". Also mark and drill rib locations on the roof panels about 6" up from bottom, spacing the holes at 15/8" and 331/4" from each end. Install the panels 11/2" up from the bottom of the 2 × 3 with the roofing screws. The ends of the panels should extend 1" beyond the 2 × 3s.
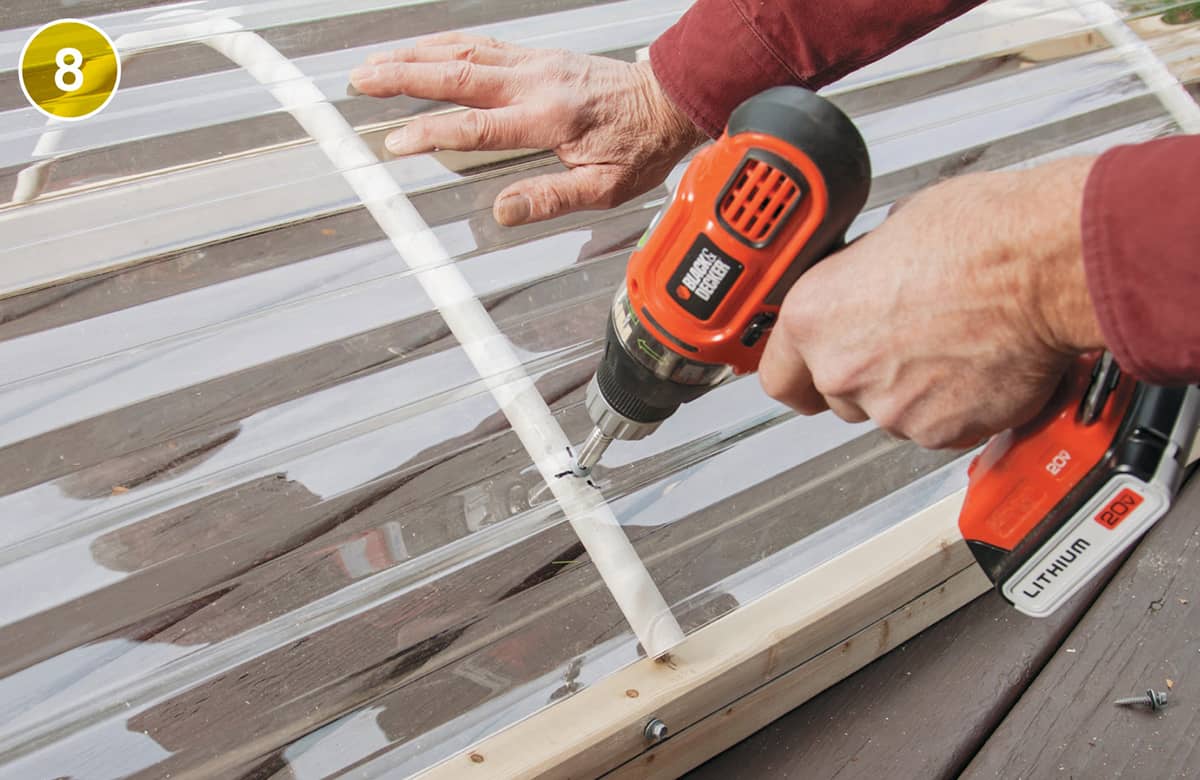
Adjust the PVC ribs until the predrilled holes in the roof panels are centered on them, then predrill the PVC with a 1/8" bit. Fasten the panels to the two center ribs.
Lap the second sheet over the first, leaving roughly the same amount of panel hanging over the 2 × 3. Fasten the second sheet the same way as the first. Insert filler strips at each end under the polycarbonate, then drill through those into the PVC ribs. Now add additional screws about every 1/6". You can just predrill the holes with the 1/8" bit (the polycarbonate panels are soft enough that the screws will drive through them without cracking).
Set the clear acrylic end panels in place, butting them against the filler at the top. Mark screw locations. Place the panel on a piece of plywood and predrill with a 1/4" diameter bit to avoid cracking the clear acrylic, which isn’t as soft or flexible as the polycarbonate. Screw the panels in place with roofing screws, hand-tightening with a screwdriver to avoid cracking the clear acrylic. Don’t overtighten.
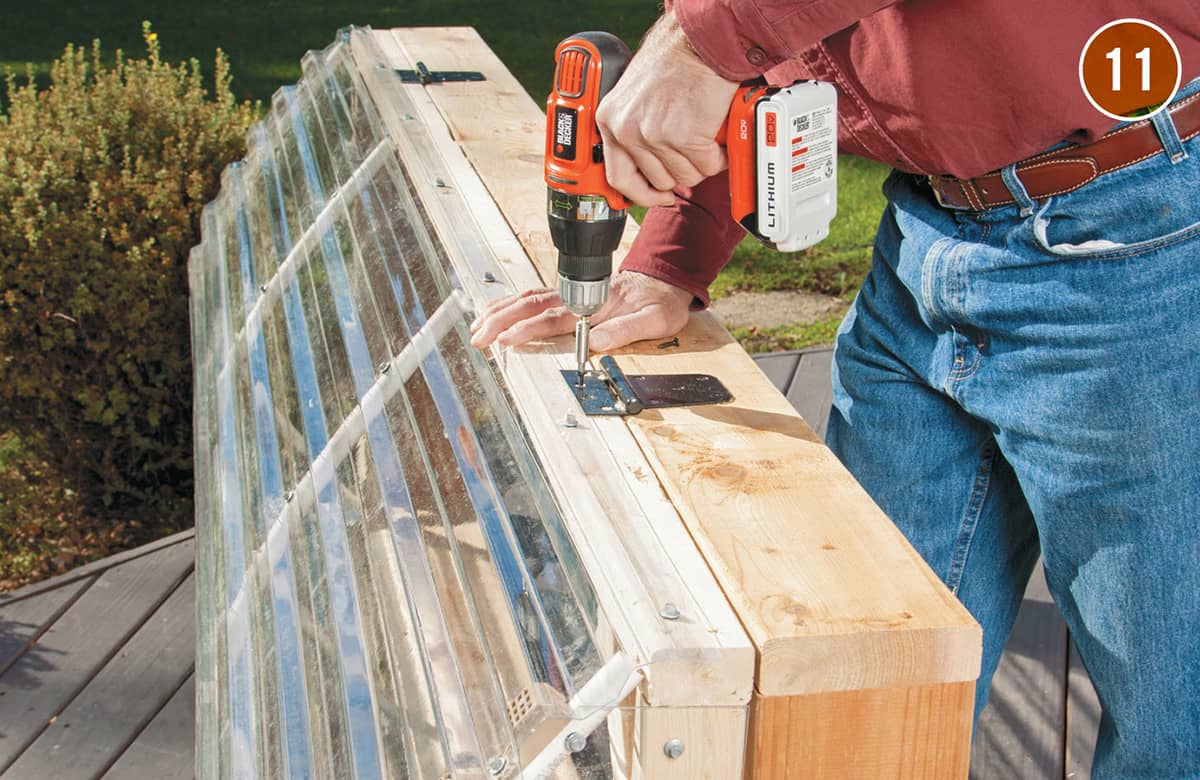
Mount the canopy to the cold frame base with two exterior hinges. The canopy frame should fit flush over the base on all sides. Screw in two hook-and-eye latches in front.
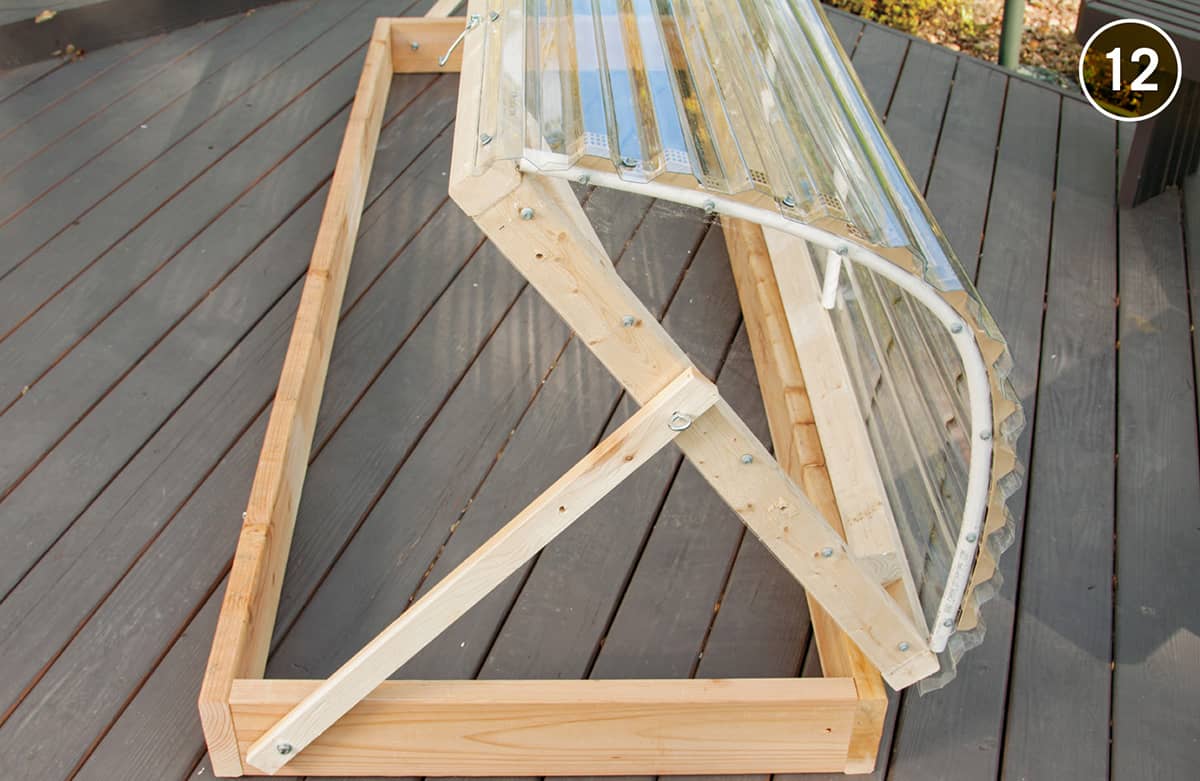
Attach a prop stick to each side with a stainless-steel bolt and nut. Insert three washers (or more) between the prop stick and the 2 × 6 base so the prop stick clears the clear acrylic side panel. Drill a few additional 5/16" holes in the stick and the frame for the eyebolts, so you can prop the canopy open at different heights. Now, prepare the ground and place the cold frame in the desired location. Anchor the base to the ground using 16" treated stakes or heavy-duty metal angles driven into the ground and secured to the frame.
Raised Planting Bed
If you live on a rural homestead with ample acreage, siting your gardens usually comes down to choosing among many good options. But if you live in a home with a smaller lot, your foray into gardening will take more planning. It will require you to make extremely efficient use of your gardening space to achieve the volume of produce you want. In many cases, this challenge is addressed by sowing your plants in raised garden beds.
Raised garden beds offer several advantages over planting at ground level. When segregated, soil can be amended in a more targeted way to support high density plantings. Also, in raised garden beds, soil doesn’t suffer compaction under foot traffic or machinery, so plant roots are free to spread and breathe more easily. Vegetables and flowers planted at high densities in raised beds are placed far enough apart to avoid overcrowding but close enough to shade and choke out weeds. In raised beds, you can also water plants easily with soaker hoses, which deliver water to soil and roots rather than spraying leaves and inviting disease.
Raised garden beds can easily be customized to fit the space you have available. Just make sure you can reach the center easily. If you can only access your raised bed from one side, it’s best to build it no wider than 3 feet. Beds that you can access from both sides can be as wide as 6 feet, as long as you can reach the center. You can build your raised bed as long as you’d like.
TIP: For low-growing plants, position the bed with a north-south orientation, so both sides of the bed will be exposed to direct sunlight. For taller plants, position the bed east-west.
Raised garden beds are easy to weed, simple to water, and the soil quality is easier to control, ensuring that your vegetable plants yield bountiful fresh produce. Your garden beds can be built at any height up to waist-level. It’s best not to build them much taller than that, however, to make sure you can reach the center of your bed.
How to Build a Raised Planting Bed with Timbers
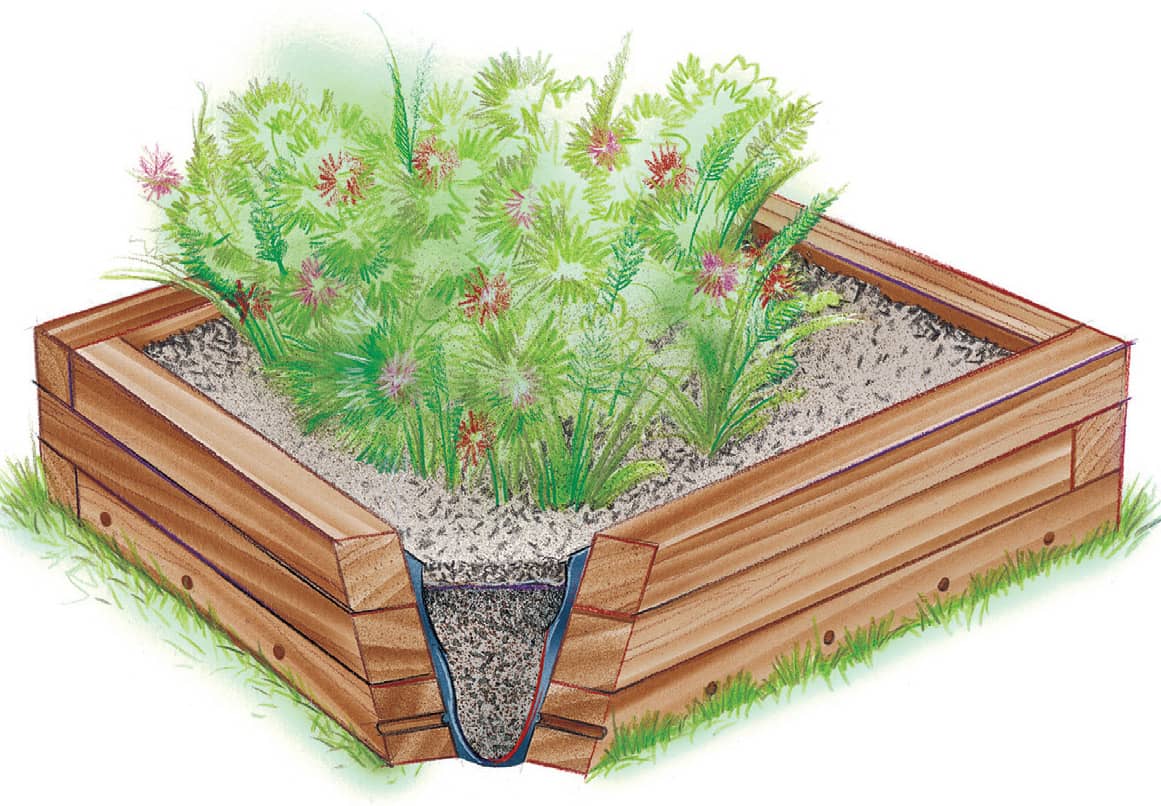
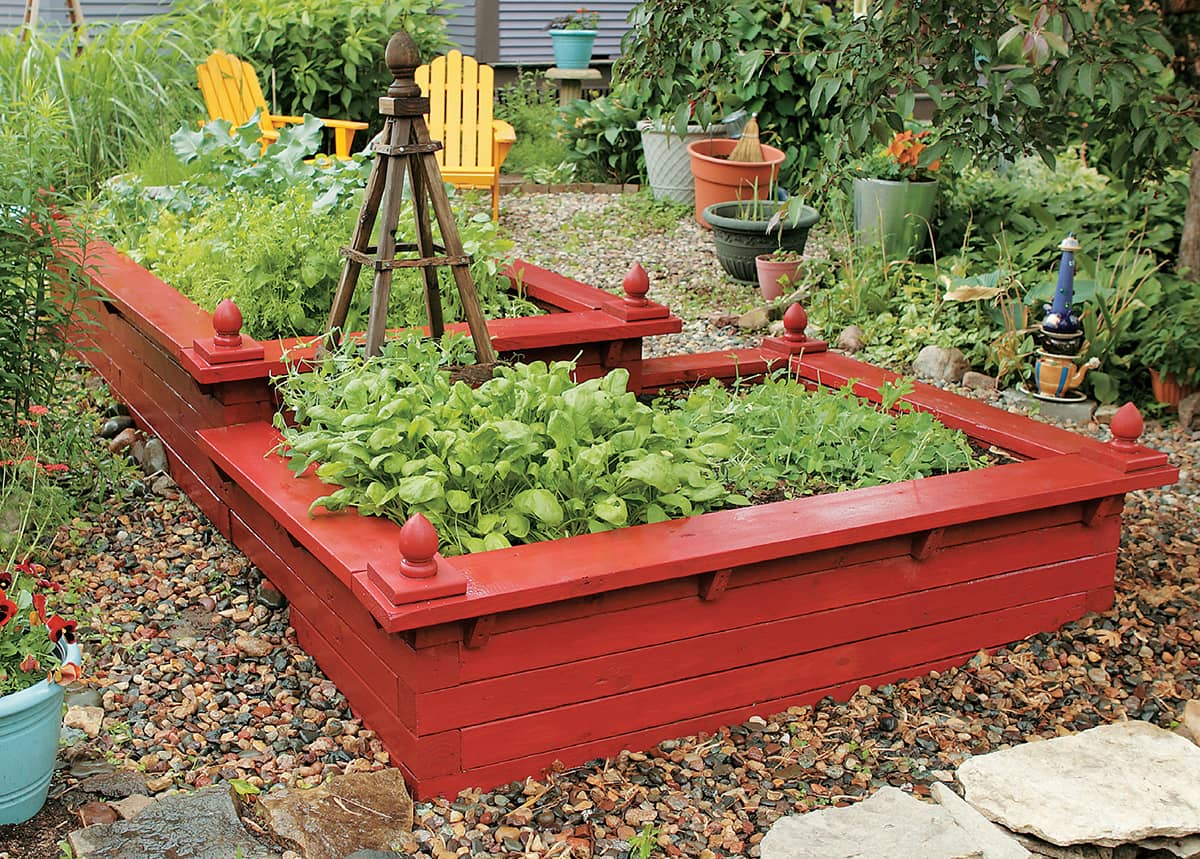
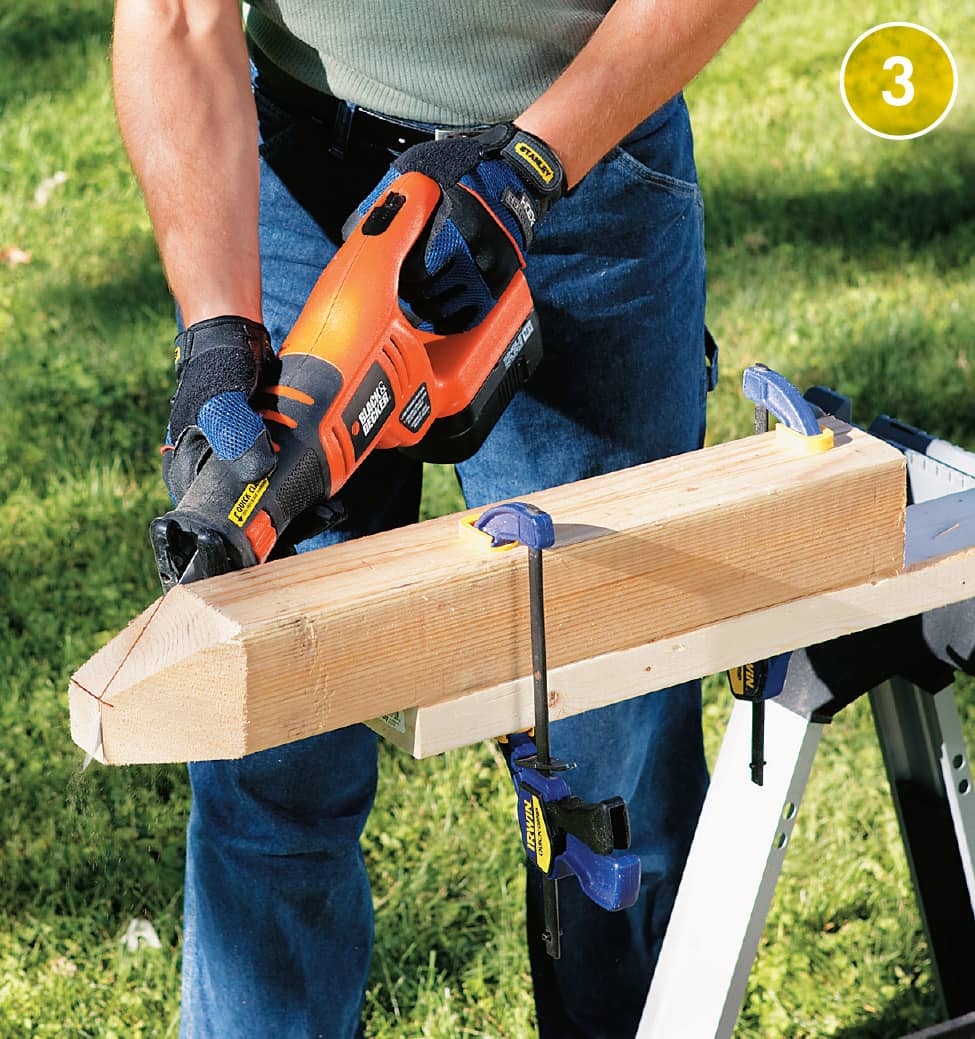
This basic but very sturdy raised bed is made with 4 × 4 landscape timbers stacked with their ends staggered in classic log-cabin style. The corners are pinned together with 6" galvanized spikes (or, you can use timber screws). It is lined with landscape fabric and includes several weep holes in the bottom course for drainage. Consider adding a 2 × 8 ledge on the top row (see here). Corner finials improve the appearance and provide hose guides to protect the plants in the bed.

Outline a 3 × 5' area with stakes and mason’s string. Remove all grass inside the area, then dig a 2"-deep × 6"-wide trench along the inside perimeter of the outline. Cut each of the four timbers into one 54" piece and one 30" piece, using a reciprocating saw or circular saw.
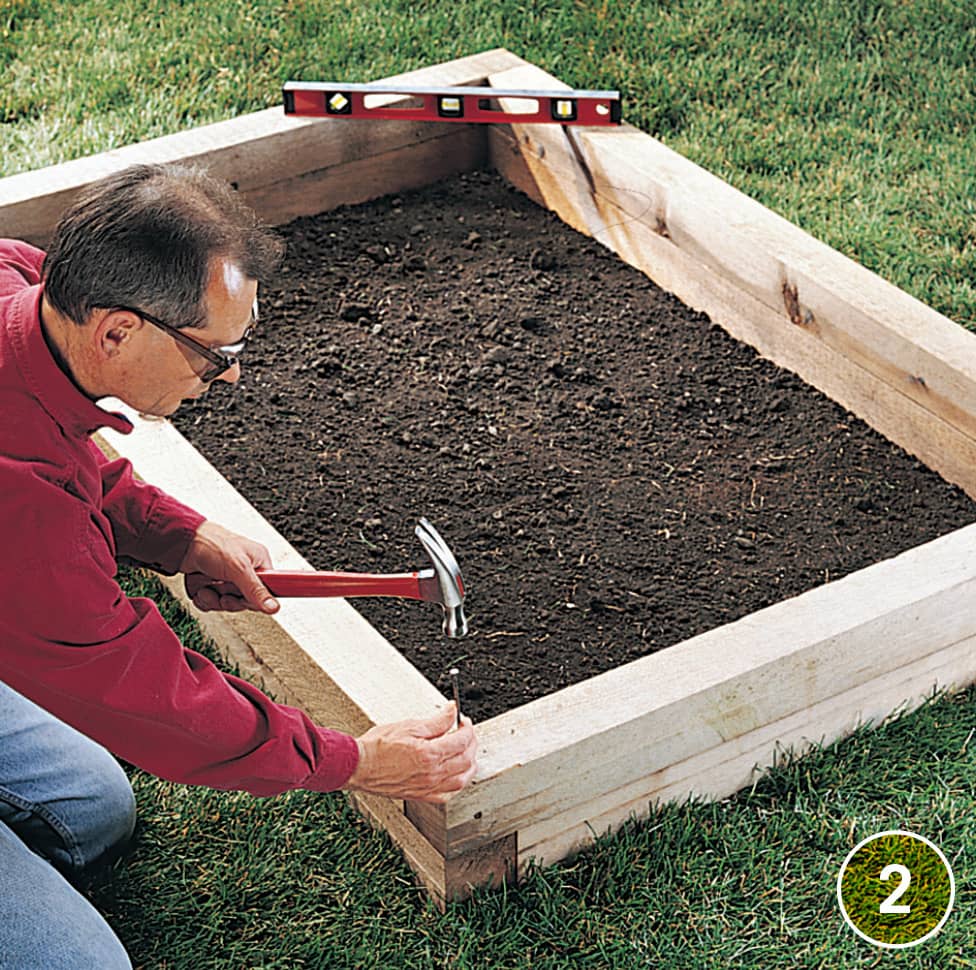
Set the first course of timbers in the trench. Check the timbers for level along their lengths and at the corners, adding or removing soil to adjust, as needed. Position the second course on top of the first, staggering the corner joints with those in the first course. Fasten the courses together at each corner with pairs of 6" nails driven through 3/16" pilot holes.
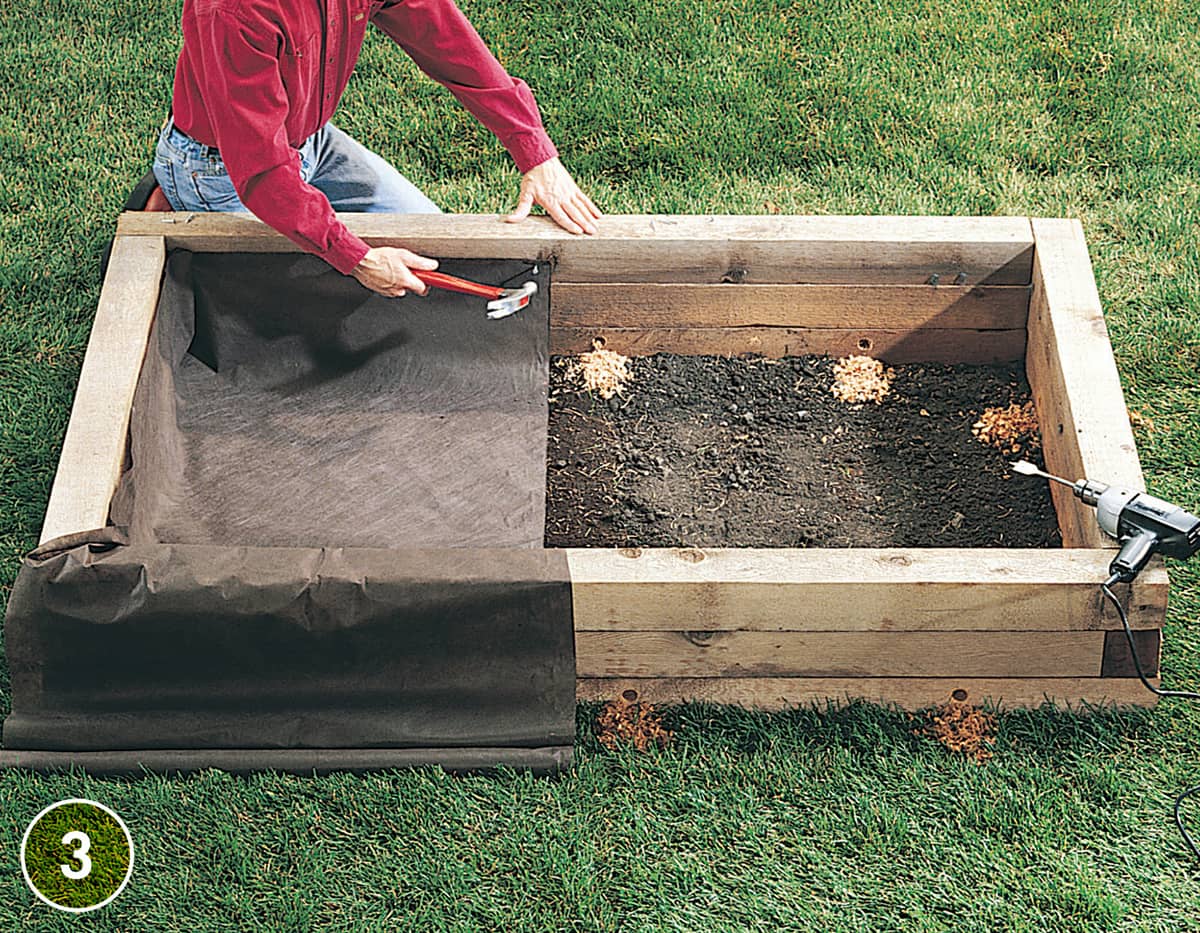
Line the bed with landscape fabric to contain the soil and help keep weeds out of the bed. Tack the fabric to the lower part of the top course with roofing nails. Some gardeners recommend drilling 1"-diameter weep holes in the bottom timber course at 2' intervals. Fill with a blend of soil, peat moss and fertilizer (if desired) to within 2 or 3" of the top.
Variation: How to Build a Raised Planting Bed with a Kit
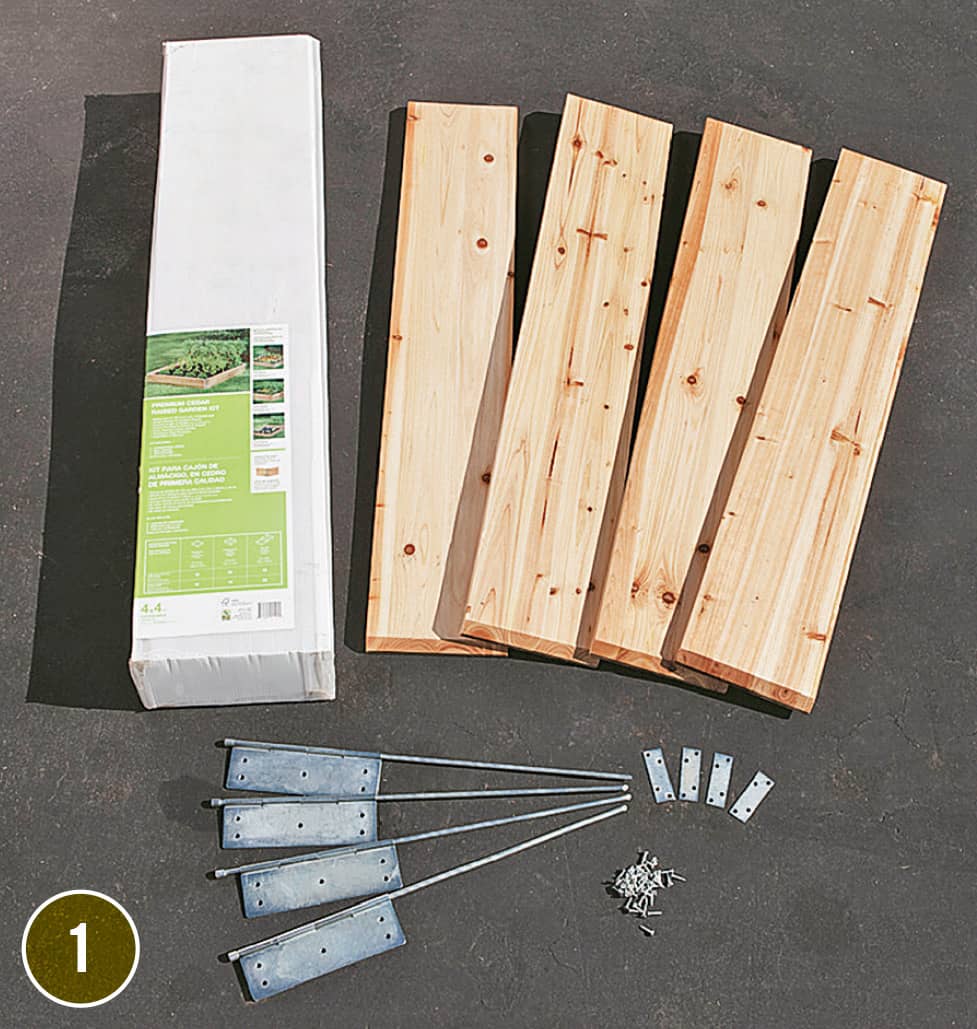
Raised garden bed kits come in many styles. Some have modular plastic or composite panels that fit together with grooves or with hardware. Others feature wood panels and metal corner hardware. Most kits can be stacked to increase bed height.
On a flat surface, assemble the panels and corner brackets (or hinge brackets) using the included hardware. Follow the kit instructions, making sure all corners are square.
Set the box down, experimenting with exact positioning until you find just the spot and angle you like. Be sure to observe the sun over an entire day when choosing the sunniest spot you can for growing vegetables. Cut around the edges of the planting bed box with a square-nose spade, move the box and then slice off the sod in the bed area.

Set the bed box onto the installation site and check it for level. Add or remove soil as needed until it is level. Stake the box to the ground with the provided hardware. Add additional box kits on top of or next to the first box. Follow the manufacturer’s suggestion for connecting the modular units. Line the bed or beds with landscape fabric and fill with soil to within 2" or so of the top box.
Raised Planting Bed & Cover
Raised planting beds solve a number of gardening challenges. A raised bed is much like a container garden in that it offers total control over the soil content and quality, without the worry of compaction from walking through the garden. Containment of the soil also prevents erosion, helps with weed encroachment, and improves water drainage. For many urban gardeners, a raised bed is the best—and often only—way to grow vegetables and other crop plants in tight spaces.
Another advantage of a raised bed is that the frame around the bed provides a structure for adding covers to protect plants from cold, wind, and snow, or to erect netting to keep out pests. The simple cover frame shown here is much like a hoophouse structure used by farmers to shelter rows of crops on a temporary basis. Ours is made with PVC pipe and is easy to disassemble for storage at the end of the season. The lightweight frame is perfect for a canopy of plastic sheeting (for warmth in colder weather), spun fleece (for insect protection), or deer netting (to deter deer or any other hungry critters).
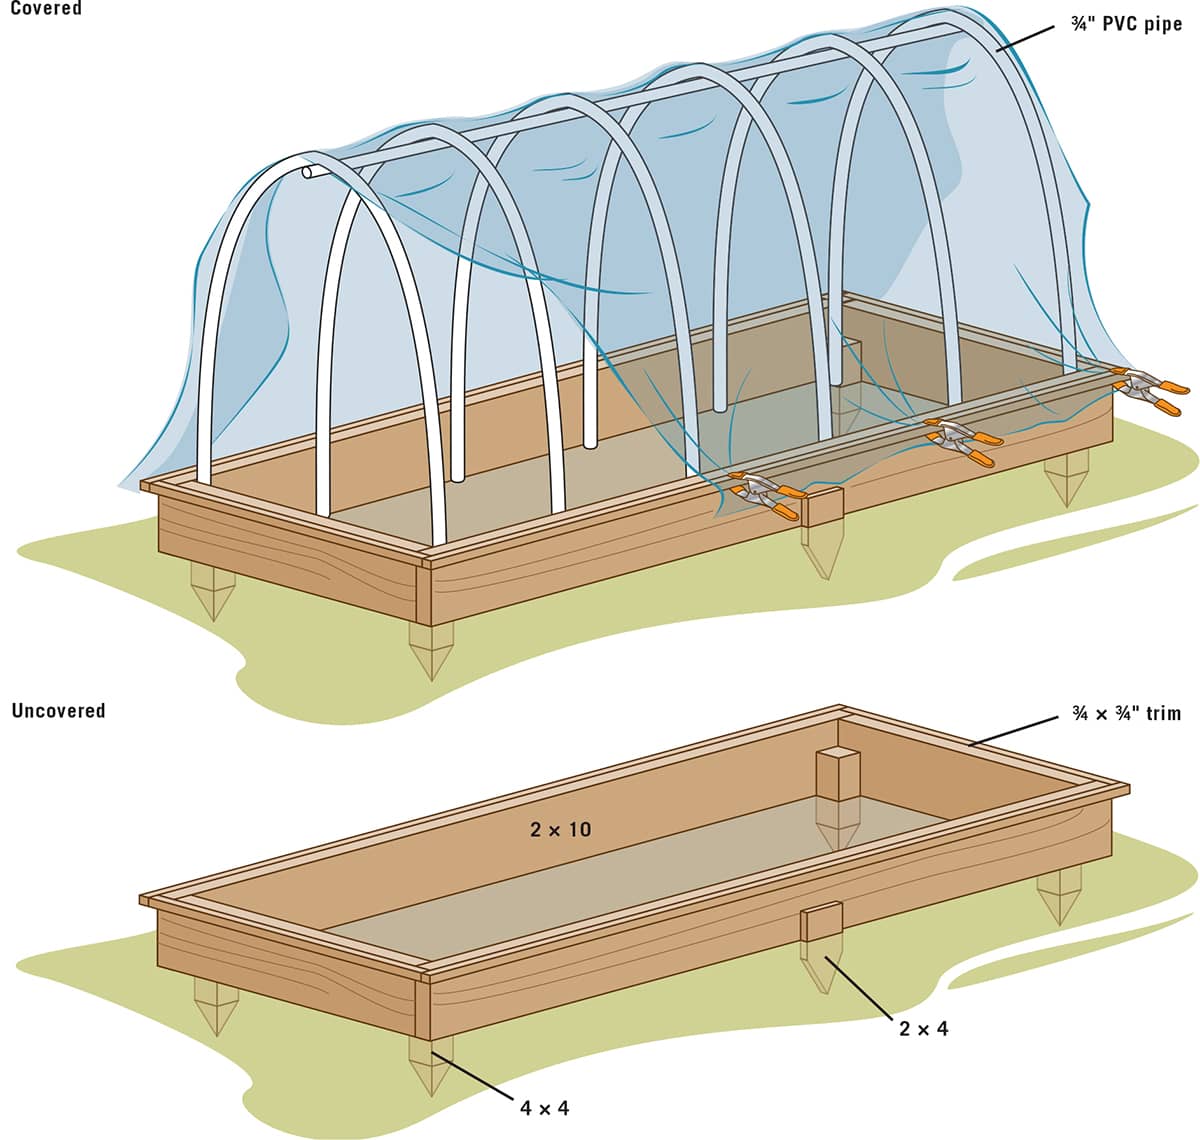
The raised bed frame is made with a single course of 2 × 10 lumber. You can use smaller lumber for a shallower bed, or go higher with more courses and taller corner posts. Unless your bed will be used strictly for ornamental plants (not food), don’t use pressure-treated lumber, due to the risk of chemical contamination. Instead, choose a naturally decay-resistant species such as all-heart redwood, cedar, cypress, or Douglas fir.
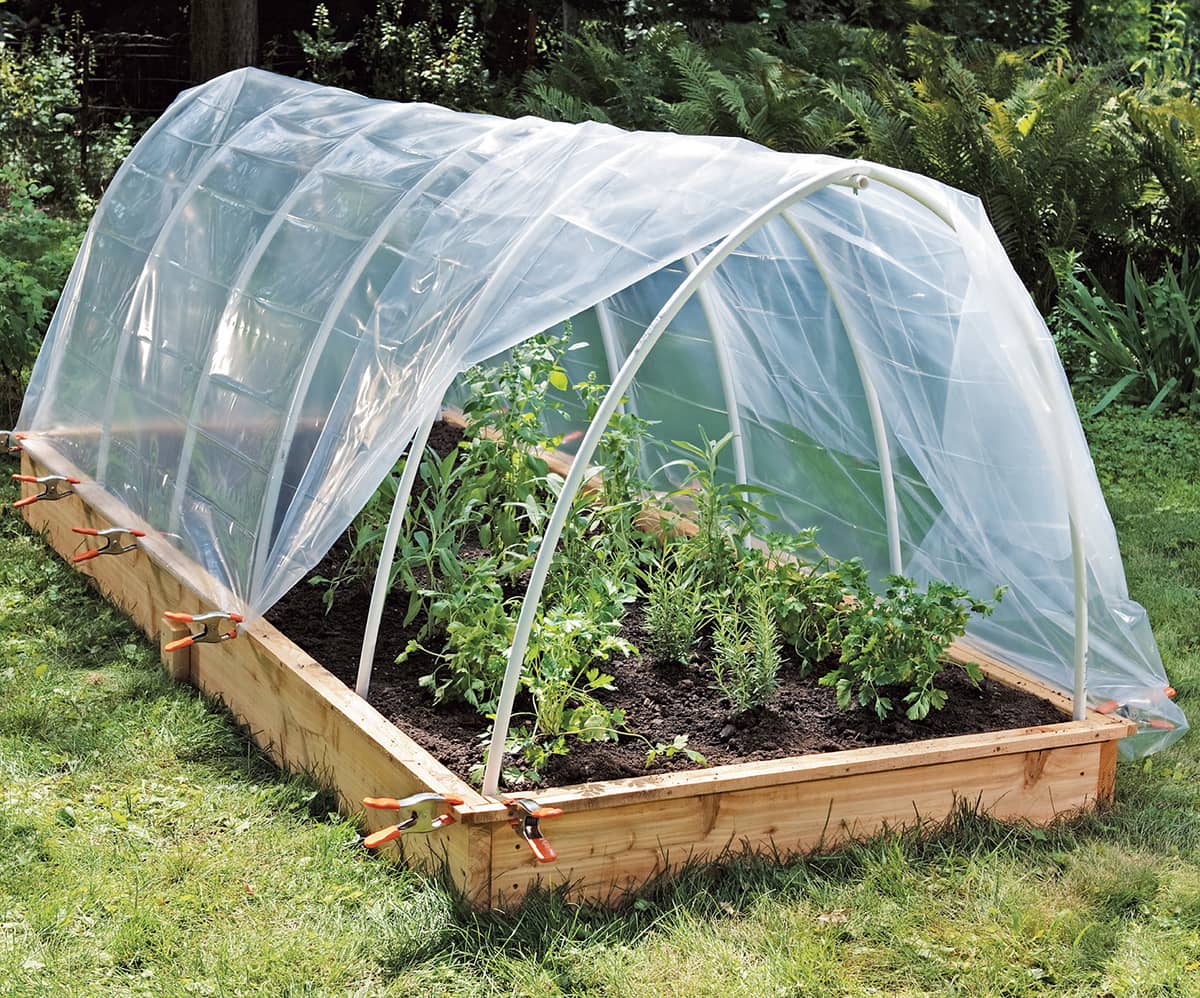
Filled with carefully prepared soil, a raised bed offers high yields in a relatively small space. This simple, inexpensive bed design includes wood cleats installed along its top edges—a handy feature for clamping down covers of all types.
RAISED PLANTING BED & COVER
TOOLS & MATERIALS
Tape measure
Hammer
Circular saw
Square or straightedge
Drill and countersink bit and 3/16" twist bit
Reciprocating saw or handsaw
Hand sledge
Level
Permanent marker
Hacksaw or pipe cutter
Eye and ear protection
Work gloves
(2) 10' 2 × 10
(1) 8' 2 × 10
Deck screws (31/2", 11/4")
(1) 8' 4 × 4
(1) 8' 2 × 4
(1) 8' 1 × 4
(7) 3/4"-dia. × 10' PVC pipe
(6) 11/2" #8 stainless-steel machine bolts and wing nuts
Cover material (8 × 14')
(12) spring clamps
How to Build a Raised Bed & Cover

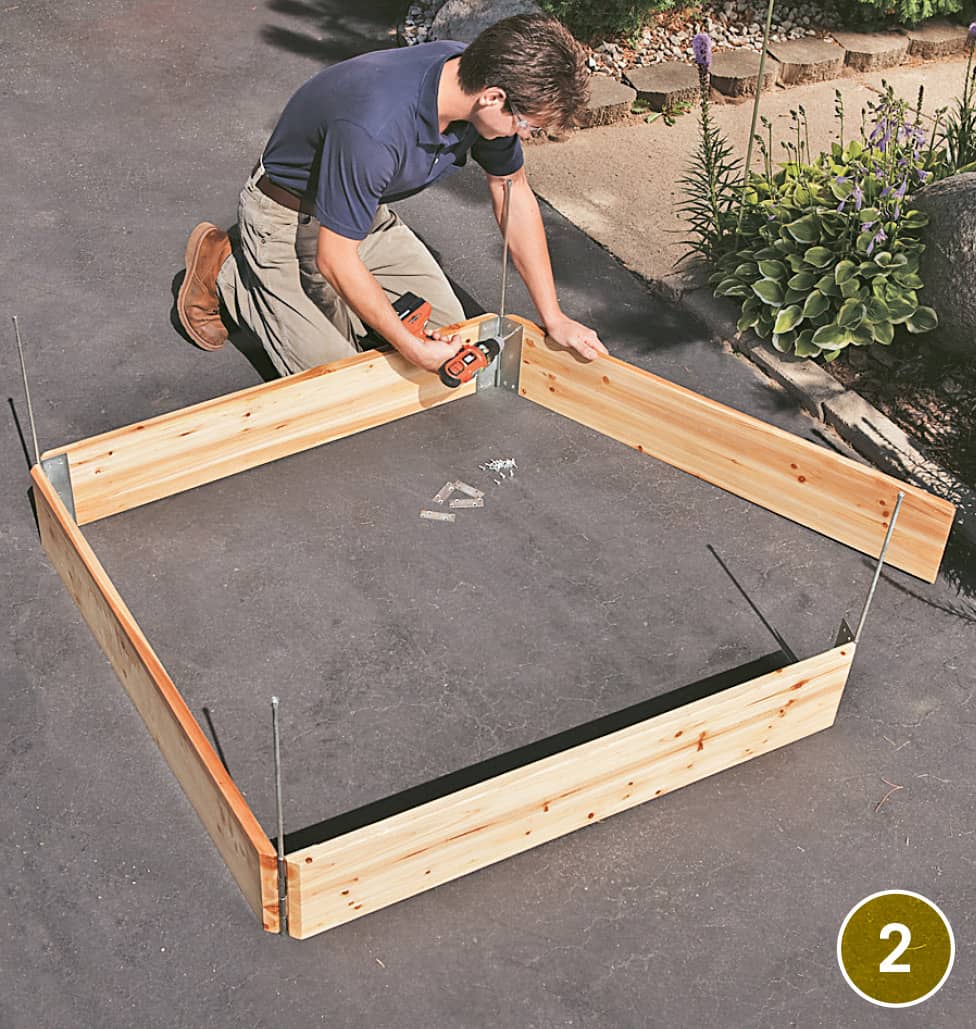
Cut the two frame ends to length (45") from an 8' 2 × 10, using a circular saw and a square or straightedge to ensure straight cuts. For the frame side pieces, trim the ends of the 10' 2 × 10s, if necessary, so they are square and measure 120".

Assemble the frame by setting the sides over the ends of the end pieces so they are flush at the top and outside edges. Drill three evenly spaced pilot holes through the sides and into the end pieces and fasten the parts with 31/2" deck screws.
Create the corner posts by cutting the 8' 4 × 4 into four pieces roughly 24" each. Trim the ends of each post to a point, using a reciprocating saw or handsaw.
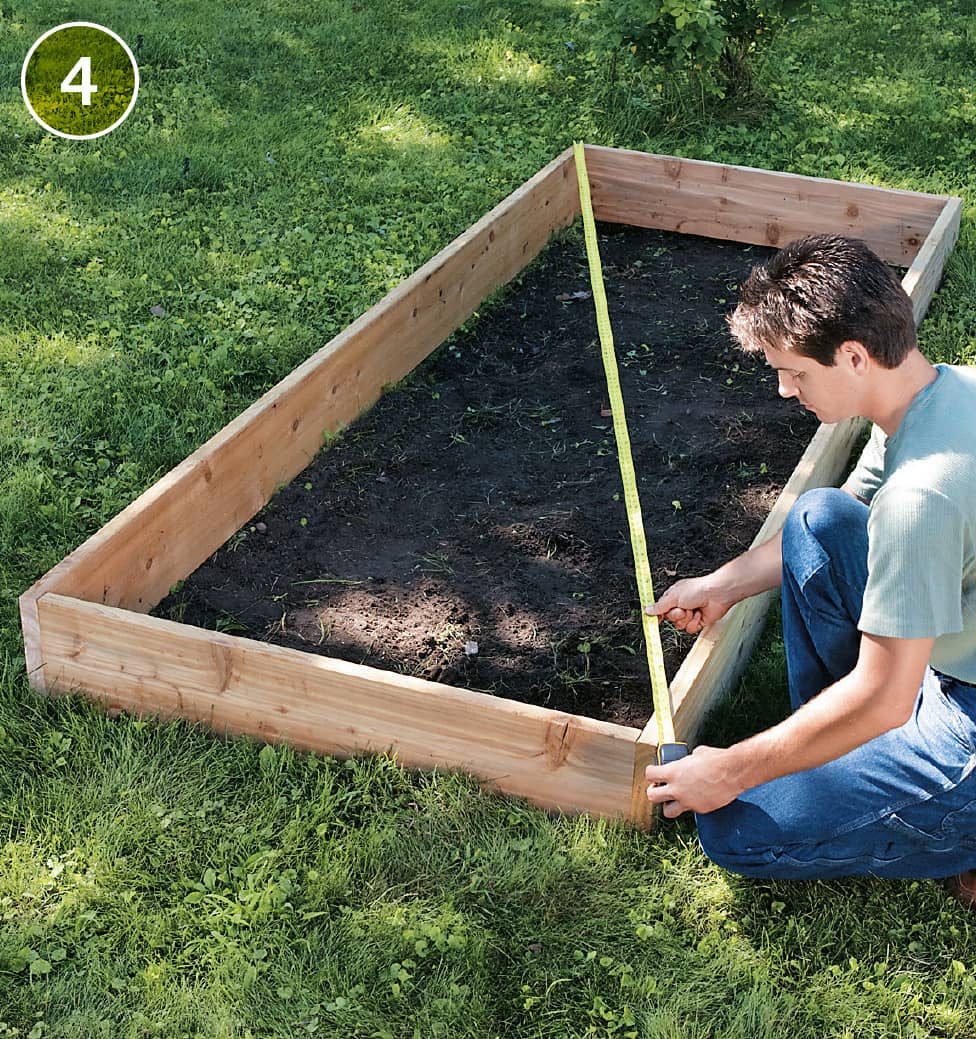
Set the bed frame into place, then measure diagonally between opposing corners to check for square: the frame is square when the measurements are equal.
TIP: For general soil preparation, turn over the soil beneath the bed and add compost or manure, as desired, before setting down the frame.
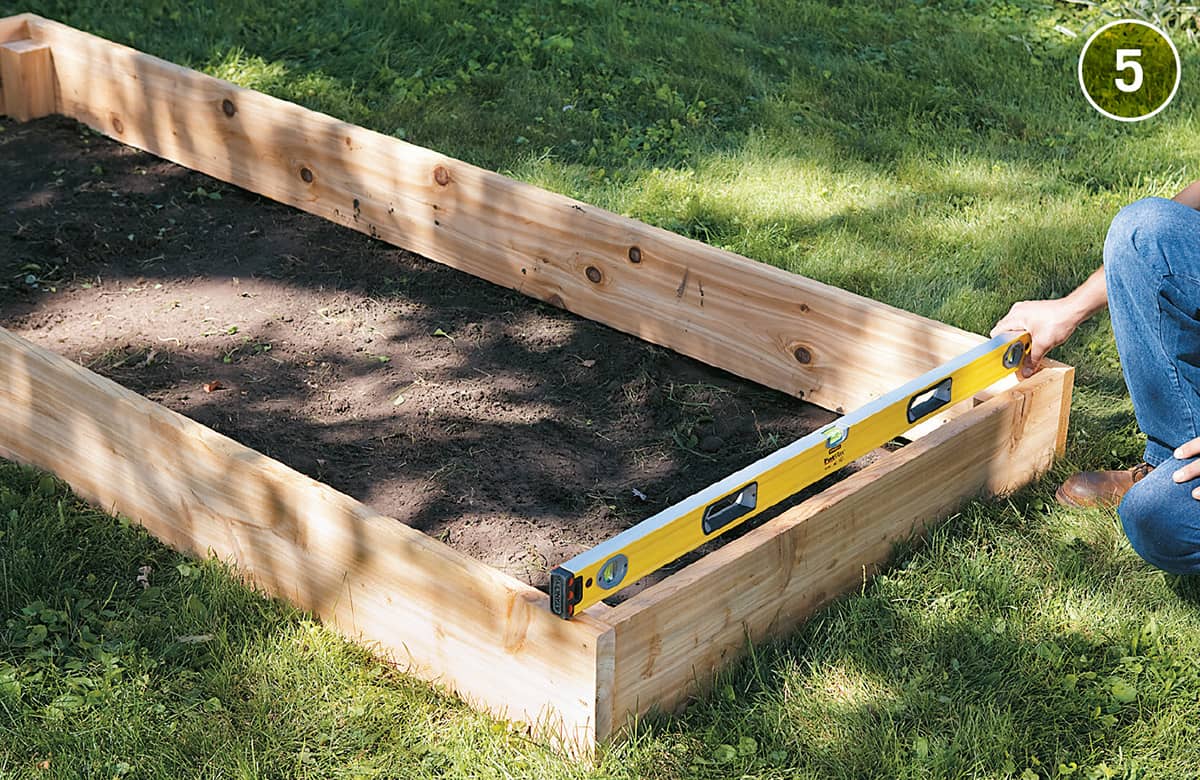
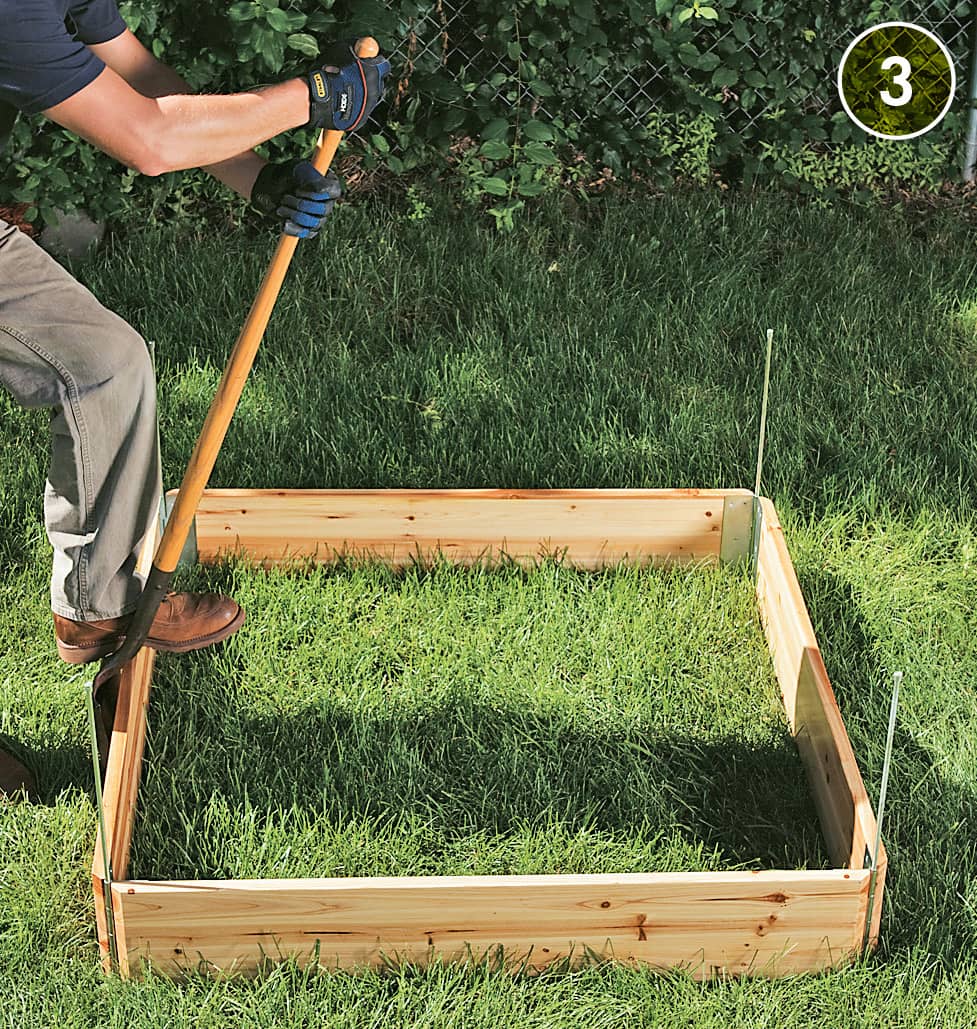
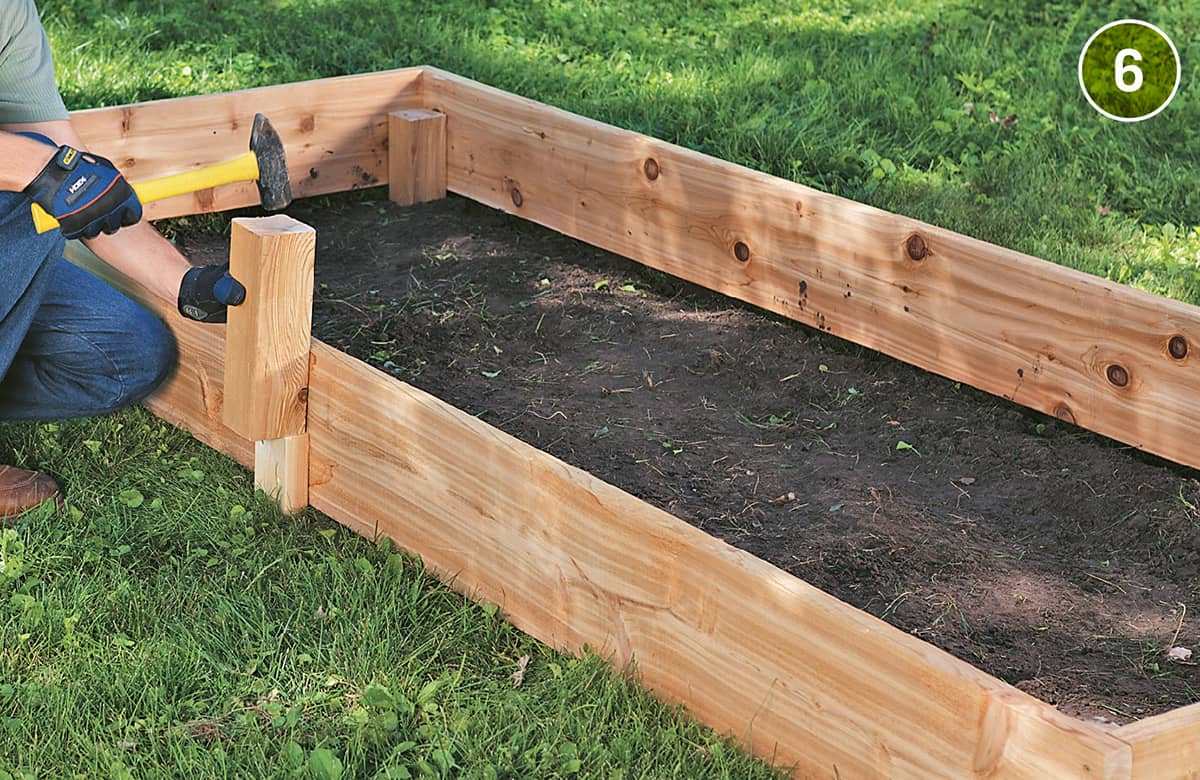
Drive a post at each corner inside the frame, using a hand sledge and a wood block to prevent mushrooming the post top. Drive the posts until the tops are about 2" below the top of the bed frame. Check the frame for level, then drill pilot holes and fasten each side and end piece to a post with 31/2" deck screws.
Add a 2 × 4 stake at the midpoint of each frame side, to help keep the lumber from bowing out over time. Cut the stake to a point and drive it down below the top edge of the frame. Tack the stake to the frame with a couple of screws.
Install the cleats: Rip a 1 × 4 into four 3/4"-wide strips, using a circular saw or table saw (it’s okay if the last strip isn’t exactly 3/4"). Fasten the strips along the perimeter of the bed frame, flush with the top edges, using 11/4" deck screws driven through pilot holes. Cut the strips to length as needed to complete each run. Fill the bed with soil and compost, as desired.

Mark and drill the ridge pole for the cover frame, using one of the 10' PVC pipes. Make a mark 1" from each end, then mark every 24" in between. The marks should form a straight line down the length of the pipe. At each mark, drill a 3/16"-diameter hole straight down through the pipe.
Prepare the cover frame ribs by cutting six 3/4"-diameter PVC pipes to length at 96", using a hacksaw or tubing cutter. Then, make a mark at the midpoint (48") of each rib, and drill a 3/16" hole straight through the pipe at each mark.
Assemble the cover frame, using 11/2" machine bolts and wing nuts. Fit a rib over the top of the ridge pole at each hole location. Insert the bolt through the rib and ridge and secure with a wing nut. The wing nuts allow for quick disassembly of the frame.
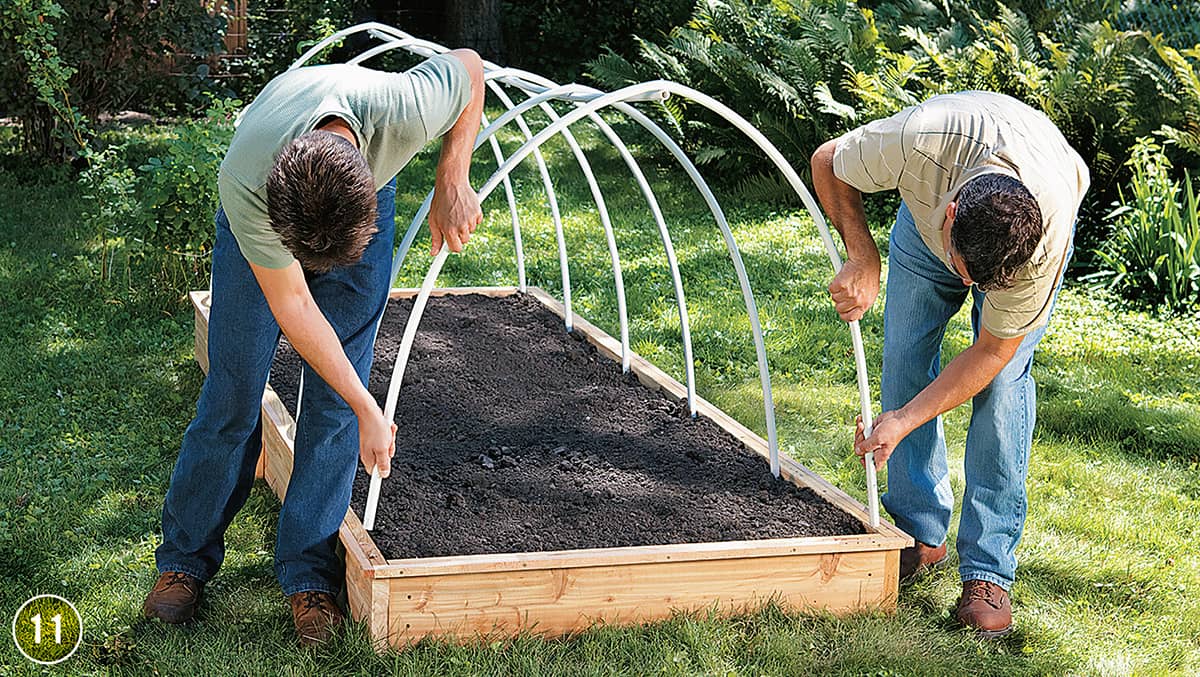
Install the cover frame into the bed by fitting one end of each rib against a frame side, inside the box area, and then bending the rib and fitting the other end inside the frame. It helps to have two people for this job, starting at one end of the frame and working down.
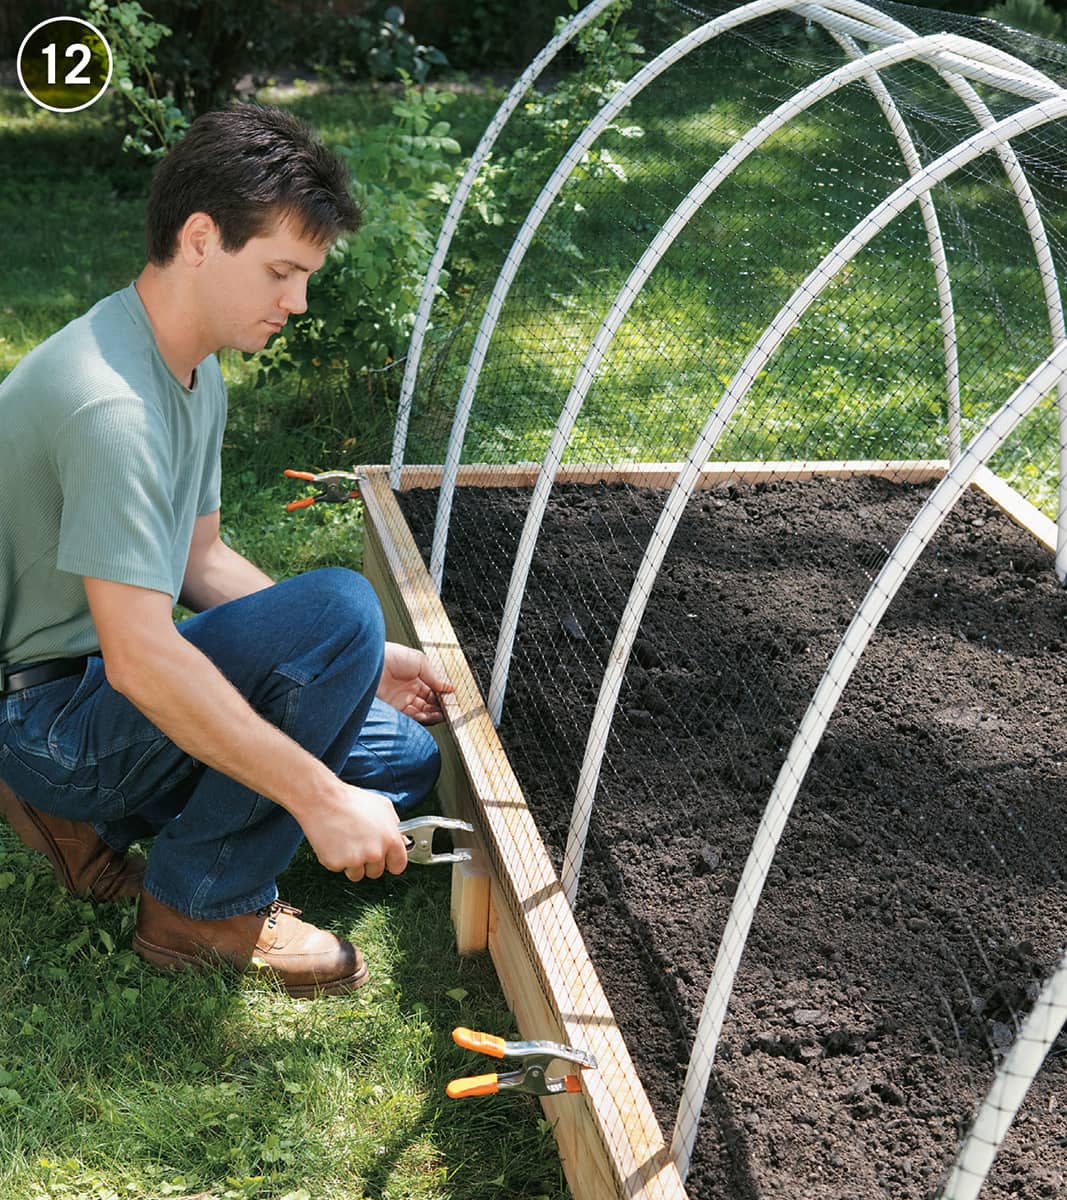
Add the cover material of your choice. Drape the cover over the cover frame, center it side-to-side and end-to-end, and secure it on all sides with clamps fitted over the cleats. To prevent overheating with plastic covers, you can roll up the cover at the ends and clamp it to the outside ribs.
Seed Starter Rack
A seed starter rack provides a spot for you to germinate seeds and grow seedlings indoors, any time of the year (in particular, immediately before the start of the outdoor growing season). Starting your own seeds can save money over buying established plants each growing season. And in many cases, it also lets you grow less-common varieties that might not be locally available in plant form. This accessory is particularly useful if you have a modest greenhouse without supplied heating, or live in a particularly cold area with long winters.
This simple starter rack is perfect for a basement or utility room. The basic structure is built with 2 × 4s and has shelves made from 1/2-inch plywood. Plants that need the warmest temperatures should go on the upper shelf.
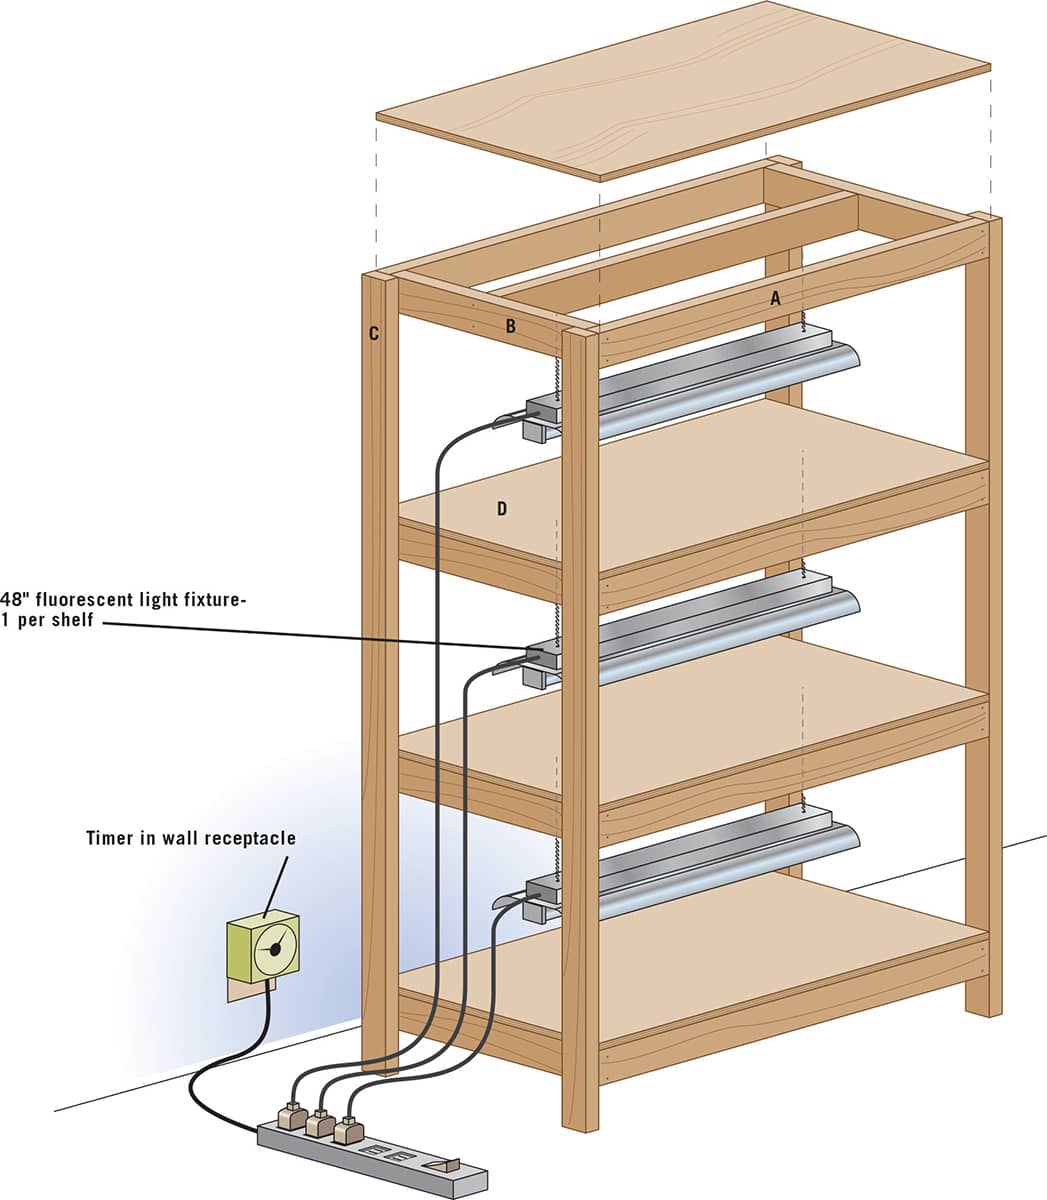
Each shelf of the rack measures 24 × 48 inches—plenty of room for four full-size seedling flats. Two fluorescent shop lights illuminate each shelf and are fully height-adjustable so you can raise or lower them as needed to provide plants with the right amounts of light and heat at different stages of development (See here for tips on choosing light bulbs for your fixtures). Because seeds and seedlings can require as much as 20 hours of light per day, it’s most convenient to control the lights with an automatic timer. This should be plugged into a GFCI-protected receptacle, due to all of the water used in the area. Even so, it’s best to remove flats before misting or watering, to keep water away from the lights.
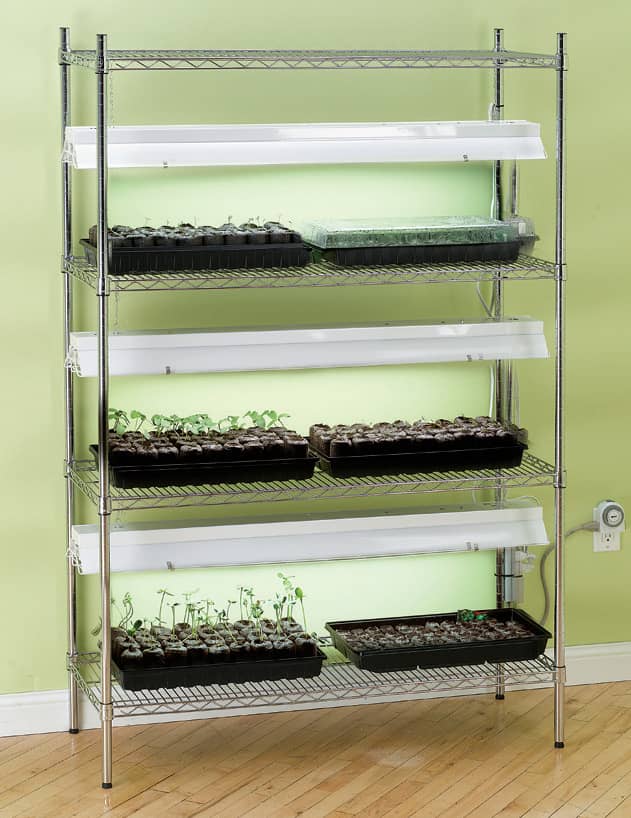
As with many projects in this book, you can easily modify the dimensions of the rack as shown to suit your specific needs. For a smaller unit, switch to 2-foot or 3-foot lights and resize the shelves accordingly, or make the shelves half as deep and use a single fixture for each. For a larger rack, you can make the shelves square and hang four 4-foot lights over each shelf.
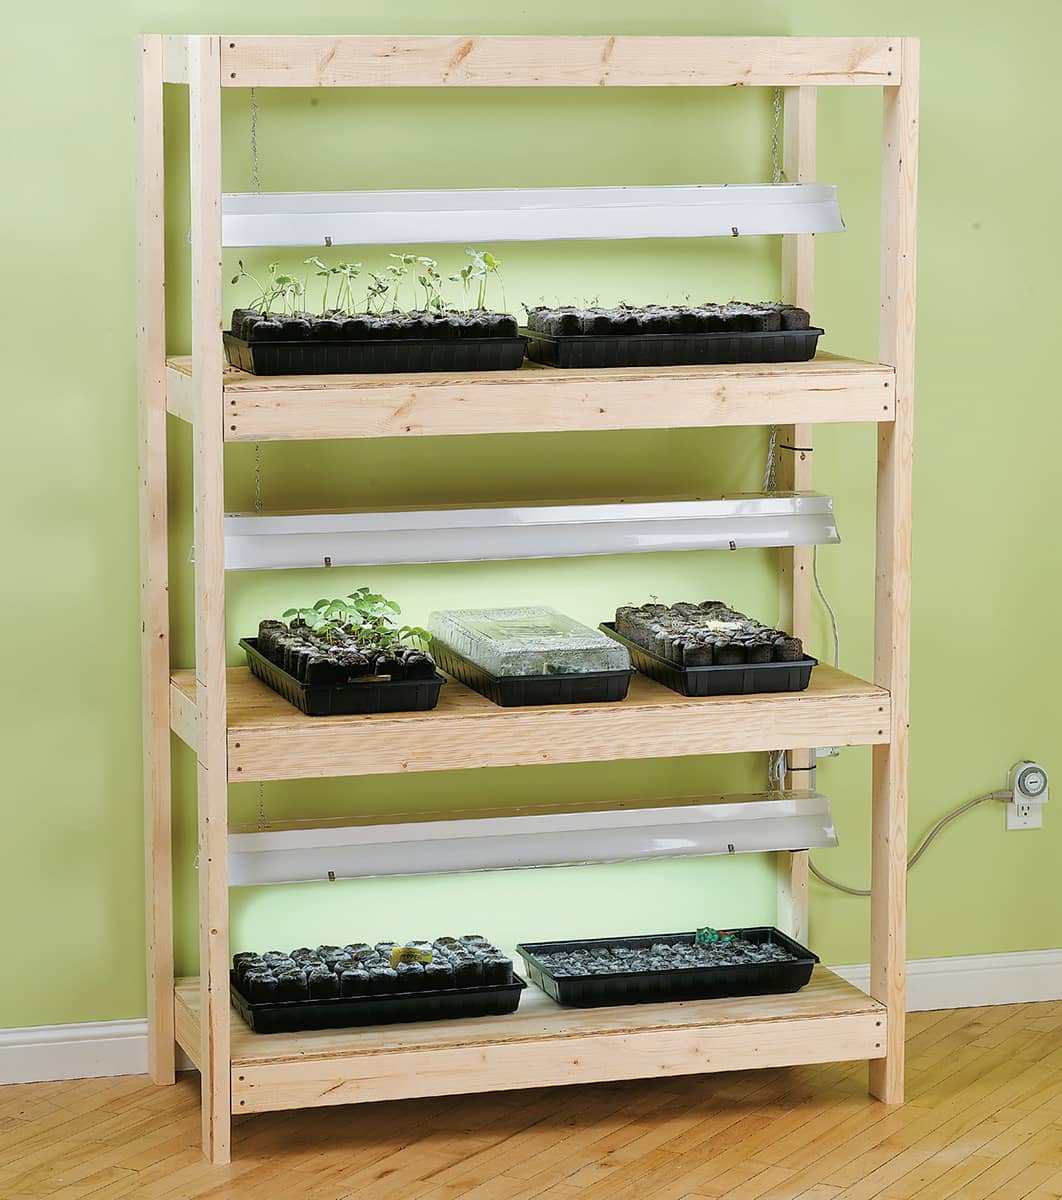
This easy-to-build starter rack (above) holds up to 12 full-size seedling flats or trays and can be located practically anywhere with an accessible electrical outlet. The top shelf offers a handy space for storing extra flats and other supplies. Wire utility shelving (below) offers an easy-to-assemble alternative to building your own rack. Most inexpensive units are only 14" deep and can accommodate one row of seedling flats per shelf. Use one or two light fixtures above each shelf, as appropriate for your needs.
SEED STARTER RACK
TOOLS & MATERIALS
Circular saw
Drill/driver
Framing square
(2) 10' 2 × 4
(8) 8' 2 × 4
(1) 1/2" × 4 × 8' plywood
Deck screws (31/2", 21/2", 15/8")
(3) 48" fluorescent light fixtures with two 40W lamp capacity and plug-in cord
Chain (10 linear ft.)
(6) S-hooks
Grounded power strip
Grounded automatic timer
Eye and ear protection
Work gloves
CUTTING LIST
KEY |
PART |
NO. |
DIMENSION |
MATERIAL |
A |
Shelf frame side |
8 |
11/2 × 31/2 × 50" |
2 × 4 |
B |
Shelf frame end |
8 |
11/2 × 31/2 × 21" |
2 × 4 |
C |
Leg |
4 |
11/2 × 31/2 × 791/2" |
2 × 4 |
D |
Shelf |
4 |
1/2 × 24 × 48" |
Plywood |
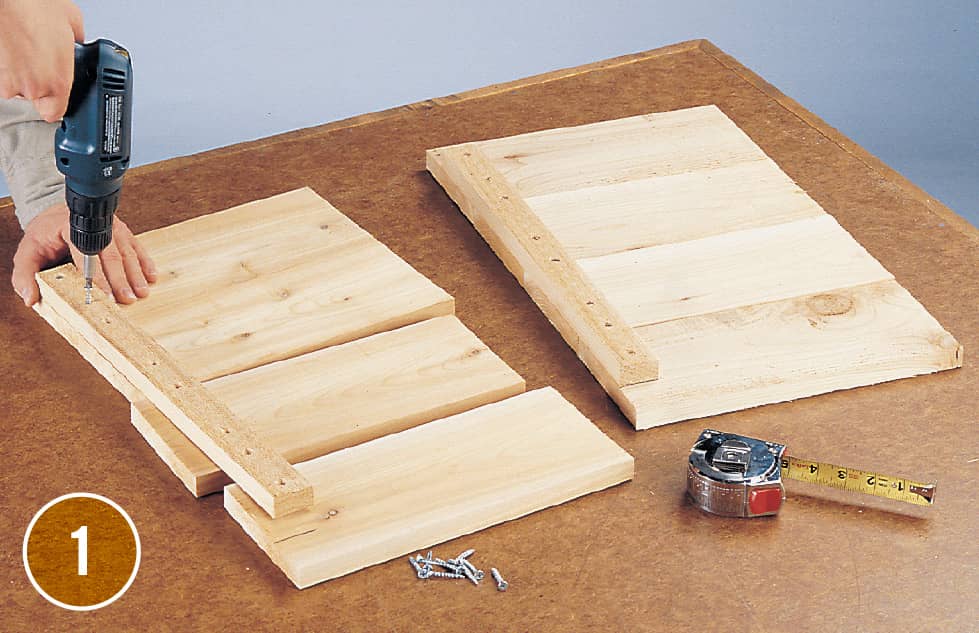
How to Build a Seed Starter Rack
Cut all of the wood parts for the shelf frames, using a circular saw or power miter saw. Cut one shelf frame side and two shelf frame ends from each of four 8' 2 × 4s, and cut the remaining four shelf frame sides from two 10' 2 × 4s. Cut each of the four legs from an 8' 2 × 4.
Assemble the shelf frames with 31/2" deck screws. Position the side pieces of each frame over the ends of the end pieces and so their top edges are flush. Drill pilot holes and drive two screws through the sides and into the ends. Complete all four shelf frames using the same technique.
Add the shelves. Cut four shelves at 24 × 48", using a circular saw and straightedge cutting guide. Check each shelf frame with a framing square, then lay the shelf over the top so it’s centered side-to-side and end-to-end. Fasten the shelf to the frame with 15/8" deck screws.
Mark the shelf locations onto the legs. Measuring from the bottom of one leg, make marks at 71/2", 311/2", and 551/2". These marks represent the top edges of the shelves; the top shelf is installed flush with the top ends of the legs. Use the framing square to transfer the layout marks to the remaining three legs.
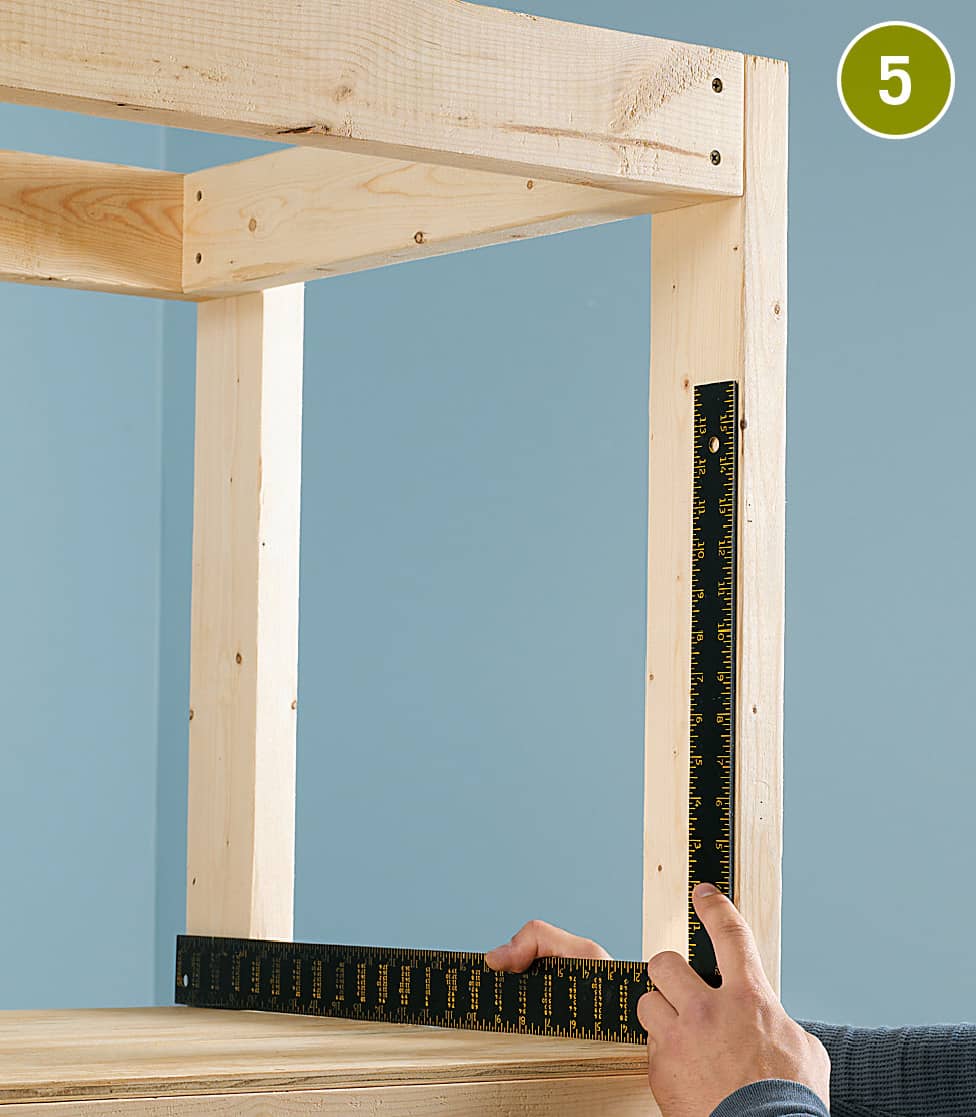
Fasten the shelves to each leg with two 21/2" deck screws driven through the shelf ends and into the legs. The top edges of each shelf should be on its layout marks (or flush with the ends of the legs), and the front and rear sides should be flush with the outside edges of the legs. Use a square to make sure the shelf and legs are perpendicular before fastening.
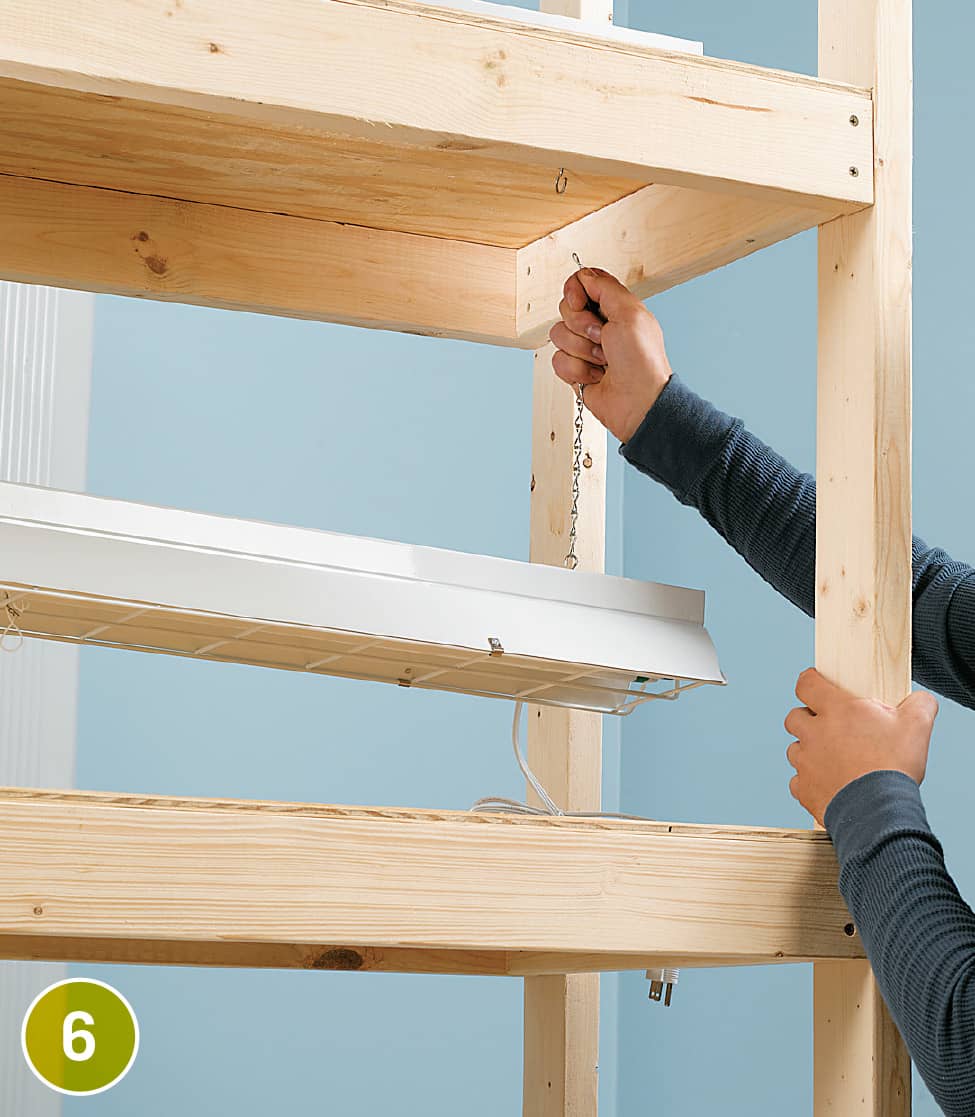
Hang the light fixtures, using chain and S-hooks. Cut the chain into 18" lengths, using wire cutters, and attach each to one end of each fixture, using S-hooks or wire, as applicable. Attach the other end of the chains to the plywood shelf above, using S-hooks.
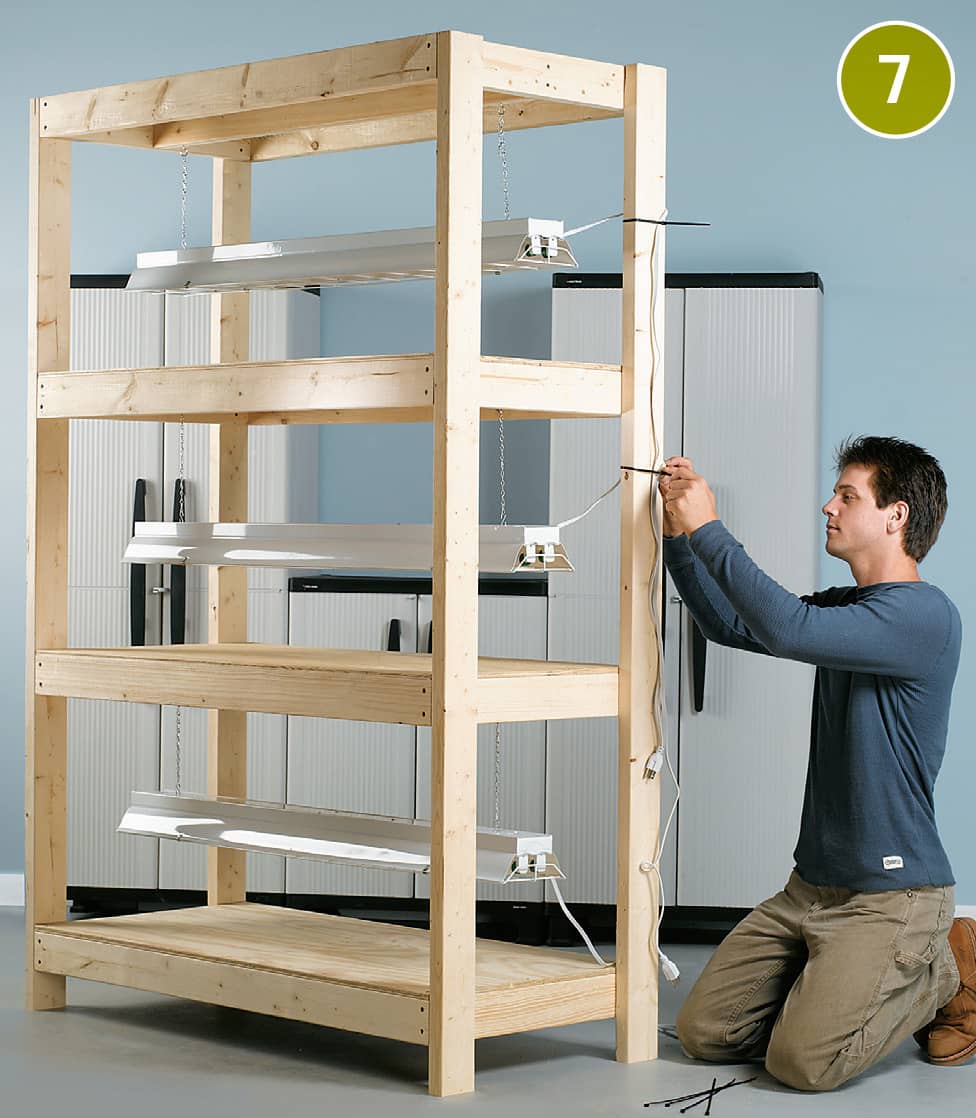
Route the fixture cords to the nearest leg of the rack and secure them with zip ties or insulated cable staples. Be sure to leave enough slack in the cord to allow for moving the fixture up and down. If necessary, use an approved extension cord to extend a fixture cord to the power strip location.
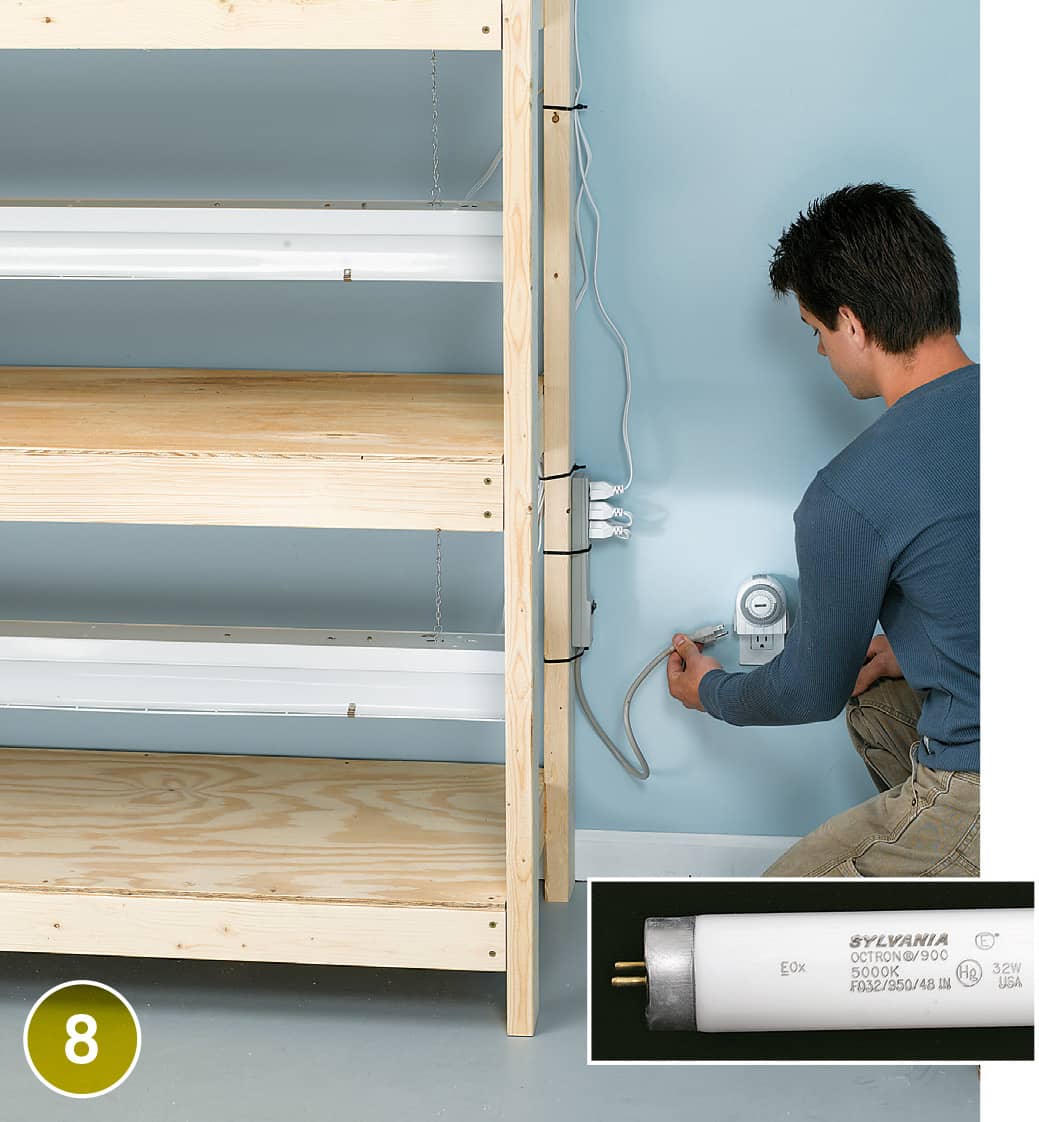
Plug the light fixtures into an approved (grounded) power strip, and plug the power strip into a 24-hour timer installed in a GFCI-protected wall receptacle. If the circuit or receptacle is not GFCI-protected, replace the existing receptacle with a GFCI receptacle, following the manufacturer’s directions.
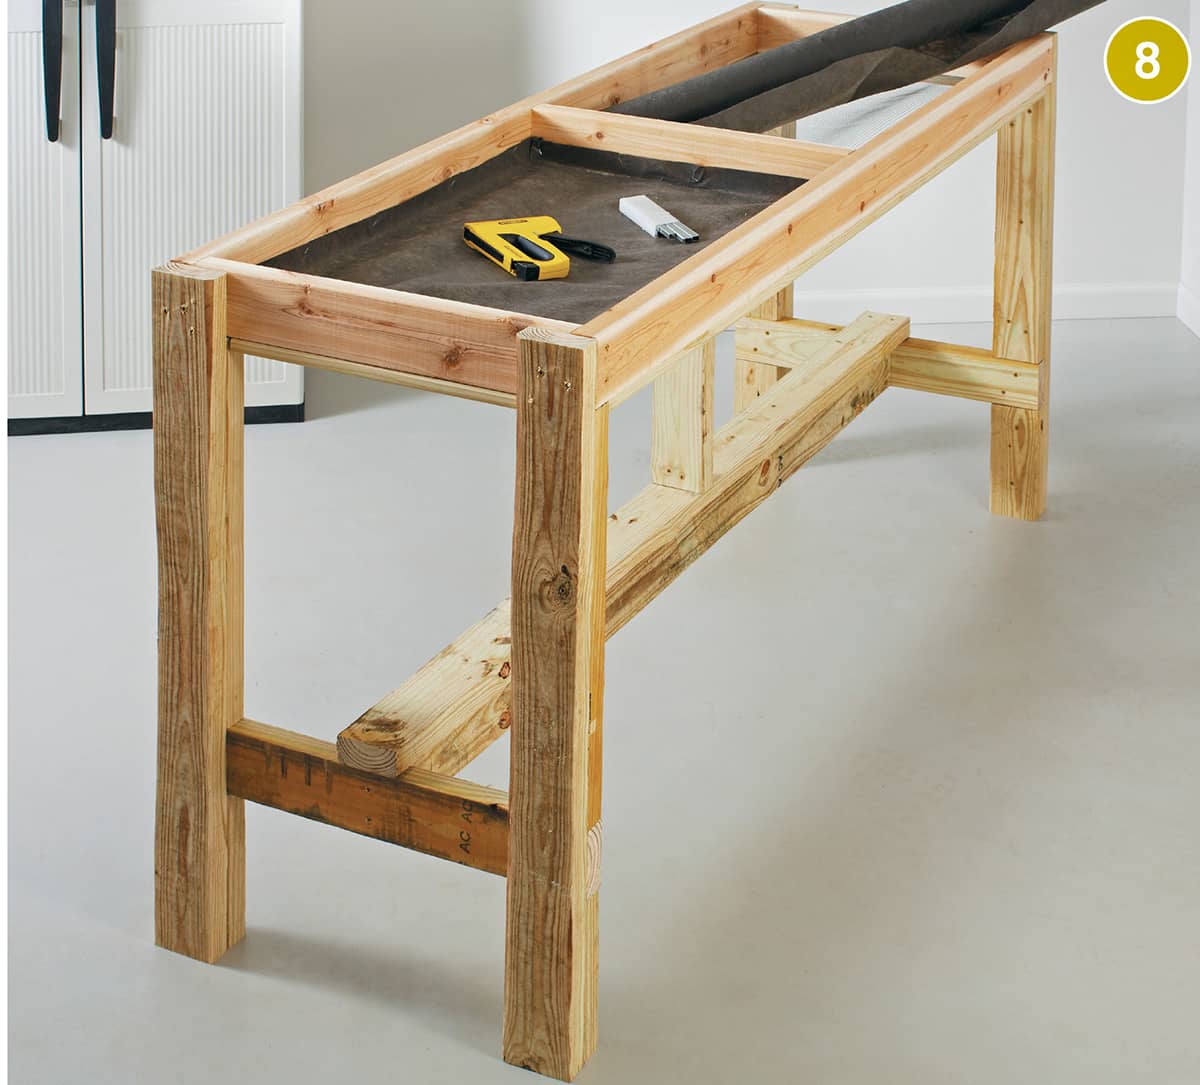
Greenhouse Workbench
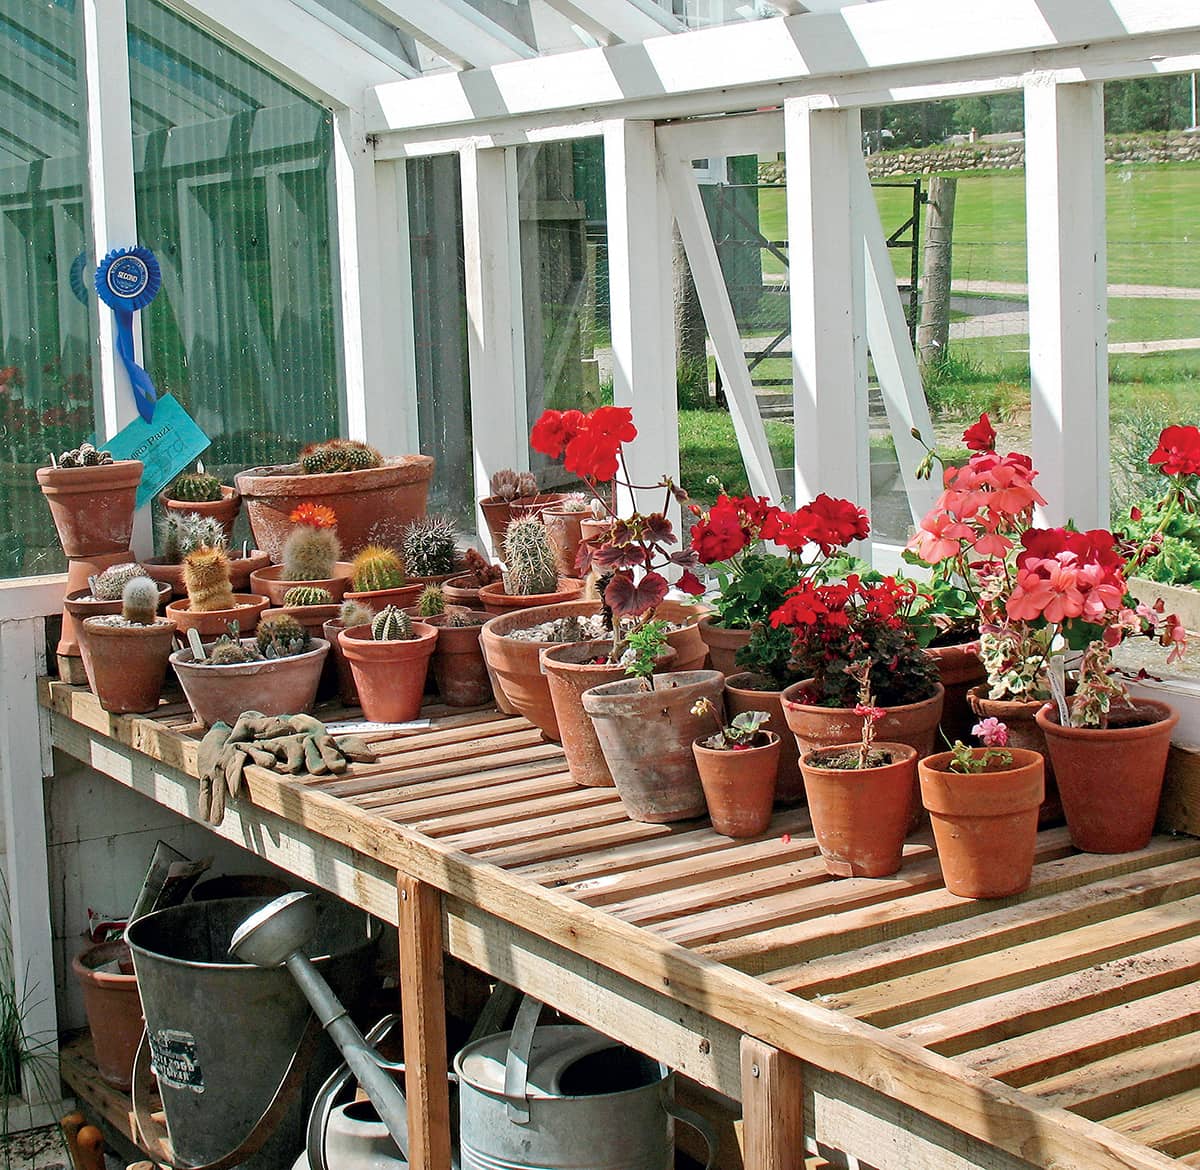
Good, sturdy worktables are indispensable tools for most greenhouse gardeners. That’s why almost any sizable greenhouse is furnished with some kind of workbench running down both long sides of the building. Benches hold plants at a comfortable level, saving your back and your knees during those many hours of tending and watering. They also make for healthier plants, keeping them above the cooler air near the floor and, with permeable bench tops, allowing airflow and even some light to reach them from below.
In this project, you’ll learn how to build a basic, easily adaptable worktable, to which you can add the top and shelf surfaces of your choice. Made with 2 × 4 lumber, the bench frame is simple, inexpensive, and durable. And because it’s put together with screws, you can easily disassemble the main parts for compact off-season storage (a great feature for temporary hoophouse gardeners). Several good options for top and shelf surfaces are shown here.
Regarding adaptability, you might want to change the dimensions of the bench as shown to suit your needs and/or fit the available space in your greenhouse. Simply add or subtract whatever you need to modify the bench width, length, or height. You can also add a second shelf to double the storage space for seedling flats and other short items, or to keep garden tools conveniently close to the bench top.
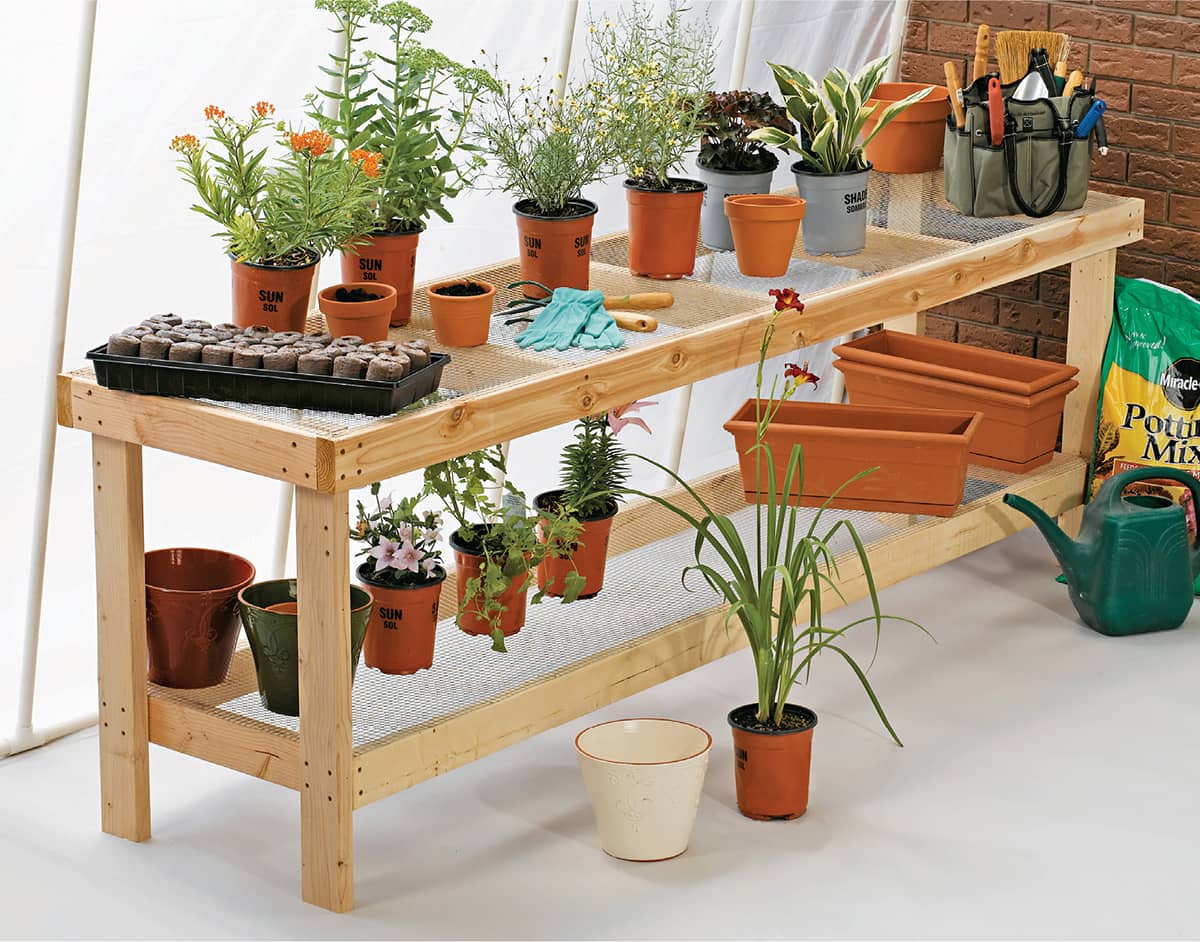
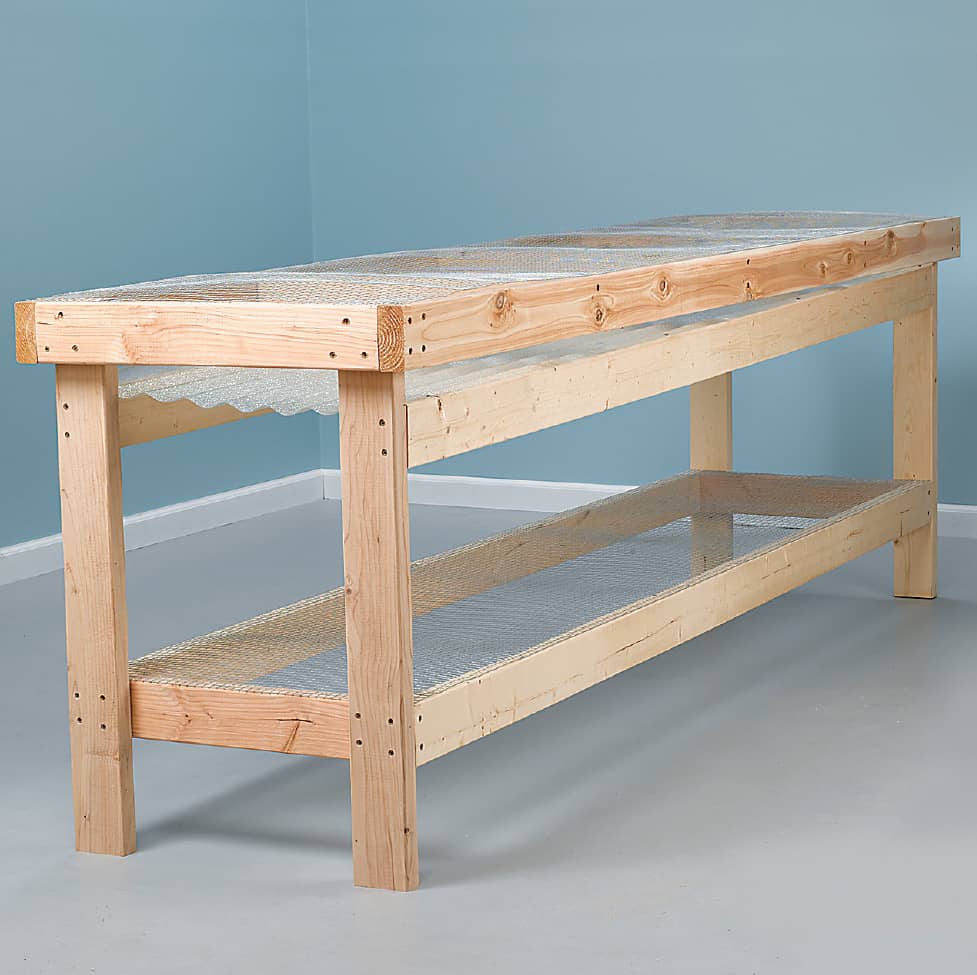
A greenhouse bench should be practical, lightweight, and space-efficient. This simple bench is highly adaptable and easy to move around. The ample lower shelf provides maximum storage area without taking up unnecessary floor space.
GREENHOUSE WORKBENCH
TOOLS & MATERIALS
Tape measure
Hammer
Circular saw or power miter saw
Clamps
Drill/driver
Framing square
Aviation snips
Metal file
(8) 8' cedar or PT 2 × 4
Deck screws (21/2", 31/2")
24"-wide steel mesh (or other tabletop material)
11/2" galvanized horseshoe nails
Eye and ear protection
Work gloves
CUTTING LIST
KEY |
PART |
NO. |
DIMENSION |
MATERIAL |
A |
Top frame side |
2 |
11/2 × 31/2 × 96" |
2 × 4 |
B |
Top frame end |
2 |
11/2 × 31/2 × 22" |
2 × 4 |
C |
Top supports |
3 |
11/2 × 31/2 × 22" |
2 × 4 |
D |
Leg |
4 |
11/2 × 31/2 × 32" |
2 × 4 |
E |
Shelf frame side |
2 |
11/2 × 31/2 × 90" |
2 × 4 |
F |
Shelf frame end |
2 |
11/2 × 31/2 × 19" |
2 × 4 |
How to Build a Greenhouse Workbench
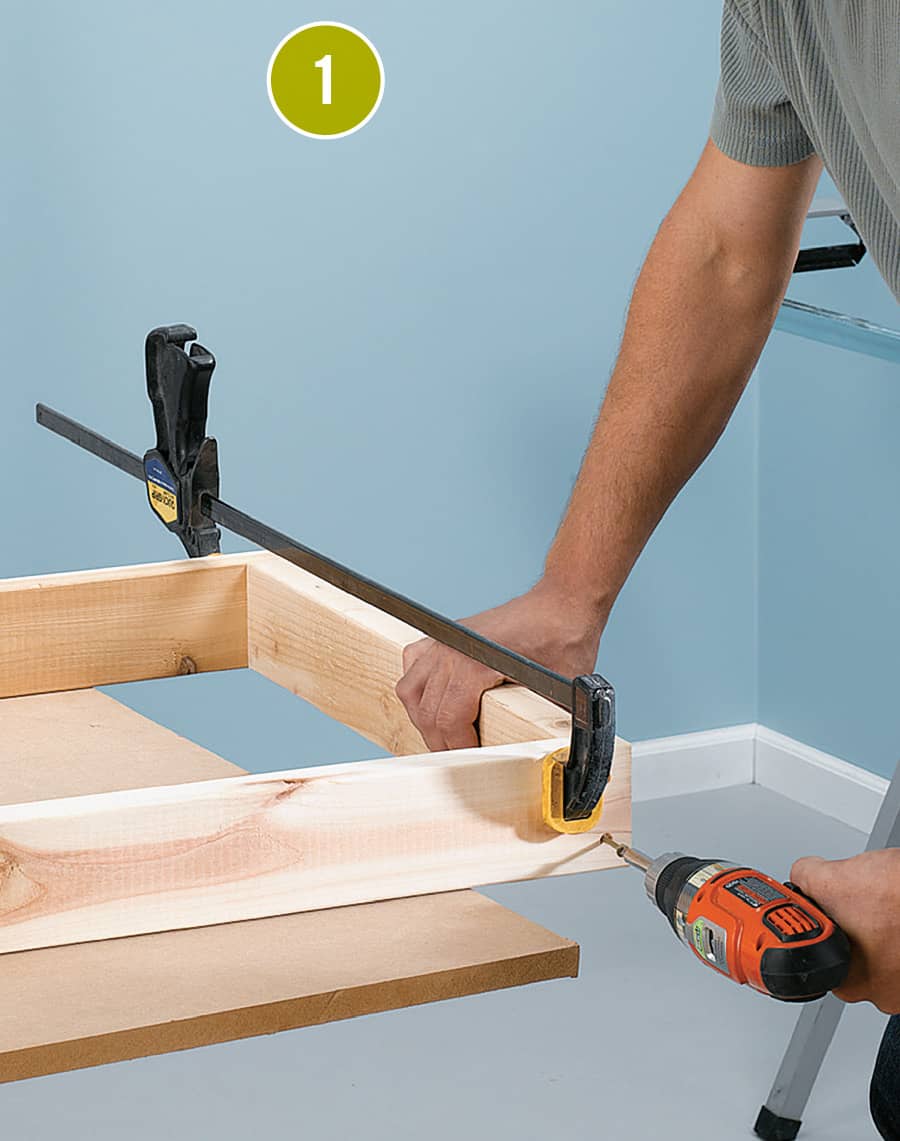
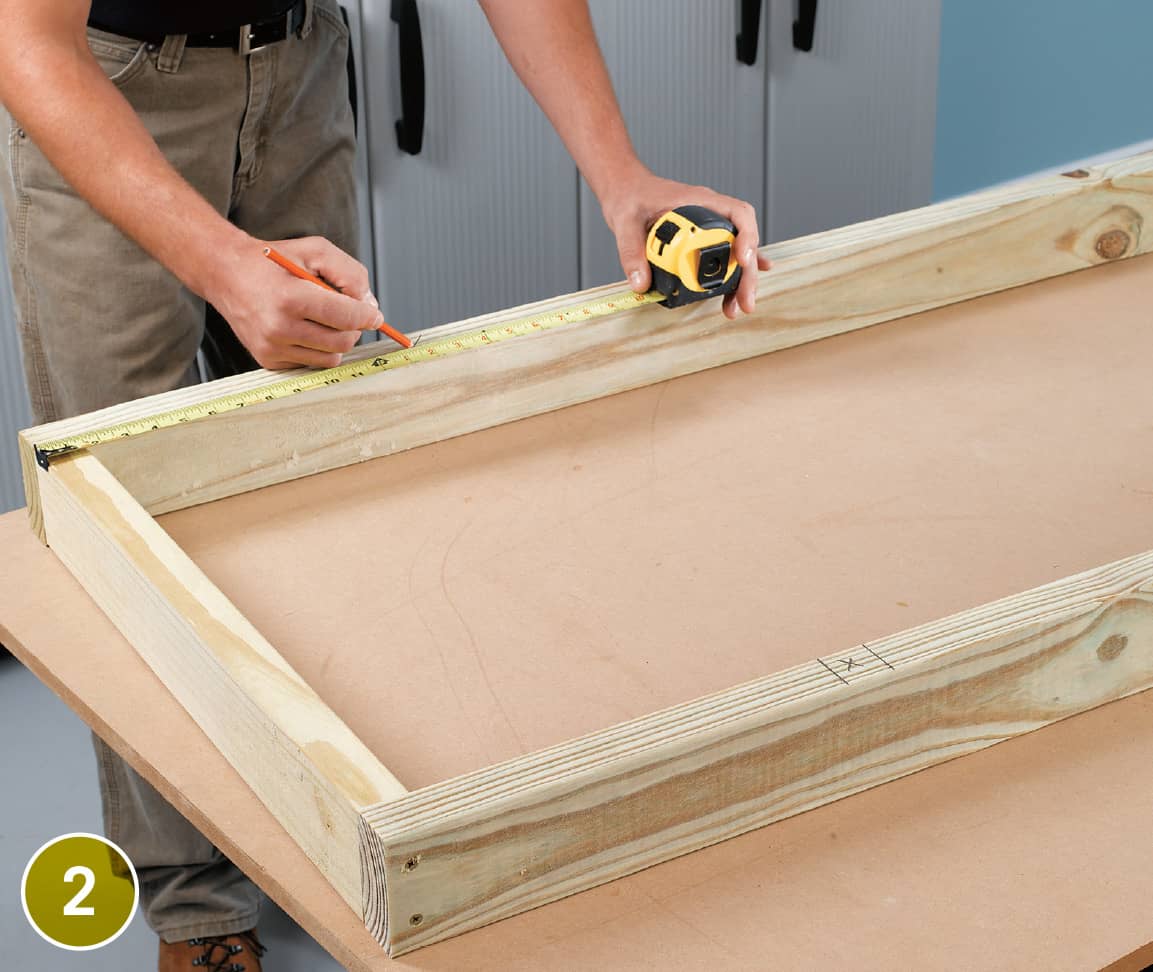
Assemble the top frame by clamping the side pieces over the ends of the end pieces so they’re flush along the top edges. Drill pilot holes and fasten each corner with two 31/2" deck screws.
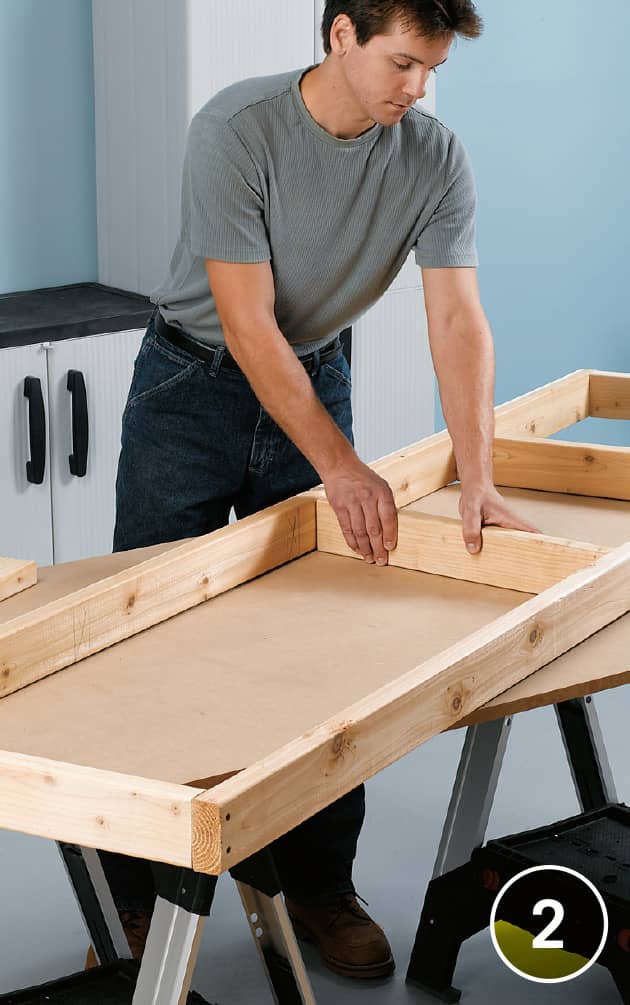
Install the top supports between the side pieces, spacing them 24" apart on center. First, mark layout lines onto both side pieces, then square the frame by measuring diagonally between opposing corners; the frame is square when the measurements are equal. Fasten the supports with pairs of 31/2" deck screws.
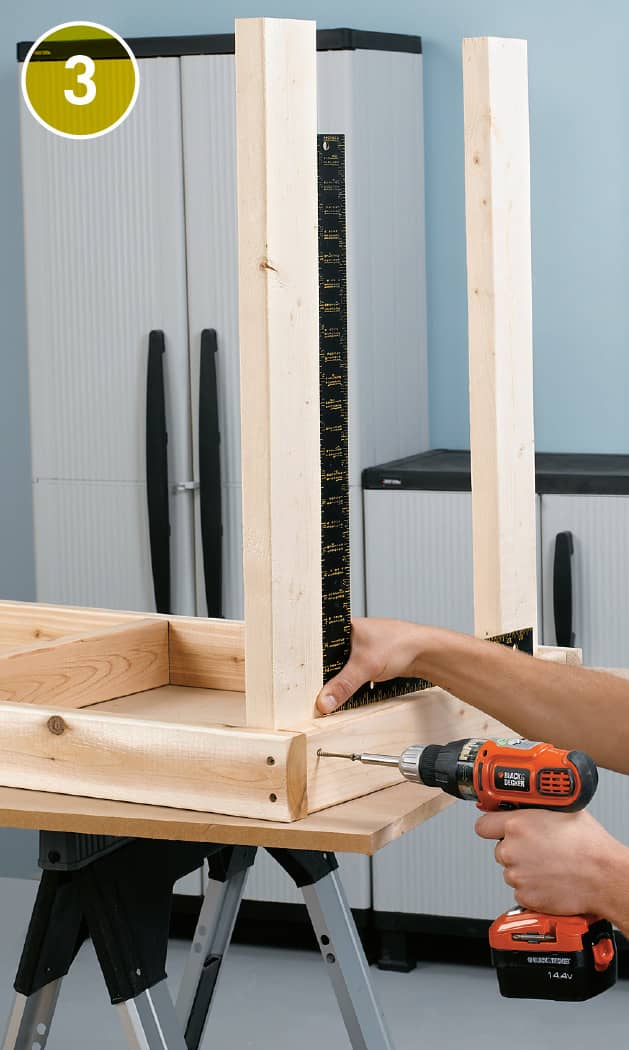
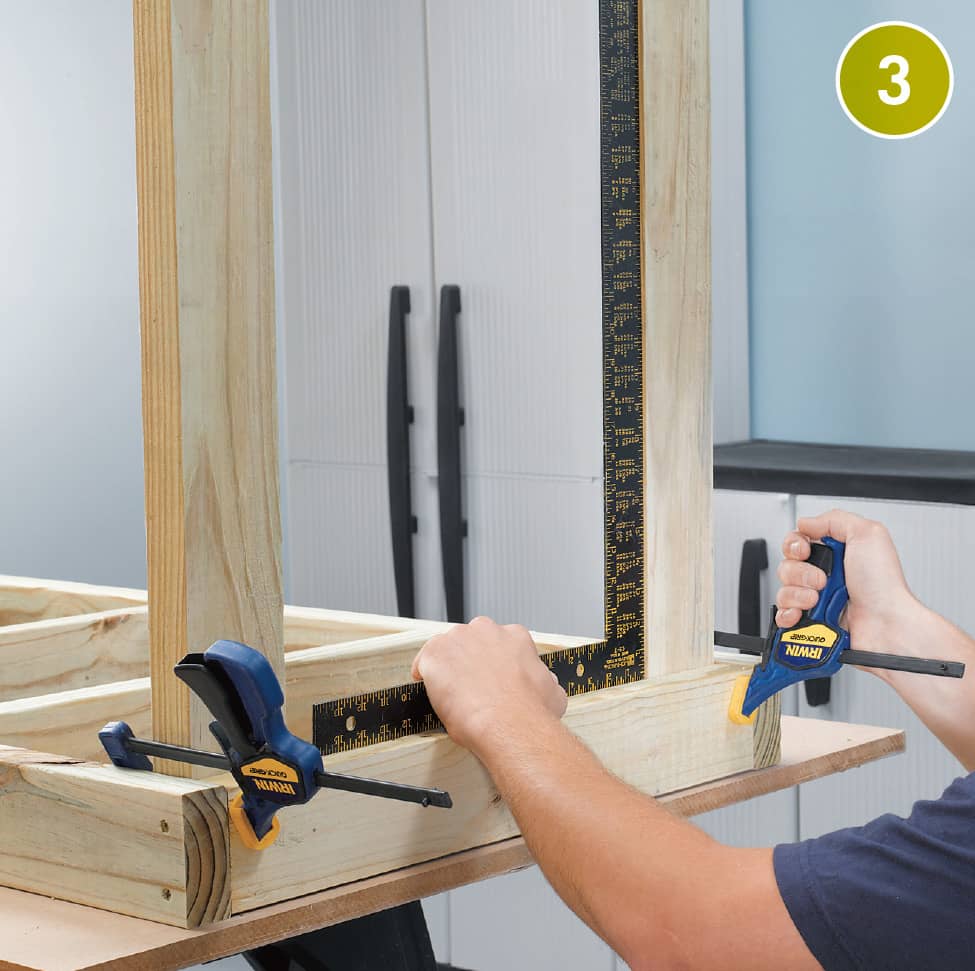
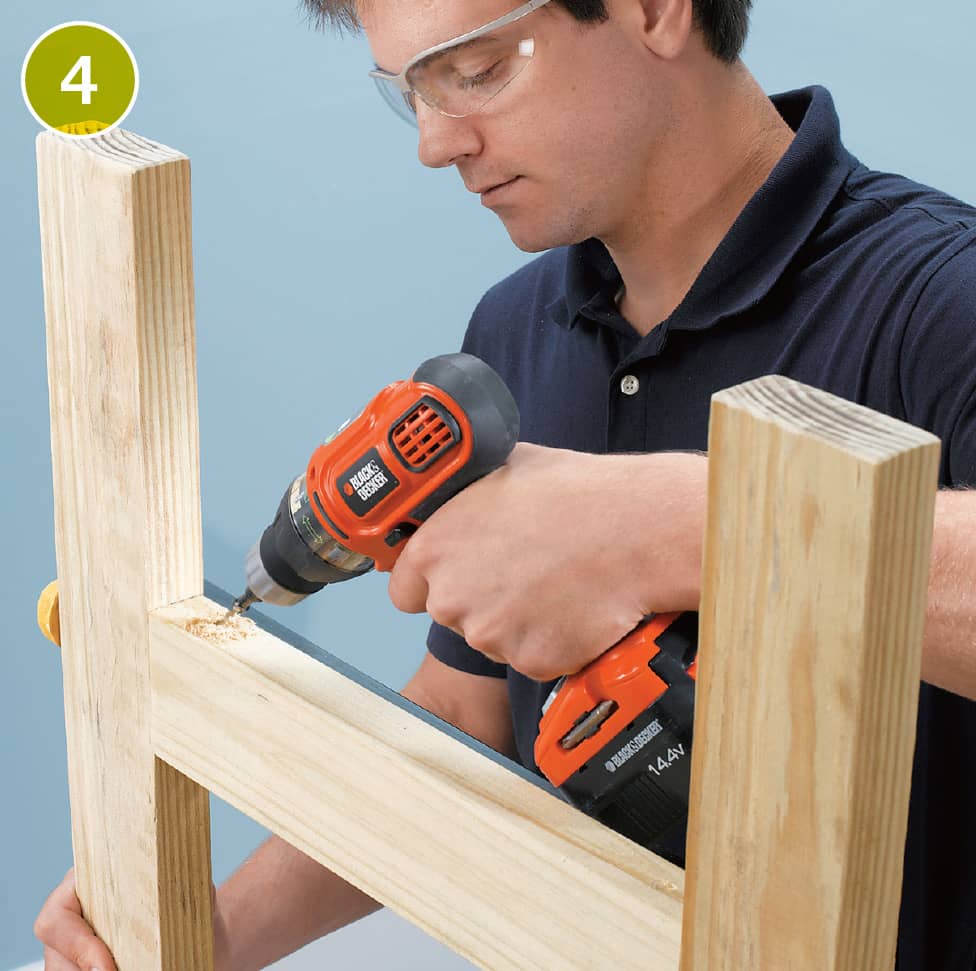
Attach the legs to the inside corners of the top frame, using 21/2" deck screws. The top ends of the legs should be flush with the top edges of the frame. Use a framing square to make sure each leg is perpendicular to the frame before fastening.
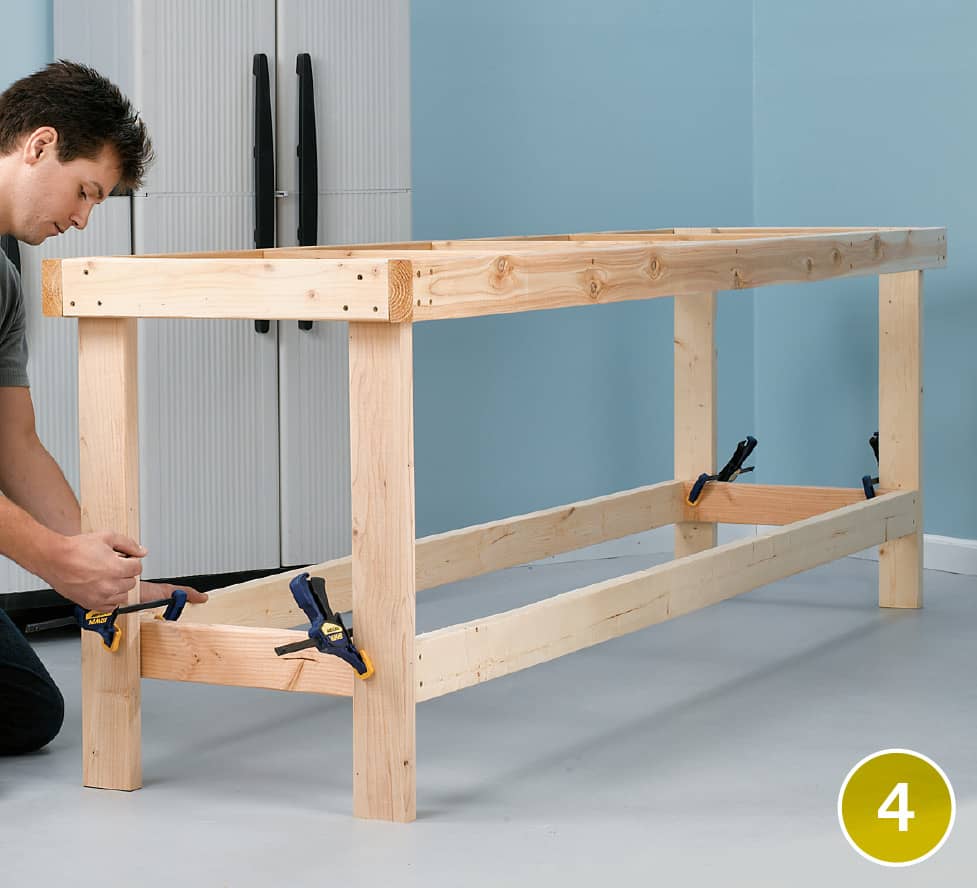
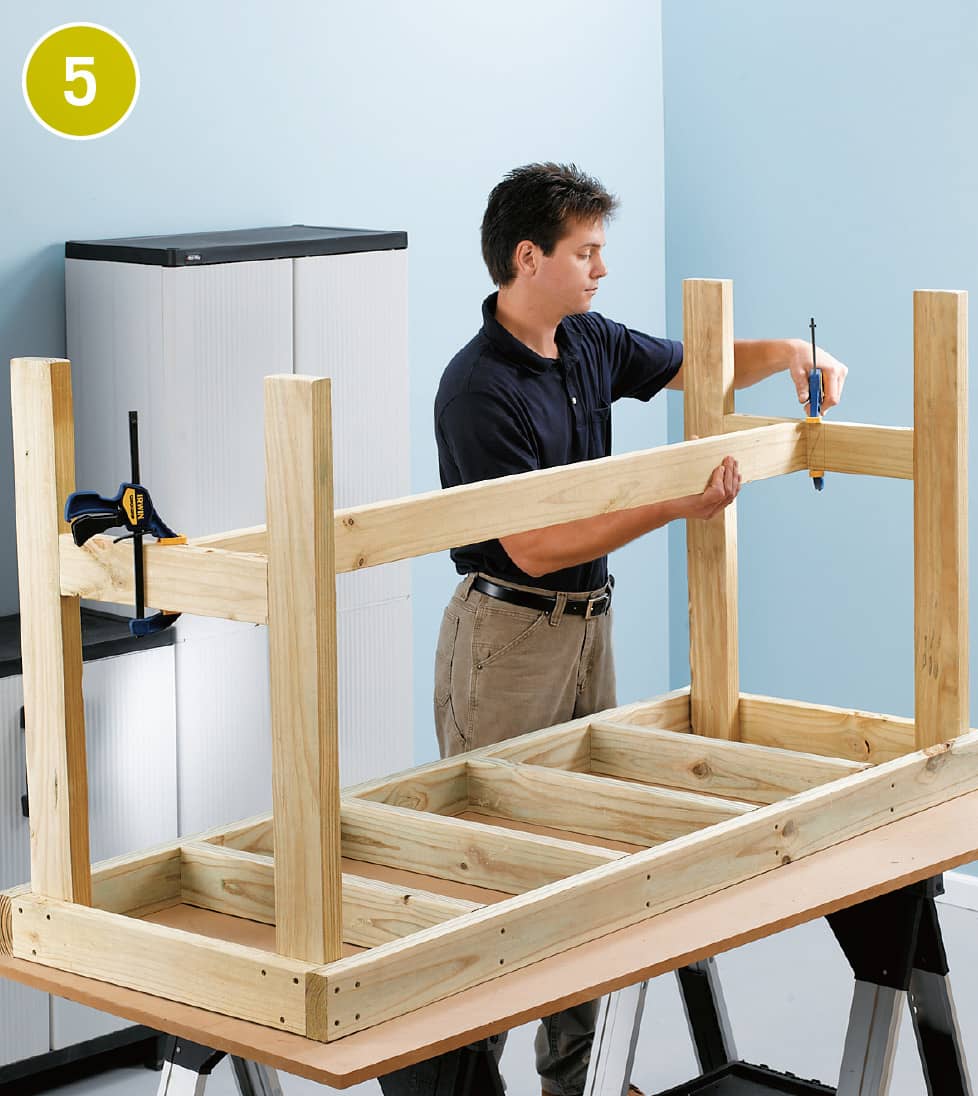
Assemble the shelf frame in the same manner as the top frame. Mark the inside face of each leg 10" up from the bottom end. Position the shelf frame with its top edges on the marks, and fasten it to the legs with 21/2" deck screws driven through the frame ends. The side frame pieces should be flush with the outside edges of the legs.
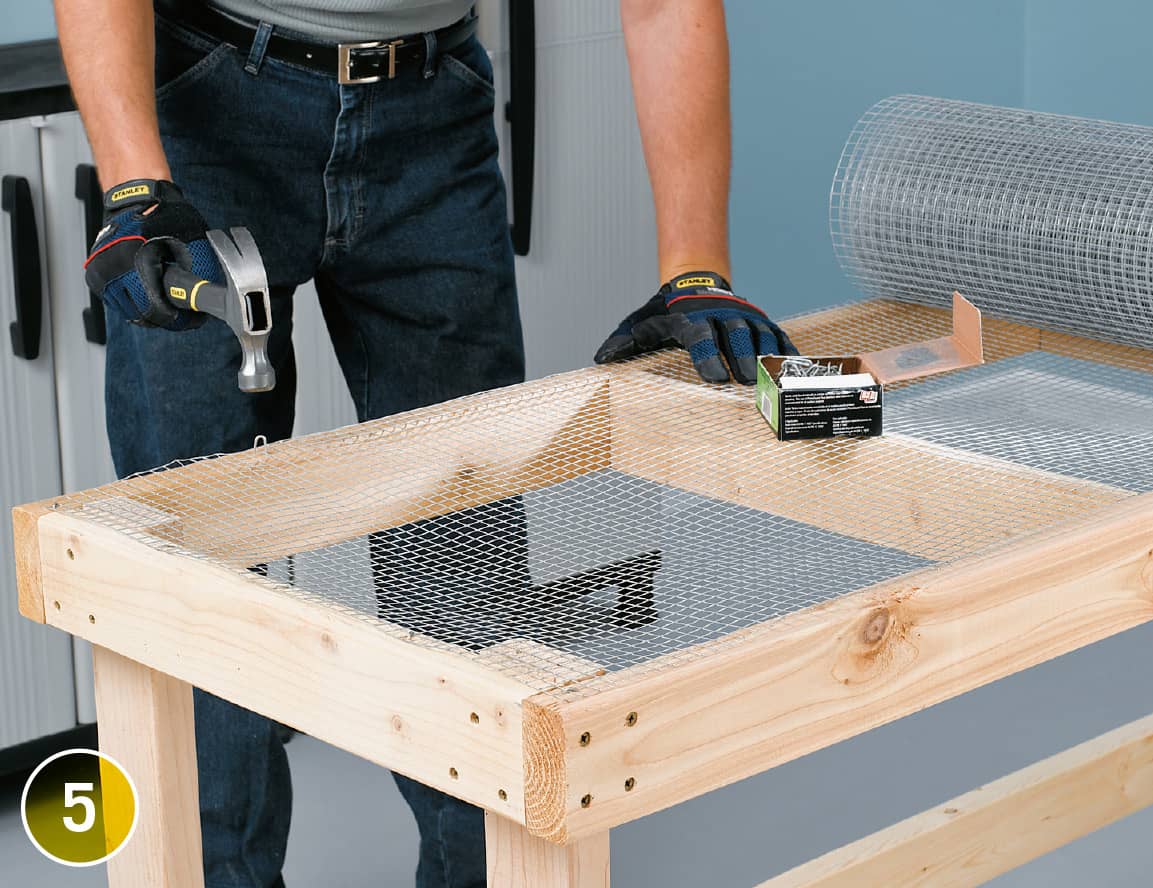
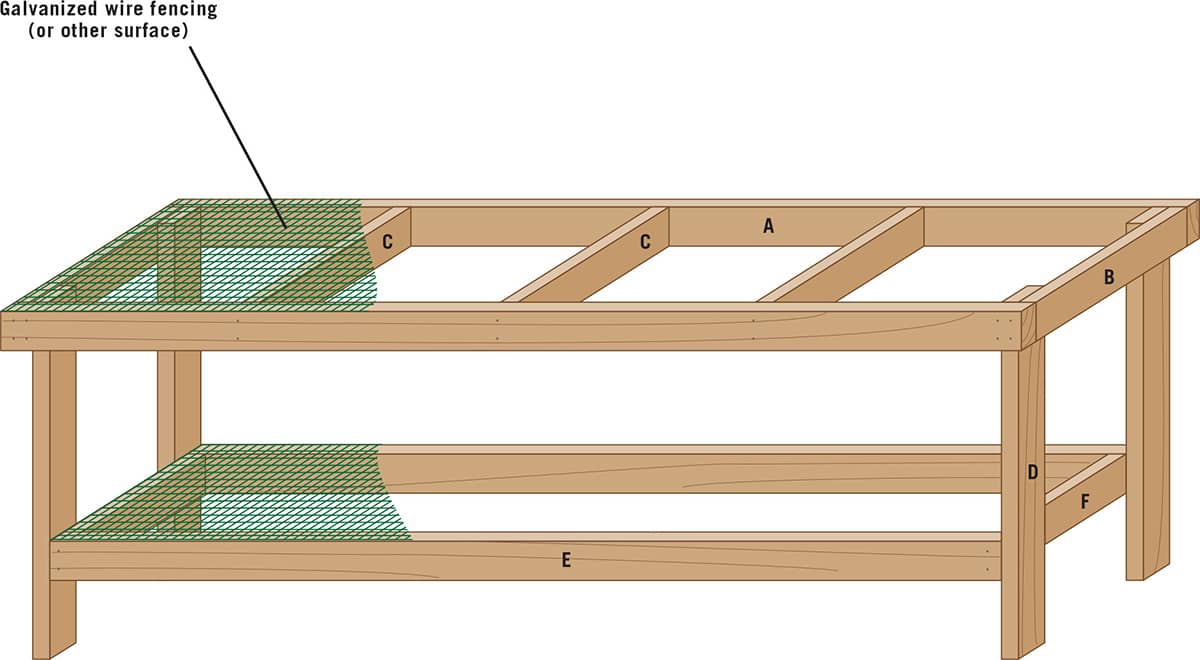
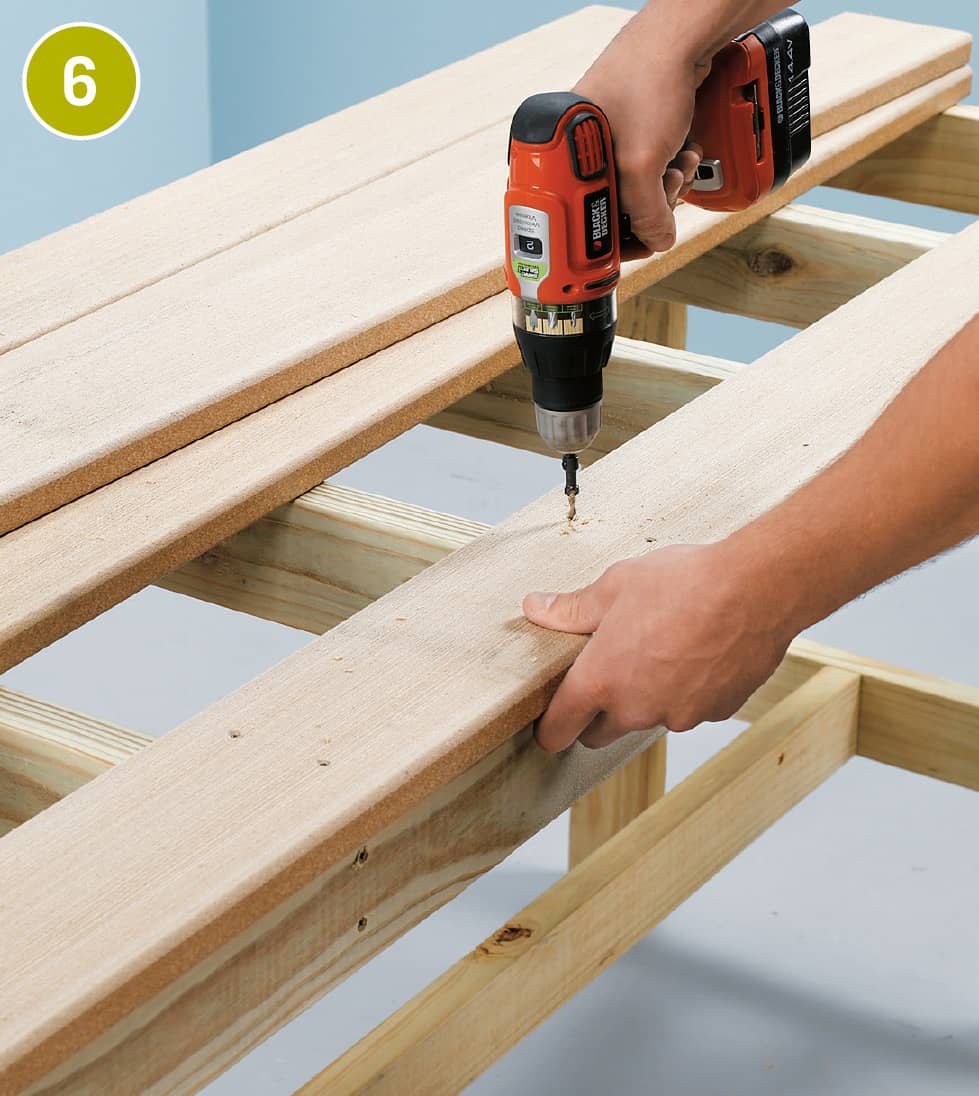
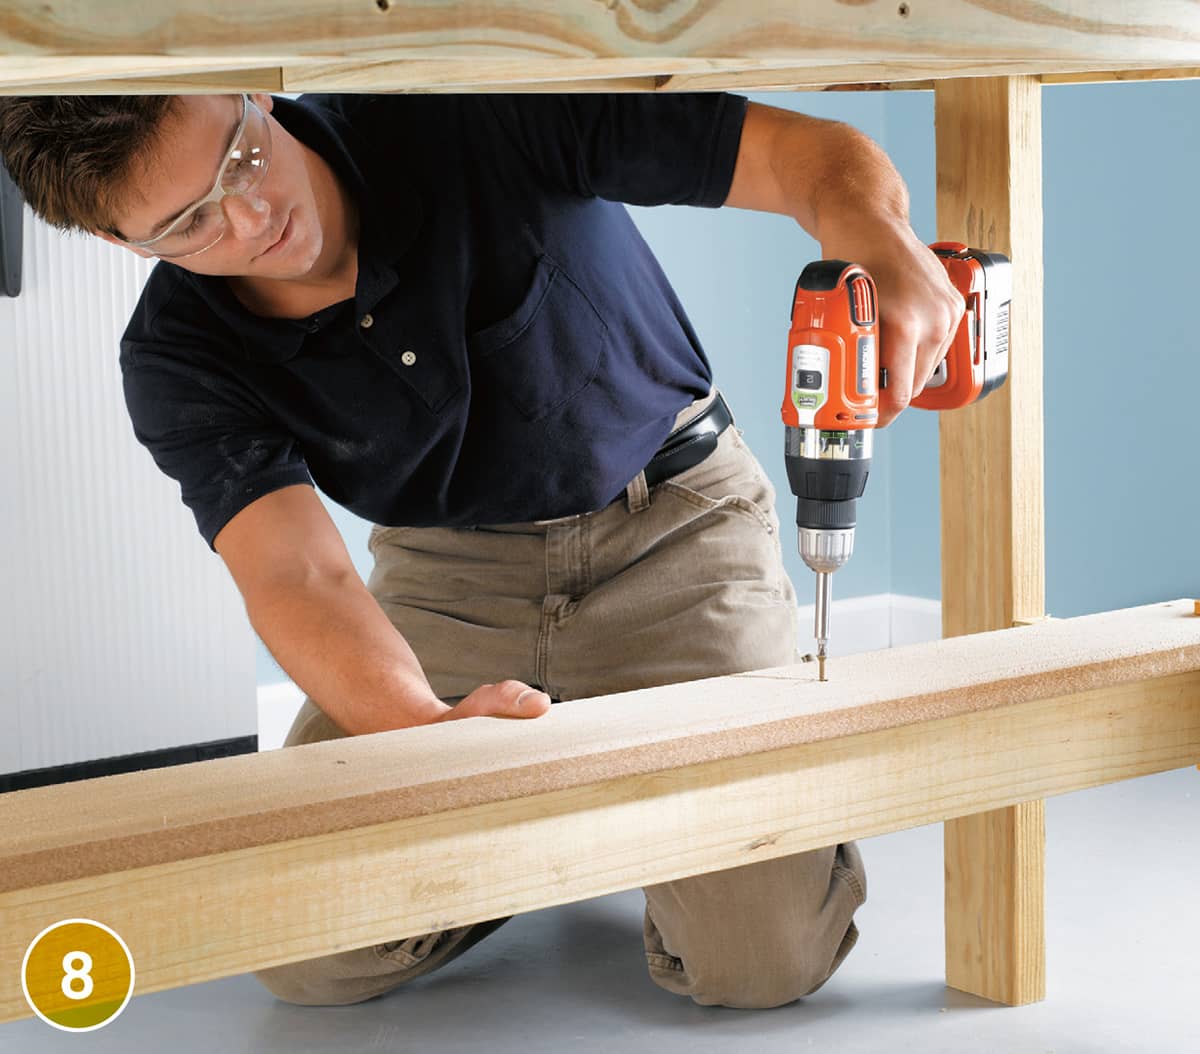
Add the top and shelf surface material. Galvanized wire mesh fencing is shown here (see here for other options). Cut the 24"-tall fencing to length at 95", using aviation snips. Round over any sharp cut ends of wire with a metal file. Center the mesh over the top frame, leaving a 1/2" margin at all sides. Fasten the mesh with 11/2" horseshoe nails. Trim and install the shelf mesh in the same fashion.
Options for Bench Top & Shelf Surfaces
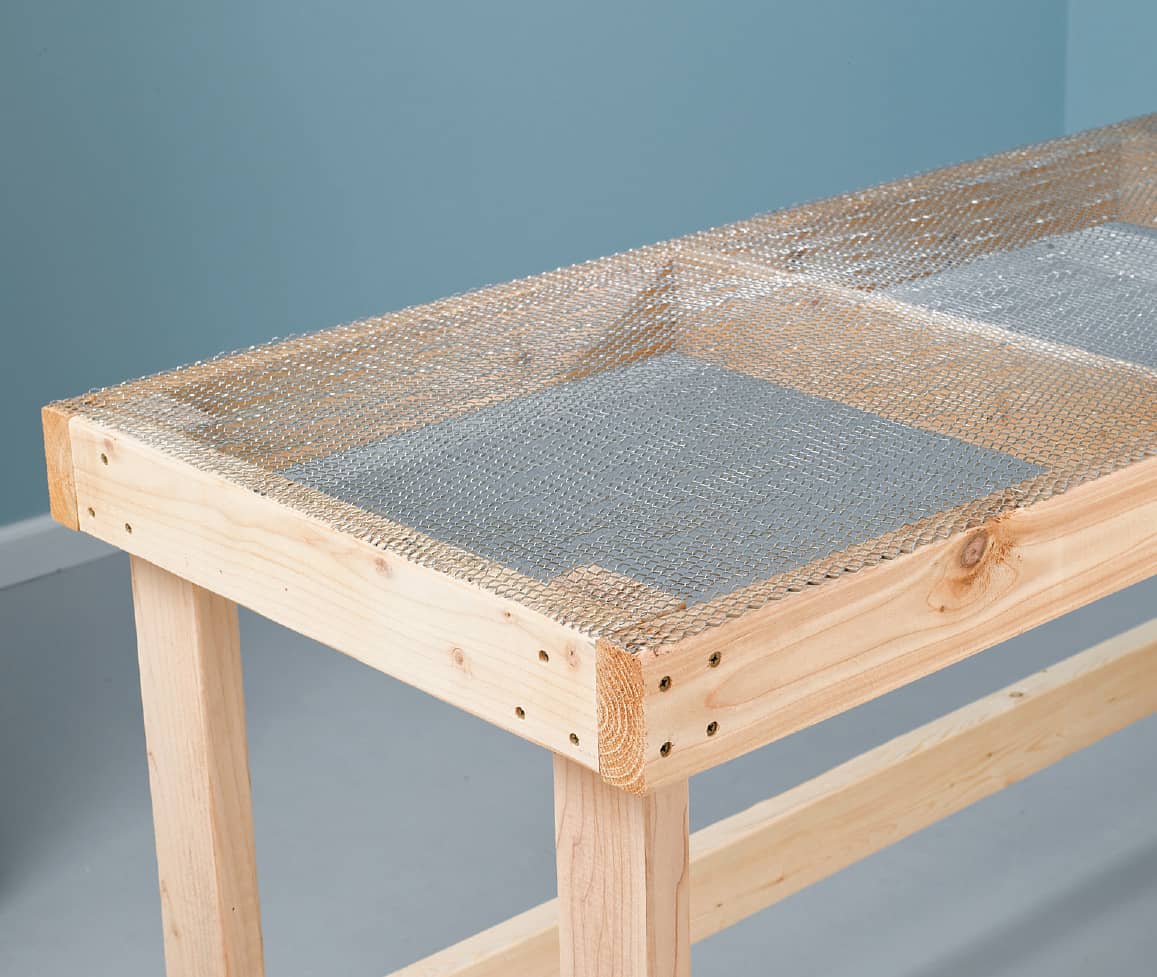
Expanded steel mesh is stiffer and has smaller holes than metal wire fencing, offering a more solid surface while maintaining permeability. Fasten steel mesh to the frame parts with heavy-duty staples or horseshoe nails. Do not use stucco lath, which has a rough surface and sharp steel edges.
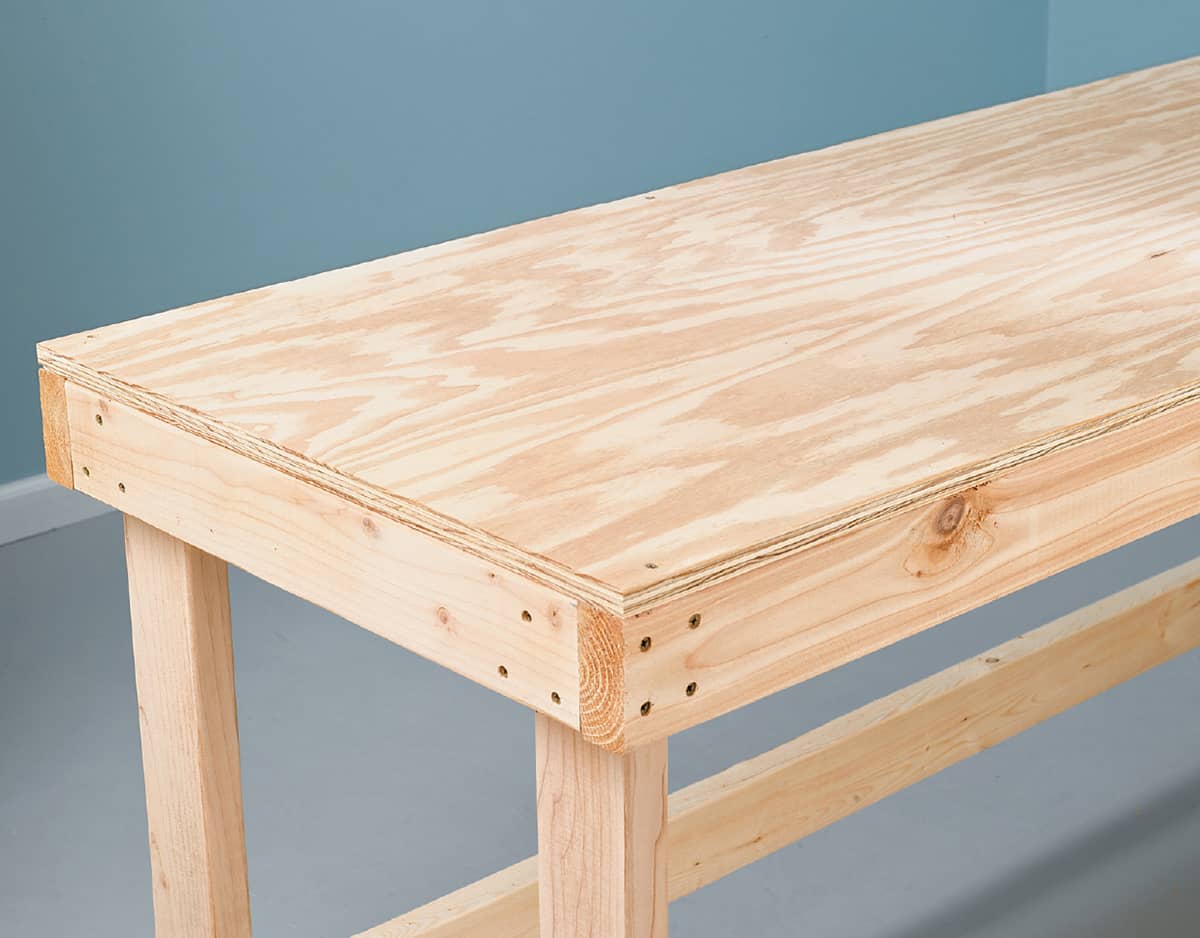
Exterior plywood offers a smooth, continuous surface for a bench top or shelf. One full 4 × 8' sheet of 3/4"-thick plywood will cover a full-size bench top and shelf. Fasten plywood to the frame parts with 11/2" deck screws. Keep in mind that a plywood surface won’t drain like a permeable material; you may want to pitch the bench slightly to one side for drainage. Coat it with deck stain or paint to make it easier to clean and more stain resistant.
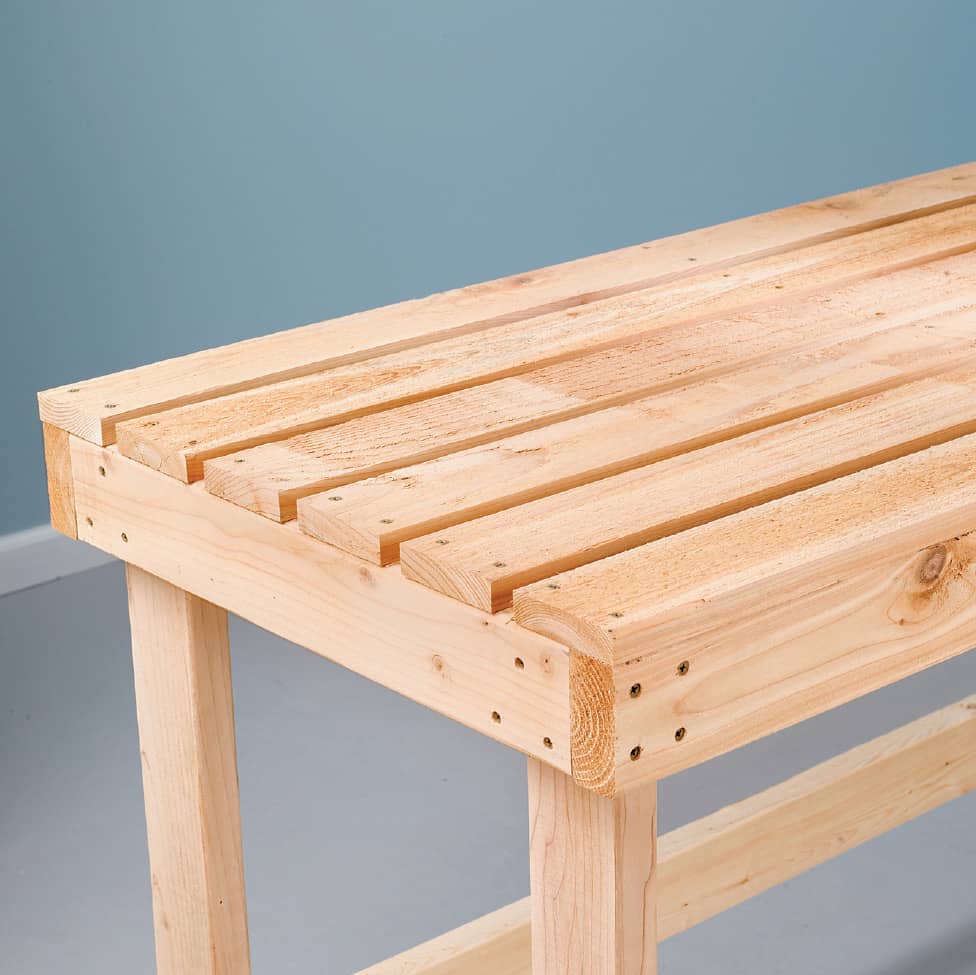
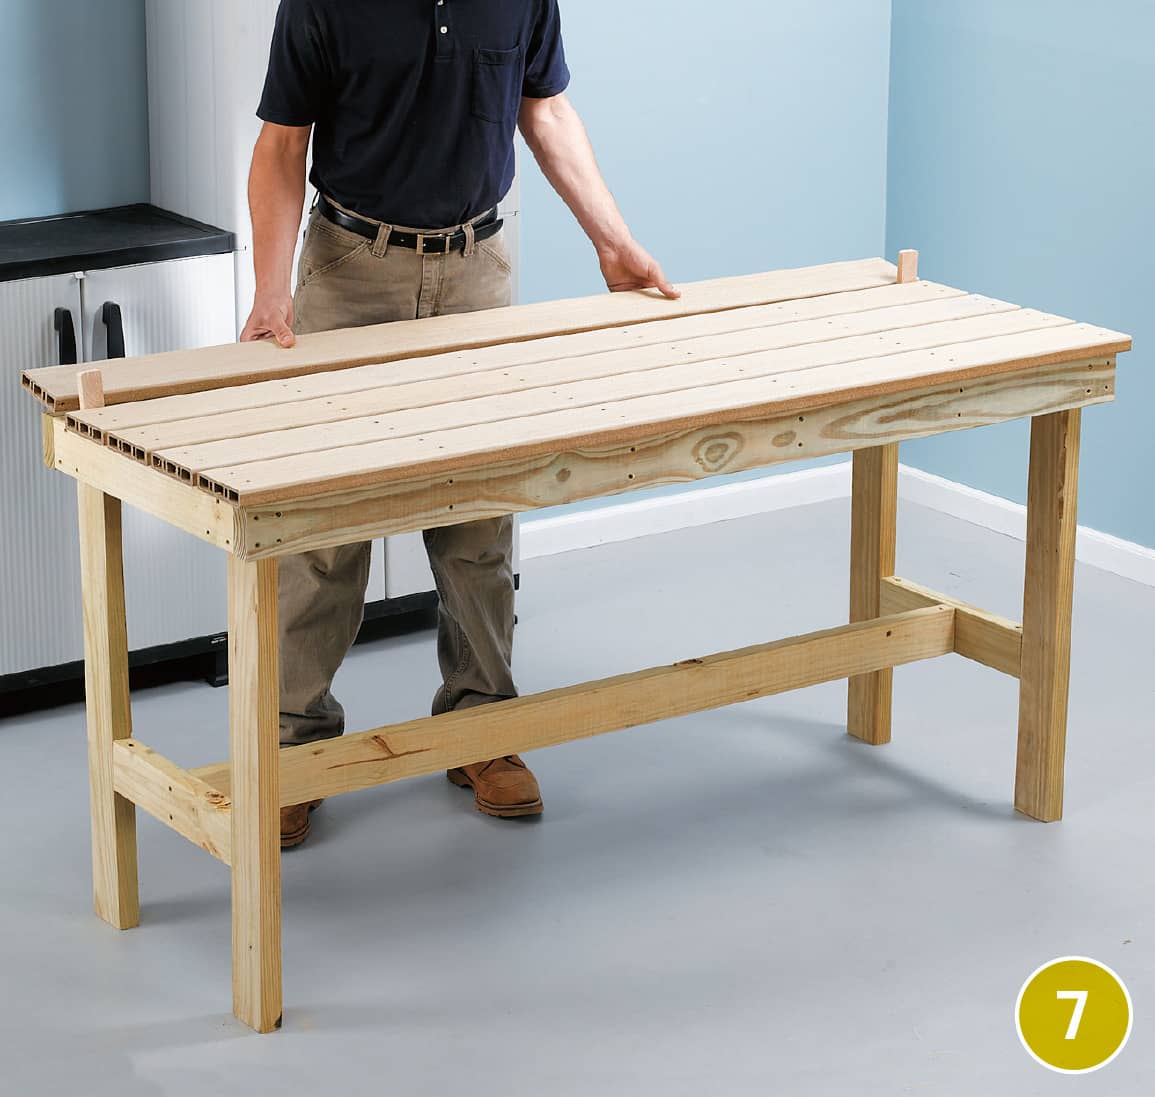
1 × 4 or 1 × 6 cedar boards or decking boards make an attractive top surface and offer some runoff, depending on how widely the boards are gapped. For the bench top, run boards parallel to the length of the top frame; for the shelf, run them perpendicular to the length of the shelf frame.
Protect stored items from draining water with a simple “roof” made with a single panel of corrugated plastic or fiberglass roofing. Use 2 × 4s between the leg pairs to support the panel, sloping the panel down toward one end at 1/4" per foot. Secure the panel at the top end with a couple of screws.
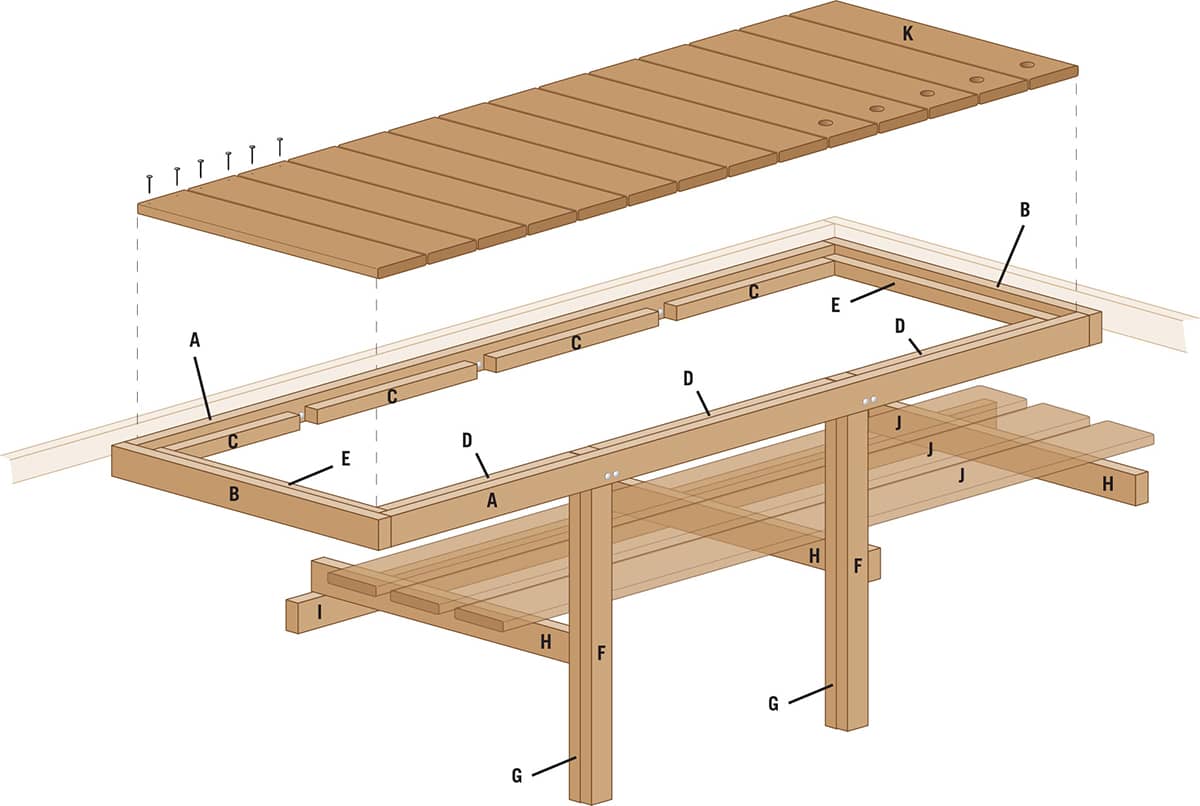
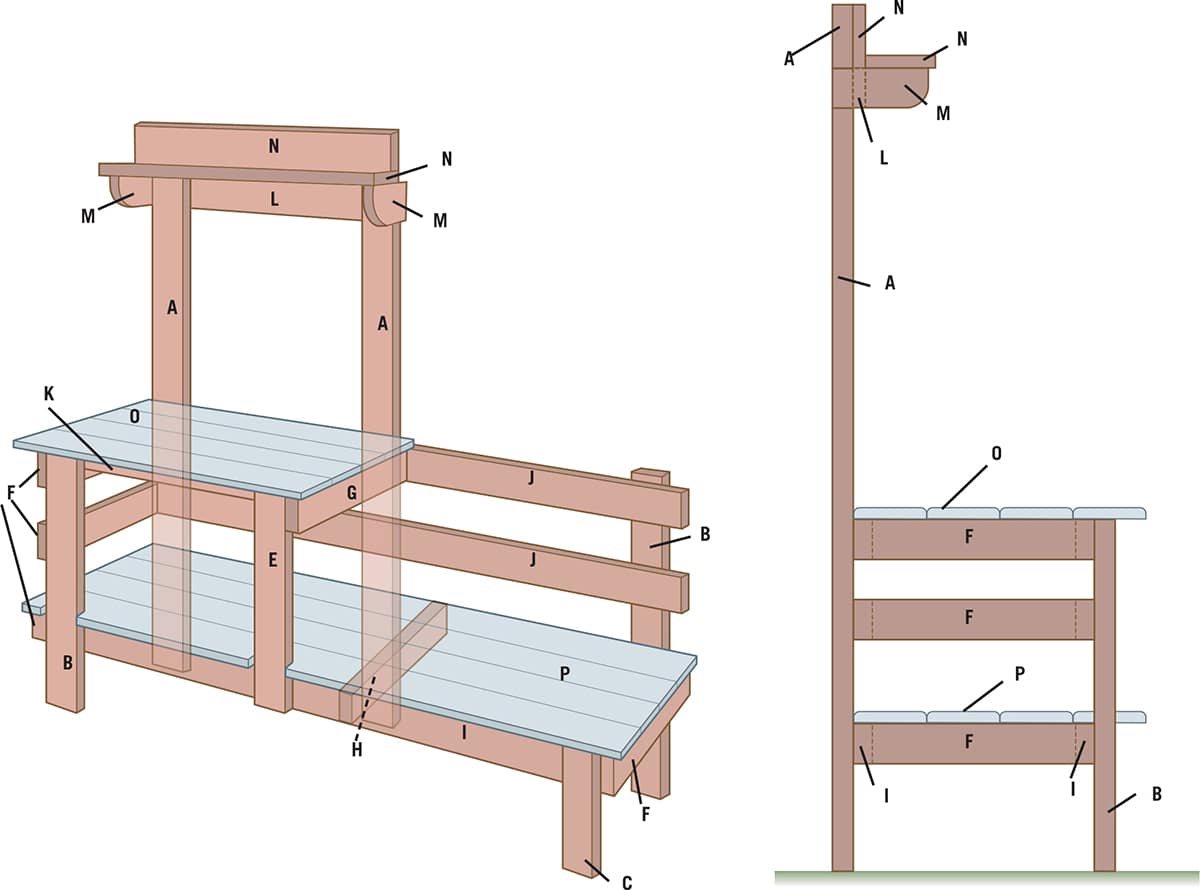
Built-In Potting Bench
Any greenhouse of reasonable size and structural integrity is a candidate for a useful and beautiful built-in workbench. A bench like the one in this project is a streamlined greenhouse addition that makes best use of the least amount of materials and fits in seamlessly with the greenhouse interior. It can also be easily adapted to different gardeners—made lower or higher, longer, or deeper as need dictates. That makes it much more valuable than any prefab potting bench you can buy. The design includes a handy lower shelf to keep potting materials off the greenhouse floor and a wonderful compartment beneath removable slats where you can blend your own batches of potting mix.
This built-in bench is made of standard construction grade 2 × 4s and pressure-treated 1 × 6 deck boards. Because it is covered by a roof, leaving the bench unpainted will not materially affect its longevity. But greenhouses and gardening sheds usually aren’t simple utility areas. Investing a little time and money in painting the bench is well worth it (technically, the potting bench seen here is coated with semi-transparent deck stain).
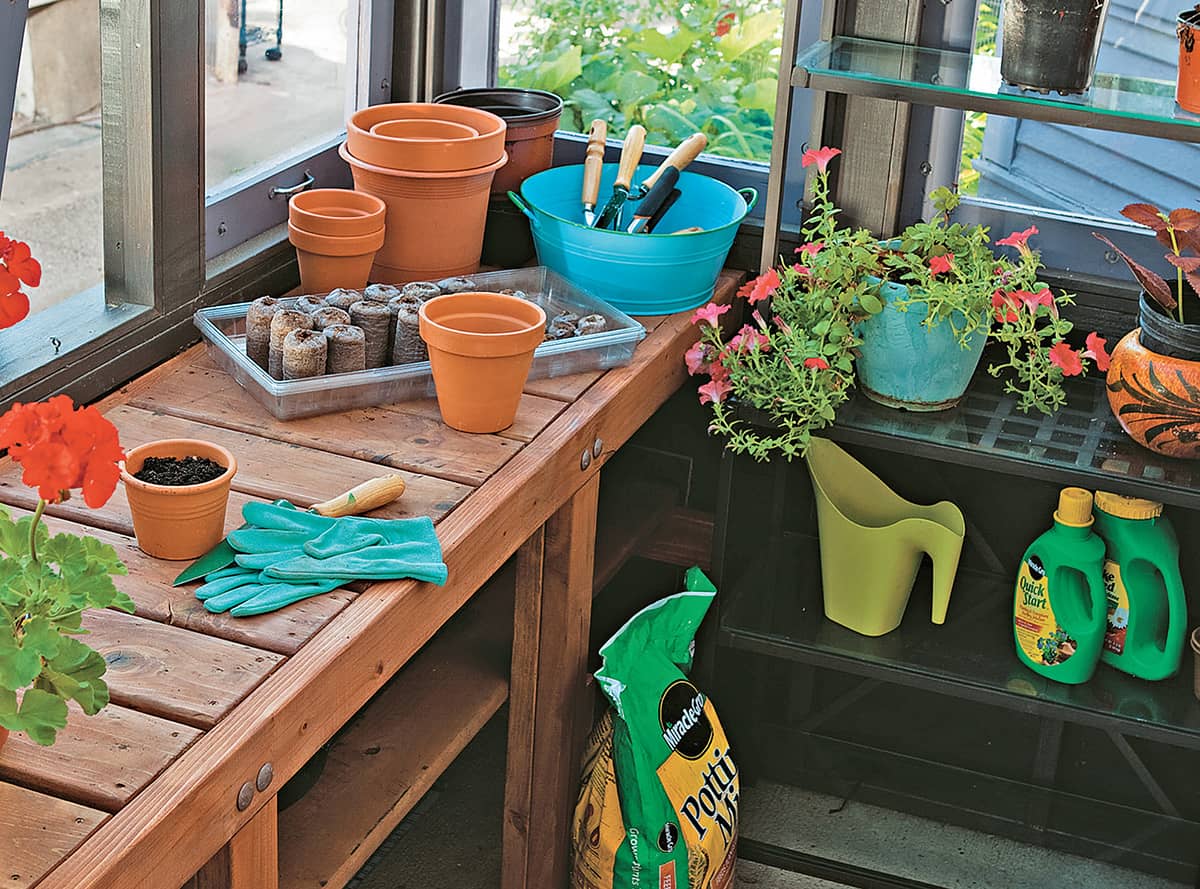
This potting bench uses the structural members of a greenhouse kneewall for support. The five slats at the right end can be removed to access a shelf for buckets and planters.
BUILT-IN POTTING BENCH
TOOLS & MATERIALS
Tape measure
Deck screws (21/2", 3")
Lag screws (3/8 × 3")
Carriage bolts (1/2 × 31/2")
Level
Exterior-rated wood glue
Drill/driver
Circular saw or power miter saw
Clamps
(6) 2 × 4" × 8'
(3) 2 × 2" × 8'
Eye and ear protection
CUTTING LIST
KEY |
PART |
NO. |
DIMENSION |
MATERIAL |
A |
Front/back frame |
2 |
11/2 × 31/2 × 81" |
2 × 4 |
B |
Frame ends |
2 |
11/2 × 31/2 × 22" |
2 × 4 |
C |
Cleats-back |
4 |
11/2 × 11/2 × 16" |
2 × 2 |
D |
Cleats-front |
3 |
11/2 × 11/2 × 22" |
2 × 2 |
E |
Cleats-side |
2 |
11/2 × 11/2 × 19" |
2 × 2 |
F |
Leg half |
2 |
11/2 × 31/2 × 311/2" |
2 × 4 |
G |
Leg half |
2 |
11/2 × 31/2 × 331/2" |
2 × 4 |
H |
Shelf support |
3 |
11/2 × 31/2 × 201/2" |
2 × 4 |
I |
Back wall ledger |
1 |
11/2 × 31/2 × 32" |
2 × 4 |
J |
Shelf board |
3 |
4/4 × 51/2 × 60" |
Deckboard |
K |
Top slat |
14 |
4/4 × 51/2 × 181/2" |
Deckboard |
How to Build a Built-In Potting Bench
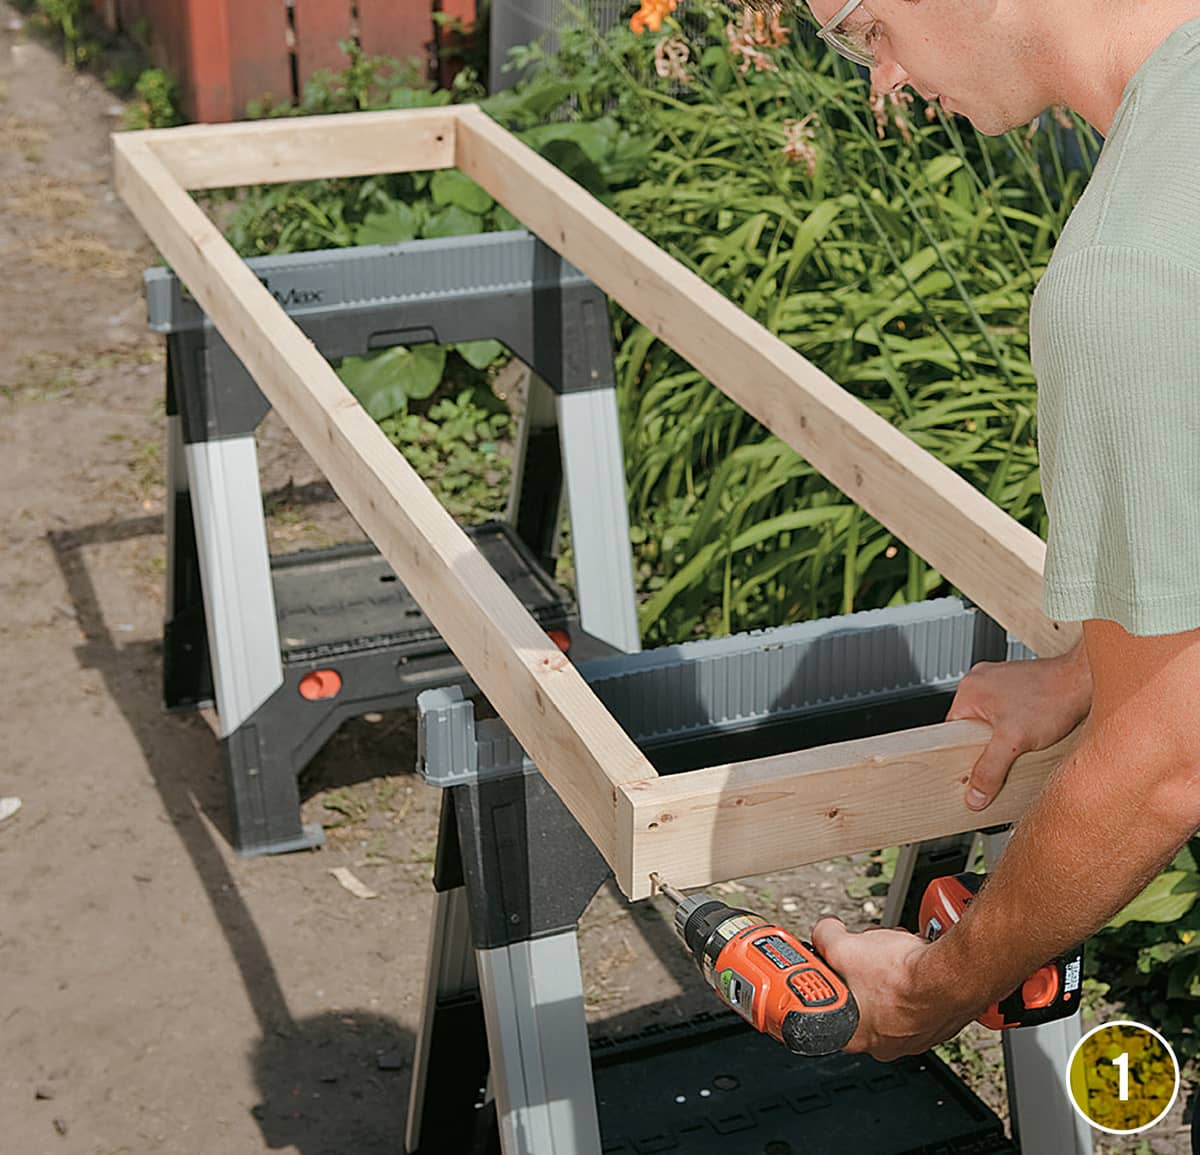
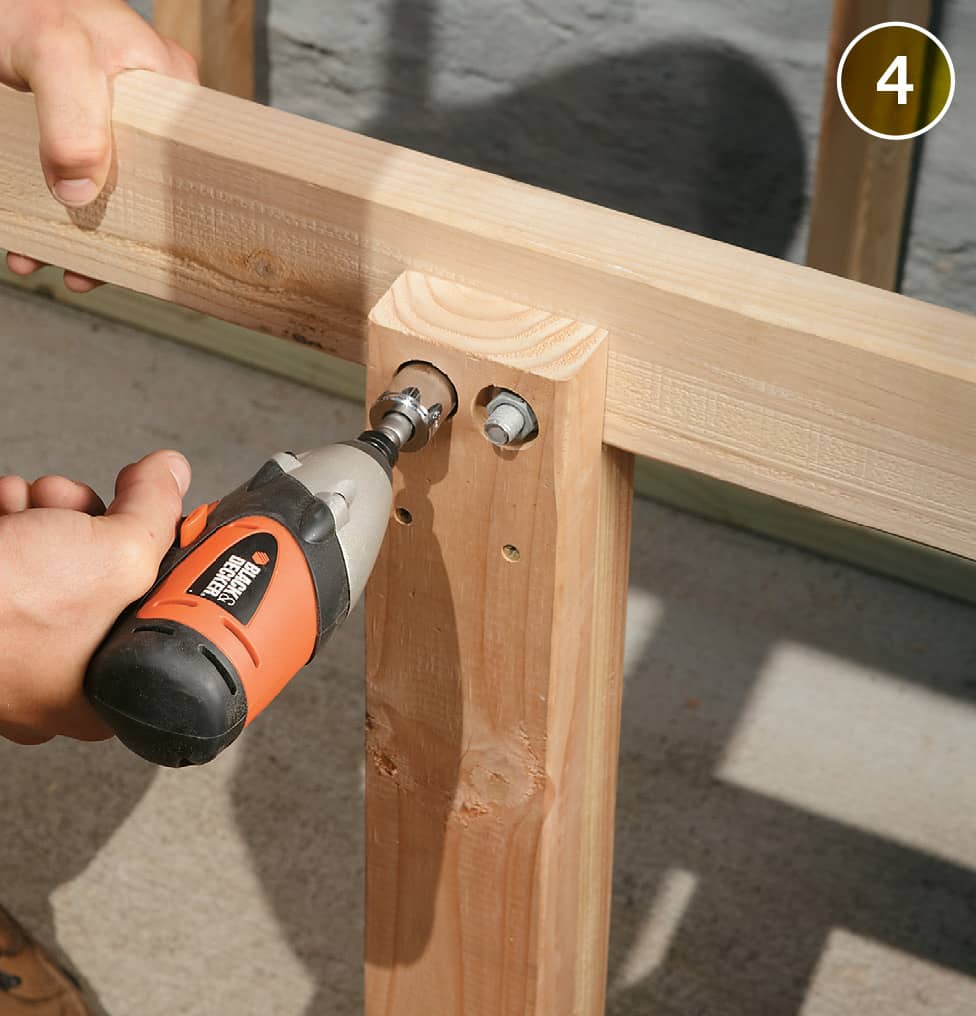
Pre-assemble the frame that is the benchtop support. Cut the 2 × 4 front, back, and ends to length and then join them with 3" deck screws and exterior-rated wood glue.
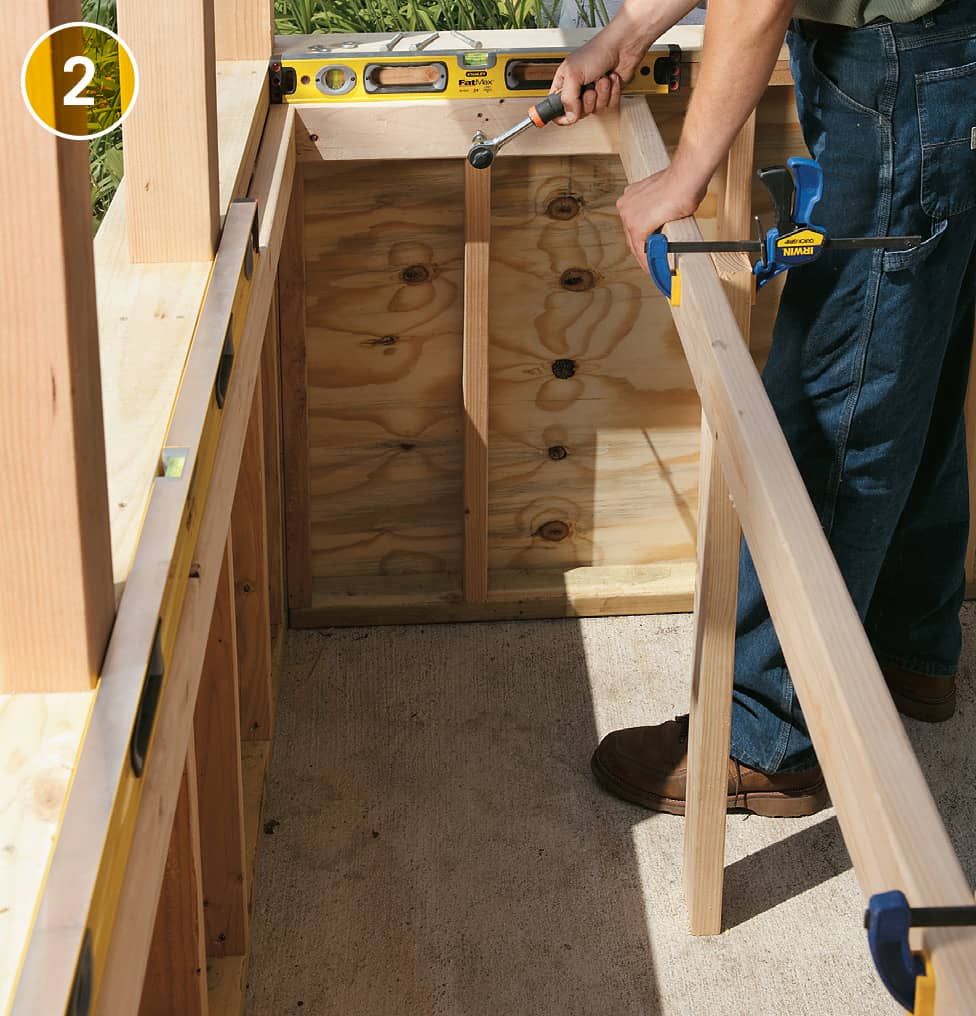
Attach the benchtop frame to the greenhouse wall studs using 3/8 × 3" lag screws. Before driving the lag screws, tack the back of the frame to the long wall with deck screws. The tops should be 36" above the floor. Then, clamp a 2 × 4 brace to the front rail of the frame and adjust it until level. Drill guide holes and drive one lag screw per wall stud at the back rail and on the ends.
Install the front legs. Each leg is created with a pair of 2 × 4s face-nailed or screwed together. The front 2 × 4 in each pair should fit between the frame and the floor. The back 2 × 4 in each pair is 21/2" longer to provide a surface for attaching the frame and legs. Join the leg halves with glue and 21/2" deck screws.
Attach each leg to the frame with a pair of 1/2 × 31/2" carriage bolts. Drill guide holes for the bolt and counterbores for the nuts and washers in the back face of the frame. Do not use washers behind carriage bolt heads.
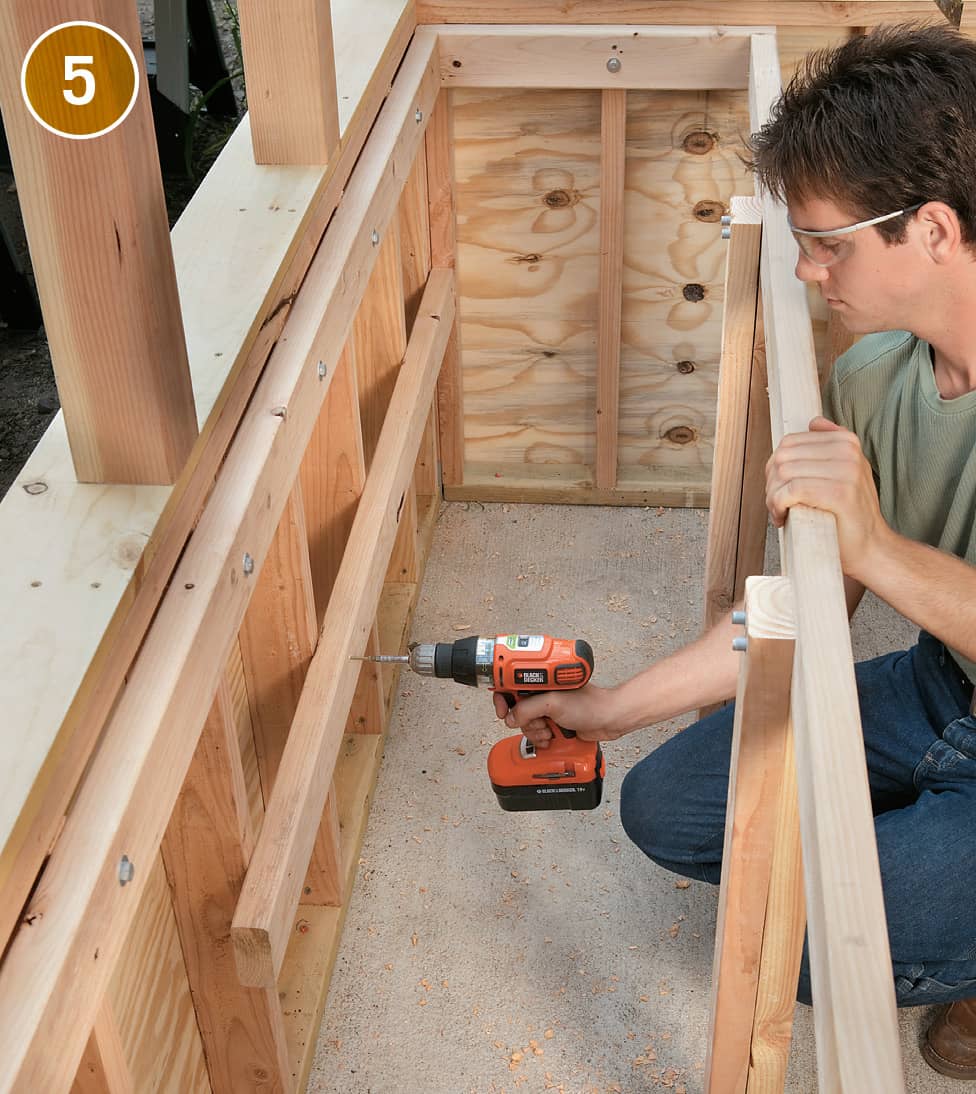
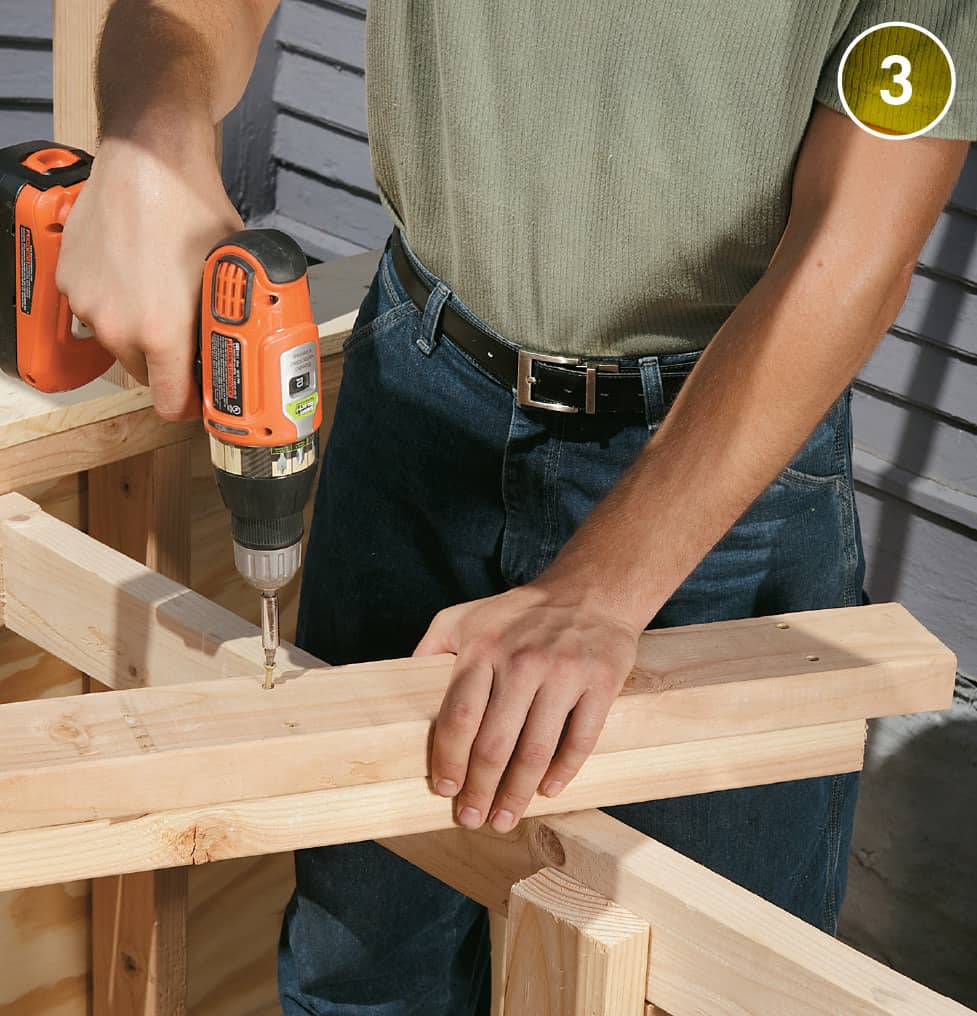
Attach a 2 × 4 ledger to the front wall studs to support the 2 × 4 shelf supports that run from the front of the bench to the wall. Use 3" deck screws driven at kneewall stud locations.
Attach 2 × 4 shelf supports to the legs and attach a 2 × 4 shelf support to the endwall. Then, fasten the shelving material to the tops of the supports. The best height for the shelf depends on the height of the containers you plan to set on the shelves beneath the removable section of the top.
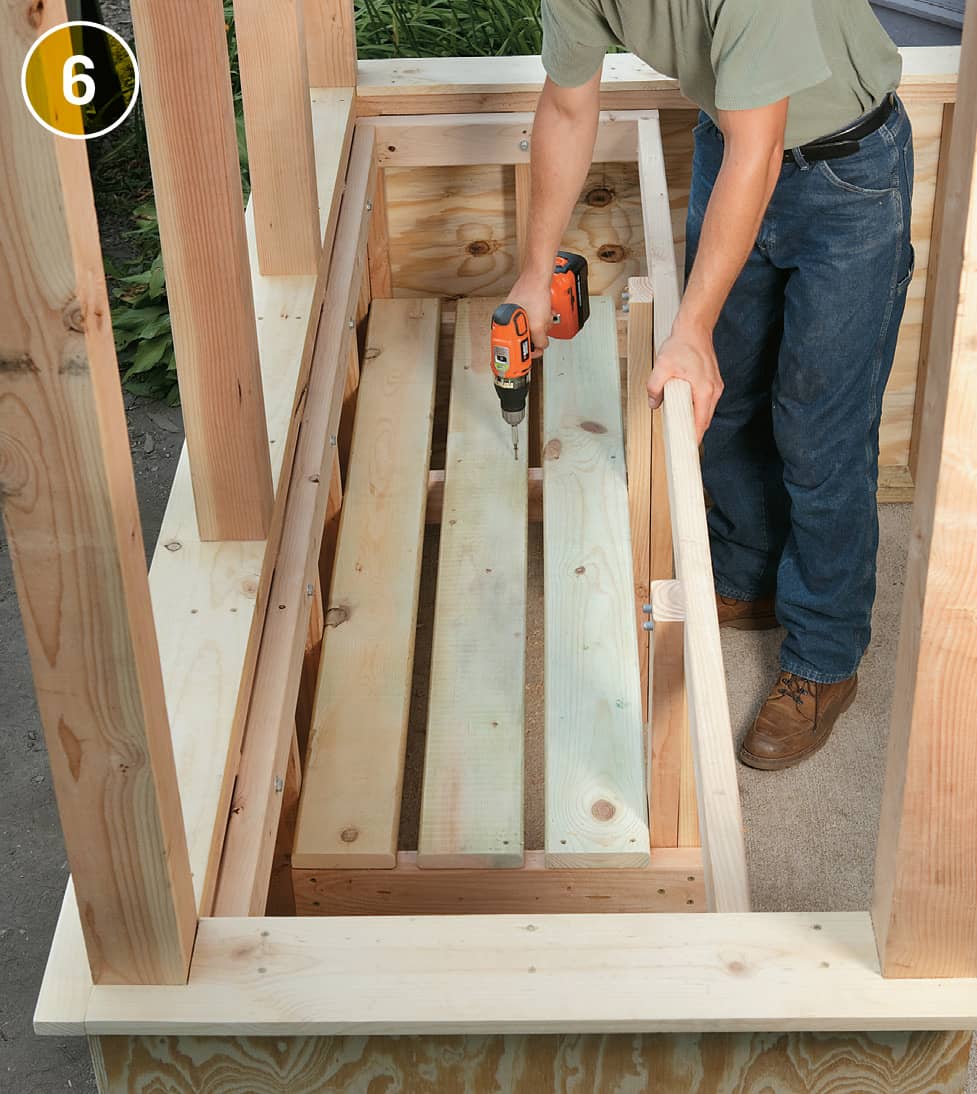
Glue and screw 2 × 2 cleats around the inside perimeter of the benchtop frame. The cleats should be positioned so they are level and the top faces of the deckboard slats will be about 1/8" above the frame tops when they rest on the cleats. Install a full-length cleat along the back wall and fill in between the legs at the front.
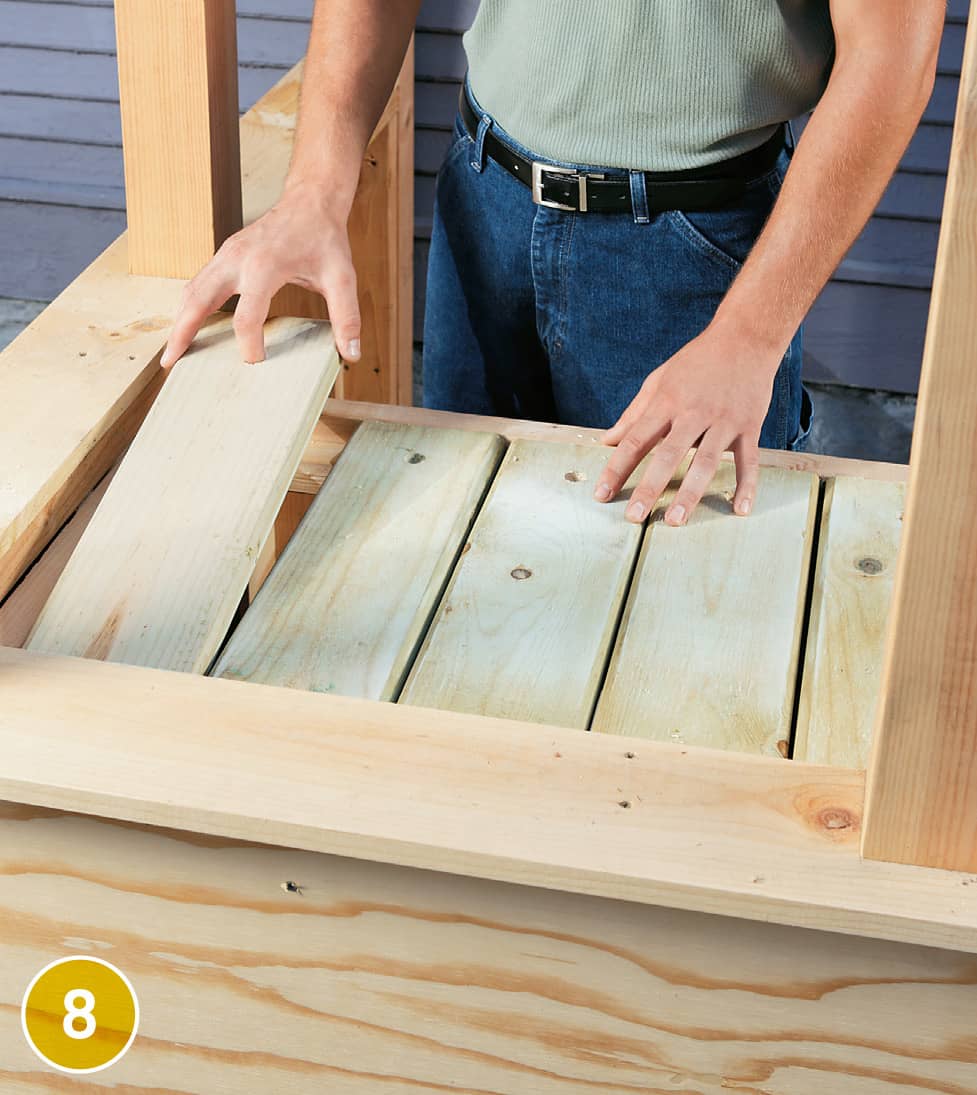
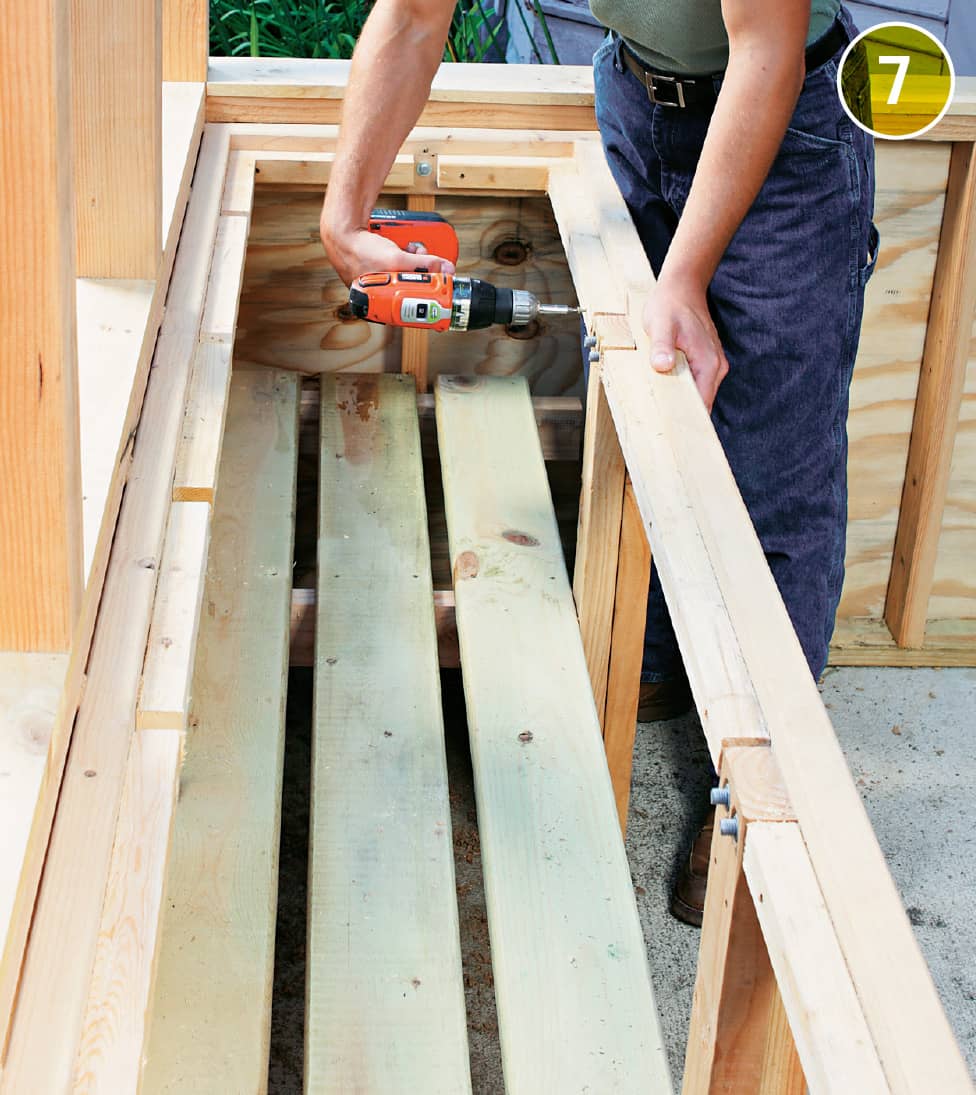
Cut the benchtop slats from treated or cedar decking (or composite if you prefer). Attach the slats over the first two bays by driving a pair of deck screws into each slat end and the cleat below. Do not fasten the deckboards over the right end bay. Drill 1" finger holes near the end of each board and simply set them on the cleats so they can be removed to access the shelf below. If you wish, coat the bench with deck finish.
Simple Potting Bench
A multi-functional workstation, like the High-Low Potting Bench shown here to here, offers great versatility that makes it useful in just about any greenhouse. But sometimes, all you really want from your work area is a big, broad surface with plenty of room to spread out and get busy. This workhorse of a bench is modeled after the most-used workspace in any home: the kitchen countertop. At 36 inches tall, the bench is the same height as most kitchen counters, and at 28 inches wide, it’s slightly deeper than standard countertops—but not so deep that you can’t easily reach across to the other side. The symmetrical configuration allows you to push any part of the bench against a greenhouse wall and still get plenty of light penetration.
There’s also no need to worry about a moisture-laden greenhouse environment. The understructure is made with moisture-resistant, pressure-treated lumber, and the top is made up of composite decking boards that won’t split, rot, or splinter and require no protective finish.
Of course, if you’ve always wished your kitchen counters were a bit higher or lower, you can simply add or subtract a few inches from the given dimension for the bench legs. You can also change the length of the bench to fit a small greenhouse, if necessary. Shortening the whole thing by 2 feet allows you to build it with standard 8-foot lumber and decking instead of 12-foot and 10-foot pieces.
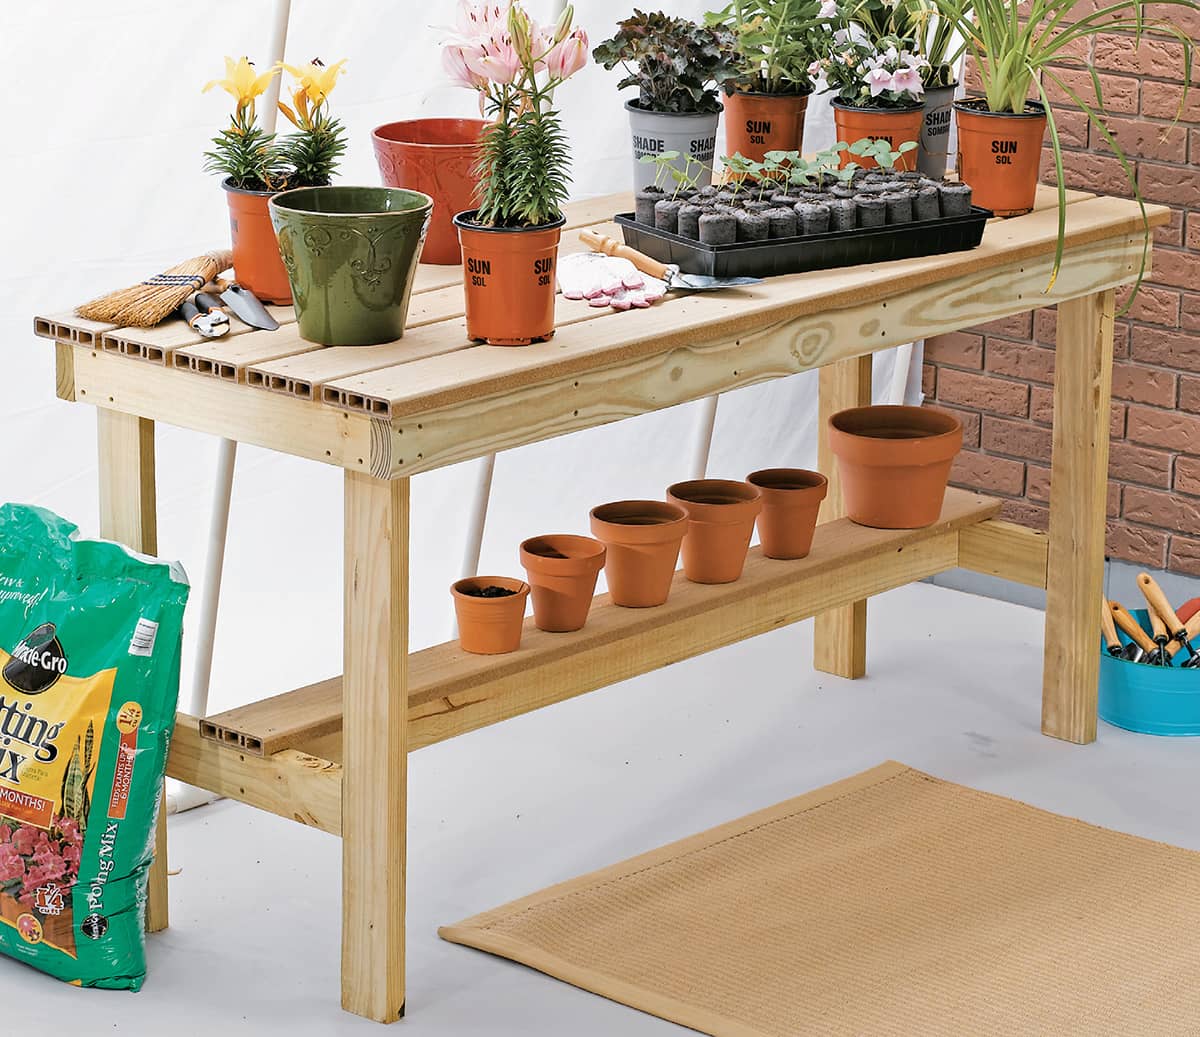
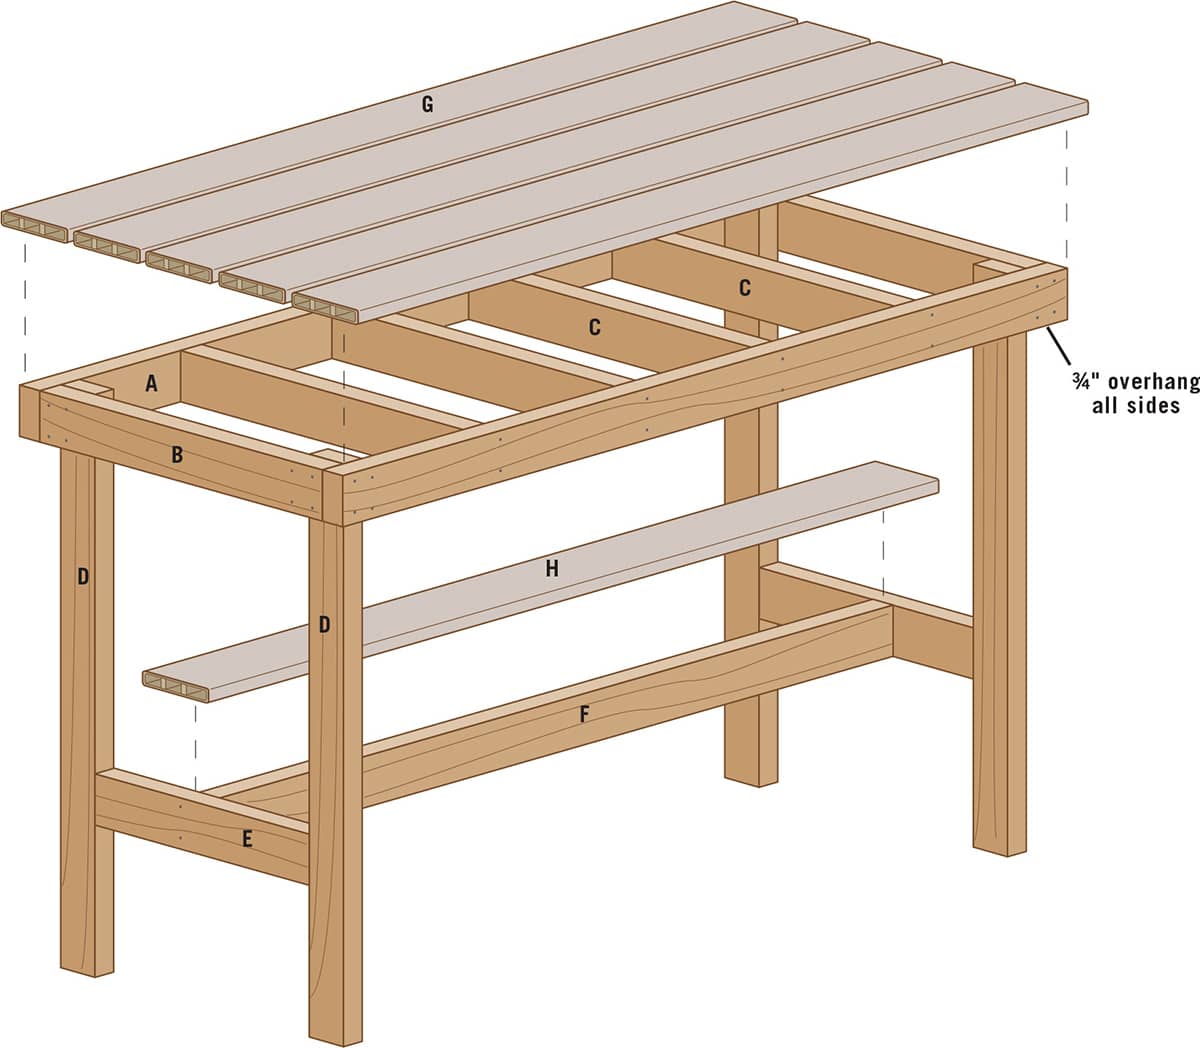
This potting bench has a 28 × 71" top and is built with four 2 × 4s and three standard-size decking boards. The handy pot shelf below the bench top is made with a cutoff from one of the deck boards.
SIMPLE POTTING BENCH
TOOLS & MATERIALS
Tape measure
Circular saw
Drill
Piloting-countersink bit
Framing square
Clamps
(3) 12' pressure-treated 2 × 4s
Deck screws (21/2", 31/2")
(1) 10' pressure-treated 2 × 4
(3) 12' 1 × 6 composite decking boards
Sandpaper
Eye and ear protection
Work gloves
CUTTING LIST
KEY |
PART |
NO. |
DIMENSION |
MATERIAL |
A |
Top frame side |
2 |
11/2 × 31/2 × 691/2" |
2 × 4 |
B |
Top frame end |
2 |
11/2 × 31/2 × 231/2" |
2 × 4 |
C |
Top supports |
4 |
11/2 × 31/2 × 231/2" |
2 × 4 |
D |
Leg |
4 |
11/2 × 31/2 × 35" |
2 × 4 |
E |
Leg support |
2 |
11/2 × 31/2 × 161/2" (field measure) |
2 × 4 |
F |
Stretcher |
1 |
11/2 × 31/2 × 631/2" (field measure) |
2 × 4 |
G |
Top decking |
5 |
1 × 51/2 × 71" |
1 × 6 decking |
H |
Pot shelf |
1 |
1 × 51/2 × 68" |
1 × 6 decking |
How to Build a Simple Potting Bench
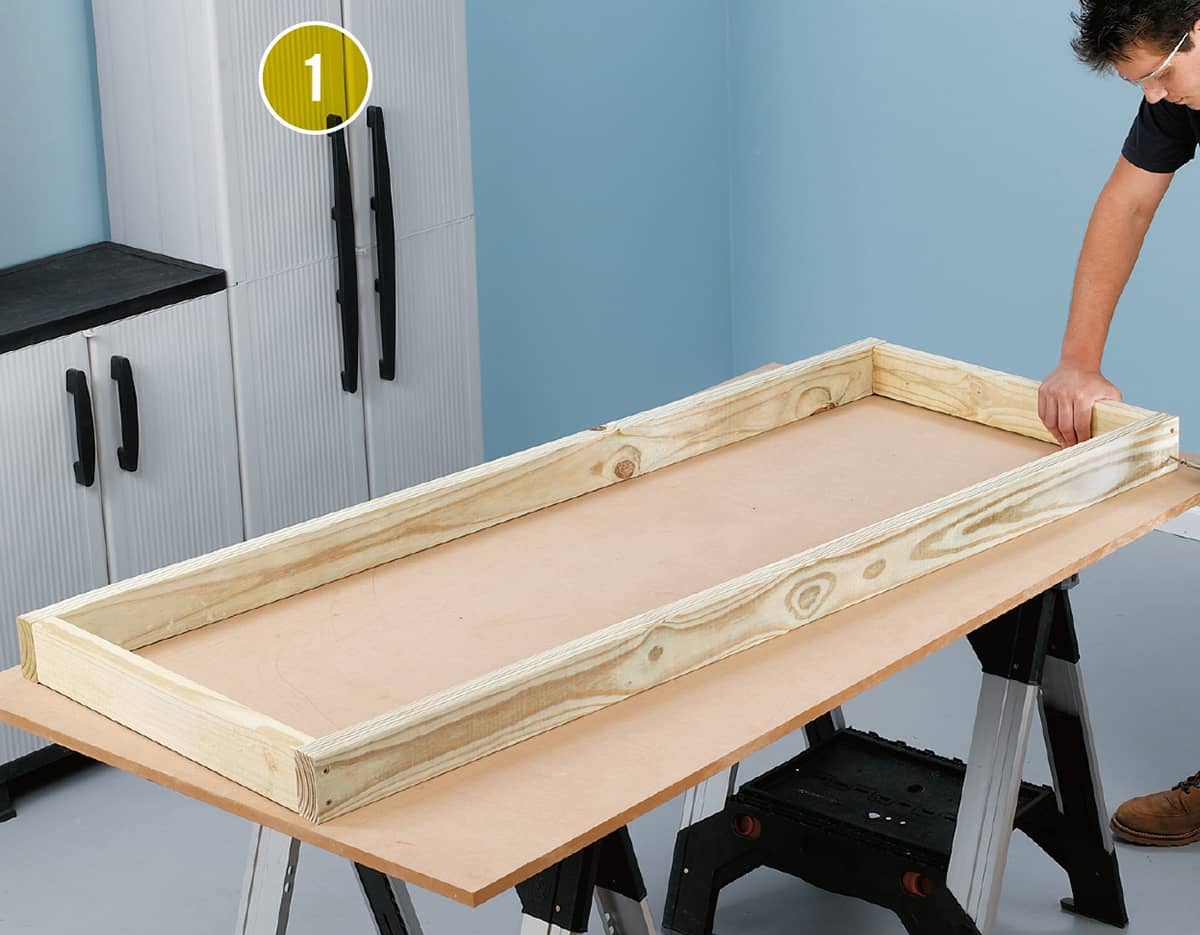
Cut the two top frame sides from one 12' 2 × 4, using a circular saw or power miter saw. Cut the two top frame ends and the four top supports from another 12' 2 × 4. Fit the side pieces over the ends of the end pieces so all top edges are flush. Drill countersunk pilot holes and fasten the pieces together with two 31/2" deck screws at each joint.
Mark the layout for the top supports. Measuring from one end of the top frame, mark both frame sides every 135/8". Check the top frame for square, using a framing square. Install the top supports between the frame sides with 31/2" deck screws driven through the frame sides and into the supports. Make sure the supports and frame sides are flush across the top.
Cut the four legs from one 12' 2 × 4. Round-over the edges on the bottom end of each leg, using sandpaper, a file, or a router and roundover bit; this prevents splintering if the table is slid around. Install the legs at the inside corners of the top frame, driving 21/2" deck screws through the legs and into the top frame ends. Also screw through the top frame sides and into the legs. Make sure the legs are square to the frame before fastening.
Mark the inside edge of each leg, 10" up from its bottom end. Measure the distance between each leg pair and cut a leg support to fit snugly between the legs, using the 10' 2 × 4. Install the leg supports with their bottom edges on the marks; drive 31/2" screws toenail style through the top and bottom edges of the supports and into the legs.
Cut the 2 × 4 stretcher to fit snugly between the leg supports, using the remainder of the 10' 2 × 4. Install the stretcher so it’s centered side-to-side on each support, with the top edges flush. Drive 31/2" screws through the outsides of the leg supports and into the stretcher ends.
Cut the top decking boards to length. Clamp the first board in place so it overhangs the front and ends of the top frame by 3/4". If the deck boards are crowned (slightly curved across the face), make sure the convex side faces up. Drill two pilot holes at the center of each top frame end and top support location, countersinking the holes slightly. Fasten the board with 21/2" deck screws.
Install the remaining deck boards so all of their ends are perfectly aligned and each board is gapped 1/8" from the next (without gaps, the joints would trap dirt). Use pieces of 1/8"-thick hardboard or two 1/8"-diameter drill bits to set the gaps. The last board should overhang the rear frame side by 3/4".
Complete the pot shelf by cutting the remaining half-piece of deck board to length. Position the board so it is centered side-to-side over the stretcher and overhangs both leg supports by 3/4". Fasten the board to the stretcher and leg supports with 21/2" deck screws driven through pilot holes.
High-Low Potting Bench
A workbench like this can be absolutely ideal against the back (north) wall of a greenhouse. It actually combines two work benches in one: a regular waist-level bench to fill seed trays or pots and a longer, lower bench that can hold supplies or plants while still allowing a maximum of sunlight to reflect back and penetrate deeply into the greenhouse. As a plus, it’s constructed of materials that are ideal for the moisture-heavy environment and temperature fluctuations common to any greenhouse.
What makes this potting bench different from most other potting benches is that the work surfaces are at appropriate heights for gardening tasks. The work surface is 30 inches high, making it easier to reach down into pots. The low work surface is just over a foot high, so you won’t have to lift heavy objects such as large pots or bags of soil. In addition to the high-low work surfaces, this bench also features a shelf and hook rail to keep small supplies and tools within reach, yet still off the main work area.
A potting bench gets wet and it gets dirty, so rot- and moisture-resistant materials were chosen to build this bench. The frame is made with pressure-treated pine lumber, and the work surfaces are composite deck boards. The composite material provides a smooth surface that will not splinter and is easy to clean.
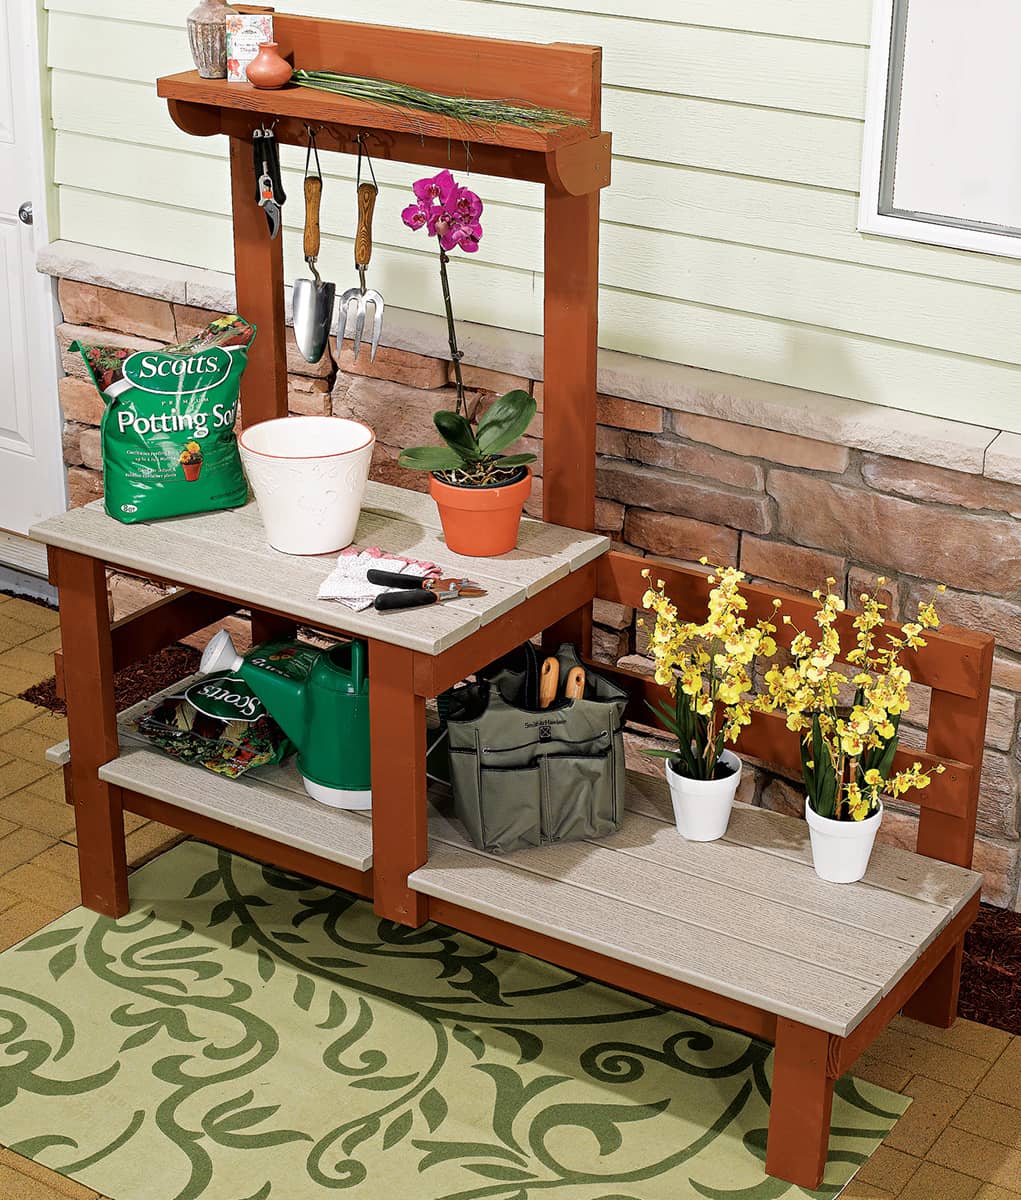
Not all pots are the same height. With two different working heights, this bench is comfortable to use whether you’re planting seeds in starter trays or planting a 5-gallon planter with tomatoes.
HIGH-LOW POTTING BENCH
CUTTING LIST
KEY |
PART |
NO. |
DIMENSION |
MATERIAL |
A |
Long leg |
2 |
11/2 × 31/2 × 623/4" |
Treated pine |
B |
Mid-length leg |
2 |
11/2 × 31/2 × 29" |
Treated pine |
C |
Short leg |
1 |
11/2 × 31/2 × 12" |
Treated pine |
D |
Back strut* |
1 |
11/2 × 31/2 × 541/4" |
Treated pine |
E |
Front strut |
1 |
11/2 × 31/2 × 201/2" |
Treated pine |
F |
Outside cross supports |
4 |
3/4 × 31/2 × 22" |
Treated pine |
G |
Middle top cross support |
1 |
11/2 × 31/2 × 193/4" |
Treated pine |
H |
Middle bottom cross support |
1 |
11/2 × 31/2 × 16" |
Treated pine |
I |
Bottom rails |
2 |
11/2 × 31/2 × 60" |
Treated pine |
J |
Back rails |
2 |
3/4 × 31/2 × 60" |
Treated pine |
K |
Front rail |
1 |
3/4 × 11/2 × 30" |
Treated pine |
L |
Hook rail |
1 |
3/4 × 31/2 × 30" |
Treated pine |
M |
Shelf supports |
2 |
3/4 × 31/2 × 7" |
Treated pine |
N |
Shelf/shelf back |
2 |
11/4 × 51/2 × 311/2" |
Treated pine |
O |
High worktop |
4 |
11/4 × 51/2 × 331/2" |
Deck boards |
P |
Low worktop |
4 |
11/4 × 51/2 × 621/2" |
Deck boards |
*Not shown
How to Build a High-Low Potting Bench
Cut the Frame Parts
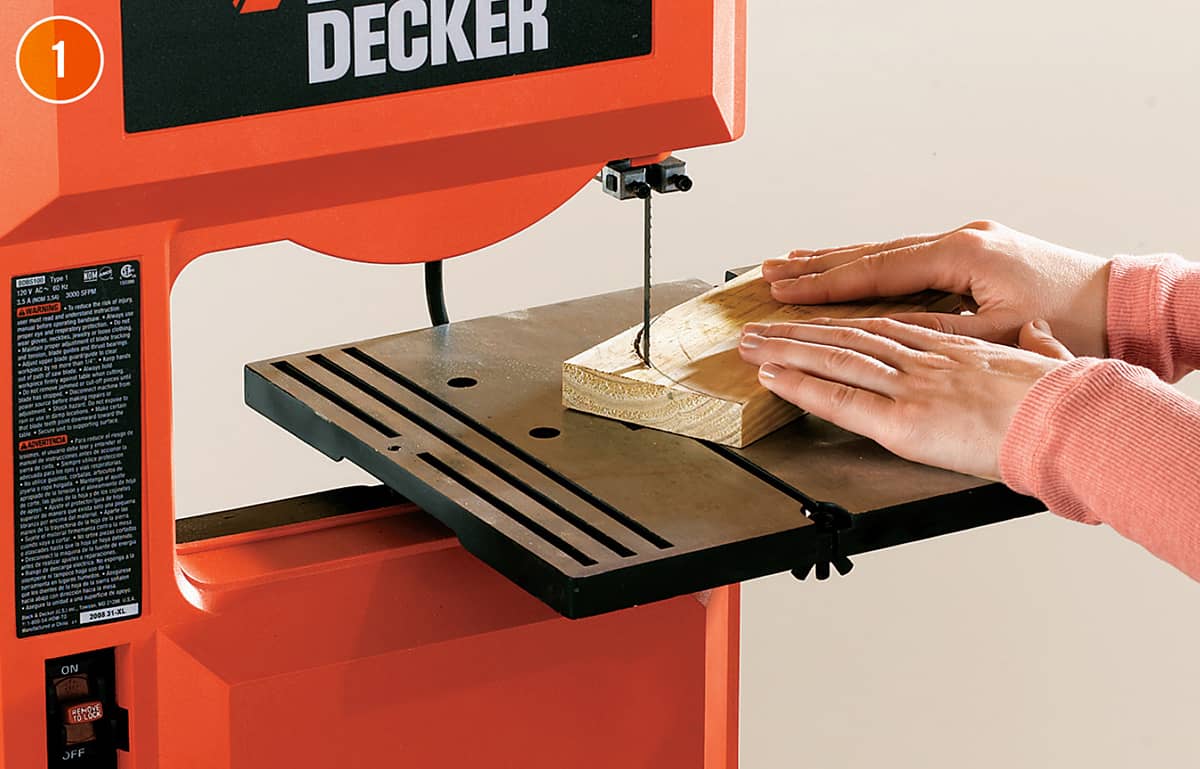
Cut all of the frame and shelf parts to length. Draw a 31/2-inch radius on the front bottom corner of each shelf support. Cut along the radius lines with a jigsaw or bandsaw (photo 1). Sand the profiles smooth. Apply a solid-color exterior deck and siding stain to all sides of the frame and shelf parts. Staining these parts isn’t mandatory, but it’s an opportunity to customize your workbench, and the stain will extend the life of the parts.
Assemble the Frame
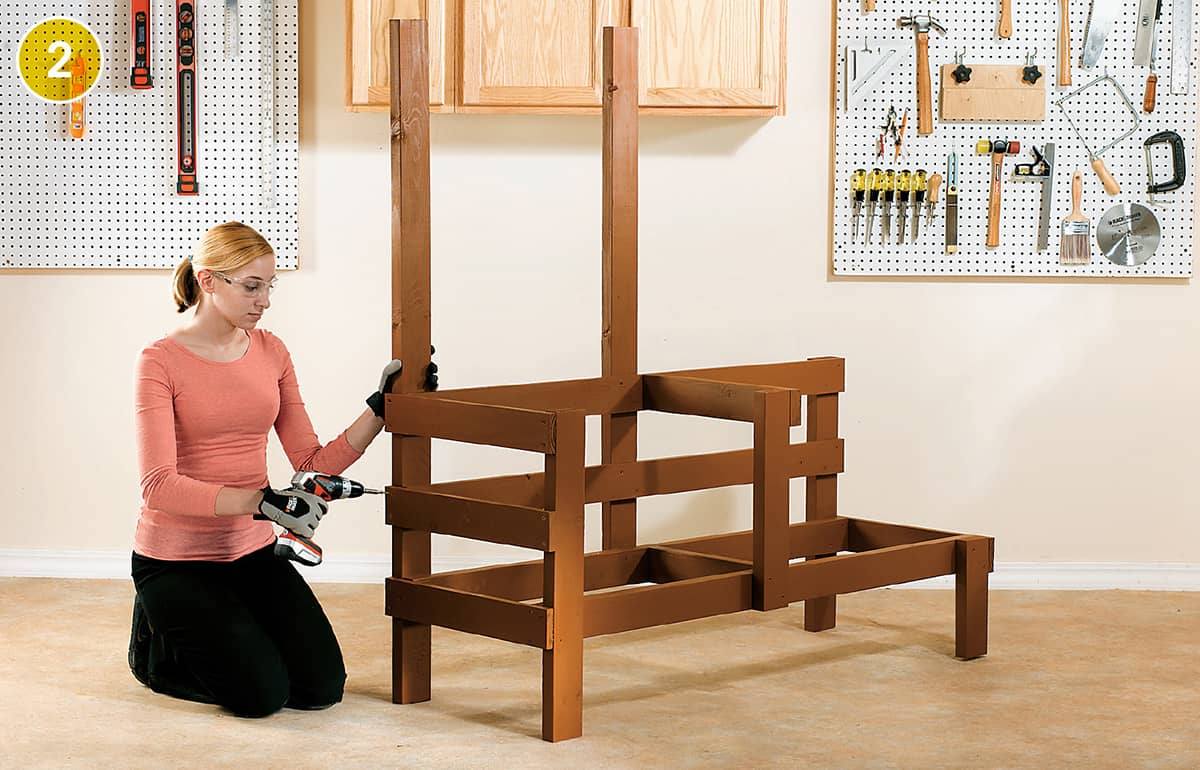
Attach two back rails and one bottom rail to the long leg, back strut, and back right mid-length leg with 2-inch deck screws. Check that all of the parts intersect at 90-degree angles. Attach the front rail and one bottom rail to the left front mid-length leg, front strut, and short leg. Connect the back assembly and front assembly by attaching them to the cross supports (photo 2).
Cut the shelf supports. Use a bandsaw or a jigsaw to make the 31/2" radius roundovers on the ends of the shelf supports. Sand smooth.
Assemble the bench frame. Clamp the cross supports to the front and back assemblies. Attach the cross supports with 2" deck screws.
Attach the Worktop Planks
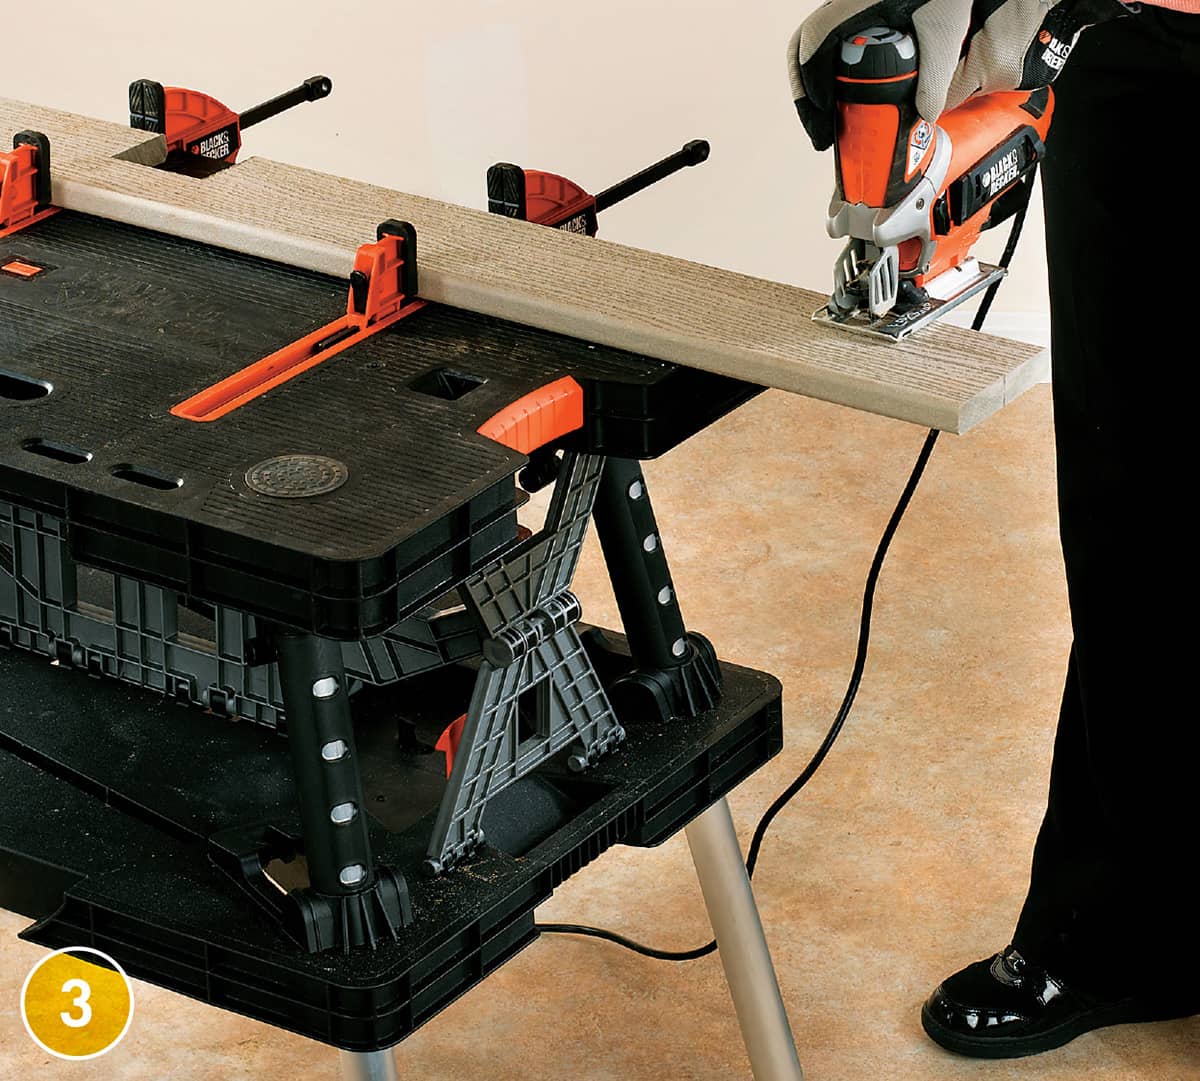
Cut the deck boards that will be used to create the work surfaces to length. We used composite deck boards because they require little maintenance and are easy to clean. Place the front deck board for the lower work surface against the backside of the front left leg and front strut. Mark the point where the front leg and strut intersect the deck board. Using these marks, draw the 33/4" deep notch outlines and cut out the notches with a jigsaw (photo 3).
Place the top and bottom deck boards on the cross supports, leaving a 1/4-inch space between the boards. Drill two pilot holes that are centered over the cross supports in each deck board. Attach the deck boards with 2-inch deck screws (photo 4). If you are using composite deck boards, use specially designed decking screws.
Cut notches. Lay out notches in the front board for the low work surface where the board must fit around the front leg and front strut. Use a jigsaw to cut the notches.
Install the worktop slats. Use composite screws to attach the composite deck boards that create the upper and lower worktops.
Attach the Shelf & Rack
Attach the shelf back, shelf hook rail, and shelf supports to the long leg and back strut with 21/2-inch deck screws. Attach the shelf to the shelf supports with 2-inch deck screws. Fasten the hooks to the shelf hook rail (photo 5).
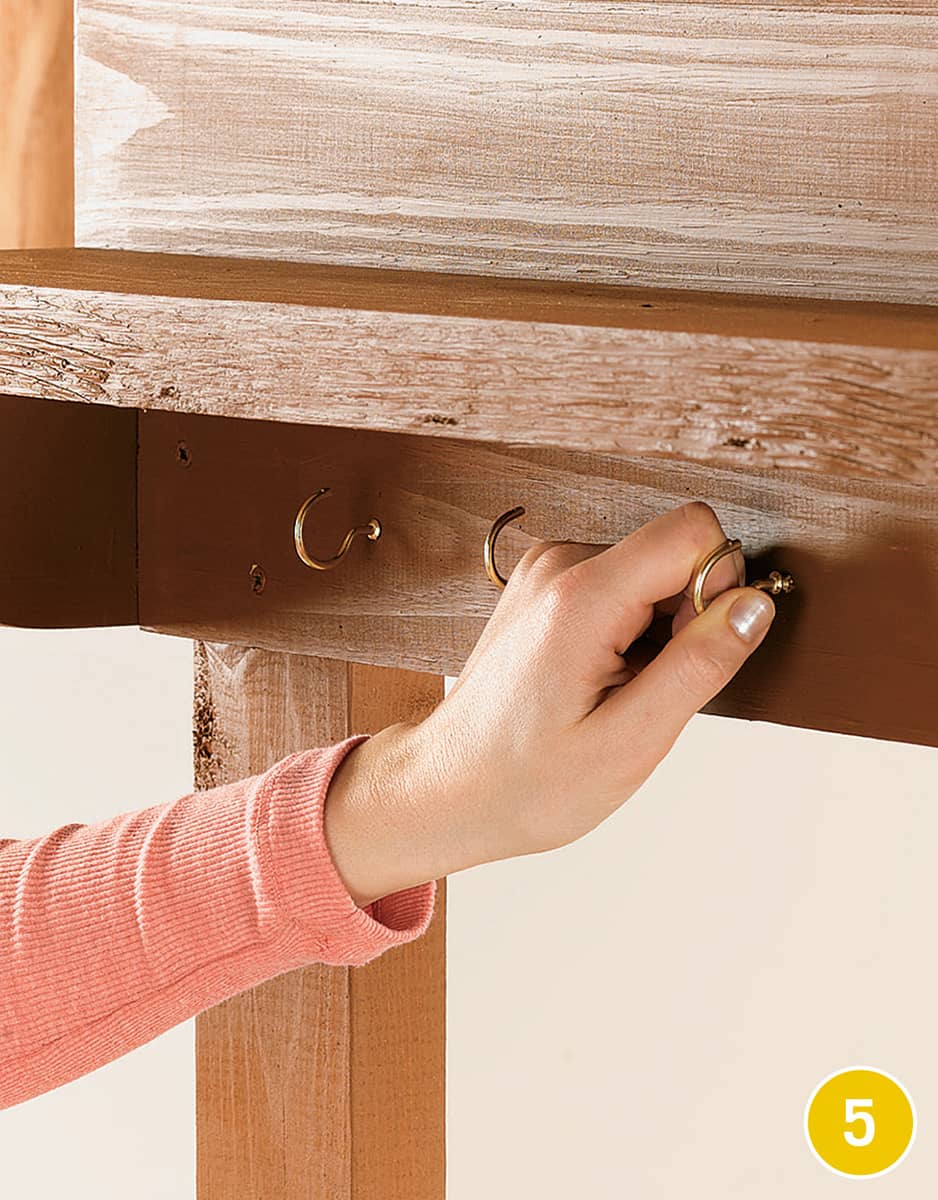
Install the shelf and hook rail. Attach the shelf to the shelf supports. Drill pilot holes for each screw to prevent splitting the shelf supports. Once the hook rail is installed twist in the cup hooks.
Lettuce Table
The lettuce table solves a number of gardening problems that home gardeners confront when growing tasty vegetables and herbs. First, and most important, it moves the crop up and out of the way of rabbits, slugs, and other destructive pests. Second, it’s portable, so it can be moved to follow or avoid the sun, or brought into the garage on frosty nights. Third, it can be set up on convenient but barren spots like decks, patios, and driveways. Fourth, it allows you to garden at a comfortable height, saving wear and tear on knees and backs. Fifth, you can easily replace the growing media every year and precisely control moisture and fertilizer, giving you better, more predictable yields. And finally, it provides accessible gardening for those in wheelchairs.
The frame of this lettuce table, which will be in contact with the soil, can be made from cedar, redwood, or any other naturally rot-resistant wood. It is left unfinished on the inside. Pressure-treated wood is used for the rest of the framework because it’s less expensive and will resist decay for decades. The galvanized hardware cloth across the bottom is an inexpensive way to support the weight of the soil; you can substitute cedar boards, galvanized metal flashing, or any other rot-resistant, nontoxic material that can hold the weight. No matter what you use to hold the weight, the soil is held in place with heavy-duty landscape fabric or aluminum screen mesh.
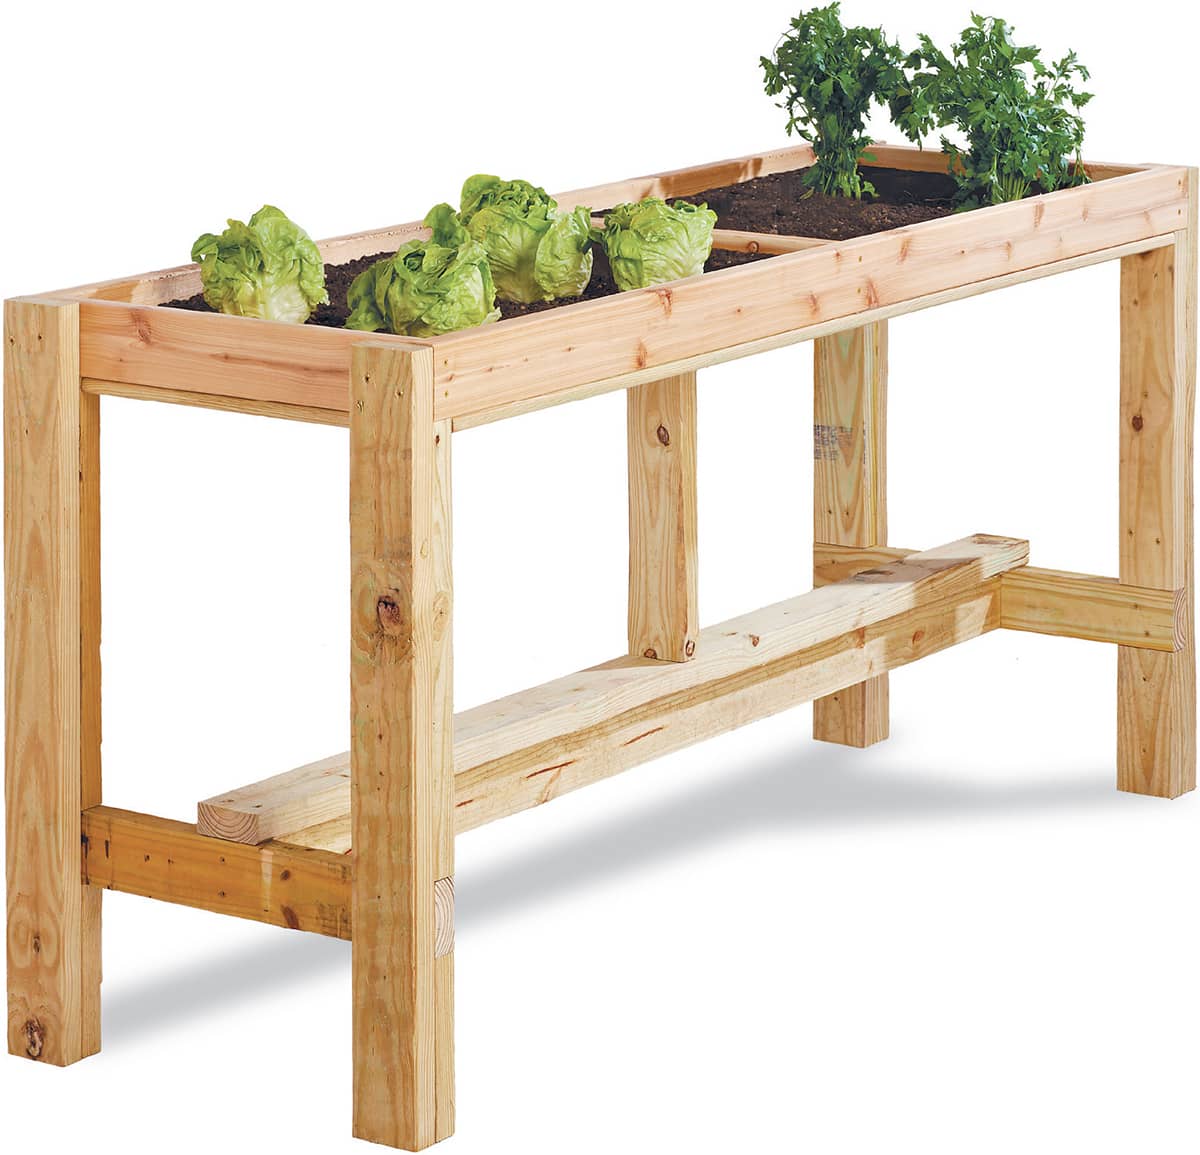
The lettuce table can be used to grow more than lettuce. It simply draws its name from its original purpose, which is to provide a shallow bed for growing lettuces in an easy-to-reach spot that can be moved easily around your yard. This interpretation is on the large side to allow you to grow several varieties, but you can easily modify the simple plan to build a more compact version.
How to Build a Lettuce Table
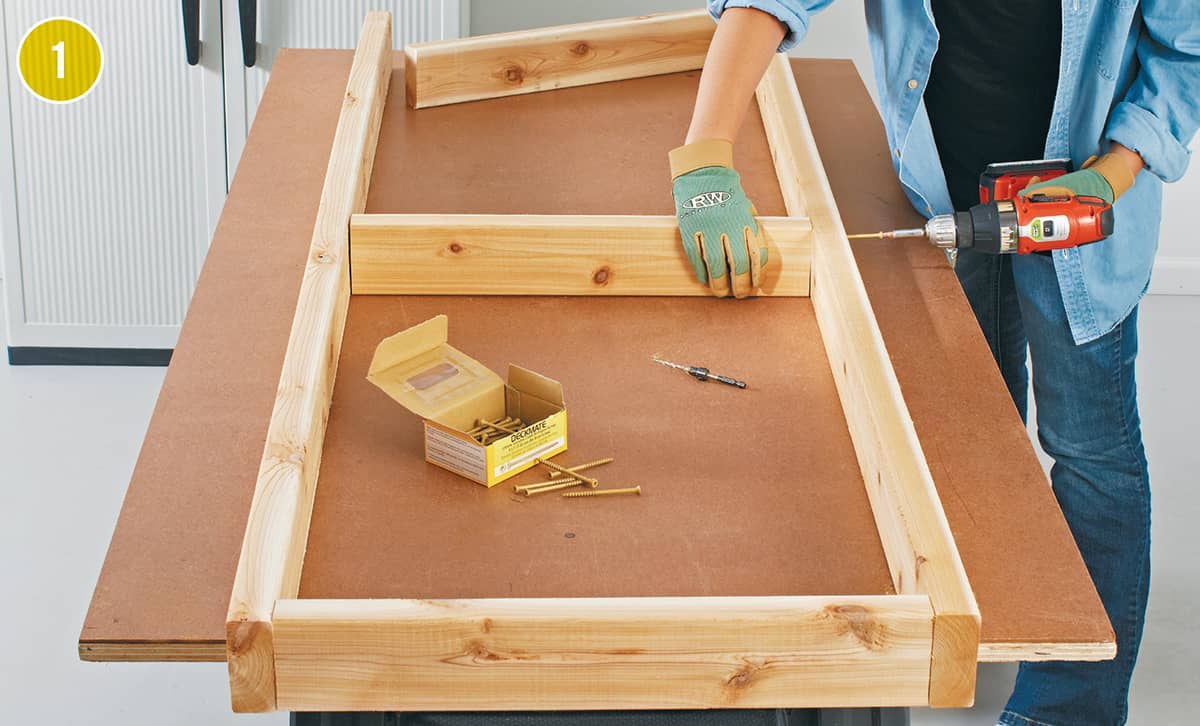
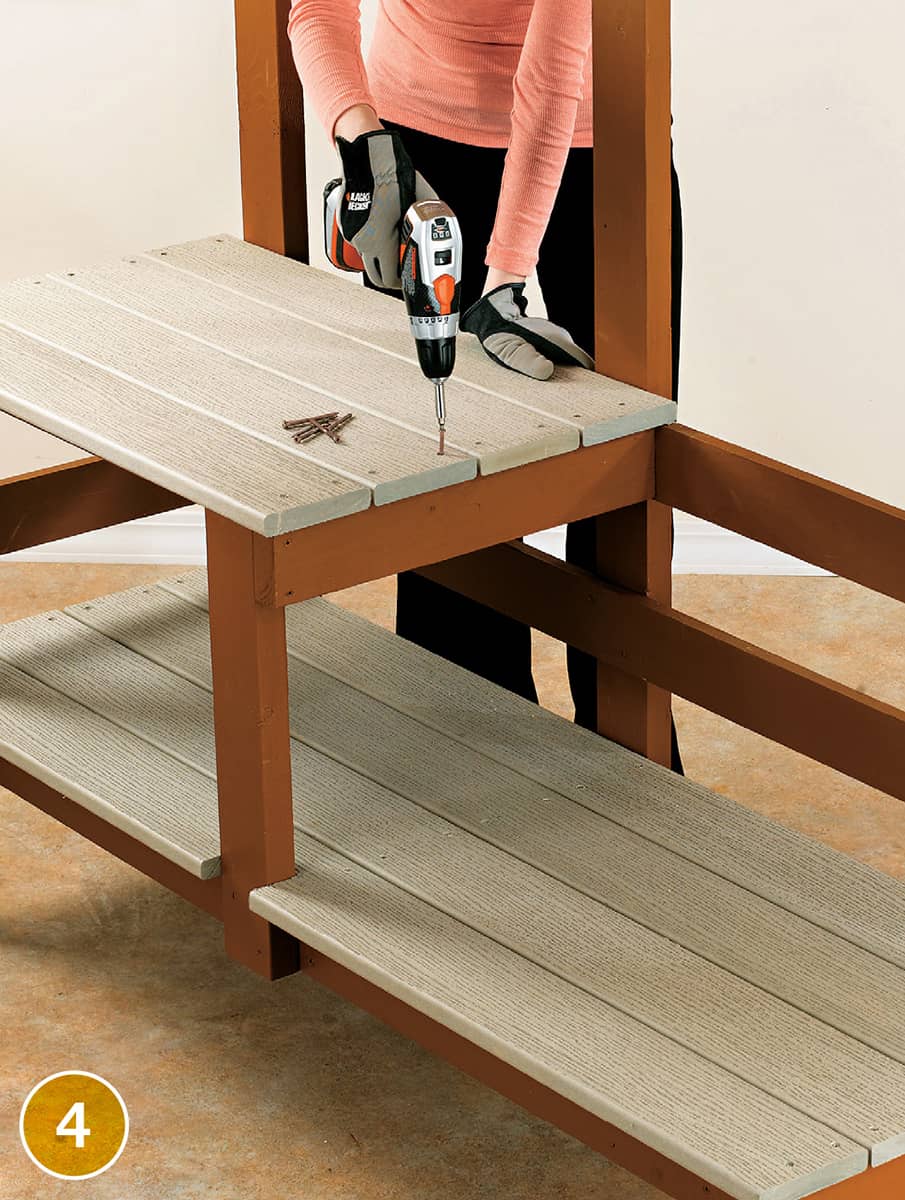
Cut the parts for the table frame to length and assemble the cedar top tray with the center divider. Predrill all screw holes to avoid splits, and use two screws at each corner. Use 21/2" (or 3") deck screws. This design is for a 2 × 6 ft. tray, but you can make it larger or smaller.
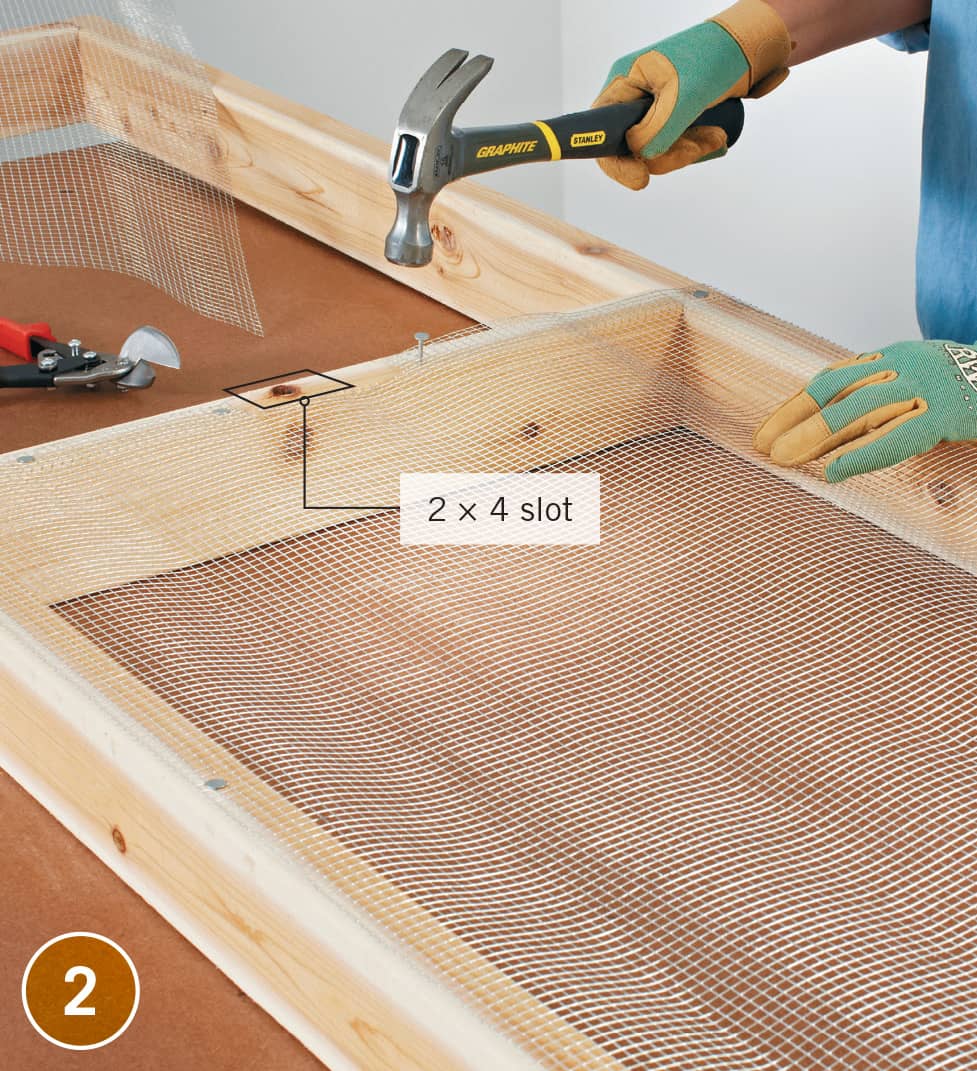
Wearing leather gloves, cut the hardware cloth to size. Cut out a 2 × 4" section at each corner for the legs. Center it on the underside of the cedar frame—it should be about 1/4" in from the edge on all sides. Nail it every 6" on the center divider, but first mark and cut out a 2 × 4" slot at the center of the divider. Pull the cloth flat and nail it several times on each side and the ends. No need to overdo it—the edges of the cloth will be covered and secured with 1 × 2s later.
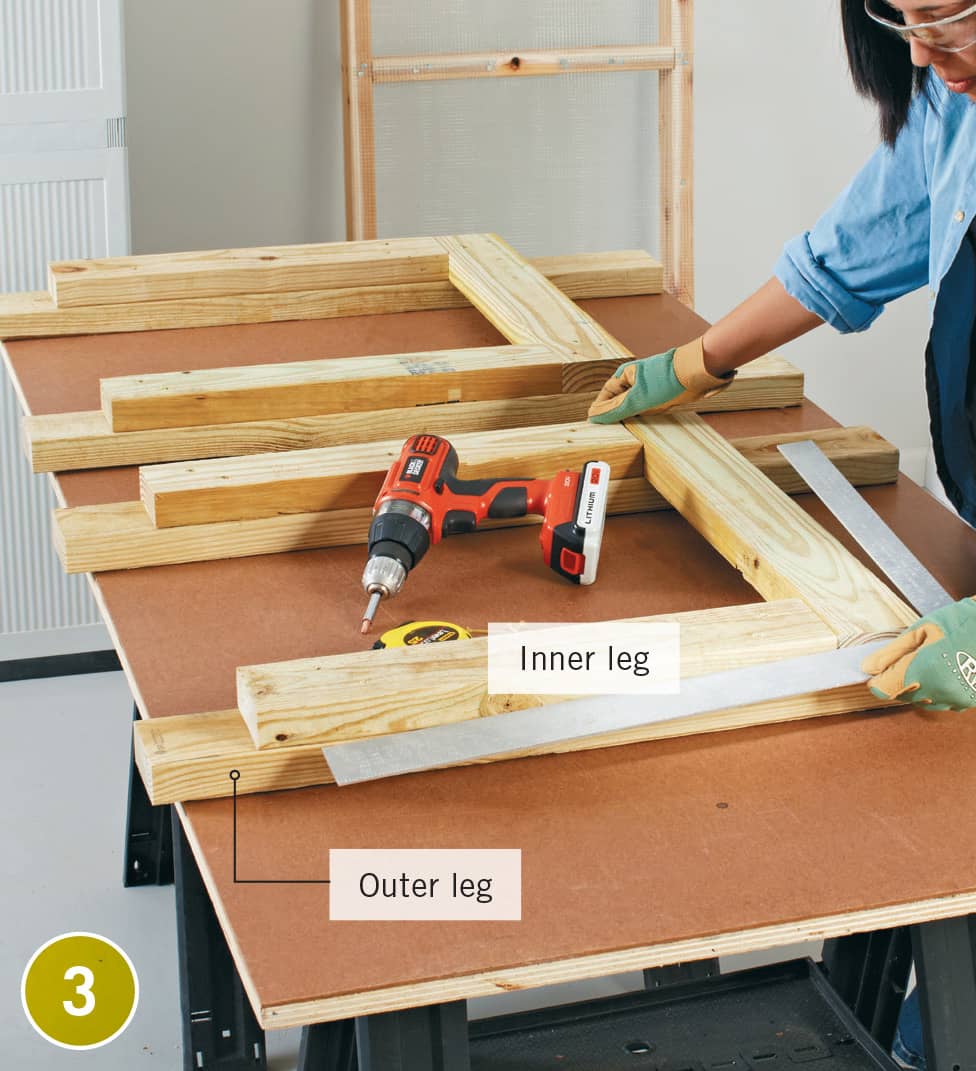
Cut the legs from the pressure-treated wood and assemble them into two leg pairs. Screw the inner and outer legs together, leaving a 31/2" gap at the top. The top frame will sit on the ledges created at the top. Leave the bottom legs off for now. Make sure the legs are parallel to each other, then join them together with the side rails. Spread a bead of construction adhesive before attaching the two pieces. Set the legs down parallel to each other and join them with the side rails.
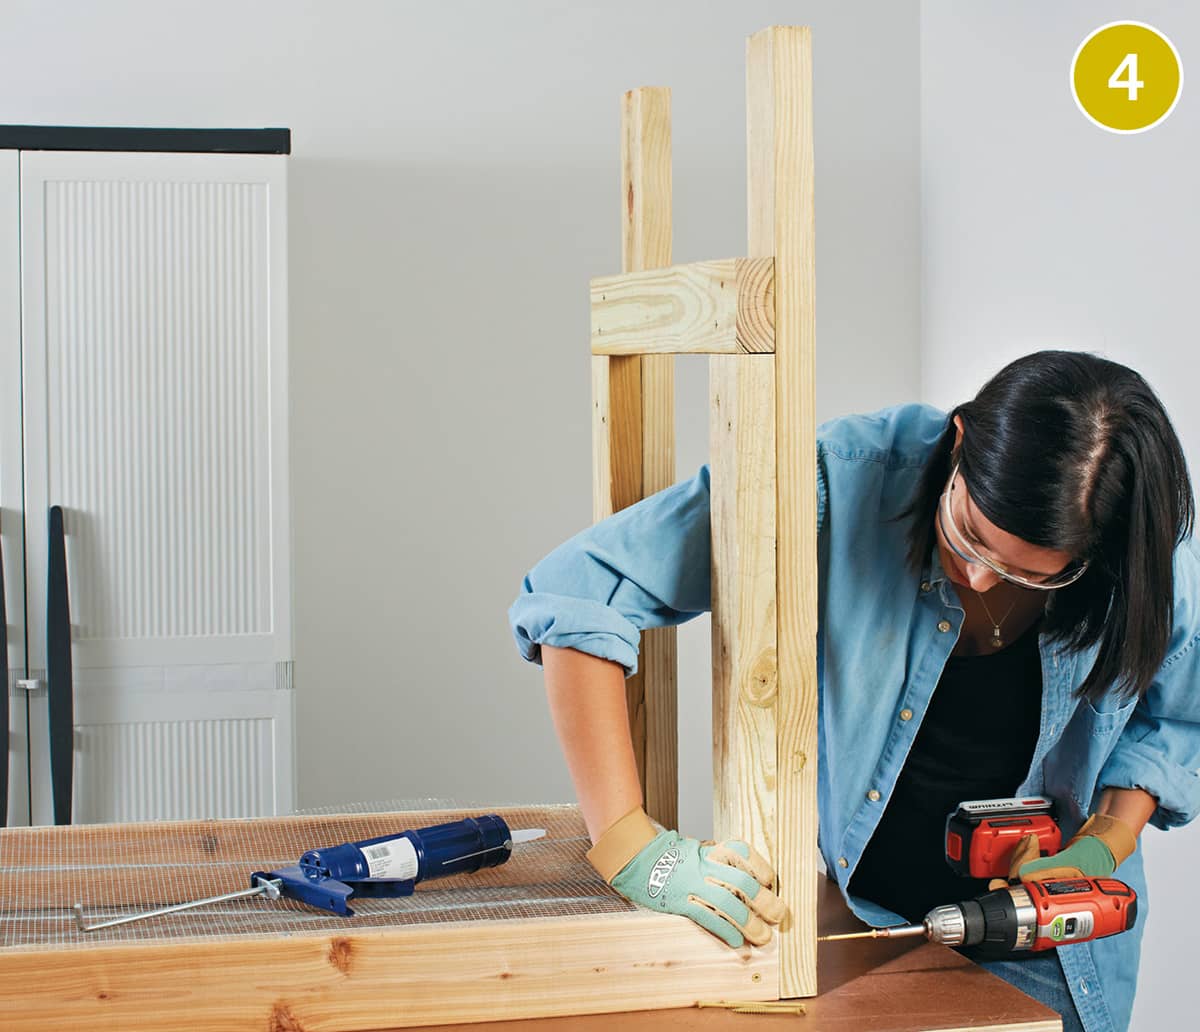
With the tray turned upside down, fit the legs onto the ends. Check that they’re square to the frame and sitting flat underneath it—if you see daylight between the inner leg and the tray, trim the outer leg a little so the gap disappears. Screw each leg to both parts of the cedar frame.
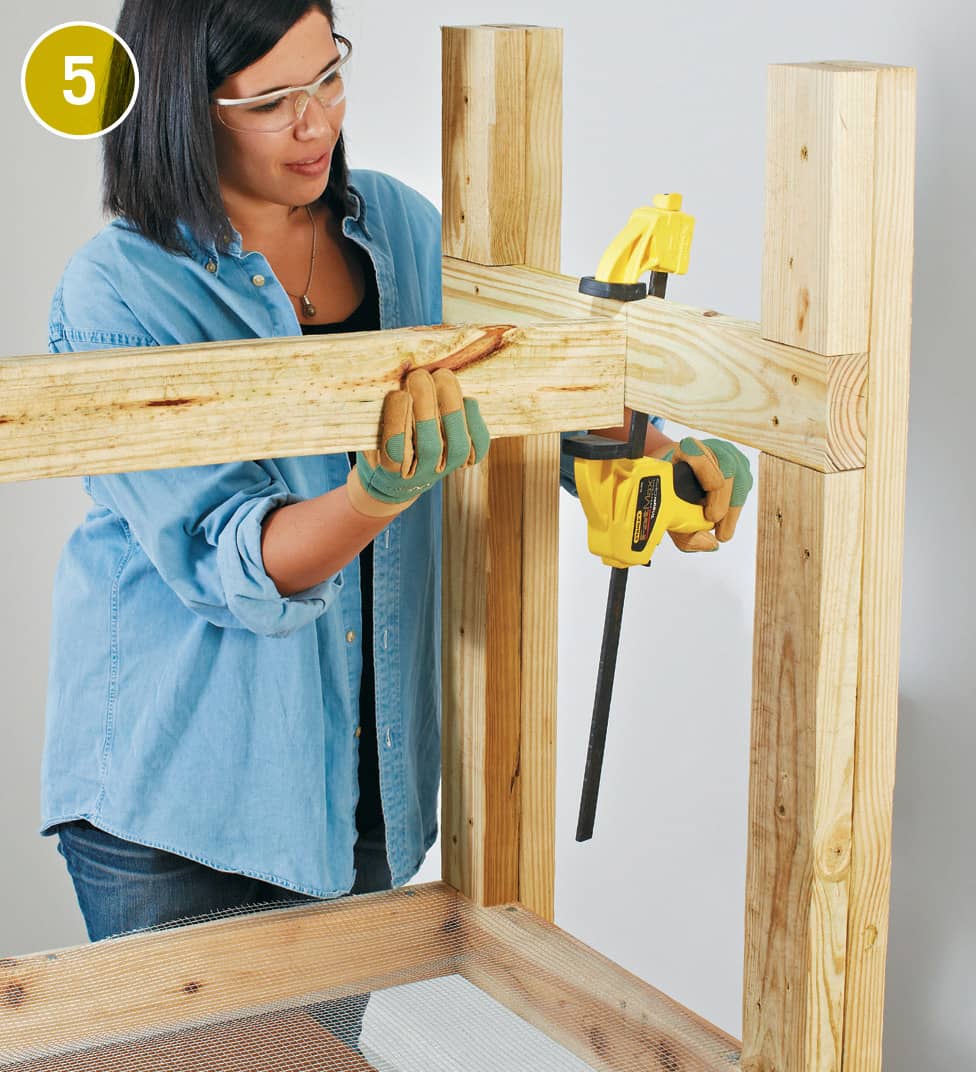
Attach the stretcher with 2 1/2" screws. Use clamps to hold the wood in place while you predrill and fasten. Also measure and cut the bottoms of the legs, and fasten with adhesive and screws.

Place the tray on the ground, right-side up. Screw the top stretcher to the rails and lower stretcher. Measure the distance from the stretchers to the center divider and cut and fasten the support. Add 1/16" to your measurement just to make sure you have a snug fit.

Predrill the 1 × 2s every 8 to 10". Flip the tray over then screw the 1 × 2s to the bottom of the tray, flush with the outside edges and covering the hardware cloth.
Finally, staple on landscape fabric or aluminum screen on the inside of the tray to hold the soil in. Fill the tray with a soilless growing media and fertilizer—not ordinary topsoil. For best results, replace the soilless mix every year, as it becomes compressed over time.
Trellis Planter
This simple, very stable planter-and-trellis combo exploits the durable nature of cedar to create a greenhouse feature ideally suited to the rigors, sun exposure, and moisture ever present in any greenhouse structure. The design showcases the wood in an incredibly useful greenhouse planter perfect for training edibles to grow vertically.
Because the 2 × 2 lattice trellis is attached to the planter, not permanently fastened to a wall or railing, it can be moved easily to follow changing sunlight patterns within the greenhouse or even shuttled outside in warmer months to make room for other plants or just to give the planter’s occupants some outside exposure. You may even want to consider installing wheels or casters on the base for greater mobility.
Building the trellis planter is a very simple job. The trellis portion is made entirely of strips of 2 × 2 cedar, fashioned together in a crosshatch pattern. The planter bin is a basic wood box, with panel sides and a two-board bottom with drainage holes that rests on a scalloped base. The trellis is screwed permanently to the back of the planter bin.
All manner of plants can be grown vertically in a greenhouse environment, including some surprising candidates, such as tomatoes, zucchini, and even miniature melon varieties. By training edibles that normally sprawl to climb up the more orderly surface of a trellis like this, you’ll free up room in your greenhouse, make it easier to tend the growing plants, and increase airflow—preventing disease in the process.
TRELLIS PLANTER
CUTTING LIST
KEY |
PART |
NO. |
DIMENSION |
MATERIAL |
A |
Box slats |
12 |
7/8 × 51/2 × 13" |
Cedar |
B |
Base front and back |
2 |
11/2 × 51/2 × 25" |
Cedar |
C |
Base ends |
2 |
11/2 × 51/2 × 123/4" |
Cedar |
D |
Cap front |
1 |
11/2 × 31/2 × 25" |
Cedar |
E |
Cap ends |
2 |
11/2 × 31/2 × 141/4" |
Cedar |
F |
Cap back |
1 |
11/2 × 11/2 × 18" |
Cedar |
G |
End posts |
2 |
11/2 × 11/2 × 591/2" |
Cedar |
H |
Center post |
1 |
11/2 × 11/2 × 631/2" |
Cedar |
I |
Long rail |
1 |
11/2 × 11/2 × 30" |
Cedar |
J |
Medium rails |
3 |
11/2 × 11/2 × 24" |
Cedar |
K |
Short rails |
2 |
11/2 × 11/2 × 18" |
Cedar |
L |
Long cleats |
2 |
7/8 × 11/2 × 181/2" |
Cedar |
M |
Short cleats |
2 |
7/8 × 11/2 × 11" |
Cedar |
N |
Bottom boards |
2 |
7/8 × 51/2 × 201/4" |
Cedar |
How to Build a Trellis Planter
Step 1: Build the Planter Bin
1. Cut the box slats (A) and cleats (L, M) to length. Arrange the slats edge-to-edge in two groups of four and two groups of two, with tops and bottoms flush.
2. Center a long cleat (L) at the top of each set of four slats, so the distance from each end of the cleat to the end of the panel is the same. Attach the cleats to the four-slat panels by driving 15/8" deck screws (photo 1) through the cleats and into the slats.
Attach the side cleats flush with the tops of the side boards.
3. Lay the short cleats (M) at the tops of the two-slat panels. Attach them to the slats the same way.
4. Arrange all four panels into a box shape and apply moisture-resistant wood glue to the joints. Attach the panels by driving 15/8" deck screws through the four-slat panels and into the ends of the two-slat panels.
Step 2: Install the Bin Bottom
1. Cut the bottom boards (N) to length. Set the bin upside down on your work surface, and mark reference lines on the inside faces of the panels, 7/8" in from the bottom of the bin. Insert the bottom boards into the bin, aligned with the reference lines to create a 7/8" recess. Scraps of 1× cedar can be put beneath the bottom boards as spacers.
2. Drill 1/8" pilot holes through the panels. Counterbore the holes slightly with a counterbore bit. Fasten the bottom boards by driving 15/8" deck screws through the panels and into the edges and ends of the bottom boards.
Step 3: Build the Planter Base
1. The planter base is scalloped to create feet at the corners.
2. Cut the base front and back (B) and the base ends (C) to length. To draw the contours for the scallops on the front and back boards, set the point of a compass at the bottom edge of the base front, 5" in from one end. Set the compass to a 21/2" radius and draw a curve to mark the curved end of the cutout. Draw a straight line to connect the tops of the curves, 21/2" up from the bottom of the board, to complete the scalloped cutout.
3. Make the cutout with a jigsaw, then sand any rough spots. Use the board as a template for marking a matching cutout on the base back.
4. Draw a similar cutout on one base end, except with the point of the compass 31/2" in from the ends. Cut out both end pieces with a jigsaw.
5. Draw reference lines for wood screws 3/4" from the ends of the base front and back. Drill three evenly spaced pilot holes through the lines. Counterbore the holes. Fasten the base ends between the base front and back by driving three evenly spaced deck screws at each joint.
Step 4: Attach the Bin to the Base
1. Set the base frame and planter bin on their backs. Position the planter bin inside the base so it extends 7/8" past the top of the base.
2. Drive 15/8" deck screws through the planter bin and into the base to secure the parts (photo 2).

The recess beneath the bottom boards in the planter bin provides access for driving screws.
Step 5: Make the Cap Frame
1. Cut the cap front (D), cap ends (E), and cap back (F) to length. Cut 45° miters at one end of each cap end and at both ends of the cap front.
2. Join the mitered corners by drilling pilot holes through the joints (photo 3). Counterbore the holes. Fasten the pieces with glue and 21/2" deck screws. Clamp the cap front and cap ends to the front of your worktable to hold them while you drive the screws.

Before attaching the cap ends, drill pilot holes through the mitered ends of the cap-front ends.
3. Fasten the cap back between the cap ends with deck screws, making sure the back edges are flush. Set the cap frame on the planter bin so the back edges are flush. Drill pilot holes and counterbore them. Drive 21/2" deck screws through the cap frame and into the side and end cleats.
Step 6: Make the Trellis
1. The trellis is made from pieces in a crosshatch pattern. The exact number and placement of the pieces is up to you—use the same spacing we used (see Drawing) or create your own.
2. Cut the end posts (G), center post (H) and rails (I, J, K) to length. Lay the end posts and center post together side by side with their bottom edges flush so you can gang-mark the rail positions.
3. Use a square as a guide for drawing lines across all three posts, 18" up from the bottom. Draw the next line 71/2" up from the first. Draw additional lines across the posts, spaced 71/2" apart.
4. Cut two 7"-wide scrap blocks and use them to separate the posts as you assemble the trellis. Attach the rails to the posts in the sequence shown in the Diagram, using 21/2" screws (photo 4). Alternate from the fronts to the backs of the posts when installing the rails.
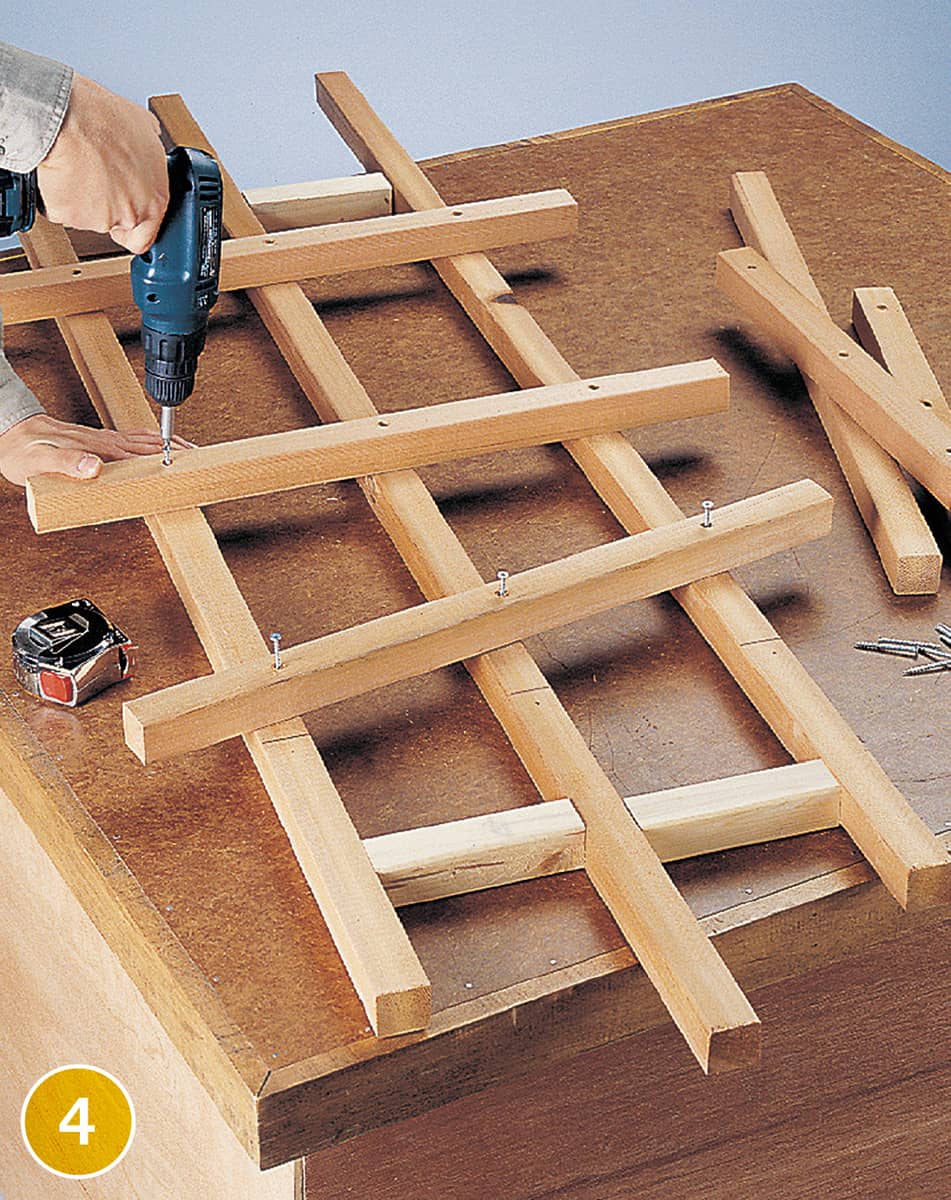
Temporary spacers hold the posts in position while the rails are attached.
Step 7: Apply Finishing Touches
1. Fasten the trellis to the back of the planter bin so the bottoms of the posts rest on the top edge of the base. Drill pilot holes in the posts. Counterbore the holes. Drive 21/2" deck screws through the posts and into the cap frame. With a 1"-diameter spade bit, drill a pair of drainage holes in each bottom board. Stain the project with an exterior wood stain.
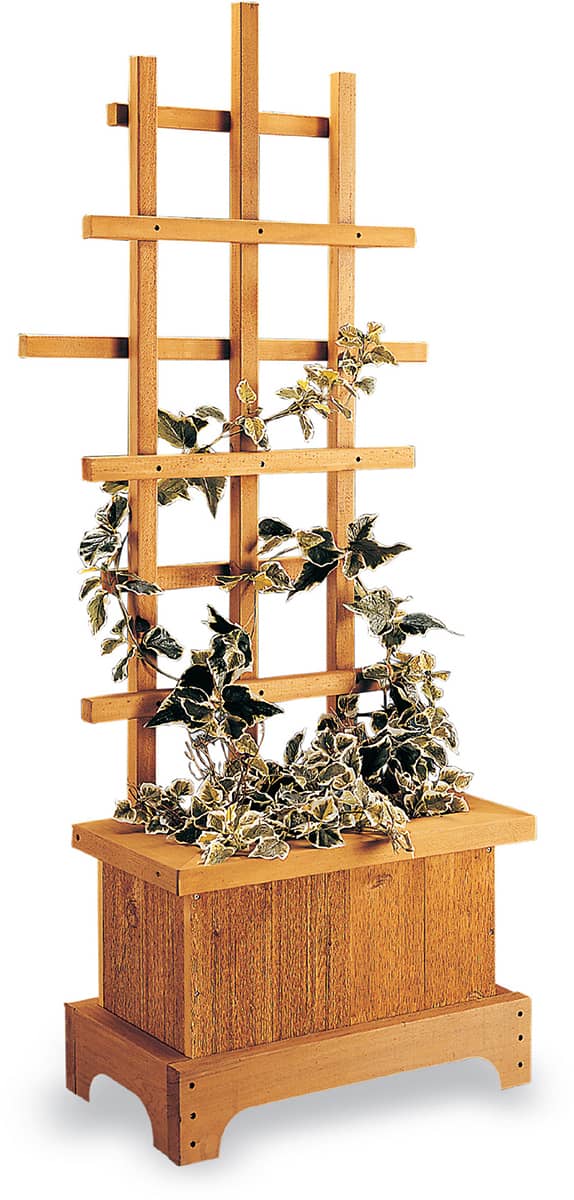
Planter with Hanging Trellis
You don’t need a large yard—or any yard at all for that matter—to have a garden. Planting in containers makes it possible to cultivate a garden just about anywhere. A container garden can be as simple as a small flowering annual planted in a single 4-inch pot or as elaborate as a variety of shrubs, flowering plants, and ornamental grasses planted in a large stationary planter.
This planter project combines a couple of different container options to create a larger garden in a relatively small space. The base is an 18 × 30-inch planter box that is large enough to hold several small plants, a couple of medium-sized plants, or one large plant. It features a trellis back that can be covered by climbing plants.
In addition to the planter and trellis, this project features two plant hangers that extend out from the back posts. Adding a couple of hanging plant baskets further extends the garden display without increasing the space taken up by the planter.
This project is easiest to build with a table saw, miter saw, jigsaw, and drill/driver. If you don’t have access to a table saw, use a circular saw or jigsaw and straightedge to rip the 1 × 6 siding boards. An even easier option is to replace the 23/4-inch-wide siding boards with 31/2-inch-wide 1 × 4s. This modification makes the planter 41/2 inches taller, so you also have to make the front posts 241/2 inches long instead of 20 inches long and add 41/2 inches to the front posts trim.
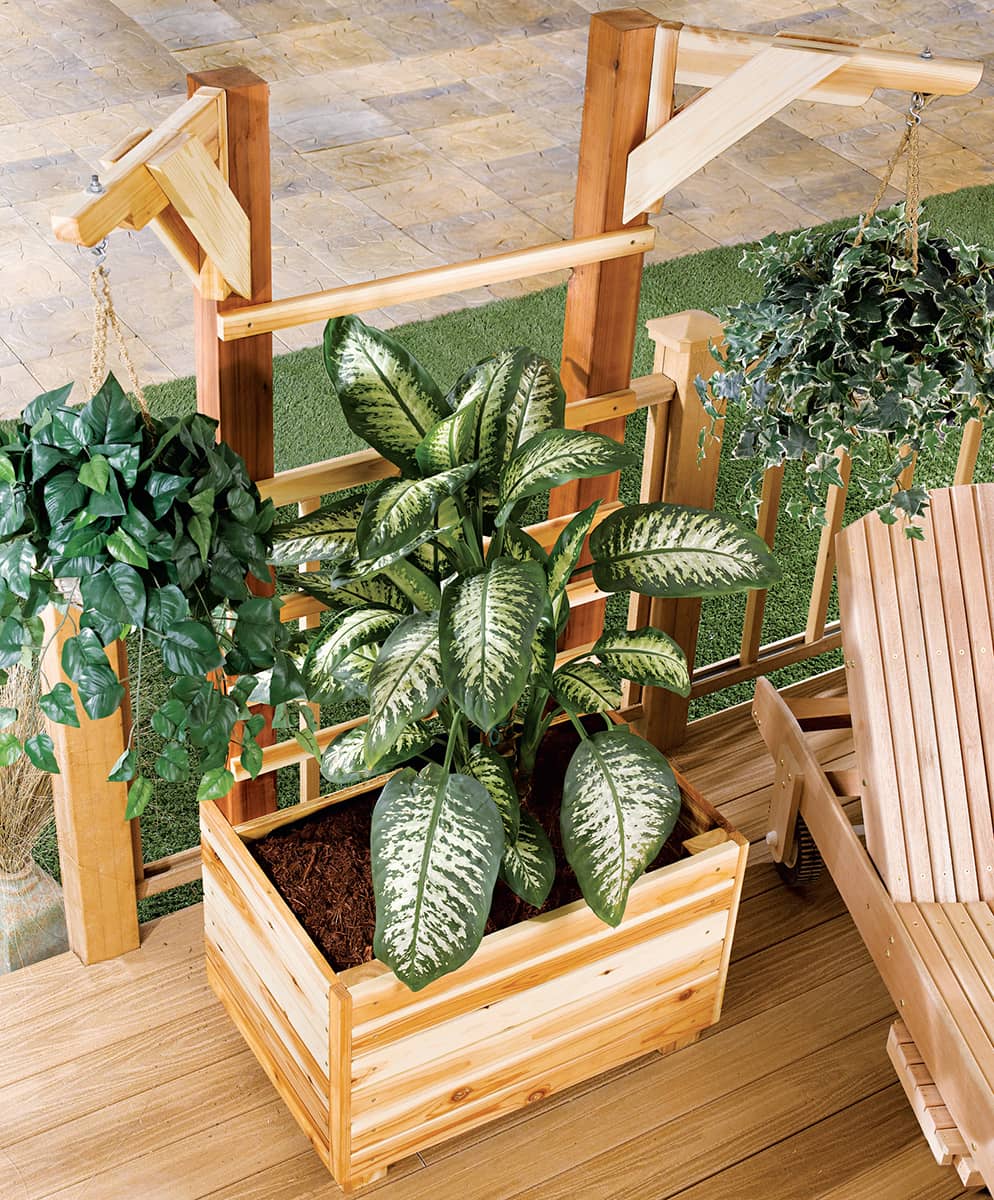
This efficient planter combines a box for container gardening with a climbing trellis and a pair of profiled arms for hanging potted plants.
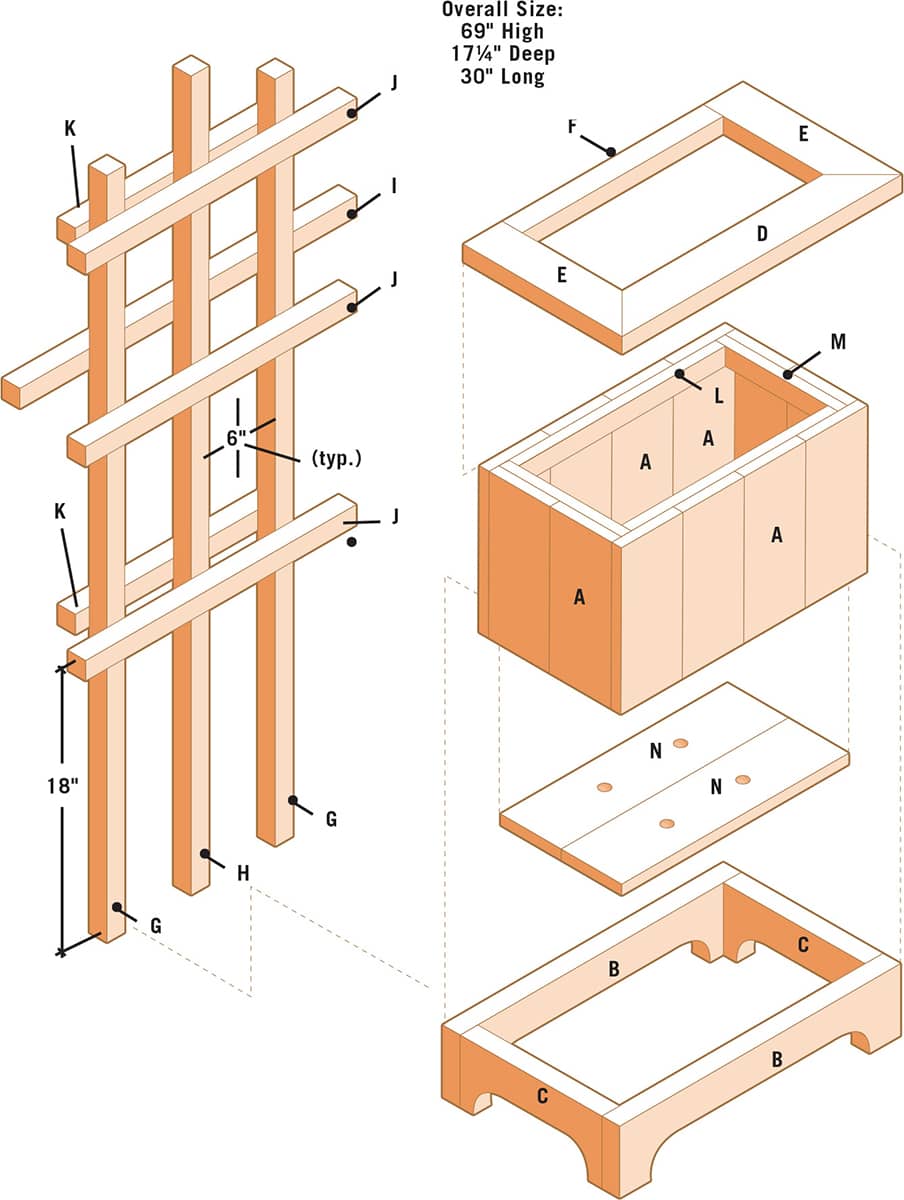
TRELLIS PLANTER

CUTTING LIST
KEY |
PART |
NO. |
DIMENSION |
MATERIAL |
A |
Back posts |
2 |
31/2 × 31/2 × 72" |
Cedar |
B |
Front posts |
2 |
11/2 × 31/2 × 20" |
Cedar |
C |
Front siding |
6 |
3/4 × 23/4 × 30" |
Cedar |
D |
Front post trim |
2 |
3/4 × 11/2 × 18" |
Cedar |
E |
Side siding |
12 |
3/4 × 23/4 × 211/2" |
Cedar |
F |
Back panel |
1 |
3/4 × 18 × 30" |
Ext. plywood |
G |
Bottom supports* |
2 |
3/4 × 11/2 × 221/4" |
Cedar |
H |
Bottom panel* |
1 |
3/4 × 221/4 × 30" |
Ext. plywood |
I |
Climbing rails |
5 |
3/4 × 11/2 × 30" |
Cedar |
J |
Hanger backs |
2 |
11/2 × 11/2 × 12" |
Cedar |
K |
Hanger arms |
2 |
11/2 × 31/2 × 18" |
Cedar |
L |
Hanger braces |
4 |
11/2 × 31/2 × 18" |
Cedar |
*Not shown
How to Build a Planter with Hanging Trellis
Cut the Base Parts
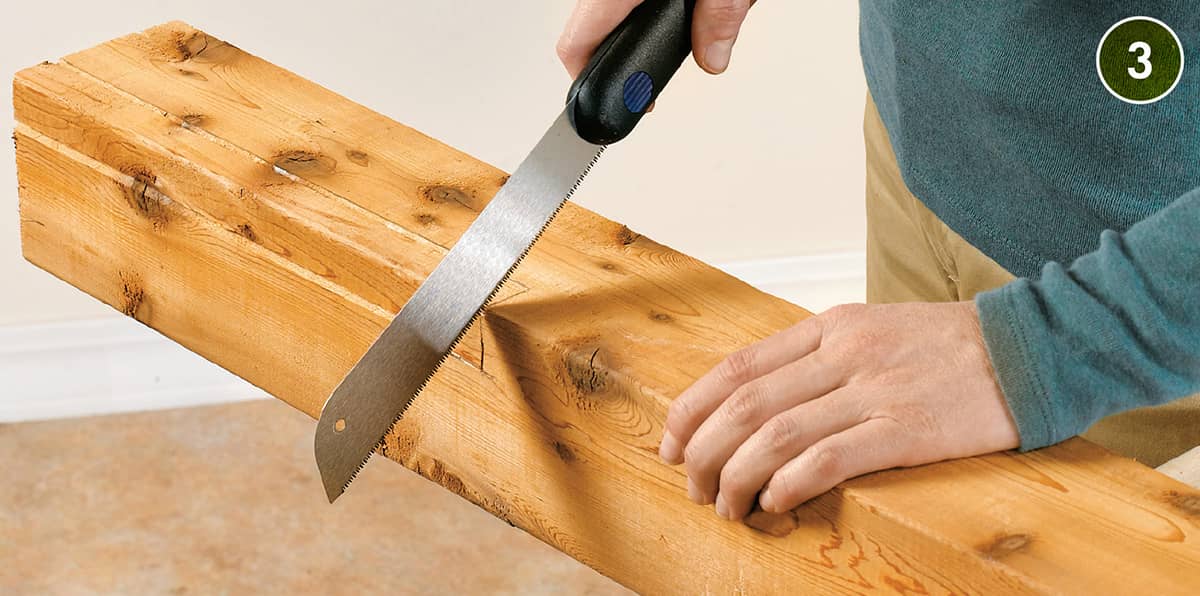
Cutting the front posts (2 × 4) and back posts (4 × 4) to length is easy. Cutting the hanger parts is a bit trickier, primarily because the plant hangers splay out from the corners of the posts at a 45-degree angle. The top, outside post corners must be beveled to create flat mounting surfaces for the hangers. Mark the bevel cut lines on the outside and front faces of the posts (photo 1). Tilt the shoe of a jigsaw to 45-degree and bevel-cut along the layout lines (photo 2). Use a handsaw to make a stop cut that meets the bottom of the bevel cut in each back post, forming a shoulder (photo 3). Rip-cut some 1 × 6 stock to 23/4 inches wide (photo 4) using a table saw or a circular saw and a straightedge cutting guide. Cut six 30-inch-long pieces and twelve 211/2-inch-long pieces to make the siding strips.
Also use a circular saw or table saw to cut the bottom and back panels to length and width. Cut 11/2-inch-long, 31/2-inch-wide notches out of the front corners of the bottom panel. Cut the front post trim, bottom supports, and back climbing rails to length from 1 × 2 boards.
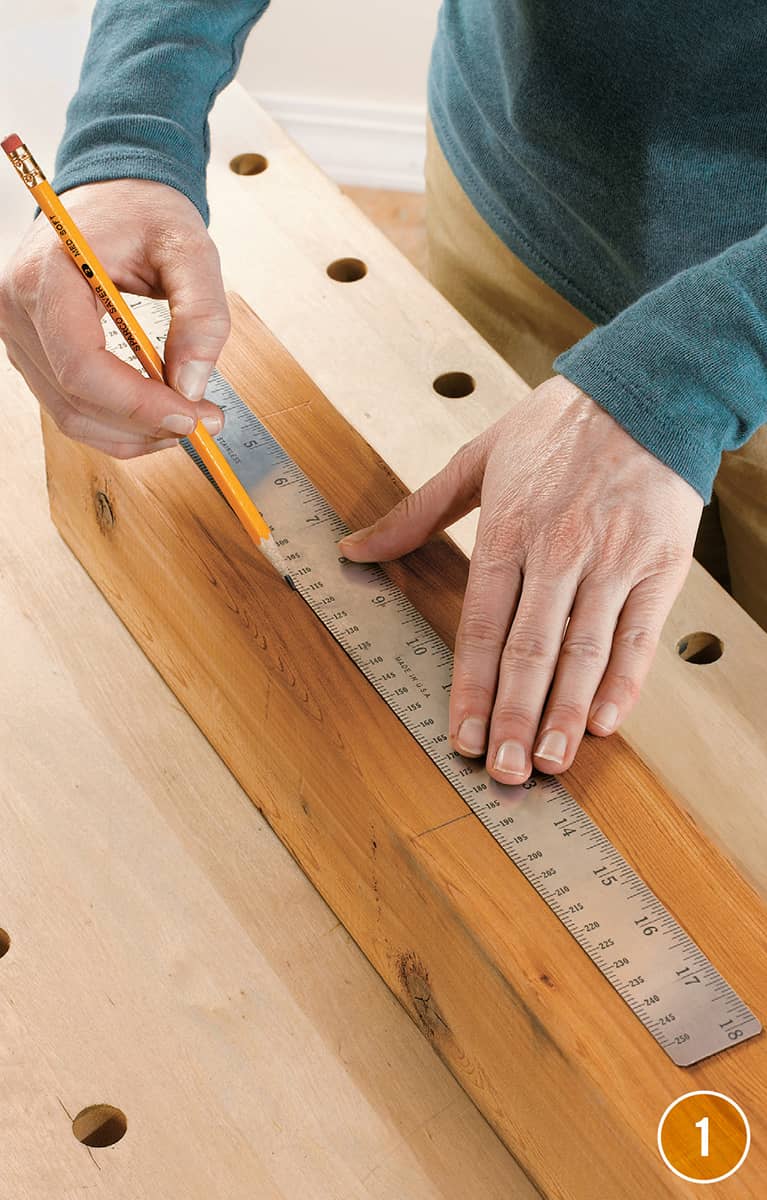
Mark the post bevel cuts. The lines at the top of each back post should be drawn 1" out from the corner and should run down the post for 12".

Cut the bevels. Tilt the foot of a jigsaw at a 45° angle so it will ride smoothly on the post face and follow the bevel cutting line. Make a bevel cut along the layout line.
Make the shoulder cut. Use a handsaw to cut into the corner of the post to meet the bevel cut, creating a shoulder for the beveled corner.
Rip 1 × 6 stock for siding. Using a table saw or a circular saw and cutting guide, rip enough material for the sides and the front to 23/4".
Assemble the Base Planter
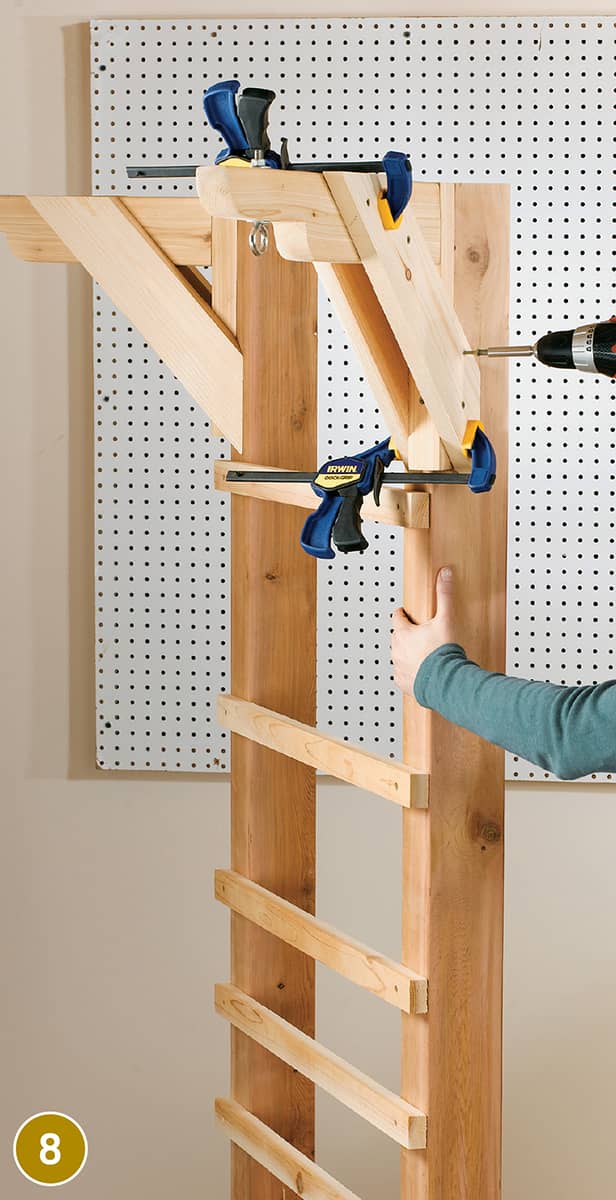
Attach the front siding strips to the front posts with 2-inch deck screws. Align the ends of the siding pieces flush with the sides of the front legs. Leave a 1/4-inch space between the siding boards. Drive one screw through each end of each siding board and into the front legs. Drill a countersunk pilot hole for each screw. Attach the front post trim pieces to the front posts with three or four 2-inch brad nails or finish nails. Align the front edge of the trim pieces flush with the front face of the front siding. Attach the back panel to the back posts with six 2-inch screws. Drive three screws into each post.
Attach the back lattice rails to the back posts. Drive one screw through each end of each climbing rail (photo 5). Refer to the construction drawing on page 000 for lattice spacing. Place the front and back assemblies on their sides and install siding on the side that’s facing up. The siding boards should be positioned against the front post trim board and flush with the back edge of the back post, spaced 1/4 inch apart. Attach the siding with 2-inch screws (photo 6). Flip the project over and repeat the process to attach siding to the other side.
Add the latticework. Attach the horizontal climbing rails to the back posts with 2" screws. Use one screw at each lattice connection to the posts.
Install siding. Attach the siding to the front and back posts with 2" screws. After completing one side, flip the project and complete the other side. Then, install siding strips on the front.
Attach the bottom supports to the front and back legs. The bottom of the front end of the bottom support should be flush with the bottom of the siding. The bottom of the back end of the bottom support should be positioned 2 inches up from the bottom of the back post. Drive one screw through the front end of the support and into the front leg and two screws into the back legs. Attach the bottom to the bottom supports with four 2-inch screws—two into each support.
Build the Plant Hangers
Cut the hanger backs, hanger arms, and hanger braces to length. Draw the hanger arm profile onto the side of each hanger arm, and use a compass to draw the radius profiles. Profile details are shown on the construction drawings (shown here). Use a jigsaw to cut along the profile layout lines on the hanger arms. Both ends of the hanger brace are mitered at 45 degrees, but the back or bottom end is a compound miter cut, meaning that it has both a miter and a bevel component. Cut the top-end 45-degree miters on all four braces. Then, make compound cuts at the bottom ends of the hanger braces (photo 7). Make the cuts so the beveled end faces the post when it is attached.
Cut the hanger brace angles. After cutting a flat 45° miter in the top end of the hanger brace, make a compound bevel/miter cut in the bottom end so it will fit flat against the bevel cut in the post.
Drill a 3/8-inch-diameter hole through the top of each hanger arm. Locate the hole 3 inches in from the end of the hanger arm. Fasten one eyebolt, two flat washers, and a locknut through each hanger arm. Attach the hanger back to the back end of the hanger arm with two 3-inch screws. Position a 2 × 2 hanger back and a 2 × 4 hanger arm against the beveled corner of each back post. Drive two 3-inch screws through the hanger back and into the back posts. Attach the hanger braces to the hanger back and hanger arm with 2-inch screws (photo 8). Make sure the hanger arms remain perpendicular to the posts when you attach the braces.
Install the hanger braces. Clamp the hanger braces to the hanger arms and hanger backs. Attach the hanger braces with 2" screws driven into the hanger back and into the hanger arm. Drive two screws at each connection.
Fill Planter
The planter itself is lined with heavy (at least 4-mil thick) black plastic sheeting. Cut the sheeting pieces that cover the sides, front, and bottom several inches oversized so they overlap in the corners. Cut the back sheeting the same size as the back panel. Attach the plastic to the inside faces of the planter with staples (photo 9). Start with the bottom sheet, overlap the sides on the bottom, and then overlap the front over the sides and bottom. Finally overlap the back over the sides, leaving a small gap between the bottom of the back sheet and the bottom sheet to allow water to drain out. Fill the planter with potting soil and add your plants.
TIP: Adding a few inches of gravel to the bottom of the planting compartment allows for better drainage.
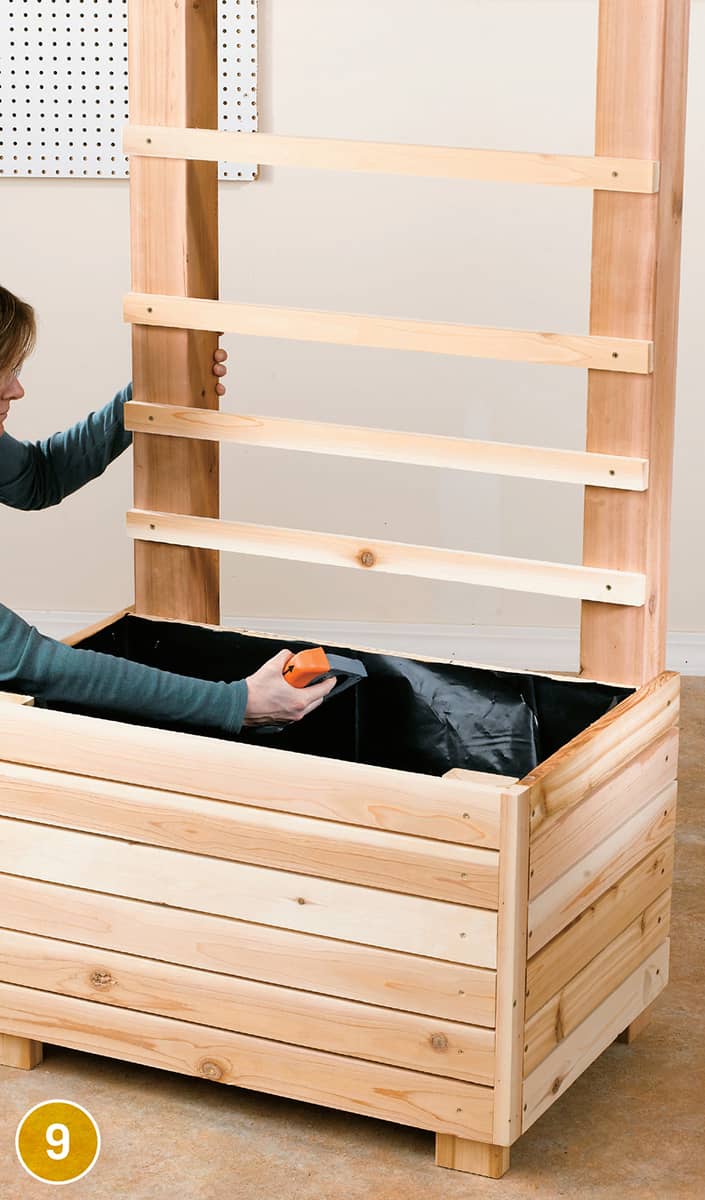
Line the container. Attach 4-mil black plastic liner with 3/8" stainless steel staples. Overlap the plastic in the corners and leave a small gap along the back bottom edge for drainage.
Solar Produce Dryer
A solar dryer is a drying tool that makes it possible to air-dry produce even when conditions are less than ideal. This dryer is easy to make, lightweight, and is space efficient. The dryer makes a great addition to your greenhouse.
The dryer, which is made of cedar, utilizes a salvaged window for completion. But you will have to adjust the dimensions given here for the size window that you find. The key to successful solar drying is to check the dryer frequently to make sure that it stays in the sun. If the air becomes cool and damp, the food will become a haven for bacteria. In a sunny area, your produce will dry in a couple days. Add a thermometer to the inside of your dryer box, and check on the temperature frequently—it should stay between 95 and 145 degrees Fahrenheit.
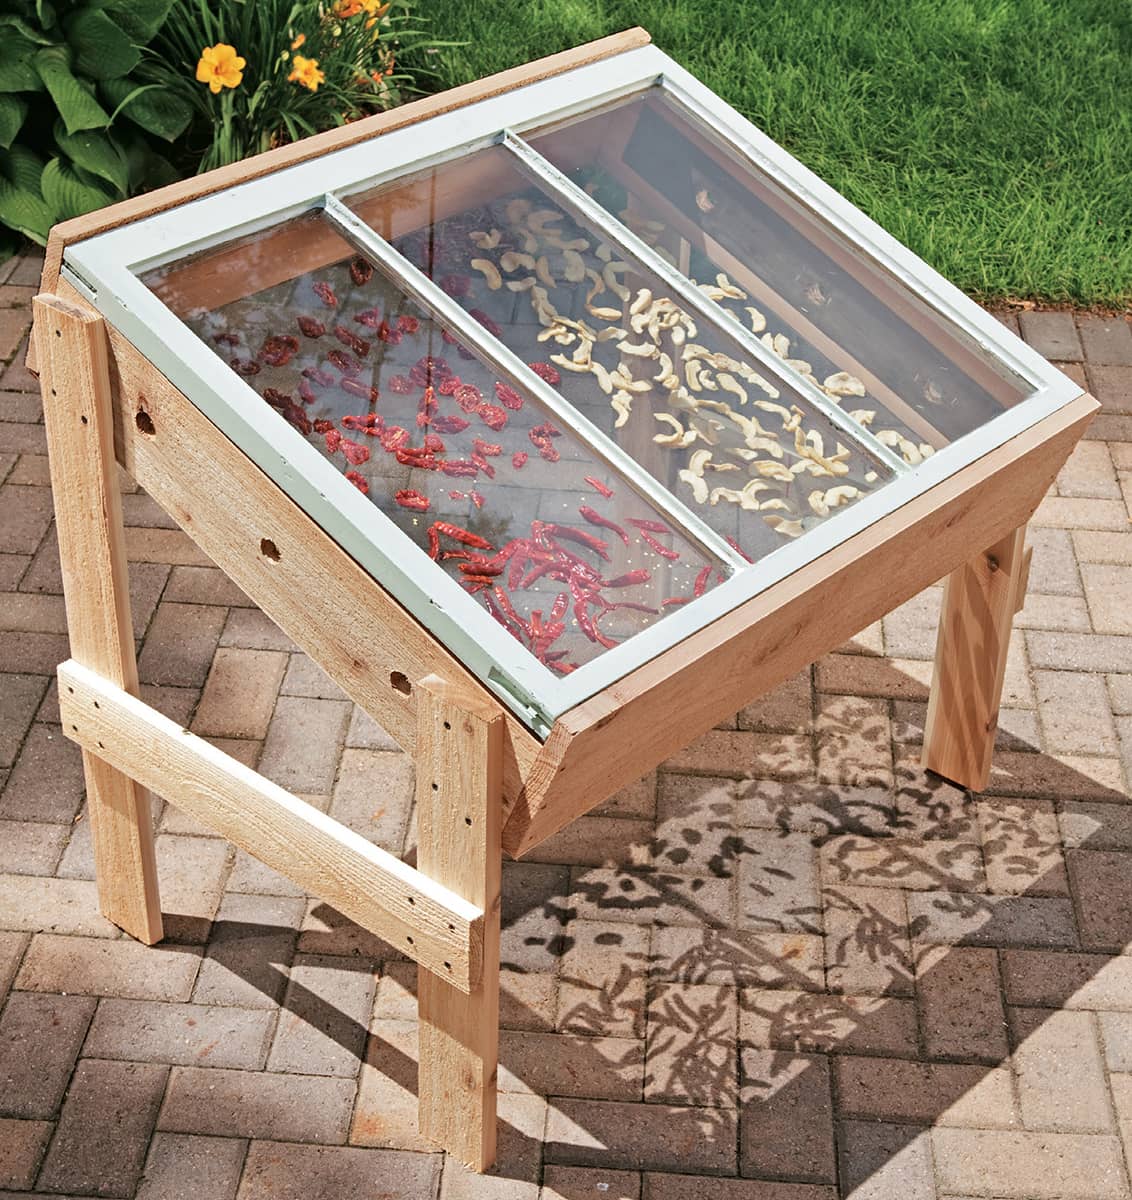
Based on the cold frame platform seen here to here, this solar dryer lets you dry fruit and vegetables quickly, naturally, and in a more sanitary fashion than simply air-drying.
SOLAR PRODUCE DRYER

TOOLS & MATERIALS
Stapler
Scissors
(2) 1 × 4" × 8'
Tape measure
Drill
Deck screws (11/2", 2")
Brad nails
Hole saw bit
Staples
Circular saw
Screen retainer strip
Insect mesh
(1) 1 × 8" × 8'
Window sash
(1) 1 × 6" × 8'
Eye and ear protection
Work gloves
CUTTING LIST
KEY |
PART |
NO. |
DIMENSION |
MATERIAL |
A |
Front/back |
2 |
7/8 × 71/2 × 343/4" |
Cedar |
B |
Side |
2 |
7/8 × 51/2 × 271/8" |
Cedar |
C |
Leg (tall) |
2 |
7/8 × 31/2 × 30" |
Cedar |
D |
Leg (short) |
2 |
7/8 × 31/2 × 22" |
Cedar |
E |
Brace |
2 |
7/8 × 31/2 × 24" |
Cedar |
Insect mesh–fiberglass 287/8 × 343/4"
How to Build a Solar Dryer
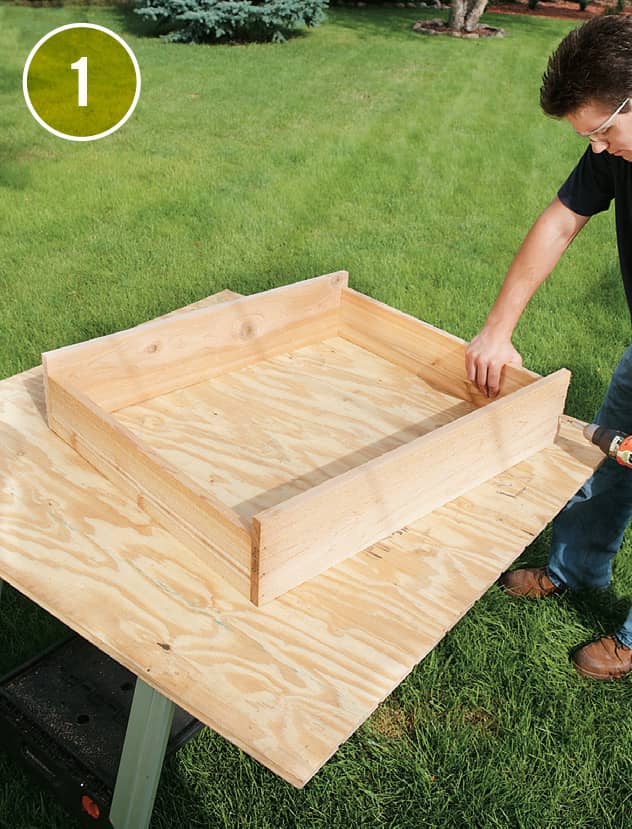
Assemble the box. Attach the wider boards for the frame by driving 2" screws through the faces of the 1 × 8" boards into the ends of the 1 × 6" boards. There will be a difference in height between these pairs of boards so that the window sash can sit flush in the recess created.
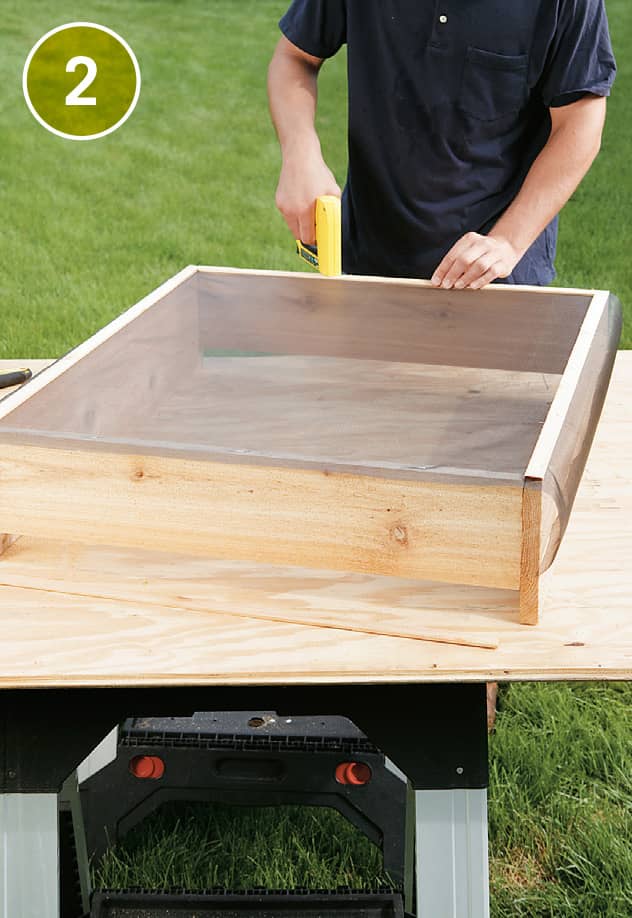
Install the mesh. Staple the screen to the frame. Then tack the retainer strips over the screen to the frame with 3 to 4 brad nails per side. Trim off the excess mesh.

Build the stand. Attach each 24" board to a 30" board (in the back) and a 22" board (in the front) with 11/2" deck screws. Then attach the finished posts to the frame with three 11/2" deck screws in each post.
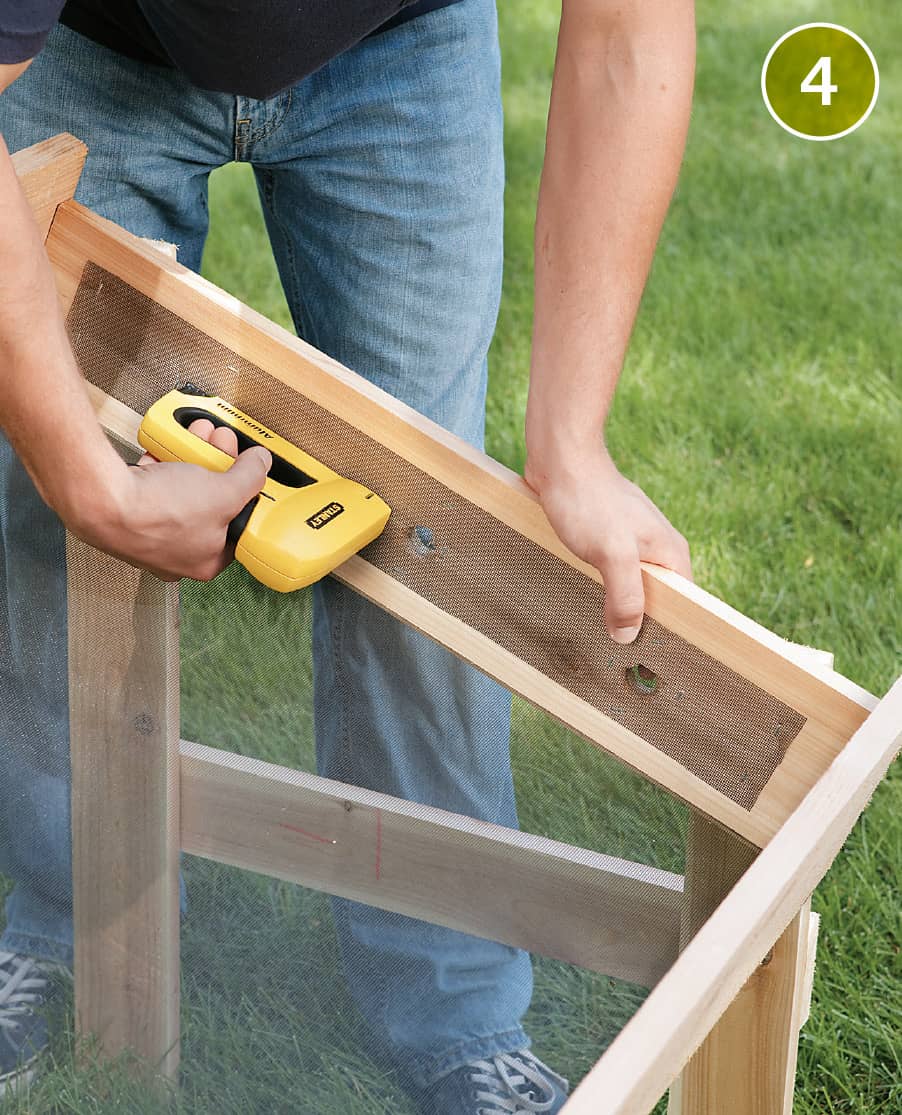
Drill three 1" holes for ventilation in each 1 × 6" board equally spaced along the length of the board, leaving 5" of room on each end for the posts. Staple leftover insect mesh behind the ventilation holes on the inside of the frame.

Finish the project by sliding the window sash into place.