FIT | 3
DRAPING THE LOOSE-FITTING SHIRT
WHAT ARE LOOSE-FITTING SHIRTS?
In this chapter, we explore how to use the drape-to-fit process to create custom-fitted shirt patterns for shirts with the following features:
• Straight side seams
• No darts
• Both fitted and dropped shoulders
• Maximized freedom of movement in the arms and shoulders
• Enough body ease to drape without wrinkles and without matching or revealing the shape of the body within
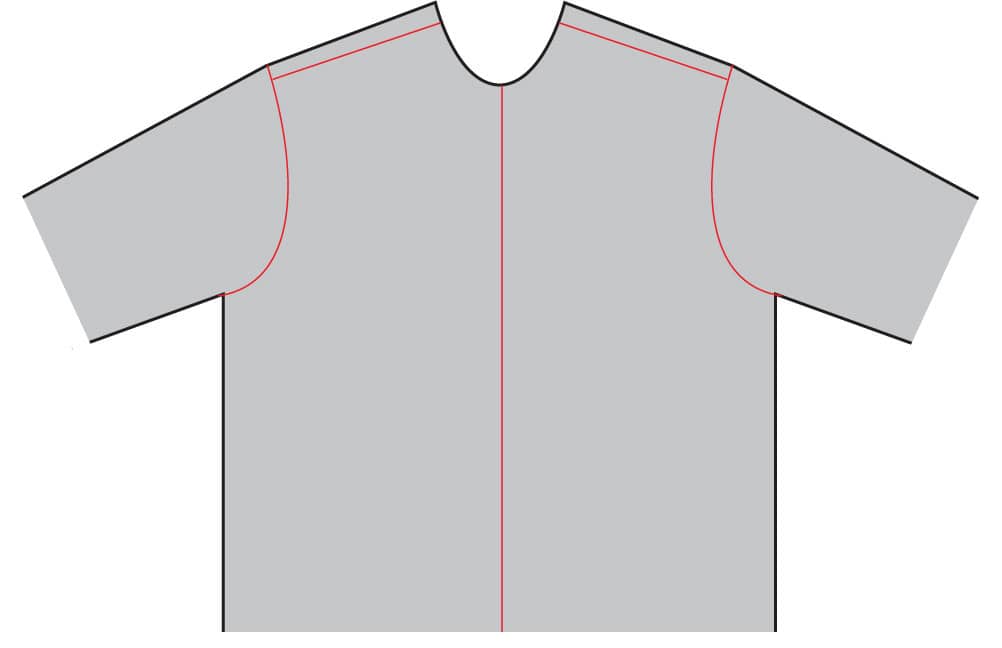
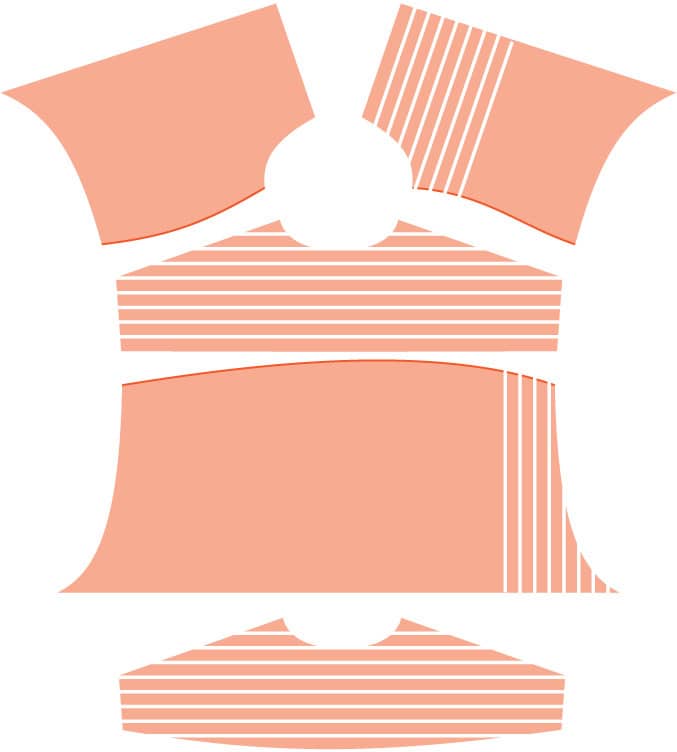
Fitted loose shirts are those that fit only with any precision through the shoulders and are, thus, for our purposes, custom-shaped to the wearer only there. Note in the diagram at right that there are no darts and only the basic seams of a typical shirt. While this is generally the most basic and easiest shirt style to drape, it introduces almost all the draping-to-fit issues we’ll encounter in this learning process, and will challenge us to deal right up front with loose draping, which is often a bit more demanding than adjusting fabric to fit snuggly. Snug fitting always pushes right up against the solid boundary of the form being draped, while loose draping always involves at least a few arbitrary judgements about where and how far exactly to position the fabric away from the form, as well as, questions on how to control the fall of fabric that isn’t touching the body or form.
Since this chapter is our overall introduction to the draping process, we’ll proceed slowly to discover the many options that can apply to all styles, but may not be addressed as thoroughly in subsequent chapters, so please read through this chapter even if loose fit isn’t your preferred style option. But, rest assured that there’s no definitive line between loose and fitted shirts, nor any reason not to add some shaping or tapering to the side seams when accommodating a loose drape. Go ahead and shape the shirt anyway you like! Once you have the perfectly draped muslin, the test muslin you want to use to create the paper pattern, download the pdf, “Converting a muslin drape to a paper pattern” at www.quartoknows.com/page/sewing-shirts.
Also, recall from the discussion shown here that draping to fit only the shoulders is perfectly appropriate when copying a shirt with shaping you like everywhere except the shoulders. In this case, drape to improve the shoulder fit to match your shoulder slope or possible asymmetry, and preserve the fit elsewhere, including any existing side-seam shaping.
HOW TO CHOOSE YOUR YOKE
Since all our draping projects, for every level of fitting ease, begin with a draped-to-fit yoke, I’ll cover that process in detail, demonstrating on each of the four fitting forms. And, I’ll use the multisize yoke pattern included in this book.
Measure either the existing yoke of a comfortable or favorite shirt or the body itself. Don’t fret over either measurement, since you’ll be customizing the actual ends of the yoke once it is on the body/form. To the measurements, add at least an inch (2.5 cm) of extrawide seam allowances, or even more if you’re not sure about what you’ll eventually feel most comfortable wearing.
To measure a yoke on a shirt, measure a little above the back/yoke seam.
To measure a body, hold a tape measure straight across the back between shoulder points that look like good yoke-end points to you.
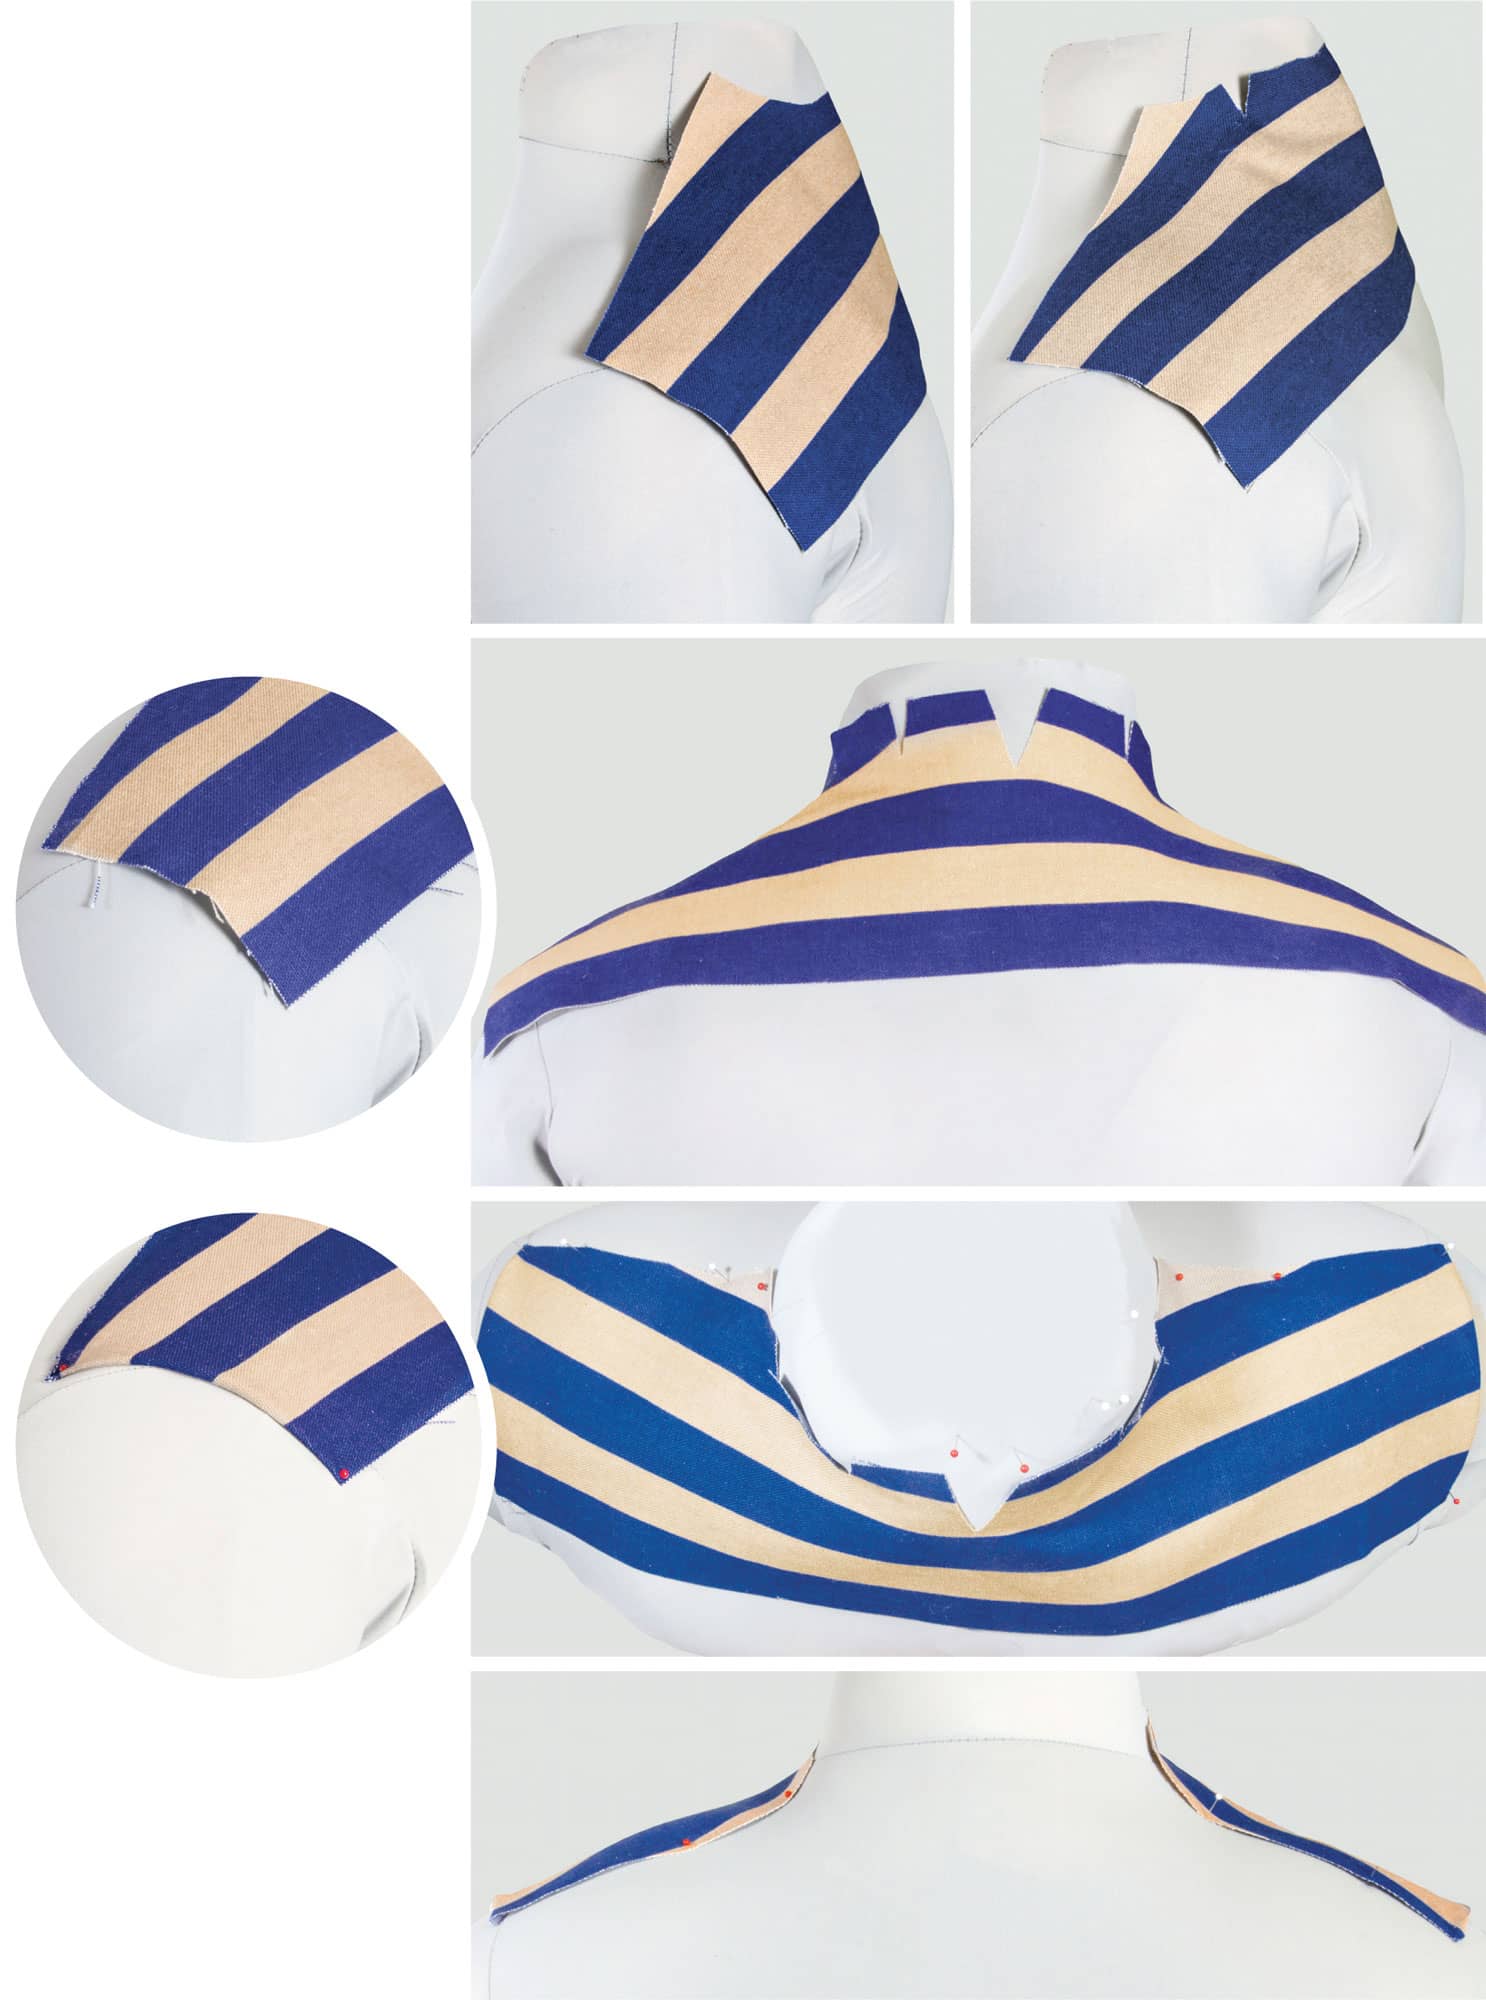
1 Near the edge of a piece of tracing paper, lay out a horizontal line equal to half your measured yoke length, then align this line with the pattern’s ruler so the beginning edge of the ruler is in position at what represents the center back of the yoke, and tape it down removably. At the end of the horizontal line (opposite from the center back), draw a vertical line long enough to cross one of the yoke outlines above.
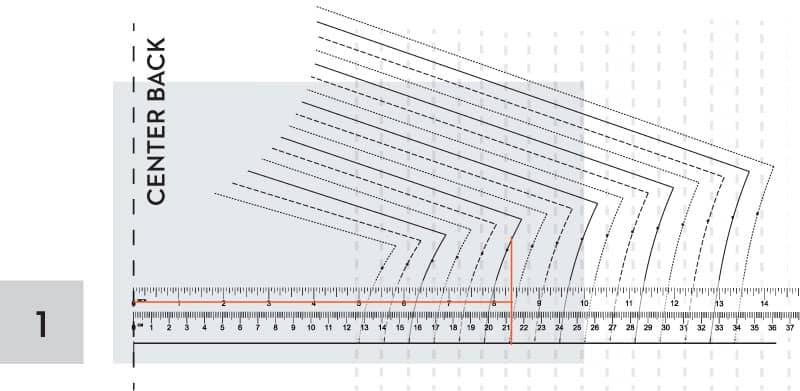
2 Trace around the yoke outline that intersects with the line you just drew, roughing in a neckline as shown, to be later refined on the form.

3 Add plenty of extra play-around seam allowance width at the neck line and ends. Square out the seam allowances, as shown. Add regular width seam allowances to the straight edges at the shoulder and bottom edges. This is your yoke pattern.
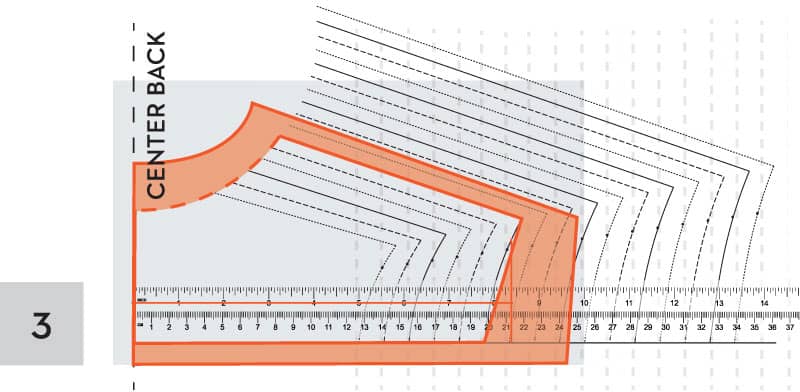
4 Fold your test fabric in half on the cross grain. Position the center back of the pattern on the fabric fold. Cut out a single layer fabric yoke on the lengthwise grain. Maintain the extrawide seam allowances; and we will determine how much to fold or trim by draping this oversize shape on the torso form (or the body).
Tip: I prefer to use fairly heavyweight test fabric for the yoke, usually not the same fabric I use to drape the front, back and sleeve, because the finished yoke of a shirt is a double layer, so a heavier fabric better simulates a real yoke.
POSITIONING THE YOKE
Once you have cut out your yoke, you can start draping. On the following pages, I’ll demonstrate how to position an identically rough-cut yoke on all four of our different shaped forms so you can start to see how the results vary, depending more upon unique body shapes than on the original cut yoke shape.
Note that everything I’m doing on a form can be as easily done on a live body. Just have the fittee wear their usual upper-body under garments, if any, and have a tight-fitting T-shirt or turtleneck on, so you can pin things to them securely and comfortably. Also note that in all these photos that I’m simply making visual judgements about what to do, measuring nothing except by eye.
In each case, I start by centering the shaped (back) neckline on the form neck, positioning it as far up as it will easily go, and pin it there. Then I evaluate, from all four sides, how the yoke appears everywhere else. Since the seam allowances are wider than usual, you’ll probably need to make multiple clips into them at the neckline to allow the yoke to sit more smoothly around the neck and more forward over the shoulders. Don’t hesitate to cautiously cut away extra fabric because if you take away too much you can always indicate where to add it back when you trace off the draped yoke.
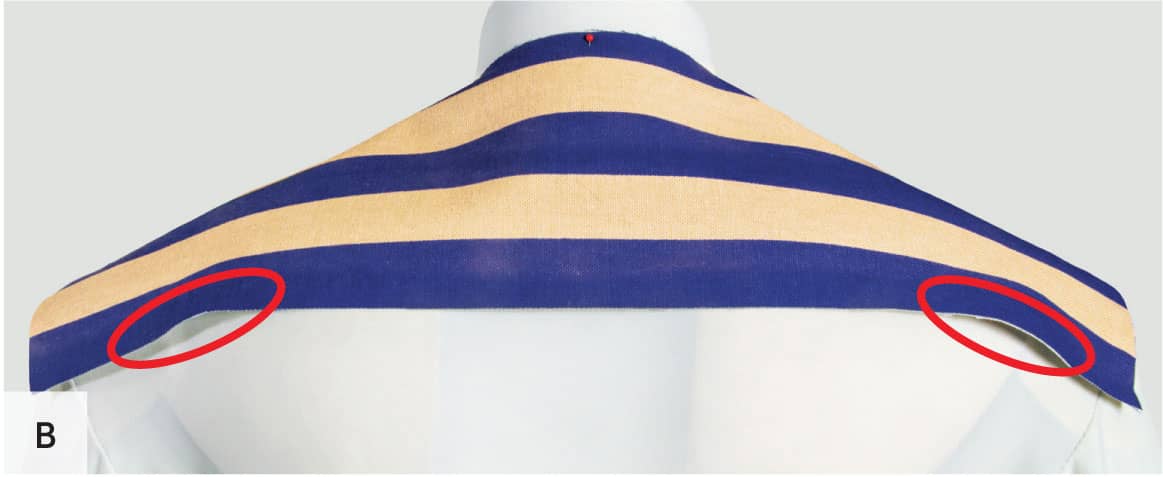
On Form #1 just a few short clips into the neck seam allowance allow the yoke to fall closer to the neck and to move forward on the shoulders. Overall, I am pleased with the width of the yoke, so there is no need to fold the ends under to make the yoke narrower, since this rounded upper back requires extra fabric.
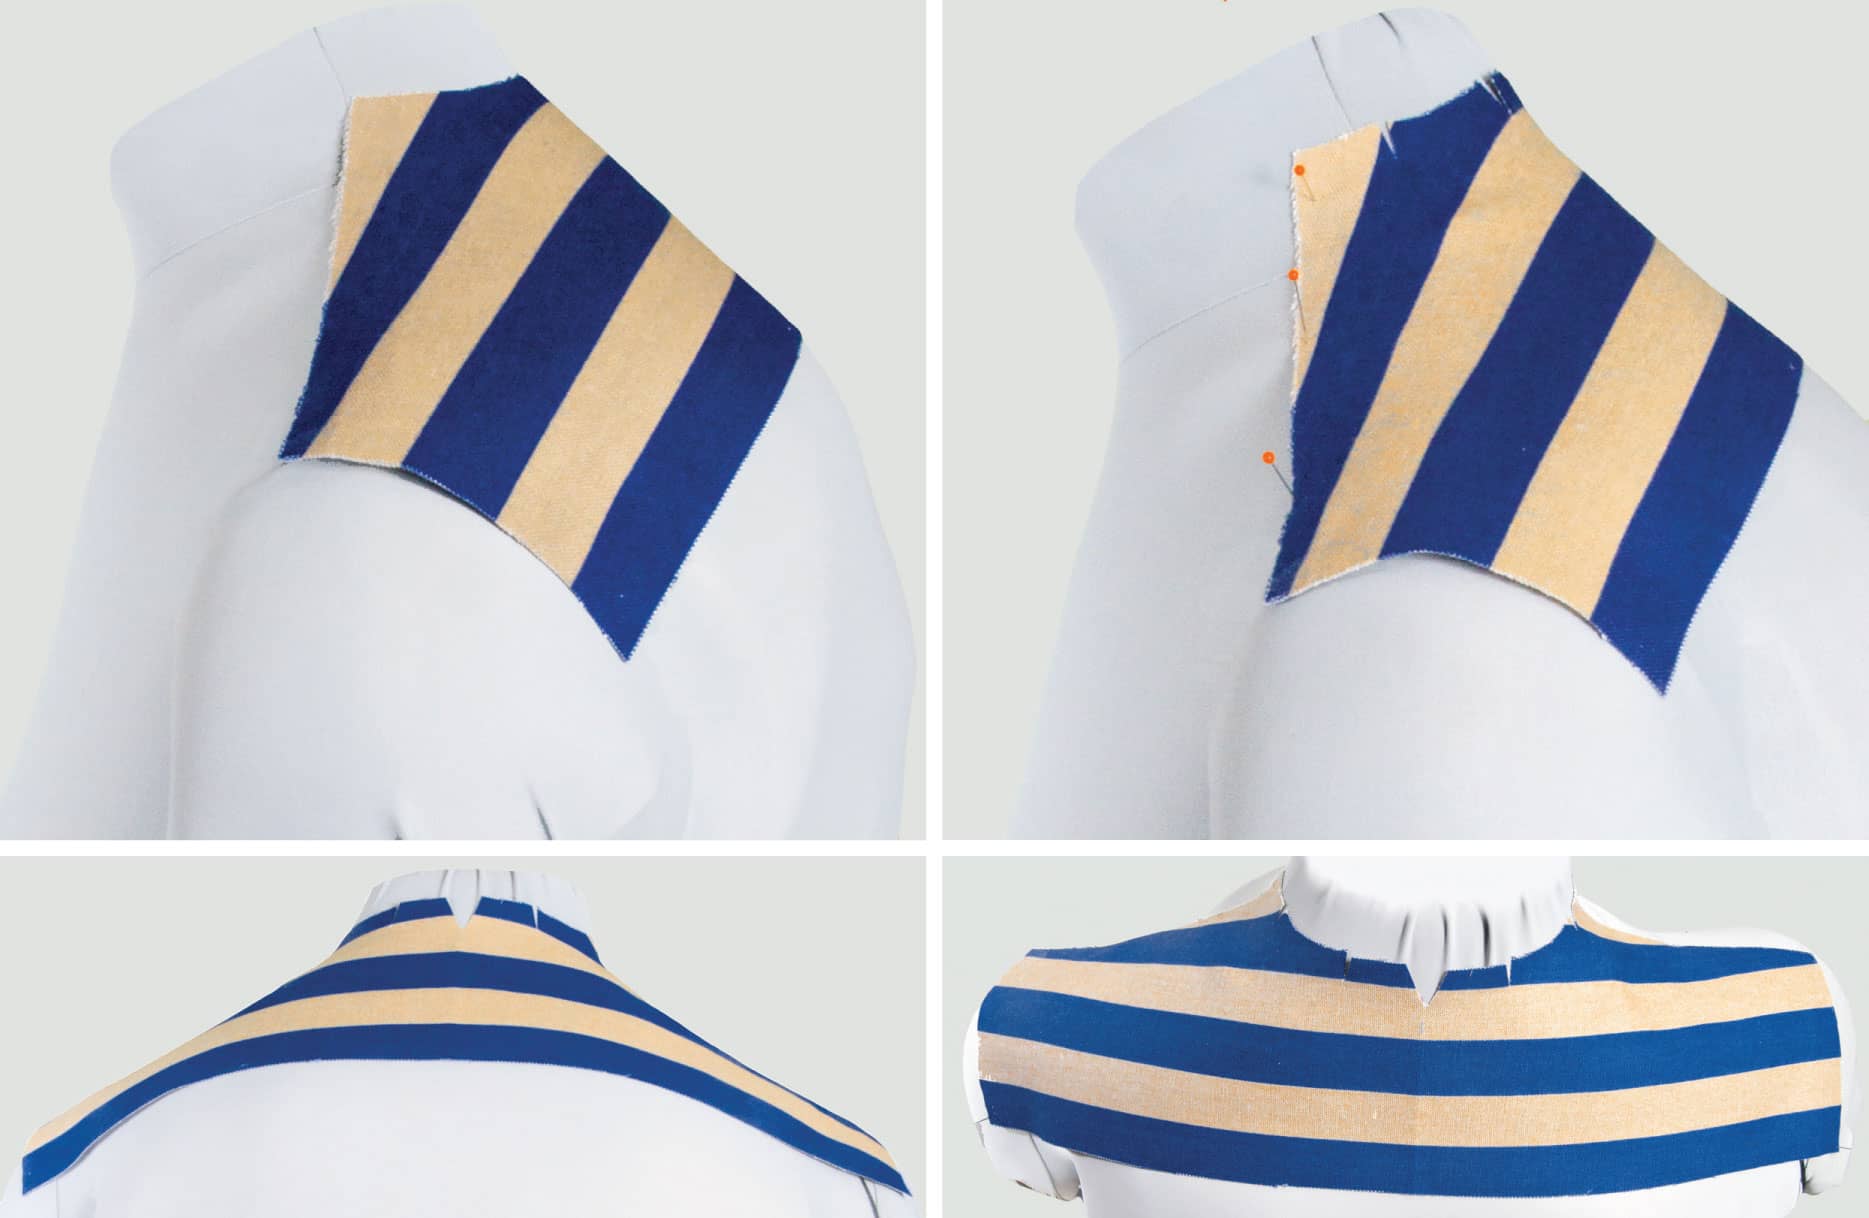
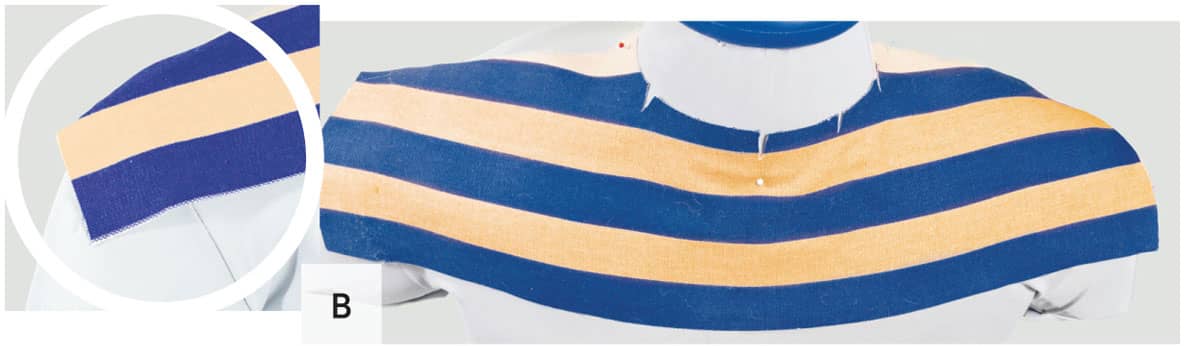
On Form #2, once again, a few clips into the neckline seam allowance works wonders to settle the yoke onto the shoulders. Because the back-edge of the yoke is much wider than it needs to be (A, B), I folded under the yoke ends at each shoulder to reduce the width (B, C). The right yoke front edge extends further forward (D) compared to the left one, so I folded that edge under to make them more symmetric (E).
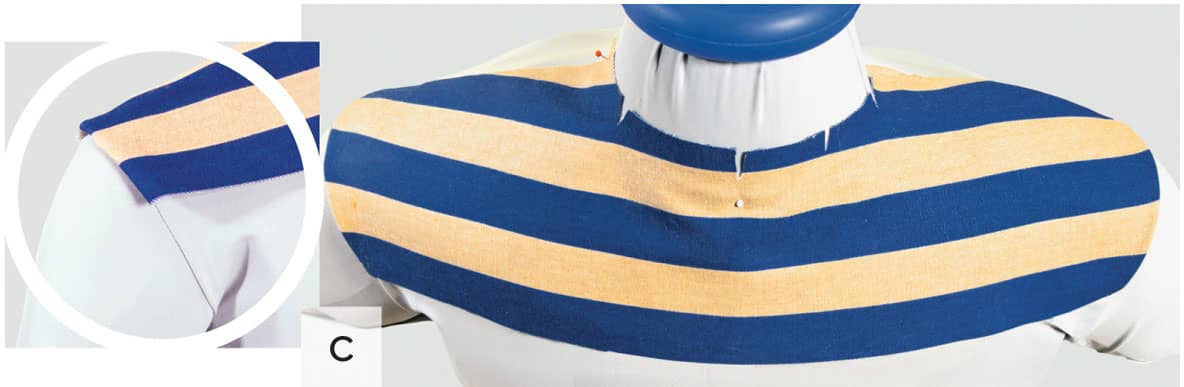

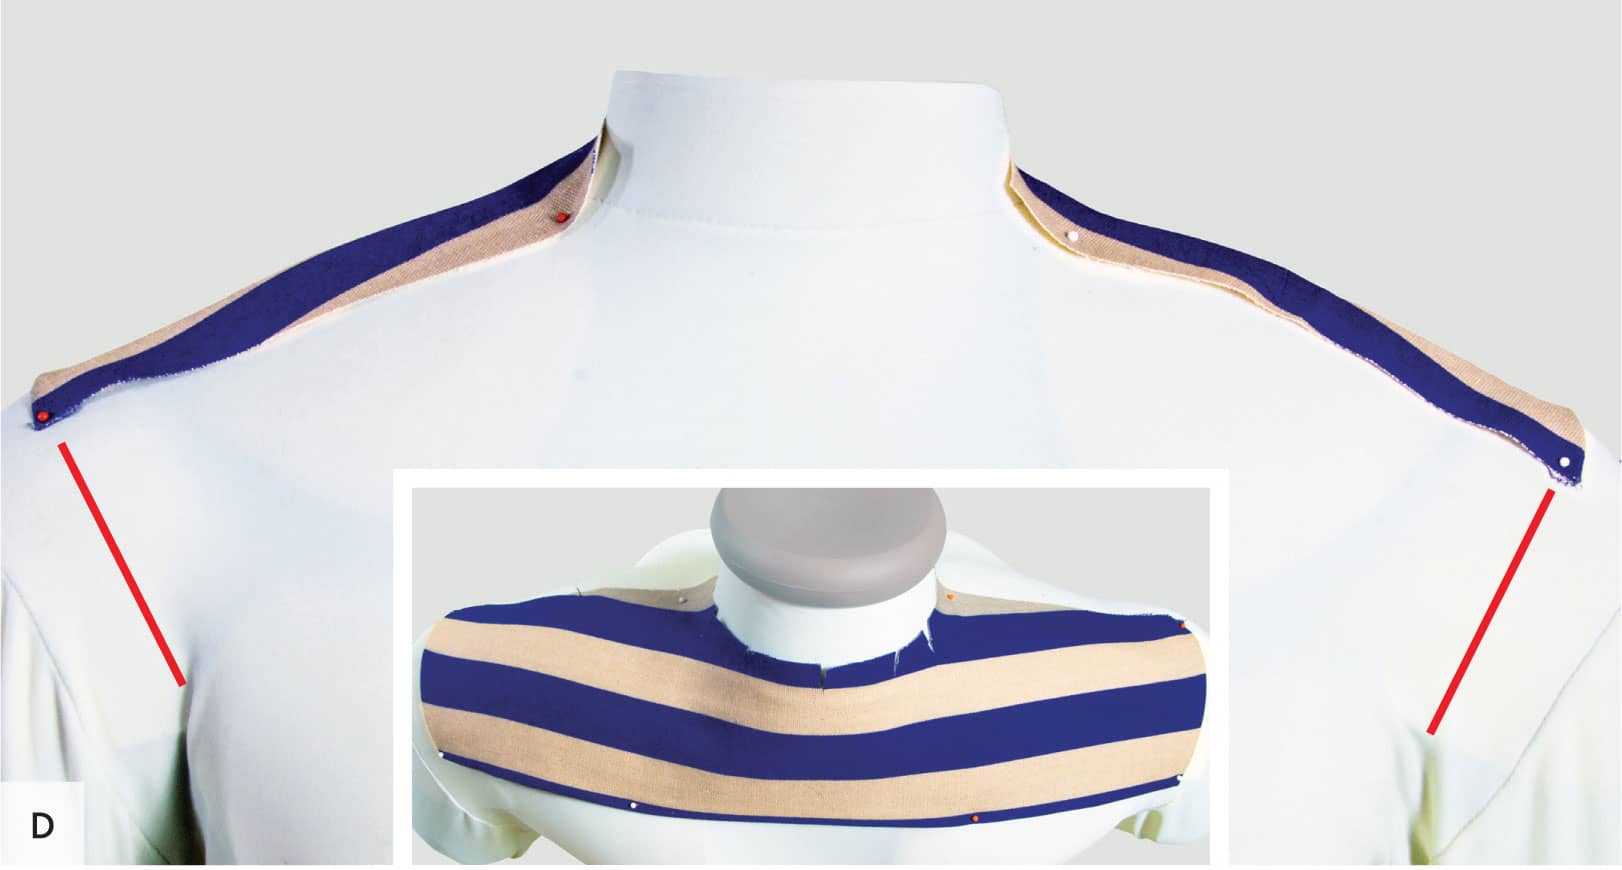
On Form #3, as usual, I’ve once again improved the lay of the yoke and shifted it slightly forward by clipping into the neckline seam allowance. But in this case, we’re seeing something new: The bottom (back) yoke edge extends beyond the curve of the back, so it sticks up above and away from the body on each side (A, B). The solution is simple, I folded up the whole bottom edge, as I folded under the yoke ends, bringing the bottom edge back into contact with body (C).

Also note how the yoke width in front, which I reduced by folding under the ends and is exposing quite a bit of the upper arm, is still considerably wider than the width of the body at the armpits (D). I’m guessing that this will allow enough width in front to cover the bust; if not, I’ll let the yoke unfold in front for more width (later in the draping process).
On Form #4, nothing about the yoke placement is new, including my decision to fold the ends under quite a bit, exposing a lot of upper arm beyond the ends. My decision is based on how wide the source shirt (from which I took the initial yoke measurement to cut yokes for all four forms) appeared to be in back when I tried it on this form. I’ll see how it works out when I drape the back.
RESHAPING THE YOKE
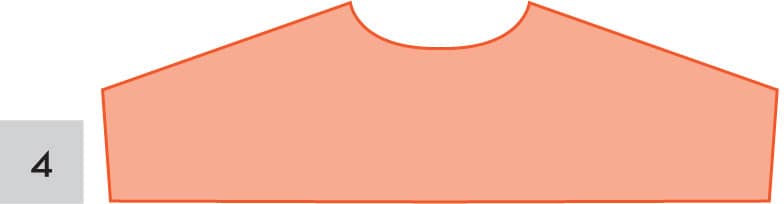
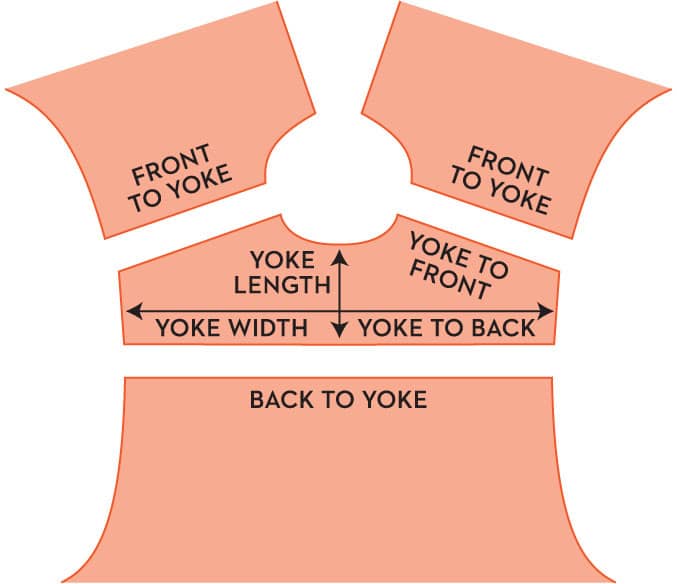
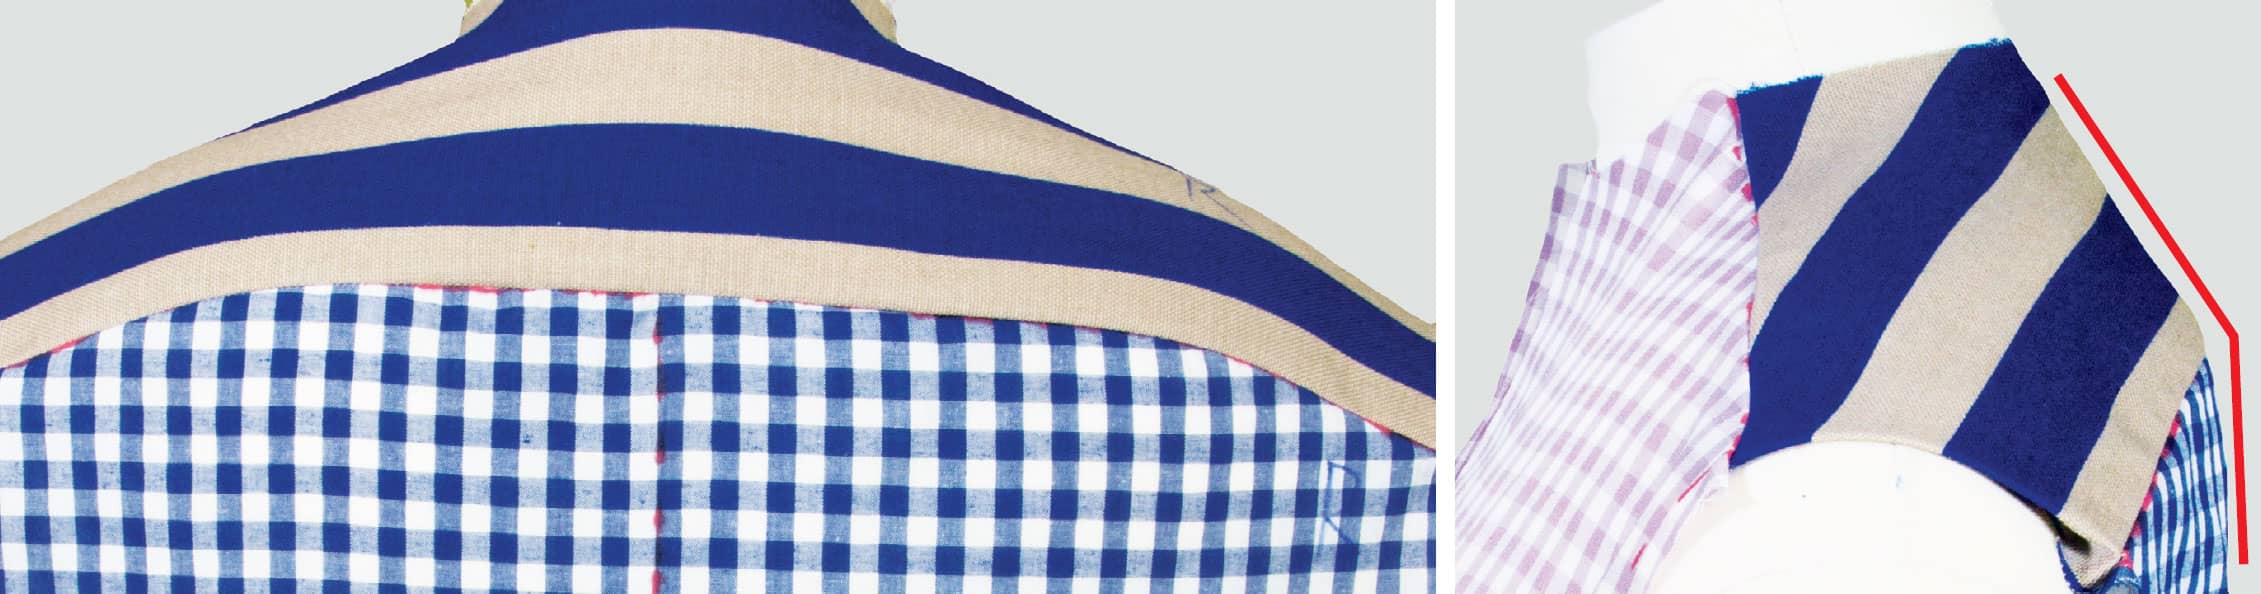
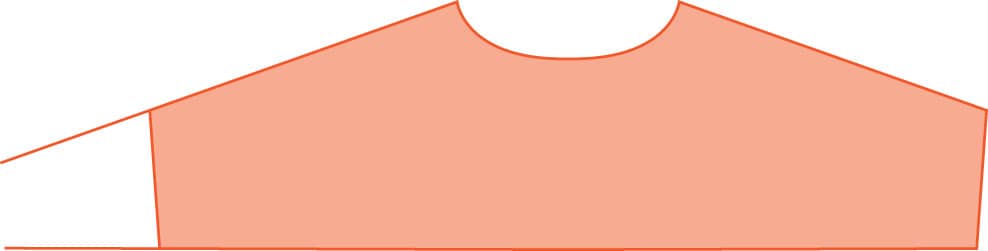
By far, the most common practice in manufactured shirts is for minimal or no shaping on any of the seam edges where the yokes join to body pieces; they’re all straight lines as in the diagram at top right. And if there is any shaping, it’s commonly applied only to the front- and back-to-yoke edges, so the yoke itself remains straightedged, no matter how much it may have curve to adapt to the body shapes inside.
This logic is perfect for my drape-to-fit process since the yoke can be cut simply and molded to the body. The fronts and backs are more precisely (and usually asymmetrically) draped, and then cut, to match the molded yoke shapes, with no need to recut the yoke. As you can see in the bottom diagram of the shaped yoke, this also makes good visual sense if a stripe or plaid is involved, because it keeps the yoke-to-back edge parallel to both the seamline and the stripes. Asymmetrically shaped pattern pieces are usually less distracting when at least one piece has stripes parallel to the seam between them.
Curving one seam edge that will join to a straight edge effectively causes the seam to act like a dart, so it’s been my practice, when fitting yokes and backs to any nonflat upper back, to first alter the yoke length so it crosses the apex or most curved part of the shoulder curves in the same way that a front princess seam crosses the bust point.
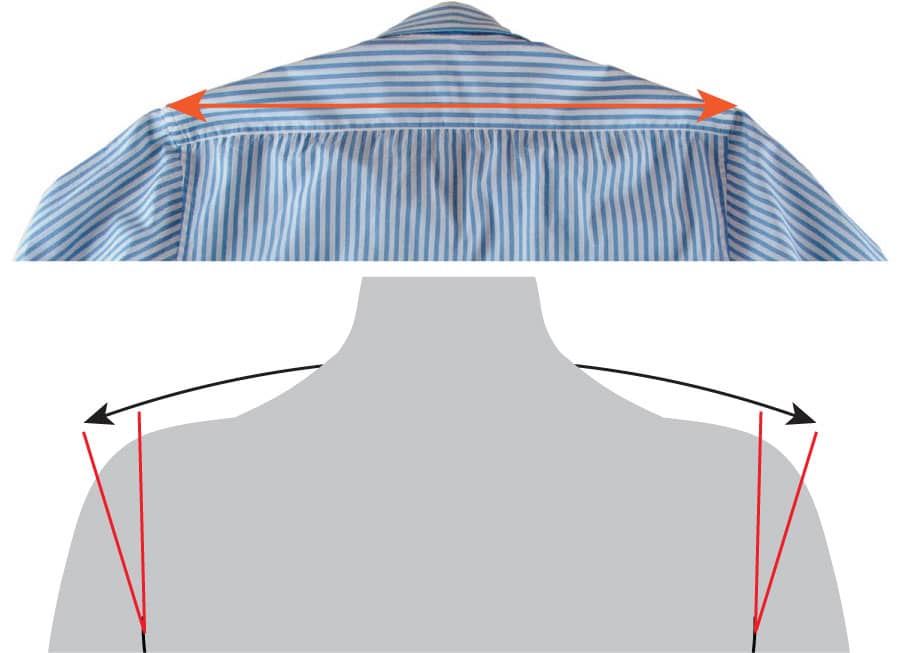
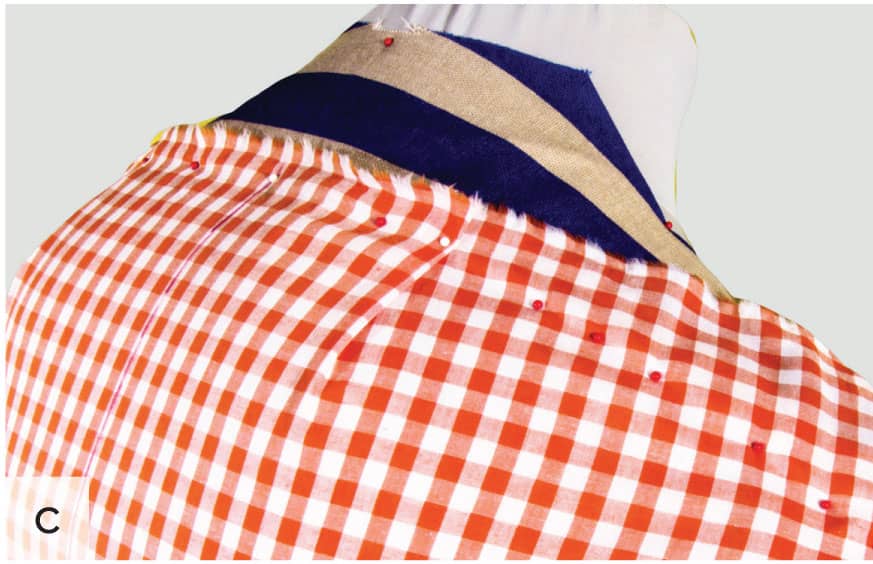
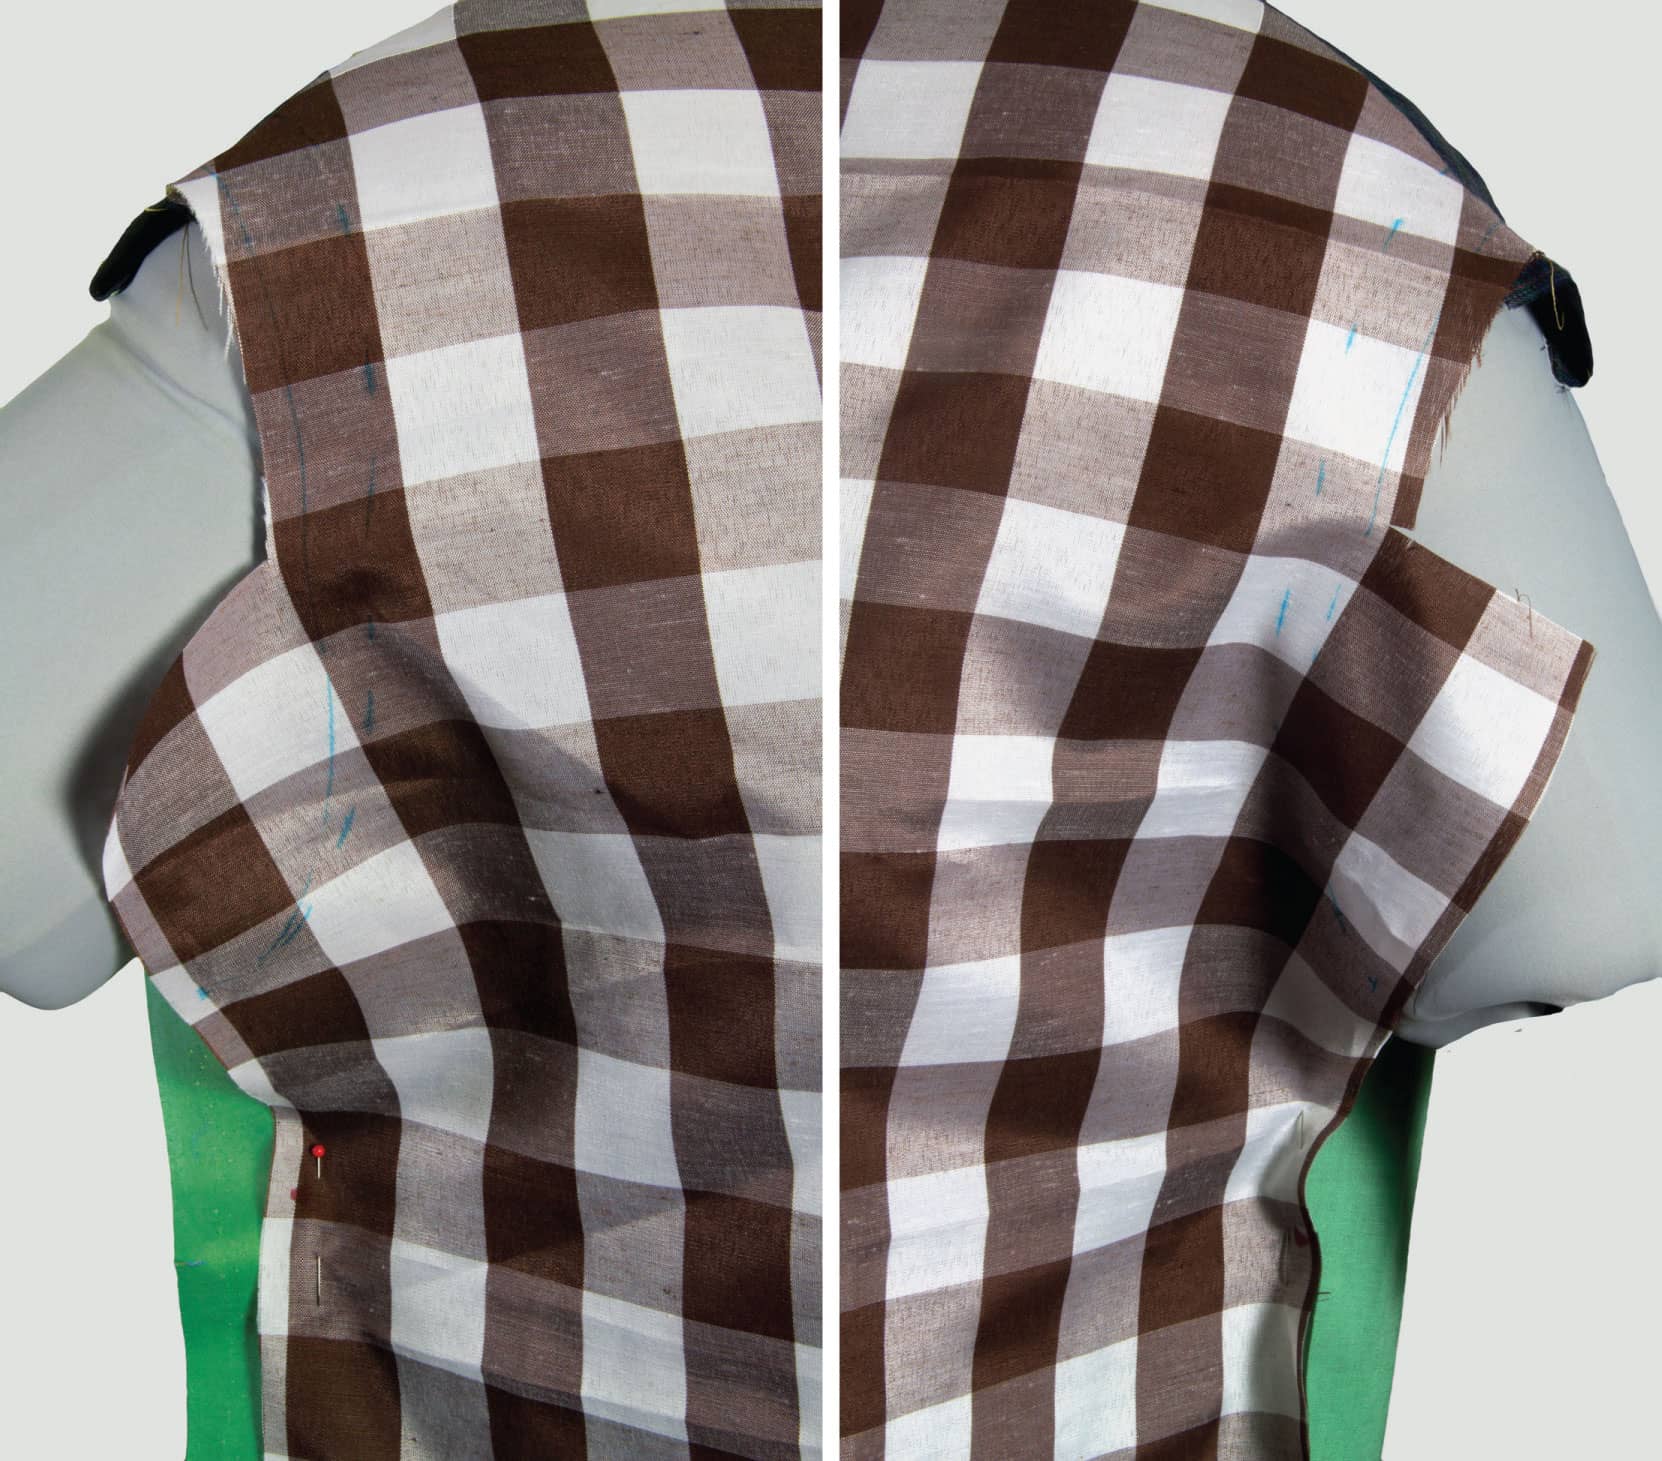
FINDING THE APEX OF SHOULDER CURVES
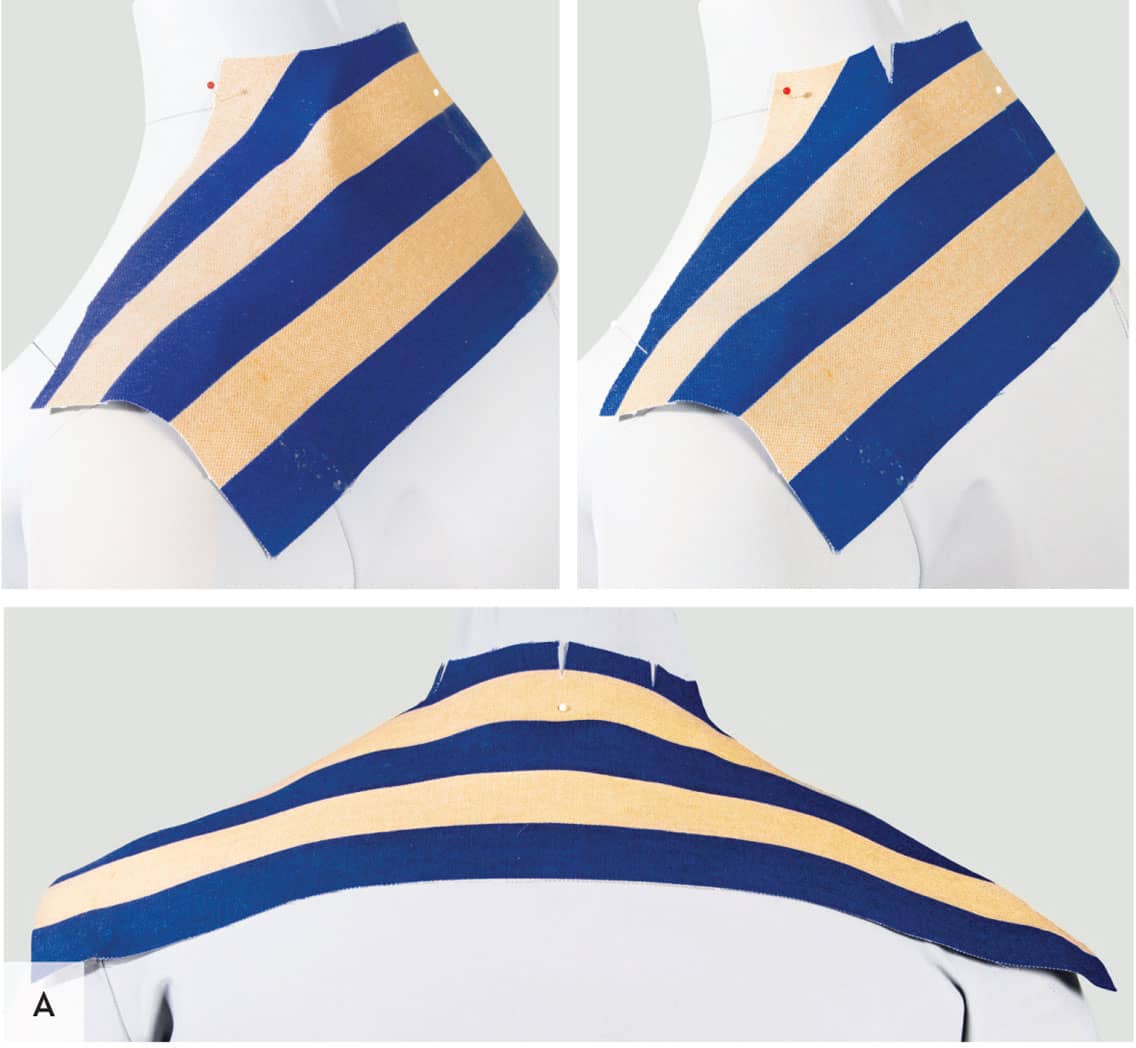
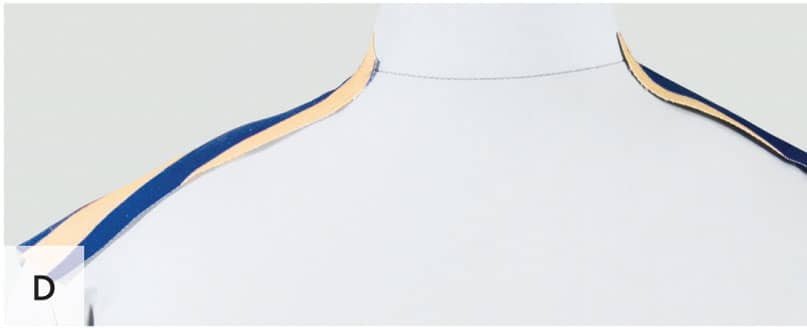
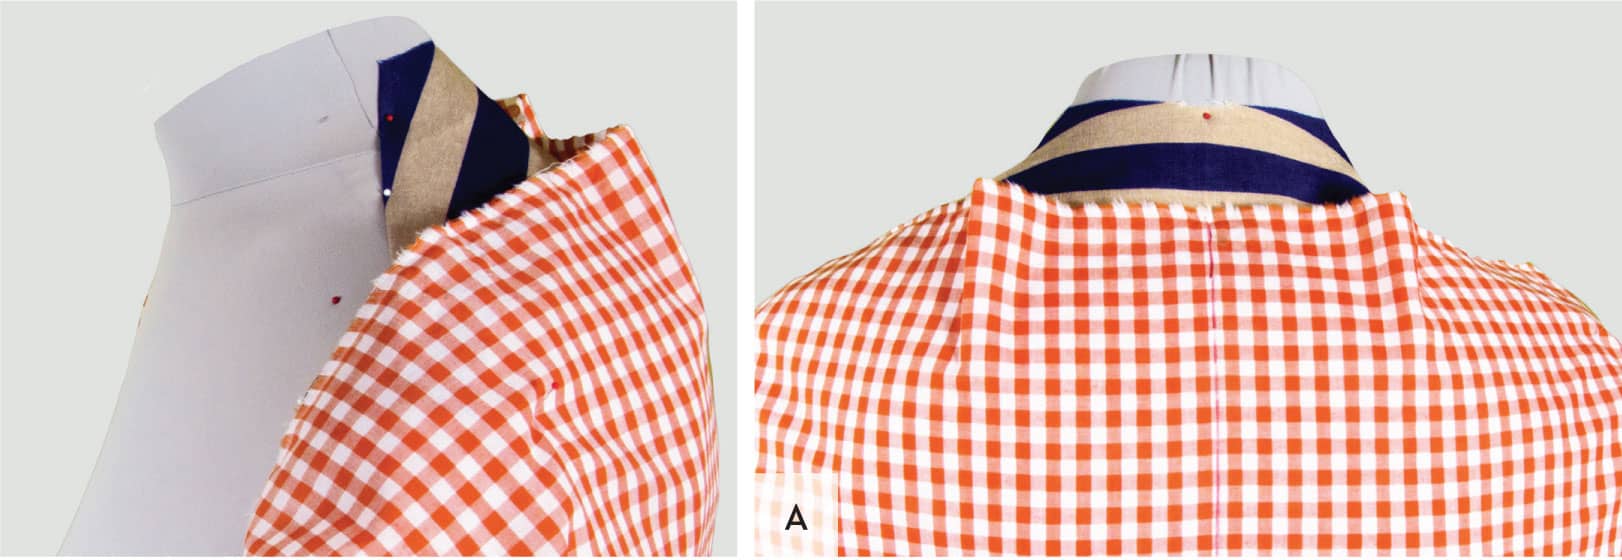
One easy way to find the apex of curved shoulders is to drape a piece of fabric over the back and across the shoulders to see if and where it naturally forms the appearance of one or more darts as the orange gingham does in the top two images shown here. If you’d like to replace these darts completely with shaping at each end of the back-to-yoke seam, you’ll need to recut the yoke so it is long enough that it reaches down to the dart points of the fold on the draped back. This allows the yoke-to-back edge to conform naturally to the body, and shows you when draping the back to the yoke, exactly how to cut the back-to-yoke edge to match the shape and length of the molded yoke edge.
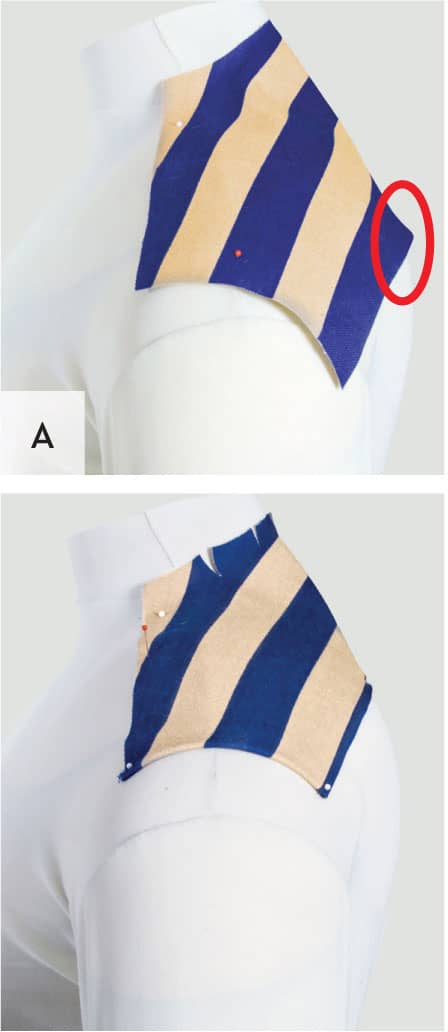
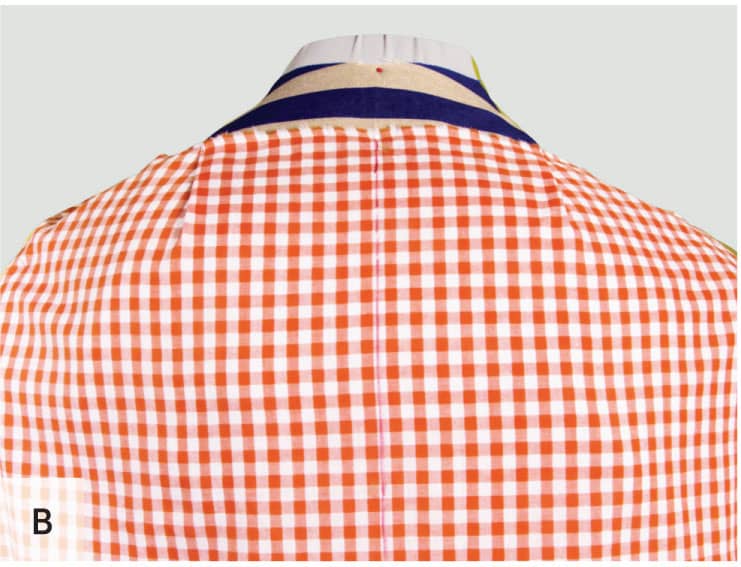
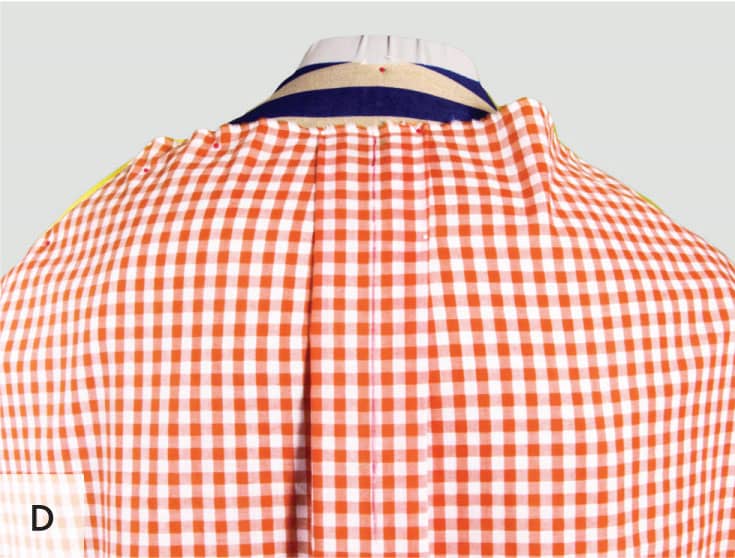
But you’ll probably notice in these photographs that the dart on the right is slightly shorter than the dart on the left (A). In many instances, lengthening the yoke to the dart-end area still allows the yoke mold itself to reflect the asymmetrical roundness of the shoulders and thus minimize the dart differences. An easier and more flexible solution would be to simply make tucks or gathers out of the dart excess as shown below, eliminating any need to recut the yoke.
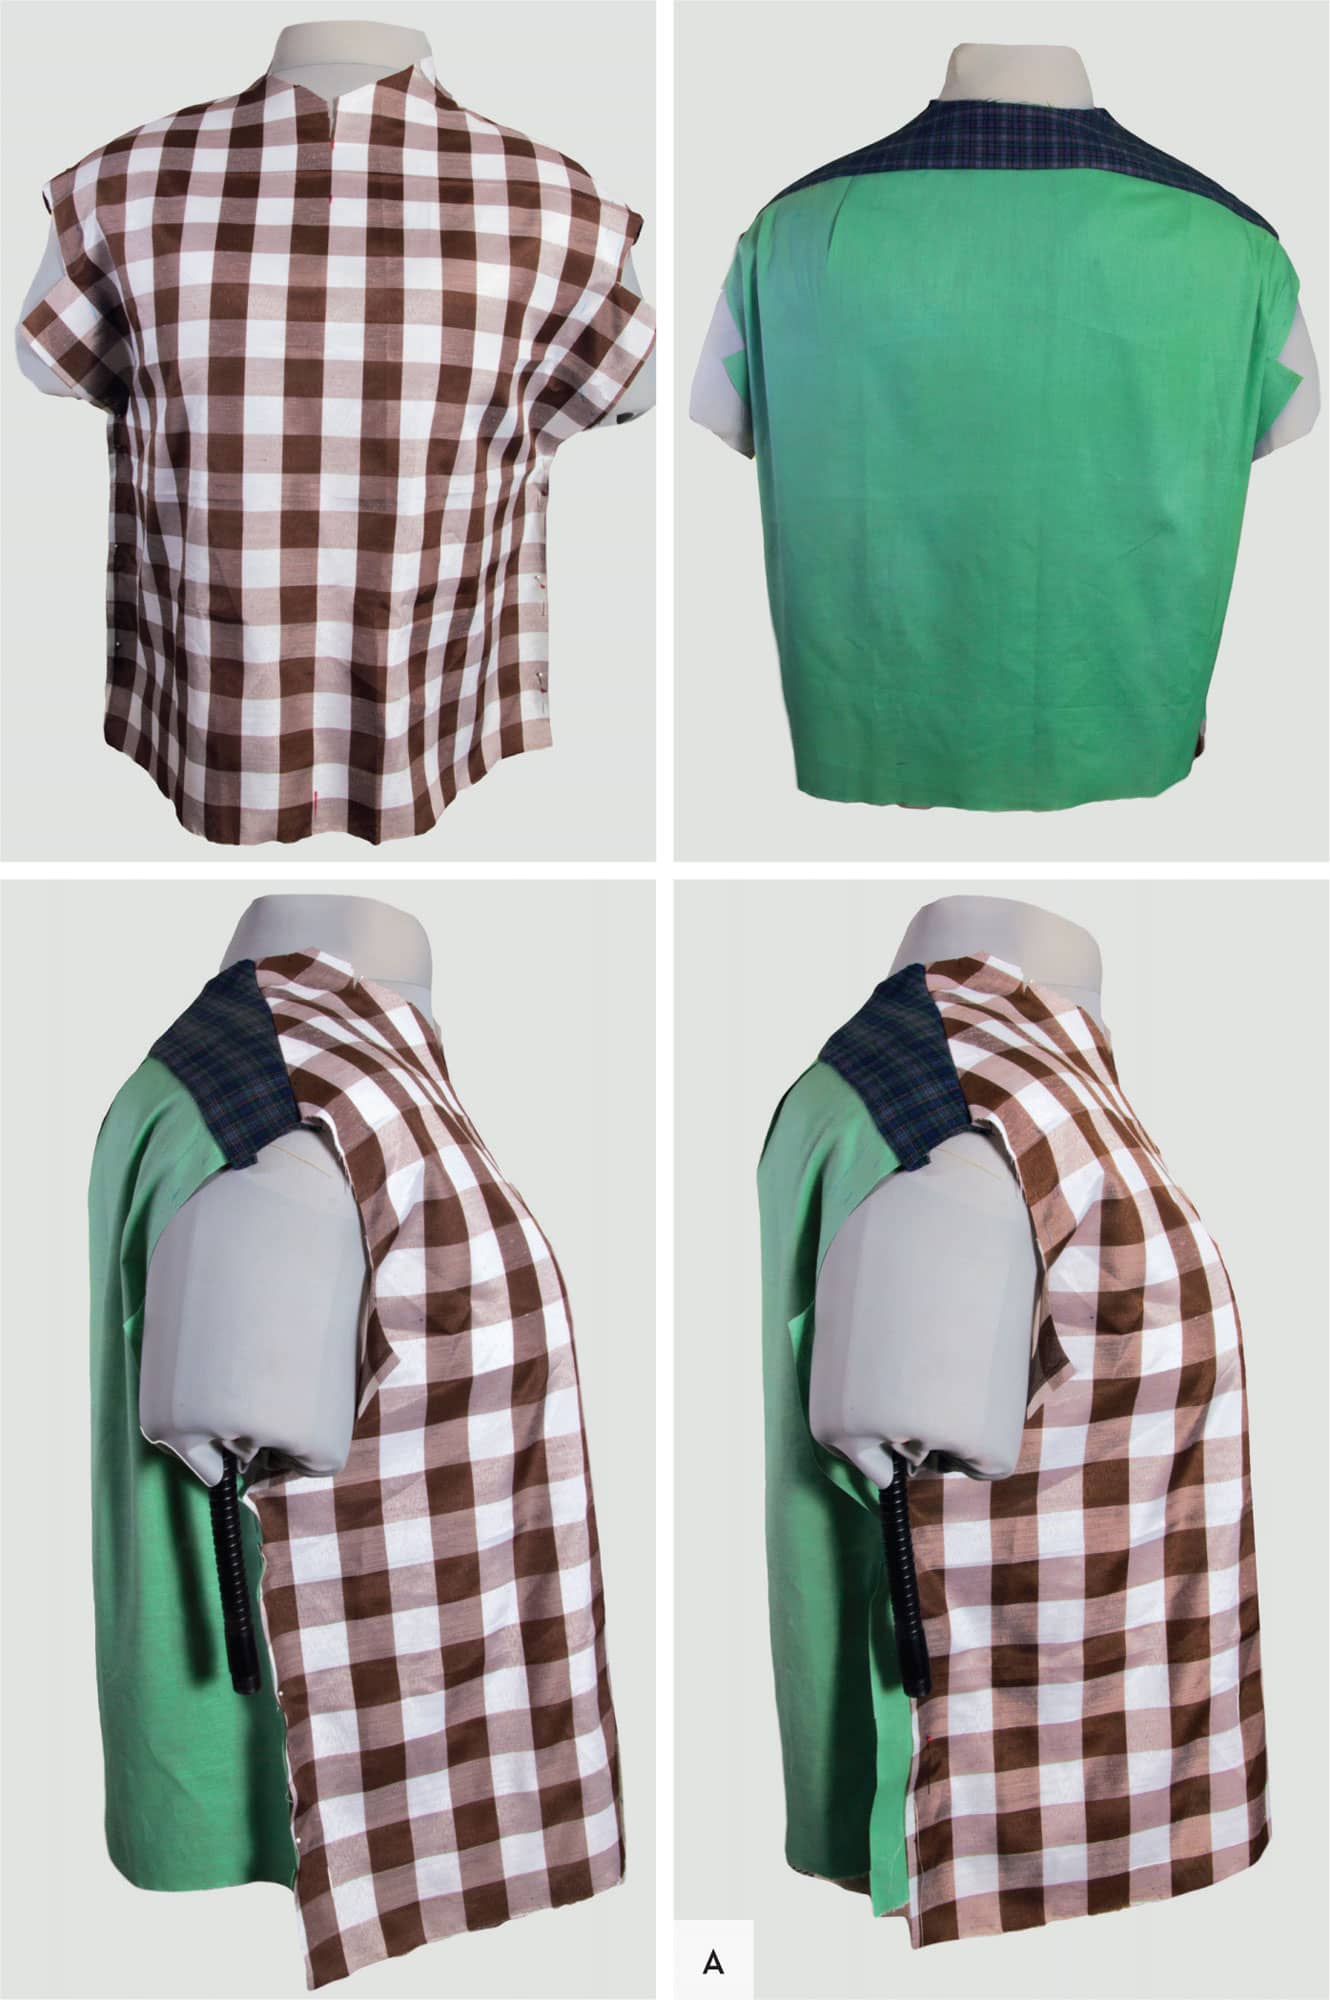
Simply folding over the excess dart fabric to create tucks, around where the darts appeared (B, C), is an easier solution than reshaping the back-to-yoke seam. Tucks are more flexible than seams, and the seam itself will be less radically curved if it’s not absorbing all the reshaping, so it will more respond better to shoulder movement.
Gathers, pleats, and tucks are design-flexible because of the different ways they can be converted, redistributed, and expanded. Note how the box pleat (D) is providing additional ease because it’s not unfolding below the curve to absorb the dart excess as it is in the example on the bottom right (E).

DRAPING FITTED SHOULDERS
After molding the yoke, the first step is to determine the size of the front and back draping rectangles. A quick eye-measure of half the form’s circumference provides the minimum width for the draping rectangle; I add a good few inches (5 cm) to each side. The length should at least just enough to reach the hips from the center-back neck. Cut the draping rectangle for the front a few inches (5 cm) longer than the back rectangle so it reaches above the neckline to completely cover the yoke fronts.
Tip: Ginghams and plaids are the ideal for draping the front and back pieces—they make it so easy to see both grains.
PLACING THE RECTANGLES
I mark the centers of the draping rectangles and the yoke edges with a fabric marking pen or a small snip into the seam allowance. Then, once you are ready to place the rectangles, you can align the center markings.
Pin the back rectangle to the back yoke, first. Adjust the sides and top edges of the back rectangle until the woven plaid looks grain-square across the back over the shoulders. A few judicious clips into, but well short of, the likely armhole allows the sides to be pinned, too.
In front, you can estimate a small neckline curve at the top center, as I did in the nutshell demo, or simply slash a few inches (5 cm) down so the rectangle can slide easily around the neck and over the yoke. I use a plum line to adjust the vertical grain of the front rectangle to the form. Carefully lift and smooth each upper corner to straighten the crosswise grain, and then pin these into the yoke to secure them in place. I clipped into the armholes just as I did for the back rectangle. Finally, with cautious clipping and pinning, I can mold and position the upper edges of the rectangle around the neck and against the yoke’s front edges in preparation for marking the seam lines there.

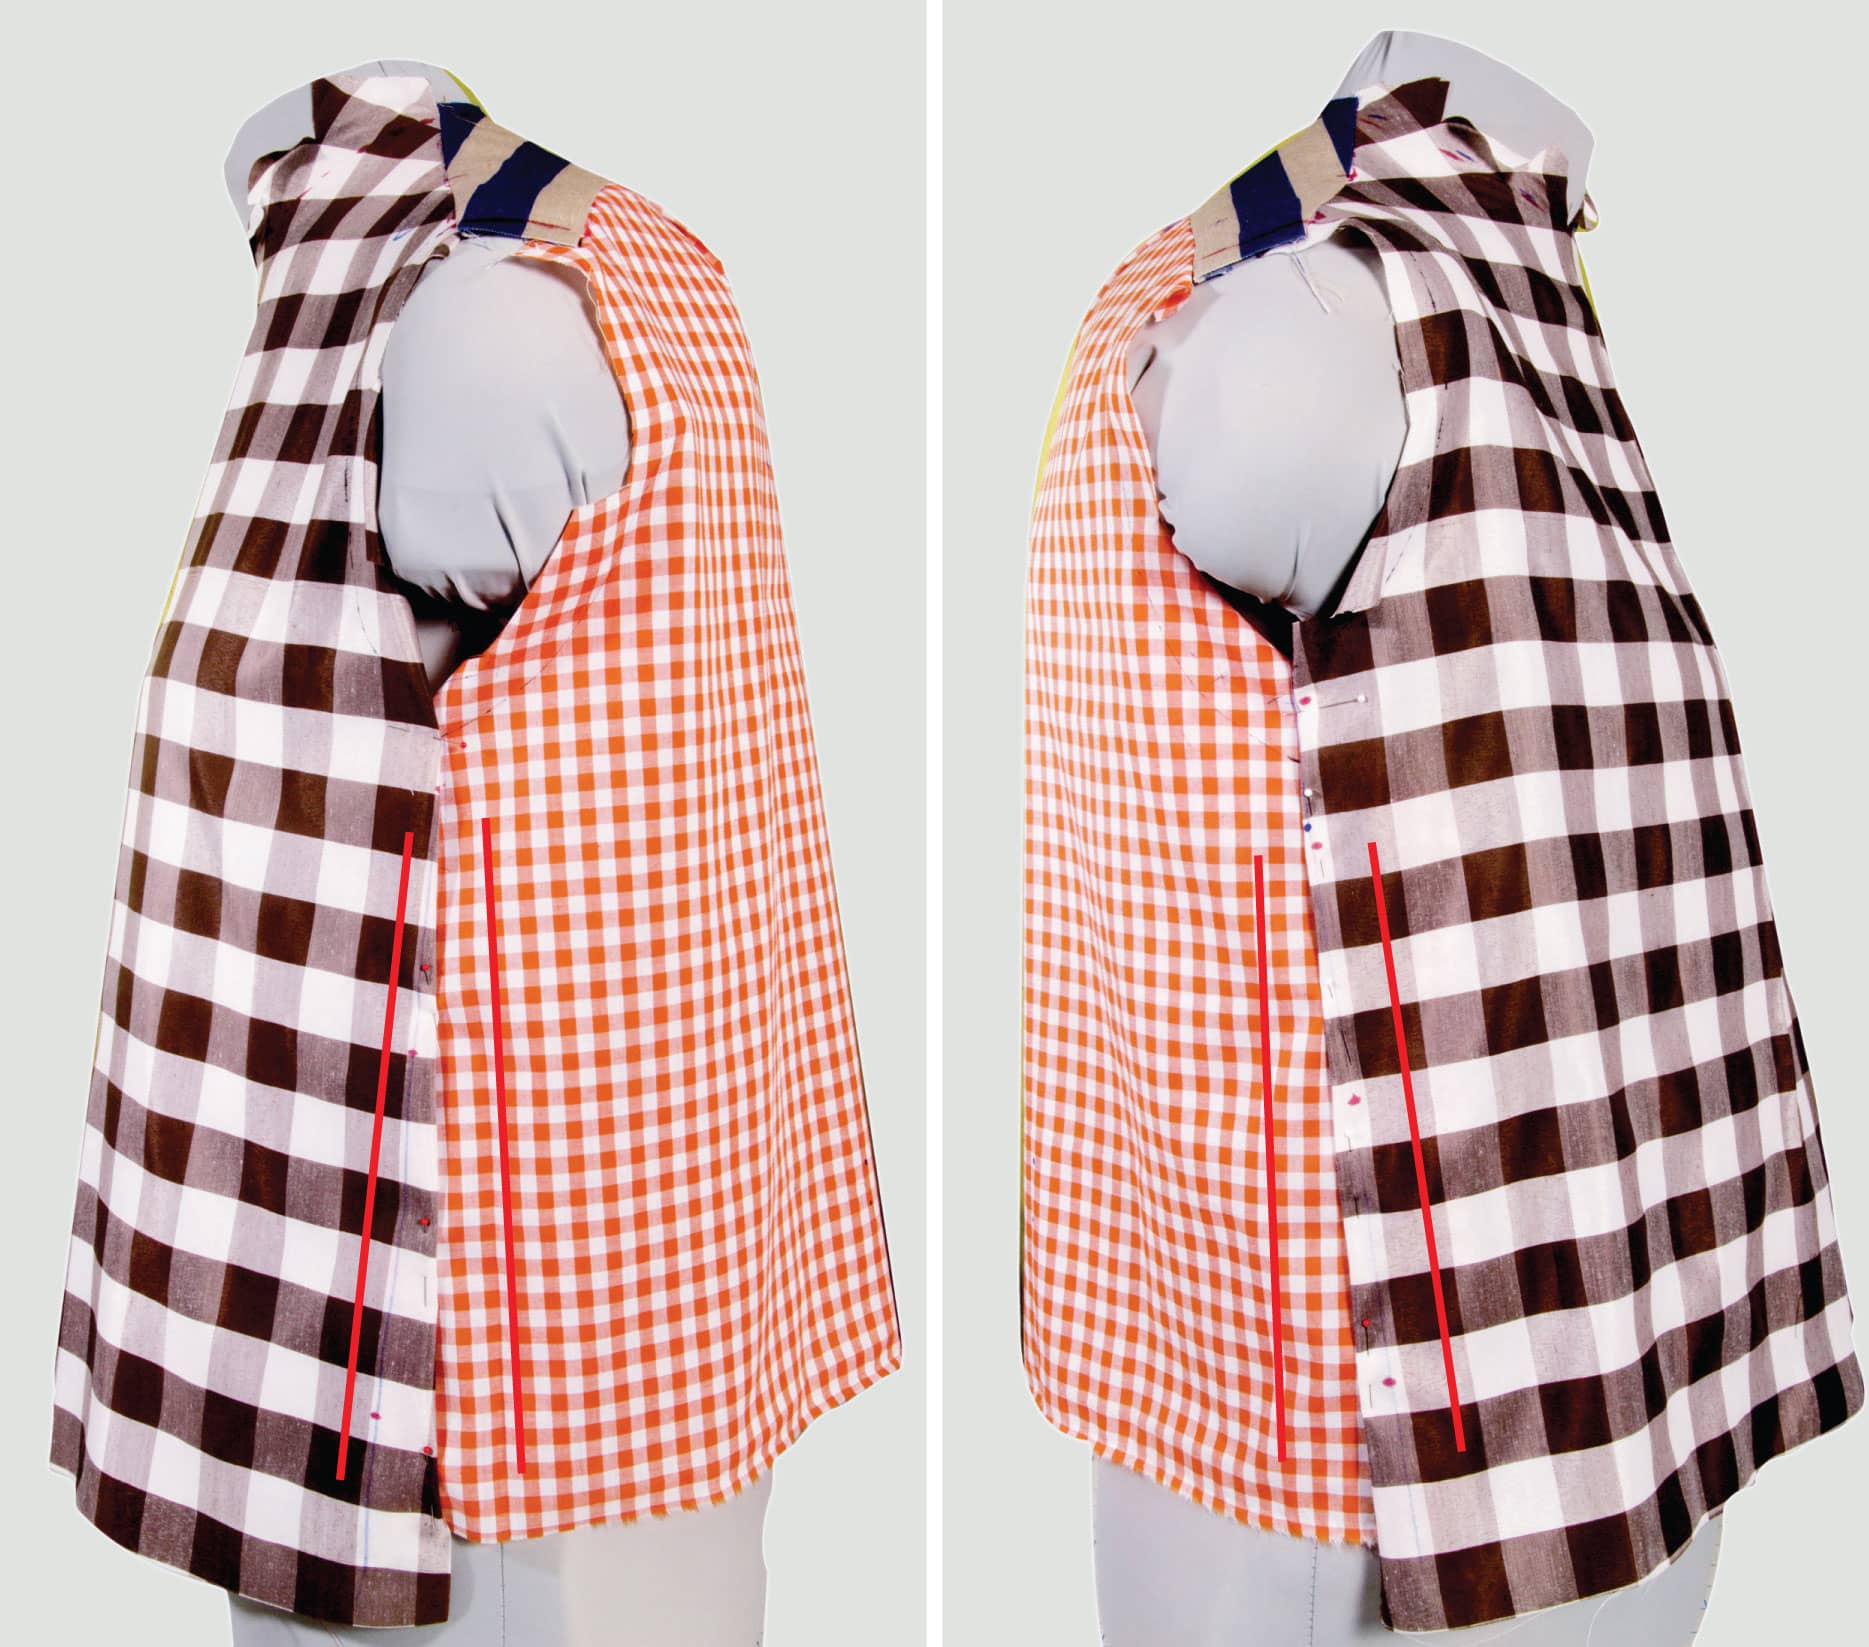
ADJUSTING THE SIDE SEAMS
Here’s where the draping process really shines by clarifying and enabling subtle adjustments with a precision that would be impossible to guestimate using flat-pattern methods. Pinning the sides so the grains are parallel, I can see slight strain wrinkles coming down diagonally from the midback to the low side. Releasing the pins in the bottom half of the side seam lets the fronts and back separately relax to smoother positions, so I can easily re-pin them for a better hanging back and front rectangle.
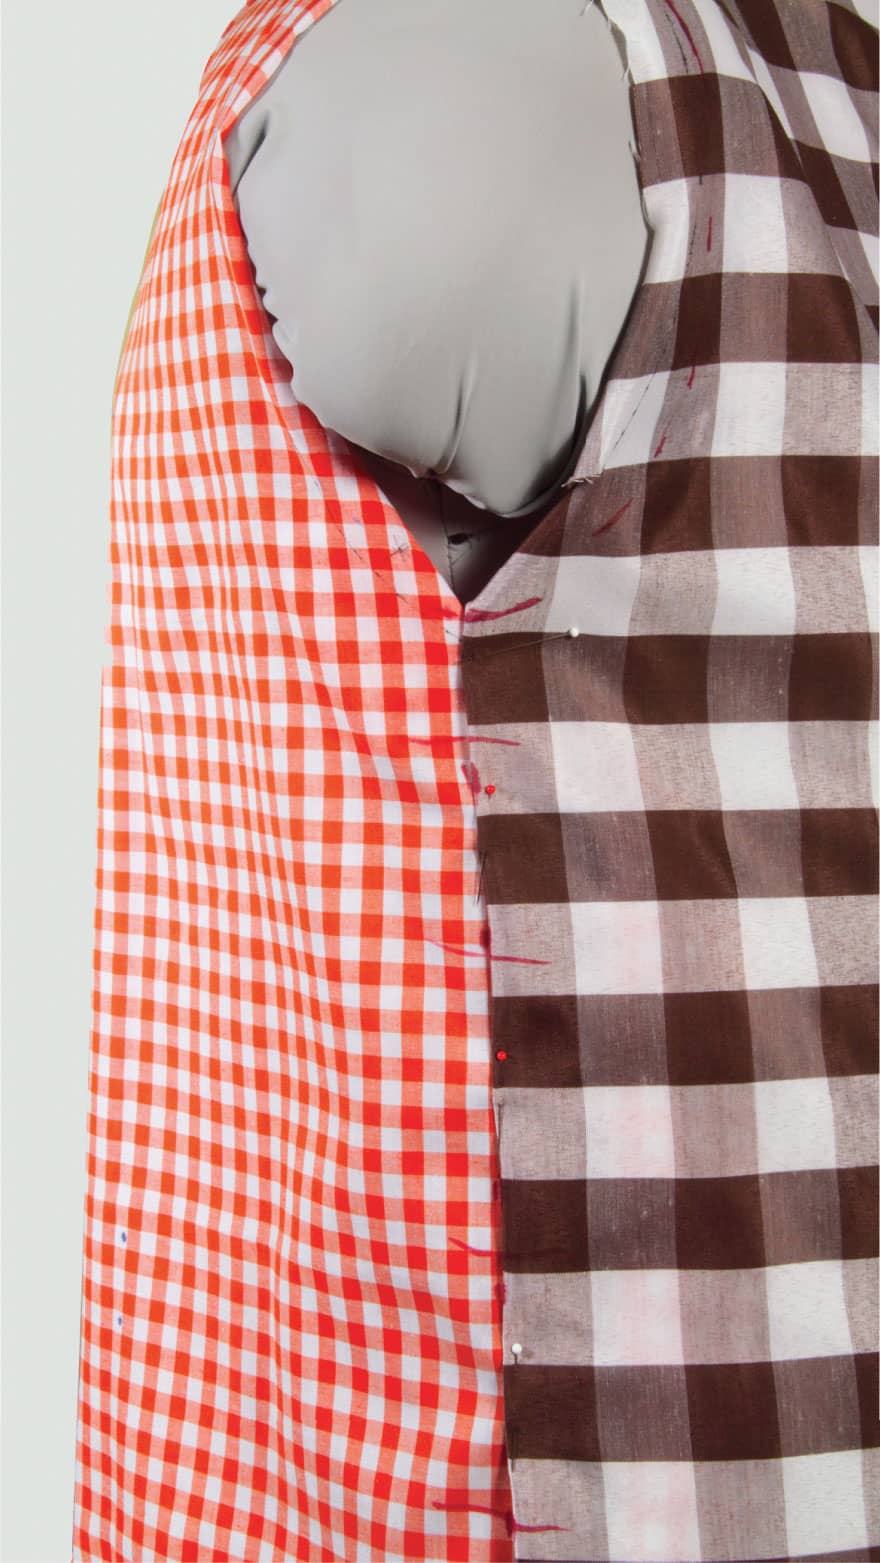
I can’t resist pinning away some of the excess fabric in the back, noting how much excess fabric I can pin out without shifting the pinned sides or adding strain wrinkles (more than 5 inches (12.5 cm) all together, at the hem). I also noted that the right side of the back needed less dramatic repinning to release fewer strain lines, once the grains were aligned, and that side, too, still looked fine after the back reduction. This is the beauty of draping, these kind of fitting adjustments, seem to happen automatically and precisely, clarifying and simplifying management of otherwise hard to see, and even harder to redraw or draft, asymmetries. Note that, so far, I’ve simply overlapped the front edges on the back ones and made no attempt to establish specific side-seam lines.


MARKING THE SEAMS
At this point, it is time to check the drape all around and mark along all the overlaps to create seam lines. I could have been marking these as I went, but in this case, I’ve waited until now when I can see the whole drape and possibly make further adjustments. To mark the side seams, slip a plastic ruler under the draped shirt so you can mark both layers at once. I place these seams visually, but you can certainly measure now, instead of later, to be more precise. The ruler will protect the form, or frittee, in case your marker bleeds through the fabric.
Along the folded-under yoke edges, I’d regularly pinned the rectangles to hold everything in place, which also simplifies accurate marking; simply use a marker to mark along the pins. At the ends, I mark both the rectangles and the yoke where I expect the armholes to begin.
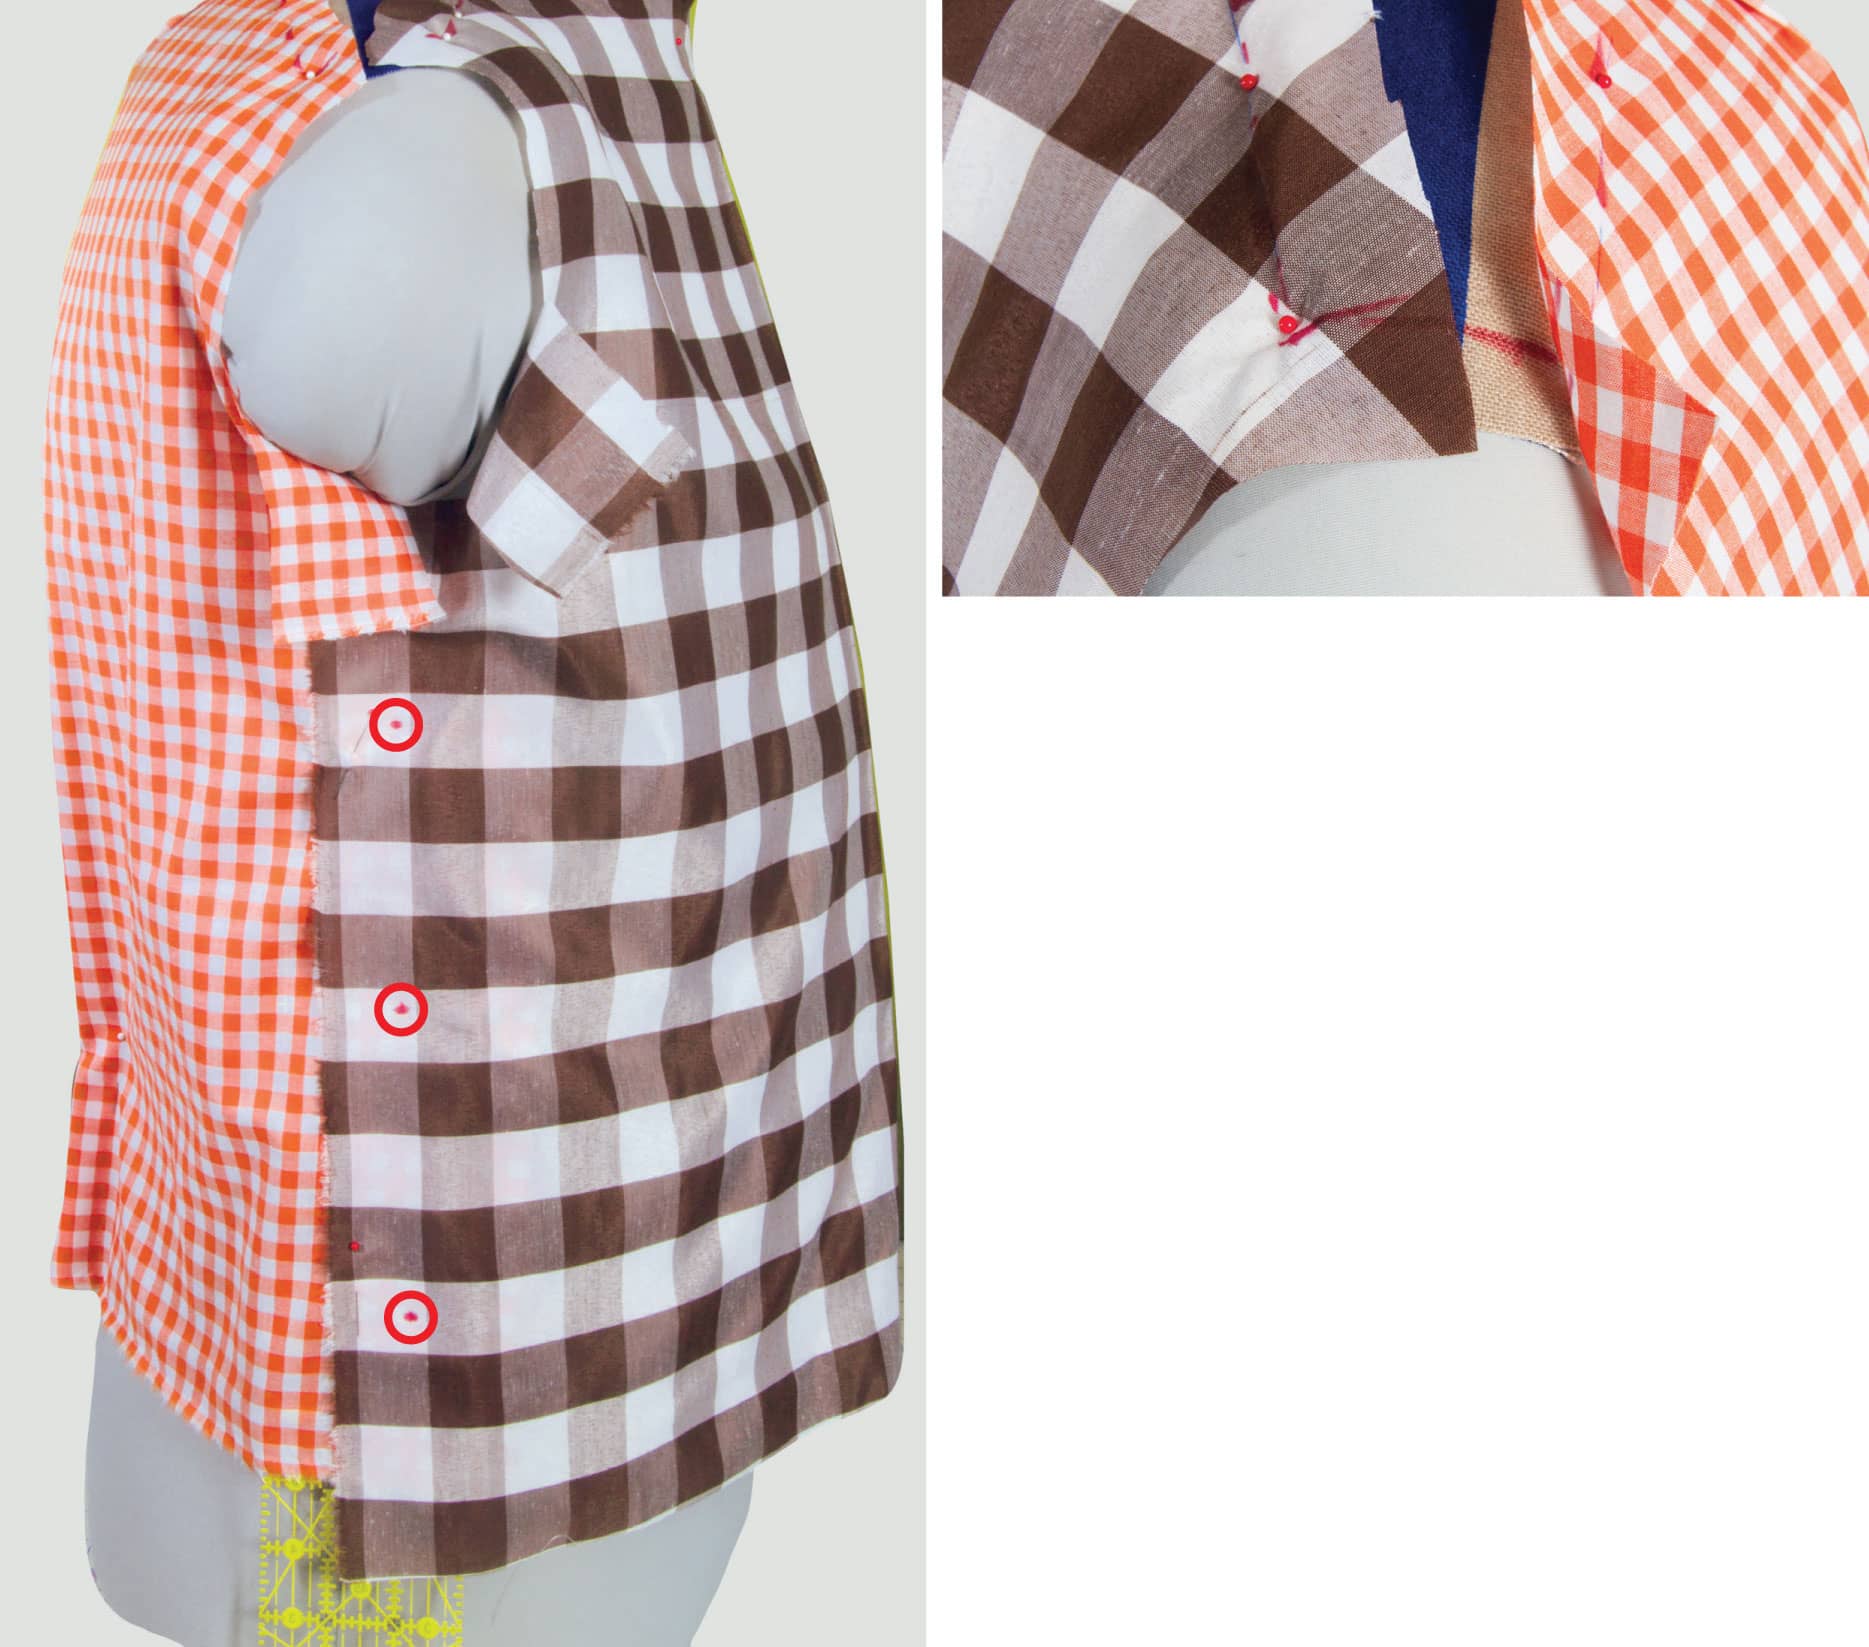
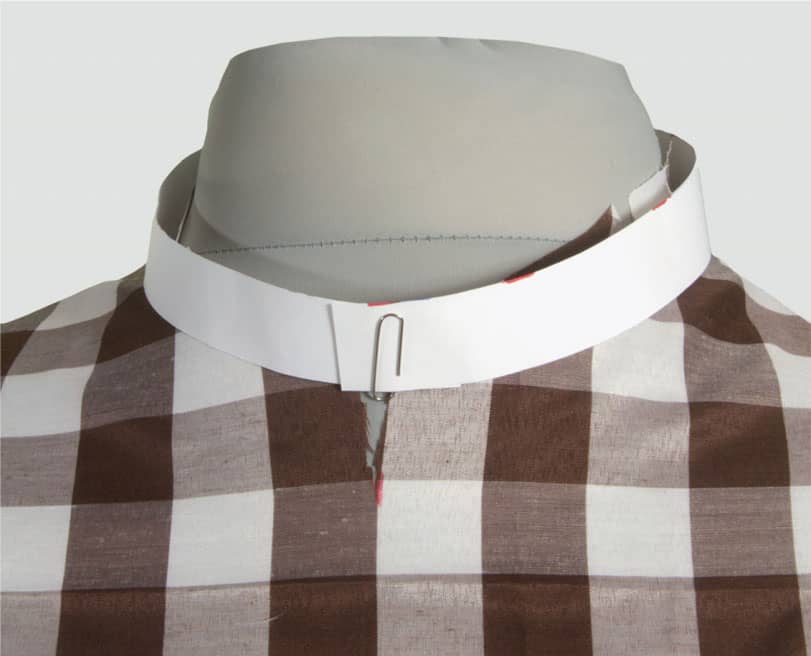
To mark a first-draft neckline, I position a paper strip, about an inch (2.5 cm) wide over the neck and adjust it to establish, and then mark, a neckline around the bottom edge of the strip. All these markings are just first-draft beginnings, to be tested with machine basting and, probably, an additional test muslin.
Finally, I measure the shirt front, from side seam to side seam, and in various locations across the body so I can be very sure of positioning the side seams symmetrically when I true the traced pattern. I make note of the measurements to see if there’s any dramatic nonsymmetry that I should both confirm and possibly leave in place to preserve the fitting information I already established.

BASTED TEST
After marking the shoulder seam lines, it’s time to baste the pieces together at the yoke. I start by machine basting the yoke seams to the front and back drapes. Once basted, it’s time to examine the drape back on the form. I pin the side seams, as marked, and then I’m able to finagle the side seams back to being grainmatched and closerfitting without creating any strain lines, in part, because I’m shifting the seam lines inward here more than before, and perhaps because I also take the time to explore microshifting the sides up and down against one another, as detailed at right.
I’m not as interested in figuring why this worked so well, as I am in seeing how good everything is looking and how intuitive and tactile the process of getting here was. No doubt, I could have gotten to this point at the pre-basting stage, but I always seem to find I can do better on a second pass, which is why I make sure there are plenty of opportunities to redrape like this.

ARMHOLES
To shape and mark the armholes, I traced the front and back curves, without seam allowances, from the same source shirt where I got the yoke (see Pin-Tracing), onto printer paper. I trimmed these curves, as you can see at right, so I could manipulate them directly on the form with no stretching, but with the same bendability that will be required of the fabric, as shown below.
This form’s right shoulder is quite a bit lower and rolls forward very differently compared to the left shoulder. This raises and enlarges the right front curve so it can’t reach the back curve, causing both curves to pivot away from the yoke end and toward the side seam. With no arm in the way, it’s easy to blend and mark a new armhole line between the curves, right on the fabric and still on the form.

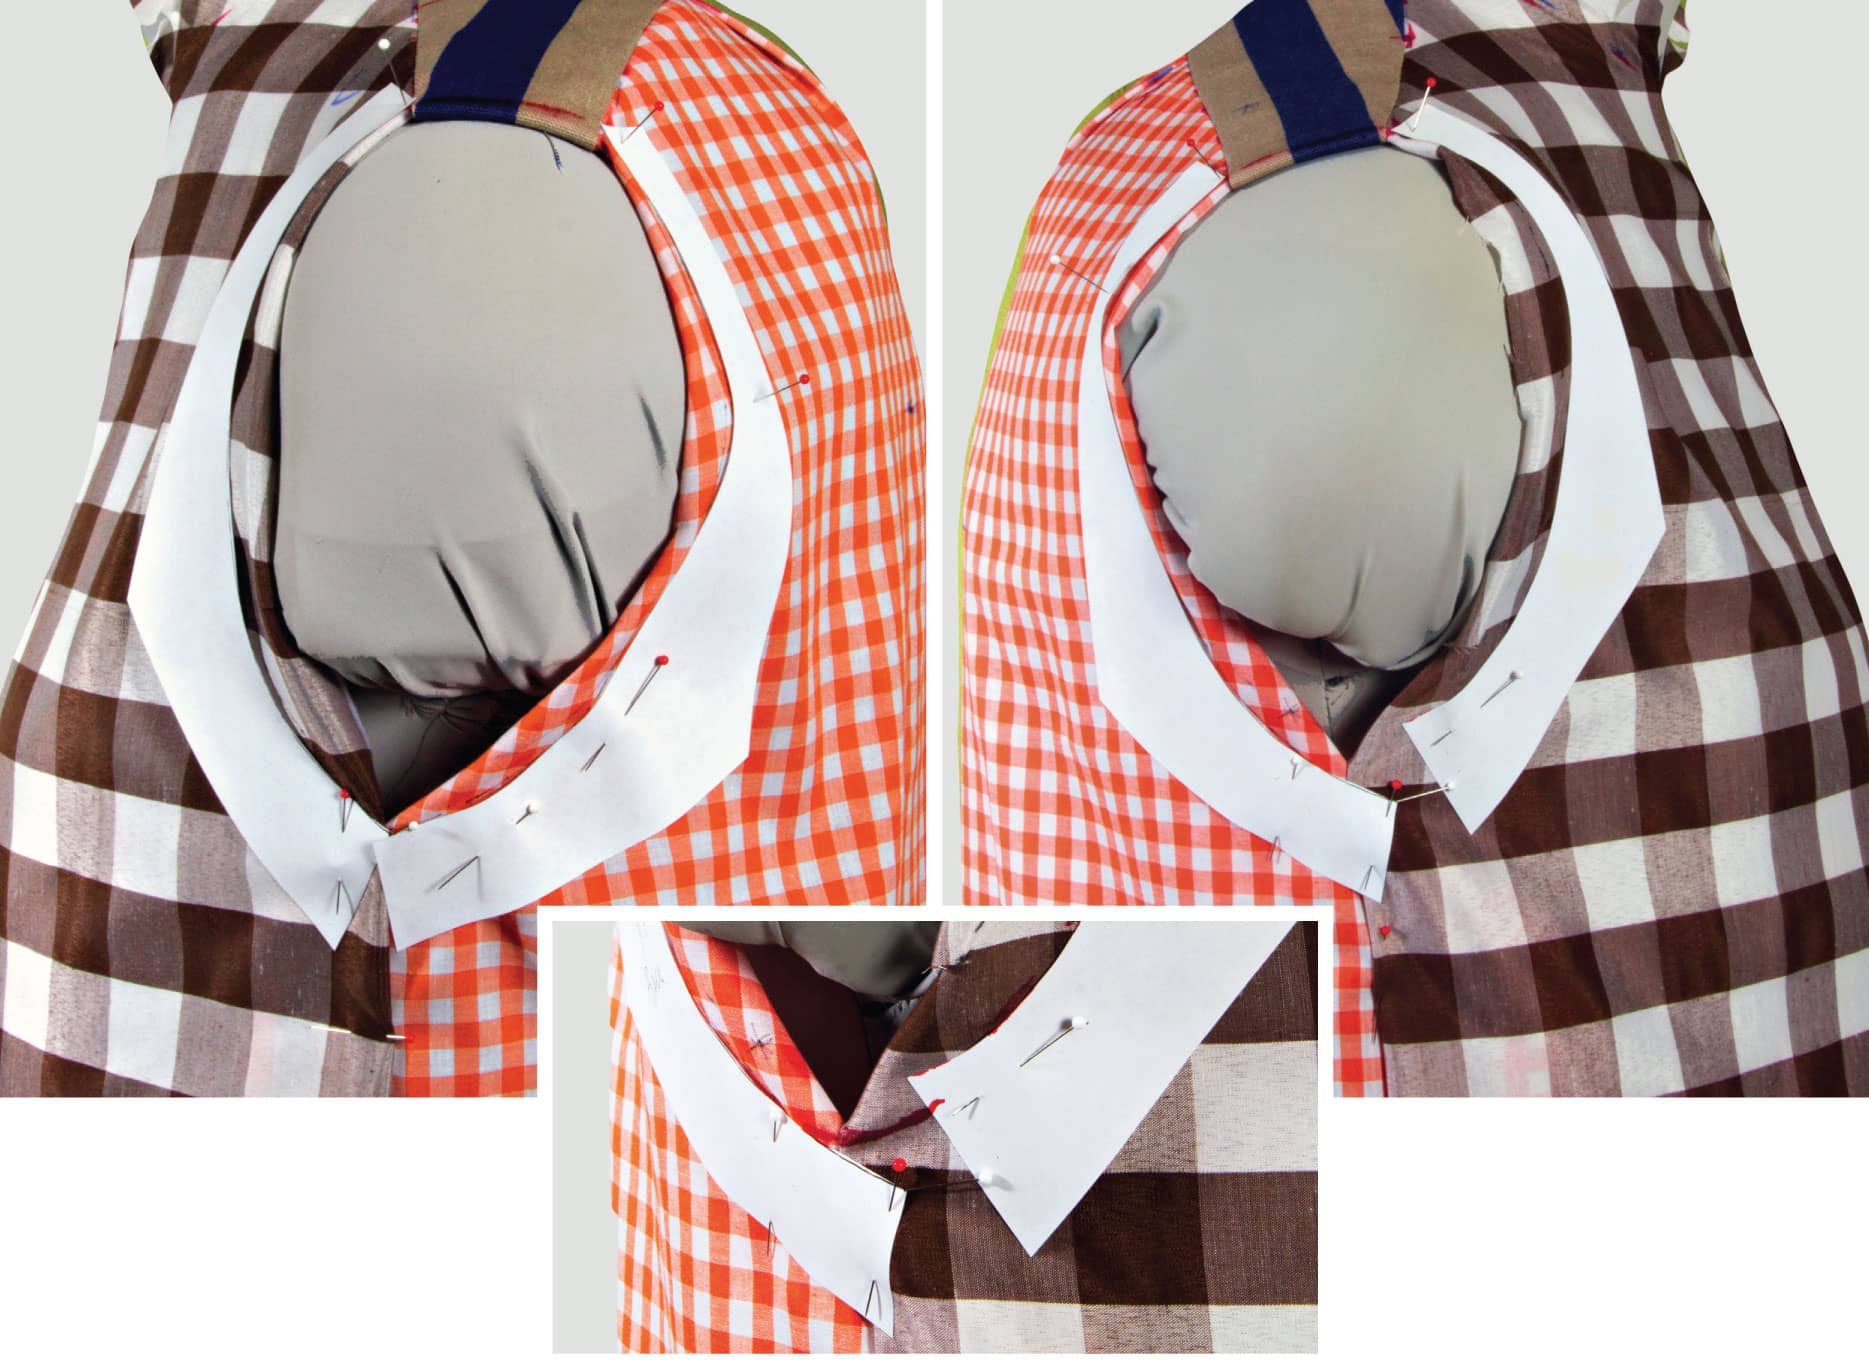
If you were fitting this on a body, you would need to assess the armhole curves with as little armraising as possible. It is much easier to do this flat on the muslin pieces after marking the final side seams and their alignment. And then, transfer the traced paper armhole curves with the test drape (muslin) flat on a table, with open side seams. Be sure to try the muslin back on and pin the side seams to check the alignment.
As another option, instead of using armhole curves from a source shirt, you can use armhole curves taken from the included pattern sheet. Choose a pair that matches the cap-length measurement from your source shirt as described shown here, or measure the form or body once you have draped to this point. These curves meet at the shoulder top, making no allowance for a yoke, so they can be used with any yoke you wind up choosing and draping, unaffected by any draped yoke asymmetries, and easier to match to nonsymmetrical shoulders. No adjustment is needed, in this case, for the armhole curves to meet at the sides.
To use these curves, tentatively mark the shapes of the curves directly on the fabric. You’ll measure the marked curves to determine armhole lengths. Do this enough and you’ll soon find your premarked curves are much the same as those you traced for transferring from this or any other pattern source, so you can skip the transfer step and start trusting the curves you draw.
SLEEVE PIN-TEST
Here’s the front view of the drape at this stage, with sample sleeves, pinned into the armhole openings.
For this step, you need to cut a pair of sleeves from any source that has a cap length that matches your armhole length. In this case, I traced one from the included pattern sheet with the medium-high cap (shown here).
Pin or machine baste the underarm seam. Starting at the top, pin the sleeve to the armhole aligning the cap with the armhole so it falls smoothly. As you can see, it’s easy at this stage to slightly rotate the whole sleeve to position the grain, as needed, so it looks good and the fabric pattern is straight. If you’re working on a form, though, be sure to test this on the real-life wearer, who may have a different opinion based on comfort. Before you commit, you might find that matching the actual arm angle at rest works better than being theoretical about grain level. In the same vein, pay attention as you position and drape the sleeve, to the relationship between what the drape looks like and how it feels to the wearer when he or she is moving. Take time for multiple pinned or basted try-ons if you’re working on a form and not directly on the wearer. Soon you’ll develop a good sense of how the results from working on whatever form you’ve got are different from on-the-body results, and you’ll see how you need to adjust the form or you will simply make mental notes of how to improve the drape for your wearer (see my blog for more on form adjusting).
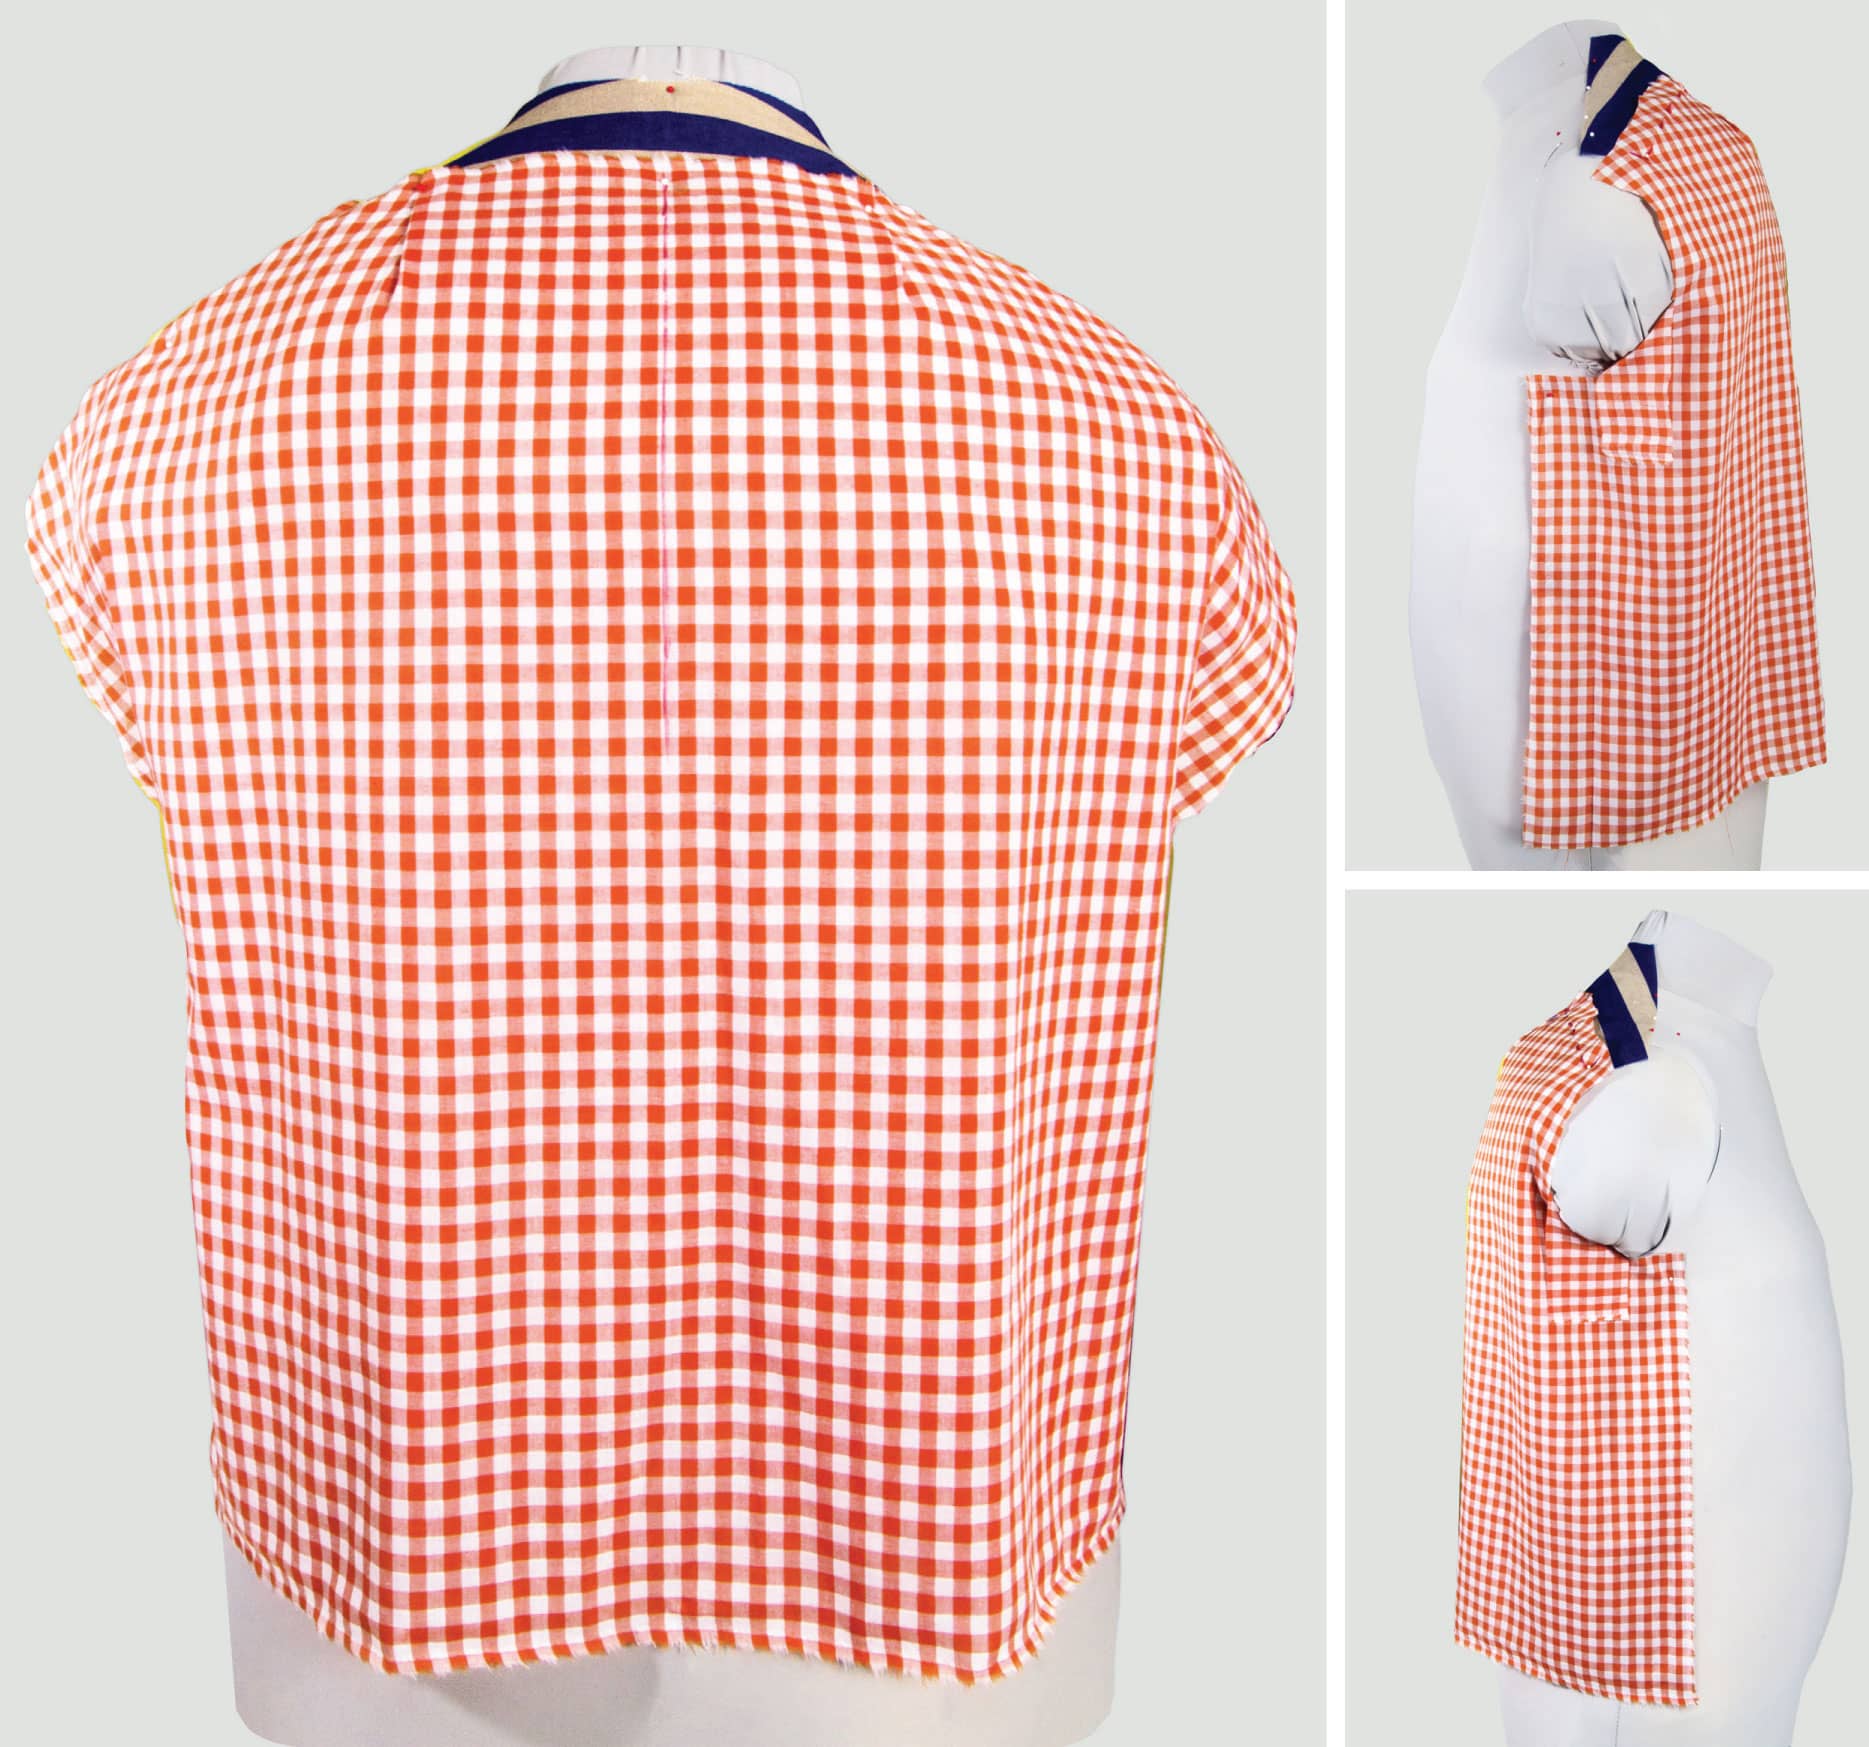
BACK VIEW AND SHOULDER EASE
Here’s the back view of the drape, at the same stage as the front view (see here), with sleeves pinned in place.
These other photos depict several views of the back armholes with a pinned sleeve, focusing on how much ease (for comfortable movement) there appears to be in the various shots and how much can be simulated.
In addition to the arm-angle/sleeve-rotation issue depicted on the front view, the impact a real arm and shoulder joint has on a drape at both the side seams and armholes can only be approximated on a form, because this will, of course, vary a lot in real wear, as the arm moves against and away from the sides of the body in all sorts of different ways.
Sleeve position can only be truly evaluated with the test garment on the wearer, and judged by the wearer based on his or her own comfort requirements. On the form, however, you can at least pin or push the sides and the armhole curves in towards the body if they’re not already fitted to be there. This simulates the impact of arms held still and close to the body, and it is reflected in the second of each of the photo pairs at the right.
We’ll look next at a few ways to increase the ease at the armholes by draping loose shoulders.

DRAPING LOOSE SHOULDERS
You’ll recall from the description (see here, start of this chapter) of the loose-fitting shirt that the shoulders and armholes of the draped test garment are all that need to match the body inside. For this next section, I am using my one homemade dress form with flexible arms.
In the previous pages (“Draping Fitted Shoulders”), we very carefully adjusted the fronts and backs as they met at the side seams to ensure that the shirt fell as smooth and straight as possible, while making no efforts to add further shaping to the shirt to reflect or match the body within. We’ll explore those options in the next chapter. Even so, the shirt’s shoulders and armhole positions were matched exactly to the body, because that’s what draping does most naturally. If, instead, you want more ease in the shoulders and armholes, you’ll need additional steps to loosen the shoulders of the drape.
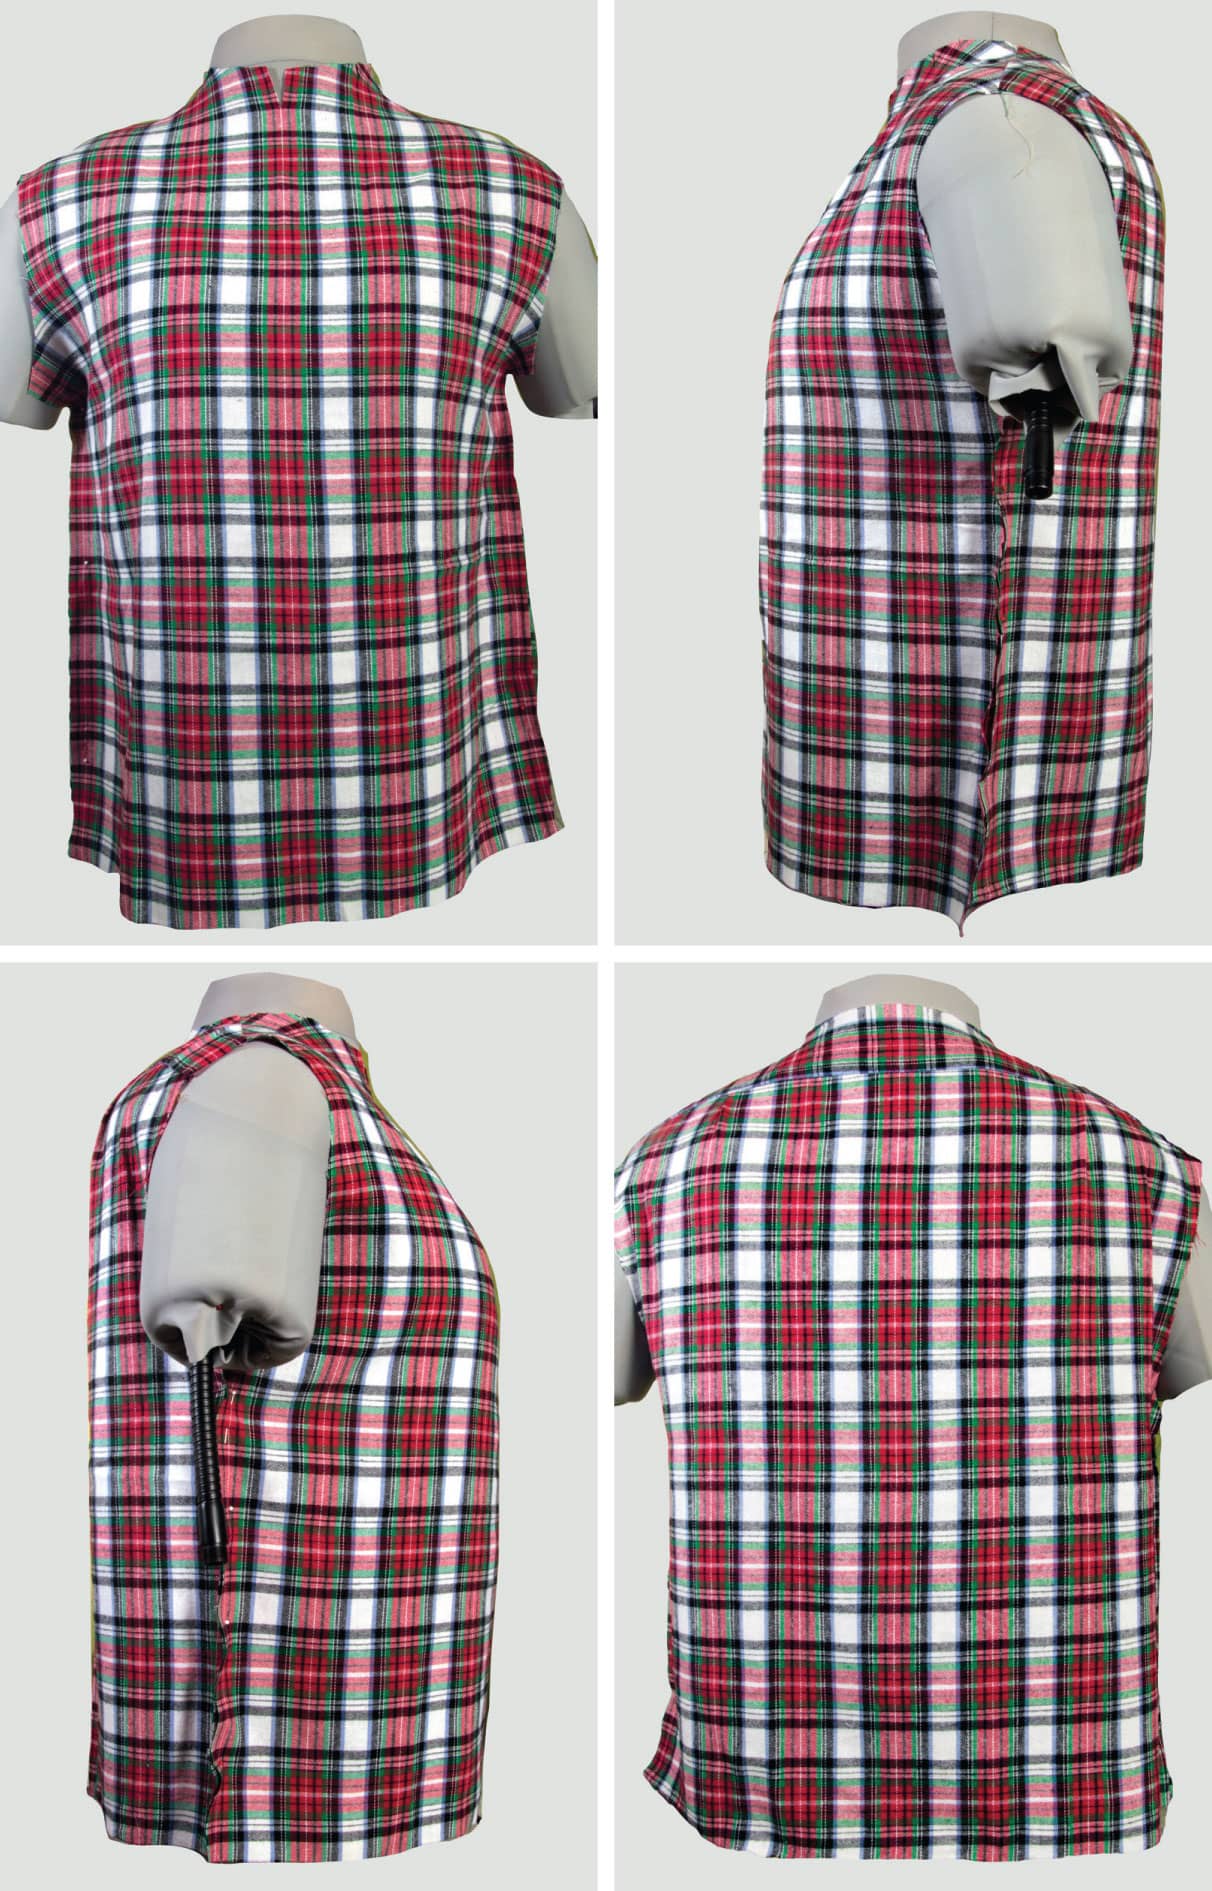
MUSLIN 1: INITIAL DRAPE
My preferred method is to start with a loose drape adjust—demonstrated to create fitted shoulders and armholes—then alter the resulting pattern to extend them.
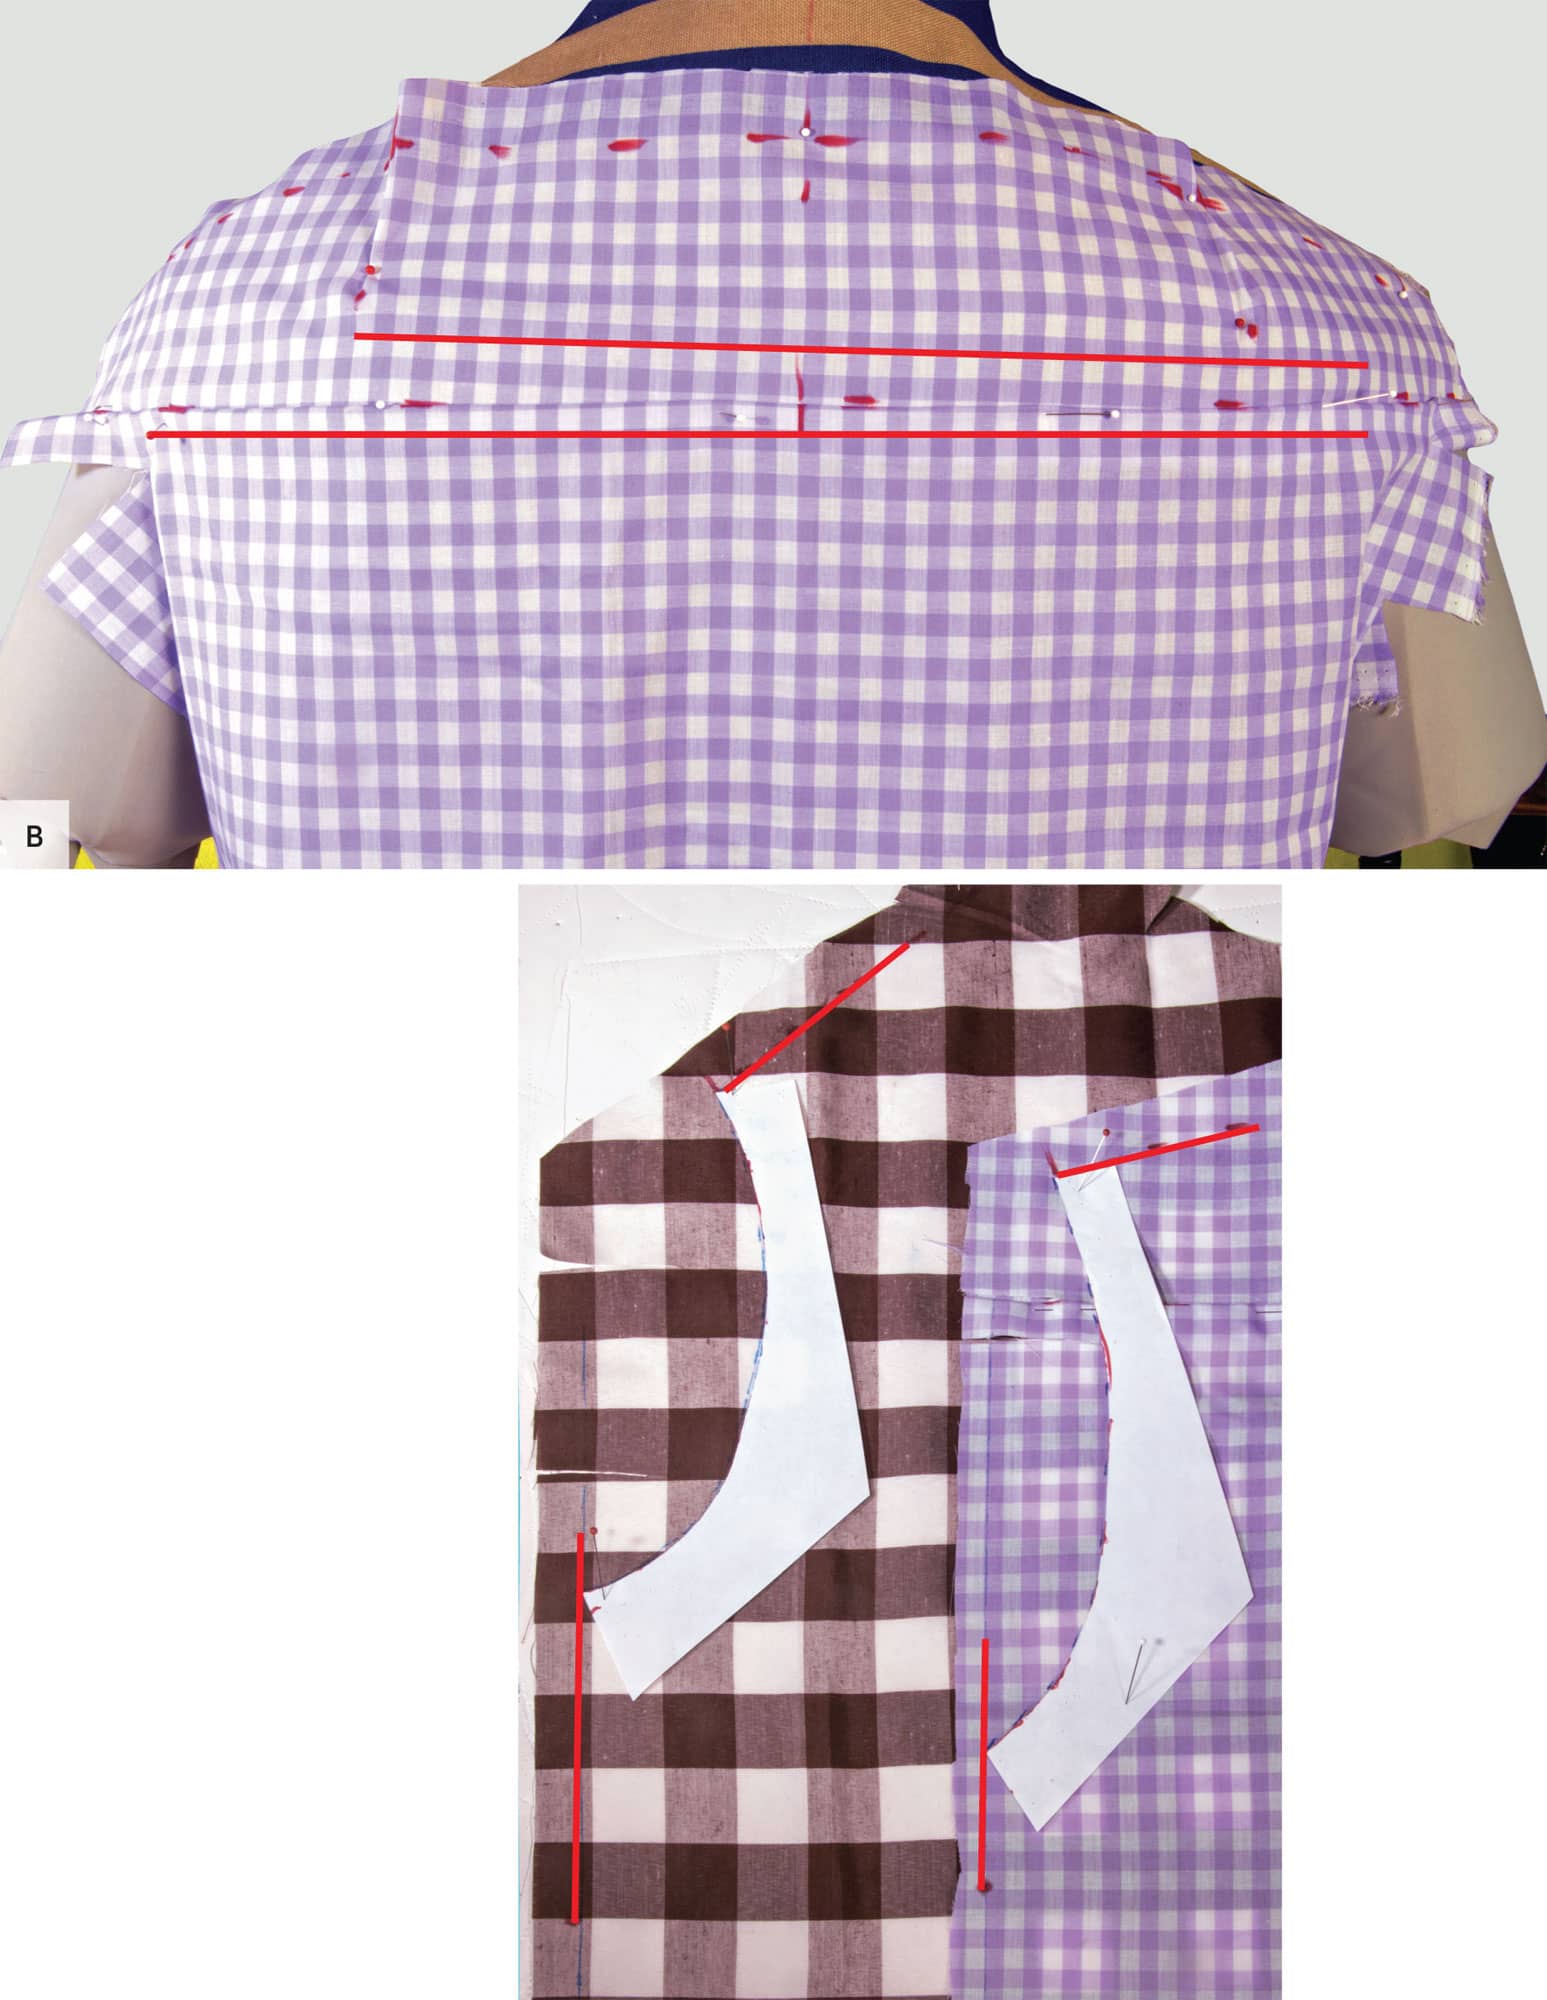
Note that for a loose drape on this particular form, I’ve tucked and lifted the back across the armholes to bring the side seams together smoothly and squarely, taking a bit more depth on the right side, as needed, for a smooth result on each side (A, B). I took care to angle the tuck smoothly across the full back so the pinned fabric would lay flat for pattern markings transfer once off the form. To trace the front and back armhole curves, I pivoted them from the respective yoke ends to the draped side seams, as shown at bottom far, right.
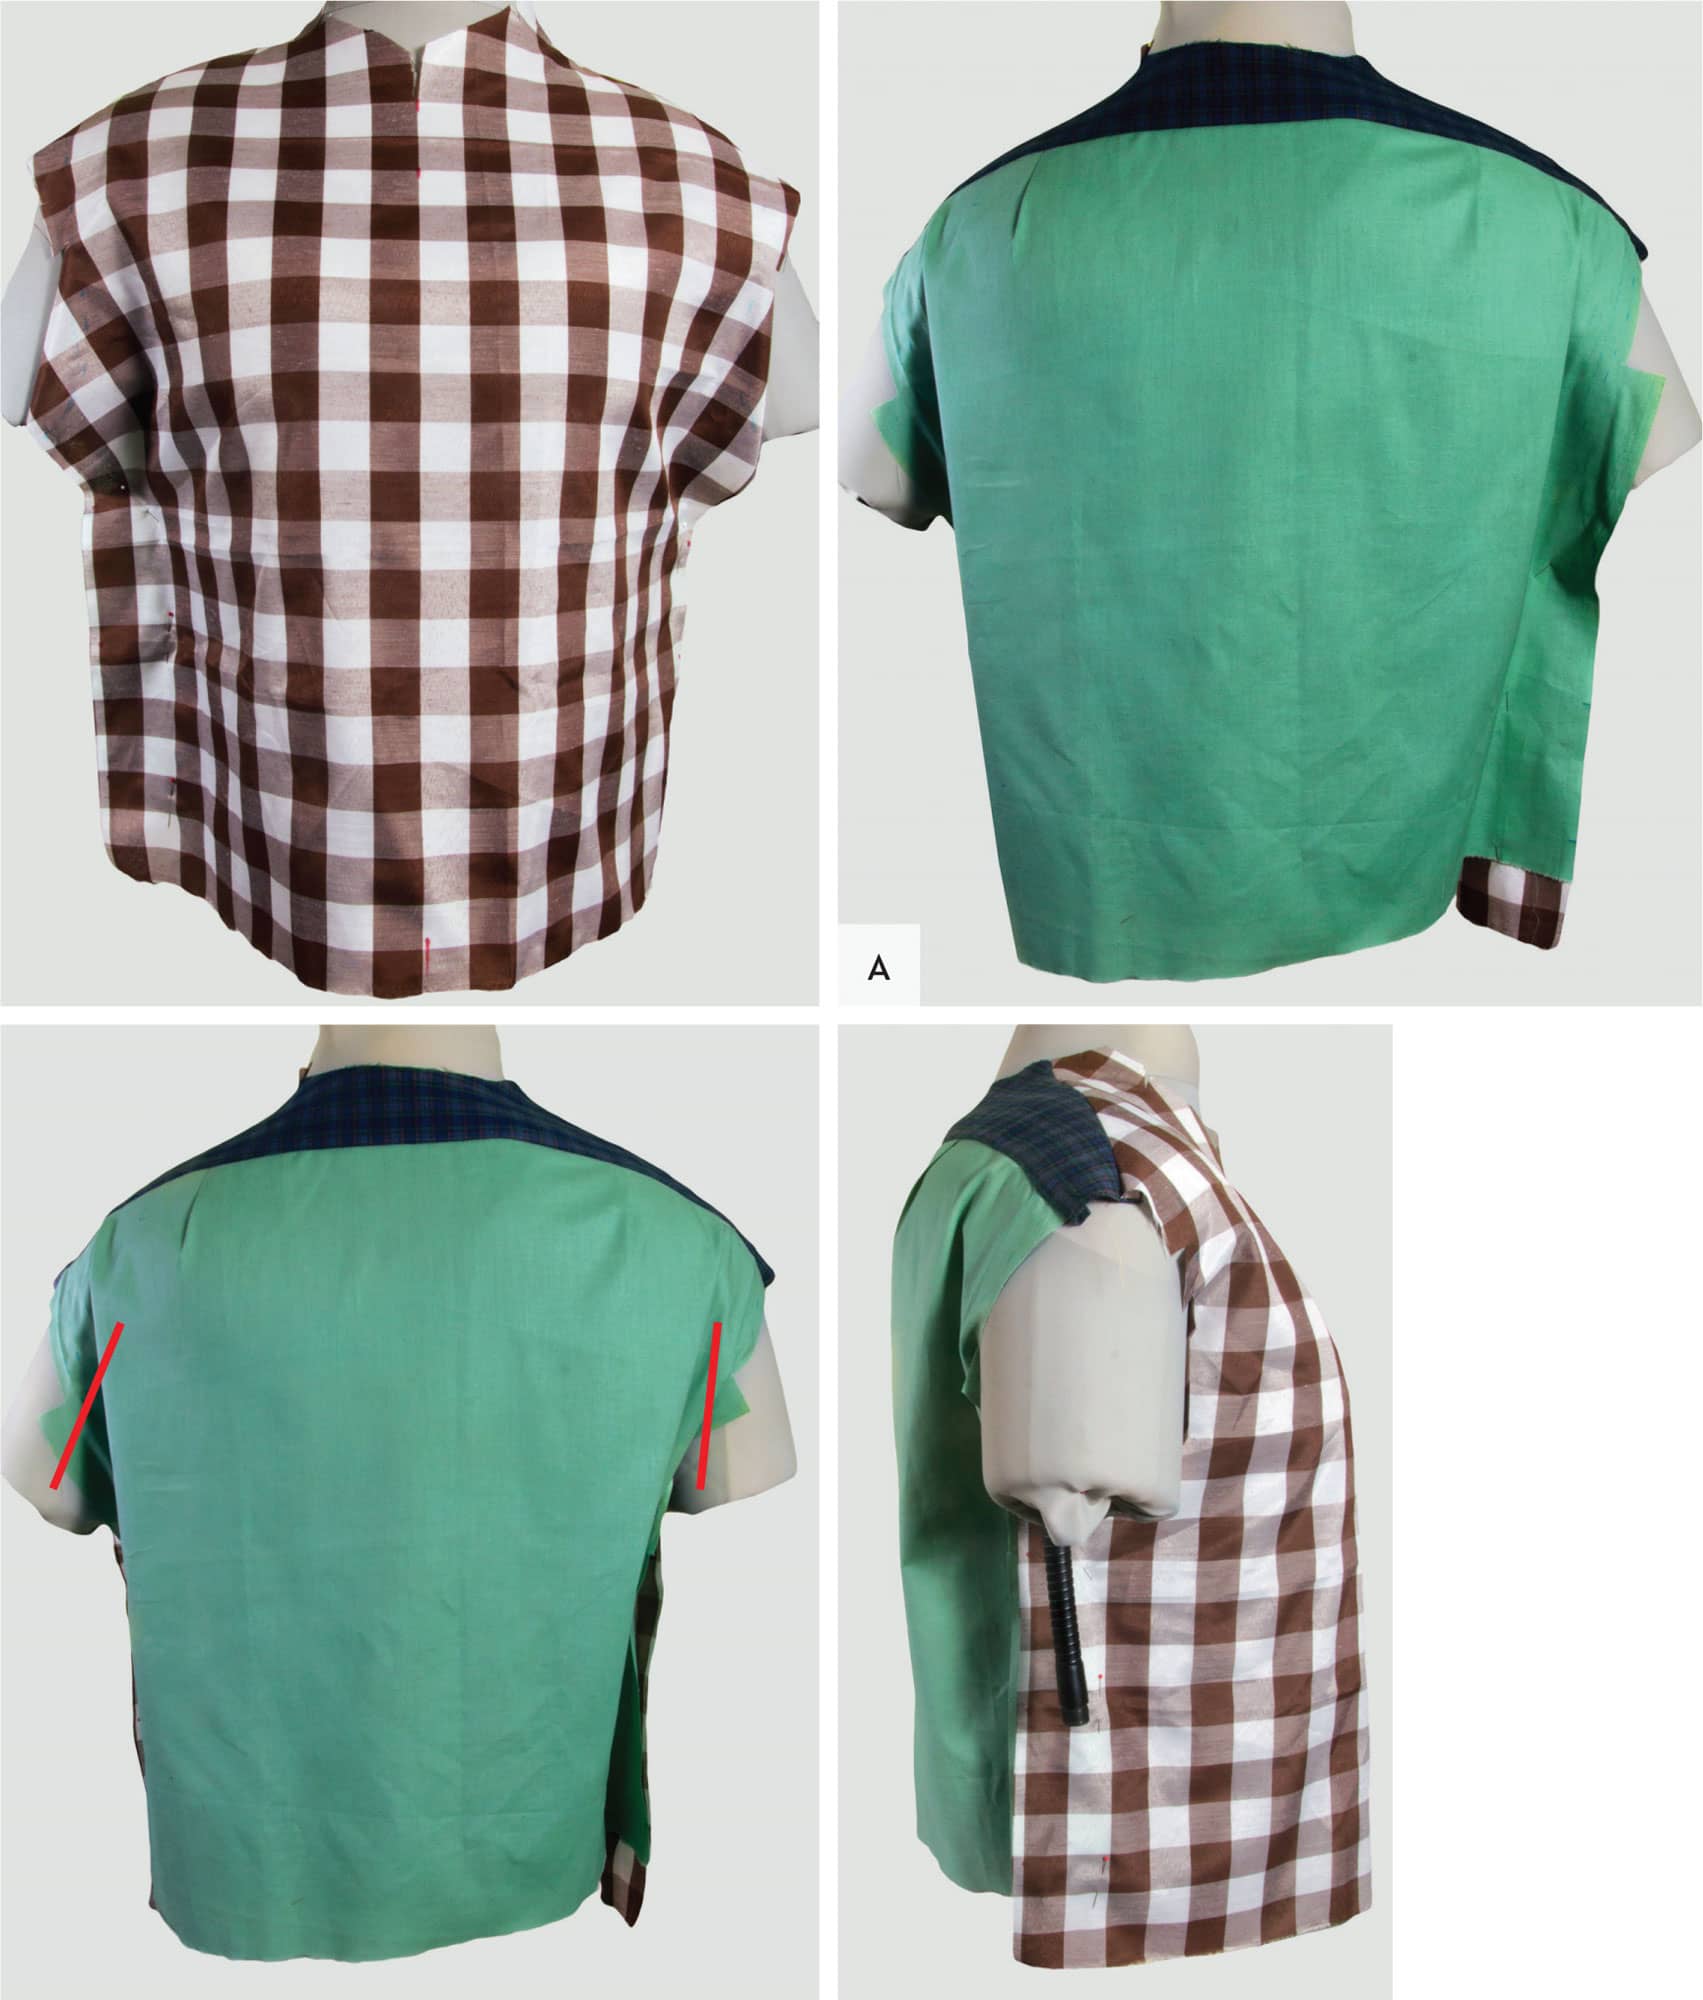
MUSLIN 2: PROOF AND ARMHOLE SHIFT
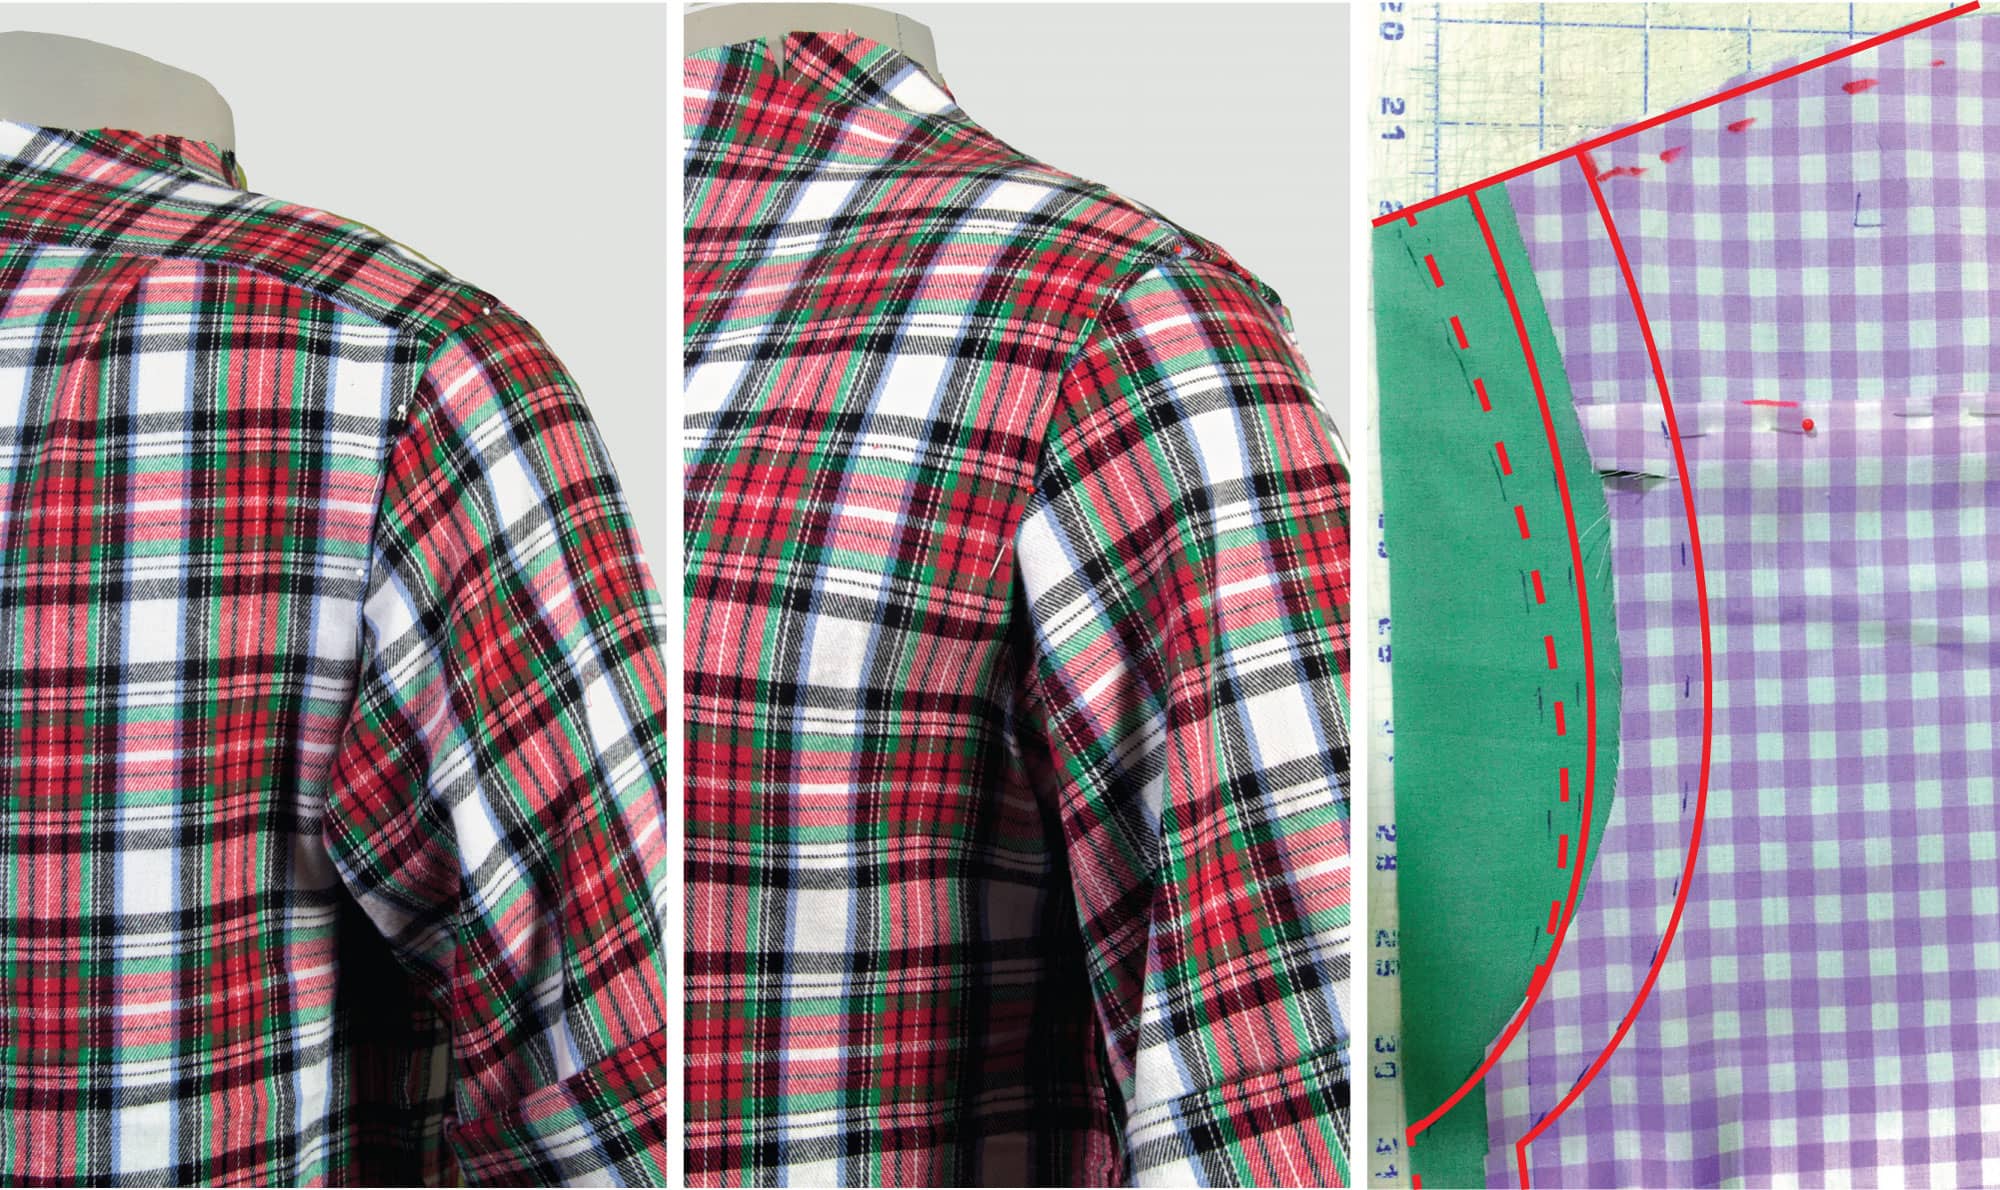
The next step, shown here in plaid images, is not additional for me anyway; it’s what I do after any initial drape. I make a basic (no details) proof muslin carefully stitched following an accurate tracing of the pieces from the first drape, minimally smoothed and/or straightened with rulers and curves. There’s no point in proceeding without being sure the draped seam lines are good so far and possibly improvable. As expected, the fit across the shoulders and at the armholes is close, not loose, with very little further adjustment having been needed at or below the armholes, and none at the shoulders—which was our initial goal. So, now that I’m satisfied, I can proceed to drape loose shoulders by altering the pieces from the original drape.
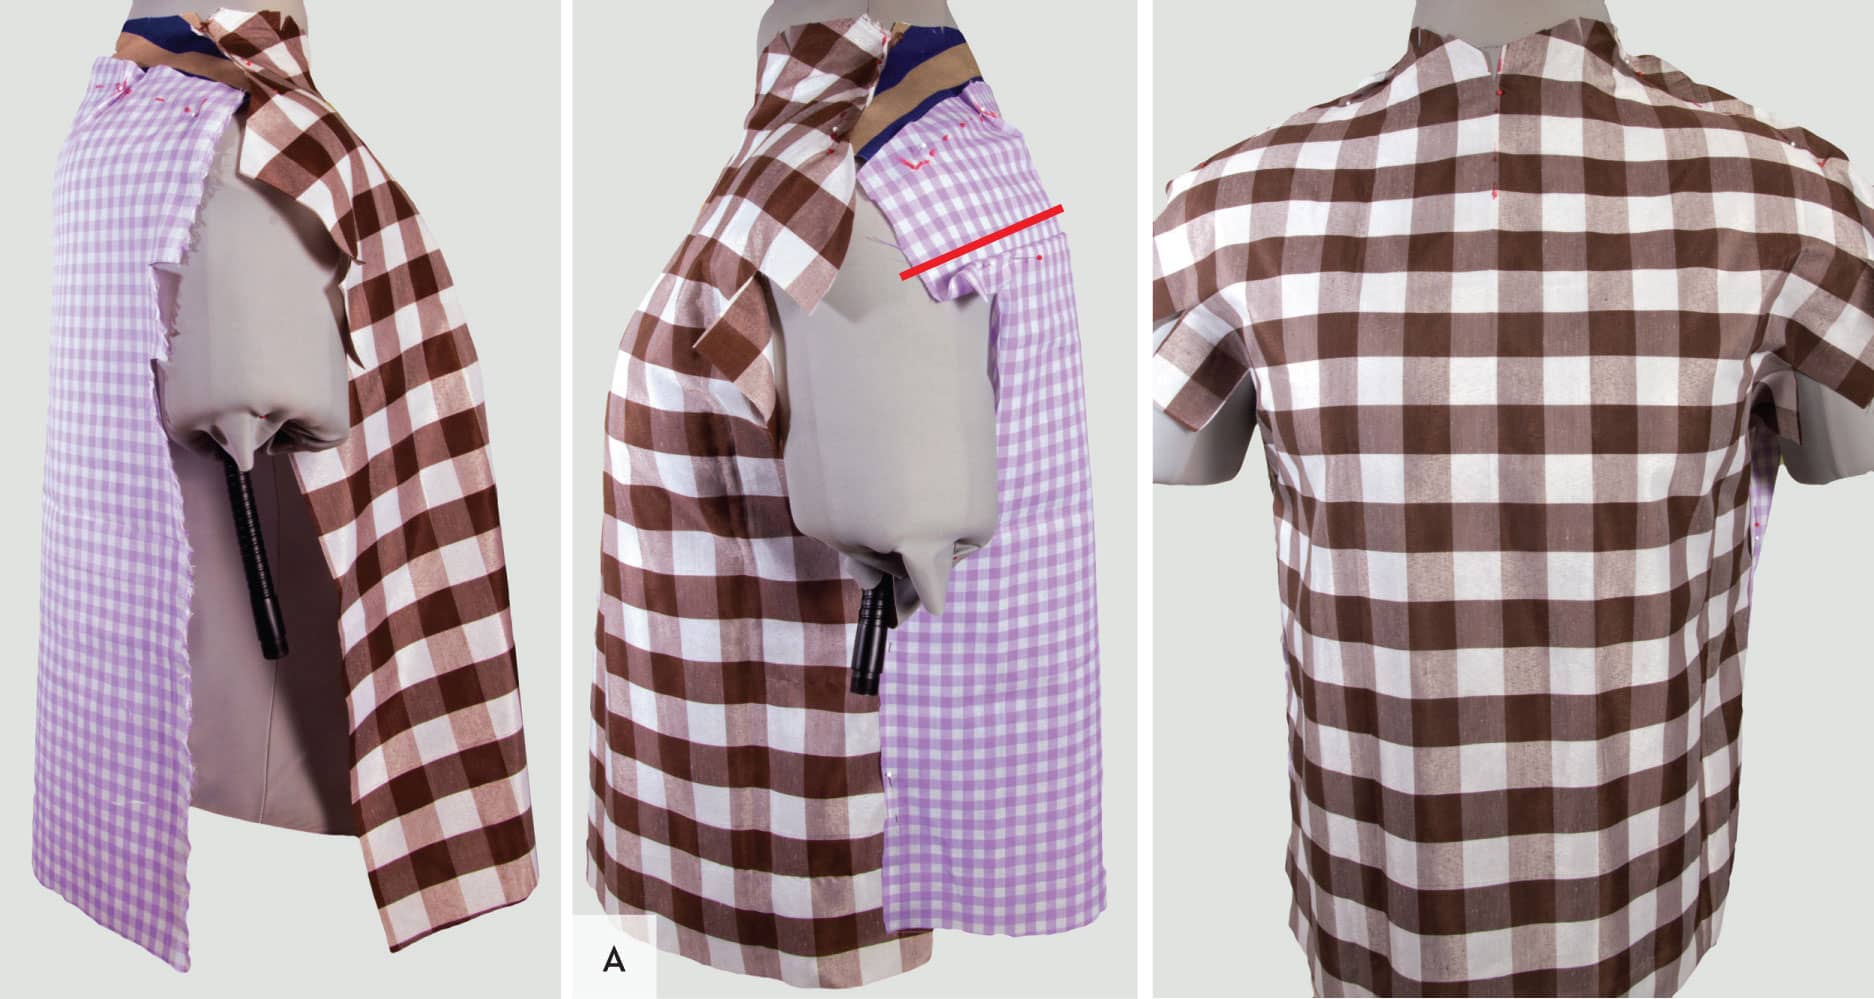
Now for the additional step shown below, at right. Although the proof muslin fits throughout the body, you’ll need to add extra fabric to the shoulders and armhole area. I’m doing this by laying out the flat yoke, front, and back pieces from the original drape from previous spread, since they’re already seperated and tested over another muslin layer (shown in green), and drawing in new armhole shapes right on the lower fabric, no paper needed. I start by trimming the front-to-yoke edges to match the proofed upper muslin layer. Next, I shift outward the original armhole and side seam lines, keeping them vertically parallel to the initial drape, and extend the yoke seams to continue outward, with no change to the initial draped angles, as indicated by the solid lines. Then, by following the curve of the original armhole, I add even more upper width by further pivoting the curve (see the dashed red line) for a total increase of about 2 inches (5 cm) at the yoke and 1 inch (2.5 cm) at both sides, front and back. Of course, additions of different amounts can be used.
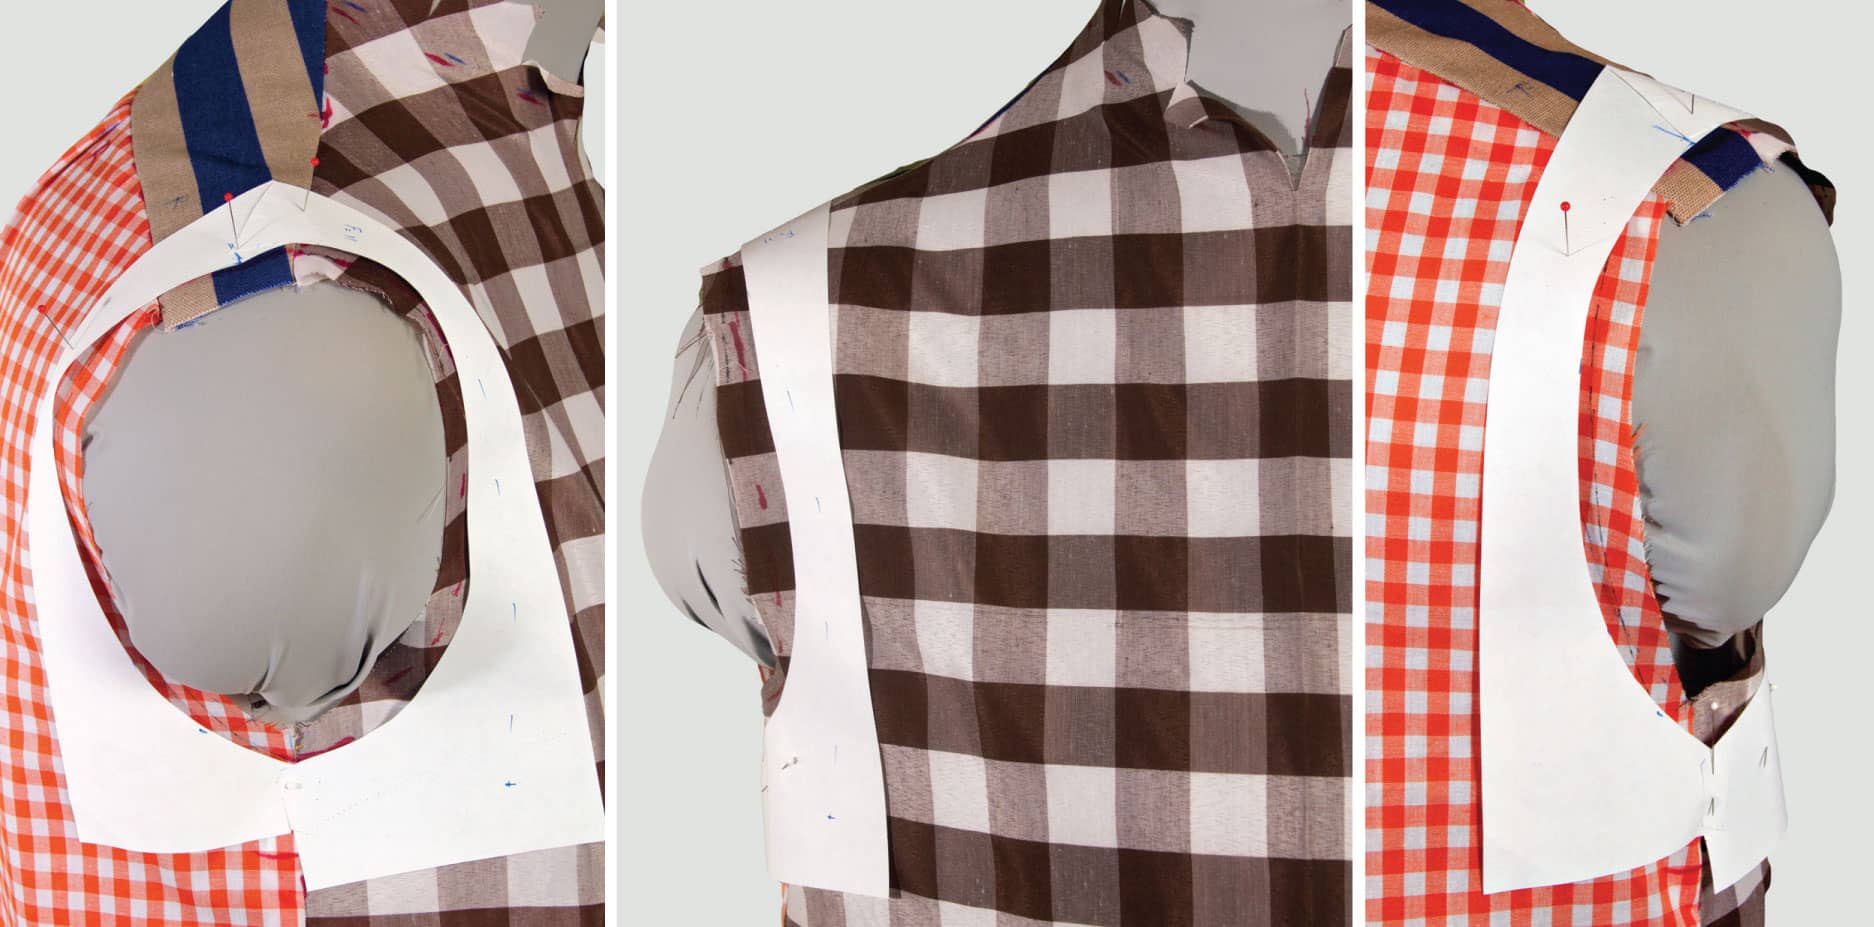
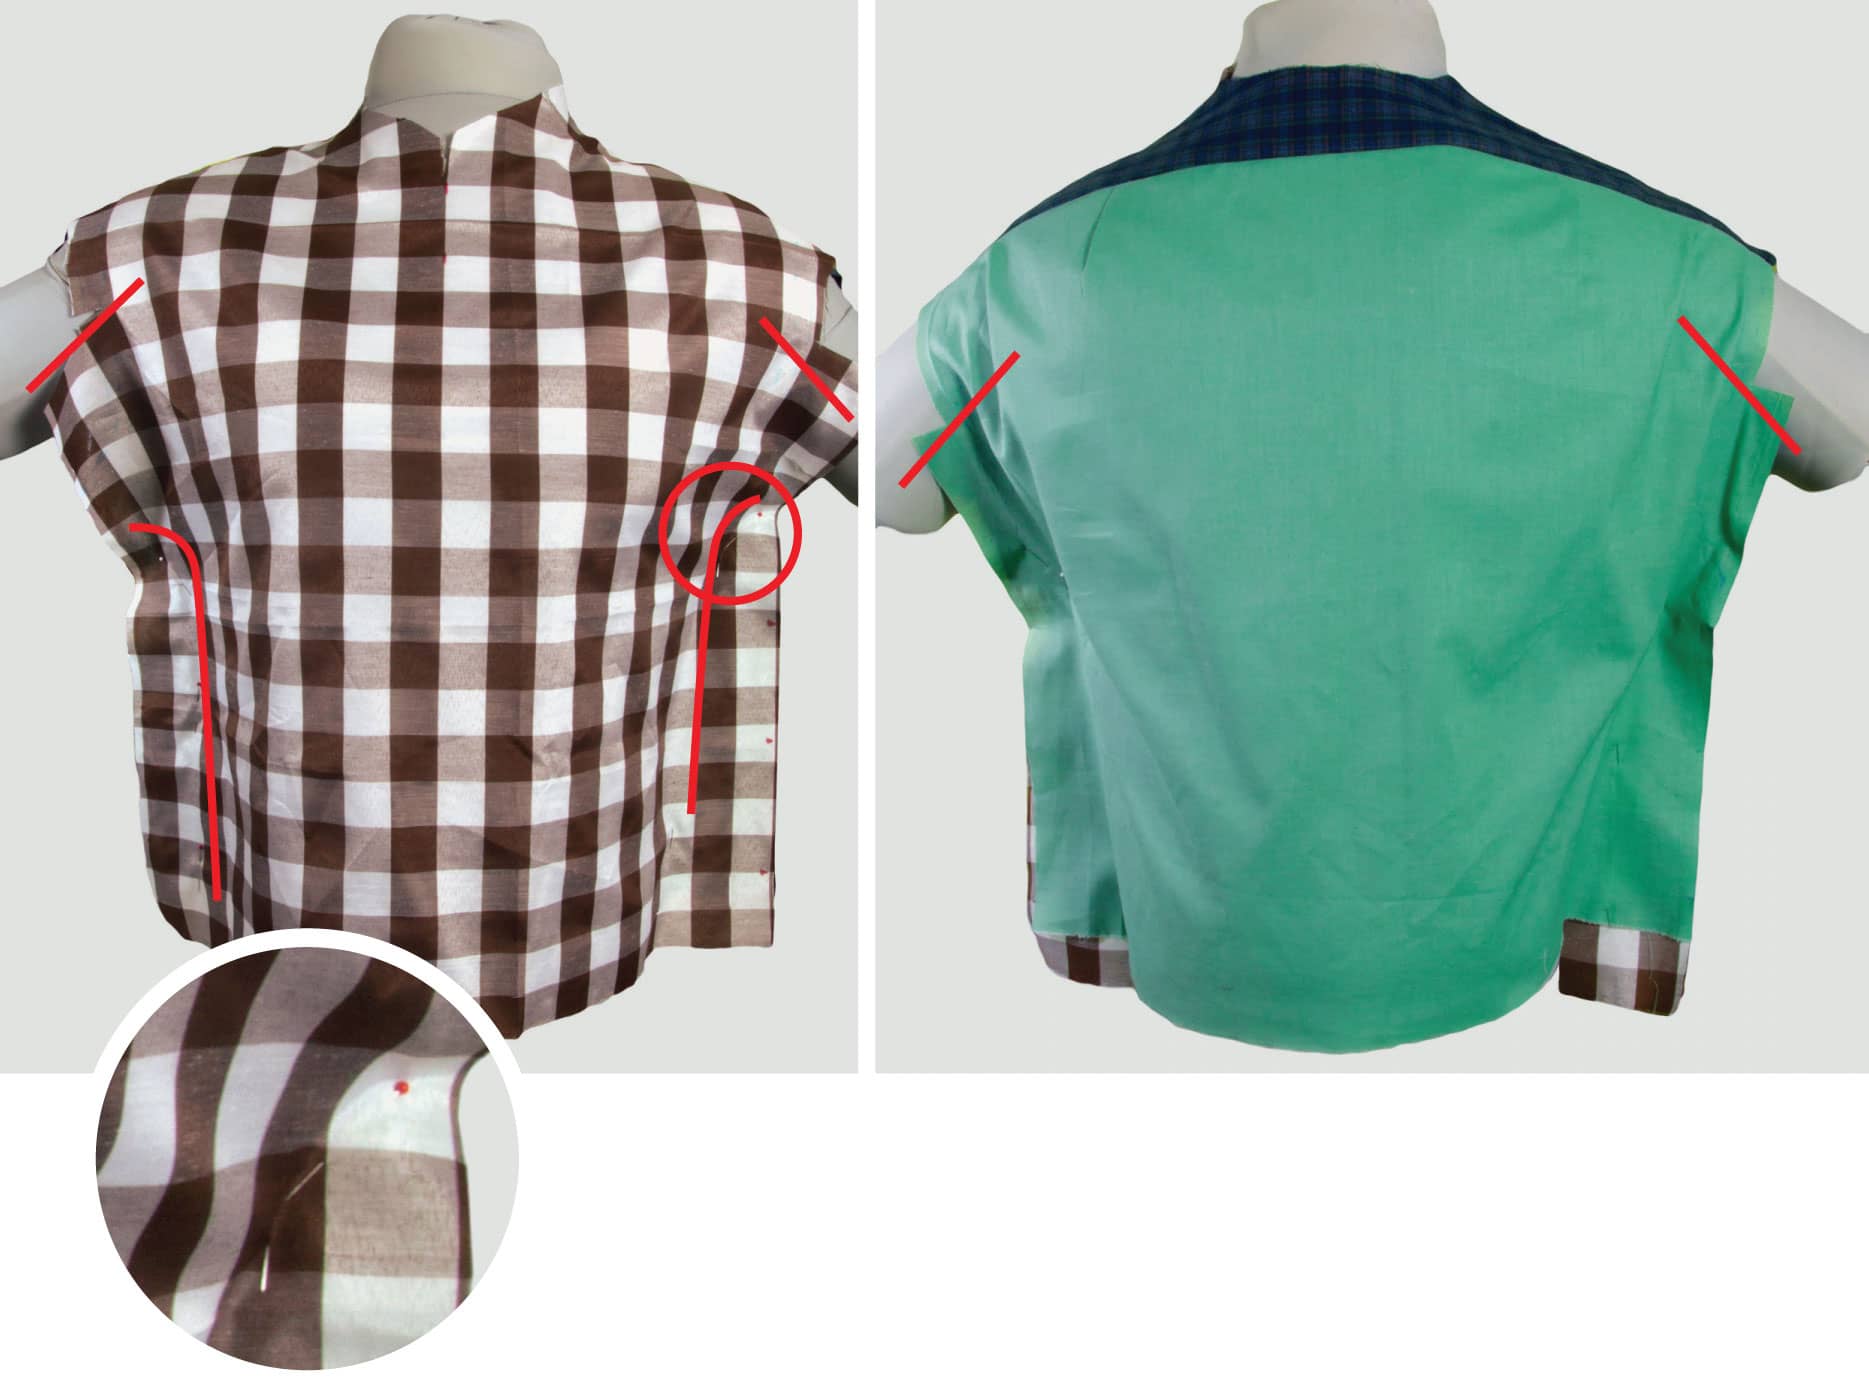
MUSLIN 3: CREATING EXTENDED ARMHOLES
Trace the proofed yoke and make a new pattern for it by extending the ends the same amount as the new muslin fronts and back, as shown in the diagram. Then cut a new yoke from test fabric. Trim the new front and back muslins following the widened side seams and drawn-in, re-angled armholes, as you can see marked on the gingham fronts, below.
Stitch these pieces together, leaving the side seams open, but transfer the markings from the proof muslin at the side seams. Then put the new muslin back on the form. Note that I’ve cut into the armholes only about half-way down, because with the changes to the total armhole seam length all my extensions created, and with the side-seam changes I’ll no doubt add next, I don’t know yet where the ends of these curves will eventually wind up. This is also why I allowed no side-seam allowances when cutting new fronts and backs; there is no way I’ll need all that extra width when the sides are finished, but I don’t yet know exactly how much I might need. But, note that the extra body ease I created at the sides, along with this shoulder-width extension, were both optional for this particular torso form, and would well have been a perfect strategy for providing more body circumference for a form or body that does need it.
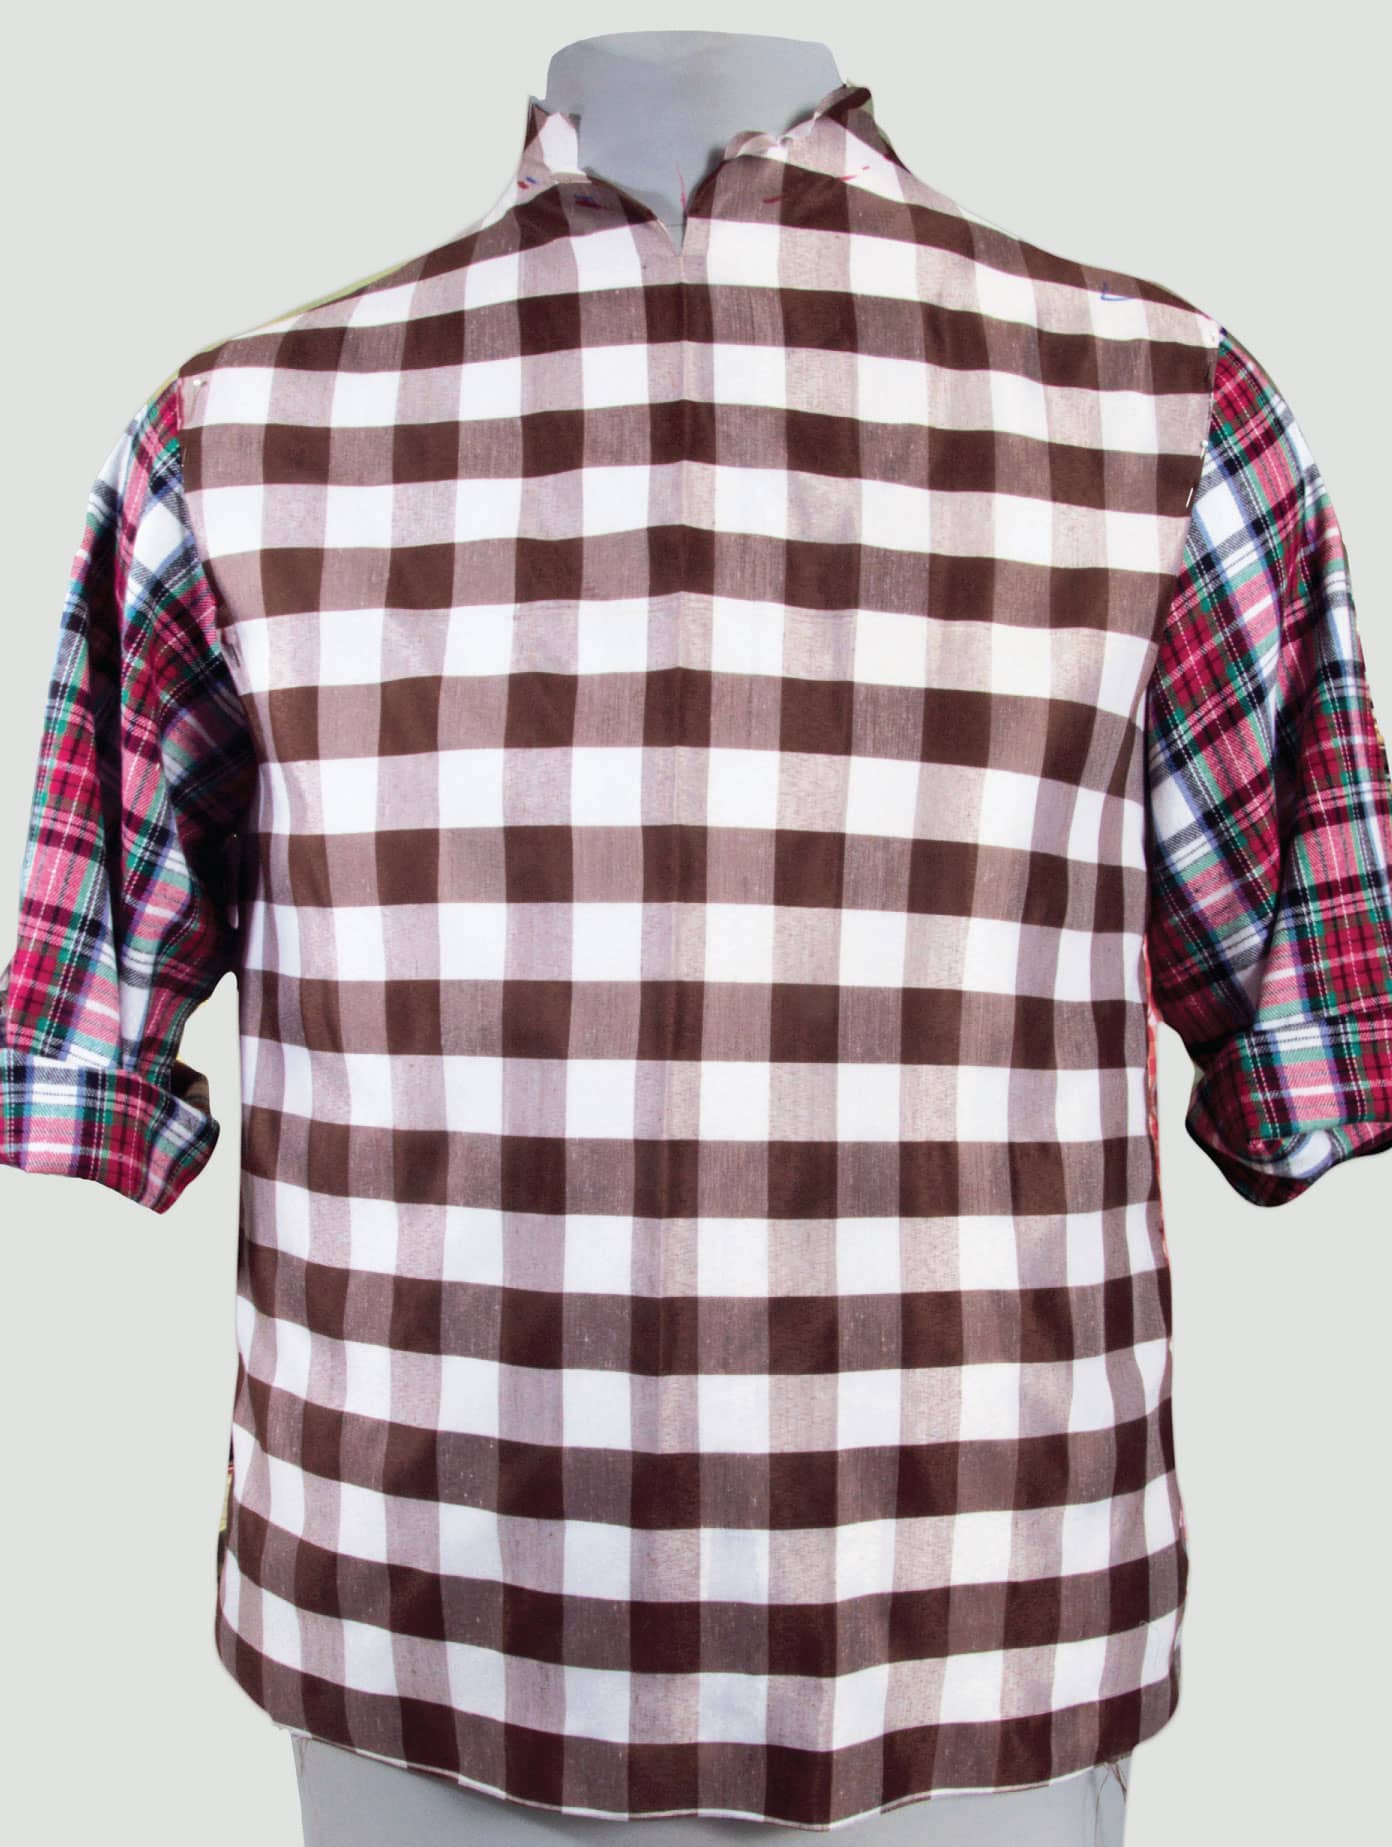
Back on the form, I can see that the widened shoulder widths are close to what I’m going for, but the widths at the lower armholes and below are going to need a lot of exploration to both blend into those wide shoulders and not overwhelm the narrow waist. As I experiment with different alignments at the side seams in the first three images, I finally settle, shown on the photo on the bottom right (A), on a version which shows repinning the sides with more width taken out in back than in front. This looks good now, but we’ll see how it looks when we add the sleeves. I like the way the straight grain along the bottom edge of the front matches the bottom edge of the back.
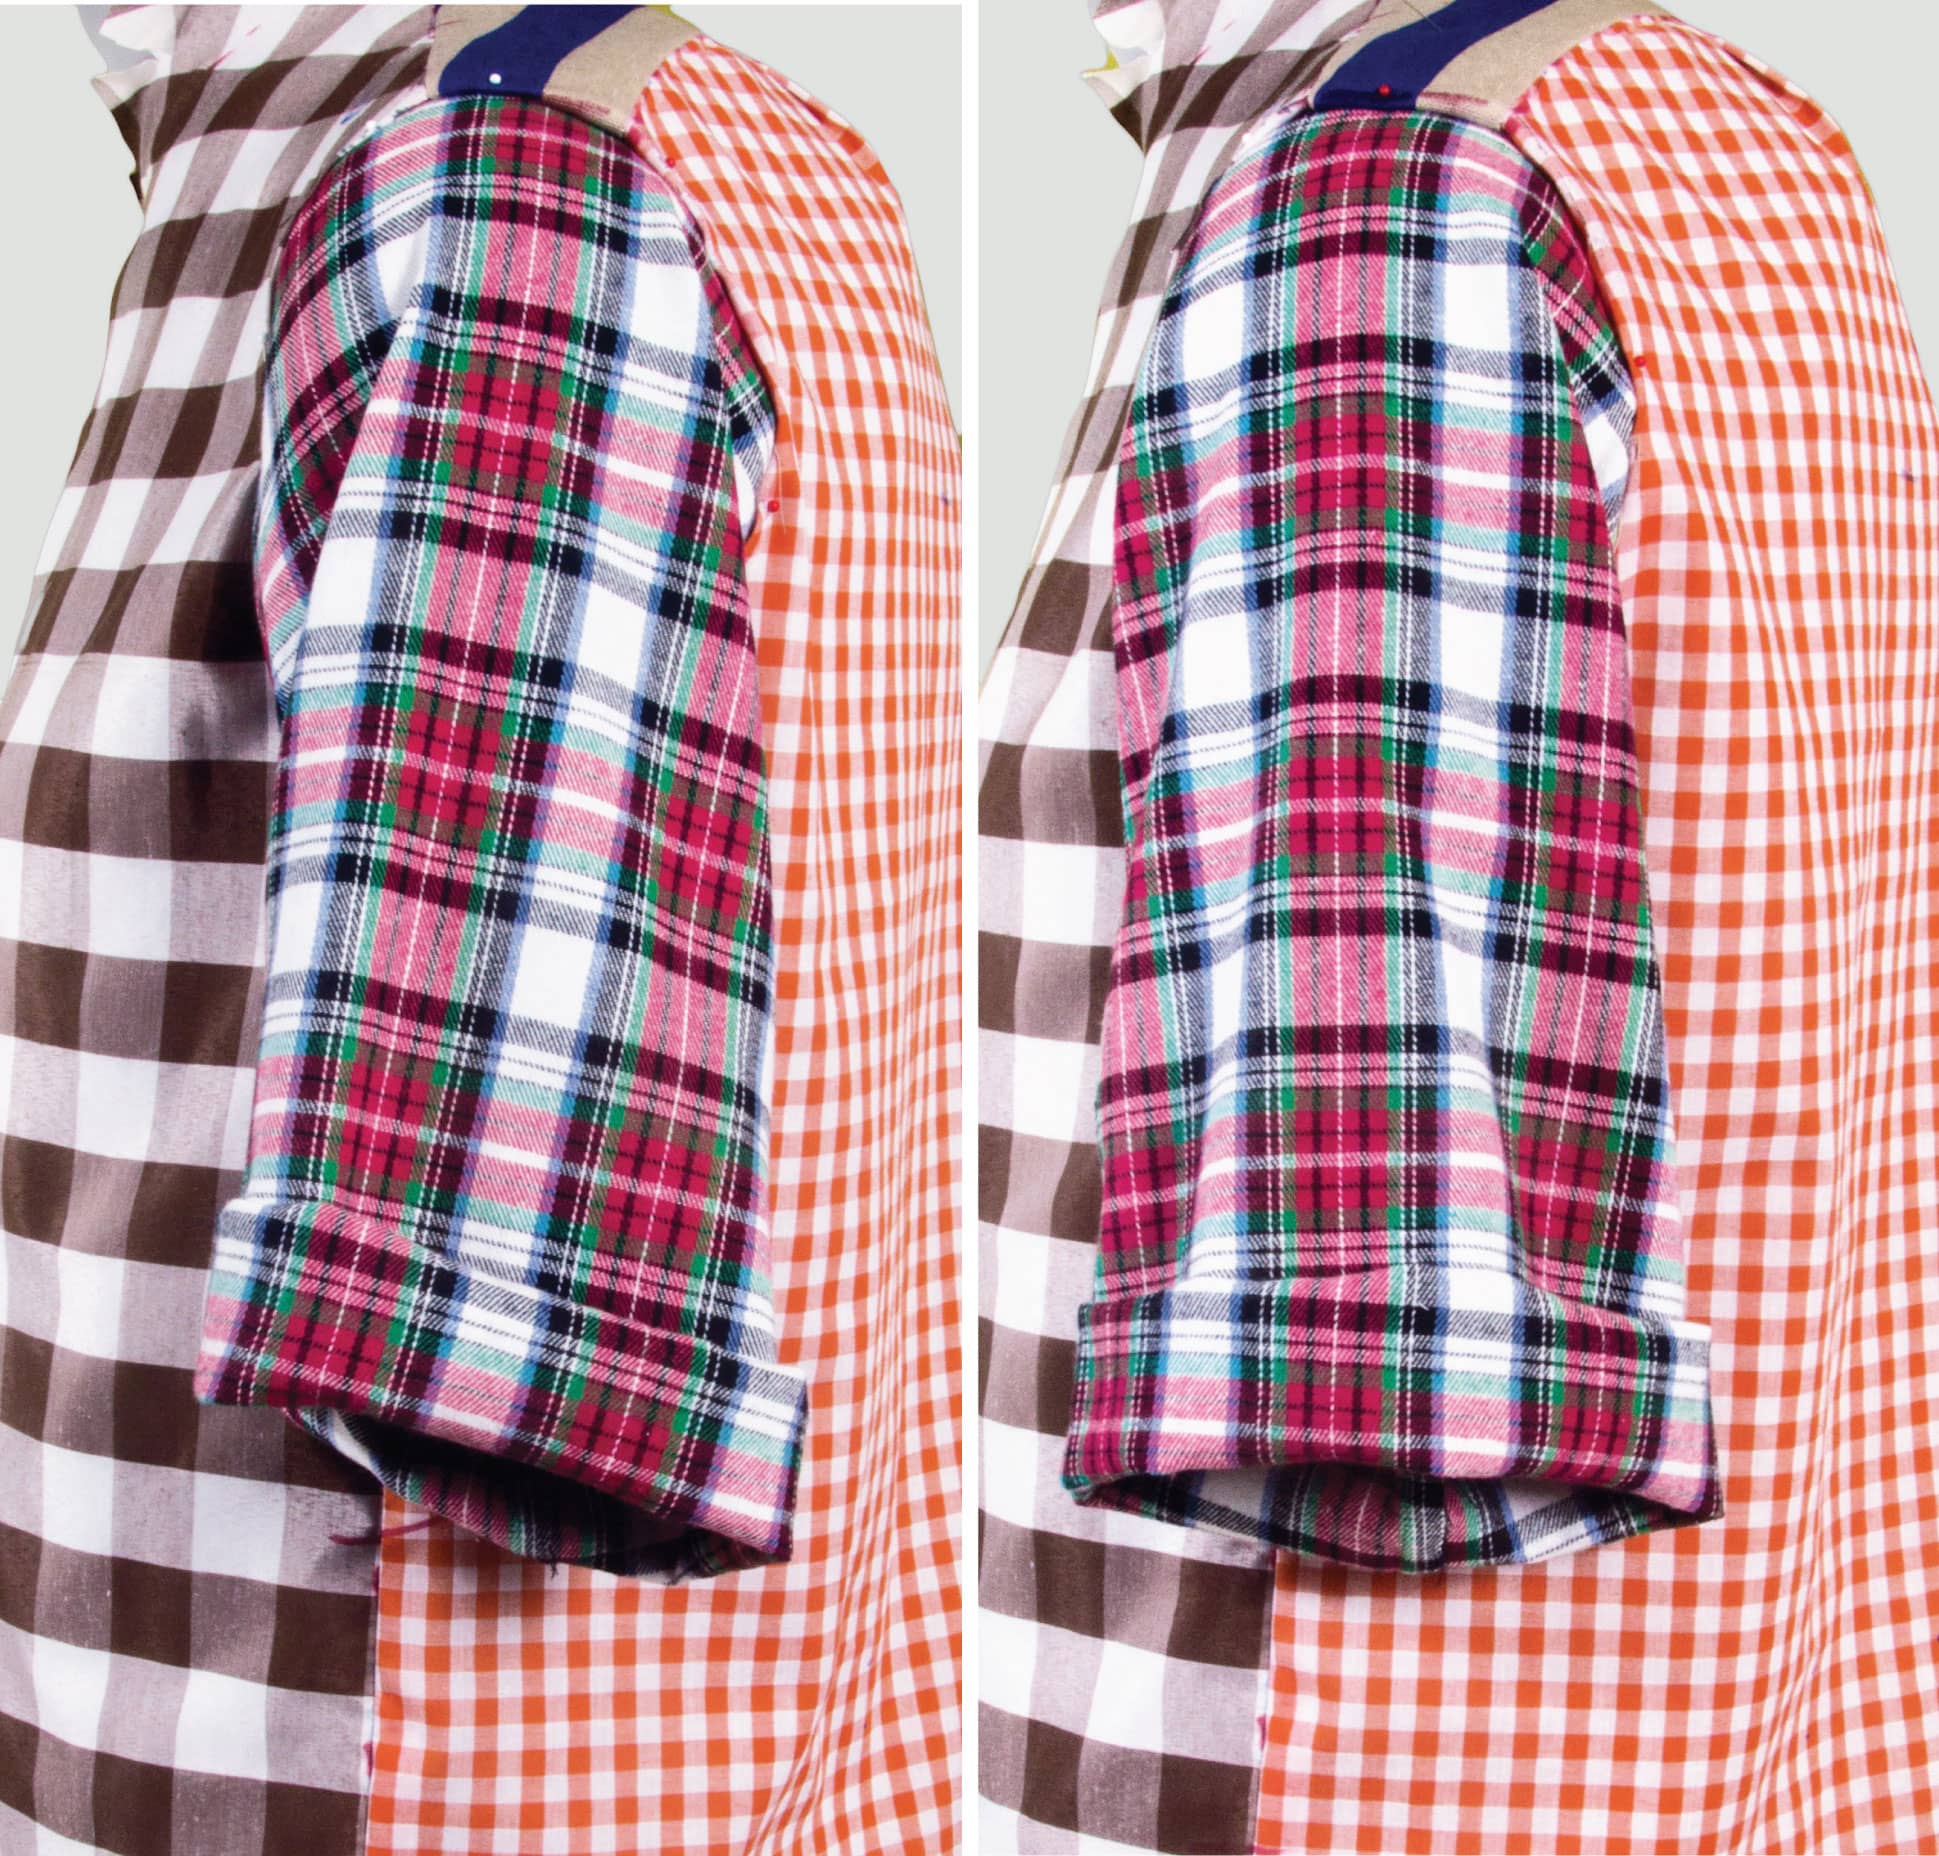
MUSLIN 3: SLEEVE TEST
With the sides roughly pinned, I pinned in the sample sleeves to test those extended shoulders. The left armhole (L) is folded under at the wider curve I’d drawn, and the right armhole at the narrower extension. I prefer the full width at the shoulder, and like the way the sleeve falls from either curve, but it’s clear there’s way too much excess width in back at the armholes and below, on both sides.

In front, it eventually becomes clear that offsetting the edges at the sides doesn’t so much pull in the back as make the overall circumference bigger than if I’d simply taken out an equal amount from front and back. I’m still thinking, at this point, that I’ll try to keep the side seams about as vertical and nontapered as on the original loose drape, and will take care of the much wider allowances overall on the left side as I repin. And I do notice how the neckline edges are somehow very uneven! No worries, that’ll probably be fine when I drape a specific neckline, and be easy to correct as needed when I eventually trace off everything from this muslin to make a final paper pattern.
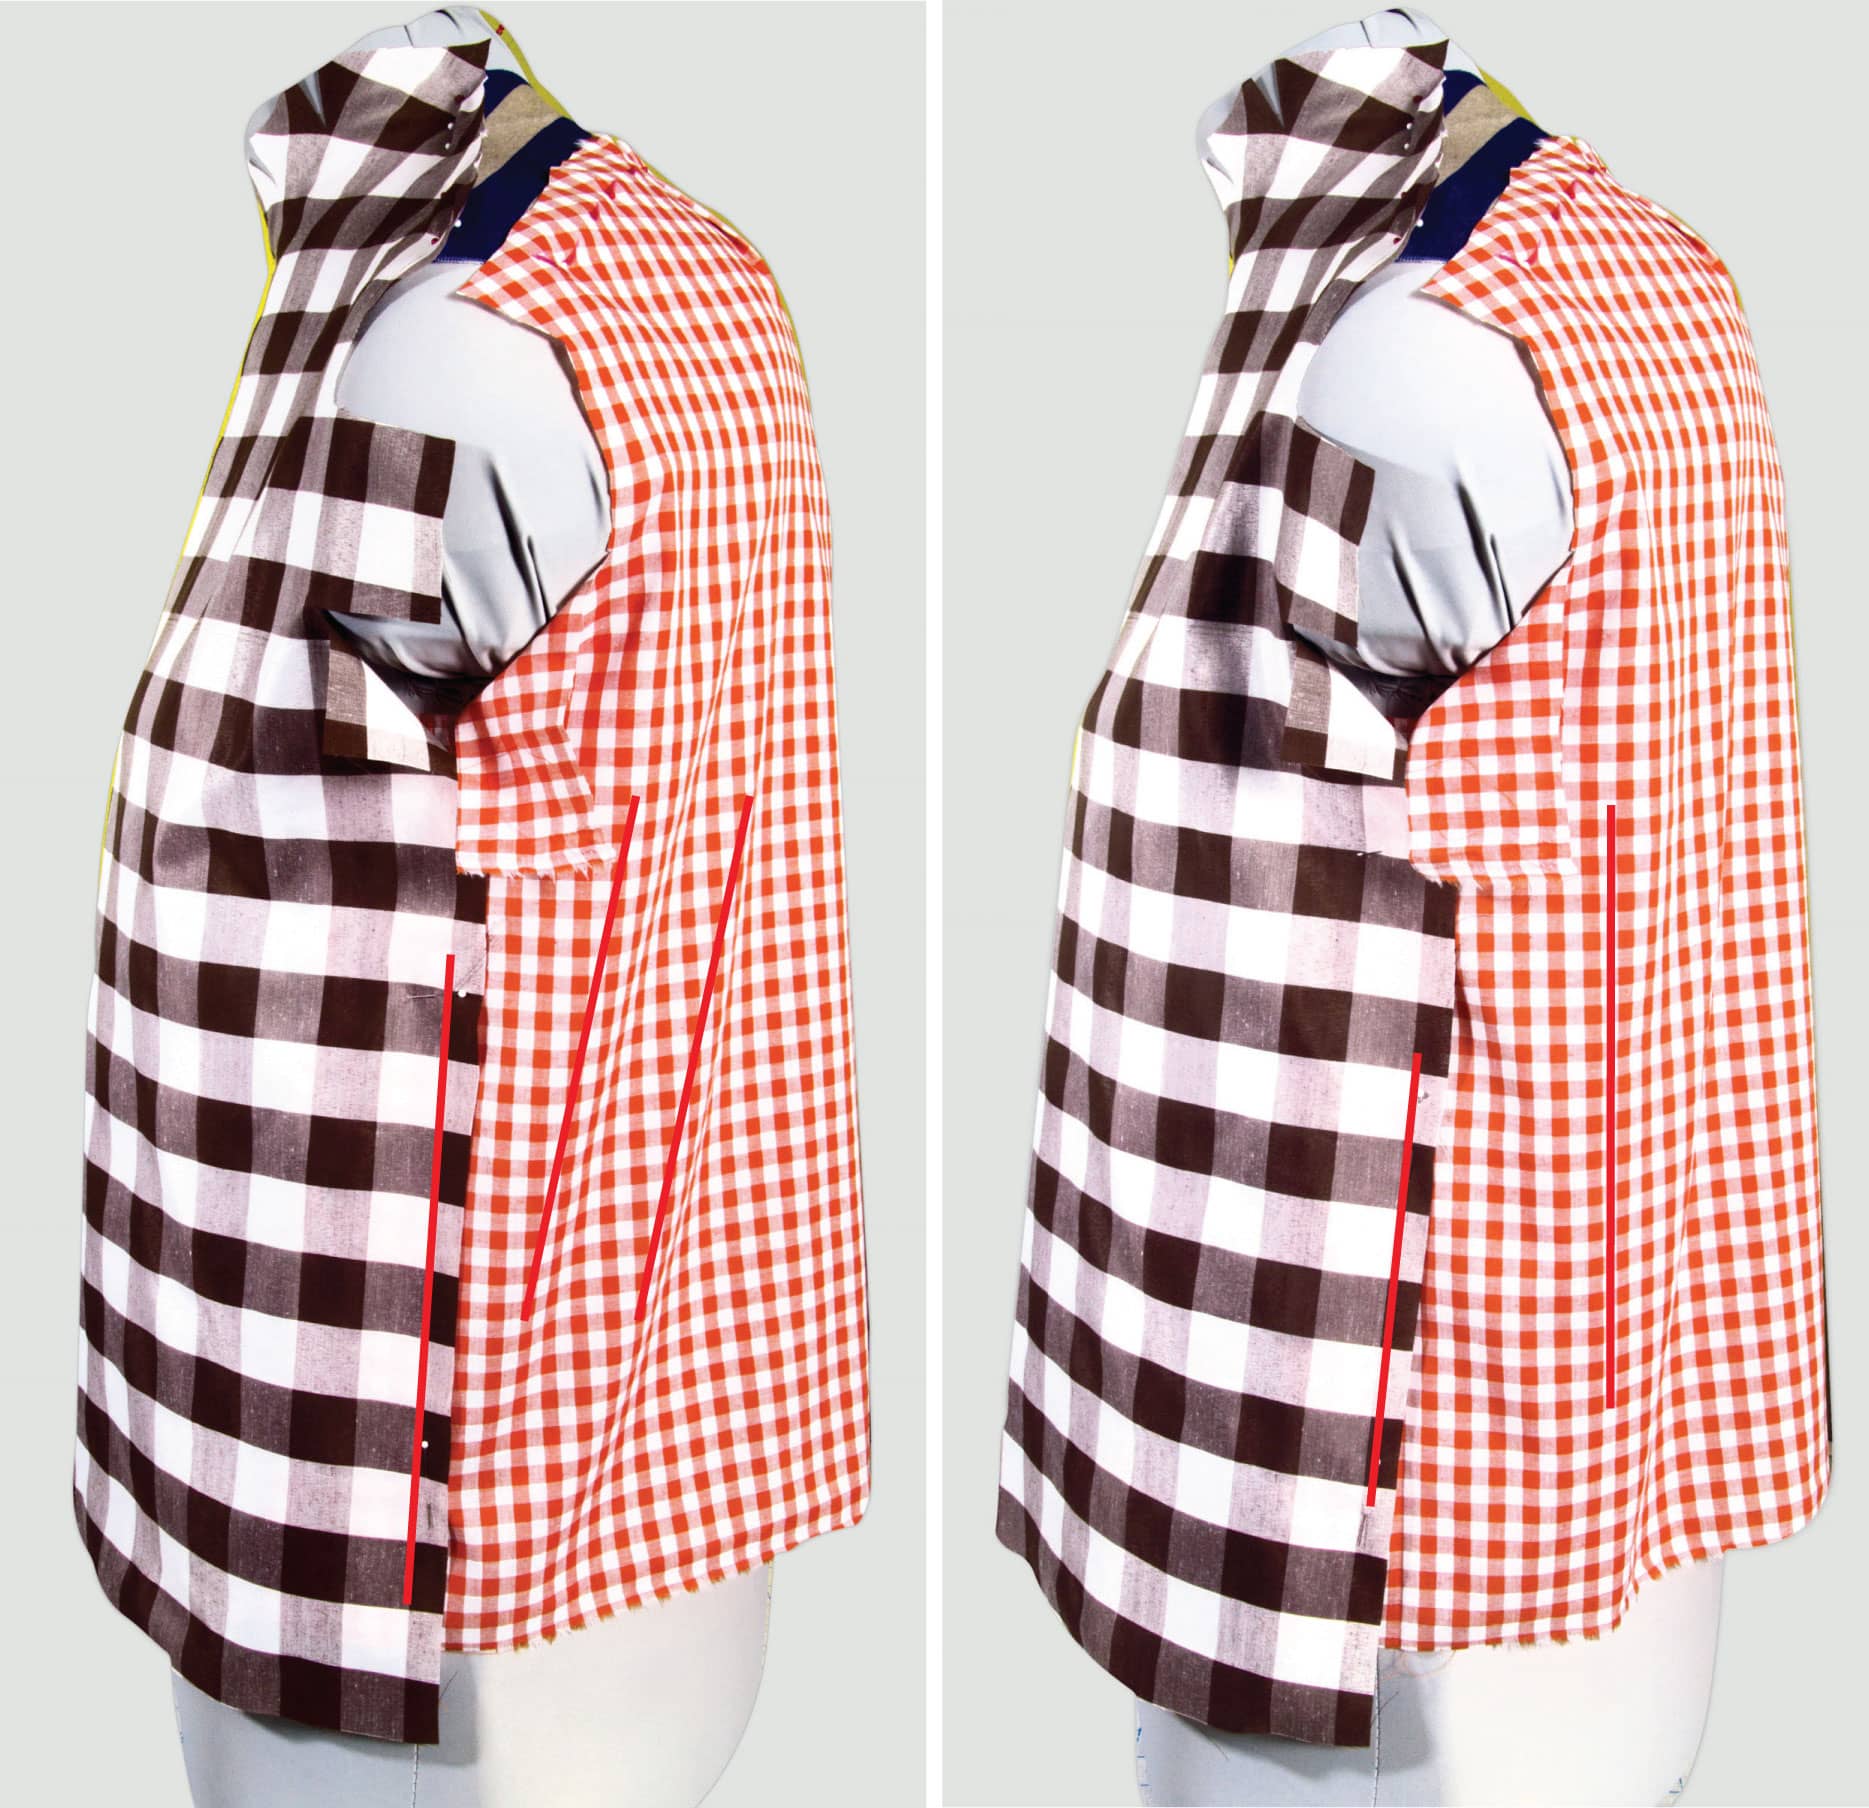
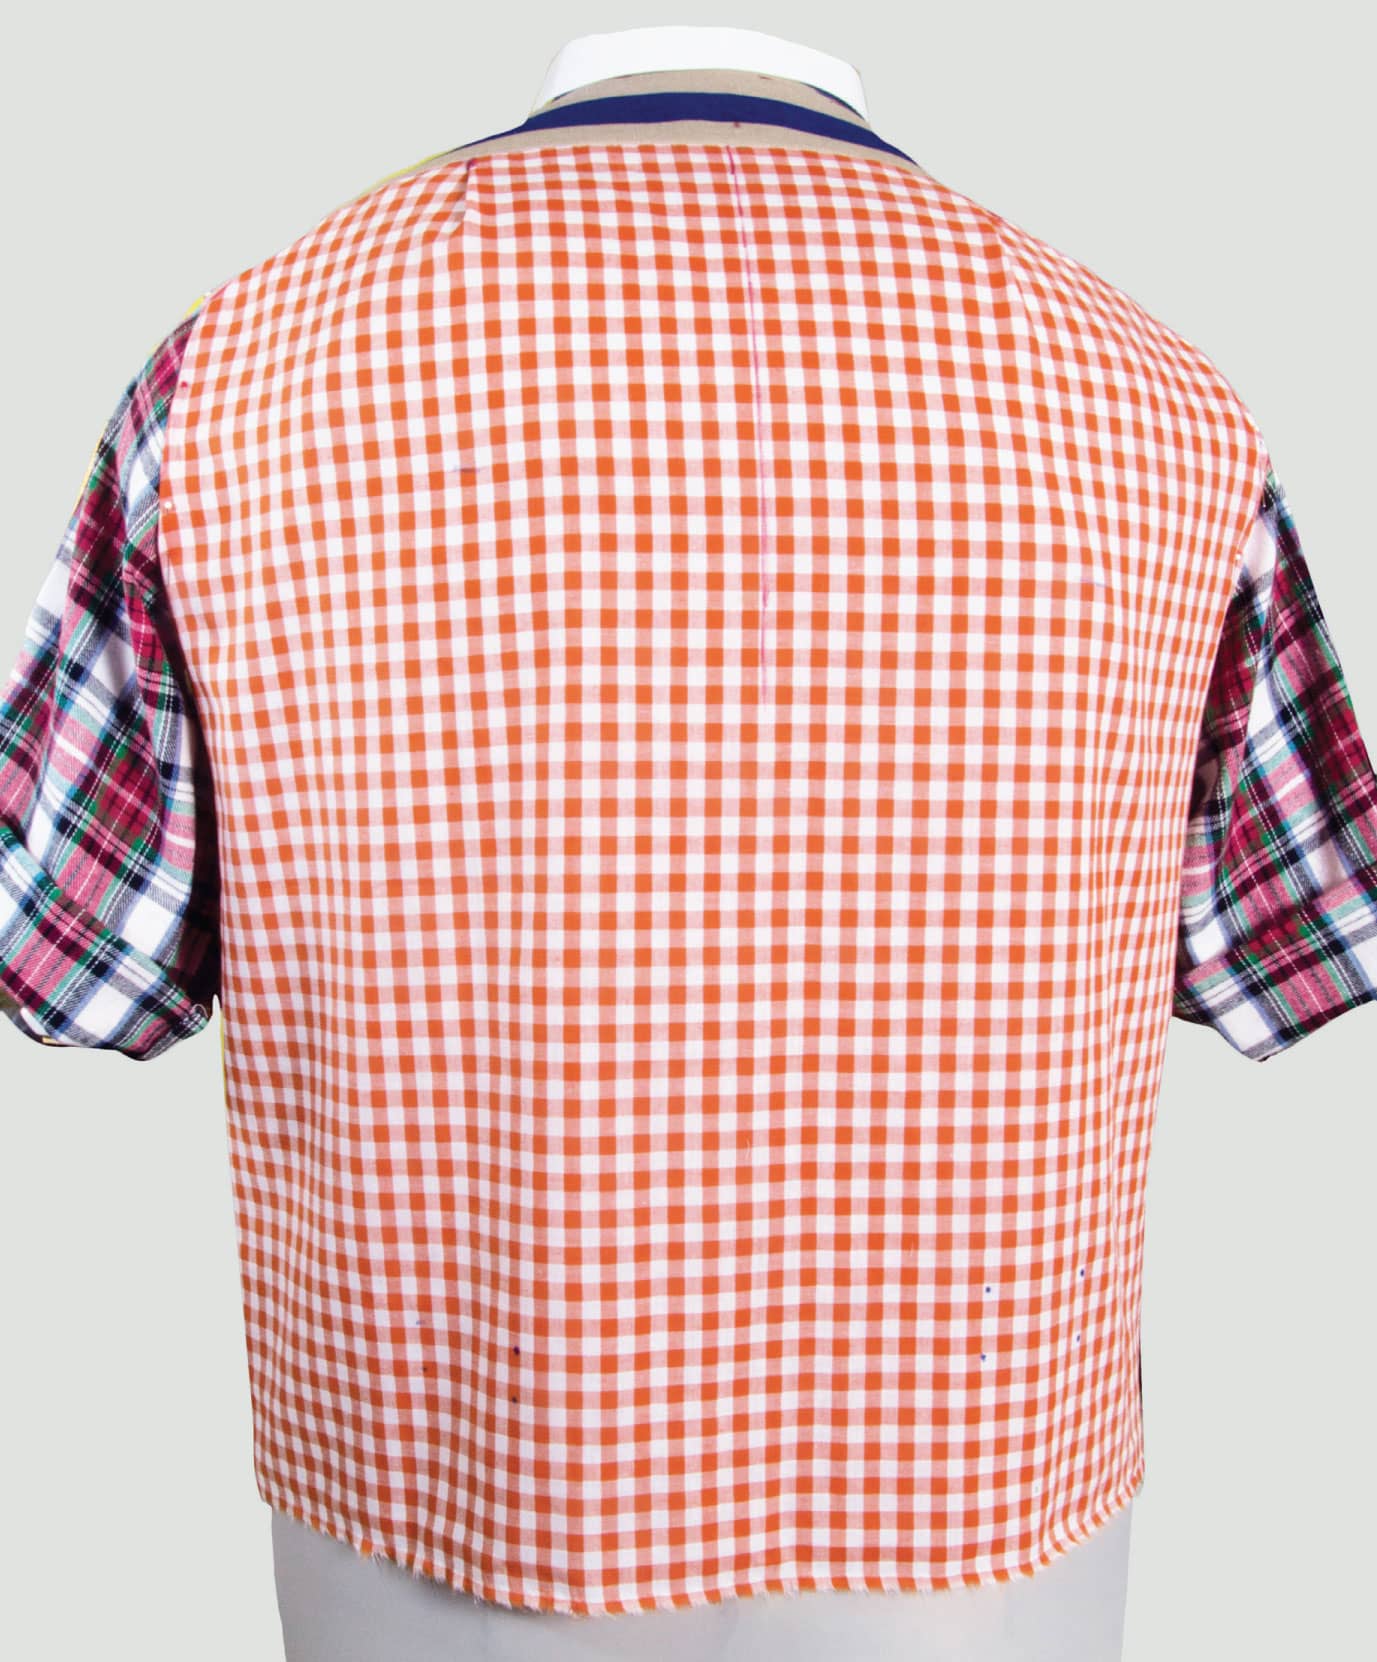
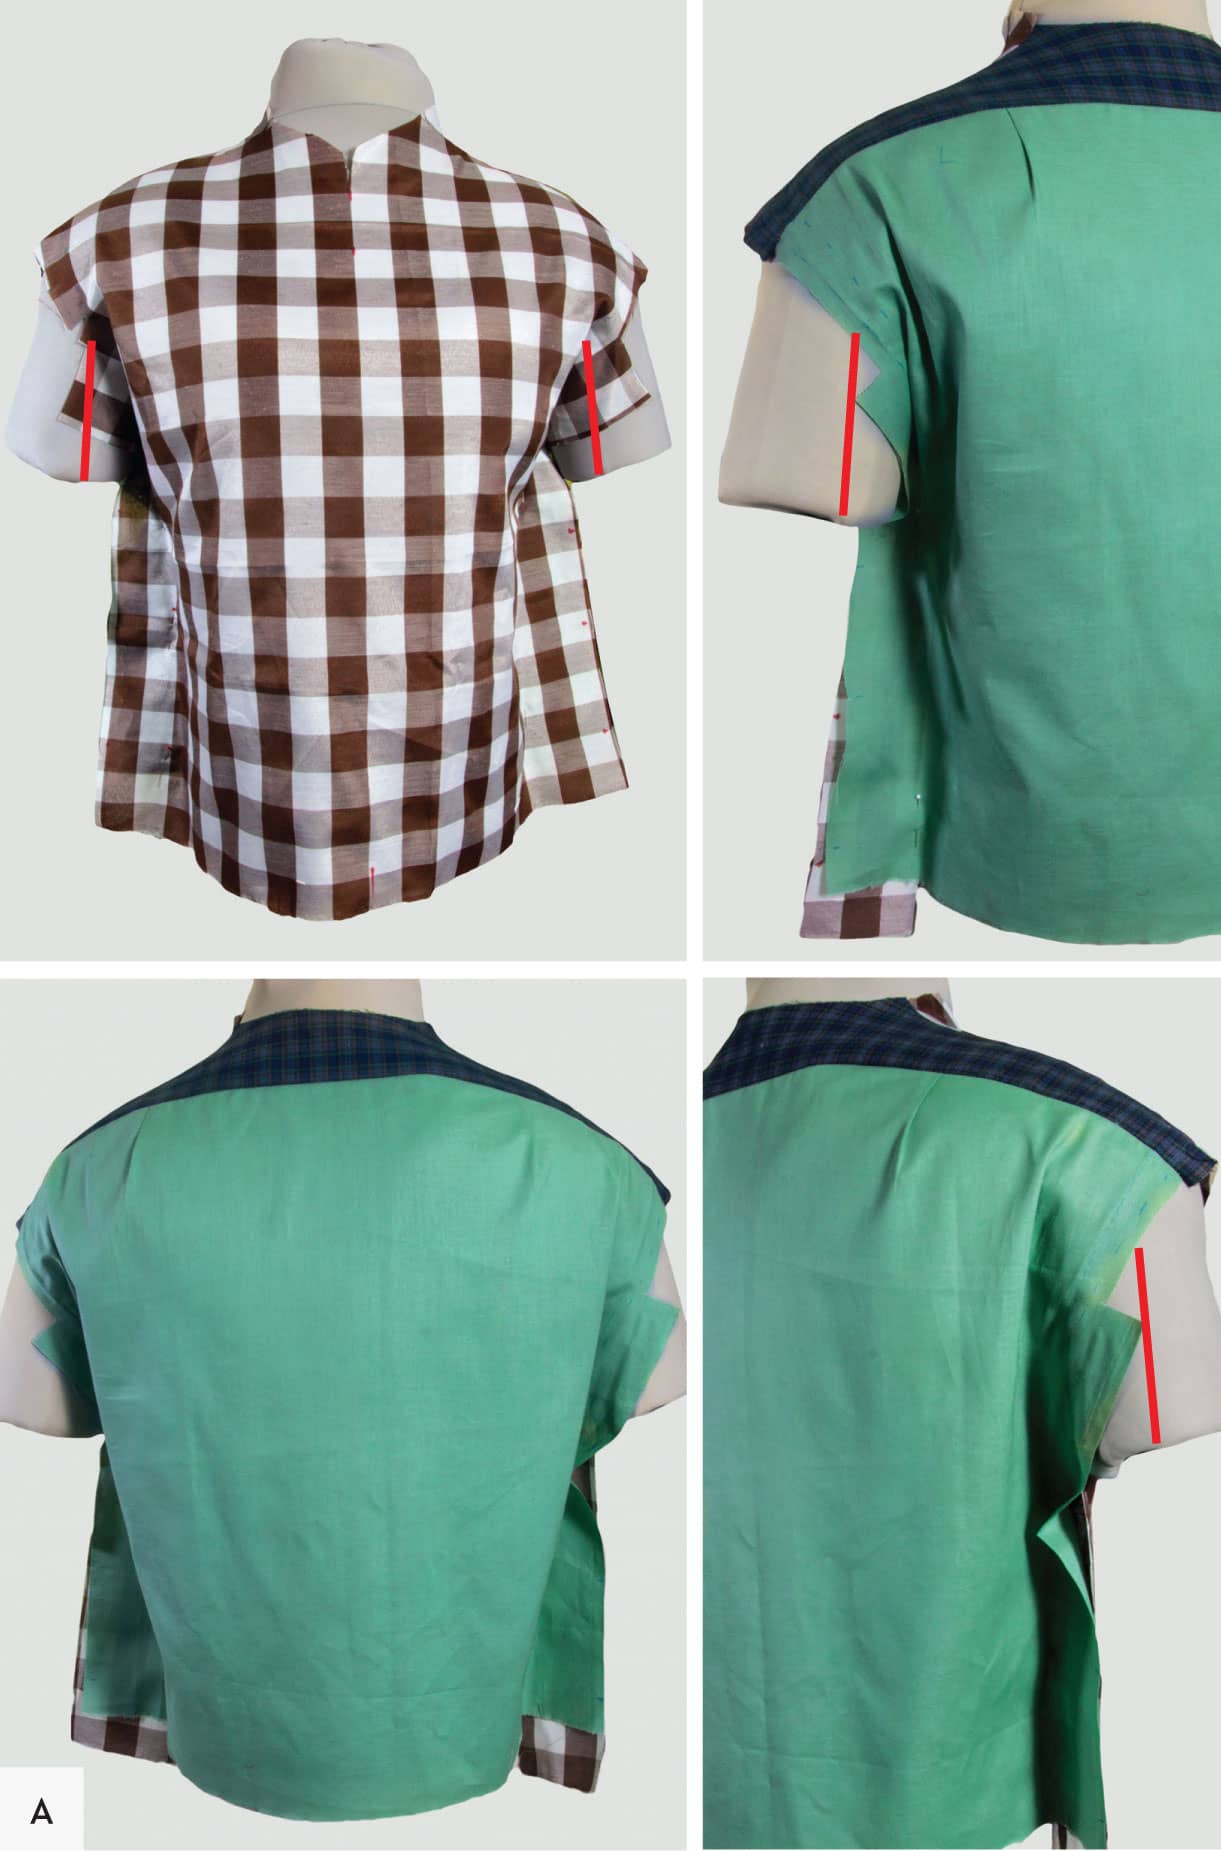
MUSLIN 3: SIDE SEAM ADJUSTMENTS
Removing the sleeves allows me to repin the sides. With the side edges realigned on the right side, and before pinning deeply into the seam, everything starts to look better. Note (A) how much I’ve had to raise the back hem in relation to the front to keep the grains square, compared to the same original drape, without extended armholes see (A) shown here. I moved the flexible arm downward to better simulate the relaxed arm position, pressing the side seams into the body as they’d naturally fall on a real body, as described shown here.
I’m pleased with the results on the right side, so far, so I raise the form arms again and experiment with various shapes of the side seams, including how that seam will blend into the armholes at the top. It’s becoming clear that some tapering down towards the narrow waist will be the best solution for this muslin, on this form, and yet another example of the power of draping to provide the instant feedback you just can’t get with flat manipulations. I decide that the pinned shaping, circled below, is how I’ll fix the excess fabric on both sides.
MUSLIN 3: ARMS UP, ARMS DOWN AND NECKLINES
It’s particularly critical to test a loose-shoulders drape with arms down, to evaluate how all the extra ease you’re building in with the extended armholes will react when pressed against the body, which is what I’m able to simulate on this form, now pinned at right with the same side-seam shaping on both sides. You will want to test this last (hopefully!) test muslin on the wearers if you’re not already draping on them.
The smooth back I’m seeing at lower right, untroubled by the compressed-fabric, extra-ease folds at the back armhole curves, with arms down, is exactly the effect I was shooting for, and the tapering is a pleasing discovery and obviously the right thing for this form, even if no doubt better suited to our next topic, the fitted drape!
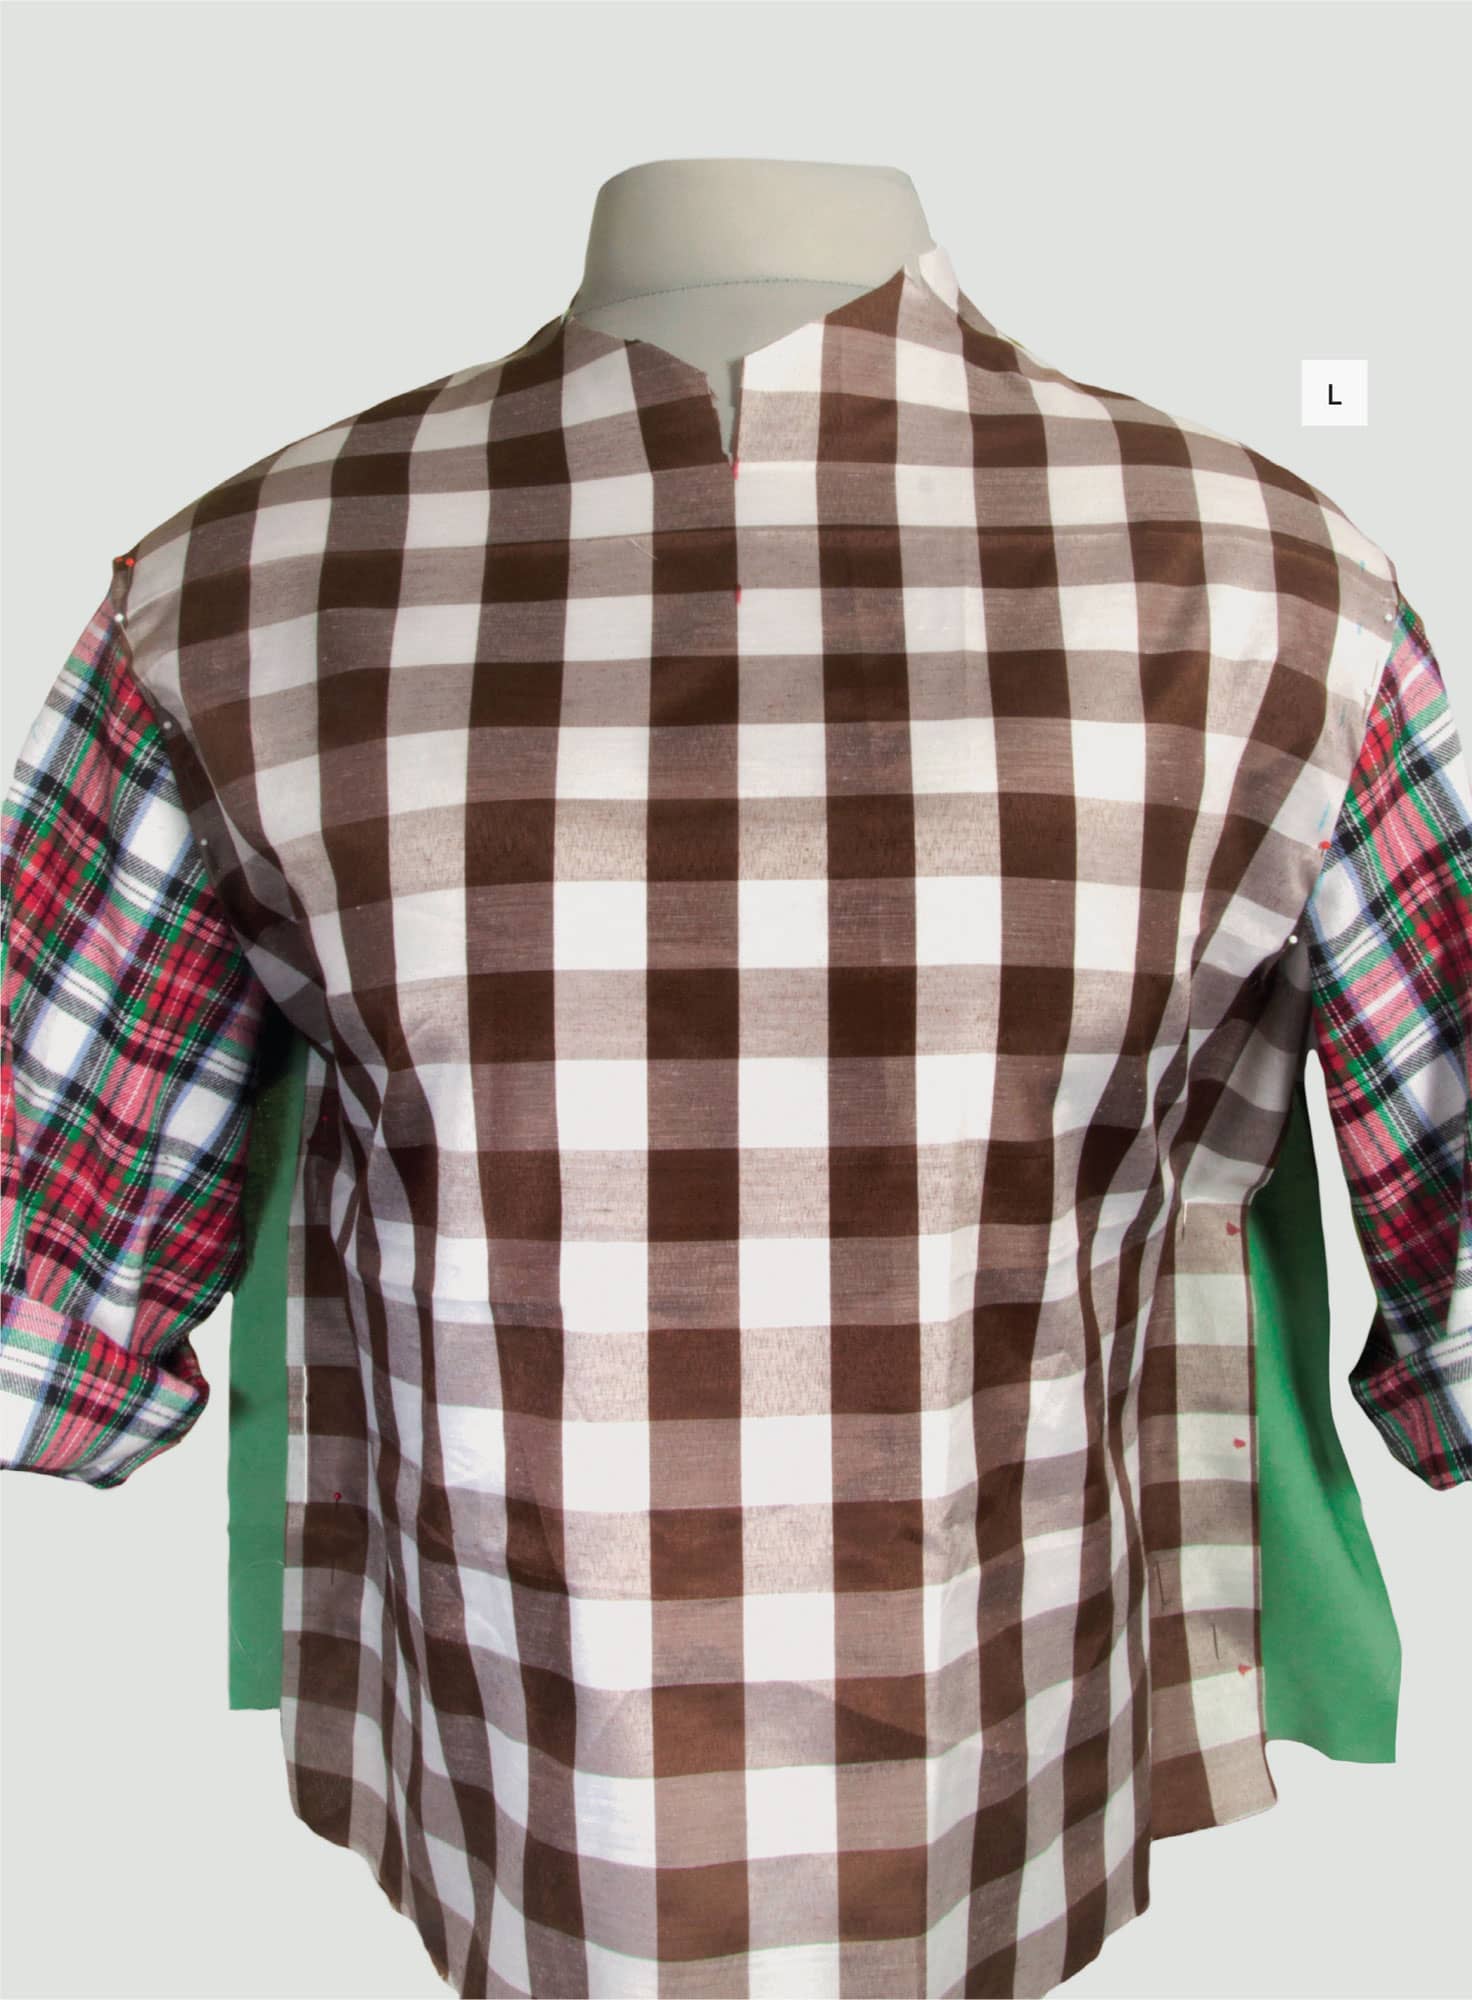
But before we turn to draping fitted shirts, let’s finish up with this one. At right, I’m trying out a couple of different neckline shapes (round and dropped in front), seeing with both that while the irregular neck-line allowances I’d noticed earlier aren’t in fact interfering with process, the yoke neckline curve in back is too deep and needs to be extended up the neck, to fill in the gap that shows below the paper-tape rings I like to use for this step. I’ll just redraw the neck on the yoke pattern to fix this, measuring the gap to find the correct amount.
Once you have an idea about the neckline, it’s time to ensure that every pinned or basted seam on this muslin is thoroughly marked both for position and alignment so that wheel-tracings from the muslin, when off the form, will be accurate and complete. I’ll start by marking along the lower edge of the neckline ring I prefer.
Once all the seams are traced, the next step is to decide if another proof muslin would be helpful. The only reason I’d do that—rather that going directly to a paper pattern or a fashion-fabric, wearable, test garment—would be if I was troubled by the obvious upper-back asymmetry the existing yoke shape calls attention to at (A), which is aggravated by the contrasting fabrics. It would be quite easy to find a less distracting, more nearly horizontal yoke-to-back seam-line curve at the initial yoke-draping stage once you decide that an asymmetrical yoke is worth exploring, so I might be tempted to do that before moving on. But that is up to you.
Either way, my preferred next step would likely be a fashion-fabric test and not a pattern, as discussed shown here, and as I’ll demonstrate in each of the project chapters.