FIT | 4
DRAPING THE FITTED SHIRT
WHAT ARE FITTED SHIRTS?
In this chapter, we explore how to use the drape-to-fit process to create custom-fitted shirt patterns for shirts with these features:
• Increased fitting ease reduction through shaped side seams
• Darts—visible and invisible
• Both fitted and dropped shoulders
• Maximum freedom of movement in the arms and shoulders
• Just enough body ease to drape without wrinkles and follow the shape of the body
Fitted shirts are basically loose shirts made more close fitting in other areas beyond the shoulders. This means we’re now going to reshape the body of the draped shirt, instead of merely allowing sufficient straight-sided looseness below the armholes to cover the body shapes as smoothly as possible, as was our goal with the loose shirt. And again, once you have the perfectly draped muslin, you want to use to create the paper pattern, download the pdf, “Converting a muslin drape to a paper pattern” at www.quartoknows.com/page/sewing-shirts.
This follows the steps taken in the previous chapter: After molding the yoke and shoulders, leveling the grains front and back, and balancing the sides for a loose fit, we simply take the next obvious step by continuing to pin out any excess ease and smooth out any still-persistent or new wrinkles below the armholes, either at the side or at the yoke seams or within the body pieces where there are no seams.
The difference between reshaping existing seams and where there are no seams is, of course, considerable. Simple as it seems, it can be difficult to match complex body shapes by repinning seams far from where the shaping is actually needed. And as we’ve just seen in the previous chapter, it can be tricky to try to adjust the fronts to a different degree than the back at the same seam. So, the following photographs demonstrate a unique draping strategy for improving the way we recut side seams, by shaping (reducing the ease) within the body of the back or front.
Pinning out excess where there’s no existing seam generally means adding a dart, or something else that reduces the excess fabric, such as gathers, tucks, pleats, or additional seams. Consider any of these as implied options wherever I mention dartmaking in the pages to come, a subject already well covered in many other places. In this chapter, I focus mainly on the far less-explored, and much more shirt-friendly options of eliminating, reducing, or concealing darts while still enjoying all the shaping they so obviously provide.
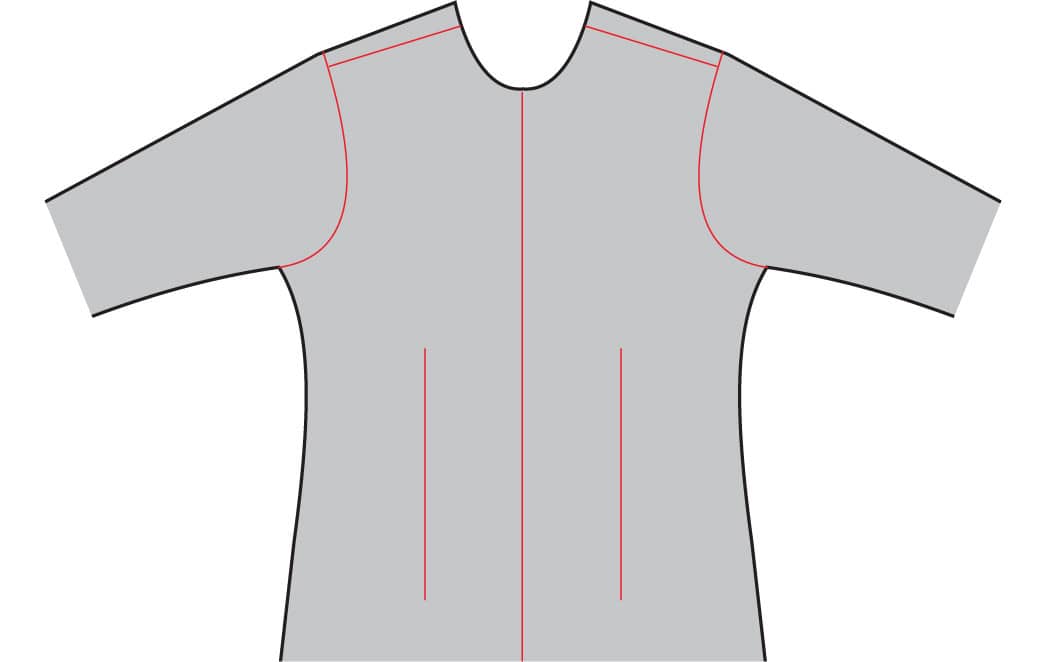
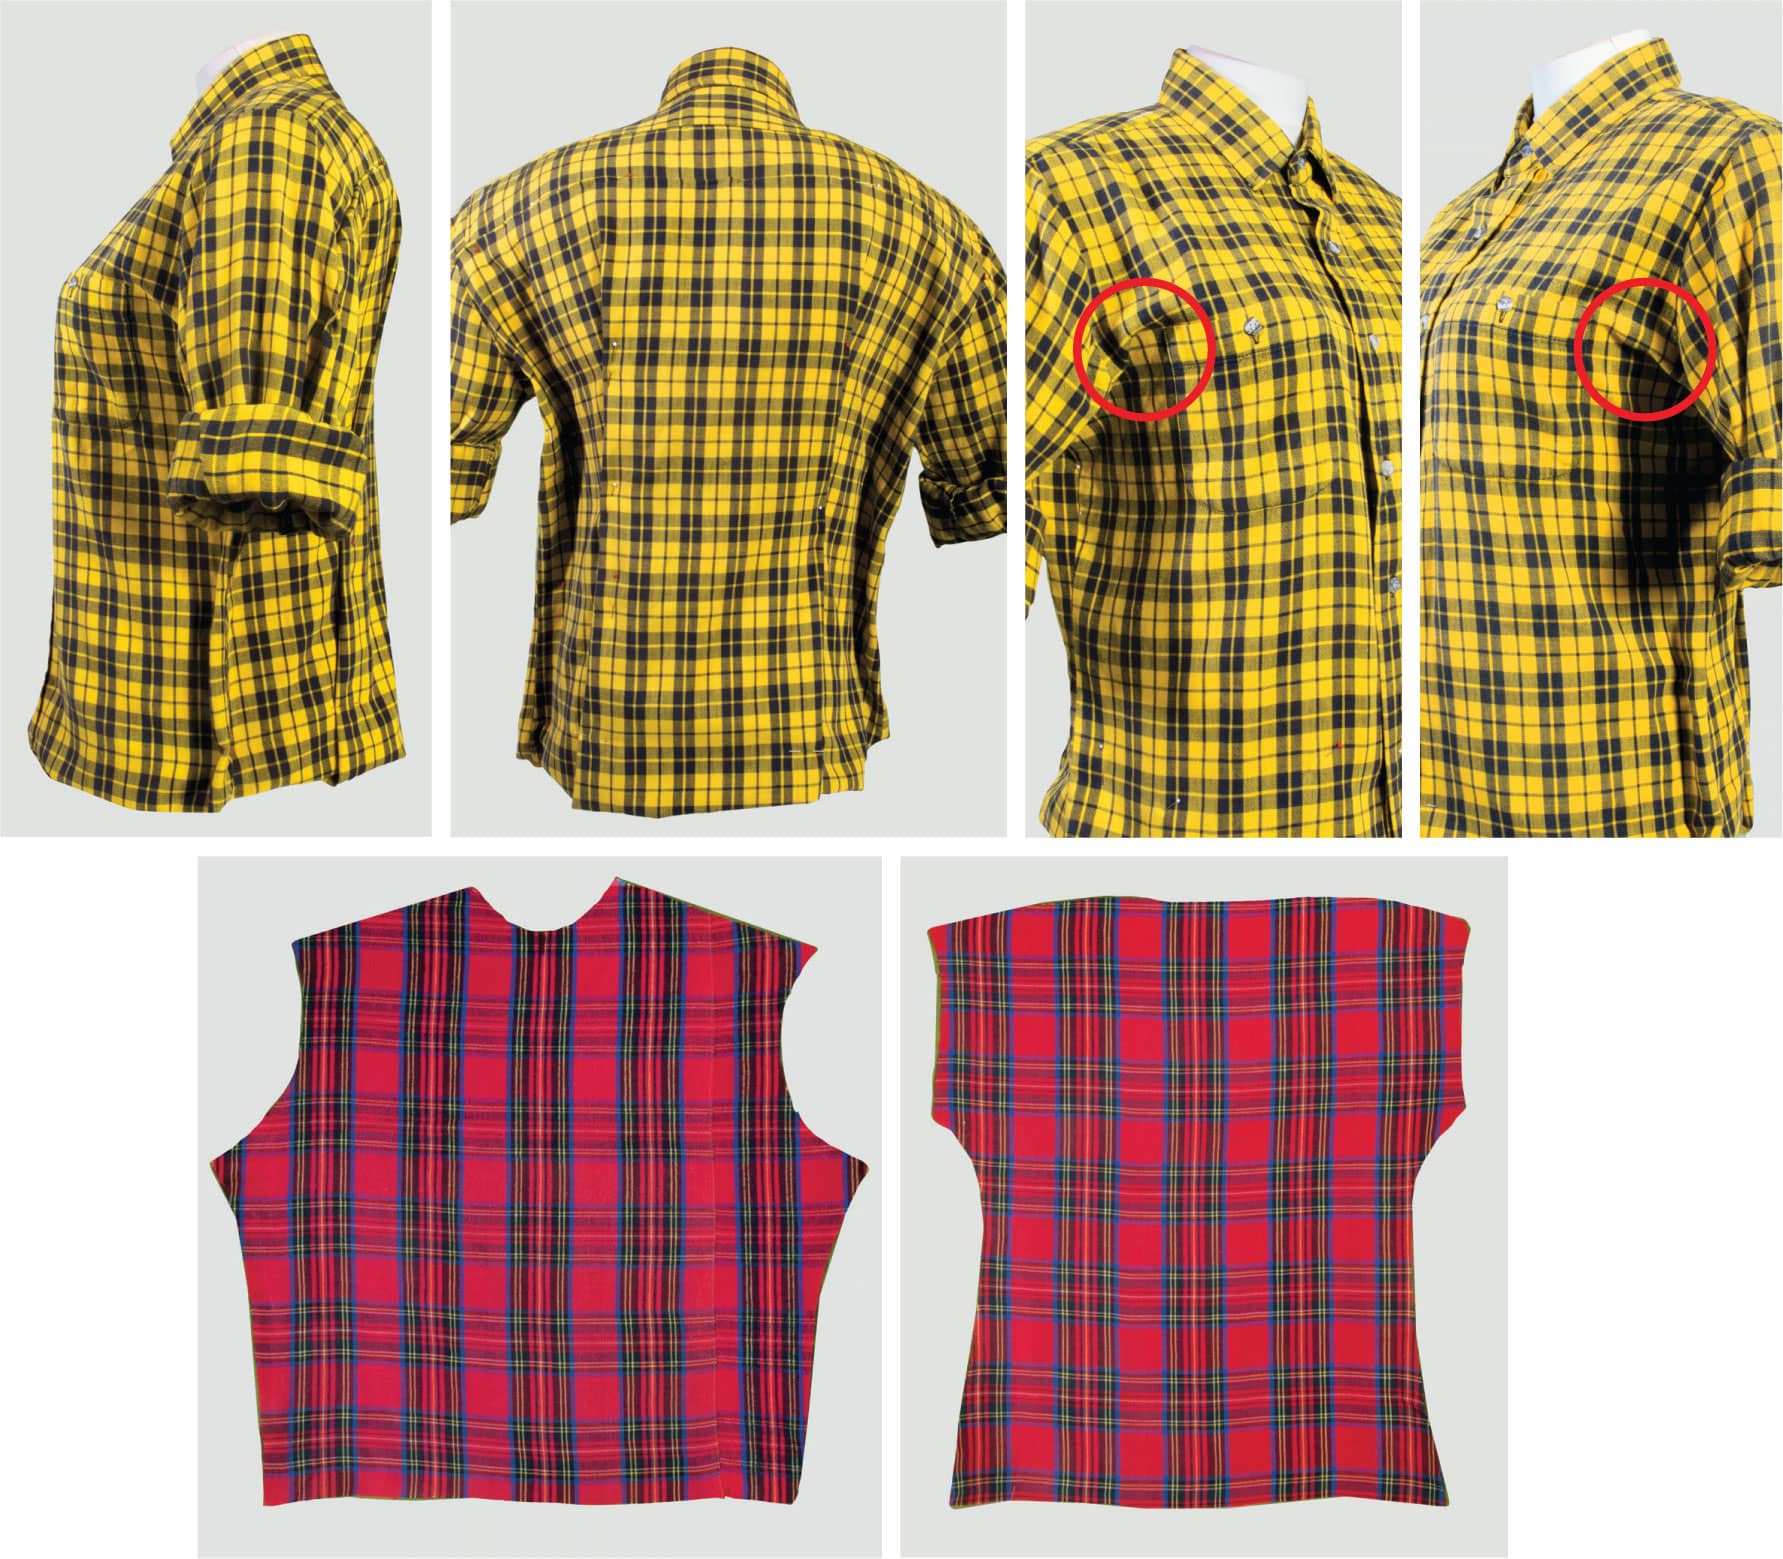
SIDE-SEAM SHAPING: THE DRAPING WAY
Here’s a good example of dart-free, off-seam ease reduction: While pinning right at the side seams to reduce the body ease can certainly work—the last demo in the previous chapter is a good example—better results almost always come from dart-like pinning on the front or back exactly where the excess fabric appears, without reshaping the side seams. This allows shaping the back and front differently and is demonstrated in the photographs, starting with a typical loose drape on form #4.
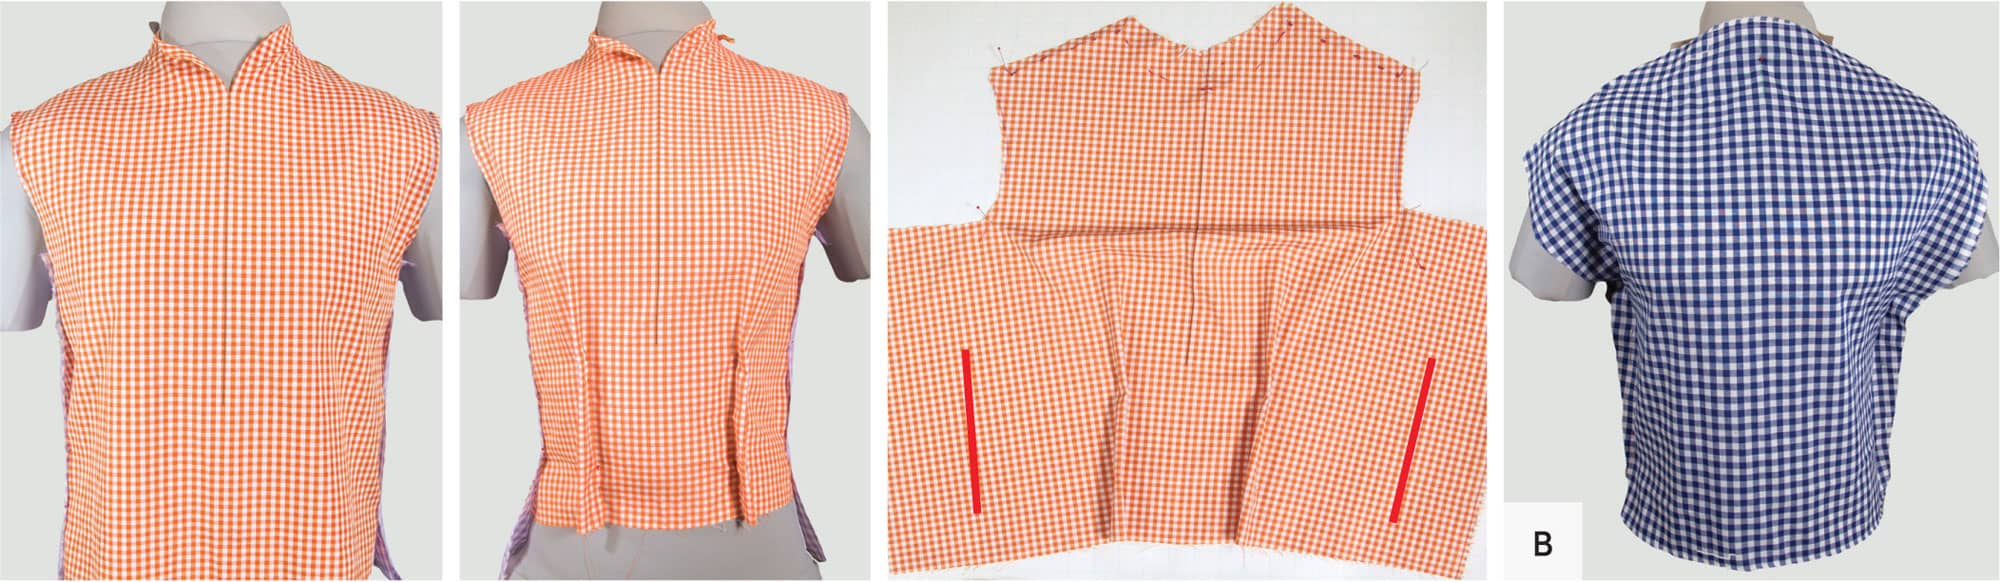
I started by pinning out the excess fabric. Once pinned out, off-seam ease can certainly be refined into darts. However, the pinned muslin can also be arranged as flat as possible, still pinned, ignoring whatever won’t lay flat, and the back (or front) drape can be retraced, including the newly shaped side seams (a result of the ease removal). This transfers the ease reduction back to the seams in a quite useful way, as shown in the photos (A, B) of new front and back pieces cut from the tracing. There’s a limit to how much flat length like this can be removed before the piece becomes too small for the three-dimensional shape, but it is often quite a lot.

DARTS: VISIBLE AND INVISIBLE
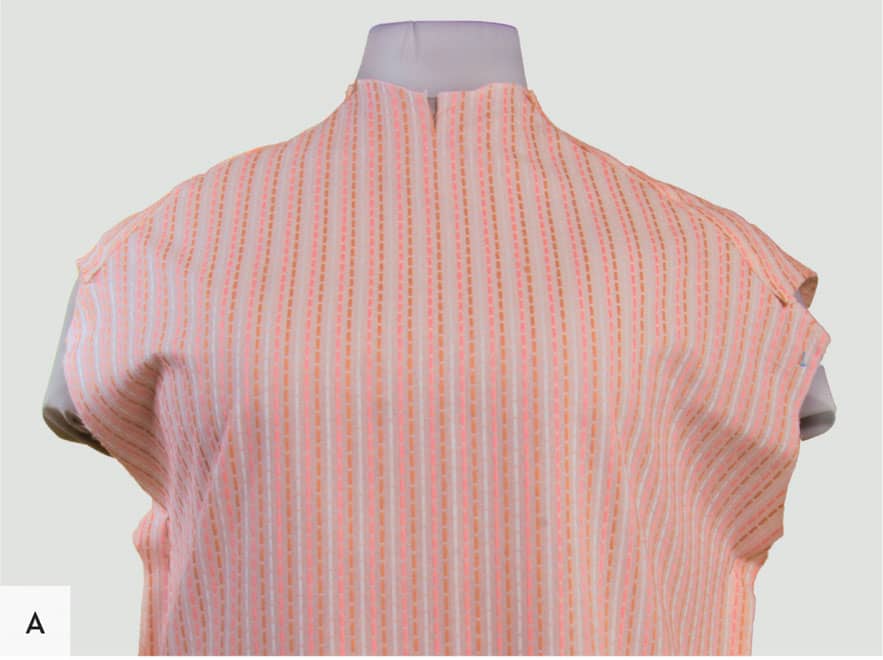
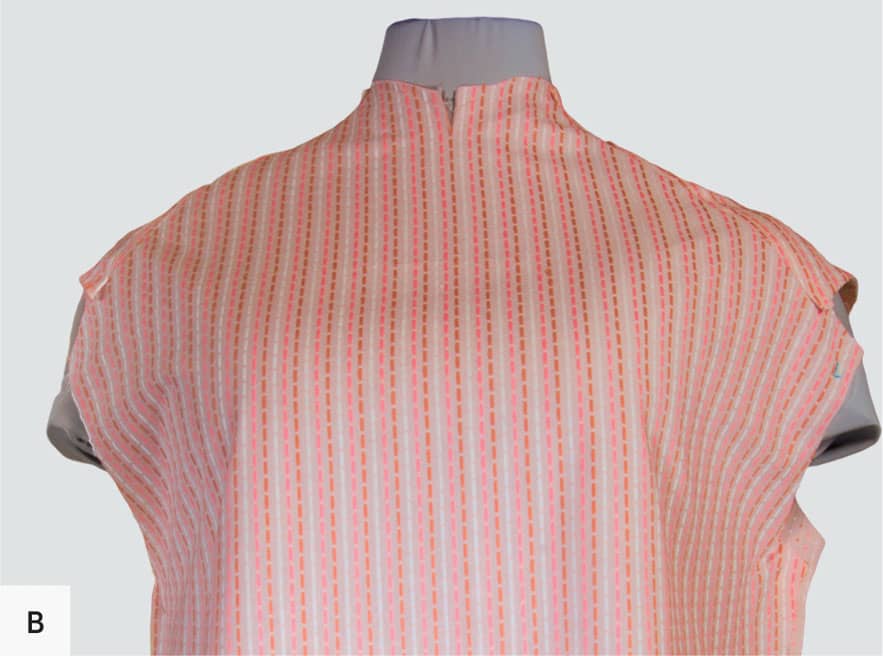
When draping a fitted shirt on a figure with a bust, a dart-like fold tends to form naturally between the bust point and the nearest part of the armhole as you reduce the ease below the bust at the side seam. This fold is easily pinched and pinned into an actual dart, which has several immediate benefits, as you can see in the photographs at right (A, B): Once the dart is pinned, the shirt front below the dart smooths right out, and the armhole pulls into a much more suitable shape, however, the armhole is reduced in length by the amount of fabric in the dart folds.
The armhole length reduction is usually an ideal solution for a fitted shirt, especially a fitted shirt that is being developed from a loose one, but if the armhole is already the perfect length or a little more length is still needed afterwards, it can easily be drawn back in, at the top of the side seam, to return it to its original circumference.
Pivoting the dart to another, farther-away edge, to avoid changing the armhole length, is another option, but note in the illustrations below how this increases the length of the dart sides, or legs, making the amount of fabric in the fold between them greater, without adding any increased shaping, since the dart angle doesn’t change. The diagrams, below, show two possible and very common alternative placements for the dart and how to make the pattern changes, by slashing and pivoting.
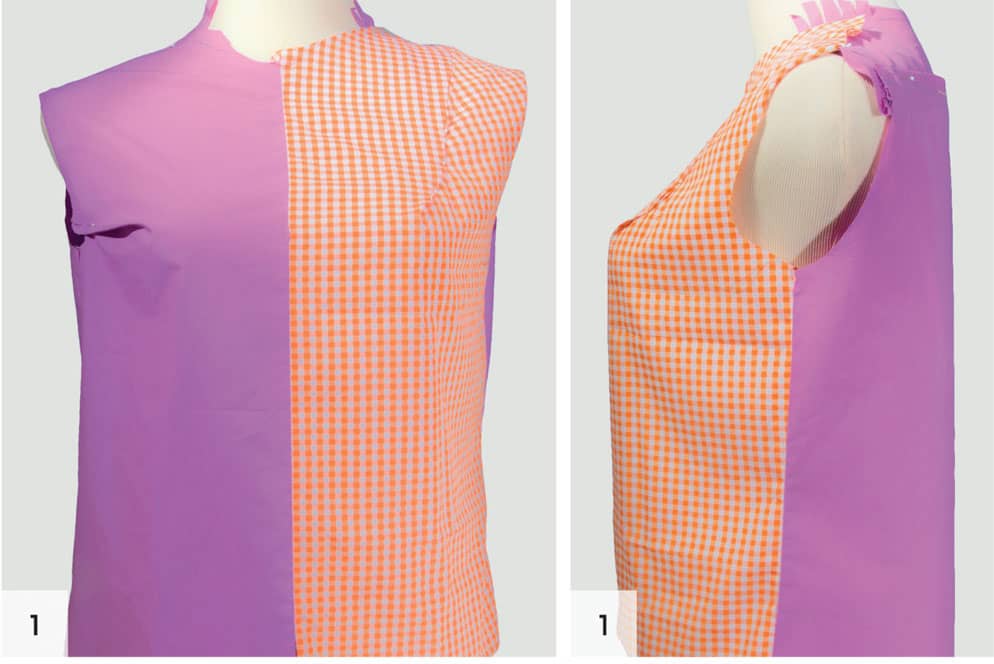
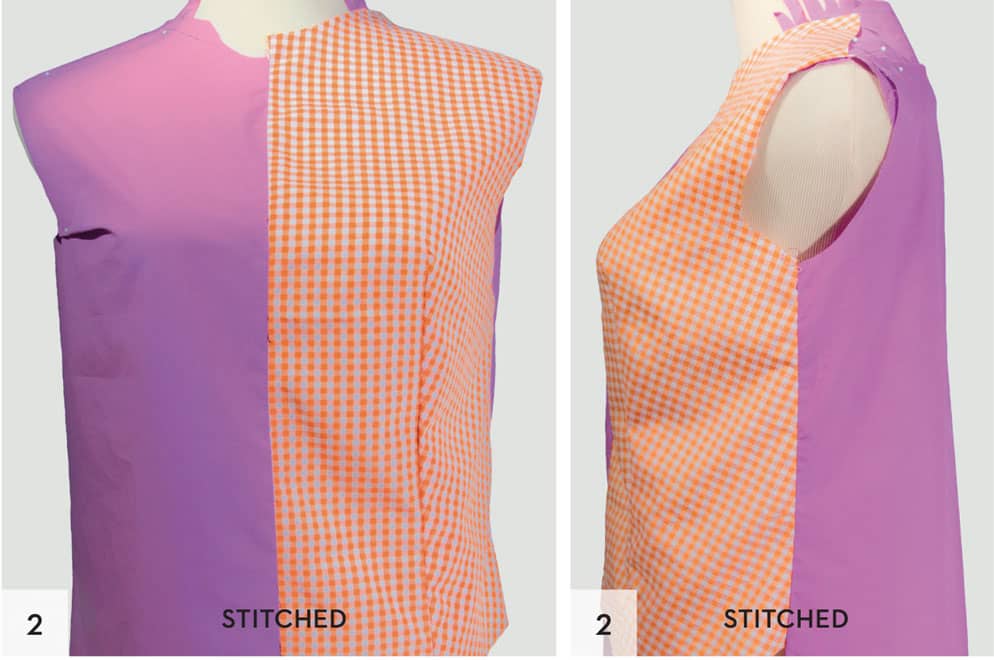
At right, in orange, are the results, in fabric from the dart, pivoting pattern changes shown below. Note that the armholes remain shorter in length and better shaped, but that each dart shift reorients the grain quite dramatically from the bust point to the side seam and at the armhole itself, while the overall body silhouette remains unchanged in the first two examples.
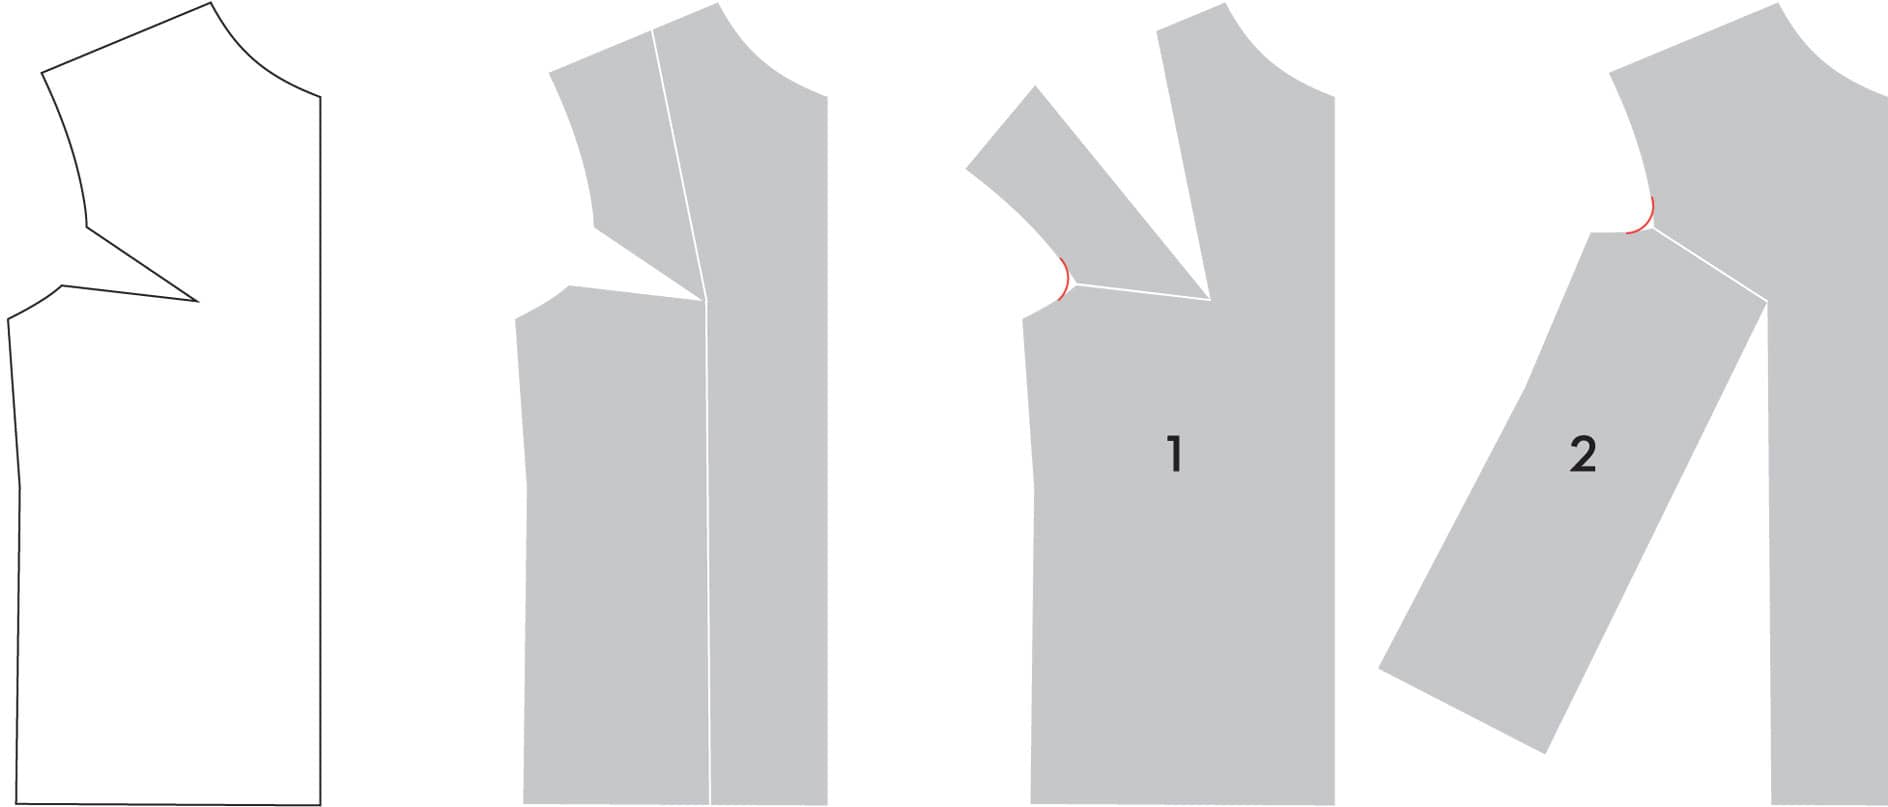
1 Moving the armhole dart to the shoulder.
2 Moving the armhole dart to the hem directly under the bust point.
3 Releasing the shifted-to-bust dart at the hem area.
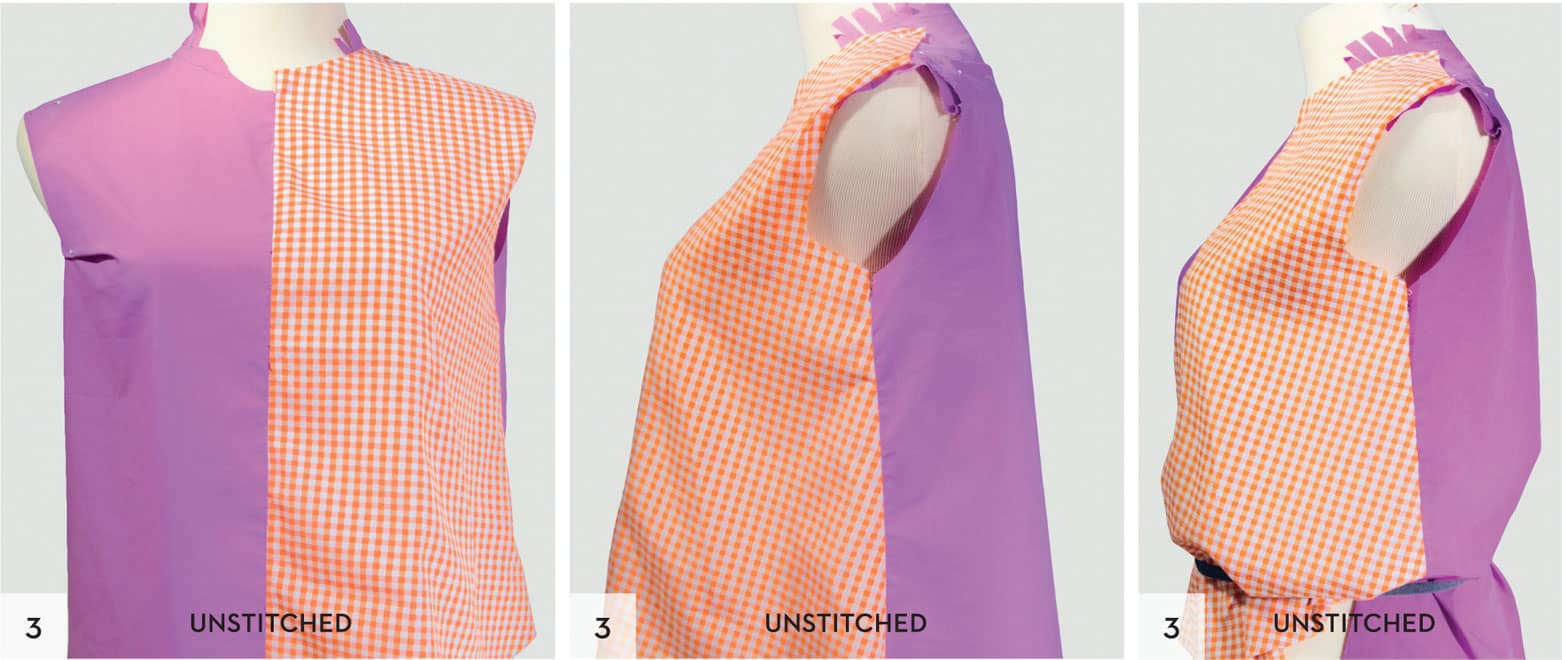
Note that in example 3, the below-bust dart has been released (left unstitched), creating a wide, loose fit below the bust, while retaining the dart shaping above and to the side of the bust. The grain shift at the side seam is, of course, unchanged.
A certain amount of this waist ease can be taken up at the side seam to bring the shirt back into trim-fit territory, but the more you pull the front in towards the side seam, the more you’ll defeat the purpose of the dart rotation, because this begins to re-create exactly the sort of natural armhole bust dart we started with. With care, you can certainly find useful points of balance, and to some extent, get the best of both worlds. I personally prefer other approaches, as you’ll see next.
FULL GARMENT CONVERSION BY DRAPING
Here’s the approach I prefer, rather than dart manipulation: draping for a closer fit. This process begins with a shirt I like, but want to convert from a loose fit to a more fitted shirt. Note that the draping process—for every shirt, regardless the fit—is impacted by the fabric type.
WITH SOFT FABRIC
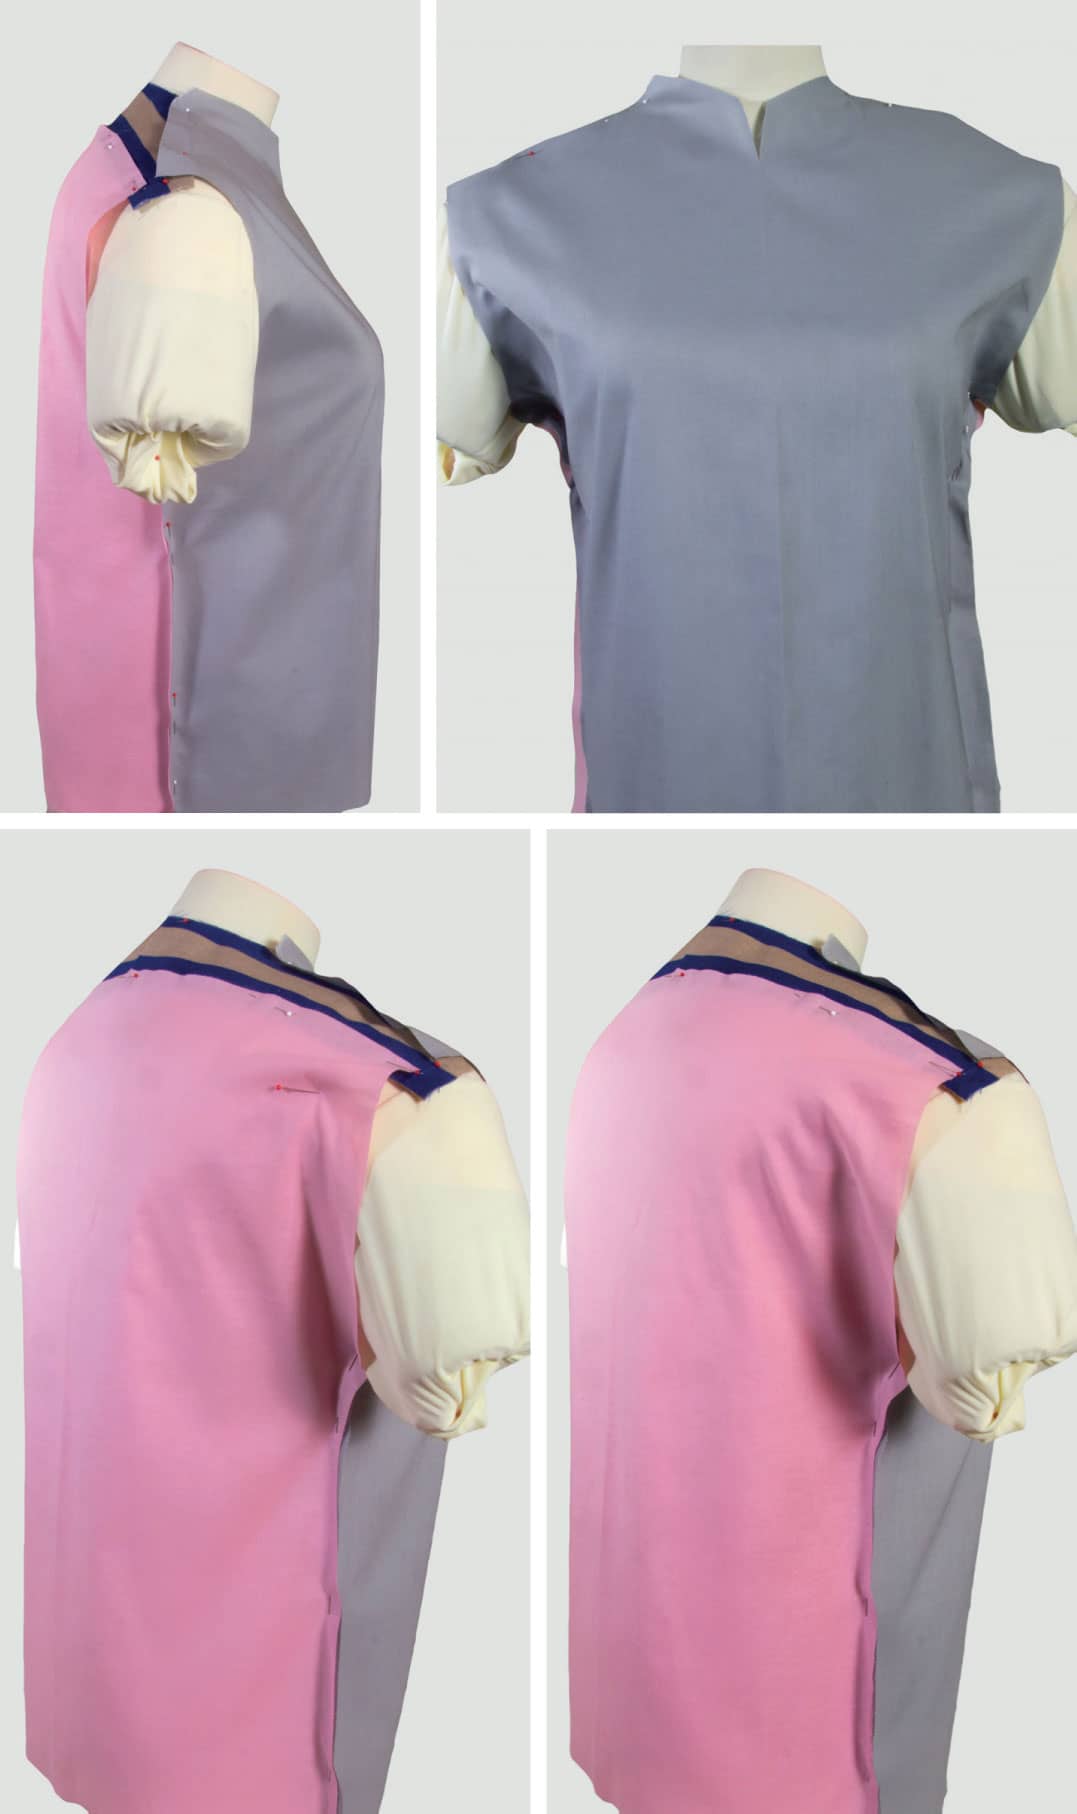
I start by placing a loose or oversized shirt, with no darts, on form #3. My goal is to pin out as much fabric as I can in the back and side seams without causing new dart folds to appear in the front. This is similar to the side-seam reshaping (within the body of the garment that I did at the beginning of this chapter), but here I’m adding side-seam pinning, for even more ease reduction. As folds begin to appear at the front armholes, circled below, I stop the ease-reduction pinning through the body.
I believe that these darts folds are small enough that I can drape them away if I use a soft fabric. I trace new front and back body-pattern outlines from the pinned original pieces, laid flat with the pins still in place. I cut the resulting shapes out from a very soft, much-washed flannel sheet, shown at bottom, below.
Back on the form, with the front and back pinned to a yoke traced from the original shirt, the armholes are clearly too wide, but overall the body fit is much better than on the original shirt, and the test muslin can be further draped to fit even better.
It’s easy to fix the armhole shaping, and improve the body width as well, by folding, trimming, and repinning the shirt right on the form. You can see how the draped shirt looks smooth and body skimming without any pattern manipulation.
In this process, every seam got further microadjustments, especially at the yoke ends, as I slipped in my trusty sleeve samples. Pinning the sleeves in place helped confirm that the curve and height of the armhole opening still fit the sleeve and that the front and back of the shirt still looked close fitted without excess fabric. And, there we have it, completely draped armholes on a smoothly fitting, dart-free body—no patterns or gingham squares needed.

WITH CRISP FABRIC
Here’s the very same drape, starting with the same shapes—yoke, fronts, and back—as in the previous example, this time cut from fabrics I know to be the exact opposite of the soft flannel I just used—crisp quilting cottons.
These unwashed quilting-cotton solids do not stretch on either grain, yet they don’t appear or feel abnormally stiff or unpleasant. They’re therefore wonderful for draping muslins when I want to test extreme fabric crispness, by which I mean fabrics that tend to wrinkle in response to even the most subtle excess fabric length or strain, rather than absorb the wrinkles as soft, more flexible fabrics often do.
As you can see, even on the same form, I was completely unable to drape away the extra dart-folding length at the front armholes and will have to add darts somewhere in front after all, in order to proceed any further with refining the armholes on these shapes and on this form in such a crisp fabric. A small potential back-armhole dart also appeared, as you can see below, which will probably disappear neatly into a much smaller armhole with continued draping.
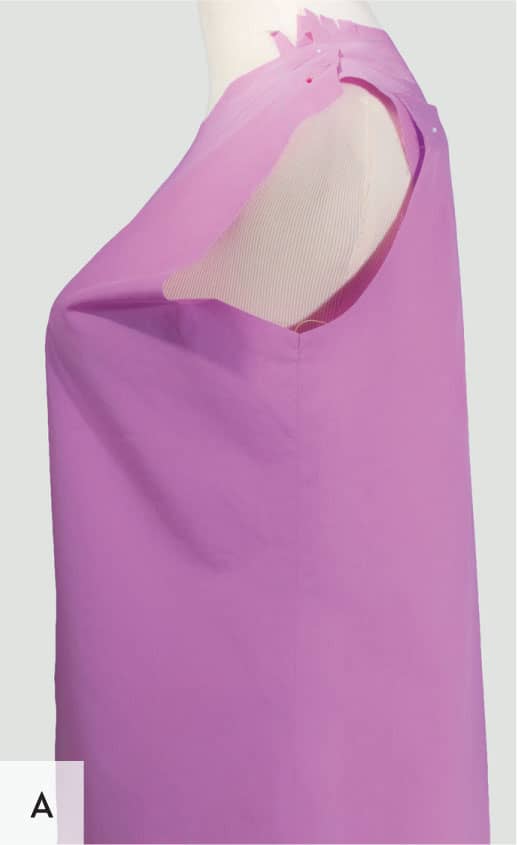
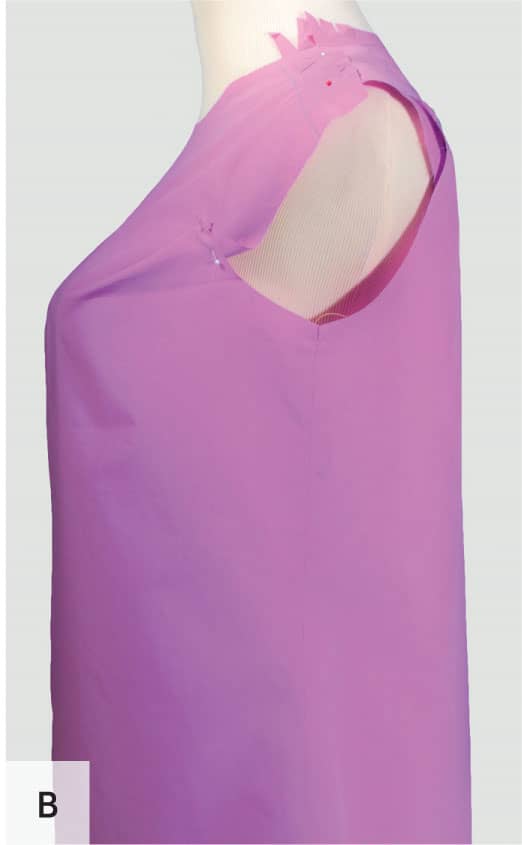
But full garment conversion isn’t limited to “soft-fabric, no darts” projects alone. They are a wonderfully efficient starting point for any fitted drape, because in one step they capture both the already working parts of any existing shirt, along with rough-draft solutions for all the not-working parts. The photographs at far right show a big, soft shirt on form #2 that needs a little vertical reduction in the back, sides, and at and below the bust, as well as serious help at the shoulders. This is done by lifting and smoothing the fronts upward while bringing the yoke forward and down, pinning them together as needed for an on-grain, dart-free front and sides. The (A) images show the shirt before pinning; the (B) images show it after pinning, and the bottom two show it flat for tracing. Note how I released the yoke-front pins to lay the front flat, and put in new pins to show where the yoke had been.

HIDING DARTS IN SEAMS AND UNDER COLLARS
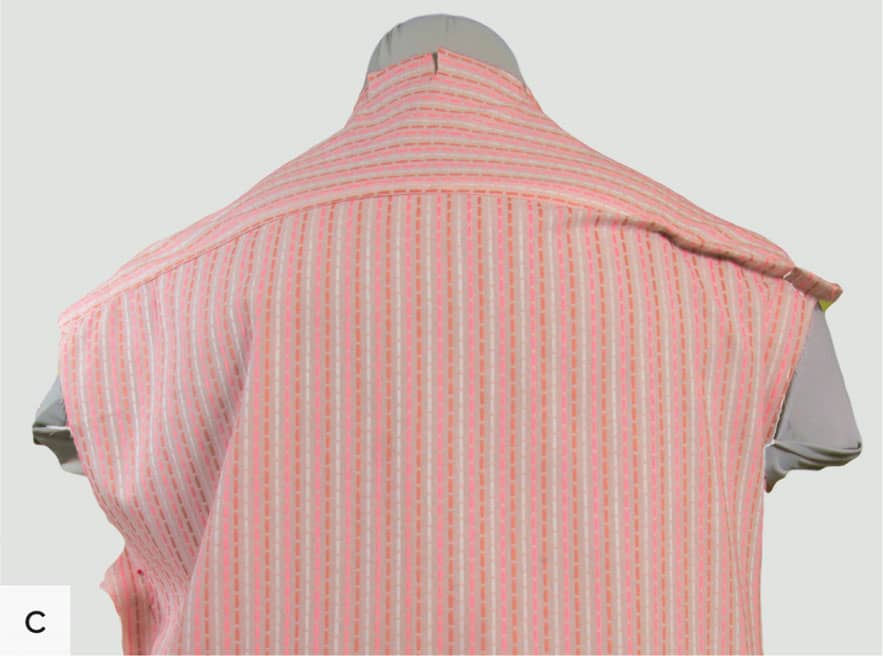
As always, the next step after a full-garment drape is to make a new muslin from the tracings, with extrawide seam allowances, and basted together at the yoke only, which you then put back on the form for further refinement. The source shirt was made from a soft silk twill, but the muslin fabric I’ve chosen here is crisper, not as extreme as the quilting solids on the previous spread, but more like the fabric already chosen to make project 2 (see here). The construction of project 2, a V-neck woman’s dress shirt, starts with this finished test muslin.
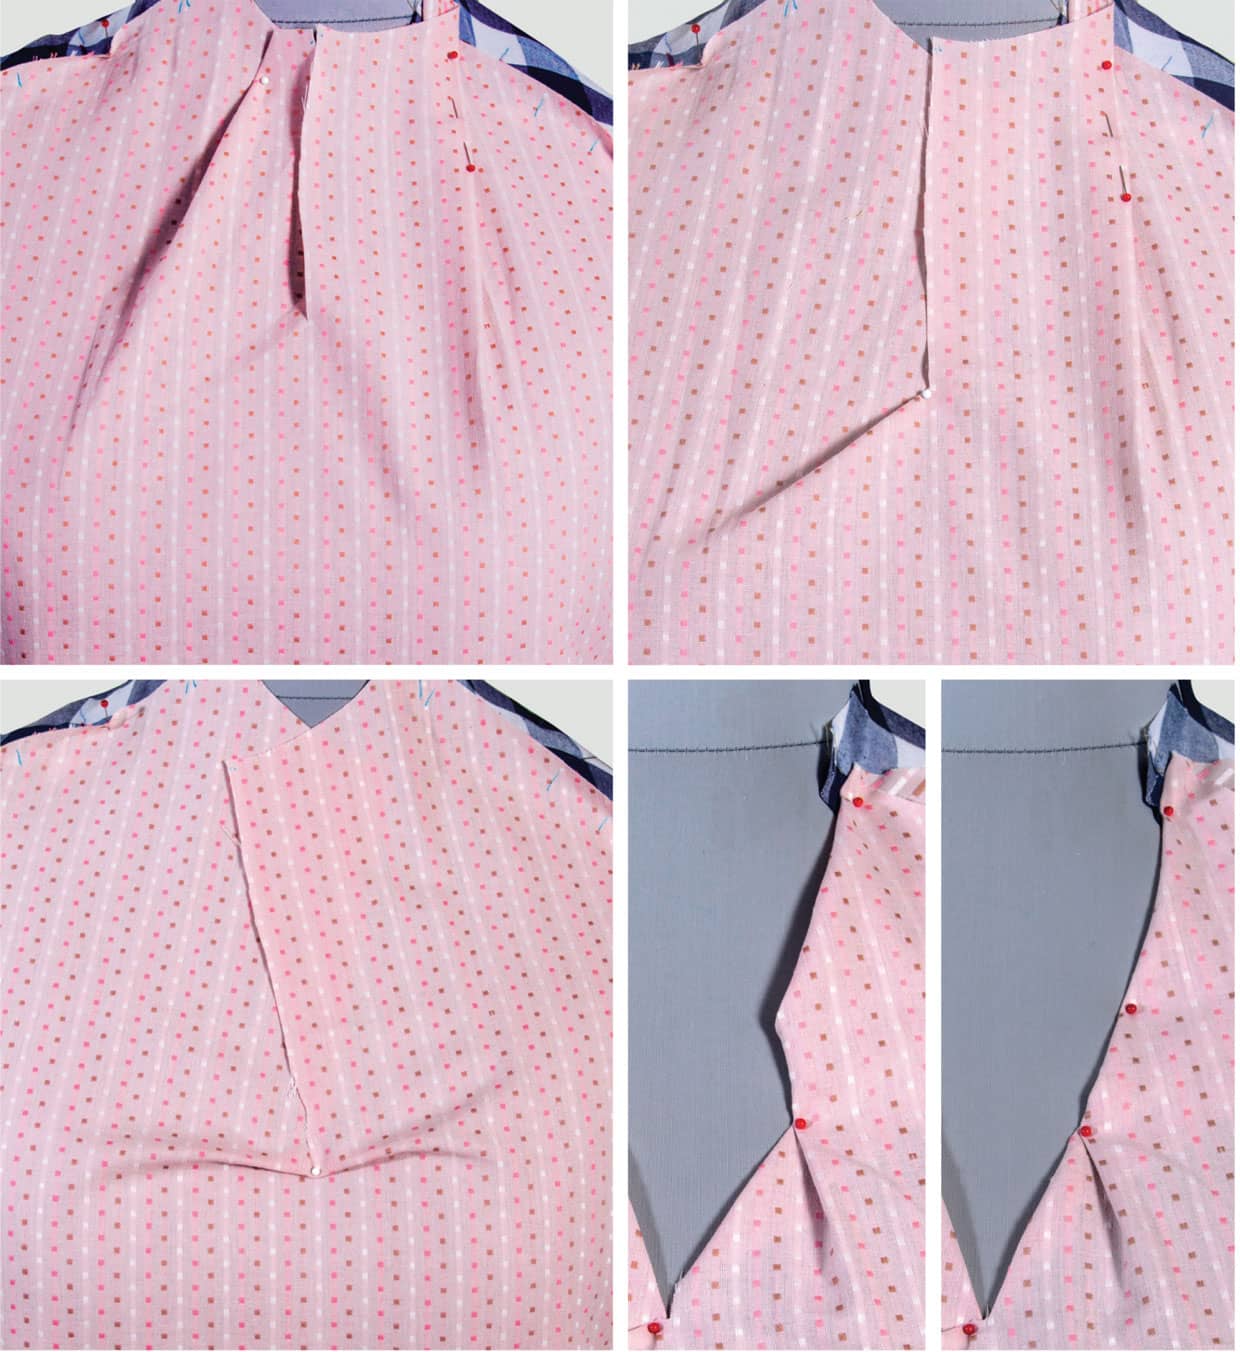
As you can see, a bit of dartlike folding has reappeared at the front armholes (A), most of which I’ve been able to lift and smooth back into the front-to-yoke seam (B). And in back (C), there’s plenty of excess length at the sides that I was able to easily lift away and hide in the back-to-yoke seam, which neatens up the armhole as well, shortening it without reshaping it.
Still, as I brought the sides closer together for balancing, some bust-dart folding returned with this fabric, and I had to either pin this out as darts or leave the sides alone. Wanting the closer fit at the sides, I decided to try some on-form dart-fold pivoting, since my extra seam allowances would allow that, so I was able to explore various positions along the shoulders, neckline, or even into the center front. Don’t be afraid to cut into the center front on the muslin; when you trace the muslin to create the pattern, you can eliminate any openings, or even create a center front opening.
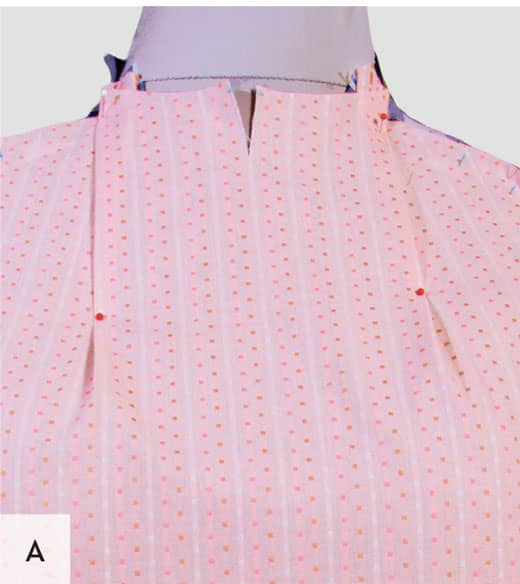
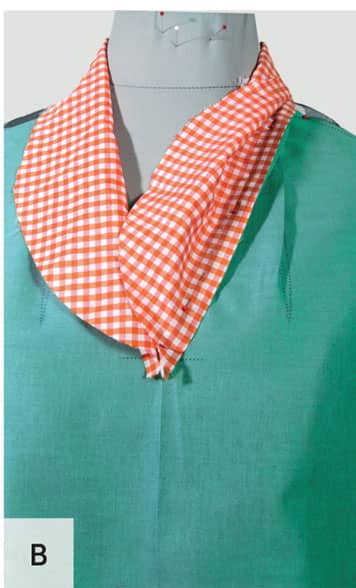
Because project 2 features a V-neckline and a collar I’m hoping to find a place for the darts that might make them easy to conceal under the collar. As we learned from the dart-manipulation demonstrations (shown here), when a dart is pivoted, the shaping it provides (its angle) stays the same, no matter where it’s pivoted and no matter how long or short the dart legs need to be to accomplish removing the desired excess fabric.
So, for the smallest dart possible, the dart should be pivoted to the seams or edges that are closest to the point. And if we move the darts close to the neckline or into the centerfront, the neckline or center-front details can be designed to conceal these small darts. I settled on the first solution I tried (A), as the least fussy. Moving the darts close to the neckline make them easy to cover with a curved collar (B) or even to convert to seams, as could be done for any sort of center-front insert shape (C).