
As teachers doing hands-on classes, we’ve seen it all. But the one thing that impresses us most is the need to be accurate. Otherwise, mistakes multiply. Here is how to avoid them. NOTE: Patterns are now multisize with several lines printed on the patterns. We have simplified the drawings here to make them easier to follow.

Do not tissue-fit or cut out the fabric using wrinkled tissue!! Press it with a DRY IRON set at the wool setting. A “warm” iron isn’t hot enough. Steam and water drips spoil the pattern tissue. Empty water from the iron if dripping is a problem.

Trimming around the tissue first improves your accuracy when cutting fabric. It keeps the tissue from moving during the cutting process. If using a multisize pant pattern, trim on the largest size if you are unsure of your fit. We prefer trimming outside the cutting lines to remind you of the size you cut. You can trim with paper scissors or a rotary cutter.
Multisize patterns don’t have stitching lines printed on the tissue. Mark the stitching lines with a pencil. Most tape measures are 5/8″ wide. Use one as a guide when marking 5/8″ seam allowances. Use a 1″-wide ruler for marking 1″ seam allowances. If you have a low derriere, draw two more stitching lines on the lower back crotch curve, each ¼” lower than the one above it. (Palmer/Pletsch McCall’s patterns already have these lines printed on the tissue.)

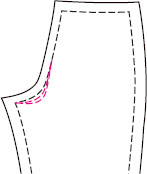
With tissue RIGHT SIDE UP, pin the front and back to a cardboard cutting board and tape the ENTIRE crotch INSIDE the stitching line.
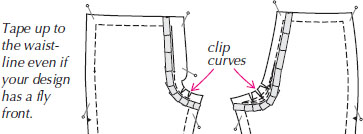
Tape the back crotch below the LOWEST stitching line. Use ½” tape. Lap short pieces of tape in the curved areas. Clip curves to the tape. Tug lightly on the tissue to see if it is taped securely.
Pin pattern WRONG SIDES TOGETHER, for fitting the right side of your body. (If your left side is much larger than your right, pin right sides together and fit your left side.)

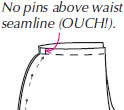
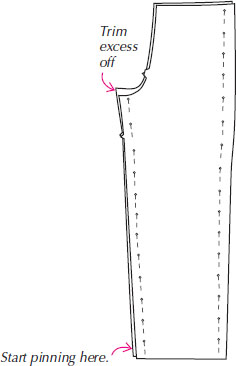
Place pattern pieces on a large cardboard surface. Start pinning by matching HEMS FIRST. Put a pin through front and back vertically into cardboard through hemlines on inseam and outseam. Don’t pin tissues together yet. Smooth the layers together and pin into board at top. NOW you can pin in the seamlines. If notches don’t match, double-check your accuracy. If they are misprinted, make your own new notches.
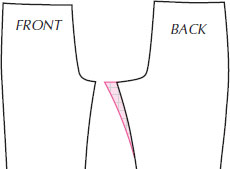
After altering, if you end up adding a lot to one inseam and not the other, they won’t be the same length. Trim inseams at the top to make them even. Pin darts on the outside.
NOTE: This plain fitted pant will become your “road map” to other styles. It will have the most changes you’d ever need to make in a pant style.
First, put 1″ elastic around your waist.

Sew Velcro to each end to make a permanent fitting elastic.

Technically, the top of your hip bones is your waist. But you can put the elastic where YOU want the waistband to sit OR where you want the very top of a faced waistline to hit.

Try the tissue on the RIGHT SIDE of your body, right side out with seams sticking out.
NOTE: If your left side is much fuller than your right, pin the tissue so RIGHT SIDES are together. Try it on the LEFT side of your body.
Stand with legs APART so you can get tissue up to your crotch and centered between the legs. Start at the back. Put the tissue under the elastic. The bottom of the elastic should rest on the pattern waistline seam where the waistband will be sewn.
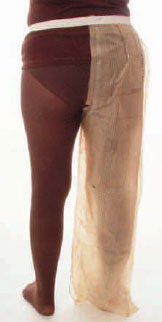
Put the elastic on the waist seamline of the tissue all the way around. Now you are ready to fit. Follow this order:
1. Centers—Bring the center front and back to your center front and back. You may need to unpin the side seam or eliminate a dart.
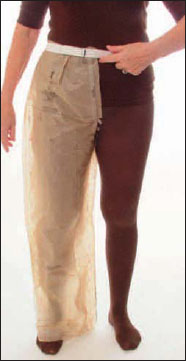
Pati’s center front is at her belly button.
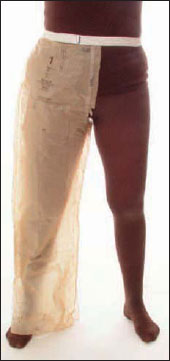
The front dart was unpinned and the pattern center front is at hers.
2. Crotch Depth—The stitching line in the crotch should touch your body. In fabric, the bias crotch will grow about ½”, giving you ease. Here the crotch is too long.
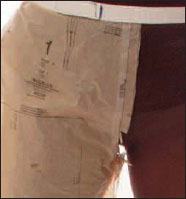
We made a horizontal tuck across the front and back. Now the crotch touches her body.
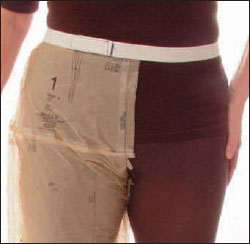
If you have drag lines below the knees, pull up at center back until they disappear. Taper to waist seamline at side.


Is the back too full? Pinch out the excess at the fullest part of your derriere. Use a hand and full-length mirror when fitting yourself.

Take pants off. Unpin front from back. Tape in a vertical tuck down the back.
Unpin side seams at waist if necessary.
4. Inseams
If wrinkles (smiles) point to the inseams, you need to let them out where you see the wrinkles.
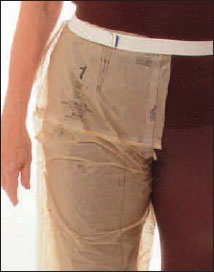
Now the wrinkles are gone.
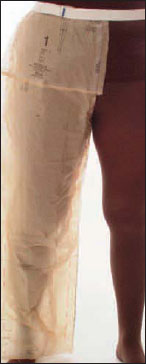
Pati let out only the front since there were no wrinkles in the back.
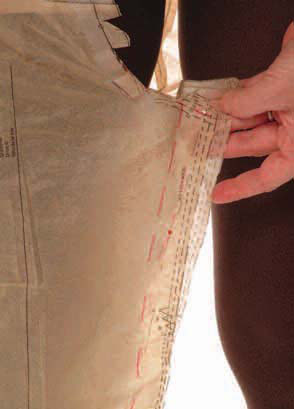
5. Side seams—the LAST thing you do.
Pin tissue along your body then add tissue to create 1″ seam allowances from where the pins are.
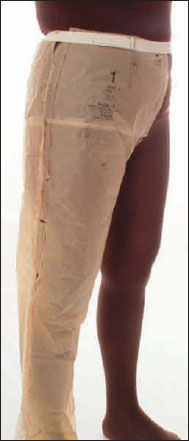
If the pants are too tight or loose, you can follow our general order. We start with the front darts because many women don’t need them. Darts should curve the pants into your waist, but if you have a thick waist, they will just pucker. Unpin them or pin them narrower. Aha! You can gain up to 2″ in width. (See chapter 12 for more on darts.)

NOTE: We are showing a narrower elastic for clarity in the art.
If your front is straight and doesn’t curve into your waist and the pant center is slanted, straighten it.
Extend grainline to waist. Add tissue, creating a new cutting line parallel to the grainline.
For fly fronts, cut on center front and make it parallel to grainline. Insert tissue.


Tape an oblong “chunk” of tissue to the side seam. Make it wider than what you’ll need. It can be short if you need room in the waist or long if you need room in the hip or thighs as well.
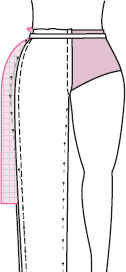
Try on the tissue, matching the center front and back to yours. Pin side seams to just skim your body shape. Leave 1″ seam allowances to allow for variations in fabrics.
TIP: Tape alteration tissue so the grid is the same on the front and back. This will help you pin accurately, adding the same amount to both front and back.
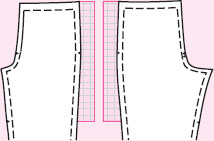
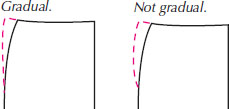
When you trim, gradually blend the edge of the added tissue into the edge of the original pattern.
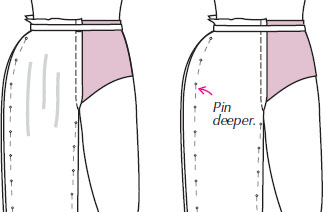
If pants are too loose, pin side seams deeper where you see vertical wrinkles, until the tissue skims your body.

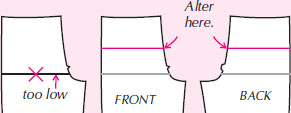
If the crotch seam-line is touching your body and the tissue doesn’t come up to your waist at the sides, then lengthen the crotch depth.
Measure from pattern waistline stitching line up to bottom of elastic at the side for the amount you will need to add.

To lengthen, add tissue to back and front evenly.


If the pattern’s lengthen and shorten line is in the crotch curve, don’t use it. Draw another line above the curve on both front and back.
1. Place alteration tissue under the area to be altered.
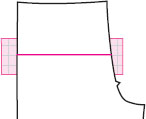
2. Cut on your alteration line. Anchor one section of the pattern tissue to the alteration tissue along one line on the grid.
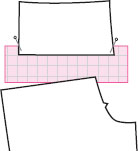
3. Spread the pattern the desired amount. Anchor the other part of the pattern.
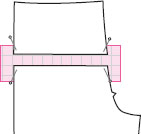
4. Use the lines on Perfect Pattern Paper as your ruler and to line up cut pattern pieces.
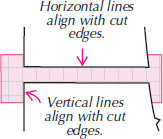
5. Tape in place and trim away excess tissue. There should be only a ¼” lap of pattern over alteration tissue.

To shorten, tuck the front and back the same amount.

Draw one line perpendicular to the grainline. If you need to shorten the crotch 1″, draw another line 1″ away and bring the two lines together.


Do not tape as you go. Tape only after all pieces are pinned and lying totally flat.
Pin tuck to board, then crease.
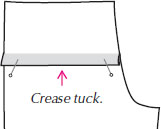
Finally, if the tuck is even all the way across, tape.
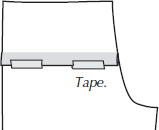
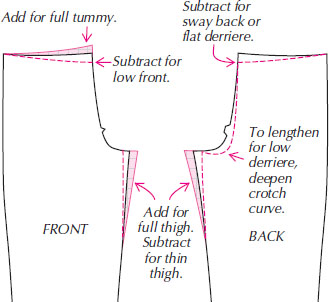
You can change crotch length in all of the following ways:
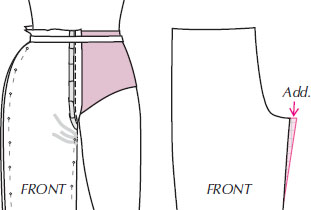
If the tissue pulls (“smiles”) in the thigh area, let out the inseam in the front or back or both, depending on where you see the pulls.
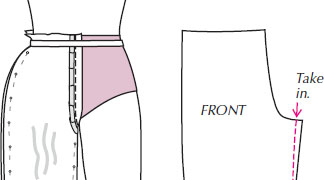
Vertical wrinkles in the front or back mean you need less crotch length. Take in front or back inseam where you see the wrinkles.

This wrinkle can be removed by putting the center front of the tissue at the body’s center front. You may need to unpin side seams or eliminate darts.

If you see these wrinkles…

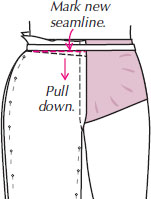
…pull pattern down at the center front until the wrinkles are gone. You’ll gain extra length over the tummy.
Mark new waist seam-line below the elastic.
If you are low-waisted or want to wear your pants below your actual waist, you must fit them that way. (See Chapter 10 for additional tips for when you have trouser pleats.)
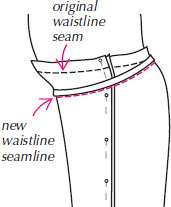
See REAL PEOPLE
examples: Marta page 51; Verna page 67; and Jean page 84.
Even if you have eliminated the darts, you may have too much length in the front below where the darts are marked. This is because you have a hollow on both sides of your tummy.
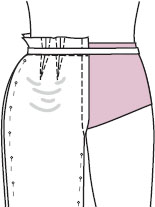
Pull the tissue up just in that area until the droopiness is gone.
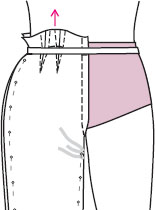
If this causes smiles in the front, let out the front inseam.
If your side seam swings forward and you have these wrinkles:
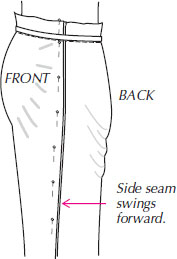
Pull down in the front and up in the back until side seam is straight. Mark new waist seamline.
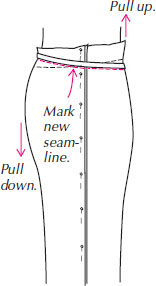

It is a balancing act between the two that takes some trial and error to get right. Eventually you will develop an eye and just “see it!”

Adding or subtracting from crotch length may make crotch DEPTH suddenly comfortable or uncomfortable.
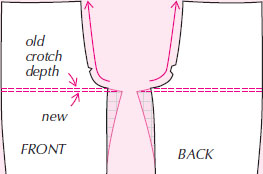
Follow this special order. After fitting thousands of people in pants, we FINALLY learned that ORDER is important!!!
1. Pull up pants in the back until wrinkles are gone.
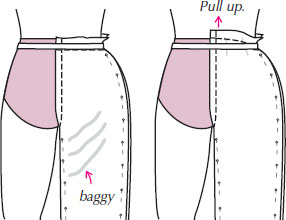
2. THEN check crotch depth.
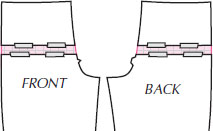
a. If it feels tight in FRONT and BACK, lengthen evenly, front and back.
b. If tight (short) in the BACK ONLY, tape tissue to lower crotch seamline and clip to tape.
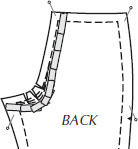
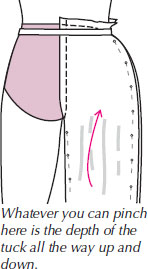
3. Now, bagginess is gone, but the back still seems FULL. If there is too much width at the fullest part of the derriere, take a vertical tuck parallel to the grainline. The tuck needs to be taken EVENLY from waist to hem, even if this makes the waist too small.
To determine the amount, pinch out the amount of excess at fullest part of the derriere.
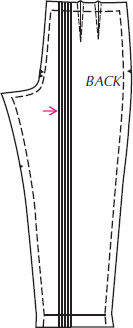
Unpin the pattern, lay it flat on a table and neatly make a tuck using lines marked on a Palmer/Pletsch pattern or draw lines using a yardstick.
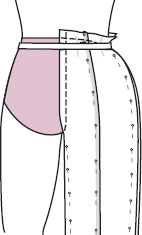
Repin and try on again.
For more waist room, make darts narrower and/or adjust side seams. Add tissue to side seams if necessary.
4. Additional fullness may also be removed by taking in the back inseam.

NOTE: See page 29 to see how straightening the back crotch seam can also remove more width across the back.
5. NOW, look at the FRONT. Lifting the back often causes the front to smile. Let out the front inseam until the wrinkles are gone and the grain or crease line is straight.

If your inner legs are full or come together just above or at the knees, you may need to widen the inner leg as shown.

Draw a new stitching line. Add tissue to the inner thighs on front and back until you have an even 1″ seam allowance. (See Alicia, page 63, Marta page 52.)
Usually we do the same thing as for knock-knees, but the purpose is to fill in some of that blank space between the legs. Avoid fitted tapered pants if you want to camouflage bow legs.
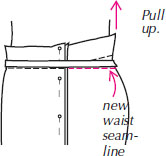
If you are hollow at the waistline at center back, you will see wrinkles puddling below the waistline.
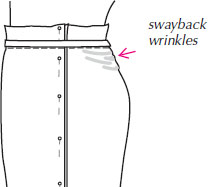
Pull pants up at center back until wrinkles are gone. Mark new waistline seam below elastic. You may also need to sew deeper back darts.
Wrinkles point to the derriere. Pants won’t come up to waist in back.
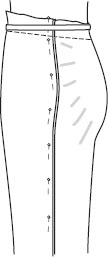
Generally, you need to add only to the back inseam but rarely you need to also add to the top. Deeper, or additional, back darts may also be needed.
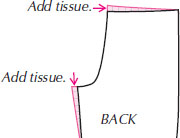
A way of adding length for a full derriere without letting out the inseam is to sew a more acute crotch curve. If you measured the new stitching line, it would be longer than the old one.
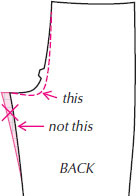
This is common with slender teenagers. Their almost “hollow” tummies don’t need front darts for shaping. We usually eliminate them. More width may be needed across the back. Add to the side seam and inseam. You may need to remove some width from the side front if seam curves to back.

If you wear control-top pantyhose with pants, the back crotch seam may hang too low since the pantyhose or a shaper lifts the body. Redraw the back curve higher. (If front crotch is also low, shorten crotch depth, see page 29.)

If the leg is straight, you can change the length at the bottom. If it is tapered or flared, alter in the knee area.

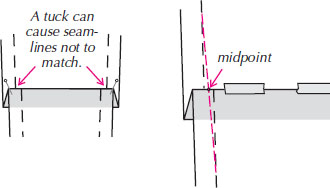
When you shorten or lengthen a tapered leg, be sure to true the lines. As a general rule, mark the midpoint between the two lines. Then draw from one stitching line to the next through the midpoint. Do this for the cutting line as well.
A straight-leg pant (16″-19″ at the bottom) is universally flattering. You can change the leg width while tissue-fitting or, if making it narrower, later in fabric.
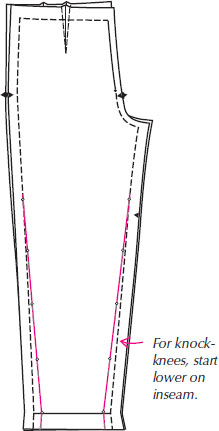
Do you want the legs narrower? Repin as shown until you like the width. At the hem, pin in the same amount on inseam and side seam. Taper to original seamlines at the knee, or higher if you have thin legs.
Or, if you have full inner thighs, you may want to take in the inseam beginning below the knee, while starting higher at the side seam.
If your calves are pulling the tissue to the back, let out side and inseams from just above the knee to hemline on the BACK ONLY.

TIP: If the crotch seam in the tissue is touching your body, it will hang down at least ½” in most fabrics.
Mark the waist seamline at the bottom edge of the elastic while the tissue is on your body.

Take tissue off and mark pin positions on the rest of the seams if they are not in the original seamlines.
A roller ball pen will penetrate both layers of tissue so you can mark front and back seams at the same time.
NOTE: DO NOT WORK WITH WRINKLED TISSUE. Unpin the tissue and press with a dry iron. Remember, you taped on the right side so press from the wrong side.
Make all seam allowances 1″ except crotch. If you have deepened the back crotch stitching line, trim the crotch seam allowance to 5/8″.


Pin front and back together on ORIGINAL side seam stitching lines to make sure your roller ball pen marks are equidistant from original seam lines on both back and front (unless you are intentionally adding more to only one piece). Mark changed stitching lines with a different color pen. Now you can trim seam allowances to 1″ on both front and back at the same time.
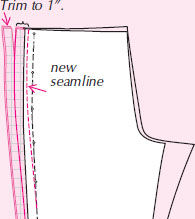
Repin pattern together, BEGINNING BY MATCHING HEMLINES to make sure front and back seams are the same length.
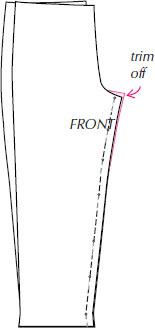
If you have added a lot to one inseam and not to the other (see below), match legs at hemline and if uneven at top, trim the longer one to match the shorter. (See illustration at right).
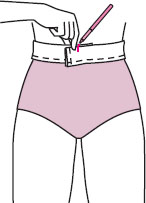
Fold the waistband tissue in half lengthwise and wrap it around your waist. Mark where the ends lap. If you don’t have 1″ left on the ends, add tissue to the ends. That’s all the fitting you need to do now!
You are ready to cut!!


NOTE TO TEACHERS: You may copy this page for your students. During the first tissue-fitting, use a pencil to circle on this page what your student needs to change with approximate amounts written as +3/4″ or -¼”. You have our permission to make copies of this page to use in your classes. From Pants for Real People by Marta Alto and Pati Palmer—www.palmerpletsch.com.