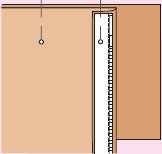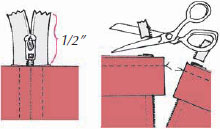
Buy a zipper 1“-2″ longer than you need! The slider won’t get in your way and cause crooked topstitching. Sew in, then unzip zipper, sew band over top, and cut off excess.

NOTE: Today’s synthetic coil zippers are self-locking. They don’t need to be zipped to the top to stay up. This means they are now shortened from the top, not the bottom.
Use a zipper that’s long enough for you. A 9″ zipper works for most people and will end up with enough length for the slider to be off the top edge of the fabric. Use a shorter one if you are short in the crotch and a longer one if you are long in the crotch. If your waist is small in relation to your hips, large, you’ll need a longer zipper.
Put zippers in center front or back even if the pattern calls for a side seam zipper, so you can alter side seams without restitching the zipper.
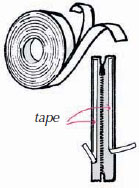
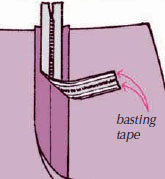
• Basting tape, a 1/8″ tape that’s sticky on both sides, can be used to eliminate hand basting. It comes on a reel covered with protective paper. Stick it to edges of zipper, peel away paper, and stick zipper to fabric. Stitch next to tape, not through it.
• ½” Scotch Magic Tape, can be used as a straight topstitching guideline for both lapped and centered zippers.

For beginners, this is easiest method, and it is the one shown in pattern instructions. Using a longer zipper will make it much easier to do a neat job.
1. Permanently stitch crotch seam beginning 1½” from inseam and backstitching at zipper opening. Machine baste seam closed. Snip basting every 1-1½” on one side.
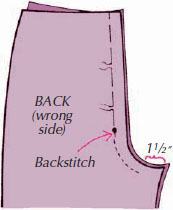
2. Press seam open. Place basting tape on right side of zipper edges. Center zipper coil over seam and stick in place.
3. Center ½” tape over seam and topstitch along each side using zipper foot.
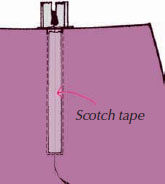
4. Remove tapes and machine basting.
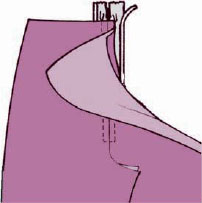
We prefer this method over the centered for a more professional look, but for a beginner, the centered is easier.
1. Snip-mark for zipper placement as shown. Permanently stitch crotch seam beginning 1½” from inseam, backstitching at zipper opening.
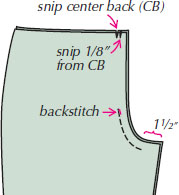
2. Press under 5/8″ on the left back to create the overlap and ½” on the right back to create the underlap. Press the underlap to 1″ below zipper opening.
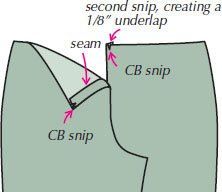
3. Place basting tape on right edge of zipper tape and stick underlap fold next to zipper coil. Stitch close to fold with zipper foot to about 1″ below zipper opening.

4. Place basting tape on overlap fold.
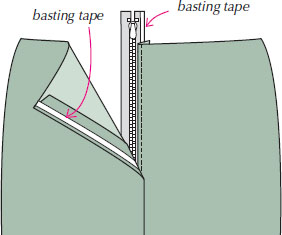
5. Stick overlap over zipper. matching center back snips. Stick ½” Scotch Magic Tape next to fold. Pin through all layers to prevent scooting and topstitch with a zipper foot next to tape. Remove basting tape and Scotch tape.
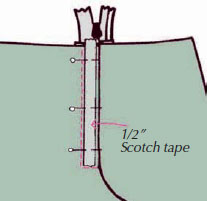
TIP: On lightweight or slippery fabrics, fuse a 1″ strip of lightweight fusible interfacing in zipper area before sewing zipper. PerfectFuse Sheer works well; it won’t pucker after washing.
A fly front zipper is like a lapped zipper. There is an overlap and an underlap. A woman’s fly laps right over left generally. Some manufacturers of ready-made pants use the men’s lapping direction, left over right. The fold line on the overlap side is the center front (CF).
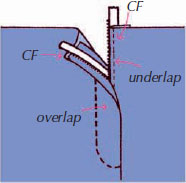
Check your pattern before cutting. The fly front extension should measure at least 1½” wide so it will be caught in topstitching.
If the fly front is not 1½” wide, add width when cutting.
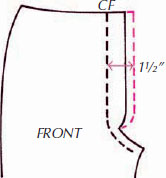
Add a fly front extension to ANY pant or skirt pattern. Just add 1½” from CF and make it 7″-8″ long.

1. Snip-mark fold lines for the overlap and underlap. The overlap fold is the center front (CF). The underlap fold is 5/8″ toward the cut edge from CF.
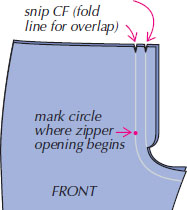
NOTE: With the 5/8″-deep underlap, your zipper will never show, so color matching isn’t necessary. We’ve used red zippers in purple pants to prove the point!
Also mark the circle where the zipper opening begins. Pin the crotch seam together at that circle.

To prevent knits from stretching or lightweight fabrics from puckering, fuse interfacing such as PerfectFuse Sheer to wrong side of fly extensions from fold to cut edge.
2. Stitch crotch seam, beginning 1½” from inseam up to zipper opening. Backstitch at the circle.
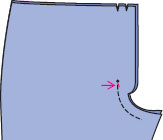
3. Fold right front (overlap) under from crotch seam to CF snip. Press.
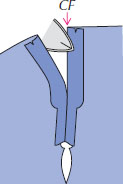
4. Fold left front (underlap) under from crotch seam allowance edge to underlap snip. Center front snips will also match.
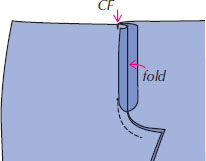
5. Place basting tape on underlap side of zipper. Peel away protective paper and stick to under-lap. Stitch next to fold using a zipper foot.
6. Place basting tape on edge of overlap. Peel away protective paper.
7. Line up CF snips and stick overlap in place.
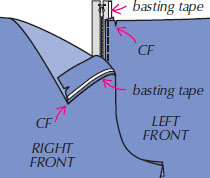
OPTIONAL: With our instructions it is not necessary to flip the right front out of the way and stitch the zipper to the extension before topstitching UNLESS you want extra strength or wider topstitching.
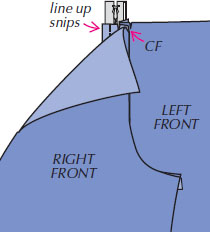
8. Lay fronts on a flat surface and pin horizontally through all layers to prevent scooting of top layer while stitching. Place the last pin just below the zipper stop so you can stitch just below it.
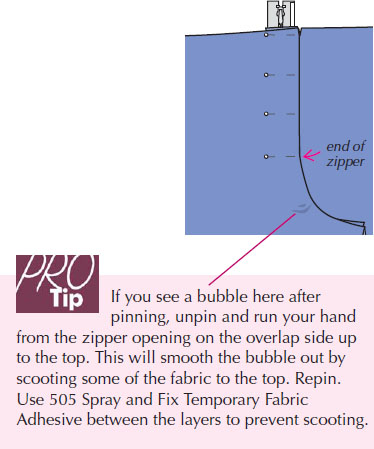
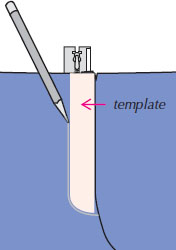
9. Topstitch 1″ from center front using one of these methods to help you stitch straight:
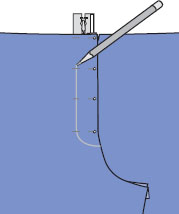
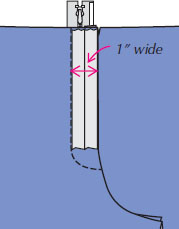
Stitch next to the tape. When you get to the curve, step on the accelerator and go! It’s easier to make a nice curve when you stitch fast. Remove tape.
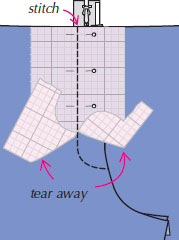
In sporty pants or pants that will get heavy wear, you may stitch a reinforcing bartack through all layers at bottom of zipper opening.
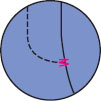
We do not feel one is necessary on women’s pants unless you use a scratchy metal zipper rather than a smooth synthetic coil zipper. It just adds bulk. For information on sewing a fly protector, see men’s fly front zipper, page 167.
The invisible zipper of the ‘70s was bulky. Today’s has a fine coil. You can buy the special foot that opens the coil as you sew or use a zipper foot as follows:
NOTE: Sew the zipper to the pants before sewing the crotch seam.
1. Open zipper. From the wrong side press the teeth flat so you can sew close to them.
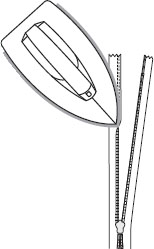
NOTE: For lightweight fabrics, fuse a 3/4″-wide lengthwise strip of lightweight interfacing to the wrong side in the zipper area.
NOTE: Be sure the long edge of the zipper tape matches edge of fabric. You actually end up sewing ½” from the edge of your fabric, but when the zipper is closed, 5/8″ rolls under.
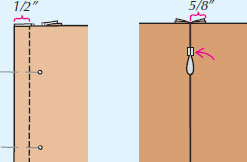
2. Place open zipper right side down onto right side of fabric. To prevent stretch, use basting tape (page 100) to hold zipper in place instead of pins.
3. The stopper at the top edge of the zipper tape should be just below the waist stitching line, and the long edge should match the edge of the fabric. Sew next to teeth until front of foot hits the slider. (Take out pins as you sew.)
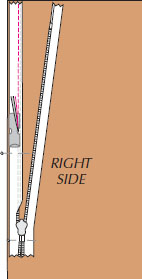
4. Close the zipper and flip it to the right side.
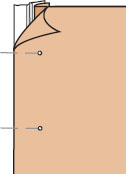
5. Place other garment section right sides together and pin or stick zipper to fabric edge as shown. Or use basting tape to hold in place.
6. Unzip the zipper and sew the other side the same way.
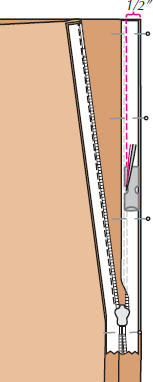
7. Sew the rest of the seam below the zipper, right sides together, using a zipper foot.
NOTE: Invisible zippers are shortened from the top if there is a waistband, but from the bottom if the waistline is faced, because it would be too bulky to fold the teeth back on themselves. Zigzag over the teeth with a short, wide stitch to lock the end and trim away extra length.
TIP: To avoid a pucker at the base of the zipper, start sewing ½” above and 1/8″ out from the end of the zipper stitching (on the 5/8″ stitching line).
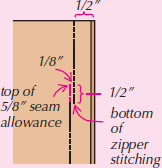
TIP No. 2: With presser foot up and zipper teeth standing on their side, lower needle into exact spot you want to start sewing. DO NOT BACKSTITCH. Lower the presser foot and stitch to the end of the seam. Pull threads to one side at the beginning of the seam and tie a knot.

8. To strengthen the zipper, sew the bottom of the tape to the seam allowances ONLY, using your machine.
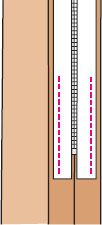
TIP: Before sewing a waistband over the zipper, fold the teeth to the inside so they won’t show.
