Since we are both selfish seamsters treasuring our precious sewing time, when we sew for men it can only be termed “a labor of love!” We try to use fast and easy, yet still professional looking, sewing techniques.
We avoid the traditional fly front, which has a center front seam instead of a fold at the edge of the overlap. Also, a fly protector is less necessary now that we have soft nylon zippers.
Our secret—we use the same techniques that we use to sew our own pants:
Once you master fitting men’s pants, then you can elaborate more on sewing techniques.
Buy a pant pattern by hip size for a better pant leg shape. Add to the waist if necessary. If the pattern includes a jacket, buy by the chest size. It’s easier to alter pants than a jacket.
Measure waist, hip, and length from waist to floor at sides, and crotch to floor at inseam. You may find it easier to measure a pair of ready-made pants that fit reasonably well. Measure the pant waist, hip, inseam, and outseam. Subtract the inseam from the outseam for crotch depth measurement.
Or, better yet, tissue-fit a man the same as you would a woman. You’ll instantly see the necessary alterations and be assured of a good fit.
The front inseam may be longer than the back and is eased to the back in the upper crotch area for more room for men’s body parts.
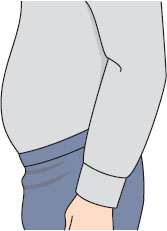
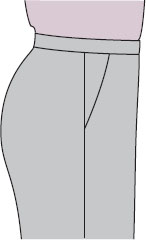
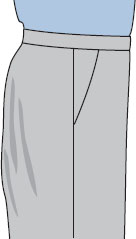
There are two very common fitting problems in pants for men of a certain age. One is the flat derriere and the other is the full tummy, commonly called the “bay window.”
“Bay Window”

“Flat Derriere”
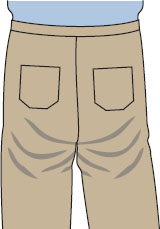
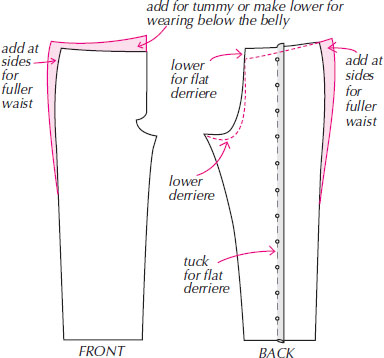
Patterns altered for men commonly look like this:
• Men’s ready-to-wear pants have a center back seam in the waistband for easy altering. If you sew to fit him, you don’t need that seam.

• If a man has a full derriere, taking in the waist at the center back in ready-made ,pants works.
• If he has a flat derriere and he needs the waist to be taken in, an angled seam, like a dart, is created at the center back which causes bagginess.
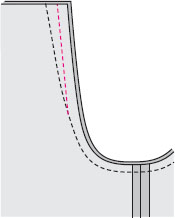
• However, if he is flat, and he needs the waist let out, the angle goes away and the pants will fit better.
NOTE: Men’s pant patterns usually appear very complicated because of all the pocket pieces (often including a front “watch pocket”). The easiest way to figure out how they are assembled is to pin the tissue pattern pieces together before you cut and sew. This helps you organize all those little pieces and understand where they go.
• A fly front zipper is like a lapped zipper. A woman’s fly laps right over left (page 101) and a man’s fly laps left over right. Also, a fly protector is added as the last step.
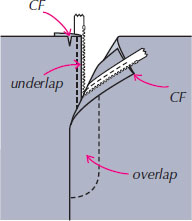
A fly front zipper has an overlap and an underlap. The fold line on the overlap side is the center front (CF).
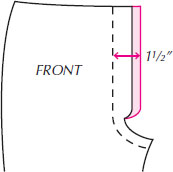
• Check your pattern before cutting. The fly front extension should measure at least 1½” wide so it will be caught in topstitching. If fly front is not 1 ½” wide, add width when cutting.
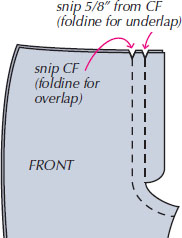
• Snip-mark fold lines. Snip CF for overlap, snip 5/8″ from CF for underlap. (This fold is even with crotch cut edge.)
• Use a 12″ conventional zipper. Let the excess extend above the top edge and into waistband and cut off later. With the deep underlap, the zipper won’t show so a perfect color match isn’t necessary.
TIP: Length of the fly opening is important to men. Pati once made the opening too short. Eventually her husband explained why this didn’t work for him.
1. Stitch crotch seam 1½” from inseam to zipper opening. Backstitch.
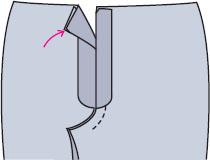
2. Fold left front under from crotch seam to center front (CF) snip. Press. Fold right front under from underlap snip to edge of crotch seam allowance.
3. Place basting tape on underlap side of zipper. Peel away protective paper and stick to underlap. Stitch next to fold.
4. Place basting tape on edge of overlap. Peel away protective paper.
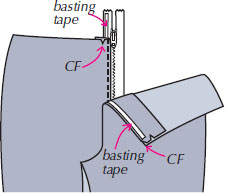
5. Line up CF snips and stick overlap in place.
6. Lay fronts on flat surface. Pin overlap side through all layers to prevent scooting of fabric. Using Scotch Magic Tape as a stitching guide, topstitch 1″ from CF. When you get to the curve, step on the accelerator and go. It’s easier when you stitch fast. Remove tapes.
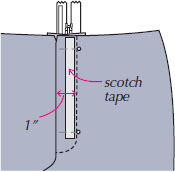
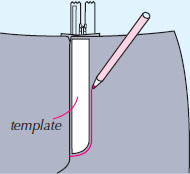
NOTE: For perfectly curved topstitching, use washable marker or chalk to draw around a paper template traced from the pattern tissue stitching line. Tuck template back in pattern envelope to use again.
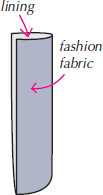
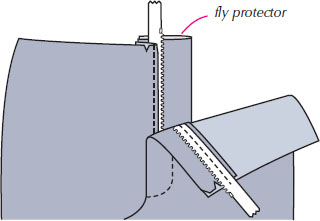
7. Insurance for men! Cut fly protector according to pattern and sew lining fabric to rounded edge. Turn and press. Sew fly protector to extension on underlap side. Since nylon zippers are now stronger than metal and they don’t scratch, ask him if the fly protector is now optional. It is one less step if he doesn’t care! But DO MAKE THE ZIPPER OPENING LONG ENOUGH!
