
For a while after getting your first DSLR or ILC camera and a normal zoom lens, everything is great. You take hundreds of pictures and enjoy the enhanced quality the big imaging sensor gives you. You look through your pictures, post them on social networking sites, and e-mail them to friends and family. All is well!
Then something occurs to you. You are looking at a picture you took of a bird sitting on a tree limb in your yard. Although it is sharp and shows the bird’s colors well, you realize that the bird is rather tiny in the image. If you try to get closer to another bird to take a picture, it flies away. Your lens cannot reach out and get a closeup of a bird in a tree. You need a long lens, one that can pull in distant subjects and make them bigger—you need a telephoto lens (figure 2.1).
This sudden realization and need is both pleasure and pain in a photographer’s life. Getting new lenses and having the ability to take specialized pictures is one of the greatest pleasures of being a photographer. Since lenses are rather expensive, it is also one of the pains of being a photographer. Convincing your partner you need another lens can help you become a very proficient negotiator. Fortunately, developing your negotiating skills will help you if you later decide to license some of your pictures to books and magazines.
This chapter will help you understand how lenses work, the types of lenses you can buy, and why you will need them. We will discuss zoom lenses versus prime lenses; wide-angle, normal, and telephoto lenses; macro and mirror lenses; and even filters to put on your lenses. We will also discuss autofocus and manual focus lenses; lenses with image stabilization; and how to build a basic three-lens kit. Finally, we will look into various lens concerns including a good understanding of bokeh, flare, light falloff, and distortion. There are many terms to wrap your head around when talking about lenses. We will examine what each term means, and you will end this chapter with a much better knowledge of lenses, how they work, and which types you might need.
First, let’s examine how a lens works.

Figure 2.1: Telephoto lens shot of a bird on a tree limb
Figure 2.2: A magnifying glass uses a lens element to modify the size of your subject
Have you ever used a magnifying glass to enlarge an object? You used a single lens element to change the perspective of your subject. As you moved the magnifying glass closer or farther away, the subject got larger or smaller (figure 2.2).
A magnifying glass is a very basic lens, with only a single element. It works in conjunction with the lens of your eye to focus an image of the subject on the retina of your eyeball. In a sense, by using the magnifying glass with your eye, you formed a compound lens that has more than one element. In this case, the retina of your eye is like the imaging sensor of a camera. The magnifying glass and the lens in your eye are like a camera lens in that it focuses the subject on something that can capture an image. To change the size (magnification) of the image you have to move the magnifying glass closer to and farther away from your eye. A camera lens similarly focuses the image on the camera’s imaging sensor. The lens on your camera has a lot more elements inside it than the two elements in the magnifying glass and eye combo. Figure 2.3 is a drawing of a lens with nine elements (blue). The gray part of the graphic represents the housing of the lens that holds the elements in place. If you sawed a lens in half lengthwise, it would look something like the figure. Instead of moving the whole camera forward and backward to focus on your subject, a zoom lens internally moves groups of elements forward and backward to focus on the subject. If you are using autofocus, the camera does it automatically. If you are using manual focus, you will have to turn a focus ring.
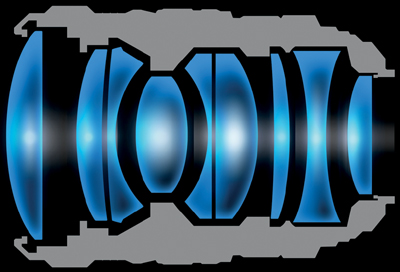
Figure 2.3: A lens cut in half lengthwise, with the elements exposed
If you want to pull your subject in close to you without walking closer to the subject, you can zoom your lens in (telephoto). The lens may get a little longer as parts of it extend outward. This way you can pull in subjects like a bird on a tree limb. When you want to take in a wider area of your subject, you can zoom out (wide angle). The lens may get physically shorter as you zoom it. In the wide-angle position, you can take in a group of people or a beautiful landscape. Lenses allow you to change the angle of view, or how much the lens can see at one time. This is called the focal length of the lens. We will examine the concept of focal length in the next section.
Figure 2.4 is a picture of one of my Nikon lenses and its controls. Your lenses should have similar controls, although they may vary in position.
Let’s look at each control on the lens:
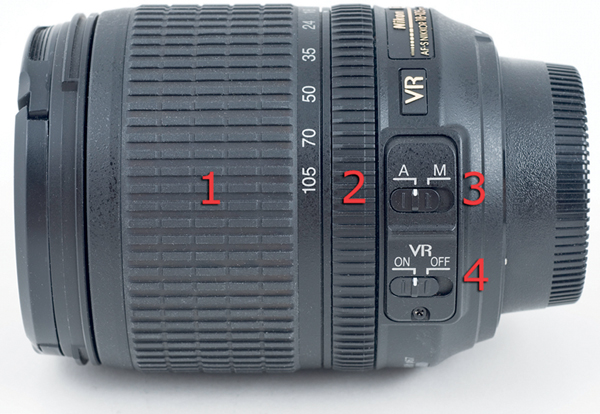
Figure 2.4: The controls of a Nikon lens (the control locations will vary on different brands)
Some older and even new retro-styled lenses have an additional ring called the aperture ring (figure 2.5). This ring is now mostly obsolete and is not included on lenses for most new DSLR and ILC cameras. However, if you see an additional ring on the lens with numbers, such as 1.4, 2, 2.8, 3.5, 4, 5.6, 8, 11, 16, and 22, that is an old-style aperture ring. We will discuss aperture later in this chapter and in a large section in the next chapter.
Additionally, some lenses have a window with figures or engravings that end in “∞“ (an infinity symbol, as shown in the lens windows of figures 2.5 and 2.6). These are focus distance scales that range from a few inches to infinity. They show approximately how far away your subject is in feet (ft) or millimeters (mm). Most photographers rarely use this scale. It is one of those items from many years ago when cameras had a function called zone focusing. You had to guess the distance and set the lens on the approximate number to get a good focus. The cameras that used zone focusing did not let you look through the lens itself, but they often had a separate viewfinder.
Now, let’s examine how focal length works. We’ll examine how a camera uses various focal lengths to capture more or less of the subject in front of the lens, and we’ll look at examples from extreme wide angle to long telephoto.
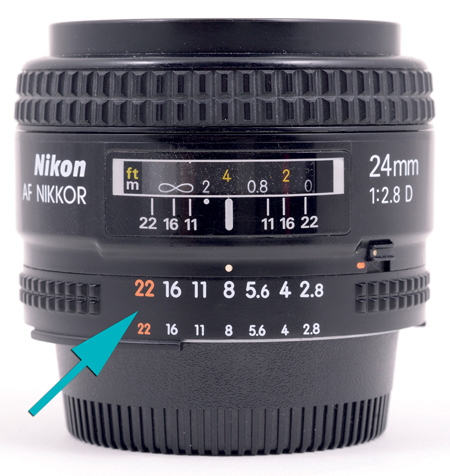
Figure 2.5: Aperture ring at the back of an older lens
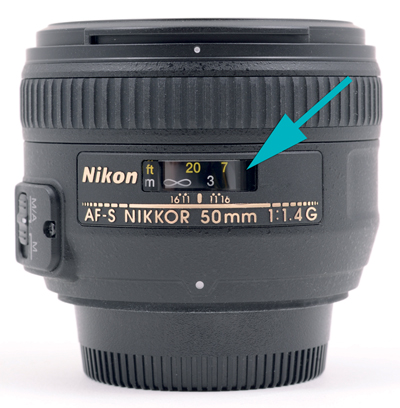
Figure 2.6: Distance scale engravings (left) and distance scale window (right)
To discuss focal length you will first need to understand the difference between a wide-angle, normal, and telephoto lens. The angle of view classifies a lens as being wide-angle, normal, or telephoto. Angle of view simply describes how much of a scene a lens can see. The longer the focal length, the narrower the angle of view (the lens sees less of the scene horizontally and vertically). The shorter the focal length, the wider the angle of view (the lens sees more of the scene horizontally and vertically). Let’s see some samples of how angle of view works.
The easiest way to determine whether a lens is wide angle, normal, or telephoto is to compare the size of the subject seen in the viewfinder to what the human eye sees. If you look through the viewfinder with both eyes open, and the eye looking through the viewfinder sees a subject that is smaller than what your other eye sees directly, the lens is probably a wide-angle lens. If both eyes see a subject of approximately the same size, the lens is probably a normal lens. If the viewfinder eye sees a subject larger than the subject seen by the other eye, the lens may be a telephoto lens.
If your camera has no viewfinder, but uses only a live view screen to see the subject, you will have to learn which focal length numbers are considered wide angle, normal, or telephoto for your camera by consulting the camera’s manual.
Let’s discuss each lens type and look at each angle of view in the following figures.
Wide-angle lens: Wide-angle lenses allow you to capture more of a scene than other lens types. Wide-angle lenses have a short focal length. You will use a wide-angle lens (or wide zoom lens setting) to take a picture of a group of people or a sweeping landscape (figure 2.7). Any time you need to photograph a larger section of your subject, use a short focal length wide-angle lens.
Normal lens: A normal lens creates a view that looks similar in size to what you see with your normal vision when you are the same distance from the subject as the lens. A normal lens (or medium zoom lens setting) is not especially wide, nor does it magnify the scene; it is in the middle. Normal lenses have a medium focal length.
Telephoto lens: A telephoto lens works like a magnifying glass. It magnifies the subject so small objects appear larger. A picture of a bird in a tree taken with a wide-angle or normal lens would be rather tiny and hard to see. However, if you use a telephoto lens (or a telephoto zoom lens setting), the bird will appear larger in the picture. Telephoto lenses have a long focal length.
Angle of view is an important topic that we will investigate more in the next section. We will look at pictures all the way from a 10 mm focal length to a 400 mm focal length, and you will see how the angle of view changes according to the focal length of the lens. First, though, let’s talk a little more about focal length.
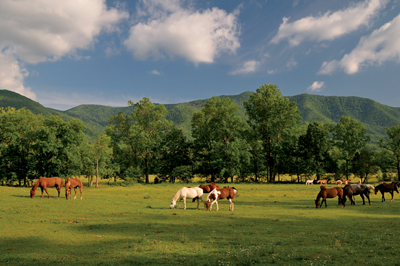
Figure 2.7: View with a wide-angle lens (short focal length). Horses in Cades Cove of Great Smoky Mountains National Park.
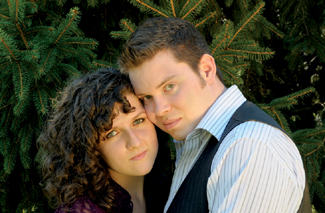
Figure 2.8: View with a normal lens (medium focal length). Emily and Gabe, a young married couple.
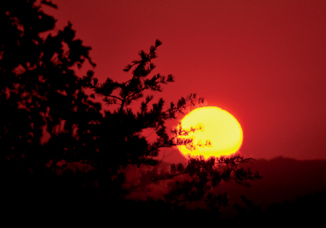
Figure 2.9: View with a telephoto lens (long focal length). Sunset on Foothills Parkway West in Great Smoky Mountains National Park.
The simplest way to describe focal length is to say, in general terms, it is the length of the lens in millimeters (mm). Physically longer lenses often have longer focal lengths, and shorter lenses often have shorter focal lengths. Figure 2.10 shows a short focal length lens (50 mm) and a long focal length lens (200 mm).
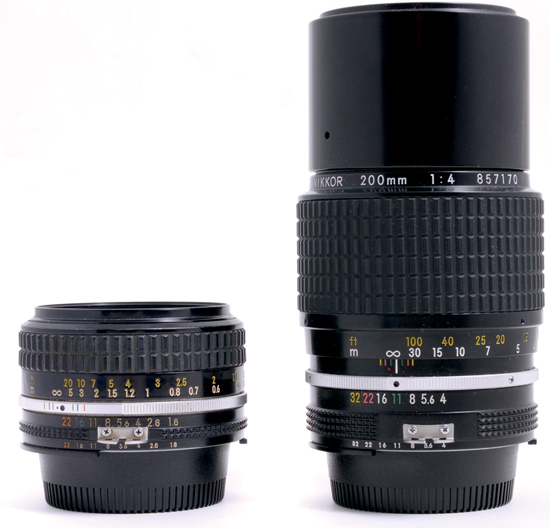
Figure 2.10: Short (50 mm) and long (200 mm) focal length lenses
However, defining focal length in this way is a little misleading because today’s lenses, made with computer-assisted design techniques, can manipulate (bend) light in ways that older lenses simply could not. A telephoto lens from today is often significantly shorter and lighter than a telephoto lens from years ago.
Focal length does not really mean the actual physical length of the lens, although that is the way most photographers think about it. Technically speaking, focal length simply means the distance from the nodal point—often in the middle of the lens—to the imaging sensor surface (point of focus). If the distance from the nodal point to the imaging sensor is 50 millimeters, you have a 50 mm lens; if the distance is 200 millimeters, the lens is a 200 mm lens (figure 2.10). But don’t worry about it! That is as technical as we need to get. You do not have to worry about nodal points and distances to imaging sensors. All you have to do is learn to recognize how a certain focal length lens (or zoom setting) performs on your camera. If you want to know more about nodal points, there are plenty of articles on the web. Here is an article that is useful, although it is quite technical: http://en.wikipedia.org/wiki/Cardinal_point_(optics).
Examine figures 2.12 through 2.19. Each picture is from the indicated focal length setting on three of my zoom lenses mounted on a camera with an APS-C imaging sensor (see chapter 1 to review sensor sizes).
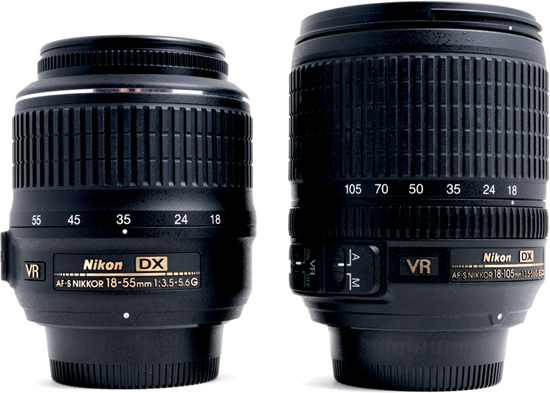
Figure 2.11: Focal length numbers on a lens
When you examine a zoom lens, you can see that the available focal lengths are indicated by numbers on the lens body (figure 2.11). Most zoom lenses included with a new camera body have a range of focal lengths, usually 18–55 mm.
I used a 10–20 mm zoom lens, a 16–85 mm zoom lens, and an 80–400 mm zoom lens to make the series of pictures in figures 2.12 to 2.19. Each of those zoom lenses has a nice range of focal lengths (and angles of view). Zoom lenses are very convenient compared to lenses with only one focal length (called a prime lens). We will discuss zoom lenses versus prime lenses in an upcoming section.
Figure 2.12: 10 mm focal length (extreme wide angle of view)

Figure 2.13: 20 mm focal length (wide angle of view)

Figure 2.14: 35 mm focal length (slightly wide angle to normal angle of view)

Figure 2.15: 50 mm focal length (normal to short telephoto angle of view)

Figure 2.16: 85 mm focal length (short telephoto angle of view)

Figure 2.17: 100 mm focal length (short telephoto angle of view)

Figure 2.18: 200 mm focal length (medium telephoto angle of view)

Figure 2.19: 400 mm focal length (long telephoto angle of view)
In the series of pictures, notice that the larger the focal length number (mm), the narrower the angle of view. Conversely, the smaller the focal length number, the wider the angle of view. A 10 mm lens is a wide-angle lens, and a 400 mm lens is a telephoto lens. The angle of view for each focal length varies according to which camera you are using. Let’s see why!
One important fact you must know about focal length is that the size of the imaging sensor affects the angle of view. For instance, a 35 mm focal length provides a normal angle of view on an APS-C sensor and a slightly wide angle of view on a full-frame imaging sensor (same size as a frame of 35mm film). You will have to read your camera manual to determine what is considered wide-angle, normal, and telephoto focal lengths for your camera. In general, the following focal lengths and associated angles of view are accurate for most lenses:
 6 to 12 mm is an extreme wide-angle lens
 16 to 25 mm is a wide-angle lens
 30 to 50 mm is a normal lens
 60 to 150 mm is a short telephoto lens
 200 to 1200 mm is a long telephoto lens
Notice that there are gaps in the list. That is because a particular focal length’s angle of view is hard to classify for different camera designs, and this list is generalized. Each imaging sensor size has a specific range of how it displays the angle of view at each focal length.
An easier way to remember this concept is as follows: the smaller the camera’s imaging sensor, the narrower the angle of view (less wide angle). With a smaller Micro Four Thirds sensor, a 50 mm lens is soundly in the short telephoto range. On a larger full-frame sensor, a 50mm lens is a normal lens. The smaller the imaging sensor, the harder it is to find an extreme wide-angle lens, but the easier it is to find a long telephoto lens.
Likewise, the smaller a camera’s sensor, the greater the telephoto effect (narrower angle of view, or greater magnification) will be at a particular focal length. A 200 mm lens is a long telephoto on a small Micro Four Thirds sensor, but it is a medium telephoto on a large full-frame sensor. The larger the imaging sensor, the easier it is to find an extreme wide-angle lens, but the harder (and more expensive) it is to find a long telephoto lens.
Telephoto lenses are usually much more expensive than wide-angle lenses, so for those who like to shoot wildlife pictures there are some benefits to having a smaller sensor. To get a similar field of view, a camera with a smaller sensor can use a shorter focal length than a camera with a full-frame sensor. For instance, an APS-C sensor with a 400 mm lens has a similar angle of view as a full-frame sensor with a 600 mm lens. A 400 mm lens costs a lot less than a 600 mm lens!
You will have to determine what range of focal lengths work best and are available for your camera. That is why it is so important to buy a camera with a nice system of lenses and accessories, as we discussed in chapter 1. Camera manufacturers usually offer wide-angle, normal, and telephoto lenses for their camera bodies. It is your job to determine which lenses you will need and what angles of view you want to cover. Most photographers end up with at least four lenses: a basic kit of three zoom lenses—like the three I used to take the sample focal length pictures—covering a wide range of focal lengths, and a macro lens for extreme closeups. We will discuss macro (closeup) lenses and a three-lens kit in later sections of this chapter.
The pictures from my camera’s APS-C sensor in figures 2.12 to 2.19 will match your camera only if your camera has an APS-C imaging sensor (which many do). If your camera has a smaller sensor, the wide-angle images shown will not be quite as wide, and the telephoto images will pull in even closer. On the other hand, if your camera has a full-frame sensor, the wide-angle focal lengths will capture even more of the image (a wider angle of view), but the telephoto images will not be as close (less magnification, since the angle of view is somewhat wider).
In Summary: Focal length and angle of view work together to let you capture different views of your subject. You can use wide angle for a big sweeping view, or you can zoom in to telephoto for a narrow, up-close view. The size of the imaging sensor in your camera modifies what the angle of view for each focal length looks like compared to cameras with different sized sensors. The best way you can learn about focal lengths and angles of view for your camera is by experimenting. The assignment above will encourage you to experiment with your current lens or lenses and see what range you can capture. Try it and you will learn a lot!
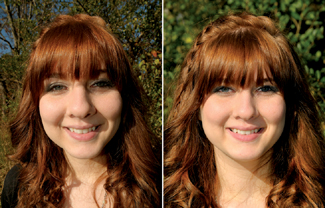
Figure 2.20: A portrait taken with a 10 mm wide-angle lens (up close) compared to a lens set to 85 mm
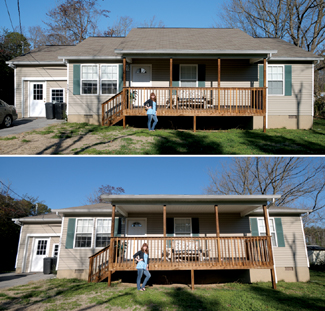
Figure 2.21: Wide-angle lens with straight-on image and tilted image (falling-over effect)
Let’s discuss some gotchas when using wide-angle lenses. If you want to keep your friends and family happy, under no circumstances should you take an up-close portrait of anyone with a wide-angle lens. Look at the pictures of my daughter taken with a 10 mm lens up close in figure 2.20 and the same approximate angle of view with an 85 mm lens. Which do you think looks better (and I don’t mean funnier)?
It can be great fun to use extreme wide-angle lenses because of the way they tend to distort the perspective of an image. In fact, wide-angle lenses are known for a concept called perspective distortion. They can bend straight lines and distort images in a strange way. Look at the images in figure 2.21.
Another problem that can be caused by shooting scenes with a wide-angle lens is called the falling-over effect. When you tilt a camera up with a wide-angle lens, the bottom of the lens is closer to the subject than the top of the lens, so the bottom of the subject is magnified and the top recedes. In addition, the edges tend to bend inward or outward. It is much harder to keep lines straight when using a wide angle lens. Do your best to keep the lens square with the subject to avoid perspective distortion.
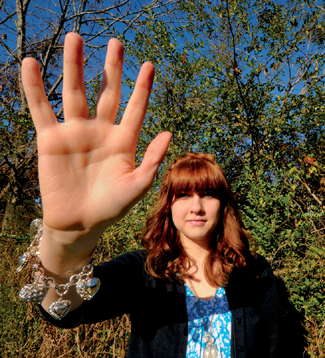
Figure 2.22: Is this person’s hand really that big?
As shown in figure 2.22, objects that are closer to the lens will look much larger than objects that are farther away, especially on superwide lenses (6 to 12 mm). Wide-angle lenses are excellent for capturing things that narrower-angle lenses cannot even see, so compose your images carefully.
To successfully create a portrait that does not distort the face of your subject, it is important to understand that a longer than normal focal length should be used. Even a normal focal length, such as 35–50 mm, may have too much wide-angle effect to use up close.
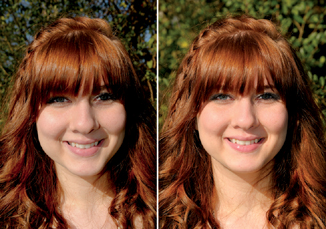
Figure 2.23: Similar portraits taken at 35 mm and 85 mm
Look at the two shots I took with my zoom lens set at 35 mm and 85 mm. Even though I used a similar view for both focal lengths, you can see that the 35 mm view emphasizes the nose of the subject in an unflattering way because her nose is closer to the lens than the rest of her face.
For a big group shot, a wide-angle lens is great, as long as you do not get too close to the group. If you get too close, the people in front will look like giants, and those in back will look pint-sized.
Figure 2.24: Perspective compression with a telephoto lens
Shooting with a telephoto lens lets you pull distant subjects in close. If you do not yet have a telephoto lens, you will have to use the good old-fashioned sneaker zoom, where you run closer to the subject (in your sneakers) to make it larger in your picture. A telephoto lens is a great addition to your lens arsenal and is one of the choices in the proverbial three-lens kit we will discuss shortly. Most photographers have a kit lens with a reasonably wide angle of view. Therefore, the first lens most people want to buy is a telephoto to pull in distant subjects. A telephoto zoom lens with a maximum focal length of 200 mm or 300 mm is a great investment and is not too costly. We will talk more about how to choose one in an upcoming section.
For now, let’s discuss an interesting thing that a telephoto lens does called perspective compression (figure 2.24). Whenever you shoot a picture that has several objects in front of and behind your subject, and you use a telephoto lens, the distance between each object seems much smaller than if you looked at the same scene with your eyes. The telephoto lens seems to pull everything closer together. This is perspective compression. You can use this look creatively when you have a subject that works well with the effect.
To really see perspective compression, you will need to use a lens of at least 200 mm. Fortunately, a 55–200 mm telephoto is a reasonably priced lens (if any lens can be considered reasonably priced). I’m sure that if you don’t already have one, you will soon!
The aperture of a lens is an adjustable opening or hole controlled by blades in your lens. The aperture determines how much light gets into the camera, giving you the ability to control the exposure (light level) of the pictures you take. Figure 2.25 shows the front end of a lens with its aperture blades partially closed, forming a hole that light can pass through into the camera.
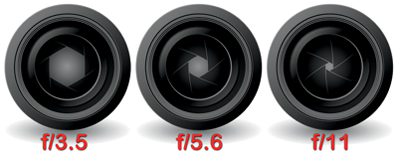
Figure 2.25: A lens aperture is an adjustable hole that controls how much light comes into the camera
In the next chapter, “Understanding Exposure Controls,” we will closely examine how aperture works, with lots of examples of what it does. We will discuss how the aperture, shutter speed, and ISO sensitivity controls work together in your camera to let you manage exactly how your pictures will look.
The most important thing to remember about lens aperture, for now, is that it controls how much light comes into the lens. Just as the diameter of a water hose controls how much water can flow through it (a garden hose passes less water than a firefighter’s hose), the diameter of the aperture controls how much light flows into the camera. A camera’s adjustable aperture size is labeled by a series of f-numbers that look like this: f/1.4, f/2, f/2.8, f/4, f/5.6, f/8, f/11, f/16, f/22. Each f-number describes the diameter of the hole formed by the aperture blades, in relation to the focal length of the lens. Other than remembering what an aperture number looks like, don’t worry about this for now; we will discuss this principle in exquisite detail in the next chapter. The aperture is part of a triad of controls that allow you to manage how much, and how long, light hits your camera’s imaging sensor.
A prime lens is like the biggest jewel in the king’s crown. It is an object of desire for many photographers. You will hear photographers talk about prime lenses in hushed, respectful tones and with reverence in their voices. OK, maybe I am overdoing it a little, but prime lenses are really cool. What is a prime lens?
Well, you know how your kit lens can zoom in and out, going wide angle one minute and telephoto the next? A prime lens cannot do that. It is a lens that does not have a range of focal lengths built in. Instead, a prime lens has only one focal length, such as 35 mm, 50 mm, or 85 mm. That does not sound very convenient, and it really isn’t. Prime lenses are not for convenience. That is why zoom lenses were invented!
A zoom lens allows you to select from a range of focal lengths and angles of view so you do not have to use sneaker zoom very often. Instead of walking to get closer to or farther away from your subject, a zoom lens lets you simply zoom in and out. A prime lens, on the other hand, has a single focal length, so you will have to use sneaker zoom to create the best image composition (where the subject appears in the picture). Why would anyone consider using a prime lens when it requires more work than a zoom lens? One word: quality!
In figure 2.26 you can see an arrow that points to the 50 mm setting on the zoom lens. You can also see how the zoom lens on the right has a range of focal lengths from 16 mm to 85 mm. The prime lens on the left has only one focal length, 50 mm.
Figure 2.26: A 50 mm f/1.4 prime lens and a 16–85 mm f/3.5–5.6 zoom lens
Since a prime lens has only one focal length, it can be optimized for that particular angle of view. The lens elements can be carefully designed to control light in a very precise way. Instead of the compromise of having multiple focal lengths in one lens and the resulting lower image quality at certain zoom settings, a prime lens can give you absolutely the best images your camera can make.
Prime lenses are usually faster (they have a bigger aperture) than zooms, which means you can shoot with them in lower ambient light levels, such as in dark shade, in an interior room, or at night. Additionally, prime lenses are usually designed to be smaller and lighter.
If you want to experiment with the higher quality a prime lens can provide, you could buy a new or used 50 mm f/1.8 lens. The cost is usually low for that particular lens, yet it is fast. When you read the next chapter and learn about controlling exposure, you will learn about depth of field, which is simply how much of the subject and its surroundings are in focus (the zone of sharp focus). Since the aperture of a lens controls depth of field, and a prime lens has a large maximum aperture, it will often give you greater choices for where you place the sharp focus in your picture.
I am not suggesting that you abandon your zoom lenses for general photography. However, you should acquire a prime lens or two in the next few months so you can see the best images your camera can make. With a prime lens, you can experiment with shallow depth of field, shooting in low light, and maximizing quality. Try one; you’ll be hooked like the rest of us!
Sometimes you want to get very close to your subject. Maybe you found a flower you like, or a bee taking pollen. Maybe you need to photograph some coins or stamps from your collection for insurance purposes. Any time you need to take a picture up close, you need a macro lens. A macro lens is especially designed for closeup pictures. Most genuine macro lenses are also prime lenses. On the surface, they don’t look much different than a regular prime lens, but the internal lens elements are designed to make life-size images.
A true macro lens (figure 2.27) has a 1:1 magnification ratio, which means it can take a picture of an object and render it in its actual size. A bee on a flower is the same size in the picture as in real life. Such a photo is hard to take with a zoom lens or a regular prime lens because those lenses will not focus close enough. Some zoom lenses are advertised as macro zoom lenses. They can focus closer than most zoom lenses, but they are not true macro lenses. Most macro zooms are limited to about half-life size, or a 1:2 magnification ratio, which means a bee on a flower would be only half its actual size in the picture. You just cannot get close enough with most zoom or regular prime lenses. For maximum closeups, only a true macro lens will do.
Figure 2.27: A 60 mm f/2.8 macro lens (Nikon calls their macro lenses “MICRO” which makes them sound different and special)
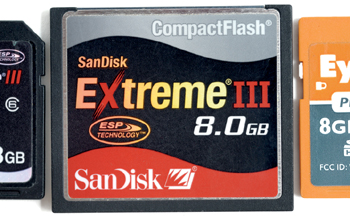
Figure 2.28: A picture from a 60 mm f/2.8 macro lens
Real macro lenses are more expensive than standard prime lenses because they are specialty prime lenses. They have special features to make pictures look their best, such as a flat-field design, which keeps the edges of the picture from curving in a distracting way. Macro lenses are highly corrected lenses, which means the lens elements are carefully designed to give maximum quality and minimum aberrations. They are optimized for closeup work. That does not mean you shouldn’t use a macro lens to take a picture of a more distant object; they do fine there, too. They are simply made to do their best work at a 1:1 magnification ratio for extreme closeups.
For maximum image quality, it is a good idea to use a real macro lens. However, there are substitutes that cost a lot less money. Let’s consider one low-cost way to get extreme closeup images without the expense of a macro lens.

Figure 2.29: A set of macro diopter filters for closeups on a budget
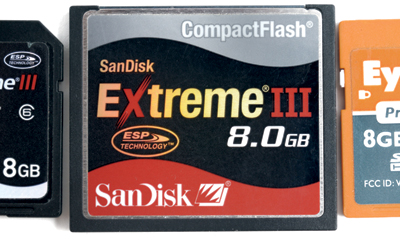
Figure 2.30: The same picture taken with a prime lens and a diopter filter (compared to figure 2.28)
The lowest-cost way to take closeup pictures is to use a closeup diopter filter on your lens. These filters cost only a few bucks online and do a reasonably good job of making extreme closeups. I bought a package of four filters with diopters (magnification factors) from +1 to +10 (figure 2.29).
A diopter filter simply screws onto the front of your prime lens (or zoom lens) and adds magnification to the lens. It is sort of the same principle as using a magnifying glass. There are various diopter powers in the filter set so you can increase or decrease the magnification. The main limitation of diopter closeup filters is a very limited amount of focus control and somewhat lower-quality images. They are not as convenient to use by any means, in comparison to a true macro lens. However, they do a pretty good job of taking extreme closeup pictures and are much lower in cost.
With a diopter filter on your lens, it cannot focus sharply on anything farther away than a few inches; therefore, the filter cannot be left on a lens for any purpose other than shooting the closeup. Although diopter filters can’t possibly give you the same quality from edge to edge as a true macro lens, they do provide photographers on a budget with a way to make interesting closeup pictures without spending a lot of money.
Note: There are threads on the front of most lenses for attaching filters, and the filters you buy must be the same size as the threads. Check the back of the lens cap for each lens; it usually lists the filter size for that lens (e.g., 52 mm, see figure 2.45). We’ll discuss this further in an upcoming section called, “Match the Filter Size to Your Lens.”
Why in the world would anyone consider a manual focus lens in today’s autofocus world? Good question! It is a bit like the question of why someone would choose to use prime lenses when zoom lenses are more convenient.
The reason many photographers use manual focus lenses at least some of the time is, again, maximum quality. Some focusing situations require very careful focus control, and the photographer may disable autofocus with a switch on the lens or the camera body, or from camera menu selections. Doing closeup or macro photography often works better with manual focus. The zone of sharp focus (depth of field) is so shallow in macro shooting that it is often better to focus the lens manually. We will discuss depth of field thoroughly in chapter 4, under the sub-heading called “Understanding Depth of Field.”
Additionally, there are certain lenses that do not have autofocus capability. I have a series of older prime lenses from the mid-1970s that I absolutely adore. They are not autofocus because they were made before that capability became a mainstream feature. However, the lenses are of such high quality construction that I cannot quit using them.
Some lens manufacturers—such as the German brand Zeiss—make extremely high-quality lenses for various camera brands. Many of these lenses have all-metal construction, are very precisely made, and have premium glass elements. They do not offer autofocus because the looser tolerances required for the operation of autofocus lenses can reduce lens accuracy. Photographers who are fanatical about their image quality often sacrifice convenience for the absolute best image possible. Money is no object for many who acquire these lenses. They can be very expensive!
As you progress in your photographic journey, you will be exposed to all the different things that make photographers happy. It can become an obsession. If you are satisfied (for now) with your current lenses, that is fine. However, just be aware that there are options, albeit expensive ones, for you to consider later. Lenses are a photographer’s tools, just like brushes are a painter’s tools. There are different brushes for different purposes and different lenses for different objectives. Photography has lots of room for creativity and personal expression.
Did you ever wonder why enthusiast photographers carry around camera bags when most people carry just their cameras? It’s because they have several lenses! It is unthinkable for an enthusiast to find him- or herself in a situation and not have a lens to cover it.
Most photographers end up with a three-lens kit for daily use. Why three lenses and not just one of the new superzoom lenses that covers the entire spectrum of focal lengths? Primarily, enthusiasts are interested in above-average quality for their images. There are times when convenience overrides quality, but not often!
Several lens manufacturers provide one-lens-does-it-all solutions. The lenses are very convenient and might even be a good choice if you are forced to use just one lens and camera body for a wide range of photography purposes, such as on vacation or on a hike where a lot of walking is required.
For instance, several camera manufacturers offer 18–200 mm f/3.5–5.6 zoom lenses. Some aftermarket lens manufacturers offer even wider coverage in one lens. However, no single lens can offer high quality at all focal lengths. There are compromises that must be made when too many focal lengths are crammed into one lens design. In fact, you will not find any truly professional lenses that have a wide range of focal lengths. Pro lenses are made for demanding photographers who will not put up with softness or aberrations at one or more zoom settings.
Although most enthusiasts are not professionals (yet), they seek higher quality and end up with three lenses that cover a very wide range of focal lengths. Figure 2.31 shows a typical enthusiast’s three-lens kit. The focal lengths range from extremely wide angle (10 mm) to long telephoto (400 mm), with a small amount of focal-length overlap between lenses. With this type of kit, a photographer is ready for almost any type of shooting situation, and since there are not too many focal lengths crammed into one lens, the quality of the image is maintained.
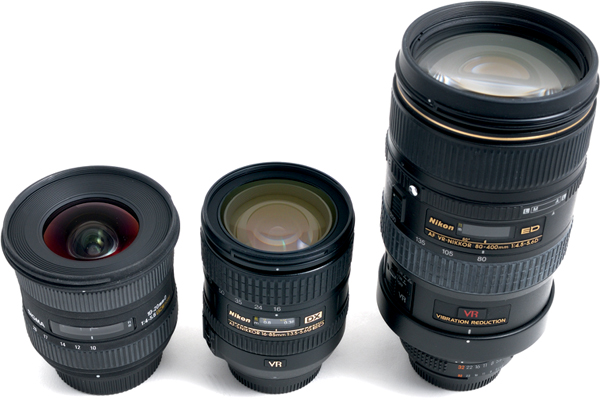
Figure 2.31: A 10–20 mm, 16–85 mm, and 80–400 mm three-lens kit

Figure 2.32: A medium-sized camera bag with a camera body, extra batteries and memory cards, a flash unit, and three lenses covering a large range of focal lengths, plus a macro lens
The three-lens kit shown in figure 2.23 can be carried in a medium-sized camera bag. It does not weigh too much and can easily be carried to any location. Many photographers use a small backpack-type camera bag, and others use an over-the-shoulder bag.
The reason you purchase a camera brand with a system concept is to have a variety of lenses and accessories to carry with you, such as extra batteries, memory cards, an external flash, and even a small GPS unit. If you are like most of us, you will be constantly seeking the ultimate camera bag to contain your camera system. If you find it, please let me know!
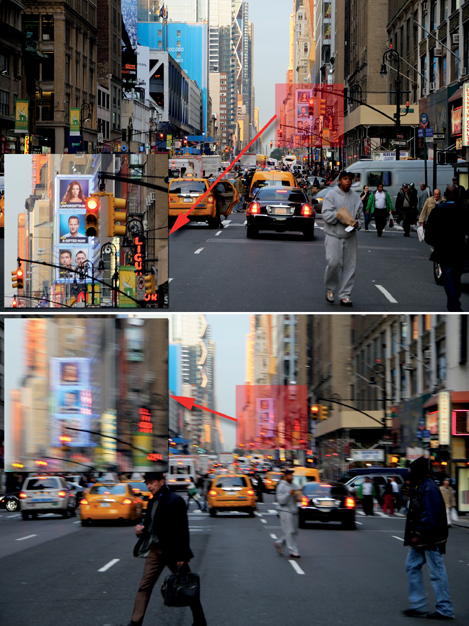
Figure 2.33: A picture taken with a slower shutter speed, with (top) and without (bottom) image stabilization
Image stabilization is when the lens or camera body tries to adjust for small movements when you are handholding your camera. No one can truly hold a camera still because of breathing, natural hand shakiness, environmental vibrations, and shutter-release vibrations. Image stabilization helps you capture sharper images when you are shooting without a tripod. Although a tripod is preferable for maximum image sharpness, a stabilized lens or camera body can help a lot. Sometimes it is not convenient or possible to use a tripod, yet you still must get the shot. Since most new lenses or camera bodies offer stabilization, why not take advantage of it?
What is the difference between image stabilization built into a lens and the type built into a camera body? Lens stabilization allows a lens element to move within the lens to counteract small vibrations. Camera body stabilization either physically moves the imaging sensor or uses software to compensate for vibrations. Image stabilization can allow you to have sharper images, especially when the picture is taken with a slower shutter speed (shutter speed is discussed in the next chapter). Figure 2.33 shows the difference between images taken with and without stabilization.
Refer to your camera manual to see whether your camera uses lens or sensor image stabilization. The following list of acronyms will help you determine if your lens or camera body is stabilized. If you see these acronyms on your lens or camera body (or in the documentation), it may well have image stabilization built in:
 Canon: OIS (Optical Image Stabilization) or IS (Image Stabilization)
 Nikon: VR (Vibration Reduction)
 Olympus: IS (Image Stabilization)
 Panasonic: Mega O.I.S. (Optical Image Stabilizer)
 Pentax: SR (Shake Reduction)
 Sigma: OS (Optical Stabilization)
 Sony: SSS (Super Steady Shot)
 Tamron: VC (Vibration Compensation)
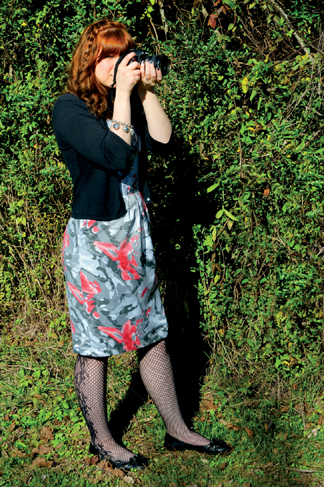
Figure 2.34: Young lady practicing good camera holding technique for maximum sharpness
In any case, you should learn to hold your camera correctly so that camera shake is less of a problem. How? As shown in figure 2.34, you must stand with your legs a few inches apart, one foot in front of the other, and keep your elbows pressed into your chest as you squeeze the shutter-release button carefully.
Most new lenses have a type of autofocus motor that uses ultrasonic sound waves to move the lens elements and focus the lens. The following acronyms are used by various manufacturers to indicate their newest type of autofocus; if your lens brand is not listed, check your lens documentation:
 Canon: USM (Ultra Sonic Motor)
 Nikon: SWM (Silent Wave Motor, also known as AF-S)
 Olympus: SWD (Supersonic Wave Drive)
 Panasonic: XSM (Extra Silent Motor)
 Pentax: SDM (Silent Drive Motor)
 Tamron: USD (Ultrasonic Silent Drive)
 Sigma: HSM (Hyper-Sonic Motor)
 Sony: SSM (Super Sonic Wave Motor)
Older lenses may not have the almost-silent ultrasonic focusing system, so you will hear a whine as the lens focuses. Ultrasonic focus is fast and relatively silent. Buying lenses with that type of focusing is better, not only because of speed and accuracy, but also because of the reduced noise during autofocus. If you are shooting pictures where you must be quiet, such as at a wedding or while hiding from wild-life, you certainly want the quietest lenses you can own. Use ultrasonic when possible!
All lenses have imperfections in how they transmit light. Correcting for one problem in lens design often creates a different problem. Lens reviews in magazines and on the Internet often use all sorts of charts and graphs to illustrate good and bad lenses. Often those charts and graphs mean little to people who use the lenses, but they do look official and make a review seem more important.
You and I, though, are probably more interested in how a lens performs in real life. As you will find, that is the best way to rate a lens. I am not overly impressed with a lot of charts and graphs, but I do like to see plenty of pictures from a lens I am interested in purchasing. I remember a particular lens that I wanted some time ago. I read some reports on the Internet. They had charts and graphs and said the lens does not perform well on shooting line-resolution charts mounted on a wall. Since I am not in the habit of shooting line charts against walls—and I read good real-life reviews from bloggers and on forums—I bought the lens anyway, and it is now one of my favorite lenses.
Do not be overly influenced with what some reviewers have to say about a lens. Often they are simply trying to outdo other reviewers and get more traffic to their websites. One way to get a lot of website traffic is to talk negatively. I don’t know why people are attracted to negative talk, but it seems to be true. If you are interested in a lens, you will learn a lot more from people who are actually using the lens in real life. Talk to people on forums and read reviews that have plenty of pictures taken with the lens. You could even rent a lens for a week from a rental agency and try it before you buy it. Surprisingly, it doesn’t cost much to rent lenses.
Today’s lenses, made with computer-aided design, are some of the best lenses in the history of photography. Digital cameras are rather unforgiving of lens imperfections; therefore, a truly poor lens will earn a terrible reputation rather quickly. There are not that many bad lenses. Some are better than others, but today’s low-cost lenses are often better than premium lenses of yesteryear—due to improved design and lens coatings that reduce light problems. Buy lenses from major manufacturers and you should do well. Even low-cost lenses from major lens companies make wonderful images.
If you regularly shoot JPEG images, the lens concerns we will discuss next can be more of an issue for you than if you shoot RAW images because it means you will have to adjust your JPEG images, which can reduce their quality because of extra compression (JPEG images throw away data every time they are modified and saved). We will discuss RAW versus JPEG images in chapter 6, “Understanding Image Formats.”
Let’s discuss some lens issues that you will need to know about when you consider a new lens.
Lens flare is sort of like the glare you see on your car windshield when it is hit directly by the sun. It lowers the contrast of what you can see clearly. When strong light hits the front element of your camera lens, it can cause reflections inside the lens that can lower the contrast and quality of the picture. Reflections between lens elements, reflections from internal parts of the lens, and even reflections from the front of the image sensor can cause flare.
Most new lenses come with a twist-on lens hood. Use it when shooting in direct sunlight! When possible, keep direct sunlight off the front of your lens. Many professional photographers wear a nice floppy hat so they can use it to shield the front of the lens from flare. They direct the shadow of the hat onto the front of the lens while taking the picture, and of course they keep the hat itself out of the picture. This only works well when shooting from a tripod, so use your tripod when shooting in very bright light. You can also reduce lens flare by using different shooting angles that minimize the flaring effect.
Figure 2.35 shows an example of lens flare. The two red spots are reflections of the bright sun from a lens element, and the shape of the flare spots are influenced by the aperture opening.
Some lenses have a greater tendency to cause lens flare. In your pictures it can look like a lower-contrast area (such as the foggy look in figure 2.36) or even little blobs or circles of rainbow-colored light in various places in the image. Even the highest-quality lens designs (expensive lenses) can suffer lens flare problems. The best way to find out if the lens has problems with flare is to look for pictures taken with that lens in which the sun is directly in the frame. Most good hands-on reviews will discuss lens flare.
Higher-quality lenses have special coatings that reduce lens flare. However, my experience with lens flare is that some lenses seem to be more prone to flare than others, regardless of cost. You will learn which of your lenses are more prone to flare than others as you gain experience with your camera system.
Light falloff, or optical vignetting, is a problem with nearly all lenses. It is worse in some lenses than in others. Fortunately, light falloff can be corrected with computer software rather easily, so it is not usually of great concern.
When a lens is used with its largest aperture (largest hole), light has to travel a little farther from the edges of the lens than from the middle of the lens to reach the rear lens elements. This can cause the rear lens elements to be shaded by the front lens elements, so the light is less bright at the corners of the picture (figure 2.37). We will discuss aperture settings in detail in the next chapter.
Most lenses do not have light falloff when the aperture is set to a smaller opening. Since it is relatively easy to correct for light falloff in your computer, usually with the included camera software, it is not of great concern to most photographers. I certainly would buy an otherwise high-quality lens that has minor light falloff at wide-open apertures.
The imaging sensor size affects light falloff. On cameras with full-frame sensors, light falloff can be worse than with smaller imaging sensors. Incoming light hits the edges of the larger sensor’s pixels at an angle, dimming the light slightly. Again, though, it is not a serious problem because it is easily corrected after the fact.
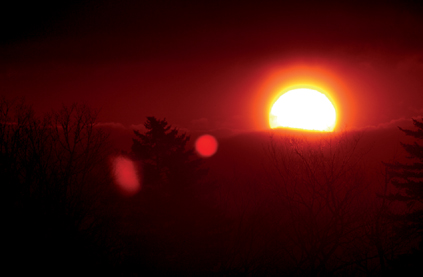
Figure 2.35: Example of lens flare
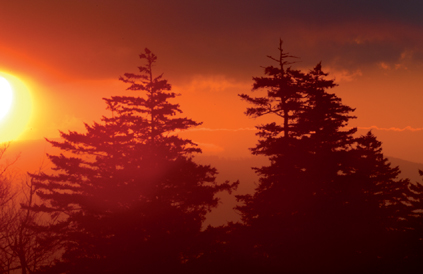
Figure 2.36: Example of contrast reduction lens flare caused by light bouncing around inside the lens and even reflecting back from the imaging sensor surface
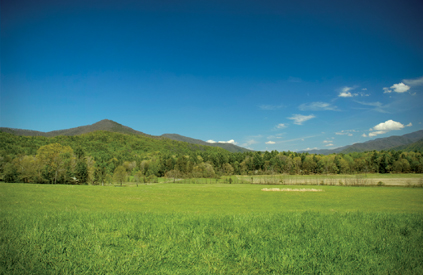
Figure 2.37: Example of light falloff
There are several types of distortion that can affect lenses and pictures. The most important of these are the following:
 Softness at the edges of the image
 Color fringing on the edges, also called chromatic aberration
 Barrel and pincushion distortion
Let’s discuss each of these issues so you can check your current lenses and analyze reviews for future lens purchases.
Edge softness is usually seen only when a lens is used at its wide-open aperture. The image appears a little less sharp at the edges than at the center of the picture (figure 2.38). This sort of distortion is present in nearly all lenses, to some degree. Lenses that are more expensive have corrections in place for edge softness, so you won’t see it as clearly. Some very expensive lenses are designed to perform well at wide-open apertures; therefore, this issue can often be corrected by spending more money. When you read lens reviews, look for information on edge softness in wide-open shooting.
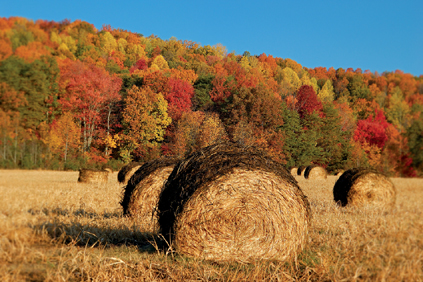
Figure 2.38: Example of edge softness
All lenses have a sweet spot where they provide the maximum sharpness they can deliver. The sweet spot is usually at a middle aperture setting (around f/5.6 to f/8). We will discuss aperture settings in detail in the next chapter. For now, though, just be aware that if you shoot often in low light and must use a large aperture to let in a lot of light, your images may be less sharp, especially at the edges.
You can use sharpening in-camera and later in your computer to help overcome this effect, but it is not as acceptable as getting a sharp image in the first place. To prevent less-sharp images you will need to use smaller apertures or invest in lenses that are designed to shoot at wide-open apertures.
You’ve seen how a prism can break up a beam of sunlight into different wavelengths and create a rainbow. When you take a picture with hard edges, where the light transitions from bright to dark, your lens may exhibit chromatic aberration or color fringing, where the light-to-dark contrast occurs. For instance, if you are shooting backlit tree limbs, it is common to see some fringed outlines, usually reddish-purple or cyan, especially in the corners of the image. Less commonly, there could even be blue and yellow fringing.
Color fringing is caused by the lens refracting (bending) different wavelengths of light at different angles and failing to focus all the wavelengths in the same place. This is a lens problem called dispersion. Using low-dispersion lenses can remedy color fringing to a large degree, but there could still be color fringing at some wide-open apertures.
Figure 2.39 shows a classic example of chromatic aberration. While this is an extreme enlargement, it clearly shows cyan and purple fringing at the points of the blue arrows, with cyan on the left and purple on the right edges of the tower. This problem is sometimes not easily noticed by inexperienced photographers. The best way to see if your lens has the problem is to shoot backlit bare tree branches and then enlarge the image to 100 percent on your computer. Check the edges of the tree limbs and see if you detect cyan or purple (or blue/yellow) fringing. Chromatic aberration usually shows up where bright and dark areas meet in your pictures. Learn to see it!
This problem can be hard to correct and may not be completely removable from some images. Newer cameras often try to correct this problem automatically. Manufacturers know which lenses have chromatic aberration and include software in the camera to correct it.
Lens reviews usually consider color fringing carefully, and you should pay close attention. Color fringing lowers the overall sharpness of the image and distorts the color of dark-to-light edges in an ugly way. Low-cost lenses without aspherical, low dispersion, or apochromatic elements will suffer more with this problem. If you buy lenses with these special elements, your images won’t suffer as badly from this problem.
Of all the distortion issues, this is one of the most important to consider because it is so difficult to correct. Buy lenses with as little chromatic aberration as possible, and your images will be much better.
Imagine the way a barrel bulges outward in the middle, with a narrower top and bottom. When your lens exhibits barrel distortion, your subjects can bulge in the middle. Pincushion distortion is the opposite; the top and bottom are wider and the middle bows inward. You won’t see these effects in a terribly pronounced way in most cases, unless the lens is cheap and uncorrected.
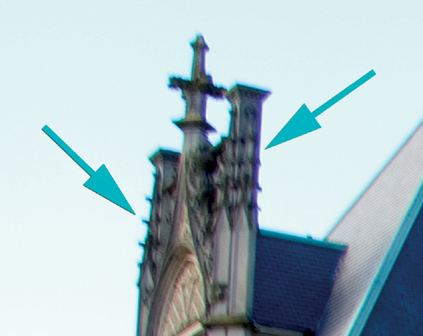
Figure 2.39: Example of chromatic aberration (color fringing)

Figure 2.40: Examples of barrel and pincushion distortion
Zoom lenses generally have these two types of distortion in varying degrees and at different zoom settings. Most new lenses are well corrected and have very low distortion, so it is not a big issue. Some lenses have a small amount of barrel distortion at wide-angle settings and pincushion distortion at telephoto settings.
For most photographers who shoot nature, portraits, sports, friends, and family, these aren’t overly important problems. However, for a photographer who shoots architectural images, or if there are many straight lines in an image, this can be an important issue.
Wide-angle zoom settings tend to have more issues than telephoto zoom settings. If you get close to flat or straight objects with a wide-angle lens you may notice that the image tends to bulge toward you in a weird way. On the other hand, you may experience the opposite effect with longer telephoto lens settings. Figure 2.40 clearly shows emphasized versions of barrel and pincushion distortion. If you take a picture and it looks like this, get rid of that lens (unless it is a super wide-angle or “fish-eye” lens, which can exhibit very strong distortion).
You’ll need to experiment with your lenses to see if anything looks objectionable. A good way to test for barrel or pincushion distortion is by putting your camera on a tripod and shooting pictures of things like door or window frames. If the edges curve out, that’s barrel distortion; curving in is pincushion distortion.
Again, read lens reviews before you buy a new lens and see if the distortion is severe at certain settings. Newer lenses are generally well corrected for these types of distortion.
Bokeh is open to interpretation and how a person feels about a picture’s out-of-focus elements in front of and behind the subject. Bokeh comes from the Japanese word boke, which means blur.
Good bokeh—the appearance of background blur—simply means that the blurred elements are smooth and attractive. Any points of out-of-focus light should be round and smooth without hard, bright edges or strange shapes. This is a difficult concept to describe and is best shown in pictures (figure 2.41).
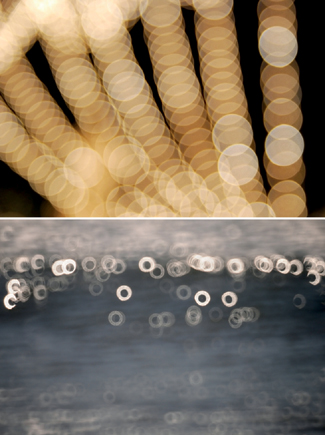
Figure 2.41: Figure 2.40 Examples of good (top) and bad (bottom) bokeh
Once again, this issue is subject to personal opinion. If you think the out-of-focus elements in your images look good, then that’s what matters. Don’t be overly concerned about it. However, your images may be criticized if the bokeh is bad. If you enter photo contests where experienced judges view your images, they will look for good bokeh.
Bokeh, especially of out-of-focus points of light, is affected by the number of aperture blades in the lens. Cheap lenses may have only five blades and form an aperture hole that is not round. The out-of-focus points of light will look like little white stop signs (polygons) with several flat sides.
If you buy lenses with at least seven to nine aperture blades, the aperture holes will be more round and form lovely circular out-of-focus points of light in the image. More aperture blades usually means more cost. Although it is hard to recognize at first, learn to see good bokeh. If an out-of-focus background (or foreground) looks busy or distracting, it probably has bad bokeh. If it looks smooth and appealing, it may have good bokeh. You will learn how to judge good and bad bokeh as your images get better and better.
Bokeh is often discussed in good lens reviews. Just by being aware of the issue, you will tend to pick up information on it and have a better understanding of what to look for. Watch the out-of-focus areas of your images and see if they look smooth. If not, find out why! Details like this will make your images look better. It’s worth the extra effort.
There are all sorts of filters available to screw into the filter threads on the front of your lenses. Filters modify the light that comes into the lens in various ways, including adding a color tint and removing reflections, and they protect the lens from scratches.
A digital camera is so much better than a film camera at modifying light that filters are not as important to photographers as they used to be. However, there are some strong exceptions! Let’s talk about a couple of filters that you should get right away.
Before we discuss filters, though, I want you to keep in mind an important fact. A filter that you screw into the front of your expensive lens becomes another lens element. If you use cheap superstore brand filters you will seriously degrade the quality of your images. You must buy the highest quality filters that you can afford. Multicoatings matter, and we will discuss them later in this chapter. Again, do not use cheap filters! Save up and get the best ones you can afford. Your images will reward you.
Now, let’s talk about a couple of filters that you should have in your camera bag right now.
An ultraviolet or UV filter is one that most photographers use regularly (figure 2.42). It may also be called a skylight filter.
The sales literature for UV or skylight filters say they help remove the scattered blue light you see in the distance when taking a landscape shot. That may be true, but the effect is so weak as to be of little importance. Why, then, do most photographers keep UV filters on their lenses? Mainly for lens protection!
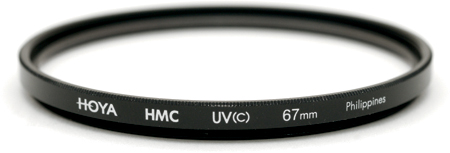
Figure 2.42: A UV filter protects the exposed front element of your expensive lens
If you accidentally drop a lens or bump it against a hard object, the big front lens element takes the abuse. Photographers would rather scratch or break a relatively inexpensive UV filter instead of the front element of their much more expensive lens. If a filter is not mounted on the lens and the front element gets damaged, sometimes the filter threads can be dented and filters can no longer be mounted. A UV filter prevents that damage, except in high-impact accidents.
Careless lens cleaning can scratch or damage the coatings on the front lens element. These coatings cut down on things like lens flare and provide extra clarity for your images. It is better to clean a fingerprint off a UV filter instead of the front element of the lens itself. Keeping a UV filter on your expensive lens can help prevent expensive lens damage.
If you buy no other filter for your lenses, you must own a polarizing filter (figure 2.43). This filter is also called a polarizer or PL filter. Polarizing filters come in two basic types: linear and circular.
Due to the way the autofocus system works on most digital cameras, it is important that you only use a circular polarizer. Some rings on filters may indicate something like “Cir. Polarizer” or PL-CIR. If it just says “Polarizer” on the lens, avoid it. You really need a circular polarizer and should be firm about getting only that type. Otherwise, if your camera’s autofocus system uses a beam splitter to focus, you may get focusing errors.
Some newer cameras may not use beam splitters for focusing and will work fine with both linear and circular polarizers; however, you should get a circular polarizer since the effect is the same with either type, and you won’t have to worry about if the filter will work on multiple cameras. As an enthusiast, you will eventually have multiple cameras. I feel very confident in making that statement.
What does a polarizer do? Its most important function is to remove reflections. Light is normally scattered in all directions. A polarizer lines up, or polarizes, the light so it vibrates in one direction. By removing some of the scattered light, the polarizer loses a portion of the brightness and cuts down on the amount of light that hits the imaging sensor. It makes the image darker when it polarizes the light because it throws away light that is not vibrating in the correct direction to pass through the filter.
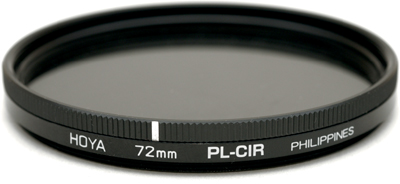
Figure 2.43: A circular polarizer, the most important filter for a landscape photographer
What good is polarized light if we suffer the penalty of less light getting to our camera’s imaging sensor? Simply this: polarized light, by not having strong reflections, tends to saturate colors in images. If you are taking a picture of a beautiful autumn scene with colorful leaves, a large percentage of the color saturation is lost to reflections.
If you are taking a picture of a beautiful stream, the light reflected back from the surface of the water is glare that can be removed with a polarizer—which darkens the water in a beautiful way (figure 2.44). Notice how the foliage has more color saturation in the polarized picture on the right. This is because the polarizer filter removes reflections from foliage too, raising contrast and deepening color in the entire image.
The interesting thing about a polarizer is how it is constructed. It is made in two parts, with a front and rear element. When you screw the polarizer into the front of your lens, you can rotate the polarizer’s outer element. This lets you select the angle of light you want to polarize so you can dial out reflections, deepening the saturation of colors and even darkening certain portions of the sky (at a 90-degree angle from sun) in an attractive way. If you point your index finger at the sun while extending your thumb (as if you were imitating a gun, with the other three fingers folded), the direction your thumb points is 90 degrees from the sun. If you rotate your arm so that your thumb rotates around your stationary index finger, your thumb will draw an arc that defines the area of the sky that can be darkened by a polarizer.
Screw a polarizer into a lens that is mounted on your camera, then go outside and look through the camera. Rotate the outside element of the polarizer and watch what happens to the colors. Look at a car that has reflections in its windows and watch how rotating the polarizer removes those reflections. It is a quite interesting filter that landscape photographers love to use. If you shoot anything outdoors that needs deeper color or fewer reflections, it’s important to have a polarizer.
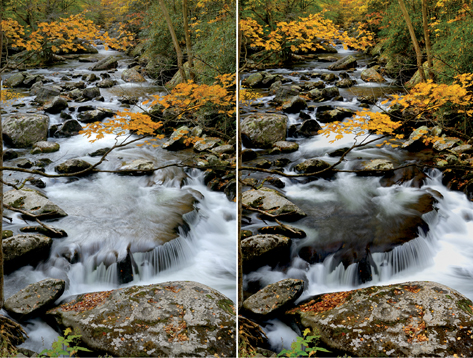
Figure 2.44: Examples of the polarizing effect (with and without polarization)
Each lens may have a different filter size. The filter size is usually engraved on the back of the lens cap for your lens, as shown in figure 2.45. If not, it may be indicated on the lens itself. If you can’t find the filter size in millimeters (mm), you’ll need to refer to the lens documentation.
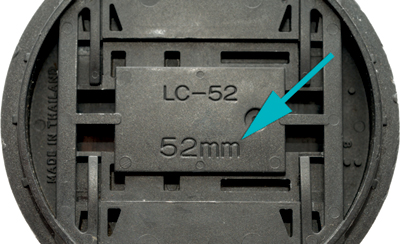
Figure 2.45: Filter size on the back of a lens cap
Often a series of lenses will use the same filter size, but you cannot be sure without checking. Many times, I’ve had to buy different filter sizes for several different lenses. One lens filter ring may be 52 mm, another may be 67 mm, and a third may be 72 mm. In that case, you’ll need UV and polarizer filters for each lens size.
One final piece of advice is that when you buy any type of filter, it should be multicoated. You can clearly see why in figure 2.46. See how the multicoated filter on the left passes much more light than the single-coated filter on the right? A single-coated filter reflects light, so the camera can’t use that light.
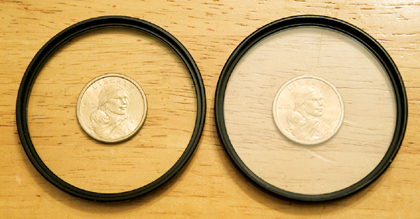
Figure 2.46: Use a multicoated filter (left) for maximum light transmission
I have experimented with filters for many years, and I have very strong opinions about particular brands. There are cheap brands and premium brands. My favorite brand is Hoya’s older HMC (Hoya Multi-Coated) or newer DMC (Digital Multi-Coated) professional filters. In fact, despite my previous advice, I might even leave a Hoya HMC or DMC filter on my camera while shooting my best work! Hoya also makes lower-cost filters that are not multicoated, as do many other companies. However, because a filter becomes another element of the lens, do you really want a cheaper filter? If you want maximum quality, you must buy multicoated filters.
We have looked at a lot of information about lenses. This chapter should give you the ability to begin understanding how to choose and use lenses that will give you good results. Lenses are the most important investments you will make in your photography. If I had to decide between a cheap lens and an expensive camera body, or an expensive lens and a cheap camera body, I would go for the expensive lens every time.
If you buy the right lenses, you can use them for many years, but camera bodies come and go as technology changes. Lenses are expensive, but a good lens is worth it in extra quality and longevity. A certain satisfaction results from owning excellent glass.
Other photographers will recognize your photographic maturity by looking into your camera bag. If they see the latest expensive camera body and cheap lenses, they will know they’ve looked into the camera bag of an amateur photographer. If, instead, they look in your bag and see a good camera body and premium glass, they will understand you are a mature photographer. If they see both premium lenses and the best camera body, they will know you are either independently wealthy or you are a professional who needs that level of equipment to make a living.
All of us want the last circumstance, the best of everything. However, unless you are wealthy enough to own the best, and few people are these days, choose premium lenses and you will do better as a photographer over time.
Now, let’s switch gears for a while. We’ve learned a lot about camera bodies, imaging sensors, filters, and lenses. Now let’s start learning how to use them in the best way. Let’s learn how a camera’s three exposure controls work.