Tarte Tatin
Tarte tatin is the famous upside-down, caramelized apple tart created many years ago by two sisters called the Demoiselles Tatin. It is an example of a dish that originated in the home kitchen, became a regional specialty, and eventually made its way into most of the great restaurants.
There are many variations on the original concoction. In my version, I cook the apples with the skins on to give a crustier, chewier texture. Dried currants (although regular dried raisins could be substituted), slivered almonds, and dried apricots help fill the holes between the large segments of apple and give taste as well as texture to the tart. Additional apples on top of the large apple segments make the dish thicker and create a flat surface for the pastry to sit on, which results in a nicer shape when unmolded.
The extra caramel added at the end can be omitted for a tarter dish. The tart should be served at room temperature or slightly warm.
Pate Brisee
1 cup (150 grams) all-purpose organic flour (about 5½ ounces)
¾ stick (6 tablespoons/85 grams) unsalted butter
⅛ teaspoon salt
½ teaspoon sugar
3 tablespoons ice cold water
Filling
¼ cup (56 grams) sugar
5 tablespoons (72 grams) unsalted butter
1 tablespoon fresh lemon juice
4 pounds (1.8 kilograms) Golden Delicious apples (about 10)
¼ cup (25 grams) slivered almonds
½ cup (75 grams) sliced dried apricots
⅓ cup (50 grams) dried currants
¾ cup (178 milliliters) water
2 tablespoons (28 grams) unsalted butter
To Glaze the Dough
2 teaspoons sugar
Caramel Glaze (optional)
3 tablespoons sugar
1 tablespoon water
1 teaspoon (5 grams) unsalted butter
Garnish
1 cup (237 milliliters) heavy cream
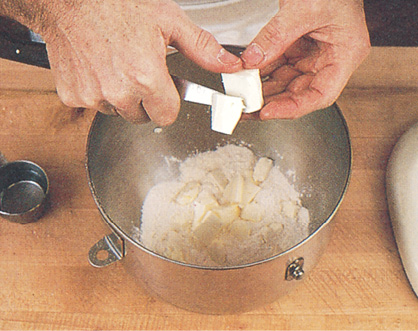
1. For the dough: Preheat the oven to 400 degrees (204°C). Although the dough can be made by hand, a mixer with the flat beater attachment does the job well and easily. In the summer, it is a good idea to keep the flour in the freezer and the butter refrigerated until ready to add since it is important in a pâte brisée to mix all the ingredients together quickly to keep the gluten from developing too much. The butter should remain visible in the dough—not blended into it. The butter will melt during the baking and develop some of the flakiness you find in a puff paste. Put the flour in the mixer bowl and cut the butter into ¼-inch (6-millimeter)-thick slivers, letting them fall into the flour.
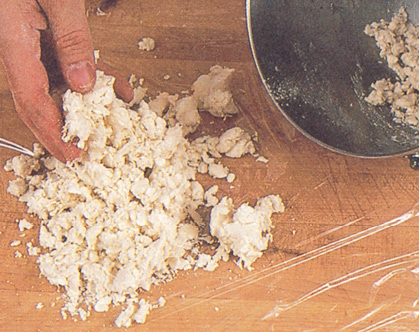
2. Add the salt and sugar and, using the flat beater, mix on low speed of an electric mixer for about 45 seconds. At that point, pieces of butter should still be visible in the dough. Add the cold water and mix on low speed for about 20 seconds, just until the mixture starts gathering together. Note the texture of the dough as you turn it out onto a large piece of plastic wrap.
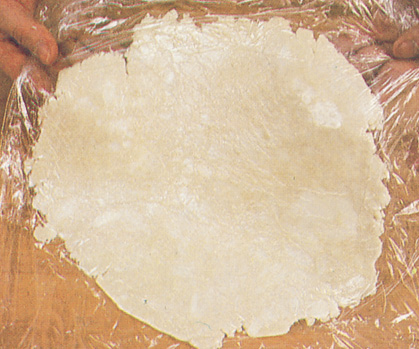
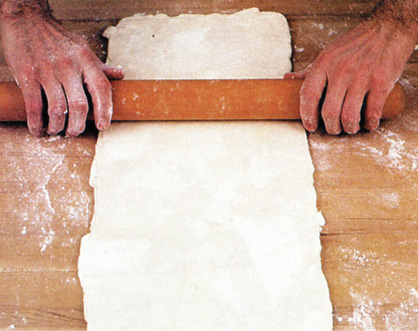
3. Cover the dough with another piece of wrap the same size. Roll the dough out between the plastic sheets. (If you were to roll it out on the table at this point, the softness of the butter would make it necessary to use a great amount of flour to prevent the butter from sticking, and this would tend to make the dough tough.) The pieces of butter are still visible in the dough through the plastic. Place in the refrigerator for 10 to 15 minutes while preparing the apples. The dough is only partially rolled out—it is still too thick to use.
4. Remove the cores from the apples at the stem end and at the opposite end, using your thumb as a pivot and rotating the tip of a sharp paring knife as you cut into the apple. Split the apples in half, and remove the cores from the centers with the same circular cutting motion. Then, cut again into quarters.
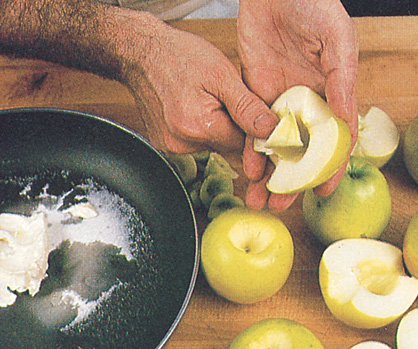
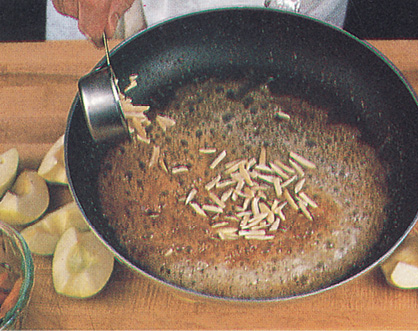
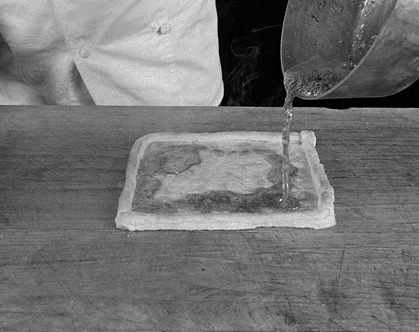
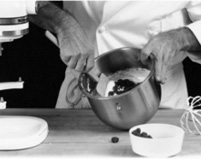
5. For the filling: Heat the sugar, butter, and lemon juice in a 12-inch (30-centimeter) skillet, and cook until it becomes caramel—3 to 4 minutes. Add the slivered almonds and cook for 10 to 15 seconds. Remove from the heat.
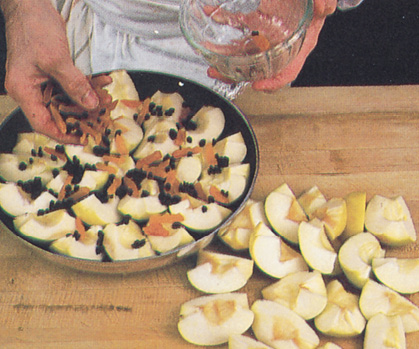
6. Arrange the apple quarters on top of the caramel, placing them skin-side down in one layer, making two concentric rows with a piece of apple in the center. You will use 6 to 7 of the apples, 20 to 25 pieces.

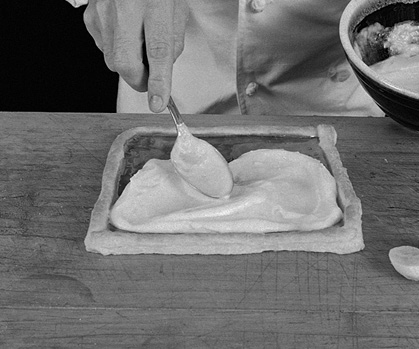
7. Sprinkle the apricots and currants on top. Slice the remainder of the apples thin and add to the skillet to fill it completely.
8. Add the water, bring the mixture to a boil, cover, and boil gently for 5 to 6 minutes. The object here is to soften the apples so they sink down and form a flat surface. Remove the lid and continue cooking on top of the stove over medium heat for about 7 to 8 minutes, until there is no visible liquid when you incline the pan slightly. This indicates that most of the moisture has been boiled away and what remains is the sugar and butter, which is beginning to caramelize.

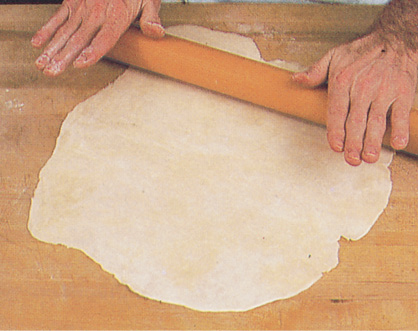
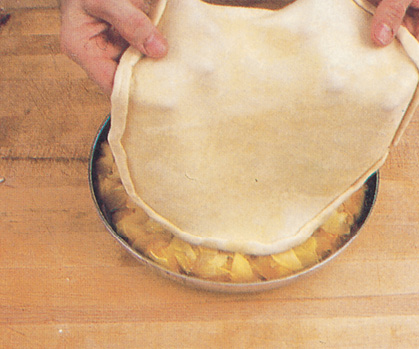
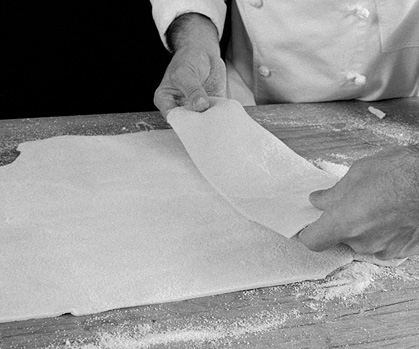
9. Remove the dough from the plastic wrap and place it on the board. Sprinkle with a little flour and roll very thin (no more than 1⁄8 inch/3 millimeters).
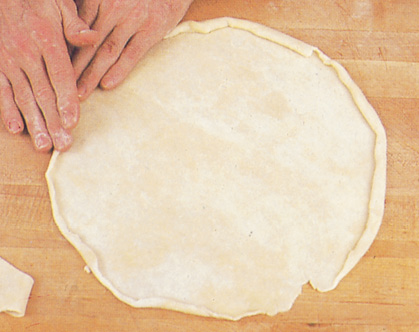
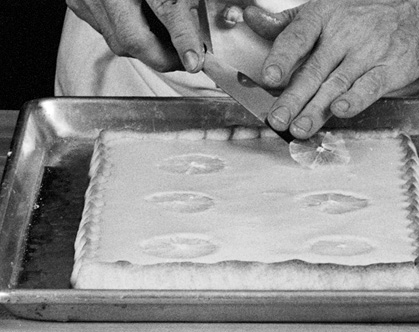
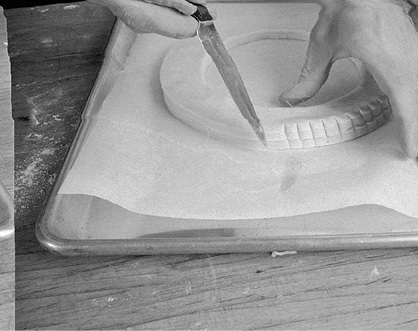
10. Trim the edge and fold it in on itself to form an edge that is a little thicker all around.
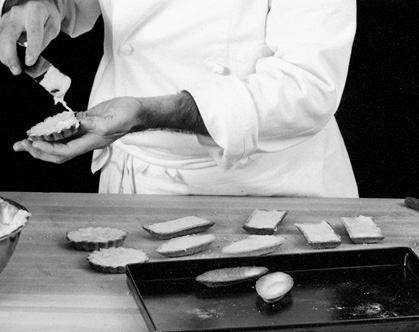
11. Dot the top of the tart with the butter, broken into pieces, and place the circle of dough on top. Press it down with your hand so it lies completely flat. Pierce with a fork all over and sprinkle with the sugar, which will caramelize on the dough during cooking.
12. If the handle of your skillet is plastic, wrap it with several layers of aluminum foil to protect it, and bake for 45 minutes. To see if the juices are caramelized, incline the pan. If any visible juices remain, place the skillet back on the heat for 3 to 4 minutes, until you see that the boiling juices have turned into caramel throughout and the top is a solid mass when the tart is moved.

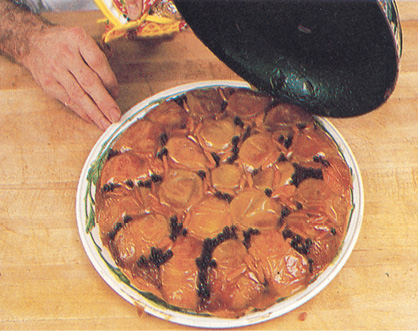
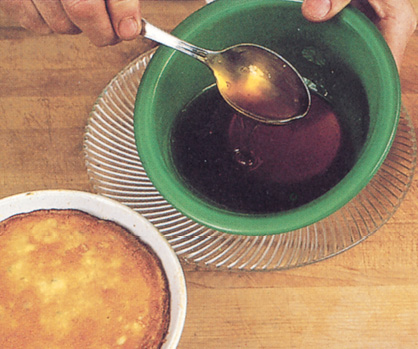
13. At serving time, heat the tart to make sure it is loose, and invert the apples onto a serving platter.
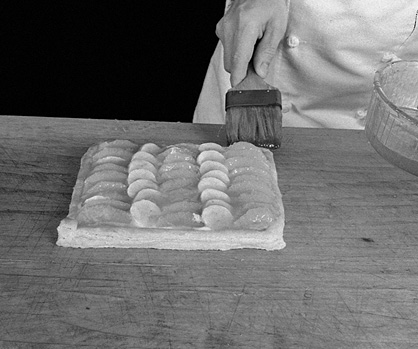
14. To make a caramel glaze (which is optional), heat the sugar, water, and butter in a skillet until the mixture turns a light caramel color. Immediately, using a brush or spoon, coat the surface of the apples. This coating of caramel will last for a few hours but will eventually melt down.

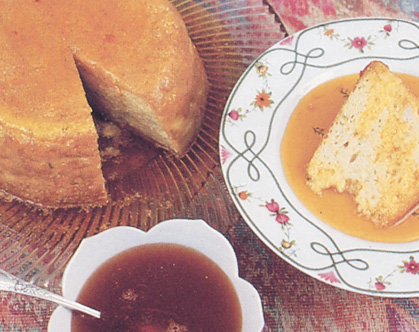
15. Beat the heavy cream until firm but not too stiff to use as a garnish. No sugar is needed since the apples are sweet. Cut the tart into wedges and serve immediately with a good tablespoon of whipped cream per serving.

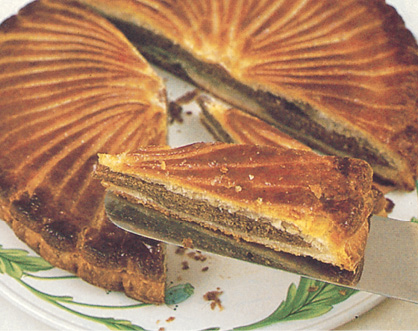
Galette of Rhubarb
(Galette de Rhubarbe)
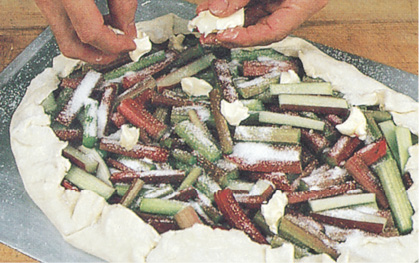
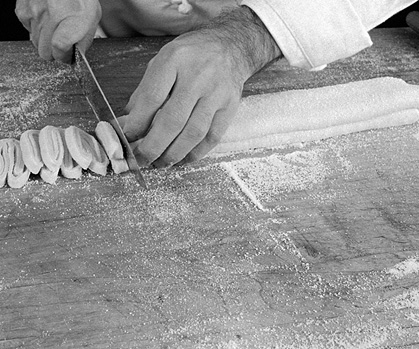
For this large country-style galette, the dough is rolled very thin, from 1/16 to 1/8 inch (1 to 3 millimeters). Any type of fruit can be placed in the center, then the edge of the dough is folded over the fruit, and the resulting galette is baked in a hot oven. For any fruits that tends to produce a lot of liquid when cooked—such as plums, rhubarb, grapes, and the like—spread a mixture of ground almonds, flour, and sugar on the dough before adding the fruit to absorb the liquid.
Processor Pate Brisee
1½ cups (180 grams) all-purpose organic flour
¼ teaspoon salt
1½ sticks (¾ cup/170 grams) cold unsalted butter, cut into pieces
⅓ cup ice cold water
Filling
2½ pounds (1.1 kilograms) rhubarb
⅓ cup (62 grams) sugar
3 tablespoons (42 grams) unsalted butter
Bottom Mixture
3 tablespoons ground almonds
3 tablespoons all-purpose organic flour
¼ cup (60 grams) sugar
Glaze
Mixture of ¾ cup (250 grams) apricot and raspberry or plum preserves, strained together
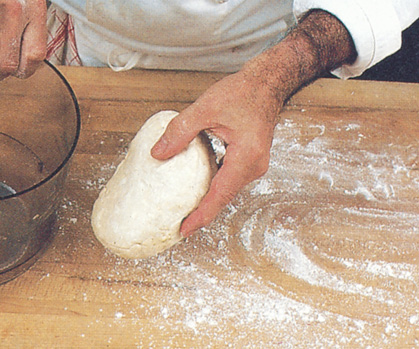
1. Preheat the oven to 400 degrees (204°C). To make the dough in a food processor, the butter should be very cold and cut into small pieces. Place the flour, salt, and butter in the food processor and process for about 5 seconds. The butter should still be in pieces. Add the cold water and process about 5 seconds more, just enough for the dough to start gathering together. The little pieces of butter should still be visible in the dough. Remove the dough from the processor and gather it into a ball. Refrigerate or use immediately.
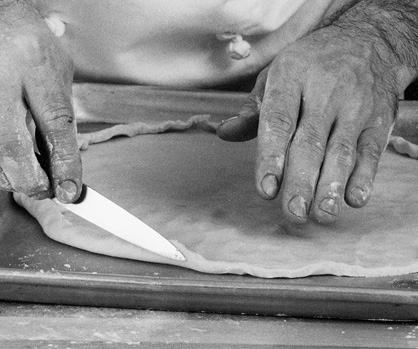
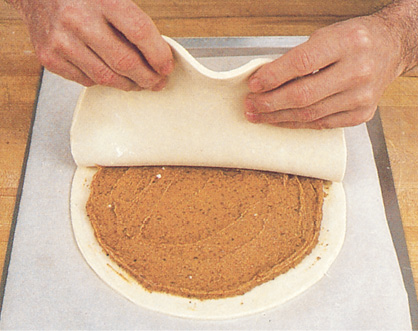
2. Roll the dough out into a large oval no more than 1⁄8 inch (3 millimeters) thick. It will be approximately 18 to 19 inches (46 to 48 centimeters) long by 16 inches (41 centimeters) wide. Tiny pieces of butter should still be visible in the dough at this point. Transfer the dough to a cookie sheet, rolling it up on the rolling pin and unrolling it onto the sheet, and refrigerate it while you prepare the bottom mixture and filling.

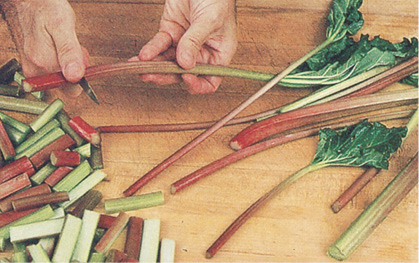
3. Cut the rhubarb into 2- to 2½-inch (5- to 6½-centimeter) pieces and, if the ribs are large, split them in half the long way. Discard the leaves.
4. Combine the ground almonds, flour, and sugar, and spread the mixture out on the dough to within approximately 2 inches (5 centimeters) of the edge.

5. Place the rhubarb pieces casually in the center of the dough. Fold the edges of the dough up over the fruit to create a border of about 2 inches (5 centimeters), and sprinkle with the sugar and butter. Some of the sugar should be sprinkled on the border of the dough.
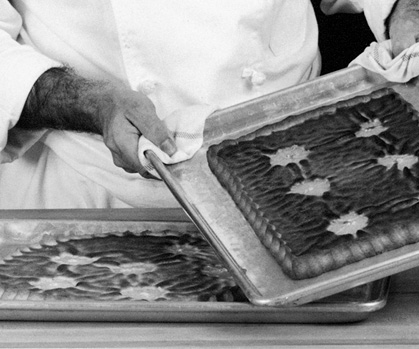
6. Bake the galette for 1 hour. The dough should be very crunchy, well-cooked, and brown, and the fruit in the center very soft. If any of the juices have leaked through the dough onto the tray, be sure to slide a knife underneath and move the pie slightly while it is still hot because the juices will harden and the pie will stick to the tray as it cools.
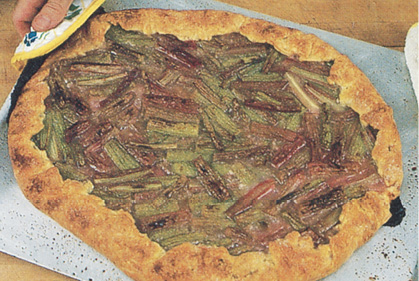
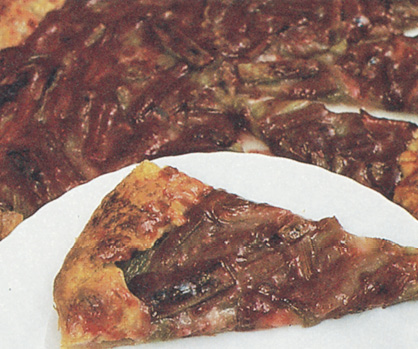
7. Spoon the glaze over the top of the galette and spread it with a spoon or brush. Spread some of the glaze on the dough border. Cut into wedges and serve at room temperature as is or with a little whipped cream.
Galette of Lemon
(Galette au Citron)
A galette is an open-faced tart, very thin and crunchy, usually made in a round shape and cut into large, pizza-type slices. Although it is usually a country dessert, it can become very elegant with the addition of a sauce. The lemon galette is made with a pâte sucrée (sweet dough) and the apple galette, with a pâte brisée (pie dough). It is a good dessert for a large party. It’s easy to make and serve, and keeps quite well for hours.
YIELD: 10 to 12 servings
PATE SUCREE
3 cups (450 grams) all-purpose organic flour
2½ sticks (1¼ cup/283 grams) unsalted butter, softened
½ cup (112 grams) granulated sugar
¼ teaspoon salt
1 large egg and 1 large egg yolk, beaten
To make the dough, combine the pâté sucrée ingredients in a bowl and work until it holds together. Place on the table. Crush or smear the mixture with the palm of your hand a few times until the mixture is well blended. Or place in a food processor and process until it gathers together. Divide into two pieces. Roll the first piece into a 14-inch (35.5-centimeter) round, about ¼ inch (6 millimeters) thick.
Lemon filling
10 large egg yolks
¾ cup (169 grams) granulated sugar
1 tablespoon, plus 1 teaspoon, cornstarch
Grated rind of 2 lemons (approximately 1 tablespoon)
Juice of 3 lemons (approximately ⅔ cup/158 milliliters)
1 lemon, peeled and cut into very thin slices
Sauce
3 large egg yolks
½ cup (50 grams) confectioners’ sugar
3 tablespoons Grand Marnier
2 cups (473 milliliters) sour cream
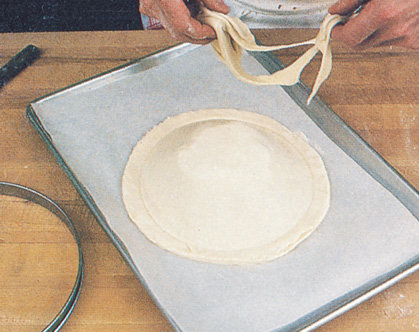
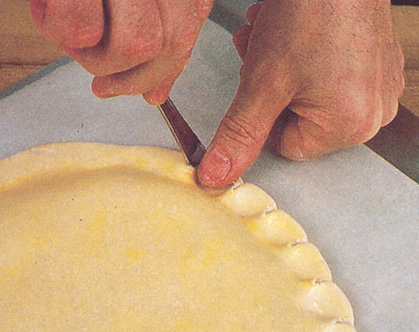
1. Preheat the oven to 400 degrees (204°C). Roll 1 piece of the dough on your rolling pin and unroll onto a cookie sheet. It is a delicate dough to roll as it tends to break. Remembering that the pâte sucrée cannot be rolled as thin as a pâte brisée or a puff paste or it will burn. Trim the edge of the dough and fold it back onto itself all around.
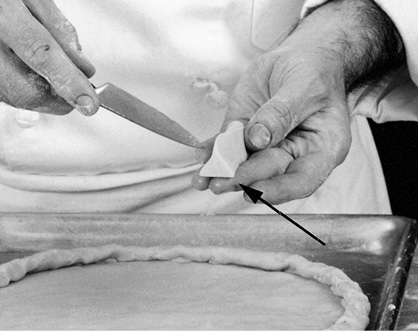
2. Fold the dough over once again to make a border approximately ½ inch (13 millimeters) high. Press the border with your fingers to bring it to a point on top. The base will be wide and the top pointed like a triangle (see arrow). This keeps the border from collapsing during cooking.
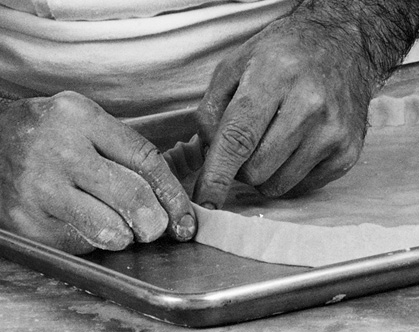
3. Use your fingers to pinch and press a decorative border all around.
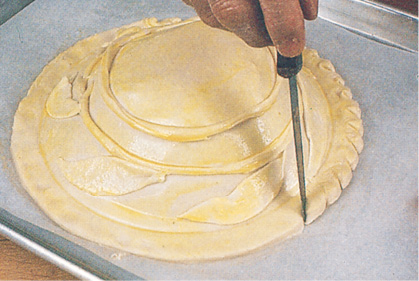
4. Roll the rest of the dough and trim it into a rectangular or square shape. Make the border.
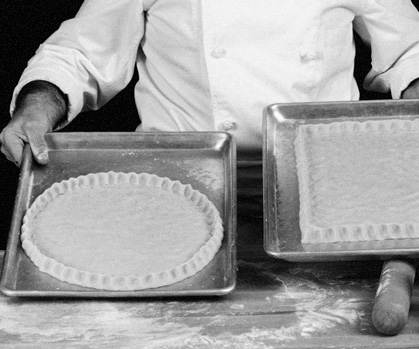
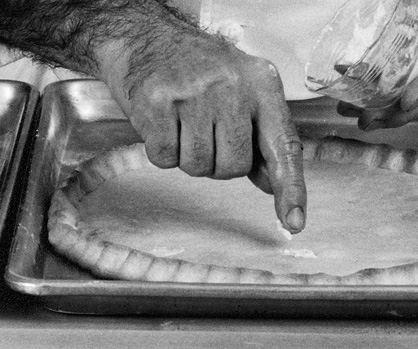
5. Bake both shells for 12 to 15 minutes to pre-cook lightly. They will be baked again later with their fillings. If there are any holes in the crust, patch with a bit of extra dough or water mixed with flour. The lemon galette batter is liquid and if there are any holes it will seep through during cooking.
6. Reduce the oven to 375 degrees (191°C). To prepare the lemon filling, mix the yolks and sugar together and whip with a whisk for 2 to 3 minutes, until it reaches the ribbon stage. Add the cornstarch and lemon rind, mix well, then add the lemon juice. Divide the mixture between the two pre-cooked shells.

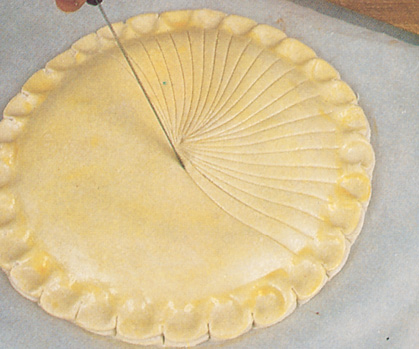
7. Arrange the slices of lemon on top and immediately place in the oven. The oven rack and the cookie sheet must be very flat or the batter will run on one side or spill over. Bake for 18 to 20 minutes.
8. As the dough cooks, the batter will pleat and pull around the slices of lemon and form a design by itself. Let cool and cut into wedges. For the sauce, mix the egg yolks and sugar together and work with a whisk for 1 to 2 minutes. Stir in the Grand Marnier and sour cream. Serve 2 tablespoons next to each slice.
Cream Puff Dough
(Pâte à Choux)
Along with pâte brisée, and feuilletage, pâte à choux is one of the mother doughs of French pastry making. It is used to make countless desserts such as éclairs and choux, gâteau St. Honoré and Paris-Brest, as well as such dishes as pommes dauphine and even quenelles. It is always made with what is called a panade—a combination of water, butter, and flour—to which eggs are added.
YIELD: Dough for 14 to 16 choux or éclairs
1 cup (237 milliliters) water
½ stick (4 tablespoons/57 grams) unsalted butter
¼ teaspoon salt
1 cup (150 grams) all-purpose organic flour
4 large eggs
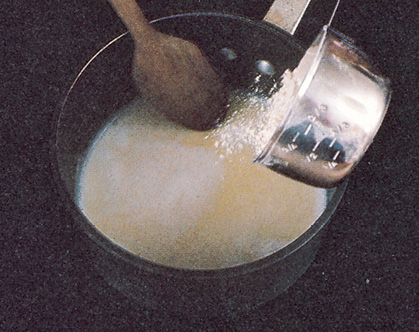
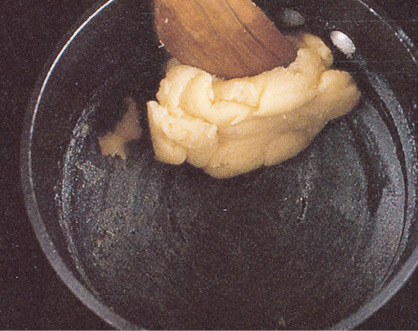
1. Combine the water, butter (cut into pieces), and salt in a heavy saucepan. Bring to a boil. When the butter is completely melted, remove from the heat and add the flour all at once.
2. Mix rapidly with a wooden spatula until the dough gathers together and begins to form a ball.
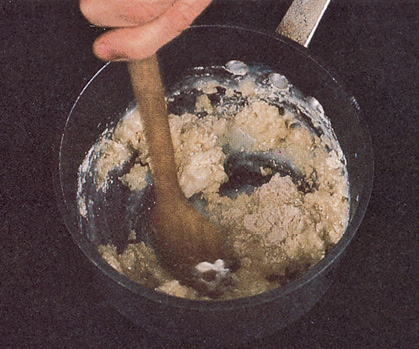
3. Place the mixture on top of a low flame and “dry” for 1 to 2 minutes, mixing with the wooden spatula. The dough should be soft and should not stick to your fingers when pinched. This mixture is called the panade.

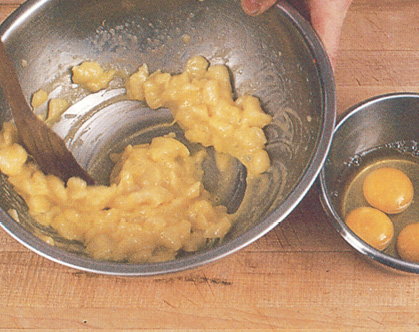
4. You will notice that the bottom of the pan is covered with a thin crust (an indication that the dough has been sufficiently dried). The eggs are mixed into the panade in the bowl because if they were added in the pan, the white crust at the bottom would break into dried little pieces that would stick in the dough.
5. Transfer the panade to a clean bowl. Let the dough cool for at least 5 minutes. Add the eggs one at a time, beating carefully after each addition so that the mixture is smooth before the next egg is added. As you add the eggs, it will seem as though they will not blend. Keep mixing; the dough will come together and smooth out. It can also be mixed in a food processor.
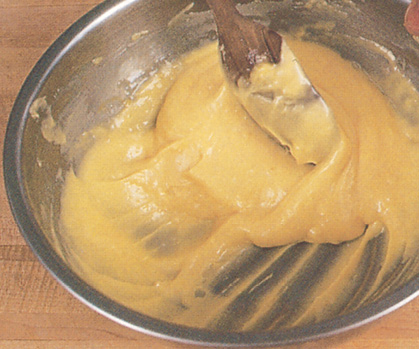
6. The dough should be smooth, shiny, and as thick and as heavy as mayonnaise. This makes enough dough for 14 to 16 choux or éclairs, which are described in the following technique.
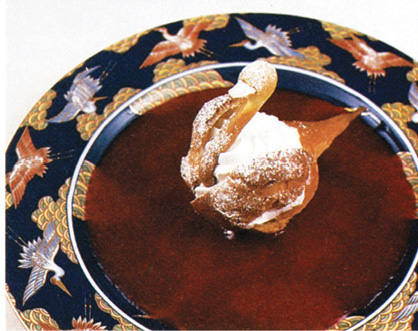
Cream Puffs
(Choux et Eclairs)
The only difference between a choux and an éclair is that the former is round and the latter is long. Both can be filled with flavored whipped cream, pastry cream, ice cream, jam, and the like. The smallest choux are known as profiteroles and are often filled with vanilla ice cream and served with a lukewarm chocolate sauce. (The ganache used for the icing in the gâteau au chocolat can be diluted with water and used as a chocolate sauce.)
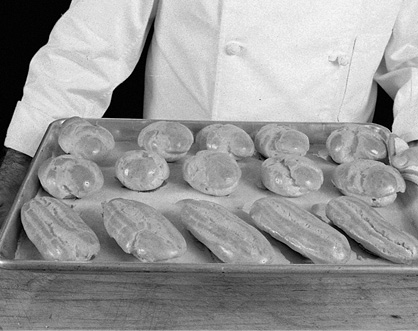
1. Preheat the oven to 375 degrees (191°C). Prepare the pâte à choux following the recipe in the preceding technique. Fill a pastry bag with the dough and coat a large cookie sheet with butter and flour. Squeeze out puffs about the size of small golf balls or elongated éclairs.

2. Brush the tops with an egg wash (l whole egg, with half of the white removed, beaten), pushing down the “tails.” The choux can also be formed by dropping spoonfuls of dough on the cookie sheet.

3. Drag the tines of a fork to make a design on top of the éclairs. Let the choux and éclairs dry for at least 20 minutes before cooking. (The egg wash gives a shiny glaze, providing it is allowed to dry for a while before baking.)

4. Bake for 35 minutes, or until well puffed and golden. Shut off the heat, open the oven door halfway (to get rid of any steam) and let the puffs cool slowly and dry for 30 minutes inside the oven. Pâte à choux will soften and collapse if cooled too fast. Cut into halves to fill or, if you want to, keep them whole.Using the tip of a knife, make a hole in the bottom of each choux. Fill a pastry bag with your filling of choice and insert the tube through the opening and squeeze the filling inside.
YIELD: 12 swans
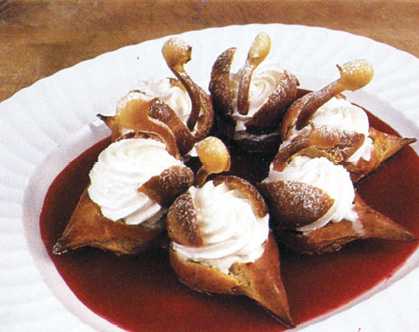
Cream Puff Swans
(Cygnes en Pâte à Choux)
Cream Puff Dough, page 578
RASPBERRY SAUCE
12 ounces (340 grams) raspberries or 1 twelve-ounce (340-gram) package frozen unsweetened raspberries, thawed
1 cup (320 grams) seedless raspberry preserves
1 tablespoon raspberry brandy or framboise
CARAMEL FOR CAGE
1 cup (220 grams) granulated sugar
3 tablespoons water
Confectioners’ sugar for dusting the swans
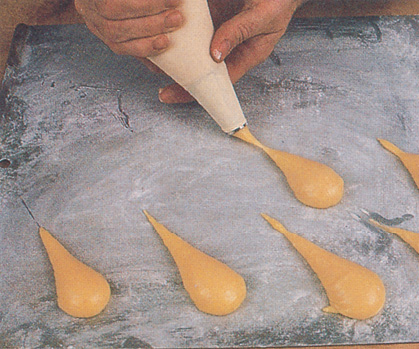
1. Preheat the oven to 375 degrees (191°C). Prepare the pâte à choux (page 578). Fill a pastry bag with the dough and coat a large cookie sheet with butter and flour. Squeeze large teardrops of dough onto the cookie sheet. The technique is to press some dough on the cookie sheet, stop pressing and pull the pastry bag back to create a tail.
2. Make a paper cornet, fill with dough, and squeeze out small necks shaped like question marks.
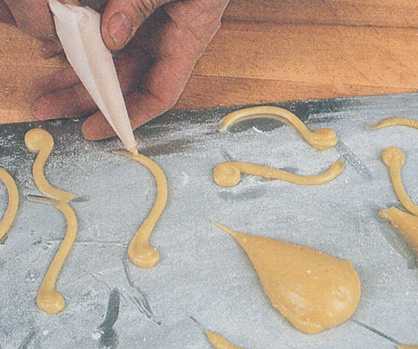
3. Make a pointed beak by pulling the cornet up.

4. Brush the piped pastry shapes with an egg wash (1 whole egg, beaten). Bake for 10 to 12 minutes. Remove the small question marks and return the cream puffs to the oven for another 25 minutes, a total baking time for the cream puffs of 35 to 40 minutes. Shut off the heat and open the oven door halfway, allowing the steam to escape. Let cool in the oven and dry for 30 minutes.

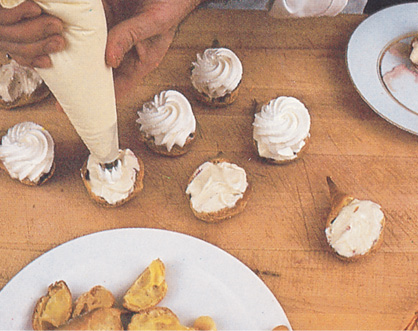
5. Holding the choux on the side, slice off the top on a diagonal with a sharp, long-bladed knife. These are the swan bodies.

6. Cut the removed lids in half lengthwise. They will be used as wings on the swan bodies.

7. Fill the swan bodies with sweetened whipped cream.
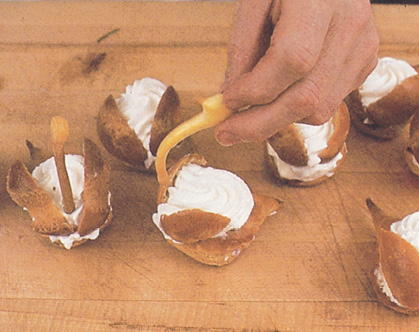
8. Place both pieces of the lid on the cream to simulate wings. The cream will hold them in place. Stick the neck into the cream between the point of the wings. Sprinkle with confectioners’ sugar. (Variation: Place 1 tablespoon of raspberry jam in the bottom of the opened swan. Top with a small scoop of vanilla ice cream and decorate with whipped cream. Place the wings and the necks into place.) Just before serving, pour diluted raspberry jam or raspberry sauce into a large platter. Arrange the swans so they appear to be swimming in the sauce. Surround with angel hair (see page 536).
To make the raspberry sauce: Place the raspberries with the preserves in the food processor and process until smooth. Pour through a fairly coarse strainer. At first, do not press on the seeds with a spatula while straining the sauce as this tends to plug the holes of the strainer. Instead, bang on the rim of the strainer with a wooden spoon or spatula to make the mixture jump, thus keeping the little seeds from clogging the holes of the strainer and allowing most of the liquid to go through. Finally, to extract any remaining liquid, press on the seeds. Add 1 tablespoon of raspberry brandy to the strained sauce.

9. Place about 3 tablespoons of raspberry sauce on a serving plate and position a swan in the center. Serve immediately.
10. An alternative way of serving is to place about 1 cup of the raspberry sauce on a large platter and arrange the swans on top so they face one another.
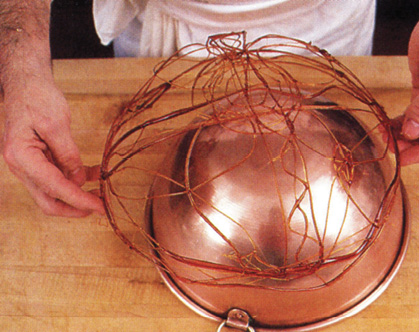
11. To make the serving platter even fancier, a caramel cage can be placed on top of the swans.
For the caramel cage: Combine the granulated sugar and water in a saucepan, and cook on top of the stove until the mixture turns a caramel color. Then remove the pot and place in cold water for 10 to 15 seconds, stirring it to cool the mixture and thicken the caramel (it should be fairly thick for making the cage).
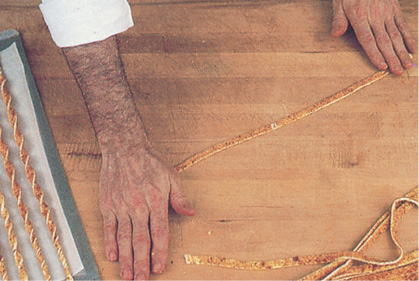
To make the cage, oil an inverted copper or stainless steel bowl. (The copper bowl is nice because it has a rounded bottom rather than a flat base.) To make a caramel cage successfully, follow the principles of good construction: i.e., don’t splatter the caramel indiscriminately all around the mold but first go from one side to the other to create supporting “beams” across. Drizzle a few rings around the bottom, rotating the bowl to form a base for the cage and to hold the beams together.

12. Swirl some interconnecting caramel lines into the open spaces between the crossed lines on top. Make several circles in the center on top to strengthen the construction, and continue spooning the caramel to create a design and hold the lines together.

13. After it cools and sets on the mold for at least 10 to 15 minutes, lift off the cage by pushing it up in a couple of places on one side. The pushing will be registered on the other side and the entire cage can be easily removed from the oiled mold.
14. Place the cage on top of the swans. Add a few fresh flowers, inserting them into the “iron work” of the cage for a more striking effect, and serve.

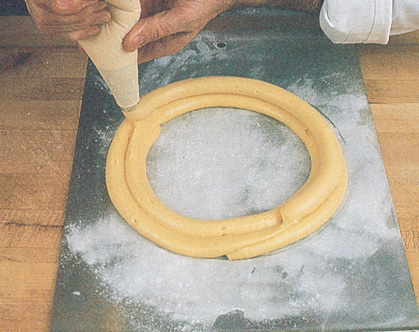
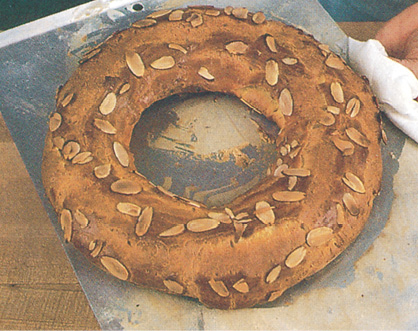
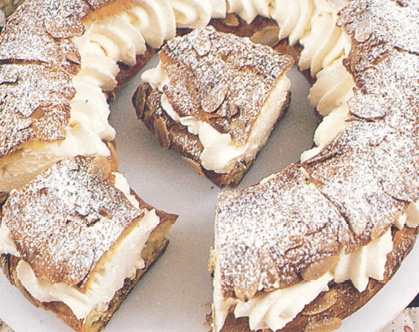
Cream Puff Ring
(Paris-Brest)
The Paris-Brest is made from a ring of pâte à choux that is baked and filled with praline cream and whipped cream, then topped with sliced almonds and confectioners’ sugar.
YIELD: 12 to 18 servings
Cream Puff Dough, page 578
PRALINE
½ cup (110 grams) sugar
¾ cup (120 grams) whole almonds
1 tablespoon sliced almonds
Slightly sweetened whipped cream
1. Preheat the oven to 400 degrees (204°C). Coat a cookie sheet with butter and flour. Using a flan ring, or any circular mold, mark an outline about 10 inches (25 centimeters) in diameter. Prepare the pâte à choux. Fill a pastry bag with the dough. Squeeze out a ring of pâté à choux about 1 inch (2.5 centimeters) wide, following the outline. Squeeze another ring inside or outside the first, depending on how large you want the cake to be. Squeeze 1 ring on top of the others, a total of 3 rings of dough.
2. Brush with an egg wash (l whole egg, beaten). Dip a fork in the wash and run it around to create lines simulating the bark of a tree.

3. Sprinkle 1 tablespoon sliced almonds on top.

4. Let the cake dry for about 20 minutes. Bake for 45 minutes. Shut off the heat, open the oven door halfway to let the steam escape, and leave the cake in the oven for 1 hour so it cools and dries.
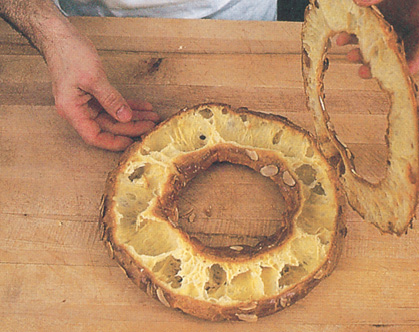
5. Using a long-bladed knife, cut a lid off the cake.
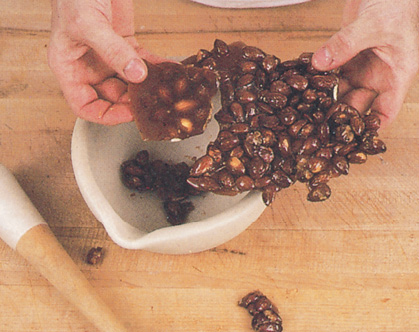
6. To make the praline: Place the sugar in a saucepan, preferably a stainless steel or unlined copper pan. Cook over medium to high heat, stirring occasionally. This will be a dry sugar caramel (no liquid added), which makes a very hard caramel. Stir the sugar as it melts. As the melting sugar is stirred into the dry sugar, the mixture often crystallizes, making it hard to stir. Keep cooking the sugar until most of the pieces of crystallized sugar melt.

7. When the mixture is a light amber color (with some crystallized sugar still visible in it), add the almonds. Keep cooking on top of the stove. Don’t worry if the mixture sets into large lumps. Continue cooking; the sugar pieces will eventually melt and the almonds will separate from the sugar, which will turn a rich caramel color.

8. At that point, pour the mixture onto an oiled tray, spreading it slightly to help it cool.

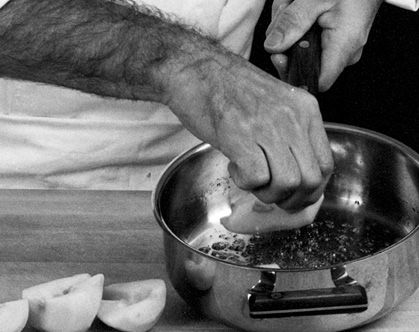
9. When cool, you can lift the almond sugar from the oiled tray in one block. Break into pieces, place them in a mortar, then pound with a pestle to form a crumbly consistency.
10. Sprinkle crushed praline onto the bottom half of the cake. Then decorate with slightly sweetened whipped cream.

11. Cut the lid of the Paris-Brest into as many portions as you want to serve (from 12 to 18).

12. Place the lid back on top of the cake.
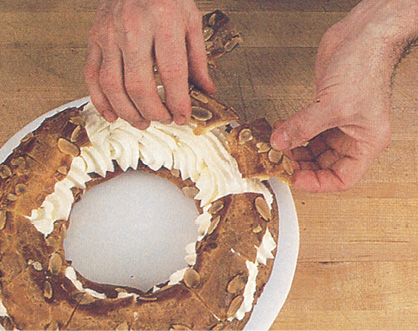
13. Thrust a knife through the lid at the separations, then cut down through the cake to divide it into servings. Serve.
Three Ways to Make Puff Paste
(Feuilletage)
Puff paste, or feuilletage, is the hardest dough to make, and it has its pitfalls even for professionals. The dough will be easier to make and will rise well if you use shortening, which melts at a higher temperature than butter. However, nothing can replace the taste or the fragrance of butter. The difference is evident.
Puff paste is made with flour and butter in equal proportions. The flour is bound with a liquid, usually water, into an elastic and shiny dough (détrempe). The butter is encased in the dough, and both elements are rolled together. By folding, rolling, and folding the dough, a multilayered effect is achieved, with layers of elastic dough and layers of butter. The butter melts during cooking and develops steam which tries to escape, pushing the layers up into the “thousand-leaf” effect. All-purpose flour is high in gluten (the protein part of the flour that makes the dough elastic). Use all-purpose flour or a mixture of pastry and all-purpose flour.
The butter and the detrempe should be the same temperature and consistency. If the butter is too cold, it will break and crumble and push through the dough during the rolling. If it is too soft, it will be “squished” and will run between the layers. Beware of hot and humid days; the ingredients are limp and have a tendency to blend together.
Puff paste tends to darken and become quite elastic when stored in the refrigerator. However, well wrapped, it freezes beautifully.
CLASSIC PUFF PASTE DETREMPE
YIELD: approximately 2½ pounds
1 pound (454 grams) all-purpose organic flour, very cold (put a bag of flour in the freezer overnight)
2 tablespoons (28 grams) unsalted butter, at room temperature
½ teaspoon salt
About 1 cup (237 milliliters) cold water (depending on humidity)
BUTTER MIXTURE
1 pound (454 grams) unsalted butter, at room temperature
¼ cup (35 grams) all-purpose organic flour
PUFF PASTE #2 (FAST PUFF)
YIELD: approximately 2½ pounds
1 pound (454 grams) all-purpose organic flour, very cold (put a bag of flour in the freezer overnight)
½ teaspoon salt
About 1 cup (237 milliliters) cold water (depending on humidity)
1 pound (454 grams) unsalted butter
PUFF PASTE #3 (INSTANT PUFF)
YIELD: approximately 2¼ pounds
1 pound (454 grams) all-purpose organic flour, very cold (put a bag of flour in the freezer overnight)
3 sticks (12 ounces/375 grams) unsalted butter
½ teaspoon salt
¼ teaspoon lemon juice
About 1 cup (237 milliliters) cold water (depending on humidity)
1. To make the classic puff paste (for detrempe): Place the flour, butter, salt, and water in the bowl of an electric mixer. Using the flat beater, mix on medium low for about 45 seconds, until well combined. Gather the dough together, wrap it in plastic wrap, and place in the refrigerator.
2. Place the pound of butter with the ¼ cup flour in the bowl of an electric mixer and, using the whisk attachment, mix until the ingredients are well-homogenized, about 15 to 20 seconds. Using plastic wrap, pat the butter mixture into a 5- to 6-inch (13- to 15-centimeter) square about 1 inch (2.5 centimeters) thick on another piece of plastic wrap. Refrigerate for at least 30 minutes along with the flour dough.
Roll out the détrempe, using as little flour as possible, into a square about 12 by 12 inches (30 by 30 centimeters). Place the butter mixture at an angle in the center of the dough, positioning it so the corners of the butter face the sides of the détrempe.

3. Bring the corners of dough over the butter, overlapping them slightly to encase the butter completely.

4. Pound the dough gently with a rolling pin to extend it. Flour the surface of the dough and roll it into a rectangle 20 inches (50 centimeters) long by 10 inches (25 centimeters) wide by 3/8 inches (10 millimeters) thick.

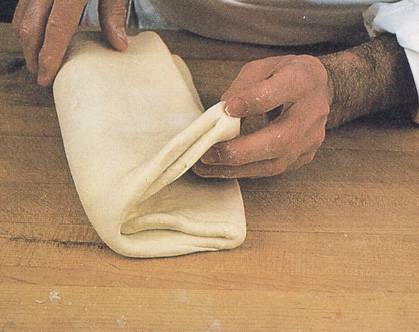
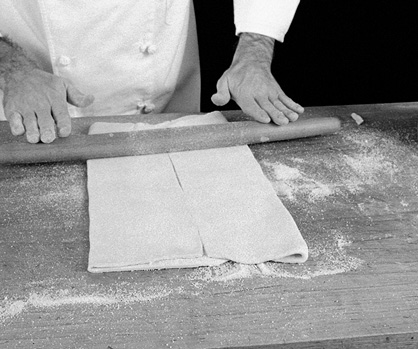
5. Brush the dough to remove any flour from the surface and fold one-third of the dough back onto the rectangle.

6. Bring the remaining single thickness of dough back over the double thickness so the rectangle is folded into thirds like a letter. Brush off any flour as you fold. This is the first “turn.” Wrap the dough in plastic wrap or place in a plastic bag in the refrigerator for 30 minutes to let it rest before giving it another turn.
Place the rectangle on the table with the folded side facing you and roll it out again into a rectangle 20 inches (50 centimeters) long by 10 inches (25 centimeters) wide by 3/8 inches (10 millimeters) thick. Fold again into thirds. This is the second turn. Re-wrap and refrigerate again for 30 minutes. Roll again into a 10- by 20-inch rectangle and fold into thirds, again brushing any flour from the center as you fold. If you feel that the dough is well-rested and not elastic at that point, give the dough another turn immediately, which will be two turns in a row, making a total of four turns. Let the dough rest again for 30 minutes or longer.
Eventually, give a fifth and sixth turn, allowing the dough to rest in the refrigerator 30 minutes between each turn. The finished dough will have six turns. After the dough has rested, it can be rolled into long, thin rectangles and stacked on a tray with plastic wrap between the rectangles.
After it rests, the dough won’t shrink when cut out for vol-au-vents or other shapes. The dough can be frozen whole or rolled, cut into shapes, and frozen. To use, defrost the large pieces to roll. The frozen shaped pieces should be placed in the oven frozen for best results.

7. To make the Fast Puff Paste #2: Use cold flour (from the freezer). Since the dough will be worked out very quickly with several turns in a row, the cold flour will absorb the heat generated through manipulation and rolling. Place the flour, salt, and water in the bowl of an electric mixer, and mix with the flat beater for about 15 seconds, just enough for the dough to be well-homogenized and hold together.
Place the dough on the table. Cut each of the 4 sticks of unsalted butter into 3 lengthwise slices.

8. Roll out the détrempe into a rectangle approximately 18 inches (46 centimeters) long by 9 inches (23 centimeters) wide by ¼ inches (6 millimeters) thick. Arrange the butter slices over two-thirds of the dough to within ¾ of an inch (19 millimeters) of the outside edges.

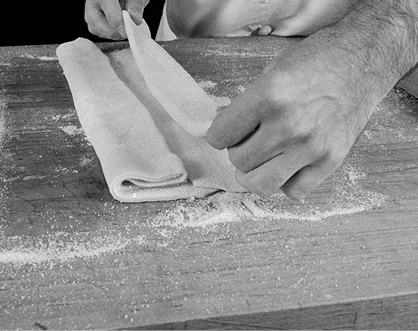
9. Bring the lower third of the dough (not covered by butter) on top of half of the butter.

10. Bring the remaining third of the buttered dough over the top, creating a sandwich with five alternating layers of dough and butter. Press along the sides to ensure that the dough is sealed together.

11. Pound the dough gently with a rolling pin to start extending it. Then, flour (minimally) the dough and roll it into a rectangle about 9 to 10 inches wide by 20 inches long by ¼ to 3/8 inches (6 to 9 millimeters) thick.

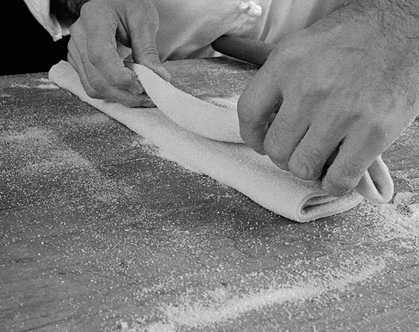
12. Bring each end of the rectangle toward the center so it joins, and roll gently to seal.

13. Fold the dough in half again, creating a four-layer dough rather than the three layers of the classic puff paste. This is what is called a double turn. Roll again into a rectangle and give the dough another double turn. Wrap and refrigerate the dough for at least 30 minutes.
Flour the board and roll the dough again into a 10 by 20-inch rectangle, fold into the center and then in half again (another double turn). At that point, if the dough is not too elastic, give it a fourth double turn. Wrap and refrigerate. After it has rested, the dough will be ready to use.
14. To make Puff Paste #3 (Instant Puff): (Notice that the proportion of butter is less and the flour is very cold.) Place the pound of cold flour in a bowl and slice the 12 ounces of butter in 1/8 -inch slivers on top of it.

15. Add the ½ teaspoon salt, ¼ teaspoon lemon juice, and 8 to 9 ounces ice cold water, and mix with a spoon until most of the flour is moist and most of the mixture holds together. Do not overmix.

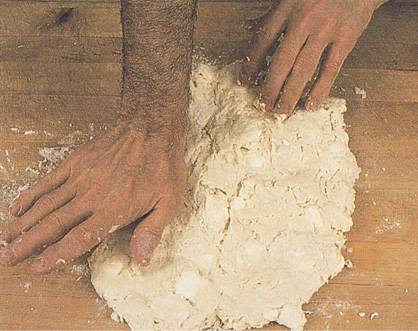
16. Place on a work surface, preferably cold, and press the dough with the heel of your hand without smearing it forward into a coarse rectangle approximately 9 by 12 inches.
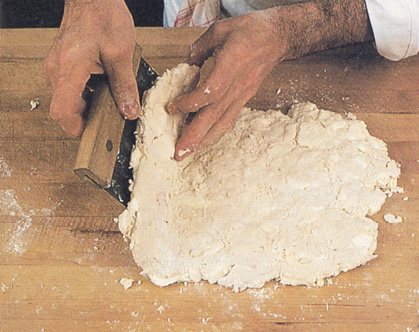
17. If the dough sticks to the work surface, use a dough scraper to lift it up and fold it into thirds, as indicated in steps 5 and 6.
18. Flour the dough, pound it, as shown in photographs 4 and 11, to start extending it, and roll the dough again into a rectangle about 9 by 20 inches. You can see that the pieces of butter are still quite visible.

19. Fold the dough into a double turn, making sure to brush the flour from the center. Again, extend the dough to make a rectangle about 8 by 20 inches and give it another double turn. Let it rest refrigerated for at least 30 minutes.

20. Roll the dough out for the third time into a rectangle about 8 by 20 inches. Notice that the butter is still visible but less and less so. Fold the dough again into a double turn, a total of 3 double turns. At that point, the dough will be quite elastic. Wrap in plastic wrap and place in the refrigerator for at least 1 hour before using. If, after you’ve let the dough rest in the refrigerator, you want it more flaky, give it another single or double turn before using.
Puff paste is used in several of the dishes that follow and any of the puff paste recipes here can be used, depending on availability.
Large Patty Shell
(Vol-au-Vent à l’Ancienne)
Vol-au-vent are customarily filled with sweetbreads, chicken, quenelles, and mushrooms, lobster meat, and the like, usually bound with a sauce. They are one of the most delicate pastries to make and must be made with perfect puff paste dough. Begin by making the classic puff paste dough. One pound (454 grams) of flour will make enough dough for two vol-au-vent.
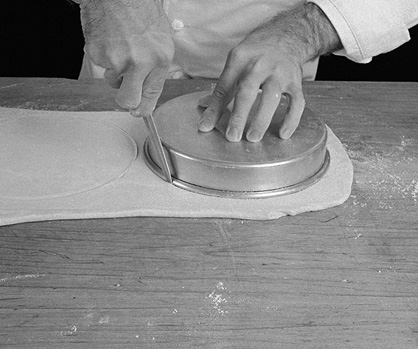
1. Preheat the oven to 400 degrees (204°C). Roll the dough 3⁄8 inch (10 millimeters) thick. Using a round object as a guide (in this case a cake pan), cut two disks 8 inches (20 centimeters) in diameter. Be sure to cut the dough with a sharp knife. If the dough is cut with a dull blade, the layers will squish together and will not rise properly.
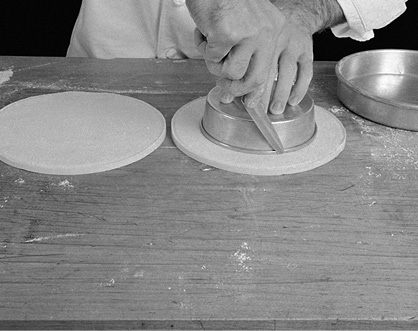
2. Using a smaller round object, cut a disk from one of the wheels to make a ring. The ring should be at least 1¼ inches (3 centimeters) across.
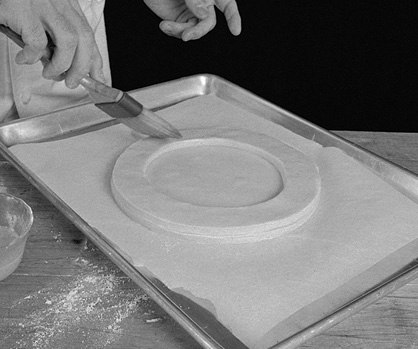
3. Place the solid disk on a cookie sheet lined with parchment paper. Brush the surface with water.

4. Place the ring of dough carefully on top and press all around so that it adheres well to the bottom layer. The dough is now ¾-inch (19 millimeters) thick at the edge.

5. Brush the ring with egg wash. It is important that the wash does not run down the sides of the shell. If this happens, the layers will be “glued” together by the wash and will have difficulty rising.
6. Using the dull side of the blade, mark the edge all around.
7. Cut about 1⁄8-inch (3 millimeters) deep into the bottom layer following the curve of the ring to create the “lid.” Carve a trellis in the center of the lid. Let the vol-au-vent rest in a cool place for 1 hour. Bake for 45 to 55 minutes. If, after 10 minutes, the shell is rising unevenly, cut the high side at the lid incision to let steam escape and allow the other side to level off. When baked, cut off and remove the lid, fill, cover with the lid, and serve.

Large Patty Shell
(Vol-au-Vent à la Moderne)
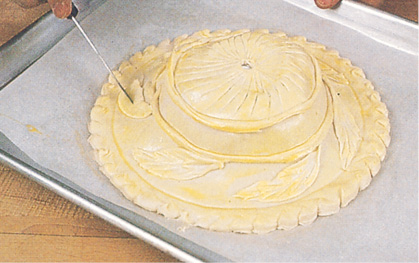
This is an easier and more dramatic way of making a large patty shell. Fast puff paste as well as puff paste trimmings are adequate, and it can also be done with a pâte brisée, although it is not as spectacular as when made with puff paste. To begin, make the puff paste.
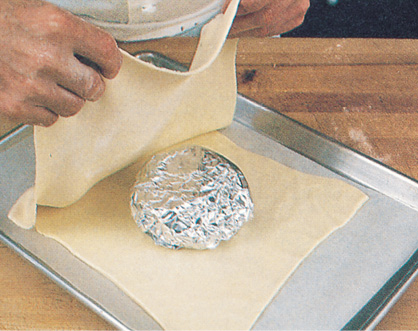
1. Roll the puff paste dough into a rectangle about 10 inches (25 centimeters) wide and 20 inches (50 centimeters) long. Cut into 2 squares. Place 1 square on a damp, or parchment-lined, cookie sheet. Place a ball of aluminum foil, about 3½ inches (9 centimeters) in diameter, in the middle of the square. Brush the dough all around the ball with water. Put the second square on top of the foil.
2. Use a 9-inch (23-centimeter) flan ring to mark a circle. Be sure that the dough is stretched uniformly around the foil ball. Trim the dough so it is even with the bottom. Cut with a sharp knife.
3. Brush the dough with an egg wash (1 whole egg, beaten). Do not let the wash run down the sides. Cut long, thin strips of dough from scraps and decorate the shell to your fancy. Cut lozenges from scraps of dough to simulate leaves and finish decorating the shell.

4. Cut out little triangles from the edges. Brush again with egg wash. Do not let it run down the sides.
5. Make a hole at the top to let the steam escape during baking. Let the shell rest in a cool place for 1 hour. Preheat the oven to 400 degrees (204°C). Bake for 40 to 45 minutes.
6. Let the shell cool for 10 to 15 minutes and cut the lid off, following the outline of the decoration.

7. Being careful not to damage the shell, slide your thumb and index finger on both sides of the aluminum foil and squeeze to reduce the size of the ball.
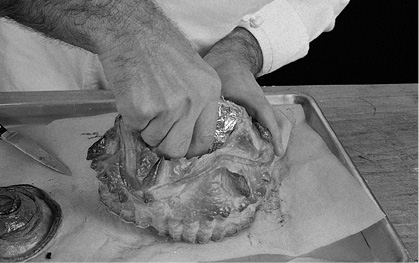
8. Pull the foil out. The shell is now ready to be garnished or filled.

Individual Patty Shells
(Bouchées)
Make the classic puff paste dough on page 591. For individual patty shells, as well as for fleurons, cheese straws, and other puff paste garnishes described in the following technique, it is preferable to roll the dough in long sheets (about 3⁄16 inch/5 millimeters thick) a few hours ahead of time, allowing it to rest, or relax, in the refrigerator. This prevents the dough from shrinking when it is cut.
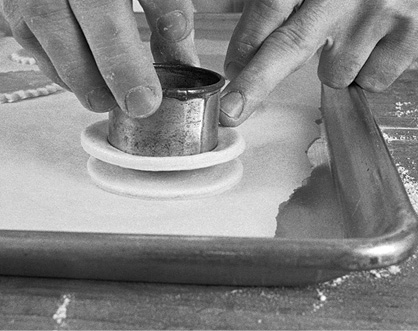
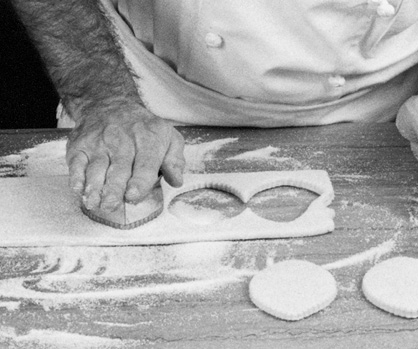
1. Preheat the oven to 400 degrees (204°C). Cut rounds about 3 inches (7.6 centimeters) in diameter with a plain or fluted-edge cutter. Be sure that the cutter is sharp. If the edge is dull, the layers will get squeezed together and will not rise properly.

2. Using a smaller cutter, cut a piece from the center of half of the rounds. The outside rings are used to form the walls of the patty shells. They should be ½ inch (13 millimeters) wide.

3. Rub your finger underneath the cutting edge of the cutter to be sure that the outside ring of the dough is free.

4. Place the rounds on a cookie sheet lined with parchment paper. Brush the tops with water. Position the ring (still attached to the cutter) over the round and push it into place. Remove the cutter. Reserve the piece of dough inside the cutter for decorating tart or pie shells.
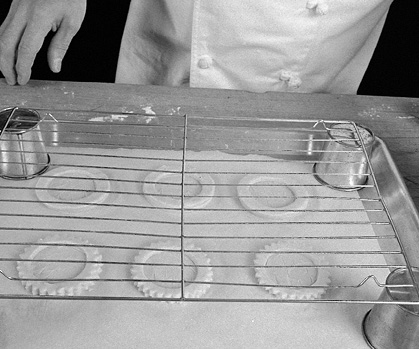
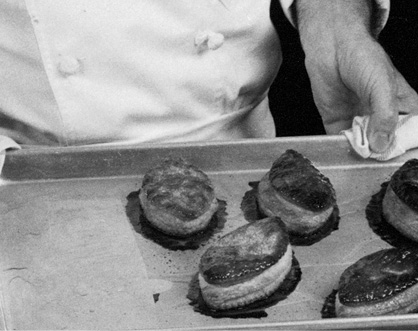
5. Brush the ring with egg wash. Do not let it run down the sides. To make the shells rise evenly, place a wire rack on top.
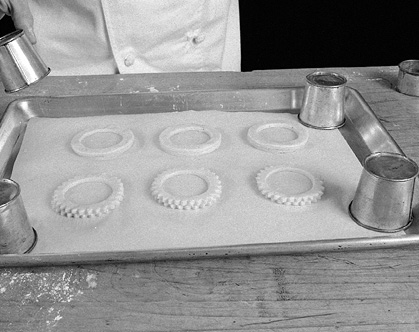
6. The shells should rise five to six times their original thickness. Hence, the wire rack should not be more than 2 inches (5 centimeters) high at the most. If the shells rise crookedly, the high side will be stopped when it touches the rack, and the other side will equalize itself. Bake for about 30 minutes. Fill to your liking.
Puff Paste Cheese Straws
(Paillettes, Diablotins, Fleurons)
Paillettes and diablotins are cheese straws; the first are flat strips and the other twisted. You can serve them with consommé for a very elegant first course, or with cheese or drinks. Fleurons (crescents) are classically used to garnish whole fish or fish fillets served with a sauce and glazed, such as sole Bercy. Both can be made with classic, fast, or instant puff paste, page 591.
YIELD: About 4 dozen straws
Puff Paste (page 591)
1 large egg, beaten, for egg wash
⅔ cup (67 grams) freshly grated Parmesan cheese
2 tablespoons Spanish paprika
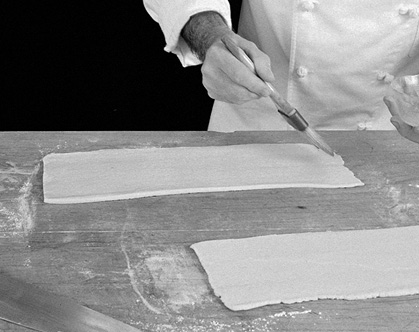
1. Preheat the oven to 400 degrees (204°C). For the cheese straws, roll the dough 1⁄8 inch (3 millimeters) thick. Brush the surface of the dough with egg wash. Mix together the Parmesan cheese and paprika. Sprinkle half of the mixture on top and rub so that the whole surface is covered.
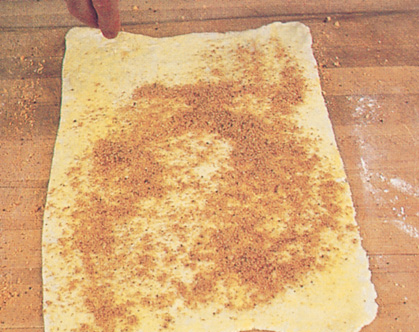
2. Turn the dough upside down and coat the other side with the mixture. Both sides of the dough are now covered with the cheese and paprika mixture. Fold in half. Cut strips about 3⁄8 inch (10 millimeters) wide.
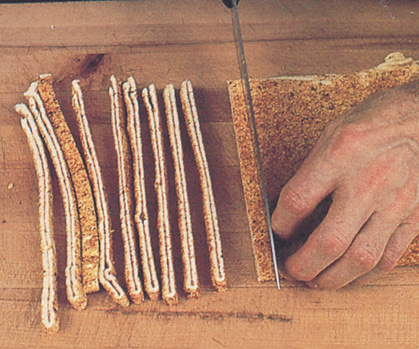
3. Unfold the strips. To make twisted cheese straws, place one hand at each end of the strip. In a swift movement, roll the strip forward with one hand and, at the same time, roll backward with the other.
4. The strip will be twisted into a corkscrew-like spiral.
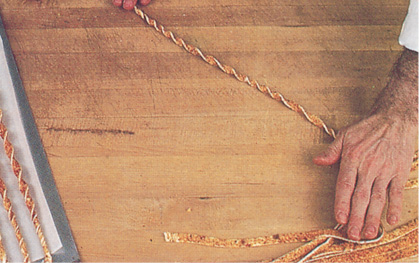
5. Place the strips, whether they are twisted or flat, on a parchment-lined cookie sheet. To prevent the strips from shrinking during baking, smear the ends onto the cookie sheet so they stick and hold the dough stretched.
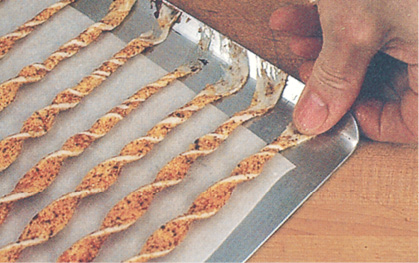
6. Bake for about 12 minutes, or until nicely browned and crisp.

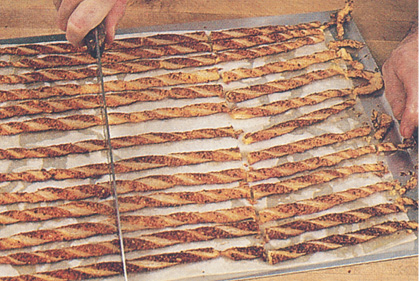
7. Trim the ends off and cut into 4-inch (10-centimeter) sticks.
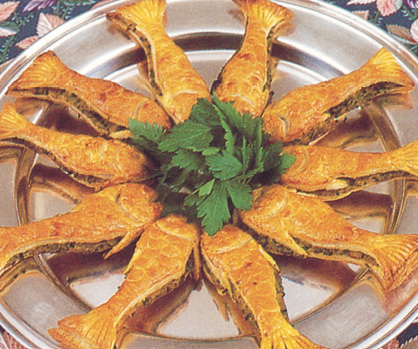
Anchovy Sticks and Fish
(Allumettes aux Anchois)
Anchovies wrapped in puff paste make attractive finger food for buffets or to serve as an hors d’oeuvre with drinks. They are customarily shaped into sticks (Method 1), but can also be made to look like little fish (Method 2). Make the puff paste.
YIELD: Makes about 12 sticks and 12 fish
Puff Paste, page 591
Filling for sticks
1 large egg, beaten
1 can anchovy fillets in oil
3 tablespoons chopped parsley
2 large hard-cooked eggs, coarsely chopped
FILLING FOR FISH
2 large hard-cooked eggs
1 can anchovy fillets in oil (2 ounces /57 grams)
3 tablespoons minced chives
¼ teaspoon freshly ground black pepper
METHOD 1
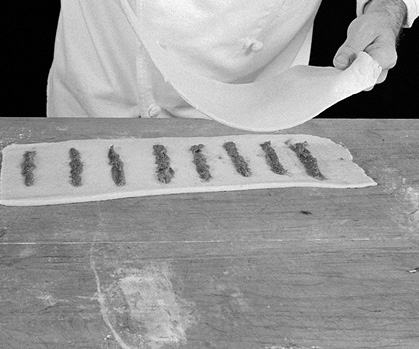
1. Preheat the oven to 400 degrees (204°C). Roll the dough into 4-inch (10-centimeter)-wide strips, about 1⁄8 inch (3 millimeters) thick. Brush with water.
2. Arrange anchovy fillets about 2 inches (5 centimeters) apart on the dough. Sprinkle the anchovies with chopped hard-cooked egg and chopped parsley. Place another layer of dough on top.
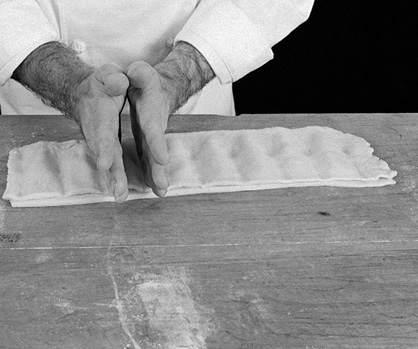
3. Press the side of your hand between each anchovy so that the top layer of dough adheres well to the bottom.
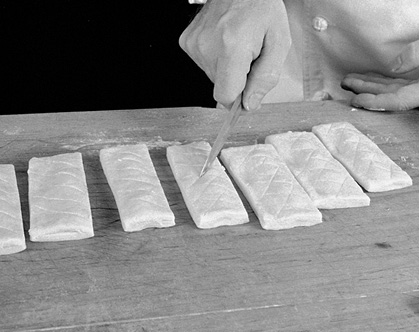
4. Brush with an egg wash and cut into individual pieces.

5. Decorate the top of each piece with the point of a knife. Let rest for 1 hour in the refrigerator before baking. Bake for about 30 minutes.
METHOD 2
1. Put the eggs and anchovy fillets in a food mill or mini food processor and process to a paste. Mix with the chives and pepper. Roll the pastry to a rectangle about 14 to 15 inches (36 to 38 centimeters) long by about 10 to 12 inches (25 to 30 centimeters) wide with a thickness of approximately 1 inch (2.5 centimeters). Cut the rectangle lengthwise into 2 strips. Spread the anchovy paste on top of one of the strips, leaving 1 inch (2.5 centimeters) of pastry around the filling on all sides.

2. Brush the exposed edges of pastry with cold water and place the other strip of pastry on top, pressing all around the edges to seal. Brush with the egg wash. Place the “sandwich” of anchovies in the freezer for about 10 minutes to firm up the dough.

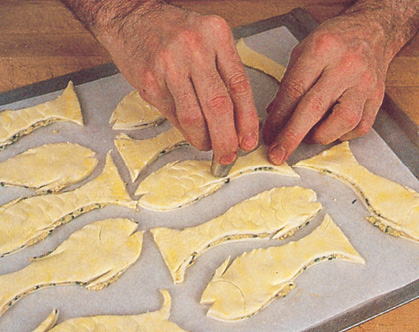
3. Cut continuous fish shapes the width of the pastry, the head of one fish forming the tail of another as the pastry is cut.

4. Trim the tail of the fish. With the point of a knife or a pastry tip, draw the scales, gills, and eyes of a fish. Let the dough rest for a good hour.
5. Preheat the oven to 400 degrees (204°C). Bake forabout 30 minutes.

6. Arrange the fish on a tray and serve at room temperature.

Puff Paste Almond Cake
(Pithiviers)
This famous puff paste almond cake is named after the small town of Pithiviers, between Paris and Orléans. Here is the classic cake, with the spiral design on top made with a knife, and the top brushed with corn syrup to create a beautiful shine and glaze when baked.
The cake is best eaten when just lukewarm. If there are pieces left over, they should be reheated slightly in the oven before serving. The cake is also excellent served with ice cream.
YIELD: 8 servings
About 2½ pounds (1.1 kilograms) Puff Paste, page 591
Almond filling
¾ cup (120 grams) whole unskinned almonds
½ cup (75 grams) confectioners’ sugar
½ teaspoon cornstarch
½ stick (4 tablespoons/56 grams) unsalted butter, softened
1 large egg
1 tablespoon dark rum
½ teaspoon pure vanilla extract
glaze
Egg wash made with 1 large egg with half the white removed, beaten
1 tablespoon corn syrup
For the almond filling: Preheat the over to 400 degrees (204°C). Place the almonds on a cookie sheet and brown in the oven for about 12 minutes. Put the toasted almonds, confectioners’ sugar, and cornstarch in the bowl of a food processor and process until the mixture is finely ground. Add the butter, egg, rum, and vanilla, and process again until smooth. Place in a bowl and, if not using right away, refrigerate. The mixture tends to thicken as it cools in the refrigerator.
1. Roll the puff paste dough into a large rectangle approximately ¼ inch (6 millimeters) thick. Using a 10-inch (25-centimeters) flan ring, mark two circles in the dough.

2. With a sharp knife, cut out the circles. (Don’t use the flan ring to cut the dough since it would crush rather than cut the dough, preventing it from rising properly.) Place one of the circles on a cookie sheet lined with parchment paper. Arrange the almond filling on top, spreading it with a spatula to within 1 inch of the edge of the circle.

3. Moisten the exposed edge of the filled dough with water and place the remaining circle of dough on top. Press around the edge to seal the two dough rounds together. Place the cake in the freezer for 5 to 10 minutes so the dough hardens a little.
4. Press around the edge with your thumb while notching with a spoon handle to create a design. Press firmly with your thumb to make firm indentations.
5. Brush the top of the cake with the egg wash and, using a knife, mark concentric lines from the outer edge to the center of the cake and make a hole through the dough in the center with the point of a knife.
6. Bake in the preheated oven for approximately 30 minutes. Reduce the heat to 375 degrees (191°C). Brush the corn syrup on the cake. Continue cooking for approximately 15 minutes. By that time, the surface should be beautiful glazed. If not, place under the broiler for a few minutes to finish glazing.

7. After cooling for 20 to 30 minutes, cut into wedges and serve lukewarm.
Pears in Caramel on Puff Paste
(Feuilleté de Poires au Caramel)
Rolled pieces of sugared puff paste, cut into ovals and baked, are called carolines. They are large puff paste cookies and can be served with fruit or whipped cream, or with poached pears and a caramel cream sauce, as we do below.
YIELD: 6 servings
1 pound (454 grams) puff paste (page 591)
1 cup (225 grams) sugar
3 medium-sized ripe pears, peeled and cut into halves
½ cup (112 grams) sugar
¼ cup (59 milliliters) water
1 cup (237 milliliters) heavy cream
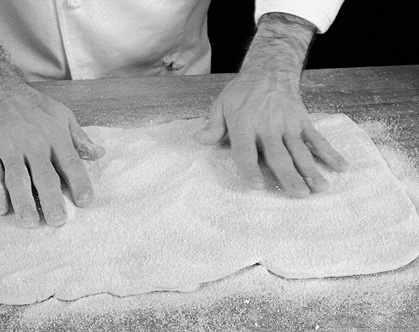
1. Spread the 1 cup sugar on the table. Using the sugar as if it was flour to prevent the dough from sticking, roll the dough approximately ¼ inch (6 millimeters) thick. Sprinkle with some of the sugar and fold into thirds like a letter. Roll out the dough again into a rectangle about 3/8 inch (10 millimeters) thick. Using a large oval cookie cutter (about 5½ inches/14 centimeters long by 3 inches/7.6 centimeters wide), cut 6 carolines. Place them on a cookie sheet lined with parchment paper and set in the refrigerator or freezer for 30 minutes.
2. Preheat the oven to 400 degrees (204°C). Bake the carolines for 25 minutes until nice and brown. Remove from the paper as soon as possible or the sugar which has melted around the dough will harden and make the dough stick. Let cool on a wire rack.
3. Peel the pears, cut them in half, and core. Mix ½ cup of sugar and 1/4 cup of water together in a large saucepan and place on high heat. Cook until it turns into a caramel, then add the pears, cover, and cook on low heat about 5 minutes, depending on the ripeness of the fruit. Do not let the pears fall apart. When tender to the point of a knife, add the cream, bring to a boil and simmer for a couple of minutes, uncovered. Set aside until cool. Remove the pears from the caramel, slice each half and arrange on top of a caroline. Pour some of the sauce over and around the puff paste and serve immediately.
Small Fruit Tarts
(Tartelettes de Fruits)
Small fruit tarts are an ideal summer dessert. The pâte sucrée (page 562) shells are precooked, filled with a purée of fruit or pastry cream (page 478), topped with fruit, and glazed. For raspberries, strawberries, or blueberries, use a glaze of currant jelly or raspberry preserves. If a jelly is used, heat to liquefy, and brush on while still warm. Any preserve which is not jelled need only be sieved and flavored with alcohol. For fruits such as banana, pear, pineapple, oranges, and the like, use an apricot or peach preserve, strained and seasoned with a bit of Kirschwasser or cognac.
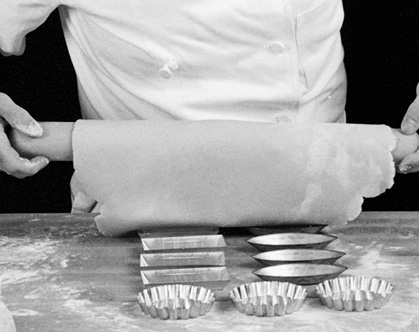
1. Preheat the oven to 375 degrees (191°C). Roll out the pâte sucrée to ¼ inch (6 millimeters) thick. It should not be too thin. If too thin, pâte sucrée tends to burn. Line up your tartelette molds. (They line up better if they are all the same size—like ours.) Roll the dough back onto the rolling pin and unroll on top of the molds.
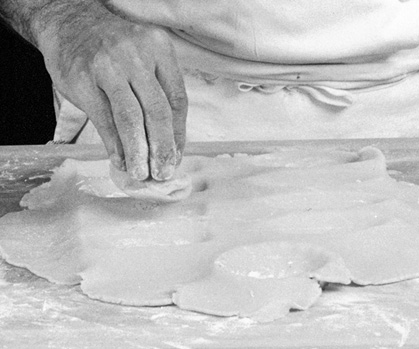
2. Take a lump of dough, dip it in flour so it doesn’t stick, and use it to push and stretch the dough into each mold.
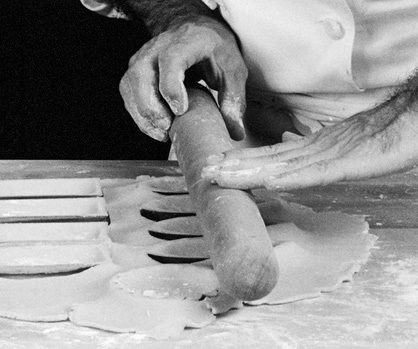
3. Trim the dough by rolling the pin on top of the molds. The weight of the pin will cut through the dough. Finish by pressing with your fingers.
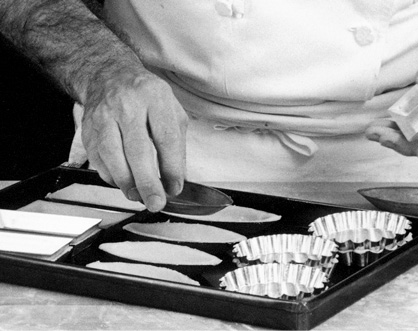
4. Place another mold on top of the dough and press it down, to keep the dough from puffing during baking. Alternatively, line with wax paper and weight with rice or beans. Bake for 5 to 8 minutes. Remove the upper molds and return to the oven for 10 more minutes or until lightly browned.
5. Fill with about 2 tablespoons pastry cream per shell, then arrange the fruit on top. Glaze with the appropriate preserve and serve as soon as possible.
Fruit Tart Strips
(Bandes pour Tartes aux Fruits)
This rectangular fruit tart is excellent for large gatherings because it is easy to serve. You just carve across at the end of each piece of fruit. The tart is made from a base of sweet dough bordered with strips of puff pastry. The dough is baked, spread with a layer of pastry cream (page 478), and topped with fruit.
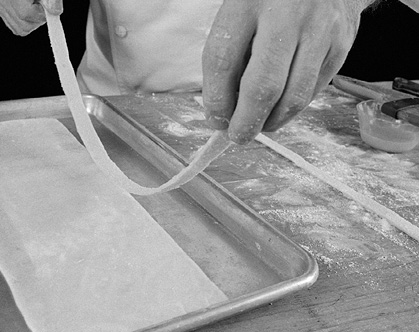
1. Roll the pâte sucrée ¼ inch (6 millimeters) thick. Cut in a strip the length of your cookie sheet and about 5 inches (13 centimeters) wide. Cut two strips of puff pastry about ½ inch (13 millimeters) wide for the border. Dampen about 1 inch (2.5 centimeters) on each side of the base with water and position the strips in place, pressing to make sure they adhere.
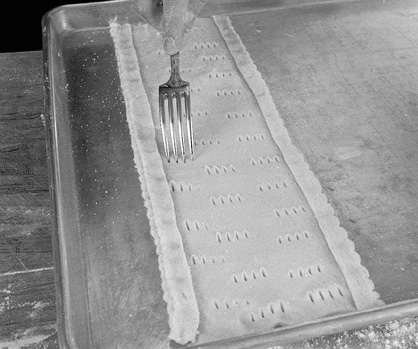
2. Using the dull side of the blade, decorate the edges of the tart with a knife. Brush the border with an egg wash (l whole egg, beaten).

3. Prick the center with a fork (you don’t want the dough to develop too much in the center). Let the dough rest for at least 30 minutes.
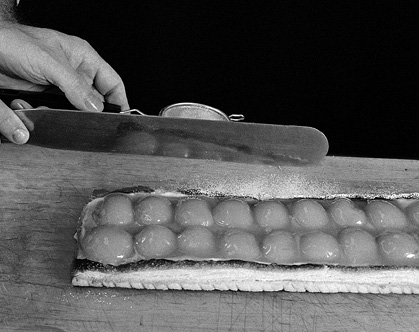
4. Preheat the oven to 400 degrees (204°C). Bake for about 30 minutes. Place a ¼- to ½-inch (6- to 13-millimeter) layer of pastry cream on the bottom and arrange poached apricot or peach halves on top. (Be sure the fruits are well drained to prevent the cream from thinning.) You may use any kind of berries also.

5. Brush the fruits with an apricot glaze and sprinkle confectioners’ sugar on the border. Serve as needed.
Square Fruit Tart
(Tarte Carrée)
Make some puff paste, either classic, fast or instant, page 591.
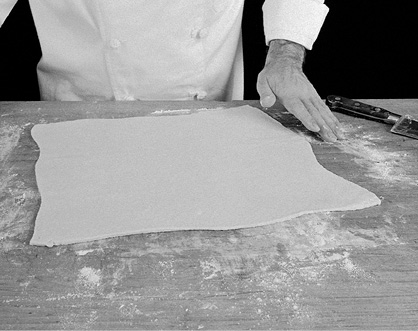
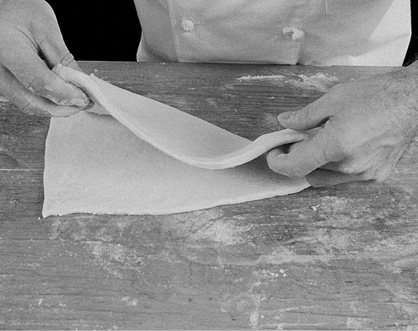
1. Preheat oven to 400 degrees (204°C). Roll the dough 1⁄8 inch (3 millimeters) thick and into a 10- to 12-inch (25-centimeter to 30-centimeter) square. Let it rest for at least 1 hour.
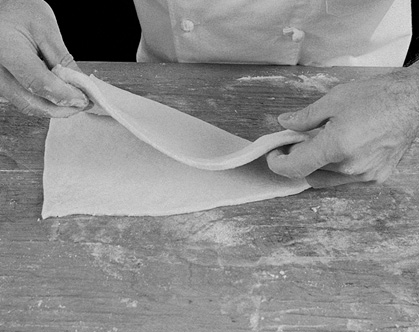
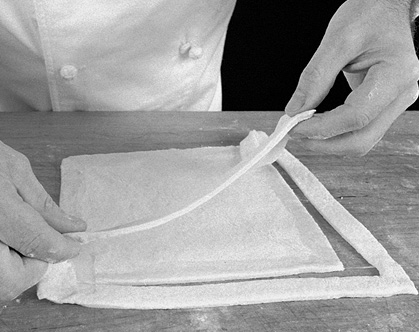
2. Fold the dough in half diagonally and trim it to have a folded square. You now have a right-angle triangle.
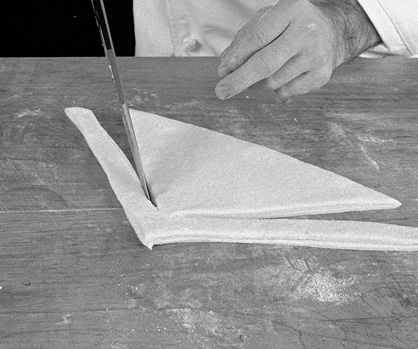
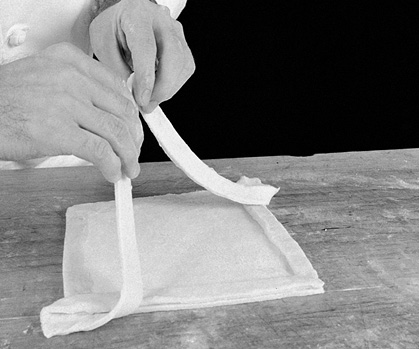
3. Cut a border on both square sides of the triangle, about ¾ inch (19 millimeters) wide.
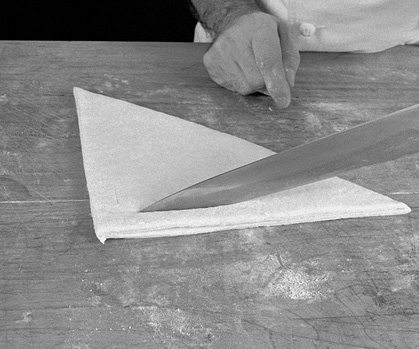
4. Be sure that the borders are still attached in the right-angle corner.
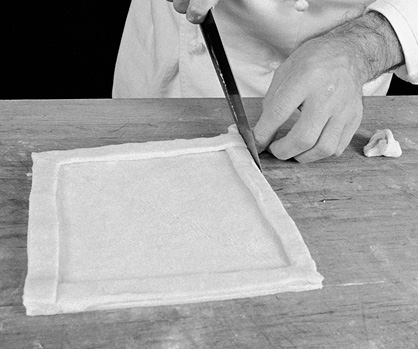
5. Unfold the dough and dampen the edges with water.

6. Bring half the border over and place on the damp edge of the dough.
7. Then bring over the other half. Press to make sure the border adheres.
8. Trim the corners where the dough overlaps. The square can also be left untrimmed.
9. Prick the center with a fork. Bake for 30 to 35 minutes. If the dough rises in the center during baking, just press it down with a fork.
10. Mix ½ cup (112 grams) sugar and ¼ cup (59 milliliters) water together in a large saucepan and place on high heat. Cook until it turns into a caramel and pour inside the shell, covering the whole bottom with a thin layer. The caramel gives crunchiness to the tart and keeps the cream from making the dough soggy.
11. Cover with pastry cream (page 478).
12. Fill with orange sections, banana slices, berries, or the like. Glaze the top with an apricot or peach glaze. Serve as soon as possible.
Palm Cookies
(Palmiers)
These are classic “pig’s ear” cookies made from sugared puff paste.
1. Sprinkle the board and dough generously with sugar. Roll the dough in the sugar, using it as if it was flour. Roll to about 1⁄8 inch (3 millimeters) thick.
2. Fold both ends of the dough so that they meet in the middle.
3. Roll the pin lightly on top to make the dough flat.
4. Fold again so that the ends meet again in the middle. Roll lightly with the pin.
5. Fold both sides together to make a simple loaf. Let the dough rest in the refrigerator or freezer for 30 minutes.
6. Preheat the oven to 400 degrees (204°C). Slice into cookies about 3/8 inch (10 millimeters) thick.
7. Arrange the cookies flat on a cookie sheet. Turn the edges outward slightly to give them a nicer shape. Bake for approximately 30 minutes. After 20 minutes, turn the cookies on the other side so that both sides are uniformly glazed with the sugar.

Glazed Puff Paste
(Allumettes Glacées)
The allumettes glacées are often served with ice cream or plain as coffee cake.
YIELD: 12
About 1 pound (454 grams) puff paste (see page 591)
Glaze
1 cup (100 grams) confectioners’ sugar
1 large egg white
2 tablespoons cornstarch
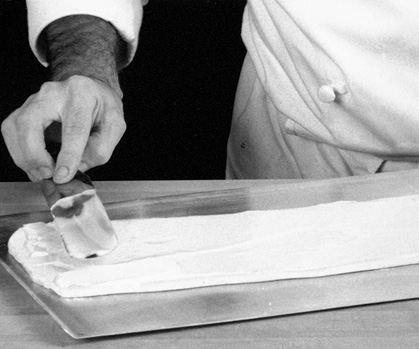
1. Roll the puff paste into a rectangle about 14 inches (35.5 centimeters) long by 6 inches (15 centimeters) wide and ¼ inch (6 millimeters) thick. Combine the sugar and egg white in a bowl and work for about 2 minutes until creamy. Add the cornstarch and work for another minute. Pour on top of the puff paste right away. If the glaze is kept it should be covered with a wet towel or a crust will rapidly form on top.

2. Use a spatula to spread the mixture as evenly as you can on top of the puff paste. Refrigerate for at least 1 hour so the glaze stiffens and forms a crust.
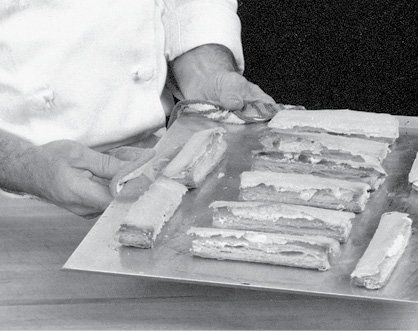
3. Preheat the oven to 375 degrees (191°C). Trim the outside of the puff paste and cut into strips about 1½ inches (4 centimeters) wide.
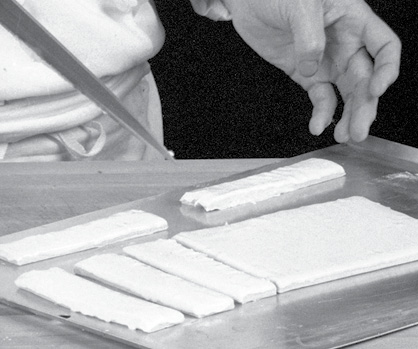
4. Bake for 30 minutes. The icing should be beige in color, shiny, and brittle. Let cool before eating.

Apple Charlotte
(Charlotte de Pommes)
There are two kinds of desserts called charlotte. The first and the oldest is the lukewarm apple charlotte. The other, made with cream and lined with ladyfingers or génoise cake, is served cold. The apple charlotte is the subject of this technique, and a cream-filled charlotte is described in the next.
8 to 10 apples, depending on size
¾ stick (6 tablespoons/85 grams) unsalted butter
Grated rind of 1 lemon
Juice of 1 lemon
2 to 3 tablespoons sugar (depending on sweetness of apples)
3 tablespoons apricot jam
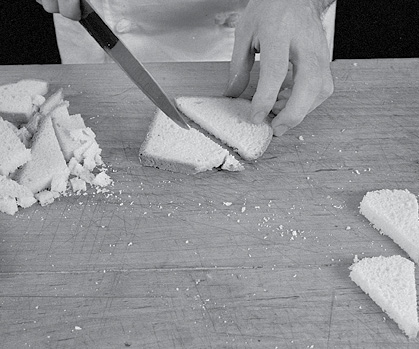
10 to 12 slices firm white bread, crusts trimmed
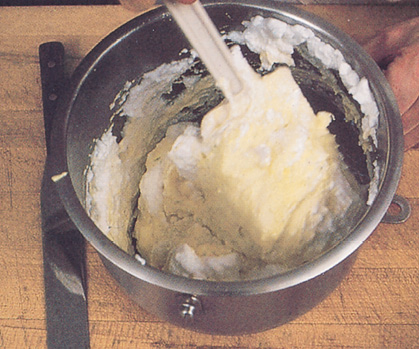
Pare and core the apples and cut into ¼-inch (6-millimeter) slices. Pick apples that will hold their shape during cooking (Calville, Rennet, Granny Smith or the all-purpose green or Golden Delicious). Melt 4 tablespoons (56 grams) of the butter in a large skillet. Add the apple slices and sauté until all the juices are released and they start to boil. Add the lemon rind, juice, and sugar. Cook on medium heat until most of the liquid has evaporated. Take off the heat and stir in the apricot jam. It is important that the apple mixture be thick; otherwise, the charlotte will collapse when it is unmolded. Set aside. Butter a 1-quart (1 scant liter) charlotte mold generously with the remaining 2 tablespoons (28 grams) butter.
APRICOT SAUCE
1 cup (237 milliliters) apricot jam
1 tablespoon sugar
3 tablespoons water
3 tablespoons Armagnac, cognac, or kirsch
Place jam, sugar, and water in a saucepan. Bring to a boil and boil for 2 to 3 minutes. Strain through a fine sieve. Cool, stirring occasionally. When lukewarm, add the alcohol.
1. Preheat the oven to 400 degrees (204°C). Cut 4 of the bread slices in half diagonally and trim into triangles.
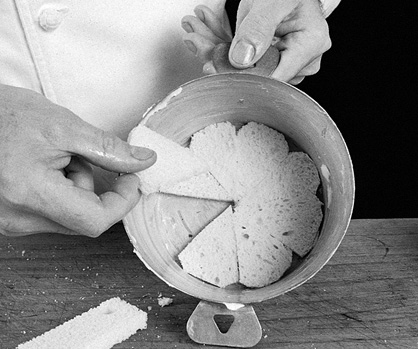
2. Arrange the triangles tightly together in the bottom of the mold.
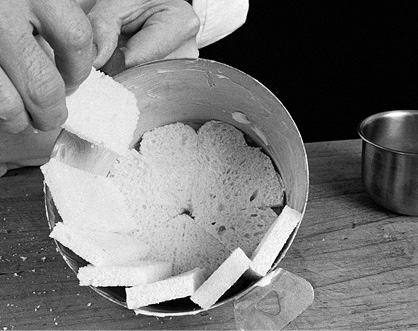
3. Cut the remaining bread slices into halves lengthwise. Arrange, overlapping, around the side of the mold.
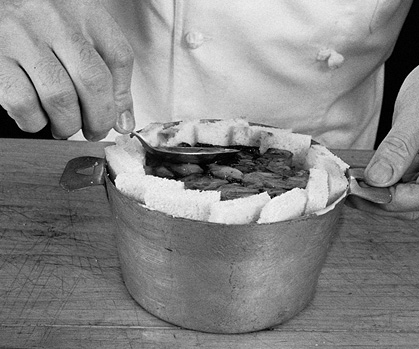
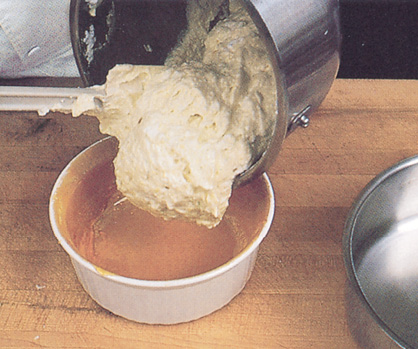
4. Fill the prepared mold with the apple mixture.

5. Pack it as much as you can in the center because the charlotte sinks as it cools. Cover with a round piece of wax paper. Bake for approximately 35 minutes.
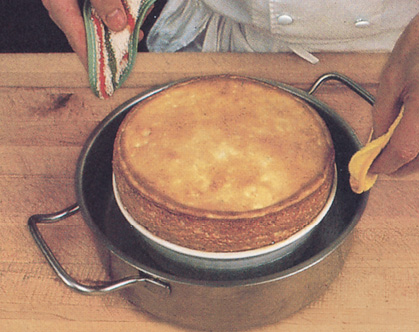
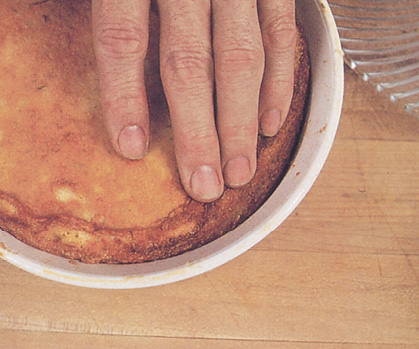
6. Remove from oven. Press down with a spoon to pack the apple mixture tightly. Trim the pieces of bread which are exposed above the apple mixture and place on top. Cover with wax paper and return to the oven for another 10 minutes. Let cool until lukewarm.
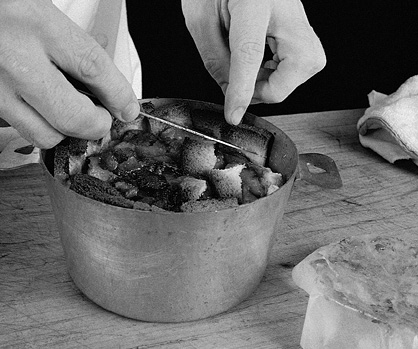
7. Run a knife around the charlotte.

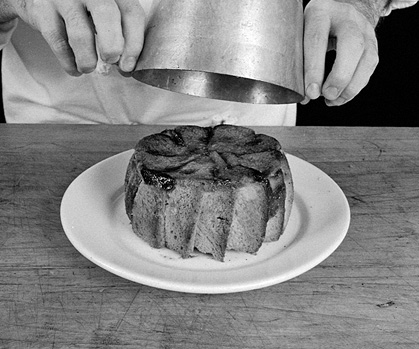
8. Place a platter on top of the charlotte, then turn upside down.

9. Remove the mold. Serve with the apricot sauce.
Chocolate Charlotte
(Charlotte au Chocolat)
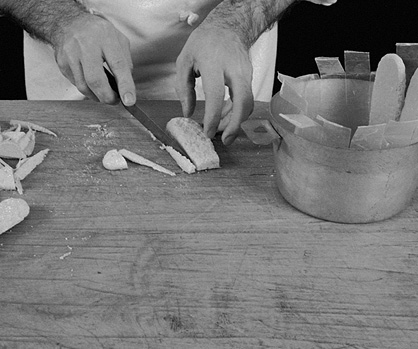
Ladyfingers (page 499)
4 large egg yolks
½ cup (50 grams) confectioners’ sugar
1 tablespoon dark rum plus ¼ cup (59 milliliters) dark rum or cognac
8 ounces (227 grams) chocolate (4 ounces/113.5 grams sweet, 4 ounces/113.5 grams bitter)
2 sticks (1 cup/227 grams) unsalted butter, softened
1 tablespoon warm water (optional)
8 large egg whites
Whipped cream
Candied violets
Crème anglaise (page 477)
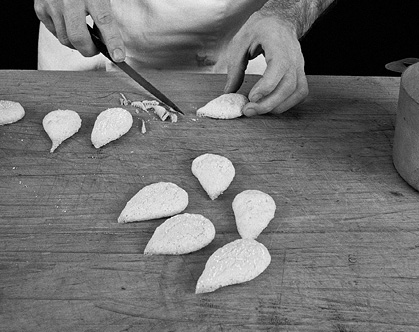
1. Prepare both long and tear-shaped ladyfingers. Trim the tear-shaped ones slightly.
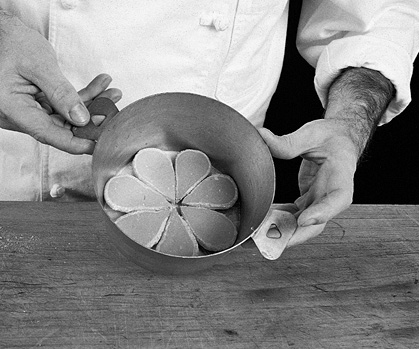
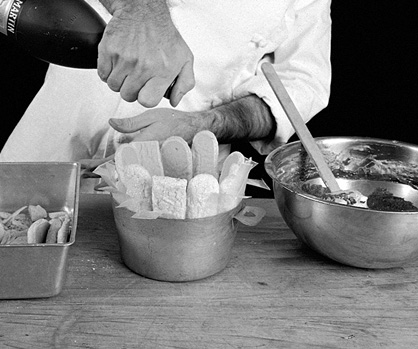
2. Place a round piece of wax paper in the bottom of a 1-quart (1-liter) charlotte mold. Arrange the tear-shaped ladyfingers upside down in a petal effect on the bottom of the mold.
3. Place a fringed strip of wax paper around the inside of the mold. Trim one end of the long ladyfingers and the sides so that they are slightly narrower on one end. Arrange the trimmed ladyfingers, cut ends down, with the rounded side touching the wax-paper-lined mold.
4. Be sure they fit tightly, one against the other.

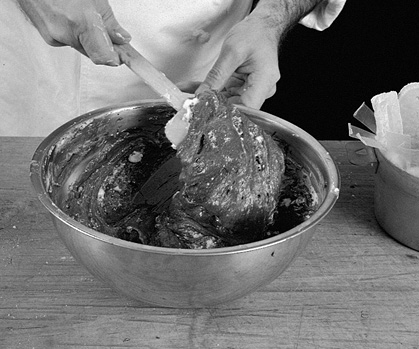
5. Combine the egg yolks, sugar, and 1 tablespoon rum in a bowl. Beat with a whisk for 4 to 5 minutes until fluffy. Melt the chocolate. Combine the chocolate and softened butter and whip for 1 minute. Combine with the egg yolk mixture. If it curdles, add 1 tablespoon warm water and whisk until it smoothes out. Keep the mixture lukewarm.

6. Whip the egg whites until stiff. Whisk about one-third of the whites into the chocolate mixture. Fold in remaining whites. The mixture will lose volume. Try to go as fast as you can to prevent the whites from getting grainy.
7. Fill the mold alternating the chocolate mixture with a layer of ladyfinger trimmings sprinkled with rum or cognac until all ingredients have been used. End with the chocolate mixture.
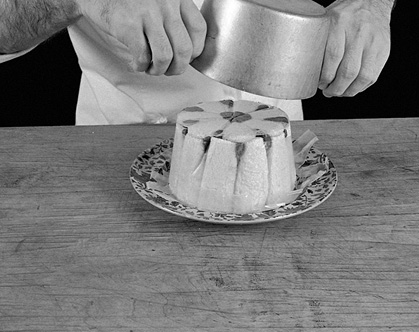
8. With a pair of scissors, trim the ladyfingers at the level of the filling and place on the chocolate to cover the top. Cover and refrigerate for at least 4 hours.

9. Unmold and remove the wax paper. Decorate with whipped cream and candied violets, and serve with crème anglaise (page 477).
Raspberry Soufflé
(Soufflé aux Framboises)
Even for the professional, making a soufflé always involves an element of suspense. A soufflé is usually made of a base into which egg whites are folded. As the soufflé bakes, the air beaten into the egg whites, in the form of little bubbles, swells and pushes the soufflé up. Although regularly made in a special soufflé mold, soufflés can be made in any oven-proof container. Soufflés are also served unmolded or lukewarm and rolled. The ice-cold soufflé is a made-up soufflé—an unbaked mousse mixture shaped in the form of a soufflé.
There are two basic types of soufflés. The most common is made with a cream sauce base (béchamel) flavored with spinach, cheese, etc., into which egg yolks and beaten egg whites are added. The second type uses a purée of the main ingredient as a base, to which egg yolks and the beaten egg whites are added. It can be a purée of cauliflower or mushrooms, or, in our case, raspberries. The flourless soufflé cooks faster and is lighter in texture.
Most soufflés can be prepared ahead, placed in a mold, and kept refrigerated for a couple of hours before cooking. Remember that the smaller the soufflé, the easier and better it works. Large soufflés are harder to make and an 8- to 10-cup soufflé is about the maximum. It is important that large soufflés be cooked in the center of the oven so there’s equal heat all around.
Remember that the equipment used to beat the whites must be immaculately clean. The egg whites should have no egg yolk in them. If they do, the egg whites will not expand to the right volume during beating. Beat the whites in an unlined copper bowl cleaned with vinegar and salt for the most volume. (Or add a dash of salt or lemon juice or cream of tartar for the same effect.) Do not beat the whites in aluminum or they will discolor. Have the base ready before you beat the whites. When you start beating, do not stop. If you stop, the whites become grainy. As soon as they are ready, combine with the base as quickly as possible. At that point the mixture can be placed in the mold and kept for a while. The base should be lukewarm when the whites are added. Whisk about a third of the egg whites into the base mixture to lighten it, then fold the rest of the whites in with a spatula. If all the whites are beaten into the base instead of being folded in, the mixture will lose volume and become too dense. The size of the mold is important and the mixture should fill it to the rim. A half-full soufflé mold will not look right after baking, even if the mixture has risen properly. The soufflé should go from the oven directly to the table, so seat your guests in advance.
Be sure when separating the eggs that all the white is removed from the shell. If a bit is left it will amount to a whole egg white for every five or six eggs. If the eggs are small, add one or two egg whites. It is better to have too much egg white than not enough.
For the recipe that follows you will need a 5- to 6-cup (1.2- to 1.4-liter) soufflé mold. Butter the mold, coat with sugar, and set aside.
SoufflE
6 large egg whites
Pinch of salt
¾ cup (169 grams) sugar
2 cups (340 grams) very ripe raspberries
Sauce
1 cup (170 grams) fresh raspberries
1 10-ounce/283-gram package frozen raspberries, defrosted
⅔ cup (158 milliliters) seedless raspberry preserves
1 tablespoon raspberry brandy, kirsch, or cognac
Confectioners’ sugar for sprinkling
Strain combined sauce ingredients through a fine strainer or food mill.
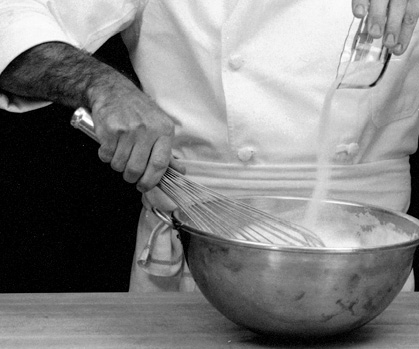
1. Preheat the oven to 375 degrees (191°C). Place the egg whites and a pinch of salt in the bowl of an electric mixer and beat on medium to high speed until they form a peak. Add sugar gradually while continuing to beat, keep beating on high speed for about 30 seconds. With a fork, crush ½ cup (85 grams) of raspberries coarsely and fold along with the whole ones into the egg whites. Fill the mold with the soufflé mixture. Smooth the top with a metal spatula and make ridges with the spatula to decorate, place the soufflé on a cookie sheet in the preheated oven for 20 minutes. If, after 10 to 15 minutes of cooking, the soufflé appears to be browning too fast, place a loose piece of aluminum foil over it and continue to bake.
2. Remove from the oven and sprinkle confectioners’ sugar on top. Serve immediately with raspberry sauce.
Caramel Lime Soufflé with Lime Sauce
(Soufflé au Citron et Caramel)
This soufflé is made at least five hours before serving and preferably the day before. It is then unmolded and served cold with the lime sauce. It can also be served hot (step 7) with the same sauce.
The soufflé mold is first lined with caramel and the soufflé is cooked in a double boiler. Soufflés cooked in this manner tend to rise evenly without cracking and hold their height for 15 to 20 minutes after they come out of the oven. But unless the mold is lined with caramel, as is done in this recipe, a soufflé baked in a water bath will be wet and white around the sides. It will not have the golden exterior of a regular soufflé that is cooked dry in the oven.
The cold caramel lime soufflé makes a delicate, light, cold dessert that is delicious with the lime sauce.
Caramel
2 cups (450 grams) sugar
½ cup (118 milliliters) water
lime sauce
⅓ cup (80 milliliters) fresh lime juice
1 tablespoon water
Half the caramel recipe from above
2 tablespoons Grand Marnier
SoufflE mixture
5 large egg yolks
¼ cup (56 grams) sugar
2 tablespoons cornstarch
1 teaspoon pure vanilla extract
Grated peel of 1 lime (1½ teaspoon)
1¼ cup (296 milliliters) milk
6 large egg whites
1. to make the caramel: Combine the sugar and water in a saucepan and stir gently, just enough to moisten the sugar. Bring to a boil and cook over high heat without stirring or shaking the pan, until the mixture turns a golden caramel color, approximately 10 to 12 minutes. Pour about half the caramel into a 6-cup (1.4 liter) soufflé mold.
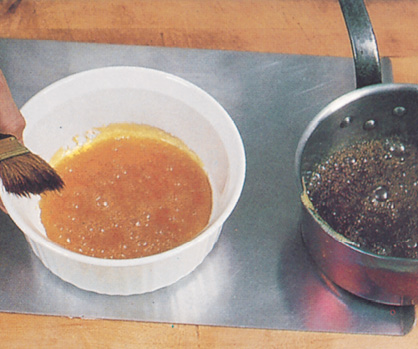
2. Incline the mold on its side, holding it over a cookie sheet to catch any caramel drippings and, using a bristle brush (not nylon), turn the mold and brush the caramel onto the sides as it flows, until the sides of the mold are completely coated. Work quickly so you can finish coating the mold before the caramel hardens.
To make the lime sauce: Add the lime juice and water to the remaining caramel and bring the mixture to a boil, stirring. Set aside to cool.

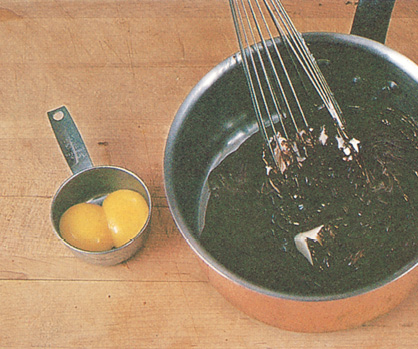
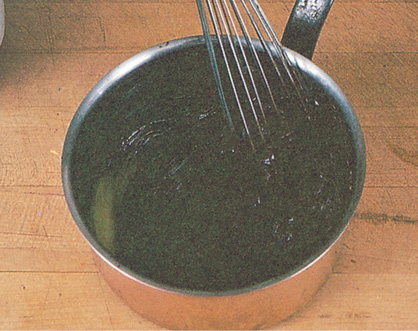
3. for the soufflE: Preheat the oven to 350 degrees (177°C). Place the egg yolks in a bowl with the sugar, cornstarch, vanilla, and grated lime peel, and mix well with a whisk. Bring the milk to a boil and combine with the egg yolk mixture. Pour into a saucepan and bring to a boil, stirring with the whisk, especially around the bottom edge of the saucepan to prevent the mixture from scorching. As soon as it comes to a boil (it should be thick and smooth), remove from the heat. Beat the egg whites until firm and add one-third to one-fourth of them to the egg yolk mixture, mixing them in well with the whisk to lighten the mixture.
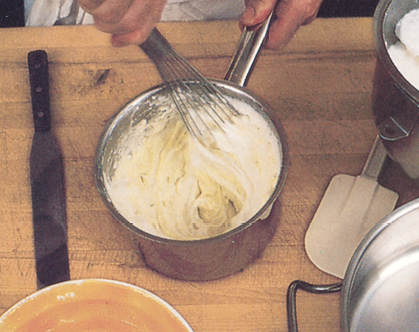
4. Add the soufflé base, now lightened by the addition of the egg whites, to the rest of the beaten egg whites and fold in with a spatula. Work quickly to prevent the mixture from getting grainy. It should not take more than 20 to 30 seconds.
5. Pour the mixture into the caramel-lined mold. It should fill the mold.
6. Place the mold in a pan and surround it with lukewarm water. Place in the oven for 1 hour 10 minutes.

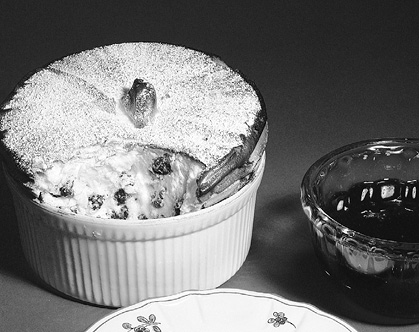
7. When it emerges from the oven, the soufflé should have risen at least a couple of inches above the mold and be brown on top. It will hold its shape for about 15 to 20 minutes and can be served hot with the lime sauce.
8. To serve the soufflé cold, allow it to cool overnight or at least 5 to 6 hours in the refrigerator, covered (so the edge of the soufflé mold doesn’t dry out and get sticky from the sugar, thus causing the soufflé to stick to the sides; if covered, the soufflé will develop moisture and the outside will stay moist). The soufflé will sink down but should not sink below its original volume before baking. Pull the sides of the soufflé toward its center to loosen it all around.
9. Stir the Grand Marnier into the lime sauce. The sauce should be about the thickness of heavy syrup.
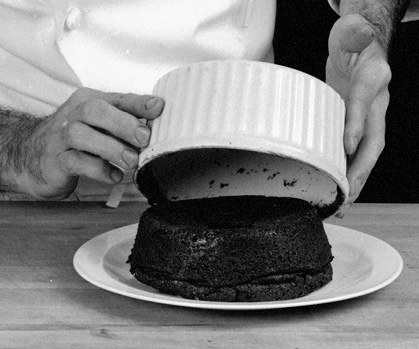
10. Unmold the soufflé; it will slide out easily onto a serving platter. Coat with some of the sauce.

11. Cut the soufflé into wedges and serve with additional sauce.
Chocolate Soufflé with Rum Sauce
(Soufflé au Chocolat Sauce au Rhum)
This soufflé does not need flour because the chocolate has enough body to hold the egg whites. More than any other soufflé, the chocolate soufflé should not be overcooked but slightly wet in the center. Serve hot right out of the oven with the sauce or let it cool, unmold and serve in wedges like a cake with or without a sauce.
Rum sauce
1½ cups (355 milliliters) milk
2 teaspoons cornstarch
1 teaspoon pure vanilla extract
3 large egg yolks (reserve the whites for the soufflé)
¼ cup (56 grams) sugar
2 tablespoons good dark rum
Place the milk, cornstarch, and vanilla in a saucepan. Mix with the whisk and bring to a boil. Meanwhile, combine the egg yolks and sugar in a bowl and whisk for 1 to 2 minutes until the mixture is light, fluffy, and pale yellow. Pour the boiling milk all at once directly on top of the yolks, whisking to combine well. The hot milk will cook the egg yolks. Cover with plastic wrap and let cool. When cold, add the rum.
Soufflé
4 ounces (113 grams) bittersweet chocolate (or 3 ounces/85 grams sweet and 1 ounce/28 grams bitter)
½ cup (118 grams) milk
4 large eggs at room temperature, separated, plus the 3 egg whites reserved from the sauce
3 tablespoons sugar
Confectioners’ sugar for sprinkling
1. Preheat the oven to 375 degrees (191°C). Butter and sugar a 6-cup (1.4-liter) soufflé mold and refrigerate until ready to use. Place the chocolate in a saucepan with the milk and melt on top of the stove. Stir until it comes to a simmer. Remove from the heat and whisk the yolks in. Beat the 7 egg whites until they reach soft peaks and add the sugar. Keep beating for about 1 minute until stiff.
2. Whisk about one-third of the egg whites into the chocolate. Pour the chocolate mixture back onto the beaten egg whites.

3. Carefully fold the chocolate mixture into the egg whites, then pour into the soufflé mold. It should reach the rim of the mold. At this point, the soufflé can be kept for a up to an hour, refrigerated or at room temperature.

4. Place on a cookie sheet in the oven and cook for 18 to 20 minutes. The baked soufflé should be moist in the center. Sprinkle with confectioners’ sugar and serve immediately with the rum sauce around it.

5. You can leave the soufflé to deflate and cool overnight and then unmold it, cut into wedges and serve with sweetened whipped cream or with the rum sauce. It will have the consistency of a very light cake.
Chocolate Leaves
(Feuilles en Chocolat)
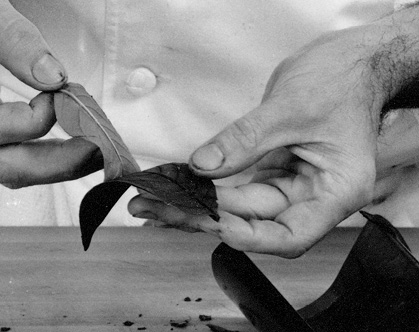
The best and easiest way to make chocolate leaves is to coat real leaves with chocolate. Natural leaves come in all shapes and sizes and make beautiful designs. Use dark chocolate, milk chocolate (which has a lighter color), or white chocolate.
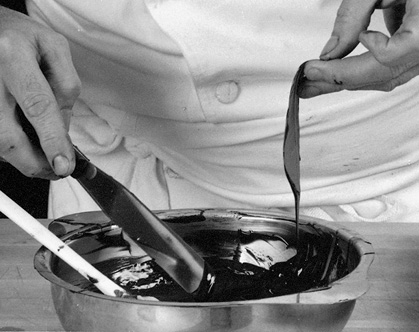
1. Select your leaves. Try to pick leaves all the same size. Decide whether you are going to coat the top or the underside of the leaves. The design on the underside is usually in more relief and will give more texture to the chocolate. Melt the chocolate in the microwave oven or over hot water.
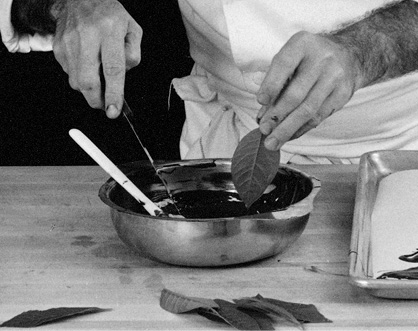
2. Dip a side of the leaf in the chocolate, making sure that it is coated all over. Or, spread chocolate on the leaf with a spatula.
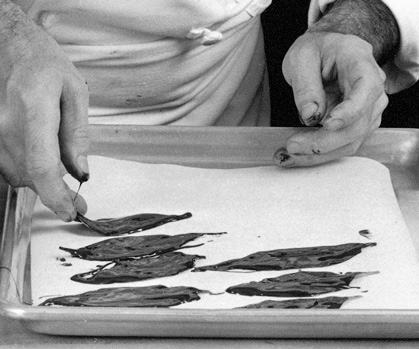
3. Place the leaves, chocolate side up, flat on a piece of parchment or wax paper.
4. White chocolate is usually thicker. Use a spatula or a knife to spread it well. Place the coated leaves flat on the paper.
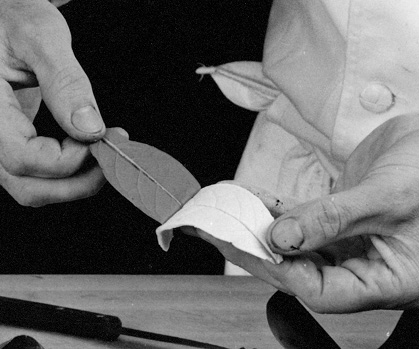
5. When the chocolate is almost set but still soft, place leaves in a curved pan to mold. If the chocolate is still too soft it will run toward the center of the leaves; if it is too hard it will break when bent. Set the pan in the refrigerator until the leaves are set.

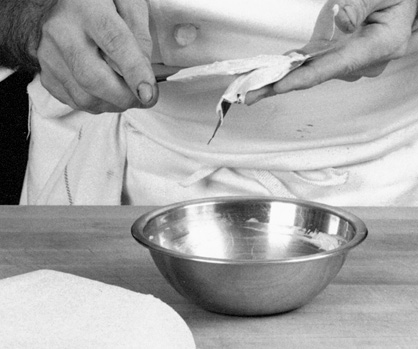
6. Pull each leaf from the chocolate. They should come off easily.
7. A white chocolate leaf. Arrange all your leaves on a platter or use to decorate a cake or a cold soufflé.
Chocolate Truffettes
(Truffettes en Chocolat)
These small chocolate truffles, or truffettes, freeze quite well and can be made ahead of time. Many of the chocolate truffles on the market have a soft and creamy interior and it is impossible to keep them for more than a few days, but these have a firm consistency that lasts.
The basic mixture can be flavored differently. I have used three flavor combinations: orange and Grand Marnier, coffee and rum, and cognac and almond.
Each variety has a different coating, which makes the flavors easy to identify. One is dusted with bitter cocoa powder, another is rolled in roasted sliced almonds, and the third is coated with melted chocolate.
Chocolate truffles can also be flavored with a praline paste, which is a mixture of caramelized sugar and almonds, or vanilla, as well as cinnamon or bourbon. Other coatings—from white chocolate to shaved chocolate—can be used.
YIELD: About 60 to 70 truffettes about the size of large cherries.
Base mixture
½ pound (8 ounces/227 grams) 70% cocoa chocolate, bittersweet or semisweet
½ stick (¼ cup/58 grams) butter
2 large egg yolks
orange truffles
1 teaspoon grated orange rind
1 tablespoon Grand Marnier
Bitter cocoa powder for dusting
Coffee-rum truffles
2 teaspoons coffee extract
2 teaspoons rum
3 to 4 ounces (85 to 144 grams) bittersweet chocolate, for coating
cognac-almond truffles
1 tablespoon cognac
¾ cup (95 grams) sliced almonds
1. For the base mixture: Put the bittersweet chocolate in a saucepan and melt over hot water, or melt in a microwave oven. Add the butter and stir with a whisk until smooth and glossy.
2. Add the egg yolks and whisk. The mixture will thicken and lose some of its shine.
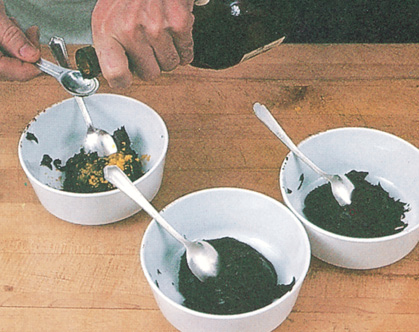
3. For the three flavors: Divide the mixture among three different bowls. To one of the bowls, add the 1 teaspoon orange rind and 1 tablespoon Grand Marnier, and mix well. To a second bowl, add the 2 teaspoons each coffee extract and rum, and stir to mix thoroughly. To the chocolate mixture in the remaining bowl, add the 1 tablespoon cognac and mix well. After the addition of liquid to each of the bowls, the chocolate may become shiny again or it may remain dull; either way is fine. Refrigerate the bowls until the chocolate mixture hardens.
4. When the chocolate mixtures are hard, make truffettes, one batch at a time, by scooping out teaspoonfuls and placing them on a cookie sheet lined with wax or parchment paper.

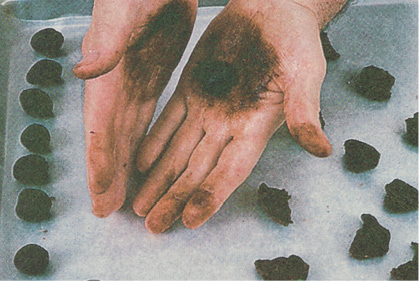
5. Take each of the little chocolate balls and roll between the palms of your hands to round them, making them look like a real truffle that might be found underground.
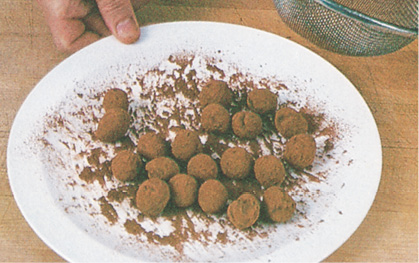
6. For the orange truffles: Place the orange-flavored truffles on a plate dusted generously with bitter cocoa powder and shake the plate so they roll in the powder and are coated on all sides. Set aside.
7. For the coffee-rum truffles: Melt the 3 to 4 ounces chocolate in a double boiler and, when cool enough to handle, pour about 2 tablespoons of it into the palm of one hand. Roll the coffee-rum truffles one by one in the chocolate in your hand until well-coated and place them on a cookie sheet lined with wax paper. Refrigerate until the outside chocolate has hardened.

8. For the cognac-almond truffles: Preheat the oven to 400 degrees (204°C). Spread the almonds on a cookie sheet and place in the oven to brown for 8 to 10 minutes. When the almonds are cool, press the balls of cognac-flavored truffles into them, crushing the nuts slightly and embedding them into the truffles to coat them on the outside.

9. The assortment of truffles are ready to be arranged for serving.

Chocolate Goblets
(Petits Bols en Chocolat)
These make attractive receptacles for fruit, cream, or other desserts.
YIELD: 4 goblets
12 ounces (340 grams) bittersweet chocolate
2 ounces (57 grams) white chocolate
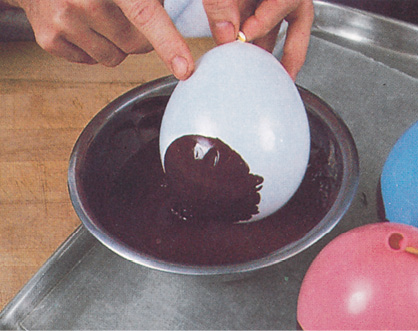
1. Melt the bittersweet and white chocolate separately in double boilers, making certain that no water gets into the chocolate as this will thicken it and make it lose its shine. If the chocolate is too thick, add a little corn or cottonseed oil. Cool both the chocolates to tepid (about 100 degrees/38°C). Blow up the balloons until they are 4 to 4¼ inches (10 to 11 centimeters) wide, then close them at the neck with plastic-coated wire twisters. Dip each balloon directly into the melted bittersweet chocolate, inclining it slightly to form a roundish shape on one side.
2. Twist the balloon and dip it in the chocolate again to create another large roundish shape around the base, lift it out and dip it again—3 or 4 times in all—then place on a parchment-lined tray. Some of the chocolate will run down the balloon and accumulate at the base to form a thicker and more stable pedestal. Refrigerate until set or, if you want to add a white chocolate design, proceed with the instructions below.

3. For a different look, pour about 2 tablespoons of the melted white chocolate into a paper cornet, fold the cornet, and cut the tip off.

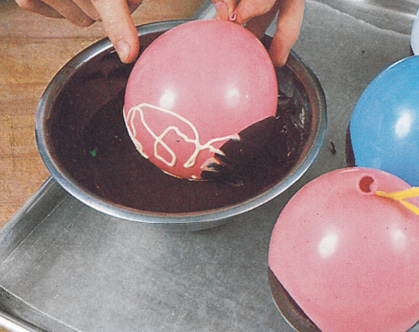
4. Pipe lines of white chocolate around the still-soft chocolate on the dipped balloon. The white chocolate will run slightly into the dark chocolate and create a marbled effect.
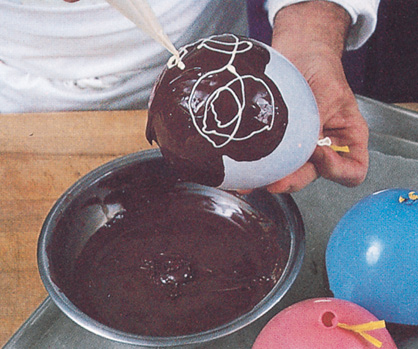
5. Or if you prefer to have the inside of the goblet marked with the white chocolate, pipe lines directly on the outside of a balloon.
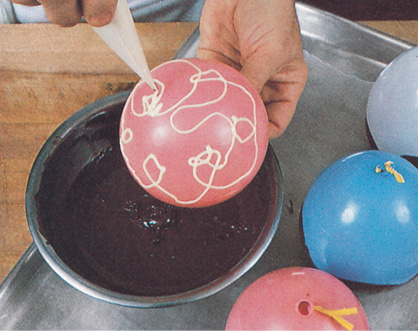
6. Then dip the base of the balloon into the bittersweet chocolate, as described in step 2. Place on a tray and refrigerate until hard.
7. After the chocolate has set hard, open the balloon and release the air inside. Although the sides of the balloon will separate from the chocolate around it, the goblet base may adhere more stubbornly to the balloon.
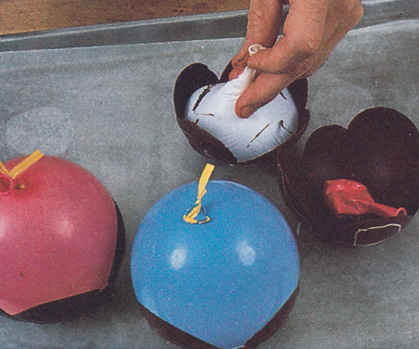
8. Pry up the balloon at the base with your fingers. If it takes too long, and the chocolate begins to soften, return to the refrigerator or freezer to harden slightly before finishing the removal of the deflated balloons.

9. The goblets, some smooth inside and some with white chocolate marbling, are ready to be filled. At this point, they can be stored in a container in the refrigerator or carefully wrapped in plastic wrap and frozen.
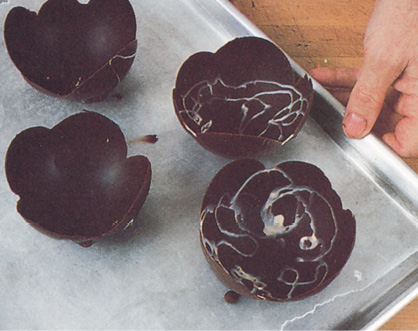
How to Peel and Glaze Chestnuts
(Epluchage et Marrons Confits)
When buying chestnuts, select carefully, checking for small holes which indicate that the chestnut is wormy. Choose them plump and shiny. Fresh chestnuts are delicious just plain roasted in the oven, over charcoal, or in the fireplace. However, after roasting and peeling they can be braised and served whole or boiled and puréed. Although dehydrated chestnuts are readily available, they do not compare to fresh ones. Before braising chestnuts with a roast pork or turkey, both the outer shell and inside skin have to be removed.
For a purée, usually served with a red wine venison stew or other game, cover the peeled chestnuts with water (or water and chicken stock), add a dash of salt and a rib of celery and simmer, covered, for about 40 to 45 minutes until tender. Then purée through the fine blade of a food mill and finish with butter, salt, pepper, and a bit of heavy cream.
For a dessert purée, such as the Mont-Blanc (a concoction of meringue, whipped cream, and purée of chestnuts), peel the chestnuts, then cook in milk with a dash of sugar and vanilla. Purée in the food mill and sweeten with a sugar syrup.
For a stuffing, peel the chestnuts, cook in water for about 30 minutes, then mix with the other stuffing ingredients. If the chestnuts are not cooked in water first, they will be tough in the stuffing.
Regardless of how they are served, the chestnuts must be peeled first.
YIELD: About 3⁄4 pound (340 grams) glazed chestnuts
To glaze chestnuts
1 pound (454 grams) chestnuts (about 20 large)
12 cups (3 scant liters) water
2 cups (450 grams) sugar
1 teaspoon pure vanilla extract
2 tablespoons rum or cognac
1. Preheat the oven to 400 degrees (204°C). Make a slice against the grain on both sides of the chestnuts. Be careful to slice only the outer and inside skins without going to much into the flesh.

2. Place on a cookie sheet and roast for approximately 15 to 20 minutes in the oven. Press the chestnuts to crack them open.
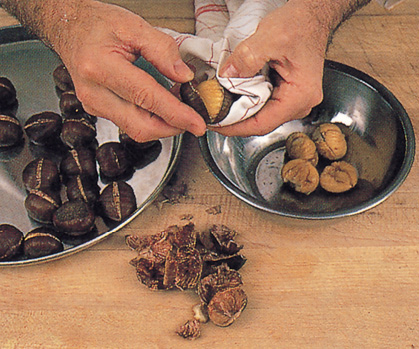
3. The chestnut should come out in one piece. Put the ones that don’t peel easily back into the oven for a few minutes. Don’t roast too many at one time unless you have helpers to peel them with you while they are hot. As they cool, they become hard to peel.

4. To glaze the chestnuts, place the chestnuts, water, sugar and vanilla in a large shallow saucepan, bring to a boil and boil for 1 minute. Reduce the water to a bare simmer and cook gently, covered, for about 3 hours at a 180-degree (82°C) temperature. Uncover and cook slowly for another hour, or until a heavy syrup has formed and all the chestnuts are coated with it.
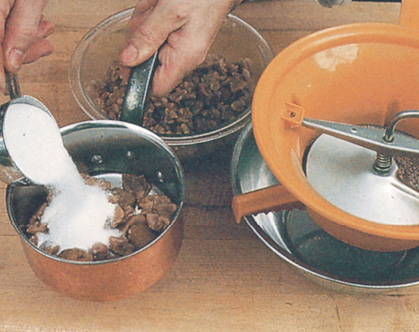
5. Half of the chestnuts may be broken. Fortunately, most recipes call for pieces of candied chestnuts. Let the chestnuts cool and then place in a jar. Add 2 tablespoons of rum or cognac to the syrup. Cover with the syrup. Keep refrigerated and use when needed.

Chestnut Chocolate Cake
(Turinois)
This is a rich cake, made with melted chocolate, purée of chestnuts, and butter. It should be served very cold, cut in thin slices, plain or with a chocolate sauce or a custard cream. Leave plain or decorate with confectioners’ sugar, and glazed or almond chestnuts. If you decorate the top with confectioners’ sugar, do it at the last moment; otherwise the sugar will dissolve within 20 to 25 minutes because of the moistness of the cake.
2 pounds (908 grams) peeled chestnuts (about 2¾ pounds unpeeled), page 646
2 sticks (1 cup/227 grams) unsalted butter
¾ cup (169 grams) sugar
1 pound (454 grams) bittersweet chocolate, melted
2 tablespoons dark rum
½ cup (170 grams) pieces of candied chestnuts (optional)
Confectioners’ sugar
1. Place the peeled chestnuts in a kettle and cover with water. Bring to a boil and simmer gently for 40 to 45 minutes until tender. The 2 pounds of chestnuts will absorb moisture during cooking, which will bring their weight up to about 3 pounds (1.4 kilograms) when cooked. Drain the chestnuts (most will have broken) and pass through the fine blade of a food mill while still hot.
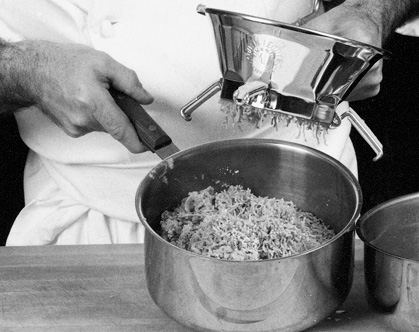
2. Mix the butter and sugar together and work with a whisk until smooth. Add the chocolate, the purée of chestnuts, and the dark rum and mix well until the mixture is smooth. Then add the pieces of candied chestnuts (optional).
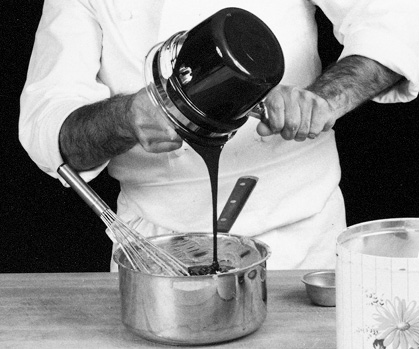
3. Line a loaf pan with a large strip of parchment paper. Place the mixture in the mold.
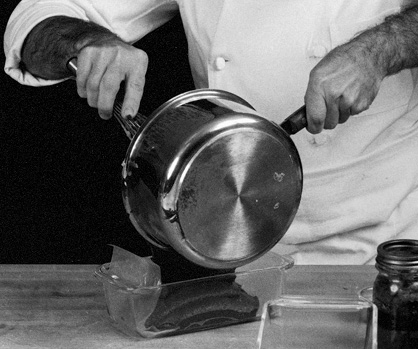
4. Refrigerate for at least 4 hours or overnight before unmolding. Run a knife all around the cake, unmold, then remove the paper.

5. To decorate, make a rectangular stencil with a piece of wax paper and place on top of the cake. Sprinkle confectioners’ sugar over the stencil, then remove.

6. Decorate the top with almonds or candied chestnuts. Serve plain or with a custard sauce flavored with rum.
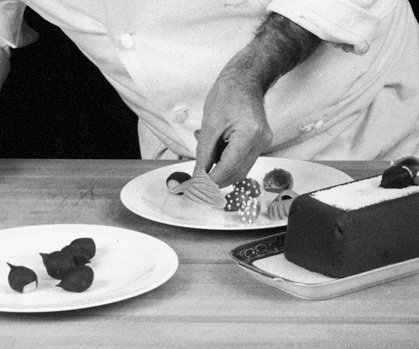
Almond Shells
(Nougatine)
A nougatine is made from caramelized sugar and sliced almonds and can be either used as a garnish on cakes (cut into different shapes—from triangles to strips) or pressed into molds, as done below, to create small receptacles to hold different types of fillings. The nougatine can also be crushed into pieces and added to ice cream, custard cream, or pastry cream.
Nougatine is hard to cut, particularly when it is too thick. To make it thinner (the thinner the better), cut out rough round or rectangular shapes to fit the molds you have selected, and then place them back in the oven to soften the nougatine until it is pliable enough to be pressed thinner.
Nougatine is better prepared on a dry day; it is difficult to keep it in areas that have a lot of humidity and moisture. Store in a cookie jar or plastic container with a tight-fitting lid so it doesn’t get soggy and sticky.
Be extra careful when making the caramel so as not to burn yourself. Pour it out onto an oiled marble surface or metal tray; don’t use wood—it will stick. Be sure to oil the dough scraper lightly as well as your metal rolling pin (I have used a piece of cast-iron tube about 1¾ inch/4 centimeters in diameter, which can be obtained from a local hardware or plumbing supply store) to keep the pieces of nougatine from sticking. (A metal rolling pin is also excellent for rolling out dough, since it is heavy, smooth, and stays cool.)
The caramel is made from dry sugar, although it can also be made from sugar and water. Dry caramel, however, produces a more brittle, harder nougatine that is less prone to stick.
Yield: 8 servings
Nougatine Shell
1 pound (454 grams) granulated sugar
2 cups (250 grams) sliced almonds
chantilly filling
Cointreau, Grand Marnier, and/or rum (½ teaspoon per portion to soak the cake)
3 to 4 sliced strawberries for garnish
1 cup (237 milliliters) heavy cream
½ cup (50 grams) confectioners’ sugar
other optional garnishes
Pound Cake
Chocolate Mousse
Candied Violets
1. Put the sugar in a saucepan and cook over medium to high heat, stirring occasionally with a wooden spatula (every 5 to 10 seconds). As some of the sugar around the outside edges of the pan starts to melt, stir it back into the dry sugar.
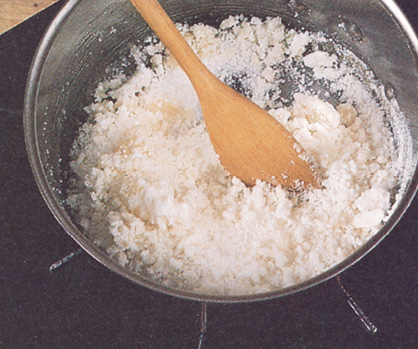
2. After 4 to 5 minutes, the sugar will begin to get liquid. Keep stirring. Lumps of crystallized sugar will be mixed with the melted sugar. Eventually, the lumps will melt as the temperature of the sugar goes higher.

3. After about 7 to 8 minutes, the sugar will liquefy further and turn a caramel color, although there will still be some lumps in it. Lower the heat and continue cooking and stirring until the lumps have completely melted. The caramel will be slightly cloudy and a rich brown color. The total cooking time will be approximately 10 minutes, although it can take longer, depending on the size, the type of metal, and the shape of your pan, as well as the intensity of the heat.

4. Add the almonds and stir gently to incorporate into the melted sugar. Keep cooking for 1 to 2 minutes, until the mixture liquefies again and becomes smooth.

5. Oil a marble slab or metal tray lightly with a tasteless oil (such as cottonseed or corn oil) and pour the nougatine onto it, using a wooden spoon to help scrape it out of the pan.
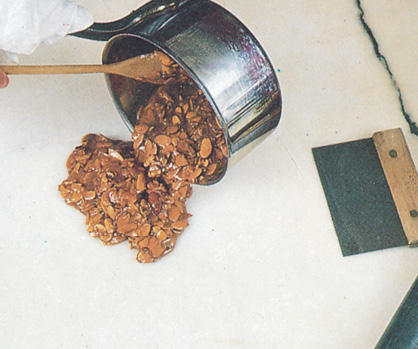
6. Lightly oil a dough scraper and spread the nougatine, being careful the hot mixture doesn’t touch your fingers.
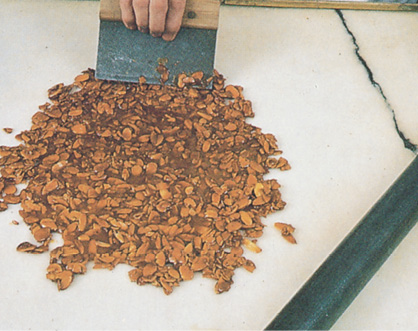
7. Using an oiled metal rolling pin, press down and roll out the nougatine further to make it smooth. It won’t expand too much at this point but should form an irregular circle with a diameter of about 12 to 14 inches (30 to 36 centimeters). If you feel the nougatine is thin enough—no more than ¼ inch (6 millimeters) thick—and soft enough to handle at this point, begin cutting it into shapes using a big, sharp knife or cookie cutter.
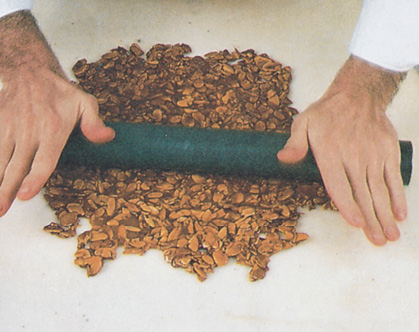
8. If the nougatine is too hard to cut at this point, lift it up off the slab or tray, place it on a cookie sheet, and put it in a preheated 200 to 250 degree (93° to 121°C) oven, checking it every couple of minutes, until it has softened again.

9. Remove the nougatine from the oven and roll it out again directly on the cookie sheet into a thinner layer. It should not be more than ¼ inch (6 millimeters) thick.
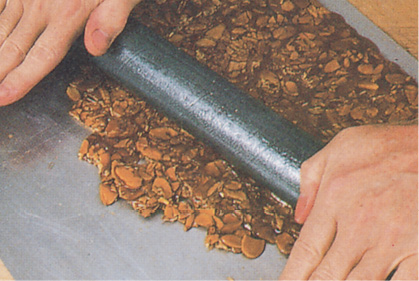
10. Press cookie cutters firmly into the soft nougatine. You may have to hammer the top of the cutters down with your metal rolling pin to cut through the nougatine.

11. Using a large, heavy knife, cut out rectangles from the nougatine and place them directly on top of molds of about the same size. They should be a little too small to fit the molds at this point. Put the nougatine cutouts in their molds into the oven to soften further. Push the nougatine trimmings together roughly and return them to the oven to soften. When soft enough, roll them out again into a smooth, single piece.
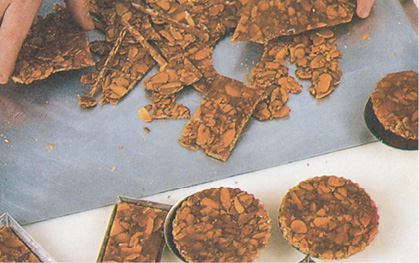
12. For a larger version of the nougatine receptacle, press a large piece of softened nougatine all around on a lightly oiled inverted pie plate. It will conform to the plate to form a large receptacle. Trim the edges with scissors.

13. When the nougatine in the small molds begins to soften, remove the molds from the oven and, holding them with a towel, press the nougatine with the back of an oiled spoon to thin and extend it further up the sides of the molds. If the edges of the nougatine are jagged at this point, trim them with scissors to make them even. (The trimmings can be pulverized and stored, refrigerated, in a jar for use as a flavoring in ice cream, pastry cream, etc.) Set the molds aside.
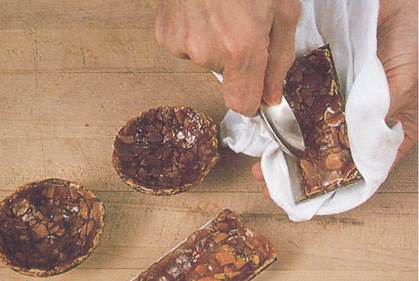
14. After 10 to 15 minutes, the nougatine will have hardened in the molds. Using the point of a knife, pry the shells out of the molds. They should release easily.

15. To make a variety of desserts: Cut the pound cake into ½-inch slices and then into round or rectangular shapes to fit the molds. Place the pieces in the appropriate molds and sprinkle either with rum (if you are using chocolate mousse as a filling), or Cointreau or Grand Marnier (if using the Chantilly filling).
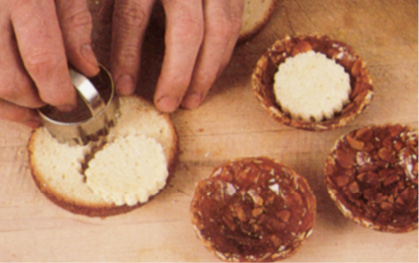
16. For the chantilly filling: Whip the cream with the confectioners’ sugar until stiff. Spoon into a pastry bag fitted with a fluted tip and pipe a mound of cream on top of the Cointreau or Grand Marnier-soaked cake in the molds. Decorate the top with sliced strawberries or other fruit.
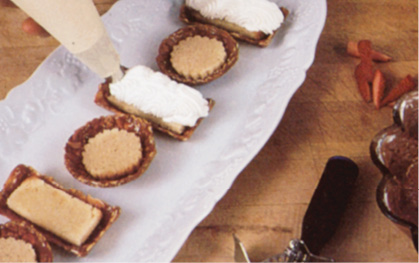
17. Using an ice cream scoop, place a scoop of chocolate mousse on top of the rum-soaked cake.
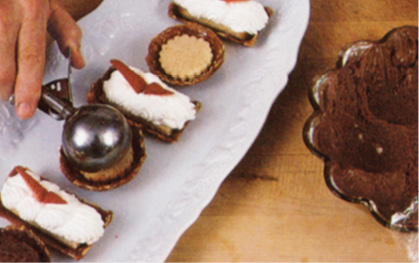
18. Decorate the chocolate filling with a little rosette of whipped cream and a piece of candied violet and serve immediately. (These desserts should not be assembled more than 30 minutes before serving as the liqueur-soaked cake and fillings will make the nougatine shell sticky if filled too far ahead.)
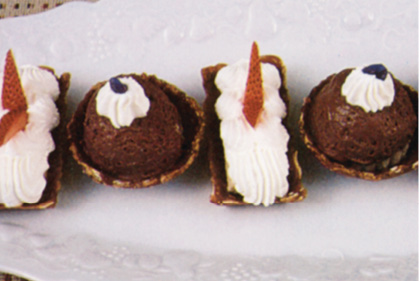
Almond Paste Flowers
(Fleurs en Pâte d’Amandes)
Almond paste is used to flavor cream or ice cream, to coat a cake, to stuff dried fruit or, as in this technique, to make little objects like animals, vegetables, or flowers. Although almond paste can be made from scratch, the commercial product on the market is quite good and easy to use. Keep it in a plastic bag or a well-sealed container since it dries out very fast. If it gets too dry, work it with a tiny bit of egg white until it gets smooth and malleable. If the paste is too soft, work it with confectioners’ sugar to harden to the right consistency. Use confectioners’ sugar instead of flour to roll out the almond paste. The flowers will be soft as they are shaped but after a while they will dry out and harden. They can be kept for a few days on a cake and a few weeks in a closed tin box.
1. If the almond paste is too soft, mix with confectioners’ sugar to make it harder. If slightly dry, add a dash of egg white and work until smooth and soft.
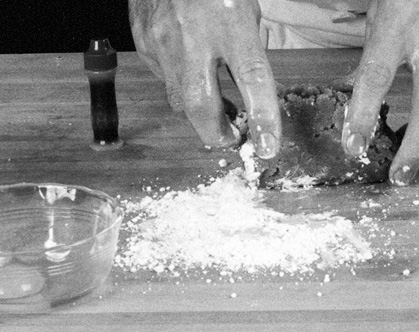
2. Divide the paste and work a few drops of red, yellow, and green food coloring into each batch. (The green is kept for the stems and leaves. Make flowers with the other colors or with plain white paste.)
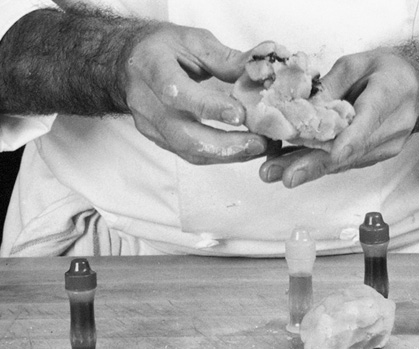
3. To make a rose, shape a piece of paste into a cone. This will be the heart of the rose.
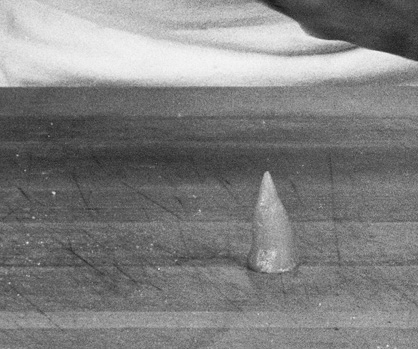
4. Flatten a piece of almond paste with the tip of your finger or a metal spatula, to make it very thin on one edge.

5. Lift the flat piece with a spatula and roll it around the center cone.

6. Roll another piece flat and place around the flower bud. Continue the process, adding more petals. Turn the petal edge outward.
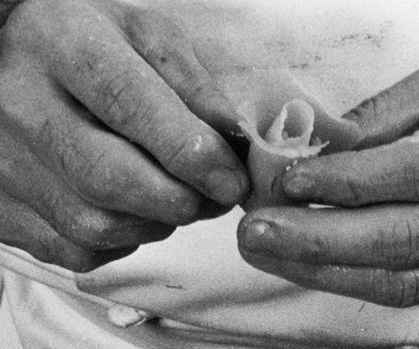
7. To make a carnation, use pink almond paste. Roll in a long cylinder about ¼ inch (6 millimeters) thick and flatten with a spatula, pressing forward so that one edge of the strip is ultra thin. Use confectioners’ sugar to prevent sticking.
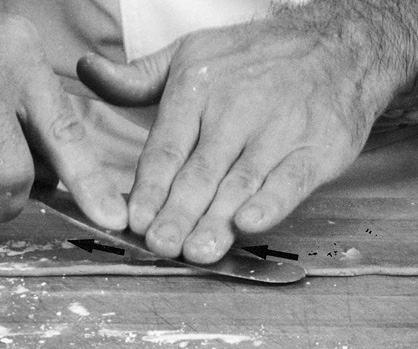
8. Using a fork, make ridges on the thin side of the strip. The tines of the fork must go all the way through the almond paste.
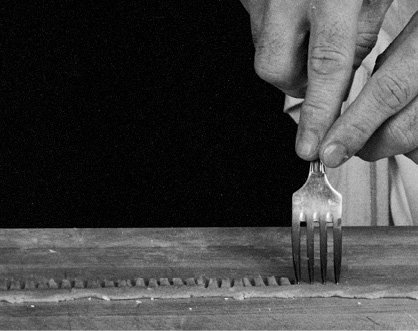
9. Slide a flexible metal spatula under the strip to loosen it.
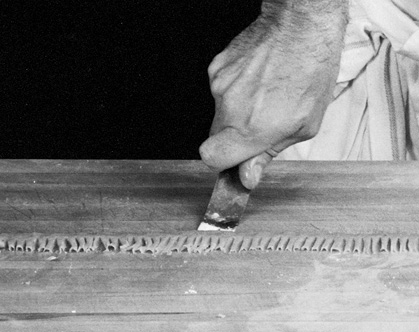
10. Fold the strip left to right on top of itself into wave-like pleats.
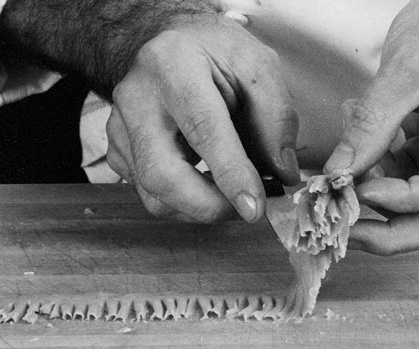
11. Roll the end of the strip around the flower to encase.
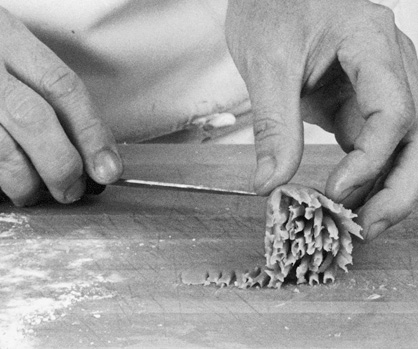
12. Press the bottom together gently between your fingers.
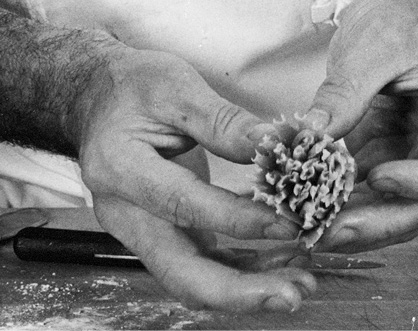
13. Squeeze and the carnation will open to form a beautiful flower. Make small and large carnations. Let rest and dry out for at least 1 hour.
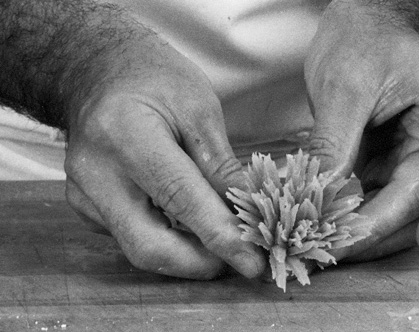
14. To make stems for the flowers, roll out a strip of green almond paste and, with the point of a knife, cut little indentations on each side to simulate thorns, nodes, etc.
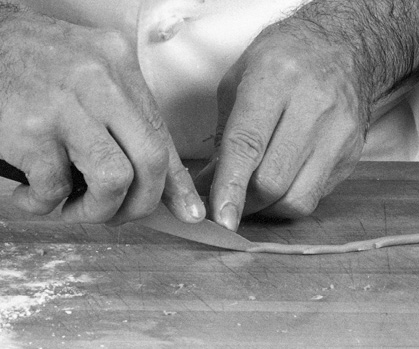
15. Form lozenge- or triangle-shaped leaves and use your knife to sketch veins in the leaves. Fold into different shapes and let dry. Decorate a cake with the flowers, leaves, and stem.

Cake Glazed with Fondant
(Gâteau Fondant)
Cakes, especially wedding cakes, are beautiful glazed with a shiny fondant (sugar icing). To glaze a cake, layer a genoise with a butter cream or ganache, then cover with a layer of almond paste so the top is absolutely smooth for the fondant.
1 8- to 10-inch (20- to 25-centimeter) diameter cake about 3 inches (8 centimeters) high
About 1 pound (454 grams) almond paste
Fast fondant
3 cups (300 grams) confectioners’ sugar
¼ cup (60 milliliters) hot water
1 tablespoon light corn syrup
1. Place the cake on a cardboard round. Roll the almond paste to about 1/8 inch (3 millimeters) thick. Use confectioners’ sugar instead of flour to help in the rolling.

2. Roll the almond paste back onto the rolling pin, lift it up and place it on the cake.
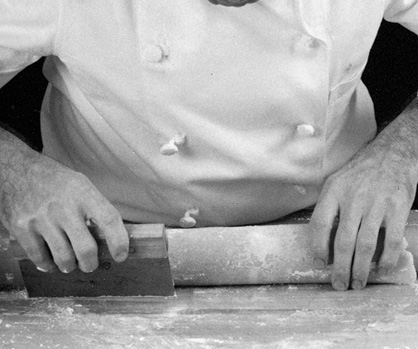
3. Press the paste all around the cake so it adheres well. Trim the base. If there are any cracks, patch closed. Brush the cake. It should be smooth all around and on top.
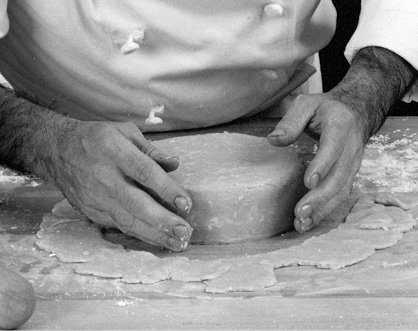
4. To make the fondant, mix together the confectioners’ sugar, water, and corn syrup. Work it for about 1 minute with a whisk. The mixture should be glossy and smooth. Use right away or cover with a wet towel or else it will crust on top very rapidly.
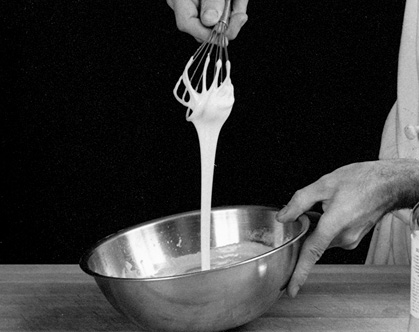
5. Place the cake on a wire rack and pour the fondant on top.
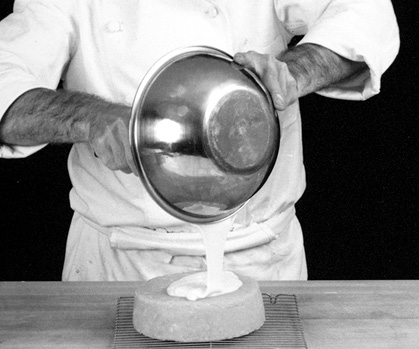
6. Spread with a spatula so the fondant runs all around. Work as quickly as possible.
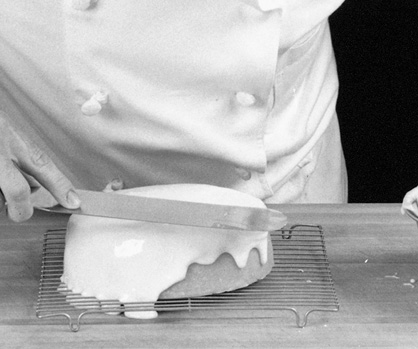
7. Lift the cake and bang the wire rack on the table a few times to encourage excess to drip off.
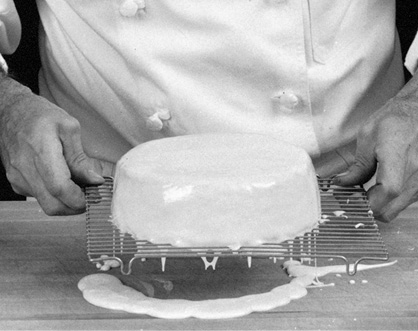
8. Lift the cake and run your fingers around the bottom edge to make it smooth. The cake can now be refrigerated or served.
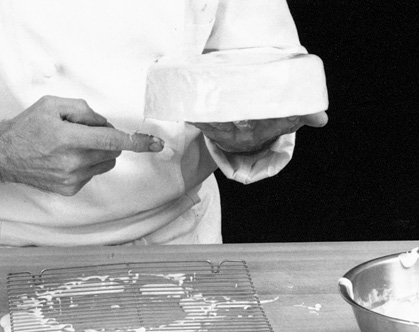
Candied Lime and Grapefruit Peels
(Pelures de Citron Vert et Pamplemousse Confites)
Candied lime and grapefruit peels are easy to make and they can be used in so many ways: chopped and mixed into pastry cream, cut into a julienne to decorate cakes and soufflés, as well as diced and combined with other dried fruit (such as raisins and apricots) to be soaked in rum and cognac, and then added to a fruitcake.
YIELD: 24 pieces
1 to 2 large, very green limes
1 large, bright-skinned grapefruit
3 cups (711 milliliters) cold water
For the Peels of Each Fruit
1 cup (185 grams) sugar
1½ cup (356 milliliters) water
2 cups (370 grams) sugar, to roll the peels in
About 2 ounces (57 grams) bittersweet chocolate, melted, for dipping
About 2 ounces (57 grams) white chocolate, melted, for dipping
1. Using a vegetable peeler, cut about 12 strips of peel from each large lime and grapefruit. (Strips cut with a peeler will be thin and thus cook quite quickly.) Place the strips in a pan with the cold water. Bring to a strong boil over high heat, boil for 30 seconds, then drain and wash under cold water. Repeat to blanch once more. Put the lime and grapefruit peels in separate pans, and add ½ cup sugar and ¾ cup water to each pan. (They should not be cooked together, as their flavors tend to blend.) Bring the liquid in each pan to a boil, and cook over medium to high heat. Cook the lime peel for about 6 minutes, until the syrup gets thicker and the lime skin begins to get transparent.
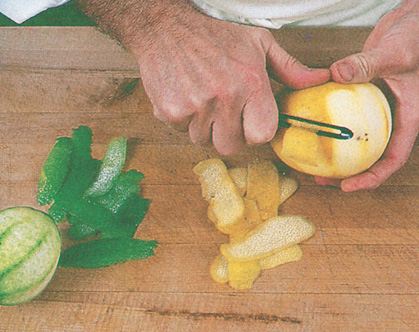
2. Using a fork, lift out the strips of lime peel and place them on a cookie sheet coated with the sugar. Turn the peels, pressing down on them so the sugar adheres to both sides, and then arrange them on a plate.
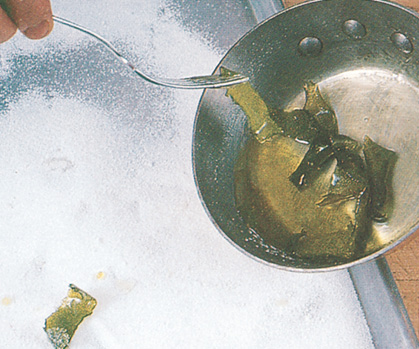
3. The grapefruit peels will take a little longer to cook, about 8 to 10 minutes total. When transparent, lift them out of the syrup with a fork and place in the sugar.
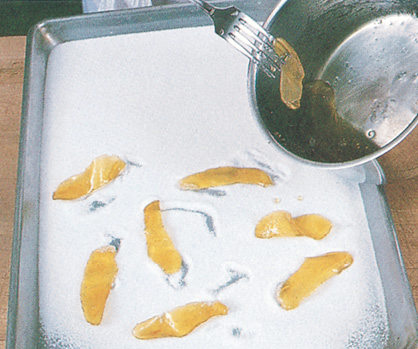
4. Turn the peels in the sugar, pressing them so they are well-coated on both sides with the sugar. Arrange on the plate with the lime peels and set aside for 30 minutes. If they are not to be used right away, place them in a plastic container with a tight-fitting lid so they don’t dry out. They can be stored like this in the refrigerator for weeks.

5. Chocolate peels: Dip the tip of each grapefruit peel into the melted bittersweet chocolate, and arrange on a cookie sheet lined with parchment paper.
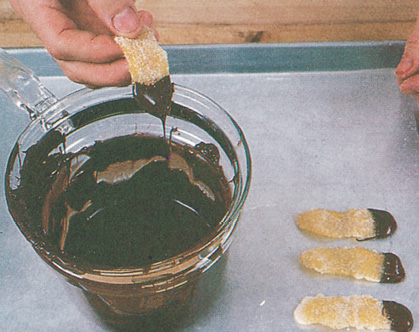
6. Dip the lime peels into the melted white chocolate, and arrange them on the cookie sheet with the grapefruit peels. Refrigerate until the chocolate hardens.
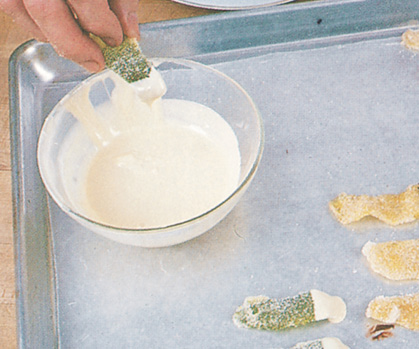
Cheesecake
(Gâteau au Fromage)
Although cheesecake should be made the day before serving so it has time to rest and set, it should not be served ice cold from the refrigerator. If it is refrigerated, it should be brought back to room temperature for serving because it is moister and more flavorful this way. If baked in a cake pan with a removable bottom, as done here, the cake can remain on the pan base and be placed as such on the serving platter. This prevents damage to the platter when the cake is cut.
Yield: 10 to 12 servings
Cheesecake Dough
About 12 graham crackers (7 ounces/198 grams)
3⁄4 stick (3 ounces/85 grams) unsalted butter
1 teaspoon ground cinnamon
1 tablespoon fresh lemon juice
1 teaspoon grated lemon rind
Filling
1¾ pounds (795 grams) cream cheese, at room temperature
1 cup (225 grams) sugar
1 cup (237 milliliters) sour cream
2 tablespoons fresh lemon juice
1 tablespoon grated lemon rind
2 teaspoons pure vanilla extract
4 large eggs
1. Preheat the oven to 350 degrees (177°C).
To make the dough: Break the graham crackers and place them in a food processor with the butter, cinnamon, lemon juice, and grated lemon rind. Process for a few seconds, until the dough comes together. Remove from the food processor and line the removable bottom of a 9-inch (23-centimeter) cake pan that is 3 inches (7.6 centimeters) deep.
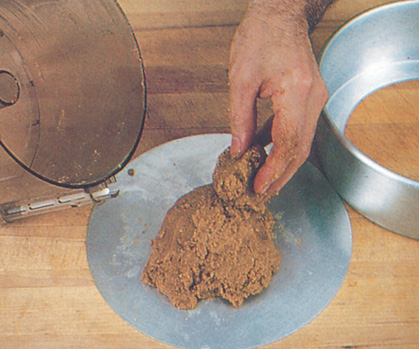
2. Reserve approximately half the dough for the sides of the pan. Press a piece of plastic wrap on top of the remaining dough on the pan base and roll to spread it. It should be very thin, approximately 1⁄8 inch (3 millimeters) thick.
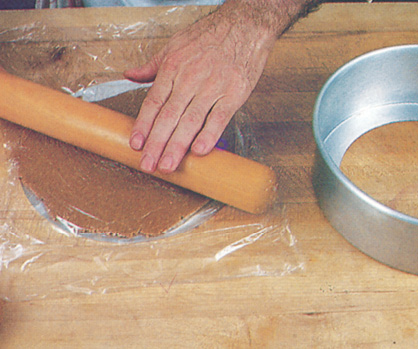
3. Trim the dough around the edge of the pan’s removable bottom with your fingers. Reassemble the pan and press the remainder of the dough up around the inside of the pan so it comes up about 1 to 2 inches (2.5 to 5 centimeters). This border of dough on the sides doesn’t have to be exactly the same height all around; it can vary a little to lend an interesting design to the side of the cake.

4. For the filling: In a food processer, put the cream cheese, sugar, sour cream, lemon juice, lemon rind, vanilla and the eggs, and process until smooth. Pour into the pan and place on a cookie sheet.
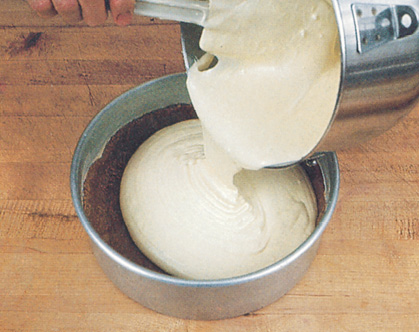
5. Bake for 1 hour. Turn the oven off and allow the cake to continue resting in the remaining heat in the oven for 1 hour longer. The cake should be lightly browned on top. Let cool for a couple of hours before unmolding.
Crème Brulée with Verbena
Crème Brulée is a rich custard and, for this reason, I cook it in small molds, approximately 1⁄2 cup (118 milliliters) each. Sometimes the dessert is made even richer by using only heavy cream, but I find it rich enough with milk and cream in equal proportions.
It is important that the crème brulée be baked slowly in a water bath in the oven. Use tepid water from the tap. The water should not come to a boil as the custard cooks. If the crème brulée is cooked too fast, the albumen will develop and start expanding and little holes will form all around the sides of the custard making it look like a sponge when it should be very smooth and silky in texture.
Crème Mixture
1 cup (237 milliliters) milk ½ cup (36 grams) loose verbena leaves or 2 verbena tea bags
2 teaspoons grated lemon rind
4 large egg yolks and 1 whole large egg
3 tablespoons sugar
1 cup (237 milliliters) heavy cream
Topping
5 tablespoons light brown sugar (about 2 teaspoons per serving)
1. Preheat the oven to 350 degrees (177°C).
For the crème: Put the milk, verbena leaves or 2 teabags, and lemon rind in a saucepan, and bring to a boil. As soon as it boils, cover, remove from the heat, and let steep for 5 minutes.

2. Beat the 4 egg yolks and 1 whole egg with the granulated sugar and add the cream. Combine the steeped verbena mixture with the egg yolk mixture, stirring well to mix thoroughly.

3. Strain the mixture through a fine strainer.
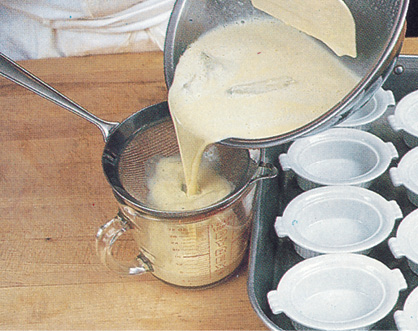
4. Preheat the oven to 350 degrees (177°C). Arrange 8 small molds (the ones used here have a capacity of about ½ cup/118 milliliters) in a roasting pan and fill with the crème mixture. Add enough tepid tap water to the pan to come three-fourths of the way up the outsides of the molds. Bake the molds for approximately 25 to 30 minutes, until set. The water around the molds should not boil. Should the water begin to boil, add a few ice cubes.

5. Remove from the oven and let cool. When cool, cover and refrigerate.
For the topping: At serving time or not more than 1 to 1½ hours beforehand, spread 2 teaspoons of light brown sugar over the top of each crème.

6. Place the molds under the broiler and broil (watching them closely) until the sugar bubbles and turns uniformly brown, approximately 3 minutes or, alternatively, use a blowtorch. Let cool for at least 10 minutes, until the sugar surface hardens, and serve. To eat, crack the sugar shell with the back of a spoon and eat with a nice pound cake as an accompaniment.

