YIELD: 1 heart-shaped cake, 3 to 4 servings

Pastry & Dessert
Christmas Yule Log with Mint Leaves
Poached Peaches with Raspberry Sauce
Vanilla Ice Cream in Netty Cups with Spicy Cherries in Wine
Sweet Pie Dough and Pastry Shell
Pears in Caramel on Puff Paste
Caramel Lime Soufflé with Lime Sauce
Chocolate Soufflé with Rum Sauce
How to Peel and Glaze Chestnuts
English Custard Cream
(Crème Anglaise)
Crème anglaise is a basic and essential cream. It is served with innumerable desserts, flavored in different ways. With the addition of unsalted butter, it can become a fine butter cream (crème au beurre); and with the addition of whipped cream and chocolate it becomes a chocolate mousse; frozen it becomes ice cream. It is the base of such desserts as bavarois, charlotte and the like.
YIELD: 1 quart (1 scant liter)
3 cups (710 milliliters) milk
9 large egg yolks
1 cup (225 grams) sugar
1 teaspoon pure vanilla extract
½ cup (118 milliliters) cold heavy cream
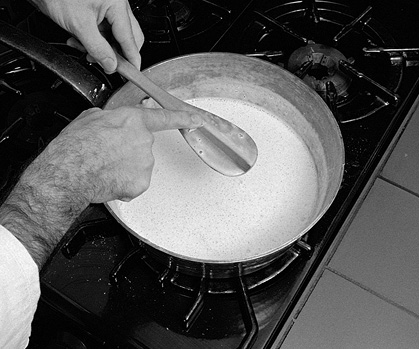
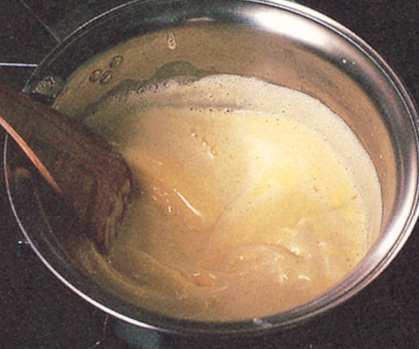
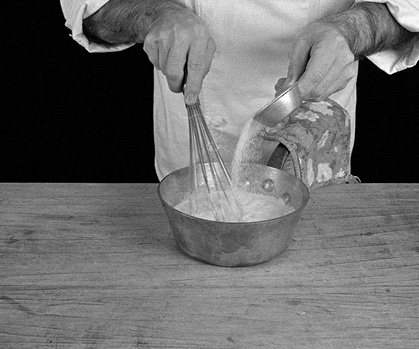
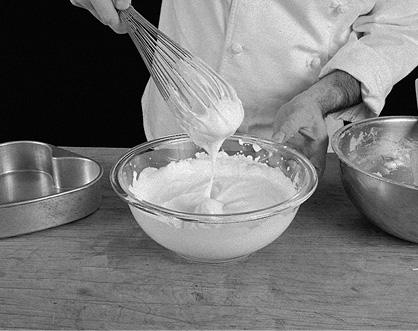
1. Bring the milk to a boil. Set aside. Beat the yolks, sugar, and vanilla in a bowl and beat with a wire whisk for about 3 minutes until it forms a “ribbon.” The mixture should be pale yellow in color, and when lifted with the whisk, it should fall back into the bowl like a ribbon folded on itself. When the ribbon is “stretched,” it should not break. Combine the hot milk and the yolk mixture in a saucepan. Place the cold cream in a bowl with a fine sieve on top. Cook for a few minutes on medium heat, stirring with a wooden spatula, until the mixture coats the spatula.

2. Test by sliding your finger across the cream; the mark should remain for a few seconds. Do not over cook or the eggs will scramble. As soon as it reaches the right consistency and temperature (175 to 185 degrees/79˚C to 85˚C), strain through the sieve into the cold cream. This will lower the temperature and prevent scrambling. Cool, stirring once and a while. Refrigerate until ready to serve.
Vanilla Pastry Cream
(Crème Pâtissière)
Crème pâtissière is a versatile and important basic cream. It can be used as a filling for éclairs, cream puffs, cakes and napoléons, or as a base for sweet soufflés. It can be made richer by replacing some of the milk with heavy cream. It can be varied with the addition of whipped cream for crème chibouche, or flavored with chocolate, coffee, liqueurs, and the like. With the addition of fresh unsalted butter, it becomes a “lean” butter cream (crème au beurre).
The difference between pastry cream and custard cream is the addition of flour. Because there is flour in pastry cream, when it is brought to a boil to thicken it does not curdle; the flour stabilizes it.
YIELD: about 3 cups
2 cups (473 milliliters) milk
6 large egg yolks
⅔ cup (150 grams) sugar
1 teaspoon pure vanilla extract
½ cup (75 grams) all-purpose organic flour
1. Bring the milk to a boil. Set aside. Place the yolks, sugar, and vanilla in a bowl and work the mixture with a wire whisk until it forms a “ribbon.” This should take about 3 minutes. Add the flour and mix well.

2. Add half of the hot milk to the yolk mixture and mix well. Pour the yolk mixture into the remaining milk, mixing as you go along.

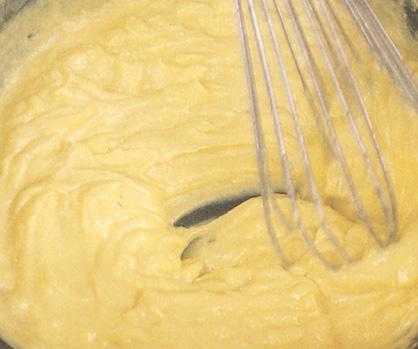
3. Bring to a boil on medium heat, stirring constantly with the whisk. The sauce will thicken as soon as it reaches the boiling point. Reduce heat and cook for 1 to 2 minutes, stirring constantly to avoid scorching.
Praline Cream
(Crème Pâtissière)
Crème praline is crème pâtissière with the addition of a powdered almond and sugar mixture (nougatine). It is used as a filler for desserts like Paris-Brest.
¾ cup (90 grams) confectioners’ sugar
¾ cup (120 grams) whole almonds
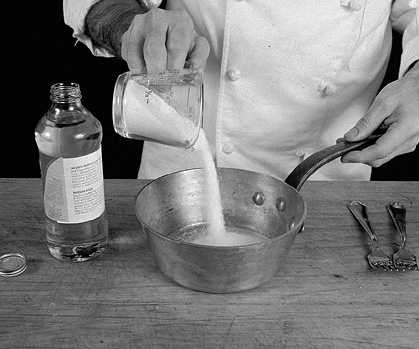
1. To make the nougatine (the cooked almond and sugar mixture), put the confectioners’ sugar and almonds in a heavy saucepan. Stir with a wooden spoon. Place the saucepan over medium heat and cook, stirring constantly, until the sugar starts to melt. Since there is no liquid in the mixture, it will take a few minutes before the edges start to melt. Stir the melted and still dry parts together. However, as soon as the sugar melts, it will turn rapidly into caramel. This method produces a very hard and tight caramel.
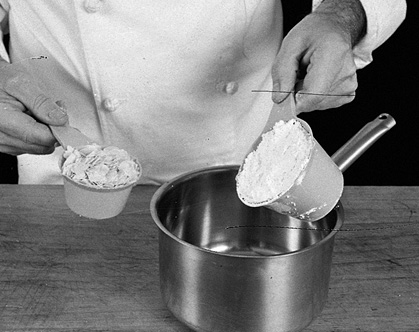
2. As soon as it turns into caramel, pour the mixture onto an oiled marble surface or an oiled tray. When cooled, break into pieces and crush into powder in a food processor or blender.

3. Fold the mixture into the crème pâtissière.
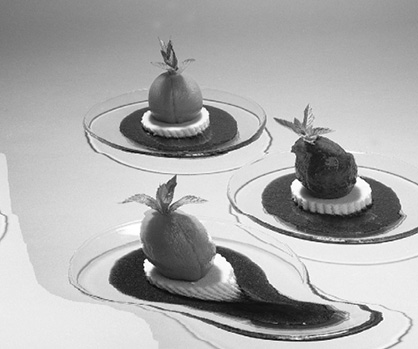
Caramel Snow Eggs
(Oeufs à la Neige)
Snow eggs are the archetypical French dessert, served in starred restaurants as well as at family dinners. Bathed with a custard cream, they are usually coated with caramel. It is important that the temperature of the poaching water does not rise above 180 degrees (82°C) and that the eggs are poached only a few minutes on each side. If they boil in the cooking liquid, they will expand and deflate as they cool and becoming rubbery.
When the caramel is spooned on the eggs in thin threads, it tends to melt faster than when applied in large spoonfuls, which will last for at least 2 to 3 hours. Snow eggs can be poached a few hours ahead of serving and the custard cream can also be made ahead. The dessert should not be assembled more than a couple of hours before serving or the caramel will have melted by serving time.
YIELD: 8 servings
custard cream
½ cup (119 milliliters) heavy cream
1 teaspoon cornstarch
1½ cup (355 milliliters) milk
6 large egg yolks
⅓ cup (62 grams) sugar
1 teaspoon pure vanilla extract
light meringue mixture
6 large egg whites
¾ cup (169 grams) sugar
caramel
½ cup (93 grams) sugar
2 tablespoons water
To make the custard cream: Put the cream in a bowl and set a fine strainer on top. In a saucepan, mix the cornstarch with the milk, and bring to a boil. Meanwhile, with a whisk, mix the 6 egg yolks and sugar together in a bowl, and beat until smooth, about 30 seconds to 1 minute. Pour in the boiling milk, then return the mixture to the saucepan and stir with a wooden spoon over medium heat until it thickens (at about 180 degrees/82°C). The foam created from beating the egg yolks and sugar will disappear when the custard has reached 180 degrees (82°C) and the mixture will thicken. The custard should coat the spoon. Immediately pour it into the cold cream through the fine strainer (to catch any curdled bits); this will lower the temperature of the custard mixture and prevent it from curdling further. Add the vanilla, cover, and cool.
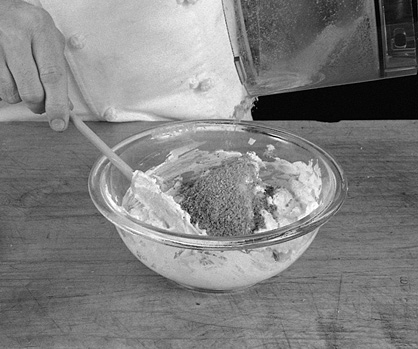
1. To make the light meringue miXture: Place a fairly large saucepan with at least 3 inches (7.5 centimeters) of water in it on the stove, and bring the water to approximately 180 degrees (82°C). For the light meringue mixture: Beat the 6 egg whites by hand with a whisk, or in a mixer, until stiff. When firm, sprinkle the sugar quickly (in 5 to 10 seconds) onto the whites while continuing to beat, and beat for another 10 seconds, just long enough to incorporate the sugar. Using a round ice cream scoop that holds 1⁄3 to 1⁄2 cup, scoop a portion of the meringue, filling the scoop completely, and smooth the top with your fingers to round it.

2. Drop balls of meringue one by one (you should have 6 to 8) into the hot water, rinsing the scoop, if sticky, after each use in a bowl of clean water. The cooking water should not boil when you are poaching the meringues or they will expand and then deflate and get rubbery.

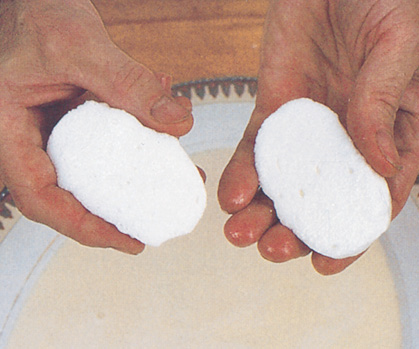
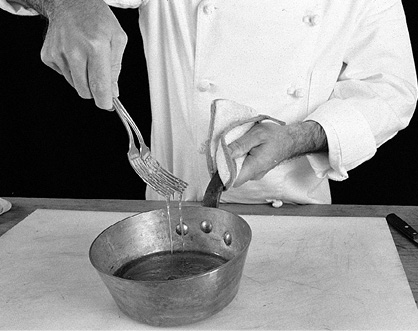
3. Cook the meringue balls for approximately 3 minutes on one side and, sliding a slotted spoon underneath, turn them over and cook them for 3 minutes on the other side. Remove to a paper towel with the slotted spoon. The meringue balls can be made ahead to this point and cooled. To check whether the meringue is cooked, cut one ball in half and press on the cut surface. It should have a spongy texture.
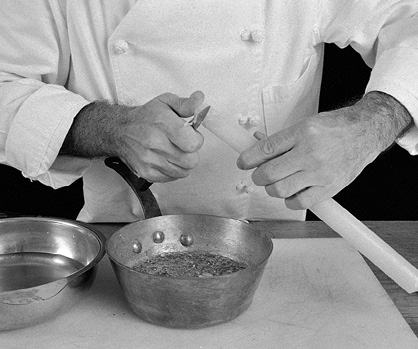
4. To make the caramel: Combine the sugar and water in a saucepan. Mix together just enough to moisten the sugar and place over medium heat until the mixture boils. Keep boiling without stirring or shaking the pan until the mixture becomes caramel colored (10 to 12 minutes). Remove the caramel from the heat, resting it for a few minutes so it will thicken a little.

5. For individual servings, spoon approximately 1½ ounces (43 grams) of custard cream on each plate and serve with one of the “eggs.” Top with a spoon or two of caramel. For a serving variation, a caramel cage (see page 584) can be made, using a small bowl as a mold, and placed on top of an individual serving of the caramel snow eggs.

Almond Floating Islands
(Ile Flottante)
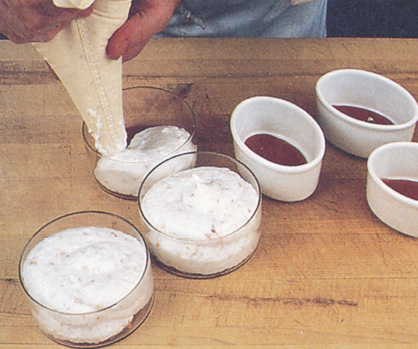
Floating islands are similar to snow eggs but are baked in the oven in a bain marie (double boiler). Here they are demonstrated in individual portions, although the dessert can be made in a large soufflé mold. The recipe uses small glass containers with about a 1½-cup (355 milliliters) capacity as well as small oval ceramic or porcelain dishes with about a 1-cup capacity (237 milliliters).
Floating islands can be cooked a day or so ahead and kept, covered, in the refrigerator so the tops don’t get rubbery. Covering also keeps the dessert moist, making it easier to unmold. When left uncovered, the sugar hardens around the edge of the molds and makes the floating islands difficult to unmold.
YIELD: 8 servings
rum custard sauce
1½ cups (355 milliliters) milk
2 teaspoons cornstarch
⅓ cup (62 grams) sugar
3 large egg yolks
½ cup (119 milliliters) cold heavy cream
1 teaspoon pure vanilla extract
3 tablespoons dark rum
butter caramel
½ cup (93 grams) sugar
4 tablespoons water
2½ tablespoons (38 grams) unsalted butter
light meringue-nut mixture
6 large egg whites
½ cup (93 grams) sugar
½ cup (65 grams) toasted slivered almonds, chopped coarsely
decoration
Toasted slivered almonds
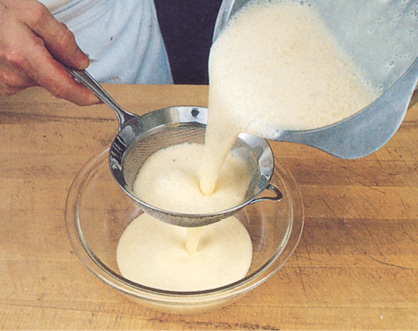
1. For the rum custard sauce: In a saucepan, combine the milk, cornstarch, and half the sugar, stirring occasionally. Meanwhile, in a bowl combine the rest of the sugar and the egg yolks, stirring well with a whisk. When the milk-cornstarch-sugar mixture comes to a strong boil, pour it all at once into the yolks and mix thoroughly with a whisk.

2. The quantity of boiling milk as compared to the quantity of egg yolk is such that the egg yolk will be cooked by the hot milk and not require further cooking. Strain the mixture immediately through a fine strainer into a bowl and add the cold cream. When lukewarm, add the vanilla and rum. Set aside until serving time.
3. For the butter caramel: Combine the sugar with 3 tablespoons of the water, just enough to moisten the sugar. Place over medium heat, bring to a boil, and cook, without shaking or moving the pan, until the mixture turns caramel-colored (10 to 12 minutes). When caramelized, remove from the stove, add the butter and remaining tablespoon water, and stir well until combined. Pour 2 tablespoons of the caramel into the bottom of 8 individual molds with a capacity of 1 to 1½ cups (237 to 355 milliliters). Let the caramel cool and harden, then butter lightly around the sides of the molds.

4. For the light meringue-nut mixture: Preheat the oven to 350 degrees (177°C). Beat the 6 egg whites until very firm. Sprinkle the sugar quickly (in 5 to 10 seconds) on top while beating at high speed with the whisk, and continue beating for another 10 seconds. Fold in the chopped almonds.

5. Place the meringue mixture in a pastry bag without a tip and squeeze it into the mold on top of the hardened caramel.
6. Tap the molds on a pot holder set on the table so there are no air bubbles in the center of the meringue.
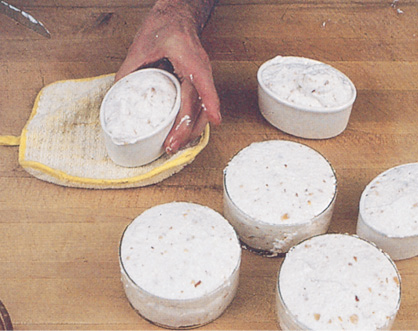
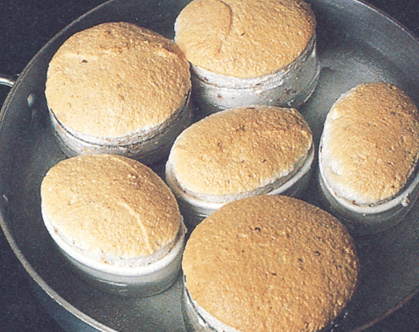
7. Arrange the molds in a pan surrounded by lukewarm water. Place in oven for 25 to 30 minutes, until well set in the center and puffy. Remove from the water and let cool.
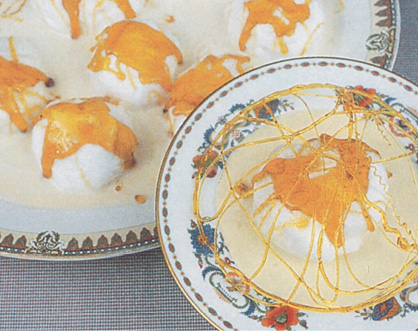
8. When cool, the individual desserts can be covered with plastic wrap and refrigerated. They will keep for up to 2 days. At serving time, place about 3 to 4 tablespoons of the rum custard sauce on individual serving plates, unmold the small floating islands on top, letting whatever caramel that comes out drip over them. Decorate with some extra toasted almond slivers and serve immediately.

Meringue
This basic egg white and sugar mixture is employed in different ways to produce innumerable desserts. It can be dried and called meringue; it can be poached and called oeufs à la neige; it can be piped into a shell and called vacherin; it can be mixed with nuts and called a dacquoise; it can be used to make cookies such as ladyfingers and as a base for an omelette soufflée. I begin here with simple dried meringue “cookies” and proceed in the next few techniques through the more elaborate meringue confections.
6 large egg whites
1½ cups (300 grams) superfine sugar, divided
Dash of salt or a few drops of fresh lemon juice
Grated chocolate, cocoa, and sliced almonds for decoration (optional)
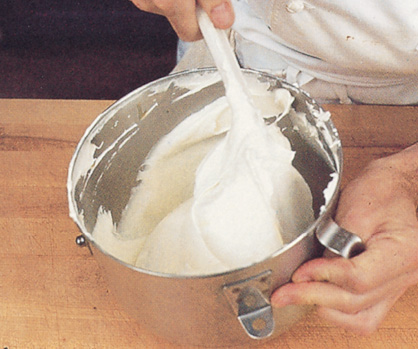
1. Whip the whites by hand or electric mixer, adding a small dash of salt or a few drops of lemon juice before you start to whip. Whip on medium to high speed. When the whites are holding a nice shape, gradually add 1 cup (200 grams) of the sugar and keep beating for 1 minute. The mixture should be stiff and shiny. Fold in the remaining ½ cup (100 grams) sugar. Folding in a part of the sugar at the end makes for a tender meringue.

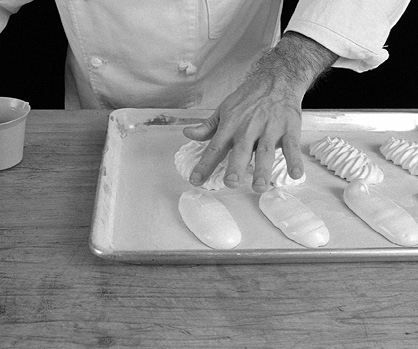
2. Preheat the oven to about 200 degrees (93°C). Coat a cookie sheet with butter and flour. Fill up a pastry bag, and pipe out plain and fluted meringues. Lift the tip of the bag in a quick, swift motion to avoid a long tail.
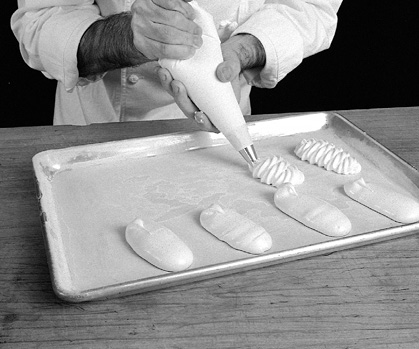
3. Dip your fingers in cold water and push the tails down. Bake for 1¾ hours. (In restaurants, the meringues are often dried in a plate warmer at about 135 degrees/57°C for 24 hours.) They should be well dried. Though some people insist that meringues should be absolutely white, I fail to see the reason and do not mind if they become slightly beige during baking. Stored dry in a covered container, meringues will keep for months.
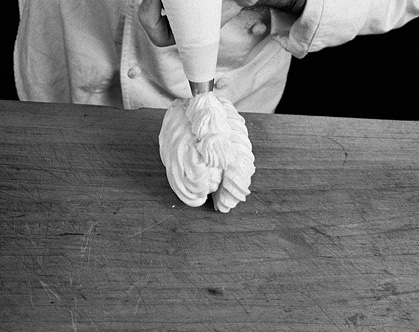
4. Meringues can be served on top of ice cream, with chestnut purée, purée of fruits, or plain whipped cream. Spread some whipped cream on the flat side of one fluted meringue and

5. place another meringue against the cream. Place the double meringue on its side and decorate the top with more whipped cream.
6. Add the grated chocolate.
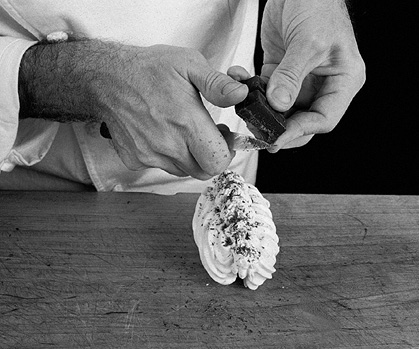
7. To dress up plain meringues sprinkle them with bitter cocoa and connect two together with whipped cream.
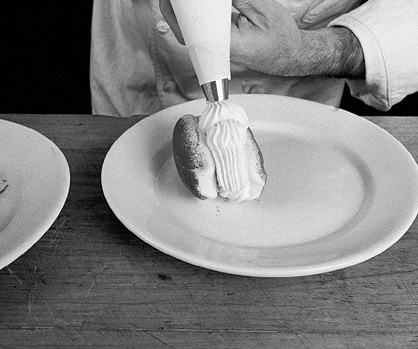
8. Decorate the top with whipped cream and sliced almonds.

Meringue Mushrooms
(Champignons en Meringue)
These little mushrooms are occasionally served by themselves as finger food for cocktail parties or buffets. Most often they are used to decorate a bûche de Noël, yule log. Make the basic meringue mixture following the instructions in the preceding technique. Coat a cookie sheet with butter and flour or line it with a no-stick liner.
YIELD: 12 to 14 mushrooms; amounts vary depending on size
1. Preheat oven to 200 degrees (93°C). Fill a pastry bag with the meringue, using a small plain tube. Squeeze some rounded small meringues and some pointed ones to be used for the stems of the mushrooms. Make them pointed by pulling the meringue mixture up after some of it has been squeezed out of the bag. Reserve some meringue for assembling the mushrooms (step 4).

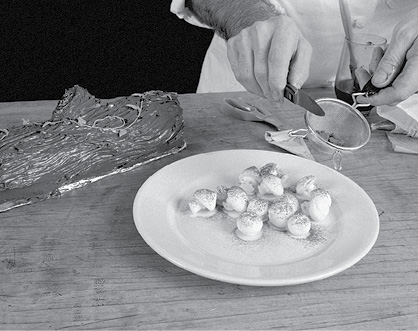
2. Flatten the tails of the caps using a little cold water on your fingers. Bake in the preheated oven for 75 minutes. Let cool for 15 minutes. (The small vacherin pictured in the background are customarily filled with ice cream, chestnut pureé, flavored whipped cream, and the like.)

3. Holding the cap of the mushroom in one hand, dig a small opening on the flat side with the point of a knife.

4. Using a paper cornet, fill the opening with meringue mixture and

5. stick a stem into place. Bake for 45 minutes.

6. You should have perfect little mushrooms.
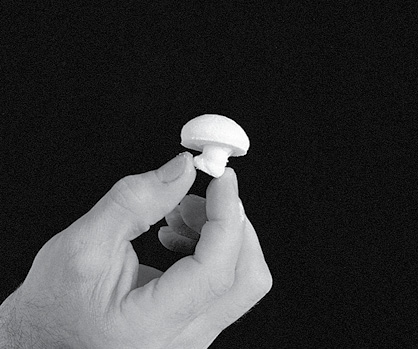
7. You can sprinkle them with bitter cocoa before using them for decoration.

Large Meringue Shells
(Vacherin)
A large vacherin makes an impressive dessert for a party. It is not as complicated as it seems, and most of the work can be done ahead of time with little last-minute preparation. You need 1½ times the amount given in the meringue recipe on page 486, which means you’ll be working with 9 egg whites instead of 6.
YIELD: 10 to 12 servings
9 large egg whites
2¼ cups (approximately 506 grams) superfine sugar
A few dashes salt or ¾ teaspoon fresh lemon juice
Ice cream
Strained peaches or apricot halves
Melba or raspberry sauce
Whipped cream
Candied violets for decorating
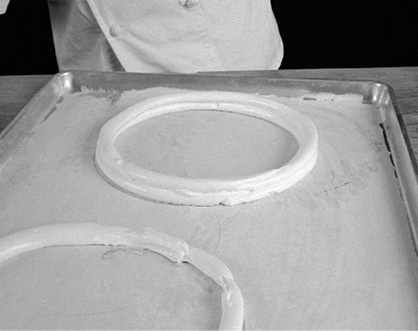
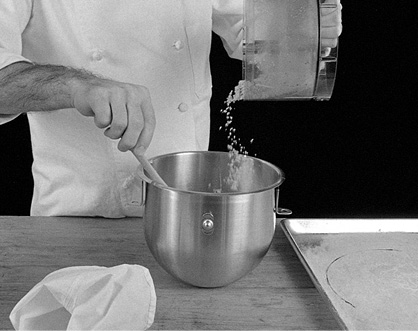
1. Preheat the oven to 200 degrees (93°C). Prepare the basic meringue mixture on page 486 using the 9 egg whites, sugar, and salt or lemon juice. Coat several large cookie sheets with butter and flour. Make outlines with a flan ring or any round object about 10 to 11 inches (25 to 28 centimeters) in diameter.

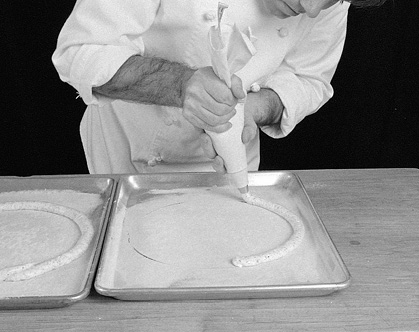
2. Place some meringue mixture in a pastry bag fitted with a plain tube. Fill in one of the outlines to make a solid base.

3. Make plain rings on the other trays

4. or double rings if you want to go a bit faster. You will need 6 single rings or 3 double ones. Bake the base and rings in the preheated oven for 1¾ hours. Let cool in the oven for 15 minutes. Keep in a dry place.
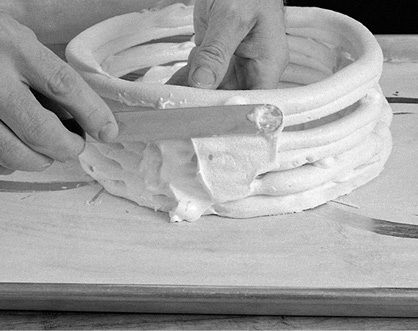
5. Using a paper cornet, place dots of meringue mixture around the outside edge of the baked base.

6. Place a baked ring on top and keep building the vacherin with rings “cemented” with the meringue mixture.
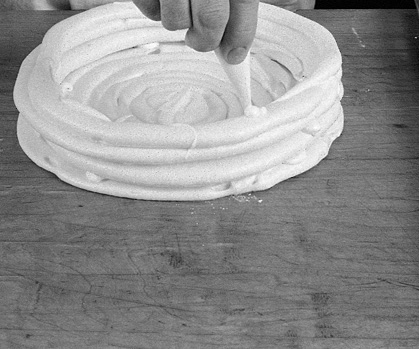
7. Continue until all the rings have been used.

8. Using a metal spatula, coat the outside of the rings with meringue, filling up holes and making it smooth all around.
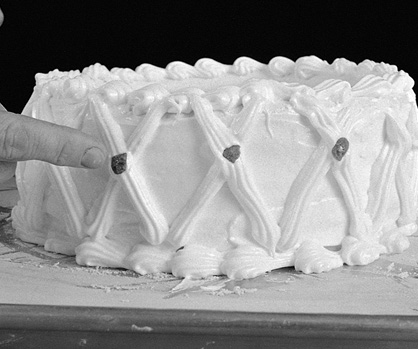
9. Decorate the top and bottom with a border of meringue.

10. Make strips, or any other motif which suits your fancy, all around the vacherin.

11. Embed small pieces of candied violets in the meringue. Return to the oven and bake for 1 hour. Cool in a dry place.
12. At serving time, fill the vacherin with slightly softened ice cream. Arrange strained peach or apricot halves on top of the ice cream and cover the fruit with a thick melba or raspberry sauce. Decorate with whipped cream and candied violets.

Chocolate Meringue Nut Cake
(Dacquoise au Chocolat)
The dacquoise mixture is akin to meringue but it is made with the addition of nuts and cornstarch, and cooked at a much higher temperature than a meringue. The cake is comprised of two flat disks filled with a chocolate butter cream and a rum-flavored whipped cream. The disks should be dry and brittle like a meringue.
YIELD: 8 to 10 servings
¾ cup (169 grams) granulated sugar
1¼ cups (125 grams) nuts (half almonds, half hazelnuts), toasted in the oven and ground
1 tablespoon cornstarch
6 large egg whites
Dash of salt
CHOCOLATE BUTTER CREAM
1½ cups (355 milliliters) heavy cream
12 ounces (340 grams) bittersweet chocolate
½ stick (2 ounces/56 grams) unsalted butter, softened
1 tablespoon dark rum
1½ cups (355 milliliters) heavy cream
2 tablespoons confectioners’ sugar
1 tablespoon dark rum
1. Preheat the oven to 350 degrees (177°C). Coat 2 cookie sheets with butter and flour. Mark the coating with 10-inch (25-centimeter) rings.

2. Mix together the sugar, nuts, and cornstarch. Whip the whites by machine or hand, adding a small dash of salt before you begin. Beat until firm. Fold in the sugar and nut mixture. Work quickly to keep the whites from becoming grainy.
3. Fill a pastry bag fitted with a plain tube with the meringue mixture. Pipe a ring on each tray, following the outline of the 10-inch (25-centimeter) ring.
4. Divide the remaining meringue mixture between the two rings.
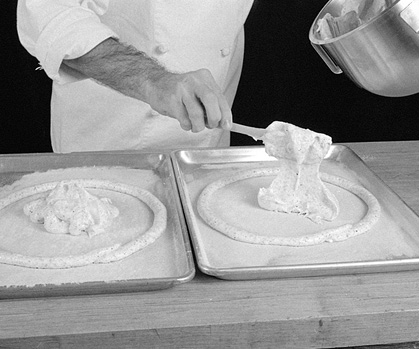
5. Spread evenly with a spatula.
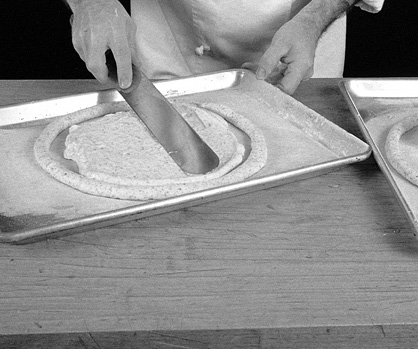
6. The disks should be the same thickness all over. Bake in the oven for 20 to 25 minutes, or until nicely browned.

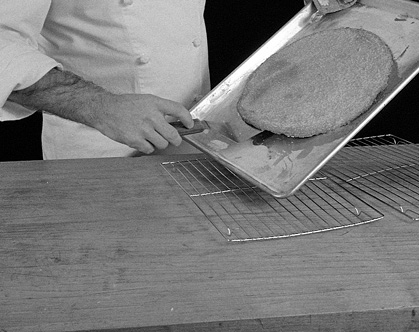
7. Let the disks set for a few minutes, then slide off the tray to a wire rack.
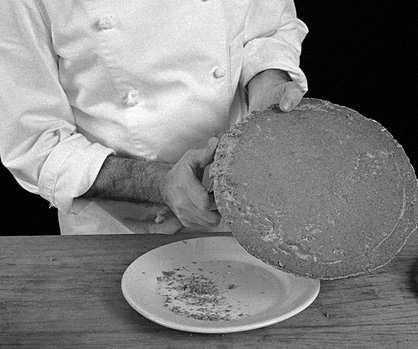
8. After a half hour or so, the meringue should be dry and brittle.

9. Trim the edges to make perfect wheels. Save the trimmings.
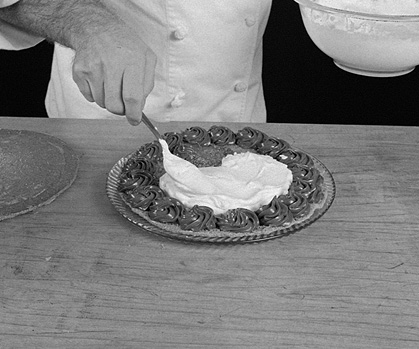
10.For the butter cream: Chop the chocolate coarsely and combine with the cream in a heavy saucepan. Heat stirring until smooth. Remove from the heat and let cool until thick, but not too hard. Place in a bowl and add the softened butter, in pieces, and the rum. Beat with a whisk for 1 to 2 minutes, which will expand the volume and whiten the cream. The cream should not be overbeaten or it will absorb too much air and become grainy and hard to spread. If this happens, remelt slightly and stir gently until soft enough to use. Place one wheel on a serving platter and, using a pastry bag fitted with a fluted tube, pipe a border all around the wheel.

11. Place a small amount of the butter cream in the middle of the wheel and sprinkle with the trimmings of the cake.

12. Combine the cream, confectioners’ sugar, and rum. Whip until firm. Arrange the cream in the middle of the wheel.
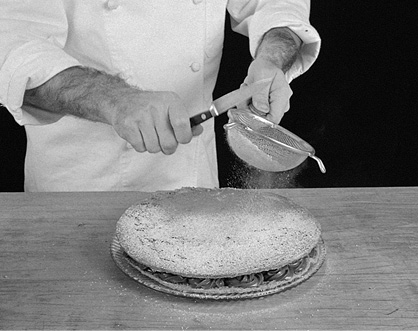
13. Place the other wheel, smooth side up, on top.

14. Sprinkle with confectioners’ sugar, coating the entire top.
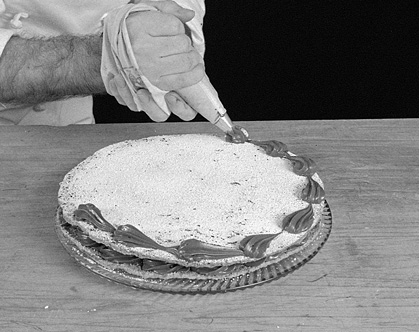
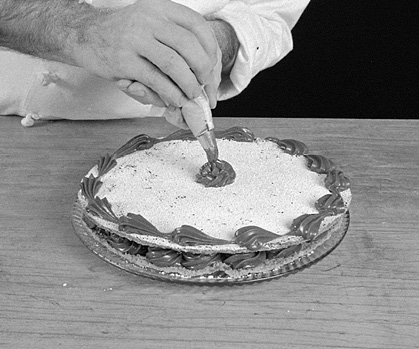
15. Decorate the edges and the middle with the chocolate butter cream.
16. Cake ready to be served. Place in the refrigerator and serve cold, a small wedge per person. Use a serrated knife to cut the cake.
Ladyfingers
(Biscuits à la Cuillère)
In France, ladyfingers are traditionally served as a cookie with champagne. They are also used to line molds, such as for a charlotte, or in an omelette soufflée.
YIELD: 20 ladyfingers
3 large eggs
½ cup (100 grams) superfine sugar
½ teaspoon pure vanilla extract
⅔ cup (100 grams) all-purpose organic flour
Confectioners’ sugar
1. Preheat oven to 325 degrees (163°C). Separate the eggs and beat the egg whites by machine or by hand. When beating egg whites, be sure the bowl is clean and that there is no egg yolk mixed with the white. If you are not using a copper bowl, a dash of salt or cream of tartar or a few drops of lemon juice can be added to the whites to help the whipping process.
2. Add the superfine sugar and continue beating for about 1 minute until the whites form firm but creamy peaks. Beat for about 6 seconds longer to incorporate. Using a spatula, fold the vanilla, then the beaten egg yolks into the meringue. Sieve the flour on top of the mixture, folding it in as you go along.

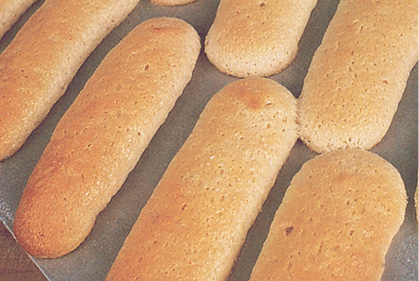
3. Coat 2 cookie sheets with butter and flour. Fit a pastry bag with a plain tube, and fill with the mixture. Hold the tip about 1 inch above the tray and pipe the ladyfingers onto the sheets. They should be approximately 4 inches (10 centimeters) long by 1 inch (2.5 centimeters) wide.

4. Lift up the tip of the bag in a swift stroke against the end of the ladyfinger to avoid a long tail.

5. Sprinkle the ladyfingers heavily with confectioners’ sugar. They should be sprinkled twice. Let them absorb the sugar for 1 minute between sprinklings.

6. Turn the filled sheet upside down and give it a little bang with a knife to make the excess sugar fall on the table. This operation should be done rapidly and swiftly. If the mixture is the right consistency, the ladyfingers will not change shape at all.

7. Bake in the preheated oven for 12 to 15 minutes. Let cool for 15 minutes. They should slide easily from the sheet. The color should be light brown. To avoid drying, stick one against the other and store in a covered container.
Soufflé Omelet
(Omelette Soufflé)
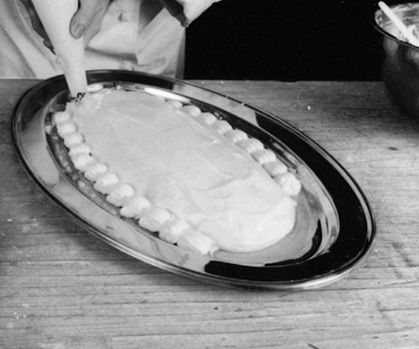
The omelette soufflé is closer to a soufflé than an omelet. It is lighter than a regular soufflé because it is not made with a starch base (a béchamel or crème pâtissière). It can be put together quickly and easily but it cannot be prepared in advance, as regular soufflés can. It will also deflate faster than a regular soufflé. To bake an omelette soufflée, you need an ovenproof platter—silver, stainless steel, or porcelain—at least 16 by 12 inches (41 x 30.5 centimeters). The same mixture can be used in a baked Alaska.
8 large egg whites
1 cup (200 grams) superfine sugar
6 large egg yolks
8 to 10 ladyfingers, or the same amount of sponge cake (see page 504)
⅓ cup (79 milliliters) Grand Marnier, cognac, or kirsch
1 tablespoon confectioners’ sugar, plus additional for garnish (optional)
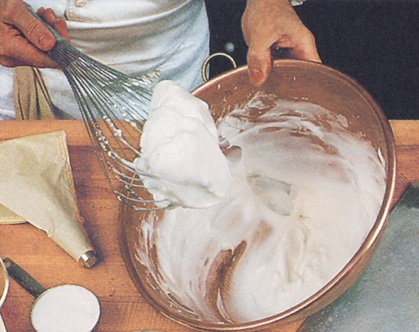
Coat an ovenproof platter generously with butter and sugar. Beat the egg whites until they hold a soft peak. Reduce the speed and add the sugar in a steady stream. Return to high speed for 1 minute. Beat the yolk lightly with a fork and fold into the whites.
1. Preheat oven to 425 degrees (218°C). Spread about one-fourth of the mixture in the center of the platter.
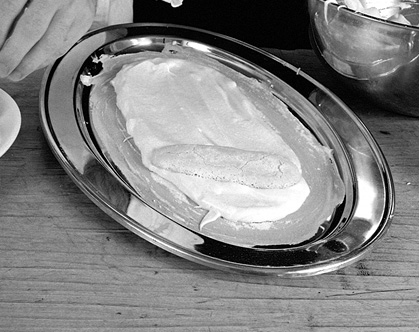
2. Arrange the ladyfingers or sponge cake on top and moisten with the liqueur or brandy.
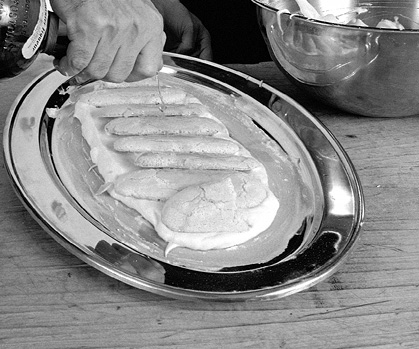
3. Cover with more mixture.

4. Smooth with a spatula.

5. Be sure that the ladyfingers are equally covered all over.

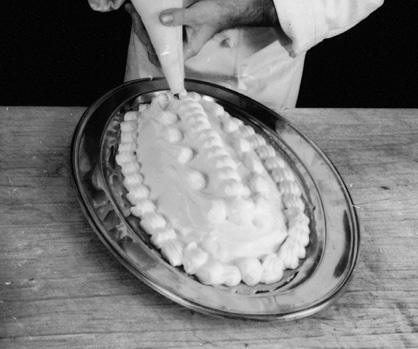
6. Fit a pastry bag with a fluted tube and fill with the remaining mixture. Pipe out a decorative border around the edge.
7. Decorate the top and sides to your fancy. At this point, the omelet can be held in the freezer for a couple of hours until ready to bake.
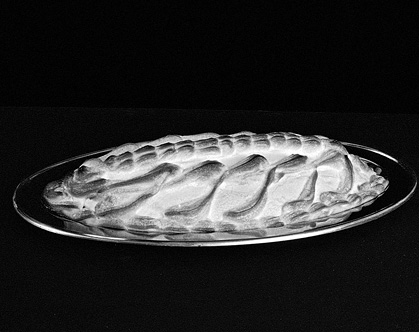
8. Sprinkle with confectioners’ sugar and bake in the preheated oven for 10 to 12 minutes, or until well glazed.

9. Baked soufflé omelet. You may sprinkle it with more confectioners’ sugar when it comes out of the oven. Serve immediately.
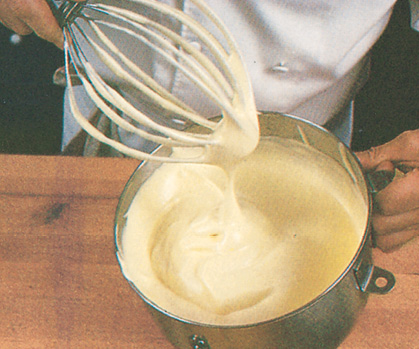
(Génoise)
The génoise—a basic sponge cake—is the base of countless cakes. It is also used for croûtes aux fruits, petits fours glaces, and to line molds. The batter can be made with an electric mixer, as shown in the photographs that illustrate this technique, as well as by hand. The recipe makes two 8-inch (20-centimeter) cakes. The flour is sifted into the batter rather than folded in, because if poorly incorporated the cake will be grayish and heavy and will have lumps. The melted butter, added at the end, is heavy and brings the mixture down. To correct this problem, “overwork” the batter slightly. The butter can be omitted or reduced (many cooks use none or only a tiny amount of butter).
YIELD: 2 cakes; 12 to 16 servings
6 large eggs, at room temperature
¾ cup (169 grams) sugar
½ teaspoon pure vanilla extract
1 cup (150 grams) flour (use all-purpose, or ⅔ cup/100 grams all-purpose and ⅓ cup/50 grams cake flour)
½ stick (4 tablespoons/56 grams) unsalted butter, melted
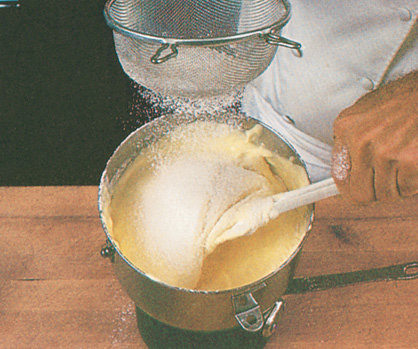
1. Preheat the oven to 350 degrees (177°C). Butter and flour two 8- by 1½-inch (20- by 4-centimeter) cake pans. Place the eggs, sugar, and vanilla in the bowl of an electric mixer. Mix well to combine the ingredients and stir over boiling water, or the burner, for about 30 seconds, so that the mixture is barely lukewarm. Remove from heat and beat on medium to high speed for about 10 minutes. The mixture should make a thick ribbon. It should be pale yellow, and it should have at least tripled in volume.
2. Using a wide spatula, fold the mixture with one hand and sift in the flour with the other.
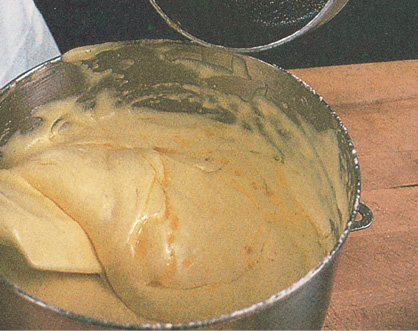
3. Add the butter, using the same procedure.
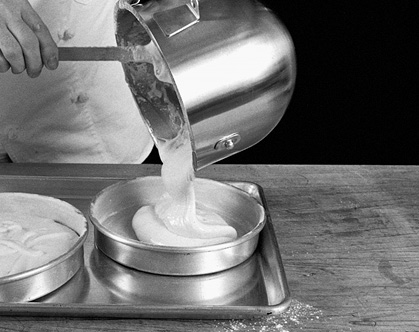
4. Fill the prepared cake pans about three-fourths full. Place pans on a cookie sheet and bake in the preheated oven for 22 to 25 minutes.
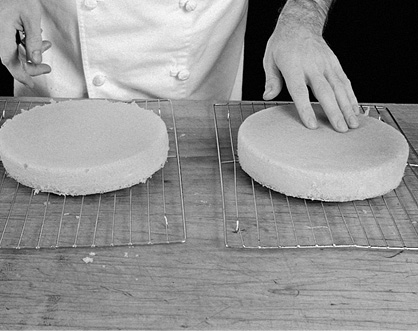
5. Remove from the oven and, after 5 minutes, turn

6. upside down on racks.
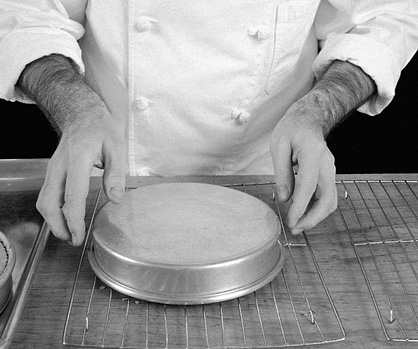
7. The bottom and sides should be pale golden in color. The cakes should be flat (no sagging) and soft and springy to the touch. When cool, they can be served or can be placed in plastic bags to keep them from drying. They will keep, wrapped and refrigerated, for a few days.
Rolled Cake
(Biscuit Roulé)
This batter is for cakes such as jelly rolls and the like. It is essentially the same as the génoise described in the preceding technique with the addition of an egg yolk. The egg yolk makes the cake moist and easier to roll.
YIELD: 1 cake; 8 to 10 servings
3 large eggs, at room temperature
1 large egg yolk
½ cup (112 grams) sugar
¼ teaspoon pure vanilla extract
½ cup (75 grams) all-purpose organic flour
¼ stick (2 tablespoons/28 grams) unsalted butter, melted
Preheat the oven to 350 degrees (177°C). Place the eggs, egg yolk, sugar, and vanilla in a mixing bowl and let the mixture get lukewarm by placing the bowl over boiling water for a few seconds. Remove from the heat and beat on medium to high speed for 6 to 8 minutes. Add the flour, then butter (see steps 2 and 3 in the preceding technique).
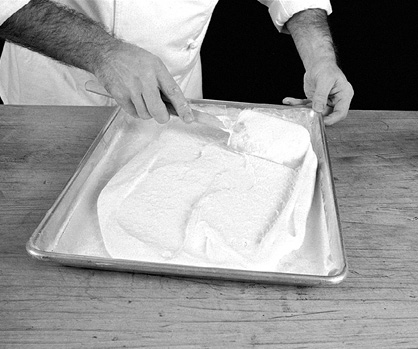
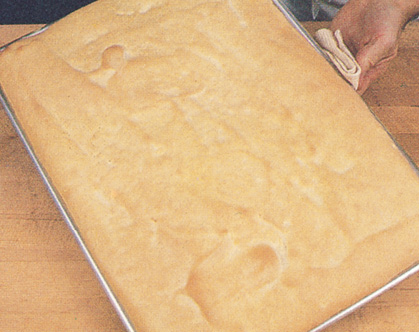
1. Butter a 16 by 12 inch (41 by 30 centimeter) rimmed cookie sheet in 2 or 3 spots and line with a piece of parchment or wax paper. (The butter anchors the paper to the cookie sheet.) Butter and flour the paper and then spread the batter evenly in the pan. Bake for 11 to 13 minutes.
2. Remove the cake from the oven and let it set for 5 minutes. Put a piece of wax paper on the table and turn the cake upside down on top of it. Make sure the paper is larger than the cake. Remove the paper adhering to the bottom (now the top) of the cake and then lay it loosely over the cake again.

3. Let the cake cool to barely lukewarm, then roll between the two sheets of paper.

4. Fold both ends to enclose the cake and keep refrigerated or in a plastic bag until you are ready to use.

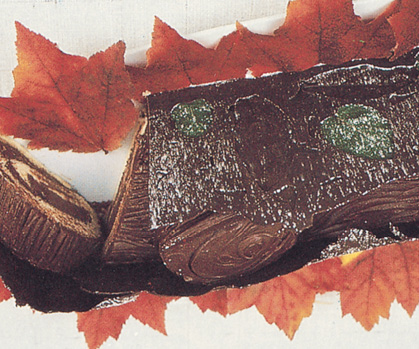
Christmas Yule Log with Mint Leaves
(Bûche de Noël au Chocolat)
This is a stunning dessert for a Christmas or fall party. It is made up of several procedures that can be used as independent recipes. Cover the cake on the plate well with plastic wrap and refrigerate until serving time because the chocolate tends to absorb tastes from other foods in the refrigerator. After a few moments on the buffet, the chocolate “bark” will soften just enough that it can be cut into pieces with the point of a sharp knife as the cake is sliced. This cake, without the “bark,” freezes well, provided it is properly wrapped and not kept frozen for more than a couple of weeks. Defrost under refrigeration.
YIELD: 1 cake; 10 to 12 servings
Jelly Roll Cake
8 large eggs, separated
⅔ cup (150 grams) granulated sugar
1 teaspoon pure vanilla extract
⅔ cup (100 grams) all-purpose organic flour
Chocolate Pastry Cream Filling
3 large egg yolks
⅓ cup (50 grams) granulated sugar
2 tablespoons cornstarch
1 teaspoon pure vanilla extract
1½ cups (355 milliliters) milk
5 ounces (142 grams) bittersweet or semisweet chocolate, broken into pieces
Rum-Chocolate Ganache or Glaze
About 4 ounces/113 grams (½ cup/118 milliliters melted) bittersweet or semisweet chocolate
½ cup (118 milliliters) heavy cream
1 tablespoon dark rum
Chocolate Bark with Leaves (optional)
12 ounces (340 grams) bittersweet chocolate
12 to 15 mint leaves plus extra larger leaves for imprinting
Decorations
Confectioners’ sugar for dusting cake
Autumn leaves or holly
1. To make the jelly roll cake: Preheat the oven to 350 degrees (177°C). Beat the egg yolks, sugar, and vanilla together for about 1 minute, until very fluffy and smooth. Then add the flour and mix well with a whisk until smooth. Beat the egg whites by hand or with an electric mixer until firm. Pour the egg yolk mixture on top of the whites.

2. Fold the yolks gently into the whites to retain most of the volume.
3. Butter a parchment paper-lined jelly roll pan 12 by 16 inches (30.5 by 40.5 centimeters). Spread the cake batter on the paper, making it of equal thickness all over.

4. Bake in the preheated oven for approximately 13 minutes. The cake will be puffy when removed from the oven. It will deflate and shrink slightly as it cools but will still remain quite soft and pliable.
5. For the chocolate pastry cream filling: Beat the egg yolks, sugar, cornstarch, and vanilla together with a whisk. Meanwhile, bring the milk to a boil. Pour the boiling milk into the egg yolk mixture, stirring, then return it to the saucepan. Bring to a boil, stirring with a whisk so the pastry cream doesn’t stick and burn on the bottom. Boil for about 10 seconds. Remove from the heat. The mixture will be quite thick.

6. Add the chocolate pieces to the saucepan and stir gently with a whisk to help melt the chocolate. After 5 minutes, stir again.

7. The mixture should be very smooth. Transfer to a bowl, cover, and refrigerate.
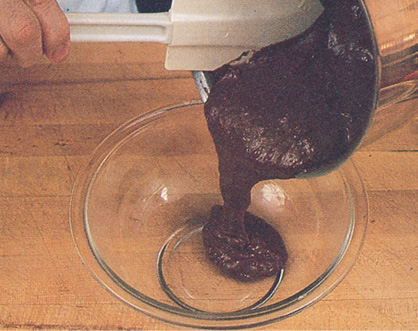
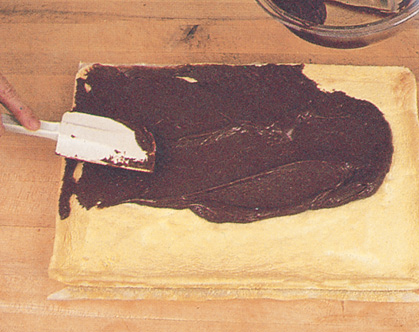
8. Slide a spatula under the cooled cake and remove it to a board with the parchment paper underneath still intact. When the chocolate pastry cream is cold, spread it on the top of the cake—the part exposed in the oven—which has visible cracks.
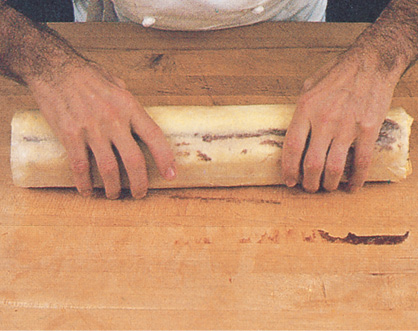
9. Using the paper lining underneath, lift up the cake and begin to roll it on itself, starting at a long end.
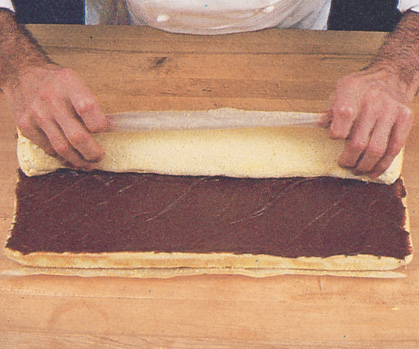
10. Keep rolling, still using the paper, until the cake roll is rolled up tightly.
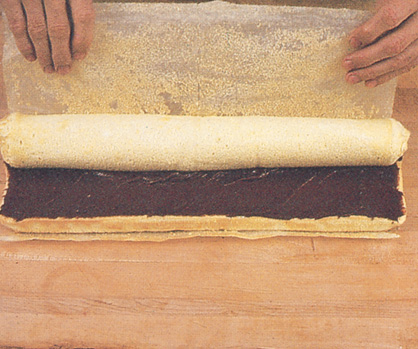
11. The pastry cream is now completely enclosed in the cake roll. Roll the cake up in the same parchment paper and refrigerate it for up to a day or so.
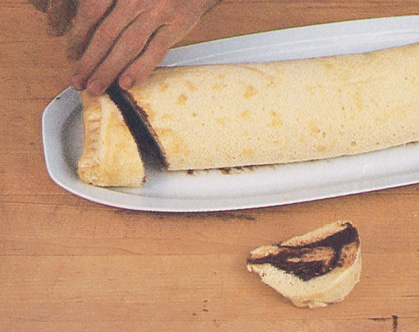
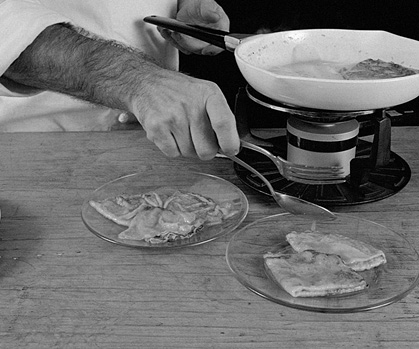
12. To finish the yule log, remove the paper and place the cake on a serving platter. Cut off both ends of the log at an angle. These pieces will be used to simulate stumps on the log.
To make the rum-chocolate ganache: Melt the bittersweet chocolate in a double boiler. Pour the cream and rum into a bowl and, when the chocolate is melted, add it and beat with a whisk for 15 seconds, until the mixture lightens slightly in color and becomes about the consistency of a buttercream. Do not over-whisk because incorporating too much air will whiten the ganache and make it set too hard as it cools. If this should happen, remelt slightly and beat again.
13. Using a spatula, coat the whole cake with a thin layer of the ganache.
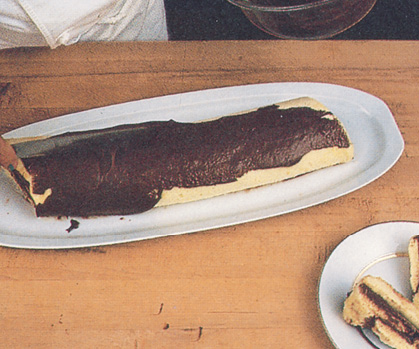
14. Place the two end pieces of cake on top to simulate tree stumps.

15. Continue coating the cake and stumps with the ganache. When thoroughly coated, draw the tines of a fork through the soft ganache to create a bark design. Using the point of a knife, make circular designs on top of the stumps and at either end of the log to simulate the design on a tree. At this point, the cake can be refrigerated. When cold, cover loosely with plastic wrap. It is usually served at this point.

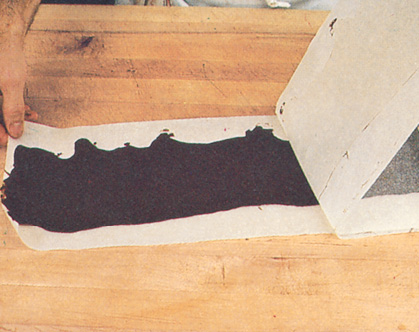
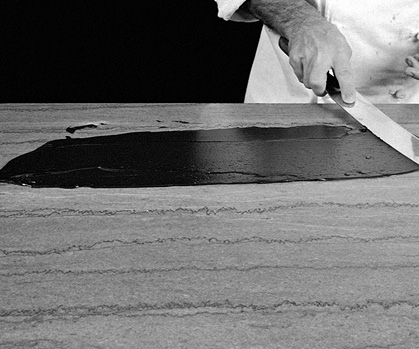
16. For a more elaborate serving variation, chocolate bark can be added.
For the chocolate bark: Melt the bittersweet chocolate in a double boiler and pour a strip of it about the length of the cake onto parchment or wax paper.

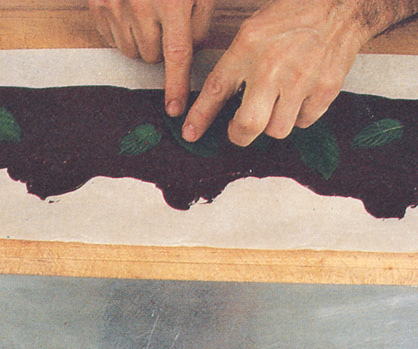
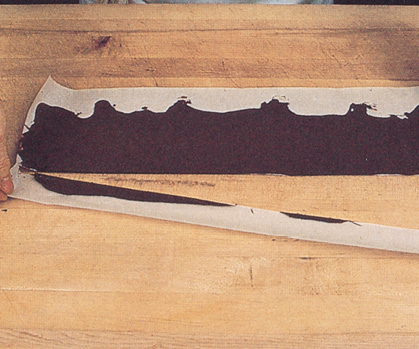
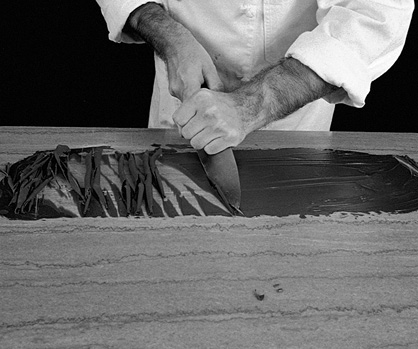
17. With a narrow, flexible spatula, spread the chocolate to a thickness of about 1/8 inch (3 millimeters), smearing the chocolate out at intervals to make a jagged edge along the length on one side to simulate broken pieces of bark.

18. While the chocolate is still warm, press the mint leaves and larger leaves into the surface. The mint leaves will be left in the chocolate and the non-edible larger leaves removed at serving time.
19. Press another strip of parchment paper on top of the chocolate and turn the package over onto a tray so the side with the leaves is touching the tray. Refrigerate. Repeat to make a strip of chocolate bark for the other side of the cake.

20. When the chocolate bark has hardened, remove the layer of paper from the top. The chocolate should have curled up a little at each end, which at this point will help it fit the contour of the cake.
21. Cut through the chocolate and paper along the straighter side to trim it to a clean edge.
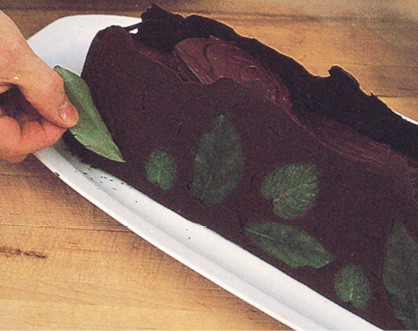
22. Place the chocolate (still attached to the paper), straight-edge down, alongside the cake, pressing it lightly against the cake. If the coating of the cake is still somewhat soft the bark strips will stick to it. (The bark can be made ahead and arranged around the cake before it is refrigerated.) The heat of your hand pressing against the paper may soften the chocolate slightly and make it adhere better to the cake. Peel off the paper.

23. Remove the larger leaves from both strips of the chocolate bark; they will have left leaf imprints in the chocolate, which is the desired effect. Leave the mint leaves in place.
24. Sprinkle a very light dusting of confectioners’ sugar on the log to simulate snow.
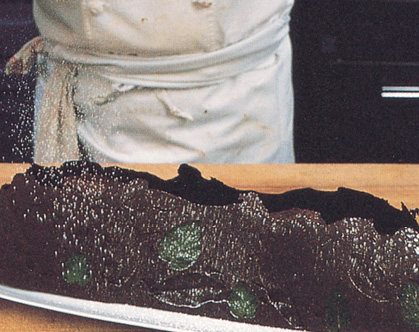
25. Arrange fall leaves or holly around the cake, cut into slices, and serve.
Vanilla-Bourbon Layer Cake
To make this layer cake, bake 2 basic sponge cake layers a few hours in advance or the day before so the cake is set and will not crumble when sliced.
There are many different buttercreams. The traditional mixture is an emulsion of egg yolks and cooked syrup with butter added. It is also made with boiled frosting, meringue, and butter or pastry cream and butter, as well as the fine, delicate version here, which is made of custard cream and butter.
YIELD: 1 layer cake; 8 to 10 servings
1 Basic Sponge Cake, page 504
BOURBON SYRUP
3 tablespoons warm water from the tap
1 teaspoon pure vanilla extract
2 tablespoons sugar
3 tablespoons bourbon
Mix together until smooth and set aside.
VANILLA-BOURBON BUTTERCREAM
¼ cup (60 milliliters) heavy cream
1 cup (237 milliliters) milk
3 large egg yolks
2 teaspoons pure vanilla extract
2 tablespoons bourbon
2½ sticks (1¼ cup/284 grams) unsalted butter, at room temperature
1 small piece (about 1 tablespoon) bittersweet chocolate
¼ teaspoon vegetable oil
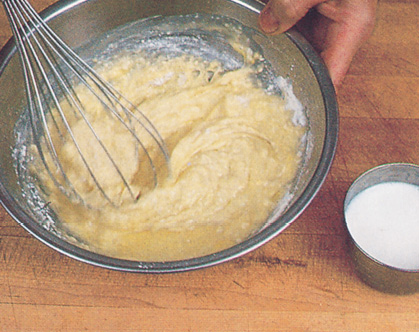
1. To make the buttercream: The delicate part of making a custard is to keep the eggs from scrambling. Pour the cream into a bowl with a fine sieve handy—when cooked, the custard will be strained through the sieve into the cold cream, which will stop further cooking and prevent curdling. Pour the milk into a saucepan and bring to a boil. Put the egg yolks and sugar in a bowl and beat with a whisk for about 1 minute, until fluffy and pale yellow. Combine the boiled milk with the yolk-sugar mixture. Pour the custard into the saucepan and return it to medium heat, stirring continuously with a spoon until it reaches about 180 degrees (82°C) and thickens. Strain immediately through the sieve into the cold cream and mix well. Add the vanilla.
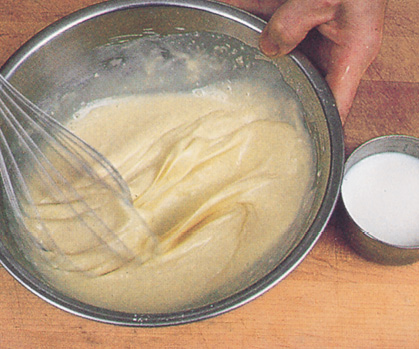
2. Let cool to tepid. Add the bourbon. The custard should be just thick enough to coat the spoon. A finger run across the coated spoon will leave a mark, as shown.

3. Meanwhile, beat the butter with a whisk until fluffy and soft. Start adding the custard cream to it, 1/4 cup (60 milliliters) at a time, beating after each addition until smooth and fluffy. Keep adding until all the custard cream is combined with the butter. If it starts to separate, put the bowl over heat for a few seconds; the outside will melt and the mixture will come together when whipped. Hold at room temperature until ready to use.

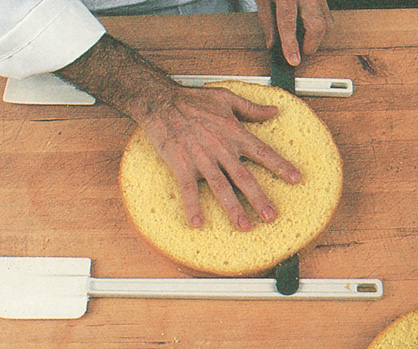
4. To build the cake: First measure and cut a piece of cardboard the size of the bottom of the cake pan. Using a long serrated knife, slice the cake into 3 horizontal layers. As you slice, keep the blade level and rotate the cake. The blade should not be removed from the cake until the cutting is complete.

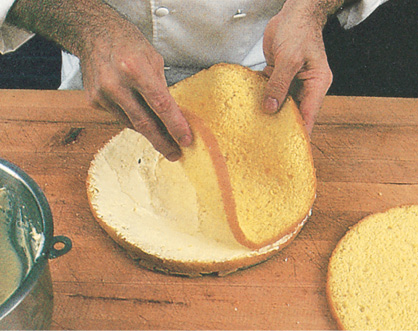
5. If you find the cutting technique difficult to master, use guides such as these spatula handles about 3/8 to 1/2 inch (10 to 13 millimeters) thick. Place the cake between them. The blade of the knife should be long enough to go through the cake and rest on both guides. Start by cutting the first layer from the top of the cake, then placing it on the cardboard upside down. The top of the cake is now the bottom layer of the cake. Brush with bourbon syrup. Spread a thin layer of buttercream on top.
6. Add the second layer. Slice the remaining cake in half the same way.
7. Brush with syrup before coating with buttercream. Place the third layer on top (the bottom of the cake is now the top), brush with remaining syrup, and coat with buttercream on top, spreading it as smoothly as you can with a long, thin metal spatula.

8. Holding the cake up (it will be secure on the cardboard), spread buttercream as smoothly as possible all around the sides.
9. Melt the bittersweet chocolate and add the vegetable oil to it. Make a paper cone (see page 72) and pour the chocolate into it. Cut off the tip and draw a design to your liking on top.

10. Fill a pastry bag fitted with a fluted tip with the remaining buttercream, and pipe a pattern all around the edge of the cake. Refrigerate until serving time. (If the cake is to be kept for several hours, cover it with plastic wrap after the buttercream has set to prevent the cake from absorbing the flavor of other foods in the refrigerator.) Cut into wedges and serve.

Chocolate Cake
(Gâteau au Chocolat)
This recipe makes two 3-layer chocolate cakes. Each cake uses a génoise as the base and is filled with ganache soufflé, topped with ganache, and decorated with glace royale.
The ganache is a delicate, glossy chocolate icing that is made from good bittersweet chocolate and heavy cream melt together. The mixture is poured on the cake while still slightly tepid. If the ganache is allowed to cool, it will become too thick and won’t run down the sides of the cake properly. If it is too hot, it will melt the filling and won’t stick to the cake.
The ganache soufflé—the filling for the cake—is simply a ganache that has been cooled and then worked with a whisk. It lightens in color, gains in volume, and becomes fluffy due to the addition of air. The glace royale is a simple sugar and egg white icing that is piped onto the chocolate icing in a decorative motif. I have used a different motif for each cake. Begin by baking 2 basic sponge cakes (see page 504). If you want the cakes themselves to be chocolate, you can substitute 1/3 cup (30 grams) bitter cocoa for 1/3 cup (50 grams) of the flour in the basic recipe. Make cardboard bases for the cakes and cut each cake into 3 layers (see page 516, steps 4, 5 and 6).
YIELD: 2 cakes; 12 to 16 servings
2 Basic Sponge Cakes (page 32), each cake sliced in 3 layers
Whipped Chocolate Filling
(Ganache Soufflé)
1 cup (237 milliliters) heavy cream
8 ounces (227 grams) chocolate (½ bitter, ½ semisweet) cut into ½-inch pieces
1 tablespoon dark rum
Put the cream in a saucepan and bring to a boil. Remove from the heat and add the chocolate. Wait for 2 to 3 minutes and then stir to mix. Keep stirring occasionally until smooth and blended. When cool, place in the bowl of an electric mixer. Add the rum and beat on high speed for 3 minutes. It will lighten in color and approximately double in volume. Use immediately; it will quickly become hard and unspreadable.
Chocolate Icing (Ganache)
12 ounces (340 grams) (squares) good chocolate (½ bitter, ½ semisweet)
1½ cups (355 milliliters) heavy cream
2 to 3 tablespoons water (optional)
Bring the cream to a boil. Remove form the heat and add the chocolate. Let set for 2 to 3 minutes and then stir until smooth and blended. Let cool to barely lukewarm. If too thick or too oily, add 1 to 2 tablespoons water.
Royal Icing (Glace Royale)
½ cup (50 grams) confectioners’ sugar
About 1½ tablespoons egg white
3 to 4 drops fresh lemon juice
Combine the sugar, egg white and lemon juice in a bowl. Work the mixture with a wooden spatula for about 2 minutes until it is nice and creamy and thick enough to form a ribbon. If too runny, add a bit of sugar. If too thick, add a dash of egg white.
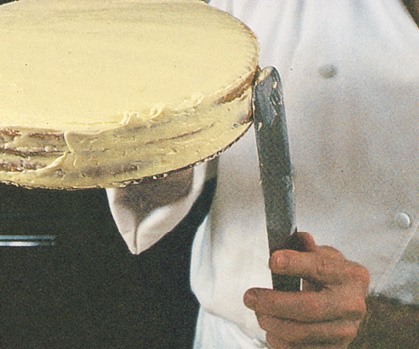
1. Place one cake layer, crusty side down, on each cardboard base and spread the surfaces with some ganache soufflé, using a thin, flexible metal spatula. Place the next layer on, add more ganache soufflé, and then add the last layer of each cake. Smooth out the coating on top of both cakes, leaving a little lip of ganache soufflé all around.

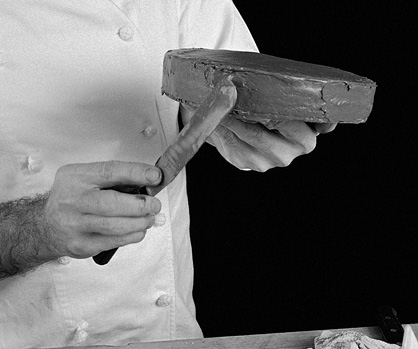
2. One at a time, hold each cake in one hand and use your spatula to smooth out the sides. Go in a down and forward motion, getting rid of the lip as you go along. Refrigerate the cakes for at least 1 to 2 hours. They should be cold and well set. While the cakes are chilling, prepare the ganache and the glace royale as explained above.
3. Place each cake in the center of a wire rack set on a piece of wax paper. You will have at least a third too much chocolate icing for both cakes, but you need a great amount to coat the cake correctly. The leftover can be kept for at least 1 month in the refrigerator. Don’t be skimpy; pour half of the chocolate icing on top of one cake.
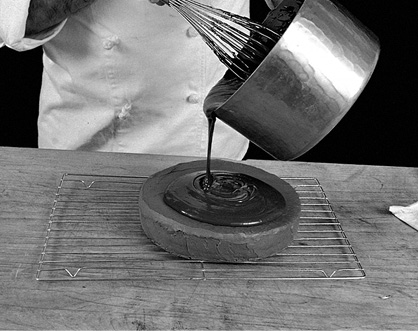
4. Spread rapidly with a long metal spatula.

5. Make sure all the sides are coated and the icing is about ¼-inch (6-millimeters) thick on top and around. If you take too long, the chocolate will cool off and become very thick.
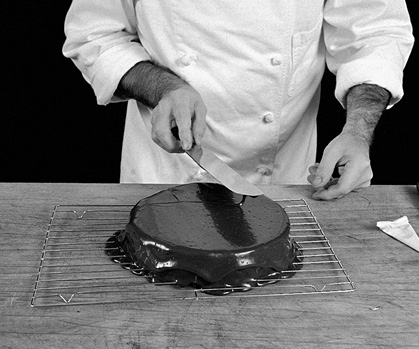
6. Lift up the wire rack and tap it gently on the table to help smooth the sides and the excess chocolate at the bottom. Run your fingers or a spatula under the cake rack to smooth out the drippings of chocolate.

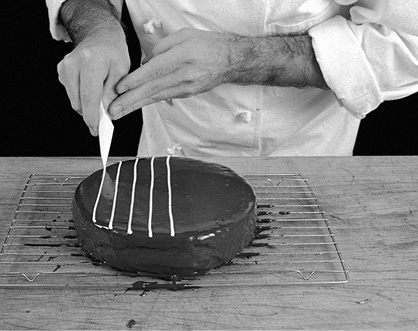
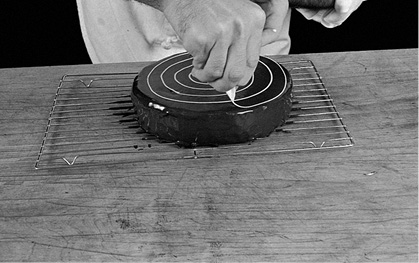
7. The cakes should be decorated with the glace royale while the chocolate on top of the cake is still slightly soft. It should not be too set and too hard. Place some icing in a paper cornet. Cut the tip and, for the first cake, pipe out lines about 1 inch (2.5 centimeters) apart.
8. Turn the cake and run a long, thin-bladed knife through the lines. The knife should just barely touch the chocolate. Pull toward you so the white lines are “dragged” through the chocolate.
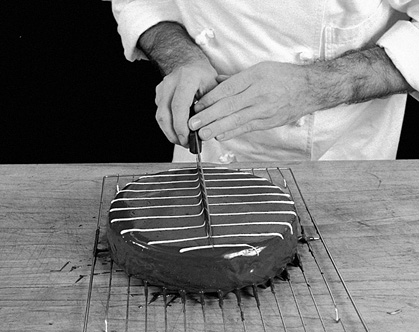
9. Clean the blade of the knife with a wet rag after each stroke, and repeat about every 1½ inches (4 centimeters).
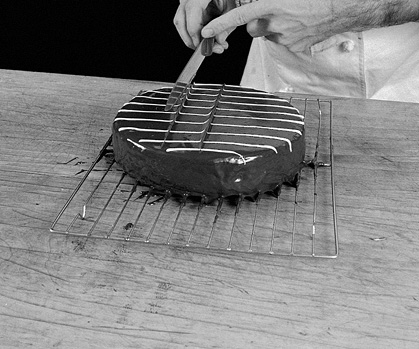
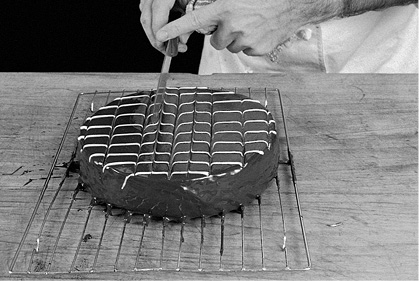
10. Turn the cake around and drag the knife between each stroke in the same manner, but pulling the icing in the opposite direction. Refrigerate to have it cold before serving.
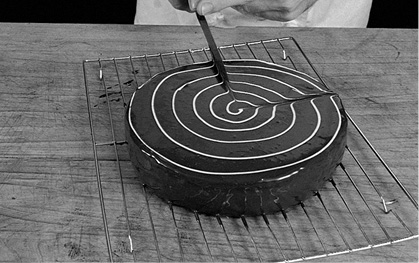
11. Using the paper cornet and the glace royale, decorate the second cake by drawing a coil. It requires practice to draw it uniformly.
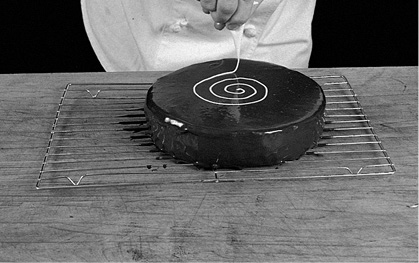
12. Keep going without pausing to avoid breaking the line. You need a steady hand.
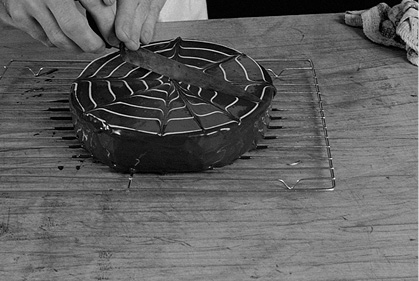
13. Using your knife, draw 8 equidistant lines from the center to the outside of the cake.
14. Repeat between each line but this time dragging the knife from the outside to the center. Refrigerate before serving.
Rum Babas with Peaches
Babas and savarin are made with the same dough but babas are cooked in a different size and shape. After baking, both the babas and the savarin can be wrapped and frozen until serving time. Because both babas as well as the savarin have a dry, airy texture they are soaked in syrup, often flavored with rum, before serving. Other alcohol can be substituted for the rum, as well as vanilla extract for a nonalcoholic dessert.
YIELD: 10 to 12 babas
Dough
½ envelope active dry yeast
½ cup (119 millilieters) milk, heated to 100 degrees (38˚C)
1 teaspoon granulated sugar
2 cups (300 grams) all-purpose organic flour
3 large eggs
½ teaspoon salt
¼ cup (45 grams) raisins
6 tablespoons (84 grams) unsalted butter, at room temperature
Egg wash made with 1 egg with half of the white removed, beaten
syrup for babas
¾ cup (165 grams) granulated sugar
1½ cups (356 milliliters) warm water
1 teaspoon pure vanilla extract
glaze
1 tablespoon dark rum
½ cup (50 grams) confectioners’ sugar
garnishes
1 cup (237 milliliters) heavy cream
1 tablespoon granulated sugar
12 candied violets
Poached Peaches
1½ cups (278 grams) granulated sugar
5 cups (1.2 liters) water
Chopped rind and juice of 1 lemon (2 to 3 tablespoons)
8 peaches (about 5 ounces/142 grams each)
For the peaches: Combine the sugar, water, and the rind and juice of the lemon in a saucepan, and bring the mixture to boil. Add the peaches, cover, return to the boil, lower the heat, and continue to cook, covered, over low heat for 6 to 10 minutes, depending on the ripeness of the peaches, until the peaches are tender. Let the peaches cool until lukewarm in the syrup, then remove them and reduce the syrup to approximately 2 cups by boiling down. Skin the peaches and combine them with the syrup.
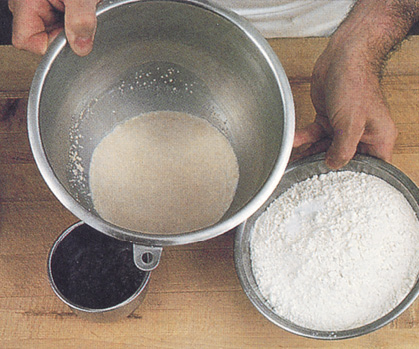
1. For the baba dough: Put the yeast with the warm milk and the sugar in the bowl of a mixer. Proof for about 5 minutes, until the mixture bubbles on top.
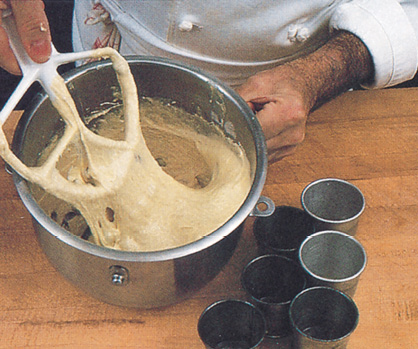
2. Add the flour, eggs, and salt, and beat approximately 3 minutes with the flat beater on medium speed. The dough should be very elastic. Then, add the raisins and the butter, and beat at the same speed for approximately 1 minute to incorporate. Don’t worry if some pieces of the butter are still visible at this point. Cover the dough or batter with a towel or plastic wrap, and let rise at room temperature (about 70 to 75 degrees/21°C to 23°C) for about 1½ hours.
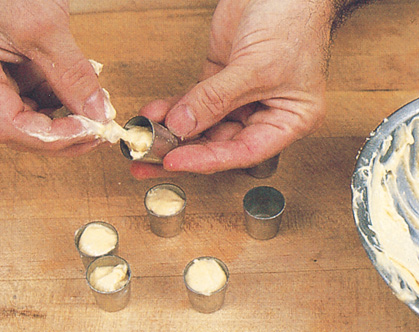
3. Stir the batter gently to push the air out. Butter the baba molds (½- to ¾-cup/119- to 178-milliliter capacity) and fill half full with the batter.

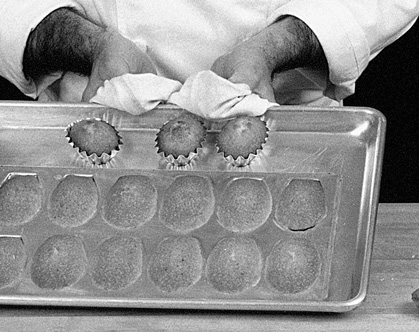
4. For tiny babas, use thimble cups with a capacity of 3 tablespoons. Butter the cups and fill them one-half full with the baba mixture. Set aside in a warm place (70 to 75 degrees/21°C to 23°C) away from any draft, and let the larger babas rise for about 30 to 40 minutes and the smaller ones for approximately 20 minutes. Preheat the oven to 375 degrees (191°C). Brush the top of the risen babas with the egg wash, and bake them on a cookie sheet for about 12 minutes for the tiny babas and about 20 minutes for the larger ones.
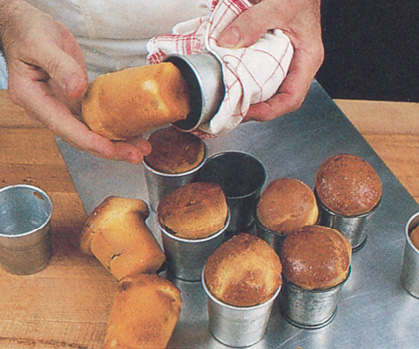
5. Let the babas cool for 15 to 20 minutes and then remove them from the molds. At this point, they can be allowed to cool completely, placed in airtight wrapping, and frozen.
6. To make the syrup: Mix the sugar, warm water, and vanilla together until the sugar is completely dissolved. Place the babas in a gratin dish so they are fairly snug, one against the other, and pour the syrup over them. Let the babas soak in the syrup for 20 minutes or so, turning them occasionally so they can absorb as much syrup as they can. The syrup may not be completely absorbed after this amount of time; push a knife through a baba, and if the center is soft, you can assume that the syrup has penetrated into the middle of the babas. If still hard, soak longer.
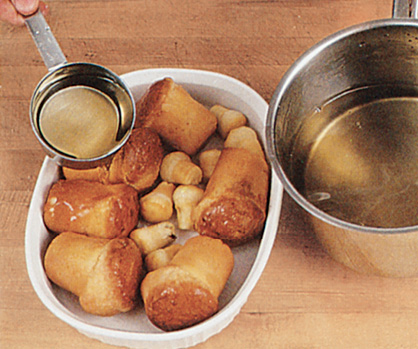
7. For the glaze: Slice the larger babas in half lengthwise. Combine the dark rum with the confectioners’ sugar in a bowl, and mix until smooth. Brush the outside surface of each half baba with the glaze and decorate with a little piece of candied violet.

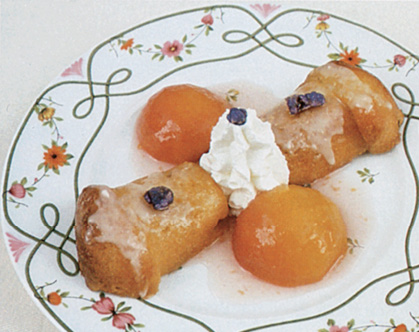
8. Beat the cream, sweetened with the sugar, to soft peaks. Place two baba halves on each serving plate with the peach halves on either side. Coat each of the peaches with a spoonful of the peach syrup. Mound some of the whipped cream in the center, decorate it with a candied violet, and serve right away.
Bourbon Apricot Savarin
YIELD: 1 savarin; 6 to 8 servings
Rum Babas with Peaches, page 51, dough only
Egg wash made with 1 egg, half the white removed, beaten
Syrup for savarin
¾ cup (165 grams) granulated sugar
1½ cups (356 milliliters) warm water
1 teaspoon pure vanilla extract
2 tablespoons bourbon
½ cup (165 grams) strained apricot preserves
¼ cup (35 grams) sliced almonds, toasted
Extra raisins for decoration
Fruit Garnish
2 tablespoons bourbon
2 ripe peaches, diced
1 cup (150 grams) sliced strawberries
⅓ cup (50 grams) blueberries
⅓ cup (115 grams) apricot preserves
Whipped Cream
1 cup (237 milliliters) heavy cream
1 tablespoon granulated sugar
12 candied violets
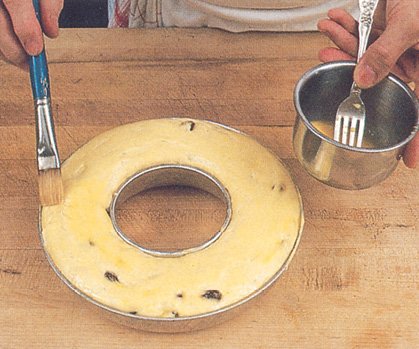
1. To Make the savarin: Butter a savarin mold and spread the baba dough in it, filling the mold to ½ full. Proof at room temperature (70 to 75 degrees/21°C to 23°C) away from any drafts for approximately 1½ hours.

2. Preheat the oven to 375 degrees (191°C). Brush the top of the savarin with the egg wash, place on a cookie sheet, and bake for approximately 35 minutes.
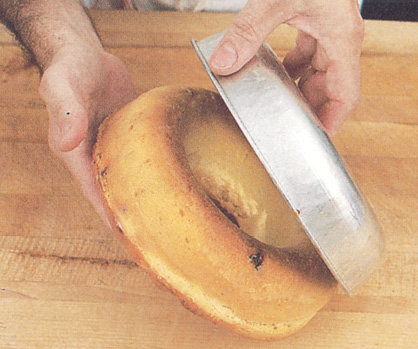
3. Let cool in the mold for at least 30 minutes and unmold. Place on a round gratin dish slightly larger than the savarin.
4. To make the syrup: Mix the sugar, warm water, and vanilla together until the sugar is completely dissolved. Pour the syrup over the savarin, and let it soak for about 30 minutes or so, turning it occasionally or basting it with the syrup so most of the syrup is absorbed. Plunge a knife into the cake to make sure that it is moistened in the center. When the syrup as been sufficiently absorbed throughout the savarin, place it on a rack to drain and then on a plate. Brush first with the bourbon and then with the apricot preserves to make it shiny all over.

5. Arrange the toasted almonds in a flower design on top, pushing them into the preserves so they adhere to the cake. Use raisins as the flower centers.
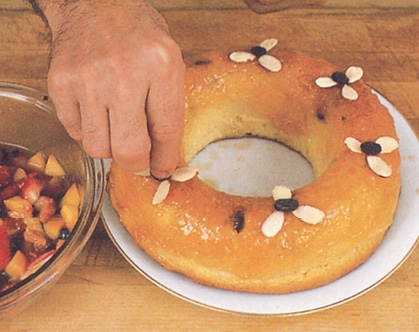
6. for the savarin fruit garnish: Combine the bourbon with the peaches, strawberries, blueberries, and apricot preserves, and mix well. Whip the cream and sugar until stiff. Arrange the savarin on a large platter with the fruit garnish around it and inside the hollow center. Pile the whipped cream on top of the fruit in the center, piping it from a pastry bag fitted with a star tip. Decorate the cream in the center with a few pieces of fruit and serve immediately.

Proust’s Small Coffee Cakes
(Madeleines de Commercy)
Here are the famous small cakes so dear to Marcel Proust in A La Recherche du Temps, Perdu, Remembrance of Things Past. They originated in the small town of Commercy. The madeleines can be made in a special tray or in small individual brioche molds.
YIELD: 16 to 18 madeleines
1 stick (½ cup/113 grams) unsalted butter, softened
½ cup (112 grams) sugar
½ teaspoon baking powder
½ teaspoon pure vanilla extract
½ teaspoon grated orange rind
2 large eggs
1 cup (150 grams) all-purpose organic flour
1. Preheate the oven to 400 degrees (204°C). Place the butter and sugar in the bowl of an electric mixer and mix on medium to fast speed until light and fluffy, about 1 minute. Add the baking powder, vanilla, orange rind, and 1 egg. Beat on low speed for about 1 minute, until smooth and light. Add the other egg and mix another minute at the same speed. Finally, stir in the flour with a whisk until the mixture is smooth. Do not overwhisk. Butter a madeleine tray well and divide the dough among 16 to 18 molds. Hit the tray on the table to flatten the dough in the molds or push it down with the tips of your fingers. Bake in the preheated oven for about 20 minutes.
2. Let the madeleines rest or set 10 minutes before unmolding. Unmold, cool on a wire rack and, when cool, place in a plastic bag or a tightly lidded tin box to prevent drying. Use as needed. They are the ideal coffee cake but are also served as garnish for ice cream, or with berries and whipped cream as a type of shortcake.

Fresh Raspberry Linzer Torte
(Tarte à la Confiture)
The linzer torte is a specialty of Austria. The dough is extremely rich and delicate. The torte is easy to make and is well suited to buffets or whenever desserts have to hold for a few hours.
YIELD: 1 torte, 8 to 10 servings
filling
12 ounces (340 grams) fresh seedless raspberries or a 12-ounce (340-gram package unsweetened frozen raspberries
2⁄3 cup (160 grams) raspberry preserves
Linzer dough
1½ cups (180 grams) all-purpose organic flour
¾ cup (75 grams) ground almonds
¼ cup (36 grams) granulated sugar
¼ teaspoon mace powder
¼ teaspoon ground cinnamon
1 teaspoon pure vanilla extract
1½ sticks (¾ cup/175 grams) unsalted butter, cut into pieces
3 large egg yolks
Confectioners’ sugar for dusting the cake
1. For the filling: Push the fresh or defrosted unsweetened frozen raspberries along with the raspberry preserves through the fine screen of a food mill.
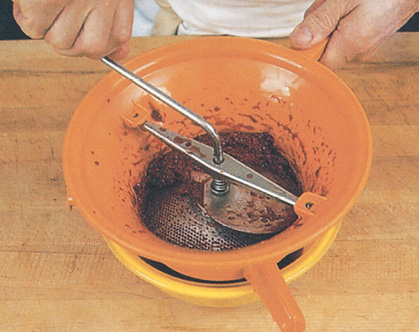
2. To be sure there are no seeds left, strain the purée through a sieve, banging the rim of the sieve with a spatula or your hand to make the seeds bounce and allow the clear liquid to go through. Then, press the seeds to extract any remaining liquid. The yield should be about 11/3 cups (340 grams).

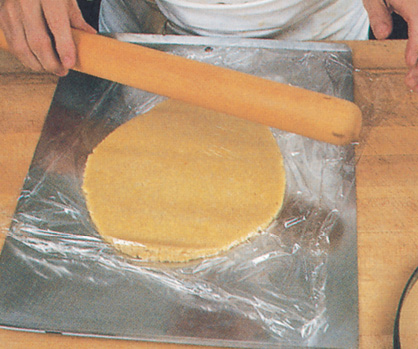
3. For the linzer dough: Put the flour, almonds, sugar, cinnamon, and vanilla in the bowl of a food processor and process until the almonds are as finely ground as the flour. Add the butter and egg yolks, and pulse the motor of the processor about 10 times, until the mixture just begins to hold together. Turn the dough out onto the table and smear it with your hands, pressing it forward in the technique of the fraisage (see page 562), until the dough is thoroughly mixed. Place two-thirds of the dough on a large cookie sheet, cover with a piece of plastic wrap, and, with a rolling pin, roll it out to a thickness of ¼ inch.
4. Preheat the oven to 375 degrees (191°C). Using a 10- to 11-inch (25- to 28- centimeter) flan ring, press through the plastic to cut a circle on the dough.
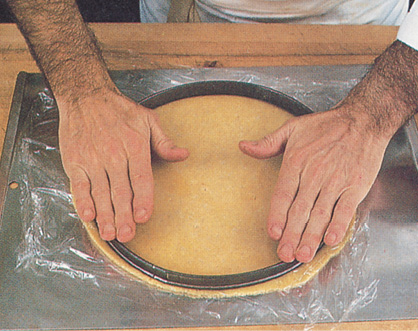
5. Remove the plastic wrap and the trimmings around the rim.
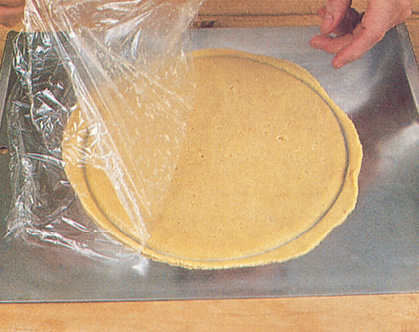
6. Fit the flan ring around the disk of dough. Make some of the extra dough into rolls about ¾ inches (19 millimeters) thick and place them all around the inside of the ring to create a border.

7. Press on the border of dough, sealing it to the disk of dough beneath and extending it slightly above the rim of the ring.

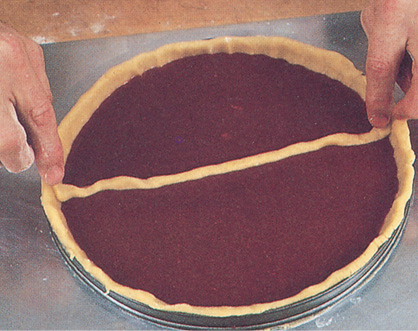
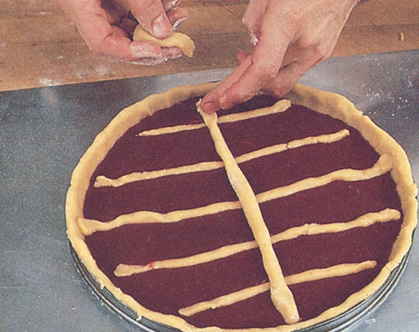
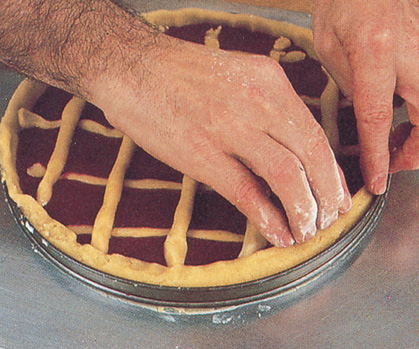
8. Pour the raspberry mixture into the shell. Using a little extra flour, roll the remaining dough into ropes about the thickness of a pencil. Place one of the ropes across the center of the torte and arrange four additional ropes parallel to it.
9. Then, arrange five ropes going in the other direction across the top of the torte.
10. Fold the extended border of dough back on top of the ropes and filling.
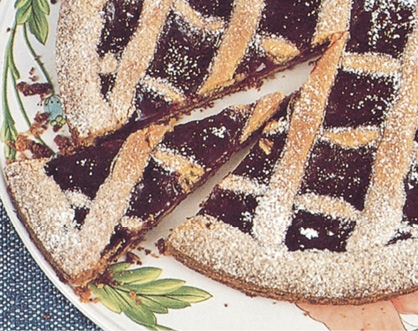
11. Bake in the center of the oven for approximately 45 minutes. Remove from the oven and immediately sprinkle some confectioners’ sugar on top. If the sugar is added while the jam is still bubbling, any that touches the filling will melt and only the sugar on the dough will remain.

12. Serve the linzer torte at room temperature, cut into wedges.
English Trifle
(Trifle Anglais)
The English trifle is simple to assemble. It can be done a few hours ahead because in this case the cake should get soft. It can be made with sponge or pound cake, with or without fruit, with pastry cream or only whipped cream. Keep refrigerated until ready to serve.
YIELD: 8 to 10 servings
2 Basic Sponge Cakes (see page 32) or 1 large pound cake
Pastry Cream
2 cups (473 milliliters) milk
¼ cup (56 grams) sugar
4 large egg yolks
½ teaspoon pure vanilla extract
2 tablespoons all-purpose organic flour poached pears
½ cup (112 grams) sugar
1½ cups (355 milliliters) water
Rind of ½ lemon
2 cored Bartlett pears
Filling
½ cup (118 milliliters) good seedless raspberry jam
¼ cup (59 milliliters) good, dry sherry
1½ cups (355 milliliters) heavy cream
2 tablespoons sugar
1. For the pastry cream: Bring the milk to a boil. Place the sugar, egg yolks, and vanilla in a bowl and whisk until the mixture is pale yellow and thick, about a minute. Mix in the flour, then pour in the boiling milk. Mix well. Place the mixture back in the saucepan and bring to a boil, stirring with a whisk. Let it boil for a few seconds, then transfer to a clean bowl, cover with plastic wrap and allow to cool. Cut the cakes into 3 layers each and spread one layer with half of the raspberry jam. Cut into 6 triangles.

2. To poach the pears: Boil the sugar, water, and lemon rind for 2 minutes. Peel the pears and cut each one into 6 wedges. Place in the boiling syrup and simmer for 2 to 3 minutes or until the pears are tender. Let them cool in syrup, and then drain. Line the bottom of a glass or crystal bowl with the cake triangles, jam-side against the glass.
3. Place a layer of plain cake in the middle of the bowl and sprinkle with 1 tablespoon of sherry. Pour the cooled custard on top. Break slices of cake into pieces and embed in the custard to cover. You may not need all of the cake. Sprinkle with 2 tablespoons of sherry.
4. Combine the cream with the sugar and 1 tablespoon of the sherry and beat until firm. Place a generous cup (approximately 240 milliliters) of the whipped cream into a pastry bag fitted with a tube tip, and spread the rest on top of the custard and cake.

5. Spread the whipped cream with a spatula so that the top is smooth. Spread another layer of cake with the remaining jam, cut into triangles. Place on top of the whipped cream.

6. Arrange the wedges of pear between the triangles of coated cake.

7. Decorate the edges and the center with the whipped cream.

8. The jam-coated cake shows through the bowl as well as being visible on top. Refrigerate until serving time. Serve with a spoon.

Poached Peaches with Raspberry Sauce
(Péches Pochés à la Purée de Framboises)
Poached fruit is easy to make, light and elegant, and particularly well suited as a finale to an elaborate meal. Poach fruit in the summer when peaches are ripe and tasty. If you cannot find good peaches, you can substitute pears, apricots, or even apples.
YIELD: 8 servings
Sauce
1 cup (170 grams) fresh raspberries
1 package (283 grams/10 ounces) unsweetened frozen raspberries
½ cup (118 milliliters) good seedless raspberry preserves
1 tablespoon raspberry brandy, cognac, or kirsch
Bring all the sauce ingredients except the brandy to a boil and simmer for 2 to 3 minutes. Strain through a fine strainer or a food mill, cover with plastic wrap, and let cool. When the sauce is cool, stir in the brandy
Poaching
2 cups (450 grams) sugar
6 cups (1.4 liters) water
Juice and rind of 1 lemon
8 ripe peaches (about 2¾ pounds/1.25 kilograms), at room temperature
To finish the dish
1 pound cake cut into 8½-inch (21.5-centimeter) slices, each slice cut into a disk with a cookie cutter (use the trimmings to make a pudding)
1 sprig fresh mint, cut into sprigs, one for each peach
1. To poach peaches: Mix the sugar, water, and lemon in a saucepan, bring to a boil and boil for 5 minutes. Add the peaches. Place a piece of paper towel on top of the peaches and push them down into the syrup so the paper towel gets wet with the syrup. If the peaches are in contact with air, they will discolor. Cover with a lid and simmer for 3 to 5 minutes, or until the peaches are tender. Let the peaches cool in the syrup. When the peaches are cool, remove from the syrup and peel the skin off. (Reserve the syrup to poach other fruit.)

Spread approximately 2 tablespoons of raspberry sauce on each individual plate and place a disk of pound cake in the center. Place a peach on the cake and decorate with a sprig of fresh mint. For an alternate method, coat the peaches with the raspberry sauce, then arrange on the pound cake and decorate with the mint.
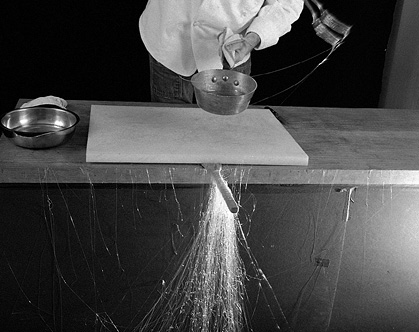
Angel Hair
(Cheveux d’ Ange)
Angel hair is very decorative and, though making it is a messy business, it can turn an ordinary dessert into a glorious affair. Although it can be made with sugar and water, we use corn syrup instead of the water because it prevents the sugar from crystallizing during and after cooking, making it more “flexible” and easier to use.
1 cup (225 grams) sugar
¾ cup (178 milliliters) corn syrup
2 teaspoons pure beeswax candle (optional)
1. Combine sugar and corn syrup in a saucepan. Mix well and place on medium heat. Do not stir the mixture anymore. After it boils, cook 12 to 14 minutes on medium to low heat until the sugar turns a very light ivory color (about 318 degrees/159°C on a candy thermometer). If there is any crystallized sugar on the sides of the pan, cover the saucepan for 30 seconds to 1 minute during the cooking. The steam produced will melt the sugar crystals.
2. Remove the sugar from the heat and grate the pure beeswax candle into the saucepan (optional). The pieces will melt right away and mix with the sugar. Angel hair has a tendency to stick together, especially during hot summer days. The wax will coat the sugar threads, making them “dry,” smooth, and easier to store and use. Pure beeswax is from the honeycomb and is a natural, edible product.
3. Let the syrup cool for a few minutes. You may place the saucepan in a bowl of cold water to accelerate the process. Using 2 forks side by side, lift some of the syrup. It should be thick.
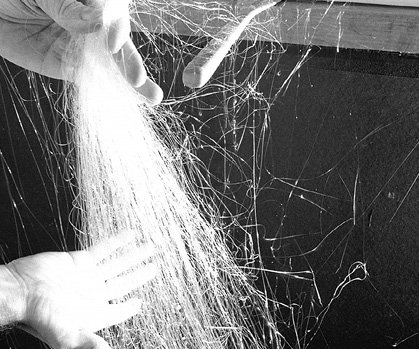
4. Cover the floor with newspaper. Place a wooden spatula on the table so it extends over the edge of the table. Dip both forks into the syrup and wave them over the spatula, high enough and broadly enough so that the threads are long, thin, and have time to solidify in the air. You may have to use a step stool to get higher.
5. Slide the angel hair away from the wooden spatula and use or store in a tightly covered container. Use as needed.
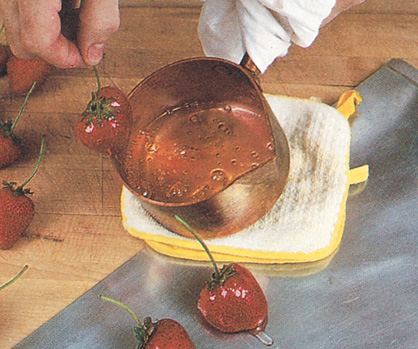
Glazed Strawberries
(Glaçage des Fraises)
When strawberries are in season, fresh and abundant, they always are welcomed desserts, either plain with brown sugar and sour cream, or simply topped with a dusting of sugar. For a buffet or elegant dinner they can be glazed and passed to the guests at the end of the meal. Here are two different ways to glaze strawberries. One is a currant jelly glaze and the other—the most sophisticated and delicate—is a cooked sugar syrup.
YIELD: 1 dozen jelly-glazed and 1 dozen sugar-glazed strawberries
Currant jelly glaze
1 jar (12 ounces/355 milliliters) currant jelly
1 dozen (12) medium-size strawberries, cold, with long stems
Sugar-syrup glaze
1 cup (225 grams) sugar
¼ cup (59 milliliters) water
½ teaspoon cream of tartar diluted with 1 teaspoon water
1 dozen (12) medium-size strawberries, with long stems
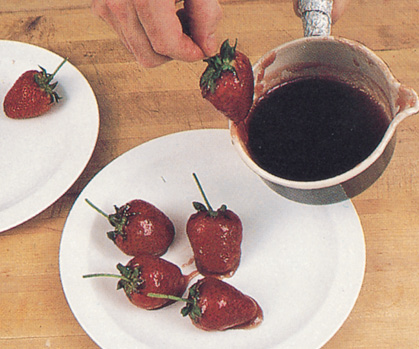
1. Currant-glazed strawberries: Place the currant jelly in a saucepan on the stove and bring to a boil. Mix with a spoon until smooth. If the mixture is not smooth, strain it. Cool to lukewarm.
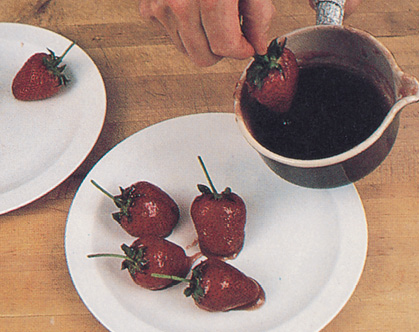
2. Holding the cold strawberry by the stem, dip in the mixture, twist to coat, and allow excess jam to fall off. Place on a very cold plate; refrigerate. The coating will harden as it cools. At serving time, transfer to a clean plate.
3. Sugar-syrup-glazed strawberries: Place the sugar and water in a heavy saucepan and stir just enough to wet the sugar. Bring to a boil but do not stir the mixture or the sugar may crystallize. Boil for 4 to 5 minutes, then add the cream of tartar. Boil for another minute, at which point it should be at the hard-crack stage (about 310 degrees/155°C), which is the stage before it turns into caramel. Dip a teaspoon in the mixture, lift it, and dip in cold water right away. If the mixture sets hard on the spoon, it is at the hard-crack stage. Incline the pan so the syrup gathers in one corner. Dip the strawberries one by one in the hot sugar syrup. Twist the berry and rub gently against the sides of the saucepan so the excess syrup drips off. The coating should be thin.
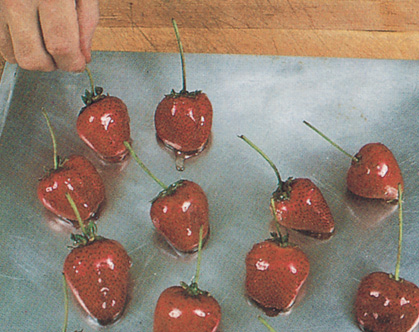
4. Place on an oiled metal tray until hard. The hot syrup will begin to cook the berry and the berry will release juices, which, in about ½ hour, will start melting the sugar coating. The berries should be eaten just before the sugar coating starts to melt as, at that moment, the coating is the thinnest.
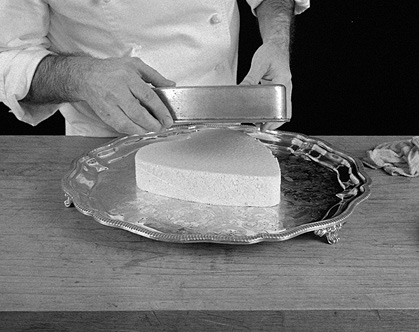
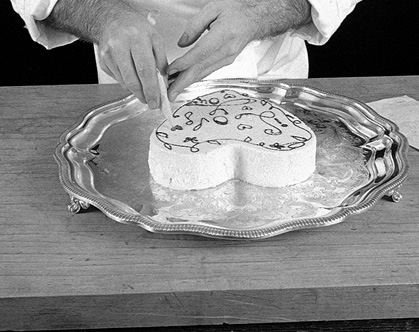
St. Valentine Custard Cake
(“Gâteau” de Semoule St. Valentin)
This unusual creation is not a cake in the traditional sense of the word but rather a molded custard served with poached fruit. It is made with farina, though rice or semolina could be used instead. Serve with any fruit in season—pear, peach, apricot, or apple—or serve plain, without fruit, like a rice pudding.
8 medium-sized pears (William, Comice or Bartlett)
1 vanilla bean
Peel of 1 lemon and 1 orange
1½ cups (337 grams) granulated sugar
Grated rind of 1 orange
5 large egg yolks
1 teaspoon pure vanilla extract
1½ envelopes unflavored gelatin
2 cups (473 milliliters) milk
¼ cup (56 grams) farina
2 cups (473 milliliters) heavy cream
3 tablespoons confectioners’ sugar
Almond or peanut oil to coat mold
1 (296-milliliter/10-ounce) jar apricot jam, strained
Food coloring
1 ounce (28 grams) chocolate (½ ounce/14 grams bitter, ½ ounce/14 grams semisweet)
2 tablespoons lukewarm water
Pear brandy
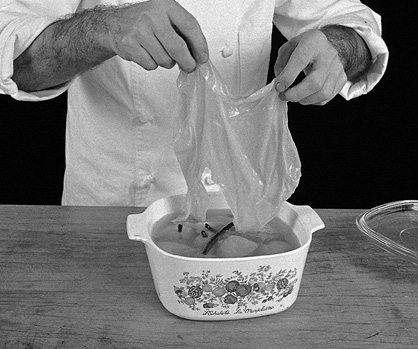
1. Peel the pears and remove the cores, leaving the stem attached, and place in a large casserole. Add the vanilla bean, lemon and orange peel, 1 cup (225 grams) of the sugar, and enough cold water to cover the pears. Bring to a boil. Place a piece of paper towel over the casserole, so that the tops of the pears are kept moist and do not discolor. Cover and simmer slowly for 5 minutes if the pears are well-ripened, and up to 35 minutes if they are green and hard. They should be tender to the point of a knife. Let cool slowly in the liquid overnight.

2. Remove the paper.
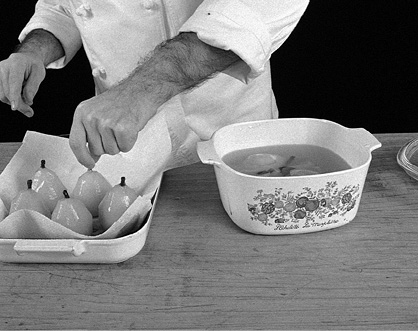
3. Drain the pears on paper towels.
4. Mix together the grated orange rind, egg yolks, the remaining ½ cup (112 grams) sugar, the vanilla extract, and gelatin. Whisk until the mixture forms a ribbon.

5. Bring the milk to a boil and add the farina. Boil, stirring, for 2 minutes until thick.
6. Add the egg yolk mixture and bring to a boil again. Remove from the heat, transfer to a clean bowl and cool to lukewarm, stirring occasionally to avoid a skin forming on top.

7. Mix the heavy cream with the confectioners’ sugar. Whip to a soft peak. Do not overwhip or the custard will taste of butter, rather than of sweet cream.
8. When the farina mixture reaches room temperature, fold in the whipped cream.

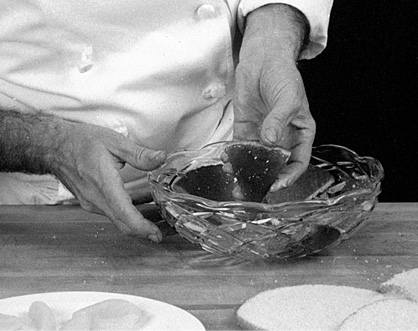
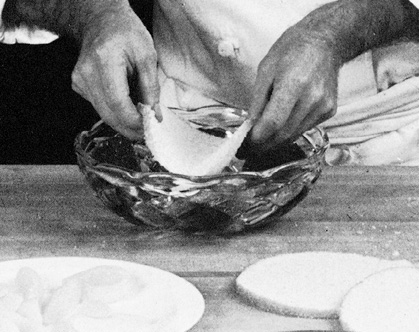
9. Rub a 6-cup/1.4-liter mold very lightly with almond or peanut oil. Pour the mixture in, cover with plastic wrap, and refrigerate overnight.
10. Run a knife around the “gateau.”

11. Invert on a large platter and cover for a few seconds with a towel wrung in hot water to help the unmolding.
12. Unmold.
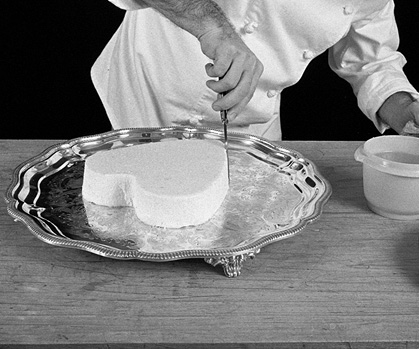
13. If the sides or top are a little rough or coarse from the unmolding, smooth out with a spatula or knife.
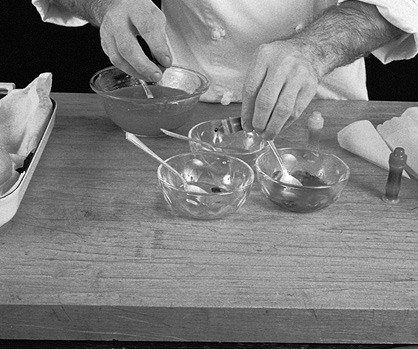
14. Place 1 tablespoon of the apricot jam in each of the 3 cups. Add a couple of drops of red, green, and yellow food coloring to have three different colored jams. If you object to food coloring, you may use mint jelly (for green), currant jelly (for red), and apple jelly (for yellow). Prepare 4 small paper cornets.
15. Melt the chocolate in a small bowl or microwave oven. Add 1½ teaspoons lukewarm water and mix. It will curdle; add more water (up to 2 tablespoons) a little at a time, and stir well until the mixture is smooth and shiny. Fill a paper cornet with chocolate and cut the tip off. Draw letters, flowers, leaves, and the like according to your fancy.
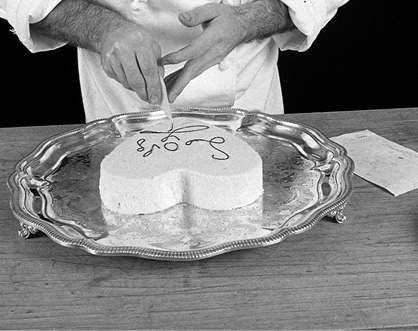
16. Fill the 3 cornets with the different colored jams, and squeeze inside the chocolate outlines.
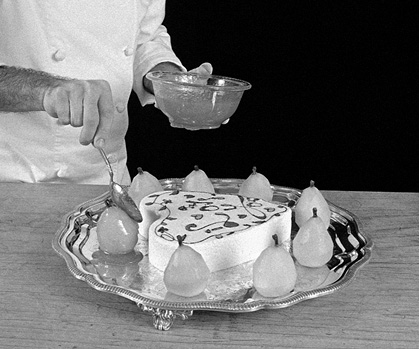
17. Place the pears around and coat with cool apricot glaze diluted with pear brandy. (Strain the remaining apricot jam through a fine sieve and dilute with the pear brandy.) Serve with extra apricot glaze.
Crêpes Suzettes
Though crêpes are best when they are fresh out of the pan, they can be refrigerated (stacked and covered) and kept for a few days. The basic crêpe can be used both for desserts and entrees. The best-known dessert crêpe is the crêpe suzette, flavored with orange and flamed at serving time with cognac and orange liqueur. You will need a large well-seasoned or no-stick skillet and a powerful gas or electric burner.
YIELD: 2 dozen crêpes
CRÊPE BATTER
1½ cups (225 grams) all-purpose organic flour
3 large eggs
1 teaspoon sugar
¾ teaspoon salt
1½ cups (355 milliliters) milk
⅔ stick (76 grams) unsalted butter, melted
½ cup (118 milliliters) cold water
THE SAUCE
2 sticks (1 cup/227 grams) unsalted butter, softened
8 tablespoons sugar
Grated rind of 2 oranges or 4 tangerines Juice of 1 orange or 2 tangerines
Cognac and Grand Marnier
1. For the crEpes: To make a smooth batter, put the flour, eggs, sugar, and salt with half of the milk in a bowl, and mix with a whisk. You will notice that the batter is still thick and lumpy.
2. Keep working the batter without adding more liquid. Because the mixture is thick, the threads of the whisk will break down any lumps in the flour and make the batter smooth. When smooth, thoroughly mix in the remaining milk and water, then add the melted butter and whisk until smooth. The batter should have the consistency of heavy cream; if it is too thick, add up to 1 tablespoon more water. It does not have to rest.
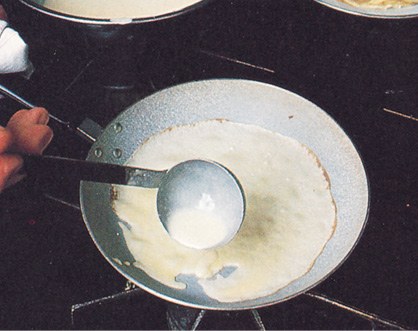
3. To make the crêpes: Heat a 6-inch (15- centimeter) crêpe pan, or no-stick skillet. When hot, spoon about 3 tablespoons of the batter into the near side of the inclined pan. Shake the pan so the batter runs down the bottom of the pan and spreads over most of its surface.
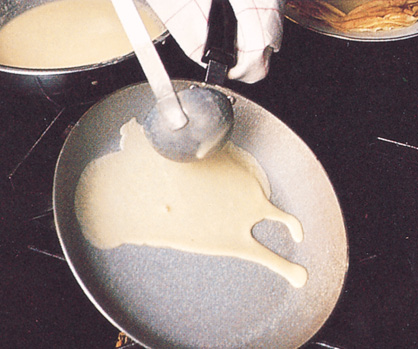
4. The thinness of the crêpe is determined by the speed with which the batter is spread. As the batter touches the hot pan surface, it solidifies. If it is not spread quickly, it will solidify thickly, so it is imperative that the batter be moved quickly. It is better to have too little than too much batter in the pan. If there are holes in the crêpe, they can be filled in with a little more batter. Add a few drops of batter to fill any holes in the crêpe.
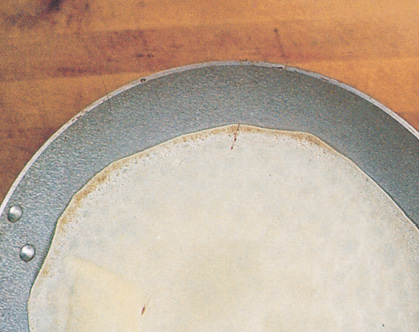
5. The edge of the crêpe is very thin and full of tiny holes. It is called a crêpe dentelle, which means “lace” in French. If the batter is liquid enough and it is spread quickly, the edge of the crêpe will look lacy.
6. Cook the first side of the crêpe for approximately 1 minute. Then, flip it over. An alternative method of turning the crêpe is to use a fork. Lift up the cooked crêpe along the edge with the fork, then grab the crêpe between your thumb and finger and turn it over.

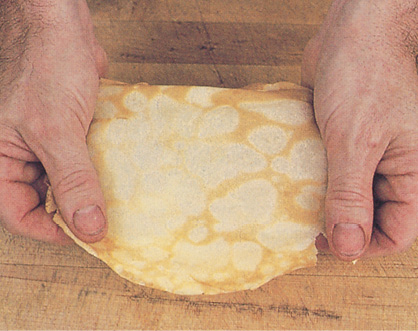
7. Cook the crêpe for approximately 30 seconds on the other side. Then remove the crêpe to a plate so the side browned first is underneath. When the crêpe is stuffed and rolled, you want to have this side showing because it looks best.

8. Note that the crêpe is very thin but elastic so it can hold a stuffing inside. If the crêpe were rich in cream or egg yolk, it might be thin but it would have a tendency to break. Stack the crêpes up on a plate, cover with plastic wrap, and set aside until the dessert is assembled. They will stay very moist and pliable and will separate easily when needed.
9. To make the sauce, place the butter, sugar, grated orange rind, and juice in a food processor and process until smooth. Transfer to a bowl.

10. At serving time, melt 4 to 6 tablespoons of the sauce in the skillet (about 1 tablespoon per crêpe).

11. When sizzling hot, place 4 to 6 crêpes flat in the sauce. Using a fork and a spoon, turn the crêpes in the sauce. When coated, fold each one into fourths (the nice side showing) and arrange in the skillet as you go along.

12. Pour 1½ to 2 tablespoons of both cognac and Grand Marnier on top of the crêpes.

13. Ignite with a match and, keeping your head back, stir the crêpes in the flaming sauce.

14. Serve the crêpes on warm plates, 2 or 3 per person, with some sauce. Repeat to make all the crêpes in several batches. Add more cognac and Grand Marnier to each batch.
Chocolate Cigarettes
I like bittersweet chocolate containing 70% cocoa (chocolate liquor). Take your time when you melt chocolate. Chocolate burns easily, stiffening and becoming granular and bitter when burned. The best method is to place the chocolate in a glass or stainless-steel container and leave it overnight in a regular oven with the pilot light on. Stir to get it smooth. The microwave oven is also an excellent place to melt it. Microwave the chocolate in 1 minute intervals, leaving 2 or 3 minutes between each one to prevent burning. If microwaved for 3 minutes straight, the chocolate might scorch.
Chocolate cigarettes, as well as chocolate strips and flowers, are often used in decoration. They require a bit of practice to make, but the chocolate can be melted again and reused as many times as necessary until the technique is perfected.
6 ounces (177 milliliters) melted good quality bittersweet hocolate, preferably 70% cocoa
1. You need to work on a flat, hard surface such as marble, stainless steel, or glass. Pour the melted chocolate on the marble surface.

2. Spread with a long, narrow spatula, going back and forth until the top of the chocolate becomes cloudy. It should be thin, but not too thin, at least 1/8 inch (3 millimeters) thick.
3. Take a large, strong knife. Holding it on an angle, start cutting into the chocolate, applying pressure down and forward on the blade of the knife. The pressure should be strong enough to bend the blade slightly.
4. The chocolate rolls onto itself as you move the knife down. The consistency is very important. Chocolate which is too soft will gather in a mush; chocolate which is too hard will flake and crumble under the blade. If this happens, scrape it from the marble, melt it again, and try until it works.

Fruit Salad Ambrosia
(Salade de Fruits)
This flavorful fruit salad is made with fresh as well as dried fruits that have been macerated in a sweet-sour sauce made from honey, lemon juice, rind of citrus fruit, apricot preserves, and Kirshwasser. The acid in the lemon juice keeps the fruit from discoloring. The sauce can be made ahead and the dried fruit prepared and combined with the sauce and kept in the refrigerator, ready to be added to the fresh fruit an hour or so before serving. The sauce and dried fruit mixture will keep several weeks in the refrigerator. The mixture of fruit used should be changed according to what’s available in the market and your own personal taste. Look for different flavors in the fruit as well as different textures and colors. Remember that even though pineapples, apples, pears, and bananas may look different before they are peeled, their flesh is basically the same color.
YIELD: 6 to 8 servings
Fruit Macerating Sauce
3 strips lemon rind
3 strips lime rind
3 strips orange rind
⅓ cup (80 milliliters) honey
⅓ cup (80 milliliters) fresh lemon juice
¼ cup (59 milliliters) apricot preserves
2 tablespoons Kirshwasser
Dry Fruit Mixture
¼ cup (37 grams) dark raisins
⅓ cup (50 grams) dried apricot halves
8 pitted prunes, cut into ½-inch (1.3-centimeter) slices
2 dried peach halves, cut into ½-inch (1.3-centimeter) strips
Fresh Fruit Mixture
1 pineapple (to make 1½ cups/240 grams pineapple pieces)
1½ cups sliced mixture of papaya and mango
1 banana, sliced
1 cup (100 grams) pitted cherries
1 cup (100 grams) seedless grapes
½ persimmon, peeled and cut into wedges
1. For the fruit macerating sauce: Stack 3 strips each of lemon, lime, and orange rind (peeled with a vegetable peeler) and cut into a fine julienne. You should have approximately 2 tablespoons of the combined julienned rinds.

2. In a bowl, combine the rind with honey, lemon juice, apricot preserves, and Kirschwasser. This makes a nice base for the fruit mixture.
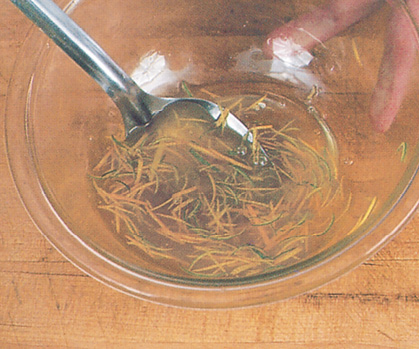
3. Add the dried fruit mixture to the macerating sauce. This mixture can be made ahead and stored in a jar in the refrigerator for several weeks.

4. For the fresh fruit: Cut the pineapple into halves and then wedges. Cut off the top of each wedge—the central woody core of the fruit—and then cut the flesh to separate it from the rind.
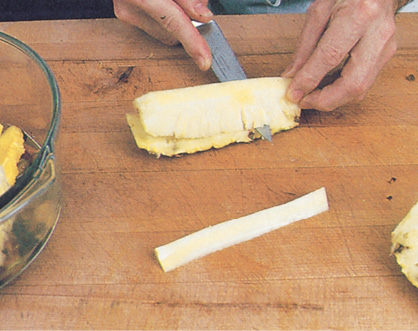
5. With the pineapple wedges still on the rind, cut into little slices about ½ inch (1.3 centimeters) thick and add to the mixture in the bowl.

6. Add the balance of the fresh fruit mixture and mix well. Spoon into dessert dishes and serve.
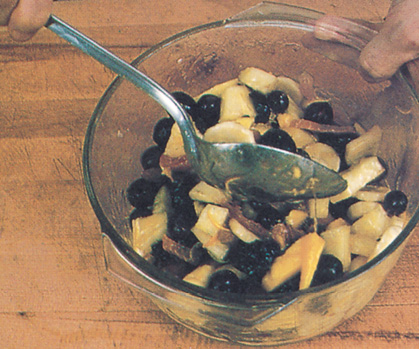
Strawberry Sherbet
(Sorbet aux Fraises)
There are lots of different types of “iced desserts”—ices, sorbet, spum, marquise, granité. All are conventionally made from fruits or fruit juices, although different cooks may interpret them differently. Fruit sherbets or sorbets have a truer taste when made only with water, sugar, and a fruit purée. With the addition of cream the fruit tends to lose its identity. Very juicy fruits like lemon or pineapple, or berries such as black currants, raspberries, or strawberries, make the best sherbets. Commercial sherbets are made in ice cream machines. We prefer to use the machine for regular ice cream only, because it tends to emulsify the sherbert mixture too much. Beating air into a mixture of milk, cream, and eggs makes it light and smooth. However, in sherberts too much air changes the color and taste of the fruit. It makes it too light and too foamy and changes the texture, as well as diluting the fruit taste. The less distinctive the taste of the fruit, the less it should be emulsified.
YIELD: 6 servings
1½ pounds (681 grams) fresh strawberries or raspberries, ripe, hulled
¾ cup (169 grams) sugar (or more or less depending on the sweetness and ripeness of the fruit)
Juice of ½ large lemon (¼ cup/59 milliliters)
2 tablespoons corn syrup
Raspberry sauce
1 cup (170 grams) fresh raspberries
1 10-ounce/283-gram package frozen unsweetened raspberries, defrosted
⅔ cup (158 milliliters) seedless rasberry preserves
1 tablespoon raspberry brandy, kirsch, or cognac
Strain combined sauce ingredients through a fine strainer or food mill.
1. For the sherbet: Place the ingredients for the sherbet in a food processor and process for about 1 minute. Strain to remove seeds. Place the mixture in a stainless steel bowl in the freezer for 2 hours. Stir it once in a while.
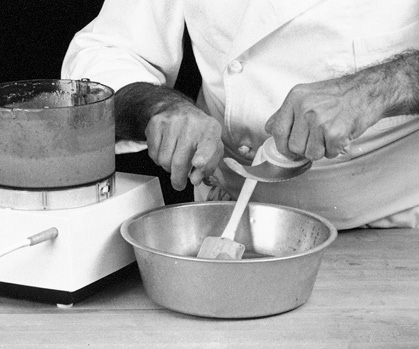
2. When the mixture is partially frozen and grainy, place it back in the food processor for about 30 seconds to emulsify. It will liquefy and get softer, whiter, and much smoother. Place back in a bowl, cover with plastic wrap, and freeze to harden for a few hours before serving. At this point, the mixture is usually spooned with an ice cream scoop and served with the raspberry sauce.

3. To make individual bombes: Line small containers with plastic wrap, fill with the sherbert and freeze. When the mixture is hard, hollow the center with a spoon, place a piece of plastic wrap into the cavity and keep it in the freezer until needed.

4. Before serving time, fill the center of the mold with fresh berries, top with a plate and invert. Serve with raspberry sauce around.

Vanilla Ice Cream in Netty Cups with Spicy Cherries in Wine
This rich vanilla ice cream made with fresh vanilla beans is distinctive in taste and has a luscious texture. Although it can be served by itself, the crunchy texture and nutty taste of the cookie cup is quite complementary.
The quantity of dough needed for each cup is approximately 1½ tablespoons. If the cups are made ahead, be sure to store them carefully in a tightly sealed container to keep them for getting soggy.
The cherries are cooked in red wine and spices, with port wine and cognac added. They make an excellent dessert by themselves with a little sour cream and a slice of pound cake. The cherries will keep in a jar, refrigerated, for weeks.
YIELD: 8 servings
vanilla ice cream
2 to 3 vanilla beans, depending on size
2 cups (474 milliliters) milk
2 cups (474 milliliters) heavy cream
4 large egg yolks
1 large egg
1 tablespoon pure vanilla extract
1 cup (225 grams) sugar
Spicy Cherries in Wine
3 pounds (1.4 kilograms) Bing or sweet cherries, pitted
¾ cup (169 grams) sugar
½ teaspoon ground cinnamon
⅛ teaspoon ground allspice
⅛ teaspoon ground nutmeg
⅛ teaspoon ground cloves
Dash cayenne pepper
1 tablespoon pure vanilla extract
1½ cups (355 milliliters) dry red wine
1½ teaspoons cornstarch dissolved in 1 tablespoon water
¼ cup (60 milliliters) sweet port wine
2 tablespoons cognac
Netty Cup Dough
¼ cup (115 grams) blanched almonds
2 tablespoons all-purpose organic flour
⅔ stick (2.5 ounces/76 grams) butter
1 tablespoon milk
¾ cup (169 grams) sugar
For the dough: Grind the almonds in the food processor with the flour until very fine. (The flour will absorb any oil released by the almonds and will produce a finer mixture). Add the butter, cut into pieces, and the milk and sugar. Process for 8 to 10 seconds, just long enough for the mixture to form into a ball.
1. For the vanilla ice cream: Break the vanilla beans, place them in a small coffee or spice grinder or mini food processor, and pulverize them into a powder. If the vanilla-bean mixture is still a bit soft and gooey, add some of the sugar from the recipe to the grinder so that it grinds into a fine powder.
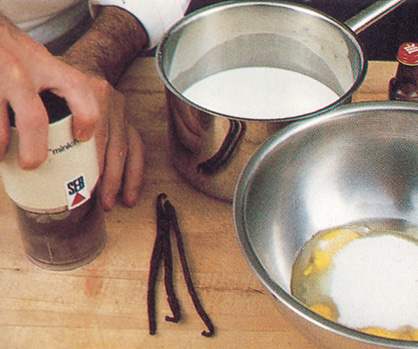
2. Pour the milk and 1 cup (237 milliliters) of the cream into a saucepan and bring to a boil. Pour the remaining cold cream into a large bowl. Mix the egg yolks, egg, vanilla extract, sugar, and powdered vanilla with a whisk. Combine with the boiling milk and cream, and place the mixture back over the heat just long enough for it to thicken, which will occur when it reaches approximately 180 degrees (82°C). Do not overcook the mixture or it will tend to curdle. As soon as the mixture thickens, pour it into the cold cream, which will cool it and prevent it from cooking further and curdling. Combine well.

3. Place the mixture in an ice cream maker and make according to the manufacturer’s instructions (it should take from 30 to 45 minutes). Then tightly pack the ice cream in a bowl or other container, and place it in the freezer, covered, until serving time.

4. For the spicy cherries in wine: Place the cherries, sugar, cinnamon, allspice, nutmeg, cloves, cayenne, vanilla, and dry red wine in a large saucepan, preferably stainless steel. Bring the mixture to a boil and cook for 2 to 3 minutes, covered. Let cool, still covered, until lukewarm. Strain off the juice (approximately 2 to 3 cups/ 474 to 711 milliliters), and reduce it to 1¼ cups (296 milliliters). Add the cornstarch dissolved in water to the juice and bring to a boil. Pour over the cherries. When the cherries are lukewarm, add the port wine and cognac and mix well. At this point, the mixture can be poured into a jar and refrigerated.

5. For the netty cups: Preheat the oven to 350 degrees (177°C). Line a cookie sheet with a piece of parchment paper (cut the paper into fourths) oiled very lightly on both sides and pressed flat on the cookie sheet. Place about 1½ tablespoons of the dough on each of the 4 pieces of paper. Wet your fingers or a spoon and press the dough into disks about 2½ inches (6 centimeters) across, making them as round as possible.
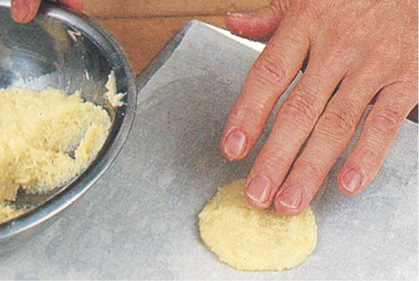
6. Bake for approximately 12 minutes. The dough should spread and be nicely browned all around. Lift up each piece of paper, turn it over, and peel the paper off. Reserve the paper (it does not need to be oiled again) for the next cookies.

7. Press the hot cookies (top side out) around half-cup molds (little Pyrex cups are ideal), pushing gently all around so they conform to the shape of the molds. Allow to harden before removing. Work quickly. If the cookies get too cool, they will break. If they are too hot, they will separate on the molds. If they harden too much to shape them, return to the oven for 1 minute to soften.

8. The cherries in wine should be served very cold. Place 2 to 3 tablespoons of the cherry and juice mixture on each serving plate.

9. Place the netty cup in the center of each plate and fill with a ball of the vanilla ice cream. Top with a cherry, spoon a little juice over the ice cream, and serve immediately.

Pie Dough and Pie Shell
(Pâte Brisée et Croûte)
Pie dough, pâte brisée, is certainly the most useful all-purpose dough in French cooking. Though the dough is easier to make with a combination of butter and shortening, an all-butter dough is finer. However, for quiche, tourte (meat pies), and the like, the difference is difficult to detect. The reasons are that the quiche is served hot or lukewarm, and the filling (bacon, mushrooms, onions, and the like) has a strong taste of its own. The difference would be quite apparent in a shell for a raspberry tart because it is served cold and the filling is very delicate.
When working with dough, remember that the more you knead and the more water you use, the more elasticity and shrinkage you get. The less water and the more fat you use, the more crumbly and lax the dough will be. At one end of the spectrum you have the bread dough (flour and water) which is elastic, springy and unrollable. At the other end of the spectrum, the cookie dough (mainly flour and fat) is soft, crumbly, and hard to roll. The pie dough is in the middle and will lean toward one side or the other, depending on your ingredients and method.
YIELD: 1 pie shell
2 cups (300 grams) all-purpose organic flour
1½ sticks (6 ounces/168 grams) unsalted butter, very cold and cut into 1⁄4-inch cubes
¼ teaspoon salt
½ teaspoon sugar
⅓ cup cold water, approximately
1. Place the flour, butter, salt and sugar in a large bowl. Mix the ingredients enough so that all the butter pieces are coated with flour.

2. Add water and start kneading the ingredients to gather the dough into a ball. Do not worry if there are little pieces of plain butter here and there. This will give flakiness to the dough, making it slightly similar to a puff paste. The dough should be malleable and usable right away. If overworked, it will become elastic, in which case you should let it rest in the refrigerator for 1 hour before using.
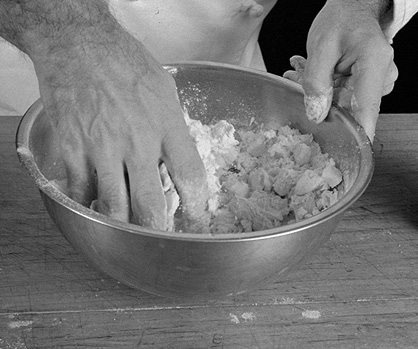
3. Place the dough on a floured board and roll uniformly, turning the dough a quarter of a turn as you are rolling so that it forms a nice “wheel.” Be sure the board is well floured underneath. The dough should be approximately 1/8-inch (3-millimeters) thick, although many cooks like it thicker.

4. Roll the dough back
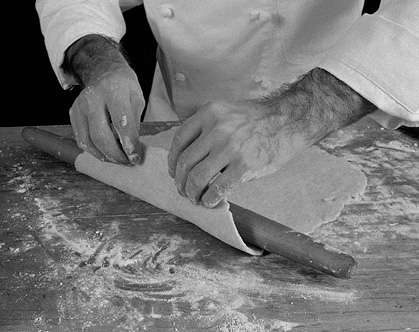
5. on the rolling pin.
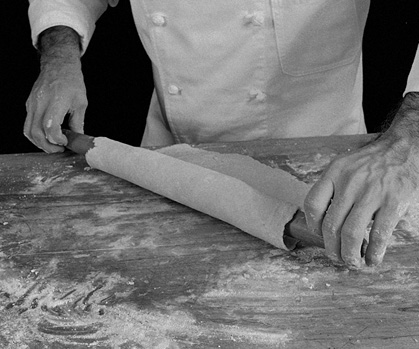
6. Lift up and
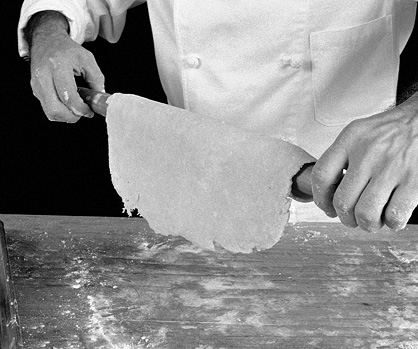
7. unroll on a flan ring or other mold.
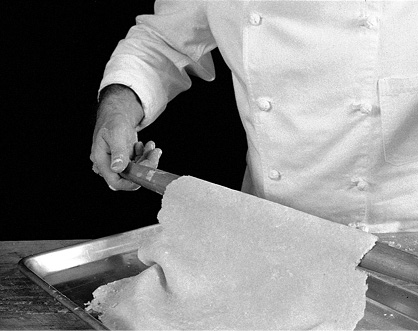
8. With the tips of your fingers, push in the corners so that the dough does not get stretched, which would cause it to shrink during the baking.

9. Squeeze a lip all around the inside of the flan ring, working the dough between your thumb and forefinger.
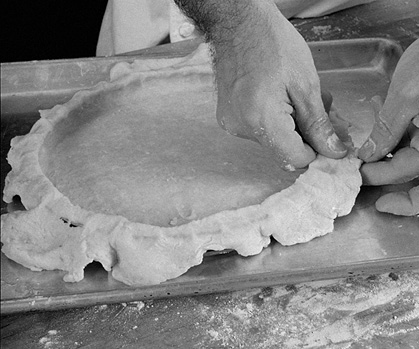
10. Use a knife, or roll your pin on top of the ring to trim the excess dough.
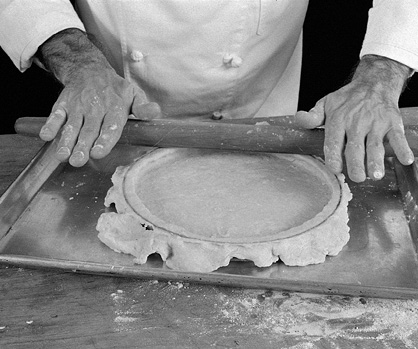
11. Remove the trimmings. (The excess dough can be stored in the refrigerator for a few days, or frozen.) Re-form the edge between your thumb and forefinger.

12. Mark the edges with a dough crimper or the tines of a fork, or by squeezing it between your fingers. Re-form the edges between thumb and forefinger.
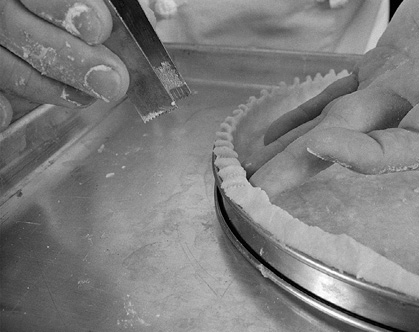
13. Shell, ready to be used. If your recipe calls for a precooked shell, line the shell with wax paper and weight it down with beans or the like to prevent the dough from shrinking during the first 15 minutes of baking. Then remove the beans and paper and continue cooking.
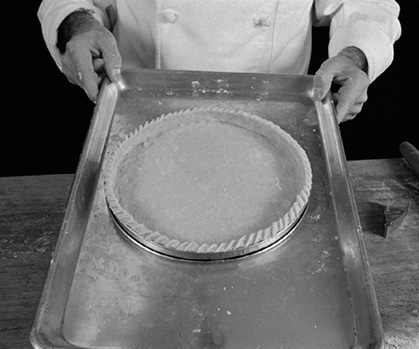
Sweet Pie Dough and Pastry Shell
(Pâte Sucrée et Croûte)
The sweet pie dough, pâte sucrée, is quite different from the pâte brisée described in the preceding technique. The texture is not flaky or tender, but rather is close to that of a cookie dough. The dough is not at all elastic or springy. It rolls easily but is a little difficult to pick up. It makes an excellent shell for runny ingredients because it does not get soggy as easily as regular pie dough. This recipe makes enough dough for two 9-inch (23-centimeter) pies.
YIELD: 2 pastry shells
3 cups (450 grams) all-purpose organic flour
2½ sticks (1¼ cup/283 grams) unsalted butter, cut into pieces, softened
½ cup (112 grams) sugar
¼ teaspoon salt
1 large egg and 1 large egg yolk, beaten lightly with a fork, for egg wash
1. Preheat the oven to 400 degrees (204°C). Place the flour in the middle of the work table. Make a well in the center and add the remaining ingredients. Gather the dough, with a pastry scraper or your fingers, into a compact mass.
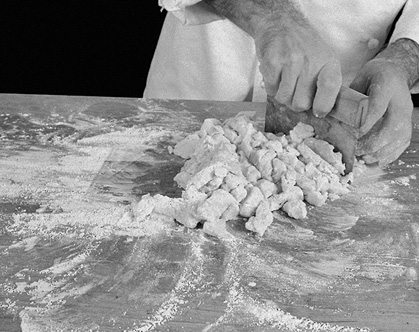
2. Place the dough close to you and, with the heel of your hand, take a mass about the size of a golf ball and “smear” it about 10 inches (25 centimeters) forward. Keep your fingers pointed upwards. Repeat, smearing more and more of the dough forward, until it has all been processed. Gather the dough into a ball and repeat the operation once more. The two smearings (fraisage in French) help homogenize the ingredients, making a well-blended dough.

3. Roll the dough and fit it into a mold as described in steps 3 to 7 of the preceding technique. You can use a flan ring or a tart mold with a removable bottom, as pictured here.

4. Cut a round disk of wax paper, fold into triangle, and fringe the edge with a pair of scissors.
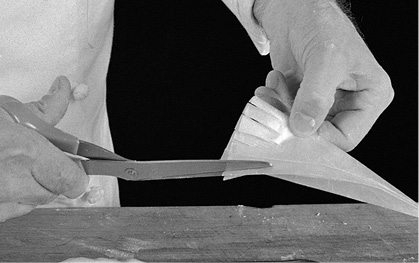
5. Line the dough with the paper. Fill the shell with dry beans, rice, pebbles, or any heavy, dry ingredient, to hold the dough in place during the baking.
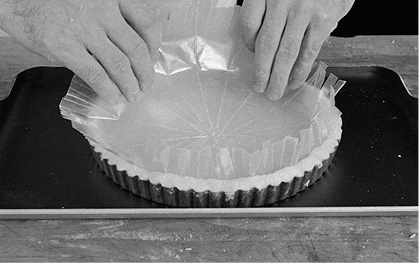
6. Place on a cookie sheet and bake for approximately 45 minutes. Remove the paper and beans and keep for later use.
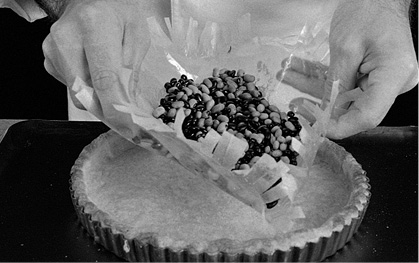
7. Brush the inside of the shell with an egg wash. Return to the oven for 10 minutes.

8. Remove from mold. The egg coating forms a waterproof layer and prevents the dough from getting soggy when filled with cream or juicy fruits. The same technique is used with pâte brisée on those occasions when you precook a shell for quiche or custard.
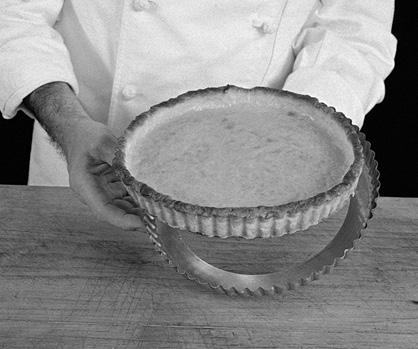
9. The dough should always be well cooked and crunchy (better overcooked than underdone). If, by a stroke of bad luck, the dough burns underneath, turn upside down when cool, and rub with a grater to remove the blackened part.

Cream Cheese Dough
(Pâte au “Cream Cheese”)
1 cup (120 grams) all-purpose organic flour (about 5½ ounces)
½ stick butter (¼ cup/57 grams)
4 ounces (114 grams) cream cheese, at room temperature
Preheat the oven to 375 degrees (191°C). Place the flour and butter, cut in pieces, into the bowl of a food processor, and process for about 10 to 15 seconds. Then add the cream cheese in pieces and process approximately 10 seconds more, until the mixture forms a ball. The dough can be made ahead and refrigerated or used immediately. To roll, flour a board lightly and roll the dough out very thin (1/8 inch/3 millimeters thick) into a circle. Roll it back onto the rolling pin and place in a mold and weight as per the previous technique. Bake for 20 minutes.
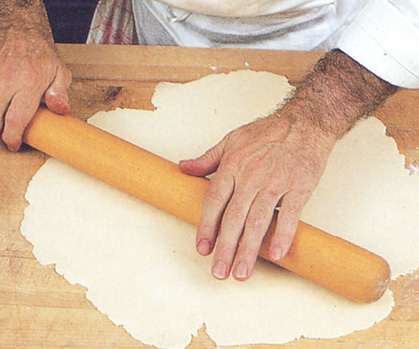
Apple Tart
(Tarte aux Pommes)
Open-faced tarts are as distinctly French as apple pie is American. The dough can be arranged in a flan ring as shown below, or in a removable bottom mold, or in a regular pie plate. It can also be cooked free form on a cookie sheet with the edges rolled to hold in the filling. I like the dough rolled very thin and the shell well-cooked. Any apple can be used, keeping in mind that some are more tart than others, and some hold their shape better than others while cooking.
Prepared Pie Dough, page 562
4 to 5 apples
3 tablespoons sugar
2 tablespoons (28 grams) unsalted butter
Apricot or apple jam (optional)
Calvados, cognac, or kirsch (optional)
1. Preheat the oven to 400 degrees (204°C). Make your pie dough and fit it into a 9-inch (23-centimeter) ring or mold. Trim both the stem and flower ends of 4 to 5 good-sized apples. Holding a paring knife by the blade, use only the point of the knife and your thumb as a pivot to cut the stem off. (This technique can also be used for pears, tomatoes, and the like.)

2. Using a vegetable peeler or a sharp paring knife, peel the apples. Cut into halves through the stem and remove the seeds with the point of the knife, using the method described in step 1.
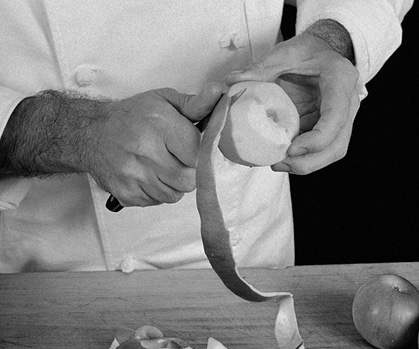
3. Cut into about ¼-inch (6-millimeter) slices. Chop the end slices coarsely, reserving the uniform center slices.

4. Arrange the chopped apples on the bottom of the pie shell.
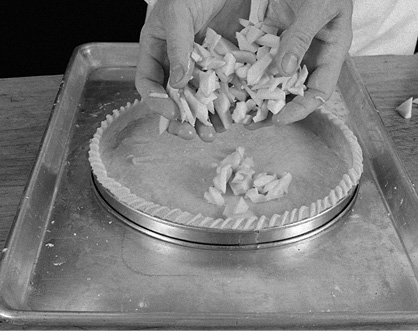
5. Fan out the center slices as you would a deck of cards and
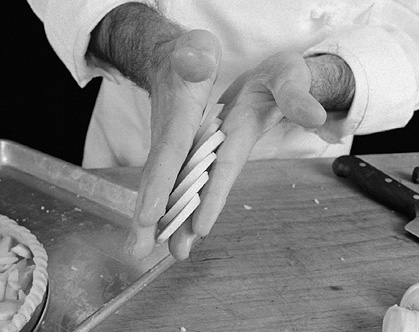
6. arrange on top of the chopped apples. (You may arrange the slices one by one if you feel it is easier.)

7. Arrange apple slices in the center of the shell
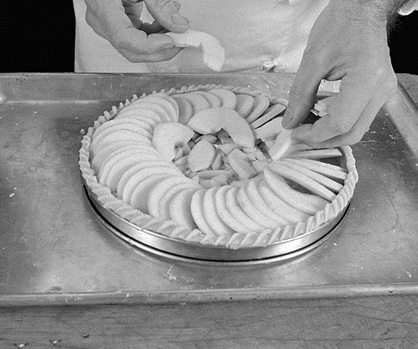
8. to simulate the petals of a rose.
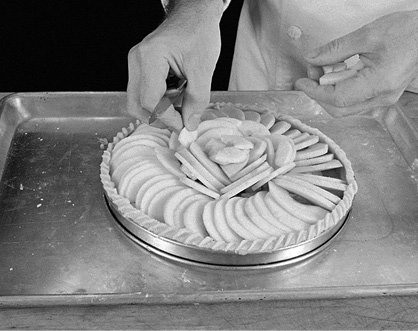
9. Sprinkle with sugar and butter cut into pieces.

10. Bake for approximately 75 minutes. It should be well browned and the crust golden. Remove the flan ring. The pie shrinks slightly during baking, making the ring easy to remove.

11. Using a large metal spatula, remove the pie from the cookie sheet and glaze (optional) with an apricot or apple jam. (Strain apricot jam through a fine sieve and dilute slightly with calvados, cognac, kirsch, or even water, if you object to alcohol.) Serve at room temperature; refrigeration is not recommended.