1 tablespoon good olive oil
3 tablespoons chopped onion
3 cups (450 grams) cubed tomatoes
Salt and freshly ground black pepper
1 clove garlic, crushed and chopped very fine
1 tablespoon tomato paste, optional

Material from The Art of Cooking Volume I and II copyright © 1987, 1988 by Jacques Pépin
Photograph copyright for The Art of Cooking Volume I and II © 1987, 1988 by Tom Hopkins
Material from La Technique copyright © 1976 by Jacques Pépin
Material from La Methode copyright © 1979 by Jacques Pépin
Jacques Pépin’s Complete Techniques copyright © 2001, 2012 by Jacques Pépin
All rights reserved. No part of this book may be reproduced in any form or by any electronic or mechanical means including information storage and retrieval systems without the written permission of the copyright holder.
Cover and Interior design by Red Herring Design
ISBN: 978-1-4532-9508-3
Published by Black Dog & Leventhal Publishers, Inc.
151 West 19th Street
New York, NY 10011
This edition distributed in 2012 by Open Road Integrated Media
180 Varick Street
New York, NY 10014
![]()
CONTENTS
INTRODUCTION

Even though I wrote La Technique and La Méthode thirty-five years ago, I am happy to say that, with some minor changes, the culinary techniques demonstrated in the books are as current and useful today as they were at that time. A good cook still beats egg whites, bones a chicken, and makes a caramel cage in the same way. Just as in 1974, the greatest hindrance to good performance in the kitchen is an inadequate knowledge of basic techniques.
Along with the hundreds of techniques collected in the original two volumes, La Technique and La Méthode, we have incorporated color photography and additional techniques from my two-volume set, The Art of Cooking, which was published in the 1980s. Furthermore, we have underlined the text in recipe captions that specifically describes what is shown in that picture. In my opinion, both improvements to the current edition will help cooks more readily comprehend what’s being demonstrated.
Jacques Pépin’s New Complete Techniques uses step-by-step pictures and detailed, descriptive text to acquaint cooks of every level with the basic procedures that make up the core, the center, and the heart of the profession. Do you want to learn how things really work in the kitchen? It is the goal of this book to teach you, and in the process, to help you understand and hone the basic manual skills that are almost impossible to explain solely in words. This book, quite simply, will teach you how to cook in a way a conventional cookbook could never do.
Don’t be discouraged if you can’t master some of these techniques instantly. Some, like the fluting of a mushroom, take practice and patience. Others, like peeling garlic, are quite simple. Remember that as your mastery grows, you will become better able to tackle even difficult recipes with ease and proficiency. In time, you will open your favorite cookbooks and experience them in a new light!

When professionals work with ease and rapidity, it is a result of long years of practice and discipline. There are no secrets or tricks, only feats of skill (tours de main) acquired with prolonged effort. Through endless repetition, these techniques will become so much a part of you that you’ll never forget them. People often tell me that what surprises them most is watching me cook and talk at the same time. This is because my hands are trained to the point where I do not have to think about the processes I use as I make a recipe—it’s automatic. Instead of fighting the mechanics of cooking, I can concentrate on thinking about the combination of ingredients, about taste, and about texture. You may be very creative and imaginative in the kitchen, but you cannot take advantage of those qualities if you don’t know the basics. A solid background must precede inventiveness. An artistic mind might create a stunning decoration for a cold salmon, but the dish will be triumphant only if the salmon is first properly cleaned and poached, and the aspic rich and crystal-clear—and this requires knowledge of the proper techniques.
For many years I have dabbled in painting, and although I have occasionally come up with what I think is a great idea for a picture, my hands are rarely good enough to express what I have in my head. This is because my knowledge of painting techniques is weak; I haven’t repeated them day after day after day for hours, so my hands very often are not skilled enough to realize my ideas. In cooking, however, after so many years of practice, I can eliminate a great many potential problems or obstacles along the way as I think about a recipe, and then my hands can do the rest. I can usually come pretty close to my vision on the first try.
In this book, I do not pretend to have explicated the whole spectrum of cooking skills; I haven’t touched on Asian cooking, for example, concentrating more on the general cooking techniques that I have used all my life. I may have taken for granted very ordinary chores, such as peeling a potato or melting butter. And even with the help of the step-by-step photos, some of the techniques, like making a butter flower, still require a fair amount of patience and perseverance to achieve. Others, like peeling and seeding a tomato or making a rabbit out of an olive, can be mastered instantly. You will discover that there is great satisfaction in conquering dishes that may have frustrated you in the kitchen before. Knowledge of the basics is so rewarding, in that it allows you to try out new ideas, to remedy potentially catastrophic miscalculations, and to tackle any kind of recipe because you will comprehend the mechanics behind it.
Start with simple techniques and work gradually toward the more involved and complicated ones. And have fun! Remember, you are not learning new recipes, you are acquiring a whole new way of cooking, and with this book, you begin your apprenticeship.
Happy cooking!

June 2012
EQUIPMENT
Today’s cooking equipment comes in all types, shapes, prices, and materials. The enormous interest in food, heightened by cooking schools, cookbooks, newspapers, magazine articles, the Internet, etc., has spurred the manufacturers into bringing many different types of paraphernalia onto the market, and a lot of it is good. However, it is often hard for people to differentiate. What pots should one buy? Should they be copper? Stainless steel? Heavy aluminum? No-stick? Black cast iron? Enameled cast iron? It is difficult to choose because ultimately there is no ideal pot. Every material has its good and bad points. The thick, heavy, hand-hammered copper is the best to conduct, diffuse, and retain heat. While attractive, it is very heavy, very expensive, and needs constant polishing. Pots should not be lined with tin, as used to be done, but with stainless steel, which is cleaner and more durable.
Heavy aluminum pans, customarily used in professional kitchens, are much lighter and easier to handle. Heavy aluminum is the best heat conductor after copper and it’s tough. However it tends to discolor food, especially when acidic ingredients such as wine, vinegar, and tomatoes are used. (When using a whisk for an emulsion, such as hollandaise, you will often have a brownish dirty color mixed with your sauce.) At home, the discoloration happens regularly just from boiling water. The pan is not used often enough and moisture in the air will cause darkening. The same heavy aluminum pot used in a restaurant kitchen may not discolor since it is used over and over again and is washed between each use, preventing any buildup. The best are heavy aluminum pans lined with stainless steel.
The no-stick lined pans are very good, especially the permanent no-stick, which have a tougher, more durable, finish than the ones made years ago.
Stainless steel cleans easily, keeps shiny, does not discolor food but, unfortunately, does develop “hot spots” or patches of burn. The transfer of heat is fast but stainless steel does not retain heat well. Fortunately, stainless steel pans are now made with thick bottoms, and aluminum or copper “sandwiched” between layers of stainless steel.
The dark cast iron skillet and kettle are good, sturdy, and practically indestructible. They are inexpensive, easy to care for and hold the heat fairly well. However, they are heavy and if not used often will get rusty, stain, and discolor food. The enameled cast iron is attractive, cleans well, and will chip if dropped. Eventually, the inside will darken and discolor.
Earthenware is attractive, good for prolonged oven cooking, and can be used as service pieces. Since they are fragile, and extreme temperatures may cause cracking, don’t use them for stove-top cooking.
For baking, flat, heavy, not too shiny, aluminum cookie sheets are the best. The iron or steel cookie sheets will warp and the heat conductivity is too rapid. Silicone liners, as well as no-stick aluminum foil, are an inexpensive and vast improvement for preventing dough from sticking. All kinds of plastic and silicone shaped containers are good when working with chocolate. Microplanes are terrific to grate the skin of citrus fruits, as well as garlic, onions, etc.
Should you have a plastic or wooden chopping block? My preference is wood—it is attractive, with just enough bounce, and it does not dull the knife’s blade. Both types should be thick, heavy, and wide. Your chopping block won’t perform properly if you do not have a high, sturdy table, which does not bounce when you use a meat pounder or a cleaver. However, I do not use my block for rolling out dough. I prefer rolling it directly on a marble, granite, or formica counter. It is clean and non-porous, with no taste attached to it.
What kind of electrical appliances should you get? A food processor (the stronger the better) is a must, as well as an electric mixer. Should you cook with gas, electricity or microwaves? Cooking is harder to control on electric tops, although the electric oven is excellent. Microwaves are efficient for melting chocolate or cooking bacon. But gas is my favorite. Professional stoves are a good investment. They are strong, have great capacity and never go out of style. We enjoy seeing the flames, and control is there at all times. Ultimately, the best heat is wood (hard wood). For barbecuing, it is a must. Never briquettes. Briquettes are a derivative of petroleum and they are not good for your health. A steak well charred on a dirty grill over briquettes has more tar than several packs of cigarettes.
Good whisks with thick, heavy threads are a must, as well as “piano-wire” whips (very thin, flexible, and tightly woven). Both are necessary—the whisk for thick sauces and the whip to whip egg whites and heavy cream. Rubber and wooden spatulas, as well as a series of stainless steel and ceramic bowls, wire racks, strainers, metal spoons, skimmers, vegetable peelers, etc., are all necessary implements.
Then there are the knives, an extension of your fingers. There is always a controversy about knives. The current trend is toward high carbon steel and ceramic knives. They do not discolor or oxidize when used for cutting lemons, tomatoes, or onions. Stainless steel is a very hard metal and difficult to sharpen, although it keeps a good edge once sharpened. The knives should be very sharp to perform correctly. You should have a minimum of three knives. A very large (10- to 12-inch/25- to 30-centimeter blade) chopping knife, a thinner, 8-inch (20-centimeter) all-purpose knife, and a small paring knife. Several paring knives would be even better. Have a good sharpener. A steel or ceramic sharpener (good for stainless steel) is necessary but both sharpen only the tiny cutting edge of the knives. After a year or so, depending on how often you use your knives, this tiny amount of metal will be worn away. The carbon knife must then be sent out to be sharpened professionally unless you have the know-how, and possess a large stone with which to grind the metal. Send dull knives out to a person who sharpens lawn mowers, scissors, or electric saws. Then the knives can again be utilized for one year, using the steel sharpener periodically. Ceramic knives must go back to the manufacturer to be sharpened.
You will notice that expensive, good equipment is usually well-designed and pleasant to look at. Visit pot and pan shops. Many specialize in gadgetry and gimmicks. Some have an enormous, confusing potpourri of paraphernalia, among which, if you have the proper lore, you will discern the good from the bad. There are a few good shops that specialize in good equipment only. When you have chosen a good shop, follow the judgment of the salesperson; once you get to know a place, the people will give you good advice. Have a tag sale and get rid of your bad tools. Buy pieces one by one if you can’t afford to spend a lot. Some people will spend a small fortune in a good restaurant without blinking an eye, but won’t spend the same amount for a few pieces of equipment. It is worth the investment, since they will go on working for you, your children, and, maybe, your grandchildren.
Have your pots, molds, strainers, etc., hung from the wall or the ceiling, as is done in a professional kitchen. They will be easy to get to and you will use them more often.
Even though you may have the best ingredients to start with, nothing is more frustrating when preparing a meal than when your oven does not keep a constant heat, your pan is discolored, your knife is dull, your pots dented, etc. It won’t work! Finally, cook, cook, cook, cook, and cook again! I know people who have great kitchens with all the latest and best equipment. It is only there for show. The more you cook, the easier it becomes. The more the equipment is used, the better it performs and you will get attached to certain tools.


THE Basics
How to Sharpen Knives
(Aiguisage des Couteaux)
A knife is useless if it is not sharp. You can tell if your knife is sharp if it can cut a soft, ripe tomato into thin slices with ease. If the knife is dull, it will just crush the tomato.
If you looked at the cutting edge of a knife through a magnifying glass, you’d see that it is made up of hundreds of tiny teeth—like a saw. Through repeated use, these teeth get twisted and bent out of alignment. This is what makes a knife dull; a sharpener gets these little teeth back into alignment.
The harder the metal the knife is made of, the harder it will be to sharpen, but the longer it will hold its edge. A sharpener has to be made of a material that’s a shade harder than the metal it is to abrade. (The hardness of metals is measured on the Rockwell Scale.)
Steels are metal sharpeners. They have a fine grain and give a super finish to an already sharp knife. Butchers and professional cooks use a steel constantly, giving the knife a few strokes before each use. A ceramic sharpener is better than a steel for sharpening hard metals such as stainless steel. (Ceramic is harder than the hardest metal on the Rockwell Scale.)
Eventually, repeated sharpening wears away the little teeth of the cutting edge. At this point the knife needs to be ground to thin the blade into a new cutting edge. This is done with an abrasive stone.
USING A CERAMIC SHARPENER
1. Start with the heel of the blade at the tip of the sharpener and slide the knife down the length of the sharpener so the cutting edge abrades against it. Apply steady and strong pressure. Keep the knife at the same angle constantly.

2. End with the point of the blade near the base of the steel sharpener. This is one steady stroke, one hand moving toward the other, every inch of the cutting edge making contact with the sharpener. Repeat on the other side of the sharpener to sharpen the other side of the knife.

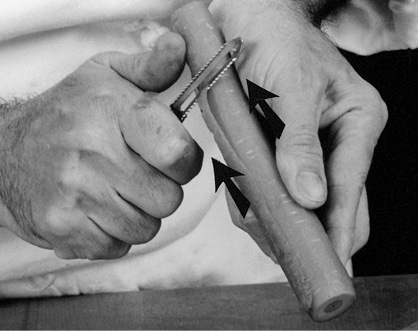
USING A STEEL SHARPENER
3. This photograph is an alternative way of sharpening. In this photo, we are using a steel sharpener with a high-carbon-steel knife. Start with the heel of the blade at the base of the steel and pull the hands away from one another, finishing with the tip of the sharpener at the tip of the blade. Repeat on the other side. Make sure that the whole blade gets worked against the sharpener. Keep the angle about 25 degrees and the pressure the same.

USING A GRINDING STONE
4. Once a year, twice a year, once every two years—depending on the kind of beating your knives get—you will need to grind them down to form a new cutting edge. You can send your knives out and have them ground by a professional or you can do it yourself if you have a sand wheel or a large stone like the one pictured here. This stone is held in place by suction so that you can apply a lot of pressure without having it slide around the way smaller stones do. It has three sides, each of a different coarseness. You begin with the coarsest side and finish with the finest.

5. Rub mineral oil on the stone to keep stone grindings loose so they can be wiped off and don’t seal and glaze the surface of the stone, which would prevent abrasion. Start at the tip of the knife and apply strong pressure down and forward so that the whole side of the blade is in contact with the stone. Move back and forth, applying pressure. Keep the angle constant. Repeat on the other side. As the knife gets sharper and thinner at the end, go to a finer stone. When you are through, clean your knife. Keep it sharp with a steel sharpener.

Holding the Knife to Chop Vegetables
(Position du Couteau)
An apprentice chef cannot “graduate to the stove” until he has mastered the basic techniques for correctly chopping, dicing, mincing, and slicing vegetables, fruits, or meat. Perfectly prepared vegetables not only have an attractive texture, but add a good “bite” and taste to the finished dish. Practice, obviously, is of the very essence, and good knives are just as important. Knives should be sharpened professionally at least once every year or two. In the interim, keep a good edge with either a steel or carborundum sharpener.
1. Handling your knife properly is your first concern. Hold the item to be cut with fingertips tucked under, so the blade “rests” and slides directly against the middle section of your fingers or against your index finger, if it is more comfortable. The knife follows, in fact, “glued” to the fingers and slides up and down the fingers at the same rate all the time. The speed at which the fingers move back determines the thickness of the slices. See steps 6 and 7 for more illustration of this technique.

2. To mince an onion, cut off the root and the stem end on opposite ends. Some onions have extremely thin skins which are hard to remove. Some are quite thick. In either case, remove one layer of onion, or several if necessary, so there is no yellow or dry skin visible.
3. Cut into halves through the root. Place one of the halves flat side down and, holding your fingers and knife properly,

4. cut vertical slices from one end to the other, up to, but not through, the root end. The knife does not go in a straight down motion while cutting, but rather in a down and back motion at the same time.

5. Holding the knife flat, cut 3 or 4 horizontal slices from top to bottom, up to the root end.

6. Finally, cut across the onion, again up to the root end. (If the dice is not fine enough, chop some more with a large knife.)

7. To slice a potato, place it on its flattest side so that it does not roll under your fingers. If the potato is not stable, cut a slice off so the potato can sit firmly on the cut end. Slice to desired thickness by controlling the progress of the fingers that hold the potato in place.

8. To chop parsley, use a bigger knife. Place the blade perpendicular to the chopping block and gather the washed parsley top into a tight ball. Slice the bunch across.

9. Slice, going down and forward, or down and backward, sliding the knife along the fingers.

10. Holding the handle firmly in one hand, the other hand relaxed on top of the blade (this hand does not apply much pressure on the blade, but rather directs it), bring the front of the blade down first, then the back. Repeat in a staccato and rapid up and down motion until the parsley is finely chopped. Draw the pieces together in a heap as you go along.

11. To dice an eggplant, hold the eggplant firmly with the tips of your fingers and cut lengthwise in equal slices.

12. Stack 2 or 3 slices on top of each other. Using the same technique, cut into square sticks.

13. Cut the sticks across to form little cubes. Very small cubes or dices of vegetables are called brunoise.

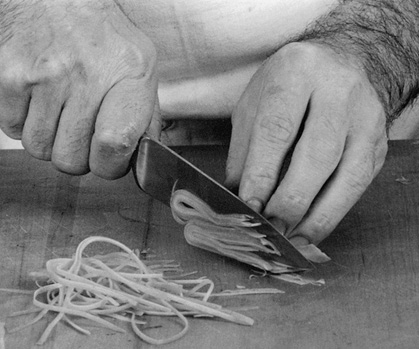
How to Julienne
(Julienne)
To cut into julienne is to cut into very thin strips. A julienne is aesthetically very pleasing and very nice as a garnish for soups, fish, meat, etc. A vegetable julienne (such as carrots, leeks, and celery) is usually blanched and finished by being cooked a few minutes with fish, veal, or whatever it will be served with. Being cut so thin, it cooks very fast.
JULIENNE OF CARROTS (Julienne de Carottes)
1. To peel: Trim both ends of the carrot to form a flat end to start from. Working toward you, peel a whole strip of carrot in one stroke, from end to end. Rotate the carrot and proceed all the way around. Use long, regular, slow strokes. Your speed will improve with practice. Short nervous strokes (or peeling one half of the carrot then turning the carrot around and peeling the other half) take twice the time.
2. Slice the carrot into very thin lengthwise slices. If you do not have a mandoline or a similar type of vegetable slicer, and if you’re not proficient enough with a knife, use a good vegetable peeler. Apply as much pressure as you can so the slices are not too thin.

3. Stack 3 or 4 of the thin slices on top of one another, fold and then slice into a fine julienne.
JULIENNE OF LEEKS (Julienne de Poireaux)
4. For the julienne of leeks, only the white and the very light green part of the leek is used. Remove the dark green part and the root, keeping the green part in the refrigerator for soups or stocks or to put in a stew. Split the trimmed leek in half.
5. Separate all of the layers of the leek. (Note that in our leek the center is woody. This happens when the leek is old and grows a tough central core. Remove and discard.)

6. Fold a few of the leaves at a time, so that the inside of the leaves shows on the outside.

7. Cut into very thin strips. Wash and then drain.

JULIENNE OF CELERY (Julienne de Céleri)
8. Separate the stalks. Use a vegetable peeler to remove the top layer of fiber from the large outer stalks if necessary. (By scratching the celery, you can find out if it is fibrous or not.)
9. Cut each stalk into 4- to 5-inch (10- to 13-centimeter) pieces. Flatten each piece with the palm of your hand. (It will probably crush in the center.)
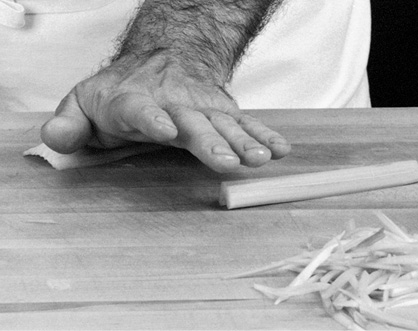
10. Using the flat of your knife held horizontally to the table, cut the celery into 2 or 3 thin slices.

11. Pile all the slices on top of one another and cut into thin strips. A julienne of celery is never as thin as a julienne of leeks or carrots, but it is used in the same way.

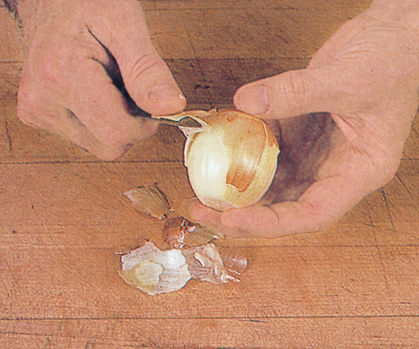
Garlic
(Ail)
There are many types of garlic readily available, the best of which is the “red garlic,” so-called because of the reddish color of the skin. Garlic affects food in different ways depending on how it is cut and used. You can roast a chicken with three full heads (about 40 unpeeled cloves) of garlic and serve them with the chicken. Guests can pick up the cloves and suck the tender insides out of the peel. Prepared this way, it is astounding how mild and sweet garlic is. The scent and taste are barely noticeable. However, the smell of one clove of garlic, peeled, crushed, chopped fine, and added at the last minute to sautéed potatoes or string beans, or to a salad, can permeate a whole room and remain on your breath for hours. The same crushed, chopped garlic—when cooked slowly for a long time, as in a stew—loses most of its pungency and harmonizes, quite modestly, with the other herbs and ingredients. Crushing the garlic releases more essential oil and gives more flavor than slicing it or leaving it whole. Raw garlic, chopped to a purée, is the most powerful. Mixed with olive oil, it becomes the garlic-loaded mayonnaise of Provence (aïoli or ailloli), known as beurre de Provence (the butter of Provence).
One important point: When making scampi, escargots, sautéed potatoes, zucchini, or any dish where the garlic is added at the end and slightly cooked, be careful not to burn it. Burned garlic hopelessly ruins a dish.
1. Holding the “head” on a bias, crush with the heel of your hand to separate the cloves.

2. First, cut off the root end of the clove. Then, using the flat side of a heavy knife, smack the clove just enough to crack the shell open. Remove the clove from the shell.

3. Place the blade flat on the clove and smack it down and forward to crush the clove to a pulp.
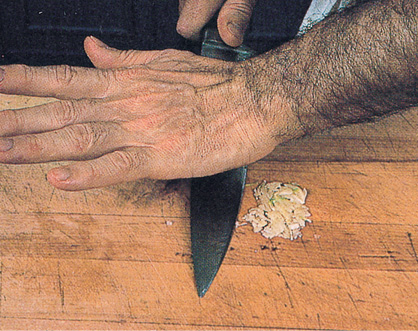
4. Chop to a purée, by rocking the knife back and forth.

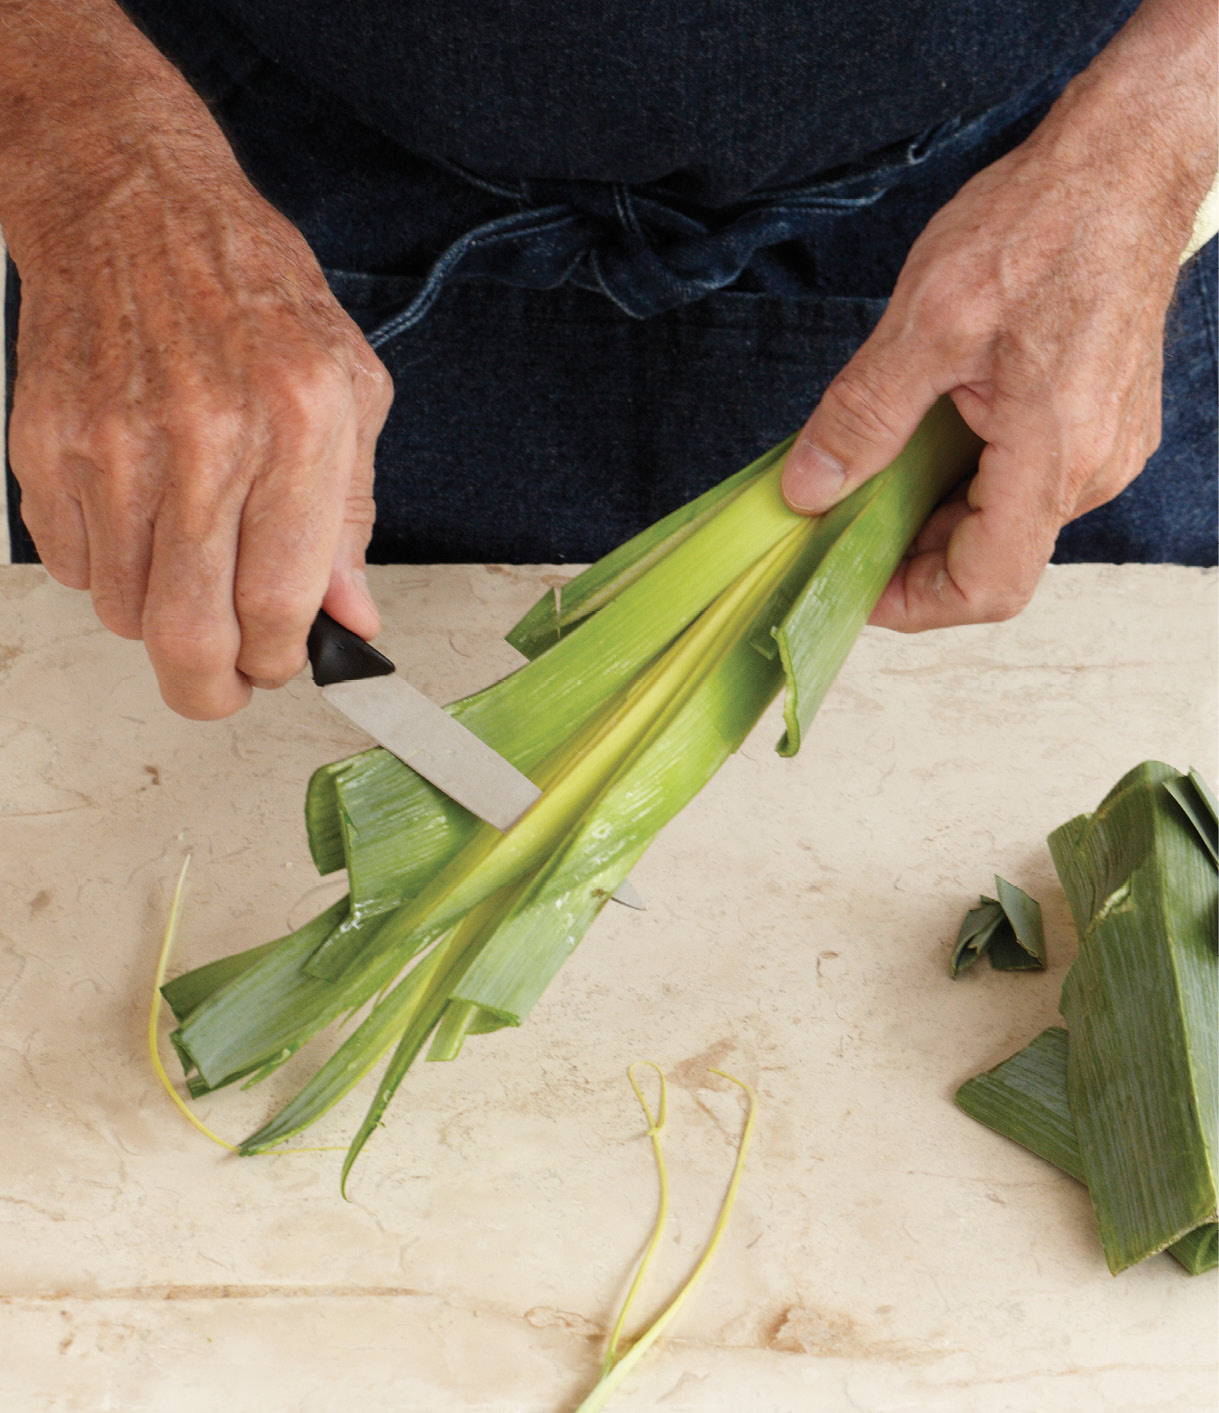
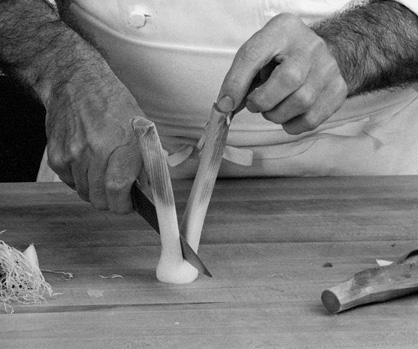
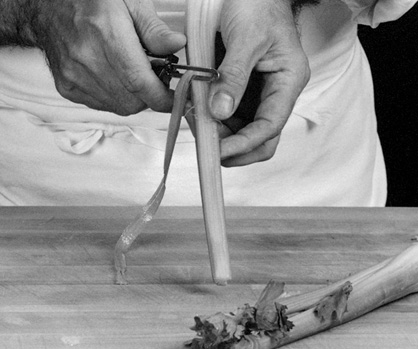
Leeks
(Poireaux)
Leeks are called the “asparagus of the poor” in France. This hardy winter vegetable is unbeatable for soups. Leeks are great cooked in water and served with a vinaigrette sauce and excellent in stews and quiches.
1. Leeks have to be cleaned properly because the centers are usually full of sand. Trim off the greener part of the leaves and wash them. Keep these leaves for stock or clarifying consommé.

2. Remove the roots. Remove the dried and yellowish skin around the leek, if any. Holding the leek, leafy side down, insert your knife through the white part approximately 2 inches (5 centimeters) down from the root, and cut through the entire length of the leek.

3. Repeat 2 or 3 times to split the leek open. Wash thoroughly under cold water. Use as needed.

Duxelle of Mushrooms
(Duxelle de Champignons)
A duxelle of mushrooms is a mixture of mushrooms chopped very, very fine and cooked, sometimes with shallots, sometimes without, and seasoned with salt and pepper. Duxelle is one of the staples of classic French cooking and is used in many dishes—as a coating, as a stuffing, as a seasoning. With the addition of cream or milk, it becomes a purée of mushrooms and is served as a vegetable.
3⁄4 pound (340 grams) mushrooms, finely chopped
2 shallots, peeled and very finely chopped (½ cup/75 grams)
1 tablespoon (14 grams) unsalted butter
Salt to taste
Freshly ground black pepper to taste
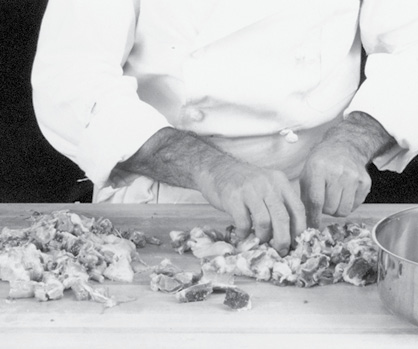
1. One of the best ways to chop mushrooms is in a food processor. However, don’t put them into the processor whole. Cut them into coarse slices or chunks first.

2. Place a large handful of mushrooms in the processor. Pulse several times. If the machine is left on for the whole duration, half the mushrooms fly around the blade—not getting properly chopped—while the other half turns into a purée. The on-and-off technique allows the mushrooms to fall back on the blade so that they all get uniformly chopped. (Use this method whenever you chop in a food processor.) Melt the butter in a skillet, add the shallots and cook on medium heat for about ½ minute. Add the chopped mushrooms, a dash of salt, and a dash of pepper and cook, mixing occasionally with a wooden spoon, for about 10 minutes. The mushrooms will render some liquid, and will be ready when the liquid has evaporated and the mixture is dry and starts to sizzle. Transfer to a bowl, cover with waxed paper, and set aside.

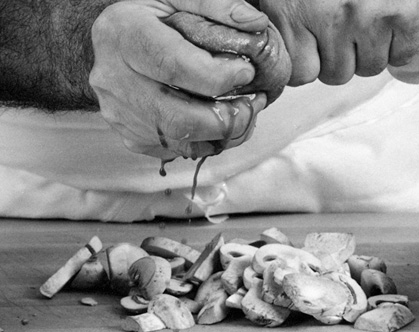
3. If you used mushrooms that were open, large and black inside, older mushrooms (which are often used for duxelle since they are hard to use for anything else), press them in a cloth towel to extrude some of the dark juices after they have been chopped.

4. As you can see, pressing the mushrooms in a towel does get rid of the extra juices. From this point, proceed as explained in step 2. If the mushrooms are plump, firm and white, there is no reason to press the juices out.
Tomatoes
(Tomates)
Peeled and seeded tomatoes are a requisite ingredient in many recipes. They are used to make tomato balls—a perfect garnish for roasts, chicken and the like—and fondue de tomates, which is a fresh tomato sauce that’s both easy to make and very good.
PEELING AND SEEDING TOMATOES
(Tomates Emondés)
1. Remove the stem from the tomato using the point of a knife. Dip the tomatoes in boiling water—they should be fully immersed—and let sit for approximately 20 seconds if well ripened. If the tomatoes are not ripe, it will take a little longer for the skin to come loose.

2. When cold enough to handle, remove and peel. The skin should slip off easily. An alternative method is to impale the tomato on a fork and, holding it by the fork handle, roll it over an open flame. “Roast” it for 15 to 20 seconds; the skin should slide off easily.
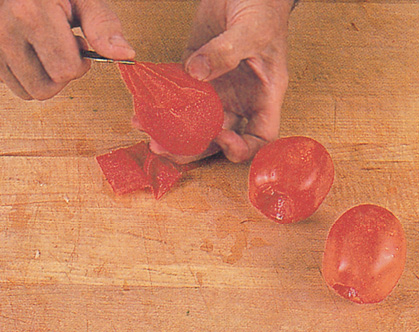
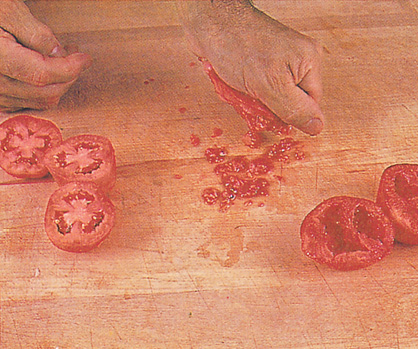
3. Cut the tomato into halves widthwise—not through the stem.

4. Press gently to extrude all the seeds. You now have pure tomato flesh or pulp. The seeds, skin, and juice can be used in a stock or long-simmered sauce.
TOMATO BALLS FOR GARNISH
(Boules de Tomates)
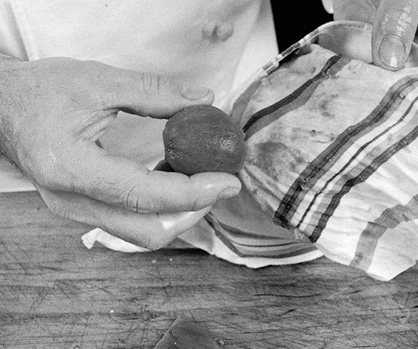
1. Peel and seed the tomato. Cut each half in two.

2. Place a tomato quarter in a strong kitchen towel, the outside against the towel.

3. Squeeze the tomato flesh

4. to form a nice, small, fleshy ball. Sprinkle with salt and a dash of ground pepper. Moisten with melted butter and heat in a hot oven for a few minutes before serving.
TOMATO SAUCE (Fondue de Tomates)
1 tablespoon good olive oil
3 tablespoons chopped onion
3 cups (450 grams) cubed tomatoes
Salt and freshly ground black pepper
1 clove garlic, crushed and chopped very fine
1 tablespoon tomato paste, optional
Heat the oil in a saucepan. When it is hot, add the chopped onion and sauté for 1 minute. Add the tomatoes and the salt and pepper to taste. Cook on a high heat for 5 to 6 minutes to evaporate some of the liquid. Add the garlic, and the tomato paste if the tomatoes are too watery or too pale in color. Cook 3 to 4 minutes and taste for seasoning. Add more salt and pepper, if necessary.
1. Peel and seed the tomatoes and cut coarsely into 1-inch (2.5-centimeter) cubes. Prepare 3 cups (450 grams) of cubed tomatoes and proceed with the recipe below.

Brown Stock (Classic and Fast), Half-Glaze, and Meat Glaze
(Fond Brun [Classique et Rapide], Demi-Glace, et Glace de Viande)
Cooks often get confused when they hear names such as brown stock (fond brun), demi-glace (half-glaze), brown sauce, glace de viande (meat glaze), sauce espagnole, fond lié (thickened stock), jus, broth, bouillon, and so forth. It is confusing. However, it is an area that is too important to French cooking to bypass.
Let’s start with the most basic—stock. (We will use the word “stock” instead of broth, bouillon, or jus.) What is a stock? It is a liquid obtained by boiling bones with water. There are two basic stocks: one white, one brown. The white stock is bones and water boiled together with seasoning. The brown stock is made from bones that were browned in the oven or on top of the stove. The browned bones give the stock a darker color and a nuttier taste. A brown stock reduced by half becomes syrupy and is called a demi-glace (half-glaze). Reduced to its extreme, to the consistency of jam, it becomes a glace, or glaze.
A stock must cook a certain amount of time, which varies depending on how large the bones are and what type of bone is used. With small pieces of bones, or with thin bones like the bones of a chicken, three hours of cooking is sufficient, whereas larger veal or beef bones require up to 10 to 12 hours. Time is essential to extract all the nutrients and taste from the bones. Water is added to the bones, but not a fixed amount. Throughout, the cooking water evaporates and more is added regularly to replenish the stock. When the stock is cooked, it is strained and reduced to its proper consistency.
We make our brown stock with veal, beef, and chicken bones mixed together. The chicken bones, besides being readily available and inexpensive, add a pleasant nutty and sweet taste to the stock. In fact, if we are low on other bones, we’ll make up the difference with more chicken bones. It is, of course, better to use fresh bones; however, in a home kitchen you rarely have enough fresh bones on hand. So when you order a roast of beef or veal from your butcher, ask him for a few bones and then freeze them. A few times a year, empty the freezer, make large amounts of stock and freeze it in small containers. It should last you for a few months and be very inexpensive. Make great quantities of stock if you have pots and pans large enough. Three pounds (1.4 kilograms) of bones take as much cooking as 20 pounds (9 kilograms).
Brown stock is a carrier—a vehicle—which permits you to make sauces. It is not a sauce in itself, but is used to “wet” (mouiller as we say in France) a stew or deglaze a pan, or add to other bones (game, lamb, etc.) to produce a more concentrated and differently flavored stock. Though it is gelatinous when cooked and holds together, a stock is not concentrated enough to be called a sauce. However, 3 quarts (3 scant liters) of brown stock reduced by half will yield 1½ quarts (1.4 liters) of a slightly syrupy and darker liquid which is concentrated enough to become a “sauce” and which has a name of its own—demi-glace (half-glaze). Furthermore, if that quart and a half of demi-glace is reduced to its extreme, it will yield about 2 to 2½ cups (473 to 591 milliliters) of what is called glace de viande (meat glaze). The glace de viande is not a sauce any longer. It has transcended the condition of a sauce and is now a strengthening and flavoring agent. The glace de viande hardens enough when cooled to be unmolded and cut into cubes. In the freezer, it will keep almost indefinitely if the reduction is correct. These cubes of glace de viande are added to sauces to make them stronger and richer. Thus a basic stock, taken to different stages of concentration and volume, changes its name as well as its function.
Stocks should be started with cold water and cooked, uncovered, at a slow, gentle boil. This way, the albumin in the bones and meat will harden and come to the surface of the liquid in the form of a gray foam which can be removed with a skimmer. The fat will also rise to the surface. However, if the stock is covered and boiling too fast, the albumin won’t separate and the fat will emulsify back into the liquid (see the discussion of emulsion in the techniques for hollandaise) instead of rising to the top. The stock will then be cloudy, less digestible, and more caloric.
The classic brown stock is usually seasoned with carrots, onions, thyme, bay leaf, peppercorns, etc., but not salt because if salt is added at the beginning and the stock is then reduced to a glaze, the concentration of salt will be overpowering. A stock, purified by slow cooking and properly skimmed, will be high in proteins, clear, meaty, and practically tasteless. This may seem paradoxical but it’s not. The stock has been too lightly seasoned to have much of an identifying taste of its own. And it shouldn’t have one if it is to become a demi-glace transformed (as we will a little later) into a red wine sauce for beef, a chicken and mushroom sauce, or sauce for a sautéed piece of veal. In each of these cases, the demi-glace must take on the identity of that particular dish. It is the “hidden and modest” friend which enables a cook to produce a well-finished, long-simmered sauce in minutes. It is what we call in English a basic brown sauce. It doesn’t have a specific name or identity of its own yet. With the addition of wine it becomes a sauce Bordelaise, with Madeira and truffles a sauce Périgueux, with vinegar and shallots a sauce Bercy, etc. The progression is from a stock to a demi-glace or basic brown sauce to a specific sauce.
What is the proper degree of reduction? The key word is “balance.” To achieve a delicate combination of seasoning and correct concentration takes practice, knowledge, and talent.
Making sauces from reduced stocks is particularly well suited for restaurant cooking because it works well with diversified sauces and dishes made one portion at a time. However, it is time-consuming and expensive to make and some cooks do not feel that reductions alone produce a satisfactory result. Besides the question of time and expense, they object to the richness and concentrated taste of the reduction. A truffle sauce for a filet of beef requires a strong reduction but a small delicate quail is overpowered by too potent a sauce.
On occasion, a stock will reduce and intensify in flavor but will lack the gelatinous element to thicken to the right consistency. If you feel your sauce has reached the right taste but it is too thin in texture, thicken it lightly with arrowroot or potato starch. At one time a brown sauce used to be heavily thickened with flour. The classic sauce Espagnole, made with a stock, brown roux, and tomato paste, though rarely made nowadays, is an example. Carème explains that the roux, the binding agent, separates after long, slow cooking, and the fat and the scum from the cooking of the roux rise to the top and should be skimmed off. The sauce clarifies and purifies through the long cooking until only the “binding elements” of the flour (the glutinous part) remain to hold the sauce together. Although this sauce works with practice and care, it is more logical and faster to use a starch such as arrowroot—which is like a purified flour (binding element only) and has no taste, cooks instantly, and doesn’t “dirty” the sauce. Cornstarch can be used, too, but tends to make the sauce a little more glue-y and gelantinous than either arrowroot or potato starch.
Must one use demi-glace to cook well? Some types of cooking require it, some do not. Home cooking and some of the best country cooking is often done without brown stock. In our family, and at friends’ where we have had some of our most memorable meals, brown stocks are practically never used. Often good cooks modify the principles behind the brown stock and use leftover juices from a roast chicken or a pot roast the way a professional uses glace de viande. Roasting and braising give natural strong juices, the equivalent of a strong reduction, which can be used in the same manner.
Following the Classic Brown Stock and the Fast Brown Stock are recipes using these stocks.
CLASSIC BROWN STOCK, HALF-GLAZE, AND GLAZE
(Fond Brun Classique, Demi-Glace, et Glace de Viande)
YIELD: 3 quarts (3 scant liters) of stock or 1½ quarts (1.4 liters) demi-glace or about 2 cups (473 milliliters) of glace de viande
10 pounds (4.5 kilograms) bones (one-third veal, one-third chicken, one-third beef), cut into 2-inch (5-centimeter) pieces
1 pound (454 grams) carrots, washed and unpeeled, cut into 1-inch (2.5- centimeter) chunks (about 4 to 6 carrots depending on size)
1½ pounds (681 grams) unpeeled onions, cut into 1-inch (2.5-centimeter) pieces (about 4 to 8 onions depending on size)
3 large ripe tomatoes, coarsely chopped (1½ pounds/681 grams)
1 large leek, cut in half
3 celery ribs, cut in pieces
2 bay leaves
½ teaspoon thyme leaves
½ teaspoon black peppercorns
1. Place the pieces of bone in a large roasting pan and brown in the oven at 425 degrees (218°C) for 1½ hours, turning the bones once, halfway through the browning process. Add carrots and onions to the bones and continue cooking in the oven another ½ hour.

2. Remove the bones and vegetables from the oven and transfer to a large stock pot, using a slotted spoon so the drippings of fat are left in the roasting pan. Pour out and discard the fat accumulated in the roasting pan. (The solidified juices left in the pan are in fact a glace de viande.)

3. Pour water into the roasting pan, place on top of the stove, bring to a boil and, using a wood spatula, rub the bottom of the pan to melt all the solidified juices. This is called deglazing.

4. Add this liquid to the kettle and then fill it with water. Bring to a boil slowly, turn the heat down and simmer for 1 hour, removing the scum. After 1 hour, add the remaining vegetables and seasonings. Bring to a boil again, then simmer slowly for about 5 to 6 hours. During the cooking process, water will evaporate; replace periodically to keep the same level. The stock can also simmer very gently overnight.

5. Strain the liquid through a fine strainer. (It is better to end up with more yield rather than less. When a lot of liquid is left, the bones get “well washed” and the strained liquid contains all the nutrients of the stock. If the liquid is over-reduced with the bones, when you strain it, a lot of the glace and taste will stick to the bones and be lost.) Return to a clean pot and boil down until it reduces to 3 quarts (3 scant liters) of liquid. Remove as much fat as possible from the surface.
6. Let the stock cool overnight, and then remove the solidified fat on the top. Notice that the stock is fat free and gelatinous. Make demi-glace or divide among containers and freeze.

7. To make demi-glace, reduce the stock by half (again) and cool. Divide into large chunks of about 1 cup (237 milliliters) each. Wrap in plastic wrap and freeze. Stock, which is gelatinous but not quite as solid as the demi-glace, should be poured into plastic containers, covered and frozen.
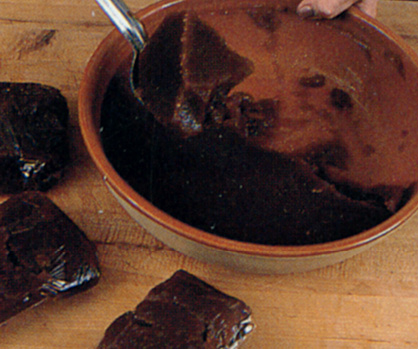
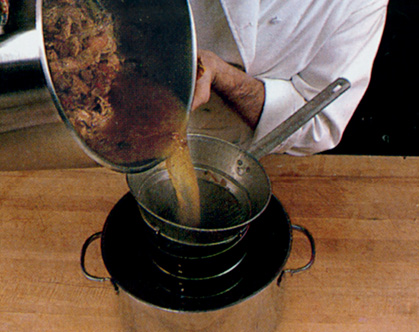
8. To make a glace de viande, strain the demi-glace again and reduce to its maximum. As it reduces, transfer the liquid to a smaller, sturdy saucepan. The last hour of reduction is delicate and should be done on very low heat because the mixture has a tendency to burn as it gets thicker. The glace will become dark brown and form bubbles on top (like large caramel bubbles) during the last 15 to 20 minutes of cooking. As they break, no steam will escape. If there is any fat left in the mixture, it will separate from the glaze and should be removed with a spoon. At that point, the reduction is completed and essentially there is no more moisture in the mixture.
9. Note that the glace de viande has the thickness of a caramel. Remember also that it is unsalted. Place the spoon and spatula into the saucepan, cover with water, and bring to a boil. The leftover, sticky glace around the pan and utensils should be remelted to be used as a stock. (The bones that have already cooked for hours are often recooked, instead of being discarded, also to make a glace de viande. It is not as rich as the one made only through the reduction of stock but it’s a bonus. To make it, fill the pot the cooked bones with cold water, bring to a boil and simmer for another 6 hours or cook gently overnight. Strain and reduce to a glace de viande as described above in step 8.)

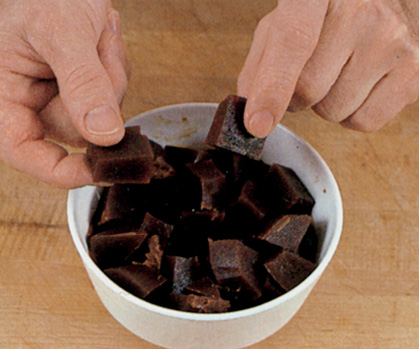
10. When the glace de viande is cold, unmold and cut into cubes. They will be hard, rubbery and dark. Keep in an uncovered jar in the refrigerator or freezer. They will become very hard and keep almost indefinitely. Use as a seasoning when needed.
FAST BROWN STOCK (Fond Brun Rapide)
This is a good, classic way of making a stock and yet it is fast. However, you can only make small amounts of it at a time because the bones get browned in a saucepan on top of the stove, and a saucepan can only accommodate so many bones. The bones are cut into small pieces so they brown rapidly and the nutrients and flavors are extracted faster during cooking. In a classic stock, the bones are roasted in the oven, which is a slower way, yet the only way to brown a large quantity of bones.
YIELD: 1 quart or stock or ½ quart (473 milliliters) demi-glace
1 pound (450 grams) veal bones
2 pounds (900 grams) chicken bones (gizzards, legs, necks, wings), cut into 1- to 2-inch (2.5- to 5-centimeter) pieces
1 carrot, unpeeled, chopped coarsely (½ cup/75 grams)
1 large onion, unpeeled, chopped coarsely (¾ cups/70 grams)
1 small leek, chopped coarsely (1 cup/135 grams)
½ cup (75 grams) celery stems and leaves
1 large tomato, cut in pieces
½ teaspoon thyme leaves
1 bay leaf
½ teaspoon black peppercorns
4 to 5 cloves garlic, unpeeled
⅓ cup (80 grams) parsley stems

1. Cut the bones into 1- to 2-inch (2.5- to 5-centimeter) pieces and place in a saucepan large enough to accommodate the bones in one layer. Place on the stove for 5 minutes on high heat. When they start sizzling, reduce to medium and continue cooking for 25 minutes, stirring occasionally with a wooden spoon.
2. The pieces should be well browned all around and the juices solidified in the bottom of the pan. Be careful not to burn the glace or solidified juices, or the stock will taste bitter.

3. After the bones have cooked for 30 minutes, use the cover to hold the bones in and invert the saucepan to pour out all the liquid fat. Add the carrots and onions to the bones and keep browning for another 10 minutes on medium to low heat. Add the rest of the ingredients and fill the saucepan with water. Bring to a boil slowly and cook uncovered on medium heat for 3 to 4 hours, replacing the water as it evaporates. Remove the scum every 10 to 15 minutes.

4. Strain through a fine chinois or fine sieve. Let cool overnight in the refrigerator and remove the fat. Reduce to 2 cups (473 milliliters) for a demi-glace.

STEAK “MARCHAND DE VIN” WITH MARROW (Steak Marchand de Vin à la Moëlle)
YIELD: 3 to 4 servings
1 large shell steak (about 1½ pounds/
681 grams, trimmed, see page 349)
¼ teaspoon salt
¼ teaspoon freshly ground pepper
1 tablespoon (14 grams) unsalted butter
1 tablespoon chopped shallots
1 small clove garlic, chopped
¼ teaspoon thyme
1 cup (237 milliliters) good dry red wine
2 anchovy fillets
¾ cup (178 milliliters) demi-glace
Sprinkle the steak with salt and pepper. Panfry steak in butter over medium heat for about 10 minutes, turning the steak every 4 to 5 minutes. Place the steak on a platter and keep warm in a 160 degree (70°C) oven. Add the shallots to the pan drippings and sauté for 10 to 15 seconds. Add garlic, thyme, and red wine. Reduce to ½ cup (118 milliliters). Chop anchovy fillets or crush with the blade of a knife to a purée and add to the wine mixture with the demi-glace. Reduce for 1 to 2 minutes. Taste for seasonings, add salt and pepper if needed, and strain the sauce on top of the steak or slice the steak and serve with the sauce around.
FILET OF BEEF WITH TRUFFLE SAUCE (Filet de Boeuf Périgueux)
YIELD: 6 servings
1¾-pound (795-gram) piece of filet of beef
(completely trimmed, see page 352), from the center, seasoned with
½ teaspoon salt
¼ teaspoon ground black peppercorns
3 tablespoons (42 grams) unsalted butter
1½ cups (355 milliliters) demi-glace
1 tablespoon chopped black truffles, preferably fresh or canned Tuber Melanosporum
½ cup (118 milliliters) good, dry Madeira wine
Salt and pepper to taste
Preheat the oven to 425 degrees (218°C). Brown the meat on all sides in 2 tablespoons (28 grams) butter in a sturdy skillet or saucepan (about 5 minutes). Place the skillet in the oven for 18 minutes. Remove, set the meat on a platter and let rest or settle in a warm place (150 degrees/66°C) for at least 10 to 15 minutes before carving. Place the pan with the drippings on top of the stove and cook on medium heat until the fat is entirely separated from the juices, which should solidify on the bottom of the saucepan. This technique is called “pincer.” Set the skillet on the table for 4 to 5 minutes, inclining the skillet so the fat comes to one corner. Pour fat out and add demi-glace. Place on the stove on low heat and, with a spatula, loosen all the solidified juices as the sauce boils gently.
Place the truffles in a clean saucepan with the Madeira wine. Bring to a boil and reduce by half. Strain the demi-glace from the skillet directly on top of the Madeira-truffle mixture. Reduce the sauce until it reaches proper consistency and coats the spoon. You should have about 1½ cups (355 milliliters) of sauce left. Season with salt and pepper if needed and finally swirl in the remaining butter, cut into small pieces. Slice the meat thinly and serve 2 to 3 slices per person with the sauce around the meat and partially covering the slices. The plates should be very warm.
HUNTER CHICKEN (Poulet Chasseur)
YIELD: 4 servings
1 tablespoon (14 grams) butter
1 tablespoon olive oil
1 (2¾-pound/1.25-kilogram) chicken, skinned, and quartered (see page 274), keep the carcass bones for stock
2 tablespoons chopped onion
1 clove garlic, peeled, crushed and chopped fine
½ cup (118 milliliters) dry white wine
1 tomato, peeled, seeded and coarsely
chopped (1 cup/225 grams)
1 teaspoon tomato paste
1 bay leaf
¼ teaspoon dried thyme
6 to 8 mushrooms, sliced (1¼ cups/144 grams,
loosely packed)
½ cup (118 milliliters) demi-glace
1 teaspoon salt
¼ teaspoon freshly ground pepper
½ tablespoon finely chopped Italian parsley
½ tablespoon fresh tarragon
Melt the butter in a heavy saucepan, add the olive oil, and brown the chicken over medium heat for 8 to 10 minutes, turning the chicken after 5 to 6 minutes of browning. Add the chopped onion and sauté for 15 to 20 seconds. Add the garlic, white wine, tomato, tomato paste, bay leaf, and thyme. Cover and bring to a boil. Turn the heat down and simmer for 10 minutes. Add the mushrooms. Cover and simmer another 5 minutes. Using a spoon, transfer the chicken and solids to a dish. Add demi-glace to the drippings, bring to a boil and reduce to 1 cup (237 milliliters). Season, add parsley and tarragon, pour on top of the chicken, and serve at once.
SAUTÉED VEAL WITH SPINACH (Veau Sauté aux Epinards)
YIELD: 4 servings
⅓ stick (38 grams) butter, plus 2 tablespoons (28 grams)
2 10-ounce (567 grams) packages leaf spinach
Salt and freshly ground pepper to taste
About 12 veal scaloppine, 2 to 3 per person,
2 ounces (57 grams) each, completely trimmed (see page 333)
¾ cup (178 milliliters) demi-glace
Put 3 tablespoons (42 grams) of butter in a large saucepan and cook it to a dark stage to obtain a nutty taste. Add the spinach, mix well, and season with ¼ teaspoon of salt and pepper to taste.
Arrange your spinach on individual serving plates. Melt the remaining butter in one or two large saucepans and sauté the scaloppini in foaming butter for approximately 40 seconds on each side, seasoning with salt and pepper. Arrange the veal on top of the spinach. Deglaze the drippings in your saucepan with the demi-glace. Stir to melt all the juices and reduce to about 1 cup (237 milliliters). Season with salt and pepper, if needed, and pour about 2 tablespoons of the sauce on the scaloppini and around the spinach on each plate. Serve immediately.
White Stock
(Fond Blanc)
White stocks (whether they be beef, chicken, fish, etc.) are cooked in the same way as brown stock, but the bones are not browned first. The stock may be reduced or thickened with a roux or beurre manié, with excellent results. When the stocks are thickened with a roux they are called veloutés (mother sauces). With the addition of cream, a velouté becomes a cream sauce and the cream sauce, in turn, takes on different names depending on the garnish. For example, a fish stock becomes a velouté of fish after it is thickened with a roux, then a cream sauce with the addition of cream, then a sauce Dugléré with the addition of sliced mushrooms and tomatoes.
In a first-class restaurant, where portions are cooked individually, the white stocks are often reduced to a glace, cream is added and the mixture boiled down until it reaches the proper consistency without the addition of flour. It makes a richer and more expensive sauce than a sauce made from a velouté. However, for economy as well as health, home cooks, except on special occasions, do not adhere to the criteria of a starred restaurant and a velouté is more the norm than the exception. A sauce should be light and, if it looks and tastes like glue, the culprit is the cook, not the flour.
YIELD: 3 quarts (3 scant liters)
10 pounds (4.5 kilograms) beef bones (knuckles, shin, and marrow bones are good), or chicken bones or half beef, half chicken
2 large onions
2 to 3 cloves
2 stalks celery
2 leeks, washed
4 carrots, peeled
4 to 5 cloves garlic, unpeeled
2 bay leaves
½ teaspoon thyme
½ teaspoon peppercorns
½ bunch parsley (1 cup/27 grams loose)
Cover the bones with cold water. Bring slowly to a boil and skim the solidified blood and albumin that rises to the surface of the water. Boil for 2 hours, skimming regularly. Most of the scum will rise to the top during these first 2 hours.
1. Stick one of the onions with the cloves. Add to the pot along with the celery, leeks, carrots, garlic, seasoning, and herbs.

2. If desired, to give an amber golden color to the stock (if a consommé or aspic is to be made from the stock), cut an unpeeled onion in half and brown in a skillet on medium heat on top of the stove until the cut side turns quite dark. Add to the stock. Boil slowly for another 4 hours, or 2 hours if you use only chicken bones. Evaporation will reduce the liquid. Add water periodically to compensate. Strain and reduce to 3 quarts (3 scant liters). Refrigerate overnight, then discard the fat, which will have solidified on top of the stock. Pack in small containers and freeze.


Fish Stock
(Fond de Poisson)
In our discussion of stocks, we have explained that long cooking and reductions enrich and intensify taste. The function of a stock, moreover, is to emphasize and enhance the food it is served with, not conceal it. Paradoxically, the same dish which will improve in taste through long cooking may be destroyed in texture by that same cooking. The way to reconcile these facts is to handle each component of the dish in a different manner. Take a fish for example: The head and bones will be separated from the fillets and cooked into a stock, then reduced to obtain an essence of strong reduction. On the other hand, the fillets will be barely cooked and, when combined with a sauce made from the reduced stock, you will have achieved the perfect balance.
It works the same way with meat. Take a salmis of pheasant: The bird will be roasted briefly at high temperature and the still-pink meat of the breast and thighs set aside, since it is the best and most tender part of the bird. The rest of the pheasant is browned further, seasoned, deglazed with wine and stock, reduced, degreased, and reduced again to intensify the taste and obtain a shiny concentrated sauce. This sauce finally gets served with the juicy, lightly cooked meat. The cycle is completed and each part of the pheasant has been utilized to the utmost and to obtain the best possible results.
Contrary to other types of stocks, fish stocks cook fast—35 to 40 minutes will be sufficient to get the nutrients and taste from the bones. A fish-court bouillon is usually made with fish bones, vegetables, and water. A fumet de poisson consists of the bones stewed in butter or oil first. With the addition of vegetables, white wine, water, and seasoning, it becomes the base of veloutés and sauces.
YIELD: Approximately 1½ quarts (1.4 liters) of stock
2 tablespoons (28 grams) unsalted butter
2½ pounds (1 kilogram) fish bones (use preferably the bones of flat fish such as sole, flounder, fluke, etc.). If fish heads are used, be sure to remove the gills and wash the bones carefully under cold water or the fish stock will be bitter.
1 medium onion, peeled and sliced
2 to 3 stalks celery, coarsely chopped
¼ cup (9 grams) parsley stems
1 leek, cleaned and sliced (1½ cup/100 grams)
2 bay leaves
¼ teaspoon thyme
½ teaspoon black peppercorns, crushed (mignonette) (see technique for Pepper Steak on page 351)
1 teaspoon salt
1½ cups (355 milliliters) dry white wine
3 quarts (3 scant liters) water
1. Put the butter in a large skillet or kettle and when it melts, add the fish bones. Steam on medium to high heat for 3 to 4 minutes, stirring with a wooden spatula.

2. When the bones begin to fall apart, add the onion, celery, parsley stems, and leek, and mix well. Steam for another 3 to 4 minutes, stirring. Add all the other ingredients and bring to a boil. Boil on high heat for 35 to 40 minutes.

3. Strain through a fine chinois or sieve. You can freeze the fish stock and use it for soups, thicken it with a roux so it becomes a velouté, or reduce it to a glaze and finish it with cream and butter.
Skimming Technique
(Technique de Dégraissage)
1. With the stock boiling gently, remove the scum with a tight, “net-like” skimmer.

2. For an alternative method, use a ladle. “Push” the fat to one side of the pot by sliding the round back of the ladle on top of the liquid. Then, using the front of the ladle, scoop the fat off. A third alternative is to let the stock cool refrigerated overnight and then remove the fat, which will have solidified on top of the liquid.

Skimming Fat
(Dégraissage des Sauces)
When sauces are cooking, the fat or scum comes up to the surface of the liquid and has to be skimmed off.
1. With the sauce simmering gently, push the top layer of fat or scum to one side of the pan.

2. With the spoon flat, scoop the fat from the side when it is accumulated.

3. Be sure to scoop only the fat. Repeat every 10 or 15 minutes, as needed, while the sauce is simmering.

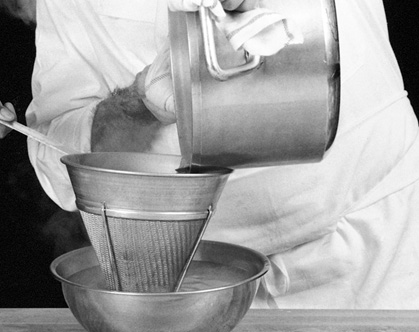
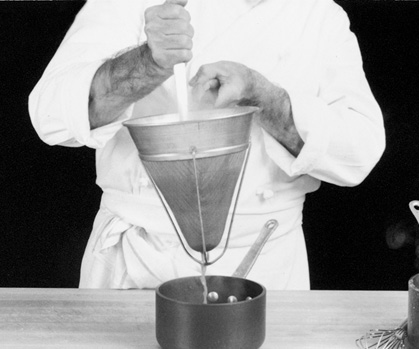
How to Strain Sauces
(Passage des Sauces au Chinois)
There are two ways to strain stocks or sauces. If it is a clear stock or demi-glace or any of its derivatives, care should be taken to not crush the solids into the liquid or it will make it cloudy.
If you are straining a thickened sauce such as a velouté, béchamel, or hollandaise, you don’t have to worry about “dirtying” the mixture and can rub as much through the mesh as possible. In the photographs that follow, we are straining through a fine-meshed chinois (strainer) that is the equivalent of a double layer of cheesecloth or kitchen towel.
To strain a stock very finely, you should put it through a colander with larger holes first to remove the larger solids and then, when the volume is reduced, work it through a finer-meshed chinois. It is particularly important to put demi-glace through a fine strainer to get the glossiness that’s possible only when all the impurities have been removed.
If you are buying a chinois, be sure to get one with a guard to protect the mesh from getting dented or crushed.
Any sauce that has to do with eggs and has a tendency to curdle—from a hollandaise to a crème anglaise—can be strained through this type of fine mesh to conceal or minimize a problem.
1. To remove solids from a sauce or stock, when it’s important to keep the liquid clear, bang the side of the strainer either with the palm of your hand or a wooden spatula to encourage the clear stock to strain through. If you crush the solids into the strained liquid, the stock or sauce will become cloudy.

2. For thickened sauces, where clarity is not an issue, use the ladle in a plungerlike, push-lift-push motion, forcing the liquid through the mesh.
Strong, Clarified Stock
(Consommé)
Consommé is the beef or chicken concoction that, when perfectly made, is a beautifully clear and sparkling soup. It can be eaten as is or used as a base for other soups, for sauces, or for aspic. It has all the proteins of meat and none of the fat. There are two steps in making consommé. The first is to make the stock and the second is to clarify it. Clarification is the simple process that gives consommé its crystal-clear appearance.If the stock is very strong and concentrated, there is no need to add ground meat to the clarification. Fifteen minutes of cooking is enough to clarify the stock in this case. A very strong consommé (consommé double) is made by adding meat to the clarification and cooking it for 1 hour, thus concentrating flavor in the liquid. A cold consommé double should be gelatinous without being too firm. With the addition of tomato, it becomes madrilène consommé.
YIELD: Serves 8
1 cup (237 milliliters) cold water
1 pound (454 grams) very lean ground beef
6 large egg whites
½ cup (25 grams) diced celery leaves
¾ cup (170 grams) diced tomato
2 cups (200 grams) sliced green of leek (or 1 cup/100 grams green of scallions)
½ cup (20 grams) coarsely cut parsley and tarragon mixed
¾ cup (110 grams) sliced carrots
½ teaspoon black peppercorns
2 bay leaves
½ teaspoon thyme leaves
Salt, if needed
12 cups (3 scant liters) stock
1. In a large kettle, combine all the ingredients except the stock.

2. Add the stock and bring to a boil over high heat, stirring constantly to avoid sticking. Do not worry if the stock becomes very cloudy and a white foam forms. The albumin in the egg whites and the meat is solidifying, and this is the process that will clarify the stock. When the mixture comes to a strong boil, STOP STIRRING and reduce the heat to a simmer. As the mixture simmers, you will notice that the ingredients form a “crust” on the surface of the liquid with one or two holes, through which the liquid boils slightly.

3. Allow the consommé to simmer gently for 1 hour without disturbing the little “geysers” in any way. Turn off the heat and let the consommé settle for 15 minutes. Tilt the pan on one side to get all the liquid out.

4. Strain the liquid through a sieve lined with paper towels or a cloth soaked in cold water and then wrung out. After the consommé has rested 1 hour, check to see if there is any fat on the surface. If so, remove it by blotting the top with paper towels. The consommé can be served hot or cold. With different garnishes, it takes on different names like célestine with shredded crêpes, or royale with cubes of meat-flavored custard. The crust is usually discarded, but with the addition of whole eggs, bread crumbs and seasonings, it can be turned into a satisfying meat loaf. Be careful to remove the peppercorns for this use.

White Butter Sauce
(Beurre Blanc)
The beurre blanc (white butter sauce) is an emulsion of butter with wine and/or vinegar which holds together because it is whipped at a proper temperature. Furthermore, the whipping beats air into the mixture, which makes it light and increases its volume. In cooking, the word “emulsion” refers to a fat and liquid or other ingredient bound together into a creamy mixture. Mayonnaise is an example of a cold emulsion and hollandaise an example of a hot emulsion. Other types of emulsions appear throughout this book—in the brill recipe (see page 222), as well as the asparagus stew (see page 81). In the latter recipe, butter and water are brought to a strong boil and it is the boiling that causes the mixture to bind. This is somewhat confusing as, on the one hand, boiling may be necessary to get some sauces into emulsion while, on the other hand, sauces like hollandaise or beurre blanc separate if they’re brought near the boil. The explanation for this paradox lies in the proportions of fat to liquid.
If the proportion of butter and liquid are more or less equal, a strong boil will bind the ingredients together and make a creamy sauce that will hold together for some time depending on temperature. If there’s a lot more butter than liquid (as there is in the beurre blanc) too much heat will make the mixture separate. This is an important point to grasp because, when understood, it allows you to bind liquids into fat or to separate fat from liquid at will. For example, in a roast chicken in aspic, the natural juices are boiled down to evaporate the moisture and reduce the mixture to solidified juices and clear fat. As the moisture boils off, the proportion of fat becomes greater and this is why it breaks down and separates from the solidified juices. Once the fat is separated, it can be easily poured off and the solidified juices dissolved with water, then strained and reduced to proper consistency. To reverse the process, let’s say that you don’t want to remove the fat from your natural juices but the mixture has over-reduced and already separated. If you want to bind the liquid and fat back together again, you just replace some of the evaporated moisture (water), bring to a strong boil, and it will bind together again. In the case of a beurre blanc or hollandaise which, again, is almost all fat, if the sauce starts to separate, remove from the heat, add a bit of cold water, and beat with a whisk to bind together again.
The beurre blanc can replace a hollandaise on top of any kind of vegetable and is especially good with shellfish and fish.
YIELD: About 2 cups
1 cup (237 milliliters) water
⅓ cup (48 grams) finely sliced shallots (3 to 5 according to size)
½ teaspoon freshly ground white pepper
½ teaspoon salt
½ cup (118 milliliters) good white wine vinegar
2 tablespoons heavy cream
2½ to 3 sticks (1¼ cups to 1½ cups/283.5 to 340 grams) unsalted butter at room temperature
1. In a saucepan, preferably stainless steel, combine the water, shallots, pepper, salt, and vinegar. Bring to a boil and simmer slowly for about 20 minutes. If the mixture reduces too much during the cooking, add some water. Push the mixture into a sieve, pushing with a spoon to force the shallots through. You should have approximately 1/2 cup (118 milliliters) of mixture left. If you have too much, reduce it. If you don’t have enough, adjust with a bit of water.

2. Add the cream to the mixture and place on very low heat. The mixture should be lukewarm. Add the butter piece by piece, beating rapidly and strongly with a wire whisk after each addition. Do not worry too much about temperature. Up to one stick (1/2 cup/113 grams) of butter can be added to the saucepan and the whole mixture boiled without it breaking down. As the quantity of butter increases, reduce the heat to low. Keep adding the butter and beating until all of it is used.
3. You should have a warm, creamy, smooth-textured sauce. Keep lukewarm in a double boiler or on the side of your stove. As long as it doesn’t begin to solidify, it can keep. At serving time, place it back on the stove and heat while beating with the whisk until hot. Serve immediately.

Hollandaise Sauce
(Sauce Hollandaise)
Although less often made today, hollandaise sauce is a classic that every chef should know how to make. Generally it is made with eight yolks per pound (454 grams) of butter, but the proportion of eggs to butter can be altered in either direction. If your hollandaise is high in egg yolks, it will be less likely to separate but it may become too yolky in taste. If it is high in butter, it will be very delicate in taste but very fragile.
Though a hollandaise sauce is usually made with clarified butter (see note), we prefer to use unclarified butter. Because unclarified butter is whole—it has not been separated into its oil and liquid components and the liquid component discarded—it is more watery, and therefore it makes a slightly thinner sauce. However, it gives the sauce a creamier taste and the extra moisture permits it to withstand higher heats than the conventional hollandaise.
I make the sauce with a base of water and lemon juice is added at the end.
A hollandaise is a base or mother sauce. With the addition of white wine vinegar, shallots, and tarragon it becomes a béarnaise sauce. If you add tomatoes to the béarnaise it becomes a sauce choron. If you add glace de viande to the béarnaise it becomes a sauce Foyot, etc. Hollandaise sauce can be made with a browned butter, which gives it a very nutty taste (sauce Noisette), or perfumed with orange rind and orange juice to make a sauce Maltaise, which is excellent with broccoli, etc.
(Note: To clarify butter, place butter in a 180-degree (80°C) oven until completely melted. Let it rest a few minutes and it will separate into two layers: a milky residue at the bottom and a transparent oily layer at the top. Clarified butter is the oily part. The milky residue is discarded.)
YIELD: About 2 cups
4 large egg yolks
3 tablespoons water
2 sticks (1 cup/113 grams) unsalted butter
Dash of cayenne
Dash of pepper
Salt to taste
1 tablespoon fresh lemon juice
1. Place the yolks and water in a saucepan, preferably stainless steel or enameled cast iron. (Aluminum will discolor the sauce.) The sabayon, which is the first part of the hollandaise, can be made in a double boiler over lukewarm to hot water to prevent curdling or it can be prepared directly on top of the stove.
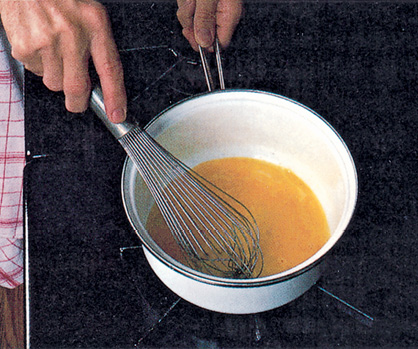
2. Start beating the mixture, making sure that you “drive” the whisk into the corners of the saucepan where the eggs will have a tendency to overcook and scramble. Cook over medium heat, alternately moving the pan off the heat while beating and then placing it back on the heat, so the mixture never gets too hot. If it comes too close to a boil, the eggs will scramble. On the other hand, if the mixture does not get hot enough during the beating, it will tend to foam too much, increase in volume, and have too light a consistency to be able to hold and absorb the butter.

3. Beat for approximately 4 minutes. The consistency of the mixture should be that of thick, soft, very smooth butter. Between the streaks of the whisk, you should be able to see the bottom of the pan.

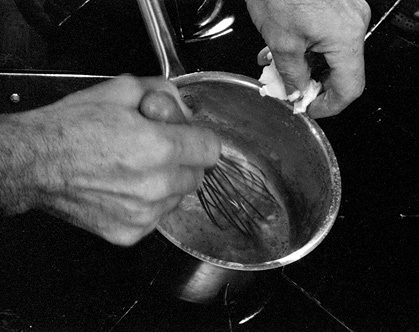
4. Add the butter piece by piece, beating after each addition while moving the hollandaise off and on the heat to keep the temperature hot enough so the butter is absorbed and the hollandaise thickens. Season with salt and cayenne pepper and add lemon juice. Notice that the hollandaise doesn’t require much salt.

5. If the hollandaise is exposed to too much heat, it will eventually separate and break down. Notice the broken look and the butter separating from the egg yolk. First, the sauce will start getting oily at the edge when it begins to break down. As that starts to happen, you can smooth it out again by beating in 1 tablespoon of hot water. However, if the sauce is completely separated, as shown in our photograph, reconstitute it as explained below.

6. Strain the mixture through a very fine strainer to separate most of the oily liquid part from the sauce.

7. Place 2 tablespoons of water in a saucepan, bring to a boil, remove from the heat, and add the thick part of the broken sauce 1 tablespoon at a time while beating. You will see the sauce becoming smooth again. Keep adding until you have used all of the thick part of the sauce, which now should be smooth, like the original sabayon. Then, while beating, add the liquid butter as though you were making the hollandaise from scratch, moving the pan on and off the heat to keep the temperature warm. If the sauce is recooked too much or if during the process the eggs scramble lightly, the mixture can be strained through a very fine strainer, a chinois, to alleviate the scrambled appearance.

Butter and White Sauce
(Beurre et Béchamel)
Fresh butter, one of the main ingredients in French cooking, is widely used in the professional kitchen for everything from hors d’oeuvre to desserts. And rightly so, because there is no substitute. Buy unsalted butter, rather than salted, because salt is added often to act as a preservative, and salted butter may not always be fresh. Unsalted butter, on the other hand, gives away its age by turning rancid faster than salted butter.
Clarified butter is nothing more than ordinary butter that has been heated until it melts, and the milky residue (milk solids) has sunk to the bottom of the pan. The clear, yellow liquid that sits on top is clarified butter. Classically, it is used to make hollandaise, béarnaise and choron sauces, among others, and it is often called for in sautéeing because it does not burn as readily as unclarified butter.
Butter is so versatile it often is used for three different purposes in the same sauce: to thicken it with either a “roux” or a beurre manié, to enrich it by adding little “nuts” of butter, and to coat the surface of the sauce to prevent a skin from forming.
A roux is a mixture of butter and flour in equal proportions which is cooked before it is combined with a liquid. A roux blanc (white) should be cooked slowly for 1 minute, stirring. It should not be allowed to brown. A roux brun (brown) is cooked until it turns a rich, nut brown, up to 30 minutes. A beurre manié is a mixture of soft butter and flour in equal proportions that has been kneaded until smooth.
White sauce (béchamel) is one of the mother sauces in French cooking. It is made with a beurre manié. With the addition of cream it becomes a sauce crème.
WHITE SAUCE with beurre manie (Sauce Béchamel)
1. Place soft butter and flour in equal proportions in a bowl. A thin sauce will take approximately 2 teaspoons each of flour and butter per cup (237 milliliters) of milk. A thick, heavy sauce (for soufflés) will take up to 3 tablespoons each of flour and butter.

2. Mix with a spoon or a whisk until smooth. This is a beurre manié.

3. Bring milk to a boil. With a wire whisk, scoop the beurre manié and whisk into the milk vigorously to avoid any lumps. The kneaded butter should incorporate easily without forming any lumps.

4. Bring the sauce to a boil and cook at low heat for 2 to 3 minutes, mixing with the whisk to avoid scalding. Season to taste with salt, pepper, and nutmeg. Often béchamel is made by melting butter in a saucepan and then stirring in the same quantity of flour. Cook for about 30 seconds and add cold or hot milk and bring to a boil, stirring with a wire whisk until thickened. Cook for a couple of minutes.

5. When the sauce is cooked, cut a little bit of butter and put it on top.

6. As the butter melts, smear it onto the whole surface of the sauce with the point of a fork. This will form a coating of fat on the surface of the sauce and will prevent a skin from forming. At serving time, stir in the butter which is on top.

LEMON-PARSLEY BUTTER (Beurre Maître D’Hôtel)
1. The maître d’hôtel butter is the most frequently used of the many compound butters. It is sliced and used on broiled steak, chops, liver, or on boiled potatoes, cauliflower, or even poached fish. To 2 sticks (1 cup/227 grams) of softened unsalted butter, add 2 tablespoons lemon juice, 2 tablespoons chopped parsley, 1 teaspoon salt, and 1 teaspoon ground black pepper.

2. Mix thoroughly until all the ingredients are well blended. Spread into a strip on the width of a piece of wax paper.

3. Roll the butter back and forth to make it smooth and equal all over.

4. Close both ends of the butter tube and place in the refrigerator or freezer. Cut into slices as needed. The same method is used to make béarnaise butter, Colbert, anchovy, and so on. Compound butter also can easily be made in a food processor.

Mayonnaise
(Mayonnaise)
Mayonnaise is a very useful cold dressing. Although most people buy prepared mayonnaise, it is important to know how to make it from scratch.
Mayonnaise is usually served with cold foods such as hard-boiled eggs, cut vegetables, salad, cold fish, shellfish, cold meat, and pâté. (Its sister, hollandaise, made with egg yolk and butter, is served warm with fish, eggs, and vegetables such as asparagus, broccoli and the like.) In French cooking, when the ingredients of a particular salad are bound with mayonnaise, it becomes: mayonnaise de volaille (chicken salad), mayonnaise de homard (lobster salad), and so on. Mayonnaise made in the food processor or blender will keep longer when refrigerated than the handmade counterpart because the elements are more finely bound together.
Mayonnaise can become sauce verte, a green sauce made with mayonnaise, watercress, tarragon, parsley, and spinach; sauce gribiche, mayonnaise with hard-cooked eggs, French sour gherkins, capers, and shallots; sauce tartare, mayonnaise with parsley, chives, chervil, and sour pickles; sauce La Varenne, mayonnaise with a purée of fresh mushrooms; sauce russe, mayonnaise with fresh caviar; and, of course, the well-known aïoli, known as the butter of Provence and made with a very substantial amount of pounded garlic and olive oil. Of course, mayonnaise can be made with olive oil (the best is an extra-virgin oil), or peanut oil, or a mixture of both; it is just a question of personal taste. Buy vinegar of the best possible quality. Use good mustard. The quality of the ingredients is sine qua non to the end result. Be sure that the ingredients are at room temperature. If the oil is too cool, the mayonnaise will definitely break down. If kept refrigerated, the mayonnaise must come to room temperature slowly before it is stirred or it will break down. This recipe yields about 2½ cups (592 milliliters) of mayonnaise. The same recipe can be made without the mustard for a milder taste; however, the mixture will be more delicate and more likely to break down.
3 large egg yolks
1½ teaspoons Dijon mustard
1 tablespoon tarragon or wine vinegar
Dash of salt
Dash of freshly ground white pepper
2 cups (473 milliliters) oil (peanut, olive, walnut, or a mixture)
1. Place all ingredients except the oil in a bowl and stir with a wire whisk. Add the oil slowly, whisking at the same time.

2. Keep mixing, adding the oil a little faster as the mayonnaise starts to take shape.

3. Lift the whisk to check the consistency of the mayonnaise.

4. To serve, scoop the mayonnaise into a clean bowl, being careful not to smear the sides of the bowl. (Place the mayonnaise in the middle of the bowl.)

5. Smooth the top with a spatula by turning the spatula in one direction and the bowl in the other direction.

6. When the top is smooth, move the spatula in the same circular and reverse motion, going up and down to make a design on top of the smooth surface.

7. With your finger, push out the mayonnaise left on the blade of the spatula in the center of the decoration.

8. Mayonnaise ready to serve.

9. When the oil is added too fast, or when the ingredients are too cold, the mixture breaks down. It looks like a broken-down custard. Mayonnaise can be put back together with egg yolk, mustard, vinegar, or a small amount of hot water. Place 1 teaspoon of vinegar, if vinegar is used, in a clean vessel. Add 1 teaspoon of the broken sauce and whisk thoroughly. When smooth, add another teaspoon, then another, and when the mayonnaise starts to hold together, you may add the broken sauce at a faster pace.

10. For another method, pour the vinegar or hot water directly into the broken mayonnaise in one place along the edge of the bowl. Using the tip of your whisk, without getting too deep into the mayonnaise, mix the liquid with the top layer of the broken sauce until you see that it is coming together. Keep mixing, pushing your whisk deeper and deeper into the mayonnaise. Then, whisk larger and larger circles until all of the sauce is back together.

Larding: Strips and Leaves
(Lardons et Bardes)
There are basically two kinds of larding needles: the large grooved needle (lardoire) for pot roast and other large pieces of meat and the small butterflied needle (aiguille à piquer) used for small cuts, such as filet mignon or rack of hare. The process of larding smaller cuts with fat was once common but it is rarely done nowadays. Piquage of meat usually is not necessary. It is shown only as part of a known technique.
Because meat is always cut against the grain, larding is done with the grain of meat. Otherwise, one might cut through whole strips of fat while carving.
Lard leaves (bardes) are used to line terrines and pâtés, or to wrap dry meat or game such as partridge or woodcock, and give moisture and enrich the meat during cooking.
LARDING A SMALL CUT OF MEAT
1. The fat used is fat back (lard dur) because it is firm and white and is not inclined to disintegrate as easily as fat from other parts of the pig. It is the layer of fat closest to the skin. Keep the piece refrigerated so it can be easily cut into strips. Flatten the piece with a large cleaver.

2. Turn upside down and, with a long, thin knife, start cutting the rind off.

3. With one hand pressing tight on top of the fat back, cut the rind off by keeping your blade flat, moving in a jigsaw fashion.

4. Cut the fat in long strips about ½ inch (13 millimeters) wide for the pot roast. Place in iced water to keep the fat firm.

5. Cut in small strips to lard the small cuts. Keep in iced water.

6. Place the fat strips inside the split end of the aiguille à piquer as far as it will go.

7. With one hand, keep the split end closed on the fat and insert the needle through the meat.

8. Pull with the other hand, leaving a small strip dangling on each side. The meat is larded on a bias in that case.

LARDING A LARGE CUT OF MEAT
1. Cut ½-inch (13-millimeter) slices of fat back.

2. Cut the slices into long strips and keep refrigerated, or in iced water to firm up.

3. This is a plain grooved larding needle. Before placing the fat in it, push the needle through the meat to make an opening. Remove the needle, place the fat in the groove in the larding needle, and insert it into the premade hole, twisting as you push the needle in. Lift the end of the fat, and hold with your finger as you withdraw the needle, or the entire strip may come out.

4. This is another type of larding needle. It is easier to use because of its hinged tip.

5. With this needle, you place the fat into the groove and close the tip on top of it.
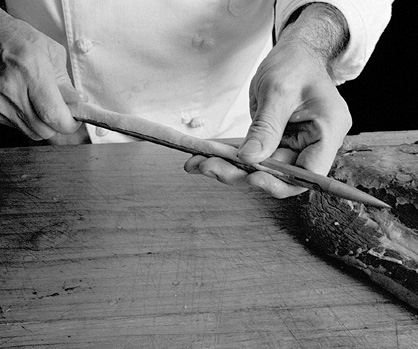
6. Insert the needle, twisting it through the meat (go with the grain of the meat). Lift up the tip and,

7. holding it between your fingers, pull off the removable handle.

8. Holding the end of the fat with your thumb, pull the needle through in the same direction it went in.

9. Repeat until the entire piece of meat is larded every 1½ to 2 inches (4 to 5 centimeters).

LARD LEAVES FOR TERRINES AND PÂTÉS
1. To make bardes or lard leaves, flatten the fat back with a cleaver. Place skin side down on the table. Stick one or two pointed knives through the rind to keep the fat back from sliding during cutting.

2. Using a long, thin knife, cut “leaves” as thin as you can, holding your blade horizontally.

3. Gently lift the leaves of fat from the fat back. This technique requires a certain amount of practice. You could ask your butcher to cut the leaves with his electric ham slicer.

Folding in Ingredients
(Incorporation à la Spatule)
Many recipes, primarily baking recipes, call for folding. The goal is to incorporate something delicate, usually whipped egg whites or cream, into a thicker mixture while retaining the fluffiness and airy quality in the mixture.
1. Use a wooden or rubber spatula, or even a metal one, and slide it gently on top of the mixture.

2. Then, cutting side down, go through the mixture and straighten out the spatula underneath it.

3. Twist the spatula again to come out on the top, cutting side up. While you perform the whole circle with one hand, spin the bowl toward you with the other hand. The motions should be simultaneous. Do not overfold.

Coating a Cookie Sheet
(Plaque Beurrée et Farinée)
There are countless recipes asking the cook to coat a cookie sheet, a soufflé mold, a cake pan, and so on. The reason is primarily to avoid sticking and also to give whatever is cooking a nice golden crust and a buttery taste. In the case of a soufflé, it is even more important; it helps the soufflé slide up during cooking. There are basically three ways to coat a dish. Butter is first rubbed on the surface of the dish; then sugar is added for a sweet dessert, cheese for a cheese soufflé, or flour for an all-purpose coating.
1. Rub soft butter all over the cookie sheet.

2. Add flour to the sheet and shake it thoroughly in all directions so that all the butter is coated with the flour. Pour the flour onto the second pan and repeat the operation. Give a bang to the back of the cookie sheet to get rid of any excess flour. The coating should be light and uniform.

Pastry Bag and Tube
(Poche et Douille)
When a cook wants to give a professional look to his desserts, he uses a pastry bag. It simplifies the work and makes the decoration faster, cleaner, and more uniform. Buy a plastic-lined pastry bag which is easy to use and to wash. A 14- or 16-inch (35- to 40-centimeter) bag is the all-purpose size most commonly used. Buy your pastry bag with a narrow opening at the point. If it is too small for your tube, you can always cut a piece off the tip to enlarge the opening.
1. Fit a pastry bag (preferably made of plastic) with a plain tip. To prevent the batter from running out through the tip as you fill the bag, twist it just above the tip and push the twisted section into the tip. This will hold the batter back until you’re ready to begin using the bag.

2. Fold the cuff of the pastry bag back on your hand and onto itself to a depth of 1½ to 2 inches (4 to 5 centimeters) so the inside of the bag near the opening is not smeared with the batter. Spoon the batter into the bag.

3. Unfold the edge of the bag and pleat the top like an accordion to close the batter in.

4. To use the bag, hold the pleated end in the hollow between your thumb and finger. If you open your fingers while pressing the mixture out, it will come up instead of going down through the tube.

5. Notice the position of your hands when using the bag: The index finger and thumb of one hand hold the bag firmly closed while the lower part of the hand presses on the bag to release the filling. The bag is held near the tip with the other hand to direct the flow from the tip.

Lining Cake Pans
(Garniture en Papier)
Before baking parchment and wax paper were so widely available, cooks used brown wrapping paper to line cake pans. This served the purpose, but the modern papers which come on rolls are easier to work with. Not all cakes call for lined pans, but when they do, they are essential if the cake is to drop out of its cake pan intact. Nowadays many cooks use no-stick aluminum foil or a silicone pad to prevent sticking.
ROUND
1. Butter half of a square piece of parchment paper. Fold the unbuttered side of the paper onto the buttered side and press together to make a square.

2. Fold the square into smaller and smaller triangles.

3. Holding the paper triangle as shown, measure the radius of a round cake pan 10 to 12 inches (25 to 30 cenimeters) in diameter and cut the paper so it will fit exactly in the pan. Open the triangle and put the paper, buttered-side down, in the pan. As soon as it touches the pan firmly, turn it over so the buttered side is up. The paper is buttered on both sides now and will adhere well to the bottom of the pan and not stick to the batter.

JELLY ROLL PAN
4. To line a jelly roll pan (16 x 12 inches/40 x 30 centimeters) with parchment paper, first cut a rectangular piece of parchment paper a little larger than the pan and butter half of it. Fold the buttered half of the paper onto the unbuttered half.

5. With a knife, make a 1-inch (2.5-centimeter) slit in both of the open corners of the folded paper, open the paper up, and place it buttered-side down in a jelly roll pan, pressing it very lightly (there’s just enough butter to grease the pan slightly). Lift the paper and turn it over in the pan. It will adhere well now.

6. The paper will overlap at the corners where it has been cut, making it fit better in the pan.

Paper Casing
(Cuisson en Papillote)
When you see “papillote” on a menu in a French restaurant, you can safely assume that it describes a dish served in an envelope of parchment paper, usually a veal chop or a filleted or whole fish. The paper is cut in the shape of a heart. The meat or fish is partially cooked, placed in the center of the paper, and baked in the oven. When the papillote is folded correctly (it is sealed so that none of the aroma and steam can escape) it browns nicely, inflates, and the dish inside bakes in its own juices. The papillote is served directly on the serving plate and the guest opens it himself.
1. To cook en papillote, start by cutting a large rectangular piece of parchment paper. (In the olden times, cooks used brown paper bags.) Fold the rectangle in half.

2. Using scissors or a knife, start cutting from the folded side, following an imaginary line that resembles a question mark.

3. Open the heart shape and place the food on the bottom. The food should be partially cooked and all seasonings and flavorings added. Fold the top paper over the food.

4. Starting at the fold, fold the edge, overlapping the folds as you go along.

5. Fold the tip of the papillote several times to secure the closing.

6. Papillote ready to bake.

Paper Frill
(Papillote)
In addition to the paper receptacle described in the preceding technique, the word papillote describes a frill—a delicate paper lace rolled into a “hat” and used to adorn the bone of a lamb chop or a ham. Its raison d’être is strictly aesthetic. A papillote is also a Christmas bonbon rolled in a piece of paper decorated with a drawing and a motto, then wrapped in colorful paper with frills at both ends. Another papillote, neither aesthetic nor edible, is a little piece of paper used by women to set their hair.
1. Cut a long rectangle of parchment or wax paper approximately 25 inches (63 centimeters) long by 5 inches (13 centimeters) wide. Fold lengthwise twice. Open the last fold. You now have a rectangle folded in half and scored down the center by the second fold. Using scissors, cut strips ¼ inch (6 millimeters) apart down the length of the paper. (Cut through the folded side to the score line.)

2. Open the rectangle completely and fold in half inside out to give the frills a nice roundness.

3. Secure with staples or plastic tape.

4. Roll the frill on your finger, or on a pencil if you are making small frills for lamb chops.

5. Secure the bottom part with a paper clip or a piece of tape.

Paper Cone
(Cornet en Papier)
A paper cone or horn is an invaluable tool for fine and elegant piping. It gives a professional touch to your decoration. Making cornets is not an easy technique to acquire, but it is well worth spending the time to master. They should be made with parchment, sulfurized paper, or the best quality wax paper you can find.
1. Cut a triangle of strong paper with a pair of scissors.

2. Grab both ends with your thumbs and forefingers and twist onto each other to make a cone. Do not worry if the cone is not very pointed.

3. Holding the cone at the seam with both hands (thumbs inside and forefingers outside the cone), move the thumbs down and the fingers up to bring up and tighten the cornet making it needle sharp. Hold the cone tight so that the paper does not unroll.

4. Fold the ends inside the cone to secure it and avoid uncoiling.

5. The cone is ready to be filled. Place some filling in the cone, being careful not to soil the edges. Do not fill more than 1/3 full.

6. Flatten the cone above the filling and fold one side.

7. Fold the other side.

8. Next fold the center onto itself twice to secure the filling inside.

9. For a plain line, cut off the tip of the cone with a pair of scissors. The smaller the opening, the finer the decoration.

10. To make leaves, cut off a larger piece of the tip on a slant.

11. Then cut on the other side so that the tip is open on two sides. It is now ready to use.

Collar for Soufflé
(Faux Col pour Soufflé)
Frozen soufflés are whipped cream, a liqueur, egg yolks, and sugar mixed together and then frozen. The “rising” of the soufflé is accomplished by the simple device of tying strong parchment paper around the mold and filling the mold up to the “collar.” Collars are also used for hot soufflés to keep them from splitting and falling out during baking.
1. Cut a wide piece of strong baking parchment long enough to go completely around the mold and overlap slightly. Then fold the paper two or three times, depending on the width of the paper and on how high you want your soufflé to rise above the mold.

2. Apply your strip of paper to the outside of the mold, pulling the paper together securely and tightly so that the soufflé mixture cannot run down between the paper and the mold.

3. Secure the paper collar with a piece of string, tying it very tightly. For a frozen soufflé, fill the mold up only to its top edge. Place both the filled mold and the remaining mixture in the freezer for 15 minutes. By that time the surplus mixture will have become firmer and will not run. Add the mixture to the mold, filling the collar. Smooth the top surface. Return to the freezer and freeze until firm. At serving time, sprinkle some cocoa over the top to simulate browning in the oven. And don’t forget to remove the paper!


Vegetables
Artichokes and Artichoke Hearts
Hollowing Out and Stuffing Artichokes
Asparagus
(Asperges)
Asparagus has been commonly cultivated in Europe since the seventeenth century. While the large white, fleshy Argenteuil is less available in the United States, the commonly found varieties are the Italian purple (with almost violet-colored tips) and the green Mary Washington type. There are countless ways of cooking and serving asparagus. The best is the simplest, boiled and served plain with vinaigrette, hollandaise, or melted butter.
1. The white asparagus is on the left. The good green asparagus is in the center. (Notice that the tip is fairly tightly closed, as it should be.) On the right is an “over-the-hill” asparagus spear. The tips are opening like a flower. Fresh asparagus is firm and plump and will snap rather than bend. A soft, wrinkled specimen indicates dehydration and age. Peel the asparagus, starting approximately one-third of the way down the stalk; you can check with your fingernail to see if the skin is fairly fibrous there.

2. To peel, hold the asparagus completely flat on the table, keeping your index finger and thumb on top of it, not underneath, so the asparagus lies flat and can be rolled on the table as it is peeled. Notice that the vegetable peeler is held with the thumb and fingers of the other hand flat and on top, so the blade is perfectly parallel to the stalk. Begin cutting near the tip end of the asparagus one-third of the way down the stalk, pushing the trimmings directly onto your fingers. As you peel, rotate the asparagus by rolling it gently. Peel all around.

3. When all the asparagus has been peeled, break each piece at the base just above where the peeling stops, removing the trimmings and the base. The asparagus can now be tied in bundles and cooked.

4. Asparagus are often bundled into a portion of about 8 to 10 thin stalks. Grab a handful and align the tips by leveling them on the flat table.

5. Holding the spears firmly in one hand, wrap your middle finger with soft kitchen string.

6. Start bundling the lower part of the bunch. Be sure to make it tight. (This is one reason why you should not use string that is too thin and might cut.)

7. Come across, still holding the bundle tight and

8. tie the front, lower than the tips. Secure with a double knot.

9. Trim the spears at the root end. The asparagus are now the same length. Bring a large pot of salted water to a rolling boil. Lower the asparagus into the water and cover them until it starts boiling again; uncover. If the cover is left on during the whole cooking time, the asparagus will turn yellowish. Boil, depending on size, from 5 to 6 minutes. They should still be crunchy, but cooked enough. Lift the bundle from the boiling water and serve immediately.

10. If cooked ahead or served cold, as soon as the asparagus is done, place the whole kettle under cold water to stop the cooking. To prevent breaking the asparagus, place a spoon across the pot to divert the force of the water so it falls gently on the tender tips. (If only a small amount of asparagus is to be cooked, place ½ inch (13 millimeters) water in a skillet. Spread the asparagus in one layer and cook, covered, for 4 minutes. Lift out the asparagus and let cool on a plate.)

11. Drain the asparagus on paper towels. To serve warm, place a bundle, when needed, in a sieve and lower into boiling water for about 1 minute. Drain and serve immediately. To serve cold, arrange the spears on a large, oblong platter.

12. Garnish the ends with a bunch of curly parsley.

Asparagus Stew
(Ragoût d’Asperges)
This is a very simple, elegant, and delicious dish. It can be served as a first course or as an accompaniment to broiled lamb chops, pan-fried veal steaks, or to any sauceless meat.
YIELD: 4 servings
2 dozen (24) green asparagus spears or a mixture of green
and white asparagus
1⁄3 cup (79 milliliters) water
½ teaspoon salt
½ stick (1⁄4 cup/57 grams) unsalted butter, cut into pieces
¼ cup (10 grams) finely chopped parsley
1. Peel the asparagus, then cut on the diagonal into 1-inch (2.5-centimeter) lengths.

2. Place the asparagus in a skillet with the water and salt, cover and bring to a strong boil. Boil for 1½ minutes, uncover and add the butter and the parsley.

3. Return to a strong boil, shaking the pan to bind the ingredients together. Boil for 20 to 30 seconds until the sauce binds and becomes foamy. The mixture will rise like milk ready to boil over.

4. As soon as it foams, remove from the heat (further cooking will reduce the amount of moisture in the sauce and make the butter and water separate). Pour into a serving dish and serve immediately.
