Trout with Almonds
(Truite Amandine)
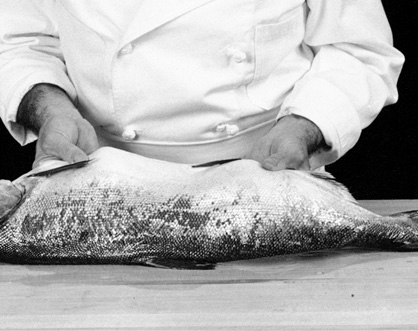
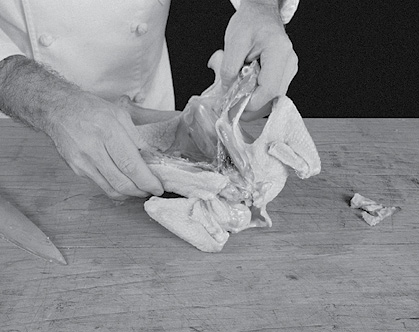
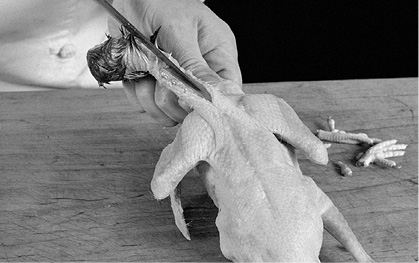
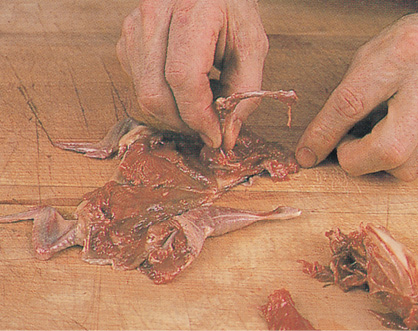
1. Another way of using the boned out trout is to fold the trout inward and pull the tail through the mouth.
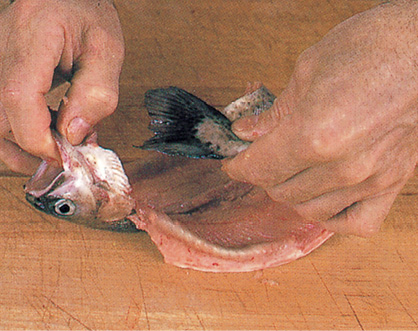
2. The trout is now ready to be sautéed.

3. Sprinkle the trout with salt, freshly ground black pepper and dredge lightly in flour. Melt 3 tablespoons (42 grams) butter in a heavy skillet, and when hot, place the fish in a skillet, skin side down, and cook on medium to low heat for about 31/2 minutes on each side. The skin should be crisp and nicely browned.

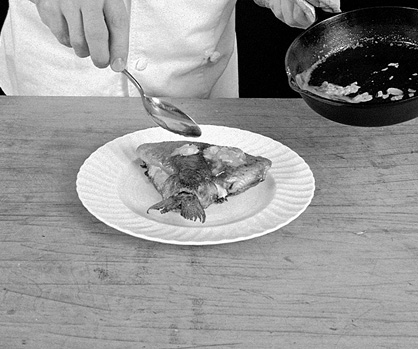
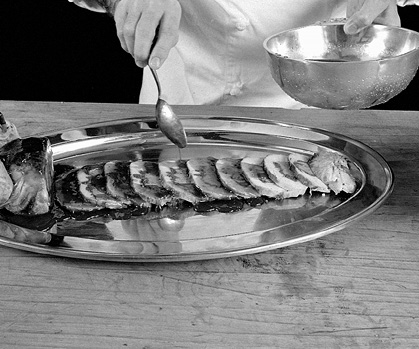
4. Place the trout on a warm plate and add 1 tablespoon sliced almonds to the drippings. Cook the almonds for about 1 minute in the hot butter. Spoon almond and drippings mixture over the trout.
5. Sprinkle with a few drops of lemon juice and decorate with slices of lemon dipped in chopped parsley. Serve immediately.

Rolled Trout
(Paupiettes de Truites)
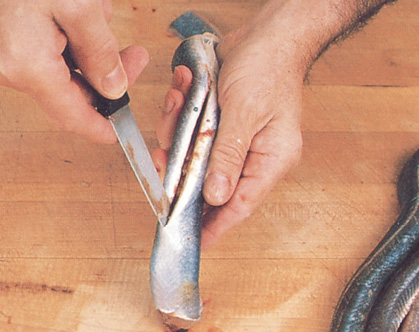
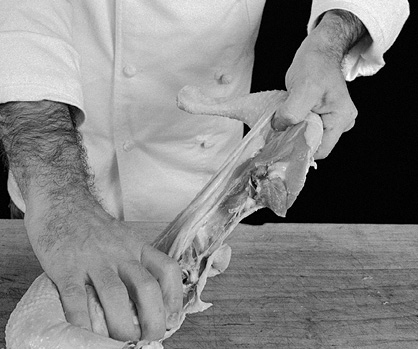
Another use is to roll the fillet of trout (stuffed or unstuffed) and cook it with its head on.
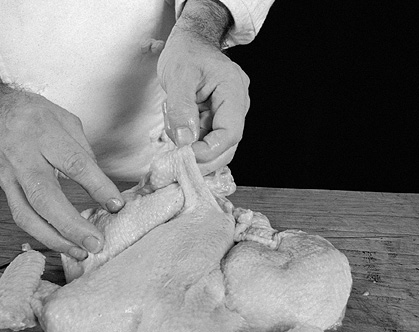
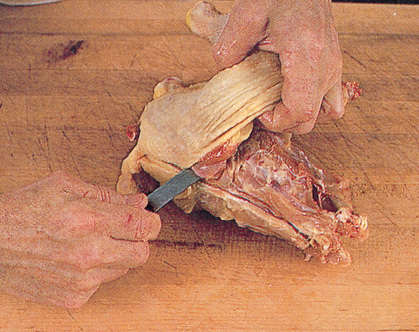
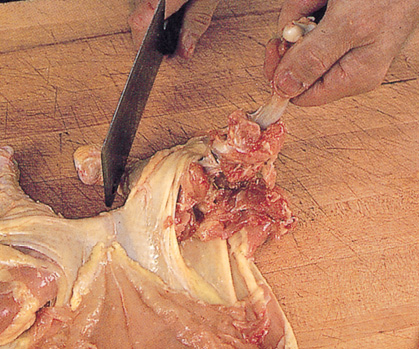
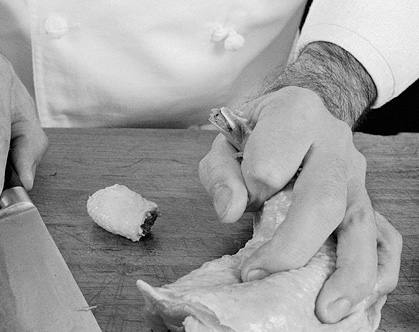
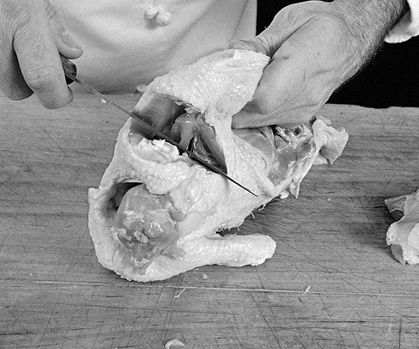
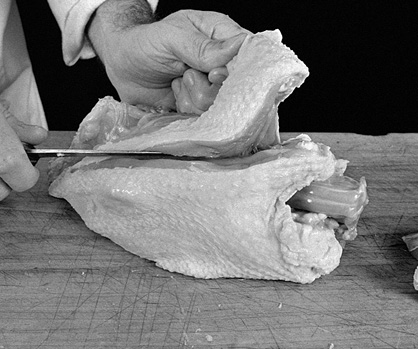
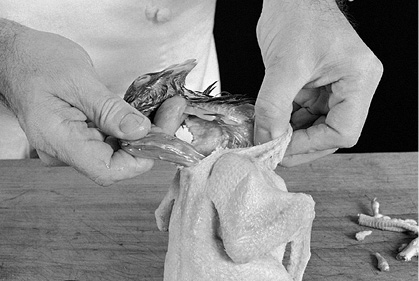
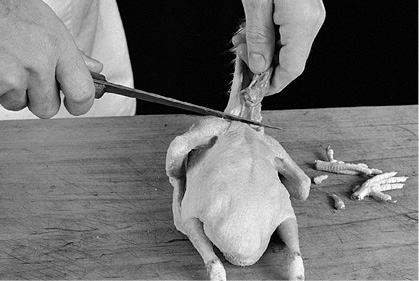
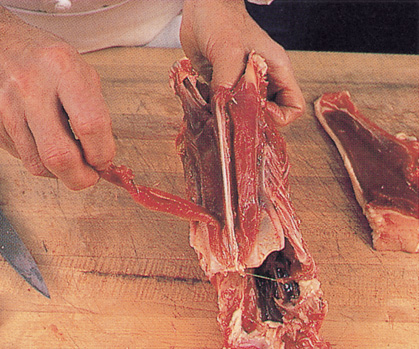
1. Separate the fillets from the central bones by cutting each side of the bones.

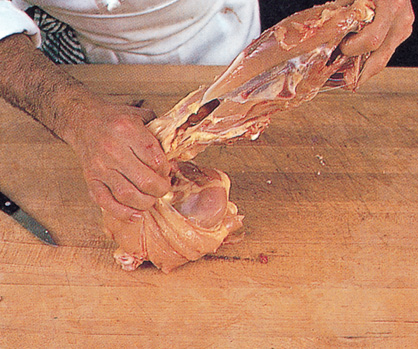
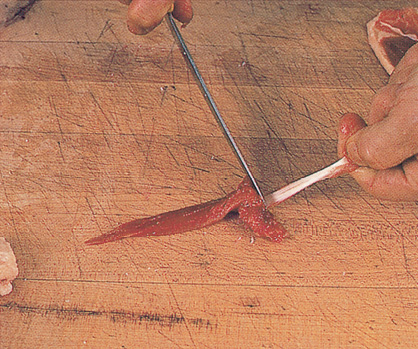
2. Remove the central bone near the head.

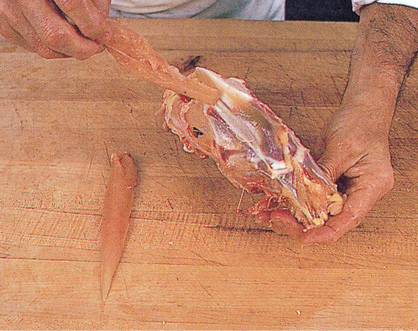
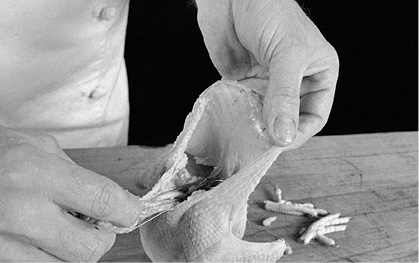
3. Roll each fillet so that the skin shows on the outside.

4. Rolled up trout, ready to cook. Trout are often prepared this way when they are to be poached and served cold in aspic.

Smoking Fish
(Fumage des Poissons)
Commercially smoked fish is expensive and often not as good as fish smoked at home. The commercial product is usually more salted and more smoked than the homemade product because the manufacturers want the fish to have the longest shelflife possible.
Smoking your own fish is fun and rewarding. There are only a few smoked fish available on the market—such as white fish, sturgeon, trout and salmon—but you can smoke practically any type of fish at home. We have had great results with mullets, porgie, eel, pike, etc. There are two basic ways of smoking: the hot and cold methods. The hot method partially cooks the fish as it smokes. The cold method smokes the fish but leaves it raw.
If you have one of the small home smokers, you will be able to hot smoke but not cold smoke. If you have no smoker, you can make one yourself from an old refrigerator or metal locker. It can be used for both the hot and cold methods. Hot smoking is done at temperatures between 200 to 225 degrees (93 to 107 °C). Cold smoking temperatures shouldn’t go above 90 degrees (32°C).
Before you smoke—whichever way you choose—you have to cure the fish with salt. Here, too, there are two different methods: You can cure it in a liquid brine (salt and water), or with dry salt. The salt leeches all the moisture out of the fish, thereby depriving the bacteria of the medium necessary for its survival. It is in this way that salting preserves. Use the kosher coarse salt which has larger crystals to better cure the fish.
Both meat and fish are smoked by being exposed to the smoke given off by smouldering wood chips. Different types of woods can be used—hickory, maple, alder, juniper, and most woods from fruit trees. Resinous woods such as pine, spruce, etc., or pressure-tested wood should be avoided. Herbs such as bay leaves or thyme, rosemary, oregano, or dry basil stems can be added to the wood chips to flavor the smoke.
In the first technique we are hot smoking trout in a little home smoker. In the second, we will cold smoke salmon in a converted ice box smoker. Hot smoking is necessary with a tight, firm fleshed fish such as sturgeon, eel and even trout. The tougher the flesh, the higher the temperature should go; 200 degrees (93°C) will be sufficient for trout, but it should go up to 225 degrees (107°C) for eel. Because of its particular texture, salmon is cold smoked. If subjected to temperatures above 90 degrees (32°C), it will cook through. The proteins coagulate around 120 degrees (49°C) and force out the moisture of the fish (it is visible as a white custard-like sediment); the flesh will flake and the salmon cook.
SMOKED TROUT (Truites Fumées)
YIELD: 12 first course lunch or brunch servings
4 cups (1 scant liter) water
2 cups (640 grams) kosher salt
1 tablespoon sugar
6 trout, 12 ounces (340 grams) each, gutted and cleaned
Vegetable oil
Hickory or alder chips
1. Put the salt and sugar in tepid tap water. Mix to dissolve and let cool. (The saltiness of the brine can be checked with a hydrometer—the specific gravity should be 1155 at 60 degrees Fahrenheit (15°C)—or by floating an egg on top of the brine; a bit of eggshell the size of a 50 cent coin should emerge from the water.) Place the trout in the brine for 2 hours. Remove, wipe dry with paper towels inside and out, and rub lightly with vegetable oil.

2. Skewer the trout, three at a time, through the gills and mouths. (We used sticks of wood as skewers.)

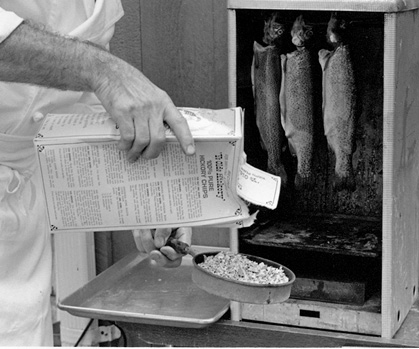
3. Hang the trout in the smoker. Plug in the hot plate, fill up the little tray with the wood chips, return to the smoker, and put the cover back on the smoker. Leave the trout in the smoker for approximately 1 hour. (It will take 15 to 20 minutes before the chips are hot enough to produce smoke.)
4. After 1 hour, unplug the smoker and leave the trout inside for another hour to cool and set. Take the trout out. They will have a nice yellowish color, be slightly warm to the touch and a little soft.

5. Refrigerate for at least 1 day to allow the trout to set and the taste to develop. Then remove the skin: Start at the belly and “unwrap” to the back. Continue unwrapping to the other side. The skin will come off in one piece.

6. Remove the head and split the top fillet in half following the line down the center of the trout. Pull out the back fillet, which is the thickest and the nicest. It should slide off the bone easily. Then push away on the other side to separate the belly fillet from the bone.

7. Remove the central bone which should come out in one piece. The trout is now ready and is usually served with toast and butter. For an elegant first course serve lukewarm, boned-out fillet of trout rolled and filled with scrambled eggs.

SMOKED SALMON (Saumon Fumé)
Use a large thick salmon. Ours weighed 10 pounds/4.5 kilograms (gutted, head on). If you don’t want to smoke a whole fillet, you can smoke half a fillet as long as the flesh is thick. Take your piece from the thickest part of the fillet. The instructions that follow are for one side of salmon, 3½ pounds (1.6 kilograms) with skin on but boned, and head and tail removed.
YIELD: about 10 servings as a first course
½ of a 10-pound (4.5-kilogram) salmon, scaled, washed,
and filleted
2 cups (640 grams) kosher salt mixed with ⅓ cup (75 grams) sugar
2 tablespoons peanut oil
1. Clean and fillet the salmon. Your fishmonger can do this for you or you can do it yourself following the instructions on page 202.
2. Using a pair of tweezers or small pliers, pull out the tiny bones which run down the center of the fillet. The bones can also be removed after smoking, too. If left, they make carving difficult.

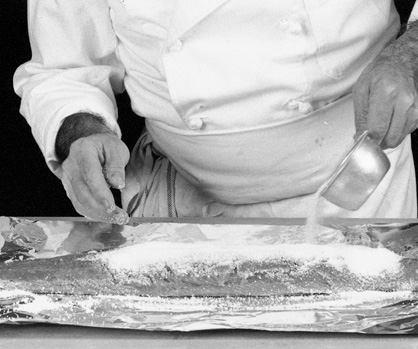
3. Spread some of the salt mixture on a large rectangular piece of aluminum foil and place the salmon, skin-side down, on top. Spread the rest of the salt mixture on top, sprinkling just a little on the tail because it is thin and shouldn’t absorb too much salt. There should be about 1/8 inch (3 millimeters) of salt mixture on top of the fillet except for the tail end.
4. Pack the salmon tightly in the aluminum foil and refrigerate for 6-8 hours or overnight, during which time the salmon will cure. Adjust the curing time for larger or smaller slabs of salmon. Remove from the aluminum foil, wash under cold water, and dry carefully with paper towels.

5. Place the salmon on a wire rack and let it dry for approximately 6 hours or overnight in front of a fan. A thin veil will form on top of the skin which should be dry to the touch. Rub the fillet generously all around with peanut oil. (At this point the salmon could be served in thin slices as gravlax.) To smoke the salmon, place in the smoker.

6. We use an electric barbecue starter to get the wood chips smoking. Note that an aluminum gutter elbow was fitted to go through the old refrigerator retrofitted as a smoker. This leaves the source of the heat on the outside so that only the smoke enters the refrigerator. With this method the temperature will not exceed 90 degrees (32°C) inside the box.

7. Embed the barbecue starter into the wood chips. Wrap the opening with aluminum foil to contain the smoke and force it through the pipe into the refrigerator. Plug the starter in for 3 minutes. The chips will start smoking after about 1 minute. After 3 minutes of smoke, unplug. The chips will continue to smoke for a few minutes. Let the salmon “rest” (without opening the door) for 1 hour.

8. Repeat the same procedure twice more. This gives a total of 9 minutes of intense smoke and about 3½ hours in the smoker.

9. The salmon in the smoker. Let the slab dry and settle under refrigeration for at least 1 day before slicing. Slice thin on a slant and serve plain with a dash of lemon juice and thin, buttered slices of black bread. The salmon can also be seasoned with capers, olive oil, and ground black pepper.

Boning Out and Filleting Black Bass and Gravlax
(Bar en Gravlax)
Black bass has firm white flesh and is excellent sautéed, poached, or raw in gravlax. This recipe serves 6 to 8.
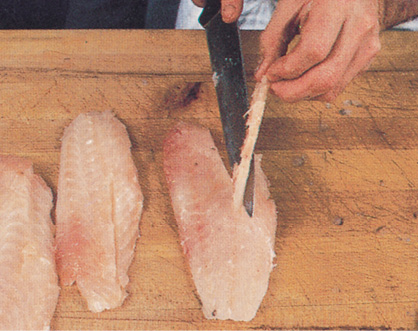
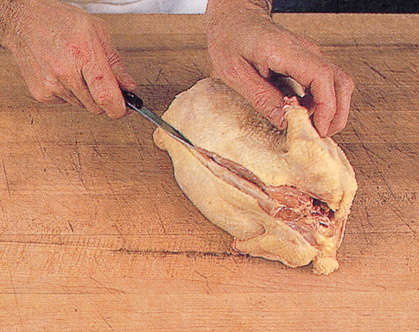
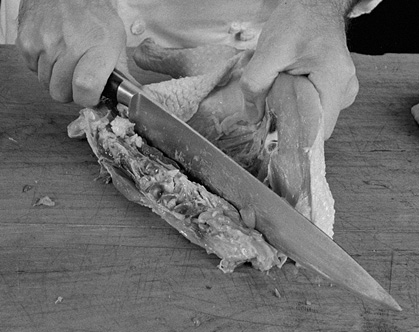
1. To bone the fish, insert a long, sturdy, sharp knife under the gill toward the head. Twist the knife so the blade faces out and, in one swoop, cut down through the rib cage and along the top of the central bone to remove the whole fillet in one piece.

2. Turn the fish on the other side and repeat this procedure to remove the other fillet. You will notice that the line of rib bones is still attached to each of the fillets.

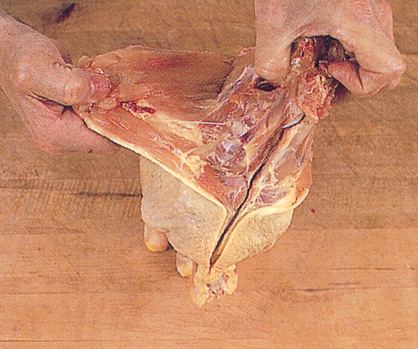
3. Slide the point of your knife under the rib bones on each of the fillets and remove the rib cage bones.
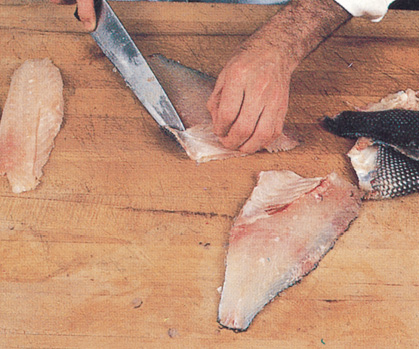
4. To remove the skin, make a cut at the tail end down through the fillet to the skin. Hold the end of the skin with one hand and pull while pushing your knife in the other direction, moving your knife forward in a jigsaw motion with the blade at about a 45-degree angle. The fish fillet will slide off the skin.
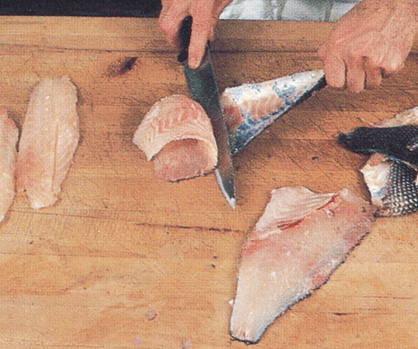
5. Notice that in the center of the fillet, on the side of the head, there is a line of bones about one-third of the way down. Cut a strip down the center to remove those bones. The fillets should be completely free of skin, bones, and sinew. Use as needed or make gravlax.
gravlax (Gravlax)
Although gravlax made with salmon, a fatty fish, will be very moist and rich, it can also be made with waxy, very firm, thinner, white-fleshed fish. Red snapper, black fish, and black bass all work particulary well for this type of gravlax.
Yield: 12 servings as a first course
Curing
1½ tablespoons sugar
2½ tablespoons kosher salt
2 black bass (each weighing about 1½ pounds/680 grams), cleaned (each fillet weighing about 5 to 6 ounces/142 to 170 grams)
Flavoring
1 tablespoon gin
½ teaspoon freshly ground black pepper
1 teaspoon grated lime rind
2 teaspoons chopped fresh mint
1 tablespoon chopped fresh dill
3 tablespoons chopped fresh Italian parsley
1. Mix the sugar and salt together. Place the fillets on a piece of plastic wrap on top of a piece of aluminum foil. Sprinkle the salt and sugar mixture over them, patting it all around the fillets. Wrap in the plastic wrap and aluminum foil, and refrigerate on a tray for 5 to 6 hours to cure. When cured, you will notice that the fillets have absorbed most of the sugar-salt mixture and are firm. Rub the fillets with the gin. Mix the pepper, lime, mint, dill, and parsley together, and pat this over the fillets. Wrap again and refrigerate with a 3- or 4-pound weight on top to press the fish down and make the flesh more compact. Refrigerate for a few hours or overnight.

2. Remove the wrappings and place the fillets flat on the table. Using a long, thin knife, cut on the bias into thin slices about 2 to 3 inches long and the width of the fillet. Each of the slices should be bordered with a thin layer of the green.
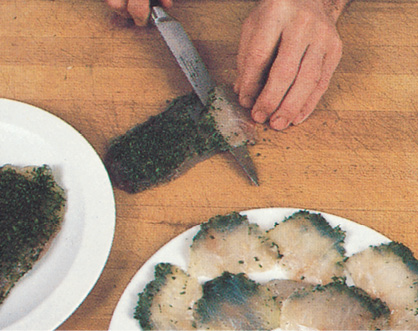
3. Mix together 2 cups (350 grams) diced cucumbers, 2 cups (240 grams) chopped hard-cooked eggs, 1/2 cup (125 grams) sour cream, and ¼ teaspoon each salt and pepper (you should have about 4 cups). Toast 12 bread ovals until nicely browned. Cover each slice with approximately 1/3 cup (75 grams) of the sour cream-cucumber-egg mixture and cover with 3 or 4 slices of cured fish.

4. Arrange on a platter. Notice that the fish should be arranged on the bread so the border of the fish remains on the outside, forming a design. Decorate by placing a piece of parsley, mint, or dill in the center of each and serve as soon as possible.

Preparing Ray or Skate Wings
(Préparation des Ailes de Raies)
Buying a whole skate is not common, as most fish mongers only sell the wings. The ray is excellent poached, sautéed, or grilled. If it is to be grilled or sautéed, as in our Ray Meunière, the skin must be removed prior to cooking. The black skin, especially, tends to be quite tough and is full of needle-like prickers. When it is poached, the skin is left on and removed after cooking. Vinegar is always added to the water to eliminate the sliminess.
RAY MEUNIERE WITH MUSHROOMS
YIELD: 4 servings
2 small rays (each about 1½ pounds/680 grams), whole and not gutted, or
1 large wing (about 2 pounds/907 grams)
¼ teaspoon salt
⅛ teaspoon freshly ground black pepper
⅓ cup (50 grams) all-purpose flour, for dredging
2 tablespoons (28 grams) unsalted butter
2 tablespoons olive oil
4 ounces (180 grams) mushrooms, sliced (about 2 cups)
Dash of salt and freshly ground black pepper
TO FINISH THE DISH
2 tablespoons (28 grams) unsalted butter
1 tablespoon lemon juice
1 tablespoon chopped fresh Italian parsley
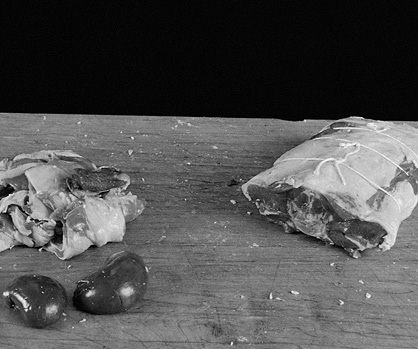
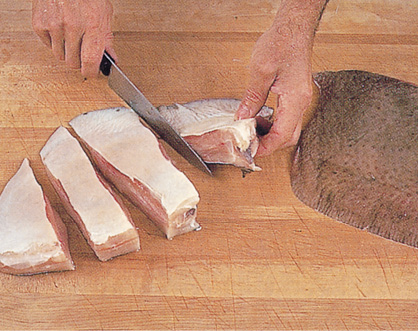
1. The ray on the left is shown on its side with the tough, prickly black skin. On the right, it is turned over to show the white underside of the ray, where the mouth is and the skin is softer and smoother.

2. Cut the wings from the ray by following the bone on each side of the belly. The wings are the edible portion of the fish.

3. A large ray’s wing bought at the market is approximately 1½ inches (3 centimeters) thick and weighs 2 pounds (1 kilogram). Cut the wing into 4 slabs about 5 ounces (141 grams) each. The pieces can now be poached or sautéed.
4. To sauté, use a sharp knife to remove the black skin, holding it with a towel if too prickly.

5. Remove the white skin underneath, using the technique shown to remove skin from fish fillets.

6. Salt and pepper the pieces of ray and dredge with flour, shaking off any excess. Heat the butter and oil in a large, sturdy skillet. When hot, add the ray. Cook over medium to high heat for about 6 minutes on one side, turn, and cook approximately 6 minutes longer on the other side, a total of 12 minutes. It should be cooked through but not overcooked. The meat should separate from the bone when pulled but still be slightly moist and pink in the center.

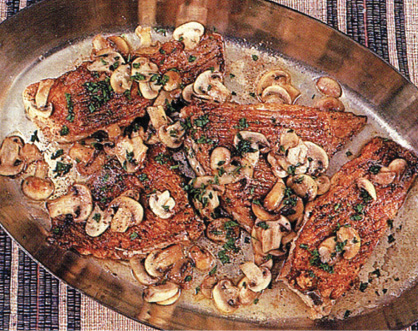
7. Place the cooked ray on a serving platter or, as here, on a copper dish. Add the sliced mushrooms to the drippings in the pan and cook briefly (1 minute), as they should still be firm. Season with a dash of salt and pepper, then lift the mushrooms out of the pan and scatter them on top of the ray. Heat the remaining 2 tablespoons (28 grams) of butter in a clean skillet until it is foamy and brown. Sprinkle the lemon juice on the ray, pour the hot butter on top, garnish with chopped parsley, and serve immediately.
Cleaning Frogs
(Nettoyage des Grenouilles)
As a child, I used to go fishing for frogs with my father and brothers. In France, the green frog is commonly eaten and is about half the size of the bull frog that we use in the United States. The bull frogs are quite large and tender when young. The meat is usually pale beige and plump. If you come across darker-colored meat or stringy-looking flesh, it is likely that the frog is older and will be tough.
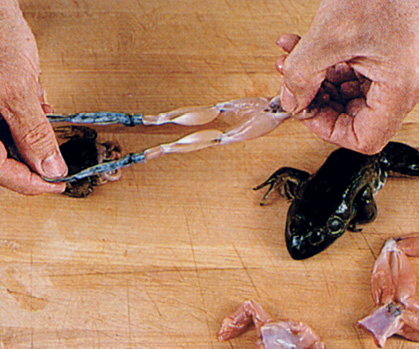
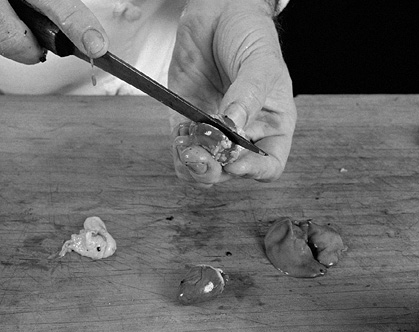
1. Frogs can be caught with a net during the day or at night with the help of a flashlight. Hold the frog by the hind legs and hit its head with a rock to kill it. Using large scissors, cut the dead frog just under the head and front leg. Grasp the skin with one hand and pull it while holding the frog with the other hand. It will peel off easily. With scissors, cut above the feet. With a small frog, only the meaty back legs are used.
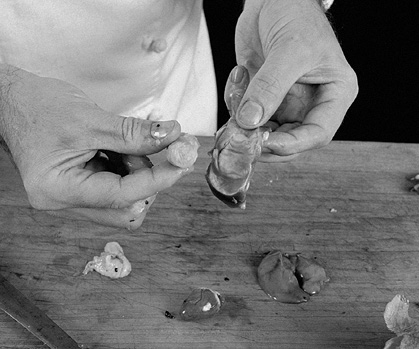
2. With a larger frog, cut the skin on the back and, using both hands, insert your fingers underneath the skin and pull on each side.
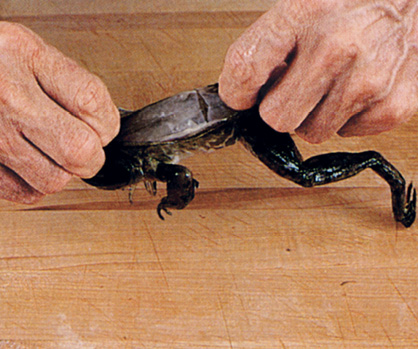
3. With a firm pull, the skin will slide off easily. Cut just below the head at one end and above the feet at the other end. Remove and discard the guts.

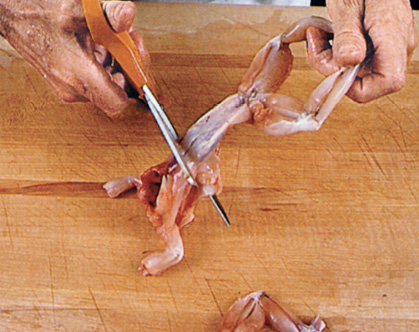
4. Using the scissors, separate the front from the back. For very large frogs, separate the legs. Wash thoroughly under cool water. They can now be sautéed or poached.
Skinning and Cleaning Eel
(Dépouillage et Nettoyage des Anguilles)
Eel used to be a great favorite, not only in the ancient cooking of the Romans but throughout the Middle Ages and practically up to the twentieth century. It is not, however, very commonly served in the United States. Most of the eels caught in this country are sent to Germany, Holland, and Belgium, which are great eel-loving countries.
Eel is one of the best fish to smoke, as it is very fatty and retains the smoke well, while the meat remains very spongy, moist, and tender. If eel is smoked, it is not skinned. When sautéed or stewed, however, it must be skinned. The best eel for this purpose weighs about 1 to 1 ½ pound (450 to 680 grams), at the most. Although a second skin underneath, a fatty layer on top of the flesh, is not always removed, in my opinion removing it greatly improves the taste. The first skin is pulled off and the eel is blanched. This sets the fat layer on top, which can then be scraped off or removed with a knife, and the eel is then sautéed or used in stew.
EEL WITH POTATO MIETTES
YIELD: 6 servings
TO COOK THE EELS
2 eels (1¼ pound each/567 grams)
All-purpose flour
3 tablespoons peanut oil
2 tablespoons (28 grams) unsalted butter
Dash salt
TO COOK THE POTATOES
2 pounds (907 grams) potatoes, (about 6 potatoes)
1 tablespoon (14 grams) unsalted butter
3 tablespoons olive oil
5 scallions, coarsely chopped (about ½ cup/60 grams)
Dash each salt and freshly ground black pepper
TO FINISH
3 tablespoons (42 grams) unsalted butter
1 teaspoon chopped garlic
1 tablespoon red wine vinegar
½ cup (100 grams) chopped fresh sorrel
1. Cut all around the head of the eel just under the side fin to loosen the skin.
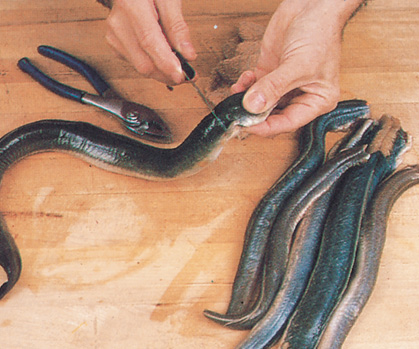
2. Hold the slippery head with a towel. Using pliers, pull the skin, which should come off easily.

3. Cut off the head and, with scissors, cut off the fin on each side.

4. Using a sharp knife, open the belly of the eel from the anus to the head and clean the inside, removing all the guts and blood. Cut each eel into about 5 pieces, each about 4 inches (10 centimeters) long.
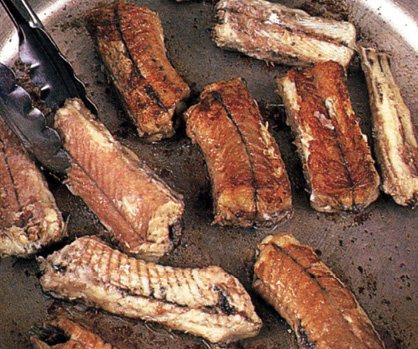
5. Bring 2 quarts of water to boil. Drop the eel pieces into the boiling water, bring it back to the boil, and boil 2 to 3 minutes. Drain the eel in a colander and rinse well under cold water until cold. When cold, peel or scrape off all the black surface, which is mostly fat, until the eel is practically clean of all that second skin and fat.

6. To cook the eels: Dry the eel pieces with a paper towel and sprinkle them with flour, coating well. Divide the oil and butter between 2 large skillets and, when hot, add the floured pieces of eel. Sprinkle lightly with salt and brown over medium to low heat for 7 to 8 minutes, turning the pieces after 3 to 4 minutes to brown evenly. Cover the skillets and set the eel aside to continue cooking and softening in its own heat for another 3 to 4 minutes.
7. For the potatoes: Peel the potatoes, cut into ¼-inch (7-millimeter) slices and then into ¼-inch (7 millimeter) dice. Wash in cold water and drain. Heat the butter and oil in a large skillet, preferably no stick. When hot, add the well-drained potatoes. Sauté over high heat for 12 to 15 minutes, stirring occasionally, until nicely browned and cooked. Add the scallions, sprinkle with a dash of salt and pepper, and continue cooking for 2 to 3 minutes longer.

8. At serving time, arrange the potatoes and scallions on individual plates. Place 1 or 2 pieces of cooked eel on top. Melt the 3 tablespoons (42 grams) butter in a skillet. When foaming but not too hot, add the garlic, cook for a few seconds, and then add the red wine vinegar. Heat through and spoon onto the eel. Sprinkle with the fresh sorrel (or, if not available, another type of herb). (The acidity of the sorrel tends to go well with the richness of the eel.) Serve immediately.

Identifying Caviar
(Caviar: Différentes Sortes)
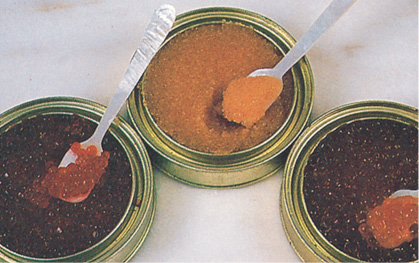
1. The most common types of caviar available. In the top row, from left to right: natural salmon (from the chum), red salmon (from the king), and whitefish caviar. In the bottom row, from left to right: beluga, osetra, sevruga, and pressed caviar. Notice that the black sturgeon caviar is identified by the color on the lid of the can; blue for beluga, yellow for osetra, green for sevruga, and red/purple for pressed caviar.

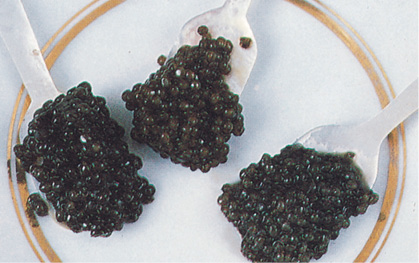
2. The best-quality caviars: from left to right, beluga, osetra, and sevruga. Notice the size and color of the beluga and that the osetra is slightly golden/greenish with a very separated grain. The sevruga grains are smaller and a bit lighter in color.

3. The same three caviars displayed on spoons: from left to right, beluga, osetra, and sevruga. Sometimes the color will change from one fish to another, getting lighter or darker depending on the maturity of the eggs, the time of the year it is fished, the length of time it has been kept, the amount of salt in the brine, how long it has been stirred, and so on.
4. Three other types of caviar: from left to right, the red coho, the whitefish, and the natural, from the chum salmon.
5. Served on a plate with mother-of-pearl spoons: from left to right, the red king, the whitefish, and the natural. Notice that the grains should be whole, soft, and sticking together but not broken.


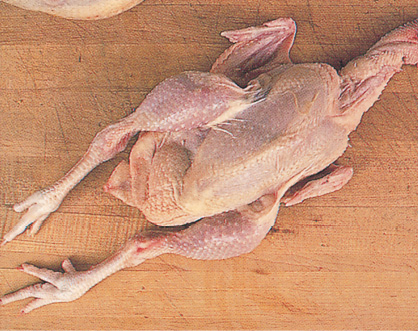
Eviscerating a Chicken or Other Poultry
(Vidage des Volailles)
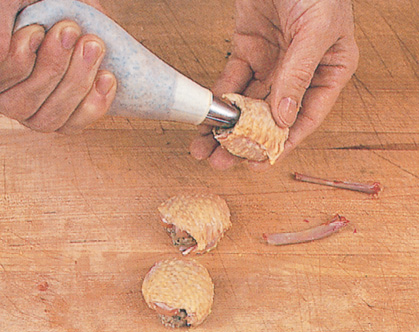
1. The technique used to eviscerate a chicken is the same as that for eviscerating a pheasant, duck, grouse, or even smaller birds such as quail or squab. The feet, which are very gelatinous, are good used in stock. If you use the feet in a stock, the thick scaly skin that covers them should be peeled off. This is easily done if the feet are passed over the flame of a gas range. Roast the feet all around until the skin starts to blister; then, using a towel to prevent burning your hand, rub the skin off. It will come off easily.
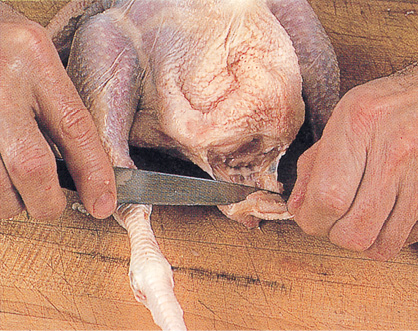
2. For a special presentation, trim each side of the feet, keeping only the center claw with the tip cut off.

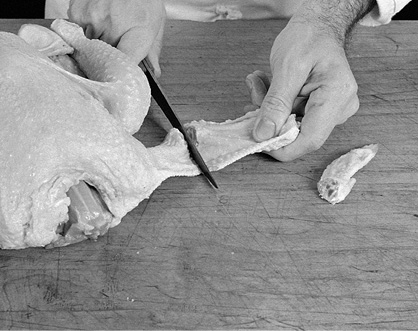
3. For aesthetic reasons, trim the ends of the wing tips and the small protrusion, or nubbin, on the side of each wing tip.

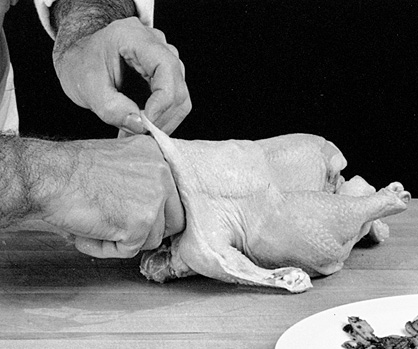
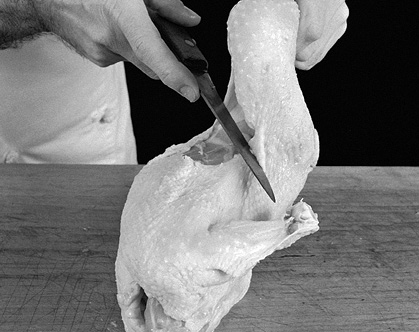
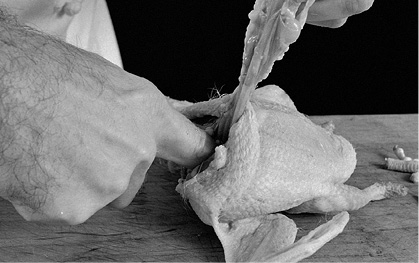
4. Fold the wings as illustrated to hold them in place. To clean out the chicken: Place the chicken on its belly and press the skin of the neck underneath to make it taut on top. Slit the neck skin the length of the neck with a sharp knife.

5. Separate the neck from the skin by pulling with both hands.
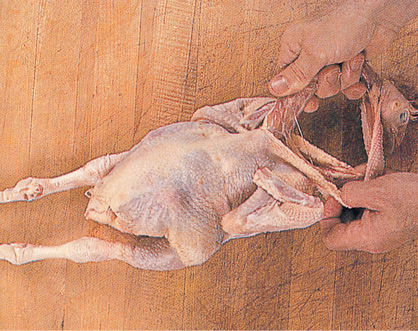
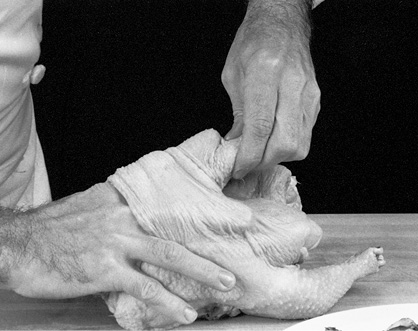
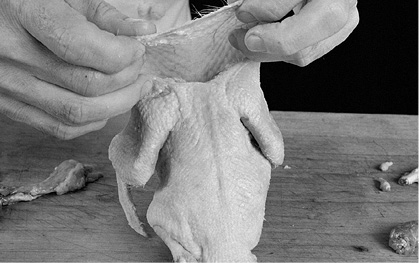
6. Separate the layer of skin from the trachea and baglike crop (which leads to the first stomach) attached to it.

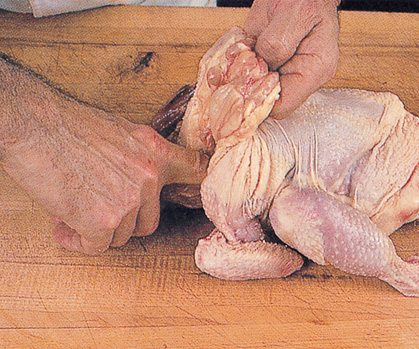
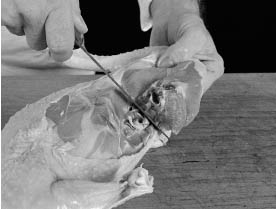
7. Placing the chicken on its back, pull the crop and skin up. Push your finger in along the backbone. On each side of it, run your finger up and down along the rib cage on each side and all around. The object here is to loosen the lungs in the area close to the neck opening.
8. Cut the neck and sac at the opening. Notice how the skin of the neck is nice and clean inside and large enough so that it can be folded back onto the chicken back to cover the whole opening.

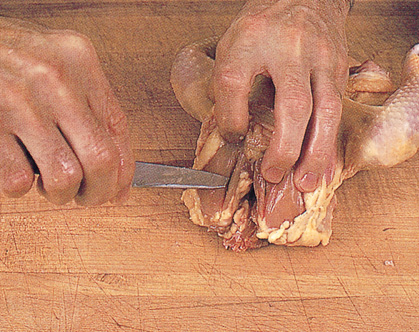
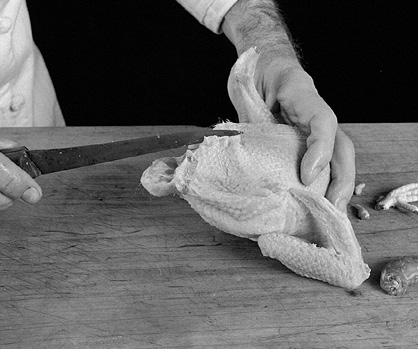
9. With the chicken on its back, cut near the tail to enlarge the opening, cutting away the little round pieces of meat on the tail.
10. Then, using a knife, slit the skin in the center from the tail to the point of the breast, or sternum, to enlarge the opening.
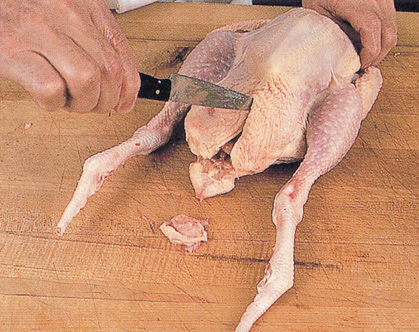
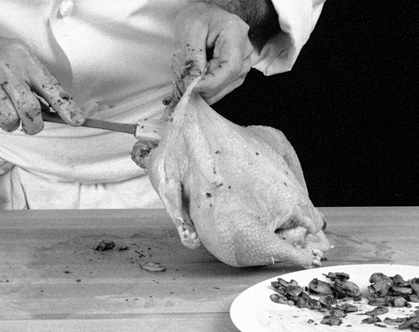
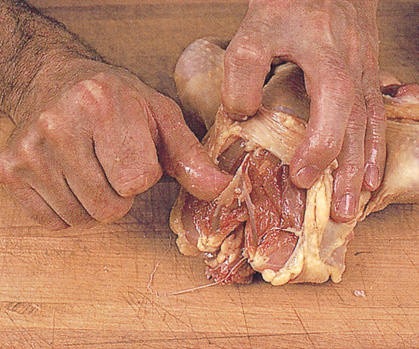
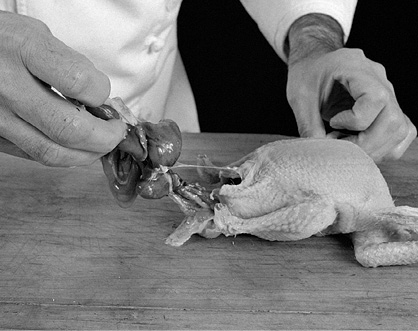
11. Slip your finger inside and remove the 2 large pieces of fat, one on each side of the opening. Loosen completely and pull the entire insides out.
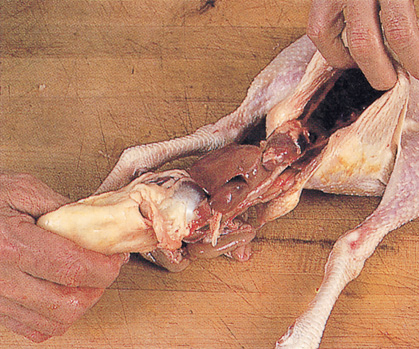
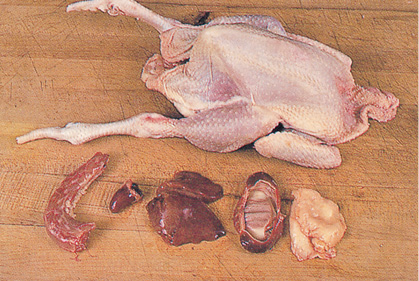
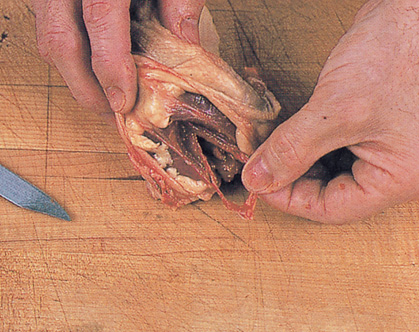
12. If the insides have been properly loosened, they will come out in one piece. To identify these parts, starting at the bottom are the lungs, then the heart and the liver, and, finally, the gizzard, or the second stomach, with the fat around it. Separate these organs to clean.

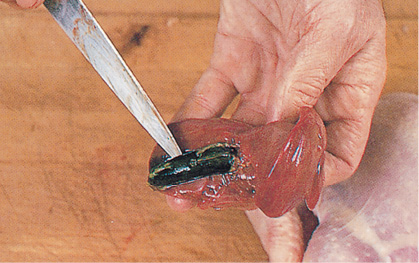
13. Notice that on top of the liver there is a green bag. This is the gallbladder, and the green liquid bile inside is extremely bitter. Cut off the sac without breaking it. If any of the liquid spills on top of the liver, cut away the areas that have been touched by the bile as they will be very bitter. If store-bought livers are green in spots, it means that bile has spilled there, so be sure to remove contaminated areas.
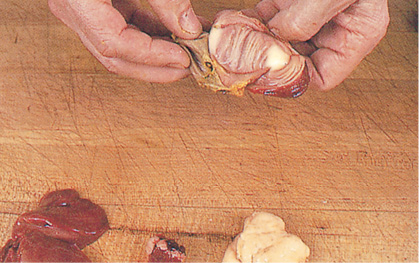
14. Remove the fat around the gizzard and slit it on the fleshier side to open it.

15. Open the gizzard and remove the little sac inside full of gravel. Discard it.
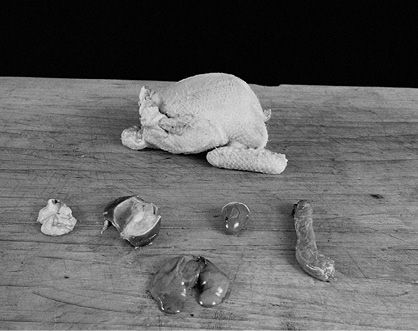
16. The chicken, completely eviscerated. In front, from left to right, the neck, the heart, the liver, the gizzard, and the fat. When you buy a chicken at the supermarket, you should find a package in the cavity with the liver, heart, and gizzard, all cleaned.
Trussing Chicken and Other Poultry
(Bridage du Poulet et Autres Volailles)
Once a bird is properly tied, it will keep its shape, be easier to manipulate and roast evenly throughout without getting dry. The chicken pictured has a mushroom stuffing under the skin, which accounts for the dark color.
METHOD 1
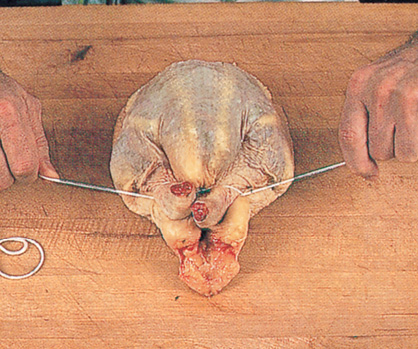
1. Trussing Method 1, without a trussing needle: Be sure to use a fairly thick cotton kitchen twine so it doesn’t cut your fingers or the meat of the chicken. Slide the string under the tail of the chicken and around the tips of the drumsticks. Then cross the string above the chicken.

2. Slide both ends of the string under the tips of the drumsticks to create a Figure 8.

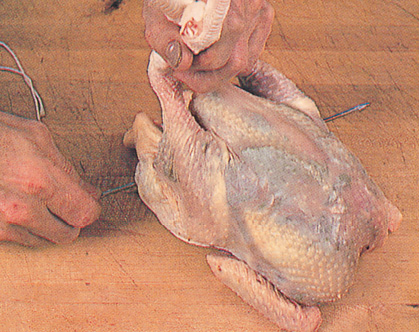
3. Pull the string together, which will tighten and close up the tail opening. Be sure the legs are pushed back snugly against the chicken and the breast is up. Bring the 2 pieces of string around the sides of the chicken until they join at the neck or next to the wing and tighten the string. It should secure the hanging skin of the neck and anchor behind the wing so it doesn’t slide off.
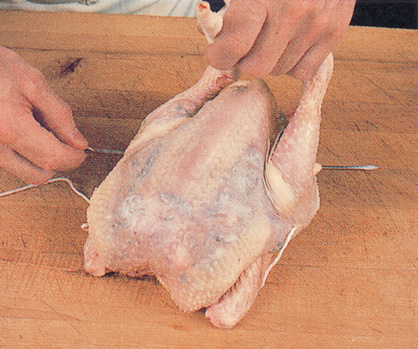
4. Tie a knot, making several loops instead of just one. The object is to make a knot that holds without someone’s finger securing it. Secure further with a second knot. In this trussing technique, notice that the string does not go across the top of the breast of the chicken (which would mark the top and make it less attractive); it should just pass around the tips of the legs and extend along the sides and behind the neck and the wings.

5. Trussing Method 2, with a trussing needle: In the following pictures, the trussing technique actually creates a design like an X with a closed bottom and top. Thread a long, thin trussing needle with string and, starting at the soft spot on the lower part of the thigh near the carcass, push your needle through, coming out on the other side in the middle of the leg between the thigh and the drumstick. Pull through.
6. Place the chicken breast-side down. With the trussing needle and twine, go through the wing, the skin of the neck, and the opposite wing. Pull through.

7. Turn the chicken over again onto its back and push the needle from the center of the leg to the lower part of the thigh on the opposite side, a reverse of what was done in step 6.
8. Be sure that the legs are pressed back against the breast of the chicken, then come across above the leg with the needle and thread. Secure with the same kind of knot used in step 4.

9. Notice that the chicken on the left, with its legs folded, was trussed using the trussing needle, while the chicken on the right was trussed without it.
Tying Chicken (Half-Hitch Technique)
(Ficeler la Volaille)
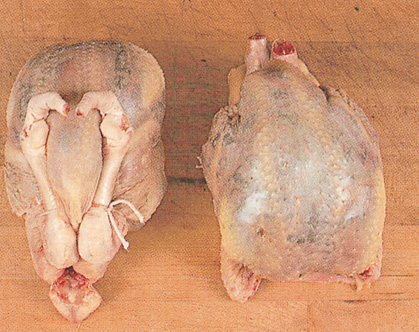
The next four pictures demonstrate how to tie a stuffed, boned chicken using the half-hitch technique. The same technique is used to tie a veal, lamb, or beef roast, as well.
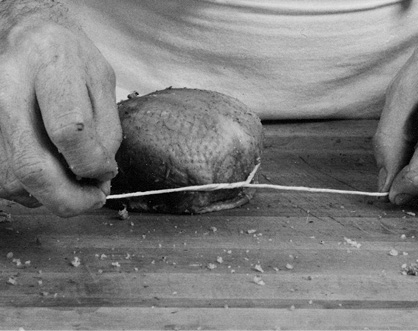
1. Cross the legs of the chicken and attach together with kitchen twine. Tie the twine with a double knot at the drum end of the chicken.
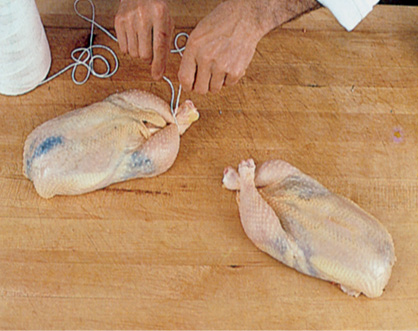
2. Make a loop at the opposite end, then slide it underneath to within 2 inches (5 centimeters) of the drum end and pull to tighten the loop (called the half-hitch).

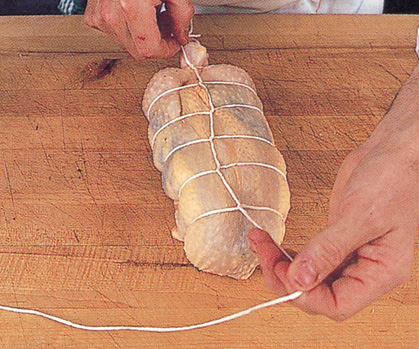
3. Repeat the loops down the whole length of the chicken.
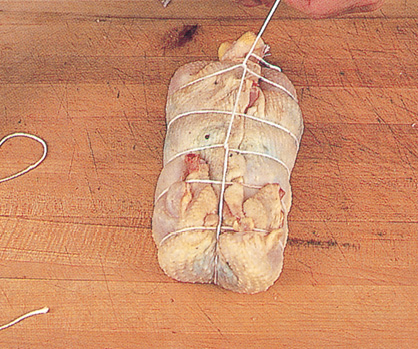
4. When the chicken is secure on top, roll it gently until it is back-side up, and secure it on the back also. Make a loop around each crossing of the twine so it looks the same on the bottom as the top. Finish by tying the twine at the crossing of the legs where the tying began. Notice that the skin on the back is overlapping to hold the stuffing inside.
Chicken Stuffed under the Skin
(Poulet Farci sous la Peau)
Stuffing a chicken between the skin and the flesh not only flavors the bird but keeps it moist as well.
YIELD: 4 to 6 servings
Stuffing
1½ tablespoons olive oil
12 ounces mushrooms (about 3 cups
loose/345 grams), sliced
½ teaspoon salt
¼ teaspoon freshly ground black pepper
1 tablespoon chopped Italian parsley
2 cloves garlic, peeled, crushed and chopped fine (1 teaspoon)
1 3½-pound (1.6-kilogram) roasting chicken
1 tablespoon (14 grams) soft unsalted butter
Sauce
2 tablespoons finely chopped onion
2 to 3 cloves garlic, peeled, crushed and chopped (1 teaspoon)
2 cups (300 grams) fresh, coarsely chopped tomatoes (peeled and seeded)
Salt and freshly ground black pepper to taste
½ cup (75 grams) oil-cured pitted olives
1 tablespoon chopped Italian parsley or other fresh herbs (chives, tarragon, etc.)
1. Heat the oil in a saucepan, add the mushrooms, salt, and pepper. Cook on medium heat for 4 to 5 minutes, until the liquid given off by the mushrooms has evaporated. Add the parsley and garlic and mix well. Set aside and let cool. Preheat the oven to 400 degrees (204°C). Remove the wishbone from the chicken (see page 266, step 1) and slide your finger between the flesh and the skin to loosen the skin from the breast.
2. Keep pushing your fingers between the skin and the flesh to separate the leg meat from the skin. Slowly loosen the skin all around the chicken except along its back.
3. Lift the skin from the flesh and using a spoon or a spatula push the seasoned mushrooms inside.
4. Press the chicken back into shape and truss with or without a trussing needle. See trussing techniques, page 256.

5. Rub the skin of the chicken with softened butter, sprinkle lightly with salt and pepper and place the chicken on its side in a roasting pan or skillet. Roast for 1 hour, turning from side to side after the first 25 minutes and finally placing it on its back during the last 10 to 15 minutes of cooking. Baste every 5 minutes during the last 10 to 15 minutes of cooking.

6. Lift the chicken from the roasting pan, trim the ends of the drumsticks and keep the chicken warm on a platter, uncovered, in a 160-degree (70°C) oven. Pour out most of the clear fat in the roasting pan; add the onions and sauté for 1 to 2 minutes on medium heat. Add the garlic and mix for a few seconds, then the tomatoes. Bring to a boil and simmer gently, stirring with a wooden spatula to melt the solidified juices. Season the sauce with salt and pepper. At serving time, pour the sauce on top and around the chicken, sprinkle with the olives and the herbs, and serve immediately. The chicken can be carved in the dining room or cut into portions in the kitchen and arranged on plates with the olives, sauce, and herbs. The olives are not added to the dish prior to serving because they tend to blacken the sauce and make it taste bitter.


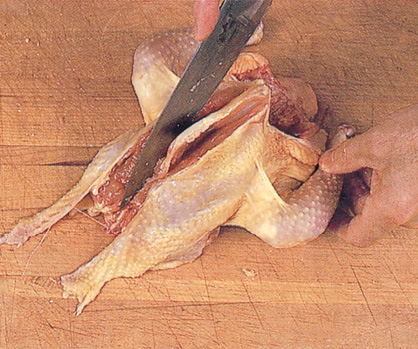
Preparing Chicken for Broiling
(Poulet pour Griller)
Chickens that are to be broiled or grilled should be cut in the way that offers maximum surface to the heat.
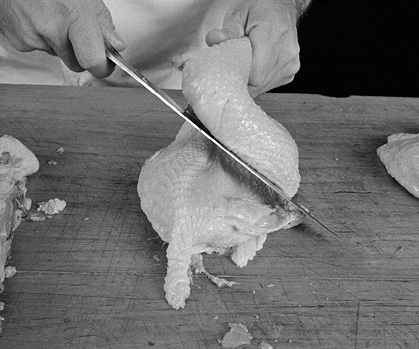
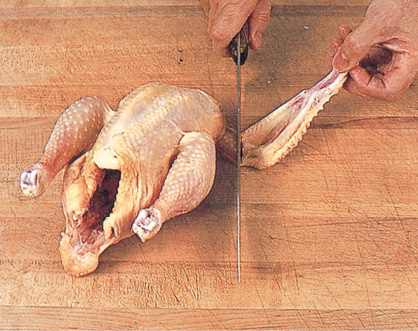
1. Holding the chicken on its side, cut through the backbone on one side of the neck with a sturdy sharp knife.
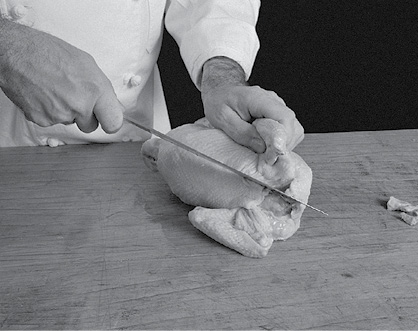
2. Pull the chicken open and
3. separate the backbone by cutting on the other side of the neck bone down to the tail. Reserve the pieces of bone for stock.

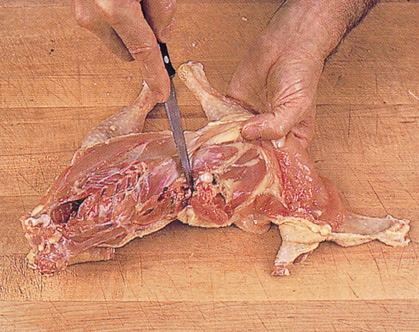
4. Remove the shoulder bones that stick up by cutting at the joint.

5. Remove the rib cage on each side.

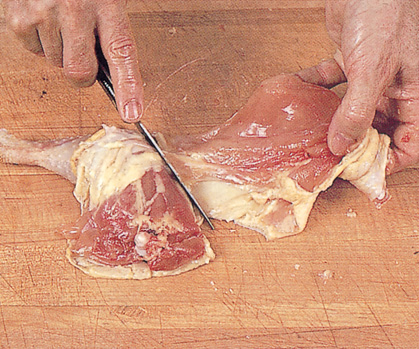
6. Using a meat pounder, flatten the chicken.

7. Make an incision at the joint which separates the thigh from the drumstick. This helps the chicken cook evenly (the thickest part of the leg would otherwise take longer to cook).

8. Cut a hole through the skin between the point where the breast and thigh meet.

9. Push the tip of the drumstick

10. through the hole to secure the leg.
11. Chicken ready to cook. Preheat the oven to 450 degrees (232°C). Sprinkle with salt and pepper and brush with olive oil or softened butter before cooking. Cook skin-side up. For chicken grillé à la diable, bake the chicken—a 3- to 3½-pound (1.4- to 1.6-kilogram) roaster won’t take more than 35 minutes—then coat with mustard and bread crumbs and finish under the broiler.

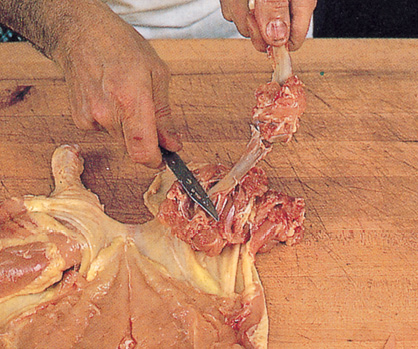
Boning a Chicken in One Piece
(Désossage Galantine)
1. Cut the chicken wings, leaving only the first joint at the shoulder. Keep the trimmings for stock. Lift up the skin by the neck and slide a small, sharp paring knife along each side of the wishbone, which forms a pointed triangle. Using your thumb and forefinger, push the bone out, prying at the point where the bone is held in the sternum, or breastbone.

2. Place the chicken on its side and make an incision through the skin on the back from the neck to the tail.
3. With the chicken on its side, lift up the skin at the shoulder joint. Move the wing and you will notice that there is a joint there. Place your knife where the joint is and cut, wiggling the knife so it cuts through the joint. Repeat on the other side at the shoulder.

4. Hold the chicken carcass securely through the bone of the shoulder, with the thumb and forefinger of one hand; take hold of the wing at the joint with the other hand and pull. The meat will come off the bone on the whole side of the carcass in the back down to the oyster of meat. Repeat on the other side.
5. The meat is still attached to the bone at the breastbone. Place two fingers on each side of the bone and pull down. The chicken is now completely free from the top and is holding only at the joint of the leg.

6. With the chicken on its side, cut through the little oyster of meat up to the joint of the hip.
7. Open up the leg and crack at the joint of the hip, then cut through the joint to sever the large sinew. Now pull the leg free from the carcass.

8. Repeat on the other side and, finally, pull the whole carcass free of the meat.
9. The only things left attached to the carcass are the fillets on each side of the breastbone. Slide your thumb or finger underneath and pull them off.
10. Holding one of the fillets flat on the table, with a knife scrape the meat free from the sinew that runs through the fillet, pushing the meat off so the sinew comes out in one place. Repeat with the other fillet.

11. To remove the leg bone, cut around the tip of the thigh bone so it can be held. Holding the blade of the knife perpendicular to the bone, start scraping the meat down off the bone until you get down to the joint. Cut around the joint with the knife and, again, scrape the bone of the drumstick down to the tip of the leg.
12. Break the bone at the end from the inside so the outside skin is not torn and the knuckle at the end of the drumstick is left intact. (This end knuckle will be trimmed off after cooking because the meat would shrink if cut before cooking.)
13. To remove the wing bones, cut around the joints where they are held and pull the bones off.

14. Place the two fillets on the skin where there is no meat. Most of the surface should be lined with meat. Roast, poach, or stuff as needed.
Chicken Sausage
(Poulet en Saucisse)
A galantine is a boned bird, usually a duck or chicken, filled with a forcemeat mixture and alternate layers of liver, truffles, and the like. The boned, stuffed bird is poached in broth, cooled off and served with its own aspic. A ballottine is essentially the same except the stuffed bird is roasted instead of poached and served hot with a sauce. A simplified version, the poulet en saucisse, is not quite a galantine or a ballottine, but it partakes of both.
1 boned-out chicken, pages 266
THE POACHING BROTH
Wings, bones, neck, and gizzard from chicken
1 carrot, peeled and coarsely sliced
1 onion, peeled and coarsely sliced
1 celery rib, coarsely sliced
2 bay leaves
¼ teaspoon dried thyme
½ teaspoon salt
Place the wing pieces, bones, neck, and gizzard in a kettle, cover with cold water and add the remaining ingredients. Bring to a boil and simmer for 1½ hours.
STUFFING AND COOKING
2 tablespoons (28 grams) unsalted butter
½ cup chopped onion
5 ounces (142 grams) mushrooms, chopped fine (1½ cups)
1½ teaspoons salt teaspoon freshly ground white pepper
2 large chicken livers
Same amount or weight of chicken fat as of chicken livers (lumps from inside the bird)
8 ounces (227 grams) ground pork
1 tablespoon sherry
Melt the butter in a saucepan, add the onion, and sauté for 1 minute. Add the mushrooms, salt, and pepper. Cook until all the liquid is evaporated from the mushrooms and the mixture starts to stick in the pan (about 5 minutes). Set aside and let cool. Cut the livers and chicken fat in small pieces. Place in a food processor and process until smooth. Add the ground pork and sherry. All ingredients should be well blended and the mixture should be smooth.
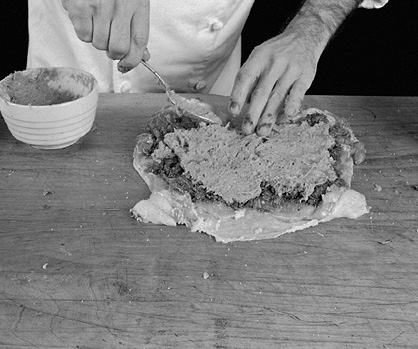
1. Spread the purée of mushrooms evenly on the meat.

2. Then place the liver mixture on top, spreading it with wet fingers. (Wet your fingers by dipping them into cold water.)
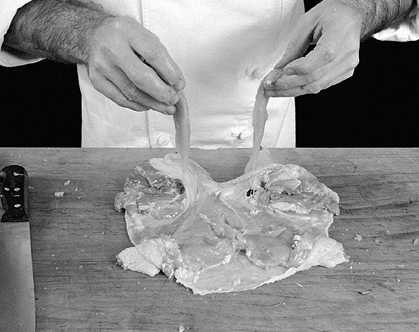
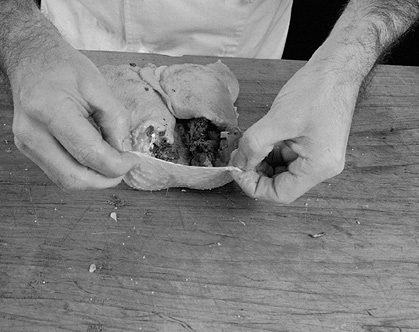
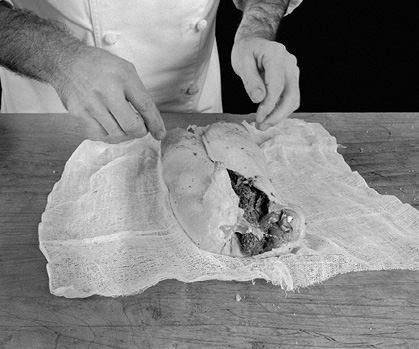
3. Bring both sides of the skin toward the center.

4. Pull the skin of the neck to enclose the stuffing.
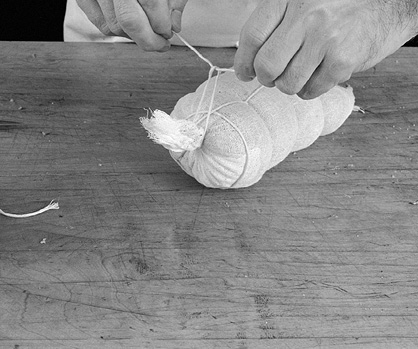
5. At this point the chicken can be trussed, as explained on page 256, or poached for a galantine, which follows. Place the chicken on a piece of cheesecloth and
6. wrap carefully. Tie with a string and secure both ends, using the half-hitch technique, as explained on pages 259.
7. Using 2 tablespoons olive oil, brown the chicken (it will brown through the cheesecloth) in a large skillet on medium to low heat. It will take about 20 minutes.

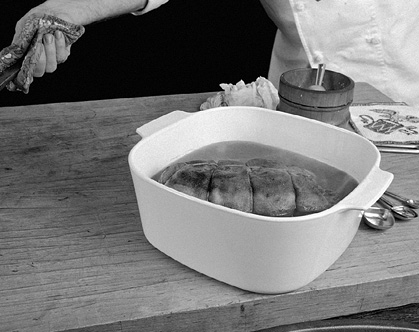
8. Strain the prepared poaching broth. You should have 5 to 6 cups (1.2 to 1.4 liters) If you don’t, add water as necessary. Place the browned bird in a deep casserole and pour the stock on top. It should come almost to the top of the bird.
9. Bring to a boil, lower the heat and simmer slowly, just below the boil, for 1½ hours. Let the chicken cool in the stock, overnight if possible. Remove from stock

10. and unwrap.

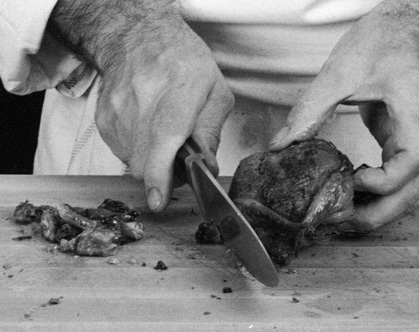
11. Trim the meat around the drumstick bone and pull the drum up.

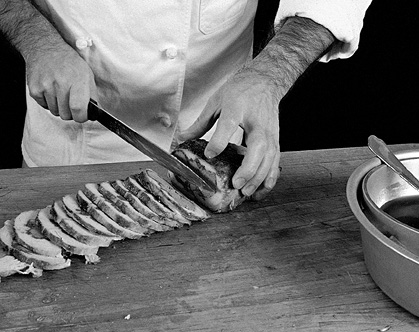
12. Strain the cold stock through a fine sieve to remove the fat. Bring to a boil and reduce over medium heat until you have about 1¼ cups (296 milliliters) left. It should be reduced enough to make a concentrated natural aspic. Place the reduced stock on ice and mix while cooling. Cut the “sausage” into ½-inch (13-millimeter) slices.
13. Arrange on a large tray and coat with the aspic when it is oily and almost set. Place paper frills on the legbones.
Preparing Chicken for Stews
(Poulet pour Sauter)
There are literally hundreds of recipes that call for cut-up chicken. Chicken can be cut “off the bone” (the backbone) or cooked with the bone in.
OFF THE BONE
1. A chicken can be cut off the bone into quarters (2 legs and 2 single breasts), into 5 pieces (2 legs, 2 wings, 1 whole breast), or into 7 pieces, if the chicken is large enough (about 3½ pounds/1.6 kilograms), by separating the legs into thighs and drumsticks. Begin by cutting the wing at the second joint, leaving only the first section attached to the chicken.
2. Place the chicken on its side and, with a small sharp knife, cut the skin all around the leg.
3. Open the leg to expose the joint where the thigh is attached to the body. Cut through the joint.
4. Holding the chicken firmly with one hand, pull the leg until it separates from the body.
5. Cut off the tip of the drumstick and

6. push down on the meat to expose the bone. Separate the thigh and drumstick at the joint. Cut the other leg in the same manner.
7. With the chicken on its side, pull back the wing. With your knife, find the joint where the wing is attached to the body and cut through with the point of your knife.
8. Cut down along the breast so part of the white meat is attached to the wing.
9. Then, holding the chicken firmly with one hand, pull the breast section out. Repeat on the other side.
10. Trim the end bone of the wings.
11. Separate the breast (in fact, the sternum; bréchet in French) from the carcass. Use the carcass, neck, and tip of bones for stock or sauces.
12. Chicken ready to sauté.
BONE IN
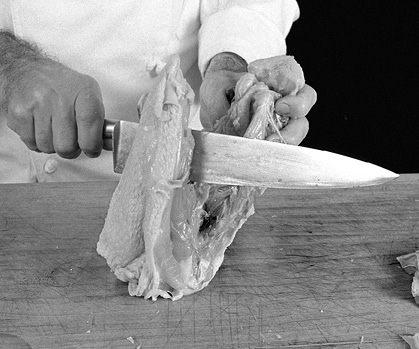
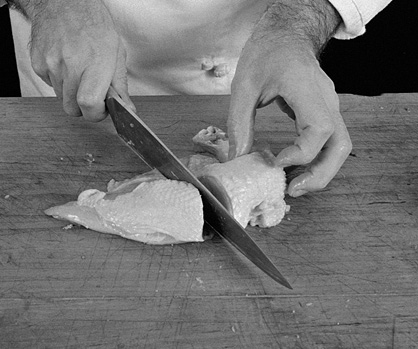
1. Remove the first joint of both wings. Then, with a heavy knife, cut through the center of the breast and through the back on one side of the backbone to separate the chicken into halves.

2. Remove the backbone and tail from the half it is attached to.
3. Separate the leg from the wing, going right through the bones with the large knife.
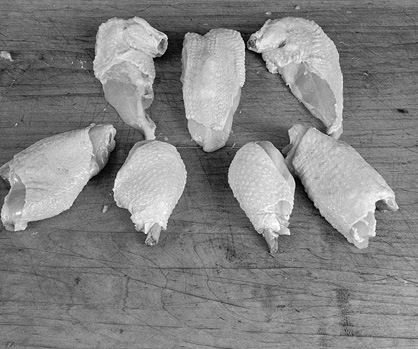
4. Cut each breast and leg into halves.
5. Chicken ready for stewing or frying.

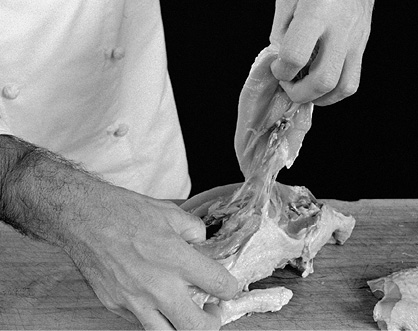
Stuffing Chicken Wings
(Farçir l’Aile de Poulet)
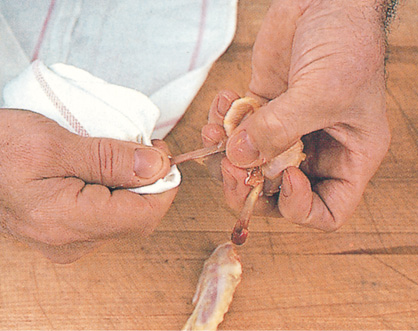
1. Cut the chicken wings above the wing tip joints on one side and above the joint at the other end, keeping only the middle segment. The object is to loosen the bones so they can be pulled out.

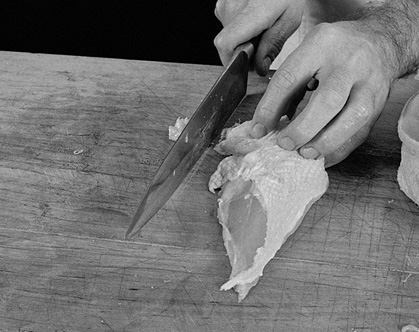
2. Trim off the strips of fatty skin that run along either side of the wing. It tends to be tough. (The trimmings can be frozen to use in stock or soup.)

3. Using a towel for a better grip, pull out the 2 bones; they should come out easily now that the wings have been cut at both ends.
4. To stuff 12 to 16 wings: Place the 5 ounces (110 grams) of chicken meat, 2 ounces (56 grams) chicken fat, 1/4 cup (15 grams) parsley, a dash of nutmeg, and 1 teaspoon salt in the bowl of a food processor and process for 15 to 25 seconds, until well blended. Place the mixture in a pastry bag fitted with a ½-inch (13-millimeter) plain tip and stuff the wings until they take on a roundish, balloon shape. Don’t worry if the stuffing is still visible. In a saucepan, cover the wings with cold water, bring to a boil, and cook at a gentle simmer for 30 minutes. Use as needed in consommé or stew.
Boning Out and Stuffing Chicken Breasts
(Désossage et Farçir de la Poitrine de Volaille)
1. Cut off each wing close to the shoulder joint, leaving only a tiny piece of bone on the body for looks. The wings can be used in stew or stock.
2. Slide a knife along each side of the wishbone. Insert your thumb and finger to loosen the wishbone and pry it loose.
3. Slide your thumb behind the wishbone and pull it out.
4. Cut along the breastbone on each side, slicing the skin of the neck in half. The object here is to divide the chicken in half and keep the longest possible pieces of skin. Place the chicken on its side and cut the skin alongside the backbone.
5. Lift up the skin at the shoulder joint and place your knife on the joint where the wing is attached to the body. (You can find out where the joint socket is by moving the little piece of wing tip that remains.) Cut right through the joint of the shoulder.

6. Grab the joint of the shoulder and the wing stump and pull, holding the carcass flat on the table with one hand and pulling with the other until the meat comes off the bone as far as the thigh joint. Remove the little oyster of meat near the back and break the leg-thigh at the joint, which will open. Cut through the joint (there is a large sinew there) and pull this half of the chicken completely loose.
7. Separate the leg from the breast, being sure to cut the skin so that more of the skin stays on the breast than the leg. Repeat with the other side of the chicken. The only pieces of meat left now are the little fillets still attached to the breast. Slide your finger behind the fillets and pull them off the carcass on both sides. Remove the sinew from the fillets. Remove as much skin from the breast as you like and use as needed.
8. Lift up the skin of the breast all around, using the point of the knife if necessary, so the skin is completely loosened except where it is attached at the wing stub. If there is a lot of fat on the inside of the skin, scrape more of it off with the flat edge of the knife blade.

9. Place the chicken breast skin-side up on the work surface, pull back the skin, and spoon about ½ cup (115 grams) of your favorite mousse on top of each breast. Arrange a piece of fillet meat on one side of each of the breast, pressing it into the mousse.

10. Bring the skin back on top of the mousse, so it encases the whole surface.

11. Hold the stuffed breast skin-side down in the palm of one hand and try to bring the edges of the skin around to the underside of the breasts. The skin will not wrap all around. Repeat with each breast. Refrigerate, skin-side down, covered, until ready to cook.

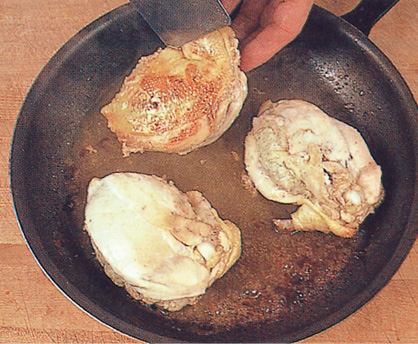
12. To sauté the chicken breast, sprinkle the chicken with ½ teaspoon salt and heat 1 tablespoon (14 grams) unsalted butter each in 2 skillets, preferably non-stick. When hot, add the chicken skin-side down, and sauté for about 4 minutes over high heat. Cover, reduce the heat, and cook gently for 10 minutes. Note that the chicken is cooked only skin-side down so the meat doesn’t toughen. Remove the cover from the chicken and continue cooking until the juices are reduced and the chicken is sizzling again in the fat. The chicken should be nicely browned. Remove to a platter. Remove the fat and deglaze the pan with ½ cup of brown stock. Bring to a boil, strain, and serve with the chicken.
Chicken with Morels
(Poulet aux Morilles)
Morels are wild mushrooms that can be found along the edges of the woods and on hillsides in early spring. Fresh-picked morels are toxic eaten raw in salad but fine when cooked. They are also perfectly safe after they have been dried, which is the way they are usually bought in specialty stores. Dry morels are very expensive but one ounce goes quite a long way. Use the tiny, pointed black-headed type, which is the best morel.
YIELD: 4 to 6 servings
1 ounce (28 grams) dried morel mushrooms
1 3½-pound (1.6-kilogram) chicken
½ teaspoon salt
¼ teaspoon freshly ground black pepper
2 tablespoons (28 grams) unsalted butter
½ cup (118 milliliters) dry white wine
6 shallots, peeled and finely sliced
(2 tablespoons)
⅓ cup (79 milliliters) dry sherry
½ cup (118 milliliters) heavy cream
Small cube glace de viande (optional)
1. One ounce of tiny dried black-headed morels.

2. Soak the morels in 2 cups of tepid water for at least 15 to 20 minutes. If they are whole, split them in half lengthwise to dispose of the sand. The inside is like a hollow furrow. Cut the tips off the stems.

3. Lift the morels gently out of the water so as not to take the sand with them. Drain and press gently to extrude some of the water. Pour the soaking water slowly from the bowl as there will be sand at the bottom of it. Reserve the soaking liquid (stock) for the sauce.

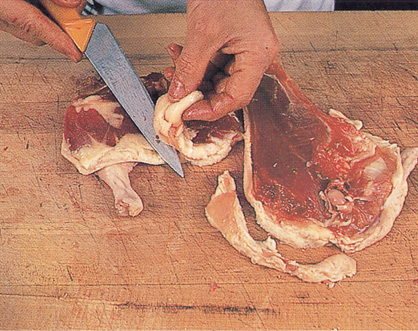
4. Cut the legs from the chicken and separate into drums and thighs. Pull the skin off the meat. Remove the wishbone from the breast. Cut at the shoulder joint (arrow) and along the breastbone (arrow). Pull the breast meat off in one piece. Repeat on the other side.

5. Remove the skin from the breast. Trim the wings. (Use the carcass, trimmings, etc., to make a stock for future use.) Cut each individual breast into 2 pieces. You now have 8 pieces of chicken with all fat and visible skin removed. Sprinkle the chicken pieces with salt and pepper.

6. Melt the butter in a skillet. When foaming, place the pieces of chicken in it. Gently sauté on medium heat for 4 minutes. The chicken should be browned lightly, but a crust shouldn’t form on the flesh. After about 2 minutes on one side, turn and brown 2 minutes on the other side. The butter should be foaming nicely, but not burning. Add the white wine, cover and simmer another 2 minutes, then remove the lower 2 pieces of the breasts. These boneless pieces of white meat will be cooked first. After another 2 minutes, remove the other 2 pieces of white meat where the wing is attached. Leave the dark meat simmering gently for another 5 to 6 minutes, then remove and set aside with the breast meat. Add the shallots to the pan drippings and cook for about 1 minute. Add the sherry, morels, and reserved soaking liquid, bring to a boil and reduce to simmer on high heat for 6 to 8 minutes, or until the mixture is reduced by three quarters.

7. Add the cream. Bring to a boil and cook for about 1 minute on high heat. The sauce should be glossy and should just coat a spoon. Add salt and pepper to taste and a small cube of glace de viande, page 27, if you have any. Pour over the chicken and serve immediately. This is an elegant dish, ideal as a main course for a dinner served with braised endives or potatoes and green vegetables.

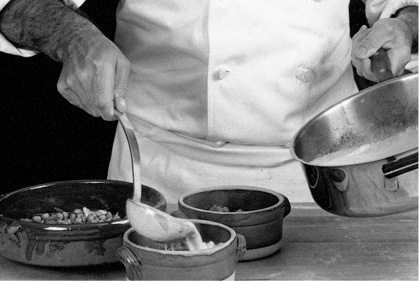
Chicken Pie
(Fricassée de Poulet en Feuilletage)
Chicken pie is a stew made of boned chicken combined with a vegetable garnish and a cream sauce and topped with puff paste. It is then baked.
Braising the Chicken
1 3½-pound (1.6-kilogram) chicken, quartered
Salt and freshly ground black pepper
½ cup (75 grams) thinly sliced onions
1 bay leaf
1 pinch dried thyme leaves
1 cup (237 milliliters) dry white wine
1 cup (237 milliliters) chicken stock
Garnishes
2 carrots, peeled and cut into 2-inch (5-centimeter) chunks, split into ¼-inch (6-millimeter)-thick sticks, blanched 3 to 4 minutes in boiling water and drained
½ cup (62 grams) fresh or frozen baby peas, blanched 30 seconds in boiling water and drained
1 or 2 stalks celery, peeled, cut into 2-inch (5-centimeter) chunks and then into ¼-inch (6-millimeter) sticks, blanched 1 minute in boiling water and drained
12 pearl onions, peeled and blanched 3 minutes in boiling water and drained
1 cup (150 grams) fresh snow peas, cleaned, blanched 1 minute in boiling water and drained (Note: The vegetables can, of course, be varied at will.)
Sauce
1 teaspoon (5 grams) unsalted butter
1 teaspoon all-purpose flour
¾ cup (178 milliliters) heavy cream
Salt and freshly ground black pepper to taste
Crust
1 pound (454 grams) of puff paste, page 590
2 large egg yolks, beaten, for the wash
1. Sprinkle the chicken with salt and pepper. Brown in a saucepan, skin-side down, without fat on medium heat for 8 to 10 minutes. There is enough fat in the skin to brown the pieces without adding extra fat. Add the onions, bay leaf, thyme, wine, and stock to the chicken. Cover and simmer for 25 minutes. Remove from heat and, when cool enough to handle, remove the skin and take the meat off the bones. Cut the meat into 1- to 2-inch (2.5- to 5-centimeter) chunks.

2. For the sauce: Knead the butter and flour together (a beurre manié) and, using a whisk, whip the mixture into the juices vigorously. Bring the sauce to a boil, stirring, and simmer for 1 minute. Add the cream, bring to a boil again, taste for seasonings, and add salt and pepper if needed. Divide the meat and all the vegetable garnish among 6 crocks and pour the sauce over them. The crocks should not be more than two-thirds full.
3. Roll the puff paste dough into 1/8-inch (3-millimeter) thick rounds large enough to cover the top of the crocks andpartway down the sides of the crocks. Brush them with the egg yolk.
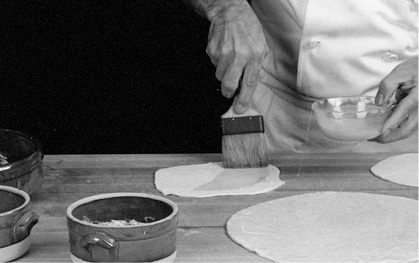
4. Place the dough on top of the crocks, egg-washed side down. Be sure to stretch the dough on top of the crock so it does not sink in the center. Press to assure that the dough adheres firmly to the sides of the dish.

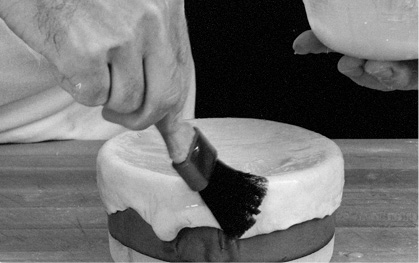
5. Brush the top and sides of the dough with egg yolk. Refrigerate for 1 hour, or place in the freezer for 15 to 20 minutes to firm up the dough.
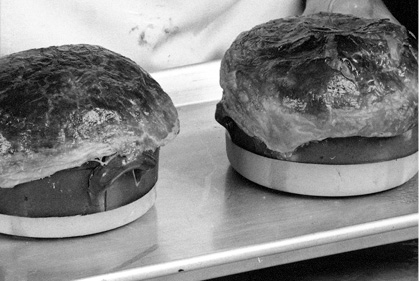
6. Preheat the oven to 375 degrees (191°C). Place the crocks on a cookie sheet and bake for 30 minutes. Serve immediately, one crock per person. Or, make one large pie for several people. For a large pie, make a hole in the crust and serve the stew from the crock, with a piece of puff paste and some vegetables in each portion. The chicken pie is a complete main course with crust, vegetables, meat, and sauce.
Cleaning Squab and Other Poultry
(Préparation du Pigeon et Autres Volailles)
A squab is a young domesticated pigeon, about 4 weeks old, which has not yet flown and has been specially fed to be plump and tender. An older pigeon is tougher and should be braised, but a dove (which is a wild species of pigeon) is quite tender.
Cleaning squab is similar to eviscerating a chicken, as shown on page 252.
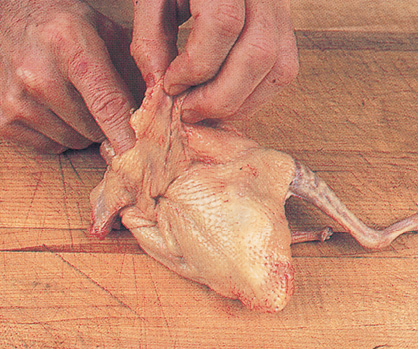
1. Cut the feet off the squab just under the joint. Holding it on its back, cut the tips sticking out at the first joint of each wing. This is primarily for aesthetics.

2. Holding the skin tightly squeezed around the neck, make a long incision to expose the bone.
3. Separate the neck from the skin and crop (the loose baglike first stomach) by pulling with both hands.
4. Cut the neck at the base, near the body, and the skin next to the head. Separate the neck from the head.
5. Pull out the crop and the viscera from the skin of the neck.
6. Lifting up the crop and viscera in the direction opposite the backbone, slide one finger underneath the crop. Slide the finger along and on each side of the backbone to loosen the guts and lungs.
7. Sever the crop near the opening and fold the neck skin onto the back of the bird.
8. Cut a piece from the opening above the tail and

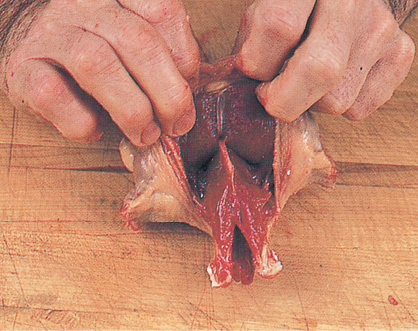
9. slit the skin open to the tip of the breastbone.
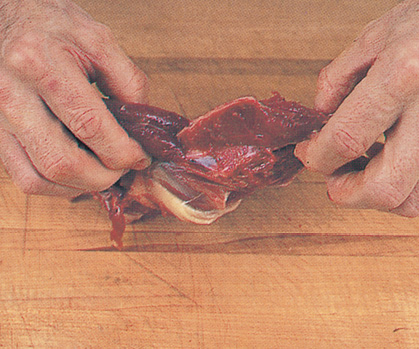
10. Pull the insides out. All the entrails should come out easily in one long piece.
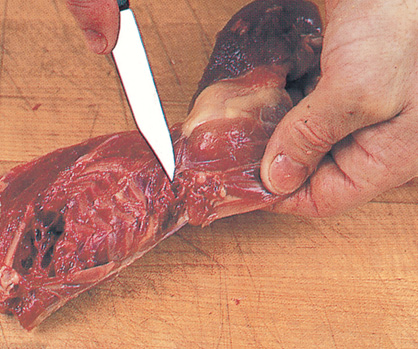
11. Reserve the little lumps of fat on each side of the opening. Separate the heart and the liver. (Squab liver does not contain a gallbladder, although most other poultry does.) Slit the gizzard (the second stomach) on the thick and fleshy side until you feel the inside which is harder.
12. Open it and remove the pouch inside the gizzard.
13. Make a hole on each side of the opening and slide the tip of the drumstick inside to hold the leg.

14. Squab, oven ready. From left to right: fat, cleaned gizzard, heart, and neck. (The liver is in front.)
Boned Stuffed Squab
(Pigeons Désossés et Farcis)
The squab is a good transition between regular poultry and real game, such as pheasant, woodcock, etc. It is dark meat and though it doesn’t have a gamey taste, it is probably as close as you can get to game if you have never had it. Squab liver, unlike other poultry livers, does not have a gallbladder (the little green sac filled up with bile that is removed from the liver). Squabs generally weigh between 10 and 18 ounces (283 to 510 grams). The squabs shown here weighed 1 pound (454 grams) each, cleaned. It is easier to eat the squabs if they are boned, particularly if you are going to stuff them. The same instructions for boning squab also apply to cornish hens and other small birds.
YIELD: 6 servings
6 squab (about 1 pound/454 grams each), eviscerated (boned and cleaned)
Stock
Carcasses, necks, gizzards, wings
½ cup (75 grams) sliced onion
½ cup (80 grams) coarsely sliced carrot
2 cloves garlic, skin on
1 cup (237 milliliters) dry white wine
¼ teaspoon dried thyme
4 quarts (4 scant liters) water (approximately)
Sauce
½ teaspoon arrowroot, dissolved in 1 tablespoon water
½ teaspoon salt
¼ teaspoon freshly ground black pepper
Stuffing
(You may change the fruits in the stuffing, using figs, dates, raisins, etc.)
3 slices French bread, well toasted and blended into fine crumbs (about 1 cup/60 grams)
¾ cup (169 grams) finely chopped mild boiled ham
1½ cups (142 grams) loose, finely chopped mushrooms (about 5 ounces)
½ cup (105 grams) (about 4) sliced dry, pitted prunes
½ cup (about 4) (65 grams) sliced dry, pitted apricots
¼ cup (59 milliliters) melted unsalted butter
½ teaspoon salt, depending on the saltiness of the ham
¼ teaspoon freshly ground black pepper
1. Lift the skin at the neck of the squab and run your knife along each side of the wishbone. Push your thumb and index finger along the bone on each side to pry it out. Pull it out.
2. Cut at the joint of the shoulder on each side of the wishbone. Push your index finger and the side of your thumb through the opening made by the knife. The object is to loosen the meat all around the central carcass.

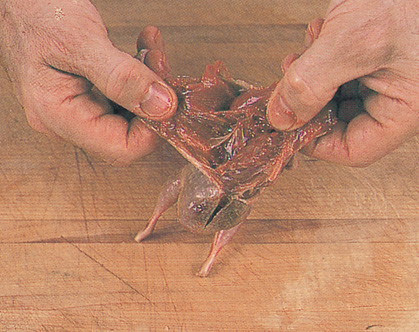
3. The most delicate part of the operation is to separate the skin from the back of the bird, as it adheres very tightly there and tends to tear. Using the tip of your index finger, push between the skin and the back carcass to loosen the skin. Go slowly to avoid tearing the skin.
4. After the meat has been separated from the back and around the shoulder, lift out the breast meat, prying to separate it from the top of the breastbone without tearing the skin. The fillets are still attached to the central carcass.
5. When it is loose from the carcass, turn the flesh inside out, pulling the meat down to separate it from the carcass. The fillets are still attached to the central carcass.

6. Keep pulling down until all the breast meat is separated and most of the carcass—up to the joint of the hip on each side—is visible. Notice that the fillets are still attached to the carcass.
7. Holding the squab by the thigh bone, cut right through the hip joint and pull so the leg separates from the carcass. Repeat on the other side.
8. To remove the bones of the leg: With the squab still inside out, scrape the meat from the thigh bones with a knife and cut all around the knee joint. Keep scraping to loosen the meat from the drumstick bone and break the drumstick bone just above the tip.
9. Turn the squab right side out again. The only bones left are the first joint of the wings. Place the neck, gizzards, heart, carcass, trimmings, etc., in a large saucepan without any fat. Brown on high heat for 1 to 2 minutes, then on medium to low heat for 25 minutes, stirring once in a while with a wooden spatula. (There is enough fat in the skin to brown the bones.) The saucepan should be large enough to hold the bones in one layer.

10. When the bones are nicely browned all around, and a nice crust of solidified juices has formed at the bottom of the pan, add the onions, carrots, and garlic, and cook, still browning, for another 10 minutes. Add the white wine, thyme, and approximately 2 quarts (2 scant liters) of water. Bring to a boil, lower the heat and simmer slowly for 1 hour. Remove the scum with a skimmer. After another hour, add another 2 quarts (2 scant liters) of water and cook for another hour. Strain the liquid through a fine strainer. You should have approximately 4 cups (1 scant liter) left. Remove as much fat as possible then reduce the liquid to 1¼ cups (296 milliliters). This reduced stock will be the base of the sauce.

11. While the stock cooks, prepare the stuffing. Toss together all the ingredients of the stuffing gently and using a pastry bag, your finger, or a spoon, stuff the squabs.

12. Cover the opening at the neck and tail by wrapping the loose skin under the body. Gently press the squab back into its original shape.

13. To truss, place a piece of string under the squab at the tail opening and cross above the drums.

14. Bring the string back under the tip of the drumsticks in a Figure 8. Pull gently on both ends of the string to close the opening at the tail and bring around the sides of the bird to tie in front.

15. Preheat the oven to 400 degrees (204°C). Make a knot under the breast. Trussing holds the squab in shape while cooking. Truss all of the squabs. Sprinkle the squabs with salt and pepper and place in a roasting pan breast-side up. To brown properly, the squabs should not touch one another, and the sides of the roasting pan should not be too high. Because squabs are fatty enough, you don’t have to rub them with butter before roasting. Roast in the oven for 20 minutes. After 15 minutes, baste with the fat which has melted from the birds, and then cook another 5 minutes.
16. Untie and trim the ends of the drumsticks and the ends of the wing bones. Place the squabs on a platter and keep warm uncovered in a 160-degree (70°C) oven while you finish the sauce. If the pan drippings are separated into solidified juices and clear fat, pour the fat out and retrieve the solidified juices by dissolving with stock. If not, cook the juices on top of the stove until the fat separates completely from the solidified juices. Pour the fat out and add the 1¼ cups (296 milliliters) of stock. Boil the mixture for a few seconds while stirring with a spatula to dissolve juices. Strain into a small saucepan and add the dissolved arrowroot, stirring. Season with salt and pepper. You should have a generous cup of sauce. Serve on a large platter or on individual plates which are very hot. Coat each squab with about 2 to 3 tablespoons of sauce.
Boning Out Quail
(Désossage de la Caille)
1. Cut the skin along the back of the quail. Sever the joint of the shoulder on either side of the neck. See the boning out of chicken and squab. A knife is needed to cut the back skin and shoulder joints, but the rest of the boning can be done with the fingers.

2. Holding the wing bone, pull out the wing on each side of the neck to separate the carcass from the meat. Although still held at the breastbone, most of the quail meat should be separated from the carcass.
3. Pull the breast to separate it from the sternum. Notice that the little fillets are still attached to the bone. They will be removed later.

4. Break the leg bone at the hip joint and pull it off. As you break and pull, the leg will separate from the back carcass. Pull the carcass off. The only 2 pieces left on the carcass now are the fillets; slide your finger between the meat and the bone and remove the fillets. Set aside. The quail is now opened flat, with the bones of the legs and wings still in place.

5. Using your finger, stand the thigh bone up so the joint is on the table, and grasping the bone as you would a pencil, push your fingers down the length of the bone, scraping the meat off as you go down. The thigh bone is now clean. Continue pushing and separating the meat from the knee joint. Now push down along the drumstick bone to separate the meat. Break the bone off at the joint of the foot.
6. Trim the wings and remove the little piece of bone in each. The quail is completely boned out with the fillet separated (in front) and the bones (on the side). It can be stuffed or sautéd.

7. To sauté the quail: Heat 1 tablespoon (14 grams) unsalted butter in each skillet. Sprinkle the quail with salt and freshly ground pepper on both sides. When the butter is hot, place the quail skin-side down and cook covered over high heat for 5 minutes. The quail are cooked only on the skin side. The heat generated in the covered pan will be enough to cook the meat and the skin. Serve with the natural juices.

Boning and Cutting up a Duck
(Découpage du Canard)
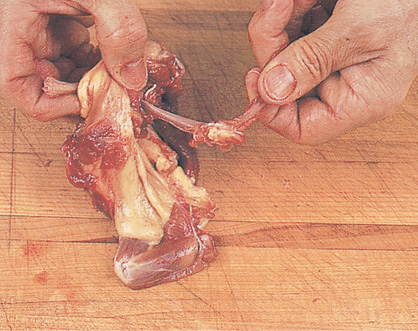
1. In this technique, the duck is cut into 4 pieces. The neck skin is kept for cracklings and the bones for stock. Remove the wing tips (the first joint), which will be used for the stock. Keep the second joint, which will be braised with the duck. Lift up the skin of the neck and cut from one side of the wishbone to the other—which is like a half circle—and slide your thumb underneath and pry to remove it. (It is always good to remove the wishbone, even when roasting a whole duck, since doing so facilitates carving.)

2. Place the duck on its side, grab a leg, and lift it until the duck is almost lifted off the table. In this manner, the weight of the duck is used and helps in separating the leg from the carcass. With the tip of your knife cut the skin around the leg, which will separate from the body. Keep cutting the skin all around until you touch the backbone.
3. Place the leg so the thigh bone is parallel to the backbone and lift up to crack it open at the joint. Cut right through the sinews of the joint of the leg, and keep pulling and cutting to separate the leg entirely from the body. Repeat with the other leg.
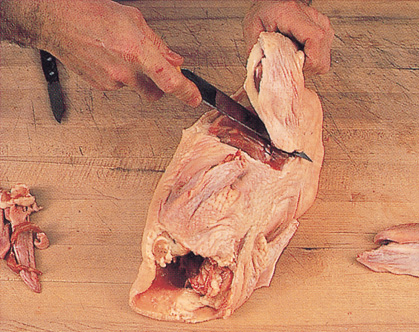
4. To separate the breast halves, place the duck on its back and, with a sharp knife, cut along the breastbone on each side to separate the 2 halves. Notice that the flesh is not very thick at the breastbone.

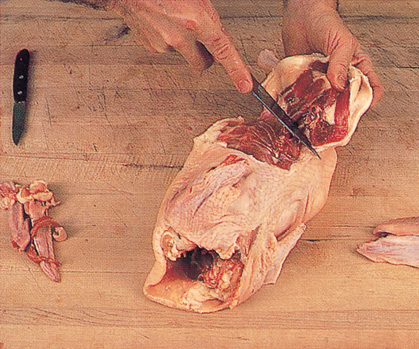
5. Place the duck on its side, hold the wing bone and move it with one finger. Place your finger under the skin on the shoulder joint. As you move the wing bone, you will feel the articulation. Cut with your knife through the joint, wiggling the blade to make it slide into the joint. Repeat on the other side, through the joint of the other breast.

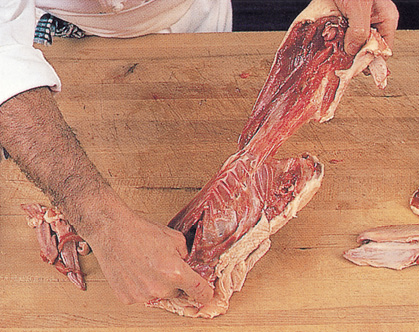
6. Grab the wing at the joint with one hand and, holding the carcass through the bones with the other hand, pull the breast off in one piece. Repeat on the other side with the other half.
7. The only things to be removed now are the 2 small fillets on the sternum, or breastbone. Slide your finger underneath and pull each fillet off the sternum.
8. Inside each fillet, there is a long sinew. Holding the sinew at the end, scrape the meat from it with the knife. Repeat with the other sinew.
9. Remove some of the fat around the meat of the breast and legs and cut off the tips of the drumsticks for use in the stock.
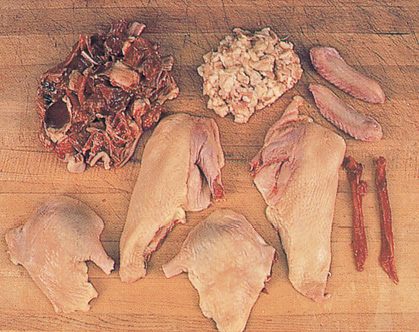
10. The cut duck: In the back on the left are the bones cut into 1½- to 2-inch (4 to 5 centimeters) pieces; the extra fat from the inside and the skin, cut into 1-inch (2.5- centimeter) pieces for use as cracklings; and the 2 pieces from the wings. Underneath are the 2 breast halves with the fillets next to them and, below, the 2 legs.

Trimming and Cooking Meat
To ascertain the exact degree of doneness when roasting or broiling meat, you need a thorough, practical knowledge of cooking. The professional chef knows by touching, or rather pushing into the meat with his fingers. How the meat springs back clearly reveals the degree to which the meat is cooked. An underdone roast feels soft and mushy; when rare, it feels soft with some bounce; when medium, it feels hard and springy; and when well-done, it feels hard with almost no bounce. However, variations due to differences between cuts, quality and method of cooking make this system difficult for the untrained.
Another method—cooking meat so many minutes to the pound or gram—is also unreliable because it doesn’t take into account the temperature of the oven, or the cut, shape, quality, or preparation of the meat. For instance, a 6-pound (2.7-kilogram) rib roast will take close to 2½ hours in a 325-degree (163°C) oven to be rare and about 1½ hours in a 420-degree (215°C) oven. At the same temperature, a 3-pound (1.4-kilogram) piece of top round will take twice the time required for a 3-pound (1.4-kilogram) flank steak because of the difference in shape. One meat may be porous, another may be tight; one may be fatty, the next one may be lean; one is boned out, another is cooked bone in, and so on and on. All these factors modify the cooking of the meat and alter the timing.
It is imperative that the meat “rest” before being carved (from 5 to 10 minutes for a small rack of lamb, to 25 minutes for a large rib roast). As the meat rests, the juices can settle, ensuring a nice pink color throughout the meat. A roast beef sliced as soon as it comes out of the oven will be mushy, lukewarm, practically raw in the middle, and grey and dry 1 inch (2.5 centimeters) all around the outside. The same piece of meat will be uniformly pink throughout if allowed to settle in a lukewarm place for 15 to 20 minutes.
You will really come to understand meat once you begin trimming it yourself, relying less on your butcher and more on your own skills. It requires some practice, but it will save you money and you will be able to have your meat trimmed the way you like it without extra expense.
Once you get to know the principal cuts in one animal, they become quite easy to recognize in other animals, even if the cuts are handled differently. For example, after you have worked on a saddle of lamb, you will know that the lamb loin chops come from the saddle. You will also recognize veal saddle, veal loin chops, pork loin chops, and, in the beef, the shell steak, the tenderloin and the porterhouse steak, all of which come from the same part of the animal. Whether you are served a saddle of venison or a “rabble” (back) of hare, you will recognize where it comes from in the animal.
Spring lamb—the 8- to 12-month-old animal—is preferred for saddle of lamb. It has more taste and flavor than baby lamb and hasn’t yet acquired the strong flavor of mutton. Baby lamb (which weighs under 20 pounds/9 kilograms with skin and head) is usually served around Easter and is always cooked medium, unlike mutton which is cooked well, and spring lamb which should be served pink.
Trimming a Saddle of Lamb
(Parer une Selle d'Agneau)
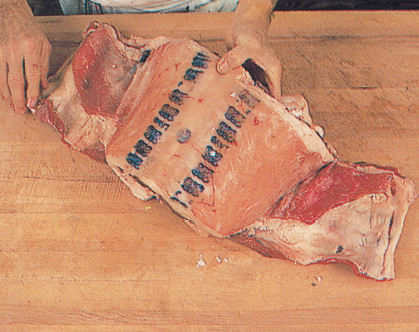
1. A saddle, the piece between the ribs and the legs, comprises the T-bone with the two loins and two tenderloins. The kidneys are underneath the saddle. This saddle is 9½ pounds (4.3 kilograms), untrimmed.

2. This is the saddle of lamb as viewed from the top.
3. Remove the kidneys, including their lumps of fat, by cutting and pulling. Remove each kidney from its envelope of fat.

4. Cut the flank or skin on both sides of the saddle. With the saddle still upside down, trim the strip of sinews and fat along the central bone. Keep trimming the fat on both sides of the tenderloin.
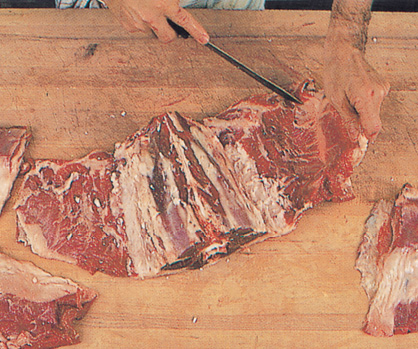
5. Turn the saddle right side up and trim the skin and fat off the back. Keep trimming on both sides of the loins, leaving only a very thin layer of fat on top of the meat.

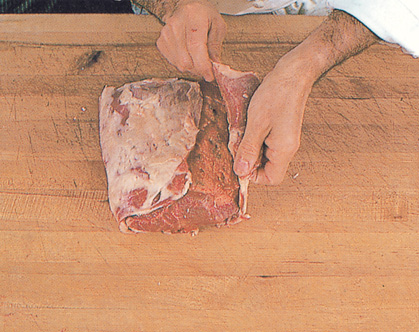
6. Fold the skirt back onto the tenderloin. (This protects the choice tenderloin from drying during cooking.)
7. Tie the saddle to secure the skirts underneath.
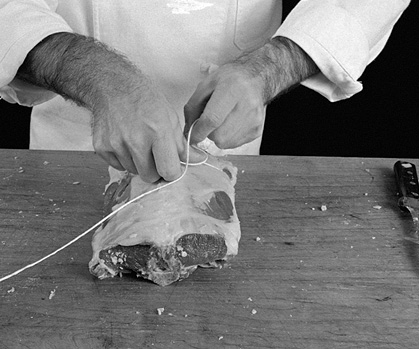
8. Saddle, oven ready. The trimmed saddle weighs 3½ pounds (1.6 kilograms), and the trimmings and kidneys combined weigh 2 pounds (908 grams). The trimmings make a delicious stew. The kidneys can be broiled or sautéed. The fat is discarded.