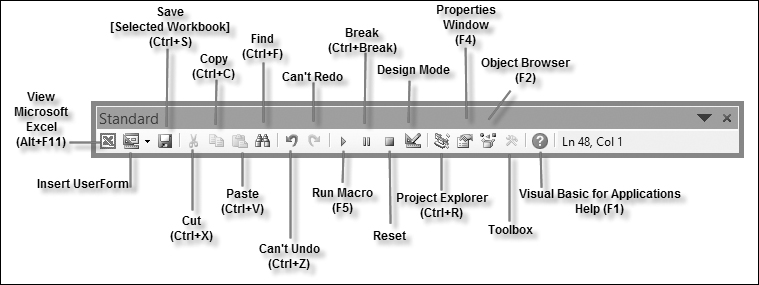
FIGURE 2.1. Buttons on the Standard toolbar provide a quick way to access many of the Visual Basic Editor features.
| Chapter 2 | EXCEL PROGRAMMING ENVIRONMENT |
| A QUICK OVERVIEW OF ITS TOOLS AND FEATURES (VBE) |
Now that you know how to record, run, and edit macros, let’s spend some time in the Visual Basic Editor window and become familiar with its features. With the tools located in the Visual Basic Editor window, you can:
• Write your own VBA procedures.
• Create custom forms.
• View and modify object properties.
• Test VBA procedures and locate errors.
The Visual Basic Editor window can be accessed in the following ways:
• Choose Developer | Code | Visual Basic.
• Choose Developer | Controls | View Code.
• Press Alt+F11.
The Project Explorer window displays a hierarchical list of currently open projects and their elements. A VBA project can contain the following elements:
• Worksheets
• Charts
• ThisWorkbook—The workbook where the project is stored
• Modules—Special sheets where programming code is stored
• Classes—Special modules that allow you to create your own objects
• Forms
• References to other projects
With the Project Explorer you can manage your projects and easily move between projects that are loaded into memory. You can activate the Project Explorer window in one of three ways:
• From the View menu by selecting Project Explorer.
• From the keyboard by pressing Ctrl+R.
• From the Standard toolbar by clicking the Project Explorer button as shown in Figure 2.1.
FIGURE 2.1. Buttons on the Standard toolbar provide a quick way to access many of the Visual Basic Editor features.
The Project Explorer window contains three buttons as shown in Figure 2.2. The first button from the left (View Code) displays the Code window for the selected module. The middle button (View Object) displays either the selected sheet in the Microsoft Excel Object folder or a form located in the Forms folder. The button on the right (Toggle Folders) hides and/or activates the display of folders in the Project Explorer window.

FIGURE 2.2. The Project Explorer window displays a list of currently open projects. The Properties window displays the settings for the object currently selected in the Project Explorer.
The Properties window allows you to review and set properties of various objects in your project. The name of the currently selected object is displayed in the Object box located just below the Properties window’s title bar. For example, Figure 2.2 displays the properties of the Sheet1 object. Properties of the object can be viewed alphabetically or by category by clicking the appropriate tab.
• Alphabetic tab—Lists alphabetically all properties for the selected object. You can change the property setting by selecting the property name and typing or selecting the new setting.
• Categorized tab—Lists all properties for the selected object by category. You can collapse the list so that you see the categories, or you can expand a category to see the properties. The plus sign (+) icon to the left of the category name indicates that the category list can be expanded. The minus sign (–) indicates that the category is currently expanded.
The Properties window can be accessed in three ways:
• From the View menu by selecting Properties Window.
• From the keyboard by pressing F4.
• From the toolbar by clicking the Properties Window button.
The Code window is used for Visual Basic programming as well as viewing and modifying the code of recorded macros and existing VBA procedures. Each module can be opened in a separate Code window. There are several ways to activate the Code window:
• From the Project Explorer window, choose the appropriate UserForm or module, and click the View Code button.
• From the menu bar, choose View | Code.
• From the keyboard, press F7.
In Figure 2.3, you will notice at the top of the Code window two drop-down list boxes that allow you to move quickly within the Visual Basic code. In the Object box on the left side of the Code window, you can select the object whose code you want to view. The box on the right side of the Code window lets you quickly choose a particular procedure or event procedure to view. When you open this box, the names of all procedures located in a module are sorted alphabetically. If you select a procedure in the Procedures/Events box, the cursor will jump to the first line of this procedure.
By dragging the split bar shown in Figure 2.3 down to a selected position in the Code window, you can divide the Code window into two panes. You can then view different sections of a long procedure or a different procedure in each pane. This two-pane display in the Code window is often used for copying or cutting and pasting sections of code between procedures of the same module.
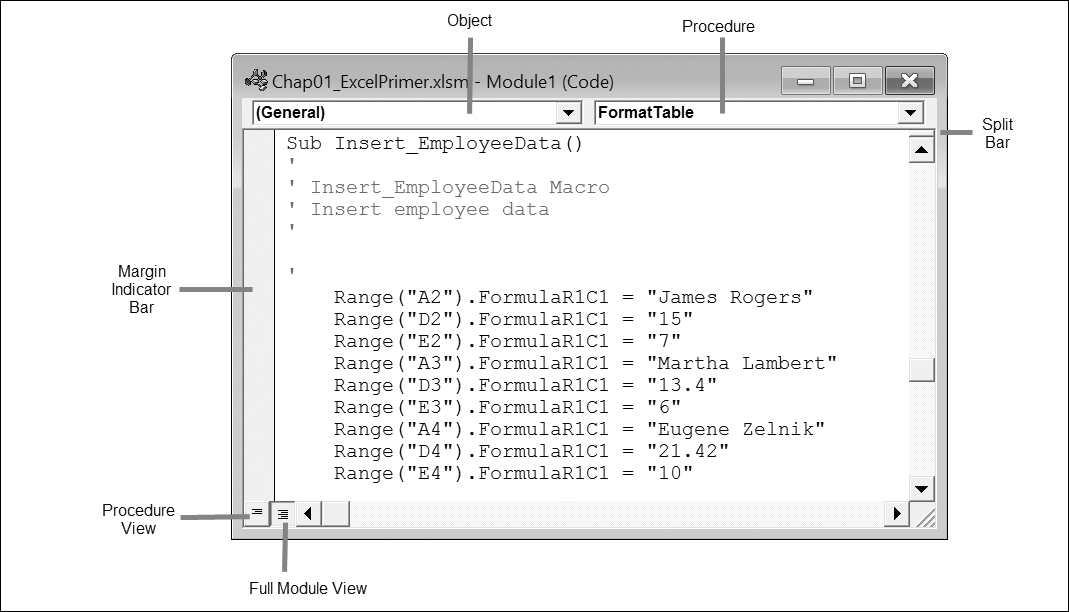
FIGURE 2.3. The Visual Basic Code window has several elements that make it easy to locate procedures and review the VBA code.
To return to the one-window display, simply drag the split bar all the way to the top of the Code window.
At the bottom left of the Code window, there are two icons. The Procedure View icon displays one procedure at a time in the Code window. To select another procedure, use the Procedures/Events box. The Full Module View icon displays all the procedures in the selected module. Use the vertical scrollbar to scroll through the module’s code.
The margin indicator bar is used by Visual Basic Editor to display helpful indicators during editing and debugging. If you’d like to take a quick look at some of these indicators, skim through Chapter 9, “Excel Tools for Testing and Debugging.”
There are several other windows that are frequently used in the Visual Basic environment.
Figure 2.4 displays the list of windows that can be docked in the Visual Basic Editor window. You will learn how to use some of these windows in Chapter 3 (Object Browser, Immediate window) and Chapter 9 (Locals window, Watch window).

FIGURE 2.4. Docking tab in the Tools | Options dialog box allows you to choose which windows you want to be dockable in the Visual Basic Editor screen.
Figure 2.5 shows the Edit toolbar in the VBE window that contains several buttons that let you enter correctly formatted VBA instructions with speed and ease. If the Edit toolbar isn’t currently docked in the Visual Basic Editor window, you can turn it on by choosing View | Toolbars | Edit.
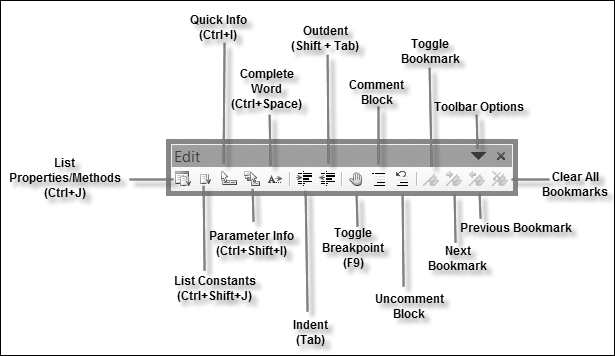
FIGURE 2.5. Buttons located on the Edit toolbar make it easy to write and format VBA instructions.
Writing procedures in Visual Basic requires that you use hundreds of built-in instructions and functions. Because most people cannot memorize the correct syntax of all the instructions that are available in VBA, the IntelliSense® technology provides you with syntax and programming assistance on demand during the course of entering instructions. While working in the Code window, you can have special windows pop up and guide you through the process of creating correct VBA code.
Each object can contain a number of properties and methods. When you enter the name of the object and a period that separates the name of the object from its property or method in the Code window, a pop-up menu may appear. This menu lists the properties and methods available for the object that precedes the period as shown in Figure 2.6. To turn on this automated feature, choose Tools | Options. In the Options dialog box, click the Editor tab, and make sure the Auto List Members check box is selected.

FIGURE 2.6. While you are entering the VBA instructions, Visual Basic suggests properties and methods that can be used with the particular object.
To choose an item from the pop-up menu that appears, start typing the name of the property or method that you want to select. When Excel highlights the correct item name, press Enter to insert the item into your code and start a new line. Or, if you want to continue writing instructions on the same line, press the Tab key instead. You can also double-click the item to insert it in your code. To close the pop-up menu without inserting an item, simply press Esc. When you press Esc to remove the pop-up menu, Visual Basic will not display it again for the same object. To display the Properties/Methods pop-up menu again, you can:
• Press Ctrl+J.
• Use the Backspace key to delete the period and type the period again.
• Right-click in the Code window and select List Properties/Methods from the shortcut menu.
• Choose Edit | List Properties/Methods.
• Click the List Properties/Methods button on the Edit toolbar.
A constant is a value that indicates a specific state or result. Excel has a number of predefined, built-in constants. You will learn about constants, their types, and usage in Chapter 3.
Suppose you want your program to turn on the Page Break Preview of your worksheet. In the Microsoft Excel application window, the View tab lists four types of workbook views:
• The Normal View is the default view for most tasks in Excel.
• Page Layout View allows you to view the document as it will appear on the printed page.
• Page Break Preview allows you to see where pages will break when the document is printed.
• Custom Views allows you to save the set of display and print settings as a custom view.
The first three view options are represented by a built-in constant. Microsoft Excel constant names begin with the characters “xl.” As soon as you enter in the Code window the instruction:
ActiveWindow.View =
a pop-up menu will appear with the names of valid constants for the property, as shown in Figure 2.7.
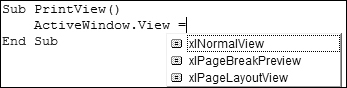
FIGURE 2.7. The List Constants pop-up menu displays a list of constants that are valid for the property entered.
To work with the List Constants pop-up menu, use the same techniques as for the List Properties/Methods pop-up menu outlined in the preceding section.
The List Constants pop-up menu can be activated by pressing Ctrl+Shift+J or clicking the List Constants button on the Edit toolbar.
If you’ve had a chance to work with Excel worksheet functions, you already know that many functions require one or more arguments (or parameters). For example, here’s the syntax for the most common worksheet function:
SUM(number1,number2, …)
where number1, number2, … are 1 to 30 arguments that you can add up.
Similar to functions, VBA methods may require one or more arguments. If a method requires an argument, you can see the names of required and optional arguments in a tooltip box that appears just below the cursor as soon as you type the beginning parenthesis as illustrated in Figure 2.8. In the tooltip, the current argument is displayed in bold. When you supply the first argument and enter the comma, Visual Basic displays the next argument in bold. Optional arguments are surrounded by square brackets [ ].

FIGURE 2.8. A tooltip displays a list of arguments utilized by a VBA method.
You can open the Parameter Info tooltip using the keyboard. To do this, enter the method or function name, follow it with the left parenthesis, and press Ctrl+Shift+I. You can also click the Parameter Info button on the Edit toolbar or choose Edit | Parameter Info.
The Parameter Info feature makes it easy for you to supply correct arguments to a VBA method. In addition, it reminds you of two other things that are very important for the method to work correctly: the order of the arguments and the required data type of each argument. You will learn about data types in Chapter 3.
When you select an instruction, function, method, procedure name, or constant in the Code window and then click the Quick Info button on the Edit toolbar (or press Ctrl+I), Visual Basic displays the syntax of the highlighted item, as well as the value of a constant, as depicted in Figure 2.9. The Quick Info feature can be turned on or off using the Options dialog box. To use the feature, click the Editor tab and choose the Auto Quick Info option.

FIGURE 2.9. The Quick Info feature displays a list of arguments required by a selected method or function, a value of a selected constant, or the type of the selected object or property.
Another way to increase the speed of writing VBA procedures in the Code window is with the Complete Word feature. As you enter the first few letters of a keyword and press Ctrl+Spacebar, or click the Complete Word button on the Edit toolbar, Visual Basic will fill in the remaining letters by completing the keyword entry for you. For example, when you enter the first four letters of the keyword Application (Appl) in the Code window and press Ctrl+Spacebar, Visual Basic will complete the rest of the word, and in the place of “Appl,” you will see the entire word “Application.”
If the Auto Indent option is turned on, you can automatically indent the selected lines of code by the number of characters specified in the Tab Width text box. The default entry for Auto Indent is four characters. You can easily change this setting via the Options dialog box (by selecting the Editor tab; see Figure 2.4).
Why would you want to use indentation in your code? When you indent certain lines in your VBA procedures, you make them more readable and easier to understand. Indenting is especially recommended for entering lines of code that make decisions or repeat actions. You will learn how to create these kinds of Visual Basic instructions in Chapters 5 and 6, “Adding Decisions to Excel VBA Programs” and “Adding Repeating Actions to Excel VBA Programs.” Let’s spend a few minutes learning how to apply the indent and outdent features to the lines of code in the WhatsInACell macro that you worked with in Chapter 1.
|
1. Open the Chap01_Supplement.xlsm workbook that you worked with in Chapter 1.
2. Press Alt+F11 to switch to the VBE window.
3. Choose View | Toolbars | Edit to gain access to the Editing toolbar. If the toolbar pops up in the middle of the screen, double-click its title bar to get it docked at the top of the VBE window.
4. In the Project Explorer window, select the Chap01_Supplement.xlsmVBA project and activate the Module1 that contains the code of the WhatsInACell macro.
5. Select the block of code located between the keyword With and End With.
6. Click the Indent button (see Figure 2.5) on the Edit toolbar or press Tab on the keyboard. The selected block of instructions will move four spaces to the right if you are using the default setting in the Tab Width box in the Options dialog box (Editor tab).
7. Click the Outdent button on the Edit toolbar or press Shift+Tab to return the selected lines of code to the previous location in the Code window.
8. Close the Chap01_Supplement.xlsm workbook.
The Indent and Outdent options are also available from the Edit menu.
In Chapter 1, you learned that a single quote placed at the beginning of a line of code denotes a comment. Not only do comments make it easier to understand what the procedure does, but also they are very useful in testing and troubleshooting VBA code.
For example, when you execute your code, it may not run as expected. Instead of deleting the lines that may be responsible for the problems you encounter, you may want to skip those lines of code for now and return to them later. By placing a single quote at the beginning of the line you want to avoid, you can continue checking the other parts of your procedure.
• To comment a few lines of code, simply select the lines and click the Comment Block button on the Edit toolbar (see Figure 2.5).
• To turn the commented code back into VBA instructions, select the lines and click the Uncomment Block button on the Edit toolbar (see Figure 2.5).
If you don’t select text and click the Comment Block button, the single quote is added only to the line of code where the cursor is currently located.
You can move easily through the myriad of VBA elements and features by examining the capabilities of the Object Browser. To access the Object Browser, use any of the following methods in the VBE window:
• Press F2.
• Choose View | Object Browser.
• Click the Object Browser button on the toolbar.
The Object Browser allows you to browse through the objects that are available to your VBA procedures, as well as view their properties, methods, and events. With the aid of the Object Browser, you can move quickly between procedures in your own VBA projects, as well as search for objects and methods across object type libraries.
The Object Browser window is divided into three sections as illustrated in Figure 2.10. The top of the window displays the Project/Library drop-down list box with the names of all libraries and projects that are available to the currently active VBA project. A library is a special file that contains information about the objects in an application. New libraries can be added via the References dialog box (Tools | References). The entry for <All Libraries> lists the objects of all libraries that are installed on your computer. When you select the library called Excel, you will see only the names of the objects that are exclusive to Microsoft Excel. In contrast to the Excel library, the VBA library lists the names of all the objects in Visual Basic for Applications.
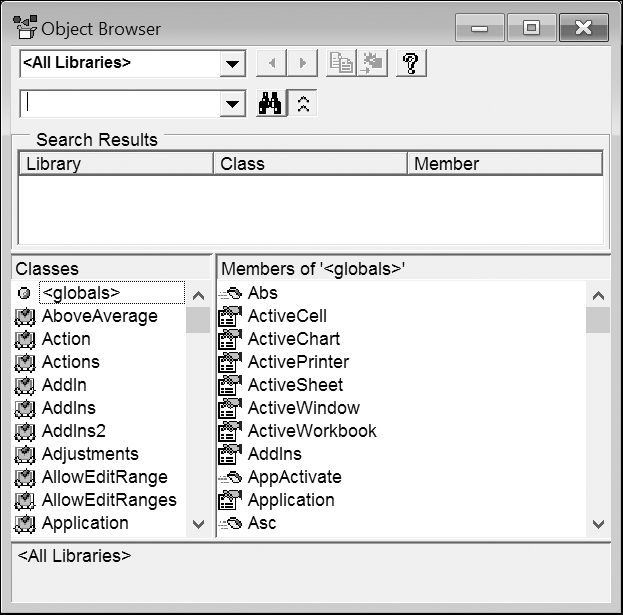
FIGURE 2.10. The Object Browser window allows you to browse through all the objects, properties, and methods available to the current VBA project.
Below the Project/Library drop-down list box is a Search text box that you’ll use to quickly find information in a particular library. This field remembers the last four items for which you searched. To find only whole words, you can right-click anywhere in the Object Browser window and choose Find Whole Word Only from the shortcut menu.
The Search Results section of the Object Browser displays the library, class, and member elements that met the criteria entered in the Search text box as shown in Figure 2.11.
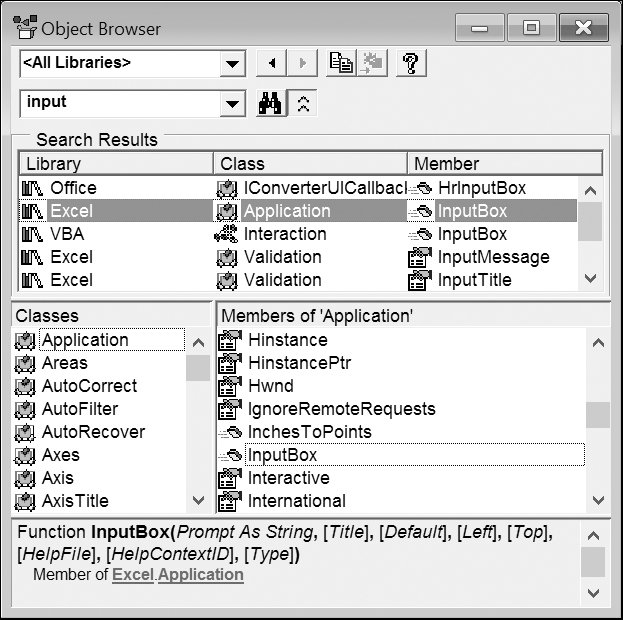
FIGURE 2.11. Searching for answers in the Object Browser.
When you type the search text and click the Search button (the binoculars icon), Visual Basic expands the Object Browser dialog box to show the Search Results area. You can hide or show the Search Results by clicking the button located to the right of the Search button.
The Classes list box displays the available object classes in the selected library. If you select a VBA project, this list shows objects in the project. In Figure 2.11 the Application object class is selected. When you highlight a class, the list on the right-hand side (Members) shows the properties, methods, and events available for that class. By default, members are listed alphabetically. You can, however, organize the members list by group type (properties, methods, or events) using the Group Members command from the Object Browser shortcut menu.
If you select a VBA project in the Project/Library list box, the Members list box will list all the procedures available in this project. To examine the code of a procedure, simply double-click its name. If you select a VBA library, you will see a listing of Visual Basic built-in functions and constants. If you need more information on the selected class or a member, click the question mark button at the top of the Object Browser window.
The bottom of the Object Browser window displays a code template area with the definition of the selected member. If you click the green hyperlink text in the code template, you can quickly jump to the selected member’s class or library in the Object Browser window. Text displayed in the code template area can be copied to the Windows clipboard and then pasted to a Code window. If the Code window is visible while the Object Browser window is open, you can save time by dragging the highlighted code template and dropping it into the Code window.
You can easily adjust the size of the various sections of the Object Browser window by dragging the dividing horizontal and vertical lines.
Now that you’ve discovered the Object Browser, you may wonder how you can put it to use in VBA programming. Let’s assume that you placed a text box in the middle of your worksheet. How can you make Excel move this text box so that it is positioned at the top left-hand corner of the sheet? Hands-On 2.2 should provide the answer to this question.
|
Hands-On 2.2. Writing a VBA Procedure to Move a Text Box on the Worksheet |
1. Open a new workbook.
2. Choose Insert | Text |Text Box.
3. Now draw a box in the middle of the sheet and enter any text as shown in Figure 2.12.

FIGURE 2.12. Excel displays the name of the inserted object in the Name box above the worksheet.
4. Select any cell outside the text box area.
5. Press Alt+F11 to activate the Visual Basic Editor window.
6. Choose Insert | Module to add a new module sheet.
7. In the Properties window, enter the new name for this module: Manipulations.
8. Choose View | Object Browser or press F2.
9. In the Project/Library list box, click the drop-down arrow and select the Excel library.
10. Enter textbox as the search text in the Search box as shown in Figure 2.13, and then click the Search button. Make sure you don’t enter a space in the search string.

FIGURE 2.13. Using the Object Browser window, you can find the appropriate VBA instructions for writing your own procedures.
Visual Basic searches the Excel library and displays the search results. It appears that the Shapes object shown in Figure 2.13 is in control of our text box operations. Looking at the members list, you can quickly determine that the AddTextbox method is used for adding a new text box to a worksheet. The code template at the bottom of the Object Browser shows the correct syntax for using this method. If you select the AddTextbox method and press F1, you will see the Help window with more details on how to use this method. The Help window tells us that the Left and Top properties determine the position of the text box in a worksheet.
11. Close the Object Browser window and the Help window if they are open.
Double-click the Manipulations module and enter the MoveTextBox procedure, as shown here:
Sub MoveTextBox()
With ActiveSheet.Shapes("TextBox 1")
.Select
.Left = 0
.Top = 0
End With
End Sub
The MoveTextBox procedure selects TextBox 1 in the collection of Shapes. TextBox 1 is the default name of the first object placed in the worksheet. Each time you add a new object to your worksheet, Excel assigns a new number (index) to it. Instead of using the object name, you can refer to the member of a collection by its index. For example, instead of:
With ActiveSheet.Shapes("TextBox 1")
enter:
With ActiveSheet.Shapes(1)
12. Choose Run | Run Sub/UserForm to execute this procedure.
13. Press Alt+F11 to switch to the Microsoft Excel application window.
The text box should be positioned at the top left-hand corner of the worksheet.
14. Save the workbook file as Chap02_ExcelPrimer.xlsm. Keep this file open as you will continue to work with it in Hands-On 2.3.
Let’s manipulate another object with Visual Basic.
|
Hands-On 2.3. Writing a VBA Procedure to Move a Circle on the Worksheet |
1. Place a small circle in the same worksheet where you originally placed the text box in Hands-On 2.2. Use the Oval shape in the Basic Shapes area of the Insert | Illustrations | Shapes tool. Hold down the Shift key while drawing on the worksheet to create a perfect circle.
2. Click outside the circle to deselect it.
3. Press Alt+F11 to activate the Visual Basic Editor screen.
4. In the Manipulations Module’s Code window, write a VBA procedure that will place the circle inside the text box. Keep in mind that Excel numbers objects consecutively. The first object is assigned a number 1, the second object a number 2, and so on. The type of object—whether it is a text box, a circle, or a rectangle—does not matter.
The MoveCircle procedure shown here demonstrates how to move a circle to the top left-hand corner of the active worksheet:
Sub MoveCircle()
With ActiveSheet.Shapes(2)
.Select
.Left = 0
.Top = 0
End With
End Sub
Moving a circle is similar to moving a text box or any other object placed in a worksheet. Notice that instead of referring to the circle by its name, Oval 2, the procedure uses the object’s index.
5. Run the MoveCircle procedure.
6. Press Alt+F11 to return to the Microsoft Excel window.
The circle should now appear on the top of the text box.
In addition to locating objects, properties, and methods, the Object Browser is a handy tool for locating and accessing procedures written in various VBA projects. The Hands-On 2.4 exercise demonstrates how you can see, at a glance, which procedures are stored in the selected project.
|
1. In the Object Browser, select VBAProject from the Project/Library drop-down list as shown in Figure 2.14.
The left side of the Object Browser displays the names of objects that are included in the selected project. The Members list box on the right shows the names of all the available procedures.
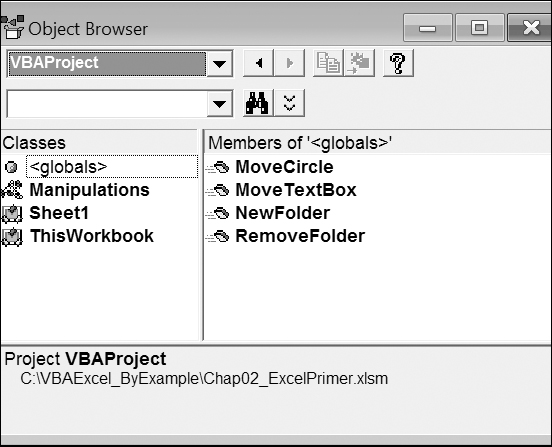
FIGURE 2.14. The Object Browser lists all the procedures available in a particular VBA project.
2. In the Members list, double-click the MoveCircle procedure.
Excel locates the selected procedure in the Code window.
In the previous examples, you used the properties of objects that are members of the Shapes collection in the Excel object library. While the Excel library contains objects specific to using Microsoft Excel, the VBA object library provides access to many built-in VBA functions that are general in nature. They allow you to manage files, set the date and time, interact with users, convert data types, deal with text strings, or perform mathematical calculations. In the following Hands-On 2.5 exercise, you will use one of the built-in VBA functions to create a new Windows subfolder without leaving Excel.
|
Hands-On 2.5. Writing a VBA Procedure to Create a Folder in Windows |
1. Press Alt+F11 to return to the Manipulations module, where you entered the MoveTextBox and MoveCircle procedures.
2. On a new line, type the name of the new procedure: Sub NewFolder().
3. Press Enter. Visual Basic will enter the ending keywords End Sub.
4. Press F2 to activate the Object Browser.
5. Click the drop-down arrow in the Project/Library list box and select VBA.
6. Enter file as the search text in the Search box and press the Search button.
7. Scroll down in the Members list box and highlight the MkDir method as shown in Figure 2.15.
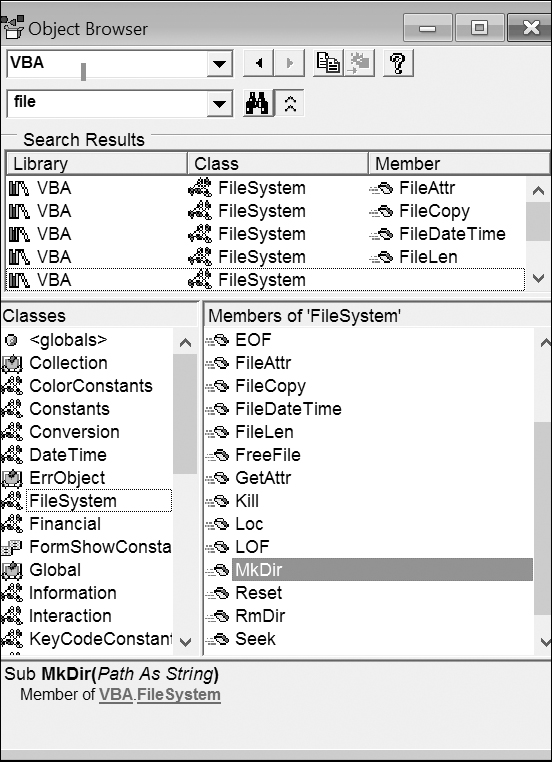
FIGURE 2.15. When writing procedures from scratch, consult the Object Browser for names of the built-in VBA functions.
8. Click the Copy button (the middle button in the top row) in the Object Browser window to copy the selected method name to the Windows clipboard.
9. Return to the Manipulations Code window and paste the copied instruction inside the procedure NewFolder.
10. Enter a space, followed by "C:\Study". Be sure to enter the name of the entire path in quotes. The NewFolder procedure should look like this:
Sub NewFolder()
MkDir "C:\Study"
End Sub
11. Position the insertion point within the code of the NewFolder procedure and choose Run | Run Sub/UserForm to execute the NewFolder procedure.
When you run the NewFolder procedure, Visual Basic creates a new folder on drive C. To see the folder, activate Windows Explorer.
After creating a new folder, you may realize that you don’t need it after all. Although you could easily delete the folder while in Windows Explorer, how about getting rid of it programmatically? The Object Browser displays many other methods that are useful for working with folders and files. The RmDir method is just as simple to use as the MkDir method.
12. To remove the Study folder from your hard drive, you could replace the MkDir method with the RmDir method, and then rerun the NewFolder procedure. However, let’s write a new procedure called RemoveFolder in the Manipulations Code window, as shown here:
Sub RemoveFolder()
RmDir "C:\Study"
End Sub
The RmDir method allows you to remove unwanted folders from your hard disk.
13. Position the insertion point within the code of the RemoveFolder procedure and choose Run | Run Sub/UserForm to execute the RemoveFolder procedure.
Check Windows Explorer to see that the Study folder is gone.
The Immediate window is used for trying out various instructions, functions, and operators present in the Visual Basic language before using them in your own VBA procedures. It is a great tool for experimenting with your new language.
The Immediate window allows you to type VBA statements and test their results immediately without having to write a procedure. The Immediate window is like a scratch pad. Use it to try out your statements. If the statement produces the expected result, you can copy the statement from the Immediate window into your procedure (or you can drag it right onto the Code window if it is visible).
The Immediate window can be moved anywhere on the Visual Basic Editor screen or it can be docked so that it always appears in the same area of the screen. The docking setting can be turned on and off on the Docking tab in the Options dialog box (Tools | Options).
• To quickly access the Immediate window, simply press Ctrl+G while in the Visual Basic Editor screen.
• To close the Immediate window, click the Close button in the top right-hand corner of the window.
Before you start creating full-fledged VBA procedures (this awaits you in the next chapter!), begin with some warm-up exercises to build up your VBA vocabulary. How can you do this quickly and painlessly? How can you try out some of the newly learned VBA statements? Here is a short, interactive language exercise: Enter a simple VBA instruction and Excel will check it out and display the result in the next line. Let’s begin by setting up your exercise screen.
|
Hands-On 2.6. Entering and Executing VBA Statements in the Immediate Window |
1. In the Visual Basic Editor window, choose View | Immediate Window.
2. Arrange the screen so that both the Microsoft Excel window and the Visual Basic window are placed side by side as presented in Figure 2.16 or use a setup with two monitors displaying Excel windows on separate screens.
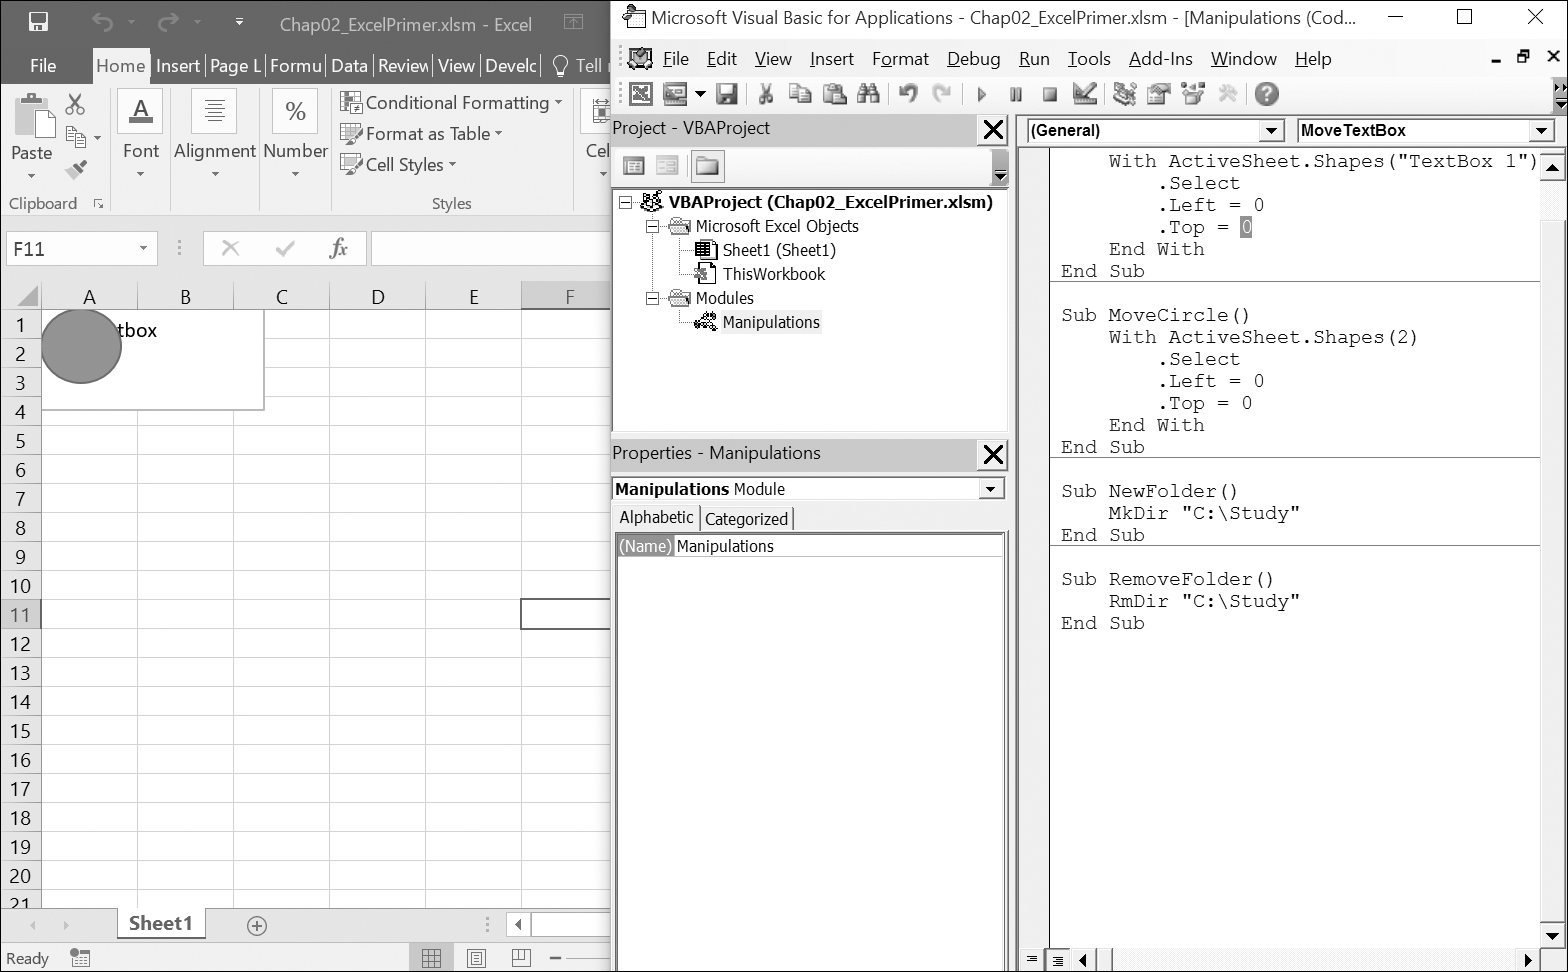
FIGURE 2.16. By positioning the Microsoft Excel and Visual Basic windows side by side you can watch the execution of the instructions entered in the Immediate window.
3. In the VBE screen, press Ctrl+G to activate the Immediate window.
4. In the Immediate window, type the following instruction and press Enter:
Worksheets.Add
When you press the Enter key, Visual Basic gets to work. If you entered the foregoing VBA statement correctly, VBA adds a new sheet in the current workbook. The Sheet2 tab at the bottom of the workbook should now be highlighted.
5. In the Immediate window, type another VBA statement and be sure to press Enter when you’re done:
Range("A1:A4").Select
As soon as you press Enter, Visual Basic highlights the cells A1, A2, A3, and A4 in the active worksheet.
6. Enter the following instruction in the Immediate window:
[A1:A4].Value = 55
When you press Enter, Visual Basic places the number 55 in every cell of the specified range, A1:A4. This statement is an abbreviated way of referring to the Range object. The full syntax is more readable:
Range("A1:A4").Value = 55
7. Enter the following instruction in the Immediate window:
Selection.ClearContents
When you press Enter, VBA deletes the results of the previous statement from the selected cells. Cells A1:A4 are now empty.
8. Enter the following instruction in the Immediate window:
ActiveCell.Select
When you press Enter, Visual Basic makes cell A1 active.
Figure 2.17 shows all the instructions entered in the Immediate window in this exercise. Every time you pressed the Enter key, Excel executed the statement on the line where the cursor was located. If you want to execute the same instruction again, click anywhere in the line containing the instruction and press Enter.

FIGURE 2.17. Instructions entered in the Immediate window are executed as soon as you press the Enter key.
For more practice you may want to rerun the statements shown in Figure 2.17. Execute the instructions one by one by clicking in the appropriate line and pressing the Enter key.
So far you have used the Immediate window to perform actions. These actions could have been performed manually by clicking the mouse in various areas of the worksheet and entering data.
Instead of simply performing actions, the Immediate window also allows you to ask questions. Suppose you want to find out which cells are currently selected, the value of the active cell, the name of the active sheet, or the number of the current window. When working in the Immediate window, you can easily get answers to these and other questions.
In the preceding exercise, you entered several instructions. Let’s return to the Immediate window to ask some questions. Excel remembers the instructions entered in the Immediate window even after you close this window. Note that the contents of the Immediate window are automatically deleted when you exit Microsoft Excel.
|
1. Click the mouse in the second line of the Immediate window where you previously entered the instruction Range("A1:A4").Select.
2. Press Enter to have Excel reselect cells A1:A4.
3. Click in the new line of the Immediate window, enter the following question, and press Enter:
?Selection.Address
When you press Enter, Excel will not select anything in the worksheet. Instead, it will display the result of the instruction on a separate line in the Immediate window. In this case, Excel returns the absolute address of the cells that are currently selected ($A$1:$A$4).
The question mark (?) tells Excel to display the result of the instruction in the Immediate window. Instead of the question mark, you can use the Print keyword, as shown in the next step.
4. In a new line in the Immediate window, enter the following statement and press Enter:
Print ActiveWorkbook.Name
Excel enters the name of the active workbook on a new line in the Immediate window.
How about finding the name of the application?
5. In a new line in the Immediate window, enter the following statement and press Enter:
?Application.Name
Excel will reveal its full name: Microsoft Excel.
The Immediate window can also be used for a quick calculation.
6. In a new line in the Immediate window, enter the following statement and press Enter:
?12/3
Excel shows the result of the division on the next line. But what if you want to know right away the result of 3+2 and 12*8?
Instead of entering these instructions on separate lines, you can enter them on one line, as in the following example:
?3+2:?12*8
Notice the colon separating the two blocks of instructions. When you press the Enter key, Excel displays the results 5, 96 on separate lines in the Immediate window.
The following lists all the instructions you entered in the Immediate window, including Excel’s answers to your questions:
Worksheets.Add
Range("A1:A4").Select
[A1:A4].Value = 55
Selection.ClearContents
ActiveCell.Select
?Selection.Address
$A$1:$A$4
Print ActiveWorkbook.Name
Book2
?Application.Name
Microsoft Excel
?12/3
4
?3+2:?12*8
5
96
To delete the instructions from the Immediate window, make sure that the selection point is located in the Immediate window, press Ctrl+A to highlight all the lines, and then press Delete.
When you are ready to write your own VBA procedure to automate a particular spreadsheet task, you will most likely begin searching for instructions that allow you to manipulate worksheet cells. You will need to know how to select cells, how to enter data in cells, how to assign range names, how to format cells, and how to move, copy, and delete cells. Although these tasks can be easily performed with the mouse or keyboard, mastering these techniques in Visual Basic for Applications requires a little practice. You must use the Range object to refer to a single cell, a range of cells, a row, or a column. There are three properties that allow you to access the Range object: the Range property, the Cells property, and the Offset property.
The Range property returns a cell or a range of cells. The reference to the range must be in an A1-style and in quotation marks (for example, “A1”). The reference can include the range operator, which is a colon (for example, “A1:B2”), or the union operator, which is a comma (for example, “A5”, “B12”).
|
Hands-On 2.8. Using the Range Property to Select Worksheet Cells |
To render this into VBA: |
Enter this in the Immediate window: |
Select a single cell (e.g., A5). |
|
Select a range of cells (e.g., A6:A10). |
|
Select several nonadjacent cells (e.g., A1, B6, C8). |
|
Select several nonadjacent cells and cell ranges (e.g., A11:D11, C12, D3). |
|
You can use the Cells property to return a single cell. When selecting a single cell, this property requires two arguments. The first argument indicates the row number and the second one is the column number. Arguments are entered in parentheses. When you omit arguments, Excel selects all the cells in the active worksheet. Let’s try out a couple of statements in Hands-On 2.9.
|
Hands-On 2.9. Using the Cells Property to Select Worksheet Cells (Part I) |
To render this into VBA: |
Enter this in the Immediate window: |
Select a single cell (e.g., A5). |
|
Select a range of cells (e.g., A6:A10). |
|
Select all cells in a worksheet. |
|
Notice how you can combine the Range property and the Cells property:
Range(Cells(6, 1), Cells(10, 1)).Select
In this example, the first Cells property returns cell A6, while the second one returns cell A10. The cells returned by the Cells properties are then used as a reference for the Range object. As a result, Excel will select the range of cells where the top cell is specified by the result of the first Cells property and the bottom cell is defined by the result of the second Cells property.
A worksheet is a collection of cells. You can also use the Cells property with a single argument that identifies a cell’s position in the collection of a worksheet’s cells. Excel numbers the cells in the following way: Cell A1 is the first cell in a worksheet, cell B1 is the second one, cell C1 is the third one, and so on. Cell 16384 is the last cell in the first worksheet row. Now let’s write some practice statements in Hands-On 2.10.
|
Hands-On 2.10. Using the Cells Property to Select Worksheet Cells (Part II) |
To render this into VBA: |
Enter this in the Immediate window: |
Select cell A1. |
or
|
Select cell C1. |
or
|
Select cell XFD. |
or
|
Notice that the word Item is a property that returns a single member of a collection. Because Item is the default member for a collection, you can refer to a worksheet cell without explicitly using the Item property.
Now that you’ve discovered two ways to select cells (Range property and Cells property), you may wonder why you should bother using the more complicated Cells property. It’s quite obvious that the Range property is more readable; after all, you used the Range references in Excel formulas and functions long before you decided to learn about VBA. Using the Cells property is more convenient, however, when it comes to working with cells as a collection. Use this property to access all the cells or a single cell from a collection.
Another very flexible way to refer to a worksheet cell is with the Offset property. Quite often when automating worksheet tasks, you may not know exactly where a specific cell is located. How can you select a cell whose address you don’t know? The answer: Have Excel select a cell based on an existing selection.
The Offset property calculates a new range by shifting the starting selection down or up a specified number of rows. You can also shift the selection to the right or left a specified number of columns. In calculating the position of a new range, the Offset property uses two arguments. The first argument indicates the row offset and the second one is the column offset. Let’s try out some examples in Hands-On 2.11.
|
To render this into VBA: |
Enter this in the Immediate window: |
Select a cell located one row down and three columns to the right of cell A1. |
|
Select a cell located two rows above and one column to the left of cell D15. |
|
Select a cell located one row above the active cell. If the active cell is located in the first row, you will get an error message. |
|
In the first example, Excel selects cell D2. As soon as you enter the second example, Excel chooses cell C13.
If cells A1 and D15 are already selected, you can rewrite the first two statements in the following way:
Selection.Offset(1, 3).Select
Selection.Offset(-2, -1).Select
Notice that the third example in the practice table displays zero (0) in the position of the second argument. Zero entered as a first or second argument of the Offset property indicates a current row or column. The instruction ActiveCell.Offset(−1, 0).Select will cause an error if the active cell is located in the first row.
When working with the Offset property, you may occasionally need to change the size of a selection of cells. Suppose that the starting selection is A5:A10. How about shifting the selection two rows down and two columns to the right and then changing the size of the new selection? Let’s say the new selection should highlight cells C7:C8. The Offset property can take care of only the first part of this task. The second part requires another property. Excel has a special Resize property. You can combine the Offset property with the Resize property to answer the foregoing question. Before you combine these two properties, let’s proceed to Hands-On 2.12 to learn how you can use them separately.
|
Hands-On 2.12. Writing a VBA Statement to Resize a Selection of Cells |
1. Arrange the screen so that the Microsoft Excel window and the Visual Basic window are side by side.
2. Activate the Immediate window and enter the following instructions:
Range("A5:A10").Select
Selection.Offset(2, 2).Select
Selection.Resize(2, 4).Select
The first instruction selects range A5:A10. Cell A5 is the active cell. The second instruction shifts the current selection to cells C7:C12. Cell C7 is located two rows below the active cell A5 and two columns to the right of A5. Now the active cell is C7.
The last instruction resizes the current selection. Instead of range C7:C12, cells C7:F8 are selected.
Like the Offset property, the Resize property takes two arguments. The first argument is the number of rows you intend to include in the selection, and the second argument specifies the number of columns. Hence, the instruction Selection.Resize(2, 4).Select resizes the current selection to two rows and four columns.
The last two instructions can be combined in the following way:
Selection.Offset(2, 2).Resize(2, 4).Select
In this statement, the Offset property calculates the beginning of a new range, the Resize property determines the new size of the range, and the Select method selects the specified range of cells.
|
Recording a Selection of Cells |
By default, the macro recorder selects cells using the Range property. If you turn on the macro recorder and select cell A2, enter any text, and select cell A5, you will see the following lines of code in the Visual Basic Editor window:
Range("A2").Select
ActiveCell.FormulaR1C1 = "text"
Range("A5").Select
You can have the macro recorder use the Offset property if you tell it to use relative references. To do this, click View | Macros | Use Relative References, and then choose Record Macro. The macro recorder produces the following lines of code:
ActiveCell.Offset(-1, 0).Range("A1").Select
ActiveCell.FormulaR1C1 = "text"
ActiveCell.Offset(3, 0).Range("A1").Select
When you record a procedure using the relative references, the procedure will always select a cell relative to the active cell. The first and third lines in this set of instructions reference cell A1, even though nothing was said about cell A1. As you remember from Chapter 1, the macro recorder has its own way of getting things done. To make things simpler, you can delete the reference to Range("A1"):
ActiveCell.Offset(-1, 0).Select
ActiveCell.FormulaR1C1 = "text"
ActiveCell.Offset(3, 0).Select
After recording a procedure using the relative reference, make sure Use Relative References is not selected if your next macro does not require the use of relative addressing.
If you often have to quickly access certain remote cells in your worksheet, you may already be familiar with the following keyboard shortcuts: End+up arrow, End+down arrow, End+left arrow, and End+right arrow. In VBA, you can use the End property to quickly move to remote cells. Let’s move around the worksheet by writing statements listed in Hands-On 2.13.
|
To render this into VBA: |
Enter this in the Immediate window: |
Select the last cell in any row. |
|
Select the last cell in any column. |
|
Select the fi rst cell in any row. |
|
Select the fi rst cell in any column. |
|
Notice that the End property requires an argument that indicates the direction you want to move. Use the following Excel built-in Direction Enumeration constants to jump in the specified direction: xlToRight, xlToLeft, xlUp, xlDown.
In the process of developing a new worksheet model, you often find yourself moving and copying cells and deleting cell contents. Visual Basic allows you to automate these worksheet editing tasks with three simple-to-use methods: Cut, Copy, and Clear. And now let’s do some hands-on exercises to get some practice in the most frequently used worksheet operations.
|
To render this into VBA: |
Enter this in the Immediate window: |
Move the contents of cell A5 to cell A4. |
|
Copy a formula from cell A3 to cells D5:F5. |
|
Delete the contents of cell A4. |
or
|
Notice that the first two methods in the table require a special argument called Destination. This argument specifies the address of a cell or a range of cells where you want to place the cut or copied data. In the last example, the Cut method is used without the Destination argument to remove data from the specified cell.
The Clear method deletes everything from the specified cell or range, including any applied formats and cell comments. If you want to be specific about what you delete, use the following methods:
• ClearContents—Clears only data from a cell or range of cells
• ClearFormats—Clears only applied formats
• ClearComments—Clears all cell comments from the specified range
• ClearNotes—Clears notes and sound notes from all the cells in the specified range
• ClearHyperlinks—Removes all hyperlinks from the specified range
• ClearOutline—Clears the outline for the specified range
Excel uses the EntireRow and EntireColumn properties to select the entire row or column. Let’s now write the statements in Hands-On 2.15 to quickly select entire rows and columns.
|
To render this into VBA: |
Enter this in the Immediate window: |
Select an entire row where the active cell is located. |
|
Select an entire column where the active cell is located. |
|
When you select a range of cells you may want to find out how many rows or columns are included in the selection. Let’s have Excel count rows and columns in Range("A1:D15").
1. Type the following VBA statement in the Immediate window and press Enter:
Range("A1:D15").Select
If the Microsoft Excel window is visible, Visual Basic will highlight the range A1:D15 when you press Enter.
2. To find out how many rows are in the selected range, enter the following statement:
?Selection.Rows.Count
As soon as you press Enter, Visual Basic displays the answer on the next line. Your selection includes 15 rows.
3. To find out the number of columns in the selected range, enter the following statement:
?Selection.Columns.Count
As soon as you press Enter, Visual Basic tells you that the selected Range("A1:D15") occupies the width of four columns.
4. In the Immediate window, position the cursor anywhere within the word Rows or Columns and press F1 to find out more information about these useful properties.
How big is an Excel worksheet? How many columns and rows does it contain? If you ever forget the details, use the Count property as shown in Hands-On 2.16.
|
To render this into VBA: |
Enter this in the Immediate window: |
Find out the total number of rows in an Excel worksheet. |
|
Find out the total number of columns in an Excel worksheet. |
|
A Microsoft Excel worksheet has 1,048,576 rows and 16,384 columns.
The information entered in a worksheet can be text, numbers, or formulas. To enter data in a cell or range of cells, you can use either the Value property or the Formula property of the Range object.
• Using the Value property:
ActiveSheet.Range("A1:C4").Value = "=4 * 25"
• Using the Formula property:
ActiveSheet.Range("A1:C4").Formula = "=4 * 25"
In both examples, cells A1:C4 display 100—the result of the multiplication 4 * 25. Let’s proceed to some practice in Hands-On 2.17.
|
Hands-On 2.17. Using VBA Statements to Enter Data in a Worksheet |
To render this into VBA: |
Enter this in the Immediate window: |
Enter in cell A5 the following text: Amount Due |
|
Enter the number 123 in cell D21. |
or
|
Enter in cell B4 the following formula: = D21 * 3 |
|
In some Visual Basic procedures you will undoubtedly need to return the contents of a cell or a range of cells. Although you can use either the Value or Formula property, this time the two Range object’s properties are not interchangeable.
• The Value property displays the result of a formula entered in a specified cell. If, for example, cell A1 contains a formula = 4 * 25, then the instruction
?Range("A1").Value
will return the value of 100.
• If you want to display the formula instead of its result, you must use the Formula property:
?Range("A1").Formula
Excel will display the formula (= 4 * 25) instead of its result (100).
A frequent spreadsheet task is applying formatting to a selected cell or a range. Your VBA procedure may need to find out the type of formatting applied to a particular worksheet cell. To retrieve the cell formatting, use the NumberFormat property:
?Range("A1").NumberFormat
Upon entering the foregoing statement in the Immediate window, Excel displays the word “General,” which indicates that no special formatting was applied to the selected cell. To change the format of a cell to dollars and cents using VBA, enter the following instruction:
Range("A1").NumberFormat = "$#,##0.00"
If you enter 125 in cell A1 after it has been formatted using this code, cell A1 will display $125.00. You can look up the available format codes in the Format Cells dialog box in the Microsoft Excel application window as shown in Figure 2.18.

FIGURE 2.18. You can apply different formatting to selected cells and ranges using format codes, as displayed in the Custom category in the Format Cells dialog box. To quickly bring up this dialog box, press the Alt, H, F, and M keys one at a time.
Now that you’ve got your feet wet working with worksheet cells and ranges, it’s time to move up one level and learn how you can control a single workbook, as well as an entire collection of workbooks. You cannot prepare a new worksheet if you don’t know how to open a new workbook. You cannot remove a workbook from the screen if you don’t know how to close a workbook. You cannot work with an existing workbook if you don’t know how to open it. These important tasks are handled by the following VBA methods: Add, Open, and Close. The next series of drills in Hands-On 2.18 and 2.19 will give you the language skills necessary for dealing with workbooks and worksheets.
|
To render this into VBA: |
Enter this in the Immediate window: |
Open a new workbook. |
|
Find out the name of the first workbook. |
|
Find out the number of open workbooks. |
|
Activate the second open workbook. |
|
Close the Chap01_ExcelPrimer.xlsm workbook and save the changes. |
|
Open the Chap01_ExcelPrimer.xlsm workbook. Type the correct path to the file location on your computer. |
|
Activate the Chap01_ExcelPrimer.xlsm workbook. |
|
Save the active workbook as NewChap.xlsm. |
|
Close the first workbook. |
|
Close the active workbook without saving recent changes to it. |
|
Close all open workbooks. |
|
If you worked through the last example in Hands-On 2.18, all workbooks are now closed. Before you experiment with worksheets, make sure you have opened a new workbook.
When you deal with individual worksheets, you must know how to add a new worksheet to a workbook, select a worksheet or a group of worksheets, name a worksheet, and copy, move, and delete worksheets. In Visual Basic, each of these tasks is handled by a special method or property.
|
To render this into VBA: |
Enter this in the Immediate window: |
Add a new worksheet. |
|
Find out the name of the first worksheet. |
|
Select a sheet named Sheet3. |
|
Select sheets 1, 3, and 4. |
|
Activate a sheet named Sheet1. |
|
Move Sheet2 before Sheet1. |
|
Rename worksheet Sheet2 to Expenses. |
|
Find out the number of worksheets in the active workbook. |
|
Remove the worksheet named Expenses from the active workbook. |
|
Notice the difference between the Select and Activate methods:
• The Select and Activate methods can be used interchangeably if only one worksheet is selected.
• If you select a group of worksheets, the Activate method allows you to decide which one of the selected worksheets is active. As you know, only one worksheet can be active at a time.
|
Sheets Other than Worksheets |
In addition to worksheets, the collection of workbooks contains chart sheets. To add a new chart sheet to your workbook, use the Add method:
Charts.Add
To count the chart sheets, use:
?Charts.Count
When you work with several Excel workbooks and need to compare or consolidate data or you want to see different parts of the same worksheet, you are bound to use the options available from the Microsoft Excel Window menu: New Window and Arrange.
In Hands-On 2.20, you will learn how to work with Windows using VBA.
|
To render this into VBA: |
Enter this in the Immediate window: |
Show the active workbook in a new window. |
|
Display on screen all open workbooks. |
|
Activate the second window. |
|
Find out the title of the active window. |
|
Change the active window’s title to My Window. |
|
When you display windows on screen, you can decide how to arrange them. The Arrange method has many arguments, as shown in Table 2.1. The argument that allows you to control the way the windows are positioned on your screen is called ArrangeStyle. If you omit the ArrangeStyle argument, all windows are tiled.
Instead of the names of constants, you can use the value equivalents shown in Table 2.1.
TABLE 2.1. Arguments of the |
||
Constant |
Value |
Description |
|
1 |
Windows are tiled (the default value). |
|
7 |
Windows are cascaded. |
|
2 |
Windows are arranged horizontally. |
|
3 |
Windows are arranged vertically. |
To cascade all windows, use the following VBA instruction:
Windows.Arrange ArrangeStyle:=xlArrangeStyleCascade
Or simply:
Windows.Arrange ArrangeStyle:=7
The Application object represents the Excel application itself. By controlling the Application object, you can perform many tasks, such as saving the way your screen looks at the end of a day’s work or quitting the application. As you know, Excel allows you to save the screen settings by using the Save Workspace button on the View tab. The task of saving the workspace can be easily performed with VBA:
Application.SaveWorkspace "Project"
This instruction saves the screen settings in the workspace file named Project. The next time you need to work with the same files and arrangement of windows, simply open the Project.xlwx file so Excel will bring up the correct files and restore your screen with those settings. And now let’s write some statements that use the Application object.
|
To render this into VBA: |
Enter this in the Immediate window: |
Check the name of the active application. |
|
Change the title of the Excel application to My Application. |
|
Change the title of the Excel application back to Microsoft Excel. |
|
Find out what operating system you are using. |
|
Find out the name of a person or firm to whom the application is registered. |
|
Find out the name of the folder where the Excel executable file (Excel.exe) resides. |
|
Quit working with Microsoft Excel. |
|
This chapter has given you an overview of the Visual Basic Editor window. You learned many basic VBA terms and practiced them by executing single statements in the Immediate window.
In the next chapter, you will learn how the data can be stored for later use in variables. You will also explore data types and constants.