
Please note files for the “Hands-On” project may be found on the companion CD-ROM.
| Chapter 8 | KEEPING TRACK OF MULTIPLE VALUES IN EXCEL VBA PROGRAMS |
| A QUICK INTRODUCTION TO CREATING AND USING COLLECTIONS |
Microsoft Excel offers a large number of built-in objects that you can access from your VBA procedures to automate many aspects of your worksheets. You are not by any means limited to using these built-in objects. VBA allows you to create your own objects and collections of objects, complete with their own methods and properties.
While writing your own VBA procedures, you may come across a situation where there’s no built-in collection to handle the task at hand. The solution is to create a custom collection object. You already know from the previous chapter how to work with multiple items of data by using dynamic and static arrays. Because collections have built-in properties and methods that allow you to add, remove, and count their elements, they are much easier to work with than arrays. In this chapter, you will learn how to work with collections, including how to declare a custom collection object. The usage of class modules to create user-defined objects will also be discussed at the introductory level.
Before diving into the theory and hands-on examples in this chapter, you should become familiar with several terms:
• Collection—an object that contains a set of related objects.
• Class—a definition of an object that includes its name, properties, methods, and events. The class acts as a sort of object template from which an instance of an object is created at runtime.
• Instance—a specific object that belongs to a class is referred to as an instance of the class. When you create an instance, you create a new object that has the properties and methods defined by the class.
• Class module—a module that contains the definition of a class, including its property and method definitions.
• Module—a module containing sub and function procedures that are available to other VBA procedures and are not related to any object in particular.
• Form module—a module that contains the VBA code for all event procedures triggered by events occurring in a user form or its controls. A form module is a type of class module.
• Event—an action recognized by an object, such as a mouse click or a keypress, for which you can define a response. Events can be caused by a user action or a VBA statement or can be triggered by the system.
• Event procedure—a procedure that is automatically executed in response to an event initiated by the user or program code or triggered by the system.
A set of similar objects is known as a collection. In Microsoft Excel, for example, all open workbooks belong to the collection of Workbooks, and all the sheets in a particular workbook are members of the Worksheets collection. Collections are objects that contain other objects. No matter what collection you want to work with, you can do the following:
• Refer to a specific object in a collection by using an index value. For example, to refer to the second object in the collection of Worksheets, use either of the following statements:
Worksheets(2).Select
Worksheets("Sheet2").Select
• Determine the number of items in the collection by using the Count property. For example, when you enter in the Immediate window the statement:
?Worksheets.Count
VBA will return the total number of worksheets in the current workbook.
• Insert new items into the collection by using the Add method. For example, when you enter in the Immediate window the statement:
Worksheets.Add
VBA will insert to the current workbook a new worksheet. The Worksheets collection now contains one more item.
• Cycle through every object in the collection by using the For Each… Next loop.
Suppose that you opened a workbook containing five worksheets with the following names: “Daily wages,” “Weekly wages,” “Monthly wages,” “Yearly salary,” and “Bonuses.” To delete the worksheets that contain the word “wages” in the name, you could write the following procedure:
Sub DeleteSheets()
Dim ws As Worksheet
Application.DisplayAlerts = False
For Each ws In Worksheets
If InStr(ws.Name, "wages") Then
ws.Delete
End If
Next
Application.DisplayAlerts = True
End Sub
The statement Application.DisplayAlerts = False is used to suppress some prompts and messages that Excel displays while the code is running. In this case, we want to suppress the confirmation message that Excel displays when worksheets are deleted. The InStr function is very useful for string comparisons as it allows you to find one string within another. The statement InStr(ws.Name, "wages") tells Excel to determine if the worksheet name (stored in ws object variable) contains the string of characters “wages.”
To create a user-defined collection, you should begin by declaring an object variable of the Collection type:
Dim collection_name as Collection
Set collection_name = New Collection
Or
Dim collection_name As New Collection
After you’ve declared the Collection object with the Dim keyword, you can insert new items into the collection by using the Add method. The Add method looks like this:
object.Add item[, key, before, after]
You are required to specify only the object and the item. The object is the collection name. This is the same name that was used in the declaration of the Collection object. The item is the object that you want to add to the collection.
Although other arguments are optional, they are quite useful. It’s important to understand that the items in a collection are automatically assigned numbers starting with 1. However, they can also be assigned a unique key value. Instead of accessing a specific item with an index (1, 2, 3, and so on), you can assign a key for that object at the time an object is added to a collection. For instance, if you are creating a collection of custom sheets, you could use a sheet name as a key. To identify an individual in a collection of students or employees, you could use their ID numbers as a key.
If you want to specify the position of the object in the collection, you should use either a before or after argument (do not use both). The before argument is the object before which the new object is added. The after argument is the object after which the new object is added.
The objects with which you populate your collection do not have to be of the same data type.
The GetComments procedure in Hands-On 8.1 declares a custom collection object named colNotes. We will use this collection to store comments that you insert in a worksheet.
|
Please note files for the “Hands-On” project may be found on the companion CD-ROM. |
|
1. Open a new workbook and save it as C:\VBAPrimerExcel_ByExample\Chap08_ExcelPrimer.xlsm.
2. Right-click any cell in Sheet1 and choose Insert Comment from the shortcut menu. Type any text you want. Click outside the comment frame to exit the comment edit mode. Add two new sheets to the workbook. Use the same technique to enter two comments in Sheet2. Enter different text for each comment. Add a comment in any cell on Sheet3. You should now have four comments in three worksheets.
3. Click the File tab and choose Options. In the Excel Options window’s General section, in the area named “Personalize your copy of Microsoft Office,” you should see a text box with your name. Delete your name and enter Joan Smith, and then click OK. Now, enter one comment anywhere on Sheet2 and one comment anywhere on Sheet3. These comments should be automatically stamped with Joan Smith’s name. When you’re done entering the comment text, return to the Excel Options window and change the User name text box entry back to the way it was (your name).
4. Switch to the Visual Basic Editor and rename the VBA project ObjCol Class.
5. Add a new module to the current project and rename it MyCollection.
6. In the MyCollection module, enter the GetComments procedure, as shown here:
Sub GetComments()
Dim sht As Worksheet
Dim colNotes As New Collection
Dim i As Integer
Dim t As Integer
Dim strName As String
strName = InputBox("Enter author's name:")
For Each sht In ThisWorkbook.Worksheets
sht.Select
i = ActiveSheet.Comments.Count
For Each myNote In ActiveSheet.Comments
If myNote.Author = strName Then
MsgBox myNote.Text
If colNotes.Count = 0 Then
colNotes.Add Item:=myNote, key:="first"
Else
colNotes.Add Item:=myNote, Before:=1
End If
End If
Next
t = t + i
Next
If colNotes.Count <> 0 Then MsgBox colNotes("first").Text
MsgBox "Total comments in workbook: " & t & Chr(13) & "Total comments in collection: " & colNotes.Count
Debug.Print "Comments by " & strName
For Each myNote In colNotes
Debug.Print Mid(myNote.Text, Len(myNote.Author) + 2, Len(myNote.Text))
Next
End Sub
The foregoing procedure begins by declaring the custom collection object called colNotes. Next, the procedure prompts for an author’s name and then loops through all the worksheets in the active workbook to locate this author’s comments. Only comments entered by the specified author are added to the custom collection.
The procedure assigns a key to the first comment and then adds the remaining comments to the collection by placing them before the comment that was added last (notice the use of the before argument). If the collection includes at least one comment, the procedure displays a message box with the text of the comment that was identified with the special key argument. Notice how the key argument is used in referencing an item in a collection. The procedure then prints the text of all the comments included in the collection to the Immediate window.
Text functions (Mid and Len) are used to get only the text of the comment without the author’s name. Next, the total number of comments in a workbook and the total number of comments in the custom collection are returned by the Count property.
7. Run the GetComments procedure twice each time, supplying a different name of the commenting author (your name and Joan Smith). Check the procedure results in the Immediate window.
Removing an item from a custom collection is as easy as adding an item. To remove an object, use the Remove method in the following format:
object.Remove item
The object is the name of the custom collection that contains the object you want to remove. The item is the object you want to remove from the collection.
To demonstrate the process of removing an item from a collection, let’s modify the GetComments procedure that you prepared in the preceding section. At the end of this procedure, we’ll display the contents of the items that are currently in the colNotes collection one by one, and ask the user whether the item should be removed from the collection.
|
1. Add the following lines to the declaration section of the GetComments procedure:
Dim response As Integer
Dim myID As Integer
The first statement declares the variable called response. You will use this variable to store the result of the MsgBox function. The second statement declares the variable myID to store the index number of the Collection object.
2. Locate the following statement in the GetComments procedure:
For Each myNote In colNotes
Precede the foregoing statement with the following line of code:
myID = 1
3. Locate the following statement in the GetComments procedure:
Debug.Print Mid(myNote.Text, Len(myNote.Author) + 2, Len(myNote.Text))
Enter the following block of instructions below that statement:
response = MsgBox("Remove this comment?" & Chr(13) & Chr(13) & myNote.Text, vbYesNo + vbQuestion)
If response = 6 Then
colNotes.Remove Index:=myID
Else
myId = myID + 1
End If
4. Enter the following statements at the end of the procedure before the End Sub keywords:
Debug.Print "These comments remain in the collection:"
For Each myNote in colNotes
Debug.Print Mid(myNote.Text, Len(myNote.Author) + 2, Len(myNote.Text))
Next
The revised GetComments procedure, named GetComments2, is shown here. Note that this procedure removes the specified comments from the custom collection. It does not delete the comments from the worksheets.
Sub GetComments2()
Dim sht As Worksheet
Dim colNotes As New Collection
Dim myNote As Comment
Dim i As Integer
Dim t As Integer
Dim strName As String
Dim response As Integer
Dim myID As Integer
strName = InputBox("Enter author's name:")
For Each sht In ThisWorkbook.Worksheets
sht.Select
i = ActiveSheet.Comments.Count
For Each myNote In ActiveSheet.Comments
If myNote.Author = strName Then
MsgBox myNote.Text
colNotes.Add Item:=myNote, key:="first"
Else
colNotes.Add Item:=myNote, Before:=1
End If
End If
Next
t = t + i
Next
If colNotes.Count <> 0 Then MsgBox colNotes("first").Text
MsgBox "Total comments in workbook: " & t & Chr(13) & "Total comments in collection:" & colNotes.Count
Debug.Print "Comments by " & strName
myID = 1
For Each myNote In colNotes
Debug.Print Mid(myNote.Text, Len(myNote.Author) + 2, Len(myNote.Text))
response = MsgBox("Remove this comment?" & Chr(13) & Chr(13) & myNote.Text, vbYesNo + vbQuestion)
If response = 6 Then
colNotes.Remove index:=myID
Else
myID = myID + 1
End If
Next
MsgBox "Total notes in workbook: " & t & Chr(13) & "Total notes in collection: " & colNotes.Count
Debug.Print "These comments remain in the collection:"
For Each myNote In colNotes
Debug.Print Mid(myNote.Text, Len(myNote.Author) + 2, Len(myNote.Text))
Next
End Sub
5. Run the GetComments2 procedure and remove one of the comments displayed in the message box.
Keep in mind that this procedure manipulates only the custom collection of comments and not the actual comments you entered in the workbook. Therefore, after deleting the comments via the foregoing code, the comments will still be present in the workbook. To delete all comments from the workbook, run the following code:
Sub DeleteWorkbookComments()
Dim myComment As Comment
Dim sht As Worksheet
For Each sht In ThisWorkbook.Worksheets
For Each myComment In sht.Comments
myComment.Delete
Next
Next
End Sub
|
Reindexing Collections |
Collections are reindexed automatically when an object is removed. Therefore, to remove all objects from a custom collection, you can use 1 for the |
Do While myCollection.Count > 0
myCollection.Remove Index:=1
Loop
Visual Basic Editor’s Insert menu has two Module options: Module and Class Module. So far, you’ve used standard modules to create subroutine and function procedures. You’ll use the class module for the first time in this chapter to create a custom class named CAsset and learn how to define its properties and methods.
Before you can create custom objects, you need a basic understanding of what a class is. If you refer back to the beginning of this chapter, you will see that we described a class as a sort of object template. A frequently used analogy is comparing an object class to a cookie cutter. Just as a cookie cutter defines what a particular cookie will look like, the definition of the class determines how a particular object should look and behave. Before you can actually use an object class, you must first create a new instance of that class. Object instances are the cookies. Each object instance has the characteristics (properties and methods) defined by its class. Just as you can cut out many cookies using the same cookie cutter, you can create multiple instances of a class. You can also change the properties of each instance of a class independently of any other instance of the same class.
A class module lets you define your own custom classes, complete with custom properties and methods. Recall that a property is an attribute of an object that defines one of its characteristics, such as shape, position, color, title, and so on. You can create the properties for your custom objects by writing property procedures in a class module. There are three types of property procedures (Property Get, Property Let, and Property Set). You will learn how to work with property procedures in Lab 8.3.
A method is an action that the object can perform. The object methods are also created in a class module by writing subroutines or function procedures. Working with class modules is an advanced topic and covered in this chapter at the introductory level.
![]()
Lab 8.3 will introduce you to the process of creating a custom object named CAsset. This object will contain information about a single computer hardware asset. It will have four properties to hold the information about AssetType, Manufacturer, Model, and Price. It will also have a method that will allow you to modify the price. The asset information that you will use in this project is provided in a text file on the companion CD-ROM disc and depicted in Figure 8.1.

FIGURE 8.1. This text file (AssetInfo.txt) provides the data for the custom CAsset object class.
As you can see in Figure 8.1, the data file contains several lines (records). The data between the quotes is treated as a single field. Fields are delimited by a comma (,). This type of a text file is often called a comma-delimited file or a sequential access file. To successfully complete this lab, you need to know that in sequential access files the data is retrieved in the same order as it is stored. Sequential access files can be opened in Input, Output, or Append mode. In this project you will use the Input mode, which will allow you to read the data from the file into your custom object’s properties. Because the file contains data on several assets, you will also reinforce your understanding about collections by reading the data from the text file into a collection of CAsset objects and then manipulating these objects. So let’s get started.
|
1. Select VBAProject (Chap08_ExcelPrimer.xlsm) in the Project Explorer window and choose Insert | Class Module.
2. Highlight the Class 1 module in the Project Explorer window and use the Properties window to rename the class module CAsset.
|
Naming a Class Module |
Every time you create a new class module, give it a meaningful name. Set the name of the class module to the name you want to use in your VBA procedures that use the class. The name you choose for your class should be easily understood and identify the “thing” the object class represents. As a rule, the object class name is prefaced with an uppercase “C.” |
After adding and renaming the class module, the next step is to declare the variables that will hold the data you want to store in the object. Each item of data you want to store in an object should be assigned a variable. Variables in a class module are called data members and are declared with the Private keyword. This keyword ensures that the variables will be available only within the class module. Using the Private keyword instead of the familiar Dim statement hides the data members and prevents other parts of the application from referencing them. Only the procedures within the class module in which the variables were defined can modify the value of these variables.
Because the name of a variable also serves as a property name, use meaningful names for your object’s data members. It’s traditional to preface the variable names with m_ to indicate that they are data members of a class.
Let’s continue with our project by declaring data members for our CAsset class.
|
1. Type the following declaration lines at the top of the CAsset class module:
'declarations
Private m_AssetType As String
Private m_Manufacturer As String
Private m_Model As String
Private m_Price As Currency
Notice that the name of each data member variable begins with the prefix m_.
Declaring the variables with the Private keyword guarantees that the variables cannot be directly accessed from outside the object. This means that the VBA procedures from outside the class module will not be able to set or read data stored in those variables. To enable other parts of your VBA application to set or retrieve the asset data, you must add special property procedures to the CAsset class module.
There are three types of property procedures:
• Property Let allows other parts of the application to set the value of a property.
• Property Get allows other parts of the application to get or read the value of a property.
• Property Set is used instead of Property Let when setting the reference to an object.
Property procedures are executed when an object property needs to be set or retrieved. The Property Get procedure can have the same name as the Property Let procedure.
You should create property procedures for each property of the object that can be accessed by another part of your VBA application. The easiest of the three types of property statements to understand is the Property Get procedure. Let’s examine the syntax of the property procedures by taking a closer look at the Property Get AssetType procedure. As a rule, the property procedures contain the following parts:
• A procedure declaration line that specifies the name of the property and the data type:
Property Get AssetType() As String
AssetType is the name of the property and As String determines the data type of the property’s return value.
• An assignment statement similar to the one used in a function procedure:
AssetType = m_AssetType
AssetType is the name of the property, and m_AssetType is the data member variable that holds the value of the property you want to retrieve or set. The m_AssetType variable should be defined with the Private keyword at the top of the class module.
• The End Property keywords that specify the end of the property procedure:
Property Get AssetType() As String
AssetType = m_AssetType
End Property
The CAsset class has four properties (AssetType, Manufacturer, Model, and Price) that need to be exposed to a VBA procedure that you will write later. Because this procedure will need to read a data file and then write it into a collection of CAsset objects, the next step requires writing the necessary Property Get and Property Let procedures.
|
1. Type the following Property Get and Let procedures in the CAsset class module, just below the declaration section.
' Property procedures
Property Get AssetType() As String
AssetType = m_AssetType
End Property
Property Let AssetType(ByVal aType As String)
m_AssetType = aType
End Property
Property Get Manufacturer() As String
Manufacturer = m_Manufacturer
End Property
Property Let Manufacturer(ByVal aMake As String)
m_Manufacturer = aMake
End Property
Property Get Model() As String
Model = m_Model
End Property
Property Let Model(ByVal aModel As String)
m_Model = aModel
End Property
Property Get Price() As Currency
Price = m_Price
End Property
Property Let Price(ByVal aPrice As Currency)
m_Price = aPrice
End Property
Notice that each type of the needed asset information requires a separate Property Get procedure. Each of the Property Get procedures returns the current value of the property. The Property Get procedure is similar to a function procedure. Like function procedures, the Property Get procedures contain an assignment statement. As you recall from Chapter 4, to return a value from a function procedure, you must assign it to the function’s name.
|
Immediate Exit from Property Procedures |
Just like the |
In addition to retrieving values stored in data members (private variables) with Property Get procedures, you wrote corresponding Property Let procedures to allow other parts of the application to change the values of these variables as needed. You can make a property read-only by not writing a corresponding property Let procedure.
The Property Let procedures require at least one parameter that specifies the value you want to assign to the property. This parameter can be passed by value (see the ByVal keyword in the Property Let Price procedure shown earlier) or by reference (ByRef is the default). If you need a refresher on the meaning of these keywords, see the section titled “Passing Arguments by Reference and Value” in Chapter 4.
The data type of the parameter passed to the Property Let procedure must have exactly the same data type as the value returned from the Property Get procedure with the same name. Notice that the Property Let procedures have the same name as the Property Get procedures prepared in the preceding section.
|
Defining the Scope of Property Procedures |
You can place the Public, Private, or Static keyword before the name of a property procedure to define its scope. For example, to indicate that the Property Get procedure is accessible to other procedures in all modules, use the following statement format:
Public Property Get AssetType() As String
To make the Property Get procedure accessible only to other procedures in the module where it is declared, use the following statement format:
Private Property Get Model() As String
To preserve the Property Get procedure’s local variables between procedure calls, use the following statement format:
Static Property Get Manufacturer() As String
If not explicitly specified using either Public or Private, property procedures are public by default. Also, if the Static keyword is not used, the values of local variables are not preserved between the procedure calls.
Apart from properties, objects usually have one or more methods. A method is an action that the object can perform. Methods allow you to manipulate data stored in a class object. Methods are created with the sub or function procedures. To make a method available outside the class module, use the Public keyword in front of the sub or function definition.
The CAsset class that you create in this lab has one method that allows you to calculate the new price. Assume that the asset’s price can be decreased by a specific percentage or amount. Let’s continue with our lab by writing a class method that calculates the new price.
|
1. Type the following NewPrice function procedure in the CAsset class module:
' function to calculate new price
Public Function NewPrice(discountType As Integer, currentPrice As Currency, amount As Long) As Currency
If amount >= currentPrice Then
NewPrice = currentPrice
Exit Function
End If
Select Case discountType
Case 1 ' by percent
If amount > 50 Then
amount = 50
End If
NewPrice = currentPrice - ((currentPrice * amount) / 100)
Case 2 ' by amount
NewPrice = currentPrice - amount
End Select
End Function
The NewPrice function defined with the Public keyword in a class module serves as a method for the CAsset class. To calculate a new price, a VBA procedure from outside the class module must pass three arguments: discountType, currentPrice, and amount. The discountType argument specifies the type of the calculation. Suppose you want to decrease the asset price by 5% or by $5. The first option will decrease the price by the specified percentage, and the second option will subtract the specified amount from the current price. The currentPrice argument is the current price figure for an asset, and amount determines the value by which the price should be changed. The other assumptions in the new price calculation that you might want to include can be specified with the conditional statements.
You have now completed the definition of the CAsset class. Every time you define a class you must do this in a class module. In VBA you can define only one class in a class module. The name of the class is the name of the module. A class is a template from which you can create objects. The class specifies the properties and methods that will be common for all objects created from that class.
After defining the class, you can create objects based on that class. This process takes place in a standard module. You start by declaring an object variable. If the name of the class module is CAsset, declare a variable of type CAsset and set that variable to a new instance of the class, like this:
Dim asset As CAsset
Set asset = New CAsset
It is also possible to combine the two statements into a single statement, like this:
Dim asset As New CAsset
The asset variable represents a reference to an object of the CAsset class. You can name your object variable anything you want except you cannot use any of the VBA reserved words. All the properties and methods defined in CAsset class will now be available in the asset variable. When you declare the object variable with the New keyword, VBA creates the object and allocates memory for it; however, the object isn’t instanced until you refer to it in your procedure code by assigning a value to its property or running one of its methods.
Let’s continue our hands-on lab project by writing the VBA procedure that reads the data from the text file into a collection of CAsset objects.
|
1. In the Visual Basic Editor screen, choose Insert | Module to add a standard module to the current VBA project.
2. In the Properties window, rename the module AssetInfo.
3. In the Project Explorer window, double-click the AssetInfo module to activate the Code window.
4. In the AssetInfo Code window, enter the Retrieve_AssetInfo procedure as shown here:
Sub Retrieve_AssetInfo()
' declare two object variables
' one for the object and the other
' for the collection of objects
Dim asset As CAsset
Dim AssetsColl As Collection
' declare variables for reading the data file
Dim strAssetType As String
Dim strMake As String
Dim strModel As String
Dim itemPrice As String
' declare a variable to specify discount type
' in the calculation of new asset price
Dim intDiscount As Integer
' declare variables used by the MsgBox function
Dim strTitle As String
Dim strPrompt As String
' declare variables to facilitate data
' entry in a worksheet and the Immediate window
Dim strFilePath As String
Dim strRecord As String
Dim wRow As Integer
' declare variables used for collection purpose
Dim counter As Integer
Dim aKey As String
' declare variables for accessing an object
' in a collection via a key
Dim assetKey As String
'Dim m As Object
' if error occurs go to the next statement
On Error Resume Next
' initialize various variables
strFilePath = "C:\VBAPrimerExcel_ByExample\AssetInfo.txt"
counter = 0
wRow = 1
strPrompt = "Enter 1 for the percent discount or "
strPrompt = strPrompt + "2 for the amount discount"
strTitle = "Price Discount Type"
' create an instance of the collection object
Set AssetsColl = New Collection
' open the text file for reading
Open strFilePath For Input As #1
'check is the file is available
If Err.Number <> 0 Then
MsgBox "File not found!", vbCritical, "File Error"
Exit Sub
End If
' ask the user the type of discount to apply
intDiscount = CInt(InputBox(strPrompt, strTitle, 1))
' add a new empty worksheet
ActiveWorkbook.Worksheets.Add
' -------------------------------------
' loop until end of file is encountered
' -------------------------------------
Do While Not EOF(1)
'read data from the text file into four variables
Input #1, strAssetType, strMake, strModel, itemPrice
If strAssetType = "AssetType" Then
' ----------------------------------------------
' enter column headings in the worksheet 1st row
' 5th column is for new price calculation
' ----------------------------------------------
With ActiveSheet
.Cells(1, 1) = strAssetType
.Cells(1, 2) = strMake
.Cells(1, 3) = strModel
.Cells(1, 4) = itemPrice
.Cells(1, 5) = "New " & itemPrice
End With
' skip lines of code following the if statement
GoTo Label_SkipHeading
End If
'---------------------------------------
' create an instance of the CAsset class
'---------------------------------------
Set asset = New CAsset
counter = counter + 1
aKey = "record" & counter
'-----------------------------------
' set properties of the asset object
'-----------------------------------
asset.AssetType = strAssetType
asset.Manufacturer = strMake
asset.Model = strModel
asset.Price = itemPrice
'----------------------------------------------
' add asset object to the AssetsColl collection
' and assign a custom key for that object
'----------------------------------------------
AssetsColl.Add asset, aKey
Set asset = Nothing
Label_SkipHeading:
Resume Next
Loop
'Close the text file
Close #1
' display informational message
MsgBox "Asset Collection contains " & AssetsColl.Count & " items.", vbInformation, "Total Items"
'------------------------------------------
' iterate through the collection and access
' each instance of the CAsset class
' printing the data to the Immediate window
'------------------------------------------
Debug.Print asset.AssetType & vbTab & asset.Manufacturer & vbTab & asset.Model & vbTab & FormatNumber(asset.Price, 2)
Next asset
'----------------------------------------------
' iterate through the collection to access
' each instance of the CAsset class
' this time entering data the active worksheet
'----------------------------------------------
For Each asset In AssetsColl
'set next row in the worksheet
wRow = wRow + 1
'write record to the worksheet
With ActiveSheet
.Cells(wRow, 1) = asset.AssetType
.Cells(wRow, 2) = asset.Manufacturer
.Cells(wRow, 3) = asset.Model
.Cells(wRow, 4) = asset.Price
' calculate the discount
.Cells(wRow, 5) = asset.NewPrice(intDiscount, asset.Price, 100)
End With
Next asset
Selection.CurrentRegion.Columns.AutoFit
'retrieve the asset from a collection by a key
assetKey = InputBox("Enter key", "Retrieval", "record1")
Set asset = AssetsColl.Item(assetKey)
strRecord = "Asset Type" & vbTab & asset.AssetType & vbCrLf
strRecord = strRecord & "Manufacturer" & vbTab & asset.Manufacturer & vbCrLf
strRecord = strRecord & "Model" & vbTab & vbTab & asset.Model & vbCrLf
strRecord = strRecord & "Price" & vbTab & vbTab & Format(asset.Price, "Currency")
MsgBox strRecord, vbInformation + vbOKOnly, "Retrieving " & assetKey
End Sub
5. Run the Retrieve_AssetInfo procedure. Reply to all the procedure prompts by accepting the default values.
After running the procedure, you should see the asset data entered in a worksheet and in the Immediate window as shown in Figures 8.2 and 8.3.
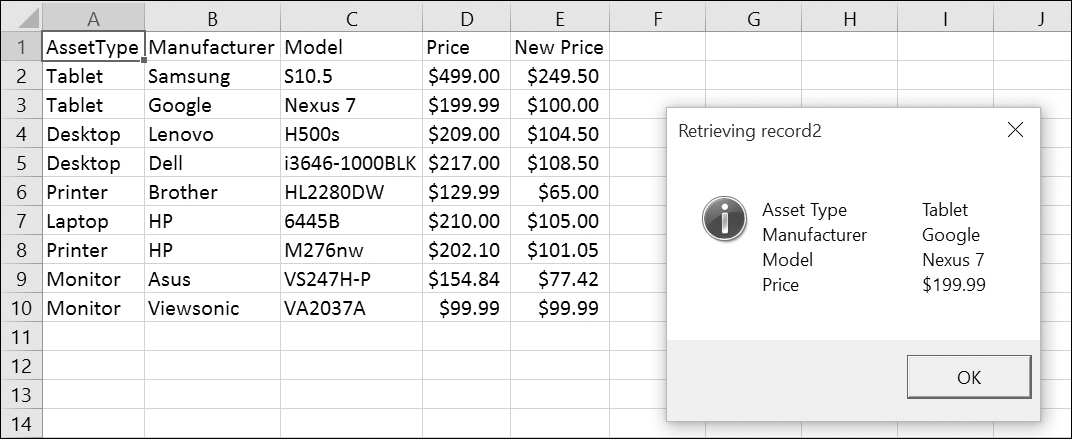
FIGURE 8.2. The asset data in the provided text file (see Figure 8.1) is stored in a collection of objects and written to the worksheet. The New Price column does not exist in the original file and was added by the VBA procedure to demonstrate the use of class methods.
The Retrieval input box demonstrates how a key can be used for accessing objects in a collection. The asset details for the specified record are displayed in a message box above.

FIGURE 8.3. The asset data in the provided text file (see Figure 8.1) is written to the Immediate window.
The Retrieve_AssetInfo procedure starts off by declaring and initializing a whole bunch of variables that will be used by various sections of the code. Because you are dealing with an external file, you want to make sure that if the file cannot be found, a message is displayed and the procedure ends. The Number property of the VBA Err object will return a number other than zero if some problem was encountered while opening the file. To read the file, you must open it in Input mode using the following statement:
Open strFilePath For Input As #1
Once the file is open, you want to read it sequentially from top to bottom. This can be done using the Do While or Do Until loop that you learned in Chapter 6. Text files contain a special character known as an end-of-file marker that is appended to the file by the operating system. When reading the file, you can use the EOF function to detect that marker and thus know if the end of file was reached. The statement
Do While Not EOF(1)
means that you want to keep executing the statements inside the loop until all data in the file has been read. This statement is equivalent to Do Until EOF(1). The number between the parentheses is a number corresponding to the file number from which you want to read the data (the same number that was used in the Open statement).
Each time in the loop, we use the Input # statement to read the data from the file into four variables:
Input #1, strAssetType, strMake, strModel, itemPrice
Note that there are other ways of reading text files in VBA but they are beyond the scope of this primer book.
After writing out the column names into the worksheet, we create our asset object and set its four properties (AssetType, Manufacturer, Model, and Price), using the values stored in the variables:
asset.AssetType = strAssetType
asset.Manufacturer = strMake
asset.Model = strModel
asset.Price = itemPrice
Each of the foregoing assignment statements is actually a call to the appropriate Let procedure in the CAsset class module. For example, to set the AssetType property of the asset object, the following procedure is executed:
Property Let AssetType(ByVal aType As String)
m_AssetType = aType
End Property
You can execute the procedure line by line (see the next chapter) to gain better understanding of what’s going on when these statements are being executed.
At this point the asset object contains the first record data, which is the second line in our text file. Before handling the next record’s data, we use the Add method to add the asset object to the AssetsColl collection:
AssetsColl.Add asset, aKey
Each object in the collection is identified by a key that we create by concatenating a number and the word “record,” obtaining “record1,” “record2,” “record3,” and so on.
After adding the asset object to the collection, we release the memory by setting it to Nothing and we continue to the next record, executing the statements within the loop, skipping only those that were used for the preparation of the column headings. A new object is created, its properties are set, and the object is added to the collection. The same process repeats until the EOF is reached. When we are done looping, we close the file using the Close#1 statement. We should now have 9 asset objects in the AssetsColl collection. The remaining code in the procedure iterates through the collection of objects and prints the data to the immediate window and to the worksheet. When we retrieve the objects from the collection, VBA goes on to execute the Property Get procedures that you wrote in the CAsset class module. When writing the New Price to the worksheet we call the NewPrice method. This method uses the intDiscount variable whose value was obtained from the user earlier in the procedure. If you accepted the default value in the input box, then the Price is reduced by the specified percentage. The last parameter of the NewPrice method, which denotes amount, is hardcoded. Based on the entered amount, the IF statements included in the NewPrice method will execute or will be skipped. When entering prices, it is often necessary to appropriately format the data. The Retrieve_AssetInfo procedure uses the FormatNumber function to format the Price data in the Immediate window:
FormatNumber(asset.Price, 2)
The second argument of the FormatNumber function specifies how many places to the right of the decimal are displayed. To format the number as Currency, change the foregoing statement to:
FormatCurrency(asset.Price, 2)
In this chapter, you learned how to create and use your own objects and collections in VBA procedures. You used a class module to create a custom object, and you saw how to define your object’s properties using Property Get and Property Let procedures. You also learned how to write a method for your custom object. In the next chapter, you will learn how to troubleshoot your VBA procedures.