
Please note files for the “Hands-On” project may be found on the companion CD-ROM.
| Chapter 4 | EXCEL VBA PROCEDURES |
| A QUICK GUIDE TO WRITING FUNCTION PROCEDURES |
Earlier in this book you learned that a procedure is a group of instructions that allows you to accomplish specific tasks when your program runs. In this book you get acquainted with the following types of VBA procedures:
• Subroutine procedures (subroutines) perform some useful tasks but don’t return any values. They begin with the keyword Sub and end with the keywords End Sub. Subroutines can be recorded with the macro recorder or written from scratch in the Visual Basic Editor window. In Chapter 1, you learned various ways to execute this type of procedure.
• Function procedures (functions) perform specific tasks that return values. They begin with the keyword Function and end with the keywords End Function. In this chapter, you will create your first function procedure. Function procedures can be executed from a subroutine or accessed from a worksheet just like any Excel built-in function.
• Property procedures are used with custom objects. Use them to set and get the value of an object’s property or set a reference to an object. You will learn how to create custom objects and use property procedures in Chapter 8.
In this chapter, you will learn how to create and execute custom functions. In addition, you find out how variables are used in passing values to subroutines and functions. Later in the chapter, you will take a thorough look at the two most useful VBA built-in functions: MsgBox and InputBox.
With the hundreds of built-in Excel functions, you can perform a wide variety of calculations automatically. However, there will be times when you may require a custom calculation. With VBA programming, you can quickly fulfill this special need by creating a function procedure. You can build any functions that are not supplied with Excel. Among the reasons for creating custom VBA functions are the following:
• analyze data and perform calculations
• modify data and report information
• take a specific action based on supplied or calculated data
Like Excel functions, function procedures perform calculations and return values. The best way to learn about functions is to create one, so let’s get started. After setting up a new VBA project, you will create a simple function procedure that sums two values.
|
Please note files for the “Hands-On” project may be found on the companion CD-ROM. |
|
1. Open a new Excel workbook and save it as C:\ VBAPrimerExcel_ByExample\Chap04_ExcelPrimer.xlsm.
2. Switch to the Visual Basic Editor window and select VBAProject (Chap04_ExcelPrimer.xlsm).
3. In the Properties window, change the name of the project name to ProcAndFunctions.
4. Select the ProcAndFunctions (Chap04_ExcelPrimer.xlsm) project in the Project Explorer window, and choose Insert | Module.
5. In the Properties window, change the Module1 name to Sample1.
6. In the Project Explorer window, highlight Sample1 and click anywhere in the Code window. Choose Insert | Procedure. The Add Procedure dialog box appears.
7. In the Add Procedure dialog box, make the entries shown in Figure 4.1:
Name: SumItUp
Scope: Public
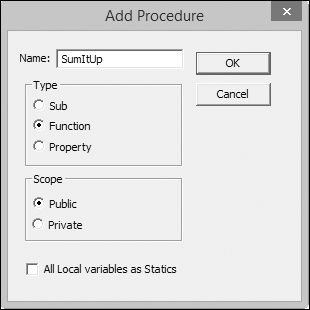
FIGURE 4.1. When you use the Add Procedure dialog box, Visual Basic automatically creates the procedure type you choose.
8. Click OK to close the Add Procedure dialog box. Visual Basic enters an empty function procedure that looks like this:
Public Function SumItUp()
End Function
9. Modify the function declaration as follows:
Public Function SumItUp(m,n)
End Function
The purpose of this function is to add two values. Instead of passing the actual values to the function, you can make the function more flexible by providing it with the arguments in the form of variables. By doing this, your custom function will be able to add any two numbers that you specify. Each of the passed-in variables (m, n) represents a value. You will supply the values for each of these variables when you run this function.
10. Type the following statement between the Public Function and End Function statements:
SumItUp = m + n
This statement instructs Visual Basic to add the value stored in the n variable to the value stored in the m variable and return the result to the SumItUp function. To specify the value that you want the function to return, type the function name followed by the equals sign and the value you want it to return. In the foregoing statement, set the name of the function equal to the total of m + n. The completed custom function procedure is shown here:
Public Function SumItUp(m,n)
SumItUp = m + n
End Function
The first statement declares the name of the function procedure. The Public keyword indicates that the function is accessible to all other procedures in all other modules. The Public keyword is optional. Notice the keyword Function followed by the name of the function (SumItUp) and a pair of parentheses. In the parentheses, you will list the data items that the function will use in the calculation. Every function procedure ends with the End Function statement.
|
About Function Names |
Function names should suggest the role that the function performs, and must conform to the rules for naming variables (see Chapter 3). |
|
Scoping VBA Procedures |
In the previous chapter, you learned that the variable’s scope determines which modules and procedures it can be used in. Like variables, VBA procedures have scope. A procedure scope determines whether it can be called by procedures in other modules. By default, all VBA procedures are public. This means they can be called by other procedures in any module. Because procedures are public by default, you can skip the |
Unlike a subroutine, a function procedure can be executed in just two ways: You can use it in a worksheet formula or you can call it from another procedure. In the following sections, you will learn special techniques for executing functions.
A custom function procedure is like an Excel built-in function. If you don’t know the exact name of the function or its arguments, you can use the Formula palette to help enter the required function in a worksheet as shown in Hands-On 4.2.
|
Hands-On 4.2. Executing a Function Procedure from within an Excel Worksheet |
1. Switch to the Microsoft Excel window and select any cell.
2. Click the Insert Function (fx) button on the Formula bar. Excel displays the Insert Function dialog box. The lower portion of the dialog box displays an alphabetical listing of all the functions in the selected category.
3. In the category drop-down box, select User Defined. In the function name box, locate and select the SumItUp function that was created in Hands-On 4.1. When you highlight the name of the function in the function name box (Figure 4.2), the bottom part of the dialog box displays the function’s syntax: SumItUp(m,n).
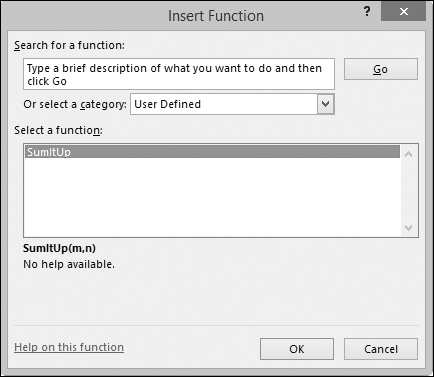
FIGURE 4.2. VBA custom function procedures are listed under the User Defined category in the Insert Function dialog box. They also appear in the list of all Excel built-in functions when you select All in the category drop-down.
4. Click OK to begin writing a formula. The Function Arguments dialog box appears, as shown in Figure 4.3. This dialog displays the name of the function and each of its arguments: m and n.
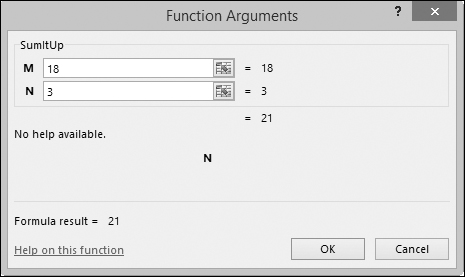
FIGURE 4.3. The Formula palette feature is helpful in entering any worksheet function, whether built-in or custom-made with VBA programming.
5. Enter the values for the arguments as shown in Figure 4.3, or enter your own values. As you type the values in the argument text boxes, Excel displays the values you entered and the current result of the function. Because both arguments (m and n) are required, the function will return an error if you skip either one of the arguments.
6. Click OK to exit the Function Arguments dialog.
Excel enters the SumItUp function in the selected cell and displays its result.
7. To edit the function, select the cell that displays the function’s result and click the Insert Function (fx) button to access the Function Arguments dialog box. Enter new values for the function’s m and n arguments and click OK.
NOTE |
To edit the arguments’ values directly in the cell, double-click the cell containing the function and make the necessary changes. You may also set up the |
To execute a custom function, write a VBA subroutine and call the function when you need it. The following procedure calls the SumItUp function and prints the result of the calculation to the Immediate window.
|
1. In the same module where you entered the code of the SumItUp function procedure, enter the RunSumItUp procedure.
Sub RunSumItUp()
Dim m As Single, n As Single
m = 37
n = 3459.77
Debug.Print SumItUp(m,n)
MsgBox "Open the Immediate Window to see the result."
End Sub
Notice how the foregoing subroutine uses one Dim statement to declare the m and n variables. These variables will be used to feed the data to the function. The next two statements assign the values to those variables. Next, Visual Basic calls the SumItUp function and passes the values stored in the m and n variables to it. When the function procedure statement SumItUp = m + n is executed, Visual Basic returns to the RunSumItUp subroutine and uses the Debug.Print statement to print the function’s result to the Immediate window. Finally, the MsgBox function informs the user where to look for the result. You can find more information about using the MsgBox function later in this chapter.
2. Place the mouse pointer anywhere within the RunSumItUp procedure and press F5 to run it.
Your custom VBA function is available only as long as the workbook where the function is stored is open. If you close the workbook, the function is no longer available. To make sure that your custom VBA functions are available every time you work with Microsoft Excel, you can do one of the following:
• Store your functions in the Personal macro workbook.
• Save the workbook with your custom VBA function in the XLStart folder.
• Set up a reference to the workbook containing your custom functions.
|
A Quick Test of a Function |
After you write your custom function, you can quickly try it out in the Immediate window. To display the value of a function, open the Immediate window and type a question mark (?) followed by the function name. Remember to enclose the function’s arguments in parentheses.
For example, type:
? SumItUp(54, 367.24)
and press Enter. Your function procedure runs, using the values you passed for the m and n arguments. The result of the function appears on a line below:
421.24
Procedures (both subroutines and functions) often take arguments. Arguments are one or more values needed for a procedure to do something. Arguments are entered within parentheses. Multiple arguments are separated with commas.
Having used Excel for a while, you already know that Excel’s built-in functions can produce different results based on the values you supply to them. For example, if cells A4 and A5 contain the numbers 5 and 10, respectively, the Sum function =SUM(A4:A5) will return 15, unless you change the values entered in the specified cells. Just like you can pass any values to Excel’s built-in functions, you can pass values to custom VBA procedures.
Let’s see how you can pass some values from a subroutine procedure to the SumItUp function. We will write a procedure that collects the user’s first and last names. Next, we will call the SumItUp function to get the sum of characters in a person’s first and last names.
|
1. Type the following NumOfCharacters subroutine in the same module (Sample1) where you entered the SumItUp function:
Sub NumOfCharacters()
Dim f As Integer
Dim l As Integer
f = Len(InputBox("Enter first name:"))
l = Len(InputBox("Enter last name:"))
MsgBox SumItUp(f,l)
End Sub
2. Place the mouse pointer within the code of the NumOfCharacters procedure and press F5. Visual Basic displays the input box asking for the first name. This box is generated by the following function: InputBox("Enter first name:"). For more information on the use of this function, see the section titled “Using the InputBox Function” later in this chapter.
3. Enter any name, and press Enter or click OK. Visual Basic takes the text you entered and supplies it as an argument to the Len function. The Len function calculates the number of characters in the supplied text string. Visual Basic places the result of the Len function in the f variable for further reference. After that, Visual Basic displays the next input box, this time asking for the last name.
4. Enter any last name, and press Enter or click OK.
Visual Basic passes the last name to the Len function to get the number of characters. Then that number is stored in the l variable. What happens next? Visual Basic encounters the MsgBox function. This function tells Visual Basic to display the result of the SumItUp function. However, because the result is not yet ready, Visual Basic jumps quickly to the SumItUp function to perform the calculation using the values saved earlier in the f and l variables. Inside the function procedure, Visual Basic substitutes the m argument with the value of the f variable and the n argument with the value of the l variable. Once the substitution is done, Visual Basic adds up the two numbers and returns the result to the SumItUp function.
There are no more tasks to perform inside the function procedure, so Visual Basic returns to the subroutine and provides the SumItUp function’s result as an argument to the MsgBox function. Now a message appears on the screen displaying the total number of characters.
5. Click OK to exit the message box.
You can run the NumOfCharacters procedure as many times as you’d like, each time supplying different first and last names.
To pass a specific value from a function to a subroutine, assign the value to the name of the function. For example, the NumOfDays function shown here passes the value of 7 to the subroutine DaysInAWeek.
Function NumOfDays()
NumOfDays = 7
End Function
Sub DaysInAWeek()
MsgBox "There are " & NumOfDays & " days in a week."
End Sub
In the preceding section, you learned that functions perform some calculations based on data received through their arguments. When you declare a function procedure, you list the names of arguments inside a set of parentheses. Argument names are like variables. Each argument name refers to whatever value you provide at the time the function is called. When a subroutine calls a function procedure, it passes the required arguments as variables to it. Once the function does something, the result is assigned to the function name. Notice that the function procedure’s name is used as if it were a variable.
Like variables, functions can have types. The result of your function procedure can be String, Integer, Long, and so on. To specify the data type for your function’s result, add the keyword As and the name of the desired data type to the end of the function declaration line—for example:
Function MultiplyIt(num1, num2) As Integer
Let’s take a look at an example of a function that returns an Integer number, although the arguments passed to it are declared as Single data types in a calling subroutine.
|
1. Add a new module to the ProcAndFunctions (Chap04_ExcelPrimer.xlsm) project and change the module’s name to Sample2.
2. Activate the Sample2 module and enter the HowMuch subroutine as shown here:
Sub HowMuch()
Dim num1 As Single
Dim num2 As Single
Dim result As Single
num1 = 45.33
num2 = 19.24
result = MultiplyIt(num1, num2)
MsgBox result
End Sub
3. Enter the MultiplyIt function procedure below the HowMuch subroutine:
Function MultiplyIt(num1, num2) As Integer
MultiplyIt = num1 * num2
End Function
Because the values stored in the variables num1 and num2 are not whole numbers, you may want to assign the Integer data type to the result of the function to ensure that the result is a whole number. If you don’t assign the data type to the MultiplyIt function’s result, the HowMuch procedure will display the result in the data type specified in the declaration line of the result variable. Instead of 872, the result of the multiplication will be 872.1492.
4. Run the HowMuch procedure.
How about passing different values each time you run the procedure? Instead of hardcoding the values to be used in the multiplication, you can use the InputBox function to ask the user for the values at runtime—for example:
num1 = InputBox("Enter a number:")
The InputBox function is discussed in detail in a later section of this chapter.
In some procedures, when you pass arguments as variables, Visual Basic can suddenly change the value of the variables. To ensure that the called function procedure does not alter the value of the passed-in arguments, you should precede the name of the argument in the function’s declaration line with the keyword ByVal. Let’s look at the following example.
|
1. Add a new module to the ProcAndFunctions (Chap04_ExcelPrimer.xlsm) project and change the module’s name to Sample3.
2. Activate the Sample3 module and type the procedures shown here:
Sub ThreeNumbers()
Dim num1 As Integer, num2 As Integer, num3 As Integer
num1 = 10
num2 = 20
num3 = 30
MsgBox MyAverage(num1, num2, num3)
MsgBox num1
MsgBox num2
MsgBox num3
End Sub
Function MyAverage(ByVal num1, ByVal num2, ByVal num3) num1 = num1 + 1
MyAverage = (num1 + num2 + num3) / 3
End Function
To prevent the function from altering values of arguments, use the keyword ByVal before the arguments’ names (see the “Know Your Keywords: ByRef and ByVal” sidebar).
3. Run the ThreeNumbers procedure.
The ThreeNumbers procedure assigns values to three variables and then calls the MyAverage function to calculate and return the average of the numbers stored in these variables. The function’s arguments are the variables num1, num2, and num3. Notice that all of the function arguments are preceded with the keyword ByVal. Also, notice that prior to the calculation of the average, the MyAverage function changes the value of the num1 variable. Inside the function procedure, the num1 variable equals 11 (10 + 1). Therefore, when the function passes the calculated average to the ThreeNumbers procedure, the MsgBox function displays the result as 20.3333333333333 and not 20, as expected. The next three MsgBox functions show the contents of each of the variables. The values stored in these variables are the same as the original values assigned to them—10, 20, and 30.
What will happen if you omit the keyword ByVal in front of the num1 argument in the MyAverage function’s declaration line? The function’s result will still be the same, but the contents of the num1 variable displayed by MsgBox num1 is now 11. The MyAverage function has not only returned an unexpected result (20.3333333333333 instead of 20) but also modified the original data stored in the num1 variable. To prevent Visual Basic from permanently changing the values supplied to the function, use the ByVal keyword.
At times you may want to supply an additional value to a function. Let’s say you have a function that calculates the price of a meal per person. Sometimes, however, you’d like the function to perform the same calculation for a group of two or more people. To indicate that a procedure argument is not always required, precede the name of the argument with the Optional keyword. Arguments that are optional come at the end of the argument list, following the names of all the required arguments.
Optional arguments must always be the Variant data type. This means that you can’t specify the optional argument’s type by using the As keyword. In the preceding section, you created a function to calculate the average of three numbers. Suppose that sometimes you’d like to use this function to calculate the average of two numbers. You could define the third argument of the MyAverage function as optional.
To preserve the original MyAverage function, let’s create the Avg function to calculate the average for two or three numbers.
|
1. Add a new module to the ProcAndFunctions (Chap04_ExcelPrimer.xlsm) project and change the module’s name to Sample4.
2. Activate the Sample4 module and enter the function procedure Avg shown here:
Function Avg(num1, num2, Optional num3)
Dim totalNums As Integer
totalNums = 3
If IsMissing(num3)Then
num3 = 0
totalNums = totalNums - 1
End If
Avg = (num1+num2+num3)/totalNums
End Function
Let’s take a few minutes to analyze the Avg function. This function can take up to three arguments. The arguments num1 and num2 are required. The argument num3 is optional. Notice that the name of the optional argument is preceded with the Optional keyword. The optional argument is listed at the end of the argument list. Because the type of the num1, num2, and num3 arguments is not declared, Visual Basic treats all of these arguments as Variants. Inside the function procedure, the totalNums variable is declared as an Integer and then assigned a beginning value of 3. Because the function has to be capable of calculating an average of two or three numbers, the handy built-in function IsMissing checks for the number of supplied arguments. If the third (optional) argument is not supplied, the IsMissing function puts in its place the value of zero (0), and at the same time it deducts the value of 1 from the value stored in the totalNums variable. Hence, if the optional argument is missing, totalNums is 2. The next statement calculates the average based on the supplied data, and the result is assigned to the name of the function.
The IsMissing function allows you to determine whether the optional argument was supplied. This function returns the logical value true if the third argument is not supplied, and it returns false when the third argument is given. The IsMissing function is used here with the decision-making statement If…Then. (See Chapter 5 for a detailed description of decision-making statements used in VBA.) If the num3 argument is missing (IsMissing), then (Then) Visual Basic supplies a zero for the value of the third argument (num3 = 0) and reduces the value stored in the argument totalNums by one (totalNums = totalNums – 1).
3. Now call this function from the Immediate window like this:
?Avg(2,3)
As soon as you press Enter, Visual Basic displays the result: 2.5. If you enter the following:
?Avg(2,3,5)
this time the result is 3.3333333333333.
As you’ve seen, the Avg function allows you to calculate the average of two or three numbers. You decide which values and how many values (two or three) you want to average. When you start typing the values for the function’s arguments in the Immediate window, Visual Basic displays the name of the optional argument enclosed in square brackets.
How else can you run the Avg function? On your own, run this function from a worksheet. Make sure you run it with two and then with three arguments.
To test whether a custom function does what it was designed to do, write a simple subroutine that will call the function and display its result. In addition, the subroutine should show the original values of arguments. This way, you’ll be able to quickly determine when the values of arguments were altered. If the function procedure uses optional arguments, you’ll also need to check those situations in which the optional arguments may be missing.
VBA comes with numerous built-in functions. These functions can be looked up in the Visual Basic online help:
http://msdn.microsoft.com/en-us/library/office/jj692811.aspx
Take, for example, the MsgBox or InputBox function. One of the features of a good program is its interaction with the user. When you work with Microsoft Excel, you interact with the application by using various dialog boxes. When you make a mistake, a dialog box comes up and displays a message informing you of the error. When you write your own procedures, you can also inform the users about an unexpected error or the result of a specific calculation. You do this with the help of the MsgBox function. So far you have seen a simple implementation of this function. In the next section, you will find out how to control the way your message looks. You will also learn how to get information from the user with the InputBox function.
The MsgBox function that you have used thus far was limited to displaying a message to the user in a simple one-button dialog box. You closed the message box by clicking the OK button or pressing the Enter key. You create a simple message box by following the MsgBox function name with the text enclosed in quotation marks. In other words, to display the message “The procedure is complete.” you write the following statement:
MsgBox "The procedure is complete."
You can quickly try out the foregoing instruction by entering it in the Immediate window. When you type this instruction and press Enter, Visual Basic displays the message box shown in Figure 4.4.

FIGURE 4.4. To display a message to the user, place the text as the argument of the MsgBox function.
The MsgBox function allows you to use other arguments that make it possible to set the number of buttons that should be available in the message box or change the title of the message box from the default, “Microsoft Excel.” You can also assign your own help topic.
The syntax of the MsgBox function is as follows:
MsgBox (prompt [, buttons] [, title], [, helpfile, context])
Notice that while the MsgBox function has five arguments, only the first one, prompt, is required. The arguments listed in square brackets are optional. When you enter a long text string for the prompt argument, Visual Basic decides how to break the text so it fits the message box. Let’s do some exercises in the Immediate window to learn various text formatting techniques.
|
Hands-On 4.8. Formatting Text for Display in the MsgBox Function |
1. Enter the following instruction in the Immediate window. Be sure to enter the entire text string on one line, and then press Enter.
MsgBox "All processes completed successfully. Now connect an external storage device to your computer. The following procedure will copy the workbook file to the attached device."
As soon as you press Enter, Visual Basic shows the resulting dialog box (Figure 4.5).

FIGURE 4.5. This long message will look more appealing when you take the text formatting into your own hands.
When you write a VBA procedure that requires long messages, you can break your message text into several lines using the VBA Chr function. The Chr function takes one argument (a number from 0 to 255), and it returns a character represented by this number. For example, Chr(13) returns a carriage return character (this is the same as pressing the Enter key), and Chr(10) returns a linefeed character (useful for adding spacing between the text lines).
Sub LongTextMessage()
MsgBox "All processes completed successfully. " & Chr(13) & "Now connect an external storage device to " & Chr(13) & "your computer. The following procedure " & Chr(13) & "will copy the workbook file to the attached device."
End Sub
Figure 4.6 depicts the message box after running the LongTextMessage procedure.

FIGURE 4.6. You can break a long text string into several lines by using the Chr(13) function.
You must surround each text fragment with quotation marks. The Chr(13) function indicates a place where you’d like to start a new line. The string concatenation character (&) is used to add a carriage return character to a concatenated string.
Quoted text embedded in a text string requires an additional set of quotation marks, as shown in the revised statement here:
Sub LongTextMessageRev()
MsgBox "All processes completed successfully. " & Chr(13) & "Now connect an external storage device to " & Chr(13) & "your computer. " & "The following procedure ""TestProc()""" & Chr(13) & "will copy the workbook file " & "to the attached device."
End Sub
When you enter exceptionally long text messages on one line, it’s easy to make a mistake. As you recall, Visual Basic has a special line continuation character (an underscore _) that allows you to break a long VBA statement into several lines. Unfortunately, the line continuation character cannot be used in the Immediate window.
2. Add a new module to the ProcAndFunctions (Chap04_ExcelPrimer.xlsm) project and change the module’s name to Sample5.
3. Activate the Sample5 module and enter the LongTextMessage and LongTextMessageRev subroutines as shown earlier. Be sure to precede each line continuation character (_) with a space.
4. Execute each procedure.
Notice that the text entered on several lines is more readable, and the code is easier to maintain.
To improve the readability of your message, you may want to add more spacing between the text lines by including blank lines. To do this, use two Chr(13) or two Chr(10) functions, as shown in the following step.
5. Enter the following LongTextMessage2 procedure and run it:
Sub LongTextMessage2()
MsgBox "All processes completed successfully. " & Chr(10) & Chr(10) & "Now connect an external storage device " & Chr(13) & Chr(13) & "to your computer. The following procedure " & Chr(10) & Chr(10) & "will copy the workbook file to the attached device."
End Sub
Figure 4.7 displays the message box generated by the LongTextMessage2 procedure.

FIGURE 4.7. You can increase the readability of your message by increasing spacing between the selected text lines.
Now that you’ve mastered the text formatting techniques, let’s take a closer look at the next argument of the MsgBox function. Although the buttons argument is optional, it is frequently used. The buttons argument specifies how many and what types of buttons you want to appear in the message box. This argument can be a constant or a number, as shown in Table 4.1. If you omit this argument, the resulting message box includes only the OK button, as you’ve seen in the preceding examples.
TABLE 4.1. Settings for the |
||
Constant |
Value |
Description |
Button settings |
||
|
0 |
Displays only an OK button. This is the default. |
|
1 |
OK and Cancel buttons. |
|
2 |
Abort, Retry, and Ignore buttons. |
|
3 |
Yes, No, and Cancel buttons. |
|
4 |
Yes and No buttons. |
|
5 |
Retry and Cancel buttons. |
Icon settings |
||
|
16 |
Displays the Critical Message icon. |
|
32 |
Displays the Question Message icon. |
|
48 |
Displays the Warning Message icon. |
|
64 |
Displays the Information Message icon. |
Default button settings |
||
|
0 |
The first button is the default. |
|
256 |
The second button is the default. |
|
512 |
The third button is the default. |
|
768 |
The fourth button is the default. |
Message box modality |
||
|
0 |
The user must respond to the message before continuing to work in the current application. |
|
4096 |
All applications are suspended until the user responds to the message box. |
Other MsgBox display settings |
||
|
16384 |
Adds Help button to the message box. |
|
65536 |
Specifies the message box window as the foreground window. |
|
524288 |
Text is right aligned. |
|
1048576 |
Text appears as right-to-left reading on Hebrew and Arabic systems. |
When should you use the buttons argument? Suppose you want the user of your procedure to respond to a question with Yes or No. Your message box may then require two buttons. If a message box includes more than one button, one of them is considered a default button. When the user presses Enter, the default button is selected automatically. Because you can display various types of messages (critical, warning, information), you can visually indicate the importance of the message by including in the buttons argument the graphical representation (icon) for the chosen message type.
In addition to the type of message, the buttons argument can include a setting to determine whether the message box must be closed before a user switches to another application. It’s quite possible that the user may want to switch to another program or perform another task before responding to the question posed in your message box. If the message box is application modal (vbApplication Modal), the user must close the message box before continuing to use your application. On the other hand, if you want to suspend all the applications until the user responds to the message box, you must include the vbSystemModal setting in the buttons argument.
The buttons argument settings are divided into five groups: button settings, icon settings, default button settings, message box modality, and other MsgBox display settings. Only one setting from each group can be included in the buttons argument. To create a buttons argument, you can add up the values for each setting you want to include. For example, to display a message box with two buttons (Yes and No), the question mark icon, and the No button as the default button, look up the corresponding values in Table 4.1 and add them up. You should arrive at 292 (4 + 32 + 256).
Let’s go back to the Immediate window for more testing of the capabilities of the MsgBox function.
|
Hands-On 4.9. Using the MsgBox Function with Arguments (Example 1) |
1. To quickly see the message box using the calculated message box argument, enter the following statement in the Immediate window, and press Enter:
MsgBox "Do you want to proceed?", 292
The resulting message box is shown in Figure 4.8.

FIGURE 4.8. You can specify the number of buttons to include in the message box by using the optional buttons argument.
When you derive the buttons argument by adding up the constant values, your procedure becomes less readable. There’s no reference table where you can check the hidden meaning of 292. To improve the readability of your MsgBox function, it’s better to use the constants instead of their values.
2. Now enter the following revised statement on one line in the Immediate window and press Enter.
MsgBox "Do you want to proceed?", vbYesNo + vbQuestion + vbDefaultButton2
This statement (which must be entered on one line) produces the same result shown in Figure 4.8 and is more readable.
The following example shows how to use the buttons argument inside the Visual Basic procedure.
|
Hands-On 4.10. Using the MsgBox Function with Arguments (Example 2) |
1. Add a new module to the ProcAndFunctions (Chap04_ExcelPrimer.xlsm) project and change the module’s name to Sample6.
2. Activate the Sample6 module and enter the MsgYesNo subroutine shown here, and then run it:
Sub MsgYesNo()
Dim question As String
Dim myButtons As Integer
question = "Do you want to open a new workbook?"
myButtons = vbYesNo + vbQuestion + vbDefaultButton2
MsgBox question, myButtons
End Sub
In the foregoing subroutine, the question variable stores the text of your message. The settings for the buttons argument is placed in the myButtons variable. Instead of using the names of constants, you can use their values, as in the following:
myButtons = 4 + 32 + 256
However, by specifying the names of the buttons argument’s constants, you make your procedure easier to understand for yourself and others who may work with this procedure in the future.
The question and myButtons variables are used as arguments for the MsgBox function. When you run the procedure, you see the result displayed, as shown in Figure 4.8. Notice that the No button is selected. It’s the default button for this dialog box. If you press Enter, Excel removes the MsgBox from the screen. Nothing happens because your procedure does not have any more instructions following the MsgBox function.
To change the default button, use the vbDefaultButton1 setting instead.
The third argument of the MsgBox function is title. While this is also an optional argument, it’s very handy, as it allows you to create procedures that don’t provide visual clues to the fact that you programmed them with Microsoft Excel. Using this argument, you can set the title bar of your message box to any text you want.
Suppose you want the MsgYesNo procedure to display in its title the text “New workbook.” The following MsgYesNo2 procedure demonstrates the use of the title argument:
Sub MsgYesNo2()
Dim question As String
Dim myButtons As Integer
Dim myTitle As String
question = "Do you want to open a new workbook?"
myButtons = vbYesNo + vbQuestion + vbDefaultButton2
myTitle = "New workbook"
MsgBox question, myButtons, myTitle
End Sub
The text for the title argument is stored in the variable myTitle. If you don’t specify the value for the title argument, Visual Basic displays the default text, “Microsoft Excel.”
Notice that the arguments are listed in the order determined by the MsgBox function. If you would like to list the arguments in any order, you must precede the value of each argument with its name:
MsgBox title:=myTitle, prompt:=question, buttons:=myButtons
The last two optional arguments—helpfile and context—are used by programmers who are experienced with using help files in the Windows environment.
The helpfile argument indicates the name of a special help file that contains additional information you may want to display to your VBA procedure user. When you specify this argument, the Help button will be added to your message box.
When you display a simple message box dialog with one button, clicking the OK button or pressing the Enter key removes the message box from the screen. However, when the message box has more than one button, your procedure should detect which button was pressed. To do this, you must save the result of the message box in a variable. Table 4.2 shows values that the MsgBox function returns.
TABLE 4.2. Values returned by the |
||
Button Selected |
Constant |
Value |
OK |
vbOK |
1 |
Cancel |
vbCancel |
2 |
Abort |
vbAbort |
3 |
Retry |
vbRetry |
4 |
Ignore |
vbIgnore |
5 |
Yes |
vbYes |
6 |
No |
vbNo |
7 |
Let’s revise the MsgYesNo2 procedure to show which button the user has chosen.
|
Hands-On 4.11. Using the MsgBox Function with Arguments (Example 3) |
1. Activate the Sample6 module and enter the MsgYesNo3 subroutine as shown here:
Sub MsgYesNo3()
Dim question As String
Dim myButtons As Integer
Dim myTitle As String
Dim myChoice As Integer
question = "Do you want to open a new workbook?"
myButtons = vbYesNo + vbQuestion + vbDefaultButton2
myTitle = "New workbook"
myChoice = MsgBox(question, myButtons, myTitle)
MsgBox myChoice
End Sub
In the foregoing procedure, we assigned the result of the MsgBox function to the variable myChoice. Notice that the arguments of the MsgBox function are now listed in parentheses:
myChoice = MsgBox(question, myButtons, myTitle)
2. Run the MsgYesNo3 procedure.
When you run the MsgYesNo3 procedure, a two-button message box is displayed. When you click on the Yes button, the statement MsgBox myChoice displays the number 6. When you click the No button, the number 7 is displayed.
|
MsgBox Function With or Without Parentheses? |
Use parentheses around the |
The InputBox function displays a dialog box with a message that prompts the user to enter data. This dialog box has two buttons—OK and Cancel. When you click OK, the InputBox function returns the information entered in the text box. When you select Cancel, the function returns the empty string (""). The syntax of the InputBox function is as follows:
InputBox(prompt [, title] [, default] [, xpos] [, ypos] [, helpfile, context])
The first argument, prompt, is the text message that you want to display in the dialog box. Long text strings can be entered on several lines by using the Chr(13) or Chr(10) functions (see examples of using the MsgBox function earlier in this chapter). All of the remaining InputBox arguments are optional.
The second argument, title, allows you to change the default title of the dialog box. The default value is “Microsoft Excel.”
The third argument of the InputBox function, default, allows the display of a default value in the text box. If you omit this argument, the empty edit box is displayed.
The following two arguments, xpos and ypos, let you specify the exact position where the dialog box should appear on the screen. If you omit these arguments, the box appears in the middle of the current window. The xpos argument determines the horizontal position of the dialog box from the left edge of the screen. When omitted, the dialog box is centered horizontally. The ypos argument determines the vertical position from the top of the screen. If you omit this argument, the dialog box is positioned vertically approximately one-third of the way down the screen. Both xpos and ypos are measured in special units called twips. One twip is equivalent to approximately 0.0007 inches.
The last two arguments, helpfile and context, are used in the same way as the corresponding arguments of the MsgBox function discussed earlier in this chapter.
Now that you know the meaning of the InputBox function’s arguments, let’s look at some examples of using this function.
|
1. Add a new module to the ProcAndFunctions (Chap04_ExcelPrimer.xlsm) project and change the module’s name to Sample7.
2. Activate the Sample7 module and enter the Informant subroutine shown here:
Sub Informant()
InputBox prompt:="Enter your place of birth:" & Chr(13) & " (e.g., Boston, Great Falls, etc.) "
End Sub
This procedure displays a dialog box with two buttons, as shown in Figure 4.9. The input prompt is displayed on two lines.

FIGURE 4.9. A dialog box generated by the Informant subroutine.
As with the MsgBox function, if you plan on using the data entered by the user in the dialog box, you should store the result of the InputBox function in a variable.
3. Type the Informant2 procedure shown here to assign the result of the InputBox function to the variable town:
Sub Informant2()
Dim myPrompt As String
Dim town As String
Const myTitle = "Enter data"
myPrompt = "Enter your place of birth:" & Chr(13) & "(e.g., Boston, Great Falls, etc.)"
town = InputBox(myPrompt, myTitle)
MsgBox "You were born in " & town & ".", , "Your response"
End Sub
Notice that this time the arguments of the InputBox function are listed within parentheses. Parentheses are required if you want to use the result of the InputBox function later in your procedure. The Informant2 subroutine uses a constant to specify the text to appear in the title bar of the dialog box. Because the constant value remains the same throughout the execution of your procedure, you can declare the input box title as a constant. However, if you’d rather use a variable, you still can. When you run a procedure using the InputBox function, the dialog box generated by this function always appears in the same area of the screen. To change the location of the dialog box, you must supply the xpos and ypos arguments, as explained earlier.
4. Run the Informant2 procedure.
5. To display the dialog box in the top left-hand corner of the screen, modify the InputBox function in the Informant2 procedure as follows and then run it:
town = InputBox(myPrompt, myTitle, , 1, 200)
Notice that the argument myTitle is followed by two commas. The second comma marks the position of the omitted default argument. The next two arguments determine the horizontal and vertical position of the dialog box. If you omit the second comma after the myTitle argument, Visual Basic will use the number 1 as the value of the default argument. If you precede the values of arguments by their names (for example, prompt:=myPrompt, title:=myTitle, xpos:=1, ypos:=200), you won’t have to remember to place a comma in the place of each omitted argument.
What will happen if you enter a number instead of the name of a town? Because users often supply incorrect data in an input dialog box, your procedure must verify that the supplied data can be used in further data manipulations. The InputBox function itself does not provide a facility for data validation. To validate user input, you must learn additional VBA instructions that are presented in the next chapter.
The result of the InputBox function is always a string. If the user enters a number, the string value the user entered should be converted to a numeric value before your procedure can use this number in mathematical computations. Visual Basic is capable of converting values from one data type to another.
Let’s try out a procedure that suggests what type of data the user should enter by supplying a default value in the InputBox dialog.
Refer to Chapter 3 for more information about using the |
|
1. Activate the Sample7 module in the ProcAndFunctions (Chap04_ExcelPrimer.xlsm) project and enter the following AddTwoNums procedure:
Sub AddTwoNums()
Dim myPrompt As String
Dim value1 As String
Dim value2 As Integer
Dim mySum As Single
Const myTitle = "Enter data"
myPrompt = "Enter a number:"
value1 = InputBox(myPrompt, myTitle, 0)
value2 = 2
mySum = value1 + value2
MsgBox "The result is " & mySum & " (" & value1 & " + " & CStr(value2) + ")", vbInformation, "Total"
End Sub
The AddTwoNums procedure displays the dialog box shown in Figure 4.10. Notice that this dialog box has two special features that are obtained by using the InputBox function’s optional title and default arguments. Instead of the default title “Microsoft Excel,” the dialog box displays a text string defined by the contents of the myTitle constant. The zero entered as the default value in the edit box suggests that the user enter a number instead of text. Once the user provides the data and clicks OK, the user’s input is assigned to the variable value1.
value1 = InputBox(myPrompt, myTitle, 0)
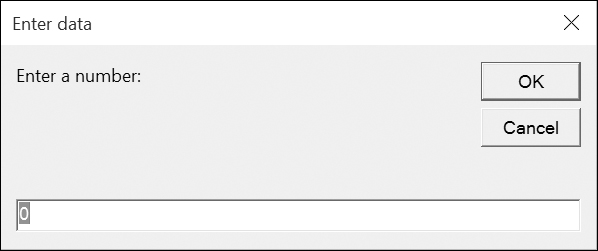
FIGURE 4.10. To suggest that the user enter a specific type of data, you may want to provide a default value in the edit box.
2. Run the AddTwoNums procedure, supply any number when prompted, and then click OK.
The data type of the variable value1 is String.
3. You can check the data type easily if you follow the foregoing instruction in the procedure code with this statement:
MsgBox VarType(value1)
When Visual Basic runs the foregoing line, it will display a message box with the number 8. Recall from Chapter 4 that this number represents the String data type.
The statement mySum = value1 + value2 adds the value stored in the value2 variable to the user’s input and assigns the result of the calculation to the variable mySum. Because the value1 variable’s data type is String, prior to using this variable’s data in the computation, Visual Basic goes to work behind the scenes to perform the data type conversion. Visual Basic understands the need for conversion. Without it, the two incompatible data types (String and Integer) would generate a Type mismatch error. The procedure ends with the MsgBox function displaying the result of the calculation and showing the user how the total was derived. Notice that the value2 variable has to be converted from Integer to String data type using the CStr function in order to display it in the message box:
MsgBox "The result is " & mySum & " (" & value1 & " + " & CStr(value2) + ")", vbInformation, "Total"
|
Define a Constant |
To ensure that all the title bars in a particular VBA procedure display the same text, assign the title text to a constant. By doing this you will save time by not having to type the title text more than once. |
In addition to the built-in InputBox VBA function, there is also the Excel InputBox method. If you activate the Object Browser window and type “inputbox” in the search box and press Enter, Visual Basic will display two occurrences of InputBox—one in the Excel library and the other one in the VBA library, as shown in Figure 4.11.

FIGURE 4.11. Don’t forget to use the Object Browser when researching Visual Basic functions and methods.
The InputBox method available in the Microsoft Excel library has a slightly different syntax than the InputBox function that was covered earlier in this chapter. Its syntax is:
expression.InputBox(prompt, [title], [default], [left], [top], [helpfile], [helpcontextID], [type])
All bracketed arguments are optional. The prompt argument is the message to be displayed in the dialog box, title is the title for the dialog box, and default is a value that will appear in the text box when the dialog box is initially displayed.
The left and top arguments specify the position of the dialog box on the screen. The values for these arguments are entered in points. Note that one point equals 1/72 inch. The arguments helpfile and helpcontextID identify the name of the help file and the specific number of the help topic to be displayed when the user clicks the Help button.
The last argument of the InputBox method, type, specifies the return data type. If you omit this argument, the InputBox method will return text. The values of the type argument are shown in Table 4.3.
TABLE 4.3. Data types returned by the |
|
Value |
Type of Data Returned |
|
A formula |
|
A number |
|
A string (text) |
|
A logical value (True or False) |
|
A cell reference, as a Range object |
|
An error value (for example, #N/A) |
|
An array of values |
You can allow the user to enter a number or text in the edit box if you use 3 for the type argument. This value is obtained by adding up the values for a number (1) and a string (2), as shown in Table 4.3. The InputBox method is quite useful for VBA procedures that require a user to select a range of cells in a worksheet.
Let’s look at an example procedure that uses the Excel InputBox method.
|
1. Close the Object Browser window if you opened it before.
2. In the Sample7 module, enter the following WhatRange procedure:
Sub WhatRange()
Dim newRange As Range
Dim tellMe As String
tellMe = "Use the mouse to select a range:"
Set newRange = Application.InputBox(prompt:=tellMe, Title:="Range to format", Type:=8)
newRange.NumberFormat = "0.00"
newRange.Select
End Sub
The WhatRange procedure begins with a declaration of an object variable—newRange. As you recall from Chapter 3, object variables point to the location of the data. The range of cells that the user selects is assigned to the object variable newRange. Notice the keyword Set before the name of the variable:
Set newRange = Application.InputBox(prompt:=tellMe, Title:="Range to format", Type:=8)
The Type argument (Type:=8) enables the user to select any range of cells. When the user highlights the cells, the next instruction:
newRange.NumberFormat = "0.00"
changes the format of the selected cells. The last instruction selects the range of cells that the user highlighted.
3. Press Alt+F11 to activate the Microsoft Excel Application window, and then press Alt+F8 and choose WhatRange procedure and run it.
Visual Basic displays a dialog box prompting the user to select a range of cells in the worksheet.
4. Use the mouse to select any cells you want. Figure 4.12 shows how Visual Basic enters the selected range reference in the edit box as you drag the mouse to select the cells.

FIGURE 4.12. Using Excel’s InputBox method, you can get the range address from the user.
5. When you’re done selecting cells, click OK in the dialog box.
The selected range is now formatted. To check this out, enter a whole number in any of the selected cells. The number should appear formatted with two decimal places.
6. Rerun the procedure, and when the dialog box appears, click Cancel.
When you click the Cancel button or press Esc, Visual Basic displays an error message—“Object Required.” When you click the Debug button in the error dialog box, Visual Basic will highlight the line of code that caused the error. Because you don’t want to select anything when you cancel the dialog box, you must find a way to ignore the error that Visual Basic displays. Using a special statement, On Error GoTo labelname, you can take a detour when an error occurs. This instruction has the following syntax:
On Error GoTo labelname
This instruction should be placed just below the variable declaration lines. Labelname can be any word you want, except for a Visual Basic keyword. If an error occurs, Visual Basic will jump to the specified label, as shown in Step 8 ahead.
7. Choose Run | Reset to cancel the procedure you were running.
8. Modify the WhatRange procedure so it looks like the WhatRange2 procedure shown here:
Sub WhatRange2()
Dim newRange As Range
Dim tellMe As String
On Error GoTo VeryEnd
tellMe = "Use the mouse to select a range:"
Set newRange = Application.InputBox(prompt:=tellMe, Title:="Range to format", Type:=8)
newRange.NumberFormat = "0.00"
newRange.Select
VeryEnd:
End Sub
9. Run the modified procedure, and click Cancel as soon as the input box appears. Notice that this time the procedure does not generate the error when you cancel the dialog box. When Visual Basic encounters the error, it jumps to the VeryEnd label placed at the end of the procedure. The statements placed between On Error Goto VeryEnd and the VeryEnd labels are ignored. In Chapter 9, you will find other examples of trapping errors in your VBA procedures.
|
Subroutines and Functions: Which Should You Use? |
Create a subroutine when… |
Create a function when… |
You want to perform some actions. |
You want to perform a simple calculation more than once. |
You want to get input from the user. |
You must perform complex computations. |
You want to display a message on the screen. |
You must call the same block of instructions more than once. |
You want to check if a certain expression is True or False. |
In this chapter, you learned the difference between subroutine procedures that perform actions and function procedures that return values. While you can create subroutines by recording or typing code directly into the Visual Basic module, function procedures cannot be recorded because they can take arguments. You must write them manually. You learned how to pass arguments to functions and determine the data type of a function’s result. You increased your repertoire of VBA keywords with the ByVal, ByRef, and Optional keywords. You also learned how, with the help of parameters, subprocedures can pass values back to the calling procedures. After working through this chapter, you should be able to create some custom functions of your own that are suited to your specific needs. You should also be able to interact easily with your procedure users by employing the MsgBox and InputBox functions as well as the Excel InputBox method.
Chapter 5 will introduce you to decision making. You will learn how to change the course of your VBA procedure based on the results of the conditions that you supply.