These are the quickest and simplest of all bakes. So what will help them go right? Butter not only tastes good, it also helps the structure of the bake. Sugar may be caster, which has a fine grain, or a brown muscovado, which will add a darker colour and flavour and make biscuits slightly chewy. Flour is usually plain or self-raising to give a soft, crumbly texture.
When shaping biscuits, use only a little flour on the worktop and pin – too much flour could make the final result tough and dry. If the dough feels too sticky, wrap it in clingfilm and chill until it is firm.
Most biscuits need to be cooled a bit on the baking sheet before being lifted on to a wire rack. If you need to bake several batches and want to re-use the same baking sheet, rinse the sheet under the cold tap to cool it quickly, then dry and re-line.
Recipe List
Olive Oil and Rosemary Crackers
Red Pepper and Goats’ Cheese Muffins
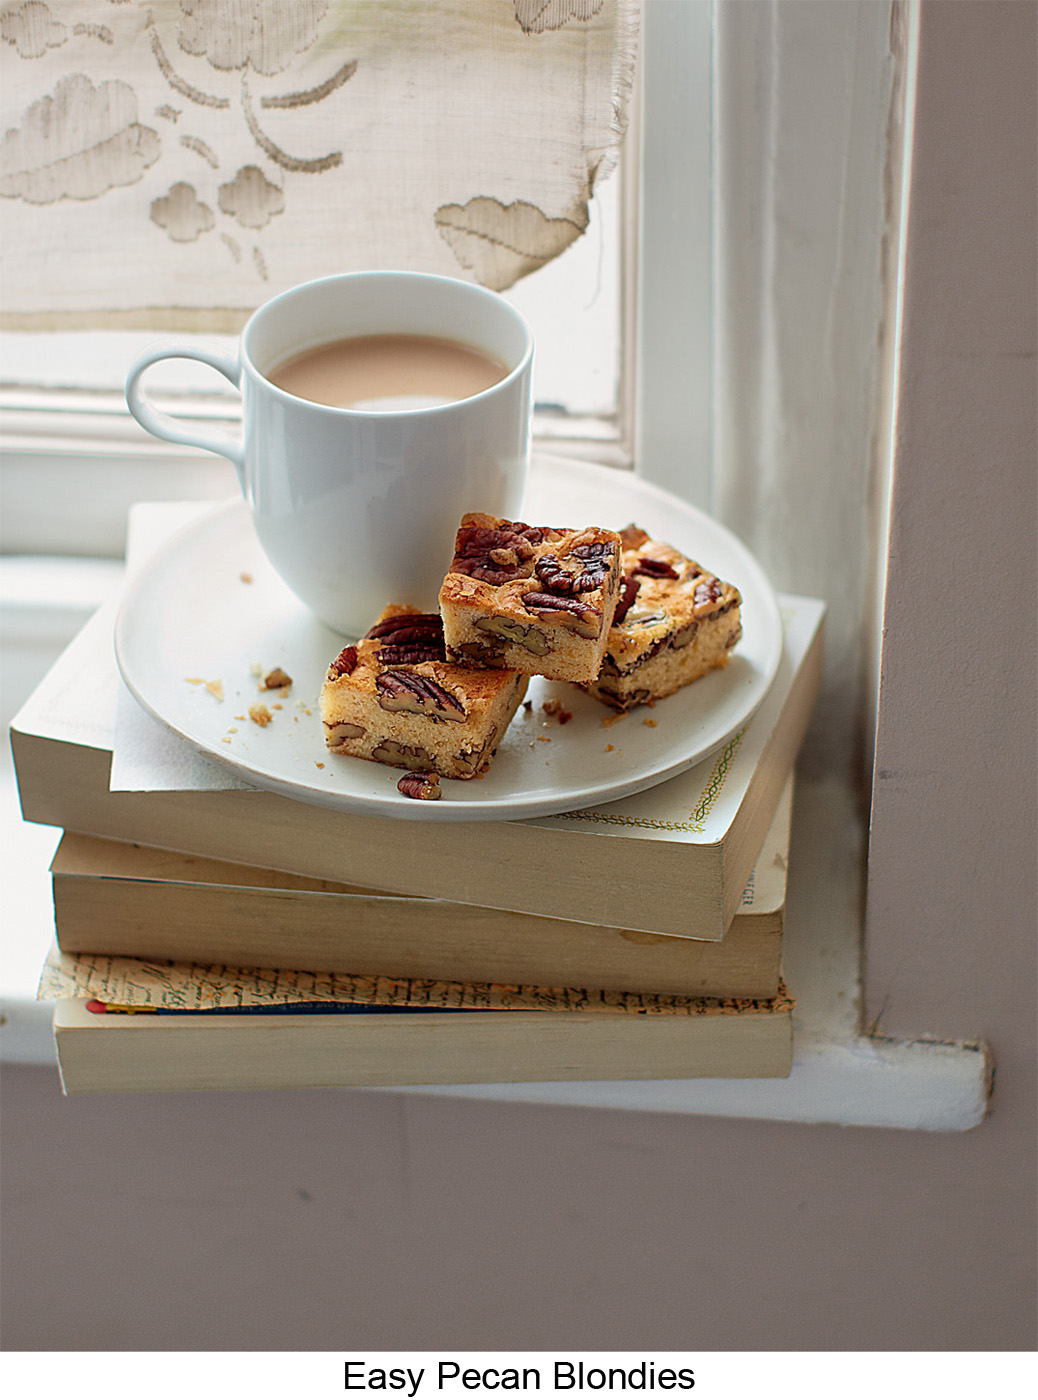
These blondies – brownies made with white chocolate – look deceptively benign. But using a really good brand of white chocolate gives them a rich taste. To make them even more decadent, mix 100g dark chocolate chips into the blondie mixture with the pecan halves. Or, for a special dessert, cut the blondie cake into larger squares and serve with a warm toffee sauce (see here) and scoops of ice cream.
CUTS INTO 36 SQUARES
YOU WILL NEED: 1 × 20.5CM SQUARE BROWNIE TIN OR SHALLOW CAKE TIN, GREASED AND BASE-LINED
175g white chocolate (about 25% cocoa solids), chopped or broken up
115g unsalted butter, diced
100g caster sugar
2 medium free-range eggs, at room temperature
½ teaspoon vanilla extract
125g plain flour
½ teaspoon baking powder
150g pecan halves
1 Heat your oven to180°C/350°F/gas 4. Put the chocolate and butter into a heatproof bowl large enough to hold all the ingredients. Set the bowl over a pan of hot water, off the heat, and melt gently, stirring frequently (white chocolate melts at a lower temperature than dark chocolate so watch carefully). As soon as the chocolate has nearly all melted, remove the bowl from the pan and stir until the mixture is smooth.
2 Stir in the sugar (don’t worry if the mixture looks curdled at this stage). Leave to cool for 2 minutes or until barely warm.
3 While the chocolate mix is cooling, put the eggs and vanilla in a small bowl and beat with a fork until frothy. Add to the chocolate mixture and stir well with a wooden spoon to make a sleek and glossy mixture. Sift the flour and baking powder into the bowl and stir in. Add 100g of the pecan halves and stir in.
4 Transfer the mixture to the prepared tin and spread evenly. Scatter the remaining nuts over the top. Place in the heated oven and bake for 20–25 minutes until a skewer inserted into the cake (halfway between the centre and the side of the tin) comes out clean. The centre of the cake will still be slightly soft – it will firm up as it cools.
5 Set the tin on a wire rack. Run a round-bladed knife around the cake to loosen it from the tin, then leave to cool. Once cold, turn out and cut into squares. Store in an airtight container and eat within 4 days.
Very rich, crisp, sandy-textured biscuits, sablés are the French equivalent of shortbread. The dough is traditionally rolled out and cut into rounds with a fluted cutter. The vanilla-scented biscuits here are given a glossy golden glaze with beaten egg. To ensure they colour evenly, rotate the baking sheets halfway through the baking time.
MAKES ABOUT 16
YOU WILL NEED: 1–2 BAKING SHEETS, WELL GREASED WITH BUTTER OR LINED WITH BAKING PAPER
200g plain flour
good pinch of salt
75g icing sugar
140g unsalted butter, chilled and diced
3 medium free-range egg yolks
¾ teaspoon vanilla extract
beaten egg, to glaze
1 Put the flour, salt and sugar into the bowl of a food processor and pulse to combine. Add the pieces of butter and run the machine just until the mixture looks sandy. Add the egg yolks and vanilla and process until the mixture comes together to make a firm ball of dough.
2 Remove the dough from the processor, shape it into a disc about 2.5cm thick and wrap in clingfilm. Chill for about 30 minutes until firm. Meanwhile, heat your oven to 180°C/350°F/gas 4.
3 Lightly flour the worktop and your rolling pin, then roll out the dough until it is about 4mm thick (slightly thicker than a pound coin). Try to roll the dough so it is the same thickness all over, to ensure the biscuits will cook evenly.
4 Use a 7.5cm fluted round cutter to stamp out rounds of dough. Dip the cutter in flour before you start and between each biscuit. For neat shapes firmly stamp out the rounds – don’t twist the cutter. Gently knead the trimmings together, then re-roll and stamp out more rounds.
5 Set the rounds, slightly apart, on the prepared baking sheets (you may need to bake in 2 batches). Brush very lightly with beaten egg, then prick each round a couple of times with a fork. Brush again with egg. Finally, lightly score the top of each round in a cross pattern with the prongs of the fork.
6 Place in the heated oven and bake for 11–15 minutes until golden. Remove from the oven and cool on the baking sheets for 2 minutes so the biscuits can firm up, then carefully transfer them to a wire rack and leave to cool completely. Store in an airtight container and eat within a week.
These deliciously crisp biscuits are particularly good with ice cream. Make sure you use unsweetened desiccated coconut or the biscuits will quickly scorch.
MAKES ABOUT 16
YOU WILL NEED: 1–2 BAKING SHEETS, WELL GREASED WITH BUTTER OR LINED WITH BAKING PAPER
40g unsweetened desiccated coconut
160g plain flour
good pinch of salt
75g icing sugar
40g ground almonds
160g unsalted butter, chilled and diced
2 medium free-range egg yolks
1 Put the coconut, flour, salt and icing sugar into the bowl of a food processor and run the machine for 20 seconds to grind up the coconut slightly. Add the almonds and briefly pulse to combine. Add the pieces of butter and run the machine just until the mixture looks sandy. Finally, add the egg yolks and process until the mixture comes together to make a ball of dough.
2 Remove the dough from the processor bowl, shape it into a disc about 2.5cm thick and wrap in clingfilm. Chill for about 30 minutes until firm. Meanwhile, heat your oven to 180°C/350°F/gas 4.
3 Dust the worktop and your rolling pin with flour, then roll out the dough until it is about 4mm thick (slightly thicker than a pound coin). Try to roll the dough so it is the same thickness all over, to ensure the biscuits will cook evenly.
4 Use a 7.5cm fluted round cutter to stamp out rounds of dough. Dip the cutter in flour before you start and between each biscuit. For neat shapes firmly stamp out the rounds – don’t twist the cutter. Gently knead the trimmings together, then re-roll and stamp out more rounds.
5 Arrange the rounds, slightly apart, on the prepared baking sheets (you may need to bake in 2 batches). Prick each round 3 times with a fork then place in the heated oven and bake for 11–14 minutes until pale golden. Rotate the baking sheets halfway through the baking time.
6 Remove from the oven and cool on the baking sheets for 2 minutes so the biscuits can firm up, then carefully transfer to a wire rack and leave to cool completely. Store in an airtight container and eat within a week.
Use these to make a dessert: brush the cooled biscuits with warm jam, then top with fresh berries and a swirl of whipped cream. Or sandwich 2 rounds with chilled chocolate mousse (see here). If you’re baking in batches, quickly cool the baking sheet under the cold tap between batches, then dry – never put your carefully chilled and cut dough rounds on a warm baking sheet as they will melt.
MAKES ABOUT 20
YOU WILL NEED: 1–2 BAKING SHEETS, WELL GREASED WITH BUTTER OR LINED WITH BAKING PAPER
275g plain flour
good pinch of salt
125g icing sugar
175g unsalted butter, chilled and diced
2 medium free-range egg yolks
1 tablespoon dark rum
caster sugar, for sprinkling
1 Put the flour, salt and icing sugar into the bowl of a food processor and ‘pulse’ several times just to combine. Add the pieces of butter and run the machine until the mixture looks like sand. Add the egg yolks and rum and process until the mixture comes together to form a ball of dough.
2 Remove the dough from the bowl, flatten it into a disc about 2.5cm thick and wrap in clingfilm. Chill for about 30 minutes until firm.
3 Heat your oven to 180°C/350°F/gas 4. Lightly dust the worktop and rolling pin with flour, then roll out the dough to about 4mm thick. Dip a 7.5cm fluted round cutter in flour and use to stamp out rounds, re-flouring the cutter when the dough begins to stick. Gather up the trimmings and gently knead them together, then re-roll and stamp out more rounds.
4 Arrange the rounds, slightly apart, on the prepared baking sheets (you may have to bake in batches). Prick each round twice with a fork and sprinkle with sugar. Place in the heated oven and bake for 12–15 minutes until light gold. Leave to cool and firm up on the baking sheets for a couple of minutes, then transfer to a wire rack and leave to cool completely. Store in an airtight container and eat within a week.
Popular in northern Europe and Scandinavia at Christmas and Hannukah, these crumbly cookies have a rich buttery taste and a good nutty crunch.
MAKES ABOUT 14
YOU WILL NEED: 1–2 BAKING SHEETS, LINED WITH BAKING PAPER
100g walnut pieces OR roughly chopped almonds
115g unsalted butter, softened
65g icing sugar, plus extra for rolling
½ teaspoon vanilla extract OR 3 drops almond essence (if using almonds)
125g plain flour
1 Heat your oven to 180°C/350°F/gas 4. Spread the nuts in a small baking dish or tin and toast in the heated oven for 7–10 minutes until slightly darker. Leave to cool. Lower the oven temperature to 160°C/325°F/gas 3.
2 Put the soft butter into a mixing bowl and beat with an electric mixer or wooden spoon until creamy. Sift the icing sugar into the bowl and add the vanilla extract or almond essence. Beat, slowly at first, until the mixture is very light in colour and texture – about 2 minutes with an electric mixer or
3 minutes by hand.
3 Sift the flour into the bowl and work into the mixture with a wooden spoon or plastic spatula. When the flour is completely incorporated work in the nuts to make a stiff dough.
4 Dust your hands with flour. Take small pieces of dough and roll into walnut-sized balls, re-flouring your hands when the dough starts to stick. Set the balls, slightly apart, on the prepared baking sheets (if necessary bake in 2 batches). Chill for 10–15 minutes until firm – this helps the cookies keep their shape during baking.
5 Place in the heated oven and bake for 17–20 minutes until barely golden and firm. Remove from the oven and leave the cookies on the baking sheets to firm up for 2–3 minutes, then carefully transfer them to a wire rack. Leave to cool completely. When cold, gently roll the cookies in icing sugar so they look like mini snowballs. Store in an airtight container and eat within a week.
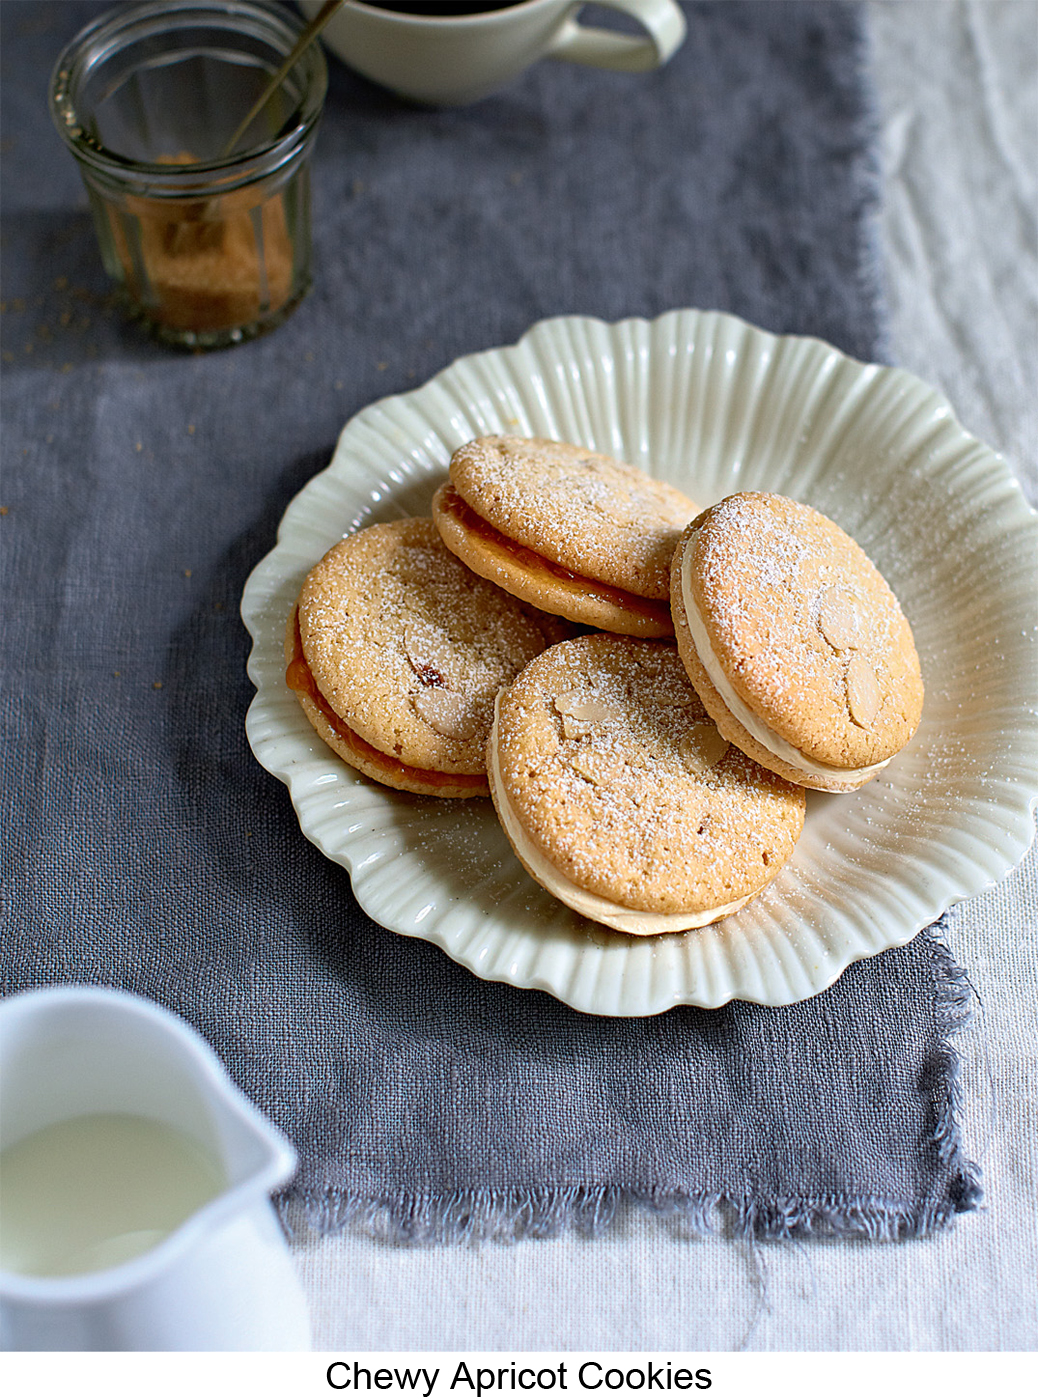
Very quick to put together and bake, these almondy cookies – rather like the British version of soft amaretti – are sandwiched with apricot conserve or butter icing. You can make the cookie dough by hand or in a food processor.
MAKES 8 SANDWICH COOKIES
YOU WILL NEED: 1–2 BAKING SHEETS, LINED WITH BAKING PAPER
125g self-raising flour
50g ground almonds
100g caster sugar
100g unsalted butter, chilled and diced
1 medium free-range egg
3–4 drops almond essence
20g flaked almonds
200g apricot conserve OR 1 × quantity Butter Icing (see here)
icing sugar, for dusting
1 Heat your oven to 160°C/325°F/gas 3. To make the dough by hand, sift the flour, ground almonds and sugar into a mixing bowl. Add the butter and rub in with your fingertips until the mixture looks like coarse crumbs. Beat the egg with the almond essence in a small bowl using a fork, just to mix, then add to the flour mixture. Beat the mixture with a wooden spoon for a few seconds so it is thoroughly combined.
2 To make the dough in a food processor put the flour, ground almonds and sugar into the processor bowl and pulse 3 or 4 times, just to combine the ingredients. Add the pieces of butter and process until the mixture looks sandy. Beat the egg with the almond essence in a small bowl using a fork, just to mix, then add to the processor through the feed tube while the machine is running. Stop the machine as soon as the dough comes together.
3 Tip the dough on to the worktop. Lightly dust your hands with flour, then roll the mixture into 16 walnut-sized balls. Arrange the balls on the prepared baking sheets, spaced well apart to allow for spreading (it may be necessary to bake in batches). Scatter the flaked almonds on top of the balls and press in very gently. Place in the heated oven and bake for 14–17 minutes until golden and just firm when gently pressed.
4 Remove from the oven and leave the cookies to cool on the baking sheets before peeling them off the baking paper. Use the apricot conserve or butter icing to sandwich pairs of cookies together, flat sides in, then dust with icing sugar. Store in an airtight container and eat within 5 days.
Simple but useful, butter icing can be used plain or flavoured (see below), and it can be tinted by adding edible food colouring a couple of drops at a time. The quantities here make enough icing to decorate 24 fairy cakes or 12 larger cupcakes; to fill and top a 20cm sponge cake; or to sandwich 8 pairs of cookies.
MAKES ABOUT 530G
125g unsalted butter, softened
400g icing sugar
3–4 tablespoons milk
1 teaspoon vanilla extract
1 Put the soft butter into a mixing bowl and beat with a wooden spoon or an electric mixer until paler in colour and very creamy.
2 Sift the icing sugar into the bowl. Add the milk and vanilla, and beat (on low speed if using an electric mixer) until very smooth and thick. To use, spread the icing with a table or palette knife, or spoon into a piping bag fitted with a star tube and pipe in swirls or rosettes.
Variations:
Chocolate butter icing: Replace the vanilla with 3 tablespoons cocoa powder.
Coffee butter icing: Replace the milk with cold, very strong black coffee.
Considerably richer, lighter and creamier than Butter Icing (above), buttercream is also slightly trickier. The quantities here make enough to decorate 24 fairy cakes or 12 larger cupcakes, or to fill and top a 20cm sponge cake.
MAKES ABOUT 350G
YOU WILL NEED: A SUGAR THERMOMETER
85g caster sugar
4 tablespoons water
2 large free-range egg yolks
150g unsalted butter, very soft but not runny
1 teaspoon vanilla extract
1 Put the sugar and water into a small heavy-based pan and heat gently until the sugar dissolves. Bring to the boil and boil until the temperature reaches 110°C on a sugar thermometer – this will take about 5 minutes. Don’t let the syrup start to caramelise.
2 While the sugar syrup is coming up to temperature, put the egg yolks into a heatproof bowl and set the bowl on a damp cloth to keep it from wobbling. Whisk the egg yolks briefly with an electric mixer.
3 As soon as the sugar syrup is ready, slowly pour it into the bowl in a thin, steady stream, whisking constantly. Keep whisking until the mixture becomes very thick and mousse-like, pale in colour and completely cold.
4 Gradually whisk in the soft butter followed by the vanilla. To use, spread or pipe the buttercream on to the cakes. In warm weather, chill the decorated cakes just until the icing is firm.
Variations:
Chocolate buttercream: Replace the vanilla with 75g dark chocolate, melted and cooled.
Coffee buttercream: Replace the vanilla with 1–2 tablespoons cold, very strong black coffee.
The ingredients for shortbread are simple – sugar, butter and flour used in the traditional proportions of 1: 2: 3. A mixture of caster and icing sugar make the texture sandy and crisp, and a mix of plain flour and cornflour gives lightness.
CUTS INTO 24 FINGERS
YOU WILL NEED: 1 TRAYBAKE TIN OR CAKE TIN 20.5 × 25.5 × 5CM, GREASED WITH BUTTER
220g unsalted butter, softened
30g icing sugar
80g caster sugar, plus extra for sprinkling
30g cornflour
300g plain flour
1 Heat your oven to 160°C/325°F/gas 3. Put the soft butter into a mixing bowl and beat with a wooden spoon or electric mixer until creamy.
2 Sift the icing sugar into the bowl and beat in (if using an electric mixer, use low speed to start). Beat in the caster sugar. Scrape down the sides of the bowl, then beat thoroughly for a couple of minutes until the mixture is very light and fluffy.
3 Sift the cornflour into the bowl and beat in. Sift the flour into the bowl and mix in with a wooden spoon or plastic spatula to make a crumbly mixture.
4 Tip the crumbs into the prepared tin and spread evenly. Gently press out the mixture, being sure to press it into the corners of the tin too. Prick all over with a fork. Place in the heated oven and bake for about 35 minutes until pale golden.
5 Remove the tin from the oven and set it on a heatproof surface. Cut into 24 fingers using a sharp knife, then sprinkle with sugar. Leave to cool completely before removing from the tin. Store the fingers in an airtight container and eat within a week.
Shortbread is used here as both base and topping for an unusual filling – you’ll discover bursts of sharp and sweet tastes. The filling is made from lemon slices macerated overnight with sugar, then thickened with eggs, flour and butter.
CUTS INTO 20 SQUARES
YOU WILL NEED: 1 TRAYBAKE TIN OR CAKE TIN 20.5 × 25.5 × 5CM, GREASED WITH BUTTER
1 × quantity Shortbread mixture (see here)
1 medium free-range egg yolk
caster sugar, for sprinkling
For the filling
2 medium unwaxed lemons, rinsed
150g caster sugar
2 medium free-range eggs
2 tablespoons plain flour
30g unsalted butter, melted
1 First make the lemon filling mixture. Using a sharp knife (or a serrated tomato knife), cut the lemons in half lengthways, then trim off the ends. Cut the lemon halves across into the thinnest possible slices, discarding the seeds. Tip the slices and any juice into a dish.
2 Add the sugar and stir well. Cover with clingfilm and leave in the fridge for 8 hours, or overnight, stirring from time to time if possible. At the end of this time, the lemon slices will have softened and the juice and sugar formed a thick syrup.
3 Heat your oven to 160°C/325°F/gas 3. Put the eggs in a small bowl and beat with a fork, just to mix. Add to the lemon mixture along with the flour and melted butter and stir to mix.
4 Tip three-quarters of the crumbly shortbread mixture into the prepared tin and spread out, then gently press down to make an even layer. Set aside.
5 Mix the egg yolk into the remaining shortbread crumbs to make a firm dough. Turn this out on to a lightly floured worktop and roll with your hands into a sausage about 20cm long. Cut across into 30 rounds (each about the thickness of a pound coin).
6 Spoon the lemon mixture into the tin on top of the shortbread base. Make sure the lemon slices are evenly distributed. Arrange the shortbread rounds on top. Place in the heated oven and bake for 40–45 minutes until pale golden.
7 Remove from the oven and set on a wire rack. Sprinkle with sugar, then cut into 20 squares using a sharp knife. Leave in the tin to firm up for 10 minutes, then eat warm as a dessert. Or leave to cool completely in the tin. Store in an airtight container and eat within 2 days.
Shortbread is all about good butter – it is what gives the biscuits their ‘short’ or crumbly texture and their rich flavour. These Scottish-inspired shortbread squares need to be made with top-quality jam too. Try them warm for dessert, with Fresh Egg Custard (see here) or ice cream.
CUTS INTO 20 SQUARES
YOU WILL NEED: 1 TRAYBAKE TIN OR CAKE TIN 20.5 × 25.5 × 5CM, GREASED WITH BUTTER
1 × quantity Shortbread mixture (see here)
325g Raspberry and Redcurrant Jam (opposite) OR good bought raspberry jam or conserve
50g flaked almonds
icing sugar, for dusting
1 Heat your oven to 160°C/325°F/gas 3. Set aside a quarter of the crumbly shortbread mixture for the topping, then tip the rest into the prepared tin and spread out. Press down to make an even layer. Prick well with a fork, then place in the heated oven and bake for 20 minutes. Remove and leave to cool for 10 minutes – the shortbread will still be soft as it’s not completely cooked.
2 Carefully spread the jam over the shortbread base. Mix the reserved shortbread crumbs with the flaked almonds and scatter evenly over the jam.
3 Return the tin to the oven and bake for a further 20–25 minutes until the topping is lightly golden. Remove from the oven and set the tin on a heatproof surface. Cut into 20 squares using a sharp knife, then dust with icing sugar. Leave to firm up for 10 minutes before removing from the tin to eat warm, or leave to cool completely in the tin. Store in an airtight container and eat within 3 days.
A brilliantly coloured jam with a really vibrant taste of fresh fruit, this is just the thing to spread on home-made scones, muffins and crumpets or to fill sponge sandwich cakes.
MAKES ABOUT 1.6KG
500g redcurrants
500g raspberries
1kg jam sugar (sugar with pectin)
1 Rinse and thoroughly drain the redcurrants (there’s no need to remove them from their stalks), then put them into a large non-aluminium pan. Set the pan over low heat and cook gently, stirring frequently, for about 10 minutes until the fruit is soft and pulpy.
2 Set a fine sieve over a large measuring jug and carefully pour in the contents of the pan to strain the juice, gently pressing on the pulp to extract all the liquid. Discard the pulp and stalks. Measure the liquid – if necessary add water to make it up to 300ml.
3 Pour the 300ml juice back into the pan and add the raspberries. Bring to the boil and simmer gently for about 5 minutes until the fruit is soft.
4 Stir in the sugar and cook gently over low heat, stirring frequently, until it has completely dissolved. Turn up the heat and boil rapidly until setting point is reached (see here), which will take 10–15 minutes.
5 Remove the pan from the heat and leave the jam to stand for 5 minutes so it cools slightly and the fruit ‘settles’. Carefully ladle into hot, sterilised jam jars, then cover and label. Store in a cool spot.
HOW TO TEST FOR ‘SETTING POINT’
The easiest and most accurate way to test is with a sugar thermometer: put it into the pan after the sugar has dissolved. When the temperature reaches 220°C, the jam has reached setting point. If you don’t have a thermometer, you can use a safe ‘finger’ test. Before you add the sugar to the pan, put several old saucers into the freezer to chill. When the boiling jam is thick, with large bubbles, start to test: carefully draw the pan off the heat, take a spoonful of jam and drop it on to a chilled saucer. Wait for 20–30 seconds so the jam cools, then draw a finger through it – if the surface wrinkles the jam will set. If it doesn’t wrinkle, carry on boiling for a few more minutes, then test again.
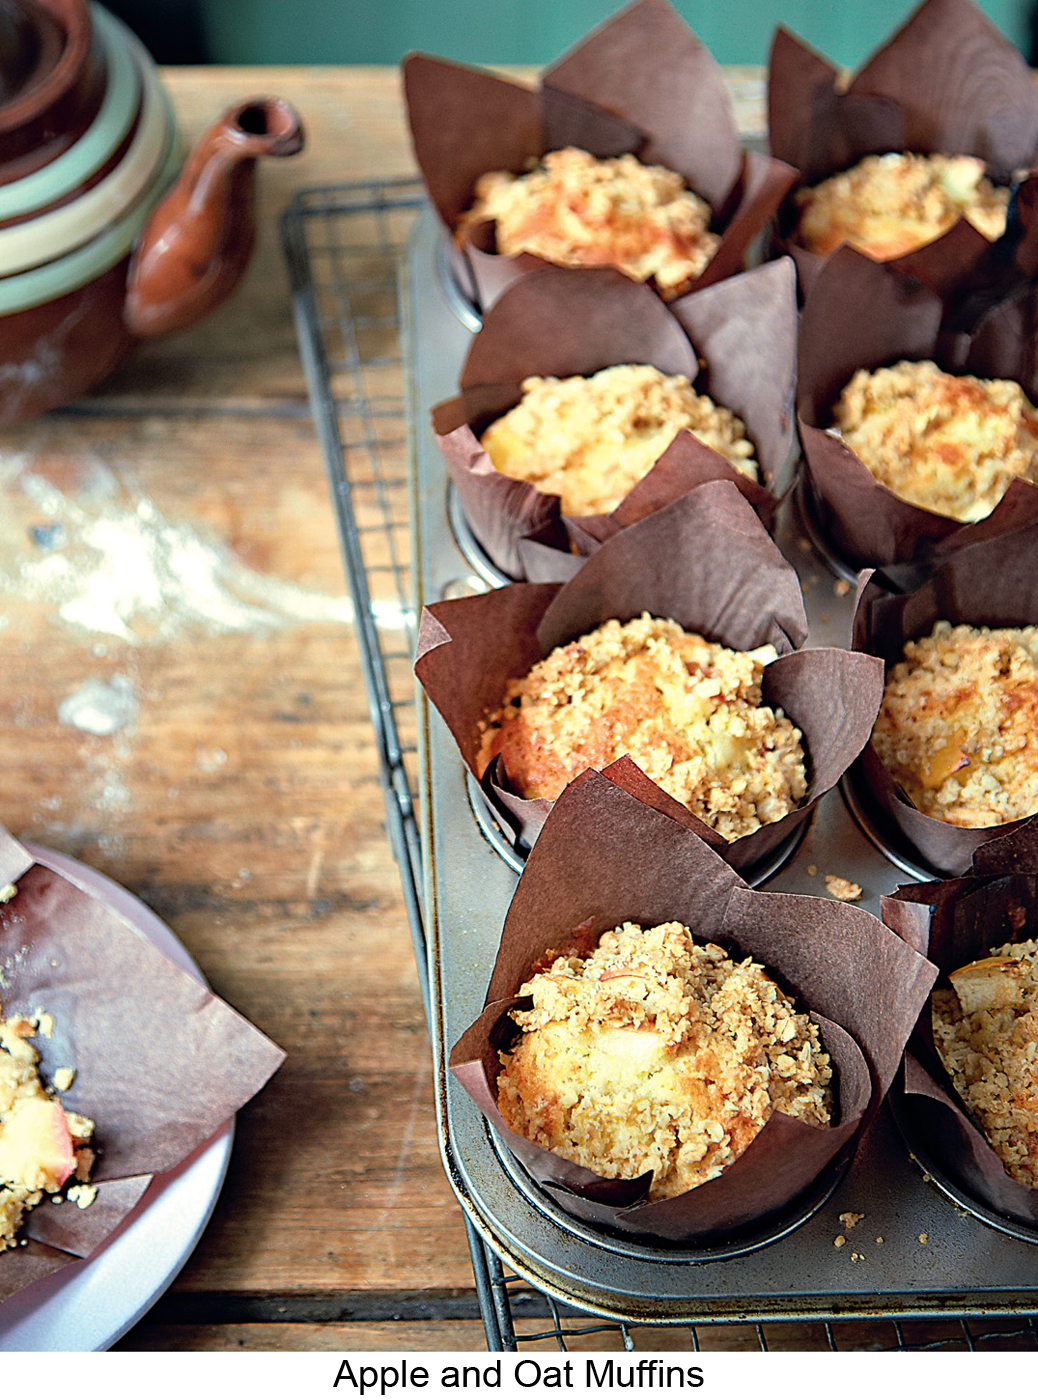
Just a bit richer than a scone, and faster to make than a cake, a home-made muffin makes a good treat.
MAKES 12
YOU WILL NEED: 1 × 12-HOLE MUFFIN TRAY, LINED WITH PAPER MUFFIN CASES
For the topping
50g porridge oats
50g demerara (or caster) sugar
50g plain flour
50g unsalted butter, at room temperature
For the base
250g plain flour
25g porridge oats
175g caster sugar
2 teaspoons baking powder
finely grated zest of 1 medium unwaxed lemon
150g unsalted butter, diced
2 medium free-range eggs, at room temperature
100ml milk, at room temperature
1 large eating apple, cored and cut into small pieces (about 1cm)
1 Heat your oven to 190°C/375°F/gas 5. Make the crumble topping first. Put the oats, sugar and flour into a mixing bowl and combine with your hand. Cut the butter into pieces, add to the bowl and rub into the dry ingredients with your fingertips until the mixture looks like coarse crumbs. Then gently squeeze the mixture together until it forms pea-like clumps. Set aside until needed.
2 Now make the base. Put the flour, oats, sugar, baking powder and lemon zest into a mixing bowl and mix together thoroughly with a wooden spoon. Gently melt the butter in a small pan or in the microwave (use 10-second bursts); leave to cool. Beat the eggs and milk in a small bowl with a fork until just combined. Add the melted butter and the milk mixture to the flour mix in the bowl and stir gently until just combined – there’s no need to beat this mixture.
3 Spoon the mixture into the 12 paper cases in the muffin tray so they are evenly filled. Top each with an equal amount of chopped apple and gently press the pieces into the muffin mixture (they should remain visible). Cover with the crumble topping, dividing it equally among the muffins, and gently press down on to the base.
4 Place in the heated oven and bake for 30–35 minutes until golden and just firm when gently pressed in the centre. Set the tray on a wire rack and cool for 3–4 minutes, then carefully lift the muffins out of the tray on to the rack. Eat warm or at room temperature the same or the next day (store in an airtight container).
Here’s the classic hard-to-beat combination: crisp shortbread, sticky toffee and dark chocolate. Don’t undercook the shortbread base or it will have a damp, soggy texture.
CUTS INTO 30 FINGERS
YOU WILL NEED: 1 TRAYBAKE TIN OR CAKE TIN 20.5 × 25.5 × 5CM, GREASED WITH BUTTER
1 × quantity Shortbread mixture (see here)
For the toffee layer
225g unsalted butter, diced
115g caster sugar
4 tablespoons golden syrup
1 × 397g tin condensed milk
For the chocolate topping
200g dark chocolate (about 70% cocoa solids), chopped or broken up
3 tablespoons water
1 Heat your oven to 160°C/325°F/gas 3. Tip the crumbly shortbread mixture into the prepared tin and spread evenly. Gently press out the mixture, being sure to press it into the corners of the tin too. Prick all over with a fork. Place in the heated oven and bake for about 35 minutes until pale golden.
2 Remove the tin from the oven and set it on a heatproof surface. Leave the shortbread in the tin until completely cold.
3 To make the toffee layer, put the diced butter, sugar, syrup and condensed milk into a medium-sized heavy-based pan. Set over low heat and stir frequently with a wooden spoon until the butter melts. Bring to the boil, then simmer, stirring constantly to prevent the mixture from catching on the base of the pan, for 3–5 minutes until it turns golden (don’t let the mixture turn a darker caramel colour or it will set too hard to cut). Pour the toffee mixture over the cold shortbread and spread it evenly. Leave until cold.
4 Put the chocolate and water in a heatproof bowl, set the bowl over a pan of hot water and melt gently, stirring occasionally. Spread the chocolate evenly over the toffee.
5 Leave in a cool place – not the fridge – to set, then use a sharp knife to cut into 30 fingers. Store in an airtight container and eat within 5 days.
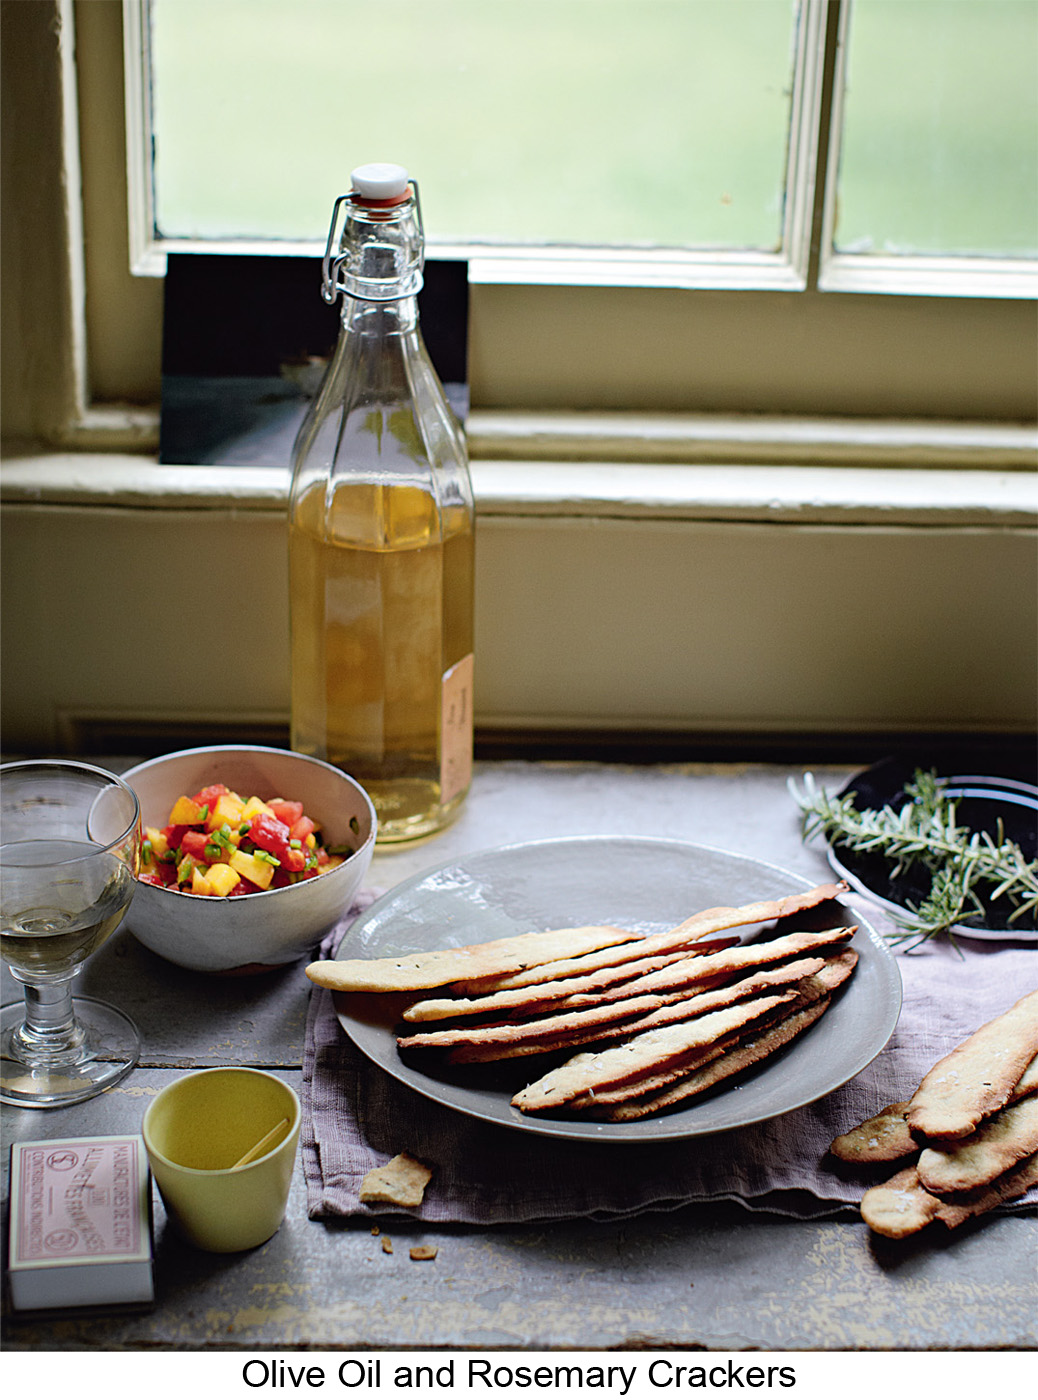
Adding cream to a simple dough gives these crackers a flaky texture – there’s no need for elaborate shaping or folding techniques. You can make the crackers any size you choose. They’re good with cheese and pâtés.
MAKES 24–30
YOU WILL NEED: 1–2 BAKING SHEETS, LINED WITH BAKING PAPER
125g plain flour
½ teaspoon caster sugar
15g unsalted butter, cool but not hard
¾ teaspoon sea salt flakes, or to taste
1 teaspoon cumin seeds OR 2 teaspoons sesame seeds
4 tablespoons double or single cream
3–4 tablespoons water, at room temperature
1 Sift the flour and sugar into a mixing bowl. Cut the butter into flakes and add to the bowl, then rub into the flour using your fingertips until the mixture looks like very fine crumbs. Stir in the salt and seeds.
2 Add the cream and 3 tablespoons of water. Using a round-bladed knife mix everything together, adding more water a teaspoon at a time as needed, to make a soft but not sticky dough (it should look slightly rough, and feel like shortcrust pastry).
3 Lightly dust the worktop with flour. Turn out the dough and very gently knead it just for 5 seconds so it looks slightly smoother. Put the dough back into the bowl and cover the top with clingfilm. Leave to relax at room temperature for 30 minutes.
4 Towards the end of the relaxing time, heat your oven to 180°C/350°F/gas 4. Lightly dust the worktop and rolling pin with flour, then roll out the dough to a very thin sheet roughly 35 × 45cm. Cut the sheet in half and gently lift one piece on to a lined baking sheet. Prick the dough sheet all over with a fork. Using a pizza wheel cutter or large sharp knife, trim the edges so they are straight and neat (discard the trimmings), then cut the dough into squares or rectangles. Repeat with the other portion of dough (if you only have one sheet then bake in 2 batches).
5 Place in the heated oven and bake for 14–17 minutes until the crackers are a light gold colour (they will shrink a little). To make sure they cook evenly, it’s a good idea to rotate the baking sheet halfway through the baking time.
6 Remove from the oven and firm up on the baking sheets for 2 minutes, then transfer the crackers to a wire rack and leave to cool. Store in an airtight container and eat within 5 days.
Serve these crisp and crumbly biscuits with cheese and wine or for a savoury snack. The dough can be kept in the fridge, tightly wrapped, for up to 2 days, so you can slice and bake to order. For a simple starter, top the warm biscuits with slices of tomato or roasted peppers plus crumbled blue cheese.
MAKES 36
YOU WILL NEED: 1–2 BAKING SHEETS, LINED WITH BAKING PAPER
200g plain flour
½ teaspoon salt
½ teaspoon baking powder
100g unsalted butter, chilled and diced
1 medium free-range egg yolk
200g extra-mature Cheddar cheese, grated
2 tablespoons wholegrain mustard
1 Put the flour, salt and baking powder into a food processor and ‘pulse’ a couple of times just to combine. Add the butter and run the machine for a few seconds until the mixture looks like fine crumbs. Add the egg yolk, cheese and mustard and run the machine just until the mixture comes together to form a ball of dough.
2 Remove the dough from the bowl and set in the middle of a sheet of clingfilm. With lightly floured hands shape the dough into a log 18 × 6cm. Wrap the clingfilm around the log. Chill for 1 hour until firm.
3 Towards the end of the chilling time, heat your oven to 180°C/350°F/gas 4. Unwrap the log and set it on a cutting board. Cut across into slices 5mm thick. Arrange them on the lined baking sheets, spacing well apart to allow for spreading. (If you have only one sheet, wait for it to cool down before baking the second batch of biscuits.) Place in the heated oven and bake for 15–18 minutes until a good golden colour.
4 Leave the biscuits to cool and firm up on the baking sheet for 2–3 minutes before transferring to a wire rack. Eat warm or leave to cool. Store in an airtight container and eat within 4 days.
Serve this colourful fresh sauce as a dip for crackers and bread or with quiches and cold pies. For a deeper flavour, roast the whole chillies under a very hot grill until the skin is charred; leave to cool in a paper bag, then carefully peel off the skin.
SERVES 4–6
2 large, ripe tomatoes
1 large, ripe peach
1–2 moderately hot jalapeño chillies, to taste
salt
½–1 tablespoon lemon juice, to taste
1 Bring a medium pan of water to the boil. With the tip of a small knife, make a tiny nick in the skin of the tomatoes and peach at the stalk end. Lower the tomatoes and peach into the boiling water using a slotted spoon. Leave for 10 seconds, then lift out and put into a bowl of cold water. Leave until cool enough to handle.
2 Drain the tomatoes and peach, and slip off their skins. Quarter the tomatoes and discard the seeds. Halve the peach and remove the stone. Cut the tomatoes and peach into small chunks. Put into a mixing bowl.
3 Halve the chillies, then carefully cut out the core, seeds and white ribs. Chop the chillies very finely. (Take care you don’t touch your eyes or any delicate skin until you’ve finished and thoroughly washed your hands, because all the ‘heat’ in the chillies is in the seeds and ribs and can sting.)
4 Add the chillies to the bowl with a little salt and lemon juice. Mix gently, then taste and add more salt and lemon juice if needed. Cover and chill for at least 1 hour before serving. Best eaten the same day, icy cold.
Very thin and crisp, these crackers are good with dips. During baking it’s a good idea to rotate the baking sheets about halfway through so the crackers cook evenly.
MAKES 20
YOU WILL NEED: 1–2 BAKING SHEETS, LINED WITH BAKING PAPER
200g plain flour
¾ teaspoon baking powder
½ teaspoon icing sugar
½ teaspoon sea salt flakes, or to taste
1 teaspoon finely chopped fresh rosemary
4 teaspoons extra virgin olive oil, plus extra for brushing
about 100ml water, at room temperature
1 Sift the flour, baking powder and icing sugar into a mixing bowl. Add the salt and rosemary and stir them in with your hand. Add the oil to the bowl plus enough water to make a soft but not sticky dough – you can use a wooden spoon, round-bladed knife or your hand to mix the dough.
2 Turn out the dough on to a very lightly floured worktop and shape it with your hands to a sausage 20cm long. Wrap it in clingfilm and chill for 1 hour until firm.
3 Towards the end of the chilling time, heat your oven to 220°C/425°F/gas 7. Unwrap the dough and set it on a cutting board. Cut across into 20 equal pieces. Lightly dust the worktop and rolling pin with flour, then roll out each piece into a long oval as thin as possible – aim for about 15cm long. The ovals should look fairly rustic rather than neat and even in shape.
4 Arrange the ovals slightly apart on the lined baking sheets (you may need to bake in batches). Brush very lightly with olive oil, then place in the oven and bake for 8–10 minutes until the crackers are a light golden colour with slightly darker edges that curl up. Watch them carefully to be sure they don’t get too dark. They will bubble up in places so no two crackers will look the same.
5 Remove from the oven and firm up on the baking sheets for 2 minutes, then transfer the crackers to a wire rack and leave to cool. Store in an airtight container and eat within 5 days.
Rich and fudge-like, these dark chocolate brownies are a gluten-free treat. Finish simply with a dusting of icing sugar or add a fudge icing plus a decoration of walnut halves if you feel like it. Make a day ahead because, as with most chocolate bakes, the chocolate flavour will develop and mature. The cake will slice better too.
CUTS INTO 36 SQUARES
YOU WILL NEED: 1 × 20.5CM SQUARE BROWNIE TIN OR SHALLOW CAKE TIN, GREASED AND BASE-LINED
225g dark chocolate (about 70% cocoa solids), chopped or broken up
110g unsalted butter, diced
35g cocoa powder
good pinch of salt
3 medium free-range eggs, at room temperature
150g light brown muscovado sugar
100g walnut pieces
icing sugar, for dusting, OR 1 × quantity Quick Fudge Icing (opposite)
1 Heat your oven to 180°C/350°F/gas 4. Put the chocolate and butter in a heatproof bowl, set the bowl over a pan of hot water and melt gently, stirring occasionally. Remove the bowl from the pan and sift the cocoa and salt on top of the melted mixture. Stir in until completely smooth, then leave to cool until just barely warm.
2 While the mix is cooling, put the eggs into a large mixing bowl and whisk with an electric mixer until frothy. Make sure there are no lumps in the sugar, then add to the eggs and continue whisking until the mixture is very thick and mousse-like, and will make a ribbon trail on itself.
3 Pour the chocolate mixture into the bowl and fold in with a large metal spoon. When you can no longer see any streaks, add the nuts and fold them in.
4 Transfer the mixture to the prepared tin and spread evenly. Place in the heated oven and bake for about 30 minutes until a skewer inserted into the mixture – halfway between the side of the tin and the centre – comes out clean. The centre will still be slightly soft; the brownie cake will continue cooking for a few minutes after it comes out of the oven.
5 Set the tin on a wire rack and run a round-bladed knife around the brownie cake to loosen it from the tin. Leave until cold, then carefully turn out and cut into squares. Dust with icing sugar just before serving. Alternatively, cover the brownie cake with fudge icing before cutting into squares. Store the brownies in an air tight container and eat within 5 days.
This easy melt-and-mix topping can be used to ice Bitter Chocolate Brownies (opposite) and Easy Pecan Blondies (see here) as well as to fill a sponge sandwich cake. For a salted caramel icing add ¼–½ teaspoon sea salt flakes (to taste) after the icing sugar has been worked in; for a vanilla fudge icing add ½ teaspoon vanilla extract with the icing sugar.
MAKES ENOUGH TO ICE A 20.5CM SQUARE CAKE
125g dark brown muscovado sugar
75g unsalted butter
3 tablespoons single or double cream
125g icing sugar, sifted
50g walnut halves (optional)
1 Press any lumps out of the sugar, then put it in a small, heavy-based pan with the butter. Set over low heat and stir until melted and smooth, then bring to the boil and simmer for 1 minute.
2 Stir in the cream and simmer for 1 more minute, stirring constantly so the mixture doesn’t catch on the base of the pan. Remove from the heat and add the icing sugar, then beat well with a wooden spoon until the mix is smooth and thick.
3 Spread the icing on top of the turned-out brownie or blondie cake. If adding walnut halves, arrange them on the icing. Leave to set before cutting into squares.
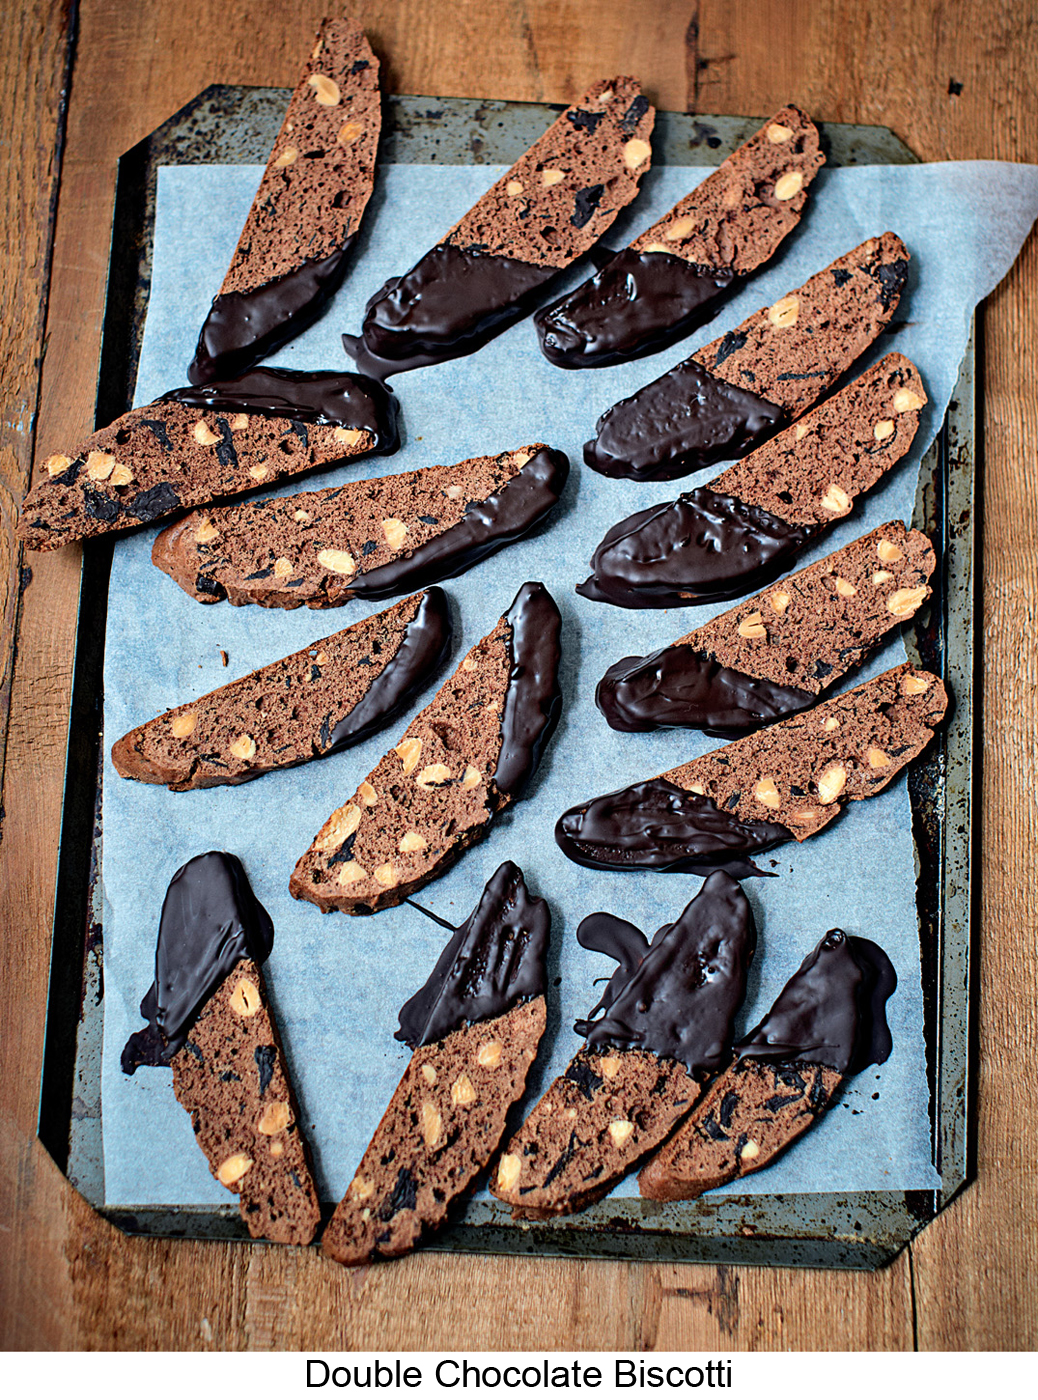
Just the thing for dunking into hot chocolate or good coffee – and a boxful makes an excellent gift. For the ultimate triple chocolate biscotti, coat one end with melted dark chocolate.
MAKES ABOUT 34
YOU WILL NEED: 1–2 BAKING SHEETS, LINED WITH BAKING PAPER
100g whole blanched almonds or hazelnuts
100g unsalted butter
3 medium free-range eggs, at room temperature
200g caster sugar
½ teaspoon vanilla extract
325g plain flour
2 teaspoons baking powder
good pinch of salt
3 tablespoons cocoa powder
110g dark chocolate (about 70% cocoa solids), coarsely chopped
To finish (optional)
150g dark chocolate (about 70% cocoa solids), chopped into even pieces
1 Heat your oven to 180°C/350°F/gas 4. Put the nuts into a small baking dish or tin and toast in the heated oven for 6–8 minutes until they turn a light golden brown. Leave to cool a bit, then chop each nut in half. Set aside until needed. Don’t turn off the oven.
2 Gently melt the butter in a small pan over low heat, or in the microwave (use 10-second bursts). Leave to cool until lukewarm but still fluid.
3 While the butter is cooling, put the eggs in a large mixing bowl and whisk with an electric mixer until frothy. Add the sugar and vanilla extract and whisk for 3–4 minutes until very thick. Pour the melted butter into the bowl while whisking at medium speed (to avoid splattering). Once all the butter has been added, whisk for 10 seconds on high speed.
4 Sift the flour, baking powder, salt and cocoa into the bowl and stir in with a wooden spoon. When you can no longer see any specks of flour (or cocoa), mix in the toasted nuts and chopped chocolate. The dough will be stiff and heavy.
5 Dust your hands with a little flour, then divide the dough into 2 equal portions. Set each piece on a prepared baking sheets (if using just one large baking sheet, set the pieces of dough well apart to allow for spreading). Flour your hands again, then gently mould and shape each piece of dough into a log about 23cm long and 7cm wide.
6 Place in the heated oven and bake for 25–30 minutes until barely firm when gently pressed in the centre (the dough will continue cooking for a few minutes after it comes out of the oven). Remove from the oven but leave the logs on the baking sheets until completely cold – if you try to cut the logs while they are still warm you’ll end up with a sticky mess. Turn off the oven now.
7 When the dough is ready for slicing and the second bake, reheat the oven to 180°C/350°F/gas 4. Put one log on to a cutting board and, using a serrated bread knife, gently cut across into diagonal slices 1cm thick – for best results use a sawing motion rather than chopping straight down. Arrange the slices, cut-side down, on the lined baking sheet – they can be set close together now as they won’t need room to spread. Repeat to slice the second log, baking the biscotti in batches if necessary (line the baking sheet with fresh baking paper each time).
8 Place in the heated oven and bake for 10–15 minutes until firm and dry. Remove from the oven and allow to firm up for 5 minutes, then slide the biscotti off the lining paper on to a wire rack and leave until completely cold.
9 To finish your biscotti with an optional chocolate dip, put the chopped chocolate into a heatproof bowl, set over a pan of hot water and melt gently. Remove the bowl from the pan and stir the chocolate until smooth. Dip one end (about a third) of each biscotti into the chocolate to coat lightly, then place on a sheet of baking or wax paper and leave to set. Store in an airtight container and eat within a week.
An easy, but deeply flavoured all-in-one sponge, this doesn’t need an icing. You could also eat it warm for dessert, with a hot chocolate sauce (see opposite) and vanilla ice cream.
CUTS INTO 20 SQUARES
YOU WILL NEED: 1 TRAYBAKE TIN OR CAKE TIN 20.5 × 25.5 × 5CM, GREASED AND BASE-LINED
150g blanched hazelnuts
150g unsalted butter, softened
150g caster sugar
170g self-raising flour
3 medium free-range eggs, at room temperature
2 tablespoons milk
100g dark chocolate (about 70% cocoa solids)
cocoa powder and icing sugar, for dusting
1 Heat your oven to 180°C/350°F/gas 4. Tip the nuts into a small baking dish or tin and toast in the heated oven for 6–8 minutes until golden. Allow to cool (leave the oven on), then put 100g of the nuts on a cutting board and chop each one in half. Finely grind or finely chop the remaining 50g nuts.
2 Put the ground nuts into a mixing bowl and add the soft butter, sugar, flour, eggs and milk. Beat well with a wooden spoon or an electric mixer until smooth and creamy.
3 Chop the chocolate into large, thin shards and add to the bowl with the halved nuts. Gently stir in with a plastic spatula or large metal spoon.
4 Transfer the mixture to the prepared tin and spread evenly. Place in the heated oven and bake for 25–30 minutes until the sponge is golden and feels just firm when gently pressed in the centre.
5 Set the tin on a wire rack. Run a round-bladed knife around the sponge to loosen it from the tin, then carefully turn out on to the rack. Leave to cool before cutting into squares. Dust with cocoa and then lightly with icing sugar just before serving. Store in an airtight container and eat within 5 days.
A jug of hot chocolate sauce makes a bowl of ice cream a real treat, or you can pour it over profiteroles, meringues and all manner of puds – try it with a piece of warm Italian Chocolate Traybake (opposite) or Chestnut Meringue Roulade (see here). Any leftover sauce can be kept, covered, in the fridge, then gently reheated to serve the next day.
SERVES 4–6
100g dark chocolate (about 70% cocoa solids), broken up
25g unsalted butter
2 tablespoons icing sugar
100ml water
1 Simply put all the ingredients into a small pan, preferably non-stick, and heat gently, stirring frequently, until melted and smooth. Serve warm.
An old trick for making feather-light scones is to use buttermilk, a low-fat, slightly acidic by-product of butter-making. Adding fresh rather than dried fruit to the scones gives bursts of flavour as you eat – be sure to pick firm berries and mix in lightly to prevent them from breaking up too much.
MAKES 8–9
YOU WILL NEED: 1 BAKING SHEET, GREASED WITH BUTTER
250g self-raising flour
good pinch of salt
60g caster sugar
50g unsalted butter, chilled and diced
1 medium free-range egg, at room temperature
about 100ml buttermilk, at room temperature
50g fresh blueberries
40g fresh raspberries
a little extra buttermilk or milk, for brushing
demerara or caster sugar, for sprinkling
1 Heat your oven to 220°C/425°F/gas 7. Sift the flour, salt and caster sugar into a mixing bowl. Add the pieces of butter and rub them into the flour using your fingertips until you can no longer see any lumps of butter, and the whole mixture looks like fine crumbs.
2 Put the egg and 100ml buttermilk in a small bowl and beat with a fork, just to mix. Pour into the crumbs and mix in with a round-bladed knife to make a rough-looking dough. Add the berries and use your hands to bring the mixture together to make a ball of slightly soft dough, with the berries evenly distributed – try not to squash the berries too much as you mix. If there are any dry crumbs at the bottom of the bowl, work in a little more buttermilk.
3 Lightly dust the worktop and your hands with flour. Turn out the dough on to the worktop and gently pat out to about 3cm thick. Dip a 6cm plain round cutter in flour and use it to stamp out rounds, re-flouring it when it starts to stick. Press the trimmings together, pat out and cut more rounds as before.
4 Set the scone rounds slightly apart (to allow for spreading) on the prepared baking sheet. Lightly brush the top of each scone with buttermilk, then sprinkle with demerara sugar. Place in the heated oven and bake for 12–14 minutes until a good golden brown (undersides too) – these fresh berry scones will take slightly longer to bake than regular or dried fruit scones.
5 Transfer immediately to a wire rack and leave to cool slightly, then eat warm, split and spread with butter or clotted cream. These are best eaten the same day.
Try these scones – flavoured with bittersweet marmalade and milk chocolate – for brunch, split and spread with butter or more marmalade. To ensure a crisp and golden exterior, your oven needs to be fully up to temperature before you put the scones in to bake.
MAKES 8
YOU WILL NEED: 1 BAKING SHEET, GREASED WITH BUTTER
250g self-raising flour
good pinch of salt
50g caster sugar
50g unsalted butter, chilled and diced
1 medium free-range egg, at room temperature
about 100ml buttermilk, at room temperature
2 tablespoons marmalade (see here for an easy home-made marmalade recipe)
60g milk chocolate chips or chopped chocolate
1 Heat your oven to 220°C/425°F/gas 7. Sift the flour, salt and sugar into a mixing bowl. Add the pieces of butter and rub them into the flour using your fingertips until you can no longer see any lumps of butter, and the whole mixture looks like fine crumbs.
2 Put the egg and 100ml buttermilk in a small bowl and beat with a fork, just to mix. Pour into the crumbs and add the marmalade and chocolate chips. Mix with a round-bladed knife to make a rough-looking dough, then use your hands to bring the mixture together into a ball of slightly soft dough. If there are dry crumbs at the bottom of the bowl work in a little more buttermilk.
3 Lightly dust the worktop and your hands with flour. Turn out the dough on to the worktop and gently knead for a couple of seconds. Flour your hands again, then pat out the dough to about 3cm thick. Dip a 6cm plain round cutter in flour and use it to stamp out rounds, re-flouring it when it starts to stick. Press the trimmings together, pat out and cut more rounds as before.
4 Set the scone rounds slightly apart (to allow for spreading) on the prepared baking sheet. Place in the heated oven and bake for about 12 minutes until a good golden brown (undersides too). Immediately transfer to a wire rack to cool slightly. These are best eaten warm the same day.
The tastier the cheese you use to make these savoury scones, the better their flavour will be. A straight-sided cutter will make scone rounds with good, neat sides that rise well.
MAKES 8–9
YOU WILL NEED: 1 BAKING SHEET, GREASED WITH BUTTER
250g self-raising flour
a couple of pinches each salt and cayenne pepper
50g unsalted butter, chilled and diced
25g pecorino cheese, grated
100g extra-mature Cheddar cheese, grated
1 teaspoon finely chopped fresh dill
1 medium free-range egg, at room temperature
about 100ml buttermilk, at room temperature
1 Heat your oven to 220°C/425°F/gas 7. Sift the flour, salt and cayenne into a mixing bowl. Add the pieces of butter and rub them into the flour using your fingertips until you can no longer see any lumps of butter, and the whole mixture looks like fine crumbs. Stir in the pecorino cheese. Set aside a heaped tablespoon of the grated Cheddar (for sprinkling) and add the rest to the bowl with the dill. Mix in with a round-bladed knife.
2 Put the egg and 100ml buttermilk in a small bowl and beat with a fork, just to mix. Pour into the crumbs and mix with the round-bladed knife to make a shaggy-looking dough, then use your hands to bring the mixture together into a ball of soft but not sticky dough. If there are dry crumbs at the bottom of the bowl work in a little more buttermilk.
3 Lightly dust the worktop and your hands with flour. Turn out the dough on to the worktop and gently knead for a couple of seconds. Flour your hands again, then pat out the dough to about 3cm thick. Dip a 6cm plain round cutter in flour and use it to stamp out rounds, re-flouring it when it starts to stick. Press the trimmings together, pat out and cut more rounds as before.
4 Set the scone rounds slightly apart (to allow for spreading) on the prepared baking sheet. Sprinkle the top of each scone with some of the reserved Cheddar. Place in the heated oven and bake for about 12 minutes until a good golden brown (undersides too). Immediately transfer to a wire rack to cool slightly. Eat warm the same day, or split and toast the next day (when cold, store in an air tight container).
If you like feta cheese, you can use that instead of the goats’ cheese. These are perfect with a bowl of soup or a salad.
MAKES 12
YOU WILL NEED: 1 × 12-HOLE MUFFIN TRAY, LINED WITH PAPER MUFFIN CASES
135g log-style goats’ cheese
1 medium red pepper (about 100g), cored and cut into 1cm chunks
300g plain flour
2 teaspoons baking powder
½ teaspoon bicarbonate of soda
½ teaspoon salt, or to taste
¼ teaspoon cayenne pepper, or to taste
1 tablespoon coarsely chopped fresh basil or parsley
225ml buttermilk, at room temperature
1 medium free-range egg, at room temperature
100ml extra virgin olive oil
1 Heat your oven to 190°C/375°F/gas 5. Cut or crumble the goats’ cheese into pieces about the same size as the red pepper chunks.
2 Sift the flour, baking powder, bicarbonate of soda, salt and cayenne into a mixing bowl. Add the chopped herbs, red pepper and cheese and stir into the dry ingredients using a wooden spoon.
3 Lightly beat the buttermilk with the egg and olive oil in a measuring jug, just to mix, then pour into the bowl. Mix everything together with the wooden spoon until just combined – there’s no need to beat the mixture. Spoon into the paper muffin cases, making sure they are evenly filled.
4 Place in the heated oven and bake for 25–30 minutes until the muffins are golden brown and feel just firm when pressed in the centre. Leave the muffins to cool in the tray for 2 minutes, then lift out on to a wire rack. Eat warm or at room temperature the same or the next day. Once cold store in an airtight container.