
Impeccable petite appetizers make ideal bites to serve as nibbles with predinner drinks. As full-on cocktail fare, small and savory nibbles are perfect for the shaken and stirred crowd. Hors d’oeuvres used to be considered before or outside the meal, but have increasingly become part of the meal, or sometimes the meal itself.
The trend today is to call little bites tapas, the term for a wide variety of appetizers, or snacks, in Spanish cuisine. It is as if the term hors d’oeuvres is as outdated as the formerly de rigueur party dish, bacon-wrapped water chestnuts. Somehow it doesn’t seem right to call a very traditional Southern nibble, such as pigs in a blanket, a tapa. Technically, I think it would be a canapé, but that doesn’t seem quite right either. I’ve seen pigs in a blanket range from Vienna sausages and canned biscuit dough to artisan-made sausage wrapped in puff pastry. The phrase “lipstick on a pig” comes to mind. However, there’s one truth no one, myself included, can deny. As sure as death and taxes, people may look down their tapas-sniffing noses at pigs in a blanket, but you can bet money it’s the first empty platter on the buffet.
That truism aside, a party menu needs to be a balance of dishes: some that can be made ahead and served chilled or at room temperature, some freshly assembled or prepared, and some basic dishes that are perhaps as simple as opening a mason jar. Boring and basic are not the same thing. The most interesting bites are those that are a little out of the proverbial (cracker) box.
I prefer homemade and handmade, but I am a cook. It’s what I do. I’d be telling a tale, though, if I didn’t reveal to you that I also buy premade products. I try to buy the best quality, but I do buy what some overachieving hosts might deem shortcuts. Heck, even my former boss, Martha Stewart, the doyenne of DIY, suggests in her Hors d’Oeuvres Handbook to serve bowls of edamame or pistachio nuts.
Let the guests help themselves; there’s no need to stuff, spread, and frantically fill your way into a tired tizzy. This isn’t a bridge group or your grandmother’s tea party. Put the doilies away. Please.
I generally have a Southern-kissed hors d’oeuvres platter made with quality store-bought ingredients, such as olives, pickled okra, tomato confit, and pickled green beans. I love the look of a whole country ham surrounded by a mountain of biscuits on a wooden board with bowls of room temperature sweet butter and pungent mustard. And, if you don’t want to make the Mini Country Ham Cheddar Biscuits, buy them from a local bakery or restaurant. I know for a fact that one of Atlanta’s top hostesses serves Mary B’s tea biscuits, and no one is the wiser.
In this chapter, I’ve included recipes to create more informal and relaxed menus that satisfy the guests without sacrificing you, the host. They marry ease and elegance, flavor and finesse, and of course, each Basic recipe has a Brilliant alternative.
Welcome your guests. Focus on flavor and good ingredients. À votre santé—and relax and enjoy.
SERVES 4 TO 6
The French have ratatouille; the Sicilians, caponata; the Basque, pipérade; Indians, chutney; and Southerners have relish. All nationalities have gardens brimming full with fresh vegetables at the height of a hot summer. Southerners generally consider relish a cooked or pickled vegetable or fruit that is typically used as a condiment, starter, or nibble. It has always been an obligatory component of major feasts in my family. China cabinets across the South are filled with ornate cut-glass relish trays, multichambered vessels for holding various relishes. Relish was fairly recently perceived as a relic from an elderly relative’s dinner table, but with the resurgence of home canning, relishes have returned.
2 tablespoons pure olive oil
1 onion, preferably Vidalia, chopped
2 cloves garlic, finely chopped
1 large eggplant (about 2 pounds), cut into ¾-inch cubes
2 zucchini (about 2 pounds), cut into 1-inch cubes
Coarse salt and freshly ground black pepper
¾ cup water
1 red bell pepper, cored, seeded, and chopped
3 tomatoes, cored, seeded, and chopped, or 1 (28-ounce) can whole tomatoes with juice
1 pound small tender okra, ends trimmed
1 teaspoon chopped fresh thyme
½ cup chopped fresh basil
Heat the oil in a large, heavy saucepan with a tight-fitting lid over medium heat. Add the onion and cook, stirring occasionally, until translucent, 3 to 5 minutes. Add the garlic and cook until fragrant, 45 to 60 seconds. Stir in the eggplant and zucchini; season generously with salt and pepper. Add the water; cover, and simmer, stirring once, until the vegetables are beginning to soften, about 5 minutes. Stir in the bell pepper; simmer, covered, until softened, about 5 minutes. Stir in the tomatoes, okra, and thyme; bring to a boil.
Decrease the heat to medium-low. Partially cover; simmer, stirring often, until the vegetables are tender, 15 to 20 minutes. Remove from the heat.
Just before serving, stir in the basil. Taste and adjust for seasoning with salt and pepper. Serve warm, at room temperature, or cold.

Lots of things can be used as a vessel for that perfect hors d’oeuvre bite, including those store-bought pastry and phyllo cups available in the freezer section of most grocery stores and markets. What’s really Brilliant? A simple cornmeal crust that pairs wonderfully with the savory vegetable relish.
Position a rack in the center of the oven and preheat to 350°F. In the bowl of a heavy-duty mixer fitted with the paddle attachment, combine 6 tablespoons unsalted butter and 3 ounces room-temperature Neufchâtel or cream cheese. Combine 1 cup all-purpose flour, ½ cup fine cornmeal, and a pinch of fine sea salt in a small bowl. Add gradually to butter mixture, mixing constantly until well incorporated. Divide the dough into 1-inch balls and press into a nonstick mini muffin tins, using your thumbs to form cups that come up the sides. Make the dough cups as even as possible. Bake until pale golden brown, about 18 minutes. Transfer to a rack to cool. Store in an airtight container for up to 1 week. Makes about 30.
To serve, spoon 1 tablespoon of the vegetables into the cups and serve immediately. You will use about 2 cups of the ratatouille.
MAKES ABOUT 32
Butter beans are one of my very favorite things on earth. I love them. There is an expression, “what grows together, goes together,” and that sums up how I prefer to cook. I am particular about combining flavors, and even though I blend my Southern tradition with my French training, I think fusion is more akin to con-fusion. In my mind, flavors have to make sense together in a flavor as well as in an emotional sense. What thrives at the peak of a smoldering hot Southern summer? Tender butter beans and fragrant basil—both love the heat.
2 cups shelled fresh butter beans (about 1½ pounds unshelled) or frozen butter beans
4 cups water, plus more if needed
1 onion, preferably Vidalia, halved
2 tablespoons canola oil
Coarse salt and freshly ground black pepper
1 baguette, sliced diagonally ¼ inch thick
2 tablespoons extra-virgin olive oil, for the bread
1 shallot, finely chopped
2 cloves garlic, halved, for the toasts, plus 1 clove garlic, very finely chopped
1 small jalapeño, cored, seeded, and chopped
Finely grated zest and juice of ½ lemon
6 large fresh basil leaves
16 grape tomatoes, halved
Combine the butter beans, water, onion, and 1 tablespoon of the canola oil in a saucepan over medium-high heat. Season with salt and pepper. Bring to a boil, then decrease the heat and simmer, occasionally skimming the scum that floats to the top, until the beans are tender, 35 to 45 minutes for fresh or according to package instructions if frozen.
Meanwhile, position an oven rack 4 inches below the broiler and preheat the broiler. To make the toasts, arrange the baguette slices on a baking sheet and brush one side with some of the olive oil. Broil until brown, 2 to 3 minutes. Turn the toasts and broil the other side until brown, 2 to 3 minutes. Remove the toasts from the oven and while warm, rub one side of each toast with the cut surfaces of the halved garlic cloves. Transfer to a rack to cool.
Reserve 1 cup of the cooking water. Drain the beans in a colander and shake well to remove excess moisture. Remove and discard the onion or set aside for another use. Set the beans aside to cool.
In the now-drained saucepan, heat another 1 tablespoon of the canola oil over medium-low heat. Add the shallot and cook until translucent, about 3 minutes. Add the chopped garlic and cook over low heat until fragrant, 45 to 60 seconds. Add the jalapeño and cook for 1 minute longer.
Transfer the drained beans and the shallot mixture to a food processor fitted with a metal blade. Add the lemon zest, lemon juice, and basil. Season with salt and pepper. Purée until smooth, adding a little of the reserved cooking water, if necessary.
Taste and adjust for seasoning with salt and pepper. Spread some of the bean mixture on the prepared toasts. Drizzle lightly with any remaining olive oil. Top with the tomatoes. Sprinkle with a little salt and pepper to finish.
Layering on the flavor of the sun-kissed basil elevates the Basic Butter Bean Croustades to Brilliant.
To make the basil oil, heat ½ cup pure olive oil in a small saucepan over medium-low heat until very warm. Combine the heated oil, the leaves of 4 large sprigs basil, and ¼ teaspoon sugar in a blender. Purée until smooth and well combined. Pour into a bowl, cover, and chill for 2 hours to let the flavor develop, then strain through a fine-mesh sieve lined with cheesecloth. Makes ½ cup. Store in an airtight container for up to 2 weeks. Using a small spoon or squeeze bottle, drizzle over the croustades and serve.

Anne’s Roasted Pepper and Cheese Gratin, served the Brilliant way with a Cheese-Stuffed Roasted Red Pepper
SERVES 6
Sometimes roasted red pepper can be overpowering, but this is a full-flavored combination that is reminiscent of French country cooking. This simple yet delicious combination can be achieved at a moment’s notice with a well-stocked pantry. Having a jar of peppers in your pantry is not a sin, nor is using a jar of best-quality store-bought tomato sauce. If you do use bottled red peppers, I suggest draining and rinsing them under cold running water.
I like serving this in individual portions for a first course (pictured at left of photo). The gratins can be put together a day ahead and held in the refrigerator. Just let them come to room temperature before baking.
1 tablespoon extra-virgin olive oil, for the gratin dish
2 red bell peppers and 1 poblano pepper, or 1 (12-ounce) jar roasted red peppers
10½ ounces fresh goat cheese, thickly sliced
2 teaspoons fresh rosemary leaves, finely chopped
2 teaspoons chopped fresh oregano
1½ to 2 cups Sauce Tomate or best-quality store-bought pasta sauce, at room temperature
30 Niçoise or brine-cured black olives, pitted
Freshly ground black pepper
Garlic Toasts, for serving
Position the oven rack about 5 inches below the broiler and preheat. Brush a medium gratin dish with the olive oil.
If you are using fresh peppers, place the peppers directly on a gas burner over high heat or on a grill. As each side turns puffy and black, turn the peppers with tongs. (If you don’t have a gas stove or grill, place the peppers on a rimmed baking sheet and broil in the oven, turning as each side becomes charred.) When the peppers are charred on all sides, transfer them to a large bowl and immediately cover with plastic wrap. The steam will help loosen the skins. Let the peppers sweat until they are cool enough to handle, about 10 minutes.
Transfer the peppers to a clean cutting board. Peel off the blackened skin and discard. Halve the peppers and open them flat. Use the blade of a paring knife to remove the seeds, hard seed cluster, stem, and whitish ribs. Slice the cleaned peppers lengthwise into strips about 1 inch wide. Avoid rinsing the home-charred peppers since it dilutes the smoky sweet flavor of the peppers; instead, wipe clean with paper towels. If using jarred peppers, rinse and cut into strips.
Scatter the roasted red pepper strips and sliced goat cheese slices on the bottom of the prepared gratin dish. Top with a sprinkling of half of the herbs. Spoon over the tomato sauce to coat evenly. Top with the olives and the remaining herbs. Season with black pepper.
Transfer the gratin to the oven. Broil until bubbling and hot, about 5 minutes. Serve with the garlic toasts.
Put in just a few minutes in additional preparation of the peppers and you will have a showstopping Brilliant dish (pictured at right of photo).
Increase the number of peppers to 6 or, for an extra-special presentation, use a smaller chile such as Fresno or baby bell peppers. Roast them as directed in the Basic recipe, but instead of slicing the roasted, peeled peppers into strips, cut a lengthwise slit in each pepper; discard the seeds, leaving the stems intact. (If it tears a little don’t worry, it can be coated in sauce.) Set aside. Preheat the oven to 400°F. Combine the goat cheese and herbs in a bowl. Season with salt and freshly ground black pepper. Divide into 6 portions and shape each portion into a cylinder. Slip 1 cheese cylinder into each prepared pepper. Transfer the peppers to the prepared baking dish. Spoon the sauce and olives over the peppers. Bake until heated through, about 10 minutes. Serve with garlic toasts.
SERVES 6 TO 8
Southerners are fond of pickles, but we’re not alone. There’s been an enormous resurgence of canning and “putting up” across the country. In French cooking, the term à la grecque refers to vegetables, most often mushrooms, lightly pickled in a seasoned mixture of oil, lemon juice, and water, and served cold. In this recipe I’ve combined a basic American-style refrigerator pickle made with vinegar and spices, and the French version made with lemon and oil.
Pickled vegetables are a traditional accompaniment to cured meats. The vinegary impertinence of the pungent pickle cuts the fat of the meat; the richness of the meat mellows the piquancy of the vegetables. Serve these quick pickles with the Pork Terrine, or pick up some country ham, pâté de campagne, salumi, or saucisson sec at a local gourmet market.
2 teaspoons coriander seeds
1 teaspoon mustard seeds
1 teaspoon allspice berries
¾ cup dry white wine
½ cup apple cider vinegar
½ cup water
Finely grated zest and juice of 1 lemon
⅓ cup pure olive oil
Coarse salt and freshly ground black pepper
8 ounces small white button mushrooms, stems trimmed
8 ounces small cremini mushrooms, stems trimmed
8 ounces haricot verts or young tender green beans, ends trimmed
½ cauliflower, cut into florets
8 ounces small tender okra, ends trimmed
2 teaspoons finely chopped fresh flat-leaf parsley
Combine the coriander seeds, mustard seeds, and allspice berries in a piece of cheesecloth. Place in a very large pot with the wine, vinegar, water, lemon zest, lemon juice, and olive oil; season with salt and pepper. Bring to a boil over medium-high heat.
Add the mushrooms and vegetables, stirring to combine. Cover the pot and bring to a simmer over medium heat, gently shaking the pan a few times during the first few minutes of cooking. Simmer gently, covered, until the vegetables are just tender, about 8 minutes.
Using a slotted spoon, remove the mushrooms and vegetables from the pot to a bowl. Set aside. Increase the heat under the liquid to high. Bring to a boil, uncovered, and simmer until the liquid is reduced by half, about 8 minutes. Remove from the heat. Pour the reduced liquid into a bowl over a bowl of ice. Stir until cool. Once cooled, pour over the vegetables. Taste and adjust for seasoning with salt and pepper.
Serve garnished with the parsley. Store in an airtight container in the refrigerator up to 6 days.
Elevate the Basic Pickled Vegetables to Brilliant with Basil Aioli as a dipping sauce, or for a more interesting presentation, spoon some of the sauce into the bottom of short glasses and top with the vegetables.
To make the basil aioli, whisk to combine 2 large egg yolks, 1 teaspoon Dijon mustard, finely grated zest and juice of 1 lemon, and 1 finely chopped garlic clove in a bowl until smooth and light. In a slow, steady stream, whisk in 1 cup oil, a drop at a time, until the mixture starts to stiffen and thicken. Add 2 tablespoons very finely chopped fresh basil. Taste and adjust the seasoning with coarse salt and freshly ground white pepper. Store in an airtight container in the refrigerator for up to 2 days. Makes 1 cup.
SERVES 6
Rillettes are found throughout France, but they are a specialty of the Loire Valley, traditionally made with pork or duck; they are essentially pulverized confit: shredded meat smashed with fat to produce a rich, rustic paste for spreading on bread. First the meat is cooked slowly over low heat until very tender—this is the confit—then it is raked into small shreds and blended with the warm cooking fat to form a rustic paste—the rillettes. Rillettes, like confit, were originally a means of preservation. The meat could be stored in crocks under a layer of fat in a cool place. The thing to remember is that pâtés and rillettes aren’t considered upscale delicacies in France; they are simple everyday food.
Sometimes I prepare free nibbles for book signings. You could offer cotton balls on toothpicks, and people would devour every fluffy bite. However, when I offered this recipe, there was a veritable stampede. Be warned.
1 tablespoon canola oil
2 shallots, chopped
1 bay leaf, preferably fresh
8 ounces large shrimp (21/25 count), peeled and deveined
¼ cup dry white wine
Coarse salt and freshly ground white pepper
3 tablespoons unsalted butter
4 ounces Neufchâtel or cream cheese, at room temperature
Finely grated zest and juice of ½ lemon
2 tablespoons chopped fresh chives
Belgian endive, cored and separated into individual leaves, crackers, or croutons, for serving
Heat the oil in a large skillet over medium heat. Add shallots and bay leaf. Cook until the shallots are translucent, about 3 minutes. Add the shrimp and wine. Season with salt and white pepper and cook until the shrimp are pink and cooked through, about 3 minutes. Remove and discard the bay leaf. Transfer the mixture to a food processor fitted with a metal blade.
Add the butter and Neufchâtel. Purée until smooth. Add the lemon zest and juice, chives, and salt and pepper to taste. Pulse to mix and transfer to a 1½-cup crock or to 3 small jars. Cover with plastic wrap, pressing the plastic wrap directly onto surface of shrimp mixture to prevent a skin from forming.
Refrigerate for at least 8 hours or up to 3 days. Let stand at room temperature for 30 minutes before serving with Belgian endive, crackers, or croutons.
Serving the Shrimp Rillettes with store-bought crackers is Basic; homemade crackers are definitely above and beyond but scrumptious and Brilliant. This recipe is based on the flatbread served at Canoe, in Atlanta, and was shared with me by chef Carvel Gould. She told me that one of her regular patrons had placed the dough between two baking sheets and run over it in her car to flatten it. I suggest a rolling pin and a little elbow grease.
Preheat the oven to 350°F. Brush a rimmed baking sheet with olive oil. In the bowl of a food processor fitted with a metal blade, combine 2¼ cups bread flour, ½ teaspoon fine sea salt, ¼ cup fresh thyme leaves, and 1 tablespoon fennel seeds. Pulse to combine. Add ¾ cup cold water and pulse until the dough comes away from the sides of the bowl, 45 to 60 seconds. Turn the dough out onto a silicone baking sheet or lightly floured surface and knead until smooth and elastic, 5 to 7 minutes. Form the dough into a ball. Portion the dough into ten 2-ounce balls. One at a time, working on a silicone baking sheet and using a lightly floured rolling pin, roll each ball as flat as possible. Season with salt and pepper, then give the dough one more roll. Place two or three at a time on the prepared baking sheet. Bake until golden brown, about 20 minutes. Remove to a rack to cool. Repeat with the remaining dough. Makes 10.
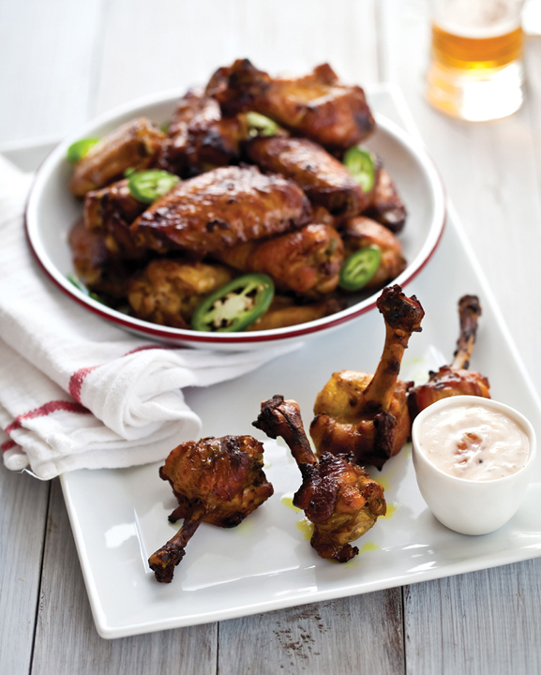
Curried Chicken Wings with Peach Dipping Sauce, served the Brilliant way as Chicken “Lollipops.”
MAKES ABOUT 24
Madras curry is a fairly hot curry blend, most often deep red from a heavy amount of powdered chile. Oddly enough, for a region that until recently considered any flavor other than bacon fat to be exotic, there is a history of curry in the South, which entered our region through the seaports of Savannah and Charleston. Curried chicken salad was once considered a very proper Southern Junior League sort of ladies tea or lunch delicacy. Some of those ladies might not consider a wing to be an appropriate nibble for party guests. In my opinion, with that built-in handle, chicken wings are perfect.
3 pounds chicken wings (12 to 14 whole wings)
1 teaspoon Madras or spicy curry powder
½ teaspoon ground turmeric
¼ teaspoon cayenne pepper, or to taste
2 tablespoons soy sauce
2 tablespoons canola oil
2 to 3 jalapeños, cored, seeded, and very finely chopped, plus more for garnish
2 cloves garlic, very finely chopped
Coarse salt and freshly ground black pepper
½ cup plain low-fat or whole-milk Greek-style yogurt
3 tablespoons peach preserves
¼ teaspoon hot sauce, or to taste
Coarse salt and freshly ground black pepper
Cilantro sprigs, for garnish
To prepare the chicken wings, cut off the wing tips (reserve to make stock), and halve the wings at the joint. In a large bowl, combine the wings, curry powder, turmeric, cayenne, soy sauce, canola oil, jalapeños, garlic, salt, and pepper. Toss to coat. Cover and refrigerate for at least 1 hour, or overnight.
Meanwhile, to make the sauce, combine the yogurt, preserves, and hot sauce. Season with salt and pepper. Cover and refrigerate until serving.
Remove the marinated wings from the refrigerator and let come to room temperature.
Preheat the oven to 400°F. Line a rimmed baking sheet with aluminum foil, then set a large wire rack on the foil. (I don’t like to use a nonstick baking liner on the baking sheet in this instance because the curry can stain the silicone.)
Transfer the wings without crowding to the prepared baking sheet.
Bake until the wings are deep brown and the juices run clear, turning once, 15 to 20 minutes per side. (If you like charred bits, after the 40 minutes, turn the oven on to broil for about 5 more minutes.)
Taste the yogurt dipping sauce and adjust for seasoning with salt and pepper. Garnish with cilantro and serve the hot wings with the dipping sauce on the side.

I first learned this watching Jacques Pépin on television. It’s impossible to watch him without learning something. This converts regular old chicken wings to Brilliant hors d’oeuvres.
To prepare the “lollipops,” cut off the wing tips (reserve to make stock), and halve the wings at the joint. (This will leave you with the drumette and flat.) Using a paring knife, cut the tendons at the narrower end of each drumette joint. Hold that end with a kitchen towel and scrape down the meat as far as possible toward the thicker end to make a plump lollipop shape. Then, take each flat and cut through the cartilage at one end of each piece, separating the bones. Scrape the meat down the larger bone to make a lollipop shape; remove and discard the smaller bone. Proceed with the Basic recipe to marinate as instructed.
SERVES 4 TO 6
I love liver. Mama and my sister prefer gizzards, but when you chew them, they bounce back while you are chewing a little too much for me. I once brought my mother a large can of duck gizzard confit from France. I didn’t have to purchase it in a specialty store. Confit de gibier is a merely a few steps from canned tuna and crackers in a typical French grocery store. Perhaps more interesting is that duck gizzards are available in those number 10 cans we’re more accustomed to for pork and beans stateside. Mama’s response to her savory snack? You would have thought there was an Hermès scarf in that tin.
Quatre épices means “four spices,” although some versions contain a mixture of five; it is a traditional French ground spice blend that usually contains a combination of both white and black peppercorns, cinnamon, nutmeg, ginger, and cloves. If you don’t want to make your own, or order it online, McCormick’s sells Chinese five-spice powder, with a similar flavor profile, which makes it a perfectly acceptable substitute.
1 tablespoon canola oil
1 onion, preferably Vidalia, finely chopped
1 clove garlic, very finely chopped
1 pound chicken livers, tough membranes and fat removed
1 sprig thyme
½ cup dry white wine
1 teaspoon quatre épices
Coarse salt and freshly ground black pepper
Toasted brioche, for serving
Heat the oil in large, heavy skillet over medium heat. Add the onion and cook until translucent, 3 to 5 minutes. Add the garlic and cook until fragrant, 45 to 60 seconds. Increase the heat to medium-high and add the chicken livers and thyme. Sauté until lightly browned, 2 to 4 minutes. Add the wine and cook until most of the liquid evaporates, about 3 minutes. Remove from the heat and remove the thyme sprig. Taste and adjust for seasoning with salt and pepper.
Spoon the livers onto warmed serving plates and accompany with the toasted brioche.
Some folks won’t touch liver, but pâté? That’s Brilliant.
To make the pâté, transfer the sautéed livers to a food processor fitted with a metal blade. Add ½ cup (1 stick) unsalted butter; purée until smooth and creamy. Taste and adjust for seasoning with salt and pepper. (It can be a little on the salty side because it will be served cold, which slightly dulls the seasoning.) Transfer to several small crocks or ramekins. Press a piece of plastic wrap directly onto the surface of the pâté and refrigerate until firm, about 4 hours or overnight. Serve with toasted brioche. Because of the richness, it’s also nice to serve piquant cornichons or Pickled Vegetables alongside. Serves 4 to 6.
Sel rose (also known as pink salt), a mixture of sodium chloride, potassium nitrate, and natural red coloring, is a preserving salt that helps meats keep their rosy color. It is available online and in gourmet markets. To use, place the livers in a bowl and toss with 1 teaspoon sel rose. Proceed with the recipe. The livers do not brown in the pan, but stay pink and the resulting Brilliant pâté is pink, as well.
MAKES 1 (12½ × 4-INCH) LOAF
Containing three different forms of pork, this is a real country pâté—country French and country Southern. When I first moved to France, the weekly farmer’s market was a menacing combination of pleasure and pain. My eyes were seeing food for the first time as I had never seen it, but my Southern ears struggled with the thick country French accents, and let me just say my honeyed drawl and the French “r” are not friends. The worst part of all was the elderly French women who would run roughshod over me. I’d be standing at the counter, wanting to order terrine, and everyone would be mumbling, waiting for me to decide. At best, the bevy of pinched face women would not-so-gently press me forward; at worst, they would literally push me out of the way. It was if I was mute, no amount of excusez–moi mattered. All I really wanted to do was cuss out one of them, which I would have never done, but just thinking about it made me feel better.
In my effort to take the fear out of pâté and be as polite as possible to you, I want to make this simple. Make sure to use shoulder so the mixture will contain enough fat. Don’t be intimidated, just think of it as meat loaf.
10 to 12 thin slices bacon
1½ pounds pork shoulder, cut into cubes
4 ounces country ham, skin and fat removed, cut into cubes or strips
4 ounces chicken livers
1 tablespoon unsalted butter
1 onion, preferably Vidalia, chopped
Pinch of ground allspice
Pinch of cayenne pepper
2 large eggs, lightly beaten
2 tablespoons bourbon
2 bay leaves, preferably fresh
2 sprigs thyme
Coarse salt and freshly ground black pepper
Preheat the oven to 350°F. Line a 12½ × 4-inch terrine mold with the bacon, reserving several slices for the top.
Combine the pork, ham, and liver in a bowl. Transfer the meats to the freezer until quite firm but not frozen, 15 to 20 minutes.
While the meats are chilling, begin making the filling. Heat the butter in a small frying pan over medium heat. Add the onion and sauté until translucent, 3 to 5 minutes. Set aside to cool.
Work the chilled meats and cooled onion through the coarse plate of a meat grinder into a large bowl, or process a little bit at a time in the bowl of a food processor fitted with a metal blade. Stir in the allspice, cayenne, eggs, and bourbon. (Sauté a spoonful of the mixture in a bit of oil and taste. It should be quite spicy, as it will be served cold later.) Adjust the seasoning of the mixture, as needed. Spread the mixture in the terrine mold and smooth the top. Cover the top with the remaining bacon, trimming it to fit the mold. Put the bay leaves and thyme sprigs on top and cover the terrine with the lid.
Make a water bath by filling a roasting pan half full with hot water and bring to a boil on the stovetop. Add the terrine. Transfer the roasting pan to the oven and bake until the temperature registers 165°F on an instant-read thermometer, 1 to 1½ hours.
Remove the terrine from the water bath and let it cool to tepid. (For safety purposes, leave the hot water in the oven to cool completely before removing.) Remove the lid and set a 2-pound weight on top to compress the filling. A brick tightly wrapped in plastic wrap is an ideal size for many terrines. Or, cut a piece of cardboard and wrap in aluminum foil, then set a couple of cans on top. Chill the terrine until cold and
firm, about 12 hours. Remove the weight, cover the mold again with the lid, and store in the refrigerator, preferably for 1 to 3 days before serving.
What could be more Brilliant than homemade mustard to go with the terrine?
Combine ⅓ cup yellow mustard seeds with ½ cup white wine and ⅔ cup white wine vinegar in a glass or stainless-steel bowl. Let sit for 48 hours. In a second bowl, combine ½ cup mustard powder and ½ cup water and mix until smooth. Let rest for 20 minutes. Transfer the seeds and their soaking liquid to a food processor. Process until the seeds become creamy, 4 to 6 minutes. (It’s important to really process until smooth; this takes an entire 4 to 6 minutes.) Add the mustard-water mixture, 2 teaspoons sugar, ½ teaspoon ground allspice, and a pinch of ground turmeric. Process until well combined. Store in an airtight container in the refrigerator for at least 1 week before using to let the flavors develop. Store the mustard in an airtight container in the refrigerator for up to 1 month. Makes 2 cups.
MAKES 36
The smoky flavor of highly spiced andouille is a cornerstone of Cajun cuisine, and is featured in classic dishes such as jambalaya, gumbo, and red beans and rice. LaPlace, Louisiana, about 30 miles outside of New Orleans, is “the place” to find the authentic Cajun sausage made from pork shoulder, garlic, peppery seasoning, and pecan smoke.
I’m putting some of that aforementioned lipstick on these pigs in a blanket. Puff pastry is the pastry equivalent of a pashmina scarf. Wrapped around andouille sausage and dusted with cornmeal and whole mustard seeds, these have a crispy, toothsome bite. Regardless of how fancy I’ve made it, this little nibble is still dead easy and your guests will love it, although they may think you’ve gone a bit high on the hog.
1 pound Quick Puff Pastry or 1 (14-ounce) box store-bought puff pastry
All-purpose flour, for rolling out
1 large egg
1 tablespoon water
18 ounces (6 sausages) fully cooked andouille sausage
2 tablespoons yellow mustard seeds
2 tablespoons very fine yellow cornmeal
Creole mustard, for serving
Preheat the oven to 400°F. Line a rimmed baking sheet with a silicone baking liner or parchment paper.
Place the puff pastry on a lightly floured work surface. Sprinkle the pastry with a little flour, and roll out to a thickness of ⅛ inch. Brush away any excess flour and trim the edges to form a 12-inch square. Slice in half horizontally, then again in thirds vertically to make six 4 × 6-inch rectangles. (Layer the resulting scraps on top of one another—don’t bunch them all together—and save for another use. Wrap in plastic wrap and store in the freezer for up to 3 months.)
In a small bowl, whisk together the egg and water. Brush the rectangles with the egg wash. Place 1 cooked sausage along the long edge of a rectangle (its tips will extend out either end). Roll up the pastry around the sausage and press the edge to seal. Place on the prepared pan. Repeat with the remaining sausages; set aside the remaining egg wash. Refrigerate until firm and chilled, about 30 minutes up to overnight.
Combine the mustard seeds and cornmeal in a shallow baking dish. Working with 1 roll at a time, brush the outside of the pastry all over with the reserved egg wash. Roll in the seed-cornmeal mixture, then place on the prepared baking sheet. Repeat with the remaining rolls. (If the pastry becomes warm or soft, return the rolls to the refrigerator to firm up.) Using a sharp knife, trim the ends of the sausage that protrude from the pastry to make 4-inch rolls and discard the ends. Cut the rolls about ⅔-inch thick to make 6 pieces. Return to the prepared baking sheet, placing the pieces about 1½ inches apart. Return to the refrigerator to chill and firm, if necessary.
Bake until a rich golden brown on the bottom, about 10 minutes. Using an offset spatula, flip each disk and continue baking until rich golden brown on both sides, an additional 8 to 10 minutes. Remove to a rack to cool slightly. Transfer to a warmed serving platter. Serve hot or warm, topped with a small dollop of Creole mustard.

Talk about going high on the hog—our humble finger food is transformed into Brilliant, and perfect for passing at a party, with a wooden skewer. Once the sausage has been cut into pieces, insert a 6-inch skewer into the side of each disk. Place the sausage on the prepared baking sheet, alternating the orientation so the skewers don’t touch the dough as it expands while baking. Bake as directed. Serve hot or warm with Creole mustard on the side for dipping.
MAKES ABOUT 30
When I was a little girl, one of my favorite breakfast meals was cheese toast biscuits. Mama would halve biscuits, leftover from supper the night before, and I would take that familiar plastic-wrapped orange slice and bend it until it broke into four equal pieces. I topped each half biscuit with a quarter of a slice before placing it on the bent and battered baking tray she used to make toast. Sometimes Mama would place a thin slice of ham under the cheese. She then placed it under the broiler. The cheese would bubble and melt, and the biscuit edges would toast and brown. I especially liked it when she cooked the cheese to a deep chocolate color so that I could remove the nutty burnt skin and enjoy it separately first, leaving the cheese creamy and soft underneath. (Mama used to make cheese toast every morning for our dachshund, as well. But that’s another story for another day.)
2 cups all-purpose flour, plus more for rolling out
1 tablespoon baking powder
½ teaspoon fine sea salt
¼ teaspoon freshly ground black pepper
½ cup (1 stick) unsalted butter, chilled and cut into ½-inch pieces
⅓ cup shredded sharp Cheddar cheese (1¼ ounces)
⅓ cup finely diced country ham (1¾ ounces)
½ cup buttermilk, plus more for brushing
2 large eggs
Preheat the oven to 400°F. Line a baking sheet with a silicone baking liner or parchment paper.
To prepare by hand, whisk together the flour, baking powder, salt, and pepper in a bowl. Using a pastry cutter or two knives, cut in the butter until it’s the size of large peas. Stir in the cheese and ham and make a well in the center. In a small measuring cup, whisk together the buttermilk and eggs. Pour the liquid into the well and quickly stir until the dough is moistened.
To prepare in a food processor fitted with a metal blade, combine the flour, baking powder, salt, and pepper in the food processor and pulse to combine. Add the butter and pulse until it is the size of peas. Pulse in the cheese and ham. Then, pour in the buttermilk mixture and pulse to combine. The dough will pull away from the sides of the bowl.
Turn the dough out onto a lightly floured work surface and knead two or three times, just until it holds together. Using a lightly floured rolling pin, roll the dough out to a thickness of ¾ inch. Cut out rounds of dough with a 1½-inch round cutter dipped in flour; press the cutter straight down without twisting so the biscuits will rise evenly when baked. Place the biscuits on the prepared baking sheet. If the biscuits are baked close together the sides will be moist. If the biscuits are baked farther apart, the sides will be crisp.
Gently press the remaining scraps together and cut out more biscuits. (These are more worked and will be a little tougher and likely not as pretty, but they still taste good!) Transfer the biscuits to the prepared baking sheet.
Using a pastry brush, lightly brush the biscuit tops with buttermilk. Bake until golden brown and risen, 15 to 17 minutes. Serve hot.
Honey and butter on a biscuit is Basic, but being a good Southern girl, I am of the mind that adding bourbon to a situation is always Brilliant.
Combine ½ cup (1 stick) room-temperature unsalted butter with ¼ cup honey and 2 tablespoons bourbon in a bowl. Season with salt and freshly ground black pepper. Whisk until smooth. (It will look like it will never come together, but it will; just keep whisking. Makes ¾ cup. To serve, split the warm biscuits and spread with Honey Bourbon Butter. Serve immediately.
MAKES ABOUT 12
Chausson is French for “slipper,” and chausson aux pommes is a classic triangle-shaped pastry filled with tender slices of apple. While I was working in France at La Varenne, it was tradition every Bastille Day for the stagiares to make hundreds of bite-size morsels for the town festival. We’d work for a week preparing pâte feuilletée, then subsequently bake bouchées, palmiers, sacristains, and chaussons, all bite-size puff pastry hors d’oeuvres, canapés, and mignardises. Repetition may seem monotonous, but it can be the key to real learning.
The most widely available version of store-bought frozen puff pastry is available in a 17.3-ounce box and does not contain a bit of butter. Considering puff pastry is nothing more than flour, butter, and water, that’s pretty significant. My Quick Puff Pastry is fundamental and worth making. Honestly? Shh, don’t tell but I rarely have time to make my own and most often use Dufour’s, a fine product made from real butter. It is available in 14-ounce containers online and at many Whole Foods Market locations.
1 pound Quick Puff Pastry or 1 (14-ounce) package store-bought puff pastry
1 large egg yolk
2 tablespoons heavy cream
2 Granny Smith apples, peeled, cored, and finely chopped
¼ cup crumbled Roquefort cheese or best-quality blue cheese
2 teaspoons chopped fresh thyme
Freshly ground black pepper
Preheat the oven to 400°F. Line a rimmed baking sheet with parchment paper or a silicone baking liner.
Place the puff pastry on a lightly floured work surface. Sprinkle the pastry with a little flour, and roll out to a thickness of ⅛ inch. Brush away any excess flour and trim the edges to form a 9 × 12-inch rectangle. Cut the pastry into twelve 3-inch squares, and transfer them to the prepared baking sheet. (Layer the scraps on top of one another, don’t bunch them all together—and save for another use. Wrap in plastic wrap and store in the freezer for up to 3 months.)
Combine the egg yolk and heavy cream in a small bowl and whisk together with a fork. Neatly brush a little of the egg wash along two adjoining edges of each square. Place a spoonful of the apple just below the center of each square, top with a teaspoon of cheese, sprinkle with thyme, and season with pepper. Fold down the unwashed edges to enclose the mixture and form a triangle. Using your fingers, gently but firmly press the pastry edges together to seal. Then, using the back of a paring knife, create a scalloped edge.
Place the baking sheet in the freezer for 20 minutes, or until the pastry is chilled. Remove from the freezer and brush the tops liberally with the remaining egg wash. Bake until the pastries are puffed and golden brown, about 15 minutes. Store warm or at room temperature. These nibbles are best served the day of baking; if you want to prepare ahead, assemble to the point just before the final egg wash and baking. Cover the baking sheet tightly with plastic wrap and refrigerate overnight.
Even though the pastries are filled with fine cheese and made with puff pastry, our chaussons are simply Basic pocket sandwiches. So, to take our little slippers to Brilliant, serve with a drizzle of Spiked Apple Butter.
To make the apple butter, heat ¾ cup apple butter in a saucepan. Add 2 tablespoons Calvados, applejack, or brandy. Cook until bubbly and warm. Remove from the heat. Using a whisk, stir in 1 tablespoon unsalted butter. Makes 1 scant cup. To serve, spoon the enhanced butter onto a plate. Top with 2 pastries set at an angle to one another and serve immediately.
Certain French products have a protected designation of origin, known as Appellation d’Origine Contrôlée (AOC), which translates as “controlled term of origin.” Similar cheeses are produced elsewhere, but European and French law dictate that only those cheeses aged in the natural Combalou caves of Roquefort-sur-Soulzon may bear the name Roquefort. The AOC certification of authenticity is granted to certain French wines, cheeses, butters, and other agricultural products, all under the very powerful auspices of the government bureau Institut National des Appellations d’Origine.
MAKES ABOUT 4 DOZEN
This aromatic shortbread is a twist on Dede’s cheese straws, a Southern classic I have enjoyed my entire life. It is very appropriately spiced, too, as he loved black pepper. The French have a tradition of nibbles such as this with an apéritif before dinner. The word is derived from the Latin verb aperire, which means “to open.” An apéritif is served before a meal to stimulate the appetite, contrasting with digestifs, which are served at the end of a meal to aid digestion. Dede never had an apéritif in his life.
1½ cups all-purpose flour
1 tablespoon freshly ground black pepper, or to taste
½ teaspoon fine sea salt
Pinch of cayenne pepper, or to taste
½ cup (1 stick) unsalted butter, at room temperature
8 ounces sharp white Cheddar cheese, at room temperature, grated
Position the oven racks in the top and bottom third of the oven. Preheat the oven to 375°F. Butter two baking sheets or line them with silicone baking liners or parchment paper.
Combine the flour, black pepper, salt, and cayenne in a food processor fitted with a metal blade and pulse to combine. Add the butter and cheese and process until smooth. Cover the work bowl with plastic wrap and set aside to rest for about 15 minutes.
Transfer the dough to a clean work surface. To shape the dough, work it in your hands; it should be soft and pliable (like Play-Doh). Shape the dough into two equal cylinders and wrap tightly in plastic wrap. Transfer to the refrigerator and chill until firm, about 30 minutes. Then, working with 1 cylinder at a time, using a utility knife, cut into ¼-inch-thick slices and place 1 inch apart on the prepared baking sheet. Repeat with remaining dough.
Bake the shortbreads, rotating the baking sheets once, until lightly browned on the edges, about 20 minutes. Remove the baking sheets to a rack to cool slightly. Using an offset or slotted spatula, remove the individual shortbreads to a rack and cool completely.
It’s all about accessorizing. To lift our simple cheese nibble to Brilliant, garnish with pecans (pictured at the beginning of the chapter). Prepare the dough as directed in the Basic recipe. Roll the edges of each cylinder in 1 cup chopped pecans to coat. Then, when you are ready to bake, slice the shortbread and place on the prepared baking sheets. Top each slice with a perfect pecan half. Bake as directed.
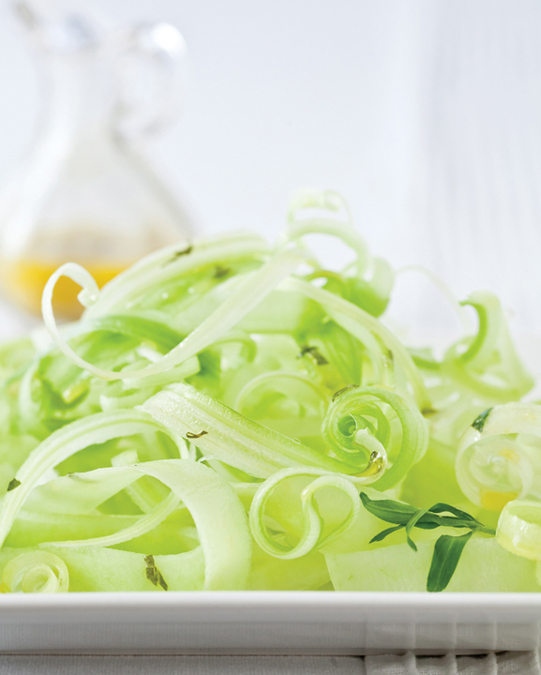
Celery Ribbons with Tarragon Vinaigrette
 Southern Ratatouille