
“Boy, you got a good scald on that chicken,” said Ed to Evelyn in the movie Fried Green Tomatoes. Okay, so not everyone can quote dialogue about fried chicken like I can. It’s my own “special gift” because fried chicken is the absolute quintessence of cooking in the South. And, to translate this bizarre nugget of cinematic commentary, Ed is referring to the high, but controlled heat that scalds the skin into crispy goodness and creates moist, juicy meat. The title of this chapter may seem equally puzzling. What’s a gospel bird? Gospel bird is an old-fashioned term for fried chicken, traditionally a special treat reserved for Sundays. When I lived far away from home and flew home to visit, it didn’t matter what time of the day or night I arrived, my grandmother Meme would be at the stove frying chicken to welcome me home. And now, my mother does the same. Even though it is part of my mission to convince people the South is more than fried chicken, fried chicken would still be my hands-down choice for my last supper if I were “on the way to the chair.” The smell of biscuits baking and chicken frying reaches into my soul.
Long, squatty chicken houses dot the landscape of North Georgia. The gentle sloping foothills of the Appalachian Mountains provide the perfect cool climate for raising chickens. Increasingly, chicken producers have moved farther south in the state for cheaper land with the advent of better cooling systems to adjust for the searing hot weather. On an average day, Georgia produces 24.6 million pounds of chicken and 14 million eggs. That’s a whole lot of bird.
It hasn’t always been that way. Before World War II, small flocks, tended to by the farmers’ wives, scratched and pecked their way around the yards and barnyards, producing the majority of eggs. The profits received from the sale of the eggs, often called “egg money,” were kept by the wives.
The rural South has always been very poor, and the 1920s and 1930s were economically disastrous. Then, according to the Georgia Encyclopedia, in the 1930s, an enterprising feed and seed salesman from Gainesville named Jesse Jewell offered farmers a deal: He would sell them baby chicks and feed on credit. When the chicks were grown, Jewell would buy back the adult chickens at a fair price that would guarantee the farmers a profit. Once he had recruited enough farmers to produce broilers for him, Jewell took his business venture to the next level by investing in his own processing plant and hatchery.
With World War II, the War Food Administration, an agency created during World War I to manage food stock, reserved all the chicken in North Georgia. Georgia farmers had a sure bet, a guaranteed buyer. These developments brought enormous changes in production: more facilities, as well as packaging fully dressed birds, with no head, feet, or entrails, better for freezing and transport, similar to what we have today.
Jewell added a feed mill and rendering plant in the postwar boom of the 1950s, triggering a change in the business model of the modern poultry farm. After the war, poultry farming steadily increased, then soared in the 1970s and 1980s, as Americans decreased their consumption of red meat.
The same rural women who once raised the eggs, along with African Americans, became the labor force for these growing chicken-production facilities. Although it is now far better, working in a chicken plant was, and still is, dangerous work. Poor working conditions in some plants have led to attempts at unionization. However, union presence in the South in all fields of industry has always been vehemently resisted, and the chicken industry has been no different. There are some plants that have unionized, but more are not. Currently, the overwhelming majority of production workers in Georgia’s processing plants are Latin American immigrants, mainly from Mexico.
I was able to visit a chicken-processing plant in North Georgia several years ago. I saw everything, from incubated eggs to chicken fingers flash frozen in a freezer the size of my house. Frankly, it was a lot cleaner than I expected, and quite a bit of the work is now done by machine. The breasts are scanned by laser, configured by computer to allow the maximum number of cutlets per breast, automatically adjusted on the belt by the machine, and cut with high-pressure water, the same technology used to cut steel. It was astonishing. The robot was impressive, but one of the most amazing things I saw was a Hispanic man boning out thighs by hand. His knife was moving so fast it was an absolute blur. He was paid not by the hour, but by the pound.
There are literally tens of thousands of chickens moving through these plants every day. Not surprisingly, increased scrutiny of the poultry industry, the political implications of 200 to 300 percent increases in the immigrant population to meet the labor needs in North Georgia and across the South, and growing concerns about the negative effects of agribusiness have created a slow-foods movement toward smaller farms and smaller production facilities. It’s the beginning of some people wanting to unravel what the enterprising Jesse Jewell started decades ago.
Choosing Poultry
Antibiotic-free and hormone-free stickers appear on packages throughout the meat case at local markets. It can be a bit confusing. Actually, all chicken is hormone free. USDA regulations prohibit poultry growers from giving hormones or steroids to their birds. So, this label, while truthful, is also potentially misleading. It would be similar to putting a “cholesterol-free” label on an apple—sounds great until you realize that all apples are cholesterol free.
The use of antibiotics is necessary to control illness in massive chicken houses that can hold up to 25,000 chickens. It’s common sense. Too many animals in an enclosed environment can become sickly and harbor disease; yet folks are concerned about ingesting too many antibiotics. Trouble is, some poultry that is labeled antibiotic free only means the chickens themselves haven’t been given antibiotics, it doesn’t mean the chicken feed doesn’t contain antibiotics, or that they were administered to eggs before the chicks hatched.
Consumer response to the massive poultry farms and production facilities is the increased desire for what are known as free-range chickens. It is to a large extent a marketing term. Producers of free-range chickens must simply be able to demonstrate to the USDA that the poultry has been allowed access to the outside. This does not necessarily mean the chickens are pecking away in a bucolic farmyard. They may simply have a door open in one of these large houses. And, although many people are convinced that free-range birds are healthier, according to the USDA, there is no discernible difference in salmonella levels between free-range, organically produced poultry and conventionally produced birds.
Speaking of salmonella, according to the USDA, washing chicken is not necessary. Washing the chicken actually increases the chance of cross contamination; water that has touched raw chicken and splashed into the sink can potentially contaminate other food. Nothing is getting washed off with cold water, that’s for sure; and if the chicken is slimy, well, you don’t want to be eating it anyway.
Another word cropping up in poultry production is heritage, sometimes heirloom. “Heritage” is usually used to describe animals, while “heirloom” refers generally to plants. Heritage describes varieties of animals that have unique genetic traits and were grown or raised many years ago, before the drastic reduction of breed variety caused by the rise of industrial agriculture. Typically heritage breeds are produced in a sustainable manner. The main criteria for sustainability, for example, applied most often to turkeys are that they are able to mate naturally, be able to withstand life outdoors, and have a slow growth rate.
Another fairly common set of buzzwords is “certified organic.” The USDA’s National Organic Program regulates the standards for any farm, wild-crop harvesting operation, or handling operation that wants to sell an agricultural product as organically produced. Livestock must be fed a diet of 100 percent organic feed, raised free of antibiotics and hormones, and have access to the outdoors and sunlight.
In the vocabulary of poultry production, foods labeled “natural” are not subject to the same set of strict USDA standards as those that are labeled organic. In essence, the meat must be minimally processed; contain no added food colorings, preservatives, or flavoring agents; and the producers must define what they mean by natural (such as “no added colorings or artificial ingredients” or “minimally processed”).
Organic, natural, heritage—whatever your choice may be, in this chapter you’ll find old-fashioned recipes for perfect for Sunday dinner as well as a selection of what are sure to become weeknight family favorites. Basic to Brilliant, gospel to game bird, there’s a little something for everyone.
SERVES 4
A velouté is one of the five French mother sauces. It starts with a roux, which in classic French cooking is made by melting butter and adding all-purpose flour. The mixture is cooked until foamy, then white stock is added to make the sauce. Now, in Georgia we’d call that sauce gravy. In this recipe we poach the chicken in stock, then use that cooking liquid to make the velouté.
Large bunch of tarragon
4 cups homemade chicken stock or reduced-fat, low-sodium chicken broth
4 boneless, skinless chicken breasts (about 2½ pounds)
Coarse salt and freshly ground white pepper
2 tablespoons unsalted butter
2 tablespoons all-purpose flour
Juice of ½ lemon
Preheat the oven to 350°F.
Remove the leaves from the tarragon stems. Place the stems and half of the leaves in a saucepan with the chicken stock. (Reserve the other half of the leaves for the sauce.) Bring to a boil and decrease the heat to simmer. Cook until the stock is very flavorful, about 5 minutes.
Season both sides of the chicken breasts with salt and white pepper. Place the chicken breasts in a shallow baking dish. Strain over the tarragon-flavored stock. Cover and seal with aluminum foil or a tight-fitting lid. Bake until the chicken juices run clear when pierced with a knife, 15 to 20 minutes.
Remove the chicken breasts from the stock to a warmed plate and cover to keep warm and let rest. (See
Crystal Clear. It’s here you strain the stock, if you choose.)
Melt the butter in a saucepan. Whisk in the flour and cook until foaming but not browned, 45 to 60 seconds. Whisk in the 2 cups of the cooking liquid and bring to a boil. Decrease the heat to a simmer and cook until the sauce is reduced and thickened, 15 to 20 minutes.
Meanwhile, finely chop the reserved tarragon. Add the chopped leaves and lemon juice to the sauce. Taste and adjust for seasoning with salt and white pepper.
Slice the breasts on the diagonal and spoon the sauce over the breasts to lightly coat. Serve immediately.

When I was growing up, Mama would sometimes make “patty shells.” I didn’t know they were puff pastry, and I sure didn’t know what that was or how to make it. I want to emphasize the technique here. It’s easy to get lost and bewildered in rulers and measurements. We basically want a little pastry boat, a solid base of dough with a ring of dough placed on top that makes a wall to contain a saucy filling. So don’t think recipe, think technique.
To prepare vol-au-vent, on a lightly floured surface, roll out 1 pound
Quick Puff Pastry or 1 (14-ounce) box store-bought puff pastry about ¼ inch thick, if needed. Cut out 8 vol-au-vent circles using a 3-inch round cookie cutter. Set aside half of the pastry circles. Then with the other half of the circles, using a smaller round cutter, remove the center of the circles to form a ring. Brush the reserved full circles with an egg wash made from 1 large egg and 2 tablespoons of cold water. Place the rings on the reserved whole circles and gently press so they will stick. (Remember, we’re making a boat, so the ring of dough on top forms the sides of the boat.) Brush the ring with egg wash and prick the center of the bottom circle with the tines of a fork. (You can decorate the ring by marking in the egg wash with the back of a knife or the tines of the fork.) Refrigerate until well chilled, at least
15 minutes. Bake at 375°F until the sides are firm and the pastry is deep golden brown, about 25 minutes. Transfer to a rack to cool. With a fork, gently scrape out the unbaked dough in the center. There you are. Vol-au-vent. Wasn’t that easy? Makes 4. To serve, place a vol-au-vent on each warmed serving plate. Fill with sliced chicken breasts and spoon sauce into the “boat.” Serve immediately.
When the chicken is cooking in the stock, it begins to clarify the stock as if for consommé. Consommé is made by whisking a mixture of egg whites, vegetables, and sometimes ground meat into stock. The protein in the egg whites and meat brings the impurities to the surface of the stock, forming a “raft.” Once the raft begins to form, the heat is decreased and the consommé is simmered until the raft is solid. The resulting liquid is very clear, perhaps not colorless, but very clear. Finally, a hole is made in the raft and the crystal clear broth is carefully ladled into a fine-mesh sieve lined with cheesecloth. When the chicken breasts are cooking in the stock, a similar process occurs. The stock sometimes becomes quite clear, and there are some bits that coagulate. Don’t worry. There’s nothing wrong with it. You can choose to strain out the bits, or not.
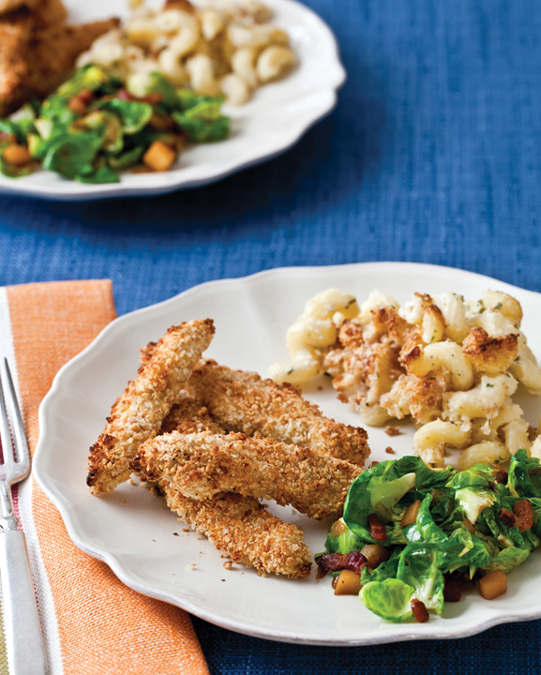
Ruby’s Peanut-Crusted Chicken Fingers, Pasta Gratin with Sauce Mornay, and Sautéed Brussels Sprouts with Apples and Bacon
SERVES 4 TO 6
One of my best recipe-testing assistants is also my friend, a young girl named Ruby. Whenever I develop recipes with young adults and children in mind, I try to pass them by Ruby. She’s already starting her own recipe book and is meticulous about writing the ingredients in order and documenting her technique. Granted, her palate is a bit more advanced than that of some of her schoolmates because she is the daughter of two chefs.
One of the great tragedies in the United States is what we feed schoolchildren. I was invited to the White House to help launch Let’s Move, the initiative started by First Lady Michelle Obama with an ambitious but important goal, to solve the epidemic of childhood obesity within a generation. Some chefs insist on not mimicking junk food and staying away from the chicken fingers, pizza, and hot pockets. Me? I just want them to eat healthful, not processed food. This one fits the bill and passes muster with Ruby.
¼ cup coarse salt
1 tablespoon sugar
2 teaspoons dry mustard
1 teaspoon paprika
½ teaspoon freshly ground white pepper, plus more to season
4 boneless, skinless chicken breasts (about 2½ pounds)
4 cups buttermilk
2 cups plain or whole-wheat fresh or panko (Japanese) breadcrumbs
1 cup finely chopped unsalted dry-roasted peanuts
2 large eggs
Preheat the oven to 350°F. Line a rimmed baking sheet with aluminum foil, then set a large wire rack on the foil.
To make the brine, combine the salt, sugar, mustard, paprika, and white pepper in a large plastic or glass container. Add the buttermilk and stir until the salt is completely dissolved. Immerse the chicken breasts in the brine and marinate at room temperature for 30 minutes. (Do not brine any longer or the chicken will be too salty.)
Meanwhile, combine the breadcrumbs and peanuts in a shallow dish. Season with white pepper. In a second shallow dish, whisk the eggs until they are loose, not ropey.
Working with 1 breast at a time, remove the chicken from the brine and shake off any excess liquid. Transfer to a plastic cutting board and, using a chef’s knife, cut the breasts on the diagonal into strips or fingers. (Yes, there is a reason I don’t cut them before I brine them; it makes them too salty.)
Dip the chicken into the egg mixture, coating both sides. Place the fingers in the breadcrumb mixture, sprinkle with crumbs to cover, and press so the coating adheres; turn the chicken over and repeat the process. Gently shake off any excess crumbs. Place the coated fingers on the rack set on the baking sheet.
Bake until the chicken is golden brown and the juices run clear, 20 to 25 minutes. Remove from the rack and serve immediately.
Perhaps one of the most outlandish
paillards I have ever seen was in the backwoods of southern Indiana near the Kentucky border. An entire pork tenderloin was pounded into a cutlet, breaded, deep fried, and sandwiched into a bun. The result was comical to say the least. It resembled a pork airplane with the large wings of the paillard hanging off the edges of the plate. But, I will say this, it was nicely and evenly pounded.
When pounding meat, instead of using thin plastic wrap or paper, I protect it with a heavy-duty freezer bag that I’ve separated into two thick sheets. I place the meat between the sheets and pound it with a flat meat pounder or the bottom of a heavy skillet. The meat is pounded and pulled simultaneously, practically stretching the meat into an evenly thin piece of meat about ¼ inch thick. Each pounded breast should measure roughly 6 inches wide and 8½ inches long. This technique works equally well with chicken, turkey, pork, or veal. For this recipe, once the meat is pounded, proceed with the recipe as with the fingers. Bake until golden brown, about 20 minutes. Remove from the rack and serve immediately.
I can see hands being frantically waved about the ¼ cup salt in the brine. Let’s do the math. Our brine is 32 ounces buttermilk + 1¼ ounces of salt + less than ½ ounce sugar. Therefore, the salt content is about 4 percent of the solution. With me so far? Brined meats can soak up about 10 percent of their weight in brine, which is to say that if you have 1 pound (16 ounces) of meat in your brine, it will absorb 1.6 ounces of the solution. With the chicken fingers, 2½ pounds chicken breasts will absorb 4 ounces of the solution. So, 4 ounces × 4 percent salt results in .16 ounce or 4.72 grams salt. That’s a lot, you say! But salt is not pure sodium, and sodium is the health culprit. Salt is sodium chloride, which is only about 40 percent sodium. So, 4.72 grams salt is about 1.9 grams or 1,900 milligrams of sodium. Divide that total by the 4 breasts and you have about 475 milligrams per breast, well below the U.S. recommended daily sodium intake of less than 2,400 milligrams.
SERVES 4
It often occurs to me when buying chicken breasts that the chicken breast consortium is in league with the buttermilk mafia. Have you ever noticed how hard it is to buy four boneless, skinless chicken breasts? They always come in packs of three. It’s the same with buttermilk, every now and then a pint jumps the wall, but mainly it’s a deluge of a half a gallon when you really only need a cup. This recipe is a bit fussy with the various steps and technique, but they are necessary, and the result is delicious and well worth the effort. Warm goat cheese and spinach stuffed inside a tender, golden brown chicken breast. Save this recipe when you have some time on a weekend to savor your time in the kitchen.
1 tablespoon unsalted butter
1 onion, preferably Vidalia, finely chopped
1 clove garlic, finely chopped
1 pound fresh baby spinach or 1 (12-ounce) bag thawed frozen leaf spinach
4 ounces fresh goat cheese
1 teaspoon chopped fresh thyme leaves
Coarse salt and freshly ground black pepper
4 boneless, skinless chicken breasts (about 2½ pounds), pounded into paillards
1 cup all-purpose flour
4 large eggs
¾ cup canola oil
1 tablespoon water
1½ cups plain or whole-wheat fresh or panko (Japanese) breadcrumbs
Prepare the spinach as for the
Skillet-Baked Eggs with Mushrooms and Spinach. Heat the butter in a skillet over low heat until melted. Add the onion and sauté, stirring occasionally, until soft and translucent, 3 to 5 minutes. Add the garlic and cook until fragrant, 45 to 60 seconds. Add the prepared spinach and stir to combine. Cook until dry and all of the moisture is removed, 3 to 5 minutes. Transfer to a bowl and set aside to cool.
Add the goat cheese and thyme to the cooled spinach mixture and stir to combine. Season with salt and pepper.
Place each breast, smooth side outward, on a clean work surface. Top with filling and roll to seal. Wrap each stuffed breast tightly in plastic wrap, twisting the ends in opposite directions so that the breast becomes tightly compact. (It looks like chicken twisted in a hard-candy wrapper.) Refrigerate until the filling is firm, at least 45 minutes.
Position the oven rack in the lower middle of the oven and preheat to 400°F.
Place the flour in a shallow baking dish and lightly season with salt and pepper. Crack the eggs in another shallow dish and beat with 1 tablespoon of the oil and the water. Season with salt and pepper. Put the breadcrumbs in another shallow baking dish. Season with salt and pepper.
Unwrap the chicken breasts and roll in the flour; shake off any excess. Using tongs, roll the breasts in the egg mixture; let the excess drip off. Transfer the breasts to the breadcrumbs; shake the pan to roll the breasts in the crumbs, then press with your fingers to help the crumbs adhere.
Heat the remaining oil in a skillet over medium-high heat until shimmering but not smoking, about 4 minutes. Add the chicken, seam side down, and cook until medium golden brown, about 2 minutes. Turn each roll and cook until medium golden brown on all sides, 2 to 3 minutes longer. Transfer the chicken rolls to a baking sheet.
Bake until the breasts are deep golden-brown and an instant-read thermometer inserted into center of each roll registers 165°F, about 15 minutes. Let stand for 5 minutes before slicing each roll crosswise on the diagonal into medallions. Transfer to a warmed plate, fanning the medallions just slightly, and serve immediately.

Creamy goodness in the form of Cauliflower Purée plays off the creamy, cheesy stuffing and makes a Brilliant bed for the oven-fried chicken. Cut 1 head cauliflower into 1-inch florets. Place in a microwave-safe bowl. Add 1 tablespoon water and a pinch of freshly grated nutmeg; season with coarse salt and freshly ground white pepper. Cover tightly with plastic wrap or seal with a microwave-safe lid. Microwave on high until the cauliflower is very tender, about 10 minutes. Transfer the cauliflower and some of the liquid to a food processor fitted with a metal blade. Purée until smooth, about 5 minutes, adding more of the liquid, if necessary. Add 2 tablespoons heavy cream, if desired, and purée until very smooth. Taste and adjust for seasoning with coarse salt and freshly ground white pepper. Serves 4. To serve, place a spoonful of the purée on a warmed plate and fan the medallions of stuffed breast at an angle on the top. Serve immediately.
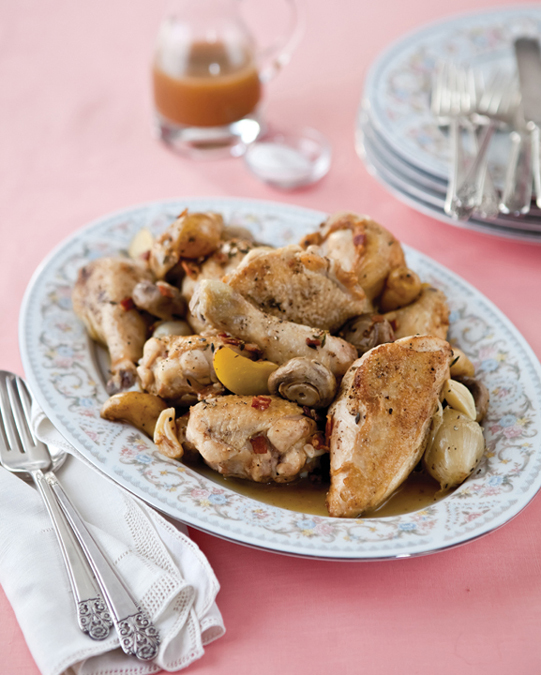
Grandmother’s Chicken
SERVES 4 TO 6
The concept of laissez-faire may be something that most of us remember from seventh-grade social studies and the Louisiana Purchase. Laissez-faire means “leave it alone.” Well, sometimes cooking is as much about knowing when to stir the pot as not. Try to flip that fish fillet before it’s ready, and it will simply tear. Leaving something alone to cook will allow it to develop and grow. The key is to pay attention, but let it be.
To achieve a rich dark flavor, it’s important to leave the chicken alone and let it become nicely seared. And, this concept seemed particularly appropriate to mention for grandma’s chicken. It seems that grandmothers hold the wisdom of the world in their hands and hearts.
1 tablespoon canola oil
1 tablespoon unsalted butter
1 (4-pound) chicken, cut into 8 pieces, or 6 bone-in, skin-on breasts or thighs
Coarse salt and freshly ground black pepper
4 slices bacon, cut into lardons
6 shallots, peeled and trimmed
2 heads garlic (about 20 cloves), separated, peeled, and tough ends removed
3 sprigs thyme
2 bay leaves, preferably fresh
18 bite-size fingerling potatoes, or 6 Yukon gold potatoes, cut into 1-inch chunks
12 white button or cremini mushrooms, stems trimmed
½ cup dry white wine
1½ cups homemade chicken stock or reduced-fat, low-sodium chicken broth
Heat the oil and butter in a large, heavy pot over medium-high heat. Season the chicken with salt and pepper. Cook without moving the pieces or crowding the pan, in batches if necessary, until well browned on all sides, 5 to 7 minutes. (Take your time; you want a nice, rich brown.) Transfer the chicken to a platter and keep warm while you cook the vegetables.
Pour off all but 1 tablespoon of the fat from the pan. Decrease the heat to medium. Add the bacon, shallots, garlic, thyme, and bay leaves. Cook, stirring occasionally, until the bacon starts to render and the vegetables start to take on a little color, 3 to 5 minutes. Add the potatoes and mushrooms, season with salt and pepper, and return the chicken to the pan. Pour over the white wine and stock. Cook until the vegetables are tender and the juices of the chicken run clear when pierced with a knife, 20 to 25 minutes. Taste and adjust for seasoning with salt and pepper. Serve immediately.
Variation You can make this recipe with boneless, skinless breasts instead of bone-in pieces. Simmer the breasts as directed on top of the stove along with the other ingredients, but just until the juices run clear, 8 to 10 minutes. Remove the breasts to a warmed plate and cover with aluminum foil. Let the sauce continue to simmer until the vegetables are tender and the sauce is thick enough to coat a spoon. Return the breasts to the sauce and finish as directed.
Monter au beurre is a term used to mean whisking cold butter into a sauce to add richness and gloss. Using a slotted spoon, remove the vegetables and chicken to a warmed serving platter. Tent it with aluminum foil to keep warm. Increase the heat to medium-high and boil until the sauce is reduced by half. Remove the pan from the heat. Using a whisk, swirl in 1 tablespoon cold unsalted butter. Taste and adjust for seasoning with coarse salt and freshly ground black pepper. Pour the sauce over the chicken and vegetables, and serve immediately with a crusty baguette to sop up the sauce.
SERVES 6
In French cooking, any meat or poultry seasoned with mustard and hot pepper and then coated with breadcrumbs is called à la diable, since the devil, or diable, is associated with anything hot and fiery. The French, however, aren’t known for a whole lot of heat in their cooking.
There are a couple of variations you can try if you want it hotter. You can obviously increase the amount of red pepper, but I also like using powdered chiles—not chili powder, or at least not the blend that often includes cumin, oregano, garlic powder, and salt. I use a powdered chile, such as ground Hatch or Dixon chile peppers from New Mexico.
2 tablespoons smooth Dijon mustard
1 tablespoon coarse-grain Dijon mustard
¼ teaspoon red pepper flakes or powdered chile, or to taste
2 large eggs
Coarse salt and freshly ground black pepper
6 bone-in, skin-on leg quarters or chicken breasts, or 12 bone-in, skin-on thighs
½ cup plain or whole-wheat fresh or panko (Japanese) breadcrumbs
2 tablespoons unsalted butter (optional)
Preheat the oven to 375°F. Line a rimmed baking sheet with a silicone baking liner or piece of aluminum foil (this will help with cleanup).
Combine the two mustards and red pepper in a small bowl. Crack the eggs into a shallow bowl or pie plate and whisk lightly with a fork to blend; season with salt and pepper.
Using a pastry brush, brush the mustard mixture all over the chicken. Dip each piece in the eggs, coating evenly on all sides. Sprinkle with the breadcrumbs, coating as evenly as possible. Place the chicken pieces on the prepared baking sheet.
Dot with the butter and bake until the juices run clear, 45 to 60 minutes for leg quarters, 30 to 35 minutes for thighs, and 35 to 40 minutes for breasts. Remove the chicken from the oven and transfer the pieces to a rack to cool slightly before removing from the baking sheet. Tent with foil and let rest for 3 to 5 minutes. Serve immediately.
The simple addition of two ingredients and the use of boned chicken thighs takes this Basic recipe to Brilliant without a whole lot of effort.
Cut 1 ounce Gruyère into batons approximately 2 inches long (each baton needs to be about the same size as the bone that was removed, because you are going to snuggle that cheese into that place). Set aside. Have 6 paper-thin slices (about 3 ounces) country ham, prosciutto, or Serrano ham ready for use. Season 6 boneless, skinless thighs on both sides with salt and pepper. Place the batons of cheese in the thigh bone cavity. Fold the thigh to close. Place a piece of ham on the work surface, place the filled thigh, seam side up, on the ham, and roll to wrap the chicken in the ham. Repeat with remaining ingredients. Proceed as directed in the Basic recipe, first brushing with the seasoned mustard, then dipping in egg, and finally coating in breadcrumbs. Bake until the juices run clear when pierced with a knife and the topping is a rich golden brown, about 35 minutes. Serve immediately.
SERVES 4
I like using chicken quarters in this spicy West African–influenced stew. The dish is somewhat unusual because peanuts did not permeate the cuisine like okra or other African foodways, even though many of the slaves brought to the United States were from the peanut-growing countries of Senegal, Congo, and Angola. Also, goober, from the African nguba, is another common name for peanut in the South.
I grew up in the country about thirty miles from Plains, home of former president and peanut farmer Jimmy Carter. In fact, my grandfather called him Goober Carter. Peanuts are harvested by uprooting the whole plant and then drying the plants in the field for a few days. Driving through the countryside, the air is perfumed with the heady aroma of iron and earth. Every year in early November, a local farmer would unload a pickup truck of peanut plants at the top of the driveway. We’d separate the nuts from the plants and shake off most of the dirt. Mama would then wash the nuts without soap in the washing machine to remove every last bit of dirt before boiling and canning them.
4 to 6 chicken leg quarters (about 4 pounds)
Coarse salt and freshly ground black pepper
1 tablespoon canola oil
2 onions, preferably Vidalia, thinly sliced
2-inch piece fresh ginger, peeled and grated
1 tablespoon red pepper flakes, or to taste
1 teaspoon ground coriander
1 teaspoon ground cumin
4 ripe tomatoes, preferably heirloom, cored and quartered
3 cups homemade chicken stock or reduced-fat, low-sodium chicken broth
⅓ cup crunchy peanut butter
2 sweet potatoes, peeled and sliced ¼ inch thick
4 green onions, white and green parts, chopped, for garnish
½ cup chopped unsalted dry-roasted peanuts, for garnish
2 tablespoons chopped fresh mint, for garnish
Hot cooked rice, for serving
Season the chicken with salt and pepper. Heat the oil in large, heavy pot over medium-high heat. Add the chicken, skin side down first, and cook until nicely browned on all sides, 5 to 7 minutes. Transfer the chicken to a plate.
Add the onions, ginger, red pepper flakes, coriander, and cumin; cook until the onions are translucent, 3 to 5 minutes. Return the chicken to the pot. Add the tomatoes.
Combine the chicken stock and peanut butter in a measuring cup and mix until smooth. Pour over the chicken. (You may need a little less or a little more depending on the size of your pot; you want the chicken mostly, but not completely, covered.) Increase the heat to high and bring to a boil. Cover and decrease the heat to simmer. Cook for 15 minutes.
Add the sweet potatoes and spoon some of the cooking liquid over to moisten. Return the lid and continue to cook until the juices run clear when pierced with a knife, 30 to 45 minutes more. Taste and adjust for seasoning with salt and pepper. Serve immediately with rice and garnished with the green onions, peanuts, and mint.
Calas are Creole rice fritters traditional to New Orleans. They marry Brilliantly with this West African–influenced stewed chicken.
In a bowl, whisk together 6 tablespoons all-purpose flour, 2 teaspoons baking powder, and ¼ teaspoon
coarse salt. Add 2 cups cooked rice, 2 beaten eggs, and ¼ cup chopped ham. Season with freshly ground black pepper. Stir well to combine. Pour 4 cups peanut oil into a heavy saucepan, deep fryer, or Dutch oven, filling it no more than one-third full. Heat the oil over medium heat until it reaches 350°F. Line a plate with paper towels and set by the stovetop. To fry the calas, scoop up the batter with a medium ice cream scoop and drop it into the hot oil without crowding. Fry, stirring occasionally with a slotted spoon, until golden, 2 to 3 minutes. Remove with a slotted spoon to the prepared plate. Adjust the heat to maintain the proper temperature and repeat with the remaining batter. Makes 10. Serve immediately with the garnished stewed chicken and rice.
SERVES 4 TO 6
You know how it is when you are itching for summer to start. You are ready for it. It buzzes in your brain like a hungry mosquito zeroing in for a feast on a naked expanse of skin. Warm weather, sunshine, and swimming. Porches, fishing, and lying on the grass by the river. I love summer food. Okra. Lady peas and butter beans. Tomatoes. Summer squash. Corn. Garrison Keillor is rumored to have said, “Sex is good, but not as good as fresh sweet corn.” Well, fresh sweet corn is really good. Simple. Uncomplicated. Satisfying.
Regardless of your opinion of sex and corn, I am sure you can agree summer does mean grilling. I love to grill throughout the year, but in the summer, it’s just practical to keep the heat out of the kitchen. Burgers and brats are brilliant, steaks and seafood are stupendous, but perhaps my absolute fave? The cheap and cheerful pedestrian chicken. Chicken can be absolutely sublime on the grill: smoky and charred, yet tender and juicy (pictured here). It can also be drier than chalk and just about as tasty, too. The trick is if you pierce the meat with the tip of a knife and the juices run clear, it’s done. If the juices run pink? It’s underdone. If there are no juices? Ahem.
4 quarts tepid water
¾ cup coarse kosher salt
⅓ cup firmly packed light brown sugar
2 cups ice cubes
1 (4-pound) chicken, cut into 8 pieces, or 6 bone-in skin-on breasts or thighs
Coarse salt and freshly ground black pepper
Mama’s Barbecue Sauce, warmed
Combine the water, salt, and brown sugar in a large plastic container and stir to dissolve. Add ice to chill, then add the chicken; cover and marinate in the refrigerator for 4 to 6 hours.
Prepare a charcoal fire using about 6 pounds of charcoal and burn until the coals are completely covered with a thin coating of light gray ash, 20 to 30 minutes. Spread the coals evenly over the grill bottom, position the grill rack above the coals, and heat until medium-hot (when you can hold your hand 5 inches above the grill surface for no longer than 3 or 4 seconds). Or, for a gas grill, turn on all burners to high, close the lid, and heat until very hot, 10 to 15 minutes.
Meanwhile, remove the chicken from the marinade and rinse under cool running water. Pat dry with paper towels, season with pepper, and set aside.
Using a wad of paper towels or an old cloth and a pair of tongs, apply some canola oil to the grill grate. Place the chicken on the grill, leaving plenty of space between each piece. Grill until seared, 1 to 2 minutes per side for legs and thighs, and 3 or so minutes for breasts. Move the chicken to where the heat is medium-low or lower the heat in a gas grill to medium. Continue to grill, turning occasionally, until the juices run clear when pierced, 12 to 18 minutes. During the last 5 to 7 minutes of cooking, brush the chicken with the barbecue sauce. (Any sooner and the sauce will burn.)
Remove the chicken pieces from the grill as soon as they are done and transfer to a warmed platter. Give them a final brush of sauce for flavor and serve immediately with additional sauce on the side.
Make a batch, then separate out a cup or so for brushing on the chicken. Don’t dip your brush in the big pot, then dab it on half-cooked chicken, and then serve that same sauce on the side. Eew. That’s just bad food safety and asking for a tummy ache.
1 cup (2 sticks) unsalted butter
1 onion, preferably Vidalia, very finely chopped
2½ cups ketchup
2 cups apple cider or distilled white vinegar
½ cup Worcestershire sauce
¼ cup Dijon mustard
2 tablespoons firmly packed dark brown sugar
Juice of 2 lemons
2 tablespoons freshly ground black pepper, or to taste
Coarse salt
In a saucepan, melt the butter over medium heat; add the onion and simmer until soft and melted, 5 to 7 minutes. Add the ketchup, vinegar, Worcestershire sauce, mustard, brown sugar, lemon juice, and pepper.
Bring to a boil, decrease the heat to low, and simmer until the flavors have smoothed and mellowed, at least 10 and up to 30 minutes. Taste and adjust for seasoning with salt and pepper. Store in an airtight container in the refrigerator. It will last for months.

The first time I saw “barbecue salad” listed on a menu, I was in Alabama on the way to the Southern Foodways Alliance conference in Oxford, Mississippi. It made me chuckle. Only a Southerner would heap a mountain of barbecue on a bed of lettuce and consider that a salad. Dubious, I ordered one, and it was really, really good. The warm meat slightly wilted the greens and yet still there was a lovely crunch. The way to transform this Basic recipe into Brilliant is to transform it into a salad. Remove all the bones and skin from the chicken and pull, not chop, into bite-size pieces. Toss with just enough warmed barbecue sauce to make it wet, but not sopping. For the salad greens, thinly slice 1 head romaine lettuce and place in a bowl. Work with what’s in season such as green onions, thinly sliced raw okra, tomato wedges, shredded carrot, or radishes. Top with the chicken and serve immediately.
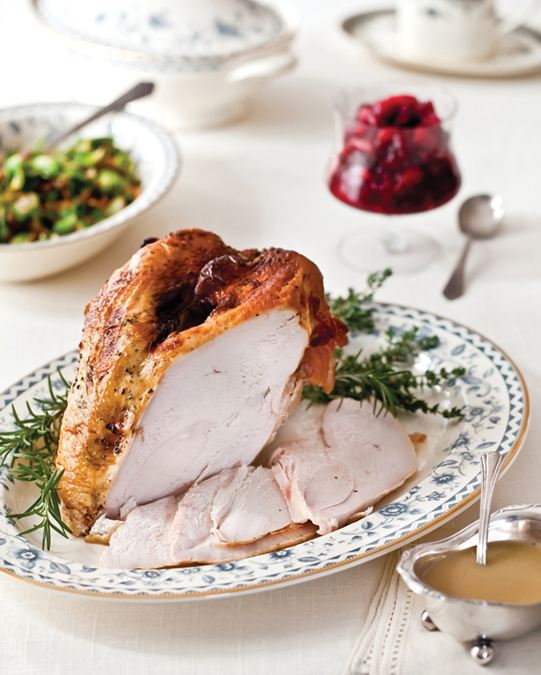
Brined Roast Turkey Breast with Herb Pan Gravy
SERVES 6 TO 8
Several years ago I was asked to style the food for a commercial with Paula Deen. They called me during the ten-day photo shoot for my first cookbook, Bon Appétit, Y’all. I was exhausted, but it was good work, and I have an attitude that you can do anything for two days. I drove south and, with toothpicks holding my eyes open, did my work. On the afternoon of the second day, her assistant told me Ladies Home Journal was coming to shoot the Thanksgiving cover story, a big deal in the magazine world. He said, “We thought they were bringing a stylist; they thought we had a stylist. Will you stay two more days?” Well, I can do anything for two days so I pushed through and stayed, creating an iconic roast Thanksgiving turkey cover shot and all.
The experience turned out to be a life lesson. Six months later, Ladies Home Journal posted that my first cookbook was one of their favorite books of the year, and Paula soon thereafter had me as a guest on her show. I believe sometimes you have to put it all out there for good to happen. That, and you can do anything for two days.
1 cup kosher salt
1 cup sugar
1½ gallons water
1 whole bone-in, skin-on turkey breast (6 to 7 pounds)
¼ cup (½ stick) unsalted butter, room temperature
1 teaspoon very finely chopped fresh sage
1 teaspoon very finely chopped fresh thyme
Freshly ground black pepper
3 celery stalks, chopped
3 carrots, cut into chunks
3 onions, preferably Vidalia, quartered
2½ cups homemade chicken stock or reduced-fat, low-sodium chicken broth, plus more if needed
2 tablespoons all-purpose flour
Coarse salt
Dissolve the kosher salt and sugar in the water in large, clean bucket or stockpot. Set the turkey breast in the brine, making sure it is submerged. Cover and refrigerate for at least 8 hours or up to overnight.
Remove the turkey breast from the brine. Pat dry and set aside. Place the butter in a bowl; add the sage and thyme. Season the butter well with pepper and stir to combine. Set aside.
Twenty minutes before roasting, preheat the oven to 450°F.
Place the turkey on a clean work surface. Using a chef’s knife, remove the remaining portion of the neck and reserve it for the stock and gravy. Remove the wishbone to make carving easier; set it aside with the neck for the gravy. With your hand, carefully release the skin on both breasts to form two pockets. Rub the seasoned butter under the released skin. If there is any extra butter, massage it on the outside of the skin.
Put the celery, carrots, and onions in a large roasting pan. Pour ½ cup of the chicken stock into the pan bottom to prevent the drippings from burning. Place the prepared turkey, skin side up, on top of the vegetables. Place the pan in the oven with the wide neck end toward the rear of the oven. Roast for 15 minutes, then rotate the pan back to front. Roast for 15 minutes more, until skin turns golden. Decrease the oven temperature to 325°F and continue to roast, rotating the pan once more about halfway through the cooking, until the internal temperature in the thickest part of the breast registers 160°F to 165°F, 30 to 45 minutes.
Remove the pan from the oven and transfer the turkey breast to a cutting board, preferably with a moat.
Cover the turkey loosely with aluminum foil. Pour the remaining 2 cups chicken stock into a saucepan. Add the reserved neck and wishbone and bring to a boil. Decrease the heat to simmer.
Place the roasting pan over medium-high heat. Add the flour to the pan drippings and stir until well combined. Strain the warmed stock over the flour-vegetable combination and bring to a boil. Decrease the heat to simmer and cook until thickened, 5 to 7 minutes. Strain the mixture into a saucepan (the saucepan that held the stock is fine to use), pressing on the vegetables to get every drop and all the flavor. Check and make sure the sauce is thick enough to coat a spoon; if not, continue simmering the sauce until the correct consistency is achieved. (If it’s too thick, add a little water or additional stock.)
Carve the turkey breast and plate on a warm platter. Add any juices that run into the moat to the gravy. Taste and adjust for seasoning with salt and pepper and serve with the gravy on the side.
I have a love-hate relationship with canned cranberry sauce. It is so evocative of the holidays, with its familiar ridges produced from being packed in the can. But I struggle with not making something fresh when making homemade is so easy. Transform this Basic Turkey recipe into Brilliant with Pear and Cranberry Chutney.
Combine 3 cups cranberries and ¾ cup sugar in a saucepan over medium heat. Cook, stirring occasionally, until the berries release their juices, about 8 minutes. Add the juice of 2 oranges (about ½ cup), ½ cup golden raisins, 1 cinnamon stick, and 1 star anise. Season with salt and freshly ground black pepper. Increase the heat to medium-high and bring to a boil, stirring occasionally. Peel 3 firm pears, then core and cut into ½-inch dice and add to the chutney with the finely grated zest and juice of 1 lemon. Decrease the heat to medium-low and cook until the mixture thickens and the pears are tender, about 10 minutes. Transfer to a bowl and cool completely. Store in an airtight container in the refrigerator for up to 2 weeks. Serves 8.
SERVES 4 TO 6
My grandparents used to drive their motor home south and spend the winter in Florida. Hilariously, Meme once told Mama that she wasn’t certain she liked it, that Florida was “full of nothing but old people.” She was in her eighties. They would return with bushels of fruit, and occasionally Meyer lemons. Sunshine yellow Meyer lemons are native to China and a happy marriage of a lemon and a mandarin orange. If it is Meyer lemon season, late November through April, seek them out. I really fell in love with them while working for Martha. They are amazingly fragrant and perfumed.
Mama would serve Cornish hens for “company supper” when we were growing up. Cornish hens are young, immature chickens (usually five to six weeks of age), weighing not more than two pounds. I find one bird perfect to serve two guests.
2 cups water
2 or 3 Cornish hens (about 1¾ pounds each), halved and wing tips, neck bone, and giblets reserved
1 bunch thyme, plus more for garnish
3 tablespoons unsalted butter, at room temperature
3 lemons, preferably Meyer (1 thinly sliced; 1 halved, for squeezing; and 1 cut into wedges, for serving)
¼ cup loosely packed fresh flat-leaf parsley leaves
Coarse salt and freshly ground black pepper
Preheat the oven to 400°F. Line a rimmed baking sheet with a silicone baking liner or parchment paper.
In a small saucepan, combine the water, wing tips, and the neck bone. (Keep the giblets for the Brilliant, or, if not preparing, save for another use or discard.) Add a sprig of thyme. Bring to a boil, then decrease the heat to a low simmer, and cook to make stock while the birds are in the oven.
Loosen the skin from each breast without tearing by running your fingers between the skin and the flesh of the bird. Rub a little bit of butter under the skin and all over the halves. On the prepared baking sheet, scatter a couple of thyme sprigs and then arrange 4 to 6 beds of sliced lemon large enough to accommodate each half. Place the hen halves skin side up on each lemon “bed.” Squeeze the lemon halves over the hens. Season on both sides with salt and pepper.
Roast, rotating the pan halfway through, until the skin turns golden brown and an instant-read thermometer inserted into the thickest part of the thigh registers 165°F, about 30 minutes. Let stand for 10 minutes. Transfer the hens to warmed plates or a warmed serving platter. (I like to transfer the browned and leathery lemon slices, too; otherwise, simply remove and discard both the lemon and the now-dried thyme sprigs.) Garnish the platter with flat-leaf parsley, fresh thyme sprigs, and lemon wedges. Tent with foil while you make the jus.
Place the roasting pan over medium-high heat. Strain the neck bone and wing tip stock into the roasting pan, loosening the brown bits with a wooden spoon. Bring to a boil, then decrease the heat to simmer. Cook until reduced by half, about 10 minutes. Tip any accumulated juices from the platter into the roasting pan. Strain the jus into a warmed serving bowl; add 1 teaspoon fresh thyme leaves. Taste and adjust for seasoning with salt and pepper. Serve the Cornish hens with the thyme jus on the side.
Each bird contains only a few organs. Don’t be alarmed if your bird has more than one liver or is missing a heart. The bag doesn’t always match the bird. Sometimes I treat these little bits as a benefice de cuisine, or a chef snack to cook and enjoy while preparing the meal. You can, however, be a little less greedy and really impress your dining companions with a French-inspired version of giblet gravy.
If you are not using them immediately, keep the giblets refrigerated while the hens are cooking. When you are ready to cook, pat the giblets dry with paper towels. Season with salt and pepper. Heat 1 tablespoon canola oil in a skillet over medium-high heat. Add the heart and gizzard and cook until browned on both sides, 3 to 5 minutes. Remove to a cutting board and let cool slightly. Chop into ¼-inch pieces. Once the hens are cooked and the jus is prepared, add to the jus and stir to combine. Taste and adjust for seasoning with coarse salt and freshly ground black pepper and serve immediately.
To halve a Cornish game hen, chicken, or other bird, place the bird on a clean cutting board, breast side down. Using poultry shears or a chef’s knife, first remove the wing tips. Set aside for stock. Then, make a lengthwise cut on both sides of the backbone from neck to tail. (You can use shears or a knife for this.) Remove the backbone and save it for stock. Open the bird like a book. Return it the cutting board, skin side down and sternum facing up. At the tip of the breast, there is a pointed bit of cartilage that is easy to cut through. Cut the cartilage in half so that only the sternum remains uncut. Place the tip of your knife on the board, lined up with the cut in the cartilage. Align the blade on the sternum and forcefully bring down the handle, using the heft of the knife to cut through the bone. The two halves of the bird are now separated.
SERVES 2 TO 4
There is no doubt a well-prepared, well-executed roast duck can be a bit of trouble for not a whole lot of meat. You will notice this recipe serves two to four, not the normal four to six. But, oh my, the flavor is worth every bit of effort.
Duck possesses a rich, red-meat flavor. Much in the way that pork has a natural affinity for sweet-tart barbecue sauce, so has duck. When peaches are not in season, you can substitute frozen peaches for the barbecue sauce.
1 (4- to 5-pound) whole duck
2 bay leaves, preferably fresh
Coarse salt and freshly ground black pepper
2 tablespoons canola oil or rendered duck fat
1 onion, preferably Vidalia, finely chopped
1 clove garlic, finely chopped
1-inch piece fresh ginger, peeled and grated
1½ cups ketchup
½ cup peach jam
2 ripe peaches, cut into ¾-inch chunks
2 tablespoons apple cider vinegar
Pull any loose fat from the duck. Using the tip of a paring knife, make ¼-inch incisions all over the body of the duck. (This will allow for the fat to render during cooking.) Place the duck on a wire rack set over a baking sheet, and refrigerate, uncovered, until dry, at least overnight or up to 3 days.
Place the bay leaves in the cavity of the duck. Set aside to come to room temperature, about 20 minutes. Fill a roasting pan with ¼ inch water and place on the lowest oven rack. (This will create steam and catch fat as it is released from the duck during roasting.) Pat the duck completely dry with paper towels. Season the duck inside and out with salt and pepper.
Position a second rack in the center of the oven and preheat to 400°F.
Place the duck, breast side up, directly on the oven rack and roast for about 15 minutes, until it starts to sizzle. Turn the duck onto one side, baste it with any accumulated fat, and roast for 15 minutes more. Turn the bird onto the other side, baste it with accumulated fat, and roast for 15 minutes more. Finally, return the duck to its back and continue roasting, basting often, until dark brown and slightly puffed, about 45 minutes. Total roasting time is about 1½ hours. (I know, cooking directly on the rack is a little dramatic. It is a technique I learned from the chef at Four Seasons in New York, once famous for its crisp roast duck. You can also place the duck on a rack in a roasting pan.)
Meanwhile, heat the oil in a saucepan over medium-high heat. Add the onion and cook until translucent, about 3 minutes. Add the garlic and ginger and cook until fragrant, 45 to 60 seconds. Add the ketchup, peach jam, peaches, and vinegar. Season with salt and pepper; decrease the heat to low and simmer, stirring occasionally, until the sauce thickens, about 30 minutes.
When the duck is cooked, transfer it to a warmed platter. Cover with foil and let it rest for 10 to 15 minutes before carving. (Turn off the oven and allow the roasting pan of water to cool before removing it. Remember the magic fat? Pour the cooled water into a fat separator. Pour off and discard the water, but save the fat.)
Carve the duck and transfer to a warmed serving platter. Serve immediately with the warm barbecue sauce on the side.
Old-school barbecue joints almost always serve barbecue with pickles. Change this Basic, but somewhat fancy-pants roast duck to Brilliant by humbling it with a simple quick pickle. Slice 1 English cucumber into ¼-inch-thick slices. Place the slices in a colander set in the sink. Sprinkle with ½ teaspoon kosher
salt; stir to combine. Let stand for 20 minutes. Rinse, drain, and transfer to a large heatproof bowl. Meanwhile, combine ½ cup apple cider vinegar; ¼ cup firmly packed light brown sugar ½ Vidalia onion, thinly sliced; 1 clove garlic, thinly sliced; and ¼ teaspoon mustard seeds in a small saucepan. Bring to a boil. Decrease the heat and simmer for 10 minutes. Pour the hot liquid over the cucumbers; stir to combine. Store in an airtight container in the refrigerator for up to 2 days before serving alongside the duck. Makes about 1½ cups.
When carving a chicken, turkey, or duck, let the bird guide the way. This may sound funny, but the parts should separate at the joints with little or no effort. I often tell my students that if the bird is fighting you, the knife is not in the right place.
Set the bird breast side up on a cutting board. If the bird is hot, I use a clean kitchen towel instead of a carving fork to protect my hand, but you can use a fork. I prefer to use the towel because it doesn’t tear the skin, and I have those asbestos fingers chefs often have. Do what feels comfortable to you.
Pull the leg and thigh back to expose the joint that attaches it to the body.
Somewhat forcefully bend a leg away from the body until the joint pops apart. Use a sharp knife to sever the leg from the body, cutting through the separated joint. As you separate the leg, using the tip of the knife, be sure to get the “oyster,” a yummy nugget of delicious dark meat toward the back of the chicken just above the thigh. Repeat the process with the other leg and thigh.
Place each leg quarter on the cutting board, skin side down. Use a chef’s knife to cut through the joint that connects the leg to the thigh. (It should be fairly easy to cut through the joint.) Look for a line of fat, and if the knife meets resistance, your knife is hitting bone and is not placed at the joint, which is easy to carve through. So, reposition the blade slightly and try again.
Place the bird, breast side up, on the cutting board. Feel for the breastbone, which runs along the top center of the chicken carcass. Begin separating one side of the breast from the body by cutting immediately alongside the breastbone with the tip of your knife. Work from the tail end of the bird toward the neck end. When you hit the wishbone, angle the knife and cut down along the wishbone toward the wing, then make a cut between the breast and the wing.
Finish separating the breast by simultaneously pulling back on the meat and using little short strokes of the knife tip to cut the meat away from the carcass. Do the same to remove the breast meat on the other side.
Find the joint where the wings connect to the body and bend until the joint pops apart. Use a sharp knife to sever the wing from the body, cutting through the separated joint.
Using a chef’s knife or your hands, remove whatever meat remains on the carcass. (Reserve the carcass for stock.) Arrange the legs, thighs, wings, and meat on a platter, pour over any accumulated juices to moisten the meat, or use in pan sauce, and serve.
SERVES 4
Muscadines and scuppernongs are wild grapes indigenous to the Southeast. More than forty years ago, Dede planted an arbor of muscadines, and the thick, twisted, and gnarled vines are still producing fruit over forty years later.
Store-bought quail are available whole, split, and semiboneless in better grocery stores and gourmet markets. This recipe calls for semiboneless quail. If you have access to wild quail, and if boning out a bony little bird is too much, simply halve the bird right down the backbone.
8 semiboneless quail
Coarse salt and freshly ground black pepper
2 tablespoons unsalted butter
1 tablespoon canola oil
8 sprigs thyme
2 tablespoons bourbon, brandy, or Cognac
1 cup dry white wine
1 cup homemade chicken stock or reduced-fat low-sodium chicken broth
4 ounces muscadines or scuppernongs, halved, seeded, and peeled, or large seedless grapes
Preheat the oven to 400°F. Pat the quail dry and season with salt and pepper. Heat a roasting pan over medium-high heat. Add the butter and oil and heat until shimmering. Add the quail and sear on both sides until deep brown, about 3 minutes per side. Sprinkle the thyme over the birds and transfer the pan to the oven.
Roast until cooked through but still pink, 8 to 10 minutes. Transfer the quail to a warmed platter; cover with aluminum foil to keep warm.
Off the heat, add the bourbon to deglaze the pan. Stand back, as it may flame up. Return the pan to the heat, add the wine, and bring to a boil. Stir with a wooden spoon to loosen any browned bits from the pan. Decrease the heat to medium and simmer, stirring occasionally, until the liquid is well reduced, 8 to 10 minutes. Add the stock and continue to simmer until reduced by half, about 5 minutes. Add the grapes and stir over low heat to warm, for 1 to 2 minutes. Taste and adjust for seasoning with salt and pepper. Garnish with the thyme and serve the quail immediately with the sauce on the side.
Earthy chestnuts and quail are a traditional combination in France and will heighten the flavors in this autumnal dish to Brilliant.
Combine 1 (14.8-ounce) jar roasted chestnuts 1 cup homemade
chicken stock or reduced-fat, low-sodium chicken broth, 1 sprig thyme, and a large pinch of coarse salt in a saucepan. Bring to a simmer and cook, partially covered, until the chestnuts are hot, about 20 minutes. Remove the thyme. Transfer to a food processor fitted with a metal blade. Process until the mixture is very smooth and has the consistency of a thick spread. Taste and adjust for seasoning with coarse salt and freshly ground black pepper. Place a dollop in the center of each warmed serving plate. Top with 2 quail and the sauce. Serve immediately. Serves 4.
Muscadines and scuppernongs have tough, sour skins concealing their sweet, juicy flesh. To peel and seed, halve the grapes through the stem end with a sharp chef’s knife. Using the tip of the knife, remove the seeds. Squeeze each half over a bowl. The flesh will separate from the skin. Use immediately.
SERVES 4 TO 6
One of my dearest friends despises what she calls “little bony birds,” but I absolutely love them. I grew up eating the quail, doves, and ducks my father, uncle, and grandfather shot in the fall. One of the best places to hunt these birds is in corn, millet, or wheat fields that have recently been harvested. Unethical hunters will reseed an area with store-bought feed, but that’s not fair and would be more like shooting a fish in a barrel.
10 whole quail
Coarse salt and freshly ground black pepper
1 cup all-purpose flour
2 tablespoons unsalted butter
2 tablespoons canola oil
8 sprigs thyme, plus more for garnish
1 cup homemade chicken stock or reduced-fat, low-sodium chicken broth
1 cup heavy cream, half-and-half, or whole milk
1 tablespoon Dijon mustard
Preheat the oven to 350°F. Pat the quail dry; tie the legs together with kitchen twine. Season with salt and pepper. Place the flour in a shallow bowl and season with salt and pepper. One at a time, dredge the quail in the flour, then shake to remove any excess flour.
Meanwhile, heat 1 tablespooon each of the butter and oil in a large skillet over medium-high heat until shimmering. Without crowding and working in batches with the remaining butter and oil, add the quail and sear on both sides until deep brown, about 3 minutes per side. Sprinkle the thyme over the birds and transfer the skillet with all the quail to the oven.
Roast until cooked through but still pink, 8 to 10 minutes. Transfer the quail to a warmed platter; cover with aluminum foil to keep warm.
Place the skillet on the stovetop over high heat. Add the stock and cream. Stir with a wooden spoon to loosen any browned bits from the skillet. Bring to a boil. Decrease the heat to medium and simmer, stirring occasionally, until thick enough to coat the back of a spoon, about 10 minutes. Whisk in the mustard. Taste and adjust for seasoning with salt and pepper. Pour the gravy over the quail. Garnish with thyme; serve immediately.
Heat 1 tablespoon canola oil in a skillet over medium heat. Add 1 teaspoon each yellow and brown mustard seeds. When they start to pop and release their aroma, after about 5 seconds, add 3 onions, preferably Vidalia, sliced, and season with coarse salt and freshly ground black pepper. Cook, stirring occasionally, until the onions are soft, 15 to 20 minutes. Increase the heat to medium-high. Add 2 tablespoons red wine vinegar and cook, stirring occasionally, until the vinegar is reduced and the onions are a deep golden brown, about 15 minutes more. Taste and adjust for seasoning with salt and pepper. Makes 1 cup. Serve a dollop of the
warm mustard relish with the quail and gravy.
Trussing refers to tying up the whole bird before it is roasted, to ensure it holds its shape during cooking so it cooks more evenly, carves more easily, and is more attractive upon presentation. The trouble is, it’s a pretty complicated process that sometimes involves a needle and twine and winds up looking like a bird in bondage. So, I use the cheater’s method: I just cross the drumsticks and tie the ends of the legs together, resulting in a more ladylike bird. If you want the bird to cook faster, skip trussing.
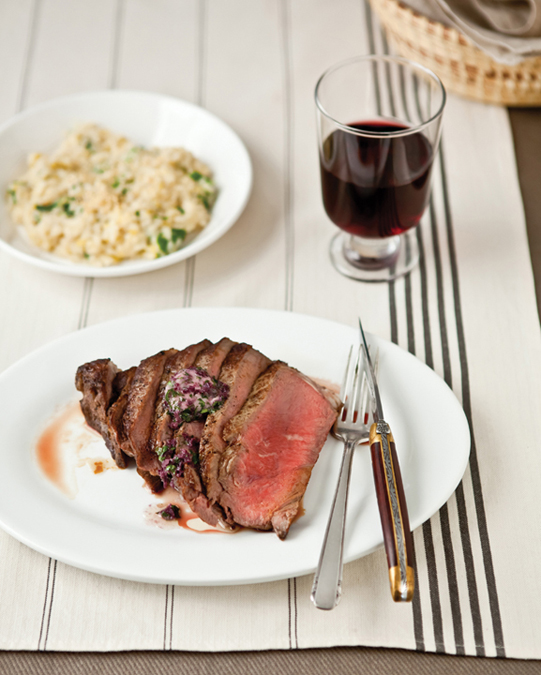
Grilled Entrecôte with Red Wine Compound Butter
 Chicken Breasts with Tarragon Velouté