
At most sites, the information stored on computers is worth far more than the computers themselves. It is also much harder to replace. Protecting this information is one of the system administrator’s most important (and, unfortunately, most tedious) tasks.
There are hundreds of creative and not-so-creative ways to lose data. Software bugs routinely corrupt documents. Users accidentally delete data files. Hackers and disgruntled employees erase disks. Hardware problems and natural disasters take out entire machine rooms.
If executed correctly, backups allow an administrator to restore a filesystem (or any portion of a filesystem) to the condition it was in at the time of the last backup. Backups must be done carefully and on a strict schedule. The backup system and backup media must also be tested regularly to verify that they are working correctly.
The integrity of your backup procedures directly affects your company’s bottom line. Senior management needs to understand what the backups are actually capable of doing, as opposed to what they want the backups to do. It may be OK to lose a day’s work at a university computer science department, but it probably isn’t OK at a commodity trading firm.
We begin this chapter with some general backup philosophy, followed by a discussion of the most commonly used backup devices and media (their strengths, weaknesses, and costs). Next, we talk about how to design a backup scheme and review the mechanics of the popular dump and restore utilities.
We then discuss some additional backup and archiving commands and suggest which commands are best for which situations. Finally, we take a look at Bacula, a free network backup package, and offer some comments about other open source and commercial alternatives.
Before we get into the meat and potatoes of backups, we want to pass on some general hints that we have learned over time (usually, the hard way). None of these suggestions is an absolute rule, but you will find that the more of them you follow, the smoother your backups and restores will go.
Many backup utilities allow you to perform dumps over the network. Although there is some performance penalty for doing dumps that way, the increase in ease of administration makes it worthwhile. If you manage only a handful of servers, it’s probably easiest to run a script from a central location that executes dump (by way of ssh) on each machine that needs to be dumped. If you have more than a few servers, you should use a software package (commercial or free) to automate this process.
Even if your backups are too large to be funneled through a single server, you should still try to keep your backup system as centralized as possible. Centralization facilitates administration and lets you restore data to alternate servers. Depending on the media you are using, you can often put more than one media device on a server without affecting performance.
Dumps created with dump can only be restored on machines that have the same byte order as the dump host (and in most cases, only on machines running the same OS). You can sometimes use dd to take care of byte swapping problems, but this simple fix won’t resolve differences among incompatible versions of dump.
If you are backing up so much data across a network that the network’s bandwidth becomes an issue, consider creating a LAN dedicated to backup traffic. Many organizations find this approach effective for alleviating network bottlenecks.
Label each piece of backup media clearly and completely—an unlabeled tape is a scratch tape. Directly label each piece of media to uniquely identify its contents. On the cases for the media, write detailed information such as lists of filesystems, backup dates, the format of the backups, the exact syntax of the commands used to create them, and any other information you would need to restore the system without referring to on-line documentation.
Free and commercial labeling programs abound. Save yourself a major headache and invest in one. Vendors of laser printer labels can usually provide templates for each of their labels. Better yet, buy a dedicated label printer. They are inexpensive and work well.
Your automated dump system should record the name of each filesystem it has dumped. Good record keeping allows you to quickly skip forward to the correct filesystem when you want to restore a file. It’s also a good idea to record the order of the filesystems on the tape or case.
If you can afford it, buy an autochanger or tape drive that reads bar codes. This feature ensures that your electronic tape labels always match the physical ones.
The more often backups are done, the less data is lost in a crash. However, backups use system resources and an operator’s time. You must provide adequate data integrity at a reasonable cost of time and materials. In general, costs increase as you move toward more granular restoration capabilities.
On busy systems, it is generally appropriate to back up home directories every workday. On systems that are used less heavily or on which the data is less volatile, you might decide that performing backups several times a week is sufficient. On a small system with only one user, performing backups once a week is probably adequate. How much data are your users willing to lose?
Filesystems that are rarely modified do not need to be backed up as frequently as users’ home directories. If only a few files change on an otherwise static filesystem (such as /etc/passwd in the root filesystem), you can copy these files every day to another partition that is backed up regularly.
If /tmp is a separate filesystem, it should not be backed up. The /tmp directory should not contain anything essential, so there is no reason to preserve it. If this seems obvious, you are in better shape than many sites we’ve visited.
See Chapter 9 for more information about cron
In a perfect world, you could do daily dumps of all your important filesystems onto a single tape. High-density media such as DLT, AIT, and LTO make this goal practical for some sites. However, as our work habits change and telecommuting becomes more popular, the range of “good” times to do backups is shrinking. More and more network services must be available around the clock, and large backups take time.
Another major problem is the rapid expansion of disk space that has resulted from the ever-lower price of hard disks. You can no longer purchase a stock desktop machine with less than 250GB of disk space. Why clean up your disks and enforce quotas when you can just throw a little money at the problem and add more disk space? Unfortunately, it’s all too easy for the amount of on-line storage to outstrip your ability to back it up.
Backup utilities are perfectly capable of dumping filesystems to multiple pieces of media. However, if a dump spans multiple tapes, an operator or tape library robot must be present to change the media, and the media must be carefully labeled to allow restores to be performed easily. Unless you have a good reason to create a really large filesystem, don’t do it.
If you can’t fit your daily backups on one tape, you have several options:
• Buy a higher-capacity backup device.
• Buy a stacker or library and feed multiple pieces of media to one device.
• Change your dump sequence.
• Use multiple backup devices.
First, baby steps: you should always have an off-line copy of your data. That is, a protected copy that is not stored on a hard disk on the machine of origin. Snapshots and RAID arrays are not substitutes for real backups!
Most organizations also keep backups off-site so that a disaster such as a fire cannot destroy both the original data and the backups. “Off-site” can be anything from a safe deposit box at a bank to the President’s or CEO’s home. Companies that specialize in the secure storage of backup media guarantee a secure and climate-controlled environment for your archives. Always make sure your off-site storage provider is reputable, bonded, and insured. There are on-line (but off-site) businesses today that specialize in safeguarding your data.
The speed with which backup media are moved off-site should depend on how often you need to restore files and on how much latency you can accept. Some sites avoid making this decision by performing two dumps to different backup devices, one that stays on-site and one that is moved immediately.1
Dan Geer, a security consultant, said, “What does a backup do? It reliably violates file permissions at a distance.” Hmmm.
Encryption of backup media is usually a no-brainer and is required by security standards such as the Payment Card Industry Data Security Standard (PCI DSS).
Many backup utilities make encryption relatively painless. However, you must be sure that the encryption keys cannot be lost or destroyed and that they are available for use in an emergency.
Physically secure your backup media as well. Not only should you keep your media off-site, but you should also keep them under lock and key. If you use a commercial storage facility for this purpose, the company you deal with should guarantee the confidentiality of the tapes in their care.
Some companies feel so strongly about the importance of backups that they make duplicates, which is really not a bad idea at all.
Filesystem activity should be limited during backups because changes can cause your backup utility to make mistakes. One way to limit activity is to do dumps when few active users are around (in the middle of night or on weekends). To automate the process, mount your backup media every day before leaving work and let cron execute the backup for you. That way, dumps occur at a time when files are less likely to be changing, and the dumps have minimal impact on users.
In practice, it is next to impossible to find a disk that doesn’t always have at least a little activity. Users want 24/7 access to data, services run around the clock, and databases require special backup procedures. Most databases must be temporarily stopped or put in a special degraded mode so that backups can accurately capture data at a single point in time. Sites with a lot of data may not be able to tolerate the downtime necessary to perform a traditional backup of their database. These days the only way to do a backup with no disk activity is to first create a snapshot.
See page 274 for more information about SANs.
Most SAN controllers, and all our example operating systems, provide some way to create a snapshot of a filesystem. This feature lets you make relatively safe backups of an active filesystem, even one on which files are currently open. On Linux, snapshots are implemented through the logical volume manager (see page 249), and on our other example systems they are created through the filesystem.
Snapshots can be created almost instantaneously thanks to a clever copy-on-write scheme. No data is actually copied or moved at the time the snapshot is created. Once the snapshot exists, changes to the filesystem are written to new locations on disk. In this way, two (or more) images can be maintained with minimal use of additional storage. Snapshots are similar in concept to incremental backups, except that they operate at the block level rather than the filesystem level.
In this context, snapshots are primarily a tool for creating “real” backups of a file-system. They are never a replacement for off-line backups. Snapshots also help facilitate database backups, since the database only needs to be paused for a second while the snapshot completes. Later, the relatively slow tape backup can be performed against the snapshot as the live database goes happily on its way serving up queries.
We’ve heard many horror stories about system administrators who did not discover problems with their dump regime until after a serious system failure. It is essential that you continually monitor your backup procedure and verify that it is functioning correctly. Operator error ruins more dumps than any other problem.
The first check is to have your backup software attempt to reread tapes immediately after it has finished dumping.2 Scanning a tape to verify that it contains the expected number of files is a good check. It’s best if every tape is scanned, but this no longer seems practical for a large organization that uses many tapes every day. A random sample would be most prudent in this environment.
See page 310 for more information about restore.
It is often useful to generate a table of contents for each filesystem (dump users can use restore -t) and to store the resulting catalogs on disk. These catalogs should be named in a way that relates them to the appropriate tape; for example, okra:usr.Jan.13. A database of these records makes it easy to discover what piece of media a lost file is on. Just grep for the filename and pick the newest instance.
In addition to providing a catalog of tapes, successfully reading the table of contents from the tape is a good indication that the dump is OK and that you will probably be able to read the media when you need to. A quick attempt to restore a random file gives you even more confidence in your ability to restore from that piece of media.3
You should periodically attempt to restore from random media to make sure that restoration is still possible. Every so often, try to restore from an old (months or years) piece of dump media.4 Tape drives have been known to wander out of alignment over time and become unable to read their old tapes. The media can be recovered by a company that specializes in this service, but it is expensive.
A related check is to verify that you can read the media on hardware other than your own. If your machine room burns, it does not do much good to know that the backup could have been read on a tape drive that has now been destroyed. DAT tapes have been particularly susceptible to this problem in the past, but more recent versions of the technology have improved.
All media have a finite life. It’s great to recycle your media, but be sure to abide by the manufacturer’s recommendations regarding the life of the media. Most tape manufacturers quantify this life in terms of the number of passes that a tape can stand: a backup, a restore, and an mt fsf (file skip forward) each represent one pass. Nontape technologies have a much longer life that is sometimes expressed as a mean time to failure (MTTF), but all hardware and media have a finite lifetime. Think of media life in dog-years rather than real years.
Before you toss old tapes in the trash, remember to erase or render them unreadable. A bulk tape eraser (a large electromagnet) can help with this, but be sure to keep it far, far away from computers and active media. Cutting or pulling out part of a backup tape does not really do much to protect your data, because tape is easy to splice or respool. Document-destruction companies shred tapes for a fee.
In the case of hard disks used as backup media, remember that drive recovery services cost less than a thousand dollars and are just as available to bad guys as they are to you. Consider performing a secure erase (page 227) or SCSI format operation before a drive leaves your site.
With disks so cheap and new storage architectures so reliable, it’s tempting to throw up your hands and not back up all your data. Don’t give up! A sensible storage architecture—designed rather than grown willy-nilly as disk needs increase—can make backups much more tractable.
Start by taking an inventory of your storage needs:
• The various kinds of data your site deals with
• The expected volatility of each type of data
• The backup frequency needed for comfort with potential losses
• The network and political boundaries over which the data is spread
Use this information to design your site’s storage architecture, keeping backups and potential growth in mind. For example, putting project directories and users’ home directories on a dedicated file server can make it easier to manage your data and ensure its safety.
With the advent of powerful system-imaging and disk-building solutions, it is often easier to re-image a broken system than to troubleshoot and restore corrupt or missing files. Many administrators configure their users’ workstations to store all data on a centralized server. Others manage farms of servers that have near-identical configurations and data (such as the content for a busy web site). In such an environment, it’s reasonable not to back up vast arrays of duplicated systems. On the other hand, security mavens encourage generous backups so that data is available for forensic analysis in the event of an incident.
After you have established a backup procedure, explore the worst case scenario: your site is completely destroyed. Determine how much data would be lost and how long it would take to get your system back to life. (Include in your calculations the time it would take to acquire new hardware.) Then determine whether you can live with your answers.
More formal organizations often designate a Recovery Time Objective (RTO) and a Recovery Point Objective (RPO) for information on specific servers or filesystems. When these numbers are available, they provide valuable guidance.
An RTO represents the maximum amount of time that the business can tolerate waiting for a recovery to complete. Typical RTOs for user data range from hours to days. For production servers, RTOs can range from hours to seconds.
An RPO indicates how recent a backup is required for the restore and influences the granularity at which backups must be retained. Depending on how frequently the dataset changes and how important it is, an RPO might range from weeks to hours to seconds. Tape backups clearly can’t satisfy near-real-time RPOs, so such requirements usually imply large investments and specialized storage devices located in multiple data centers.
Although the process of defining these metrics may seem somewhat arbitrary, it is a useful way to get the “owners” of the data on the same page as the technical folks. The process requires balancing cost and effort against the business’s need for recoverability. It’s a difficult but important venture.
Many failures can damage several pieces of hardware at once, so backups should be written to some sort of removable media. A good rule of thumb is to create off-line backups that no single disgruntled system administrator could destroy.
Backing up one hard disk to another on the same machine or in the same data center provides little protection against a server failure, although it is certainly better than no backup at all. Companies that back up your data over the Internet are becoming more popular, but most backups are still created locally.
The following sections describe some of the media that can be used for backups. The media are presented in rough order of increasing capacity.
Manufacturers like to specify their hardware capacities in terms of compressed data; they often optimistically assume a compression ratio of 2:1 or more. In the sections below, we ignore compression in favor of the actual number of bytes that can physically be stored on each piece of media.
The compression ratio also affects a drive’s throughput rating. If a drive can physically write 1 MB/s to tape but the manufacturer assumes 2:1 compression, the throughput magically rises to 2 MB/s. As with capacity figures, we have ignored throughput inflation below.
At a cost of about $0.30 each, CDs and DVDs are an attractive option for backups of small, isolated systems. CDs hold about 700MB and DVDs hold 4.7GB. Dual-layer DVDs clock in at about 8.5GB.
Drives that write these media are available for every common bus (SCSI, IDE, USB, SATA, etc.) and are in many cases are so inexpensive as to be essentially free. Now that CD and DVD prices have equilibrated, there’s no reason to use CDs rather than DVDs. However, we still see quite a few CDs used in the real world for reasons that are not entirely clear.
Optical media are written through a photochemical process that involves the use of a laser. Although hard data on longevity has been elusive, it is widely believed that optical media have a substantially longer shelf life than magnetic media. However, the write-once versions (CD-R, DVD-R, and DVD+R) are not as durable as manufactured (stamped) CDs and DVDs.
Today’s fast DVD writers offer speeds as fast as—if not faster than—tape drives. The write-once versions are DVD-R and DVD+R. DVD-RW, DVD+RW, and DVD-RAM are rewritable. The DVD-RAM system has built-in defect management and is therefore more reliable than other optical media. On the other hand, it is much more expensive.
Manufacturers estimate a potential life span of hundreds of years for these media if they are properly stored. Their recommendations for proper storage include individual cases, storage at a constant temperature in the range 41°F–68°F with relative humidity of 30%–50%, no exposure to direct sunlight, and marking only with water-soluble markers. Under average conditions, a reliable shelf life of 1–5 years is probably more realistic.
As borne out by numerous third-party evaluations, the reliability of optical media has proved to be exceptionally manufacturer dependent. This is one case in which it pays to spend money on premium quality media. Unfortunately, quality varies from product to product even within a manufacturer’s line, so there is no safe-bet manufacturer.
A recent entry to the optical data storage market is the Blu-ray disc, whose various flavors store from 25–100 GB of data. This high capacity is a result of the short wavelength (405nm) of the laser used to read and write the disks (hence the “blue” in Blu-ray). As the cost of media drops, this technology promises to become a good solution for backups.
External storage devices that connect through a USB 2.0 or eSATA port are common. The underlying storage technology is usually some form of hard disk, but flash memory devices are common at the low end (the ubiquitous “jump drives”). Capacities for conventional hard drives range from less than 250GB to over 2TB. Solid state drives (SSDs) are based on flash memory and are currently available in sizes up to 160GB. The limit on USB flash memory devices is about 64GB, but it is growing fast.
The lifetime of flash memory devices is mostly a function of the number of write cycles. Midrange drives usually last at least 100,000 cycles.
The main limitation of such drives as backup media is that they are normally online and so are vulnerable to power surges, heating overload, and tampering by malicious users. For hard drives to be effective as backup media, they must be manually unmounted or disconnected from the server. Removable drives make this task easier. Specialized “tapeless backup” systems that use disks to emulate the off-line nature of tapes are also available.
Many kinds of media store data by adjusting the orientation of magnetic particles. These media are subject to damage by electrical and magnetic fields. You should beware of the following sources of magnetic fields: audio speakers, transformers and power supplies, unshielded electric motors, disk fans, CRT monitors, and even prolonged exposure to the Earth’s background radiation.
All magnetic tapes eventually become unreadable over a period of years. Most tape media will keep for at least three years, but if you plan to store data longer than that, you should either use media that are certified for a longer retention period or rerecord the data periodically.
Various flavors of 8mm and Digital Data Storage/Digital Audio Tape drives compose the low end of the tape storage market. Exabyte 8mm tape drives were early favorites, but the drives tended to become misaligned every 6–12 months, requiring a trip to the repair depot. It was not uncommon for tapes to be stretched in the transport mechanism and become unreliable. The 2–7 GB capacity of these tapes makes them inefficient for backing up today’s desktop systems, let alone servers.
DDS/DAT drives are helical scan devices that use 4mm cartridges. Although these drives are usually referred to as DAT drives, they are really DDS drives; the exact distinction is unimportant. The original format held about 2GB, but successive generations have significantly improved DDS capacity. The current generation (DAT 160) holds up to 80GB of data at a transfer rate of 6.9 MB/s. The tapes should last for 100 backups and are reported to have a shelf life of 10 years.
Digital Linear Tape/Super Digital Linear Tape is a mainstream backup medium. These drives are reliable, affordable, and capacious. They evolved from DEC’s TK-50 and TK-70 cartridge tape drives. DEC sold the technology to Quantum, which popularized the drives by increasing their speed and capacity and by dropping their price. In 2002, Quantum acquired Super DLT, a technology by Benchmark Storage Innovations that tilts the recording head back and forth to reduce crosstalk between adjacent tracks.
Quantum now offers two hardware lines: a performance line and a value line. You get what you pay for. The tape capacities vary from DLT-4 at 800GB to DLT-4 in the value line at 160GB, with transfer rates of 60 MB/s and 10 MB/s, respectively. Manufacturers boast that the tapes will last 20 to 30 years—that is, if the hardware to read them still exists. How many 9-track tape drives are still functioning and on-line these days?
The downside of S-DLT is the price of media, which runs $90–100 per 800GB tape. A bit pricey for a university; perhaps not for a Wall Street investment firm.
Advanced Intelligent Tape is Sony’s own 8mm product on steroids. In 1996, Sony dissolved its relationship with Exabyte and introduced the AIT-1, an 8mm helical scan device with twice the capacity of 8mm drives from Exabyte. Today, Sony offers AIT-4, with a capacity of 200GB and a 24 MB/s maximum transfer rate, and AIT-5, which doubles the capacity while keeping the same transfer speed.
SAIT is Sony’s half-height offering, which uses larger media and has greater capacity than AIT. SAIT tapes holds up to 500GB of data and sport a transfer rate of 30 MB/s. This product is most common in the form of tape library offerings— Sony’s are especially popular.
The Advanced Metal Evaporated (AME) tapes used in AIT and SAIT drives have a long life cycle. They also contain a built-in EEPROM that gives the media itself some smarts. Software support is needed to make any actual use of the EEPROM, however. Drive and tape prices are both roughly on par with DLT.
The VXA and VXA-X technologies were originally developed by Exabyte and were acquired by Tandberg Data in 2006. The VXA drives use what Exabyte describes as a packet technology for data transfer. The VXA-X products still rely on Sony for the AME media; the V series is upgradable as larger-capacity media become available. The VXA and X series claim capacities in the range of 33–160 GB, with a transfer rate of 24 MB/s.
Linear Tape-Open was developed by IBM, HP, and Quantum as an alternative to the proprietary format of DLT. LTO-4, the latest version, has an 800GB capacity at a speed of 120 MB/s. LTO media has an estimated storage life of 30 years but is susceptible to magnetic exposure. As with most technology, the previous generation LTO-3 drives are much less expensive and are still adequate for use in many environments. The cost of media is about $40 for LTO-4 tapes and $25 for the 400GB LTO-3 tapes.
With the low cost of disks these days, most sites have so much disk space that a full backup requires many tapes, even at 800GB per tape. One possible solution for these sites is a stacker, jukebox, or tape library.
A stacker is a simple tape changer that is used with a standard tape drive. It has a hopper that you load with tapes. The stacker unloads full tapes as they are ejected from the drive and replaces them with blank tapes from the hopper. Most stackers hold about ten tapes.
A jukebox is a hardware device that can automatically change removable media in a limited number of drives, much like an old-style music jukebox that changed records on a single turntable. Jukeboxes are available for all the media discussed here. They are often bundled with special backup software that understands how to manipulate the changer. Storage Technology (now part of Oracle) and Sony are two large manufacturers of these products.
Tape libraries, also known as autochangers, are a hardware backup solution for large data sets—terabytes, usually. They are large-closet-sized mechanisms with multiple tape drives (or optical drives) and a robotic arm that retrieves and files media on the library’s many shelves. As you can imagine, they are quite expensive to purchase and maintain, and they have special power, space, and air conditioning requirements.
Most purchasers of tape libraries also purchase an operations contract from the manufacturer to optimize and run the device. The libraries have a software component, of course, which is what really runs the device. Storage Technology (Oracle), Spectra Logic, and HP are leading manufacturers of tape libraries.
The decreasing cost of hard drives makes disk-to-disk backups an attractive option to consider. Although we suggest that you not duplicate one disk to another within the same physical machine, hard disks can be a good, low-cost solution for backups over a network and can dramatically decrease the time required to restore large datasets.
One obvious problem is that hard disk storage space is finite and must eventually be reused. However, disk-to-disk backups are an excellent way to protect against the accidental deletion of files. If you maintain a day-old disk image in a well-known place that’s shared over NFS or CIFS, users can recover from their own mistakes without involving an administrator.
Remember that on-line storage is usually not sufficient protection against malicious attackers or data center equipment failures. If you are not able to actually store your backups off-line, at least shoot for geographic diversity when storing them on-line.
Service providers have recently begun to offer Internet-hosted storage solutions. Rather than provisioning storage in your own data center, you lease storage from a cloud provider. Not only does this approach provide on-demand access to almost limitless storage, but it also gives you an easy way to store data in multiple geographic locations.
Internet storage services start at 10¢/GB/month and get more expensive as you add features. For example, some providers let you choose how many redundant copies of your data will be stored. This pay-per-use pricing allows you to pick the reliability that is appropriate for your data and budget.
Internet backups only work if your Internet connection is fast enough to transmit copies of your changes every night without bogging down “real” traffic. If your organization handles large amounts of data, it is unlikely that you can back it up across the Internet. But for smaller organizations, cloud backups can be an ideal solution since there is no up-front cost and no hardware to buy. Remember, any sensitive data that transits the Internet or is stored in the cloud must be encrypted.
Whew! That’s a lot of possibilities. Table 10.1. summarizes the characteristics of the media discussed in the previous sections.
Table 10.1. Backup media compared

When you buy a backup system, you pretty much get what you see in Table 10.1.. All the media work reasonably well, and among the technologies that are close in price, there generally isn’t a compelling reason to prefer one over another. Buy a system that meets your specifications and your budget. If you are deploying new hardware, make sure it is supported by your OS and backup software.
Although cost and media capacity are both important considerations, it’s important to consider throughput as well. Fast media are more pleasant to deal with, but be careful not to purchase a tape drive that overpowers the server it is attached to. If the server can’t shovel data to the drive at an acceptable pace, the drive will be forced to stop writing while it waits on the server. You sure don’t want a tape drive that is too slow, but you also don’t want one that is too fast.
Similarly, choose backup media that is appropriately sized for your data. It doesn’t make any sense to splurge on DLT-S4 tapes if you have only a few hundred GB of data to protect. You will just end up taking half-full tapes off-site.
Optical media, DDS, and LTO drives are excellent solutions for small workgroups and for individual machines with a lot of storage. The startup costs are relatively modest, the media are widely available, and several manufacturers are using each standard. All of these systems are fast enough to back up beaucoup data in a finite amount of time.
DLT, AIT, and LTO are all roughly comparable for larger environments. There isn’t a clear winner among the three, and even if there were, the situation would no doubt change within a few months as new versions of the formats were deployed. All of these formats are well established and would be easy to integrate into your environment, be it a university or corporation.
In the remainder of this chapter, we use the generic term “tape” to refer to the media chosen for backups. Examples of backup commands are phrased in terms of tape devices.
Almost all backup tools support at least two different kinds of backups: full backups and incremental backups. A full backup includes all of a filesystem’s contents. An incremental backup includes only files that have changed since the previous backup. Incremental backups are useful for minimizing the amount of network bandwidth and tape storage consumed by each day’s backups. Because most files never change, even the simplest incremental schedule eliminates many files from the daily dumps.
Many backup tools support additional kinds of dumps beyond the basic full and incremental procedures. In general, these are all more-sophisticated varieties of incremental dump. The only way to back up less data is to take advantage of data that’s already been stored on a backup tape somewhere.
Some backup software identifies identical copies of data even if they are found in different files on different machines. The software then ensures that only one copy is written to tape. This feature is usually known as deduplication, and it can be very helpful for limiting the size of backups.
The schedule that is right for you depends on
• The activity of your filesystems
• The capacity of your dump device
• The amount of redundancy you want
• The number of tapes you want to buy
When you do a backup with dump, you assign it a backup level, which is an integer. A level N dump backs up all files that have changed since the last dump of level less than N. A level 0 backup places the entire filesystem on the tape. With an incremental backup system, you may have to restore files from several sets of backup tapes to reset a filesystem to the state it was in during the last backup.5
Historically, dump, supported levels 0 through 9, but newer versions support thousands of dump levels. As you add additional levels to your dump schedule, you divide the relatively few active files into smaller and smaller segments. A complex dump schedule confers the following benefits:
• You can back up data more often, limiting your potential losses.
• You can use fewer daily tapes (or fit everything on one tape).
• You can keep multiple copies of each file to protect against media errors.
• You can reduce the network bandwidth and time needed for backups.
These benefits must be weighed against the added complexity of maintaining the system and of restoring files. Given these constraints, you can design a schedule at the appropriate level of sophistication. Below, we describe a couple of possible sequences and the motivation behind them. One of them might be right for your site—or, your needs might dictate a completely different schedule.
If your total amount of disk space is smaller than the capacity of your tape device, you can use a trivial dump schedule. Do level 0 dumps of every filesystem each day. Reuse a group of tapes, but every N days (where N is determined by your site’s needs), keep the tape forever. This scheme costs you
(365/N) * (price of tape)
per year. Don’t reuse the exact same tape for every night’s dump. It’s better to rotate among a set of tapes so that even if one night’s dump is blown, you can still fall back to the previous night.
This schedule guarantees massive redundancy and makes data recovery easy. It’s a good solution for a site with lots of money but limited operator time (or skill).
From a safety and convenience perspective, this schedule is the ideal. Don’t stray from it without a specific reason (e.g., to conserve tapes or labor).
A more reasonable schedule for most sites is to assign a tape to each day of the week, each week of the month (you’ll need 5), and each month of the year. Every day, do a level 9 dump to the daily tape. Every week, do a level 5 dump to the weekly tape. And every month, do a level 3 dump to the monthly tape. Do a level 0 dump whenever the incrementals get too big to fit on one tape, which is most likely to happen on a monthly tape. Do a level 0 dump at least once a year.
The choice of levels 3, 5, and 9 is arbitrary. You could use levels 1, 2, and 3 with the same effect. However, the gaps between dump levels give you some breathing room if you later decide you want to add another level of dumps. Other backup software uses the terms full, differential, and incremental rather than numeric dump levels.
This schedule requires 24 tapes plus however many tapes are needed for the level 0 dumps. Although it does not require too many tapes, it also does not afford much redundancy.
The dump and restore commands are the most common way to create and restore from backups. These programs have been around for a very long time, and their behavior is well known. At most sites, dump and restore are the underlying commands used by automated backup software.
 You may have to explicitly install dump and restore on your Linux systems, depending on the options you selected during the original
installation. A package is available for easy installation on all our example distributions.
The current Red Hat release offers a system administration package at installation
time that includes dump.
 On Solaris systems, dump and restore are called ufsdump and ufsrestore. A dump command exists, but it’s not backup-related. As the names suggest, the ufs* commands work only with the older UFS filesystem; they do not work on ZFS filesystems.
See page 316 for a discussion of ZFS backup options.
ufsdump accepts the same flags and arguments as other systems’ traditional dump, but it parses arguments differently. ufsdump expects all the flags to be contained in the first argument and the flags’ arguments to follow in order. For example, where most commands would want -a 5 -b -c 10, on Solaris ufsdump would want abc 5 10.
ufsdump is only supposed to be used on unmounted filesystems. If you need to back up a live filesystem, be sure to run Solaris’s fssnap command and then run ufsdump against the snapshot.
 On AIX, the dump command is called backup, although restore is still called restore. A dump command exists, but it’s not backup-related.
For simplicity, we refer to the backup commands as dump and restore and show their traditional command-line flags. Even on systems that call the commands something else, they function similarly. Given the importance of reliable dumps, however, you must check these flags against the man pages on the machine you are dumping; most vendors have tampered with the meaning of at least one flag.
dump builds a list of files that have been modified since a previous dump, then packs those files into a single large file to archive to an external device. dump has several advantages over most of the other utilities described in this chapter.
• Backups can span multiple tapes.
• Files of any type (even devices) can be backed up and restored.
• Permissions, ownerships, and modification times are preserved.
• Files with holes are handled correctly.6
• Backups can be performed incrementally (with only recently modified files being written out to tape).
The GNU version of tar used on Linux provides all these features as well. However, dump’s handling of incremental backups is a bit more sophisticated than tar’s. You may find the extra horsepower useful if your needs are complex.
Unfortunately, the version of tar shipped with most major UNIX distributions lacks many of GNU tar’s features. If you must support backups for both Linux and UNIX variants, dump is your best choice. It is the only command that handles these issues (fairly) consistently across platforms, so you can be an expert in one command rather than being familiar with two. If you are lucky enough to be in a completely homogeneous Linux environment, pick your favorite. dump is less filling, but tar tastes great!
 On Linux systems, dump natively supports filesystems in the ext family. You may have to download and install
other versions of dump to support other filesystems.
The dump command understands the layout of raw filesystems, and it reads a filesystem’s inode table directly to decide which files must be backed up. This knowledge of the filesystem makes dump very efficient, but it also imposes a couple of limitations.7
See Chapter 18 for more information about NFS.
The first limitation is that every filesystem must be dumped individually. The other limitation is that only filesystems on the local machine can be dumped; you cannot dump an NFS filesystem you have mounted from a remote machine. However, you can dump a local filesystem to a remote tape drive.8
dump does not care about the length of filenames. Hierarchies can be arbitrarily deep, and long names are handled correctly.
The first argument to dump is the incremental dump level. dump uses the /etc/dumpdates file to determine how far back an incremental dump must go.
The -u flag causes dump to automatically update /etc/dumpdates when the dump completes. The date, dump level, and filesystem name are recorded. If you never use the -u flag, all dumps become level 0s because no record of your having previously dumped the filesystem is ever created. If you change a filesystem’s name, you can edit the /etc/dumpdates file by hand.
See page 418 for information about device numbers.
dump sends its output to some default device, usually the primary tape drive. To specify a different device, use the -f flag. If you are placing multiple dumps on a single tape, make sure you specify a non-rewinding tape device (a device file that does not cause the tape to be rewound when it is closed—most tape drives have both a standard and a non-rewinding device entry).9 Read the man page for the tape device to determine the exact name of the appropriate device file. Table 10.2. gives some hints for our four example systems.
Table 10.2. Device files for the default SCSI tape drive

If you choose the rewinding device by accident, you end up saving only the last filesystem dumped. Since dump does not have any idea where the tape is positioned, this mistake does not cause errors. The situation only becomes apparent when you try to restore files.
To dump to a remote system, you specify the identity of the remote tape drive as hostname:device; for example,
$ sudo dump -0u -f anchor:/dev/nst0 /spare
Permission to access remote tape drives should be controlled through an SSH tunnel. See page 926 for more information.
In the past, you had to tell dump exactly how long your tapes were so that it could stop writing before it ran off the end of a tape. Modern tape drives can tell when they have reached the end of a tape and report that fact back to dump, which then rewinds and ejects the current tape and requests a new one. Since the variability of hardware compression makes the “virtual length” of each tape somewhat indeterminate, it’s always best to rely on the end-of-tape (EOT) indication.
All versions of dump understand the -d and -s options, which specify the tape density in bytes per inch and the tape length in feet, respectively. A few more-sensible versions let you specify sizes in kilobytes with the -B option. For versions that don’t, you must do a little bit of arithmetic to express the size you want.
For example, let’s suppose we want to do a level 5 dump of /work to a DDS-4 (DAT) drive whose native capacity is 20GB (with a typical compressed capacity of about 40GB). DAT drives can report EOT, so we need to lie to dump and set the tape size to a value that’s much bigger than 40GB, say, 50GB. That works out to about 60,000 feet at 6,250 bpi:
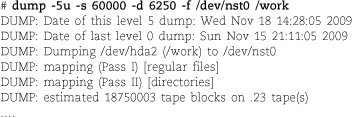
The flags -5u are followed by the parameters -s (size: 60,000 feet), -d (density: 6,250 bpi), and -f (tape device: /dev/nst0). Finally, the filesystem name (/work) is given; this argument is required. Most versions of dump allow you to specify the filesystem by its mount point, as in the example above. Some require you to specify the raw device file.
The last line of output shown above verifies that dump will not attempt to switch tapes on its own initiative, since it believes that only about a quarter of a tape is needed for this dump. It is fine if the number of estimated tapes is more than 1, as long as the specified tape size is larger than the actual tape size. dump will reach the actual EOT before it reaches its own computed limit.
The program that extracts data from tapes written with dump is called restore. We first discuss restoring individual files (or a small set of files), then explain how to restore entire filesystems.
Normally, the restore command is dynamically linked, so you need the system’s shared libraries available to do anything useful. Building a statically linked version of restore takes some extra effort but makes it easier to recover from a disaster because restore is then completely self-contained.
When you are notified of a lost file, first determine which tapes contain versions of the file. Users often want the most recent version, but that is not always the case. For example, a user who loses a file by inadvertently copying another file on top of it would want the version that existed before the incident occurred. It’s helpful if you can browbeat users into telling you not only what files are missing but also when they were lost and when they were last modified. We find it helpful to structure users’ responses with a request form.
If you do not keep on-line catalogs, you must mount tapes and repeatedly attempt to restore the missing files until you find the correct tape. If the user remembers when the files were last changed, you may be able to make an educated guess about which tapes the files might be on.
After determining which tapes you want to extract from, create and cd to a temporary directory such as /var/restore where a large directory hierarchy can be created; most versions of restore must create all the directories leading to a particular file before that file can be restored. Do not use /tmp—your work could be wiped out if the machine crashes and reboots before the restored data has been moved to its original location.
The restore command has many options. Most useful are -i for interactive restores of individual files and directories and -r for a complete restore of an entire filesystem. You might also need -x, which requests a noninteractive restore of specified files—be careful not to overwrite existing files.
restore -i reads the table of contents from the tape and then lets you navigate through it as you would a normal directory tree, using commands called ls, cd, and pwd. You mark the files that you want to restore with the add command. When you finish selecting, type extract to pull the files off the tape.
See page 317 for a description of mt.
If you placed multiple dumps on a single tape, you must use the mt command to position the tape at the correct dump file before running restore. Remember to use the non-rewinding device!
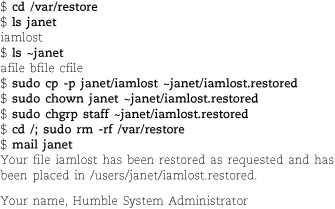
For example, to restore the file /users/janet/iamlost from a remote tape drive, you might issue the following commands. Let’s assume that you have found the right tape, mounted it on tapehost:/dev/nst0, and determined that the filesystem containing janet’s home directory is the fourth one on the tape.

Volumes (tapes) are enumerated starting at 1, not 0, so for a dump that fits on a single tape, you specify 1. When restore asks if you want to set the owner and mode, it’s asking whether it should set the current directory to match the root of the tape. Unless you are restoring an entire filesystem, you probably do not want to do this.
Once the restore has completed, give the file to janet:
Your name, Humble System Administrator
Some administrators prefer to restore files into a special directory and allow users to copy their files out by hand. In that scheme, the administrator must protect the privacy of the restored files by verifying their ownership and permissions. If you choose to use such a system, remember to clean out the directory every so often.
If you originally wrote a backup to a remote tape drive and are unable to restore files from it locally, try hosting the tape on the same remote host that was used for the original backup.
restore -i is usually the easiest way to restore a few files or directories from a dump. However, it does not work if the tape device cannot be moved backwards a record at a time (a problem with some 8mm drives). If restore -i fails, try restore-x before jumping out the window. restore -x requires you to specify the complete path of the file you want to restore (relative to the root of the dump) on the command line. The following sequence of commands repeats the previous example, but with -x.
With luck, you will never have to restore an entire filesystem after a system failure. However, the situation does occasionally arise. Before attempting to restore the filesystem, be absolutely sure that whatever problem caused the filesystem to be destroyed in the first place has been taken care of. It’s pointless to spend hours spinning tapes only to lose the filesystem once again.
Before you begin a full restore, create and mount the target filesystem. See Chapter 8, Storage, for more information about how to prepare the filesystem. To start the restore, cd to the mount point of the new filesystem, put the first tape of the most recent level 0 dump in the tape drive, and type restore -r.
restore prompts for each tape in the dump. After the level 0 dump has been restored, mount and restore the incremental dumps. Restore incremental dumps in the order in which they were created. Because of redundancy among dumps, it may not be necessary to restore every incremental. Here’s the algorithm for determining which dumps to restore:
Step 1: Restore the most recent level 0 dump.
Step 2: Restore the lowest-level dump made after the dump you just restored. If multiple dumps were made at that level, restore the most recent one.
Step 3: If that was the last dump that was ever made, you are done.
Step 4: Otherwise, go back to step 2.
Here are some examples of dump sequences. You would need to restore only the levels shown in boldface.
0 0 0 0 0 0
0 5 5 5 5
0 3 2 5 4 5
0 9 9 5 9 9 3 9 9 5 9 9
0 3 5 9 3 5 9
Let’s take a look at a complete command sequence. If the most recent dump was the first monthly after the annual level 0 in the “moderate” schedule on page 307, the commands to restore /home, residing on the logical volume /dev/vg01/lvol5, would look like this:

If you had multiple filesystems on one dump tape, you’d use the mt command to skip forward to the correct filesystem before running each restore. See page 317 for a description of mt.
This sequence would restore the filesystem to the state it was in when the level 3 dump was done, except that all deleted files would be resurrected. This problem can be especially nasty when you are restoring an active filesystem or are restoring to a disk that is nearly full. It is possible for a restore to fail because the filesystem has been filled up with ghost files.11
When an entire system has failed, you must perform what is known as “bare metal recovery.” Before you can follow the filesystem restoration steps above, you will at least need to
• Provision replacement hardware
• Install a fresh copy of the operating system
• Install backup software (such as dump and restore)
• Configure the local tape drive or configure access to a tape server
After these steps, you can follow the restoration process described above.
We recommend that when you perform a major OS upgrade, you back up all file-systems with a level 0 dump and, possibly, restore them. The restore is needed only if the new OS uses a different filesystem format or if you restructure your disks. However, you must do backups as insurance against any problems that might occur during the upgrade. A complete set of backups also gives you the option to reinstall the old OS if the new version does not prove satisfactory. Fortunately, with the progressive upgrade systems used by most distributions these days, you are unlikely to need these tapes.
Be sure to back up all system and user partitions. Depending on your upgrade path, you may choose to restore only user data and system-specific files that are in the root filesystem or in /usr, such as /etc/passwd, /etc/shadow, or /usr/local. UNIX’s directory organization mixes local files with vendor-distributed files, making it quite difficult to pick out your local customizations.
You should do a complete set of level 0 dumps immediately after an upgrade, too. Most vendors’ upgrade procedures set the modification dates of system files to the time when they were mastered rather than to the current time. Ergo, incremental dumps made relative to the pre-upgrade level 0 are not sufficient to restore your system to its post-upgrade state in the event of a crash.
dump is not the only program you can use to archive files to tapes; however, it is usually the most efficient way to back up an entire system. tar and dd can also move files from one medium to another.
tar reads multiple files or directories and packages them into one file, often a tape device. tar is a useful way to back up any files whose near-term recovery you anticipate. For instance, if you have a bunch of old data files and the system is short of disk space, you can use tar to put the files on a tape and then remove them from the disk.
tar is also useful for moving directory trees from place to place, especially if you are copying files as root. tar preserves ownership and time information, but only if you ask it to. For example,
sudo tar -cf - fromdir | (cd todir ; sudo tar -xpf -)
creates a copy of the directory tree fromdir in todir. Avoid using .. in the todir argument since symbolic links and automounters can make it mean something different from what you expect. We’ve been bitten several times.
Most versions of tar do not follow symbolic links by default, but they can be told to do so. Consult your tar manual for the correct flag; it varies from system to system. The biggest drawback of tar is that non-GNU versions do not allow multiple tape volumes. If the data you want to archive will not fit on one tape, you may need to upgrade your version of tar.
Another problem with some non-GNU versions of tar is that pathnames are limited by default to 100 characters. This restriction prevents tar from archiving deep hierarchies. If you’re creating tar archives on your Linux systems and exchanging them with others, remember that people with the standard tar may not be able to read the tapes or files you create.12
tar’s -b option lets you specify a “blocking factor” to use when writing a tape. The blocking factor is specified in 512-byte blocks; it determines how much data tar buffers internally before performing a write operation. Some DAT devices do not work correctly unless the blocking factor is set to a special value, but other drives do not require this setting.
On some systems, certain blocking factors may yield better performance than others. The optimal blocking factor varies widely, depending on the computer and tape drive hardware. In many cases, you will not notice any difference in speed. When in doubt, try a blocking factor of 20.
tar expands holes in files and is intolerant of tape errors.13
dd is a file copying and conversion program. Unless you tell it to do some sort of conversion, dd just copies from its input file to its output file. If a user brings you a tape that was written on a non-UNIX system, dd may be the only way to read it.
One historical use for dd was to create a copy of an entire filesystem. However, a better option these days is to mkfs the destination filesystem and then run dump piped to restore. dd can sometimes clobber partitioning information if used incorrectly. It can only copy filesystems between partitions of exactly the same size.
You can also use dd to make a copy of a magnetic tape. With two tape drives, say, /dev/st0 and /dev/st1, you’d use the command
$ dd if=/dev/st0 of=/dev/st1 cbs=16b
With one drive (/dev/st0), you’d use the following sequence:

Of course, if you have only one tape drive, you must have enough disk space to store an image of the entire tape.
dd is also a popular tool among forensic specialists. Because it creates a bit-for-bit, unadulterated copy of a volume, dd can be used to duplicate electronic evidence for use in court.
See page 264 for a more general introduction to ZFS.
Solaris’s ZFS incorporates the features of a logical volume manager and RAID controller as well as a filesystem. It is in many ways a system administrator’s dream, but backup is something of a mixed bag.
ZFS makes it easy and efficient to create filesystem snapshots. Past versions of a filesystem are available through the .zfs directory in the filesystem’s root, so users can easily restore their own files from past snapshots without administrator intervention. From the perspective of on-line version control, ZFS gets a gold star.
However, snapshots stored on the same media as the active filesystem shouldn’t be your only backup strategy. ZFS knows this, too: it has a very nice zfs send facility that summarizes a filesystem snapshot to a linear stream. You can save the stream to a file or pipe it to a remote system. You can write the stream to a tape. You can even send the stream to a remote zfs receive process to replicate the filesystem elsewhere (optionally, with all its history and snapshots). If you like, zfs send can serialize only the incremental changes between two snapshots. Two gold stars: one for the feature, and one for the fact that the full documentation is just a page or two (see the man page for zfs).
The fly in the ointment is that zfs receive deals only with complete filesystems. To restore a few files from a set of serialized zfs send images, you must restore the entire filesystem and then pick out the files you want. Let’s hope you’ve got plenty of time and free disk space and that the tape drive isn’t needed for other backups.
In fairness, several arguments help excuse this state of affairs. ZFS filesystems are lightweight, so you’re encouraged to create many of them. Restoring all of /home might be traumatic, but restoring all of /home/ned is likely to be trivial.14 More importantly, ZFS’s on-line snapshot system eliminates 95% of the cases in which you would normally need to refer to a backup tape.
On-line snapshots don’t replace backup tapes or reduce the frequency with which those tapes must be written. However, snapshots do reduce the frequency at which tapes must be read.
A magnetic tape contains one long string of data. However, it’s often useful to store more than one “thing” on a tape, so tape drives and their drivers conspire to afford a bit more structure. When dump or some other command writes a stream of bytes out to a tape device and then closes the device file, the driver writes an end-of-file marker on the tape. This marker separates the stream from other streams that are written subsequently. When the stream is read back in, reading stops automatically at the EOF.
You can use the mt command to position a tape at a particular stream or “fileset,” as mt calls them. mt is especially useful if you put multiple files (for example, multiple dumps) on a single tape. It also has some of the most interesting error messages of any UNIX utility. The basic format of the command is
mt [-f tapename] command [count]
There are numerous choices for command. They vary from platform to platform, so we discuss only the ones that are essential for doing backups and restores.
rew rewinds the tape to the beginning.
offl puts the tape off-line. On most tape drives, this command causes the tape to rewind and pop out of the drive. Most scripts use this command to eject the tape when they are done, clearly indicating that everything finished correctly.
status prints information about the current state of the tape drive (whether a tape is loaded, etc.).
fsf [count] fast-forwards the tape. If no count is specified, fsf skips forward one file. With a numeric argument, it skips the specified number of files. Use this command to skip forward to the correct filesystem on a tape with multiple dumps.
bsf [count] should backspace count files. The exact behavior of this directive depends on the tape drive hardware and its associated driver. In some situations, the current file is counted. In others, it is not. On some equipment, bsf does nothing, silently. If you go too far forward on a tape, your best bet is to run mt rew on it and start again from the beginning.
Consult the mt man page for a list of all the supported commands.
If you’re fortunate enough to have a robotic tape library, you may be able to control its tape changer by installing the mtx package, an enhanced version of mt. For example, we use it for unattended tape swapping with our groovy Dell PowerVault LTO-3 tape cartridge system. Tape changers with barcode readers will even display the scanned tape labels through the mtx interface. Look ma, no hands!
Bacula is an enterprise-level client/server backup solution that manages backup, recovery, and verification of files over a network. The Bacula server components run on Linux, Solaris, and FreeBSD. The Bacula client backs up data from many platforms, including all our example operating systems and Microsoft Windows.
In previous editions of this book, Amanda was our favorite noncommercial backup tool. If you need Amanda information, see a previous edition of this book or amanda.org.
The feature list below explains why Bacula is our new favorite.
• It has a modular design.
• It backs up UNIX, Linux, Windows, and Mac OS systems.
• It supports MySQL, PostgreSQL, or SQLite for its back-end database.
• It supports an easy-to-use, menu-driven command-line console.
• It’s available under an open source license.
• Its backups can span multiple tape volumes.
• Its servers can run on multiple platforms.
• It creates SHA1 or MD5 signature files for each backed-up file.
• It allows encryption of both network traffic and data stored on tape.
• It can back up files larger than 2GiB.
• It supports tape libraries and autochangers.
• It can execute scripts or commands before and after backup jobs.
• It centralizes backup management for an entire network.
To deploy Bacula, you should understand its major components. Exhibit A illustrates Bacula’s general architecture.
Exhibit A Bacula components and their relationships
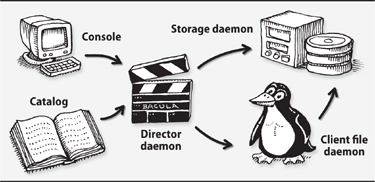
The Bacula director is the daemon that coordinates backup, restore, and verification operations. You can submit backup or restore jobs to the director daemon by using the Bacula console. You can also ask the director daemon to query the Bacula storage daemon or the file daemons located on client computers.
You communicate with the director daemon through the Bacula console, which can be run as a GNOME or MS Windows GUI or as a command-line tool. The console can run anywhere; it doesn’t have to be located on the same computer as the director daemon.
A storage daemon is the Bacula component that reads and writes tapes or other backup media. This service must run on the machine that is connected to the tape drive or storage device used for backups, but it does not have to be installed on the same server as the director (although it can be).
A Bacula file daemon runs on each system that is to be backed up. File daemon implementations for each supported operating system send the appropriate file data and attributes to the storage daemon as backup jobs are executed.
The final Bacula component is the catalog, a relational database in which Bacula stores information about every file and volume that is backed up. The catalog makes Bacula fast and efficient during a restore because the entire backup history is available on-line; Bacula knows what storage volumes are needed to restore a particular fileset before it reads a single tape. Bacula currently supports three different databases: MySQL, PostgreSQL, and SQLite. The catalog database need not reside on the same server as the director.
An additional, optional component is the Bacula Rescue CD-ROM. This component is a separately downloadable package that creates individualized, bootable rescue CDs for Linux systems to use for “bare metal” recovery. The CDs contain a statically linked copy of the system’s file daemon as well as customized shell scripts that incorporate configuration information about the system’s disks, kernel, and network interfaces. If a Linux system has a catastrophic failure, you can use its rescue CD to boot the fresh system, partition the disk, and connect to the Bacula director to perform a full system restore over the network.
Because of Bacula’s complexity, advanced feature set, and modular design, there are many ways to set up a site-wide backup scheme. In this section we walk through a basic Bacula configuration.
In general, six steps get Bacula up and running:
• Install a supported third-party database and the Bacula daemons.
• Configure the Bacula daemons.
• Install and configure the client file daemons.
• Start the Bacula daemons.
• Add media to media pools with the Bacula console.
• Perform a test backup and restore.
A minimal setup consists of a single backup server machine and one or more clients. The clients run only a file daemon. The remaining four Bacula components (director daemon, storage daemon, catalog, and console) all run on the server. In larger environments it’s advisable to distribute the server-side Bacula components among several machines, but the minimal setup works great for backing up at least a few dozen systems.
It’s important to run the same (major) version of Bacula on every system. In the past, some major releases have been incompatible with one another.
Before you can install Bacula, you must first install the back-end database for its catalog. For sites backing up just a few systems, SQLite provides the easiest installation. If you are backing up more systems, it’s advisable to use a more scalable database. Our experience with MySQL in this role has been positive, and we assume MySQL in the following examples.
Stability and reliability are a must when you are dealing with a backup platform, so once you have installed the database, we recommend that you download and install the latest stable source code from the Bacula web site. Step-by-step installation documentation is included with the source code in the docs directory. The documentation is also on-line at bacula.org, where it is available in both HTML and PDF format. Helpful tutorials and developer guides can also be found there.
After unpacking the source code, run ./configure --with-mysql followed by make to compile the binaries, and, finally, run make install to complete the installation.
Once Bacula has been installed, the next step is to create the actual MySQL database and the data tables inside it. Bacula includes three shell scripts that prepare MySQL to store the catalog. The grant_mysql_privileges script sets up the appropriate MySQL permissions for the Bacula user. The create_mysql_database script creates the Bacula database, and, finally, the make_mysql_tables script populates the database with the required tables. Analogous scripts are included for PostgreSQL and SQLite. Bacula’s prebuilt database creation scripts can be found in the src/cats directory of the Bacula source code distribution.
Bacula saves a table entry for every file backed up from every client, so your database server should have plenty of memory and disk space. Database tables for a medium-sized network can easily grow to millions of entries. For MySQL, you should probably dedicate at least the resources defined in the my-large.cnf file included in the distribution. If you eventually find that your catalog database has grown to become unmanageable, you can always set up a second instance of MySQL and use separate catalogs for different groups of clients.
After setting up the database that will store the catalog, you must configure the other four Bacula components. By default, all configuration files are located in the /etc/bacula directory. Bacula has a separate configuration file for each component. Table 10.3. lists the filenames and the machines on which each configuration file is needed.
Table 10.3. Bacula configuration filenames (in /etc/bacula)

It might seem silly that you have to configure each Bacula component independently when you have a single server, but this modular design allows Bacula to scale incredibly well. Tape backup server at capacity? Add a second server with its own storage daemon. Want to back up to an off-site location? Install a storage daemon on a server there. Need to back up new clients? Install and configure the clients’ file daemons. New backup administrator? Install the management console on his or her workstation.
The configuration files are human-readable text files. The sample configuration files included in the Bacula distribution are well documented and are a great starting place for a typical configuration.
Before we begin a more detailed discussion of our example setup, let’s first define some key Bacula terms.
• “Jobs” are the fundamental unit of Bacula activity. They come in two flavors: backup and restore. A job comprises a client, a fileset, a storage pool, and a schedule.
• “Pools” are groups of physical media that store jobs. For example, you might use two pools, one for full backups and another for incrementals.
• “Filesets” are lists of filesystems and individual files. Filesets can be explicitly included in or excluded from backup or restore jobs.
• “Messages” are inter-daemon communiqués (log entries, really) regarding the status of daemons and jobs. Messages can also be sent by email and written to log files.
We do not cover all the possible configuration parameters in this chapter. Instead, we begin each section with a general overview and then point out some parameters that we think are either particularly useful or hard to grasp.
The Bacula configuration files are composed of sections known generically as “resources.” Each resource section is enclosed in curly braces. Some resources appear in multiple configuration files. Comments are introduced with a # sign in all Bacula configuration files.
All four configuration files contain a Director resource:

The Director resource is more or less the mother ship of the Bacula sea. Its parameters define the name and basic behavior of the director. Options set the communication port through which the other daemons communicate with the director, the location in which the director stores its temporary files, and the number of concurrent jobs that the director can handle.
Passwords are strewn throughout the Bacula configuration files, and they serve a variety of purposes. Exhibit B shows how the passwords on different machines and in different configuration files should correspond.
Exhibit B Passwords in the Bacula configuration files
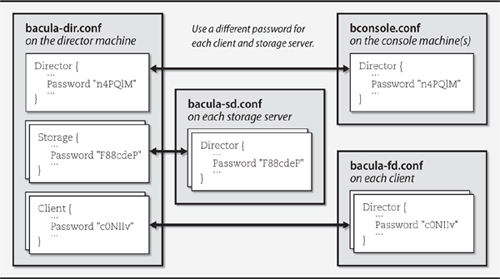
Although passwords appear as plaintext in the configuration files, they are never transmitted over the network in this form.
In our example configuration, the director and console are hosted on the same machine. However, a password is still required in both configuration files.
The director, storage, and file daemons all have a Messages resource that tells Bacula how to handle specific message types generated by each Bacula daemon. In a typical configuration, the storage and file daemons forward their messages back to the director:

In the director’s configuration file, the Messages resource is more complex. The example on the next page tells Bacula to save messages to a log file and to forward them by email.
You can define multiple Messages resources for the director and then assign them to specific jobs in Job resources. This resource type is very configurable; a complete list of variables and commands can be found in the on-line documentation.
bacula-dir.conf is the most complex of Bacula’s configuration files. It requires a minimum of seven types of resource definitions in addition to the Director and Messages resources described above: Catalog, Storage, Pool, Schedule, Client, FileSet, and Job. We highlight each resource definition here with a brief example, but start your own configuration by editing the sample files included with Bacula.
A Catalog resource points Bacula to a particular catalog database. It includes a catalog name (so that you can define multiple catalogs), a database name, and database credentials.

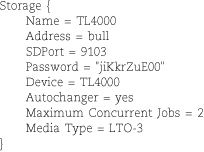
A Storage resource describes how to communicate with a particular storage daemon, which in turn is responsible for interfacing with its local backup devices. Storage resources are hardware-independent; the storage daemon has its own configuration file that describes the storage hardware in detail.
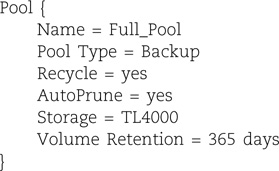
A Pool resource groups backup media, typically tapes, into sets that are used by specific backup jobs. It may be useful to separate tapes that you use for off-site archival storage from those that you use for nightly incrementals. Each piece of media is assigned to a single Pool, so it’s easy to automatically recycle some tapes and archive others.
Schedule resources define the timetables for backup jobs. The name, date, and time specification are the only required parameters, but as you can see from the example below, you can sneak in additional parameter values. These values then override the default parameters set in a Job specification.
Below, full backups run on the first Tuesday of each month at 8:10 p.m. The incremental backups use a different tape pool and run every week from Wednesday through Monday at 8:10 p.m.

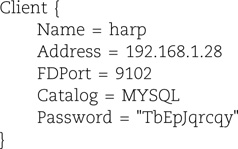
Client resources identify the computers to be backed up. Each resource has a unique name, IP address, and password; one is required for each client. The catalog for storing backup metadata is also specified. The parameters File Retention and Job Retention specify how long file and job records for this client should be kept in the catalog. If the AutoPrune parameter is set, expired data is deleted from the catalog. Pruning affects only the catalog records and not the actual files stored on backup tapes; recycling of tapes is configured in the Pool resource.
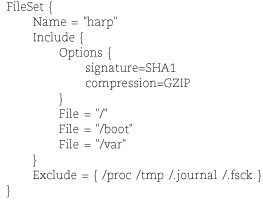
A FileSet resource defines the files and directories to be included in or excluded from a backup job. Unless you have systems with identical partitioning schemes, you’ll probably need a different fileset for each client. FileSet resources can define multiple Include and Exclude parameters, along with individual Options such as regular expressions. By default, Bacula recursively backs up directories but does not span partitions, so take care to list in separate File parameters all the partitions you want to back up.
In the example below, we enable software compression as well as the signature option, which computes a hash value for each file backed up. These options increase the CPU overhead for backups but can save tape capacity or help identify files that have been modified during a suspected security incident.
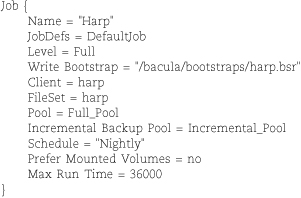
A Job resource defines the overall characteristics of a particular backup job by tying together Client, FileSet, Storage, Pool, and Schedule resources. In general, there is one Job definition per client, although you can easily set up multiple jobs if you want to back up different FileSets at different frequencies.
You can supply an (optional) JobDefs resource to set the defaults for all backup jobs. Use of this resource can simplify the per-job configuration data.
A “bootstrap” file is a special text file, created by Bacula, that contains information about files to restore. Bootstrap files list the files and volumes needed for a restore job and are incredibly helpful for bare-metal restores. They are not mandatory but are highly recommended.
Bootstrap files are created during restores, or during backups if you have defined the Write Bootstrap parameter for the job. Write Bootstrap tells Bacula where to save the bootstrap information. Bootstrap files are overwritten during full backups and appended to during incremental backups.
Storage daemons accept data from file daemons and transfer it to the actual storage media (or vice versa, in the case of a restore). The resources Storage, Device, and Autochanger are defined within the bacula-sd.conf file, along with the common Messages and Director resources.
The Director resource controls which directors are permitted to contact the storage daemon. The password in the Storage resource of bacula-dir.conf must match the password in the Director resource of bacula-sd.conf.

The Storage resource is relatively straightforward. It defines some basic working parameters such as the daemon’s network port and working directory.
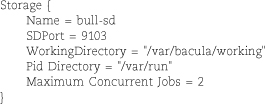
Each storage device gets its own Device resource definition. This resource specifies details about the physical backup hardware, be it tape, optical media, or online storage. The details include media type, capabilities, and autochanger information for devices that are managed by a tape changer or media robot.
The example below defines an LTO-3 drive with an automatic tape changer. Note that /dev/nst0 is a non-rewinding device, which is almost invariably what you want. The Name parameter defines a symbolic name that’s used to associate the drive with its corresponding Autochanger resource. The Name also helps you remember which piece of equipment the resource describes.
The AlwaysOpen parameter tells Bacula to keep the device open unless an administrator explicitly requests an unmount. This option saves time and tape stress because it avoids rewinding and positioning operations between jobs.

The optional Autochanger resource definition is only required if you are lucky enough to have a tape changer. It associates the storage devices to the autochanger and specifies the command that makes the changer swap tapes.

The console program communicates with the director to schedule jobs, check the status of jobs, or restore data. bconsole.conf tells the console how to communicate with the director. The parameters in this file must correspond to those given in the Director resource in the director’s configuration file (bacula-dir.conf), with the exception of the Address parameter.
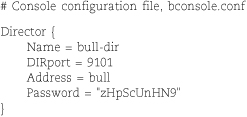
The file daemon installed on backup clients communicates with the Bacula storage daemon as backups and restores are executed. A file daemon must be installed and configured on every computer that is to be backed up with Bacula.
Bacula is available in binary form for many platforms, including Windows and various Linux distributions. On UNIX systems, you can install the file daemon from the original source tree by running ./configure --enable-client-only followed by make and make install. You can hard-code defaults for many file daemon options at configuration time, but maintenance is easier if you just list them in your bacula-fd.conf file. By default, binaries are installed in /sbin and configuration files in /etc/bacula.
After installing the file daemon, configure it by editing bacula-fd.conf, which is broken into three parts. The first part consists of the Director resource, which tells the file daemon which director is allowed to schedule backups for this client. The Director resource also includes a Password parameter, which must be identical to the password listed in the Client resource in the director’s own configuration file.
The second part of the bacula-fd.conf file is the FileDaemon resource, which names the client and specifies the port on which the file daemon listens for commands from the director daemon.
The final component is the Messages resource (refer back to page 323), which defines how local messages are to be handled.
With the server daemons installed and a test client configured, the next step is to fire up the daemons by running the startup script in the server’s installation directory (./bacula start). This same command is also used on each client to start the client’s file daemon.
The bacula startup script should be configured to run at boot time. Depending on your system and installation method, this may or may not be done for you. See Chapter 3, Booting and Shutting Down, for some additional details on how to start services at boot time on our example systems.
Once the daemons are running, you can use the console program (bconsole in the installation directory) to check their status, add media to pools, and execute backup and restore jobs. You can run bconsole from any computer as long as it has been properly installed and configured.

Use the console’s help command to see a list of the commands it supports.
Before you can run a backup job, you need to label a tape and assign it to one of the media pools defined in the director’s configuration file. Use the console’s label command to write a software “label” to a blank tape and assign it to a Bacula pool. Always match your Bacula label to the physical label on your tape. If you have an autochanger that supports bar codes, you can use the label barcode command to automatically label any blank tapes with the human-readable values from their bar-coded labels.
Use the list media command to verify that the tape has been added to the correct pool and marked as appendable.
Use the console’s run command to perform a manual backup. No arguments are needed; the console displays all the backup jobs defined in the director’s configuration file. You can modify any option within the run command by following the console’s menu-driven prompts.
The following example shows a manual full backup of the server harp, using the defaults specified in our configuration files.
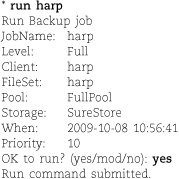
After the backup job has been successfully submitted to the director, you can track its status with the console’s status command. You can also use the messages command to obtain blow-by-blow updates as they arrive. Depending on how you have set up the system’s Message resources, a detailed summary report may also be emailed to the Bacula administrator.
To restore files, start up the console and run the restore command. Like the run command, restore is menu driven. It starts by helping you identify which jobs need to be read to restore the target files. restore presents you with several methods of specifying the relevant job IDs. Once you have selected a set of jobs, you can then select the files from those jobs to restore.
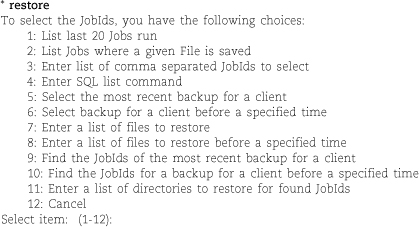
The three most useful options are probably “Select the most recent backup for a client” (#5), “Select backup for a client before a specified time” (#6), and “List Jobs where a given File is saved” (#2). The first two of these options provide a shell-like environment for selecting files, similar to that of restore -i. The third option comes in handy for those pesky users that can never seem to remember exactly where the file they removed really lives. Another powerful way to find job IDs is option #4, “Enter SQL list command,” which lets you enter any properly formatted SQL query. (Of course, you must be familiar with the database schema.)
Suppose that a user needs a recent copy of his pw_expire.pl script restored. However, he’s not sure in which directory he kept the file. In addition, he would like the files restored to the /tmp directory of the original machine. A request like this would set many a system administrator to grumbling around the water cooler, but for the Bacula administrator it’s a snap. (Unfortunately, Bacula’s format for search results is so wide that we had to truncate it below.)
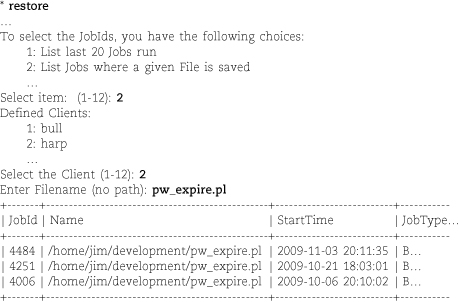
Bacula’s list of pw_expire.pl instances reveals several recent backups and their associated job IDs. Bacula then returns us to the restore menu, where we can use option #3 (enter job IDs) to focus on a specific job.
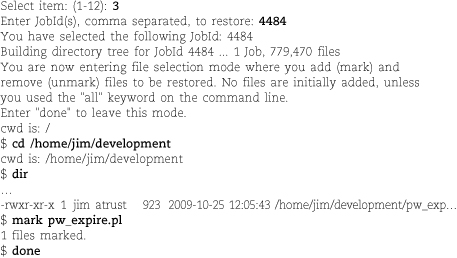
It’s not shown in this example, but Bacula sometimes displays job IDs with a comma (e.g., 4,484). You must omit the comma any time you enter an ID back into Bacula; otherwise, Bacula interprets your entry as a comma-separated list.
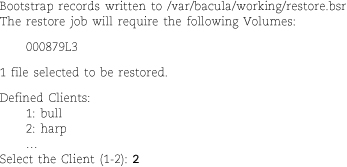
Bacula now writes the bootstrap file that it will use to perform the restore, displays the names of the tape volumes it requires, and prompts you to select a client to which it should restore the files. For this example, we restored the file back to the original host harp.
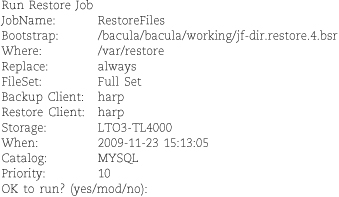
Before we run this particular job, we want to modify the default settings. Specifically, we need to change the destination of this restore to /tmp to accommodate the user’s request.

After making the changes, we submit the job to the director, which executes it. We could then use the messages command to view the job’s logging output.
You can download prebuilt binaries for Windows clients from bacula.org.
Bacula is great for backing up Windows data files, but it takes an extra step to create a bomb-proof level 0 backup of a Windows system. Unfortunately, Bacula has no understanding of the Windows registry or system state, and it does not understand Windows’ locking of open files. At a minimum, you should configure a pre-execution script that triggers Windows’ built-in System Restore feature. System Restore will make a local backup of the system state, and your Bacula backup will then receive the current state in its archived form. To capture locked files correctly, you may also need to make use of the Windows Volume Shadow Copy Service (VSS).
Check the examples directory in the Bacula source tree for other Windows-related goodies, including a clever script that “pushes” Windows file daemon updates to clients through Bacula’s built-in restore system. The Windows client in the latest version of Bacula supports Windows 7 clients and 64-bit clients. It even has experimental support for Microsoft Exchange backups.
System administration requires vigilance, and backups are the last place to be making an exception. Backups will fail, and if not fixed quickly, critical data will surely be lost.
Bacula jobs produce a job report that is routed according to the job’s Message resource in the director daemon’s configuration file. The report includes basic information about the volumes used, the number and size of files backed up, and any errors that may have occurred. The report usually gives you enough information to troubleshoot any minor problems. We recommend that you configure important messages to go to your email inbox, or perhaps even to your pager.
You can use the console’s status command to query the various Bacula daemons for information. The output includes information about upcoming jobs, currently running jobs, and jobs that were terminated. The messages command is an easy way to review recent log entries.
Bacula includes a contributed Nagios plug-in, which makes it easy to integrate backups into your existing monitoring infrastructure. See page 887 for general information about Nagios.
Two issues that come up frequently are client file daemons that aren’t running and storage daemons that cannot find any appendable tape volumes. In the example below, the director daemon reports that a backup job terminated with a fatal error because it could not communicate with the file daemon on host harp. This error can be seen repeatedly at the end of the summary report.

The example below shows the storage daemon reporting that no tape volumes from the appropriate pool are available to perform a requested backup. You can fix the problem either by adding a new volume to the pool or by purging and recycling an existing volume. There’s no need to restart the job; Bacula should continue to execute it unless you cancel it explicitly.

If you ever need to see more detailed information about what the daemons are doing, you can have them send a slew of debugging information to the console by appending the option -dnnn to the startup command. For example,
$ sudo ./bacula start -d100
The nnn represents the debug level. Typical values range between 50 and 200. The higher the number, the more information displayed. You can also enable debugging from within the console with the setdebug command.
Several other free or shareware backup tools are available for download. The following packages are particularly noteworthy; all are still actively developed.
• Amanda: a very popular and proven system that backs up UNIX and Linux systems to a single tape drive. See amanda.org.
• rsync: a free tool that runs on all of our example platforms and is included by default on many Linux distributions. It can synchronize files from one computer to another and can run in conjunction with SSH to transfer data securely over the Internet. rsync is smart about only transferring differences in files, so it uses network bandwidth efficiently. See page 725 for additional discussion of rsync. Note that rsync alone usually isn’t sufficient for backups since it does not save multiple copies. Nor does it create off-line backups.
• star: a faster implementation of tar. star is included with Linux and is available for all types of UNIX.
• Mondo Rescue: a utility that backs up Linux systems to CD-R, DVD-R, tape, or hard disk. This tool is particularly useful for bare-metal recovery. Read more at mondorescue.org.
We would all like to think that UNIX is the only OS in the world, but unfortunately, that is not the case. When looking at commercial backup solutions, you should consider whether they can handle any other operating systems that you are responsible for backing up. Most contemporary products address cross-platform issues and let you include UNIX, Windows, and Mac OS workstations in your backup scheme. You must also consider non-UNIX storage arrays and file servers.
Users’ laptops and other machines that are not consistently connected to your network should also be protected from failure. When looking at commercial products, you may want to ask if each product is smart enough not to back up identical files from every laptop. How many copies of command.com do you really need? Since we find that Bacula works well for us, we don’t have much experience with commercial products. We asked some of our big-bucks buddies at commercial sites for quick impressions of the systems they use. Their comments are reproduced here.
The ADSM product was developed by IBM and later purchased by Tivoli. It is marketed today as the Tivoli Storage Manager (TSM), although the product is once again owned by IBM. TSM is a data management tool that also handles backups. More information can be found at ibm.com/tivoli.
Pros:
• Owned by IBM; it’s here to stay
• Attractive pricing and leasing options
• Very low failure rate
• Uses disk cache; useful for backing up slow clients
• Deals with Windows clients
• Excellent documentation (priced separately)
Cons:
• Poorly designed GUI interface
• Every 2 files =1kB in the database
• The design is incremental forever
Veritas merged with Symantec in 2005. They sell backup solutions for a variety of systems. When you visit their web site (symantec.com), make sure you select the product that’s appropriate for you. NetBackup is the most enterprise-ish product, but smaller shops can probably get away with BackupExec.
Pros:
• Decent GUI interface
• Connects to storage area networks and NetApp filers
• Push install for UNIX and Windows
• Can write tapes in GNU tar format
• Centralized database, but can support a distributed backup system
Cons:
• Some bugs
• Pricing is confusing and annoying
• Client notorious for security vulnerabilities
Storage behemoth EMC acquired Legato NetWorker back in 2003. At the time, Veritas and Legato were the two market leaders for enterprise backup.
Pros:
• Competitively priced
• Server software can run on each of our example platforms
• Supports diverse client platforms
• Slick, integrated bare-metal restorations
Cons:
• Significant overlap among EMC products
W. Curtis Preston, author of the O’Reilly book Backup & Recovery, maintains a web page about backup-related topics (disk mirroring products, advanced filesystem products, remote system backup products, off-site data-vaulting products, etc.) at backupcentral.com.
PRESTON, W. CURTIS. Backup & Recovery: Inexpensive Backup Solutions for Open Systems. Sebastopol, CA: O’Reilly Media, 2007.
E10.1 Investigate the backup procedure used at your site. Which machines perform the backups? What type of storage devices are used? Where are tapes stored? Suggest improvements to the current system.
E10.2 What steps are needed to restore files on a system that uses Bacula? How do you find the right tape?
 E10.3 Given the following output from df and /etc/dumpdates, identify the steps needed to perform the three restores requested. Enumerate your
assumptions. Assume that the date of the restore request is January 18.
df output from the machine khaya.cs.colorado.edu:

/etc/dumpdates from khaya.cs.colorado.edu:
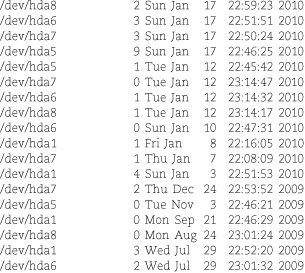
a) Please restore my entire home directory (/usr/home/clements) from some time in the last few days. I seem to have lost the entire code base for my senior project.”
b) Umm, I accidentally did a sudo rm -rf /* on my machine khaya. Could you restore all the filesystems from the latest backups?”
c) “All my MP3 files that I have been collecting from BitTorrent over the last month are gone. They were stored in /tmp/mp3/. Could you please restore them for me?”
 E10.4 Design a backup plan for the following scenarios. Assume that each computer
has a 400GB disk and that users’ home directories are stored locally. Choose a backup
device that balances cost vs. support needs and explain your reasoning. List any assumptions
you make.
a) A research facility has 50 machines. Each machine holds a lot of important data that changes often.
b) A small software company has 10 machines. Source code is stored on a central server that has 4TB of disk space. The source code changes throughout the day. Individual users’ home directories do not change very often. Cost is of little concern and security is of utmost importance.
c) A home network has two machines. Cost is the most important consideration, and the users are not system administrators.
 E10.5 Design a restore strategy for each of the three situations described in Exercise
10.4.
 E10.6 Write Bacula configuration statements that implement the backup plans you came
up with for Exercise 10.4.
 E10.7 Outline the steps you would take to perform a dump to a remote tape drive through a secure SSH tunnel.