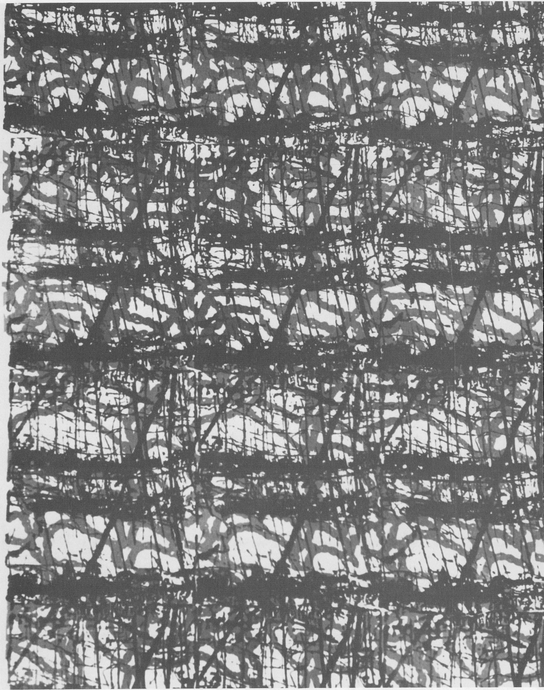
Fig. 7-1. Two screens were used to produce this print, which was designed with bark fibers and a lace doily. (By Timothy J. McIlrath)
7. TECHNIQUES FOR PRINTING
In this chapter we will discuss further techniques for constructing a printing board and frame as well as include some information about inks, paints, and dyes that can be used and what fabrics and papers will accept printing. In addition, the actual techniques of using printing media, keying the screen, pulling the squeegee, and drying the results will be given. Printing techniques mentioned in preceding chapters will not be repeated.
Construction of the Frame and Printing Base
In Chapter 4 we suggested that clear pine should be used for the construction of the basic wood frame. But other woods that are sometimes used are spruce, mahogany, basswood, and boxwood. English screen printers frequently make their frames from sycamore and beech. For frames smaller than 15 by 20 inches, 1 - by 1
 -inch lumber is recommended. Frames from 15 by 20 inches to 30 by 40 inches should be made from 1
 - by 1
 -inch lumber.
The butt joint suggested in Chapter 4 is the simplest joint to make, but there are a number of other ways of joining four pieces of frame lumber together, most of which (miter, rabbet, end lap, dovetail) are preferred to the butt joint because of their greater strength (Fig. 7-2).
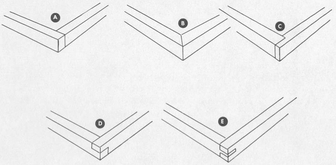
Fig. 7-2. This drawing shows some of the various types of end joints that can be used in screen frames: butt joint (A); mitered joint (B); rabbet joint (C); end-lap joint (D); dovetail joint (E).
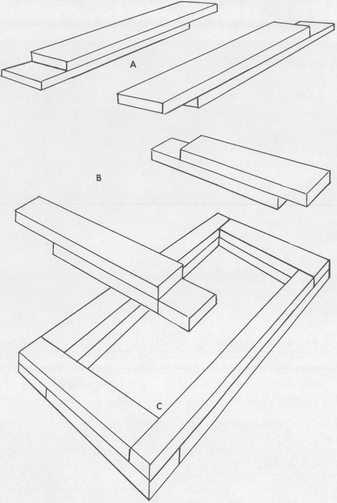
Fig. 7-3. One method for making a frame if your carpentry skill is limited is with end-lap joints. For each side, two pieces of lumber of equal length are glued together with one piece extended on each end a distance equal to the width of the lumber used. The drawing shows two assembled side pieces (A), two assembled end pieces (B), and the completely assembled frame (C).
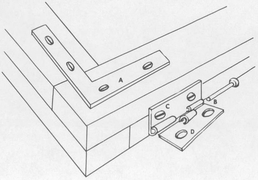
Fig. 7-4. An end-lap joint can be strengthened with an angle iron (A). Drop-pin hinges make attaching the frame to the printing board fairly simple. The drop-pin (B) is removed to show the female section of the hinge (C) on the frame and the male section (D) on the printing board. On the other end of this side of the screen the arrangement should be reversed; that is, the male section should be on the frame and the female on the printing board.
If you have limited carpentry skill and a minimum of equipment, you might try the version of the end-lap joint (shown in Fig. 7-3) calling for two pieces of lumber on each side. If you do, it would be wise to strengthen the joints with angle irons (Fig. 7-4).
The methods for constructing a printing board for textiles and for keying the frame to it were discussed in Chapter 5. A temporary surface for textile printing can be made by carefully padding a table top or flat board with smooth semisoft materials and taping them to the table instead of stapling them.
In serigraphy, a simple drop-pin hinge used to fasten the screen to the printing surface is a good idea because it makes it possible to use several printing frames with a single base. Be sure to put the male and female halves of one hinge on the base (Fig. 7-5). If you are setting up a permanent printing studio, a strong, sturdy table makes the best base. Then you will need to screw the two halves of a drop-pin hinge to each screen so that it fits the one set of hinges on the table. In a somewhat better way of fastening the frame to the printing base, the frame is hinged to a length of the same-size wood used in its construction, which is then bolted to the table or printing board with carriage bolts and wing nuts (Fig. 7-6). Ordinary hinges or even a piano hinge can be used, since the frame is removed from the board with the extra piece of wood attached. This arrangement is a bit steadier, and it allows the printing frame to be shimmed up at both ends when thick materials are being printed (Fig. 7-7).
There was a time when the silk-screen artist purchased heavy belt rubber and made his own squeegee. Squeegees can still be improvised from stiff, thin pieces of cardboard or wood, but the most practical procedure is to acquire a good commercially produced squeegee. The kind made for two hands (you pull the squeegee toward you or push it away, using both hands on the wood part of the blade) is recommended because it is easy to work and gives greater control. But also popular with many printers are one-handed squeegees (Fig. 7-8). These have a vertical handle that is grasped firmly in either the right or the left hand depending upon the direction of the stroke and, usually, is passed from side to side in front of the printer.
The blade of a squeegee is rated in durometers to indicate flexibility. A very soft blade is approximately 45 durometers, while a hard one is 80 durometers. A blade for textiles is usually thin and soft (between 45 and 50 durometers). A soft blade forces more dye paste or textile ink into the weave of the textile. The blade used for most serigraphs is 50 to 60 durometers, or about medium in flexibility. For hard, sharp lines, intricate details, and very thin applications of ink, hard blades up to 80 durometers may be used. Hard blades are also used on nonabsorbent surfaces. Formerly all blades were of natural rubber, but plastic blades have come on the market recently. While they are more expensive, they are tough and need minimum sharpening. They also clean easily. Some firms identify the hardness of the blade by color: gray for hard, black for medium, amber for soft.
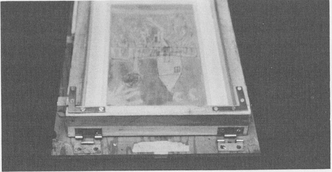
Fig. 7-5. Reversing the male and female parts of the hinge on the two sides of the frame means a saving in hardware. Each time you make a new frame simply attach the two parts of one hinge to it to fit the hinge arrangement on the printing board.
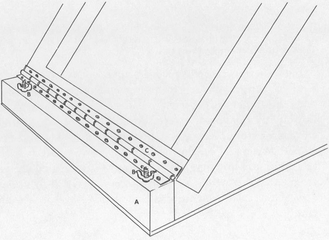
Fig. 7-6. An even better way of fastening the screen frame to the printing surface is to bolt an extra block of wood (A) the same height as the screen frame to the printing surface with carriage bolts (B) and to attach the frame to the block with a piano hinge (C).
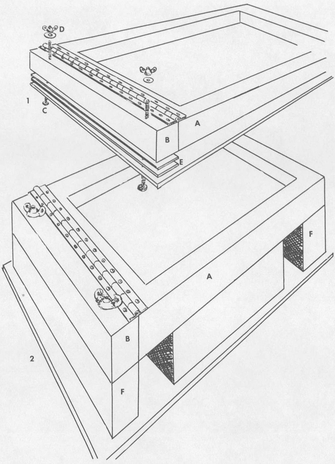
Fig. 7-7. With the printing frame (A) attached to an extra block of wood (B), which in turn is bolted to the printing surface (C) with carriage bolts and wing nuts (D), materials of varying thicknesses can be printed. For example, if you wish to print a thin sheet of metal, a thickness or two of cardboard (E) inserted under the block of wood (B) will raise the frame the necessary distance. If you wish to print something very thick, such as a box, a block of wood (F) with holes drilled for the carriage bolts is used. (If a box being printed is cardboard, it may need a second block of wood (F) placed under the other end of the printing frame to protect the box from the printing pressure).
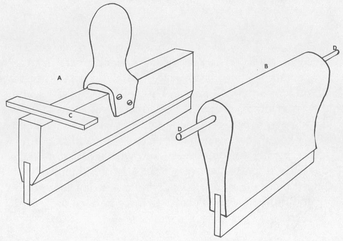
Fig. 7-8. Squeegees may be either one-handed (A) or two-handed (B). A piece of wood (C) or dowels (D) attached to the squeegee will prevent it from falling into the ink during the printing process.
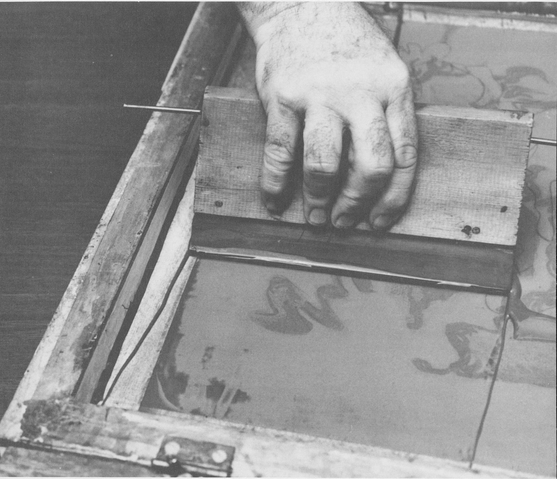
Fig. 7-9. Nails driven into the ends of a squeegee will also prevent it from falling into the ink. The squeegee is rested on the sides of the frame when not in use.
There are five or six different types of edges on squeegee blades. The one most frequently used by the serigrapher is sharp and square. With use it may round off or develop small nicks. This will give blurred and uneven printing images, and the nicks will cause streaks in the color areas. The blade will need to be sharpened with a fine sheet of sandpaper. Rub evenly and smoothly. Textile printers on the other hand will find that a blade edge that is basically square but slightly rounded will deposit more ink or dye paste on a textile. For fine printing and intricate details blades that are pointed or shaped like a chisel are used.
Some of the newer squeegee models have removable handles. A worn blade can be replaced or turned around and the other edge used. Blades should always be thoroughly cleaned after use. They should be hung up in storage or stored flat or propped up on the handle. They should never rest on the rubber blade or be stored with anything pressing against the blade. To keep a squeegee from falling into the paint in the frame while printing, drive wooden dowels or small nails (Fig. 7-9) into each end.
The Screen Mesh
Silk has long been the most common screen mesh. While it is still widely used, other materials are also popular. Inexpensive and disposable screens can be made from organdy. They do not work very well with water-based paints and should be used only for small runs. They also sag after they have been cleaned a number of times. Nylon meshes have been gaining in popularity because of their ease of cleaning and their durability. Silk does not stand up under the strong chemicals used in some photographic methods. Copper, brass, bronze, and stainless-steel fabric meshes are used in commercial screen printing because they hold up well for very long runs. But their cost, the difficulty of stretching them on a frame, and their susceptibility to damage from small dents makes them impractical for most small-volume screen printers.
Silk fabrics are classified with a number that indicates the size of the mesh holes and an X to signify the strength of the weave. All screen silks are rated XX (double weight) as to strength. The following table gives mesh counts, which are the number of mesh holes per linear inch.
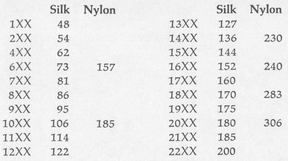
Most serigraphers use grades between 10XX and 16XX. Generally speaking, 10XX is for heavier and coarser printing, and 16XX is used with photo stencils. When textiles are printed with pigment colors, meshes between 8XX and 10XX are used, while meshes between 10XX and 12XX are required for printing with dyes.
For a heavy impasto effect with a paper blockout resist, a mesh of 12XX is commonly used. Listed here are the mesh numbers required for various types of stencil resists.
| Cut film | 6XX-12XX | Photo halftone | 18XX-19XX |
| Paper blockout | 6XX-12XX | Photo (with detail) | |
| Photographic | 10XX-16XX | 14XX-16XX | |
| Glue blockout | 12XX-18XX | Washout resist | 14XX-18XX |
| Mimeograph stencil | 9XX-12XX | Acetate blockout | 12XX-19XX |
Most screen fabrics are stretched by one of the two methods described in Chapter 5. If staples are not available, No. 4 carpet tacks can be used. Some European printers adhere the fabric to the frame by temporarily tacking it with thumbtacks, then giving the areas where the screen and frame are in tight contact three or four coats of clear lacquer. When the lacquer has dried, the tacks are removed and the screen is sealed with tape (see Chapter 5). A variation of the cord-and-groove method used in Chapter 5 can be seen in Fig. 7-10. Four grooves are cut in the screen frame, and wooden bars are fitted into them. The silk is placed under the bars and pulled somewhat tight. The bars are then slowly screwed into the frame. This method gives a very tight screen, but it requires a little more skill to use. Regardless of how you stretch screen fabric, the stretching tool used by artists to stretch canvas is a very useful implement to have. After the fabric has been stretched, it should be washed (see Chapter 8).
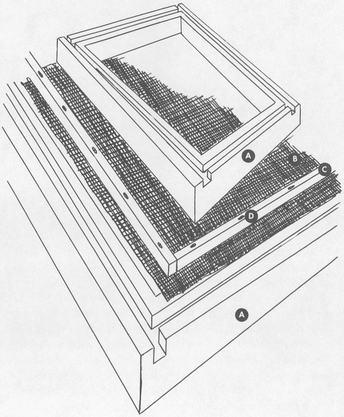
Fig. 7-10. In this method of stretching a screen, which is particularly good for a wire or metal screen fabric, a groove is cut into the screen frame (A) with a table saw. Then the screen fabric (B) is laid over the frame, and thin strips of hardwood (C) with screw holes (D) previously drilled in them are positioned above the fabric over the grooves in the frame and carefully screwed down into the grooves.
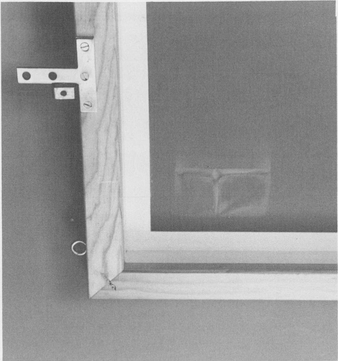
Fig. 7-11. A small tear in screen fabric can be repaired. First, the rip is covered on the underside with masking tape.
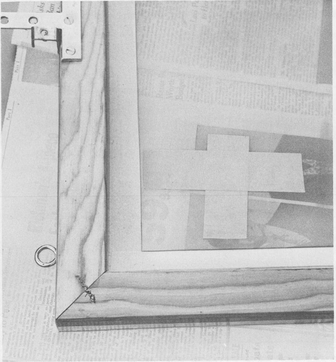
Fig. 7-12. Tape is then placed on the other side of the tear, and both sides are lacquered.
If a screen is punctured and the tear is not too large, it can be repaired. If adequate printing surface is left, the screen can be used for smaller designs. Carefully tape together the cut in the fabric on the underside with masking tape, then seal it on the inside with one or two coats of clear lacquer. After the lacquer has dried, cover that section with tape also, and lacquer the tape on both sides of the fabric with several coats (Figs. 7-11 and 7-12). The frame can now be used. A frame that develops a leak during printing can usually be temporarily repaired with masking tape. After the printing is finished, it is usually wise to tear off all of the tape around the leak, then completely reseal it with new tape. If a screen fabric becomes somewhat loose and saggy, you can sometimes continue to print by raising the printing surface with a sheet or two of cardboard. Place the cardboard, which should be smaller than the inside of the printing frame, under the print. This forces the print more tightly against the screen and takes up some of the slack in the fabric tension. In most cases this will only temporarily solve the problem of a loose screen fabric. Usually a new screen must be stretched.
Selecting and Preparing Printing Paints, Inks, or Dyes
Like other equipment for screen-process printing, the variety of paints, inks, and dyes available is almost overwhelming. We will not attempt to enumerate all of them, but instead list briefly and describe only those that are likely to be of most interest to the small-volume printer.
The paint used can be a kind that is very inexpensive and readily available, like the tempera paint formula in Chapter 3. Most screen-process supply houses also sell an inexpensive grade of water-based poster ink designed for school use that can be thinned and cleaned out of the screen with water. It is excellent for beginners if they do not wish any high degree of permanence. But you cannot use with it a screen resist that washes out with water.
Screen-process paints are thick and syrupy. Among them are the many varieties of flat-type or poster colors. They are not designed for outdoor use, but they can be used outdoors if given a coat of overprint varnish. These paints are made more transparent with transparent base, which also improves their printing quality. Frequently, toner base is mixed with the transparent base. The paints are thinned with mixing varnish and mineral spirits, and cleaned from the screen with paint thinner or mineral spirits.
High-gloss enamels come in two types: a fast-drying enamel that cannot be used outside without the protection of overprint varnish, and a synthetic or natural varnish with a high-gloss color. The second is suitable for outdoor use, and some types can even be baked on the printing surface at a temperature up to 350 degrees. Special thinners, transparent bases, and cleaning material should be those recommended by the manufacturers for most screen paints.
If you are looking for transparent colors, get one of the transparent toner colors. These are highly concentrated paints that are mixed with a crystal type of transparent base, which increases transparency without much loss of color value. Petroleum distillate or paint thinner is used to thin the paints and clean them off the screen.
If you are working with a screen resist not affected by lacquer, you can use lacquer-based paints. They are very brilliant and tend to dry rapidly. Special thinners are designed for use with them. If you cannot get a slow-drying thinner, add about a teaspoon of castor oil to a pint of the thinner you do get. This will prevent clogging of the mesh.
Contemporary serigraphers of the Op and Pop schools have been using fluorescent inks. Thinners, wash solutions, and transparent bases have been especially produced for these paints.
Designed for printing on glass but useful on paper as well are the cellulose-based inks. They are somewhat expensive but offer a wide range of brilliant colors. They print much thinner than do most oil-based inks, and they do not clog the mesh as quickly. Shellac screens cannot be used since the ink will dissolve the shellac. They require special cleaners, thinners, and transparent base.
A few more inks, primarily of interest to the serigrapher, are specialty products designed to print on plastics, acetates, and vinyl. There are inks that can be heated and used in the vacuum-forming process popular among Pop sculptors. Lithographers can use lithographic asphaltum to silk-screen photo images on lithographic stones, and etchers can do the same with an ink designed for the printing of etched electrical circuits. Ceramists can silkscreen photo images in a glaze on their ceramic objects before they fire them in the kiln.
For textile designers there are water-based textile inks that do not stiffen the cloth and that are fairly easy to use. Most need some form of heat setting but are reasonably color-fast if they are aged before washing and then washed with some care.
In addition, textile designers employ commercially manufactured pigments in oil emulsion and pigments in water emulsion, which are commonly used by some of the large screen-process textile firms on banners, T shirts, and sweat shirts. Although these inks are produced for textiles, they will stiffen the cloth slightly, but with some experience and skill in the use of the thinners and extenders, the printer can reduce this stiffness. The inks are fairly easy to use and are quite color-fast and permanent. There are inks designed especially for awnings and similar outdoor banners and fabrics. Fluorescent textile inks offer striking effects, but they present some problems in pressing and laundering.
Since the mid-1950s, the use of dyes has increased rapidly. Any dye that can be produced in a paste form can be used in screen-process printing. The most useful dyes for the small-scale printer are acid dyes, basic dyes, direct dyes, disperse dyes, fiber-reactive dyes, household dyes, prepared vat dyes, and soluble vat dyes. These offer many avenues for the textile printer to explore. Each requires special handling, gives different results, and presents different difficulties.
Recently, textile printers have been working with fiber-reactive dyes, which are relatively easy to apply in paste form. The colors are fixed by development in a steam chamber or with a steam iron. They usually give brilliant transparent hues.
Probably the most critical part of screen printing is mixing the inks, dyes, and paints. Because the printing process considerably alters the final color, experience and only experience can give the printer the skill needed to mix color hues that will turn out to be what he wants. Colors are altered in drying, and they change a good deal depending upon the color, texture, and absorbency of the surface on which they are printed. Since even the experienced screen-process printer often can do no more than make an educated guess, it is wise to test-print a color before it is finally applied. Many printers have a series of screens as small as 4 by 6 inches with a permanent design on them (like squares, circles, or triangles, which lend themselves easily to overprinting color areas) for testing the colors to be used on a piece of the material to be printed. In this manner, the intensity, value, and shade of the color can be quite accurately judged. In addition, overprinting tests the relative transparency or opacity of the ink. If the color is incorrect, a small screen can be cleaned much more easily than a full-sized screen and the process repeated.
Mixed colors left over from previous printing runs should be very carefully checked for lumps and other inconsistencies before they are used. If there is any suspicion of foreign matter in the ink, strain it through cheesecloth or an old nylon stocking.
Screen-process paints come in pint, quart, and gallon cans; serious printers should purchase them by the quart. Most inks are available in half-pints, pints, quarts, and gallons. Transparent base, toner base, paint thinner or mineral spirits, and mixing varnish should be purchased by the gallon.
Only experience and participating perception will enable a textile printer to judge the quantity of textile paint or dye paste required. The amounts of ink needed depend on the size of the area receiving ink in each color run and and the absorbency and roughness of the fabric. Because textiles vary more in texture and ink absorbency than do most serigraphic papers, estimating the amount of ink needed is more difficult. The amount of pressure you use on the squeegee will also affect the amount of ink needed. It is advisable to mix at least one full cup of ink even for test runs or experimental purposes: better too much than too little. Unused color stores quite easily, or it can be blended with other colors.
Predicting the amount of paint needed in serigraphy is only a little easier. In both textile printing and serigraphy, it is important to mix about 3 ounces more paint than you will use, to prevent the squeegee from running out of ink before the printing run is finished. This overrun can be saved, so it is not lost. Mixing a color in the middle of a run is an unnecessary problem. Here is a rule of thumb for predicting the amount of paint needed to print one color run of a serigraph. Calculate roughly the area to be printed in square inches. Then, if your paper is average in texture and absorbency, and the humidity in the room, the pressure you place on the squeegee, and the angle of your stroke are normal, you can calculate that you will need roughly 3½ to 4 ounces of paint to cover about 100 square inches. This is estimated on an edition of twenty-five to thirty prints, including proof prints. If you add to that the 3 ounces allowed for overrun, you will need to mix 6½ to 7 ounces of printing ink to print an area of 100 square inches on each of twenty-five to thirty prints.
We are not going to discuss the mixing of colors to get certain hues, except to say that it will save ink if you follow the general rule of always adding dark colors to light colors and strong, intense colors to weaker, less intense colors; then, if you move slowly and cautiously, you will keep good control over your color mixing. Color mixing with screen-process paints, inks, or dyes is much like mixing any colors. If you need more help in color phenomena, get a good book on color theory and mixing. Creative Color by Faber Birren is recommended.
Besides mixing the pigments and dyes to produce the color desired, you can alter the basic nature of inks in a number of ways to affect the color. You can increase transparency with transparent base, which is made of aluminum stearate and varnish and has the consistency of soft butter. But since it often makes inks too thick and when dry causes ink to flake off, it is wise to mix with it a smaller amount of toner base (sometimes called crystal base or clear base). This transparent but syrupy solution improves the flexibility of the transparent base and helps prevent the flaking off of the paint when dry; in addition it has good binding qualities. Thick paint can be made thinner to improve its printing quality by adding a still smaller amount of mixing varnish. Therefore, a good mixture for increasing the transparency of serigraphic screen-process paints is approximately 25 ounces of transparent base, 17 ounces of toner base, and 8 ounces of mixing varnish. This can be kept in a container and mixed with the color to be printed to get the transparency required. Some should be mixed with all paints to improve their printing quality; about one part of this mixture can be 102 added to ten parts of most screen-process inks without reducing opacity to any noticeable degree.
If you wish the paint to dry more quickly, you can decrease the drying time with a reducer, and if you wish to slow down the drying time you can add a retarder. A retarder is necessary with some of the more volatile inks to prevent the screen from clogging on a day when the humidity is very low.
Proper printing consistency is important for a smooth printing operation. In both serigraphy and textile printing, the prepared ink should dribble slowly from the ink mixing stick. If it does not drop at all, it is too thick and needs the proper thinner. If it flows in a liquid stream from the stick, it is too thin and needs the proper thickener. Dye pastes tend to be a little more transparent and flow more readily.
Make test prints to become familiar with the number of passes of the squeegee required for each type of fabric. (Since only one pull of the squeegee is used in serigraphy, this test is not necessary.) Also experiment with the pressure on the squeegee to see how it will change the nature of the color. Observe carefully the effect that the base color of the cloth or paper has on the printed color. Colors cannot be evaluated until they have dried. Drying some paints can be speeded up with an electric hair dryer, but some dye pastes have to be developed in steam or chemicals before the final color can be judged.
When mixing fiber-reactive dyes for textile printing, a generous quart of printing paste or thickener can be prepared from the following: 1 teaspoon Calgon, 10 tablespoons urea, 1 teaspoon resist salt-L, 1 cup hot water, 3 cups cold water, and 3½ to 4 teaspoons Keltex (thickener). Dissolve the Calgon, urea, and resist salt-L in the 1 cup of hot water, then add the 3 cups of cold water. Stir or beat in 3½ teaspoons of Keltex for heavier cloth or 4 teaspoons for lightweight cloth with a hand beater until completely dissolved. This will make a basic thickener solution that can be stored in a closed container if refrigerated. Use 1 cup of the basic thickener at a time. To this 1 cup add the required Procion dyestuff: ½ teaspoon of Procion dye will give a pale value; 1 teaspoon will give a medium value; 2 teaspoons of Procion dye will give a dark value. Just before printing, dissolve 1 teaspoon of bicarbonate of soda in a small amount of water and add to the cup of thickener and dyestuff.
Since this dye paste has a thinner consistency than some of the prepared textile inks or paints, it is wise to make some test prints. Pressure on the squeegee, the amount of dye-paste mixture used in the printing frame, and the number of passes over the printing surface with the squeegee should be determined before starting on the final printing. You should also develop some of these test runs with a steam iron to determine the final color. Press for 5 minutes with a steam iron set at “steam,” or at 285 degrees.
Discharging color from a fabric with a screen-print stencil is another way to design. A slightly different thickener (1 cup of hot water, ½ teaspoon of Calgon, and 2 teaspoons of Keltex) is mixed, cooled, and then combined with an equal amount of chlorine bleach. This discharge solution has a good printing consistency. Because of the use of bleach in the paste, nylon mesh must be used for the screen. Cut lacquer-film stencils give a sturdy, hard-edged screen resist. Thorough washing and rinsing of the fabric is necessary to remove all of the discharge paste containing the bleach. Different fabric textures and fibers can be used, but it is not practical to use fabrics that are 100 per cent wool or silk, since the bleach in the paste will deteriorate the fibers.
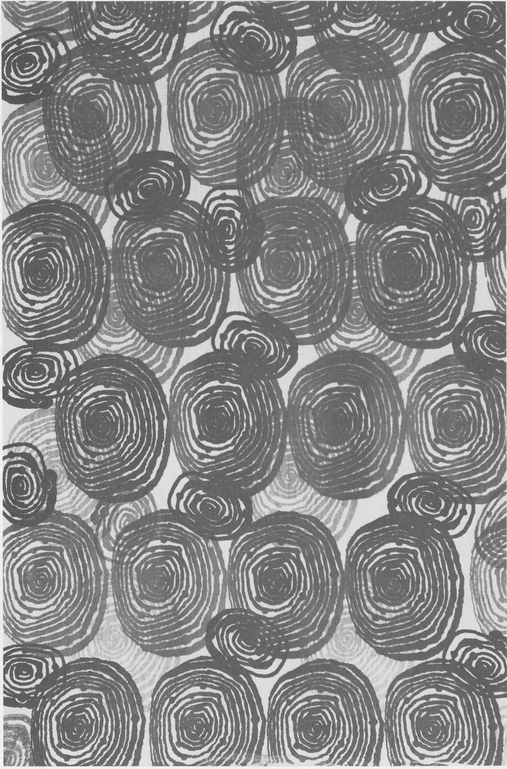
Fig. 7-13. “Moons and Suns” is the title of this design, which is screen-printed on fabric. (By Mathilda V. Schwalbach)
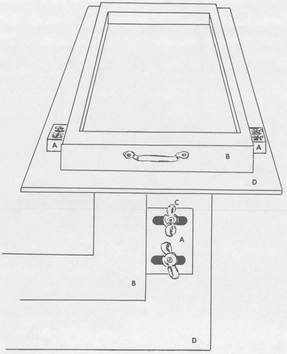
Fig. 7-15. Blocks of wood (A) bolted to the printing surface (D) with carriage bolts and wing nuts (C) hold the frame (B) in place accurately during printing. The slots in the blocks of wood allow necessary adjustments to be made.
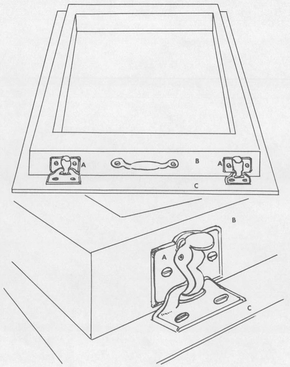
Fig. 7-16. Metal clasp locks (A) fastened to both sides of the unhinged end of the printing frame (B) hold the frame securely against the printing board (C).
Timothy J. McIlrath, who developed this process while a graduate teaching assistant in related art at the University of Wisconsin, has produced exhibition pieces of professional quality with the process (Fig. 7-14). He has used solid-color fabrics in blue, navy, brown, and black. When the discharge patterns have been printed, the original cloth colors are bleached to various subtle, earthy, frosty hues.
Correct Register Assures Printing Accuracy
To key or register a print in serigraphy and textile printing merely means that some device is used to assure that the printing frame comes down on the material to be printed in exactly the same place each time. This is not so important in a one-color serigraph. It is, however, essential in multicolor serigraphs and all fabrics that repeat a design. If the printer wishes to achieve an intuitive and random register, this is perfectly legitimate and can be exciting in its results. But he should be able to register a print accurately and consistently. Only then will he be skilled enough to exercise the amount of control needed even for a random print register.
There are two factors in controlling register. One is the permanently fixed printing frame and the other the adjustable parts where adaptations are possible. In serigraphy, the fixed instrument is the printing board with the hinged printing frame. Check to be absolutely sure that all of the permanently fixed parts of the printing frame and surface are rigidly attached. Check the hinges and bolts to be sure that they are tight. A device that will hold the frame in exactly the same place each time it comes in contact with the printing board is illustrated in Fig. 7-15. Slotted wood blocks are screwed to the printing board on each side of the printing frame. The blocks can be adjusted so they fit tightly against each side of the printing frame. When the board is brought down in contact with the printing paper, it is then held in place. There are special printing-frame locks that can be purchased from screen-process supply houses. They hold the unhinged end of the printing frame securely against the printing surface (Fig. 7-16).
In fabric printing, the permanent fixed part is the long printing board with metal key rails along one or both sides. The adjustable parts are the sliding bolts on each of the side rails and the screw eyes at the end of each printing frame. See Chapter 5 for details on how these are used to register fabric for printing. In the printing of a serigraph, first adjustments will have to be made to take care of the thickness of the printing stock.
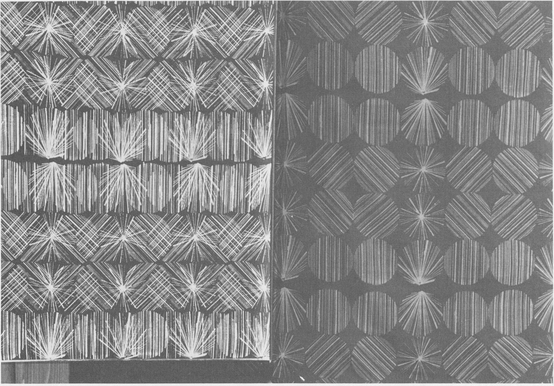
Fig. 7-14. (Reproduced in full color between pages 16 and 17.) This textile print was produced by discharging color from the fabric with a stencil. (“Morning Snow,” by Timothy J. McIlrath)
The two most important factors in correct print register are the register tabs on the printing surface and the register marks on the screen resist. For basic instructions in placing these, see Chapter 4. When heavier paper is used, the tabs must be made out of a piece of cardboard that is just a little bit thinner than the printing stock. A metal tab is nailed over the cardboard tab so that there is about a quarter of an inch overhang (Fig. 7-17). Register tabs should not be positioned under the frame so they press against the screen mesh while printing. If this is unavoidable, then smooth them with emery paper. The silk must also be protected with masking tape. This is most important when the metal tabs are used.
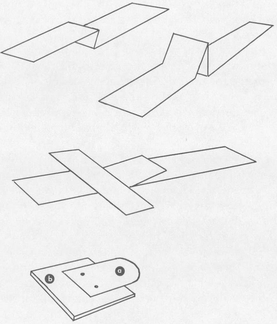
Fig. 7-17. For printing paper and thin cardboard, keying tabs made by folding gummed paper or masking tape are satisfactory. For anything thicker, nail a thin plastic or metal tab (a) placed on a piece of cardboard (b) the same thickness as the material to be printed onto the printing surface. If the tab is metal, it must have no sharp or rough edges.
Printing the Color Runs
The climax of the screen-print process is in the actual production of the print. Here is where you find the excitement. For everything up to this point has been conjecture, ideas, hopes. Now the unpredictability of a successful realization is what often keeps you printing late into the night. Of course, successful results are stimulating, but the creative printer should be ready to accept the more frequent failure. For when you are in search of that indefinable essence of a really successful creative effort, technical success often falls far short of the goal. Technical success should, with experience, be expected, but that certain “something” is much more elusive. But it is this very search that, in itself, has its own rewards. So, let us talk about the printing of the image.
The design that is on the screen resist can be changed in many ways in the printing process. In textile printing there are even more avenues open for creative interpretation in the printing process. Textile printers should deliberately experiment with printing a pattern in a variety of ways; after all, in no other textile design field can you experiment as easily. Different color harmonies can be attempted. The motif can be printed in a number of different arrangements and sequences. The design can be printed in part or in whole, reversed, or turned. Pressure on the squeegee can be varied in passing it across the screen. Paint can be added for gradual color changes. All of these suggest that the textile printer who does not print creatively is, indeed, not fully utilizing the process. The serigrapher has almost equal opportunities to be creative in the application of ink to paper. However, because he is normally not dealing with a repetitive unit and is working with fixed printing frame and board, he has a few more limitations.
Screen-process printers must first of all think of the transparency and opacity of the colors and develop a general scheme for the printing sequence of colors. This is necessary because whether a red is printed over a blue or a blue over a red makes a difference. The relative transparency or opacity of each greatly affects the color that results.
The printing operation can be performed by a single printer, if he is organized and able to keep his hands clean during the operation. However, it is much simpler when two printers work together. One sticks with the printing and handles the ink because he is liable to have soiled hands. The other handles the paper, registers it on the printing board, removes it from under the frame after the color has been applied, and stacks it in the drying rack. He must keep his hands clean. Small fabrics can be printed quite easily by one person. But almost all fabrics printed on a wide board need two printers to operate the squeegee, passing it from one side to the other in a smooth, rhythmic operation. Skilled screen printing looks deceptively easy; some experience is needed to develop the skill.
In large textile printing plants there are basically two methods of printing. One is a two-man operation on a very long table (150 to 200 feet long). The team works down the table length, printing every other unit in the first color. Then they print the intervening unit. This process is repeated for each color used in the design. The fabric hand-printed on a long table retains that subtle characteristic of a hand-produced object, the living human quality that many people prize. On the other hand, there are automatic screen-printing machines that use a much smaller table and can be operated by only one man. Such a machine can print 300 yards in one hour with an accuracy of 1/50,000 of an inch.
In hand printing there are basically two approaches in the number of screens used. Most serigraphers use only one screen. When the first color is printed, the screen resist is removed and a new one is added. In this process an edition could fail somewhere along the way: since all of the previous screen resists have been destroyed, there is no turning back except to start over completely. Textile designers, because they generally use fewer colors, can produce a separate frame for each resist used. This allows almost unlimited variation with the same basic pattern. In addition, the entire set of frames can be stored and the printed yardage duplicated or re-created in different printing modes at a later date. This is a great advantage that the textile designer has over the serigrapher. Occasionally, serigraphers have attempted to produce a separate frame for each color, but too frequently it is impractical.
The printer can take an additive approach, printing one color, developing a new resist and adding it to the first, and so on until the printing is finished. In both serigraphy and textile printing this seems to be most common. The reverse is the subtractive method, in which successive portions of the screen are blocked out. Of course, the two approaches can be combined.
Portions of a single screen resist can be printed with different colors. This can be accomplished in two different ways. Temporary partitions, consisting of thin pieces of cardboard or wood, can be placed inside the frame with masking tape to divide the printing area (Fig. 7-19). If the run is a long one, they should be sealed with shellac or lacquer. A different color is placed in each section, and smaller squeegees are used, one for each color. When the frame is placed on the printing material, each of the two or three colors is squeegeed, in turn, before the frame is lifted. But although you can print two or three colors at one time, it is difficult to keep each color area rigidly separated by the temporary partitions. (A variation is to place two colors in the frame at the same time without the partition. They will mix together during the printing process and blend. This method demands much more skill to maintain some sort of consistency between the various prints of an edition or the units in a textile pattern. But such consistency need not always be the goal of the artist.) A second method calls for printing a single screen resist with the first color after blocking portions of it with paper on the underside. Then the second color is printed using the same resist with other portions blocked off with a paper stencil. Colors can be overlapped and mixed as the printer wishes. This can be repeated with the single screen resist as many times as it suits the printer. With two screen resists there are five ways of printing color areas (see Fig. 7-20).
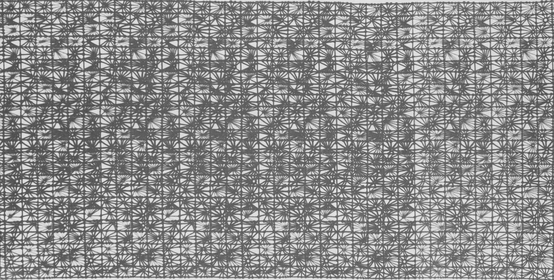
Fig. 7-18. A light-sensitive emulsion film stencil was used to produce this textile print, entitled “Loge’s Tarnhelm.” (By Mathilda V. Schwalbach)
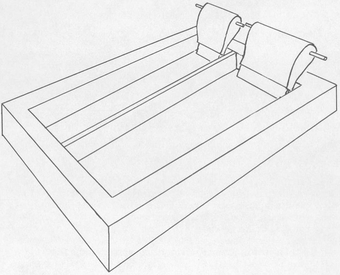
Fig. 7-19. Two colors can be printed at the same time by dividing the screen with a thin wood or stiff cardboard partition and sealing the partition at both ends and along the screen to prevent paint leakage.
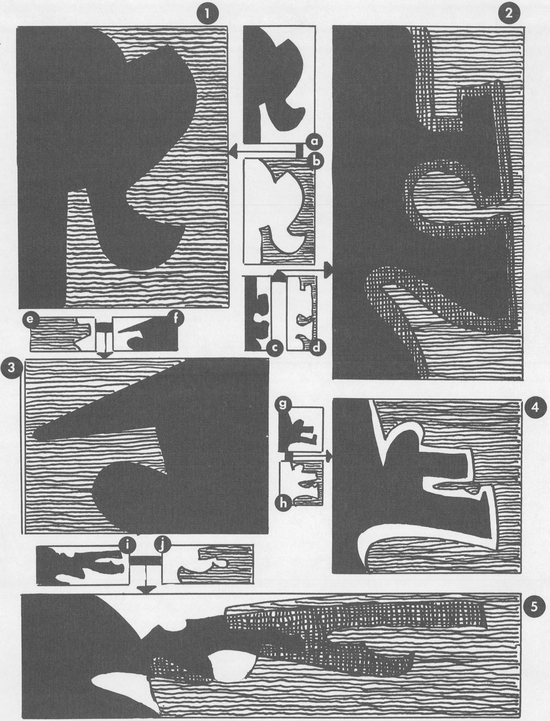
Fig. 7-20. There are five basic ways in which two stencils can be used together in a design: (1) stencils a and b are printed so that their edges fit perfectly together with no overlap or gap between, which is very difficult to accomplish and requires excellent registration techniques; (2) stencils c and d overlap each other slightly, creating the effect of a line between them where the second color, which is transparent, has overprinted the first color; (3) stencils e and f have very different edges and overlap a great deal, but the second color printed is opaque and it completely covers up the edge of the first color; (4) stencils g and h have similar edges and are printed with a gap between, again creating a linear effect but this time with the background color instead of the two colors overlapping; (5) stencils i and j have dissimilar edges that overlap in some places and leave gaps in others, and the second color is a transparent ink, combining the effect produced in (2) and (4).
While the serigrapher might be interested in materials other than paper for an expression of his ideas, he has such a wide range of paper surfaces and thicknesses that he has traditionally limited himself pretty much to paper. Some Op and Pop artists have experimented with plastics. But we would suggest that the beginner at least, select a paper that suits him and then work with it. Because quantities of paper can be used even in a single edition, the serigrapher should investigate the possibility of purchasing his paper directly from a wholesale house in 100-sheet or ream quantities.
Because of the many new fabrics on the market, the textile printer has a much more complicated problem. Some fabrics reject some printing media, and it is wise to test the acceptance and fastness of any ink or dye paste on a particular fabric before printing it in any quantity.
Since most fabrics contain sizing, it is important that any fabric be thoroughly washed (machine washed, if possible) before printing. After thorough washing and rinsing, iron the fabric smooth and roll it over a paper tube. Cardboard mailing tubes are excellent, but adequate substitutes can be made with rolls of newsprint. The thorough washing will remove the sizing or stiffening from the fabric, which will then accept the color more successfully. It may be possible to obtain fabrics from one of the suppliers that distribute fabrics for controlled laboratory testing. These fabrics are limited in color (usually white or off-white), but they are unsized and unfinished, which makes them ready for immediate printing. (One of the better-known suppliers is Testfabrics, Inc., P.O. Drawer O, 200 Blackford Avenue, Middlesex, N.J. 08846).
For textile printing, choose basic and conventional cottons, linens, or silks for the best results. Generally avoid fabrics with special finishes or new chemical treatments, which will prevent the fibers from properly absorbing the textile paints, inks, or dye pastes. Try fabrics such as tobacco cloth, muslin, sheeting, pique, linen, crash, Indian Head broadcloth, voile, dull spun rayon, poplin, percale, osnaburg, nainsook, lawn, denim, chambray, balloon cloth, hoya cloth, hopsacking, pellon, and felt. Purchase ½-yard pieces or use old towels or remnants large enough for experimental printing before investing in quantity. Light colors are best for the first experiments, and middle-value colors can be very interesting; dark colors are very difficult to print.
Some of the more unpredictable fabrics that might be suitable for the average designer-craftsman who wishes to print textiles with water-based commercial textile paint are Dacron and cotton poplin with permanent press, polyester (65 per cent) and cotton poplin (35 per cent) with permanent press, Dacron polyester (100 per cent), Arnel triacetate (100 per cent), and nylon chiffon (100 per cent). Acceptable with Anthrasol dye pastes are polyester (65 per cent) and cotton poplin (35 per cent) with permanent press, Dacron polyester (100 per cent), Arnel triacetate (100 per cent), Blue C polyester (65 per cent) and cotton broadcloth (35 per cent) with permanent press, acrylic (100 per cent), rayon “linen” weave (100 per cent), nylon chiffon (100 per cent), and rayon (74 per cent) and acetate (26 per cent).
Since many of the printing media are very volatile and dry quickly, check everything carefully before starting to print. It is not easy to stop a printing operation, once begun, to make repairs or take care of something that should have been done earlier. If it is necessary to stop, inks in the printing frame and in the screen mesh can be prevented from drying for a reasonable period of time by placing the printing frame down with the underside on absorbent scrap paper such as old newspapers. Lightly rub the screen with the solvent used with the ink, leaving the screen mesh somewhat saturated. Then place more newspapers over the mesh on the inside of the frame and lightly soak the paper in a similar manner. Normally this cannot be done until most of the ink has been taken out of the frame. If the frame is to sit for only a short period, leave it on a freshly printed image, but watch it carefully for signs of drying. When printing is resumed, print several times on newspaper to clear the passage of ink through the meshes.
Here is a list of checks that can be made just before printing to prevent accidents and delays: (1) Be sure the paint is handy and set where it is not likely to touch the paper or fabric being printed. (2) Inspect the squeegee. Is it clean? Does it cover the printing width? Will it fit inside the screen frame? Are there nails or dowels inserted in each end so it can be placed in the frame without sliding into the printing ink? (3) Do you have clean rags or cleansing tissues handy? A paste cleansing cream is useful for easy, quick cleaning of dirty hands. (Consider using disposable plastic gloves to protect your hands during printing.) (4) Check the screen mesh. Is the design adhered properly? What about pinholes in the screen resist? If undesired, they will need to be filled in with the proper resist material. Is the tape sealing the edges firm and not likely to leak? Look on both the underside and the inside. Are there any damp paint smudges left on the screen (particularly the underside) from the previous color run? (5) In serigraphy, check to see if the hinges, the side register blocks, and the frame locks are tight. Are the register tabs correct? Check by placing one of the prints or the original under the frame in printing position. Lower the frame before the ink has been placed in the frame to check the register. Does the frame meet the printing surface properly, or is the printing paper too thick or too thin? Make adjustments of the frame. (6) In textile printing, check the register by placing the frame in the properly keyed position on the fabric before the paint has been placed in the frame. Check that the screw eyes are set at the proper length. Are all the gauge bolts sec-curely fastened and the proper distance apart? Is the fabric securely fastened to the surface of the printing table? Has the previous color dried sufficiently to accept an overprint? (7) Have you planned for a drying setup when the fabric or serigraph edition is printed? In serigraphy, is the drying place for prints convenient to the printing area? Will it accept the number of prints in the edition?
When everything checks out, the last step in preparation is to wipe the screen mesh lightly on the inside with a clean rag dampened with the solvent being used in the printing medium. This will speed up acceptance of the ink into the meshes of the screen. It also inhibits screen clogging and the staining of the meshes. Replace the screen frame in the proper printing position. Put the squeegee in the frame with the blade between one end of the frame and the edge of the design to be printed to keep the ink from running into the openings of the stencil. Spread a suitable quantity of ink along the entire width of the area to be printed and between the squeegee blade and the end of the frame. You are now ready to print.
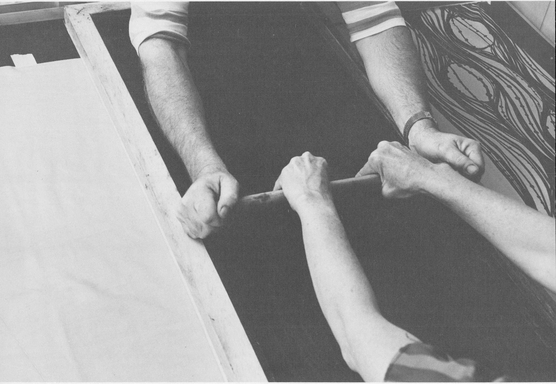
Fig. 7-21. Some design units are too long for one printer to handle himself, and two must pass the squeegee back and forth to each other. This requires a certain degree of sensitivity and rhythm to pressure variations to produce a good print.
In serigraphy, pull the squeegee in the same direction each time if you want accurate register. Because there is a slight resilience in mesh fabrics, the screen will print differently depending upon the direction in which the squeegee is pulled. If it is more convenient that you pull the squeegee in both directions, you will need to number your prints in sequence as you print them. All the even-numbered prints can then be printed by pulling the squeegee in one direction and the odd-numbered prints by pulling the squeegee in the opposite direction on each color run. At the end of the squeegee stroke, if you are pulling the squeegee in only one direction, bring the squeegee blade sharply up against the wooden end of the printing frame, scoop up the ink, and carry it back to the opposite end. Printing streaks will be avoided if the ink is kept on one side of the squeegee blade. Keep the other side relatively free of ink. In printing serigraphs, the squeegee is generally held at an angle of 60 degrees.
In printing fabrics, the blade is pulled back and forth or, on wide fabrics, passed between two printers (Fig. 7-21). To keep the ink on only one side of the printing blade, the squeegee can be raised at the end of each stroke and carefully turned around. This must be done slowly or ink will fly off the blade. In textile printing, the best angle for the squeegee is about 45 degrees. This forces more of the ink into the fibers of the cloth. The squeegee may be pulled over the cloth as many as four or five times in each direction. In a serigraph, one pull is usually adequate.
Your first prints should be trial, or proof, prints. Use newsprint or something similar for serigraphs and a piece of cloth similar to the printing fabric for textiles. In serigraphy, five or six proof prints allow the ink to saturate the mesh of the screen properly, give you a chance to sense the pressure and rhythm necessary for successful application of the inks, and let you make final check on the color. Most errors can be eliminated during proof printing.
In textiles, print alternate units to give the ink a chance to dry before you come back for the intervening units. If you are aiming at a texture caused by deliberate pinholing of the resist, you will need to make a number of test prints to stabilize the amount of pinholing you are getting. For this, the viscosity of your ink is critical.
Serigraphers working for impasto effects should use paper stencils on 10XX or 12XX screen meshes or cotton organdy. Some paints will deposit a heavier layer than others, so experimentation with the mixtures is necessary. Regular screen paint can be thickened with cornstarch if all other methods fail. The squeegee must be pulled slowly and evenly with a minimum of pressure. The texture will vary from print to print, but the shape should not. If your register is excellent, overprinting of the same area after the first layer has dried will build the color even higher. Generally speaking, the thickness of the paint deposited will equal the thickness of the paper or cardboard used in the stencil resist. The underside will need checking, and paint that has smudged outside of the printing areas must be carefully wiped off.
Another technique for depositing a heavy layer of ink or paint is “flooding.” The frame is lifted slightly above the printing surface so it does not touch. While it is held up, the squeegee pulls the ink or paint over the image, charging it fully with ink. The frame is then lowered on the printing surface and the squeegee passes over it a second time with the normal printing movement. This will result in a somewhat heavier ink or paint deposit.
For a luminous effect very much like a rubbing, glue various thin materials (such as cloth, burlap, pebbled cardboard, sandpaper) to the surface of the printing board in the desired position underneath the printed image. The printing paper for the edition must be lightweight stock, and transparent ink must be used. Keep pressure on the squeegee very consistent. The result is that the transparency of the color will vary slightly, simulating an impasto. It will be more transparent over the raised parts of the material adhered to the printing board and less transparent over the lower portions.
A list of various problems that might turn up follows, and when the remedy is not obvious, one is suggested in parentheses.
Color runs beyond the edge of a paper stencil. This could be caused by too much pressure on the squeegee blade. The stencil might be torn or the paper getting damp and allowing paint to soak through. The paper stencil has buckled (try carefully cutting a slot in the buckle so it will adhere flatly with a slight overlap; be careful not to cut the screen mesh). The color mixture is too thin. There may be too much space between the screen resist and the printing surface (again, raise the printing surface slightly by placing a thin sheet of paper or cardboard, as large as the area being printed but smaller than the inside area of the printing frame, underneath).
Uneven printing that is not consistently uneven. This could be caused by an imperfect squeegee blade. The color could be unevenly and insufficiently mixed. There are lumps or other unwanted substances in the paint, or the mixture is too thick. There is an insufficient amount of ink in the screen so that you can run out of ink during a pull of the squeegee. The pressure on the squeegee blade is uneven. Lint from cleaning rags or tissues clogs the screen (place a recent print that is not yet dry under the screen and print again. The sticky ink on the print will pull off the lint). In printed textiles, there was insufficient steaming of the dye in textile printing. Moisture from condensation has reached certain parts of the fabric during the steaming process and stained the cloth.
Consistently uneven printing. The printing surface is warped or uneven. There is something under the printing material that causes an uneven clearance between the - screen mesh and the paper or fabric being printed. The stencil is too thick. The frame is warped. The printing paper is too thick for the hinged setup of the printing frame (shim up both ends of the printing frame to raise it above the printing board).
Darker lines appearing parallel to the squeegee blade. The blade has vibrated while being pulled or has been pulled at an irregular rate. This sometimes happens when inexperienced printers pass the blade across the printing table in textile printing. It also happens when the squeegee jumps because the screen mesh is too dry and void of paint or when there is a sudden and radical change in the angle of the blade stroke or the pressure applied with the squeegee.
Small specks appear in various parts of the color areas. The screen is clogging because the paint is drying too rapidly. The paper or cloth is too absorbent for the medium used. (In serigraphy, print the paper with a solid area of the transparent-base mixture; cover the entire print, and it will act as a primer coat; after it has dried, print your color on top. In textile printing, make additional pulls of the squeegee.) In a photogelatin stencil, the gelatin was unevenly applied and is breaking down, or it was foamy, or the number of coats was inadequate (if these problems are minor, the pinholes can be covered with glue or lacquer, but in most cases the gelatin stencil will have to be replaced).
Misregistration of the image. The screen resist is inaccurately cut or badly registered. The registration marks have shifted. The hinges have come loose in serigraphy. The T-plate gauge bolts or screw eyes have worked loose in textile printing. The frame was placed on the textile carelessly. The paper was placed in the register tabs carelessly. Too much pressure on the squeegee has caused the screen mesh to ripple. The screen fabric may have come loose. The printing frame in textile printing may have shifted with the pull of the squeegee. The moisture content of the paper has radically changed because of a change in humidity in the studio.
Ink leaking through the sealed edges of the screen. A cut or leak in the screen mesh has developed (it can be temporarily sealed with masking tape and permanently sealed with lacquer or shellac). The protective taping on either the inside or the underside of the frame is torn and needs to be replaced.
Light or dark streaks in the color area being printed. There is a nick in the squeegee blade. There is insufficient ink in the frame. There are lumps or bits of grit in the paint. The paint is not evenly mixed.
Lines or areas do not print in a tusche-and-glue stencil resist. The tusche layer is not heavy enough or the glue mixture is too heavy (try to flick off the glue-covered tusche with a dull knife or scrub it with a nail brush or a toothbrush, being careful not to damage the fabric of the screen mesh).
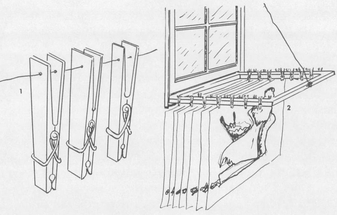
Fig. 7-22. Wooden clothespins can be strung on wire or strong cord (1) for drying wet prints, or they can be attached to the sides of a wooden frame (2) that is placed with one end on a window sill and the other suspended from the top of the window by wire.
The edges of the drawing in a tusche-glue resist are fuzzy and unclear. The screen meshes are too coarse (make a new stencil and try wiping the cornstarch solution suggested in Chapter 6 on the screen mesh before the tusche is applied).
Double printing of the image. In textile printing you are printing a second color over a first color before it has dried sufficiently. (Print alternate units of the design. Place dry newsprint paper over the first printed units when the in-between unit is printed. It may be necessary to wipe the underside of the screen carefully after each impression is printed.)
Blurring of the image. The ink is too thin and is being forced under the screen resist when squeegeed. The squeegee pressure is too great. The squeegee angle is too low. The blade of the squeegee is getting dull. The silk is loose (if not too serious, place a thin piece of paper or cardboard under the printing material). The printing paper may be pressed too tightly against the screen. It should drop off easily when the frame is lifted. If you have to peel it off it tends to blur (a thin cardboard placed under both the hinged end and the opposite end of the printing frame will raise it slightly above the printing surface).
Slight discolorations in the fabric to be printed after it has been glued to the board. The glue solution was put on carelessly and too heavily in some spots (in most cases it will disappear when the glue has dried).
The last step in the printing process is the drying of the fabrics or serigraphs. Prints should hang up or stay in a drying rack for at least thirty minutes before another color is run. When you print with paper-stencil resists, the paper stencil will stick to a print that is not completely dry. This is likely to tear or damage the stencil. Prints can be dried in elaborately constructed drying racks set on rollers so they can be moved near the printing area or on one of several hanging devices that can easily be improvised (Figs. 7-22 and 7-24). They do not take up too much room and are easily stored. If the prints are on stiff cardboard, they can be placed in a rack designed for phonograph records or a similar rack that can easily be constructed from coat-hanger wire. To test whether a print is dry, touch it lightly with your finger. If it is sticky, it is still too wet. If not sticky, rub or pull the finger lightly over the surface of the print. If it is dry, the finger will move easily and smoothly. If it is still damp, there will be a slight pull on the finger. Be very careful in touching the surface of the print because most inks are very sensitive to scratches and abrasions.
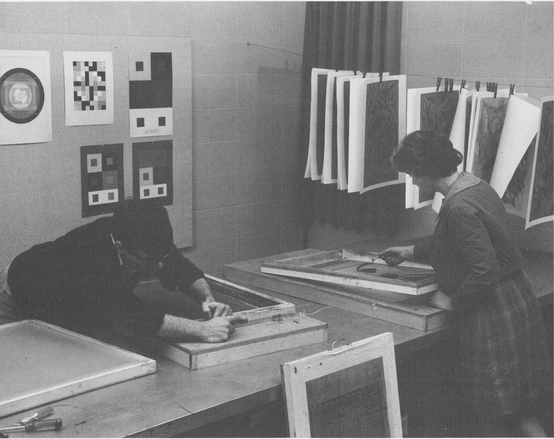
Fig. 7-23. In this studio, prints are simply suspended from clothespins hung on a wire to dry.
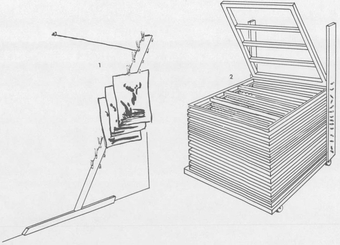
Fig. 7-24. Another drying device is a T-shaped one made of 1-by-2-inch lumber (1). The horizontal part of the T fits into the corner where the floor and wall meet, and the vertical part, which has clothespins attached to hold prints, is suspended away from the wall with wire. This rack can be easily stored when not in use. The professional drying rack at right (2) is quite large. Each shelf, which holds prints flat, is hinged at the back, and the rack is on rollers so that it can be moved close to the printing area.
Drying printed textiles requires some forethought. They can be dried on the printing board, of course. However, when the printing surface is needed for successive printing, you must be able to move quickly and easily. Wall surfaces or bulletin boards to which the wet print can be tacked or taped take care of some lengths. Laundry drying racks or laundry lines may be easily reached. In good weather a light breeze assists quick drying. Lines or wires strung up even temporarily are helpful. In professional environments, where production is voluminous and constant, overhead racks and structures are generally constructed exclusively for drying purposes. Poles or pulleys lift the fabric to its drying position. Blowers or fans may be used to aid the drying process. The beginning of a piece can then be drying while another section of it is still being printed below.
Naturally, care must be taken in carrying or shifting wet printed fabrics. Any drying surface or space may be spotted and smeared by the wet fabrics. Wipe up any stains or spots before they dry. Do not fold fabrics while they are still damp.
Pigments in oil emulsion have volatile components that must be removed from fabrics printed with them. This is usually accomplished by heat setting, but if the fabric is not washed for a six-month period, the volatile parts of the ink will evaporate naturally and heat setting will be unnecessary.
Commercially produced water-based textile paints must be heat-set. Ironing for five minutes at the proper setting for the fabric is recommended; repeat on the reverse side. But allowing the print to age after heat setting is also beneficial. Best results are obtained if the fabric is not washed until several weeks have elapsed. You will notice that excess pigment disappears from the surface of the fabric, resulting in a slight color change, and you should anticipate this when mixing the colors for printing. All hand-printed fabrics deserve special care in laundering. Wash the fabric gently as you would fine lingerie and avoid rubbing the printed portions. Hand-printed textiles can also be dry-cleaned.
Textiles printed with Indigosol or fiber-reactive dye pastes are heat-set in a steam box (Fig. 7-25), and the colors are quite permanent. Protect the printed piece by laying it on.a long sheet of clean paper (white newsprint or wrapping paper) and rolling it up in the manner of a jelly roll. Be sure that the paper is wider and longer than the fabric so that it will completely protect it. Place the roll in a steam box on a rack above the boiling water. Protect it from condensation inside of the box with layers of newsprint and felt both below and above the roll. Any drops of condensed water that reach the fabric will stain it. Nothing should touch the sides of the steam box. The fabric is steamed for 10 to 15 minutes, taken out, unrolled, and rerolled in the opposite direction. The steaming process is then repeated for another 10 to 15 minutes. These times are only approximate. The tightness of the roll, the weight of the fabric, and the type of dye used will dictate the steaming time needed. It is wise to experiment with the textiles you are using. When the fabric is removed, immediately unroll it and hang it up to dry. A steam iron may also be used to heat-set the fabric. This is mechanically easier, but the fumes generated by the steam ironing are obnoxious. Be sure the room is well ventilated. After drying from the steaming process, aging of the fabric for three days is recommended. Washing in sudsy water then removes the excess dye paste, but in this process the textile must be worked and rinsed until the water runs clear.
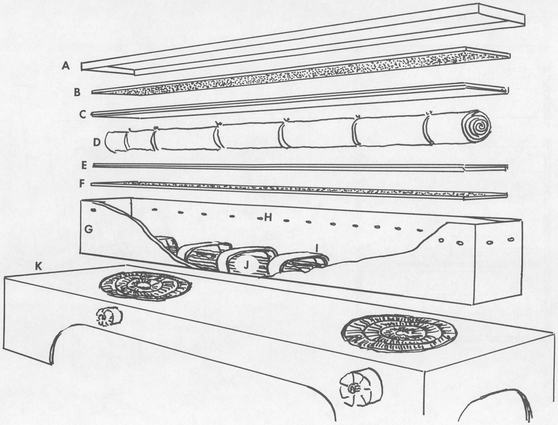
Fig. 7-25. A metal steamer for steaming dye pastes can be built and used quite easily. The box should be about 1 foot longer on each end than the standard width of fabric that you expect to print. The diagram shows the setup: cover of galvanized metal (A); felt padding to absorb condensation (B); folded newsprint, also to absorb condensation (C); wrapped roll of printed cloth to be steamed (D); folded newsprint (E); felt padding (F); galvanized steaming box (G); holes to release steam pressure (H); brackets to hold the fabric away from the water (I); water (I); two-burner hot plate (K). The cloth must be carefully rolled in newsprint or other clean paper so that no part of it touches any other part; the paper must be wider than the fabric so that the ends of the roll are protected from water; and the roll must be loosely tied.