Chapter 10
Designing High-End Jewelry
In This Chapter
![]() Identifying steps in the design process
Identifying steps in the design process
![]() Creating jewelry for formal occasions
Creating jewelry for formal occasions
![]() Crafting wedding-worthy pieces
Crafting wedding-worthy pieces
![]() Getting inspiration from other designers
Getting inspiration from other designers
Custom designed jewelry is a great addition to any special event. Sometimes it’s tough to find that perfect piece to make the statement you’re looking for right off the shelf. Or in many cases, you know exactly what you want but can’t afford to pay the retail markup. Many jewelry makers get their start by designing a single piece for a special event.
In this chapter, I show you the basic steps I use when designing special occasion jewelry. I give you specific design tips and projects for special occasions, such as a night on the town and a bride’s big day. Finally, I show you how to draw inspiration from other designers’ brilliant ideas in order to create your own masterpieces.
Understanding the Basic Design Process
Often, I see a particular bead (or group of beads) that inspires me to create special occasion jewelry. The turquoise beads in the Turquoise Bib Necklace (Project 10-8 later in this chapter) are a perfect example. I knew those beads needed to be on display in a structured way, and the bib necklace format was perfect for it.
Here are the general steps I follow for my design process:
1. Lay your central beads (those that inspire you) down on your bead board. A bead board is an indispensable designing tool. It may not be essential to making jewelry, but it is a must-have for designing custom pieces. Check out Chapter 4 to see what one looks like.
2. Dig around in your bead stash to see what you have that may go with your central beads. Look for spacers to create space between the central beads. Look for coordinating beads that add visual interest to your piece.
 Look for both contrasting and coordinating beads in terms of texture, shape, and color to vary the visual interest in your piece. A series of graduated round beads can work together even if the colors are different; the shape pulls the design together. Or maybe the colors of all your beads are in the same family, but the textures and shapes vary. Any combination can work. Let your imagination be your guide.
3. Lay your possible selections on your bead board with the central beads and start to work on the design. Play around with the arrangements of the beads. Look for patterns that work for you.
4. Finalize your design. After you’ve found patterns that you like, lay out the finished design on the bead board. Determine the length for the finished project and lay it out to match. Choose your findings to match the design.
5. String it up. Of course you may not be using string at all, but you get the picture. Move from the drawing board, or in this case the bead board, to an actual piece of finished jewelry. String, wrap, or thread the beads depending on what your design calls for. Add the finishing touches and findings, and enjoy your one-of-a-kind creation!
Designing for the Evening
I think jewelry designs for evening wear should be glamorous, sparkling, and above all, fun. Occasionally, I make pieces for a particular outfit, picking up a color theme or pattern. But by nature, I’m a practical girl, so I like most of my jewelry to be independent from the outfit. (Interchangeability is a must!) All three projects in this section serve up glitz and glamour, but because they’re classic, elegant styles, they go with just about anything. Feel free to alter lengths, color combinations, clasps, and anything else to make these designs your own.
Project 10-1: Golden Tassel Y-Necklace
This Y-necklace combines two trendy elements: chunky chain and tassles. Heavy gold chain has never been hotter, and when paired with the slightly more delicate chain tassel, it’s instant glam. The gold beaded beads turn the whole thing up to 11. Oscar parties, here we come. Check out Figure 10-1 for the finished necklace.
Tools and Materials
Round-nose pliers
Wire cutters
2 2-inch eyepins, bright gold
2 20mm gold beaded beads
4 6mm bicone crystals, clear
3 8mm jump rings, bright gold
3- to 4-inch gold chain tassel, bright gold
2 inches small link chain, bright gold
24 inches large link chain, bright gold
30mm paisley bar and toggle clasp, bright gold
1. Onto one eyepin, thread one crystal, a 20mm bead, and another crystal. Use the round pliers to create a wrapped loop on the open end of the wire. Repeat this step with the remaining eyepin, crystals, and bead. Set aside.
2. Create the dangle. Connect the tassel to one end of the 2-inch piece of small link chain. Connect the open end of the chain to the eyepin of one bead component from Step 1. Connect the eyepin of the last bead component to the wrapped loop of the first one.
3. Attach the dangle to the chain. Open one jump ring with pliers and slip it on the wrapped loop of the dangle. Set aside. Fold the large link chain in half to find the center point. Slip the dangle onto the center link. Use pliers to close the jump ring.
4. Attach the paisley toggle clasp to one end of the open chain with a jump ring. Attach the paisley bar clasp to the other open end of the chain with the last jump ring to complete the necklace.
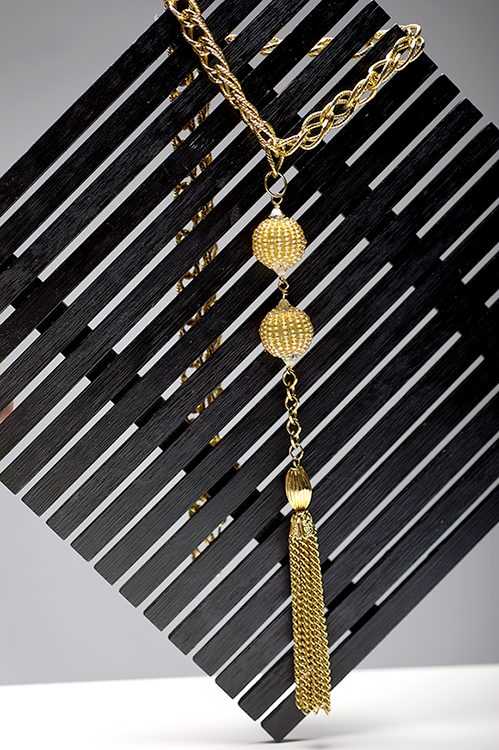
Photograph by Matt Bowen
Figure 10-1: Golden Tassel Y-Necklace.
Project 10-2: Alexandrite Surprise Necklace, Bracelet, and Earring Set
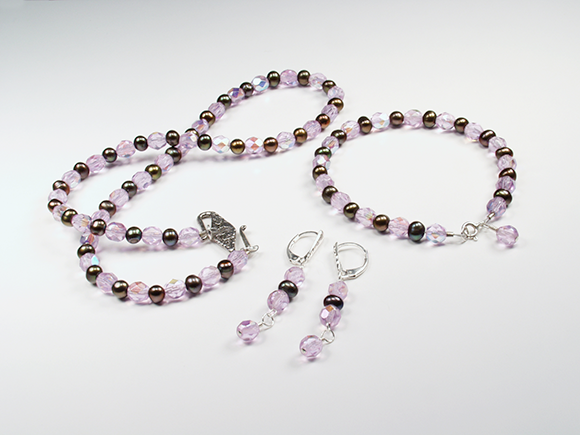
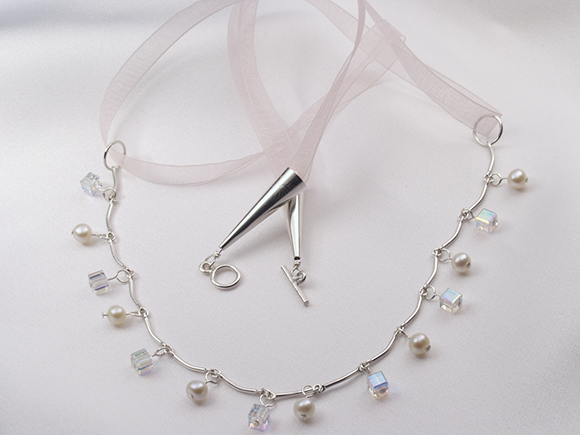
This choker, bracelet, and earring combination is sure to surprise and delight. The alexandrite appears light purple in normal light but turns blue in fluorescent lights. Wear it dancing to amaze your friends under the different lighting conditions at the clubs. The bracelet measures approximately 71⁄4 inches, and the necklace is about 16 inches. See the completed project in Figure 10-3.
 On the DVD that accompanies the printed version of this book (and at
 http://booksupport.wiley.com for you e-readers), you can find a video of how to use crimp tubes to create a professional finish for your pieces, like the bracelet and necklace in this project.
Tools and Materials
Round-nose pliers
Wire cutters
Crimp pliers (optional)
For the earrings:
2 lever-back earwires, sterling with a cut diamond shields design
6 6mm faceted round alexandrite Czech crystals
2 5mm round olive pearls
2 3-inch eyepins, sterling
2 11⁄2-inch headpins, sterling
For the bracelet:
17 6mm faceted round alexandrite Czech crystals
15 5mm round olive pearls
1 11⁄2-inch headpin, sterling
2 2×2mm crimp beads, sterling
1 jump ring, sterling
1 spring ring clasp, sterling
12 inches stainless-steel coated nylon beading wire, 0.15-inch diameter
For the necklace:
35 6mm faceted round alexandrite Czech crystals
34 5mm round olive pearls
2 2×2mm crimp beads, sterling
2 jump rings, sterling
20 inches stainless-steel coated nylon beading wire, 0.15-inch diameter
1 S clasp, sterling
1. To make the earrings, string three beads in this order on an eyepin: one crystal, one pearl, one crystal. Using your round-nose pliers, begin to create a wrapping loop (see Chapter 6 for details), but connect it to one earwire before closing and wrapping the loop. Set aside.
2. Thread one crystal onto a headpin. Begin to create a wrapping loop, but connect it to the eyepin component from Step 1 before closing and wrapping the loop.
3. Repeat Steps 1 and 2 to create the second earring.
4. To make the bracelet, slip one crimp bead onto the beading wire. Follow it with a jump ring. Reinsert the wire through the crimp bead to create a loop around the jump ring; see Figure 10-2a. Use your round-nose pliers to hold the short end of the wire while you use your crimp pliers to crimp the bead into place; see Figure 10-2b.
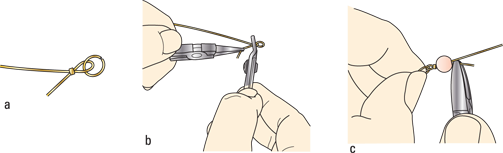
Illustration by Wiley, Composition Services Graphics
Figure 10-2: Crimping the beginning and ending of your strands.
5. Thread one crystal bead onto the wire. Tuck the excess wire down into this bead, and trim the excess from the underside of the bead using your wire cutters; see Figure 10-2c.
6. Thread the remaining beads onto the wire, alternating each crystal bead with a pearl. Continue stringing until you’ve used all your bracelet beads except one crystal. You should begin and end with a crystal.
7. Slip one crimp bead onto the beading wire. Follow it with the spring ring clasp. Reinsert the wire through the crimp bead to create a loop around the clasp. With your crimp pliers, hold the crimp in place. Use your round-nose pliers to pull the wire tightly, taking up any slack in the bracelet. Using your crimp pliers, crimp the bead into place, as you did in Step 4.
8. Tuck the excess wire down into the last bead on the strand, and then trim the excess from the underside of the bead, as you did in Step 5.
 This step gives a clean finish to your strand and makes it look much more professional.
9. Slide the last crystal onto the headpin. Begin to create a wrapping loop, but connect it to the loop of the spring ring clasp before closing and wrapping the loop. This step creates an elegant dangle at the clasp end of the bracelet.
10. To make the necklace, repeat Steps 4 and 5 with the necklace beading wire.
11. Repeat Step 6, but use all the remaining beads. You should begin and end your strand on a crystal.
12. Repeat Step 7 with the last jump ring and finish the end of the wire as in Step 8. Connect the two jump rings with the “S” clasp.
Photograph by Andy Dismore
Figure 10-3: Alexandrite Surprise Necklace, Bracelet, and Earring Set.
Project 10-3: Uber-Long Crystal and Sterling Earrings
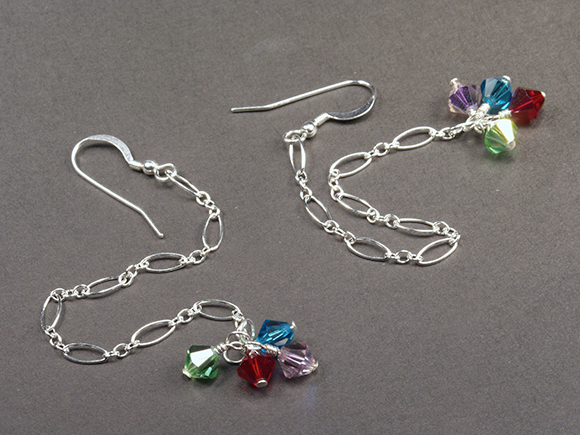
These earrings are quick to make, flashy, and unusual. If they feel a little long, feel free to shorten the chains. Also, feel free to vary the color to suit your taste. These are an excellent addition to any formal event. Check out the finished project in Figure 10-5.
Tools and Materials
Round-nose pliers
Wire cutters
Jewelry file
2 earhooks, sterling
8 inches medium weight link chain, sterling
2 6mm bicone crystals, light amethyst
2 6mm bicone crystals, ruby red
2 6mm bicone crystals, zircon
2 6mm bicone crystals, peridot
8 11⁄2-inch headpins, sterling
1. Using your wire cutters, cut the chain into two pieces, each 4 inches long.
2. Gently open the loop of one earhook; check out Figures Figure 10-4a and Figure 10-4b. Slip on one link of the chain; see Figure 10-4c. Gently re-close the loop. Repeat with the second earhook and piece of chain.

Illustration by Wiley, Composition Services Graphics
Figure 10-4: Opening the earhook and slipping on the chain.
3. Slide one zircon crystal onto one headpin. Using your round-nose pliers, begin to create a wrapping loop (see Chapter 6 for details), but before closing the loop, insert the last link on the open end of one piece of chain. Repeat this process with each color of crystal (light amethyst, ruby red, and peridot) on the same link of the same chain, as in Figure 10-5. File any sharp edges.
4. Repeat Step 3 for the second earring.
Photograph by Andy Dismore
Figure 10-5: Uber-Long Crystal and Sterling Earrings.
Making the Bride Beautiful
Her wedding day is one of the most special days of a bride’s life. Whether it’s lacy and romantic, sleek and modern, classic, or traditional, many times a bride has some idea of what she wants to look like on her special day.
Here are a few specific questions to ask before designing a piece for a bride:
 What does your dress look like? You want information about the color, fabric, detailing, any beadwork, train, and so on. If you can actually see the dress, it’s even better. You may notice design elements, such as a beading pattern along a seam, that the bride didn’t mention.
What kind of neckline does it show? This question is important if you’re designing a necklace. A straight-across strapless gown is a great candidate for a shorter (16 inches or less) necklace or choker. A more plunging neckline may demand a longer piece, maybe with a pendant or lariat styling.
What color(s) do you want to emphasize? If blush (light pink) and bashful (still light pink) are her signature colors, she may want you to design a piece around them.
If you’re working with pearls, what shade and shape do you prefer? Pearls come in just about every shade known to woman, but most of the time brides choose white or off-white. Don’t take this for granted, though. Ask the question; don’t assume. Check out Chapter 3 for information on the variety of shapes and colors in the world of pearls.
Do you prefer gold, silver, or some other metal? Some brides want to match their accents to their wedding ring, screws in the church pews, or votive holders at the reception hall. Better safe than sorry, so just double check.
Are you wearing your hair up or down? The answer can affect which clasp you choose and what kind of pattern to use near the clasp. If it’s hidden by hair, you may be able to save a little money by repeating patterns of less expensive beads. But if she wears her hair up, consider spending a bit more money on a beautiful clasp, such as a toggle clasp with a heart-shaped lock and key.
What overall feel are you looking for? If she’s looking for lots of sparkle, think crystal. If she’s looking for something understated and classic, consider pearls as your main design element. If she wants to be somewhere in between, let your imagination run wild.
How many pieces do you want? Earrings only? A bracelet to match? The whole kit and caboodle?
What length should your pieces be? This question is critical if you’re working on a necklace. One bride may prefer opera-length pearls while another is expecting a choker. Make sure you determine the answer before you develop your design.
Project 10-4: Princess Pearls with Ribbon
Any bride will feel like a princess on her wedding day wearing this beautiful necklace. It’s made from sterling silver chain, light and airy organza ribbon, and (of course) crystals and pearls. Pair it with the earrings in Project 10-5 for a perfect wedding day look. Take a look at the finished project in Figure 10-7.
Tools and Materials
Round-nose pliers
Flat-nose pliers
Wire cutters
Scissors
2 pieces, 8 inches each, light pink 1⁄4-inch-wide organza ribbon
2 pieces, 3 inches each, 22-gauge round wire, sterling, dead soft
2 1-inch cones, sterling
73⁄4-inch scallop chain, sterling
7 4mm white round pearls
7 4mm AB crystal cube beads
14 11⁄2-inch headpins, sterling
2 8mm split jump rings, sterling
Hypo Cement
1 toggle clasp, sterling
1. Fold one piece of ribbon and tie a knot in the end as close to the end of the ribbon as possible. Trim away any excess ribbon.
2. Use the round-nose pliers to make a small curl on the end of one wire. This step will help you start wrapping around the knot on the ribbon.
3. Put the wire curl around the end of the knot and use your flat-nose pliers to “smash” the wire around the ribbon. Continue to hold the wire with the pliers and use your fingers to wrap the wire around the rest of the knot, leaving about 1 inch of wire straight. Check out Figure 10-6a.
4. Place a dab of glue on the knot and insert the wire-wrapped knot through the wide end of a cone. The straight wire should be sticking out of the top of the cone; see Figure 10-6b. Let the glue dry at least 10 minutes before proceeding.
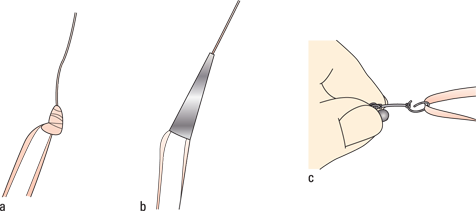
Illustration by Wiley, Composition Services Graphics
Figure 10-6: Attaching the cones to the ribbon and the ribbon to the chain.
5. Begin making a wrapping loop (check out Chapter 6 for help) with the straight wire at the top of the cone, but before completing the loop, attach it to one side of the clasp. Use wire cutters to trim excess wire as necessary.
6. Repeat Steps 1 through 5 with the second ribbon, the second piece of wire, the second cone, and the other side of the clasp. Set the ribbon portion aside.
7. Create a dangle using a headpin and crystal. Thread a crystal onto a headpin. Using your flat-nose and round-nose pliers, create an eye loop on the straight end of the headpin. (See Chapter 6 for more on eye loops.) Before closing the eye loop, attach the dangle to the leftmost link of your scallop chain.
8. Repeat Step 7 to complete the dangles, alternating between pearls and crystals, until you’ve used all 14 beads.
9. Attach a jump ring to the last link of the scallop chain. Slide one ribbon component onto the jump ring, and then close it. See Figure 10-6c.
10. Repeat with the other end, attaching a jump ring and ribbon component.
Photograph by Andy Dismore
Figure 10-7: Princess Pearls with Ribbon.
Project 10-5: Bridal Earrings
These stunning earrings are simple yet elegant. Their beauty comes from the sparkle of the oversized crystals that take center stage. See the finished project in Figure 10-8.
Tools and Materials
Round-nose pliers
Wire cutters
Jewelry file
2 2-inch beaded headpins, sterling silver
2 10mm AB clear bicone crystals
2 12mm oval links, sterling silver
2 earwires, sterling silver
1. Thread one bicone crystal on a headpin. Use round-nose pliers to begin creating a wrapped loop (check out Chapter 6 for the steps to create a wrapped loop), but before completing the loop, attach it to one oval link. Complete and wrap the loop. Trim any excess wire from the loop. File down any sharp edges.
2. Use pliers to open the loop of the earwire. Slip on the oval link. Close the open loop with pliers.
3. Complete Steps 1 and 2 to create the other earring.

Photograph by Matt Bowen
Figure 10-8: Bridal Earrings.
Drawing Inspiration from Your Favorite Designers
Beautiful jewelry is everywhere. I get tons of inspiration from looking at jewelry online, in catalogs, and in stores. Truthfully, I could never afford to buy all the pieces I’d love to own. Luckily, I can make many pieces myself, and so can you. In this section I give you my tips and design ideas that can help you turn your jewelry wish list into reality.
When you’re evaluating a piece of jewelry that inspires you, take note of these things to help create your version of the piece:
The length or size of the piece. Most catalogs and websites include details like the overall length of the chain or dimensions of the pendant.
The materials used. Unless you’re snapping pics in a store (yes, I’ve done it — don’t judge me), you can typically find a description of the materials that make up your inspiration pieces. You’ll see a description like “beads of garnet” or “wisps of oxidized sterling silver chain.”
Pay particular attention to the finish of the metals. Sterling silver is bright and shiny, while oxidized sterling silver has an intentionally tarnished look. If you try to re-create a piece made with one, but you use the other, you’ll be disappointed.
The amount of each material. With a picture, you can count how many “beads of garnet” are used and how many strands of chain they’re hanging from. It sounds simple, but it’s important.
The type of connections or findings used. Are the dangles connected with jump rings or wire wraps? Are ends crimped or knotted? Do the earrings use French wires or posts? Is the clasp a toggle or lobster claw?
I keep a little scrapbook of stuff that inspires me. I cut out pictures of jewelry from catalogs. I print out pics I’ve taken or seen online. Whenever possible, I include the designer’s description of the piece and the price tag too. (Is it wrong that I love to see how much money I save making my own pieces?) Having a physical book lets me jot down a list of the components, connections, numbers of beads, and so on. Then I can make a materials list. It helps me analyze a piece and develop a plan to re-create or customize it.
Mimicking materials, textures, and colors
One of the hottest design trends is mixing unlikely materials. The line is definitely blurring between what used to be considered costume jewelry and fine jewelry. High-end clothing designers like Michael Kors and Marc Jacobs are adding to their accessory lines, pairing precious stones with such mundane art forms as macramé (gasp!). A 14-karat gold serpentine chain may be wrapped in simple threads. It’s anarchy out there! But it’s a great time for a new jewelry maker because you can create similar looks without spending a fortune.
Project 10-6: Thread-wrapped Hand-hammered Hoops
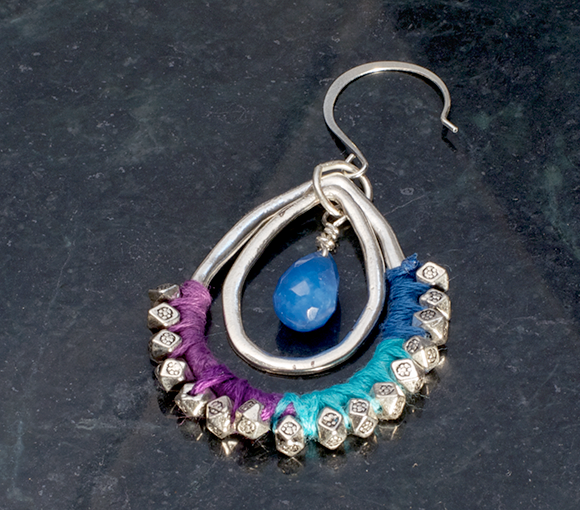
This project was inspired by a pair of earrings sold by Anthropologie (www.anthropologie.com) for $298. They paired hand-hammered hoops of oxidized brass with lowly embroidery floss and silver-dipped pyrite, also known as Fool's Gold. I used hand-hammered silver hoops of a similar shape, and embroidery floss, but I substituted faceted silver beads to get the look for under $10. I even added a faceted hemimorphite teardrop dangle to spice it up a bit. Check out the finished earrings in Figure 10-10.
 Hemimorphite is an opaque blue stone that used to be called calamine. For this design, you can substitute any blue stone or crystal you like or have on hand.
Tools and Materials
Round-nose pliers
Wire cutters
Chain-nose pliers
2 40mm hand-hammered silver-colored teardrop hoops
2 30mm hand-hammered silver-colored teardrop hoops
2 12mm hemimorphite faceted teardrops
2 2-inch lengths of 22-gauge sterling silver wire, half hard
2 12-inch lengths blue embroidery floss
2 12-inch lengths turquoise embroidery floss
2 12-inch lengths purple embroidery floss
2 12-inch lengths lavender embroidery floss
Big-eye beading needle
32 4mm faceted oxidized silver beads
2 8mm silver jump rings
2 silver earwires
Hypo Cement
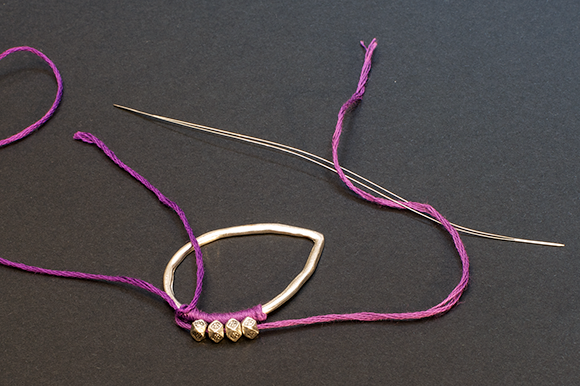
1. Using one piece of sterling wire and one teardrop bead, create a dangle. Take a look at Chapter 6 if you need help. Repeat with the remaining wire and teardrop bead. Set the dangles aside.
2. Mentally divide the bottom of one of the larger hoops into four sections. (You’ll wrap each of these sections in a different color of floss; use Figure 10-10 as a guide for what the finished hoop will look like.) Starting with the lavender floss, wrap it neatly around about one-quarter of the bottom of the hoop, covering the top tail with the floss as you go.
If you have trouble getting the thread to grab the hoop, meaning that the thread keeps sliding around and won’t stay put, apply a bit of Hypo Cement to the hoop. Apply it only to the working section of the hoop because it will dry fast.
3. Use the big-eye needle to string on four beads. Lay the strung beads up against the outside of the wrapped section of hoop, as shown in Figure 10-9. Starting from the top, wrap the thread around the hoop again, this time wrapping between each bead and securing them into place as you go.
Photograph by Andy Dismore
Figure 10-9: String on your beads.
Photograph by Andy Dismore
Figure 10-10: Thread-wrapped Hand-hammered Hoops.
4. When you reach the end of the wrapped section, tie a knot in the lavender floss. Tie on the purple floss over the tail of the lavender floss. Cover the top tail of the purple floss and the end tail of the lavender floss as you wrap the purple floss around the next section of the hoop. At this point you should be about halfway around the bottom of the hoop. Repeat Step 3 with four more beads.
5. Continue wrapping with the turquoise and then blue embroidery floss, alternating Steps 3 and 4. When you’ve finished with the blue floss, wrap the thread around the hoop to secure it and finish it with a tight square knot. Get the knot as close to the last bead as possible. Trim the knot closely and apply a dab of Hypo Cement to secure it.
Don’t worry about making things perfect. Just keep working at it, rewrapping if necessary. If you get to the end of the hoop and haven’t covered part of the metal, grab a seam ripper and a new piece of floss. It’s cheap.
6. Repeat Steps 2 through 5 with the other larger hoop and remaining floss and beads. Set both hoops aside.
7. Using your pliers, open one jump ring. Slip on one wrapped hoop, one plain hoop, one dangle from Step 1, and one earwire. Close the jump ring to complete your first earring.
8. Repeat Step 7 to create your other earring.
Project 10-7: Knotted Gemstone Cluster Necklace
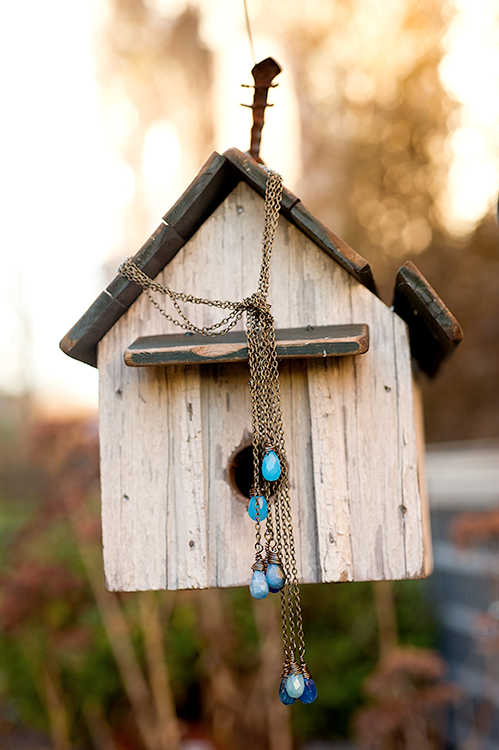
I have fallen in love with a series of necklaces sold at Arhaus Jewels (www.arhausjewels.com) for about $300 a piece. Each necklace is made up of four delicate chains, knotted at the collarbone, and finished with a cluster of gemstone dangles. Perfection, but alas not in my budget. Take a look at my version in Figure 10-13.
I use wrapped loops to connect these dangles to the chain because I don't want them to accidentally fall off. A wrapped loop creates a more permanent connection than an eye loop. If you want video instructions to follow to make a wrapped loop, check out the DVD that accompanies the printed version of this book (or http://booksupport.wiley.com if you're an e-reader).
Tools and Materials
Round-nose pliers
Nylon jaw pliers
Wire cutters
8 15mm faceted dyed quartz teardrops in a range of complementary blue and green shades
4 22-inch strands fine gauge chain, antique bronze
8 6-inch pieces of 22-gauge round wire, half hard, antique bronze
2 8mm jump rings, antique bronze
1 lobster claw clasp, antique bronze
1. Using your round-nose pliers, begin a wrapped loop about 2 inches from the end of one length of wire. Before closing the loop, slip on the last link of one length of chain. Close the wrapped loop. Slip one gemstone onto the open end of the wire. Begin a beaded dangle. Take a look at the bead on the left in Figure 10-11 to see this step in process.
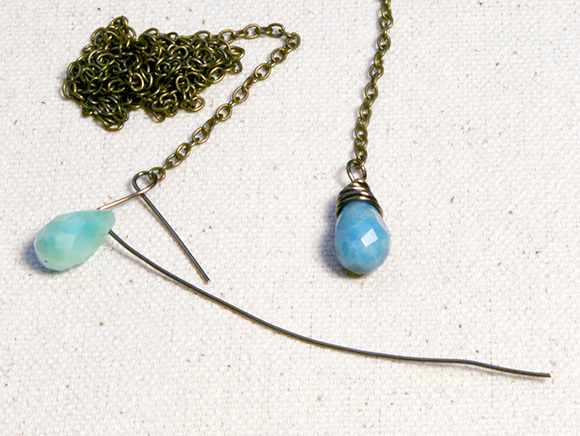
Photograph by Andy Dismore
Figure 10-11: Create a wrapped loop with the end of one chain and begin a beaded dangle.
2. Use the length of the wire to create a 1⁄4-inch bead cap. Wrap the longer end of wire around the tip of the bead. Starting about 1⁄4 inch from the point of the teardrop, work your way up to the tip.
3. Complete the wrapped loop, hiding the two ends of wire neatly. Use your nylon jaw pliers to make adjustments and tighten any ends and tidy up your wraps. Take a look at the bead on the right in Figure 10-11 to see how the final wrap should look.
4. Complete Steps 1 through 3 with the remaining wire, chain ends, and beads. Each chain will have a bead dangle on each end.
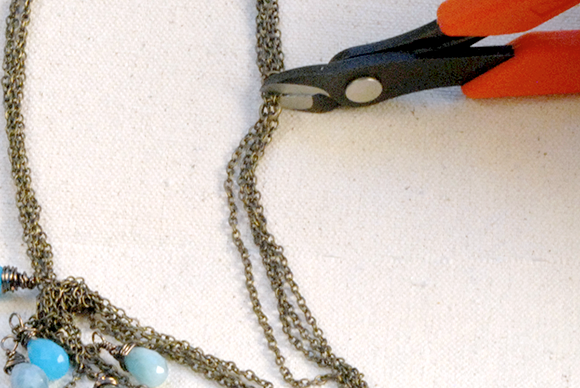
5. Collect all the chains in your hands. Hold them roughly in the center. Tie a loose knot near the beads and situate the bead clusters at roughly different lengths, no more than an inch or so long. Take a look at Figure 10-13 to see how mine looks. Once you’re happy with your arrangement, tighten the knot. Check to see if you can slip the necklace over your head. I’m just kidding — you can’t! — but you probably thought about it for a second.
You have to cut the chain grouping to add the clasp. This sounds scary, I know, but trust me. Unless you’re an infant, you cannot get this necklace on at this point. You know you want to wear it, so get your wire cutters.
6. Hold the necklace with one finger and allow gravity to pull the gemstone cluster toward the floor. This step lets you find the center of the back of the necklace. Cut through all four chains at the center of the back of the necklace. Figure 10-12 shows you how not scary this step really is.
7. Use your pliers to open one jump ring. Slip all the chain ends from one side of the opening onto the jump ring. Close the jump ring. Repeat this step with the remaining chain ends and jump ring, but before closing the last jump ring, slide on the lobster claw clasp to complete your necklace.
Photograph by Andy Dismore
Figure 10-12: Cut through all four chains to create the back opening for the necklace.
Photograph by Matt Bowen
Figure 10-13: Knotted Gemstone Cluster Necklace.
Simulating shapes and forms
Sometimes the actual shape or form of a piece is the defining element, so materials aren’t as relevant to re-creating your own version of it. This is particularly true of structural pieces like statement necklaces, bibs, and collars: The way the piece is put together, moves, or lays against you is what draws you to it.
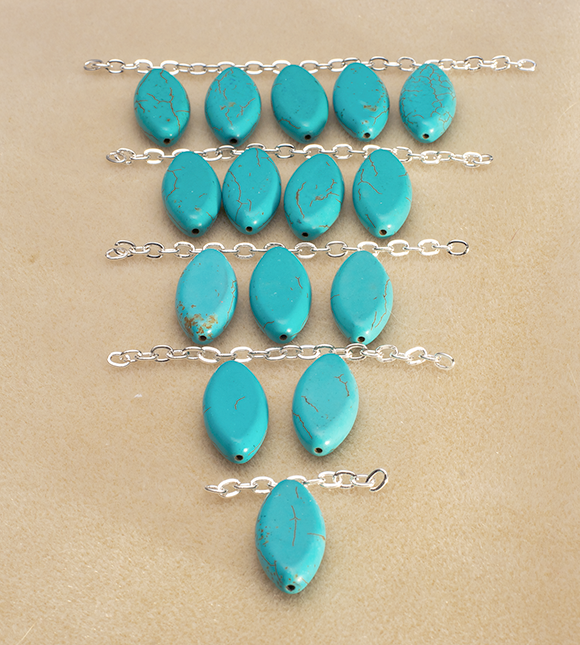
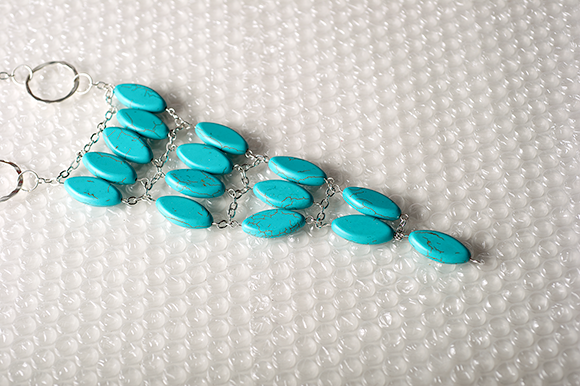
Project 10-8: Turquoise Bib Necklace
For this project, I recommend laying out all your pieces so you can visualize how they fit together. This necklace is made up of an inverted triangle of beads connected to chain segments. You can see the final outcome in Figure 10-16.
The beads in this necklace connect with eye loops. Eye loops are a great choice for connecting beads and other findings when you may need to adjust them later because they're easy to open and close. For help mastering the eye loop wire-wrapping technique, watch a video on this technique on the DVD that accompanies the printed version of this book (or at http://booksupport.wiley.com).
Tools and Materials
Round-nose pliers
Chain-nose pliers
Wire cutter
15 30mm flat oval beads, turquoise
15 2-inch lengths of 22-gauge round sterling silver wire, half hard
2 5-inch segments of silver chain
2 41⁄2-inch segments of silver chain
2 31⁄2-inch segments of silver chain
1 2-inch segment of silver chain
3 10mm silver jump rings
1 lobster claw clasp
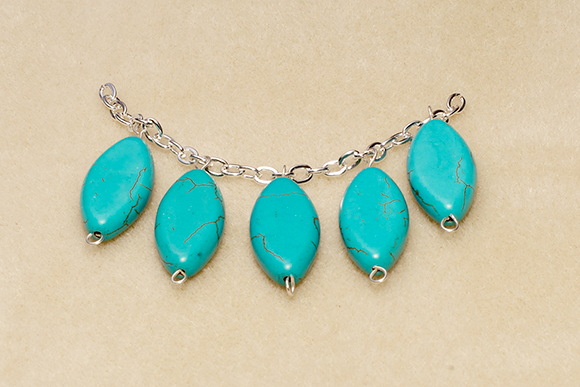
1. Lay out the rows of beads and chains using Figure 10-14 as your guide. Start with a 41⁄2-inch length of chain, followed by a row of five beads.
2. Slide one bead onto a piece of wire. Use your pliers to create eye loops on both ends of the bead. Repeat this step with all the beads and wire, maintaining the structure you set up in Step 1.
3. Attach the top row of beads to the top row of chain. Pick up the ends of the chain to make sure the beads drape nicely and curve evenly, like mine do in Figure 10-15.
Don’t worry if the ends of the chain aren’t even. You can adjust them later.
4. Continue attaching beads to chain segments. Pick up the working necklace periodically to make sure the beads and segments are hanging the way you’d like them to.
Photograph by Andy Dismore
Figure 10-14: Lay out your beads and chain segments.
Photograph by Andy Dismore
Figure 10-15: Attach your first row of beads to the 41⁄2-inch piece of chain.
5. Use your pliers to attach jump rings about 1⁄2 inch from the last bead on each side. Don’t trim it yet, though. Slip one end of the 5-inch segment of chain onto each jump ring. Close the jump rings.
6. Add a jump ring to each of the remaining ends of chain. Before closing the last jump ring, slip on the lobster clasp.
7. Try on the necklace to make sure you like its length and drape. Adjust it as necessary, even moving the jump rings if you need to. When you’re happy with the fit, cut any lingering ends of the chain to complete the necklace.
Photograph by Matt Bowen
Figure 10-16: Turquoise Bib Necklace.