Chapter 9
Defining Classes
Wrox.com Code Downloads for this Chapter
You can find the wrox.com code downloads for this chapter at www.wrox.com/go/beginningvisualc#2015programming on the Download Code tab. The code is in the Chapter 9 download and individually named according to the names throughout the chapter.
In Chapter 8, you looked at the features of object-oriented programming (OOP). In this chapter, you put theory into practice and define classes in C#. You won't go so far as to define class members in this chapter, but you will concentrate on the class definitions themselves.
To begin, you explore the basic class definition syntax, the keywords you can use to determine class accessibility and more, and the way in which you can specify inheritance. You also look at interface definitions because they are similar to class definitions in many ways.
The rest of the chapter covers various related topics that apply when defining classes in C#.
Class Definitions in C#
C# uses the class keyword to define classes:
class MyClass
{
   // Class members.
}
This code defines a class called MyClass. Once you have defined a class, you are free to instantiate it anywhere else in your project that has access to the definition. By default, classes are declared as internal, meaning that only code in the current project will have access to them. You can specify this explicitly using the internal access modifier keyword as follows (although you don't have to):
internal class MyClass
{
   // Class members.
}
Alternatively, you can specify that the class is public and should also be accessible to code in other projects. To do so, you use the public keyword:
public class MyClass
{
   // Class members.
}
In addition to these two access modifier keywords, you can also specify that the class is either abstract (cannot be instantiated, only inherited, and can have abstract members) or sealed (cannot be inherited). To do this, you use one of the two mutually exclusive keywords, abstract or sealed. An abstract class is declared as follows:
public abstract class MyClass
{
   // Class members, may be abstract.
}
Here, MyClass is a public abstract class, while internal abstract classes are also possible.
Sealed classes are declared as follows:
public sealed class MyClass
{
   // Class members.
}
As with abstract classes, sealed classes can be public or internal.
Inheritance can also be specified in the class definition. You simply put a colon after the class name, followed by the base class name:
public class MyClass : MyBase
{
   // Class members.
}
Only one base class is permitted in C# class definitions; and if you inherit from an abstract class, you must implement all the abstract members inherited (unless the derived class is also abstract).
The compiler does not allow a derived class to be more accessible than its base class. This means that an internal class can inherit from a public base, but a public class can't inherit from an internal base. This code is legal:
public class MyBase
{
   // Class members.
}
internal class MyClass : MyBase
{
   // Class members.
}
The following code won't compile:
internal class MyBase
{
   // Class members.
}
public class MyClass : MyBase
{
   // Class members.
}
If no base class is used, the class inherits only from the base class System.Object (which has the alias object in C#). Ultimately, all classes have System.Object at the root of their inheritance hierarchy. You will take a closer look at this fundamental class a little later.
In addition to specifying base classes in this way, you can also specify interfaces supported after the colon character. If a base class is specified, it must be the first thing after the colon, with interfaces specified afterward. If no base class is specified, you specify the interfaces immediately after the colon. Commas must be used to separate the base class name (if there is one) and the interface names from one another.
For example, you could add an interface to MyClass as follows:
public class MyClass : IMyInterface
{
   // Class members.
}
All interface members must be implemented in any class that supports the interface, although you can provide an “empty” implementation (with no functional code) if you don't want to do anything with a given interface member, and you can implement interface members as abstract in abstract classes.
The following declaration is invalid because the base class MyBase isn't the first entry in the inheritance list:
public class MyClass : IMyInterface, MyBase
{
   // Class members.
}
The correct way to specify a base class and an interface is as follows:
public class MyClass : MyBase, IMyInterface
{
   // Class members.
}
Remember that multiple interfaces are possible, so the following is also valid:
public class MyClass : MyBase, IMyInterface, IMySecondInterface
{
   // Class members.
}
Table 9.1 shows the allowed access modifier combinations for class definitions.
Table 9.1 Access Modifiers for Class Definitions
| Modifier | Description |
none or internal |
Class is accessible only from within the current project |
public |
Class is accessible from anywhere |
abstract or internal abstract |
Class is accessible only from within the current project, and cannot be instantiated, only derived from |
public abstract |
Class is accessible from anywhere, and cannot be instantiated, only derived from |
sealed or internal sealed |
Class is accessible only from within the current project, and cannot be derived from, only instantiated |
public sealed |
Class is accessible from anywhere, and cannot be derived from, only instantiated |
Interface Definitions
Interfaces are declared in a similar way to classes, but using the interface keyword, rather than class:
interface IMyInterface
{
   // Interface members.
}
The access modifier keywords public and internal are used in the same way; and as with classes, interfaces are defined as internal by default. To make an interface publicly accessible, you must use the public keyword:
public interface IMyInterface
{
   // Interface members.
}
The keywords abstract and sealed are not allowed because neither modifier makes sense in the context of interfaces (they contain no implementation, so they can't be instantiated directly, and they must be inheritable to be useful).
Interface inheritance is also specified in a similar way to class inheritance. The main difference here is that multiple base interfaces can be used, as shown here:
public interface IMyInterface : IMyBaseInterface, IMyBaseInterface2
{
   // Interface members.
}
Interfaces are not classes, and thus do not inherit from System.Object. However, the members of System.Object are available via an interface type variable, purely for convenience. In addition, as already discussed, it is impossible to instantiate an interface in the same way as a class. The following Try It Out provides an example of some class definitions, along with some code that uses them.
System.Object
Because all classes inherit from System.Object, all classes have access to the protected and public members of this class. Therefore, it is worthwhile to take a look at what is available there. System.Object contains the methods described in Table 9.2.
Table 9.2 Methods of System.Object
| Method | Return Type | Virtual | Static | Description |
Object() |
N/A | No | No | Constructor for the System.Object type. Automatically called by constructors of derived types. |
˜Object() (also known as Finalize() — see the next section) |
N/A | No | No | Destructor for the System.Object type. Automatically called by destructors of derived types; cannot be called manually. |
Equals(object) |
bool |
Yes | No | Compares the object for which this method is called with another object and returns true if they are equal. The default implementation checks whether the object parameter refers to the same object (because objects are reference types). This method can be overridden if you want to compare objects in a different way, for example, to compare the state of two objects. |
Equals(object, object) |
bool |
No | Yes | Compares the two objects passed to it and checks whether they are equal. This check is performed using the Equals(object) method. If both objects are null references, then this method returns true. |
ReferenceEquals(object, object) |
bool |
No | Yes | Compares the two objects passed to it and checks whether they are references to the same instance. |
ToString() |
string |
Yes | No | Returns a string corresponding to the object instance. By default, this is the qualified name of the class type, but this can be overridden to provide an implementation appropriate to the class type. |
MemberwiseClone() |
object |
No | No | Copies the object by creating a new object instance and copying members. This member copying does not result in new instances of these members. Any reference type members of the new object refer to the same objects as the original class. This method is protected, so it can be used only from within the class or from derived classes. |
GetType() |
System.Type |
No | No | Returns the type of the object in the form of a System.Type object. |
GetHashCode() |
int |
Yes | No | Used as a hash function for objects where this is required. A hash function returns a value identifying the object state in some compressed form. |
These are the basic methods that must be supported by object types in the .NET Framework, although you might never use some of them (or you might use them only in special circumstances, such as GetHashCode()).
GetType() is helpful when you are using polymorphism because it enables you to perform different operations with objects depending on their type, rather than the same operation for all objects, as is often the case. For example, if you have a function that accepts an object type parameter (meaning you can pass it just about anything), you might perform additional tasks if certain objects are encountered. Using a combination of GetType() and typeof (a C# operator that converts a class name into a System.Type object), you can perform comparisons such as the following:
if (myObj.GetType() == typeof(MyComplexClass))
{
// myObj is an instance of the class MyComplexClass.
}The System.Type object returned is capable of a lot more than that, but only this is covered here. It can also be very useful to override the ToString() method, particularly in situations where the contents of an object can be easily represented with a single human-readable string. You see these System.Object methods repeatedly in subsequent chapters, so you'll learn more details as necessary.
Constructors and Destructors
When you define a class in C#, it's often unnecessary to define associated constructors and destructors because the compiler adds them for you when you build your code if you don't supply them. However, you can provide your own, if required, which enables you to initialize and clean up after your objects, respectively.
You can add a simple constructor to a class using the following syntax:
class MyClass
{
public MyClass()
{
// Constructor code.
}
}This constructor has the same name as the class that contains it, has no parameters (making it the default constructor for the class), and is public so that objects of the class can be instantiated using this constructor (refer to Chapter 8 for more information about this).
You can also use a private default constructor, meaning that object instances of this class cannot be created using this constructor (it is non-creatable — again, see the discussion in Chapter 8):
class MyClass
{
private MyClass()
{
// Constructor code.
}
}Finally, you can add nondefault constructors to your class in a similar way, simply by providing parameters:
class MyClass
{
public MyClass()
{
// Default constructor code.
}
public MyClass(int myInt)
{
// Nondefault constructor code (uses myInt).
}
}You can supply an unlimited number of constructors (until you run out of memory or out of distinct sets of parameters, so maybe “almost unlimited” is more appropriate).
Destructors are declared using a slightly different syntax. The destructor used in .NET (and supplied by the System.Object class) is called Finalize(), but this isn't the name you use to declare a destructor. Instead of overriding Finalize(), you use the following:
class MyClass
{
˜MyClass()
{
// Destructor body.
}
}Thus, the destructor of a class is declared by the class name (just as the constructor is), with the tilde (˜) prefix. The code in the destructor is executed when garbage collection occurs, enabling you to free resources. After the destructor is called, implicit calls to the destructors of base classes also occur, including a call to Finalize() in the System.Object root class. This technique enables the .NET Framework to ensure that this occurs, because overriding Finalize() would mean that base class calls would need to be explicitly performed, which is potentially dangerous (you learn how to call base class methods in the next chapter).
Constructor Execution Sequence
If you perform multiple tasks in the constructors of a class, it can be handy to have this code in one place, which has the same benefits as splitting code into functions, as shown in Chapter 6. You could do this using a method (see Chapter 10), but C# provides a nice alternative. You can configure any constructor to call any other constructor before it executes its own code.
First, though, you need to take a closer look at what happens by default when you instantiate a class instance. Apart from facilitating the centralization of initialization code, as noted previously, this is worth knowing about in its own right. During development, objects often don't behave quite as you expect them to due to errors during constructor calling — usually a base class somewhere in the inheritance hierarchy of your class that you are not instantiating correctly, or information that is not being properly supplied to base class constructors. Understanding what happens during this phase of an object's lifecycle can make it much easier to solve this sort of problem.
For a derived class to be instantiated, its base class must be instantiated. For this base class to be instantiated, its own base class must be instantiated, and so on all the way back to System.Object (the root of all classes). As a result, whatever constructor you use to instantiate a class, System.Object.Object() is always called first.
Regardless of which constructor you use in a derived class (the default constructor or a nondefault constructor), unless you specify otherwise, the default constructor for the base class is used. (You'll see how to change this behavior shortly.) Here's a short example illustrating the sequence of execution. Consider the following object hierarchy:
public class MyBaseClass
{
public MyBaseClass()
{
}
public MyBaseClass(int i)
{
}
}
public class MyDerivedClass : MyBaseClass
{
public MyDerivedClass()
{
}
public MyDerivedClass(int i)
{
}
public MyDerivedClass(int i, int j)
{
}
}You could instantiate MyDerivedClass as follows:
MyDerivedClass myObj = new MyDerivedClass();In this case, the following sequence of events will occur:
- The
System.Object.Object()constructor will execute. - The
MyBaseClass.MyBaseClass()constructor will execute. - The
MyDerivedClass.MyDerivedClass()constructor will execute.
Alternatively, you could use the following:
MyDerivedClass myObj = new MyDerivedClass(4);The sequence is as follows:
- The
System.Object.Object()constructor will execute. - The
MyBaseClass.MyBaseClass()constructor will execute. - The
MyDerivedClass.MyDerivedClass(inti)constructor will execute.
Finally, you could use this:
MyDerivedClass myObj = new MyDerivedClass(4, 8);The result is the following sequence:
- The
System.Object.Object()constructor will execute. - The
MyBaseClass.MyBaseClass()constructor will execute. - The
MyDerivedClass.MyDerivedClass(inti,intj)constructor will execute.
This system works fine most of the time, but sometimes you will want a little more control over the events that occur. For example, in the last instantiation example, you might want to have the following sequence:
- The
System.Object.Object()constructor will execute. - The
MyBaseClass.MyBaseClass(inti)constructor will execute. - The
MyDerivedClass.MyDerivedClass(inti,intj)constructor will execute.
Using this sequence you could place the code that uses the int i parameter in MyBaseClass(int i), which means that the MyDerivedClass(int i, int j) constructor would have less work to do — it would only need to process the int j parameter. (This assumes that the int i parameter has an identical meaning in both scenarios, which might not always be the case; but in practice, with this kind of arrangement, it usually is.) C# allows you to specify this kind of behavior if you want.
To do this, you can use a constructor initializer, which consists of code placed after a colon in the method definition. For example, you could specify the base class constructor to use in the definition of the constructor in your derived class, as follows:
public class MyDerivedClass : MyBaseClass
{
…
public MyDerivedClass(int i, int j) : base(i)
{
}
}The base keyword directs the .NET instantiation process to use the base class constructor, which has the specified parameters. Here, you are using a single int parameter (the value of which is the value passed to the MyDerivedClass constructor as the parameter i), so MyBaseClass(int i) will be used. Doing this means that MyBaseClass will not be called, giving you the sequence of events listed prior to this example — exactly what you want here.
You can also use this keyword to specify literal values for base class constructors, perhaps using the default constructor of MyDerivedClass to call a nondefault constructor of MyBaseClass:
public class MyDerivedClass : MyBaseClass
{
public MyDerivedClass() : base(5)
{
}
…
}This gives you the following sequence:
- The
System.Object.Object()constructor will execute. - The
MyBaseClass.MyBaseClass(inti)constructor will execute. - The
MyDerivedClass.MyDerivedClass()constructor will execute.
As well as this base keyword, you can use one more keyword as a constructor initializer: this. This keyword instructs the .NET instantiation process to use a nondefault constructor on the current class before the specified constructor is called:
public class MyDerivedClass : MyBaseClass
{
public MyDerivedClass() : this(5, 6)
{
}
…
public MyDerivedClass(int i, int j) : base(i)
{
}
}Here, using the MyDerivedClass.MyDerivedClass() constructor gives you the following sequence:
- The
System.Object.Object()constructor will execute. - The
MyBaseClass.MyBaseClass(inti)constructor will execute. - The
MyDerivedClass.MyDerivedClass(inti,intj)constructor will execute. - The
MyDerivedClass.MyDerivedClass()constructor will execute.
The only limitation here is that you can specify only a single constructor using a constructor initializer. However, as demonstrated in the last example, this isn't much of a limitation, because you can still construct fairly sophisticated execution sequences.
Be careful not to accidentally create an infinite loop when defining constructors. For example, consider this code:
public class MyBaseClass
{
public MyBaseClass() : this(5)
{
}
public MyBaseClass(int i) : this()
{
}
}Using either one of these constructors requires the other to execute first, which in turn requires the other to execute first, and so on. This code will compile, but if you try to instantiate MyBaseClass you will receive a SystemOverflowException.
OOP Tools in Visual Studio
Because OOP is such a fundamental aspect of the .NET Framework, several tools are provided by Visual Studio to aid development of OOP applications. This section describes some of these.
The Class View Window
In Chapter 2, you saw that the Solution Explorer window shares space with a window called Class View. This window shows you the class hierarchy of your application and enables you to see at a glance the characteristics of the classes you use. Figure 9.3 shows a view of the example project in the previous Try It Out.
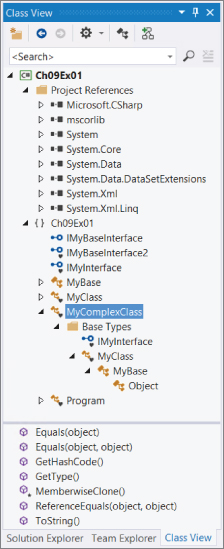
The window is divided into two main sections; the bottom section shows members of types. Note that Figure 9.3 shows the display when all items in the Class View Settings drop-down, at the top of the Class View window, are checked.
Many symbols can be used here, including the ones shown in Table 9.3.
Table 9.3 Class View Icons
| Icon | Meaning | Icon | Meaning | Icon | Meaning |
 |
Project |  |
Property |  |
Event |
 |
Namespace |  |
Field |  |
Delegate |
 |
Class |  |
Struct |  |
Assembly |
 |
Interface |  |
Enumeration | ||
 |
Method |  |
Enumeration item |
Some of these are used for type definitions other than classes, such as enumerations and struct types.
Some of the entries can have other symbols placed below them, signifying their access level (no symbol appears for public entries). These are listed in Table 9.4.
Table 9.4 Additional Class View Icons
| Icon | Meaning | Icon | Meaning | Icon | Meaning |
 |
Private |  |
Protected |  |
Internal |
No symbols are used to denote abstract, sealed, or virtual entries.
As well as being able to look at this information here, you can also access the relevant code for many of these items. Double-clicking on an item, or right-clicking and selecting Go To Definition, takes you straight to the code in your project that defines the item, if it is available. If the code isn't available, such as code in an inaccessible base type (for example, System.Object), you instead have the option to select Browse Definition, which will take you to the Object Browser view (described in the next section).
One other entry that appears in Figure 9.3 is Project References. This enables you to see which assemblies are referenced by your projects, which in this case includes (among others) the core .NET types in mscorlib and System, data access types in System.Data, and XML manipulation types in System.Xml. The references here can be expanded, showing you the namespaces and types contained within these assemblies.
You can find occurrences of types and members in your code by right-clicking on an item and selecting Find All References; a list of search results displays in the Find Symbol Results window, which appears at the bottom of the screen as a tabbed window in the Error List display area. You can also rename items using the Class View window. If you do this, you're given the option to rename references to the item wherever it occurs in your code. This means you have no excuse for spelling mistakes in class names because you can change them as often as you like!
In addition, you can navigate through your code with a view called Call Hierarchy, which is accessible from the Class View window through the View Call Hierarchy right-click menu option. This functionality is extremely useful for looking at how class members interact with each other, and you'll look at it in the next chapter.
The Object Browser
The Object Browser is an expanded version of the Class View window, enabling you to view other classes available to your project, and even external classes. It is entered either automatically (for example, in the situation noted in the last section) or manually via View ![]() Object Browser. The view appears in the main window, and you can browse it in the same way as the Class View window.
Object Browser. The view appears in the main window, and you can browse it in the same way as the Class View window.
This window provides the same information as Class View but also shows you more of the .NET types. When an item is selected, you also get information about it in a third window, as shown in Figure 9.4.
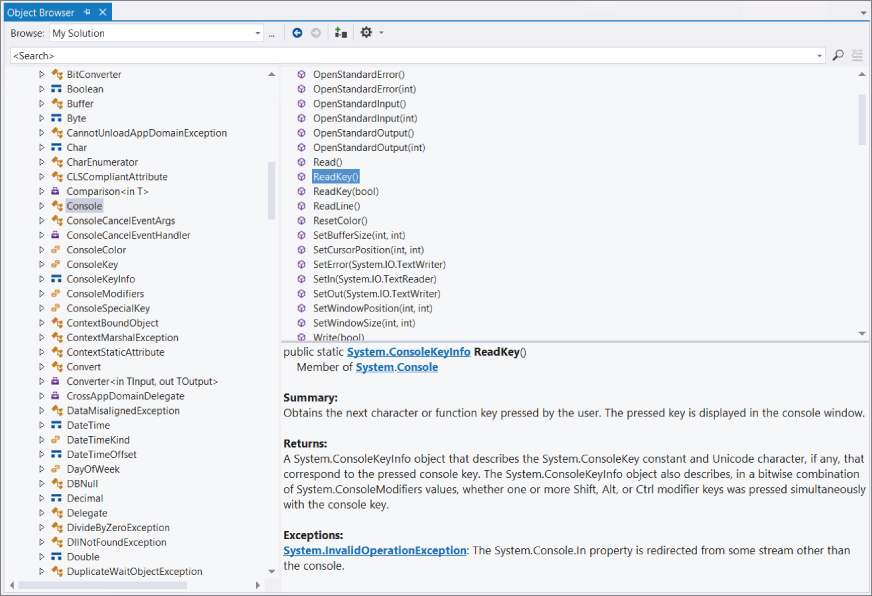
Here, the ReadKey() method of the Console class has been selected. (Console is found in the System namespace in the mscorlib assembly.) The information window in the bottom-right corner shows you the method signature, the class to which the method belongs, and a summary of the method function. This information can be useful when you are exploring the .NET types, or if you are just refreshing your memory about what a particular class can do.
Additionally, you can make use of this information window in types that you create. Make the following change to the code created previously in Ch09Ex01:
/// <summary>
/// This class contains my program!
/// </summary>
class Program
{
static void Main(string[] args)
{
         MyComplexClass myObj = new MyComplexClass();
         WriteLine(myObj.ToString());
ReadKey();
}
}Return to the Object Browser. The change is reflected in the information window. This is an example of XML documentation, a subject not covered in this book but well worth learning about when you have a spare moment.
Adding Classes
Visual Studio contains tools that can speed up some common tasks, and some of these are applicable to OOP. One of these tools, the Add New Item Wizard, enables you to add new classes to your project with a minimum amount of typing.
This tool is accessible through the Project![]() Add New Item menu item or by right-clicking on your project in the Solution Explorer window and selecting the appropriate item. Either way, a dialog box appears, enabling you to choose the item to add. To add a class, select the Class item in the templates window, as shown in Figure 9.5, provide a filename for the file that will contain the class, and click Add. The class created is named according to the filename you provided.
Add New Item menu item or by right-clicking on your project in the Solution Explorer window and selecting the appropriate item. Either way, a dialog box appears, enabling you to choose the item to add. To add a class, select the Class item in the templates window, as shown in Figure 9.5, provide a filename for the file that will contain the class, and click Add. The class created is named according to the filename you provided.
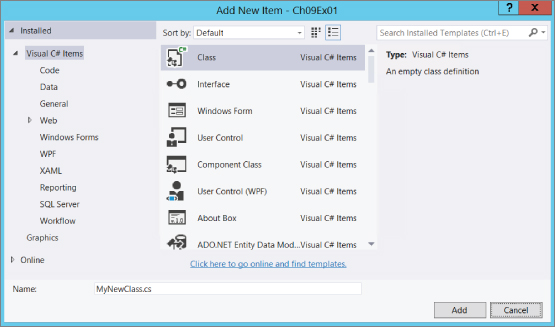
In the Try It Out earlier in this chapter, you added class definitions manually to your Program.cs file. Often, keeping classes in separate files makes it easier to keep track of your classes. Entering the information in the Add New Item dialog box when the Ch09Ex01 project is open results in the following code being generated in MyNewClass.cs:
using System;
using System.Collections.Generic;
using System.Linq;
using System.Text;
using System.Threading.Tasks;
namespace Ch09Ex01
{
   class MyNewClass
   {
   }
}
This class, MyNewClass, is defined in the same namespace as your entry point class, Program, so you can use it from code just as if it were defined in the same file. As shown in the code, the class generated for you contains no constructor. Recall that if a class definition doesn't include a constructor, then the compiler adds a default constructor when you compile your code.
Class Diagrams
One powerful feature of Visual Studio that you haven't looked at yet is the capability to generate class diagrams from code and use them to modify projects. The class diagram editor in Visual Studio enables you to generate UML-like diagrams of your code with ease. You'll see this in action in the following Try It Out when you generate a class diagram for the Ch09Ex01 project you created earlier.
Class Library Projects
As well as placing classes in separate files within your project, you can also place them in completely separate projects. A project that contains nothing but classes (along with other relevant type definitions, but no entry point) is called a class library.
Class library projects compile into .dll assemblies, and you can access their contents by adding references to them from other projects (which might be part of the same solution, but don't have to be). This extends the encapsulation that objects provide because class libraries can be revised and updated without touching the projects that use them. That means you can easily upgrade services provided by classes (which might affect multiple consumer applications).
The following Try It Out provides an example of a class library project and a separate project that makes use of the classes that it contains.
Interfaces Versus Abstract Classes
This chapter has demonstrated how you can create both interfaces and abstract classes (without members for now — you get to them in Chapter 10). The two types are similar in a number of ways, so it would be useful to know how to determine when you should use one technique or the other.
First the similarities: Both abstract classes and interfaces can contain members that can be inherited by a derived class. Neither interfaces nor abstract classes can be directly instantiated, but it is possible to declare variables of these types. If you do, you can use polymorphism to assign objects that inherit from these types to variables of these types. In both cases, you can then use the members of these types through these variables, although you don't have direct access to the other members of the derived object.
Now the differences: Derived classes can only inherit from a single base class, which means that only a single abstract class can be inherited directly (although it is possible for a chain of inheritance to include multiple abstract classes). Conversely, classes can use as many interfaces as they want, but this doesn't make a massive difference — similar results can be achieved either way. It's just that the interface way of doing things is slightly different.
Abstract classes can possess both abstract members (these have no code body and must be implemented in the derived class unless the derived class is itself abstract) and non-abstract members (these possess a code body, and can be virtual so that they can be overridden in the derived class). Interface members, conversely, must be implemented on the class that uses the interface — they do not possess code bodies. Moreover, interface members are by definition public (because they are intended for external use), but members of abstract classes can also be private (as long as they aren't abstract), protected, internal, or protected internal (where protected internal members are accessible only from code within the application or from a derived class). In addition, interfaces can't contain fields, constructors, destructors, static members, or constants.
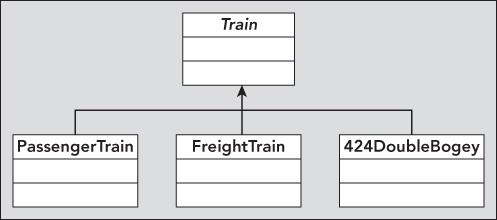
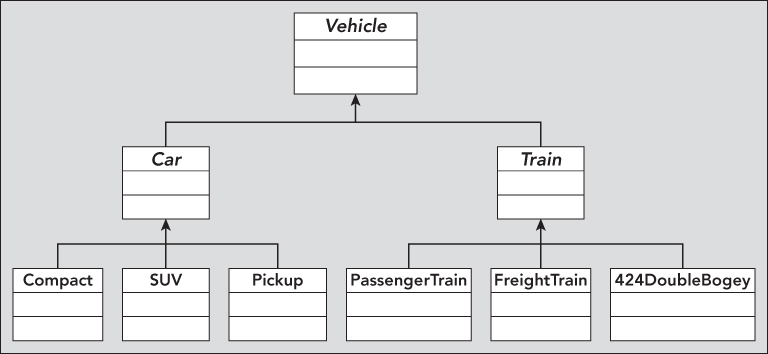
For example, consider a family of objects representing trains. The base class, Train, contains the core definition of a train, such as wheel gauge and engine type (which could be steam, diesel, and so on). However, this class is abstract because there is no such thing as a “generic” train. To create an “actual” train, you add characteristics specific to that train. For example, you derive classes such as PassengerTrain, FreightTrain, and 424DoubleBogey, as shown in Figure 9.11.
A family of car objects might be defined in the same way, with an abstract base class of Car and derived classes such as Compact, SUV, and PickUp. Car and Train might even derive from a common base class, such as Vehicle. This is shown in Figure 9.12.
Some of the classes lower in the hierarchy can share characteristics because of their purpose, not just because of what they are derived from. For example, PassengerTrain, Compact, SUV, and Pickup are all capable of carrying passengers, so they might possess an IPassengerCarrier interface. FreightTrain and Pickup can carry heavy loads, so they might both have an IHeavyLoadCarrier interface as well. This is illustrated in Figure 9.13.
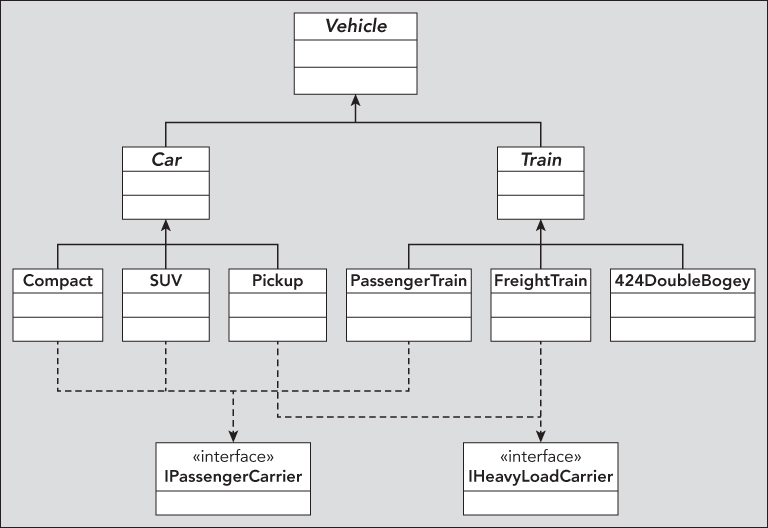
By breaking down an object system in this way before going about assigning specifics, you can clearly see which situations should use abstract classes rather than interfaces, and vice versa. The result of this example couldn't be achieved using only interfaces or only abstract inheritance.
Struct Types
Chapter 8 noted that structs and classes are very similar but that structs are value types and classes are reference types. What does this actually mean to you? Well, the easiest way of looking at this is with an example, such as the following Try It Out.
Shallow Copying Versus Deep Copying
Copying objects from one variable to another by value instead of by reference (that is, copying them in the same way as structs) can be quite complex. Because a single object can contain references to many other objects, such as field members and so on, a lot of processing can be involved. Simply copying each member from one object to another might not work because some of these members might be reference types in their own right.
The .NET Framework takes this into account. You can create a simple copy of an object where each member is copied to the new object by using the method MemberwiseClone(), inherited from System.Object. This is a protected method, but it would be easy to define a public method on an object that called this method. This copying method is known as a shallow copy, in that it doesn't take reference type members into account. This means that reference members in the new object refer to the same objects as equivalent members in the source object, which isn't ideal in many cases. If you want to create new instances of the members in question by copying the values across (rather than the references), you need to perform a deep copy.
There is an interface you can implement that enables you to deep copy in a standard way: ICloneable. If you use this interface, then you must implement the single method it contains, Clone(). This method returns a value of type System.Object. You can use whatever processing you want to obtain this object, by implementing the method body however you choose. That means you can implement a deep copy if you want to, although the exact behavior isn't mandatory, so you could perform a shallow copy if desired. There are no rules or restrictions on what you actually return from this method, so many people recommend avoiding it. Instead, they recommend implementing your own deep-copy method. You take a closer look at this interface in Chapter 11.
 What You Learned in This Chapter
| Topic | Key Concepts |
| Class and interface definitions | Classes are defined with the class keyword, and interfaces with the interface keyword. You can use the public and internal keywords to define class and interface accessibility, and classes can be defined as abstract or sealed to control inheritance. Parent classes and interfaces are specified in a comma-separated list after a colon following the class or interface name. Only a single parent class can be specified in a class definition, and it must be the first item in the list. |
| Constructors and destructors | Classes come ready-equipped with a default constructor and destructor implementation, and you rarely have to provide your own destructor. You can define constructors with an accessibility, the name of the class, and any required parameters. Constructors of base classes are executed before those of derived classes, and you can control the execution sequence within a class with the this and base constructor initializer keywords. |
| Class libraries | You can create class library projects that only contain class definitions. These projects cannot be executed directly; they must be accessed through client code in an executable application. Visual Studio provides various tools for creating, modifying, and examining classes. |
| Class families | Classes can be grouped into families that exhibit common behavior or that share common characteristics. You can do this by inheriting from a shared base class (which can be abstract), or by implementing interfaces. |
| Struct definitions | A struct is defined in a very similar way to a class, but remember that structs are value types whereas classes are reference types. |
| Copying objects | When you make a copy of an object, you must be careful to copy any objects that it might contain, rather than simply copying the references to those objects. Copying references is referred to as shallow copying, whereas a full copy is referred to as a deep copy. You can use the ICloneable interface as a framework for providing deep-copy capabilities in a class definition. |