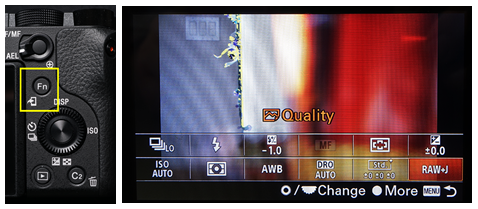
Figure 2-1: The Function button brings you to a screen where you can quickly change up to 12 of your favorite parameters.
New owners of recent Sony cameras often experience “option shock” – so many menu items and customizations are available that it literally flummoxes (look it up) them. Where to start? This chapter is designed to address that very problem right away, so you can configure your camera in a way I’ve found to be useful. Short descriptions are followed by hyperlinks to Section numbers where you can delve deeper into a function’s settings and learn more about the options available.
First, let me take a minute and recommend some very quick function settings that will make the camera work better for you right out of the gate (or box). I know it’s a little rude to talk about camera settings before I actually talk about what these functions do; however this is supposed to be an “advanced” book. Some of these may already be the factory default; however just to make sure, here are my most-essential camera settings. (The end of this chapter contains ALL of my personal camera settings.)
Let’s start with the setting I get asked about the most.
|
Figure 2-1: The Function button brings you to a screen where you can quickly change up to 12 of your favorite parameters. |
The function button provides quick access to up to 12 of your favorite parameters, and you can assign all slots using the function MENU -->  7 --> Function Menu Set. --> [Select Slot] --> [Select from 1 of 35 options].
The factory default function layout is so useful that I’ve changed only one of the slots: Slot #12, which is initially set to “Shoot Mode”, has been changed to “Quality” so I can switch between RAW and .jpg (or both) quickly in the field. (Shoot Mode is useless when you're shooting stills, but can be handy when you're in Movie mode since it allows you to quickly switch between the movie version of P, A, S, or M.) Everything else is the same, and I recommend that at least while you're reading this book you keep it that way as well so the Fn. shortcuts I mention in the book will work for you too.
|
Figure 2-2: You can re-assign these and 2 other buttons as well (3 others if your lens has a button on it). |
The A6300 has a total of 8 reassignable buttons. And I’ve made a few reassignments that are ideal for the way I work. (Your mileage may vary, as everyone’s needs are different. That’s why there are so many options!)
To assign a function to a button, just do MENU --> 7 --> Custom Key(Shoot.) --> [Choose a button] --> [Choose a function to assign to that button]. Not all buttons have the same number of reassignable functions, and there are plenty of functions that provide capabilities not available in menus. (In other words, some useful features have to be assigned to a button first in order to have access to them.) I’ve compiled a massive table of all functions, what they do, and what keys they can be assigned to in Section 7.34. Jump there if you're wondering what some of those assignable options do.
Here’s how I’ve configured my A6300:
Custom Button 1 assigned to MOVIE. This way I don’t have to use that poorly-placed-so-it-wouldn’t-be-accidentally-activated red button to start or stop video.
Custom Button 2 – Focus Magnifier. For use with non-native lenses via an adapter.
Center Button – "Focus Standard" (This way I can go from AF-C and Wide AF to Center focus area and AF-S with the push of a button). This is my "Back Button Focus".
Left Button – Spot AEL Toggle. (I would have assigned it to the AEL button where it would have been easier to remember; however I find the AEL button is the most comfortable button to hold while using Eye AF. And so the Spot AEL Toggle button goes here instead.)
Right Button – Zoom (handy for smooth zoom during movies)
Down Button – Exposure Compensation (the factory default)
AEL button set to Eye AF because that’s a comfortable button to hold down while looking through the EVF.
AF/MF button set to AF/MF Ctrl Toggle
Focus Hold button set to Focus Hold. (Focus Hold buttons appear on a small percentage of lenses.)
Here are several sets of customizations I’ve made which I think are essential. (I’ll go over ALL of my menu settings at the end of this chapter.)
MENU --> 1 --> Monitor Brightness --> MANUAL --> +1
MENU --> 1 --> Viewfinder Brightness --> MANUAL --> +1 |
I find that the factory default for LCD and EVF brightnesses to be a tad too dark. (Section 11.1) |
MENU --> |
Although being able to see the shot you just took is a GREAT idea (“Did that person have their eyes closed?”), when you’re shooting kids it can mean missing the next great shot. So I make sure this feature is OFF and I’m always ready to take the next shot. (Section 7.8) (When not shooting kids I keep this set to “10 seconds” so I have enough time to turn the camera around and show my subjects without having to press any buttons.) |
MENU --> 2 --> Mode Dial Guide --> Off |
I find those “help” screens annoying. Therefore, you shouldn’t want them either. :-) (Section 11.9). |
MENU --> |
When playing back vertical images, I want the picture to fill the entire display (instead of looking at a correctly-oriented postage stamp). I’ll happily rotate the camera 90 degrees if it means I can look at large versions of vertical images. |
MENU --> |
After the camera autofocuses, it switches to manual focus automatically (I’ll explain why in a minute) (Section 6.14) |
MENU --> MENU --> |
When in Manual Focus mode, the “Peaking” function highlights the areas that are in focus using a bright color of your choice. (In my case, yellow.) (Section 7.10) |
The last two settings, when combined, make for a wonderfully stress-free experience when you’re shooting things quickly. Recall that the peaking function shows you what’s in focus (or, more accurately, it shows you the high contrast areas which the camera uses to determine focus) when you’re in Manual Focus mode. And the “DMF” setting tells the camera to immediately go into Manual Focus mode just as soon as it gets focus confirmation. With this setup, as soon as you do a focus lock, you see instantly what the camera decided to focus on. DMF + Peaking Color let me know very quickly if the camera got it wrong so I can re-focus and shoot if I need to.
There are other settings as well that I personally use, and they’re all listed at the end of this chapter, along with section references which provide a detailed explanation of what every feature does and why I prefer certain settings in different circumstances.
Here's a combination of settings that I use when photographing the grandkids (or their pets). This is the Friedman Archives equivalent of Sports Action mode but I can specify a low ISO value if I want to for higher image quality:
Program Mode with ISO Auto Min. SS = 1/125th of a second |
“P”rogram mode in low light will drop the shutter speed to 1/60th of a second (sometimes slower), unacceptably slow for kids who don’t pose. And so the new MENU --> |
Continuous autofocus (AF-C) |
Menu --> |
Continuous Shooting Lo
|
Menu --> |
AF area = Lock-on AF Wide |
Menu --> |
ISO to something reasonable
|
Menu --> |
Face Detection = On (and Smile Shutter = OFF) |
MENU --> |
Eye AF assigned to the AEL button |
MENU --> |
Silent Shooting OFF |
MENU --> |


 1 --> Playback --> Display Rotation --> Off

 3 --> Focus Mode --> AF-C