CHAPTER 16
NTFS, Users, and Groups
In this chapter, you will learn how to
• Create and administer Windows users and groups
• Define and use NTFS permissions for authorization
• Share a Windows computer securely
• Secure PCs with User Account Control
If you asked me what keeps Windows the number one operating system in the world, I’d say “Windows is the easiest operating system for securing resources, individual computers, and entire networks.” Windows gets it right when it comes to protection. Using a combination of user accounts and groups that tie into the NTFS file system, Windows provides incredibly powerful file and folder protection. This user/group/NTFS combo scales from a single computer up to a network of computers spanning the world. Windows doesn’t just stop at files and folders, either.
To understand security in Windows, you need to see it from Windows’ point of view. In Windows, sharing files between users on a single machine and sharing files with users over a network are the same. When learning about users, groups, and NTFS permissions, however, it’s helpful to think about a single PC. To that end, this chapter focuses on Windows security from the point of view of a single, or standalone, machine. I may dip into networks and domains from time to time, especially when the only differences are cosmetic, but Chapter 29 will revisit these topics in more detail and show you how the same tools scale up to help you protect a computer in a networked environment.
802
Authentication with Users and Groups
We’ve discussed the concept of users and groups in earlier chapters, but have you ever considered what user accounts and passwords actually do? To better understand their roles, you need to know two terms: authentication and authorization. Authentication is the process by which you determine a person at your computer is who he says he is and then grant him entry into the computer. In Windows, authentication is handled by a password-protected user account. Once a user is authenticated, he needs authorization, which controls what an authenticated user can and cannot do on a system. Authorization for Windows’ files and folders is controlled by the NTFS file system, which assigns permissions to users, groups, or both.
 EXAM TIP A good security practice to determine what type of user account to give to a specific person is the principle of least privilege. In essence, you want to give users just enough—but no more—permissions to accomplish their tasks. Giving more than needed begs for problems or accidents and should be avoided.
Microsoft’s answer to the authentication/authorization process is amazing. Inside every Windows computer is a database of user accounts—an encrypted list of user names with their associated password—who are allowed access to the system. Each of these individual records is called a local user account. If you don’t have a local user account created on a particular system, you won’t be able to log on to that computer (see Figure 16-1).

Figure 16-1 Windows logon screen
Every local user account needs a password (even if it’s blank) and needs to belong to a group. Configuring these attributes requires tools in Windows for creating and managing users and groups. The tools used in Windows XP, however, are not the same as the tools used in Windows Vista or Windows 7. Each version of Windows includes one or two ways to deal with users and groups. Home editions of Windows (such as Windows XP Home Edition, Windows Vista Home Basic and Home Premium, and Windows 7 Home Premium) include a basic tool, while the professional editions of Windows (Windows XP Professional; Windows Vista Business, Ultimate, and Enterprise; and Windows 7 Professional, Ultimate, and Enterprise) include an extra, more advanced utility. That’s a lot to learn about, and I’ll explain all of these tools later in the chapter. First, I want to explain passwords and groups, which are common to users across all versions of Windows.
 NOTE To create and manage users, you must have administrator privileges.
Passwords
Passwords are the ultimate key to protecting your computer. If someone learns your user name and password, they can log on to your computer. Even if the user account has only limited permissions—perhaps it can only read files, not edit them—you still have a security breach. Remember: for a hacker, just getting into the computer is half the battle.
Protect your passwords. Never give out passwords over the phone. If a user forgets a password, the network administrator should reset it to a complex combination of letters and numbers. The user should then change the password to something he or she wants, according to the parameters set by the administrator.
Make your users choose good passwords. I once attended a security seminar, and the speaker had everyone stand up. She then began to ask questions about our passwords—if we responded yes to the question, we were to sit down. She began to ask questions such as
“Do you use the name of your spouse as a password?” and
“Do you use your pet’s name?”
By the time she had asked about 15 questions, only 6 people out of some 300 were still standing. The reality is that most of us choose passwords that are amazingly easy to hack. Make sure you use a strong password: at least eight characters in length, including letters, numbers, and punctuation symbols.
Using non-alphanumeric characters makes any password much more difficult to crack, for two reasons. First, adding non-alphanumeric characters forces the hacker to consider many more possible characters than just letters and numbers. Second, most password crackers use a combination of common words and numbers to hack passwords.
Because non-alphanumeric characters don’t fit into common words or numbers, a character such as an exclamation point defeats these common-word hacks. Not all systems allow you to use characters such as @, $, %, or \, however, so you need to experiment.
CompTIA also recommends that you should have users change passwords at regular intervals. Although this concept sounds good on paper, it is a hard policy to maintain in the real world. For starters, users tend to forget passwords when they change a lot. This can lead to an even bigger security problem because users start writing passwords down.
If your organization forces you to change passwords often, one way to remember the password is to use a numbering system. I worked at a company that required me to change my password at the beginning of each month, so I did something very simple. I took a root password—let’s say it was “m3y3rs5”—and simply added a number to the end representing the current month. So when June rolled around, for example, I would change my password to “m3y3rs56.” It worked pretty well!
NOTE Every secure organization sets up various security policies and procedures to ensure that security is maintained. Windows has various mechanisms to implement such things as requiring a strong password, for example. Chapter 29 goes into detail about setting up Local Policies and Group Policy.
Windows enables logged-on users to create a password reset disk they can use if they forget a password. This is very important to have. If you lose your password and an administrator resets it, you might not have access to all of the files you had access to before, especially if they were encrypted. When you reset a password with a password reset disk, you can log on with the new password and still have access to previously encrypted files.
Best of all, password reset disks enable users to fix their own passwords. Encourage your users to create this disk; they only have this power if they create a password reset disk before they forget the password! Windows Vista and Windows 7 have an obvious option in the Tasks list to Create a password reset disk. You need a USB flash drive to create the disk. If by some chance you still have a floppy drive, you can use a floppy disk—which is where the term “disk” in password reset disk came from.
NOTE Don’t be caught without a password reset disk. You won’t think you need it until it’s too late. Make one today.
In addition to supporting password reset disks, Windows 7 enables you to create a password hint for your accounts. This clue appears after your first logon attempt fails (see Figure 16-2).
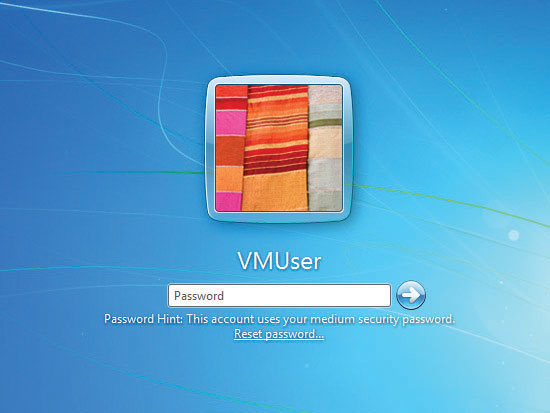
Figure 16-2 Password hint on the Windows 7 logon screen
Be aware that if your computer is a member of a domain, you cannot use password reset disks or password hints to recover your password. In those cases, the network administrator has to reset your password on the domain controller.
 CAUTION Blank passwords or passwords that are easily visible on a sticky note provide no security. Always insist on non-blank passwords, and do not let anyone leave a password sitting out in the open.
Groups
A group is a collection of user accounts that can define the capabilities of its members. A single account can be a member of multiple groups. Groups are an efficient way of managing multiple users, especially when you are dealing with a whole network of accounts.
Groups make Windows administration much easier in two ways. First, you can assign a certain level of access for a file or folder to a group instead of to just a single user account. You can make a group called Accounting, for example, and put all the accounting user accounts in that group. If a person quits, you don’t need to worry about assigning all of the proper access levels when you create a new account for his or her replacement. After you make an account for the new person, just add his account to the appropriate access group! Second, Windows provides numerous built-in groups with various access levels already predetermined. As you might imagine, there are differences among the versions of Windows, as described next.
Groups in Windows XP
Windows XP Professional provides seven built-in groups: Administrators, Power Users, Users, Backup Operators, Replicator, Everyone, and Guests. These built-in groups have a number of preset capabilities. You cannot delete these groups. Here’s what you need to know about the five most important groups:
• Administrators Any account that is a member of the Administrators group has complete administrator privileges. Administrator privileges grant complete control over a machine. It is common for the primary user of a Windows system to have her account in the Administrators group.
• Power Users Members of the Power Users group are almost as powerful as Administrators, but they cannot install new devices or access other users’ files or folders unless the files or folders specifically provide them access.
• Users Members of the Users group cannot edit the Registry or access critical system files. They can create groups but can manage only those they create.
• Everyone This group applies to any user who can log on to the system. You cannot edit this group.
• Guests The Guests group enables someone who does not have an account on the system to log on by using a guest account. You might use this feature at a party, for example, to provide casual Internet access to guests, or at a library terminal. Most often, the guest account remains disabled.
NOTE If you’re running Windows XP Professional on a Windows domain, all of the groups listed previously are included, plus other specialized groups like HelpServicesGroup and Remote Desktop Users.
Windows XP Home Edition uses groups like its big, professional brother, but never shows the user. In fact, Home Edition only enables you to use three groups: Administrators, Users, and Guests. You’ll understand more when I explain how to manage users in Windows XP, but for now, know that groups are severely limited in the Home Edition of Windows XP.
Groups in Windows Vista and Windows 7
The professional editions of Windows Vista (Business, Ultimate, and Enterprise) and Windows 7 (Professional, Ultimate, and Enterprise) offer the same groups found in Windows XP Professional and throw in a lot more. Some of the default groups, such as Distributed COM Users, target specific roles in certain industries and mean little for the average user or tech. Other specific groups enable people to check on the performance and reliability of a computer without gaining access to any of the documents on the computer. These groups include Event Log Readers, Performance Log Users, and Performance Monitor Users. These groups provide excellent levels of access for technicians to help keep busy Vista/7 machines healthy.
NOTE Windows Vista Enterprise and Windows 7 Enterprise users will almost always log on to a domain.
Like Windows XP, the home editions of Windows Vista and 7 (Home Basic and Home Premium) offer only three groups: Administrators, Users, and Guests. Administrators and Guests function as they do in all of the other versions of Windows. Members of the Users group, on the other hand, are called standard users and differ significantly from the limited users of Windows XP infamy. Standard users are prevented from harming the computer or uninstalling applications but can run most applications. Technicians don’t have to run over to standard user accounts to enable access to common tasks such as printing or doing e-mail.
Simple Tools for Managing Users
While I’ve already covered some of what makes users and groups so powerful, Microsoft understood that everyday users wanted user accounts, too. Remember that, beyond all of the permissions and administrative privileges, user accounts also create personal folders for a user’s files, such as his My Documents, My Photos, and My Music folders. To that end, every version and edition of Windows includes these simple tools for managing users, all of which are found in the Control Panel. You’ll learn about a more advanced tool in the next section of this chapter.
Managing Users in Windows XP
Windows XP provides the User Accounts applet in the Control Panel for basic user and group management. Here you can create new users, delete users, change passwords, and so forth.
User Accounts hides the complete list of users using a simplistic reference to account types that is actually a reference to the user account’s group membership. An account that is a member of the local Administrators group is called a computer administrator; an account that belongs only to the Local Users group is called a limited user account. Which users the applet displays depends on which type of user is currently logged on (see Figure 16-3). When an administrator is logged on, the administrator sees both types of accounts and the guest account. Limited users see only their own account in User Accounts.
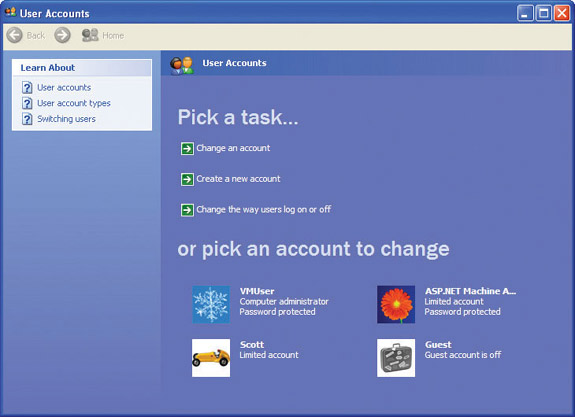
Figure 16-3 User Accounts dialog box showing a computer administrator, a couple of limited accounts, and the guest account (disabled)
Windows XP requires you to create a second account that is a member of the Administrators group during the initial Windows installation. This is for simple redundancy—if one administrator is not available or is not able to log on to the computer, another one can.
Creating users is a straightforward process. You need to provide a user name (a password can and should be added later), and you need to know which type of account to create: computer administrator or limited. To create a new user in Windows XP, open the User Accounts applet from the Control Panel and click Create a new account. On the Pick an account type page, you can create either type of account (see Figure 16-4). Simply follow the prompts on the screen. After you create your local accounts, you’ll see them listed when you open the User Accounts applet.
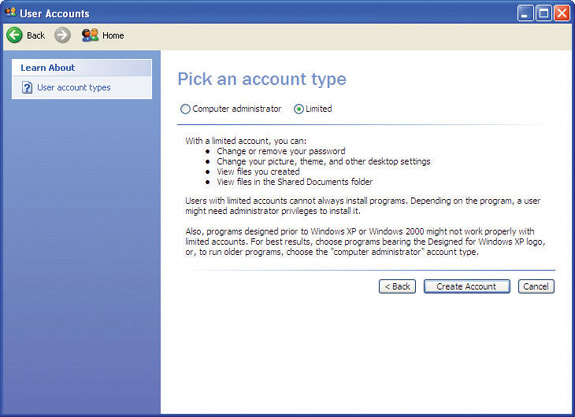
Figure 16-4 The Pick an account type page showing both options available
Head back to the User Accounts applet and look at the Change the way users log on and off option. Select it to see two checkboxes (see Figure 16-5). If you select the Use the Welcome screen checkbox, Windows brings up the friendly Welcome screen shown in Figure 16-6 each time users log on. If this box is unchecked, you’ll get the classic logon screen (see Figure 16-7).
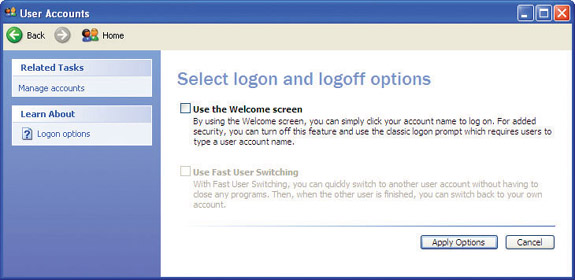
Figure 16-5 Select logon and logoff options
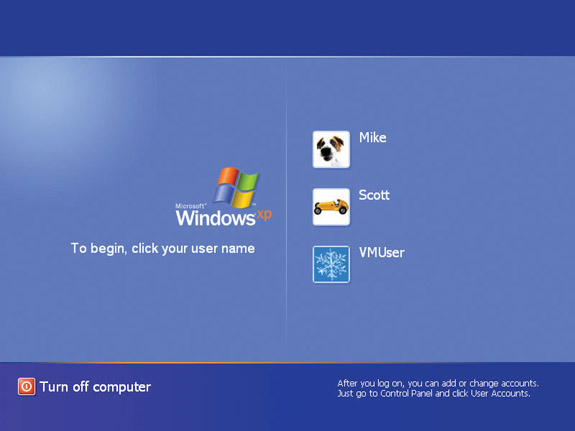
Figure 16-6 Welcome screen with three accounts
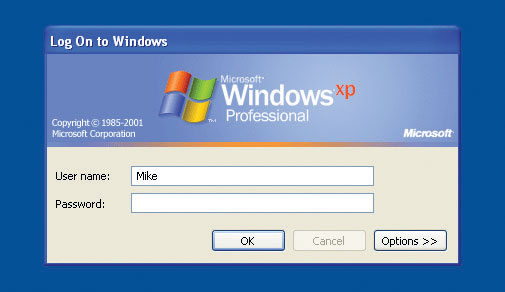
Figure 16-7 Classic logon screen, XP style
The second option, Use Fast User Switching, enables you to switch to another user without logging off of the currently running user, a feature appropriately called Fast User Switching. This option is handy when two people actively share a system, or when someone wants to borrow your system for a moment but you don’t want to close all of your programs. This option is only active if you have the Use the Welcome screen checkbox enabled. If Fast User Switching is enabled, when you click the Log Off button on the Start menu, you get the option to switch users, as shown in Figure 16-8.

Figure 16-8 Switching users on the Welcome screen
Managing Users in Windows Vista
Microsoft made some major changes to user accounts and the applet used to create and modify them in Windows Vista. Just as with Windows XP, you create three accounts when you set up a computer: guest, administrator, and a local account that’s a member of the Administrators group. That’s about where the similarities end.
To add or modify a user account, you have numerous options depending on which Control Panel view you select and which edition and update of Vista you have installed. If your machine is on a workgroup, you’ll see the User Accounts and Family Safety applet (see Figure 16-9). If you connect to a domain, the default Control Panel Home view offers the User Accounts applet (see Figure 16-10). The options in each applet differ as well, as you can see in the screenshots.

Figure 16-9 User Accounts and Family Safety applet in the Control Panel Home in Windows Vista Home Premium
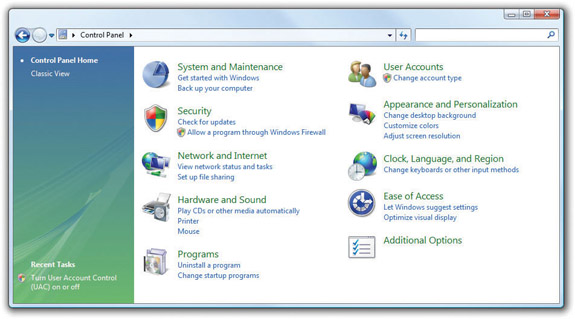
Figure 16-10 User Accounts applet in the Control Panel Home in Windows Vista Ultimate
Most techs almost immediately change the Control Panel view to Classic, but even there the different versions of Windows—and whether you’re logged on to a workgroup or a domain—give you different versions of the User Accounts applet. Figure 16-11 shows the User Accounts applet in Windows Vista Business in a domain environment. Figure 16-12 shows the applet in Windows Vista Home Premium.
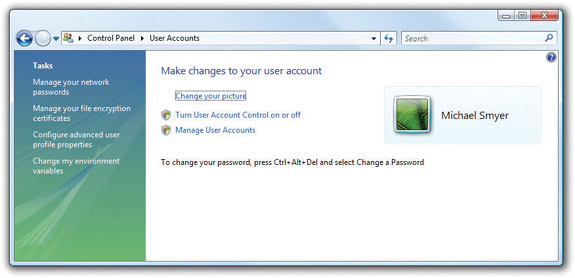
Figure 16-11 User Accounts applet in Windows Vista Business
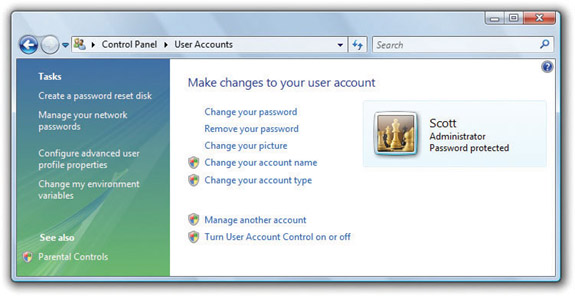
Figure 16-12 User Accounts applet in Windows Vista Home Premium
The Tasks links on the left are similar between editions of Windows (with the addition of Parental Controls in the Home Premium edition), but the main options differ a lot. This chapter focuses on standalone machines, so we’ll look more closely at the options included with Vista Home Premium.
Windows Vista Home Premium uses Vista’s version of the Welcome screen for logging on, so each user account has a picture associated with it. You can change the picture from the User Accounts applet. You can also change the name of the user account here and alter the account type, demoting an account from administrator to standard user, for example.
To add a user in Windows Vista, open the User Accounts applet. You may need to open User Accounts and Family Safety first. Click Manage another account and select Create a new account. Give the account a user name and select a user account type. Then click Create Account.
NOTE At least one account must be an administrator account. If you try to demote the sole administrator account, you’ll find the option dimmed.
User Account Control Windows XP made it too easy—and, in fact, almost necessary—to make your primary account on a computer an administrator account. Because limited users can’t do common tasks, such as running certain programs, installing applications, updating applications, updating Windows, and so on, most users simply created an administrator-level account and logged on. Such accounts have full control over the computer, so any malware that slipped in with the account could do a lot more harm.
Microsoft addressed this problem with the User Account Control (UAC), a feature that enables standard users to do common tasks and provides a permissions dialog box when standard users and administrators do certain things that could potentially harm the computer (such as attempt to install a program). We’ll discuss UAC in detail at the end of this chapter.
Parental Controls With Parental Controls, an administrator account can monitor and limit the activities of any standard user in Windows Vista (and Windows 7), a feature that gives parents and managers an excellent level of control over the content their children and employees can access (see Figure 16-13). Activity Reporting logs applications run or attempted to run, Web sites visited or attempted to visit, any kind of files downloaded, and more. You can block various Web sites by type or specific URL, or you can allow only certain Web sites, a far more powerful option.
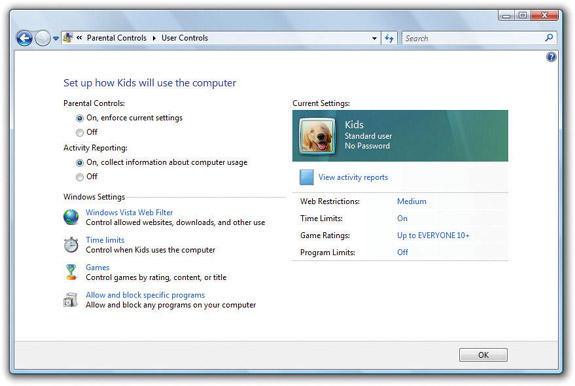
Figure 16-13 Parental Controls
Parental Controls enable you to limit the time that standard users can spend logged on. You can specify acceptable and unacceptable times of day when standard users can log on. You can restrict access both to types of games and to specific applications. If you like playing rather gruesome games filled with monsters and blood that you don’t want your kids to play, for example, you can simply block any games with certain ESRB (Entertainment Software Rating Board) ratings, such as E for Everyone, T for Teen, or M for Mature or Mature 17+.
Managing Users in Windows 7
Windows 7 handles user creation in a manner very similar to Windows Vista, continuing the use of the User Accounts Control Panel applet. The Windows 7 applet is virtually identical to the one used in Windows Vista.
To create a user account, open the User Accounts applet and select Manage another account to see something like Figure 16-14.
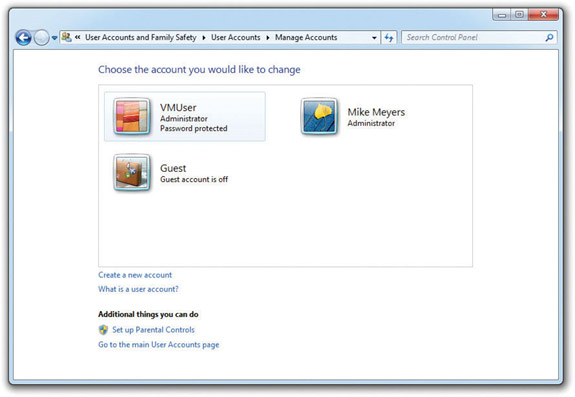
Figure 16-14 Manage Accounts
Click on Create a new account to see your options for making a new account (see Figure 16-15). Note that this applet only enables you to make administrator accounts (in the Administrators group) or standard users (in the Users group).
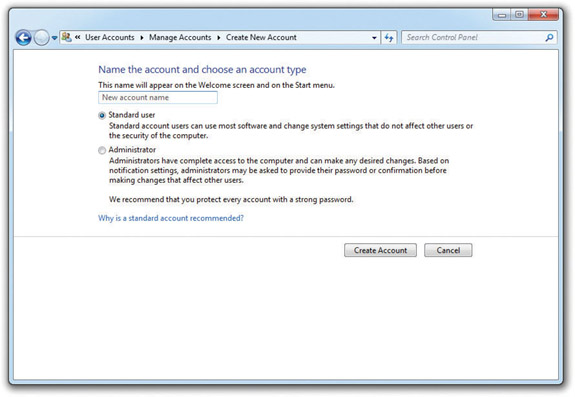
Figure 16-15 Adding a new user
While smaller, less sophisticated systems can get away with putting all their users into one of these two groups, you’ll need to turn to Local Users and Groups to take full advantage of the power of Windows’ users and groups.
Advanced User Management
The professional editions of Windows include the Local Users and Groups tool, a more powerful tool for working with user accounts. You can get to Local Users and Groups via Control Panel | Administrative Tools | Computer Management. From here, you can create, modify, and remove users and groups. Keep in mind, however, that this advanced tool will not hold your hand like the Control Panel applets. Think of the Local Users and Groups tool as a bike without the training wheels of the User Accounts applet. Figure 16-16 shows the Local Users and Groups tool in Windows Vista with Groups selected.
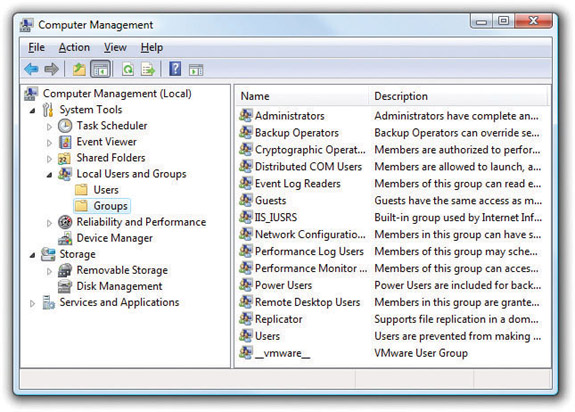
Figure 16-16 Local Users and Groups in Windows Vista
To add a group, simply right-click on a blank spot in the Groups folder and select New Group. This opens the New Group dialog box, where you can type in a group name and description in their respective fields (see Figure 16-17).
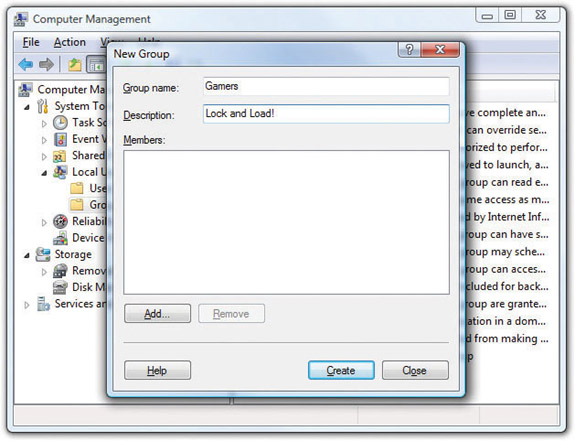
Figure 16-17 New Group dialog box in Windows Vista
To add users to this group, click the Add button. The dialog box that opens varies a little in name among the three operating systems, though they all contain the same functionality (see Figure 16-18).
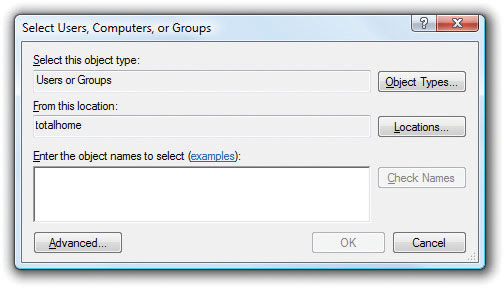
Figure 16-18 Select Users, Computers, or Groups dialog box in Windows Vista
You can add more than just users to a group. Windows uses multiple object types to define what you can add. Object types include user accounts, groups, and computers. Each object type can be added to a group and assigned permissions. The short story of how to add a user account is to click the Advanced button to expand the dialog box and then click the Find Now button (see Figure 16-19).

Figure 16-19 Select Users, Computers, or Groups dialog box with Advanced options expanded to show user accounts
You can either add group membership to a user’s properties or add a user to a group’s properties.
• To add group membership to a user account, select the Users folder, right-click a user account you want to change, and select Properties from the context menu. Then select the Member Of tab on the user account’s Properties dialog box (see Figure 16-20). Click Add to add group membership.
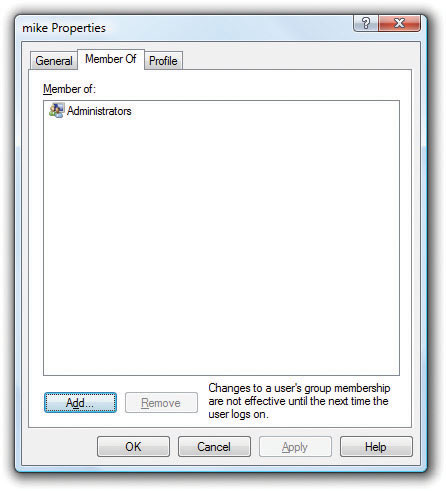
Figure 16-20 Properties dialog box of a user account, where you can change group memberships for that account
• To add users via the group’s properties, select the Groups folder. Right-click on a group and select Properties. Beneath the Members list, click the Add button to search for and add user accounts to the group.
You can also use either method to remove users. This level of flexibility makes the Local Users and Groups tool much more powerful and useful than the User Accounts Control Panel applets.
Authorization Through NTFS
User accounts and passwords provide the foundation for securing a Windows computer, enabling users to authenticate onto a PC. After you’ve created a user account, you need to determine what the user can do with the available resources (files, folders, applications, and so on). We call this process authorization. Windows uses the powerful NT File System (NTFS) to protect its resources. Let’s delve into the amazing world of NTFS to see how this powerful file system protects your folder and files.
NTFS Permissions
In Windows, every folder and file on an NTFS partition has a list that contains two sets of data. First, the list details every user and group that has access to that file or folder. Second, the list specifies the level of access that each user or group has to that file or folder. The level of access is defined by a set of restrictions called NTFS permissions. NTFS permissions define exactly what any particular account can or cannot do to the file or folder and are thus quite detailed and powerful. You can make it possible, for example, for a person to edit a file but not delete it. You can configure NTFS permissions to enable someone to create a folder and not allow other people to make subfolders.
Here are a few rules about NTFS permissions:
1. You may see the NTFS permissions on a folder or file by accessing the file’s or folder’s Properties dialog box and opening the Security tab.
2. NTFS permissions are assigned both to user accounts and groups, although it’s considered a best practice to assign permissions to groups and then add user accounts to groups instead of adding permissions directly to individual user accounts.
3. Whoever creates a folder or a file has complete control over that folder or file.
4. Administrators do not automatically have complete control over every folder and file. If an administrator wants to access a folder or file they do not have permission to access, they may go through a process called Take Control.
NTFS file and folder permissions are so complicated that entire books have been written on them! Fortunately, the CompTIA A+ 220-802 exam tests your understanding of only a few basic concepts of NTFS permissions: Ownership, Take Ownership permission, Change permission, folder permissions, and file permissions.
• Ownership When you create a new file or folder on an NTFS partition, you become the owner of that file or folder. Owners can do anything they want to the files or folders they own, including changing the permissions to prevent anybody, even administrators, from accessing them.
• Take Ownership permission With the Take Ownership special permission, anyone with the permission can seize control of a file or folder. Administrator accounts have Take Ownership permission for everything. Note the difference here between owning a file and accessing a file. If you own a file, you can prevent anyone from accessing that file. An administrator whom you have blocked, however, can take that ownership away from you and then access that file!
• Change permission Another important permission for all NTFS files and folders is the Change permission. An account with this permission can give or take away permissions for other accounts.
• Folder permissions Let’s look at a typical folder on my Windows 7 system to see how this one works. My E: drive is formatted as NTFS, and on it I created a folder called E:\Mike. I set the permissions for the E:\Mike folder by right-clicking on the folder, selecting Properties, and clicking the Security tab (see Figure 16-21).
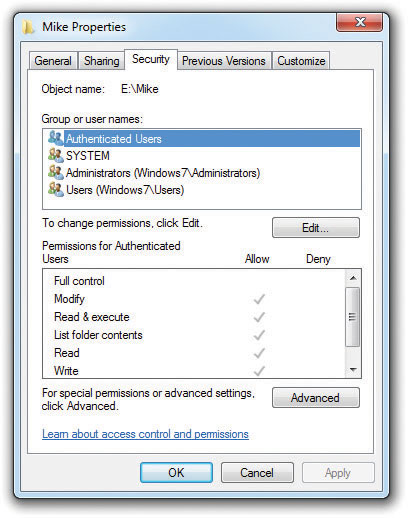
Figure 16-21 The Security tab lets you set permissions.
• File permissions File permissions are similar to Folder permissions. We’ll talk about File permissions right after we cover Folder permissions.
In Windows, just about everything in the computer has a Security tab in its Properties dialog box, and every Security tab contains two main areas. The top area shows the list of accounts that have permissions for that resource. The lower area shows exactly what permissions have been assigned to the selected account.
Here are the standard permissions for a folder:
• Full Control Enables you to do anything you want.
• Modify Enables you to do anything except delete files or subfolders, change permissions, or take ownership.
• Read & Execute Enables you to see the contents of the folder and any sub-folders.
• List Folder Contents Enables you to see the contents of the folder and any subfolders. (This permission seems the same as the Read & Execute permission, but it is only inherited by folders.)
• Read Enables you to view a folder’s contents and open any file in the folder.
• Write Enables you to write to files and create new files and folders.
File permissions are quite similar to folder permissions, with the main difference being the Special Permissions option, which I’ll talk about a bit later in the chapter.
• Full Control Enables you to do anything you want.
• Modify Enables you to do anything except take ownership or change permissions on the file.
• Read & Execute Enables you to open files and applications.
• Read Enables you to open files.
• Write Enables you to open and write to the file.
EXAM TIP Don’t panic about memorizing special permissions; just appreciate that they exist and that the permissions you see in the Security tab cover the vast majority of our needs.
Take some time to think about these permissions. Why would Microsoft create them? Think of situations where you might want to give a group Modify permission. Also, you can assign more than one permission. In many situations, we like to give users both the Read and Write permissions.
Permissions are cumulative. If you have Full Control on a folder and only Read permission on a file in the folder, you get Full Control permission on the file.
NOTE Windows editions for home use have only a limited set of permissions you can assign. As far as folder permissions go, you can assign only one: Make This Folder Private. To see this in action, right-click a file or folder and select Sharing and Security from the options. Note that you can’t just select Properties and see a Security tab as you can in the professional-oriented editions of Windows. Windows home editions do not have file-level permissions.
Permission Propagation
Permissions present an interesting challenge when you’re moving and copying files. Techs need to understand what happens to permissions in several circumstances:
• Copying data within one NTFS-based partition
• Moving data within one NTFS-based partition
• Copying data between two NTFS-based partitions
• Moving data between two NTFS-based partitions
• Copying data from an NTFS-based partition to a FAT- or FAT32-based partition
• Moving data from an NTFS-based partition to a FAT- or FAT32-based partition
Do the permissions stay as they were on the original resource? Do they change to something else? Microsoft would describe the questions as such: Do inheritable permissions propagate? Ugh. CompTIA describes the process with the term permission propagation, which I take to mean “what happens to permissions on an object when you move or copy that object.”
In Windows 7, if you access a folder’s Properties dialog box, click on the Security tab, and then click the Advanced button, you’ll see a little checkbox that says Include inheritable permissions from this object’s parent. In other words, a user receives the parent folder’s permissions for any files or subfolders created in that folder—a feature called inheritance. All versions of Windows have inheritance turned on by default, which most of the time is a good idea. However, there might be times where you want to turn off inheritance. Deselecting this option enables you to stop users from getting a specific permission via inheritance. Windows also provides explicit Deny functions for each option (see Figure 16-22). Deny overrules inheritance.
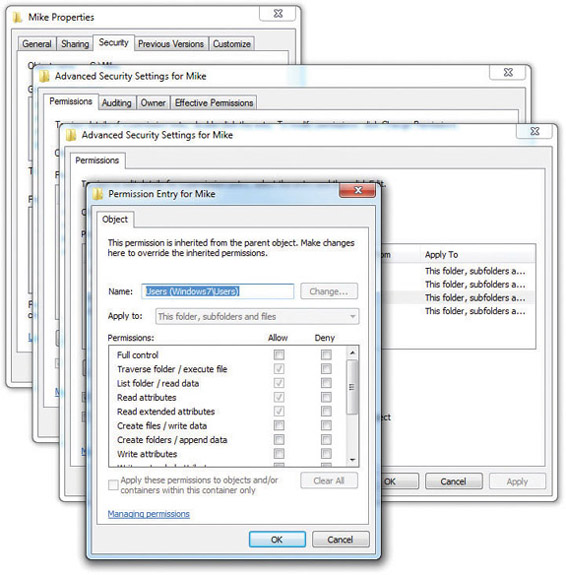
Figure 16-22 Special permissions
Let’s look at our list of six things techs need to know to see what happens when you copy or move an object, such as a file or folder.
1. Copying within a partition creates two copies of the object. The object in the original location retains its permissions, unchanged. The copy of the object in the new location inherits the permissions from that new location. The new copy can have different permissions than the original.
2. Moving within a partition creates one copy of the object. That object retains its permissions, unchanged.
3. Copying from one NTFS partition to another creates two copies of the object. The object in the original location retains its permissions, unchanged. The copy of the object in the new location inherits the permissions from that new location. The new copy can have different permissions than the original.
4. Moving from one NTFS partition to another creates one copy of the object. The object in the new location inherits the permissions from that new location. The newly moved file can have different permissions than the original.
5. Copying from an NTFS-based partition to a FAT- or FAT32-based partition creates two copies of the object. The object in the original location retains its permissions, unchanged. The copy of the object in the new location has no permissions at all.
6. Moving from an NTFS-based partition to a FAT- or FAT32-based partition creates one copy of the object. That object has no permissions at all.
From a tech’s standpoint, you need to be aware of how permissions can change when you move or copy files and, if in doubt about a sensitive file, check it before you sign off to a client. Having a top secret document totally locked down on a hard drive doesn’t do you a lot of good if you put that document on a thumb drive to transport it and the thumb drive is FAT32!
Techs and Permissions
Techs, as a rule, hate NTFS permissions. You must have administrative privileges to do almost anything on a Windows machine, such as install updates, change drivers, and install applications; most administrators hate giving out administrative permissions (for obvious reasons). If an administrator does give you administrative permission for a PC, and something goes wrong with that system while you’re working on it, you immediately become the primary suspect!
If you’re working on a Windows system administered by someone else, make sure he understands what you are doing and how long you think it will take. Have the administrator create a new account for you that’s a member of the Administrators group. Never ask for the password for a permanent administrator account! That way, you won’t be blamed if anything goes wrong on that system: “Well, I told Janet the password when she installed the new hard drive.. .maybe she did it!” When you have fixed the system, make sure the administrator deletes the account you used.
This “protect yourself from passwords” attitude applies to areas other than just doing tech support on Windows. PC support folks get lots of passwords, scan cards, keys, and ID tags. New techs tend to get an “I can go anywhere and access anything” attitude, and this is dangerous. I’ve seen many jobs lost and friendships ruined when a backup suddenly disappears or a critical file gets erased. Everybody points to the support tech in these situations. In physical security situations, make other people unlock doors for you. In some cases, I’ve literally asked the administrator or system owner to sit behind me, read a magazine, and be ready to punch in passwords as needed. What you don’t have access to can’t hurt you.
Sharing a Windows PC Securely
User accounts, groups, and NTFS work together to enable you to share a Windows PC securely with multiple user accounts. You can readily share files, folders, programs, and more. More to the point, you can share only what should be shared, locking access to files and folders that you want to make private. Each version of Windows handles multiple user accounts and sharing among those accounts differently, so let’s look at Windows XP, Windows Vista, and Windows 7 separately and then finish with a look at a few other sharing and security issues.
Sharing in Windows XP
Microsoft tried to make secure sharing in Windows XP easier than it was in previous versions of Windows. To this end, Microsoft included several features. Each user account gets a series of folders in My Documents that the user can share and administrators can access. Windows XP also comes with a set of pre-made folders called Shared Documents that are accessible by all of the users on the computer. Also, Windows XP comes with simple file sharing enabled by default, which makes the option to share or not pretty easy. Finally, Windows XP Professional provides the option to use the full NTFS permissions and make customized shares possible.
Making Personal Documents Secure
The fact that most users of Windows XP computers will be computer administrators rather than limited users creates a bit of an issue with computers shared by many users. By default, administrators can see all of the contents of Documents and Settings, where the My Documents folder for each user account resides. You can override this option in the My Documents Properties dialog box. Selecting the option to Make this folder private blocks the contents from anyone accessing them (see Figure 16-23).
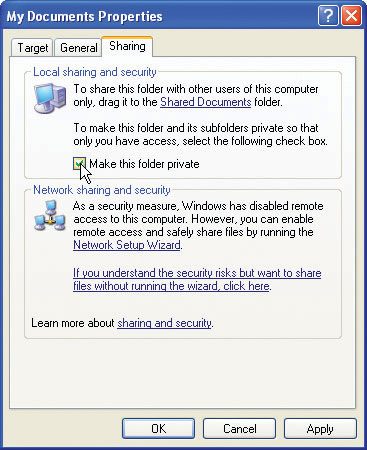
Figure 16-23 Making personal documents secure from prying eyes
Note that an administrator can take ownership of anything, so the only true way to lock down your data is to encrypt it. In the My Documents Properties dialog box, select the General tab and then click the Advanced button to open the Advanced Attributes dialog box. Click the checkbox next to Encrypt contents to secure data and that’ll handle the encryption. Just make sure you have a password reset disk if you’re going to use encryption to secure your files.
Shared Documents
You can use the Shared Documents folders to move files and folders among many users of a single machine. Every account can access the Shared Documents folder and the subfolders within, such as Shared Music and Shared Pictures (see Figure 16-24). Because new folders inherit the permissions of parent folders, by default any new sub-folder you create in Shared Documents can be accessed by any account.
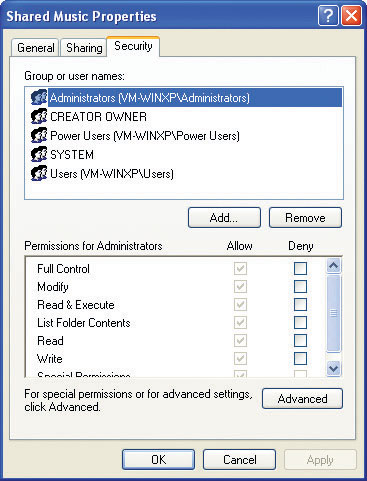
Figure 16-24 Shared Music Properties dialog box
Simple File Sharing
With simple file sharing, you essentially have one local sharing option, and that’s to put anything you want to share into the Shared Documents folder or one of its subfolders. To share a folder over a network, you only have a couple of options as well, such as to share or not and, if so, to give full control to everybody. Note that the sharing option is enabled in Figure 16-25. It’s pretty much all or nothing.
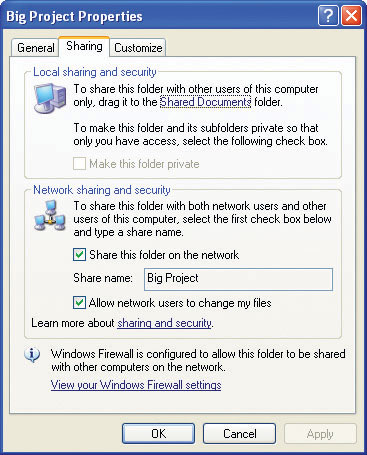
Figure 16-25 Folder shared, but seriously not secure
Windows XP Home and Media Center only give you the simple file sharing method, so the sharing of files and folders is straightforward. Windows XP Professional, on the other hand, enables you to turn off simple file sharing and unlock the true power of NTFS and permissions. To turn off simple file sharing, open a view of Windows Explorer (such as My Documents), choose Tools | Folder Options, and select the View tab. The very last option on the View tab is Use simple file sharing (Recommended). Deselect that option, as in Figure 16-26, and then click OK.

Figure 16-26 Turning off simple file sharing
When you access sharing and security now, you’ll see a more fully formed security dialog box (see Figure 16-27).
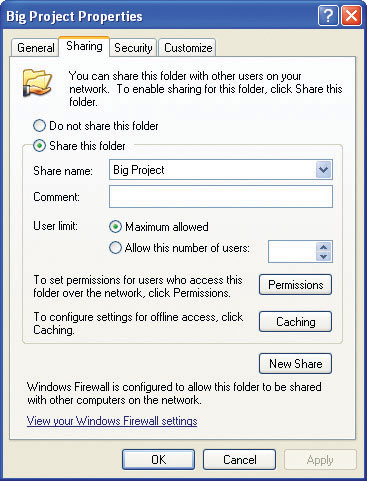
Figure 16-27 Full sharing and security options in Windows XP
NOTE When you add a Windows XP Professional system to a domain, simple file sharing is disabled. You must use the full power of NTFS.
Sharing in Windows Vista
Microsoft tweaked the settings for sharing a single PC with multiple users in Windows Vista to fix the all-or-nothing approach offered by simple file sharing; Vista enables you to target shared files and folders to specific user accounts. Microsoft beefed up the standard user account (as you read about earlier in the chapter) so users could access what they needed to get meaningful work done. Plus they expanded the concept of the Shared Documents folder into the Public folders.
Targeted Sharing
To share a folder or file with specific users—or with everyone, for that matter—you simply right-click on it and select Share. This opens the File Sharing dialog box, where you can select specific user accounts from a drop-down list (see Figure 16-28).
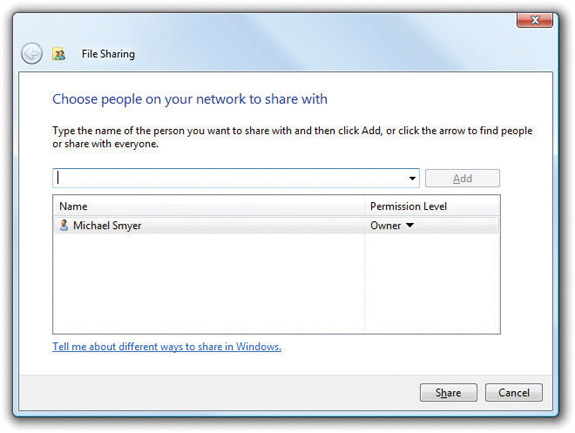
Figure 16-28 File Sharing dialog box on a standalone machine
Once you select a user account, you can then choose what permission level to give that user. You have three choices: Reader, Contributor, or Co-owner (see Figure 16-29). Reader simply means the user has read-only permissions. Contributor gives the user read and write permissions and the permission to delete any file the user contributed to the folder. (Contributor only works at the folder level.) Co-owner enables the user to do anything.

Figure 16-29 Permissions options
NOTE If the computer in question is on a Windows domain, the File Sharing dialog box differs such that you can search the network for user accounts in the domain. This makes it easy to share throughout the network.
Public Folders
Public folders offer another way to share files and folders. Anything you want to share with all other users on the local machine—or, if on a network, throughout the network—simply place it in the Public folder or one of the many subfolders, such as Public Documents or Public Pictures (see Figure 16-30). Note that the Public folder does not give you any control over what someone accessing the files contained within can do with those files.
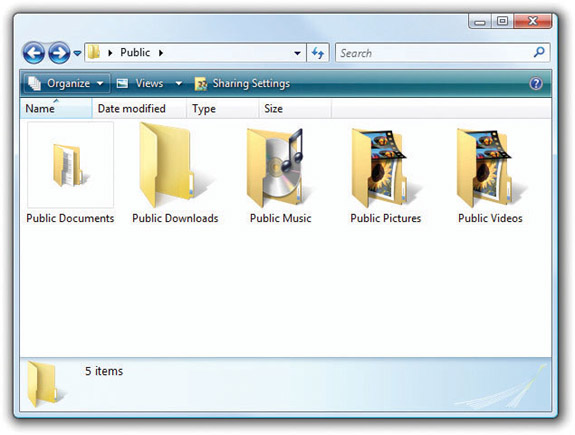
Figure 16-30 Shared folders in the Public folder
NOTE Like in Windows XP, NTFS sharing is alive and well in Windows Vista.
Sharing in Windows 7
Windows 7 keeps the file sharing options of Windows Vista and adds homegroups to the mix. You already learned all about homegroups in Chapter 5, but here’s a quick refresher: Instead of sharing individual files or folders, you can use HomeGroup to share libraries, such as your Documents or Music libraries. Any files in your shared libraries will be automatically accessible by everyone in the homegroup, though you can also use more specific permissions. You’ll need a password to join a homegroup, so any shared data will be secure.
Locating Shared Folders
Before you walk away from a computer, you should check for any unnecessary or unknown (to you) shared folders on the hard drives. This enables you to make the computer as secure as possible for the user. When you open My Computer or Computer, shared folders don’t just jump out at you, especially if they’re buried deep within the file system. A shared C: drive is obvious, but a shared folder all the way down in D:\temp\backup\Simon\secret share would not be obvious, especially if none of the parent folders were shared.
Windows comes with a handy tool for locating all of the shared folders on a computer, regardless of where they reside on the drives. The Computer Management console in the Administrative Tools has a Shared Folders option under System Tools. In that are three options: Shares, Sessions, and Open Files. Select Shares to reveal all of the shared folders (see Figure 16-31).
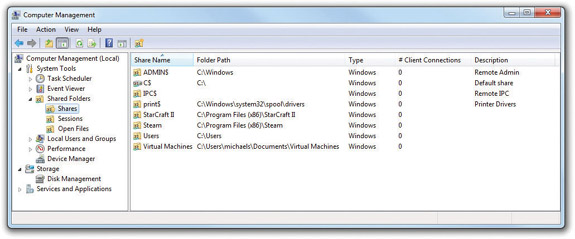
Figure 16-31 Shared Folders tool in Computer Management
You can double-click on any share to open the Properties dialog box for that folder. At that point, you can make changes to the share—such as users and permissions—just as you would from any other sharing dialog box.
Administrative Shares
A close glance at the screenshot in Figure 16-31 might have left some of you with raised eyebrows and quizzical looks. What kind of share is ADMIN$ or C$?
Every version of Windows since Windows NT comes with several default shares, notably all hard drives—not optical drives or removable devices, such as thumb drives—plus the %systemroot% folder—usually C:\Windows—and a couple of others, depending on the system. These administrative shares give local administrators administrative access to these resources, whether they log on locally or remotely. (In contrast, shares added manually are called local shares.)
Administrative shares are odd ducks. You cannot change the default permissions on them. You can delete them, but Windows will re-create them automatically every time you reboot. They’re hidden, so they don’t appear when you browse a machine over the network, though you can map them by name. Keep the administrator password safe, and these default shares won’t affect the overall security of the computer.
NOTE Administrative shares have been exploited by malware programs, especially because many users who set up their computers never give the administrator account a password. Starting with Windows XP Home, Microsoft changed the remote access permissions for such machines. If you log on to a computer remotely as administrator with no password, you get guest access rather than administrator access. That neatly nips potential exploits in the bud.
Protecting Data with Encryption
The scrambling of data through encryption techniques provides the only true way to secure your data from access by any other user. Administrators can use the Take Ownership permission to seize any file or folder on a computer, even those you don’t actively share. Thus you need to implement other security measures for that data that needs to be ultra secure. Depending on the version of Windows, you have between zero and three encryptions tools: Windows Home editions (Windows XP Home Edition, Windows Vista Home Basic and Home Premium, and Windows 7 Home Premium) have basically no security features; Windows XP Professional uses the Encrypting File System to, well, encrypt files; and Windows Vista/7 Ultimate and Enterprise add an encryption system that can encrypt entire hard drives.
Encrypting File System
The professional editions of Windows (Windows XP Professional; Windows Vista Business, Ultimate, and Enterprise; and Windows 7 Professional, Ultimate, and Enterprise) offer a feature called the Encrypting File System (EFS), an encryption scheme that any user can use to encrypt individual files or folders on a computer. The home editions of Windows do not enable encryption through the built-in tools, though you have the option to use third-party encryption methods, such as TrueCrypt, to lock down data.
To encrypt a file or folder takes but a moment. You right-click the file or folder you want to encrypt and select Properties. In the Properties dialog box for that object, select the General tab and click the Advanced button (see Figure 16-32) to open the Advanced Attributes dialog box. Click the checkbox next to Encrypt contents to secure data (see Figure 16-33). Click OK to close the Advanced Attributes dialog box and then click OK again on the Properties dialog box, and you’ve locked that file or folder from any user account aside from your own.
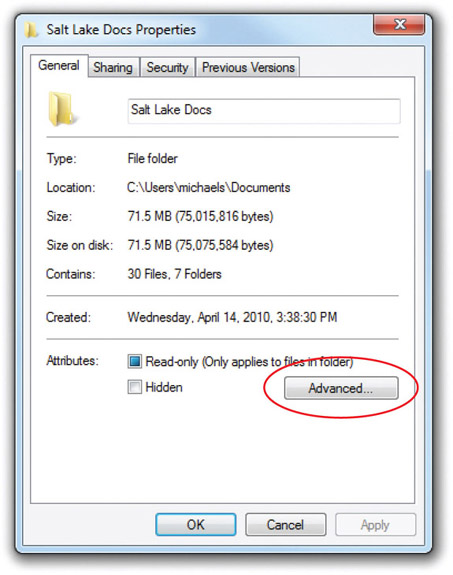
Figure 16-32 Click the Advanced button on the General tab

Figure 16-33 Selecting encryption
NOTE Encryption is just one possible attribute of a file. You can also make files hidden, read-only, and more, all from a file or folder’s Properties dialog box. You’ll learn more about attributes in Chapter 18.
As long as you maintain the integrity of your password, any data you encrypt by using EFS is secure from prying. That security comes at a potential price, though, and your password is the key. The Windows security database stores the password (securely, not plain text, so no worries there), but that means access to your encrypted files is based on that specific installation of Windows. If you lose your password or an administrator resets your password, you’re locked out of your encrypted files permanently. There’s no recovery. Also, if the computer dies and you try to retrieve your data by installing the hard drive in another system, you’re likewise out of luck. Even if you have an identical user name on the new system, the security ID that defines that user account will differ from what you had on the old system.
NOTE Remember the password reset disk we discussed earlier in the chapter? If you use EFS, you simply must have a valid password reset disk in the event of some horrible catastrophe.
And one last caveat. If you copy an encrypted file to a disk formatted as anything but NTFS, you’ll get a prompt saying that the copied file will not be encrypted. If you copy to a disk with NTFS, the encryption stays. The encrypted file—even if on a removable disk—will only be readable on your system with your login.
BitLocker Drive Encryption
Windows Vista/7’s Ultimate and Enterprise editions offer full drive encryption through BitLocker Drive Encryption. BitLocker encrypts the whole drive, including every user’s files, so it’s not dependent on any one account. The beauty of BitLocker is that if your hard drive is stolen, such as in the case of a stolen portable computer, all of the data on the hard drive is safe. The thief can’t get access, even if you have a user on that laptop that failed to secure his or her data through EFS.
BitLocker requires a special Trusted Platform Module (TPM) chip on the motherboard to function. The TPM chip validates on boot that the Vista/7 computer has not changed—that you still have the same operating system installed, for example, and that the computer wasn’t hacked by some malevolent program. The TPM also works in cases where you move the BitLocker drive from one system to another.
If you have a legitimate BitLocker failure (rather than a theft) because of tampering or moving the drive to another system, you need to have a properly created and accessible recovery key or recovery password. The key or password is generally created at the time you enable BitLocker and should be kept somewhere secure, such as a printed copy in a safe or a file on a network server accessible only to administrators.
To enable BitLocker, double-click the BitLocker Drive Encryption icon in the Classic Control Panel, or select Security in Control Panel Home view and then click Protect your computer by encrypting data on your disk (see Figure 16-34).

Figure 16-34 Enabling BitLocker Drive Encryption
User Account Control
When picking the poster child for the “327 Reasons We Hated Vista” list, I’ll bet most folks put Vista’s User Account Control (UAC) at the very top. Vista’s UAC manifested as a pop-up dialog box that seemed to appear every time you tried to do anything on a Windows Vista system (see Figure 16-35).
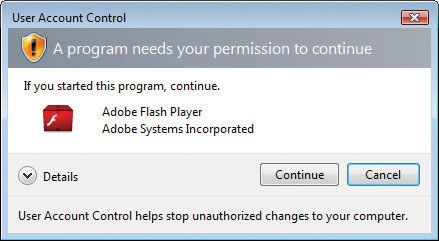
Figure 16-35 UAC in action. Arrgh!
It’s too bad that UAC got such a bad rap. Not only is UAC an important security update for Windows Vista and Windows 7, but it is also a common feature in both Mac OS and Linux/Unix. Figure 16-36 shows the equivalent feature on a Mac.
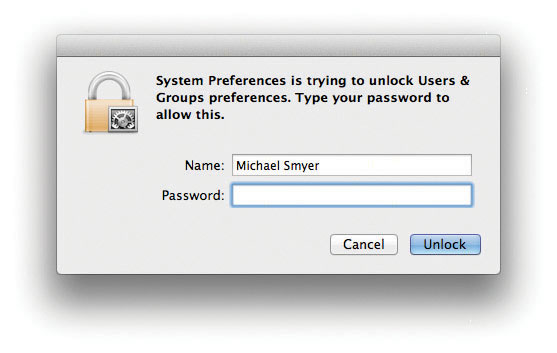
Figure 16-36 UAC equivalent on a Mac
If every other major operating system uses something like UAC, why was Microsoft slammed so hard when they unveiled UAC in Windows Vista? The reason is simple: Windows users are spoiled rotten, and, until UAC came along, the vast majority of users had no idea how risky their computing behavior was.
The problem started years ago when Microsoft created NTFS. NTFS uses robust user accounts and enables fine control over how users access files and folders—but at a cost: NTFS in its pure form is somewhat complicated. To share a folder, you need to make sure the person accessing that folder has a user account and that you’ve configured the NTFS permissions to give that user the permissions needed to do whatever he or she wants to do (see Figure 16-37).
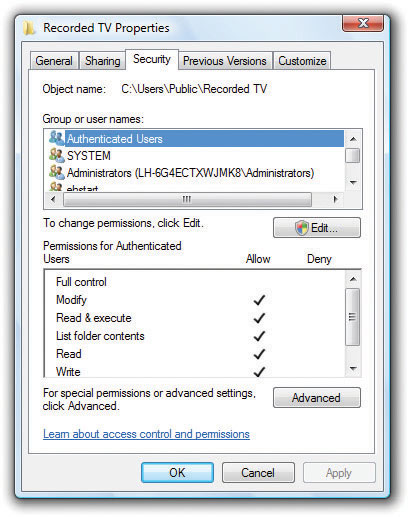
Figure 16-37 Typically confusing settings for NTFS permissions
User accounts have always been a bit of a challenge. The only account that can truly do anything on a Windows system is the administrator. Sure, you can configure a system with groups and assign NTFS permissions to those groups—and this is commonly done on large networks with a full-time IT staff—but what about small offices and home networks? These users almost never have the skill sets to deal with the complexities of users and groups, which often results in systems where the user accounts are all assigned administrator privileges by default—and that’s when it gets dangerous (see Figure 16-38).
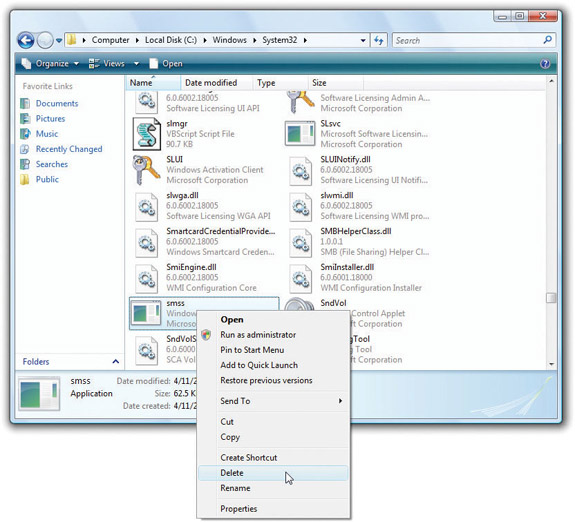
Figure 16-38 The danger of administrator privileges in the wrong hands!
UAC in Windows Vista
User Account Control enables users to know when they are about to do something that has serious consequences. The Microsoft TechNet library (“Understanding and Configuring User Account Control in Windows Vista”) provides examples of common actions that require Administrator privileges:
• Installing and uninstalling applications
• Installing a driver for a device (e.g., a digital camera driver)
• Installing Windows Updates
• Configuring Parental Controls
• Installing an ActiveX control
• Adjusting Windows Firewall settings
• Changing a user’s account type
• Modifying UAC settings in the Security Policy Editor snap-in (secpol.msc)
• Configuring Remote Desktop access
• Adding or removing a user account
• Coping or moving files into the Program Files or Windows directory
• Scheduling Automated Tasks
• Restoring system backed-up files
• Configuring Automatic Updates
• Browsing to another user’s directory
Before Vista, Microsoft invented the idea of the Power Users group to give users almost all of the power of an administrator account (to handle most of the situations just described) without actually giving users the full power of the account. Assigning a user to the Power Users group still required someone who knew how to do this, however, so most folks at the small office/home level simply ignored the Power Users group (see Figure 16-39).
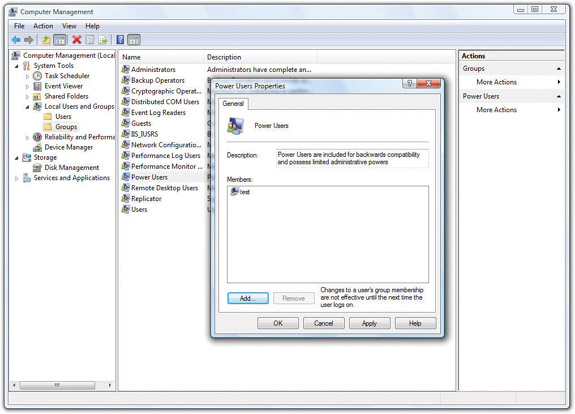
Figure 16-39 Power Users group—almost never used at the small office/home level
Clearly, Microsoft needed a better method to prevent people from running programs that they should not run. If users have the correct privileges, however—or the ability to “escalate” their privileges to that of an administrator—then they should be able to do what they need to do as simply as possible. Microsoft needed to make the following changes:
• The idea of using an administrator account for daily use needed to go away.
• Any level of account should be able to do anything as easily as possible.
• If a regular account wants to do something that requires administrator privileges, the user of the regular account will need to enter the administrator password.
• If a user with administrator privileges wants to run something that requires administrator privileges, the user will not have to reenter his or her password, but the user will have to respond to an “Are you sure?”-type dialog box so he or she appreciates the gravity of the action—thus, the infamous UAC dialog box.
How UAC Works
UAC works for both standard user accounts and administrator accounts. If a standard user attempts to do something that requires administrator privileges, he or she sees a UAC dialog box that prompts for the administrator password (see Figure 16-40).

Figure 16-40 Prompting for an administrator password in Vista
If a user with administrator privileges attempts to do something that requires administrator privileges, a simpler UAC dialog box appears, like the one shown in Figure 16-41.
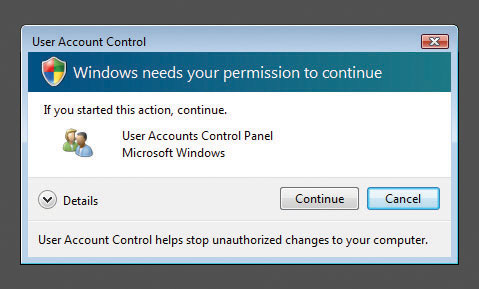
Figure 16-41 Classic UAC prompt
NOTE The official name for the UAC dialog box is the “UAC consent prompt.” When the UAC consent prompt appears in Vista, the rest of the desktop darkens and you cannot take any other action until you respond to the consent prompt.
Interestingly, Vista has not one but four different UAC prompts, depending on the program/feature you wish to run, as outlined in Table 16-1.
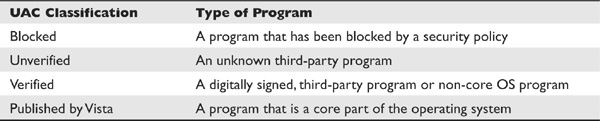
Table 16-1 UAC Prompts in Windows Vista
Blocked programs generate a scary-looking, red-bannered dialog box like the one shown in Figure 16-42. Note you can click OK in Windows Vista (or Close in Windows 7) or look at more details (if available).
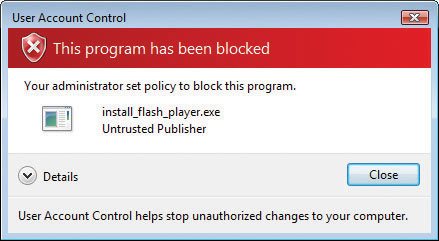
Figure 16-42 Blocked program
Unverified programs lack any form of certificate to validate. In this case, you get a yellow-bannered dialog box warning you the application is unsigned and giving you two options: allow the program to run (Yes) or not (No). See Figure 16-43 for an example of this.
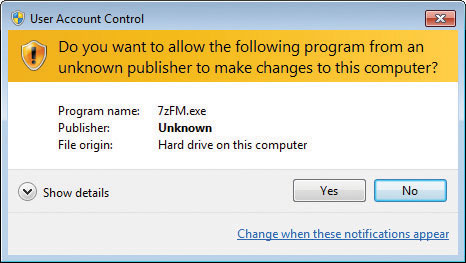
Figure 16-43 Unverified program
Verified programs aren’t part of the core of Vista and are usually written by third parties. These programs do have valid, verified certificates. You can identify the dialog box by its gray-blue banner (see Figure 16-44).
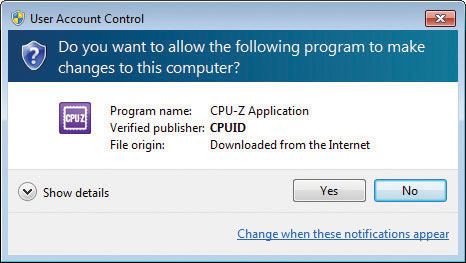
Figure 16-44 Verified program
Published by Vista programs are written as part of the core of Vista and show up with a teal-bannered dialog box (see Figure 16-45).
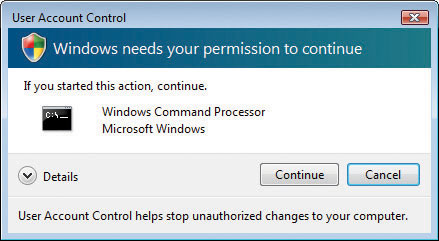
Figure 16-45 Published by Vista
UAC uses small shield icons to warn you ahead of time that it will prompt you before certain tasks, as shown in Figure 16-46. Microsoft updated this somewhat redundant feature in Windows 7, as you’ll soon see.

Figure 16-46 Shield icons in the Control Panel
UAC gives users running a program an opportunity to consider their actions before they move forward. It’s a good thing, but spoiled Windows users aren’t accustomed to something that makes them consider their actions. As a result, one of the first things everyone learned how to do when Vista came out was to turn off UAC.
How to Turn Off UAC
You can turn off UAC in a number of ways in Windows. Here are the two most common ways:
1. In the User Accounts Control Panel applet, you’ll see an option to Turn User Account Control on or off (see Figure 16-47). Select this option and uncheck the checkbox to turn UAC off. Check the checkbox to turn it on again.
2. Open up the System Configuration utility (msconfig) and select Disable UAC on the Tools tab, as shown in Figure 16-48. You’ll have to reboot for the changes to take effect. Note you can also turn on UAC from the System Configuration utility.

Figure 16-47 Turning User Account Control on or off
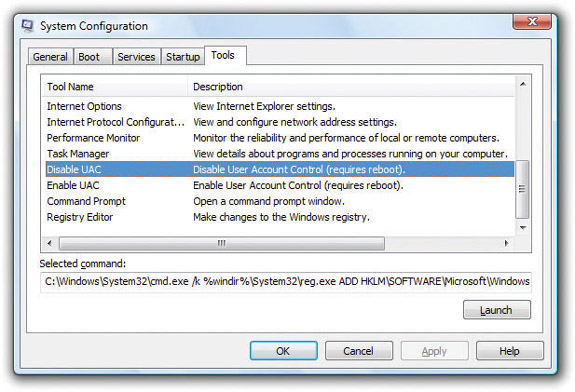
Figure 16-48 Disabling UAC in the System Configuration utility
UAC in Windows Vista worked well, but it startled users. Suddenly, users had to deal with UAC, and they didn’t like that. Most users simply turned UAC off and added it to the reasons to not like Windows Vista.
UAC in Windows 7
Microsoft may be a huge company, but it still knows how to react when its customers speak out about features they don’t like. Windows 7 unveiled a more refined, less “in-your-face” UAC that makes the feature much easier to use.
NOTE All references to Control Panel applets in Windows 7 assume you are using the Small Icon view.
A More Granular UAC
Microsoft did some research on why UAC drove users nuts, concluding that the problem wasn’t UAC itself but the “I’m constantly in your face or you can turn me off and you get no help at all” aspect. To make UAC less aggressive, Microsoft introduced four UAC levels. To see these levels, go to the User Accounts applet and select Change User Account Control settings, as shown in Figure 16-49. When you select this option, you see the dialog box in Figure 16-50.

Figure 16-49 Change User Account Control settings option
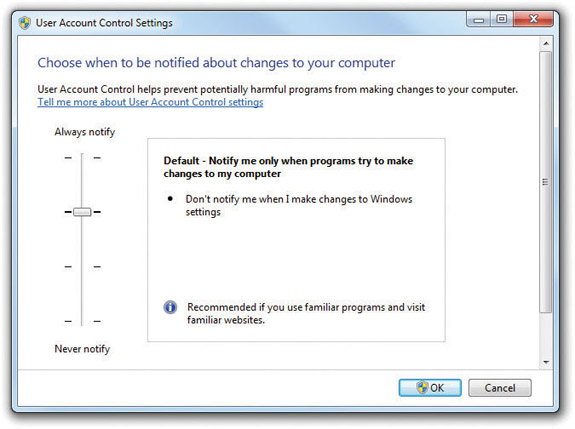
Figure 16-50 Four levels of UAC
In Figure 16-50, you can see a slider with four levels. The top level (Always notify) means you want UAC to work exactly as it does in Vista, displaying the aggressive consent form every time you do anything that typically requires administrator access. The bottom option (Never notify) turns off UAC. The two levels in the middle are new and are very similar. Both of them do the following:
• Don’t notify me when I make changes.
• Notify me only when programs try to makes changes.
The only difference is in how they show the change. The second-from-top level will display the typical consent form, but only when programs try to make changes. The third-from-top level displays a consent form, but where the normal consent form dims your desktop and doesn’t allow you to do anything but address the form, this consent form just pops up like a normal dialog box.
EXAM TIP Make sure you know what each of the four UAC levels does.
Program Changes Versus Changes I Make
So what’s the difference between a program making a change and you making a change? Take a look at Figure 16-51. In this case, Windows 7 is set to the second-from-top option. A program (the very safe and, judging by the color of the banner, verified) Adobe Download Manager is attempting to install a feature into Internet Explorer. Because this is a program trying to make changes, the UAC consent form appears and darkens the desktop.
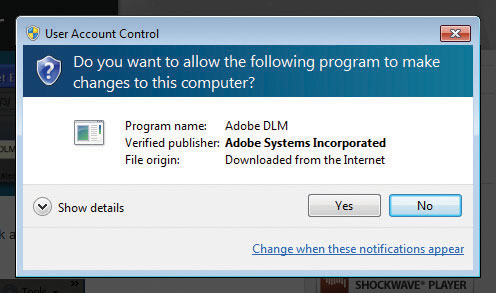
Figure 16-51 Darkened UAC
If you lower the UAC to the third-from-top option, you still see a consent form, but now it acts like a typical dialog box, as shown in Figure 16-52.
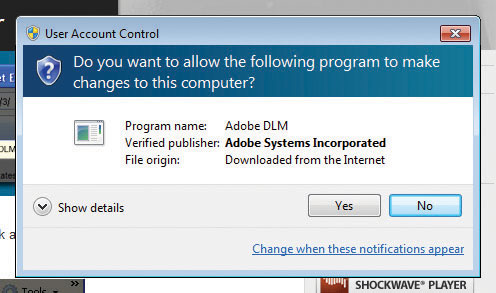
Figure 16-52 Non-darkened UAC
EXAM TIP The default behavior for UAC in Windows 7 is the second-from-top option, which results in a screen similar to Figure 16-51.
A program such as the Adobe program described earlier is very different from a feature you want to change. Notice the shields, as shown earlier in Figure 16-49.
Each of these options isn’t a program—each is merely a feature built into Windows. Those shields tell you that clicking the feature next to a shield will require administrator privileges. If you were to pick the Vista-strength UAC option, you’d get a UAC consent prompt when you click one of those features. If you set UAC to any of the three lower settings, however, you’d go straight to that feature without any form of UAC consent prompt. Of course, this isn’t true if you don’t have administrator privileges. If you’re a standard user, you’ll still be prompted for a password, just as in Vista.
Overall, the improvements to UAC in Windows 7 show that it has a place on everyone’s computer. UAC might cause an occasional surprise or irritation, but that one more “Are you sure?” could mean the difference between safe and unsafe computing. So go ahead, turn UAC back on in Windows 7! It’s well worth the small inconvenience.
Chapter Review
Questions
1. Which of the following tools would enable you to create a new user account in Windows XP?
A. User Accounts
B. User Account Control
C. Users and Groups
D. Users and Passwords
2. Which feature in Windows XP enables you to change to another user account without logging out of the current user account?
A. Change Accounts
B. Fast User Switching
C. User Account Control
D. Users and Groups
3. Which is the best password for the user Joy, who has a pet named Fido and a birth date of January 8, 1982?
A. joy1982
B. joylovesfido
C. 1982cutie
D. oddvr88*
4. How can you encrypt an entire drive, including files and folders belonging to other users?
A. EFS
B. User Account Control
C. Administrative Shares
D. BitLocker
5. What feature in Windows 7 opens a consent prompt for standard users to enter administrator credentials to accomplish various tasks reserved for the latter group?
A. User Access Command
B. User Access Control
C. User Account Command
D. User Account Control
6. Which permission enables an administrator to change the ownership of a file without knowing the user account password for that file?
A. Change permission
B. Change Ownership permission
C. Ownership permission
D. Take Ownership permission
7. You copy a file from a folder on a hard drive formatted as NTFS, with permissions set to Read for everyone, to a USB thumb drive formatted as FAT32. What permissions does the copy of the file have?
A. Read-only for everyone
B. Full Control for everyone
C. None
D. You can’t copy a file from an NTFS drive to a FAT32 drive.
8. What set of folders is available to all users on a computer in Windows XP?
A. My Documents
B. Personal Documents
C. Public folder
D. Shared Documents
9. Which of the following operating systems do not allow you to disable simple file sharing? (Select two.)
A. Windows XP Home
B. Windows XP Media Center
C. Windows XP Professional
D. Windows Vista Ultimate
10. Which of the following file systems enables you to encrypt files, thus making them unviewable by any account but your own?
A. EFS
B. FAT
C. FAT32
D. OSR
Answers
1. A. User Accounts would enable you to create a new user account in Windows XP.
2. B. In Windows XP, Fast User Switching enables you to change to another user account without logging out of the current user account.
3. D. Of the choices listed, oddvr88* would be the best password; it has a non-alphanumeric character, which makes it more difficult for a hacker to crack.
4. D. BitLocker Drive Encryption enables you to encrypt an entire drive, including files and folders belonging to other users.
5. D. The User Account Control feature in Windows 7 provides a consent prompt for standard users to enter administrator credentials to accomplish various tasks normally reserved for the Administrators group.
6. D. The Take Ownership permission enables an administrator to change the ownership of a file without knowing the user account password for that file.
7. C. The key here is that you are copying from an NTFS hard drive to a FAT32 USB drive. Copying from an NTFS-based partition to a FAT- or FAT32-based partition creates two copies of the object; the copy of the object in the new location has no permissions at all.
8. D. The Shared Documents set of folders is available to all users on a computer in Windows XP.
9. A, B. Windows XP Home and Windows XP Media Center do not allow you to disable simple file sharing.
10. A. The Encrypting File System (EFS) enables you to encrypt files, making them unviewable by any account but your own.