NOTE The majority of topics in this chapter apply exclusively to the 802 exam, but several 801 exam objectives fit well here too. I’ll point out the 801 topics when they appear in the chapter.
In this chapter, you will learn how to
• Explain the threats to your computers and data
• Describe key security concepts and technologies
• Explain how to protect computers from network threats
Your PC is under siege. Through your PC, a malicious person can gain valuable information about you and your habits. He can steal your files. He can run programs that log your keystrokes and thus gain account names and passwords, credit card information, and more. He can run software that takes over much of your computer processing time and use it to send spam or steal from others. The threat is real and right now. Worse, he’s doing one or more of these things to your clients as I write these words. You need to secure your computer and your users’ computers from these attacks.
But what does computer security mean? Is it an antivirus program? Is it big, complex passwords? Sure, it’s both of these things, but what about the fact that your laptop can be stolen easily or that improper ventilation can cause hard drives and other components to die?
To secure computers, you need both a sound strategy and proper tactics. From a strategic sense, you need to understand the threat from unauthorized access to local machines as well as the big threats posed when computers go onto networks. Part of the big picture means to know what policies, software, and hardware to put in place to stop those threats. From a tactical in-the-trenches sense, you need to master the details, to know how to implement and maintain the proper tools. Not only do you need to install antivirus programs in your users’ computers, for example, but you also need to update those programs regularly to keep up with the constant barrage of new viruses.
NOTE The majority of topics in this chapter apply exclusively to the 802 exam, but several 801 exam objectives fit well here too. I’ll point out the 801 topics when they appear in the chapter.
Threats to your data and PC come from two directions: accidents and malicious people. All sorts of things can go wrong with your computer, from users getting access to folders they shouldn’t see to a virus striking and deleting folders. Files can be deleted, renamed, or simply lost. Hard drives can die, and optical discs get scratched and rendered unreadable. Accidents happen and even well-meaning people can make mistakes.
Unfortunately, a lot of people out there intend to do you harm. Add that intent together with a talent for computers, and you have a deadly combination. Let’s look at the following issues:
• Unauthorized access
• Data destruction, accidental or deliberate
• Administrative access
• Catastrophic hardware failures
• Malware
• Environmental threats
Unauthorized access occurs when a person accesses resources without permission. Resources in this case mean data, applications, and hardware. A user can alter or delete data; access sensitive information, such as financial data, personnel files, or e-mail messages; or use a computer for purposes the owner did not intend.
Not all unauthorized access is malicious—often this problem arises when users who are randomly poking around in a computer discover that they can access resources in a fashion the primary user did not intend. Unauthorized access becomes malicious when outsiders knowingly and intentionally take advantage of weaknesses in your security to gain information, use resources, or destroy data!
One of the ways to gain unauthorized access is through intrusion. You might imagine someone kicking in a door and hacking into a computer, but more often than not it’s someone sitting at a home computer, trying various passwords over the Internet. Not quite as glamorous, but still....
Dumpster diving is the generic term for anytime a hacker goes through your refuse, looking for information. This is also a form of intrusion. The amount of sensitive information that makes it into any organization’s trash bin boggles the mind! Years ago, I worked with an IT security guru who gave me and a few other IT people a tour of our office’s trash. In one 20-minute tour of the personal wastebaskets of one office area, we had enough information to access the network easily, as well as to embarrass seriously more than a few people. When it comes to getting information, the trash is the place to look!
Shoulder surfing is another technique for gaining unauthorized access. Shoulder surfing is simply observing someone’s screen or keyboard to get information, often passwords. As the name implies, it usually requires the bad guy looking over your shoulder to see what you are doing.
Although you’re more likely to lose data through accident, the acts of malicious users get the vast majority of headlines. Most of these attacks come under the heading of social engineering—the process of using or manipulating people inside the networking environment to gain access to that network from the outside—which covers the many ways humans can use other humans to gain unauthorized information. This unauthorized information may be a network login, a credit card number, company customer data—almost anything you might imagine that one person or organization may not want a person outside of that organization to access.
Social engineering attacks aren’t hacking—at least in the classic sense of the word—although the goals are the same. Social engineering means people attacking an organization through the people in the organization or physically accessing the organization to get the information they need. Following are a few of the more classic types of social engineering attacks.
NOTE It’s common for social engineering attacks to be used together, so if you discover one of them being used against your organization, it’s a good idea to look for others.
Hackers can physically enter your building under the guise of someone who might have a legitimate reason for being there, such as cleaning personnel, repair technicians, or messengers. They then snoop around desks, looking for whatever they can find. They might talk with people inside the organization, gathering names, office numbers, department names—little things in and of themselves but powerful tools when combined later with other social engineering attacks.
Dressing the part of a legitimate user—with fake badge and everything—enables malicious people to gain access to locations and thus potentially your data. Following someone through the door, for example, as if you belong, is called tailgating. Tailgating is a common form of infiltration.
Telephone scams are probably the most common social engineering attack. In this case, the attacker makes a phone call to someone in the organization to gain information. The attacker attempts to come across as someone inside the organization and uses this to get the desired information. Probably the most famous of these scams is the “I forgot my user name and password” scam. In this gambit, the attacker first learns the account name of a legitimate person in the organization, usually using the infiltration method. The attacker then calls someone in the organization, usually the help desk, in an attempt to gather information, in this case a password.
Hacker: “Hi, this is John Anderson in accounting. I forgot my password. Can you reset it, please?”
Help Desk: “Sure, what’s your user name?”
Hacker: “j_w_Anderson”
Help Desk: “OK, I reset it to e34rd3.”
Certainly telephone scams aren’t limited to attempts to get network access. There are documented telephone scams against organizations aimed at getting cash, blackmail material, or other valuables.
Phishing is the act of trying to get people to give their user names, passwords, or other security information by pretending to be someone else electronically. A classic example is when a bad guy sends you an e-mail that’s supposed to be from your local credit card company asking you to send them your user name and password. Phishing is by far the most common form of social engineering done today.
Often an extension of unauthorized access, data destruction means more than just intentionally or accidentally erasing or corrupting data. It’s easy to imagine some evil hacker accessing your network and deleting all your important files, but authorized users may also access certain data and then use that data beyond what they are authorized to do. A good example is the person who legitimately accesses a Microsoft Access product database to modify the product descriptions, only to discover that she can change the prices of the products, too.
This type of threat is particularly dangerous when users are not clearly informed about the extent to which they are authorized to make changes. A fellow tech once told me about a user who managed to mangle an important database when someone gave him incorrect access. When confronted, the user said: “If I wasn’t allowed to change it, the system wouldn’t let me do it!” Many users believe that systems are configured in a paternalistic way that wouldn’t allow them to do anything inappropriate. As a result, users often assume they’re authorized to make any changes they believe are necessary when working on a piece of data they know they’re authorized to access.
Every operating system enables you to create user accounts and grant those accounts a certain level of access to files and folders in that computer. As an administrator, supervisor, or root user, you have full control over just about every aspect of the computer. Windows XP, in particular, makes it entirely too easy to give users administrative access to the computer, especially Windows XP Home, which has only two kinds of users: administrators and limited users. Because you can’t do much as a limited user, most home and small office systems simply use multiple administrator accounts. If you need to control access, you need to use non-Home versions of Windows.
As with any technology, computers can and will fail—usually when you can least afford for it to happen. Hard drives crash, the power fails—it’s all part of the joy of working in the computing business. You need to create redundancy in areas prone to failure (such as installing backup power in case of electrical failure) and perform those all-important data backups. Chapter 17 goes into detail about using backups and other issues involved in creating a stable and reliable system.
A fellow network geek once challenged me to try to bring down his newly installed network. He had just installed a powerful and expensive firewall router and was convinced that I couldn’t get to a test server he added to his network just for me to try to access. After a few attempts to hack in over the Internet, I saw that I wasn’t going to get anywhere that way.
So I jumped in my car and drove to his office, having first outfitted myself in a techylooking jumpsuit and an ancient ID badge I just happened to have in my sock drawer. I smiled sweetly at the receptionist and walked right by my friend’s office (I noticed he was smugly monitoring incoming IP traffic by using some neato packet-sniffing program) to his new server.
I quickly pulled the wires out of the back of his precious server, picked it up, and walked out the door. The receptionist was too busy trying to figure out why her e-mail wasn’t working to notice me as I whisked by her carrying the 65-pound server box. I stopped in the hall and called him from my cell phone.
Me (cheerily): “Dude, I got all your data!”
Him (not cheerily): “You rebooted my server! How did you do it?”
Me (smiling): “I didn’t reboot it—go over and look at it!”
Him (really mad now): “YOU <EXPLETIVE> THIEF! YOU STOLE MY SERVER!”
Me (cordially): “Why, yes. Yes, I did. Give me two days to hack your password in the comfort of my home, and I’ll see everything! Bye!”
I immediately walked back in and handed him the test server. It was fun. The moral here is simple: Never forget that the best network software security measures can be rendered useless if you fail to protect your systems physically!
Networks are without a doubt the fastest and most efficient vehicles for transferring computer viruses among systems. News reports focus attention on the many malicious software attacks from the Internet, but a huge number of such attacks still come from users who bring in programs on optical discs and USB drives. The “Network Security” section of this chapter describes the various methods of virus infection and other malware and what you need to do to prevent such attacks from damaging your networked systems.
Your computer is surrounded by a host of dangers all just waiting to wreak havoc: bad electricity from the power company, a host of chemicals that just by the nature of your business may or may not be near your computer, dust, heat, cold, wet.. .it’s a jungle out there!
 EXAM TIP Expect questions on environmental threats on the 220-801 exam.
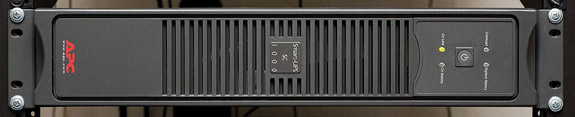
We’ve covered power issues extensively back in Chapter 10. Don’t ever fail to appreciate the importance of surge suppressors and uninterruptible power supplies (UPSs) to protect your electronics from surges, brownouts, and blackouts. Also remember that network devices need power protection as well. Figure 29-1 shows a typical UPS protecting a network rack.
Figure 29-1 UPS on rack
Proper environmental controls help secure servers and workstations from the environmental impact of excessive heat, dust, and humidity. Such environmental controls include air conditioning, proper ventilation, air filtration, and monitors for temperature and humidity. A CompTIA A+ technician maintains an awareness of temperature, humidity level, and ventilation, so that he or she can tell very quickly when proper levels or settings are out of whack.
A PC works best in an environment where the air is clean, dry, and room temperature. CompTIA doesn’t expect you to become an environmental engineer, but it does expect you to explain and deal with how dirty or humid or hot air can affect a computer. We’ve covered all of these topics to some extent throughout the book so let’s just do a quick overview with security in mind.
Dirty Air Dust and debris aren’t good for any electronic components. Your typical office air conditioning does a pretty good job of eliminating the worst offenders, but not all computers are in nice offices. No matter where the computers reside, you need to monitor your systems for dirt. The best way to do this is observation as part of your regular work. Dust and debris will show up all over the systems, but the best place to look are the fans. Fans will collect dust and dirt quickly (see Figure 29-2).
Figure 29-2 Dirty fan
All electronic components get dirty over time. To clean them, you need to use either compressed air or a nonstatic vacuum. So which one do you use? The rule is simple: If you don’t mind dust blowing all over the place, use compressed air. If you don’t want dust blowing all over the place, use a vacuum.
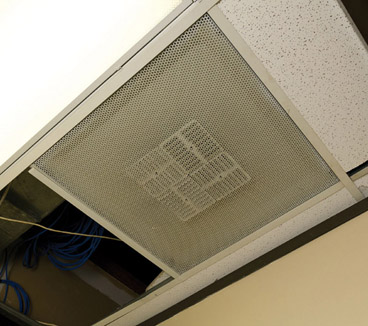
Equipment closets filled with racks of servers need proper airflow to keep things cool and to control dusty air. Make sure that the room is ventilated and air-conditioned (see Figure 29-3) and that the air filters are changed regularly.
Figure 29-3 Air-conditioning vent in a small server closet
If things are really bad, you can enclose a system in a dust shield. Dust shields come complete with their own filters to keep a computer clean and happy even in the worst of environments.
Temperature and Humidity Most computers are designed to operate at room temperature, which is somewhere in the area of 22°C (72°F) with the relative humidity in the 30–40 percent range. Colder and dryer is better for computers (but not for people), so the real challenge is when the temperature and the humidity go higher.
A modern office will usually have good air conditioning and heating, so your job as a tech is to make sure that things don’t happen to prevent your air conditioning from doing its job. That means you’re pretty much always on ventilation patrol. Watch for the following to make sure air is flowing:
• Make sure ducts are always clear of obstructions.
• Make sure ducts are adjusted (not too hot or too cold).
• Don’t let equipment get too closed off from proper ventilation.
Every office is filled with chemicals, compositions that invariably get stored, spilled, or dumped. If something spills and it’s not something you’re familiar with, refer to the Material Safety Data Sheet (MSDS) for proper documentation for handling and disposal. Always comply with local government regulations when dealing with chemicals, including batteries and the metals on circuit boards.
 TIP Most cities in the U.S. have one or more environmental services center that you can use to recycle electronic components. For your city, try a Google (or other search engine) search on the term “environmental services” and you’ll almost certainly find a convenient place for e-waste disposal.
Once you’ve assessed the threats to your computers and networks, you need to take steps to protect those valuable resources. Depending on the complexity of your organization, this can be a small job encompassing some basic security concepts and procedures, or it can be exceedingly complex. The security needs for a three-person desktop publishing firm, for example, would differ wildly from those of a defense contractor supplying top-secret toys to the Pentagon.
From a CompTIA A+ certified technician’s perspective, you need to understand the big picture (that’s the strategic side), knowing the concepts and available technologies for security. At the implementation level (that’s the tactical side), you’re expected to know where to find such things as security policies in Windows. A CompTIA Network+ or CompTIA Security+ tech will give you the specific options to implement. (The exception to this level of knowledge comes in dealing with malicious software such as viruses, but we’ll tackle that subject as the last part of the chapter.) So let’s look at three concept and technology areas: access control, data classification and compliance, and reporting.
Access is the key. If you can control access to the data, programs, and other computing resources, you’ve secured your systems. Access control is composed of four interlinked areas that a good security-minded tech should think about: physical security, authentication, users and groups, and security policies. Much of this you know from previous chapters, but this section should help tie it all together as a security topic.
The first order of security is to block access to the physical hardware from people who shouldn’t have access. This isn’t rocket science. Lock the door to your workspace. Don’t leave a PC unattended when logged in. In fact, don’t ever leave a system logged in, even as a limited user. God help you if you walk away from a server still logged in as an administrator. You’re tempting fate.
Employee ID badges are now so common that even relatively small organizations use them. Badges are a great way not only to control building access but also to store authentication tools such as radio frequency identification (RFID) or smart cards (see “Authentication” later in this chapter). Figure 29-4 shows a typical badge.
Figure 29-4 Typical employee badge/smart card
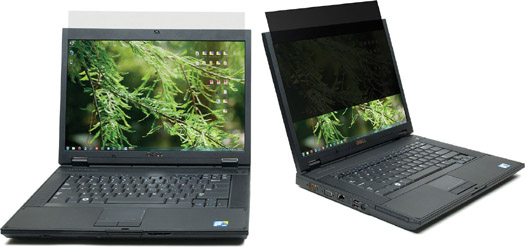
Be aware of the risk of shoulder surfing. One handy tool to prevent this is a privacy filter. A privacy filter is little more than a framed sheet or film that you apply to the front of your monitor. Privacy filters reduce the viewing angle, making it impossible to see the contents on the screen for anyone except those directly in front of the screen (see Figure 29-5).
Figure 29-5 Privacy filter
Security is more of an issue when users walk away from their computers, even for a moment. When you see a user’s computer logged in and unattended, do the user and your company a huge favor and lock the computer. Just walk up and press WINDOWS LOGO KEY-L on the keyboard to lock the system. It works in all versions of Windows. Better yet, make a point to make users aware of this issue so they understand the risk and can take the precaution themselves. You should also instruct them how to password-protect their screensaver. When the password feature is enabled, a user won’t be able to return to the desktop until they’ve entered the proper password. It’s a little like locking the computer, and good for those who like using screensavers.
While you’re looking at a user’s monitor, examine around his or her desk. Is the user writing down passwords and putting them in plain sight? If so, tell the user to get rid of them! Teach users to create easy-to-remember passwords. Are critical, personal, or sensitive documents also lying about in plain sight? The user should put them in a closed, secure place. Documents no longer needed should be shredded immediately.
Security requires properly implemented authentication, which means in essence how the computer determines who can or should access it and, once accessed, what that user can do. A computer can authenticate users through software or hardware, or a combination of both.
You can categorize ways to authenticate into three broad areas: knowledge factors, ownership factors, and inherent factors. A knowledge factor is something the user knows, like a password or personal identification number (PIN). An ownership factor is something the user has, like an ID card or security token. An inherent factor (also called a biometric) is something that is part of the user, like a fingerprint or retinal pattern.
NOTE A popular way to remember authentication factors is to think of them as something you know (passwords), something about you (biometric), and something you have (badge, key fob, or security token).
Multifactor authentication provides the best authentication, where a user must use two or more factors to prove his or her identity. Note that multifactor means more than one factor, not just more than one thing. Logging in with a user name and password is two things, for example, but because both fall into the category of what a user knows, it’s not multifactor authentication.
Many organizations use two-factor authentication. An example is a key fob that generates a numeric key. A user authenticates by entering his or her user name and password (something you know) and is then prompted to enter the key (something you have).
EXAM TIP Remember the concept of single sign-on from Chapter 5? You can log on to any computer in a domain using one set of credentials. In addition to being a time-saver, this is also a great security feature that helps network administrators better control who can gain access to the network.
Software Authentication: Proper Passwords It’s still rather shocking to me to power up a friend’s computer and go straight to his or her desktop, or with my married-with-kids friends, to click one of the parents’ user account icons and not be prompted for a password. This is just wrong! I’m always tempted to assign passwords right then and there—and not tell them the passwords, of course—so they’ll see the error of their ways when they try to log on next. I don’t do it but always try to explain gently the importance of good passwords.
You know about passwords from Chapter 16, so I won’t belabor the point here. Suffice it to say that you must require that your users have proper passwords. Don’t let them write passwords down or tape them to the underside of their mouse pads either!
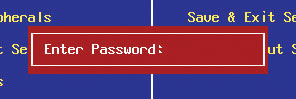
It’s not just access to Windows that you need to think about. There’s always the temptation for people to do other mean things, such as changing CMOS settings, opening up the case, and even stealing hard drives. Any of these actions renders the computer inoperable to the casual user until a tech can undo the damage or replace components. All modern CMOS setup utilities come with a number of tools to protect your computer, such as drive lock, intrusion detection, and of course system access passwords such as the one shown in Figure 29-6. Refer to Chapter 8 to refresh yourself on what you can do at a BIOS level to protect your computer.
Figure 29-6 CMOS access password request
Hardware Authentication Smart cards and biometric devices enable modern systems to authenticate users with more authority than mere passwords. Smart cards are credit card-sized cards with circuitry that can identify the bearer of the card. Smart cards are relatively common for such tasks as authenticating users for mass transit systems, for example, but are fairly uncommon in computers. Figure 29-7 shows a smart card and keyboard combination.
Figure 29-7 Keyboard-mounted smart card reader being used for a commercial application (photo courtesy of Cherry Corp.)
Security tokens are devices that store some unique information that the user carries on their person. They may be digital certificates, passwords, or biometric data. They may also store an RSA token. RSA tokens are random-number generators that are used with user names and passwords to ensure extra security. Most security tokens come in the form of key fobs, as shown in Figure 29-8.
Figure 29-8 RSA key fob (photo courtesy of EMC Corp.)
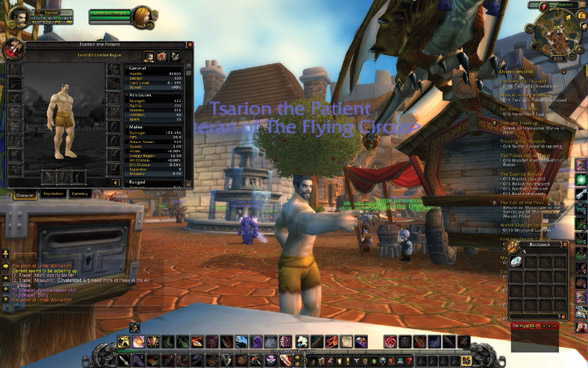
You can also get many types of security tokens as software. Anyone who plays World of Warcraft knows that there’s an entire illegal industry known as “gold farmers” who like to hack accounts and steal all the hard-earned loot your character collects. It’s a terrible feeling to log in to the game only to find your character cleaned out (see Figure 29-9).
Figure 29-9 I’ve been robbed! My fine armor is gone, my bags are empty, and my bank account only has a few copper pieces!
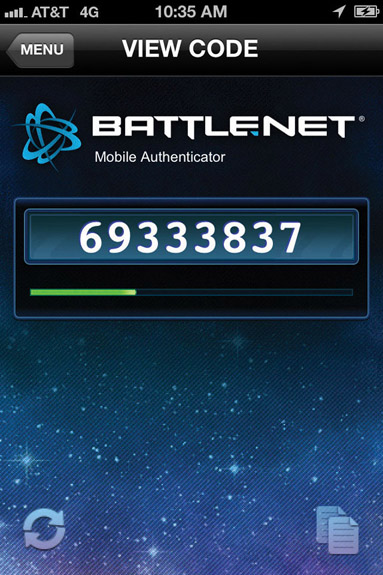
To counter this problem, Blizzard Entertainment, the folks who own World of Warcraft, provide free security tokens. Most folks think “hardware” in the form of key fobs when they hear the words “security tokens,” but you can also download a security token as software—Blizzard offers an app for your smartphone, as shown in Figure 29-10.
Figure 29-10 Blizzard Entertainment security token for iPhone
People can guess or discover passwords, but it’s a lot harder to forge someone’s fingerprints. The keyboard in Figure 29-11 authenticates users on a local machine by using fingerprints. Other devices that will do the trick are key fobs and retinal scanners. Devices that require some sort of physical, flesh-and-blood authentication are called biometric devices.
Figure 29-11 Microsoft keyboard with fingerprint accessibility
NOTE How’s this for full disclosure? Microsoft does not claim that the keyboard in Figure 29-11 offers any security at all. In fact, the documentation specifically claims that the fingerprint reader is an accessibility tool, not a security device. Because it enables a person to log on to a local machine, though, I think it falls into the category of authentication devices.
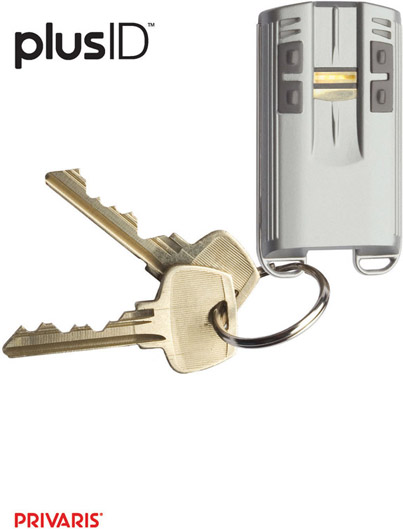
Clever manufacturers have developed key fobs and smart cards that use RFID to transmit authentication information so users don’t have to insert something into a computer or card reader. The Privaris plusID combines, for example, a biometric fingerprint fob with an RFID tag that makes security as easy as opening a garage door remotely! Figure 29-12 shows a plusID device.
Figure 29-12 plusID (photo courtesy of Privaris, Inc.)
For some reason, CompTIA lists retinal scanners as a form of biometric security. While retinal scanners do exist, I have been in hundreds of high-security facilities and have only seen one retinal scanner in operation in almost 30 years as a tech. CompTIA should remove this silly objective, but until they do, Figure 29-13 shows about the only image of a retinal scanner in operation you’ll ever encounter.
Figure 29-13 Retinal scanner in Half-Life 2
The file system on a hard drive matters a lot when it comes to security. On a Windows machine with multiple users, you simply must use NTFS or you have no security at all. Not just primary drives but also any secondary drives in computers in your care should be formatted as NTFS, with the exception of removable drives such as the one you use to back up your system.
When you run into a multiple-drive system that has a second or third drive formatted as FAT32, you can use the convert command-line utility to go from FAT to NTFS. The syntax is pretty straightforward. To convert a D: drive from FAT or FAT32 to NTFS, for example, you’d type the following:
convert d: /fs:ntfs
You can substitute a mount name in place of the drive letter in case you have a mounted volume. The command has a few extra switches as well, so at the command prompt, type /? after the convert command to see all of your options.
Windows uses user accounts and groups as the bedrock of access control. A user account is assigned to a group, such as Users, Power Users, or Administrators, and by association gets certain permissions on the computer. Using NTFS enables the highest level of control over data resources.
Assigning users to groups is a great first step in controlling a local machine, but this feature really shines once you go to a networked environment. Let’s go there now.
Access to user accounts should be restricted to the assigned individuals, and those who configure the permissions to those accounts must remember the Principle of Least Privilege discussed in Chapter 16: Accounts should have permission to access only the resources they need and no more. Tight control of user accounts is critical to preventing unauthorized access. Disabling unused accounts is an important part of this strategy, but good user account management goes far deeper than that.
Groups are a great way to achieve increased complexity without increasing the administrative burden on network administrators, because all operating systems combine permissions. When a user is a member of more than one group, which permissions does that user have with respect to any particular resource? In all operating systems, the permissions of the groups are combined, and the result is what you call the effective permissions the user has to access the resource. As an example, if Rita is a member of the Sales group, which has List Folder Contents permission to a folder, and she is also a member of the Managers group, which has Read and Execute permissions to the same folder, Rita will have both List Folder Contents and Read and Execute permissions to that folder.
Watch out for default user accounts and groups—they can become secret backdoors to your network! All network operating systems have a default Everyone group that can be used to sneak into shared resources easily. This Everyone group, as its name implies, literally includes anyone who connects to that resource. Windows gives full control to the Everyone group by default, for example, so make sure you know to lock this down! The other scary one is the Guest account. The Guest account is the only way to access a system without a user name and password. Unless you have a compelling reason to provide guest access, you should always make sure the Guest account is disabled.
All of the default groups—Everyone, Guest, Users—define broad groups of users. Never use them unless you intend to permit all of those folks access to a resource. If you use one of the default groups, remember to configure them with the proper permissions to prevent users from doing things you don’t want them to do with a shared resource!
Although permissions control how users access shared resources, there are other functions you should control that are outside the scope of resources. For example, do you want users to be able to access a command prompt on their Windows system? Do you want users to be able to install software? Would you like to control what systems a user can log on to or at what time of day a user can log on? All network operating systems provide you with some capability to control these and literally hundreds of other security parameters, under what Windows calls policies. I like to think of policies as permissions for activities, as opposed to true permissions, which control access to resources.
A policy is usually applied to a user account, a computer, or a group. Let’s use the example of a network composed of Windows XP Professional systems with a Windows Server 2008 system. Every Windows XP system has its own local policies program, which enables policies to be placed on that system only. Figure 29-14 shows the tool you use to set local policies on an individual system, called Local Security Policy, being used to deny the user account Danar the capability to log on locally.
Figure 29-14 Local Security Policy
NOTE When you open the Local Security Policy tool in Windows XP, note that the program is labeled “Local Security Settings,” even though the icon is labeled “Local Security Policy.” In Windows Vista and Windows 7, it is always called Local Security Policy.
Local policies work great for individual systems, but they can be a pain to configure if you want to apply the same settings to more than one PC on your network. If you want to apply policy settings en masse, you need to step up to Windows Active Directory domain-based Group Policy. By using Group Policy, you can exercise deity-like—Microsoft prefers to use the term granular—control over your network clients.
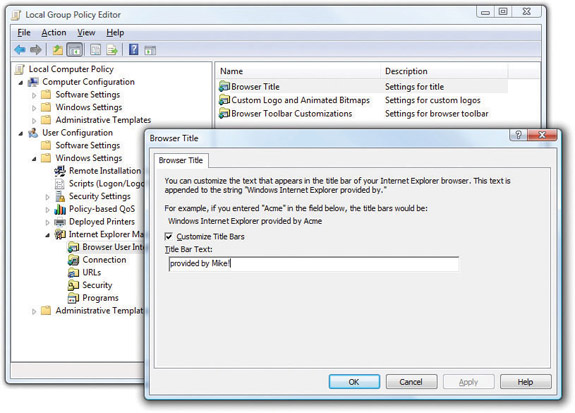
Want to set default wallpaper for every PC in your domain? Group Policy can do that. Want to make certain tools inaccessible to everyone except authorized users? Group Policy can do that, too. Want to control access to the Internet, redirect home folders, run scripts, deploy software, or just remind folks that unauthorized access to the network will get them nowhere fast? Group Policy is the answer. Figure 29-15 shows Group Policy; I’m about to change the default title on every instance of Internet Explorer on every computer in my domain!
Figure 29-15 Using Group Policy to make IE title say “provided by Mike!”
That’s just one simple example of the settings you can configure by using Group Policy. You can apply literally hundreds of tweaks through Group Policy, from the great to the small, but don’t worry too much about familiarizing yourself with each and every one. Group Policy settings are a big topic on most of the Microsoft certification tracks, but for the purposes of the CompTIA A+ exams, you simply have to be comfortable with the concept behind Group Policy.
Although I could never list every possible policy you can enable on a Windows system, here’s a list of some commonly used ones:
• Prevent Registry Edits If you try to edit the Registry, you get a failure message.
• Prevent Access to the Command Prompt Keeps users from getting to the command prompt by turning off the Run command and the Command Prompt shortcut.
• Log on Locally Defines who may log on to the system locally.
• Shut Down System Defines who may shut down the system.
• Minimum Password Length Forces a minimum password length.
• Account Lockout Threshold Sets the maximum number of logon attempts a person can make before being locked out of the account.
• Disable Windows Installer Prevents users from installing software.
• Printer Browsing Enables users to browse for printers on the network, as opposed to using only assigned printers.
Although the CompTIA A+ exams don’t expect you to know how to implement policies on any type of network, you are expected to understand that policies exist, especially on Windows networks, and that they can do amazing things to control what users can do on their systems. If you ever try to get to a command prompt on a Windows system only to discover the Run command is dimmed, blame it on a policy, not the computer!
Larger organizations, such as government entities, benefit greatly from organizing their data according to its sensitivity—what’s called data classification—and making certain that computer hardware and software stay as uniform as possible. In addition, many government and internal regulations apply fairly rigorously to the organizations.
Data classification systems vary by the organization, but a common scheme classifies documents as public, internal use only, highly confidential, top secret, and so on. Using a classification scheme enables employees such as techs to know very quickly what to do with documents, the drives containing documents, and more. Your strategy for recycling a computer system left from a migrated user, for example, will differ a lot if the data on the drive was classified as internal use only or top secret.
Compliance means, in a nutshell, that members of an organization or company must abide by or comply with all of the rules that apply to the organization or company. Statutes with funny names such as Sarbanes-Oxley impose certain behaviors or prohibitions on what people can and cannot do in the workplace.
From a technician’s point of view, the most common compliance issue revolves around software, such as what sort of software users can be allowed to install on their computers or, conversely, why you have to tell a user that he can’t install the latest application that may help him do the job more effectively because that software isn’t on the approved list. This can lead to some uncomfortable confrontations, but it’s part of a tech’s job.
The concepts behind compliance in IT are not, as some might imagine at first blush, to stop you from being able to work effectively. Rather they’re designed to stop users with not quite enough technical skill or knowledge from installing malicious programs or applications that will destabilize their systems. This keeps technical support calls down and enables techs to focus on more serious problems.
As a final weapon in your security arsenal, you need to report any security issues so a network administrator or technician can take steps to make them go away. You can set up auditing within Windows so that the OS reports problems to you. Event Viewer enables you to read the logs created by auditing. You can then do your work and report those problems. Let’s take a look.
The Security section of Event Viewer doesn’t show you anything by default. To unlock the full potential of Event Viewer, you need to set up auditing. Auditing in the security sense means to tell Windows to create an entry in the Security Log when certain events happen, such as when a user logs on—called event auditing—or tries to access a certain file or folder—called object access auditing. Figure 29-16 shows Event Viewer tracking logon and logoff events.
Figure 29-16 Event Viewer displaying security alerts
The CompTIA A+ certification exams don’t test you on creating a brilliant auditing policy for your office—that’s what network administrators do. You simply need to know what auditing does and how to turn it on or off so you can provide support for the network administrators in the field. To turn on auditing at a local level, go to Local Security Policy in Administrative Tools. Select Local Policies and then click Audit Policy. Double-click one of the policy options and select one or both of the checkboxes in the Properties dialog box that opens. Figure 29-17 shows the Audit object access Properties dialog box.
Figure 29-17 Audit object access Properties dialog box, with Local Security Policy open in the background
NOTE Event Viewer stores log files in %SystemRoot%\System32\Config.
Once you’ve gathered data about a particular system or you’ve dealt with a computer or network problem, you need to complete the mission by telling your supervisor. This is called incidence reporting. Many companies have pre-made forms that you simply fill out and submit. Other places are less formal. Regardless, you need to do this!
Incidence reporting does a couple of things for you. First, it provides a record of work you’ve accomplished. Second, it provides a piece of information that, when combined with other information you might or might not know, reveals a pattern or bigger problem to someone higher up the chain. A seemingly innocuous security audit report, for example, might match other such events in numerous places in the building at the same time and thus show that conscious, coordinated action rather than a glitch was at work.
As a tech, you’ll need to deal with people who use company computers in prohibited ways. In most cases, you’re not paid to be the police and should not get involved. There are times, however, where something bad—really bad—takes place on one of the systems you support, and if you’re the first tech person there, everyone is going to turn to you for action.
EXAM TIP Look for evidence handling questions on the 220-801 exam.
A technician should ignore personal information in and around a person’s computer. As mentioned back in Chapter 2, you should treat anything said to you and anything you see as a personal confidence, not to be repeated to customers, coworkers, or bosses. Here’s Mike’s Rule of Confidentiality: “Unless it’s a felony or an imminent physical danger, you didn’t see nothin’.” This includes any confidential customer materials. Try not to look at anything that isn’t directly related to your job. (Sometimes that’s impossible, but limit your exposure.) If you’re waiting on a printout at a printer and suddenly there’s a bunch of printed pages coming out of the printer with employee payroll information, set it to the side and pretend you never saw it.
But what about the scary stuff? Obvious espionage? Pornography? People passing out personal information? Hacking? In these cases, you’ve just become the first line of defense and you need to act accordingly. Let’s address the objectives as listed by CompTIA for the 220-801 exam.
Identify the Action or Content as Prohibited Use common sense, but keep in mind that most organizations have an Acceptable Use Policy that employees must sign. The Acceptable Use Policy defines what actions employees may or may not perform on company equipment. Remember that these polices aren’t just for obvious issues such as using a computer for personal use. These policies cover computers, phones, printers, and even the network itself. This policy will define the handling of passwords, e-mail, and many other issues.
NOTE The SANS Institute provides an excellent boilerplate Acceptable Use Policy on their Web site: www.sans.org/security-resources/policies/Acceptable_Use_Policy.pdf.
Report Through Proper Channels In most cases, you’ll report any prohibited actions or content directly to your supervisor. There’s also a chance your company will have a security officer or incident response leader who you’ll contact instead. Do not speak to the person committing the infraction unless your supervisor approves that contact.
Data/Device preservation You might end up in a situation serious enough that a computer or other device becomes evidence. In these cases, the location of the system and who has touched it may come into question, so you need to establish a chain of custody: a documented history of who has been in possession of the system. You’ll hopefully have a legal expert to guide you, but the following are fairly common rules:
1. Isolate the system. Shut down the system and store it in a place where no one else can access it.
2. Document when you took control of the system and the actions you took: shutting it down, unplugging it, moving it, and so on. Don’t worry about too much detail, but you must track its location.
3. If another person takes control of the system, document the transfer of custody.
Networks are under threat from the outside as well, so this section looks at issues involving Internet-borne attacks, firewalls, and wireless networking. This content is the security bread and butter for a CompTIA A+ technician, so you need to understand the concepts and procedures and be able to implement them properly.
The beauty of the Internet is the ease of accessing resources just about anywhere on the globe, all from the comfort of your favorite chair. This connection, however, runs both ways, and people from all over the world can potentially access your computer from the comfort of their evil lairs. The Internet is awash with malicious software that is, even at this moment, trying to infect your systems.
The term malware defines any program or code (macro, script, and so on) that’s designed to do something on a system or network that you don’t want done. Malware comes in quite a variety of guises, such as grayware, spam, viruses, worms, macros, Trojan horses, and rootkits. Let’s examine all these malware flavors and then explore how to deal with them.
Programs that intrude unwanted into your computing experience but don’t actually do any damage to your systems or data—what’s called grayware—can make that computing experience less than perfect. On most systems, the Internet Web browser client is the most often used piece of software. Over the years, Web sites have come up with more and more ways to try to get you to see what they want you to see: their advertising. When the Web first got underway, we were forced to look at an occasional banner ad. In the past few years, Web site designers have become much more sophisticated, creating a number of intrusive and irritating ways to get you to part with your money in one form or another.
There are basically two irritating grayware types: pop-ups and spyware. Pop-ups are those surprise browser windows that appear automatically when you visit a Web site, proving themselves irritating and unwanted and nothing else. Spyware, meanwhile, defines a family of programs that run in the background on your PC, sending information about your browsing habits to the company that installed it on your system. Of the two, spyware is much less noticeable but far more nefarious.
NOTE The term adware generally refers to programs that support themselves using revenue from ads, like all those “free” Internet game sites. Every once in a while those ads can lead to spyware installing on a system, making many authors lump adware into the grayware category.
Pop-Ups Getting rid of pop-ups is actually rather tricky. You’ve probably noticed that most of these pop-up browser windows don’t look like browser windows at all. They have no menu bar, button bar, or address window, yet they are separate browser windows. HTML coding permits Web site and advertising designers to remove the usual navigation aids from a browser window so all you’re left with is the content. In fact, as I’ll describe in a minute, some pop-up browser windows are deliberately designed to mimic similar pop-up alerts from the Windows OS. They might even have buttons similar to Windows’ own exit buttons, but you might find that when you click them, you wind up with more pop-up windows instead! What to do?
The first thing you need to know when dealing with pop-ups is how to close them without actually having to risk clicking them. As I said, most pop-ups have removed all navigation aids, and many are also configured to appear on your monitor screen in a position that places the browser window’s exit button—the little X button in the upper-right corner—outside of your visible screen area. Some even pop up behind the active browser window and wait there in the background. Most annoying! To remedy this, use alternate means to close the pop-up browser window. For instance, you can right-click the browser window’s taskbar icon to generate a pop-up menu of your own. Select Close, and the window should go away. You can also press ALT-TAB to bring the browser window in question to the forefront and then press ALT-F4 to close it.
Most Web browsers have features to prevent pop-up ads in the first place, but I’ve found that these types of applications are sometimes too thorough. That is, they tend to prevent all new browser windows from opening, even those you want to view. Applications such as AdSubtract control a variety of Internet annoyances, including pop-up windows, cookies, and Java applets, and are more configurable—you can specify what you want to allow on any particular domain address—but the fully functional versions usually cost at least something, and that much control is too confusing for most novice-level users.
Spyware Some types of spyware go considerably beyond grayware’s level of intrusion. They can use your computer’s resources to run distributed computing applications, capture your keystrokes to steal passwords, reconfigure your dial-up settings to use a different phone number at a much higher connection charge, or even use your Internet connection and e-mail address list to propagate itself to other computers in a virus-like fashion! Are you concerned yet?
Setting aside the legal and ethical issues—and there are many—you should at least appreciate that spyware can seriously impact your PC’s performance and cause problems with your Internet connection. The threat is real, so what practical steps can you take to protect yourself? Let’s look at how to prevent spyware installation and how to detect and remove any installed spyware.
How does this spyware get into your system in the first place? Obviously, sensible people don’t download and install something that they know is going to compromise their computers. Makers of spyware know this, so they bundle their software with some other program or utility that purports to give you some benefit.
What kind of benefit? In 2005, Movieland (otherwise known as Movieland.com and Popcorn.net) released a “handy” movie download service. They didn’t tell users, of course, that everyone who installed the software was “automatically enrolled” in a three-day trial. If you didn’t cancel the “trial,” a pop-up window filled your screen demanding you pay them for the service that you never signed up for. The best part, however, was that you couldn’t uninstall the application completely. The uninstaller redirected users to a Web page demanding money again. (Movieland was shut down in 2007.) As you can see, spyware doesn’t need to force its way into a PC. Instead, it saunters calmly through the front door.
Another popular spyware method is to use pop-up browser windows crudely disguised as Windows’ own system warnings (see Figure 29-18). When clicked, these may trigger a flood of other browser windows, or may even start a file download.
Figure 29-18 A spyware pop-up browser window, disguised as a Windows alert
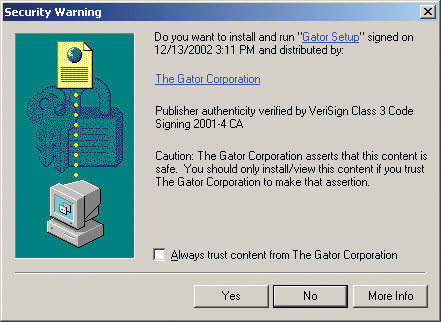
If Movieland was a problem back in 2005, what are the big spyware applications today? Unfortunately, I can’t tell you—not because it’s a secret, but because we don’t know about them yet. Look at Figure 29-19: the dialog box asks the user if she trusts the Gator Corporation (a well-known spyware producer from several years ago). Because everyone eventually knew not to trust Gator, they would click No, and the company faded away several years ago. Gator, however, was incredibly well-known at the time. What about those small, unknown applications waiting in the dark corners of the Internet—the ones that just might have spyware hiding inside? How do you protect yourself from them?
Figure 29-19 Gator Corporation’s acknowledgment warning
The lesson here is simple: Don’t install these programs, at least not without researching the program first. Careful reading of the software’s license agreement before you install a program is a good idea, but realistically, it does little to protect your PC. With that in mind, here are a couple of preventive measures you can take to keep parasitic software off of your system.
If you visit a Web site that prompts you to install a third-party application or plug-in that you’ve never heard of, don’t install it. Well-known and reputable plug-ins, such as Adobe’s Shockwave or Flash, are safe, but be suspicious of any others. Don’t click anywhere inside of a pop-up browser window, even if it looks just like a Windows alert window or DOS command-line prompt—as I just mentioned, it’s probably fake and the Close button is likely a hyperlink. Instead, use other means to close the window, such as pressing ALT-F4 or right-clicking the browser window’s icon on the taskbar and selecting Close.
You can also install spyware detection and removal software on your system and run it regularly. Let’s look at how to do that.
Some spyware makers are reputable enough to include a routine for uninstalling their software. Gator, for instance, made it fairly easy to get rid of their programs; you just used the Windows Add/Remove Programs or Programs and Features applet in the Control Panel. Others, however, aren’t quite so cooperative. In fact, because spyware is so—well, sneaky—it’s entirely possible that your system already has some installed that you don’t even know about. How do you discover it?
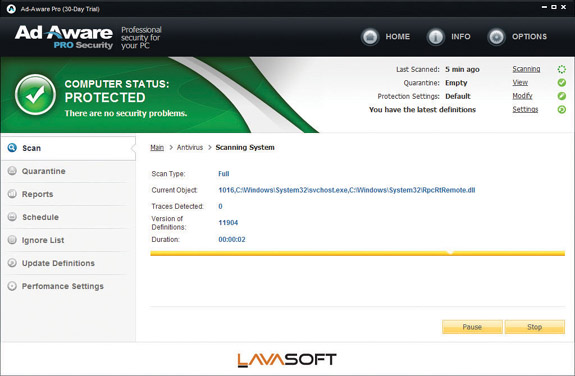
Windows comes with Windows Defender, a fine tool for catching most spyware, but it’s not perfect. The better solution is to back up Windows Defender with a second spyware removal program. There are several on the market, but two that I highly recommend are Lavasoft’s Ad-Aware (see Figure 29-20) and Safer Networking’s Spybot Search & Destroy.
Figure 29-20 Lavasoft’s Ad-Aware
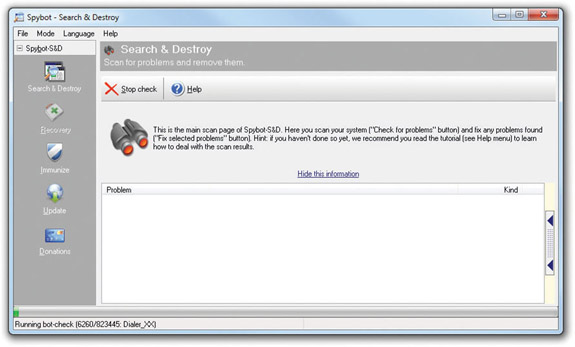
Both of these applications work exactly as advertised. They detect and delete spyware of all sorts—hidden files and folders, cookies, Registry keys and values, you name it. Ad-Aware is free for personal use, while Spybot Search & Destroy is shareware (see Figure 29-21). Many times I’ve used both programs at the same time because one tends to catch what the other misses.
Figure 29-21 Spybot Search & Destroy
TIP If you haven’t done this already, do it now. Go to www.safer-networking.org and download the latest copy of Spybot Search & Destroy. Install it on your computer and run it. Did it find any spyware that slipped in past your defenses?
E-mail that comes into your Inbox from a source that’s not a friend, family member, or colleague, and that you didn’t ask for, can create huge problems for your computer and you. This unsolicited e-mail, called spam, accounts for a huge percentage of traffic on the Internet. Spam comes in many flavors, from legitimate businesses trying to sell you products to scammers who just want to take your money. Hoaxes, pornography, and get-rich-quick schemes pour into the Inboxes of most e-mail users. They waste your time and can easily offend.
You can use several options to cope with the flood of spam. The first option is defense. Never post your e-mail address on the Internet. One study tested this theory and found that over 97 percent of the spam received during the study went to e-mail addresses they had posted on the public Internet.
Filters and filtering software can block spam at your mail server and at your computer. Google Mail has powerful blocking schemes, for example, that drop the average spam received by its subscribers by a large percentage, usually more than 90 percent. You can set most e-mail programs to block e-mail from specific people—good to use if someone is harassing you—or to specific people. You can block by subject line or keywords. Most people use a third-party antispam program instead of using the filters in their e-mail program.
A lot of spam contains malware or points to dangerous Web sites. Never click on any link or open an e-mail from someone you don’t know! You might just save your computer.
Spam is also notorious for phishing scams. Phishing works by sending you an e-mail message that looks legitimate, like a bill or account information, hoping you will enter important personal information. If you receive an e-mail from Amazon.com, ebay. com, or some other site (like your bank), don’t click on it! Like Admiral Ackbar said in Star Wars, “It’s a trap!”
A virus is a program that has two jobs: to replicate and to activate. Replication means it makes copies of itself, often as code stored in boot sectors or as extra code added to the end of executable programs. Activation is when a virus does something like erase the boot sector of a drive. A virus only replicates to other drives, such as thumb drives or optical media. It does not replicate across networks. Plus, a virus needs human action to spread.
A worm functions similarly to a virus, though it replicates exclusively through networks. A worm, unlike a virus, doesn’t have to wait for someone to use a removable drive to replicate. If the infected computer is on a network, a worm will immediately start sending copies of itself to any other computers on the network it can locate. Worms can exploit inherent flaws in program code like buffer overflows, where a buffer cannot hold all the data sent to it.
A macro is any type of virus that exploits application macros to replicate and activate. A macro is also programming within an application that enables you to control aspects of the application. Macros exist in any application that has a built-in macro language, such as Microsoft Excel, that users can program to handle repetitive tasks (among other things).
A Trojan horse is a piece of malware that looks or pretends to do one thing while, at the same time, doing something evil. A Trojan horse may be a game, like poker, or a free screensaver. The sky is the limit. The more “popular” Trojan horses turn an infected computer into a server and then open TCP or UDP ports so a remote user can control the infected computer. Trojan horses can be used to capture keystrokes, passwords, files, credit card information, and more. Trojan horses do not replicate.
For a virus or Trojan horse to succeed, it needs to come up with some method to hide itself. As awareness of malware has grown, anti-malware programs make it harder to find new locations on a computer to hide malware. A rootkit is a Trojan horse that takes advantage of very low-level operating system functions to hide itself from all but the most aggressive of anti-malware tools. Worse, a rootkit, by definition, gains privileged access to the computer. Rootkits can strike operating systems, hypervisors, and even firmware.
The most infamous rootkit appeared a few years ago as an antipiracy attempt by Sony on its music CDs. Unfortunately for the media giant, the rootkit software installed when you played a music CD and opened a backdoor that could be used for malicious intent.
If your PC has been infected by malware, you’ll bump into some strange things before you can even run an anti-malware scan. Like a medical condition, malware causes unusual symptoms that should stand out from your everyday computer use. You need to become a PC physician and understand what each of these symptoms means.
Malware’s biggest strength is its flexibility: it can look like anything. In fact, a lot of malware attacks can feel like normal PC “wonkiness”—momentary slowdowns, random one-time crashes, and so on. Knowing when a weird application crash is actually a malware attack is half the battle.
A slow PC can mean you’re running too many applications at once or you’ve been hit with malware. How do you tell the difference? In this case, it’s the frequency. If it’s happening a lot, even when all of your applications are closed, you’ve got a problem. This goes for frequent lockups, too. If Windows starts misbehaving (more than usual), run your anti-malware application right away.
Malware, however, doesn’t always jump out at you with big system crashes. Some malware tries to rename system files, change file permissions, or hide files completely. Most of these issues are easily caught by a regular anti-malware scan, so as long as you remain vigilant, you’ll be okay.
EXAM TIP While it’s not necessarily a malware attack, watch out for hijacked e-mail accounts, too, belonging either to you or to someone you know. Hackers can hit both e-mail clients and Webmail users. If you start receiving some fishy (or phishy) e-mail messages, change your Webmail user name and password or scan your PC for malware.
Some malware even fights back, defending itself from your many attempts to remove it. If your Windows Update feature stops working, preventing you from patching your PC, you’ve got malware. If other tools and utilities throw up an “Access Denied” road block, you’ve got malware. If you lose all Internet connectivity, either the malware is stopping you or removing the malware broke your connection. In this case, you might need to reconfigure your Internet connection: reinstall your NIC and its drivers, reboot your router, and so on.
Even your browser and anti-malware applications can turn against you. If you type in one Web address and end up at a different site than you anticipated, a malware infection might have overwritten your HOSTS file. The HOSTS file overrules any DNS settings and can redirect your browser to whatever site the malware adds to the file. Most browser redirections point you to phishing scams or Web sites full of free downloads (that are, of course, covered in malware). In fact, some free anti-malware applications are actually malware—what techs call a rogue anti-malware program. You can avoid these rogue applications by sticking to the recommended lists of anti-malware software found online.
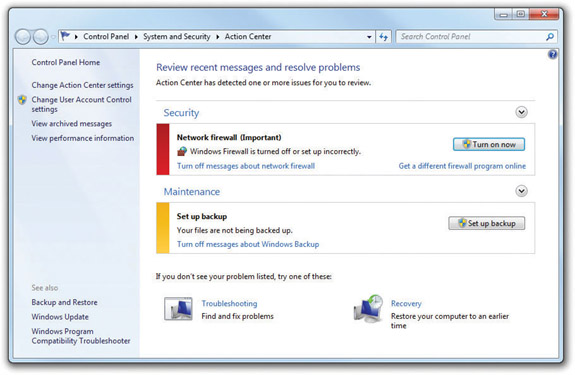
Watch for security alerts in Windows, either from Windows’ built-in security tools or from your third-party anti-malware program. Windows XP (SP2 and later) and Windows Vista include the Security Center, a Control Panel applet that monitors your software firewall, automatic updates, malware protection, and more. Windows 7 includes a similar tool, but calls it the Action Center, which you learned about back in Chapter 19 (see Figure 29-22). You don’t actually configure much using these applets; they just tell you whether or not you are protected. Both of these tools place an icon and pop up a notification in the notification area whenever Windows detects a problem. Windows XP and Vista use a red shield with a white x to notify you, while Windows 7 uses a white flag.
Figure 29-22 Windows 7 Action Center
The only way to protect your PC permanently from getting malware is to disconnect it from the Internet and never permit any potentially infected software to touch your precious computer. Because neither scenario is likely these days, you need to use specialized anti-malware programs to help stave off the inevitable assaults. Even with the best anti-malware tools, there are times when malware still manages to strike your computer. When you discover infected systems, you need to know how to stop the spread of the malware to other computers, how to fix infected computers, and how to remediate (restore) the system as close to its original state as possible.
You can deal with malware in several ways: anti-malware programs, training and awareness, patch management, and remediation.
At the very least, every computer should run an anti-malware program. If possible, add an appliance that runs anti-malware programs against incoming data from your network. Also remember that an anti-malware program is only as good as its updates—keep everyone’s definition file (explained a bit later) up to date with, literally, nightly updates! Users must be trained to look for suspicious ads, programs, and pop-ups, and understand that they must not click these things. The more you teach users about malware, the more aware they’ll be of potential threats. Your organization should have policies and procedures in place so everyone knows what to do if they encounter malware. Finally, a good tech maintains proper incident response records to see if any pattern to attacks emerges. He or she can then adjust policies and procedures to mitigate these attacks.
EXAM TIP One of the most important malware mitigation procedures is to keep systems under your control patched and up to date through proper patch management. Microsoft does a very good job of putting out bug fixes and patches as soon as problems occur. If your systems aren’t set up to update automatically, then perform manual updates regularly.
An anti-malware program such as a classic antivirus program protects your PC in two ways. It can be both sword and shield, working in an active seek-and-destroy mode and in a passive sentry mode. When ordered to seek and destroy, the program scans the computer’s boot sector and files for viruses and, if it finds any, presents you with the available options for removing or disabling them. Antivirus programs can also operate as virus shields that passively monitor a computer’s activity, checking for viruses only when certain events occur, such as a program executing or a file being downloaded.
NOTE The term antivirus (and antispyware, or anti-anything) is becoming obsolete. Viruses are only a small component of the many types of malware. Many people continue to use the term as a synonym for anti-malware.
Antivirus programs use different techniques to combat different types of viruses. They detect boot sector viruses simply by comparing the drive’s boot sector to a standard boot sector. This works because most boot sectors are basically the same. Some antivirus programs make a backup copy of the boot sector. If they detect a virus, the programs use that backup copy to replace the infected boot sector. Executable viruses are a little more difficult to find because they can be on any file in the drive. To detect executable viruses, the antivirus program uses a library of signatures. A signature is the code pattern of a known virus. The antivirus program compares an executable file to its library of signatures. There have been instances where a perfectly clean program coincidentally held a virus signature. Usually the antivirus program’s creator provides a patch to prevent further alarms. Now that you understand the types of viruses and how antivirus programs try to protect against them, let’s review a few terms that are often used when describing certain traits of viruses.
Polymorphic/Polymorphs A polymorph virus attempts to change its signature to prevent detection by antivirus programs, usually by continually scrambling a bit of useless code. Fortunately, the scrambling code itself can be identified and used as the signature—once the antivirus makers become aware of the virus. One technique used to combat unknown polymorphs is to have the antivirus program create a checksum on every file in the drive. A checksum in this context is a number generated by the software based on the contents of the file rather than the name, date, or size of that file. The algorithms for creating these checksums vary among different antivirus programs (they are also usually kept secret to help prevent virus makers from coming up with ways to beat them). Every time a program is run, the antivirus program calculates a new checksum and compares it with the earlier calculation. If the checksums are different, it is a sure sign of a virus.
Stealth The term “stealth” is more of a concept than an actual virus function. Most stealth virus programs are boot sector viruses that use various methods to hide from antivirus software. The AntiEXE stealth virus hooks on to a little-known but often-used software interrupt, for example, running only when that interrupt runs. Others make copies of innocent-looking files.
Recommended Anti-Malware Programs You can download many excellent anti-malware programs for free, either for extended trial periods or for indefinite use. Since you need these programs to keep your systems happy, download one or more anti-malware programs, such as the following:
• Windows Defender Windows Defender is a good antispyware program, but it won’t protect you against any other form of malware. It’s free with Windows, however, and better than nothing.
• Microsoft Security Essentials Recognizing the shortcomings of Windows Defender and no longer willing to count on users to download and install third-party programs, Microsoft offers a complete anti-malware solution called Microsoft Security Essentials. You can download this program for free from Microsoft (search for Microsoft Security Essentials). This program automatically shuts off Windows Defender when installed.
• Malwarebytes Anti-Malware (www.malwarebytes.org) Malwarebytes’ Anti-Malware program rocks the house in terms of dealing with malicious software. They offer both a free version that scans your computer for malware and quarantines it and a PRO version that actively protects against any incoming malware. Anti-Malware is my first choice in dealing with malware on a client’s computer.
• Lavasoft Ad-Aware (www.lavasoft.com) Ad-Aware is an excellent antispyware program. Ad-Aware will root out all sorts of files and programs that can cause your computer to run slowly (or worse).
• Spybot Search & Destroy (www.safer-networking.org) Spybot Search & Destroy from Safer Networking Ltd. is another superb antispyware program. Many folks use both Ad-Aware and Spybot—though sometimes the two programs detect each other as spyware!
• AVG Anti-Virus (http://free.avg.com) AVG offers a free version of their anti-virus software for noncommercial use. Updated regularly to add the latest virus signatures, the software will keep your system clean and bug free.
A powerful tool to prevent malware attacks and to reduce the impact of malware attacks when they happen is to educate your users. Teach users to be cautious of incoming e-mail they don’t clearly recognize and to never click on an attachment or URL in an e-mail unless they are 100 percent certain of the source.
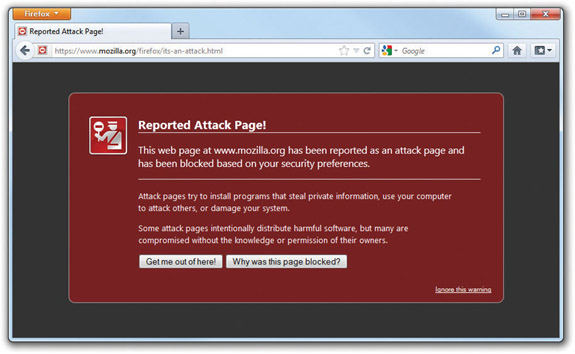
Explain to users the dangers of going to questionable Web sites and teach them how to react when they see questionable actions take place. Let’s look at a few of the more evil ones. All Web browsers have built-in attack site warnings like the one shown in Figure 29-23.
Figure 29-23 Attack site warning
NOTE Mozilla provides a sample Web site that displays the attack site sign—a great way to show users what it looks like: www.mozilla.org/firefox/its-an-attack.html.
Nobody wants their systems infected with malware. Users are motivated and happy when you give them the skills necessary to protect themselves. The bottom line is that educated and aware users will make your life a lot easier.
The secret to preventing damage from a malicious software attack is to keep from getting malware on your system in the first place. As discussed earlier, for example, all good antivirus programs include a virus shield that scans e-mail, downloads, running programs, and so on automatically (see Figure 29-24).
Figure 29-24 A virus shield in action
Use your antivirus shield. It is also a good idea to scan PCs daily for possible virus attacks. All antivirus programs include terminate-and-stay resident programs (TSRs) that run every time the PC is booted. Last but not least, know the source of any software before you load it. Although the chance of commercial, shrink-wrapped software having a virus is virtually nil (there have been a couple of well-publicized exceptions), that copy of Call of Duty: Modern Warfare 3 you borrowed from a local hacker should definitely be inspected with care.
Keep your antivirus and anti-malware programs updated. New viruses and other malware appear daily, and your programs need to know about them. The list of virus signatures your antivirus program can recognize, for example, is called the definition file, and you must keep that definition file up to date so your antivirus software has the latest signatures. Fortunately, most antivirus programs update themselves automatically. Further, you should periodically update the core anti-malware software programming—called the engine—to employ the latest refinements the developers have included.
If you run anti-malware software and your computer still gets infected, especially after a reboot, you need a more serious anti-malware tool. Many anti-malware companies provide bootable CDs or flash drives (or show you how to make one) that enable you to boot from a known-clean OS and run the same anti-malware software, but this time not corrupted by the malware on your system.
When the inevitable happens and either your computer or one of your user’s computers gets infected by malware such as a computer virus, you need to follow certain steps to stop the problem from spreading and get the computer back up safely into service. Try this five-step process.
1. Recognize
2. Quarantine
3. Search and destroy
4. Remediate
5. Educate
Recognize and Quarantine The first step is to identify and recognize that a potential malware outbreak has occurred. If you’re monitoring network traffic and one computer starts spewing e-mail, that’s a good sign. Or users might complain that a computer that was running snappily the day before seems very sluggish.
Many networks employ software such as the open source PacketFence that automatically monitors network traffic and can cut a machine off the network if that machine starts sending suspicious packets. You can also quarantine a computer manually, by disconnecting the network cable. Once you’re sure the machine isn’t capable of infecting others, you’re ready to find the virus or other malware and get rid of it.
At this point, you should disable System Restore. If you make any changes going forward, you don’t want the virus to be included in any saved restore points. To turn off System Restore in Windows XP, open the Start menu, right-click on My Computer, and select Properties. Switch to the System Restore tab and select Turn off System Restore. On the dialog box that pops up, confirm your selection by clicking Yes. To turn off System Restore in Windows Vista/7, open the Start menu, right-click on Computer, and select Properties. Click on the System protection link. In the Protection Settings section, select a drive and click on Configure. In the System Protection dialog box that opens, select Turn off system protection. Repeat the procedure for each hard drive on your Windows Vista/7 system.
Search and Destroy Once you’ve isolated the infected computer (or computers), you need to get to a safe boot environment and run anti-malware software. You can try Windows Safe Mode first, because it doesn’t require anything but a reboot. If that doesn’t work, or you suspect a boot sector virus, you need to turn to an external bootable source, such as a bootable CD or flash memory drive.
Get into the habit of keeping around a bootable anti-malware flash drive or optical media. If you suspect a virus or other malware, use the disc, even if your anti-malware program claims to have eliminated the problem. Turn off the PC and reboot it from the anti-malware disc. (You might have to change CMOS settings to boot to optical media.) This will put you in a clean boot environment that you know is free from any boot sector viruses. If you only support fairly recent computers, most have an option to boot to a USB flash drive, so you can put a boot environment on a thumb drive for even faster start-up speeds.
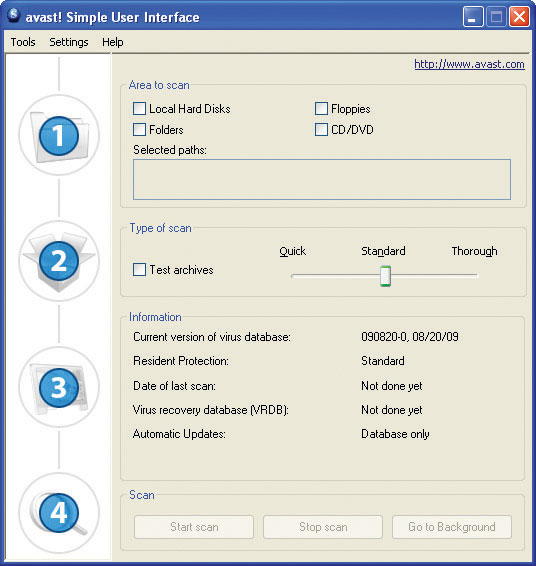
You have several options for creating the bootable optical disc or flash drive. First, some antivirus software comes in a bootable version, such as the avast! Virus Cleaner Tool (see Figure 29-25).
Figure 29-25 avast! Virus Cleaner Tool
Second, you can download a copy of Linux that offers a live CD option such as Ubuntu. With a live CD, you boot to the CD and install a complete working copy of the operating system into RAM, never touching or accessing the hard drive, to give you full Internet-ready access to many online anti-malware sites. (You’ll obviously need Internet access for those tools.) Kaspersky Labs provides a nice option at www.kaspersky.com.
Finally, you can download and burn a copy of the Ultimate Boot CD. It comes stocked with several antivirus and anti-malware programs, so you wouldn’t need any other tool. Find it at www.ultimatebootcd.com. The only downside is that the anti-malware engines will quickly be out of date, as will their malware libraries.
EXAM TIP CompTIA considers the process of removing a virus part of the remediation step. Since you can’t remediate a PC until after a virus is gone, I’ve laid out the steps as you see here.
Remediate Malware infections can do a lot of damage to a system, especially to sensitive files needed to load Windows, so you might need to remediate formerly infected systems after cleaning off the drive or drives. Remediation simply means that you fix things the virus or other malware harmed. This can mean replacing corrupted Windows Registry files or even startup files.
If you can’t start Windows after the malware scan is finished, you need to follow the steps outlined in Chapter 19 to boot to the Recovery Console in Windows XP, or boot from the Windows Preinstallation Environment into the Windows Recovery Environment in Windows Vista or Windows 7.
In the Windows XP Recovery Console, you’ll have access to tools to repair the boot sector (or boot blocks, as CompTIA calls them) through the fixmbr and fixboot commands. You can run bootcfg to rebuild a corrupted boot.ini file.
With the Windows Vista/7 Recovery Environment, you have access to more repair tools, such as Startup Repair, System Restore, Windows Complete PC Restore (System Image Recovery in Windows 7), and the command prompt (see Figure 29-26). Run the appropriate option for the situation and you should have the machine properly remediated in a jiffy.
Figure 29-26 System Recovery options in Windows Vista
EXAM TIP Remember to re-enable System Restore and create a new restore point once the system has been repaired.
Educate The best way to keep from having to deal with malware and grayware is education. It’s your job as the IT person to talk to users, especially the ones whose systems you’ve just spent the last hour cleaning of nasties, about how to avoid these programs. Show them samples of dangerous e-mails they should not open, Web sites to avoid, and the types of programs they should not install and use on the network. Any user who understands the risks of questionable actions on their computers will usually do the right thing and stay away from malware.
Finally, have your users run antivirus and antispyware programs regularly. Schedule them while interfacing with the user so you know it will happen.
Firewalls are an essential tool in the fight against malicious programs on the Internet. Firewalls are devices or software that protect an internal network from unauthorized access to and from the Internet at large. Firewalls use a number of methods to protect networks, such as hiding IP addresses and blocking TCP/IP ports.
A typical network uses one of two types of firewalls: hardware firewalls, often built into routers, and software firewalls that run on your computers. Both types of firewall protect your computer and your network. You also run them at the same time. Let’s look at both a typical SOHO router’s firewall features and your computer’s software firewall to see how they protect your network and your computers.
Most SOHO networks use a hardware firewall, often as a feature built into a router like the Linksys model you saw back in Chapter 24, shown in Figure 29-27. A hardware firewall hides and separates your internal LAN from outside connections like the Internet by using Network Address Translation (NAT), which you learned about back in Chapter 24. Routers, however, have a few other tricks up their sleeves. From the router’s browser-based settings screen, you can configure a hardware firewall (see Figure 29-28). Let’s walk through a few of the available settings.
Figure 29-27 Linksys router as a firewall
Figure 29-28 Default Web interface
A hardware firewall watches for and stops many common threats—all you have to do is turn it on (see Figure 29-29). Hardware firewalls use Stateful Packet Inspection (SPI) to inspect each incoming packet individually. SPI also blocks any incoming traffic that isn’t in response to your outgoing traffic. You can even disable ports entirely, blocking all traffic in or out. But what if you want to allow outside users access to a Web server on the LAN? Because NAT hides the true IP address of that system, you’ll need a way to allow incoming traffic past the router/firewall and a way to redirect that traffic to the right PC.
Figure 29-29 SPI firewall settings
Port forwarding enables you to open a port in the firewall and direct incoming traffic on that port to a specific IP address on your LAN. In the case of the Web server referenced in the previous paragraph, you would open port 80 (for HTTP packets) and instruct the router to send all incoming traffic to the server machine. Figure 29-30 shows port forwarding configured to send all HTTP packets to an internal Web server.
Figure 29-30 Port forwarding
Port forwarding isn’t the only way to open ports on a firewall. Port triggering enables you to open an incoming connection to one computer automatically based on a specific outgoing connection. The trigger port defines the outgoing connection, and the destination port defines the incoming connection. If you set the trigger port to 3434 and the destination port to 1234, for example, any outgoing traffic on port 3434 will trigger the router to open port 1234 and send any received data back to the PC with the original outgoing traffic. Figure 29-31 shows a router set up for port triggering of an Internet Relay Chat (IRC) server.
Figure 29-31 Port triggering
If you want to go beyond port forwarding and port triggering and open every port on a machine, you need a demilitarized zone (DMZ). A DMZ puts systems with the specified IP addresses outside the protection of the firewall, opening all ports and enabling all incoming traffic (see Figure 29-32). If you think this sounds incredibly dangerous, you are right! Any PC inside the DMZ will be completely exposed to outside attacks. Don’t use it!
Figure 29-32 DMZ set up on a SOHO router
While a hardware firewall does a lot to protect you from outside intruders, you should also use a software firewall, such as the firewalls built into each version of Windows, called (appropriately) Windows Firewall. Windows Firewall handles the heavy lifting of port blocking, security logging, and more.
You can access Windows Firewall in Windows XP by opening the Windows Firewall applet in the Control Panel. The Windows XP’s Windows Firewall applet (see Figure 29-33) looks a lot different from the one available in Windows 7 (see Figure 29-34), though their primary function remains the same. Configuring Windows Firewall involves turning it on or off, and choosing which programs and services can pass through the firewall, known as exceptions. If you wanted to play Starcraft 2 (a PC game that requires an Internet connection), for example, it would need to be on the list of exceptions for your firewall—most programs you install add themselves to this list automatically, otherwise Windows Firewall prompts you the first time you run it and asks if you want to add the program as an exception.
Figure 29-33 Windows XP’s Firewall
Figure 29-34 Windows 7 Firewall applet
EXAM TIP To turn Windows Firewall off (which I don’t recommend doing), open the Windows Firewall applet. In Windows XP, click on the Off (not recommended) radio button. In Windows Vista, click on Turn Windows Firewall on or off, then select Off (not recommended). In Windows 7, select Turn Windows Firewall on or off, then select Turn off Windows Firewall (not recommended) for each network type you use.
The Windows XP firewall’s biggest shortcoming is that it fails to consider that a single PC, especially a portable, might connect to multiple networks. You don’t necessarily want the same firewall settings used for both public and private networks. Microsoft needed to develop a way for you to separate trustworthy networks (like the one in your house or at the office) from non-trustworthy networks (like a public Wi-Fi Internet connection at the airport). To accomplish this, Microsoft included three network types in Windows Vista/7: Domain, Private, and Public.
• A Domain network is a Windows network controlled by a Windows domain controller. In this case, the domain controller itself tells your machine what it can and cannot share. You don’t need to do anything when your computer joins a domain.
• A Private network enables you to share resources, discover other devices, and allow other devices to discover your computer safely.
• A Public network prevents your computer from sharing and disables all discovery protocols.
When your computer connects to a network for the first time, Windows Vista and 7 will prompt you to choose the network type: Home, Work, or Public location (see Figure 29-35).
Figure 29-35 Set Network Location in Vista
First, notice that Domain is not an option. There’s a good reason for this: If your computer is on a domain, you won’t see the dialog box in Figure 29-35. When your computer joins a domain, Windows automatically sets your network location to Domain (unless your domain controller chooses something different, which is unlikely).
So what exactly does Windows do when you select Home, Work, or Public location? Windows configures Windows Firewall to block or unblock discovery and sharing services. When running on a Private (Home or Work) network, Windows enables Network Discovery and File and Printer Sharing as exceptions. When running on a Public network, Windows disables these exceptions.
EXAM TIP The Network Discovery setting dictates whether a computer can find other computers or devices on a network and vice versa. Even with Network Discovery activated, several firewall settings can overrule certain connections.
In Windows Vista, Microsoft cleverly used Windows Firewall and the network type to turn services on and off, but Microsoft made one mistake: the firewall configuration and network type remain the same for every connection. If your Windows machine never changes networks, you won’t have a problem. But what about machines (mainly laptops) that hop from one network to another (see Figure 29-36)? In that case, you need different firewall settings for each network the system might encounter.
Figure 29-36 Many machines need more than one network setting.
In this regard, Windows 7 makes a big departure from Windows Vista. In Windows 7, the Set Network Location dialog box appears every time you connect to a new network. Windows 7 even includes three different firewall settings: one for Domains, one for Private networks (Home or Work), and one for Public networks.
Once you’ve picked a network type, you might want to customize the firewall settings further. If you click the Advanced Settings option in Windows Vista/7’s Firewall applet, you’ll discover a much deeper level of firewall configuration, one very different from the settings found in Windows XP (see Figure 29-37). In fact, it’s an entirely different tool called Windows Firewall with Advanced Security.
Figure 29-37 Windows Firewall with Advanced Security
Microsoft enhanced how Windows Vista/7 treat exceptions. In Windows XP, you can only choose a program and make it an exception, giving it permission to pass through the firewall. But programs both send and receive network data; Windows XP ignores the “inbound” and “outbound” aspect of firewalls. Windows Vista/7 takes the exceptions concept and expands it to include custom rules for both inbound and outbound data. Figure 29-38 shows the outbound rules for a typical Windows Vista/7 system.
Figure 29-38 Outbound Rules list
A rule always includes at least the following:
• The name of the program
• Group: an organizational group that helps sort all the rules
• The associated profile (All, Domain, Public, Private)
• Enabled/disabled status
• Remote and local address
• Remote and local port number
You can add, remove, and customize any rule to your liking. It quickly gets complicated, so unless you need to set a lot of custom rules, stick to the standard Windows Firewall applet.
You know from previous chapters that the first step in securing data is authentication, through a user name and password. But when you throw in networking, you’re suddenly not just a single user sitting in front of a computer and typing. You’re accessing a remote resource and sending login information over the Internet. What’s to stop someone from intercepting your user name and password?
Firewalls do a great job of controlling traffic coming into a network from the Internet and going out of a network to the Internet, but they do nothing to stop interceptor hackers who monitor traffic on the public Internet looking for vulnerabilities. Worse, once a packet is on the Internet itself, anyone with the right equipment can intercept and inspect it. Inspected packets are a cornucopia of passwords, account names, and other tidbits that hackers can use to intrude into your network. Because we can’t stop hackers from inspecting these packets, we must turn to encryption to make them unreadable.
Network encryption occurs at many levels and is in no way limited to Internet-based activities. Not only are there many levels of network encryption, but each encryption level also provides multiple standards and options, making encryption one of the most complicated of all networking issues. You need to understand where encryption comes into play, what options are available, and what you can use to protect your network.
Have you ever considered the process that takes place each time a person types in a user name and password to access a network, rather than just a local machine? What happens when this network authentication is requested? If you’re thinking that when a user types in a user name and password, that information is sent to a server of some sort to be authenticated, you’re right—but do you know how the user name and password get to the serving system? That’s where encryption becomes important in authentication.
In a local network, authentication and encryption are usually handled by the OS. In today’s increasingly interconnected and diverse networking environment, there is a motivation to enable different operating systems to authenticate any client system from any other OS. Modern operating systems such as Windows and Mac OS X use standard authentication encryptions such as MIT’s Kerberos, enabling multiple brands of servers to authenticate multiple brands of clients. These LAN authentication methods are usually transparent and work quite nicely, even in mixed networks.
Encryption methods don’t stop at the authentication level. There are a number of ways to encrypt network data as well. The choice of encryption method is dictated to a large degree by the method used by the communicating systems to connect. Many networks consist of multiple networks linked together by some sort of private connection, usually some kind of WAN connection such as DSL or T1. Microsoft’s encryption method of choice for this type of network is called IPSec (derived from IP security). IPSec provides transparent encryption between the server and the client. IPSec also works in VPNs, but other encryption methods are more commonly used in those situations.
When it comes to encryption, even TCP/IP applications can get into the swing of things. The most famous of all application encryptions is Netscape’s Secure Sockets Layer (SSL) security protocol, which is used to create secure Web sites. Microsoft incorporates SSL into its more far-reaching HTTPS (HTTP over SSL) protocol. These protocols make it possible to create the secure Web sites people use to make purchases over the Internet. You can identify HTTPS Web sites by the https:// (rather than http://) included in the URL (see Figure 29-39).
Figure 29-39 A secure Web site
To make a secure connection, your Web browser and the Web server must encrypt their data. That means there must be a way for both the Web server and your browser to encrypt and decrypt each other’s data. To do this, the server sends a public key to your Web browser so the browser knows how to decrypt the incoming data. These public keys are sent in the form of a digital certificate. This certificate is signed by a trusted authority that guarantees that the public key you are about to get is actually from the Web server and not from some evil person trying to pretend to be the Web server. A number of companies issue digital certificates to Web sites, probably the most famous being VeriSign, Inc.
Your Web browser has a built-in list of trusted authorities. If a certificate comes in from a Web site that uses one of these highly respected companies, you won’t see anything happen in your browser; you’ll just go to the secure Web page, where a small lock will appear in the corner of your browser. Figure 29-40 shows the list of trusted authorities built into the Firefox Web browser.
Figure 29-40 Trusted authorities
If you receive a certificate from someone not listed in your browser, however, the browser will warn you and ask you if you wish to accept the certificate, as shown in Figure 29-41.
Figure 29-41 Incoming certificate
What you do here is up to you. Do you wish to trust this certificate? In most cases, you simply say yes, and this certificate is added to your SSL cache of certificates. An accepted certificate may become invalid, however, usually because of something boring; for instance, it may go out of date or the public key may change. This never happens with the “big name” certificates built into your browser—you’ll see this more often when a certificate is used, for example, in-house on a company intranet and the administrator forgets to update the certificates. If a certificate goes bad, your browser issues a warning the next time you visit that site. To clear invalid certificates, you need to clear the SSL cache. The process varies in every browser, but in Internet Explorer, go to the Content tab under Internet Options and click the Clear SSL state button (see Figure 29-42).
Figure 29-42 Internet Options Content tab in Internet Explorer
Wireless networks add a whole level of additional security headaches for techs to face, as you know from Chapter 23. Some of the points to remember or to go back and look up are as follows:
• Set up wireless encryption, at least WEP but preferably WPA or the more secure WPA2, and configure clients to use it.
• Disable DHCP and require your wireless clients to use a static IP address.
• If you need to use DHCP, only allot enough DHCP addresses to meet the needs of your network, to avoid unused wireless connections.
• Change the WAP’s SSID from default.
• Filter by MAC address to allow only known clients on the network.
• Change the default user name and password. Every hacker has memorized the default user names and passwords.
• Update the firmware as needed.
• If available, make sure the WAP’s firewall settings are turned on.
1. What is the process for using or manipulating people to gain access to network resources?
A. Cracking
B. Hacking
C. Network engineering
D. Social engineering
2. Which of the following might offer good hardware authentication?
A. Strong passwords
B. Encrypted passwords
C. NTFS
D. Smart cards
3. Which of the following tools would enable you to stop a user from logging on to a local machine but still enable him to log on to the domain?
A. AD Policy Filter
B. Group Policy Auditing
C. Local Security Policy
D. User Settings
4. Which hardware firewall feature enables incoming traffic on a specific port to reach an IP address on the LAN?
A. Port forwarding
B. NAT
C. DMZ
D. Multifactor authentication
5. Zander downloaded a game off the Internet and installed it, but as soon as he started to play, he got a Blue Screen of Death. Upon rebooting, he discovered that his My Documents folder had been erased. What happened?
A. He installed spyware.
B. He installed a Trojan horse.
C. He broke the Group Policy.
D. He broke the Local Security Policy.
6. Which of the following should Mary set up on her Wi-Fi router to make it the most secure?
A. NTFS
B. WEP
C. WPA
D. WPA2
7. What tool would you use to enable auditing on a local level?
A. AD Policy
B. Group Policy
C. Local Security Policy
D. User Settings
8. John dressed up in a fake security guard uniform that matched the uniforms of a company and then walked in with some legitimate employees in an attempt to gain access to company resources. What kind of attack is this?
A. Administrative access
B. Data destruction
C. Spoofing
D. Tailgating
9. The first day on the job, Jill received a spreadsheet that listed approved software for users and clear instructions not to allow any unapproved software. What kind of policy must she follow?
A. Classification
B. Compliance
C. Group
D. Security
10. Edna wants to put a policy in place at her company with regard to virus prevention or at least limitation. What policies would offer the best solution?
A. Install antivirus software on every computer. Teach users how to run it.
B. Install antivirus software on every computer. Set the software up to scan regularly.
C. Install antivirus software on every computer. Set the software up to update the definitions and engine automatically. Set the software up to scan regularly.
D. Install antivirus software on every computer. Set the software up to update the definitions and engine automatically. Set the software up to scan regularly. Educate the users about sites and downloads to avoid.
1. D. Social engineering is the process of using or manipulating people to gain access to network resources.
2. D. Smart cards are an example of hardware authentication devices.
3. C. You can use Local Security Policy to stop someone from logging on to a local machine.
4. A. To open a port on your hardware firewall and send incoming traffic to a specific PC, use port forwarding.
5. B. Zander clearly installed a Trojan horse, a virus masquerading as a game.
6. D. Mary should set up WPA2 on her Wi-Fi router.
7. C. You can enable local auditing through Local Security Policy.
8. D. John just practiced tailgating on the unsuspecting company.
9. B. Jill needs to enforce compliance to help keep the tech support calls at a minimum and the uptime for users at a maximum.
10. D. The best policy includes updating the software engine and definitions, scanning PCs regularly, and educating users.