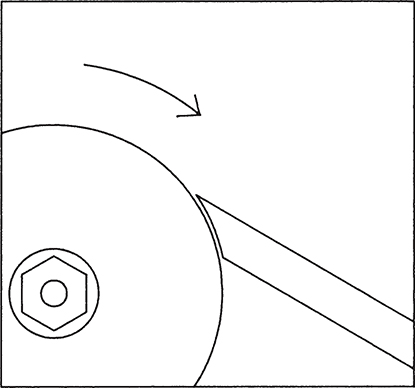
Photo 1: The round edge of a grinding wheel creates a concave bezel which is said to be hollow-ground.
As a woodworker, you have had to sharpen the tools that you use at the bench. Although, there are some similarities between sharpening lathe tools and other woodworking tools (particularly chisels), there are also some important differences. These differences are highlighted in this chapter.
Sharpening is not an arcane science. It is a skill and it is very easy to learn. However too many woodworkers are overwhelmed and confused by the jargon of sharpening. They hear talk about cutting angles, clearance angles, etc., and become baffled. In fact, the most common questions I am asked are, “What angle do you sharpen to?” and “How often do you sharpen?” The answers to these questions will be discussed later.
The first step in sharpening is to grind the cutting edge to the desired shape. For this job, I use a two-wheeled bench grinder: Sanding belts are very popular, but I find that they make the bezel longer than I like. Also, they make it very difficult to hollow-grind (see Photo 1).
Photo 1: The round edge of a grinding wheel creates a concave bezel which is said to be hollow-ground.
The stone I use most often on my grinder is #100-grit (fine). If you, too, choose to use a bench grinder, keep the wheels running true by regularly dressing them. A diamond dresser works fine. A diamond dresser is a short metal rod with an industrial diamond set into one end (available at industrial supply houses).
The dresser also freshens the surface of the wheel by exposing new abrasive particles. If the edge is kept free from clogging and glazing, the wheel will create less heat. However, you should still keep a container of water by the grinder and cool the tool often.
Whatever form of grinder you use, practice with it until you have the control necessary to create whatever shape cutting edge a tool requires. You should also be able to grind without causing so much heat that the steel turns blue and becomes too soft to hold a sharp edge.
A sharp edge is the result of two surfaces coming together at an angle. On most cutting tools (for example, a bench chisel), one side of the blade is flat. Although many woodworking magazines and authors refer to the sloping surface (the one that is ground) as a bevel, the more accurate word is bezel. To be more precise, the bezel on a chisel is called a “cannel,” although in this book I will refer to it as a bezel.
Turning tools are different from most cutting tools used at the bench in that many do not have a flat surface opposite the bezel. Gouges have a concave surface opposite the bezel, but on many other turning tools (like skews and parting tools) the cutting edge is formed by the intersection of two bezels. The bezel on many cutting tools used on the bench (planes, chisels, etc.) should be at about 30°. However, turning tools have different angles. Below I give the approximate angle of the bezels on my tools. Do not let these numbers make you nervous. You only have to approximate the angle. It is far more important that right now you are able to sharpen your turning tools so that you can learn to turn. Most times, I simply grind the tool so it does its job, and forget about its cutting angle.
One important concept to remember is that the heavier the work done by the tool, the steeper the angle of the bezel should be. This creates a stronger edge that is more capable of withstanding shock. Thus, a heavy roughing gouge will have a steeper angle than a spindle gouge that is used for shaping, which is more delicate work.
As noted above, I prefer to hollow-grind my tools, as a hollow grind creates a distinct edge and a heel. (An edge and heel have benefits that will be explained below.) This means that rather than being a true, flat surface, the bezel is slightly concave. If you are using a bench grinder, this shape occurs naturally, resulting from the circular shape of the wheel (Photo 1).
Your gouges will usually require more frequent grinding than any of your other turning tools. This is because the major amount of wood you remove when turning is cut with these tools, and, as a result, they become dull much more often.
Roughing gouges have a straight cutting edge – one that is at a right angle to the sides of the blade – just like that on a bench gouge. When you are grinding a roughing gouge, lay the center of the curved body on the tool rest with the handle held low (Photo 2). Raise the handle, bringing the center of the curved bezel into contact with the wheel. Then, grind each half of the edge by rolling the tool from side to side, rotating it on its long axis (Photo 3). With practice, you will be able to grind a cutting edge that is perfectly straight from one corner to the other.
A roughing gouge bezel should be ground to about 40°–45°.

Photo 2: When grinding a roughing gouge, lay the bottom of the curved blade on the tool rest with the handle held low.

Photo 3: Grind each side of the roughing gouge’s edge by rolling the tool from side to side on its long axis.
Spindle gouges have a convex curved edge, similar in shape to the end of your thumb. As noted in the last chapter, narrow gouges (1⁄4" and 3⁄8" wide) are often called “lady finger” gouges, because their edges are usually more elliptical.
To grind a spindle gouge, first lay the gouge on the tool rest with the center of its edge in contact with the revolving stone. Because the cutting edge is rounded, you have to move the handle in two different directions simultaneously. First, twist the handle so that the gouge’s body rolls on the rest. This is the same motion as used to grind a roughing gouge, and is described above. At the same time, swing the handle in a gentle arc, raising it slightly (Photo 4). This motion will keep the curved bezel in contact with the stone, while creating the correct shape.
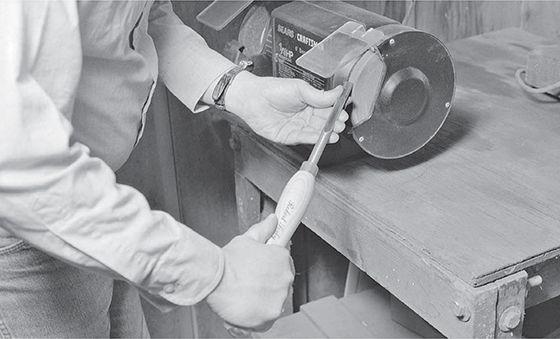
Photo 4: Grind a spindle gouge by twisting the handle and simultaneously raising the handle though a gentle arc.
Grind the other half of the bezel in the same way. Watch closely and you will see that throughout this process the far end of the tool’s handle will move in a shallow arc. Again, with practice you will learn to grind an edge that is a smooth, symmetrical curve. Spindle gouges are sharpened to 35°–40°. Narrower spindle gouges have shallower angles.
When grinding a skew, you should be concerned with the following: 1) that the cutting edge is centered on the end of the blade (Photo 5A); 2) that the bezels are the same width on both sides of the blade (Photo 5B); 3) that the bezels have a constant width along their entire length (Photo 5B); and 4) that the cutting edge is skewed at about a 75° angle to the edges of the blade (Photo 5C).

Photo 5: When grinding a skew, make sure that: A) the cutting edge is centered on the blade B) the bezels are a constant width and the same width on both sides of the blade C) the cutting edge is about 75° to the edges of the blade.
Before beginning, consider how you would go about grinding a bench chisel. The cutting edge of a bench chisel is at a right angle to the blade’s sides, so you hold its handle in line with the wheel. You lower the end of the handle and slowly raise it to bring the bezel against the revolving stone. Then, you slide the handle and blade from side to side, maintaining the grinding angle and making certain that the tool is kept parallel to the wheel.
A skew is ground in the same way, except that the handle is held at about 75° to the revolving wheel (Photo 6). (Don’t worry about getting this angle exact.) You must begin on one side or the other. Being right-handed, I naturally grind the left-hand bezel first. This means that I grip the handle with my right hand, and hold the tool on the rest with my left.

Photo 6: To grind a skew, hold the handle at about a 75° angle to the wheel. Slide the tool from side to side, as you would when grinding a bench chisel.
Place the skew on the rest with the handle low, and bring it into contact with the wheel by slowly raising the handle. Now, move the skew both to the right and to the left, being sure to hold it at 75° to the wheel.
When one side is done, grind the other. Roll the tool over and, keeping the handle at 75°, angle it in the opposite direction (Photo 7). Repeat the process. In my case, I would now be grinding the right-hand bezel. My left hand would be on the handle, while my right hand would be holding the skew against the rest.

Photo 7: Grind the skew’s other bezel with the handle angled in the other direction.
As you grind this second bezel, check often to see that it is the same width as the first. Together, the two bezels will form about a 45° angle. Thus, each should be ground at about 22°–23° to the center of the blade.
As explored in Chapter 6, you can often use a skew to plane a turned surface smooth and to make what is called a rolling cut. These techniques require that the tool pivot on the blade’s lower edge. These are important cuts, and the best results are obtained when they are made as smoothly as possible. However the edge of a skew’s blade is square, having two corners. This is hardly a surface that pivots easily.
Therefore, this edge should be rounded. First try to round the edge with a file. Often, however the skew’s blade is hardened, and the file will not cut. The rounding then has to be done on a grinder. Be careful not to overheat the blade, as this can soften it. Try to make the newly curved edge as uniform and regular as possible. When you test your skew, you will find that it rolls much more smoothly (Photo 8).

Photo 8: If you round the bottom edge of the skew, it will roll more smoothly.
The parting tool I use has an unusual cross section, often called a diamond section. It is thickest along its centerline. This is an important factor to consider when grinding a parting tool.
Like the skew, parting tools have two bezels that meet to form the cutting edge. The cutting edge is horizontal and short, rather than vertical and tall. This is because the bezels meet on the narrow dimension rather than the long one. In other words, while the skew’s cutting edge is used nearly vertical to the rest, the parting tool’s is parallel to the rest.
When you grind a parting tool, its cutting edge must align with the rib running down both sides of the tool’s blade. This is important because when a parting tool is ground correctly, its cutting edge is located at the widest point, and the widths of the two bezels taper away with the more narrow sides. Thus, when the tool makes a parting cut – a narrow, deep groove – only the corners of the cutting edge are in contact with the groove’s sides. This reduces the possibility of binding, or damage (such as burning) due to friction.
Grind the parting tool as you would a bench chisel, with the only difference that the blade is held on its edge rather than on its side. The cutting edge is square to the sides, so hold the handle in line with the rotation of the grinding wheel (Photo 9).
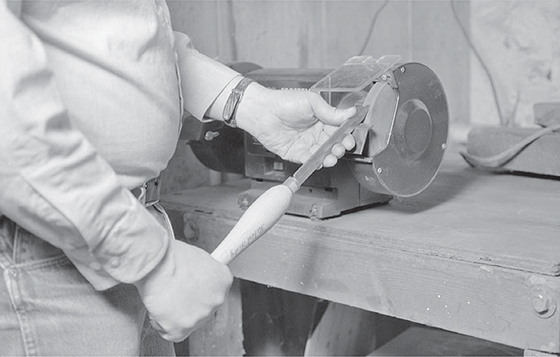
Photo 9: Grind a parting tool as you would a bench chisel. The handle should be held in line with the rotation of the wheel.
Grind one side first. Since the blade is so narrow, no side-to-side movement across the wheel is necessary. In fact, the only motion you make is to raise the handle slightly to keep the bezel against the wheel. Because you are not moving it from side to side, you do have to be careful that the tool does not overheat and loose its temper. This will result in a soft spot that will not hold an edge.
When the first bezel is complete, turn the tool over and grind the second bezel the same way. Make sure that its cutting edge stays on the raised center rib.
Diamond points also have two bezels. These bezels, however, are on the same side of the blade. When you look at them they resemble the facets of a diamond. The two bezels, set at an angle to each other, result in two cutting edges. The blade’s pointed end is actually the result of their intersection. The smaller the angle of intersection, the more pointed the tool. The two cutting edges on my diamond point intersect to form a 110° angle. Each edge is about 145° to the sides of the tool.
When grinding a diamond point, think of each cutting edge as a small skew. Place the tool against the wheel and grind it as you would a skew, moving the cutting edge back and forth while holding the handle at the correct angle relative to the wheel (Photo 10). A right-hander would naturally start grinding the tool by holding the handle in his right hand. His left hand would press the blade against the wheel. This position allows him to grind the right-hand bezel.

Photo 10: Grind each side of the diamond point as you would the sides of a small skew. Move the edge back and forth without changing the handle’s angle.
When finished with one bezel, do not invert the tool as you would a skew. Simply change hands, and you will be in position to grind the second side. If you had taken a picture of your position when grinding the first edge, it would be a mirror image of your position when grinding the second edge (Photo 11).

Photo 11: To grind the diamond point’s other bezel, do not turn the tool over; as you would with a skew. Simply change hands and angle the handle the other way.
When sharpening the diamond point, practice so that the ridge created by the two intersecting bezels is parallel to the tool’s sides.
Grinding only shapes the cutting edge and bezel. It does not create a sharp edge that will cut wood easily and cleanly. A sharp edge can only be created by honing. For this step, whetstones are needed. You should own at the very least a medium- and fine-grade stone.
It really does not matter what type of whetstone you use. Japanese water stones are inexpensive and come in a variety of grits. One disadvantage is that they have to be kept wet. This requires that you store them in a tub of water. If any water splashes about when you are using the stones, it will spot and rust other tools. So, if you choose to own water stones you also have to create a separate sharpening station.
Another disadvantage is that water stones are soft and wear quickly. Since turning tools are narrow (unlike plane blades), they can quickly wear a trough in a water stone. Fortunately, water stones can be easily flattened. Do this on a sheet of plate glass to which you have adhered #400- or #320-grit wet or dry sandpaper (silicon carbide).
Oilstones, both natural and man-made, are the more traditional alternative. They tend to be more expensive than water stones, but are usually more durable. Still, over time a trough will wear in them, too. When you are honing an oilstone, you will have to lubricate it with oil. The oil leaves a dirty film on your fingers. This oily film gets on everything you touch, even if you wipe your hands when done.
Use man-made ceramic stones. They are very hard, and seem to retain their flatness. I have not noticed the slightest hint of a trough in either of mine after six years of use. Also, ceramic stones are used dry. This is certainly more convenient.
When the surface of a ceramic stone becomes glazed with metal dust, it can be quickly cleaned with a sponge and bathroom scouring powder. Let the stone dry thoroughly before using it again. It will only take a few minutes to dry.
Whetstones are fine for honing most lathe tools. Even though gouge bezels are curved, they can still be honed on a flat surface. Simply roll the bezel as you hone. The insides of gouges, however have to be honed with slipstones. Most slipstones have a cross section that looks like an elongated tear drop. They have two flat sides with two round edges: one wide, the other narrow. The ends are flat with square corners.
Slipstones are made of the same natural and man-made materials as whetstones. The Japanese also make water-lubricated slipstones. All come in the same grades as whetstones.
Files (sometimes called “gun files”) are long, narrow stones that come in special shapes.
They are useful in many sharpening jobs. Following are some of the cross sections files can have: triangular, round, teardrop, square, and knife edge.
Files are usually made of man-made materials. Mine are made of the same ceramic materials as my whetstones. I use round- and teardrop-shaped files most often on lathe tools.
Honing is done the same way, no matter what type of whetstone is used. Remember an edge is the result of two surfaces meeting at an angle. Only when the two intersecting surfaces are polished so smooth they have a mirror surface can there be a condition called “sharp.” Sharp means that the edge is keen enough to slice cleanly through wood.
Hold the bevel of a recently ground tool up to the light, and look carefully. You’ll note that the grinding wheel’s abrasive particles have roughly scratched the surface (Photo 12). These scratches are even more pronounced under a magnifying glass. Where the scratches meet the edge, they produce serrations like the teeth on a saw. This ragged edge is deceptive, for it will cut easily (although not cleanly) for a very short while. This is because, in effect, the edge is a tiny saw. However, it quickly becomes worn and very dull. If you were to rely on this type of edge you would have to constantly regrind it on a grinding wheel. You would not only waste a lot of time grinding (it takes a lot longer than honing), you would quickly squander your tool’s steel.

Photo 12: A grinding wheel will leave coarse scratches on a bezel. These scratches produce microscopic serrations on the cutting edge, much like the teeth on a tiny saw. Although this ragged edge will cut easily, it will not cut cleanly, and it quickly dulls.
The process of honing removes these heavy scratches by making scratches that are increasingly finer and finer. Eventually, these scratches become too microscopic to be seen, and the metal takes on a mirror-like polish. However, it is critical that both intersecting surfaces be polished. If you were to concentrate on only one, the scratches on the other would always result in a ragged edge.
If your tool has a flat side (for example, a diamond point), lay that side on the stone and polish it. Hold the blade perfectly flat on the stone. Never raise it even slightly, as this will round the cutting edge. Move the tool in whichever pattern you prefer: figure eight, circles, back-and-forth, or side-to-side. Periodic inspections will tell you how well the polish is developing. The entire surface does not have to be polished, only the area along the cutting edge. Look very closely to be sure that the polish extends right out to the very edge.
Start this process with a medium stone, and follow with a fine stone. The result should be a mirror polish, one that is so smooth you can see yourself in its reflection. Anything less will not produce a razor-sharp edge.
When sharpening a gouge, you first have to hone the inside surface, just behind the cutting edge (Photo 13). This has to be done with a slipstone. Hold the slipstone perfectly flat against the steel. If you allow it to rock, it will round the edge (Photo 14).

Photo 13: Use a slipstone to polish the inside surface of both roughing and spindle gouges.

Photo 14: If you hold the tool too high when honing, you will roll the edge as shown in 1. If the tool is too low, the honing only takes place on the heel, as shown in 2. To locate the correct angle, place the heel on the stone as shown in 3 and raise the back end until the edge comes in contact with the stone, as shown in 4. Make sure that both surfaces stay in contact with the stone while you are honing.
Because the surface is concave, you will be limited in what patterns you can use. On a narrow “lady finger” gouge, all you can basically do is move the slipstone back and forth. On a large gouge, you may be able to make circles or a figure 8. Honing this surface is a slow process and it takes patience. However, the results will be worthwhile.
After honing the flat side of a tool (if it has one), the next step is to hone the tool’s bezel(s). In this step, it is important that the tool does not rock on its bezel. If you hold the tool too low, you will be honing the heel. If you hold the tool too high, you will round the cutting edge. To keep the tool from rocking, hollow-grind the bezel so that it has a distinct edge and heel. To do this, first set the heel of the bezel on the stone. This angle is, of course, too low to hone. Slowly raise the handle until the cutting edge is also touching the stone’s surface. The bezel is now in contact at two points: the heel and the edge. If you are careful to hold it in this position while honing, you will not inadvertently round the edge.
With both the heel and edge in contact with the stone, move it in the pattern you prefer. Take the tool off the stone after a dozen or more passes. You should see a narrow line of polish on the heel and at the cutting edge (Photo 15). As long as both edges are being polished uniformly, the edge is not becoming round. Because you are only honing these two narrow surfaces, honing a hollow-ground bezel is very quick and easy to do (Photo 16). By honing, you have made a very narrow flat surface at the cutting edge of the hollow-ground bezel. This polished flat surface meets at an angle with the perfectly flat and polished opposite side, and creates the condition called “sharp.”

Photo 15: You do not have to hone the entire surface of a hollow-ground bezel, only a narrow strip along the cutting edge. Note that the bezel’s heel is also honed.

Photo 16: 1 shows a hollow-ground edge. Honing creates narrow, flat surfaces on the heel and edge, as shown in 2. Each honing removes metal from these surfaces, increasing their widths. Eventually, these two surfaces will merge, as shown in 3. When this happens, it is time to regrind. If you do not, and instead continue to hone, you have to remove metal from the entire width of the bezel. This is a lot more work.
If you are sharpening a diamond point, hone each of the angled cutting edges separately. If you are sharpening a tool that has two bezels that intersect, such as a skew or parting tool, “sharp” will not occur until you have honed both bezels. Hone both bezels as just described (Photo 17).

Photo 17: Hone each of a diamond point’s bezels as you would one side of a skew.
Honing a gouge is slightly more difficult. Some woodworkers prefer to hold the gouge and work the stone over the bezel. I only do this on very large roughing gouges. For spindle gouges, I prefer to place the stone on the bench and move the tool. This gives me better control.
When honing a gouge’s bezel, move the tool in whatever pattern you prefer. However slowly rotate the blade so that the entire length of the edge is for awhile in contact with the stone. Remember to keep both the heel and edge touching. When you think you are done, examine the bezel in bright light. You should be able to see the sheen that has developed during the honing process. The sheen should be uniform along the entire bezel, and should continue right out to the edge (Photo 18).

Photo 18: When honing a gouge, make sure to slowly rotate the handle so that the entire edge is polished.
If the gouge is too long (or too big) to run over the stone, you will have to hold the stone and run it over the tool’s edge (Photo 19). Normally, the only gouge I have to do this to is my 11⁄4" roughing gouge. Hold the gouge on the bench or against your stomach and hone the bezel with a slipstone. Make sure that you first place the stone in contact with the heel, and then roll it until it also touches the cutting edge. Be sure not to accidentally brush your hand against the edge.

Photo 19: Sometimes it is easier to hone a large gouge by running the stone over its bezel, rather than the other way around.
Work the slipstone over the entire length of the bezel. You can use any stroke you like: circle, figure eight, side-to-side, or back-and-forth. Be sure that the slipstone rides on the heel as well as the edge. Examine the bezel closely to be sure that you have polished right out to the edge.
Check the polish along the bezel. It should extend along the entire length of the edge and should be brought to a mirror-like finish.
After you have honed the bezel, the edge of the blade should be sharp. Test its sharpness with the tip of your thumb. If your skin is snagged by a slight wire edge, strop this edge away. Stropping can be done on a buffing wheel impregnated with an abrasive compound. I use grey steel, but jeweler’s rouge (which is more fine) will also work (Photo 20). Simply touch the edge momentarily against the wheel. Any longer, and you risk rounding the edge.

Photo 20: Impregnate your buffing wheel with a buffing compound such as grey steel.
Next, with a bright light shining over your shoulder, hold the blade so you are looking directly at its edge. If it is sharp, it will not be visible in this inspection. If you see even the narrowest sliver of surface glinting in the light, your tool is not sharp in that location.
As you use a tool, the cutting action creates friction which, in time, blunts the edge. Therefore, how often you sharpen a tool depends on how much you have used it, not the amount of time that has elapsed since you last sharpened it. It is time to resharpen the tool (usually by re-honing) when the tool no longer cuts easily and cleanly.
The polished surface along the edge of a hollow-ground bezel becomes wider with each honing (Photo 15). So does the surface on the heel. Eventually, the two surfaces will merge so that when honing you are polishing the entire bezel. This requires a lot more time and effort. It also creates more wear on your stones. When the two surfaces have merged, it is time to grind a new hollow-ground bezel.
So far all the sharpening procedures explored involved turning tools. There are also sharpening-related jobs that have to be done to the lathe. The spurs on the drive center must bite easily and firmly into the end of the blank. They cannot do this if they are dull, rounded, or battered. You should sharpen them when you first acquire your lathe, and periodically maintain them.
To sharpen the spurs, first knock the drive center out of the headstock spindle by inserting a drift through its back end. Rap the drift with a hammer, and catch the drive center with your free hand.
The center is so hard, a file will just skate across the spurs, and, as a result, you will have to grind them. Each spur is very much like a tiny chisel. It has a flat surface and, opposite that, a bezel ground at about 35° (Photo 21).
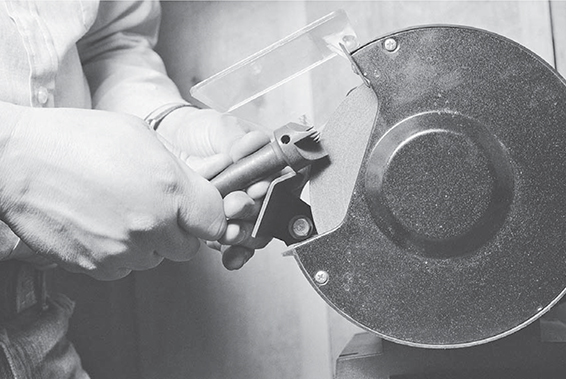
Photo 21: The spurs on a drive center should be kept sharp. Occasionally, they need to be ground. Their bezels are at about 35°. Be careful to not create any heat, as this could soften the hard steel.
Do as little grinding as is necessary to restore the bezel, as the spur is already quite short. Also, you do not want to create any heat. Heat will soften the hard spurs. If the edge of the bezel is still ragged even after you have ground the bezel, you may have to touch up the flat side of the spurs. Do this on the flat side of your stone, rather than on its round edge.
While you are grinding the spurs, purposely make a notch in the end of one of them. This particular spur will then make an imprint in the end of the blank that can be easily distinguished (Photo 22). Should you have to remove a partially completed turning from the lathe, or should you later have to work again on a completed turning, it is helpful to know exactly how it was originally mounted. Every spur is slightly different, and if the turning is not put back exactly as it was, it can be slightly eccentric. Make the notch on the grinding wheel’s sharp corner.

Photo 22: Make a notch in one of the spurs. This creates an easily distinguished imprint which allows you to always return a piece of wood to the same position.
The point on the drive center should also be sharp. If it is dull or round, it, too, should be reground. The point is usually removable. It is held in place by an Allen screw. If you loosen the Allen screw, you can draw the point out of the drive center.
Sharpen the point on the grindstone. Hold the point in your fingertips and slowly revolve it so that the end’s entire circumference is ground to a uniform taper. This way, the point will bite easily and cleanly into the blank, staying exactly on the intersection of the X that locates the blank’s centerline. (See Chapter 6.) When you return the point to the drive center, adjust it so that it stands just slightly above the ends of the spurs. This way, it engages the wood in advance of the spurs, making it easier for you to center the blank when chucking it up in the lathe.
You will learn in Chapter 5 that in order for you to make many shaping cuts, the tool has to move smoothly over the rest. This cannot happen if the rest’s bearing surface is rough. Roughness is not necessarily the result of damage. The factory may have only rough-ground the surface, or did not grind it at all, leaving it just as it was cast. To smooth the bearing surface, first run a file over it. A file will cut most quickly if it is held at a slight angle, in a technique called draw filing (Photo 23). Next, smooth the surface with either sandpaper or emery cloth. Depending on the humidity, the newly exposed metal may eventually develop a thin layer of rust. This, too, can impede the fluid movement of the tools. You can quickly remove the rust by buffing it with a fine (#200-grit) sandpaper.
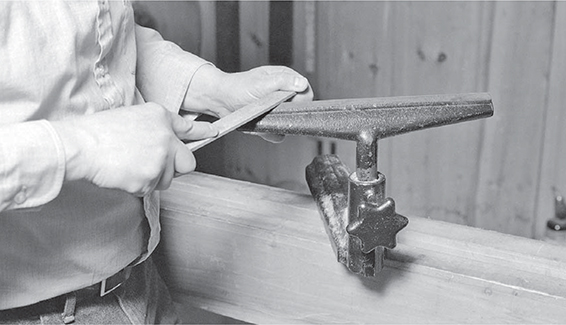
Photo 23: Draw-filing the top of your rest will remove any imperfections that might interfere with the smooth movement of your tools. Finish with sand paper or emery cloth.