CHAPTER FIVE
Turning Blanks
This chapter and Chapters 6 and 7 should be read together. Here I describe how turning tools are used to rough-round blanks and reduce them to diameter. The next two chapters explain how to identify those shapes or elements that can be cut with turning tools, and describe the actual shaping techniques. These procedures are all part of the turning process.
There is one important point to consider before reading on: In woodturning, there are many ways to make the same cut. The procedures I am about to describe are very successful. But they are not the only procedures that can be used. You may decide to adapt your own technique. As long as you have successful results with it, continue to use it.
Nothing creates more problems for a new turner than learning to make the tools cut cleanly. When cut properly, a piece turned by hand will need little or no sanding. The tools will leave the wood quite smooth. So if you find yourself doing a lot of sanding, take some time to reconsider your cutting technique.
The piece will be cut correctly only if you hold and manipulate the tool correctly and use the correct cutting angle (see below and Chapter 6) – the angle at which the tool most efficiently slices a chip from the blank. When you are doing both properly, the shavings should come off the spinning blank in solid pieces. If you are creating a lot of dust, you are scraping and not cutting, and the surface you make will be rough and tattered.
Scraping not only mars the wood, it is also hard on the tools. It creates a lot of friction, which results in heat and wear. While working at the bench, you have become familiar with the cutting tools you use to make furniture and architectural elements. For example, you know that when you use a handplane on a board, it cuts thin, even shavings and leaves behind a glassy smooth surface that no sandpaper can create. A keen edge on a plane blade will eventually become dull, but properly sharpened it will cut cleanly for a long time.
Now, imagine taking the blade out of the plane and using it as a scraper. You would have to hold it at a high angle, so that it was standing right up on the cutting edge. You would be able to remove a shaving by scraping this way, but the friction you create will soon dull the edge.
The same thing happens to lathe tools if the edge is engaging the spinning wood at too high an angle. The tool scrapes rather than cuts. Below I discuss how to properly cut with a lathe tool.
PROPER CUTTING TECHNIQUES
No matter what tool you use to cut, you should always be aware of grain direction. Your experience at the bench has taught you that pushing a tool such as a plane into rising grain will not result in as clean a cut as can be obtained working in the other direction. The same is true in turning. When you remove wood, you cut through layers of annual growth and expose end grain (Photo 1). Therefore, you always have to continue to cut in the same direction. The phrase used to describe this action is “cutting downhill.” When you cut uphill, you cut against the grain and leave a more ragged cut. Understanding these techniques is particularly important when you are making finishing cuts such as when planing (see pages 49–53).
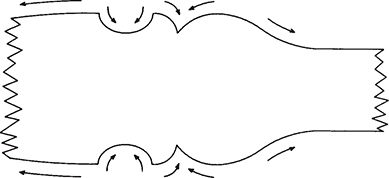
Photo 1: Whenever you make an element, make sure to always cut “downhill” so that you do not cut against the grain. Ignoring this will result in a rough surface. Furthermore, when you are making some details, such as a cove, the end grain can grab a tool and pull it out of control.
CUTTING WITH A GOUGE
Most of the cutting done with a gouge (whether deep or standard flute, or roughing or spindle) occurs on the sides of the cutting edge, rather than in the middle. This means that much of the time the gouge is used on the sides of its curved blade, rather than resting on the bottom of the arc.
Do the following to find the cutting angle: Round a blank (see Chapter 6). While it spins, lay the tool’s bezel on the wood, holding the tool at about a 65° angle to the axis of the blank (the handle is angled away from you) (Photo 2). This is a comfortable position for anyone who has ever pushed a bench plane, for, as you know, a plane cuts best if held slightly askew.

Photo 2: To find the cutting angle, lay the gouge’s bezel on the spinning blank, holding the handle at about 65° to the rest. Roll the gouge so that the blade’s round bottom is turned away from you. Slowly pull the handle rearwards a fraction of an inch. This will lower the cutting edge into the wood.
The gouge cannot cut with its bezel riding on the blank because its edge cannot engage the wood. The edge is too high. The optimum cutting angle will be lower. Using the hand with which you hold the tool handle (for right-handed people, the right hand), slowly begin to draw the handle rearwards, all the time keeping the bezel on the blank. You are only going to move the edge a fraction of an inch. This motion will bring it into contact with the wood, and it will cut a shaving. Because you are not moving the tool sidewards, the cut will be very short. Also, the heel of the bezel should still be riding on the blank.
While the tool is in this position, only the very bottom of the curved cutting edge is in a position to cut. Now, roll the gouge towards the left (counterclockwise), so that the blade’s round bottom is turned away from you at about 4 o’clock. This brings the left side of the curved cutting edge into contact with the wood. The tool handle should be directed away from you at about 65° to the blank’s axis. Meanwhile, the bezel should still be pressed against the wood. Doing this ensures that you have not raised the tool too high, approaching a scraping angle. Pull the gouge towards you. As long as the tool is in motion, it will peel off a shaving (Photo 3).
At the end of the cut, turn the gouge clockwise so it is rolling on the blade’s right side. At the same time, pull the handle towards you so that it’s angled at about 65° to the blank’s axis. Push the gouge away from you, and it will cut another shaving. Keep the bezel rubbing on the blank.
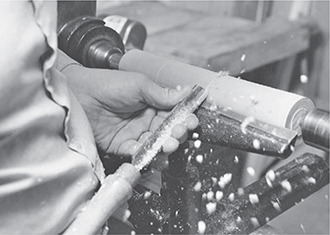
Photo 3: Holding the cutting angle, pull the gouge towards you. It will cut a shaving, which will break up into little pieces. When you reach the end of the rest, roll the tool in the other direction, repeating the process for finding the cutting angle. Now, push the tool along the rest, and it will once again cut a shaving.
This is the basic cut made with both the roughing and spindle gouges. I will describe some other techniques in Chapters 6 and 7 when explaining how to rough-round and cut concave elements such as a cove.
CUTTING WITH A PARTING TOOL
The parting tool cuts differently than a gouge. Because it makes straight plunge cuts, it is held at 90° to the wood rather than at an angle.
To find the cutting angle of a parting tool, hold the lower bezel against the spinning wood (Photo 4). Slowly pull rearward on the handle, keeping the bezel in contact with the wood. This will lower the cutting edge, and it will soon begin to engage the wood. When it does, it will quickly cut a shallow groove. To make this groove even deeper, raise the back of the handle so that the tool pivots on the tool rest, and push forward at the same time. The shaving should come off in one long ribbon. However, because the shaving is being cut across the grain, it will break up very easily.

Photo 4: To find the cutting angle for a parting tool, hold it at a right angle to the rest – the bezel riding on the wood. Pull the handle rearwards until the cutting edge engages. Lift the handle and push forward slowly. The tool will cut a straight-sided groove.
As will be explained in Chapters 6 and 7, the parting tool is used for sizing and laying out some of the elements that are used in spindle turning. However, it is also used for parting, which is a quick and efficient way of cutting turnings out of the lathe. Often, waste is left on each end of the turning where the centers make contact. This waste is later cut off with a saw. However, if you use a parting tool, you cut the turning out of the lathe while it is still running. This technique was often used by old-time production turners, who increased their efficiency by never shutting off the machine. They simply cut out the finished part and mounted a new blank while the lathe kept spinning.
To part a turning out of the lathe, make a parting cut until the remaining section is so thin (usually about the thickness of a match stick) that it snaps. The part will not fly out of the machine. Instead, it will fall gently on to the bed. Sometimes, small turnings are made two at a time; parting them out of the lathe separates them, saving the time necessary to saw them apart. (See Chapter 16.)
CUTTING WITH A SKEW
The skew is one of the most versatile tools you will use in turning. However, it is also the most difficult to master. Since you can do so much with a skew, it is worthwhile to practice and become proficient with it. Below are descriptions of the various cuts made with this tool.
Plunge Cuts
You have already learned how to use a parting tool. A skew can make very similar cuts. However, instead of making a groove, the skew is usually used to make plunge cuts with one open side. As a woodworker, you are familiar with rabbets, which are stepped edges on a board. Think of the skew as the tool you use for making rabbets in a spinning blank.
Consider the cutting technique used to make a square shoulder on a billet with a skew. First, use the heel of the skew to score a line where you want the shoulder to begin. This step is not essential, but it does eliminate any fuzz on the corner of the shoulder.
Next, place the skew in the same position as you would a parting tool.
However, in order for the bezel to be riding on the wood, place the blade on its side rather than its edge. Use the correct bezel – the one that allows you to use the skew’s pointed toe. In Photo 5, I am cutting a rabbet on the right-hand side of the turning; therefore the left bezel is riding on the wood, with the point aligned with the scored mark. It is also important that the cutting edge be parallel with the axis of the wood. This means that the handle will be angled to the right.

Photo 5: To make a square shoulder with a skew, lay the blade on its wide side with its toe pointing into the corner: The handle should be angled so that the cutting edge is parallel to the wood’s axis (the lathe centers). Ride the bezel on the wood and slowly pull the handle rearwards, as you did with the parting tool. When the tool starts to cut, push it forward. Stop cutting when you have reached the desired depth.
Now, pull the handle rearwards, lowering the cutting edge so that it engages the wood. Raise the rear end of the handle so that it pivots on the tool rest; at the same time, push forward slowly. This motion is the same one you would make with a parting tool. The skew will remove similar shavings, although they will be wider. Stop the cutting action when you reach the desired depth.
This same type of cut can be used in dozens of places on all types of turnings. One of the most common techniques is to make the fillets that separate the different elements in a turning. As you become more experienced as a turner, you will find more opportunities to use this cut in your own work.
Facing Off
If you make a plunge cut with either a parting tool or skew, the end grain in the cut’s shoulder(s) will be left ragged. To make this surface as smooth as glass, you will have to face it. This technique can be done with either a skew or a diamond point.
Rest the skew on its lower edge so that the heel does the cutting. Angle the handle away from the blank’s axis so that the adjacent bezel is at very near a right angle to the axis and parallel to the shoulder. In other words, the bezel should ride on the wood’s shoulder as it is being faced-off.
Slowly pull rearwards on the handle and pivot the blade on the rest so that it engages the wood. The heel will begin to score the wood and shear a thin shaving off the shoulder (Photo 6). Pull up slowly on the end of the handle and, at the same time, push it slowly forward into the wood. The chip that is severed from the shoulder should be thin and disc-like, and the shoulder itself should gleam like glass (Photo 7).
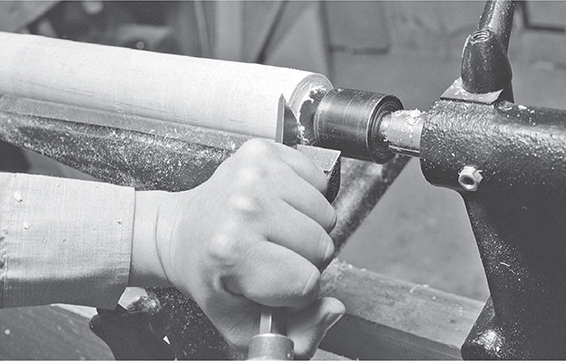
Photo 6: To face off with a skew, hold the tool with the blade vertical. The handle is angled so that the nearest bezel is close to (but not perfectly) parallel to the shoulder. Slowly lift the handle, pushing the heel into the wood. Now, advance the skew. It will shear a thin, disc-like shaving.

Photo 7: The faced-off shoulder will be so smooth that it gleams like glass.
Rolled Cuts
A rolled cut is very similar to a face-off cut. It will create the same glassy surface, and is used to shape round elements. (See Chapter 7.)
To make a rolled cut, first make a scored line with the heel of the skew. This should also mark the deepest point of the cut (which is often the end of an element, such as the bottom of a vase). Move slightly to the right of the line and lay the skew on its side, with the bezel on that side riding on the turning. Roll the handle just slightly. This will lift the toe, and the heel will begin to engage the wood, lifting a shaving.
While rolling the tool with one hand, use your hand on the blade to pull the tool towards the scored line. At the same time, push the heel into the wood (Photo 8). The effect is a rolling action that causes the heel of the tool to travel along a curve. As it does, the blade will slice a chip and leave behind a curved surface.

Photo 8: To make a rolled cut, score a line. Then move slightly to the right and lay the skew on the right side of its wide blade, with the bezel riding on the spinning blank. Roll the blade by turning the handle (in this case, it is being turned counterclockwise). The heel will engage. Completing this rolling action will cause the edge to travel along a curve. If you keep the bezel riding on the wood, it will not be pulled out of control, and will leave a gleaming, round surface.
If the curve needs to be longer than you can make with just a single cut, make a second cut that starts just to the right of the first (Photo 9). Repeat the motion, removing a second chip. Do this as many times as required to make the curve you wish. Start each cut slightly farther away from the starting point than the previous one.

Photo 9: If the detail needs a longer radius than you can cut in one pass, make a second cut, repeating the same motions. However, begin the second cut slightly farther right than the first. Keep the bezel riding on the wood.
Be careful when making this cut. If the skew’s blade becomes too vertical, the heel will catch in the end grain and be dragged up the turning. When you shut off the lathe, you will find that the heel has made a deep spiral cut, perhaps ruining the piece.
To avoid this problem, make sure as you make each rolled cut that the lower bezel stays in contact with the curved surface it is cutting.
As long as the bezel is riding on this surface, the angle is low enough that the tool will not get caught and pulled out of control. At this angle, the skew will cut a glassy, smooth surface.
In Photos 8 and 9, I am cutting from right to left and drawing the tool towards me by turning it counterclockwise. You can also cut from left to right. The techniques are the same, but in the latter case you push the skew away from you by turning it clockwise (Photo 10).

Photo 10: To make a rolled cut in the opposite direction, lay the blade on its other side, slightly to the left of the scored line. Repeat the rolling action, but this time turn the handle clockwise.
Planing
Planing is one of the most difficult techniques to learn, but once you have mastered it you can produce surfaces on a turning that are nearly as smooth as the surface of a handplaned board. Planing with a lathe eliminates the need for most sanding, and, because it can be done so quickly, it is the most efficient method for finishing your work. Also, it does not leave scratches that later become visible under the finish. (See Chapter 7.)
The size of the skew you will use to plane a turning is determined by the diameter of the blank and the size of the element being planed. I use a 3⁄4" skew for large turnings, and a 1⁄2" skew for smaller ones.
When you plane a turning, you use the skew’s sharp, straight-cutting edge to smooth the turning. To learn this technique, first turn a cylinder that is thick enough to withstand vibration. (See Chapter 6.) The surface of the cylinder will have ripples that were produced by the gouge. Planing will remove these tool marks.
To plane the cylinder with a skew, place the skew on the tool rest at the right end of the blank. The heel should face the direction of travel, which in this case is from right to left. The cutting edge should be angled (skewed) away from you at about 65° to the wood’s axis in the same way you would hold a gouge (Photo 11).
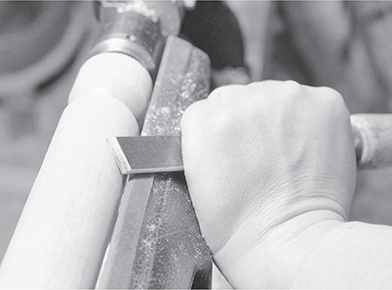
Photo 11: Planing with a skew is one of the more difficult techniques to learn, but the results make it worth the effort. Place the wide side of the skew on the rest with the heel facing the direction of travel (here, right to left). The cutting edge should be skewed at about 65° to the wood’s axis. Slowly raise the handle and twist it towards your body, engaging the cutting edge. The heel should not cut, and the toe must not touch the wood.
The right-hand bezel should be resting on the spinning wood. Only about the lower two-thirds of the bezel should be in actual contact with the blank. The heel will not be cutting. The nose must be elevated above the wood. Slowly raise the handle and twist it ever so slightly towards your body. This will engage the cutting edge with the wood. Make sure that the lower bezel is still rubbing on the blank’s surface.
Slowly draw the skew towards you. Hold the skew steady. At first, this will be somewhat difficult. However with patience and practice, you will do this as naturally as you would push a handplane.
When I plane with a skew, my right hand holds the far end of the handle and is pressed against my side, between my lowest rib and my hip (Photo 12). This location will vary from person to person and lathe to lathe. Where you press your hand depends on the height of the lathe and your own height. This is a very secure grip, and will hold the skew perfectly rigid.
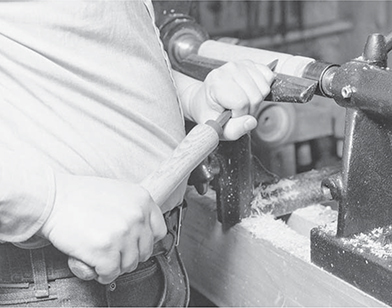
Photo 12: Once you have found the cutting angle, it is critical that you hold the skew steady. One way to brace the tool is to press the handle tightly against your side, just above your hip. Draw the tool towards you.
To move the tool, stand at the far end of the rest with your weight shifted onto your right foot. After the tool has begun to cut, move your torso to the left, gradually shifting your weight back onto both feet (and if the piece is long enough, to your left side).
The cut you make when planing with a skew is very light. The object of planing is to shear a chip off the surface. As you move the skew, you will be able to watch it cut small, gossamer-fine shavings that tend to roll up into tiny, fragile tubes (Photo 13). Complete a pass along the entire length of the blank. Make sure that you keep the skew’s pointed nose above the wood. If it makes contact with the wood it will be grabbed and slammed against the rest. You will not be hurt, but you will be startled. Worse, the skew will dig into the wood, creating a blemish that might be too deep for you to remove from the finished turning. This is one reason why beginners are frightened and wary of planing. If you are unsure at all about the procedure, experiment on a practice piece rather than a turning that you hope to complete. With practice, you will be able to plane with ease and complete confidence.

Photo 13: Holding the skew very steady, pull it towards you. Start with your weight on your right foot, and gradually shift it to your left. Make a very light cut. The chips will roll into tiny, fragile tubes. The resulting surface will be as smooth as that left by a sharp handplane.
When you have finished planing the cylinder, turn off the lathe and look at it. If you have planed it correctly, it will have a sheen that makes you think you can see right into the wood. The round surface will be as smooth as a freshly planed board.
The grip, stance, and cut just described work well when you are planing from right to left. However, as when planing a board, you have to make sure that you do not plane against the grain of the wood. When turning, always plane “downhill.” If the turning has a taper or is a vase, you may not be able to work from right to left because you will be going against the grain (“uphill”).
When it is necessary to plane from left to right, you will have to change your grip slightly. The skew’s heel always faces the direction of travel, so rotate the blade accordingly. Once again, find the cutting angle by laying the bezel on the wood and lifting the end of the handle. The grip and placement of your left hand will remain the same. Your right hand will still grip the end of the handle, but you will have to move it forward from your side to a point about halfway between your hip and navel (Photo 14). Start planing with your weight on your left foot, and move the tool along the turning by moving your torso and gradually shifting your weight onto your right foot.

Photo 14: To plane from left to right, move the end of the handle to a point about halfway between your hip and navel. Start with your weight on your left foot, gradually shifting it onto your right.
If the cylinder you are planing is longer than the tool rest, move the rest to one end and plane as much towards the middle as you can. Next, move the rest so that you can plane the remainder of the turning. Start at the other end and move towards the middle, ending when you have overlapped the planing strokes (Photo 15). When planing a turning, make sure that it is thick enough to withstand vibration caused by the cutting action of the skew. More often than not, the turning is so thin that it will vibrate when it is being planed. When this happens, the vibrating wood chatters under the pressure of the tool, and the surface is chewed by the cutting edge. The resulting damage is the exact opposite of the effect you are trying to create. The solution is to support the turning from behind with one hand. This will dampen any vibration. Of course, to do this you have to change the way you hold the tool.

Photo 15: When planing a piece that is longer than the rest, be sure to overlap the planing strokes.
So, therefore, if you are planing from left to right, grip the tool in your right hand where the blade and handle join. Grip the blade between your thumb and two forefingers. Wrap your two other fingers around the ferrule and as much of the handle as they will cover.
With your forearm and elbow, press the tool against your side. This locks the tool rigidly in place. Close the fingers of your left hand together, and holding them straight press them against the back of the blank. Remember, if your hand is cupped over a turning, it can get caught between the wood and the rest. Press your thumb against the upper corner of the skew’s blade. This helps control the tool and keeps the thumb out of the way (Photo 17).

Photo 16: A thin part may vibrate when it is being planed, which will result in a rough surface, rather than a smooth one. When planing from left to right, grip the handle between your body and forearm. Dampen the vibration by pressing your left hand against the back of the part, and pressing your thumb against the blade. Your hand will trail the cut.
Now, because you are gripping the skew against your lower chest, move your body. Draw the skew along the blank, causing it to plane the outline of the turning. When you are moving from left to right, your left hand (which is dampening the vibration) will follow the tool.
If you have to support the turning when planing from right to left, you will not be able to hold the skew with your forearm. Instead, push the end of the handle into your stomach. This is an awkward, but effective position. Your left hand will still support the blank, and your thumb is pressed against the blade’s upper corner. However, in this direction your left hand will precede the cutting, rather than follow it (Photo 17).

Photo 17: Planing from right to left is somewhat awkward. Brace the handle by pressing it into your belly. Note that your left hand should precede the tool rather than follow it.
Both these grips work on elements other than a cylinder and taper. (See Chapter 7.) For example, if you have to plane a vase, start at the apex of the swelling and plane over the shoulder and along the neck. The vase neck is so thin the turning will often vibrate; you will have to dampen this vibration by pressing one hand behind the piece, as described above.
Two final notes of caution: planing is a finishing technique used to smooth the surface of a turning. It should not be used to shape the turning. Also, make the element and then plane it, rather than completing the turning and then returning to finish all the individual sections. This, too, helps to minimize vibration. (See Chapter 8.)
Peeling
Peeling is an advanced technique used to quickly remove wood. It is done very much the same way as planing, only in this operation you purposely engage the skew’s heel in the wood. The heel lifts a chip and peels it loose. The chip gathers into a spinning mass of wood fibres that moves ahead of the tool. This mass of chips can become so large that it whips against the back of your hand (Photo 18).

Photo 18: Peeling is a way to quickly remove wood. It is similar to planing, only you purposely engage the heel. This peels a chip, which remains connected, ahead of the edge. The result is a spinning disc of shavings.
Once again, be careful not to let the toe of the skew engage the wood, for it can grab it. If this happens, you will have the same type of accident that can occur when planing.
Cleaning Up
When you complete an individual element, there are often whiskers of wood remaining between it and the adjacent elements. The skew can also be used to remove these. Snip them off by pushing the skew’s heel lightly into the joint. This fine scored line will usually cut the whiskers loose (Photo 19). Sometimes the place where these whiskers of wood are located is so tight, you have to use the toe of the skew. If so, turn the tool upside down.

Photo 19: Whiskers of shavings often remain between two elements – in this case, in a shoulder. Remove them by severing the fibres with the heel of a skew.
CUTTING WITH A DIAMOND POINT
Some of the operations done by the skew can also be done by the diamond point. A diamond point has an end with two bezels. This end is in essence two one-sided skews combined on the same tool.
Facing Off
You make a face-off cut with a diamond point in a manner similar to that made with a skew. Lay the tool on the edge of its blade, with its flat surface facing towards the shoulder. Place the cutting edge on the blank, just slightly back from the shoulder. Draw the tool’s handle rearwards. The lower cutting edge will be lowered into the wood, scoring a fine line (Photo 20). Lift the end of the handle, and push forward slowly at the same time. The edge will shave a wafer-thin disc from the shoulder and leave behind a perfect surface.

Photo 20: To face-off with a diamond point, lay the tool on its edge with the flat surface facing the shoulder. Use the same process used for facing off with a skew. Use a diamond point for delicate jobs, and a skew for heavier ones.
Planing
Because each side of the diamond point is basically a small skew, you can also plane with them. However, these edges are so short they are really only useful for delicate work. Use the same technique used for planing with a skew as described above.
Rolling Cuts
Once again, the cutting edges on a diamond point are small, one-sided skews, and can do the work of skews. The tool can also make rolling cuts. However, only use it for light work, or in a tight place, where its thinner cutting end fits more easily.
V-Grooves
The diamond point’s nose will cut V-grooves. Mark the place where the groove is to be made, and lay the bezel side of the blade on that point. Pull the handle rearwards, sliding the bezels over the wood until the pointed end engages with it. Then, push the tool gently and slowly forward. Make the groove as deep as you wish. This is more of a scraping action than a cutting one, but the detail is so small the difference will not be apparent. This is a quick and effective way to make the rings on bamboo turnings. (See Chapter 7.)