CHAPTER SEVEN
Making the Elements
Before beginning to turn, you should be able to identify the different elements that you will be learning to make. Many turned elements are similar to the moulding profiles that are used in woodworking. Today’s turners do not always use these same terms to describe woodturning elements. This is because the craft of woodturning nearly died out and has only recently been revived. In its new incarnation, the emphasis is on faceplate turning to make art objects. Thus, many of today’s turners are unfamiliar with the traditional terms that remain current among builders and cabinetmakers. These terms are listed and described below:
Astragal – A half-round ring that stands above the surrounding surface.
Bamboo – Not really an element, but a series of narrow, shallow coves meant to (depending on the turner’s wishes) either merely suggest bamboo’s distinctive joints or to simulate the material very closely. In its more sophisticated form, the joints are quite pronounced, the cove being placed between pairs of semi-astragals. Both types of bamboo turnings are sometimes called “false bamboo,” or, by the French, faux bambou (Photo 1).

Photo 1: This false bamboo Fancy chair was made in America around 1815. To further the illusion created by the turnings, the chair was painted the same color yellow as real bamboo. Note that two types of simulated bamboo are used. On the horizontal back rails, there are small bobbins centered by a cove. The stiles have clusters of three evenly spaced astragals.
Ball – A fully rounded element.
Baluster – Like bamboo, baluster turnings are not strictly an element, but rather a particular group of elements very commonly combined on turnings used in both furniture and architecture. A vase or an urn is the primary element on a baluster turning, and it is usually accompanied by various arrangements of rings and coves.
The vertical elements under a stair’s handrail are also called balusters. Since these parts were traditionally an arrangement of vase and other elements, this is probably how the word originated.
Bead – A ring cut into the turning, the apex of its convex shape flush (or near flush) with the surrounding surface. It is a moulding profile similar to an astragal.
Bobbin – A symmetrical swelling.
Cove – A concave ring, which is also a moulding profile.
Cylinder – A length of a constant diameter.
Cyma curves – S-shaped moulding profiles. The cyma recta is a true S-shape, concave at the top and convex at the bottom. The cyma reversa is a reverse S, convex at the top and concave at the bottom. These curves are also called ogee curves.
Disc – A wafer-thin element with either a square, rounded, or pointed outer edge.
Fillet (pronounced fill-it) – A small step that sets off a moulding profile or that separates various moulding profiles when used in combinations. Fillets are used for the same purpose in turnings. They separate and define the various elements.
Ring – An element like an astragal, only concave on one side, and convex on the other.
Square – An area of the original turning blank. A square is often strategically placed where a skirt or stretcher is joined to the turned part. In such a case, the mortise is cut into the square. On some parts, such as a table with an H stretcher, the squares are left on the ends of the medial stretcher, and the tenons are cut from them.
Taper – A cone-like element whose diameter decreases in a straight line (or in some cases a nearly straight line) from one end to the other.
Vase – A curved element with a fully rounded bottom and a slender neck. It is really an elongated cyma curve. Lines on a vase flow so that the shoulders (the transition between the body and neck) are also rounded.
Urn – Similar to a vase. An urn is usually more squat, its body being longer than the neck. Also, the shoulders are angular or pointed rather than flowing.
Following are descriptions of how to make the various elements that were just defined, including which tools to use and what cuts to make. Remember, however, that turning technique varies from turner to turner. As you practice you may develop your own method. As long as they give satisfying results, continue to use them.
LAYING OUT SQUARE SECTIONS
You now know how to bring a blank to its finished diameter. However, many turned parts require square sections, especially if they are going to be attached with mortises and tenons. If the square is located at one end of the turning, use a soft lead (#2) pencil and a try square to make one line that marks its end. If the square is in the middle of a turning, make two lines to mark both its ends. Many turnings have two or more squares (Photo 2). Lay them out the same way. This work can be done either in or out of the lathe.

Photo 2: Lay out square sections with a try square. Make dark pencil lines, as these are easier to see when the blank is turning.
When doing any work in the lathe other than turning, make sure that you unplug the motor to prevent it from accidentally starting up and damaging the tools and the work, and injuring you.
After laying out the square(s), adjust the rest and spin the blank by hand to be sure that it will turn clear of the rest. Then turn on the lathe. The lines will flash with every revolution of the blank. This creates a stroboscopic effect so that when you look at the spinning blank you can see these lines clearly, even though they are only flashing (Photo 3).
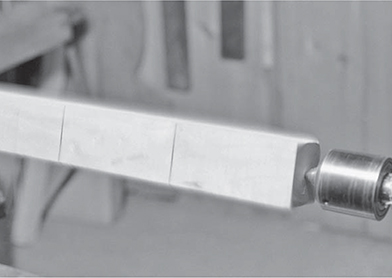
Photo 3: You can see the lines on a spinning blank even though they are only drawn on one of the four surfaces.
Next, place a parting tool on the rest in the manner described in Chapter 5. The cut you are about to make must be outside the pencil line; otherwise, the square will be too short by the width of the parting tool blade. Hold the parting tool at a cutting angle and advance it steadily into the spinning blank. The tool will knock as it cuts through the square corners, though it will eventually cut more smoothly as the groove deepens.
In the last chapter, it was suggested that you watch the cutting edge as you turned. In that case, the chips were being cut off in short segments that bounced away from your hand, permitting you a clear view of the action. However when making elements, you’ll find that the shavings are often continuous and pile up on your hand. Also, your hands often get close to the work, which makes it difficult for you to see. For this reason, when shaping elements, it is recommended that you generally, only watch the tool’s edge until it engages the wood. Then watch the far side of the turning. This area is generally unobstructed, and you can see the blank being shaped, even though the actual cutting is not happening there.
How deeply you cut the groove when laying out a square section depends on the turning. You must not go too deep or the bottom of the groove will remain in the finished piece. It is best to stop just short of the finished depth; this way, the bottom of the groove can be completely removed later.
Test the thickness at the bottom of the groove with a pair of calipers, stopping once or twice to take a measurement. If you are making a number of these plunge cuts, all to the same depth, measure the thickness at the bottom of the groove with a sizing tool attached to the end of the parting tool.
Repeat the plunge cut as many times as is necessary to separate all the squares. Using a roughing gouge as described in Chapter 6, round the areas of the blank outside the squares. The square cutting edge of the roughing gouge will allow you to cut right up to the grooves created by the parting tool (Photo 5). If the finish diameter is smaller than the rough-rounded diameter, turn the blank to its finished diameter. To do this, I will usually switch from the roughing gouge to a spindle gouge.

Photo 4: Separate the square with parting cuts.

Photo 5: The square corner on a roughing gouge will allow you to cut right into the corner created by a parting cut.
The spindle gouge will usually create a surface smooth enough to allow you to start shaping the elements. However, if you choose, you can plane the surface with a skew as explained in Chapter 5. If you plane, you will not be able to reach completely into the corner of a square shoulder such as that created by the end of the square section and the parting tool’s plunge cut. It is recommended, therefore, that you plane as far as possible and then smooth the remainder with a peeling cut started an inch or two away from the corner. The transition from planing to peeling is very natural. Just engage the skew’s heel as you approach a corner (Photo 6).

Photo 6: You cannot plane all the way into a corner. So plane as close as possible and then peel the remaining distance. Snip any stray fibres with the heel of the skew.
Before planing, push the heel of the skew into the corner so as to undercut the wood fibres. This way, when you peel into the intersection, the surface cut should be completely clean. However, if there are any stray fibres, snip them off with the skew.
Some squares are left with sharp, right-angled ends, rather than rounded ends. Since the sides of a parting tool plunge cut are rough, the surface should be faced off. Make the facing cut with either a skew or a diamond point (Photo 7).
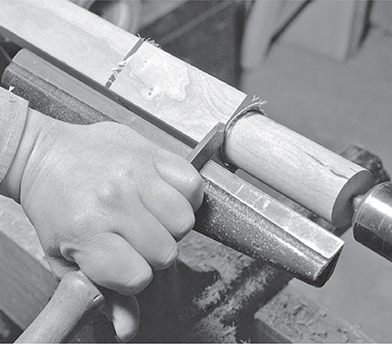
Photo 7: Face-off the end of the square with either a skew or a diamond point.
However, the ends of most squares are rounded because square corners will break when bumped, can catch on clothing, and look unappealing. To round the ends, make a rolled cut with a skew (Photo 8). (This can also be done with a diamond point. I usually use a skew on heavy work, and the thinner diamond point on small squares.) Hold the skew firmly, for you have to cut through the four spinning corners rather than through a complete section. During the first couple of cuts, the skew may be hard to control, and the rolling cut will not be as neat as you want. This should change at approximately the third cut (Photo 9).

Photo 8: The corners of square sections are often rounded. Round the corners with a skew. The first cuts are difficult because the corners are knocking against the blade.

Photo 9: If you keep the bezel rubbing against the wood, the finished surface will become clean and smooth.
CYLINDERS
The process of roughing creates a cylinder. However, you usually want a cylinder to have a constant diameter. If the cylinder is short, you can easily check its diameter with a pair of calipers. However, if the cylinder is long, or the same cylinder appears repeatedly on a set of turnings, it is quicker to lay it out with a sizing tool mounted on a parting tool. Set the distance between the parting tool’s cutting edge and the inside end of the sizing tool’s arm to just slightly more than the finished diameter.
Use a parting tool to make a series of parting cuts along the length of the cylinder (Photo 10). When used with a sizing tool, the parting tool will always cut to exactly the same depth. These grooves are really depth markers. Remove the remaining wood between them with a spindle gouge. Only the barest trace of them should remain, ensuring that the cylinder is a constant diameter all along its length and that it is just slightly thicker than the finished diameter.
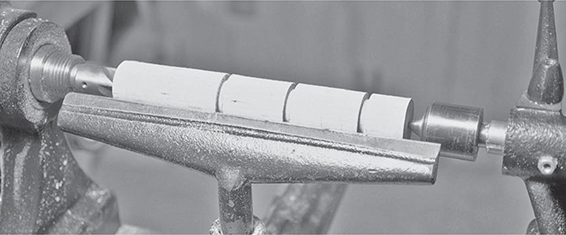
Photo 10: When you are making a cylinder, a parting tool combined with a sizing tool is very helpful. Make a series of parting cuts that are all of the same depth.
Finally, finish the cylinder by planing it with a skew, as explained in Chapter 5. This will remove what remains of the parting cuts and smooth the detail so that sanding will not be necessary.
BEADS
One of the most common elements used in turning is the bead. A bead is a round detail set off by a groove. The groove can be flat-bottomed (in which case it is called a quirk) or it can have bevelled sides. As a woodworker you know that when a bead is used as a moulding, it is run on a board’s corner edge. When turning, a bead is often treated differently, and can have a bevel on just one side or on both sides (Photo 11).
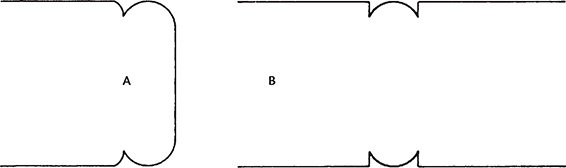
Photo 11: If a bead is placed on the end of a turning, as shown in A, it has just one side, just like a bead moulding. If it is placed anywhere else, as shown in B, a turned bead has to have two sides.
When laying out a bead, it is necessary to mark its edges. You can do this with a pencil, or you can make very light scribe marks with the pointed leg on a pair of dividers. You can make quirked beads by laying them out with a parting tool.
Beads are shaped with a skew. First, undercut the sides. Lay the skew on its bottom edge so that the pointed heel formed by the bottom edge of the blade and the sloping cutting edge is aligned with one of the marks. Hold the tool so that it is nearly parallel to the lathe bed, rather than with the handle lowered as is done when cutting. Line one of the marks up with the skew’s heel and push the tool into the rotating wood. Do the same to the other mark (Photo 12).

Photo 12: Lay the bead out by scoring a pair of lines with the heel of a skew.
By following these two steps, you have severed the wood fibres at the two ends of the bead. The profile is now formed between these two cuts. The bead is symmetrical, having two sides which will be formed individually. First form the left side. Place the skew blade so that its wide surface is lying on the rest. Its heel should be aligned with the center of the bead. Use the skew to make a rolling cut. Depending on how narrow the bead is, you may be able to form one side with a single rolling cut. If the job cannot be done with one cut, make two. Start the first cut biased in the direction of the cut. If you keep the lower bezel rubbing on the wood, you will obtain a glassy, smooth surface and the tool will not be grabbed out of control. When making the second rolling cut, move the skew closer to the center of the bead (Photo 13).

Photo 13: A bead usually requires a minimum of two rolling cuts. Make the first close to the edge, and begin the second nearer to the center.
If some of the fibres you have severed with the rolling cut remain attached at the bottom of the curve, use the skew’s heel to slice them loose. Do this as you did when scoring the ends of the bead. Reverse the skew and form the other side of the bead by making the same rolling cuts. Only make these cuts in the other direction (Photo 14).

Photo 14: Shape the bead by making rolling cuts in both directions. Keep the bezel rubbing on the wood. This not only gives you better control, you will obtain a glassy, smooth surface.
Most of the problems you will encounter when making beads can be resolved with practice. If your cuts produce an inclined plane rather than the arc of a true bead, you are not rolling the tool enough. You may also find that it is difficult to make the second cut a mirror image of the first, and, as a result, the bead is lopsided, rather than symmetrical. Also, you may have a peak where you began the two cuts. Keep practicing, and in a short time you will be able to make perfect beads.
COVES
The cove is the opposite shape of a bead. In fact, on baluster turnings, the two elements are commonly juxtaposed. This combination results in a common moulding profile, called an astragal and cove (on a turning, a bead usually replaces the astragal). This profile was first developed by the Greeks, who used it in their architecture. It has remained popular in Western woodworking since the Renaissance, and can still be purchased at a lumber yard as stock moulding.
It is recommended that you use a 1⁄4" spindle gouge to make coves (unless they are very large). First, lay out the cove’s two extreme edges in the same way you did for a bead, using either a pencil or a divider.
Start on the left half of the cove. Lay the gouge on the right edge of its blade so that its hollow throat is facing the cove’s center. Lay the point of the “lady finger” cutting edge just inside the layout line. The tool is at 90° to the horizontal, so you will start the cut at the edge of the cove and move towards the middle (Photo 15). At the same time, rotate the blade from its edge onto its round back with your right hand. Your left hand should serve mostly as a pivot.

Photo 15: Make a small cove with a 1⁄4" spindle (lady finger) gouge. Use a larger spindle gouge for larger coves. Start at the side of the cove, with the tool held on the edge of its blade, the hollow surface facing the cove’s center.
Bring the cut to the middle of the cove and stop (Photo 16). Next assume the same position, but on the opposite side of the cove. The tool should be on its left side, again facing the center. Make the same motion for the first cut, but in the opposite direction.

Photo 16: As the gouge cuts down the wall of the cove, roll it onto the center of its round blade. At the bottom of the cut, the tool should be resting upright. Do not cut any farther, as you risk catching the tool in the end grain in the other side of the cove.
The two cuts have resulted in a shallow cove. Coves are usually much deeper than can be made in two passes, and you will have to repeat what you have just done several more times. However, begin each cut inside the edges of the cove. If you do not, the cove will grow wider and wider with each cut. You do not want this to occur, as you have already laid out the width of the cove. To avoid this problem, start the tool’s cutting edge in slightly from the corner of the cove (Photo 17).

Photo 17: Start each additional cut slightly farther in from the edge of the cove.
Also, as the cove becomes deeper, you will have to lower the cutting edge of the blade by raising the handle. This ensures that the spindle gouge will remain in contact with the bottom of the cove. Just how much you have to lower the cutting edge is determined by pushing the gouge’s bezel against the side of the cove. Throughout each successive pass, keep the bezel rubbing against the cove’s hollow sides.
As you make each pair of cuts, be very careful not to extend the cuts beyond the center of the curved bottom. If the edge of the tool makes contact with the cove’s opposite wall, it may become caught in the end grain. When this happens, the tool can be pulled out of control. While you will not be hurt, the gouge is usually sent spiralling up the turning (which scars the turning). For this reason, it is advised that you learn to make these deep concave cuts in the following way: Make a plunge cut with a parting tool. Practice both your right and left cove cuts on either side of this groove. Since the end grain has been removed, you do not have to worry that the gouge will be caught (Photo 18).

Photo 18: Beginners are often more comfortable learning to make coves by using a parting tool cut. This way, there is no grain at the bottom to catch your tool. When you feel more confident, use the process shown here.
When a cove is placed next to a bead, it is usually separated by a short flat area called a fillet. The cove and bead are usually the same width, and the cove is as deep as the bead is high. Remember, the apex of the bead and the bottom of the cove mark their centers (Photo 19). However, if you follow the procedures just described for making beads and coves, there is no room for the fillet. If you make one anyway, the cove or the bead (or perhaps both) will be asymmetrical.

Photo 19: Generally, a cove is as deep as the bead is high. Both are the same width.
To ensure that both the cove and the bead are perfectly shaped, make the bead first. Shift its center slightly away from the area laid out for the cove. (See Photo 20, in which the bead is to the left of the cove, and the apex is shifted left.) When you cut the cove, shift the center of its bottom slightly away from the bead.

Photo 20: To make room for the fillet, shift both the cove and the bead slightly away from the center.
When the cove is finished, create the fillet by making a plunge cut with a 1⁄4" skew, as described in Chapter 5 (Photo 21). Hold the tool so that its skewed cutting edge is parallel to the tool rest and the axis of the turning. Feed the skew directly into the intersection of the cove and bead. It will cut a perfect fillet.
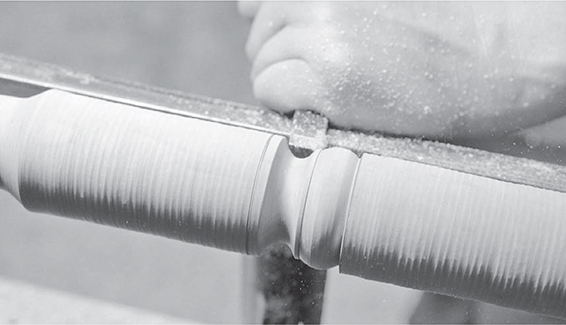
Photo 21: The fillet between the cove and bead is shaped with a skew.
VASES
If you want to make reproductions of period architecture and furniture, it is essential that you know how to make a vase. Vases are an essential element in baluster turnings. Of course, vases are commonly used in modern turnings, as well.
Vases are made in two steps. In the first step, you form the bottom. In the second step, you make the neck and body. Use a skew to make the bottom. Use rolling cuts. This is almost the exact technique used for cutting beads. The only difference is that beads usually have a shorter radius than the bottom of a vase.
Following are the methods I used to make the vase shown in Photos 22–24. As depicted, its bottom points left and its neck faces right. For clarity, I undercut the end of the vase with a skew plunge cut. Usually, you first have to mark the bottom. Score this line by pushing the heel of the skew into the bottom of the vase. Then move slightly to the right, and make a rolling cut with the heel of the skew.
Usually, you cannot cut the entire bottom with a single rolling cut. This is because there is a limit to how thick a chip you can slice off at one time while still controlling the cut. You will have to make several passes. Each time, score the wood fibres at the bottom with the heel of the skew. Then make another rolling cut over the bottom of the vase. Move farther up the vase each time and cut another longer arc (Photo 22). With each cut, be sure to keep the bezel in contact with the wood. This will not only help control the cut, it will leave a polished, glassy surface.
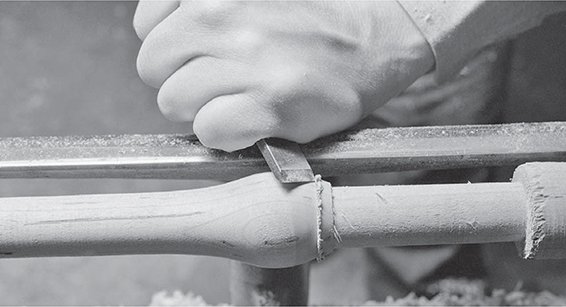
Photo 22: Shape the bottom of a vase by making rolling cuts with a skew. Several passes are usually necessary to complete the shape. Begin each one farther up the vase.
The design of the vase will determine how many rolling cuts are necessary to form the bottom. Be careful when determining the design. Vases with very round bottoms look squat. Vases with very long bottoms look spindly and fragile.
The rolling cuts should create a polished surface. However, if there is any area on the body between the bottom and where the shoulders will occur that still bears gouge marks, plane that area with a skew.
After shaping the vase’s body, make the neck. Obviously, the diameter of the neck will be less than that of the body. To reduce it, use a 3⁄4" spindle gouge to make a cut similar to that used to make a cove. The difference here is you do not have to make pairs of cuts, as there is no opposite side. Note that in Photo 23 the finished shape is almost completed. When you are at this stage, your next step is to form the shoulders and complete the vase’s attenuated S-shaped outline. Do this with the spindle gouge. The final clean-up is done by planing with the skew, as explained in Chapter 5 (Photo 24).

Photo 23: A vase’s neck is made in a manner similar to that used to make a cove. However, you cut in just one direction, and you do not have to worry about end grain.

Photo 24: Smooth a vase by planing it with a skew. Note that my left hand is dampening the vibration, as explained in Chapter 5.
URNS
Urns are made very much the same way as vases. The only difference is that the neck of an urn is usually shorter, and its shoulders are not rounded. Shape the neck with cuts with a spindle gouge. Like the neck on a vase, the urn’s neck is essentially one half of a cove, and is cut the same way (Photo 25). Because the urn’s neck is shorter than a vase’s, the gouge should cut it cleanly (as would happen on one side of a cove). Use a skew only to plane any areas of the body that need smoothing.

Photo 25: The neck on an urn is essentially half a cove, and is cut the same way. Since the urn is usually larger than a cove, you may want to use a larger spindle gouge.
TAPERS
Tapers are more challenging than vases because their outlines have to be exact. If a vase varies slightly from other vases, this discrepancy is not easy to spot. However, a taper that is not straight is very noticeable.
Making a taper is similar to making the neck of a vase. First, reduce the small end to nearly its finished diameter (Photo 26). The small end on the taper shown in Photo 26 is on the left. To make this taper, move to the right a short distance and, with a gouge, make the same type of cut as you would make when reducing a rough-rounded blank to its finished diameter. Repeat the process, only this time begin even farther up the taper, to the right. Next, make a third pass, starting even farther up the taper (Photo 27).

Photo 26: Begin a taper by reducing the small end to nearly its finished diameter.
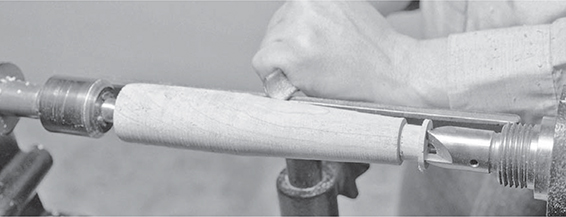
Photo 27: Start each pass farther up the taper: After several passes, the element will begin to take shape.
Each time you make a pass with the gouge, more and more of the taper is formed. The area cut by the first pass has also been cut by the second and third passes (Photo 28).

Photo 28: When making a taper, make each pass of the gouge longer than the last. After three passes, the area of the first cut has been cut three times.
As a result, it is the most narrow area. The area covered by the second pass has been only cut twice, and is, therefore, thicker. The area cut by the third pass is the thickest.
Repeat this process as many times as necessary to roughly form the taper. Finish it by planing it with the skew. Move from the thickest area to the narrowest to avoid planing against the grain. Remember, always plane downhill. If the taper ends in a square corner, peel into the corner with the skew’s heel as you would do to the corner created by a square. Finally, snip any stray fibres by undercutting them with the skew’s heel.
ASTRAGALS
An astragal is very much like a bead. The only difference is that it is not flush with the surrounding wood. Rather, it stands alone. To make an astragal, first lay out its two edges with a pencil or a scribe. With a parting tool and caliper (or, if you are making many identical astragals, a sizing tool), make a groove on either edge (Photo 29). As when laying out squares, make the plunge cuts outside the line.
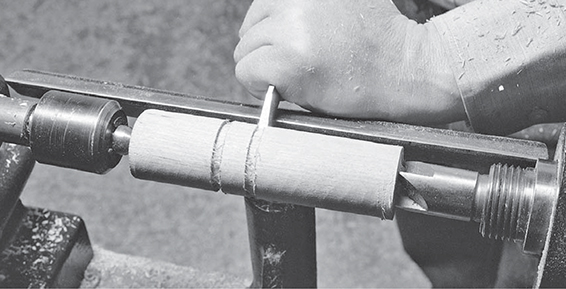
Photo 29: Lay out an astragal's two edges with pencil lines. Then use a parting tool to make a groove on either side of the lines.
Next, use a spindle gouge to reduce the turning’s diameter on either side of the astragal. This leaves a projecting disc with square corners. Finally, use a skew to make rolling cuts that round the corners, just as if you were making a bead (Photo 30).

Photo 30: Reduce the area on either side of the astragal to the depth of the parting tool grooves. This leaves a short disc, which you round by making rolling cuts with a skew.
DISCS
When making the astragal, you first created a short, squat disc. Normally, discs have different proportions than astragals. They have greater height, and are thinner. Otherwise, they are laid out the same way. Use a parting tool to make sizing grooves, and then remove the surrounding wood. Finally, if you want to leave the disc with square corners, clean up its sides by making facing cuts with a diamond point.
You may decide, however, that you want the edges of the disc round. In such a case, round them with a skew, the same way you would round the edges of an astragal (Photo 31). The edge of the disc will have a relatively short radius. Another technique is to use rolling cuts to make edges with a long radius. This gives a disc a peaked edge that is shaped like a Gothic arch. One of the bedposts shown on page 97 has such a peaked edge.
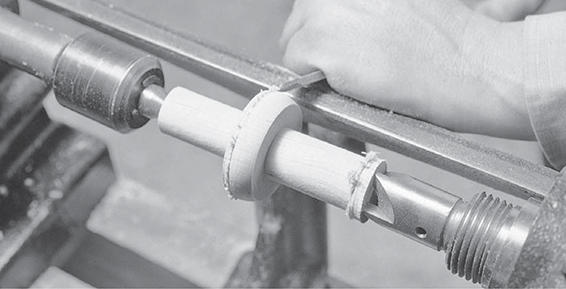
Photo 31: A disc is very similar to an astragal, except that it is usually taller. The disc’s outer edge can be left square, or can be rounded like an astragal’s. It can also be made pointed, in the shape of a Gothic arch.
Because discs are thin, they contain very short lengths of grain. This makes them fragile. A disc can be easily damaged by a blow, which can often break off large segments (Photo 32). Thus, it is wise to take measures to protect a disc when you include one on a turning. One way is to place the disc inside a cove. To do this, first lay out the disc and the sides of the coves with pencil or scribe lines. Cut the edges of the disc with a parting tool. Form the sides of the cove with a spindle gouge, as described above (Photo 33).

Photo 32: Discs have very short lengths of grain. This makes them fragile, which is why they are usually protected by an adjacent element.
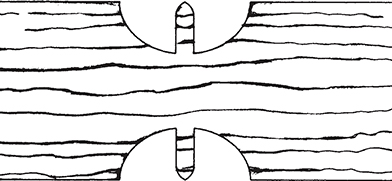
Photo 33: A disc is less likely to be damaged if protected by another element. This one is placed in a cove.
RINGS
A ring is also a freestanding element, but it differs from an astragal or a disc in that one side is concave. In baluster turnings, rings are often used at the bottom of a vase. In such a case, begin by cutting the base of the vase. Otherwise, separate the ring with a parting tool, as is done when making an astragal or a disc.
Shape the concave side with a spindle gouge, as you would if cutting a cove. Be sure to leave a little height at the base of the cut to better separate the ring from the surrounding wood. Round the other side with the heel of the skew by using a rolling cut. Be sure to create a crisp cusp at the top of the ring (Photo 34).
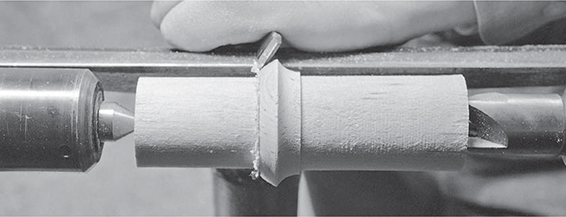
Photo 34: One side of a ring is half of a cove, and it is cut the same way. The other side is half of a bead, and is made with a rolling cut.
Like discs, rings are fragile. They are usually placed lower than surrounding elements. This protects them.
BALLS
Like astragals, balls also project above surrounding elements. They are laid out like astragals and discs, except that their width has to be about equal to their thickness. In other words, when making balls in the middle of a turning, lay them out and cut them just like wide astragals.
Balls can be made in one of two ways. They can be formed the way you would form the bottom of a vase: by making rolling cuts with a skew. Several passes will have to be made per side (Photo 35).
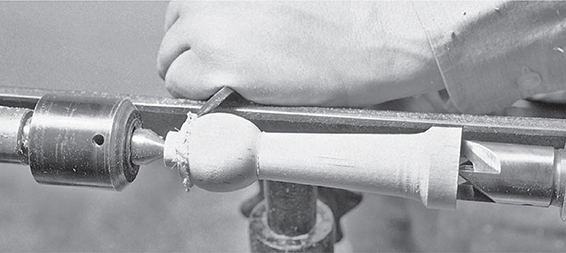
Photo 35: Balls can be made in two ways. Smaller ones are made quickly with rolling cuts.
Balls can also be made with a gouge. Rough out both sides of the ball, as you would do if making a two-necked vase. Holding the gouge’s bezel tightly against the surface of the ball, roll the tool down over the outline of the ball. This action is similar to that used when making a cove, only the outline of the ball is convex instead of concave (Photo 36). Whether I use a skew or a gouge to make a ball depends on the element’s diameter. A small ball is easier to do with a skew. I find that using a gouge to make a large ball results in better control.

Photo 36: Larger balls are more easily made with a gouge. You will obtain a smooth surface if you make sure that the bezel rubs on the wood.
Balls can be used in the middle of a turning. They can also be used on either end – either as a foot, as shown in Photo 37, or as a finial, as shown in Photo 38. In these cases, you only have to lay out the element’s inside edge with the parting tool.

Photo 37: Balls can be placed on the upper or lower end of a turning. Here one is used as the foot of a Fancy chair leg.
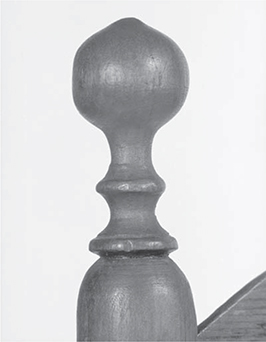
Photo 38: A ball is used as a finial on the stile of this ladder-back chair. The rear surface has been worn flat because it has been repeatedly rubbed against the wall.
BAMBOO
In its simplest form, bamboo is merely suggested through shallow, narrow rings made with a 1⁄4" spindle gouge. Use the gouge as if you were making small coves. You can also make bamboo with a diamond point. If using a diamond point, make small V-grooves instead of rings. Use a scraping rather than cutting action (Photo 39).

Photo 39: A simple form of bamboo can be made with a series of V-grooves cut with a diamond point. My left hand prevents this part from vibrating.
A more elaborate form of bamboo is made using two adjoining astragals. Lay out the joint with three evenly spaced lines. Cut the two outside lines and between them with a parting tool, and reduce the surrounding wood to its finished diameter. Rolling cuts made with a skew make the two small astragals (Photo 40).

Photo 40: Bamboo can also be suggested with groups of two (sometimes three) astragals.
Another way to make bamboo is to create a series of small bobbins (see below), and mark their centers with small, shallow coves or V-grooves (Photo 41).

Photo 41: Another form of bamboo results from V-grooves made on a series of small bobbins.
BOBBINS
A bobbin is a symmetrical swelling. This element is very commonly used in turned chair construction; the swelling provides the extra thickness needed to accommodate a joint. In fact, one type of Windsor chair leg is called a “double bobbin” because it has two swellings. The lower swelling provides the extra thickness necessary for the stretcher joint.
Because a bobbin is a symmetrical swelling, it is really a mirror image of a vase’s neck and shoulder. To make a bobbin, first locate its center with a pencil or a scribe. Next, reduce both of its ends to their finished diameters with a spindle gouge. Using the same tool, shape the shoulders. Smooth the bobbin by planing it with a skew. Work towards both ends from the middle so that you are always planing downhill (Photo 42).

Photo 42: When smoothing a bobbin, begin at the center and plane downhill on both sides. Note that I am using my left hand to dampen any vibration.
CYMA CURVES
S-shaped cyma curves are commonly used as a transitional device on the shoulder between two different diameters. These moulding profiles are more interesting than a simple square shoulder, or even a rounded one.
A long cyma recta (concave at the top) can also be made on the end of a square element. When this happens, the result is an interesting detail called a “lamb’s tongue” (Photo 43).

Photo 43: A long cyma recta on the end of a square results in a detail that is sometimes called a “lamb’s tongue.”
Cyma curves are made very much the same ways as urns and vases. However, they are shorter and more compact. To make a cyma recta, first make a layout line. You can add a fillet to the cyma recta if you wish. If you do, it is now considered a stepped cyma reversa (Photo 44). If you include a fillet, cut it first by making a shallow plunge cut with a parting tool. Reduce the concave upper part of the S-curve with a spindle gouge, as you would if making a one-sided cove. Use a gouge to “blend” the convex lower curve into the upper curve (Photo 45).

Photo 44: A shows a plain cyma recta. B shows a stepped cyma recta.
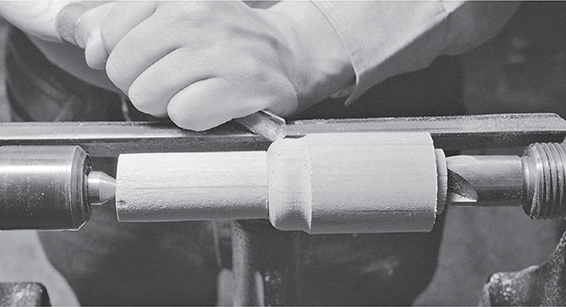
Photo 45: Use a gouge to blend the cyma recta’s concave upper curve into the convex lower curve.
The cyma reversa (convex at the top) can either be set off by a fillet, a quirk or a bevel (Photo 46). Make this detail first. Both the fillet or the quirk should be cut with a parting tool. Make a bevel with a skew the way you would make one side of a bead. Next, hollow the lower concave curve as you would if making a cove. Finally, “blend” the upper convex curve into the lower with a skew and a spindle gouge (Photo 47).
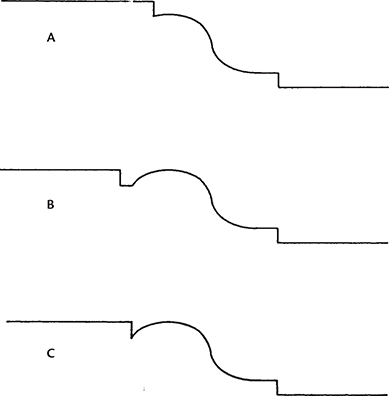
Photo 46: A cyma reversa can be set off by either a fillet (A), a quirk (B), or a bevel (C).

Photo 47: A cyma reversa is also made with a spindle gouge.
FILLETS
Fillets are the small steps between profiles. They can be either vertical or horizontal (Photo 48). Horizontal fillets are usually most easily made by making a plunge cut with a parting tool or a 1⁄4" or 1⁄2" skew (See Chapter 5.) Vertical fillets often start out as the sides of a groove made with a parting tool.
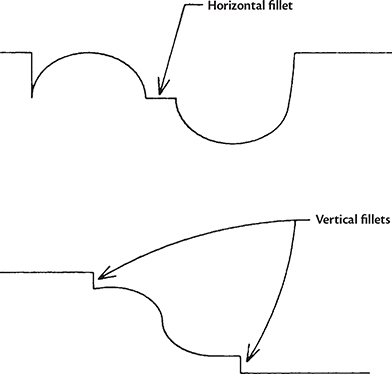
Photo 48: Fillets can either be vertical or horizontal.
SANDING
If you use your turning tools correctly to cut instead of scraping the wood, most surfaces on the various elements will be cleanly cut. They will have a smoothness that would be ruined rather than improved by sanding. Most people, however, end up doing a lot of sanding, sometimes just because they feel that every piece of wood they work needs to be sanded.
There are two good reasons why you should sand a turning as little as possible. First, a good turning is crisp. All of its various elements are distinct from each other. Sandpaper will destroy these crisp details.
Secondly, when you touch sandpaper to a turning that is spinning in your lathe, you are sanding across the grain. As a woodworker with some experience sanding, you probably know that sanding should be done in the direction of the wood’s grain. Sanding across the grain creates scratches that are very difficult to remove and often reappear under the finish. These scratches become very noticeable when a stain is applied.
When you touch sandpaper to the turning that is spinning in your lathe, you are sanding across the grain. You are creating concentric scratches that can be very difficult to remove, and when you apply a finish you may very well experience the same problems just described.
If you have to sand a completed turning, shut off the lathe and sand along the direction of the grain. Though this may be more time-consuming than sanding a spinning part, you will obtain better results and avoid creating scratches that can mar a turning. In another sense, sanding this way is an advantage. It is such a slow and tedious process, it will make you more determined to develop your cutting skills so that you can avoid sanding altogether.