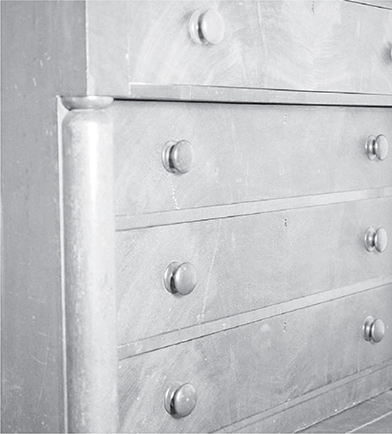
Photo 1: Mushroom-shaped drawer pulls are closely associated with the Empire period.
There are a number of other parts that both builders and furniture makers occasionally need to make that can be turned in a lathe. Some examples include wooden knobs for use on doors and lids, and pulls for drawers. Such wooden knobs have been used for centuries. While brass pulls have always been the most common for formal, high-style woodwork, wooden pulls are more usually associated with country woodwork. One exception is case furniture from the Empire period. This furniture generally had turned mahogany knobs (Photo 1). During this period, mahogany door knobs were sometimes used for passage (interior) doors. They were not used on exterior doors because mahogany cannot withstand the elements.
Only two general types of turned knob are possible. Both are usually known by colloquial names that refer to their shapes. They are the mushroom and the sausage knobs. Both names give you an indication of what these knobs look like.
Photo 1: Mushroom-shaped drawer pulls are closely associated with the Empire period.
The sausage knob is the earlier type of knob. It was used through much of the 18th century (Photo 2). As noted above, the mushroom knob became popular in the early 19th century, and was used on Empire furniture and as a passage door knob. The shape endured throughout the rest of that century and all of this one as well. Today, the mushroom knob is by far the more common shape, while sausage knobs are only seen on reproductions.

Photo 2: Sausage-shaped pulls were used during the 18th century.
Both types of knobs have several features in common. The first feature is a narrow neck located behind a wider body. The neck provides a place for your fingers, while the body gives you something to grasp, either for pulling or turning (Photo 3).
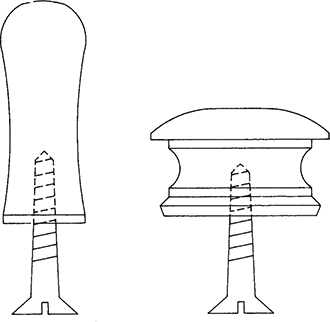
Photo 3: Sausage knobs, shown at left, were used in the 17th and 18th centuries. Mushroom knobs, shown at right, became popular in the early 19th century, and have been made throughout the 20th.
Behind the neck is a flange, slightly smaller in diameter than the body. The flange’s rear surface is flat and butts against the surface to which the knob is applied. Depending on their function, both mushroom and sausage knobs may have a stem – a narrow, round dowel projecting from the back of the flange. The stem is almost always part of the turning, rather than a separate piece.
The stem fits through a hole. If the knob is glued into a hole, the stem acts as a tenon. A stem is also necessary on a lid or door because the knob often operates some form of catch, which keeps the door (or lid) closed. The knob shown in Photo 4 has a stem with a tab attached to it. When the knob is turned, the tab engages a keeper or slides behind a jamb.

Photo 4: Some knobs keep doors closed. When they are used as such, they usually have some form of catch attached to their stems.
If a pull with a stem is used on a drawer, some form of cotter is necessary to prevent the stem from being pulled loose from the hole and to prevent it from turning. However it is far more common for drawer pulls to be attached with a screw. The screw passes through a hole in the drawer front and is fastened into the back of the knob. Being larger than the hole, the screw’s head prevents it from being pulled loose from the drawer. The screw’s thread keeps the knob tight against the drawer front. Should the knob loosen, you can easily retighten it by turning it clockwise.
Most mushroom knobs have a smooth, slightly domed face. However, during the Victorian period some knobs were decorated with a series of rings on the front surface. The method for doing this is described on pages 179 and 181.
Another turned part similar to a knob and used in both building and furniture construction is the peg, a device on which other objects are hung. The widespread interest in Shaker woodworking has given them credit for the most popular peg design, which has been generically dubbed the “shaker peg.” However, long before the Shakers arrived in America (1774), pegs were in common use. Even when the Shaker communities were at their peak, the world’s peoples were making and using pegs that were indistinguishable from those used by the Shakers.
The most common use for pegs is hanging clothes, as, for example, hats and coats. However, both kitchen and bathroom towels are also hung this way. The Shakers even used pegs for hanging chairs off the floor and out of the way (Photo 5). Pegs are most often arranged in a row, being anchored into a wooden strip that is then screwed to the wall. However, some hat and coat racks consist of a vertical post with a cluster of pegs.

Photo 5: The Shakers used pegs to hang everyday items out of the way. (Photos by Al Parrish.)
Pegs are very much like knobs and pulls, except that they are usually longer and more narrow. They generally have a mushroom-shaped body with a very long neck. Since a peg is not pulled or twisted, its body should be long enough to hold whatever is hung from it. On the back end of the peg’s neck there is generally a flange, and behind that a tenon (stem) that fits into a hole in the wooden strip. In other words, the tenon holds the peg securely in place so that the peg can hold something else.
Knobs and pegs are most efficiently made in pairs. They are attached by their fronts. To make a peg or knob, begin with a turning square about 1⁄4" (the width of a parting tool) longer than twice the part’s overall length. Round the square to the pull’s maximum diameter, usually that of the body. Using the parting tool, make a shallow cut in the middle of the blank, at the point at which the knobs will be joined together (Photo 6). This cut will help you lay out the parts. Next, if the knobs have stems, make shallow cuts with the parting tool that lay out the flanges’ rear surfaces.

Photo 6: Make a shallow parting cut to lay out a pair of knobs.
Using a spindle gouge (1⁄4" for the mushroom knob, perhaps 1⁄2" for the sausage knob), cut the neck (Photo 7). On a sausage-shaped knob, the neck is a shallow curve. On a mushroom pull, it is a deep cove.

Photo 7: Cut the knobs’ necks with a lady finger gouge. These necks are basically deep coves.
The mushroom knob usually has a narrow fillet a short distance from the edge of the flange, and the flange appears more delicate if its rear corner is bevelled backwards slightly. This, too, can be done with a skew, although a diamond point is probably better for delicate work.
Separate the knobs with the parting tool. Leave them joined by a narrow section, perhaps 3⁄8" in diameter (Photo 8). Using a diamond point, make rolling cuts to round the front surfaces. Keep the flat side of the blade in continual contact with the wood (Photo 9). This will create a glassy smoothness.
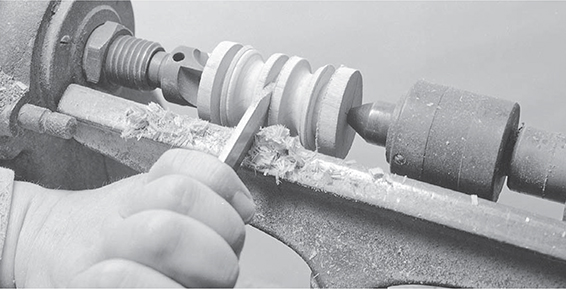
Photo 8: Separate the knobs by deepening the original parting cut.

Photo 9: Face-off each knob with a diamond point, as there is not enough room in the groove for a skew.
Using the parting tool, completely separate the knobs while they are turning in the lathe. (See Chapter 5.) They will not fly loose. Instead, they simply fall onto the bed. You will then have two completed pulls with a small burr where they were parted. This can be removed with sandpaper (Photo 10).
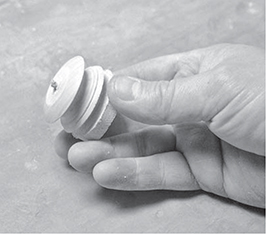
Photo 10: A burr will remain where the knobs are parted. Trim it off with a chisel and smooth the knobs with sandpaper.
In the exact center of each rear surface is a hole made by the lathe center (the drive center will also have the marks made by the spurs). Use this to locate the hole for the screw. Make this hole with a small twist drill that is narrower than the screw. This way, the screw will not split the knob, but its threads will still have a strong bite.
During the mid-19th century a more elaborate version of the mushroom pull became popular and was used on Victorian period chests of drawers. The front surface of this knob was decorated with turned rings. The inspiration for these decorated mushroom knobs may well have been the stamped brass rosette drawer pulls associated with the late Sheraton style (Photo 11).
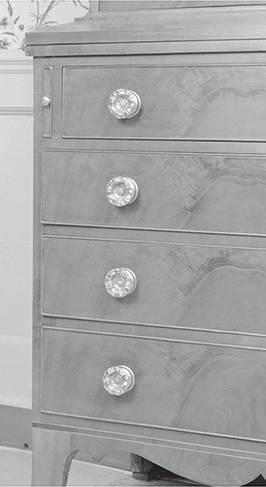
Photo 11: Decorated wooden knobs became popular during the mid-19th century, and may have been inspired by Sheraton-period brass rosette pulls.
To make these knobs, you need either a small faceplate with a hole in its exact center or a screw chuck, which is even more effective (Photo 12). If you use the faceplate, attach the wooden blank with a single screw through the center of the plate. That is all that holds the blank to the faceplate. The blank is so small, a single screw is all that is necessary to secure it.
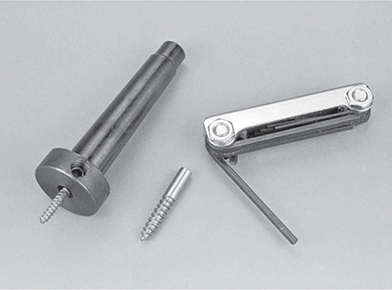
Photo 12: To turn the surface of a drawer pull, you need a screw chuck. This one comes with two sizes of screws, which you can interchange by loosening the Allen screw.
Like a drive center, a screw chuck has a reverse-tapered self-locking shank that allows you to mount it in the headstock spindle. In its exact middle is a single screw on which the blank is mounted.
Begin with a short turning square the length of the knob and locate its center by marking an X on one end. Next, drill a pilot hole for the screw in the center of the blank. This pilot hole must be wide enough so that the screw does not split the blank, but narrow enough so that the threads bite securely into the wood. In fact, it is imperative that the threads hold securely and not strip inside the hole. The lathe turns against the direction of the threads, so the cutting action must not loosen the screw. Should the screw strip its hole, you will not be able to turn the blank because it will be prevented from spinning by the counterforce of the gouge.
You will not have to use the tail stock when using the screw chuck, so move it well out of the way, preferably to the far end of the bed. Place the tool rest close to the blank. If you are using a small faceplate, the disc may project beyond the blank and, so, you might not be able to get the rest as close to the work as normally preferred.
Round the blank and turn the knob to a mushroom shape. Cut the domed front surface with a skew, making a rolling cut, or, if you prefer, use a diamond point.
When the knob is complete, shut off the lathe and pivot the rest in its bracket so that it is at a right angle to the bed. Move the rest up as close to the front of the knob as is possible without the two rubbing. Now turn the ring decorations in the face (Photo 14).

Photo 13: A small faceplate with a screw hole in its center will also do the job. Always drill the pilot hole with a bit that is smaller than the screw.
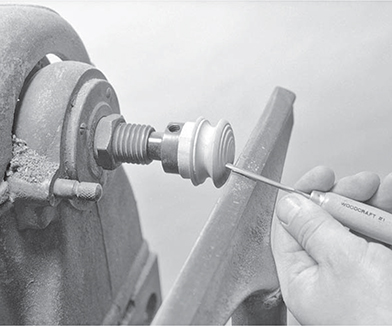
Photo 14: Turning a decorated knob is very simple. Move the rest as close to the work as possible.
Most of the tools you use in general spindle turning are probably too big to do fine, intricate decoration, although a 1⁄4" gouge and skew will cut some simple shapes. If you have to make this type of pull frequently, or you want to do more of this delicate type of work, you should invest in some miniature turning tools. These tools are available through many catalogue tool suppliers. Except for their sizes, they are identical to the larger ones. They are sharpened and used the same way, as well (Photo 15).

Photo 15: A turning set of miniature tools is needed when you are turning some finials and pendants, or decorating the surface of mushroom pulls. These tools are identical to their larger counterparts, and are ground and sharpened the same way. A 3⁄4" skew is shown for scale.
Besides knobs, pulls and pegs, other parts can also be turned with the screw chuck. Finials are the small, turned upright decorations that are often placed on top of case furniture and clocks. They usually sit on a plinth either at the corners of the pediment or in the center (Photo 16). Although they are usually more delicate and attenuated than knobs, finials can be turned on a screw chuck in the same way. However, finials are not usually held in place on a piece of furniture by a screw, as is a drawer pull. Rather, they are held in place by gravity. Their tenons are fitted into a hole drilled into the top of the plinth. When turning the finial’s tenon make sure that its diameter is great enough that the turning tool does not cut through to the screw.
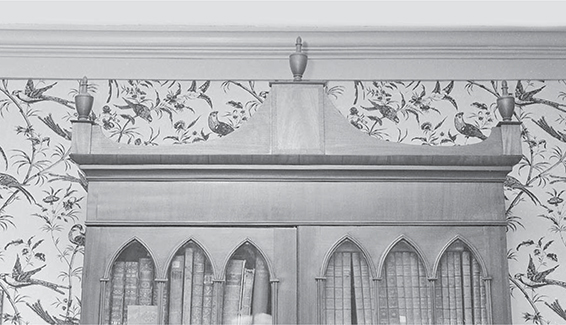
Photo 16: Finials are upright decorative elements, used on the top of clocks and case pieces, such as this secretary.
Pendants can also be turned with a screw chuck. The word pendant is the present participle of the French verb pendre, which means “to hang.” Thus, a pendant is something that is literally hanging. Pendants are less common than finials, but they can be found on Queen Anne-period highboys and lowboys (Photo 17). They are made the same way as are finials. The only difference in the way they are attached is that pendants have to be glued in place, and for that reason the stem should form a friction fit in its hole.

Photo 17: Pendants are hanging decorative elements, such as these elements on the skirt of a Queen Anne highboy.
Corner blocks can be made with the screw chuck. In Greek Revival architecture, corner blocks were used at the upper corners of door and window casements (Photo 18). These blocks were sometimes decorated with turned rings. In this case, the rings are called paterae, after the Latin word for shield. Turned corner blocks remained popular throughout the Victorian period and well into the 20th century.

Photo 18: From the early 19th century well into the 20th, corner blocks were common architectural details on window and door casements.
During those decades, turned discs called rosettes were also commonly applied (glued or tacked to a flat surface) to such structures as stair newel posts and fireplace mantels. Beginning in the Federal period and throughout the rest of the 19th century, similar turned rosettes were also applied to furniture. When applied to furniture, these ornaments are also called paterae (singular, patera).
When making corner blocks, saw the block to either a square or rectangle, depending on the shape required. Locate the center on the rear surface by connecting the corners with an X. Drill a pilot hole as explained above, and screw the block to the chuck.
It may help to lay out the patera on the block’s front surface while it is spinning. Use a #2 pencil. You can make up your own designs, copy an original, or use patterns found in catalogues of building materials printed during the Victorian period. Many of these have been reprinted, and I have included one in the bibliography. Illustrations of corner blocks are often accompanied by a cross section. If you are familiar with the architecture of that period, you will note that many of the paterae are turned with cross sections that are the same as those on Victorian moulding profiles.
Generally, a patera has a domed boss in the middle that is nearly the same thickness as the block. This prevents the turning tools from cutting through into the screw hole. Corner blocks are usually large enough so that the paterae can be turned with the turning tools that you use for general spindle work (Photo 19). A rosette is turned the same way. Use the screw chuck to hold the blank. However, unlike a corner block, a rosette is round. Thus, cut the blank round on a band saw before mounting the chuck, or saw off the corners. This technique is explained in Chapter 15. Be sure to cut the blank so that it has a slightly larger diameter than the finished rosette, as you may lose some width bringing the outside edge into round. Once the rosette blank is round, turn the face as you would on a corner block (Photo 20).

Photo 19: Turn a corner block using a screw chuck.

Photo 20: Rosettes are turned the same way, except that they are round rather than square.