By covering such matters as many of the common materials and general setting out in earlier chapters, we may now concentrate on specific material types. Each of the following four chapters (on interlocking tiles, plain tiles, natural slates and artificial slates) will include working out gauges, the positioning of battens and how to install these materials to the various common details.
There is a body of knowledge and many transferable skills between the several types of slate and tile, and so, to avoid repetition, I have made this first specific section the most extensive, not least because interlocking tiles form the largest part of the market and are the most commonly used on new-build sites, extensions and re-roofing projects.
It is worth noting that the standard recommended (minimal) batten size for interlocking tiles is 50mm × 25mm, where the rafter centres exceed 450mm apart. Truss roofs are normally set at 600mm centres. Below 450mm rafter centres (which applies to most traditional ‘cut’ roofs) 38mm × 25mm battens may be used.
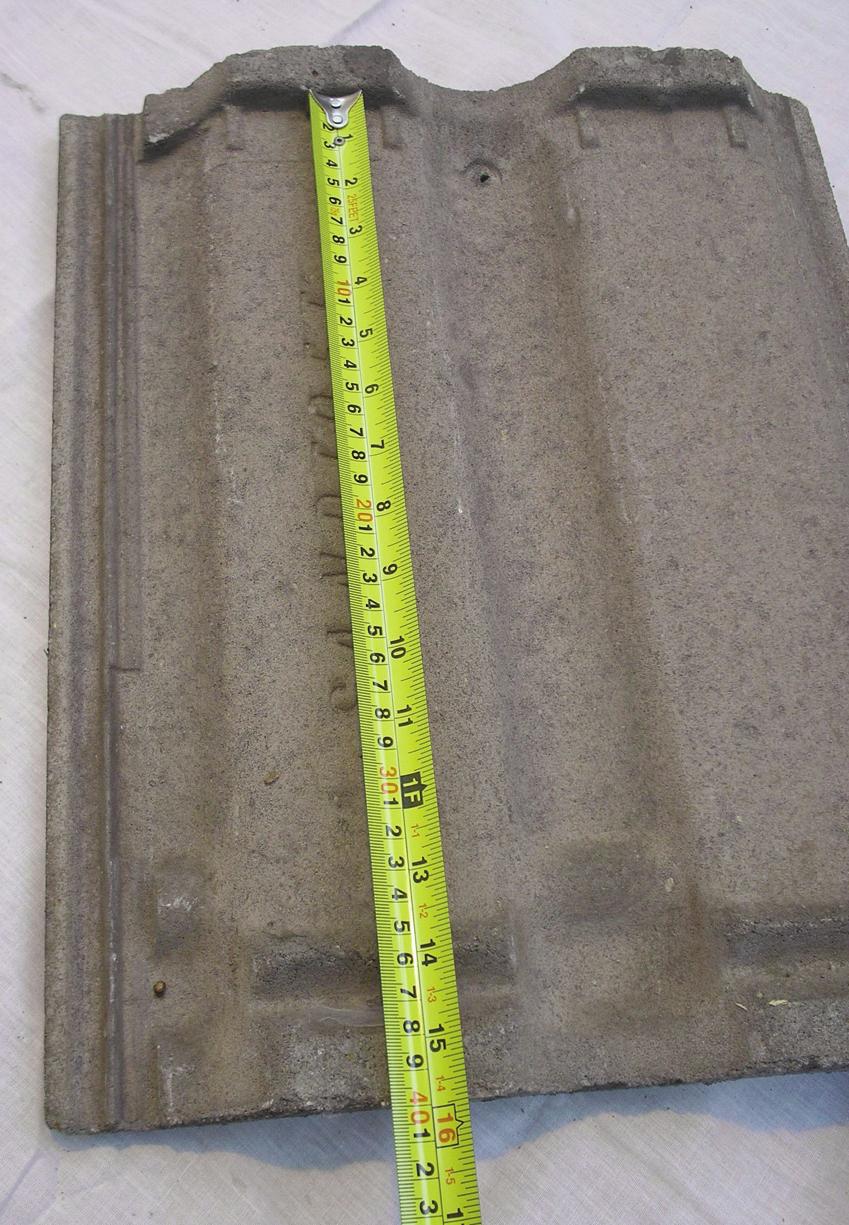
Tile measured from underside of nib to tail.
SETTING OUT
Battens, Fixed Points and Gauges
Finding the First Fixed Point
- Turn the roof tile over and measure from the underside of the nib to the tail (in this case 395mm).
- Take your tape or rule and extend the end of it 50mm over the fascia board (or halfway into the gutter, whichever is less).
- Mark this at both ends of the roof and strike a line between the two points; note that the marks are made with ‘arrows’ and the line struck through the point for accuracy.
- Fix the batten with the top edge to the line (just a few nails for now, not driven).
- The top edge of this batten is the first fixed point; try a tile on at each end to make sure that it is overhanging correctly into the gutter before continuing.
- You now have your first fixed point.
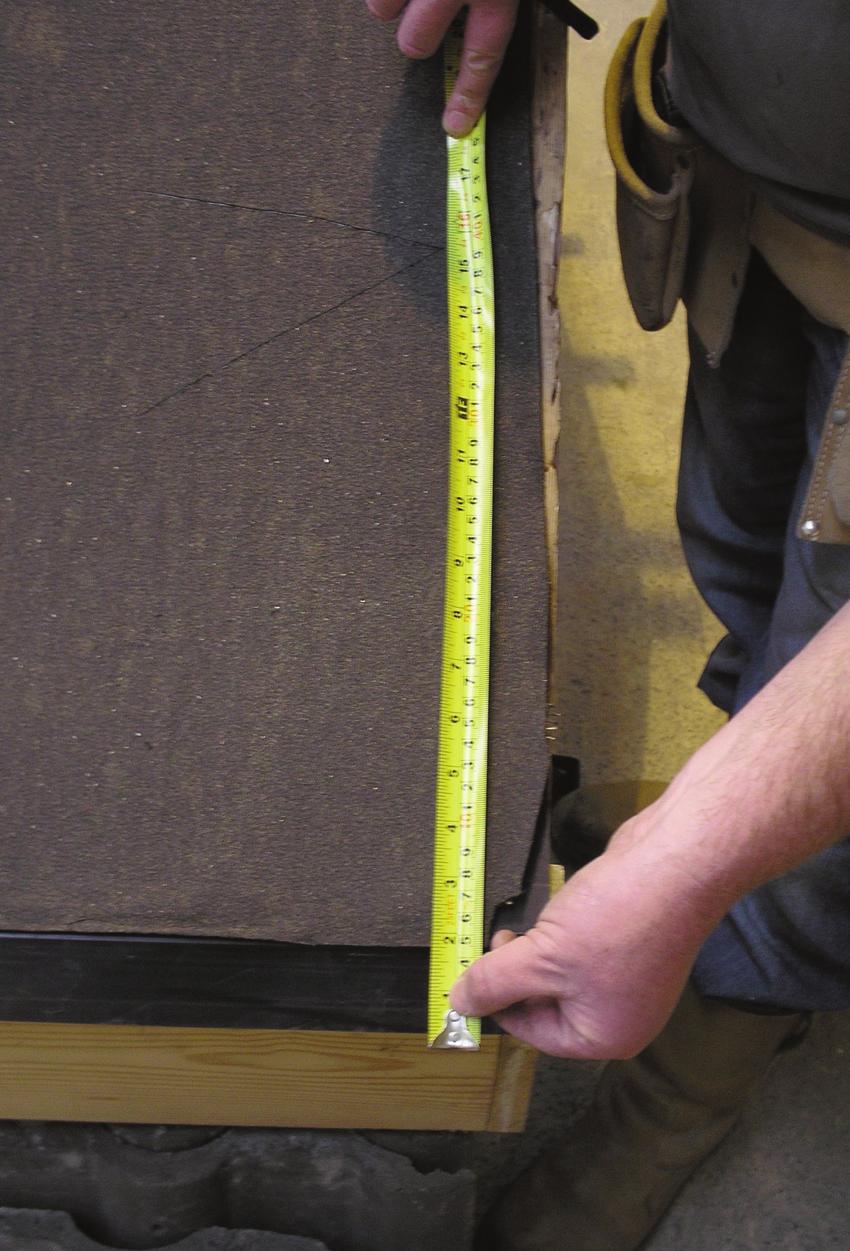
Setting the overhang over the fascia.
Finding the Second Fixed Point
- Measure the thickness of the tile nib (in this case 25mm) or, if the nib is set down from the top, measure from the underside of the nib to the top of the tile.
- Allow 5 to 10mm for clearance and make a mark (normally about 30 to 40mm) down from the apex or top of the rafter.
- This mark will be the top edge of the top batten; you now have your second fixed point.
Note: it is always preferable to have the top fixed point as high as is practicably possible, but provided that the ridge tile or flashing covers the top edge of the tile by 75mm the top batten may be able to come down slightly if necessary.

Marking and striking for the first course.
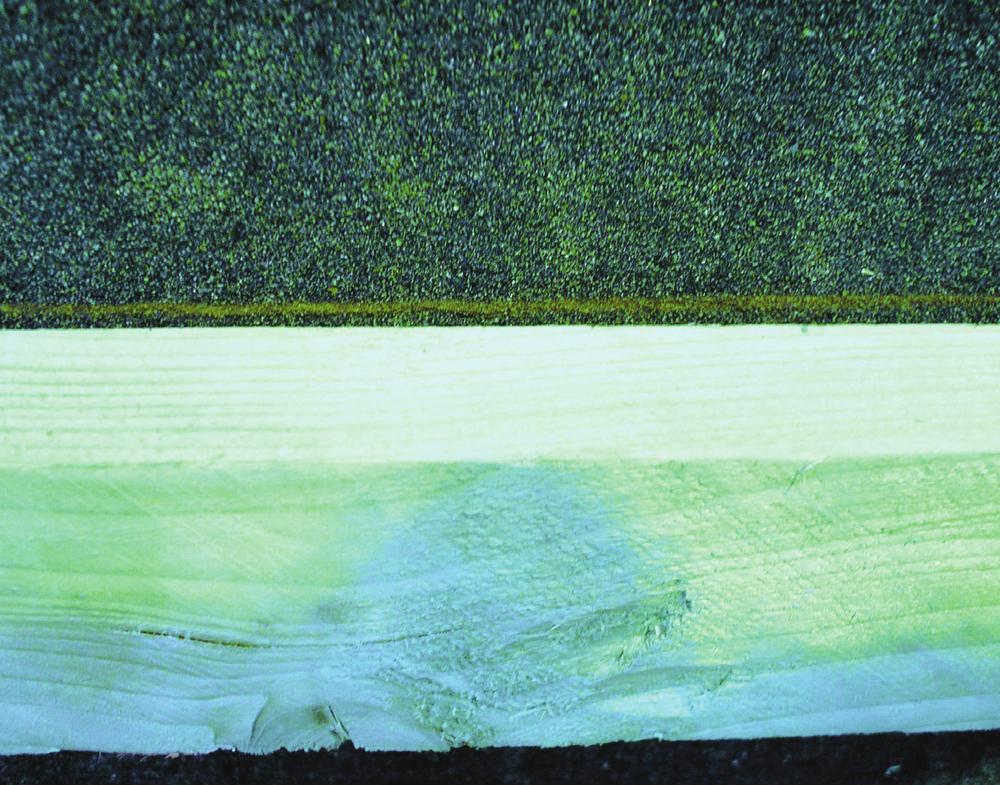
The top edge of the batten should touch the underside of the line.
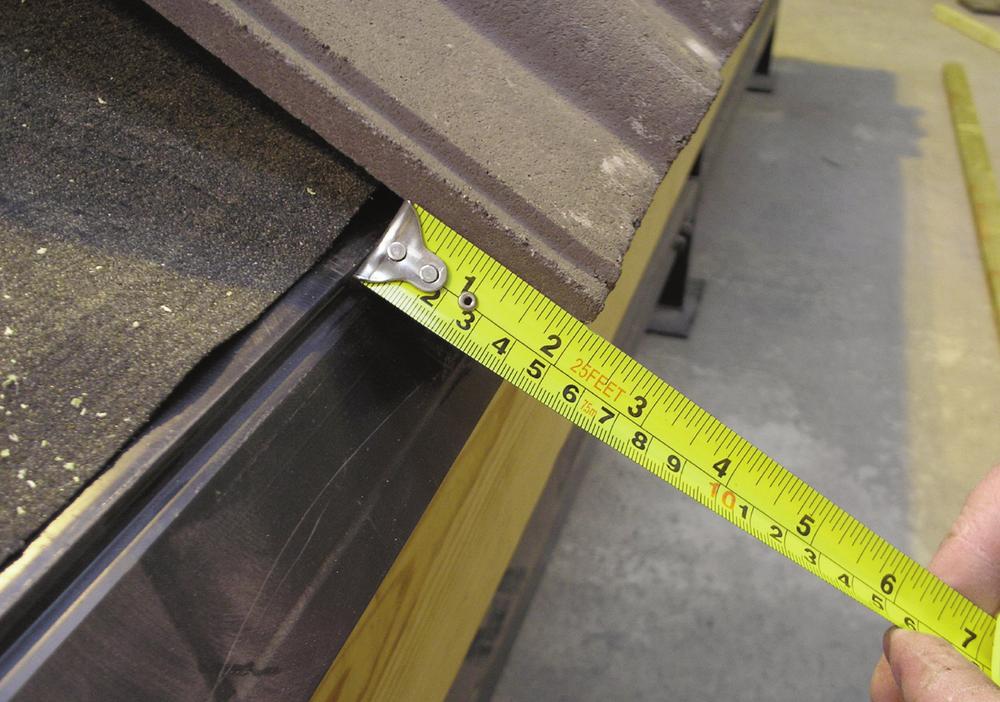
Checking the overhang at each end with tiles.
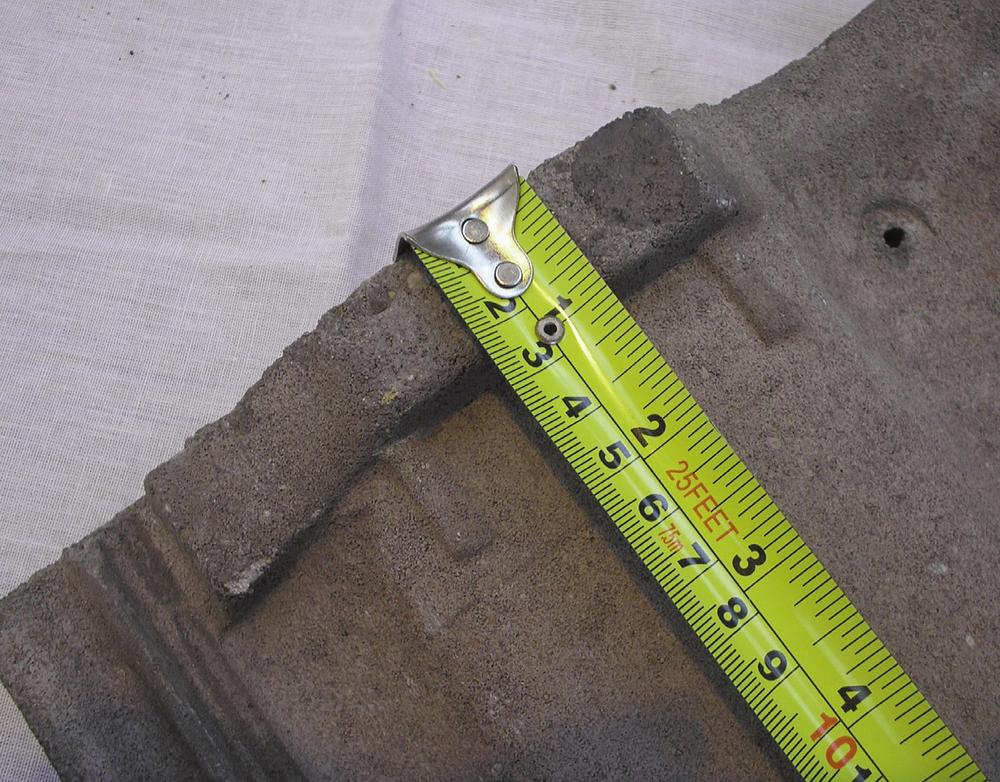
Nib thickness (or distance from the underside to the top of the tile).

Mark down from the apex to allow clearance.
The Maximum Gauge
The term gauge or batten gauge refers to the distance between the courses when measured between corresponding points, that is, from the top edge of one batten to the top edge of the one above. This distance is also equal to the ‘margin’, the visible length of a tile (or slate) once laid. This is useful to know because, if you ever need to find out what gauge existing tiles or slates have been fixed at, you can just measure the margin. The maximum gauge of a roof tile may be found in the manufacturer’s technical literature or from their web site. But, if you have access to neither but know the minimum headlap (normally 75mm), the maximum gauge may be found by using the formula:
length – lap = maximum gauge
(example: 420mm – 75mm = 345mm)
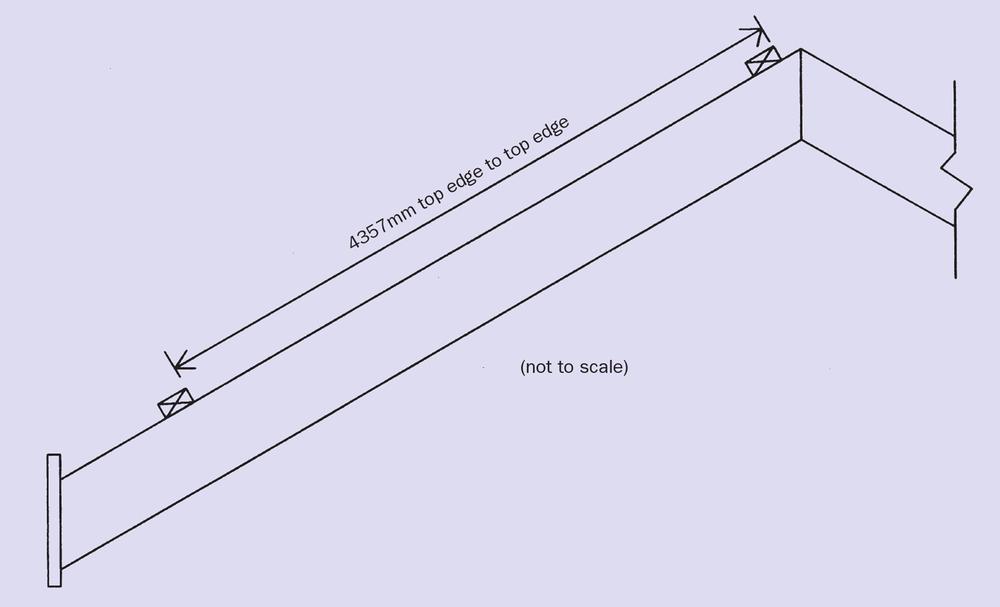
Working out the even gauge.
Working out the Even Gauge
- It is important to know what the maximum is so that we do not exceed it; but what we are really interested in for variable gauge products, is to work out the even gauge so that the courses are spaced out consistently.
- With a tape, measure between the two fixed points and record the distance in millimetres.
- With a calculator, divide this distance by the maximum gauge to find out the number of courses, rounding up the answer to the next whole number (always round up unless the first figure after the decimal place is a zero, if this happens you may try up the maximum gauge to see if it finishes high enough to be covered by the ridge tile or flashing; minimum 75mm); example: distance between fixed points = 4357mm; 4357mm ÷ 345mm = 12.63 (13 courses).
- Now divide the distance again, but this time by the number of courses and round off to the nearest millimetre (up for ≥0.5 and down for ≤0.4); example: 4357mm ÷ 13 = 335.15mm (335mm).
- This is the even gauge that you will use to batten up the roof.
Note: do not forget that in some roofs, especially old ones, the rafter lengths may vary slightly, so the gauges need to be checked at both ends and, if you have a duo-pitch, at both sides too; if the rafter is shorter, simply knock a few millimetres off each course and, if it is longer, add a few millimetres (but do not exceed the maximum gauge). You should aim to make the changes as even as possible by spreading the difference across all or most of the gauges, with the maximum addition or drop being around 5mm. For example: using our earlier example of thirteen courses at 335mm, we find that the rafter at the opposite end of the roof is 50mm longer. You can either add 4mm to each course, which will increase the gauge to 339mm to make up 52mm (which is fine), or add 5mm to the last ten courses. If the rafter is shorter then the measurements are, of course, deducted rather than added.
Tricky Little Measurements?
If your gauge works out at a good round number such as 335 or 340mm, then you should have no trouble in marking the battens, but if the gauge works out at something like 337mm then finding this accurately on a tape can be quite tricky. This is one of the reasons many roofers still prefer imperial measurements. There is a simple way of resolving this problem and it takes only about a minute or so to do. First, cut a piece of batten just over a metre in length. Starting from the factory-sawn end, extend your tape and mark the first gauge (for instance, 337mm). Keeping the tape extended, add the next gauge (2 × 337mm = 674mm) and then a third (3 × 337mm = 1011mm). This gauge batten may now be used instead of a tape and will save you time and reduce the number of errors.
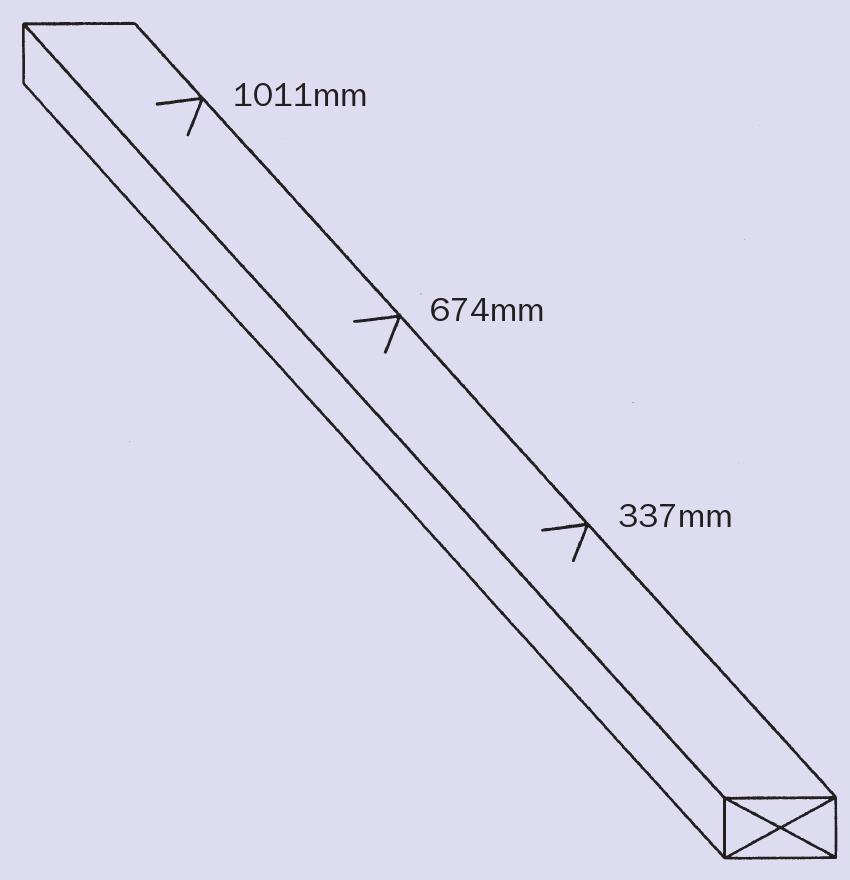
Making a gauge ‘stick’.
SETTING OR MARKING OUT (ACROSS THE ROOF)
General Principle
In roofing there are, to put it mildly, many differences of opinion. These include regional differences and, indeed, differences from one roofing gang to another, no more so in setting and marking out. Some will claim that there is no need to set or mark out at all, others may disagree. Personally, I think that it is an essential part of the job, but it does take a little patience to learn and feel comfortable with. It is one of those things that looks far more complicated than it really is, but is well worth sticking with because, once the penny drops, your setting out skills will reduce the frequency of errors and make your work easier, faster and more pleasing to look at. When we talk about ‘setting out’ or ‘marking out’ we are referring to lines on the roof to lay the tiles or slates to. These lines are sometimes called ‘perp’ lines (short for perpendicular). A series of corresponding marks (typically three tiles wide) is made along the bottom and the top edge batten and a coloured line (chalk line or wet redline) is struck between the marks. These marks can then be used to load out the roof accurately, lay the tiles or slates in straight lines and to denote start or finishing positions, such as at the verges and either side of a valley.
Shunt (Opening and Closing Tiles)
All roof tiles that interlock can be shunted ‘open’ (laid wider) or ‘closed’ (laid tighter) and this is designed into the tiles for three main reasons. The first is so that the tiles can be opened or closed if the roof is out of square. The second reason is to adjust the width of the tiling to provide a suitable overhang at the verges (if using ‘wet’/mortar finish), and the final reason is again to adjust the overall width of the tiling to try and work the roof into a full tile (that is, avoiding having to cut tiles at the verge). However, in my experience, if a cut tile looks likely you often need a long roof and/or some very generous shunt to avoid one, but it can prove a time-saver and so is sometimes worth a try.

Tiles shunted open.

Tiles shunted to closed position.
Overhangs
For interlocking tiles only, the undercloak at the verges should extend between 30mm and 60mm (38–50mm still applies to slates and plain tiles). How conveniently the tiles come in at the verges is very much down to luck, as roofs are rarely designed to fit the roof tiles. Ideally, what you are looking for is a ‘full-tile’ finish. This means the tiles will lay within the limits of the shunt and the overhang at each end will be between 30 and 60mm. If you cannot achieve a full-tile finish then introduce a cut; ideally, this should no less than half a tile wide at the right-hand side of the verge. Always try to use a cut that maintains the profile of the tiling. A cut tile alters the overall width of the tiling, giving you another chance to achieve the required overhang.
It should be noted that where dry verge is used, the overhang is fixed and so the size of the cuts may be considerably less than half a tile.
The worst case scenario is that the cut tile still does not provide the correct overhangs, and so this means that the tiles at the left-hand verge will have to be cut as well. Again, always try to use a cut that maintains the profile of the tiling.
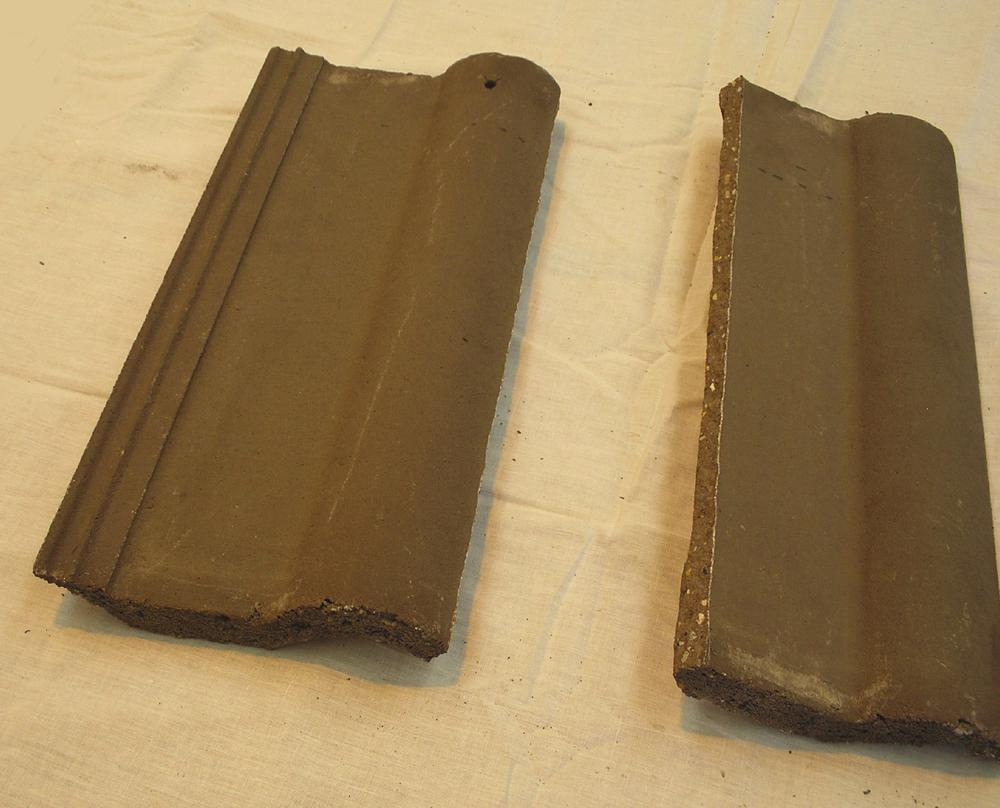
Typical right-hand ‘starter’ cut (discarded piece on right-hand side).
Thankfully, having to cut at both ends does not happen too often, and mainly on very small roofs where there are not enough tiles for the shunt to come into play or on jobs where there is no room for negotiation with the overhang limits.
Having explained what setting and marking out is, what shunt is and about the required overhangs, it is time to explain how the various roof types are marked out for interlocking tiles.
BASIC SETTING OUT FOR SMALL, STRAIGHT ROOFS
If you are just doing a small to medium-sized straight roof, such as a porch, garage or a main roof less than 5m wide, then the easiest way to set out is simply to run the tiles along the eaves and shunt them about until they fit and you are happy with the overhangs. Of course, you might need to try a cut if this does not work to a full tile. You may be able to tile in the smaller jobs without striking lines, but for larger ones it may be wise to strike ‘perp’ lines.
To mark out by using this method start at the right-hand side (bottom course) and set the first tile (or cut) to the required overhang. Then tile along the eaves and shunt the tiles about until the overhang is correct at the other side of the roof. Leave the tiles in place and repeat the exercise on the top course.
Next, take out every third tile and mark the left-hand edges of the tiles (bottom and top courses) and, once you have done this right across the roof, take all the tiles off. Then strike lines between the corresponding marks to leave a set of ‘perps’ to lay your tiles to.
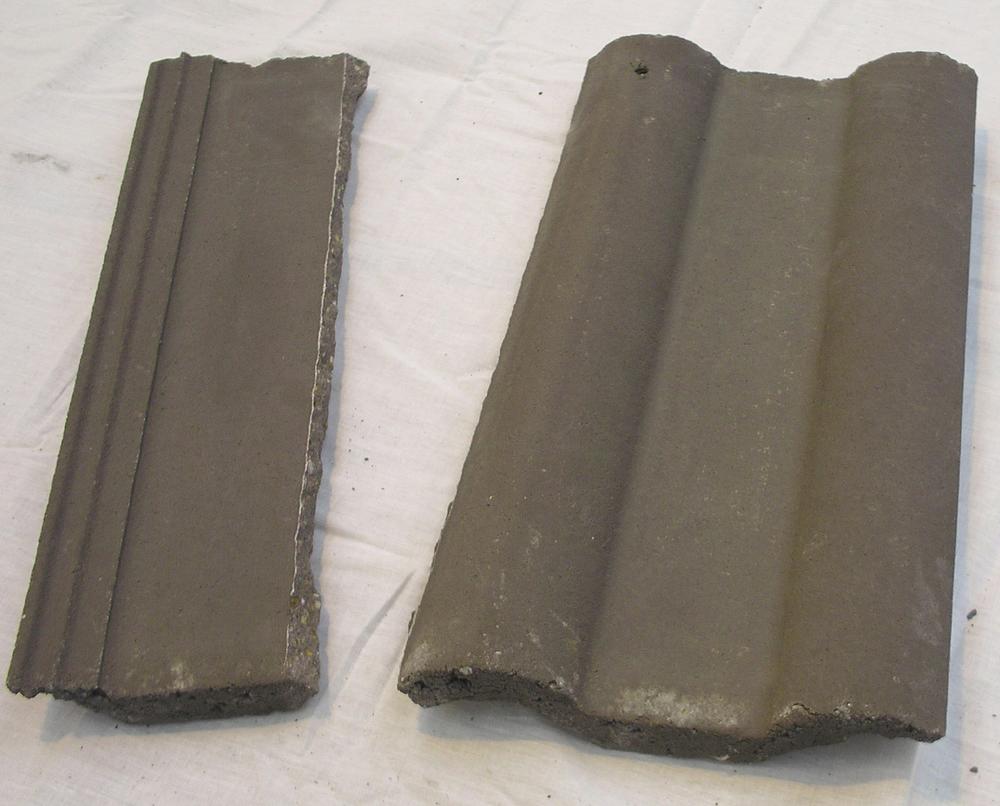
Typical left-hand ‘finisher’ cut (discarded piece on left-hand side).
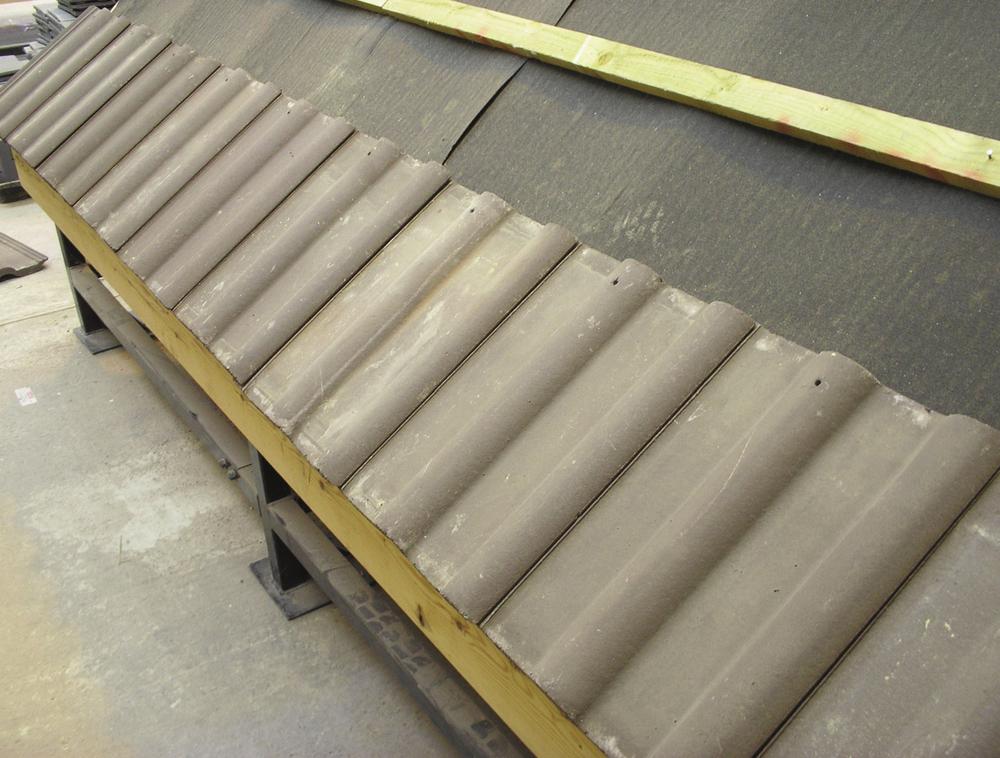
Laying tiles out to establish the overhang at the verge.

Simple method of setting out with tiles (every third removed).
SETTING OUT FOR LARGER AND MORE COMPLICATED ROOFS
For this type of job the simple method described can be very time-consuming and so it is more common for professional roofers to mark out by using a staff, or ‘marking lath’ as it is sometimes known. The idea is to mark three tile-widths on a batten and use this for setting out, rather than laying out tiles. Marking out in this way can take some grasping, but, if you can manage it, you will find that the ten or fifteen minutes spent setting out is well worth it with regard to the speed and quality of the work.
Making a Marking Lath (Staff )
Follow this method to create a marking lath for any interlocking roof tile.
- Lay a tile squarely on any batten and mark the left-hand edge; we will call this the ‘first mark’.
- Making sure that the first tile does not move, lay three tiles to the left of it, opening (but never forcing) each one to its full laying width, again, mark the left-hand edge.
- Take off the three tiles and repeat the process, this time closing the tiles; mark the left-hand edge again and remove all the tiles.
- You should now have two marks about 10mm apart; split the difference and make a mark in the middle, this will be the average tiling gauge.
- Find a straight and fairly smooth batten (full length) to mark on and place one end level with the average mark, move along to the first mark you made and transfer this up to the marking batten.
- Move the marking batten to the left until the mark you have just made comes into line with the average mark, again transfer the first mark you made up to the marking batten.
- Continue until the batten is full and, with a pencil, scribble out the part which is spare to avoid confusion later on.
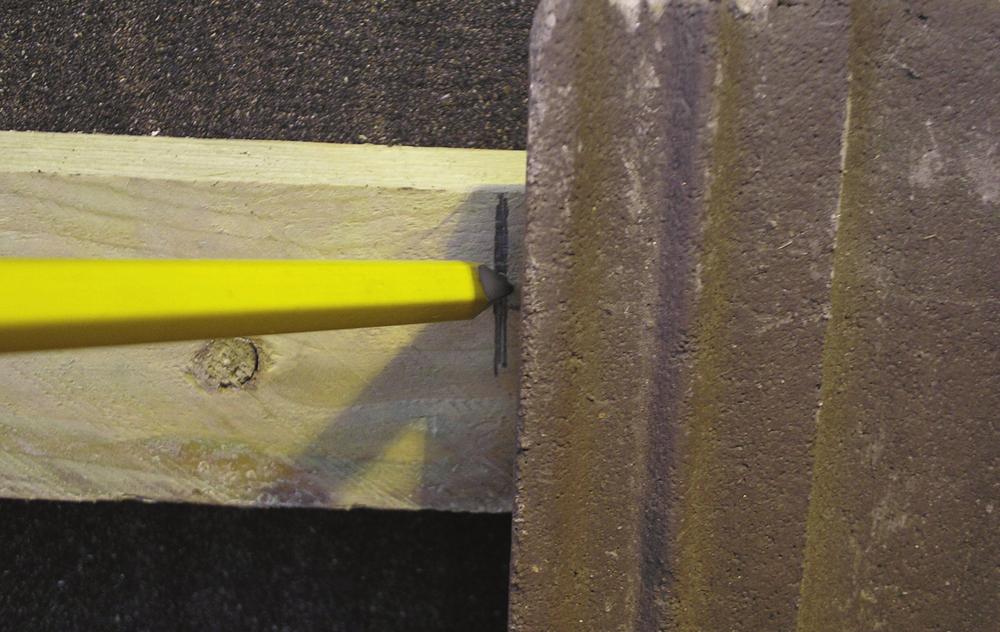
Marking the first tile.

Open and closed marks for three tiles.

Picking up the first mark.

Picking up the next and other marks.

Completed marking lath.
Marking out for Straight Roofs
Before we can put any marks on the roof we have to test it to establish factors such as overhang, whether we shall need cuts and anything out of square. Follow this method to find out what you need to know about the roof you are about to tile.
- Place the marking batten on the bottom course batten with the end of it flush (level) with the outer edge of the left-hand bargeboard.
- Move to the other end of the marking batten and transfer the furthest mark (since this is only a temporary mark, use a line not an arrow) on to the bottom course batten.
- Keep moving the marking batten along in the same way until you get close to the right-hand verge.
- At this point lay a tile (or a cut if required) on to the last mark and carry on laying tiles to the right of it until one carries over the right-hand verge; measure the total overhang and divide by two (averaging out the overhang).
- If this is within or at least close to the overhang limits (38 to 50mm each side) go back to the left-hand side and place the end of the marking batten over at the required overhang; you may now run the marking batten through again making permanent marks.
- Repeat the marking process on the top batten and strike the perp lines.

Start trying the roof through from flush with the left-hand verge.
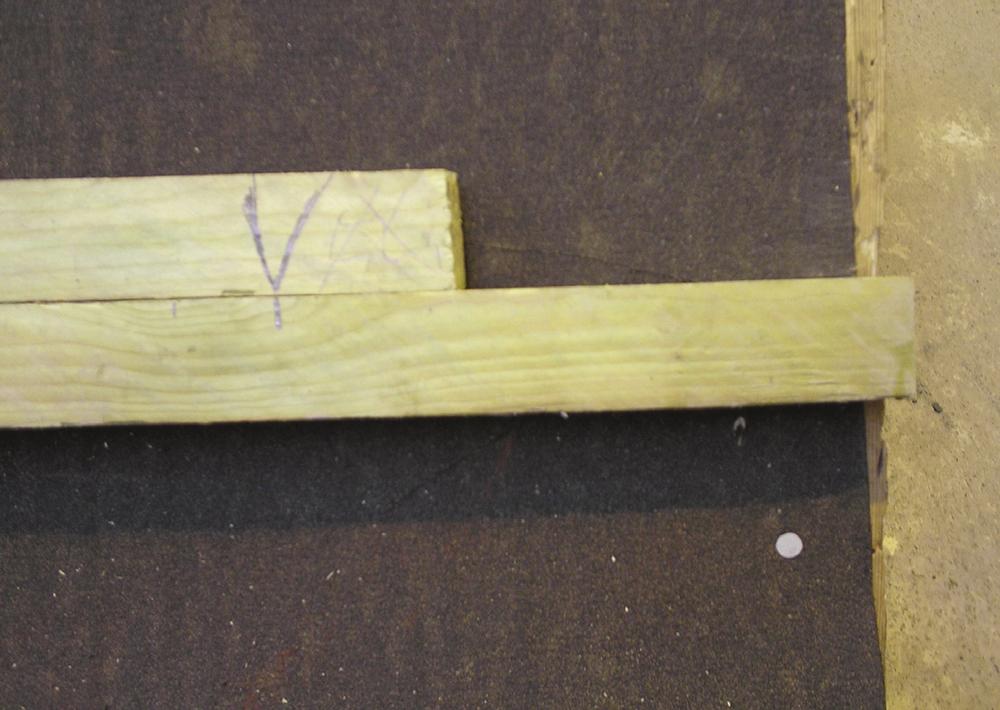
Move the marks along until close to the right-hand verge.

Measure the tile overhang (then divide by two).

Striking perpendicular lines.
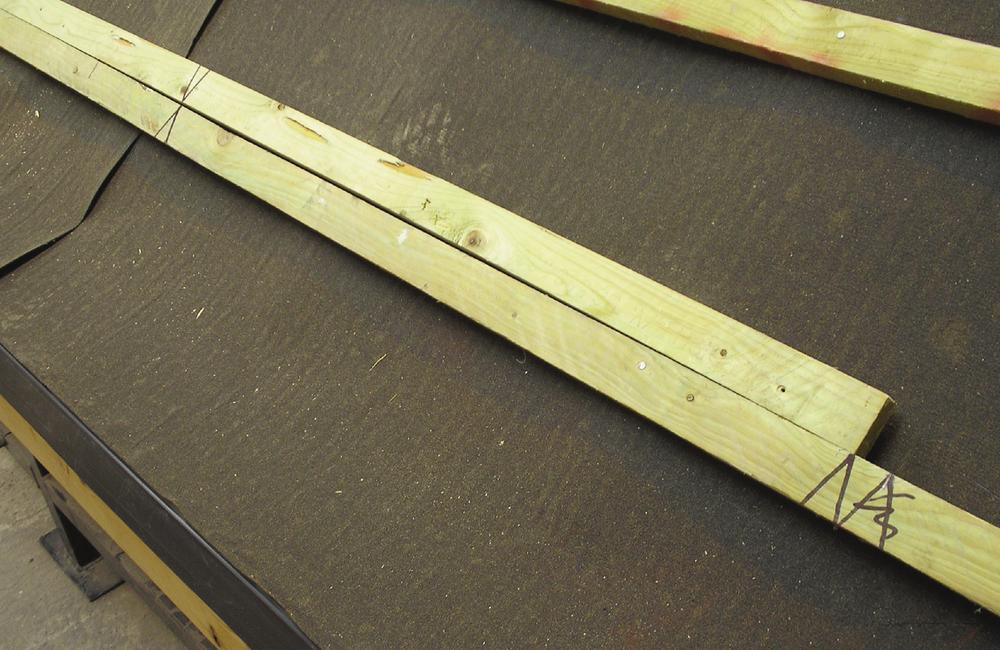
Set the permanent marks to the required overhangs.
If the roof is slightly out at the top then your tiles will not be on the lines straightaway. You will have to open or close them until they are; from that point you will be laying them at the average gauge.
Remember only to use the shunt that the tile is willing to give you. This means that you must not force it open nor closed in a rush to get on the marks. Forcing tiles can make them twist, sit poorly and cause breakages.
VARIATIONS AND EXCEPTIONS
The setting out methods described thus far refer to the most commonly used roof tiles on the market today (for instance, concrete interlocking tiles, with two rolls and two pans). Rather than go through every type, the main differences that will affect your setting out are described here.
Left-Hand Verge Tiles
Some types of tile need to have the left-hand interlock removed (for instance, flat profiles) or have in their range a special tile that fits on the left-hand verge, sometimes referred to as left-hand ‘finishers’. Left-hand verge tiles can vary in width compared with standard tiles so you should allow for this in any setting out that you do.
Flat Tiles
Flat interlocking tiles are normally laid at ‘half-bond’, like a slate or a plain tile, and so there is a little more work required in the marking out process. In simple terms, you need to mark the roof out twice, once for a full tile start and again for a half-tile start. By cutting the left-hand verge tiles and the ‘handed’ tiles provided (tiles supplied with a score line down the centre) you will have all the fittings you need for the marking out process.

Typical left-hand finishing tiles.

Handed tiles for ‘half tile’ starters and finishers.
Marking out Roofs with Valleys
The drawings below show two roofs with valleys. The main difference between them is that on one the ridge lines are the same height and on the other they are not. This makes a difference in how the roofs are marked out.
We shall start with the roof with equal ridge lines. The elevations have been marked with letters (below) to help the reader to understand the following setting out methods.
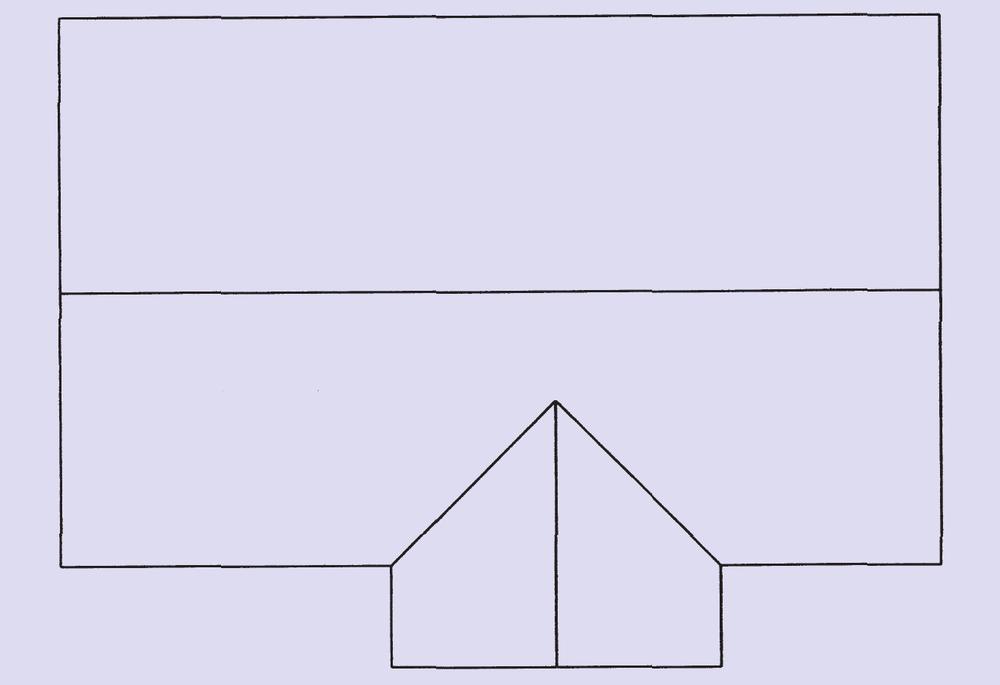
Typical roof with valleys and unequal ridge heights.
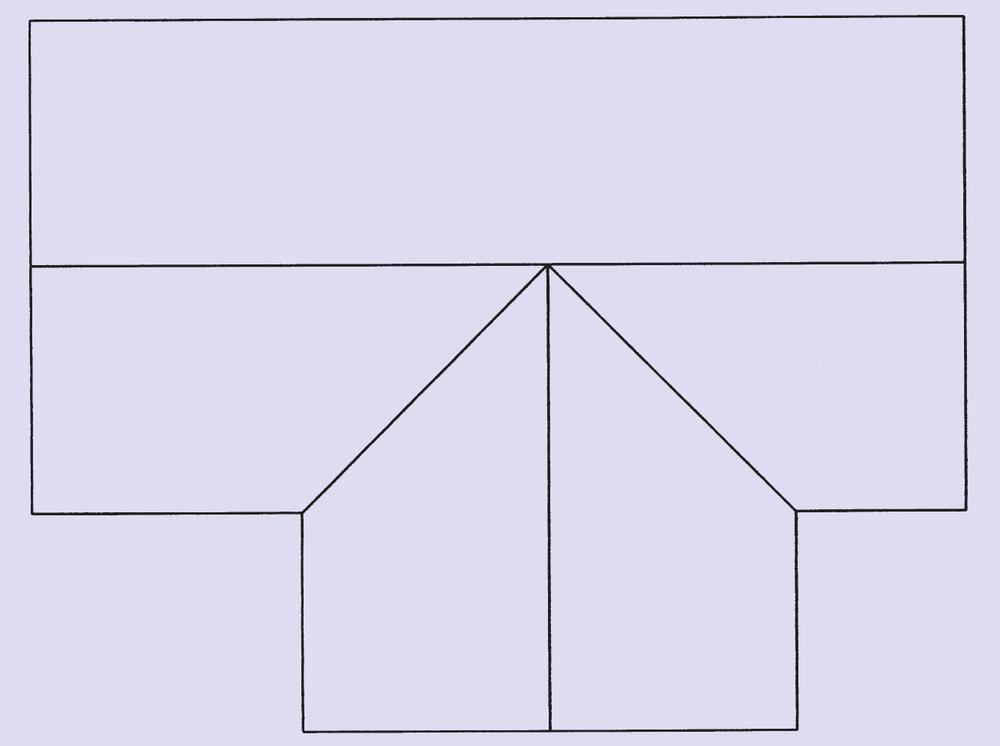
Typical roof with valleys and equal ridge heights.
If we start with elevation A, the simplest way to mark out this roof is to start with a full tile mark on the right-hand verge so that the overhang is set between 38 and 50mm. With this as a starting point, transfer the marks from the marking lath to the top course batten and the eaves course batten and strike lines between the corresponding points. Additional marks, if required, can now be transferred into the middle to upper sections of the valley, if required, and lines struck from these points to the top course.
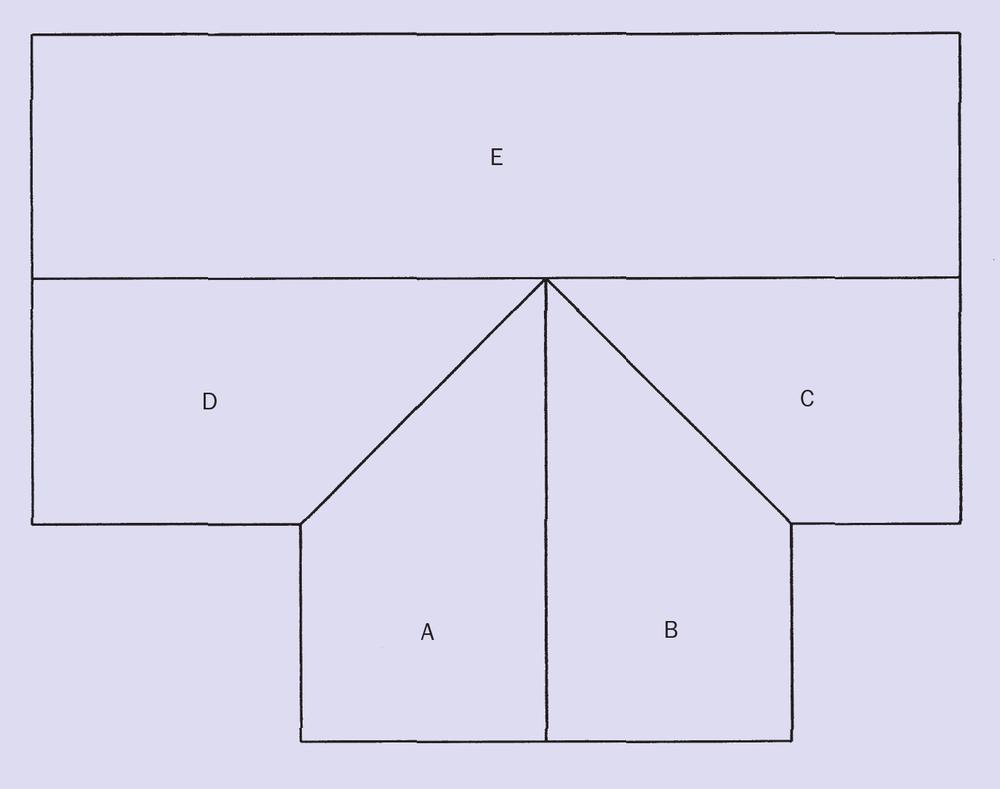
Elevations marked A–E.

Additional marks in valleys.
Elevation B is marked out from the left-hand verge inwards toward the valley. Extend the marking lath over the bargeboard at the same overhang as in elevation A and transfer the marks to the top and the bottom batten and strike lines between the corresponding points. On this side of the valley it is definitely advantageous to continue marking into the valley (as shown) because interlocking roof tiles are designed to be laid from right to left, and having extra marks provides more starting points for right to left tiling.
Elevation C is marked out in the same way as A, but the overhang needs to correspond with whatever has been worked out on the opposite (verge-to-verge) side of the roof (E). Elevation D is marked out in the same way as B, but again the overhang needs to correspond with whatever has been worked out on the opposite (verge-to-verge) side of the roof.
Where there are several courses above the valley, the top batten should be marked right through by using the required overhangs. The rest of the roof can be marked the same as described above, although many roofers prefer to use a second set of marks on the course immediately above the valley and the lines struck through. If you want to use the striking-through method, then there needs to be a decent distance between the two sets of marks. The closer they get together the more likely it is that the lines will be struck at an angle and therefore lose accuracy. Therefore, as a rule of thumb, there needs to be more roof above the valley than below it, if you are going to strike through.

Tiling can be staggered to additional marks in the valley.

Striking through over minor valley sections.

Typical marking out to a hip end.
Marking out Hip Ends
Hip ends: many roofers do not bother marking hip ends out, but, for the couple of minutes it takes, it may make the job much simpler. Start by striking a line down the centre of the roof. The easiest way to find the centre is to use the central rafter as a guide. Next make a series of marks across the eaves (using a marking batten). The higher marks are made by moving the marking batten up the roof and striking through.
FIXING DETAILS
Laying Tiles
Perhaps the main selling point of interlocking tiles in comparison with slates and plain tiles (apart from the fact that they are cheaper) is the speed and ease at which they can be laid. Interlocking tiles are designed to be laid from right to left, and you will find it much quicker and easier if you stick to this method. The basic laying technique is as follows.
- Positioning: place the first tile on the batten and pull it down to ensure that it is square on and the nibs are properly located.
- Repeat with subsequent tiles laid from right to left so that they interlock accurately and without force.
- Shunting: open or close the tiles in the direction they need to go in relation to your marks, do this gradually and without force.
- Fixing: if the fixing specification indicates nail-only, then fix the tiles you have just laid; if the tiles are clipped and nailed, or clip-only, then you will probably have to fix the tiles one at a time as you lay them; clipping is much slower than nailing, so allow more time if the specification asks for this.
I have seen many so-called roofers tile row after row right across the roof and then walk all over the ones they have just laid; normally this means that the roofer cannot see the benefits of setting out or perhaps does not know how to do it. This is poor practice, which normally results in muddy footprints all over the roof, broken or cracked tiles (often hairline cracks, which appear later) and is also actually a breach of health and safety regulations because tiles are classed as fragile and are not designed to be walked on, and, even if they were strong enough, there is still the risk of slipping. If you must be on the roof once the tiles have been laid, you should use a roof ladder or, if the specification allows for it, push tiles up on courses that are not nailed or clipped and use the exposed gaps as footholds.
First tile pulled down squarely on to the battens.

Lay tiles to marks without force.

Shunting the tiles open or closed.

Clipping and nailing.
Where possible, try to take the eaves course of tiles through first to check that your marks are correct and then tile up in columns of three to six tiles to the marks, starting with the right-hand verge, if applicable. This ensures that you are working off the battens and not the tiles; at least one foot (and normally one knee) should be on the battens at all times to avoid slipping and possible damage to the tiles. You should plan your work to ensure that you do not walk on the tiles once fixed; this is not always possible, but it is worth giving some thought to before you start.
Fixing Specifications
It is important that perimeter tiles (that is, eaves, verges, valleys, hips, top edges and abutments) are all mechanically fixed (nailed and/or clipped), according to the specification. The fixing specification for the main areas should be checked with the tile manufacturer’s technical department. As stated in chapter 3, some of the main roof tile manufacturers now have an agreed Zonal Fixing Method, which has brought some degree of clarity to fixing specifications.
Small Cuts
Small cuts, which are often difficult to fix, can occur at the sides of roof windows, dormers, in the valleys, at hips and in many other areas of the roof. It is important to check with the manufacturer how to fix these small cuts to ensure the overall specification is not compromized. A range of mechanical fixing methods – including adhesives – is readily available.
EAVES
Eaves Fillers and Clips
The purpose of eaves fillers is to close up any gaps under the tiles so that birds and vermin cannot enter the roof space. Flat-profiled tiles do not need fillers, but most medium-and deep-profile roof tiles do. The most common type of eaves filler is called a comb, for obvious reasons. These fillers normally come in different heights, so you should check with your merchant which one is right for the tiles you are using. The fillers are nailed along the edge of the fascia board, as shown. Where specified, install eaves clips appropriate to the type of tile you are using.

Typical comb-style eaves filler.
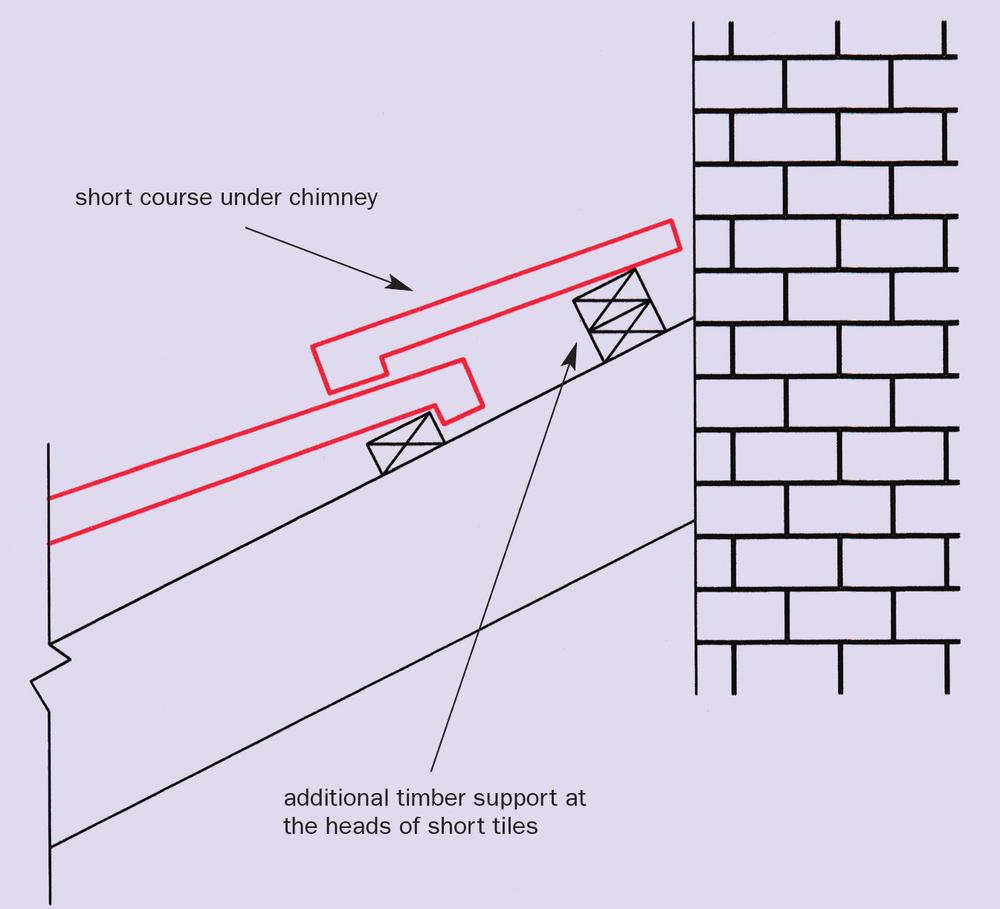
Short course under chimney.
CHIMNEYS
Below
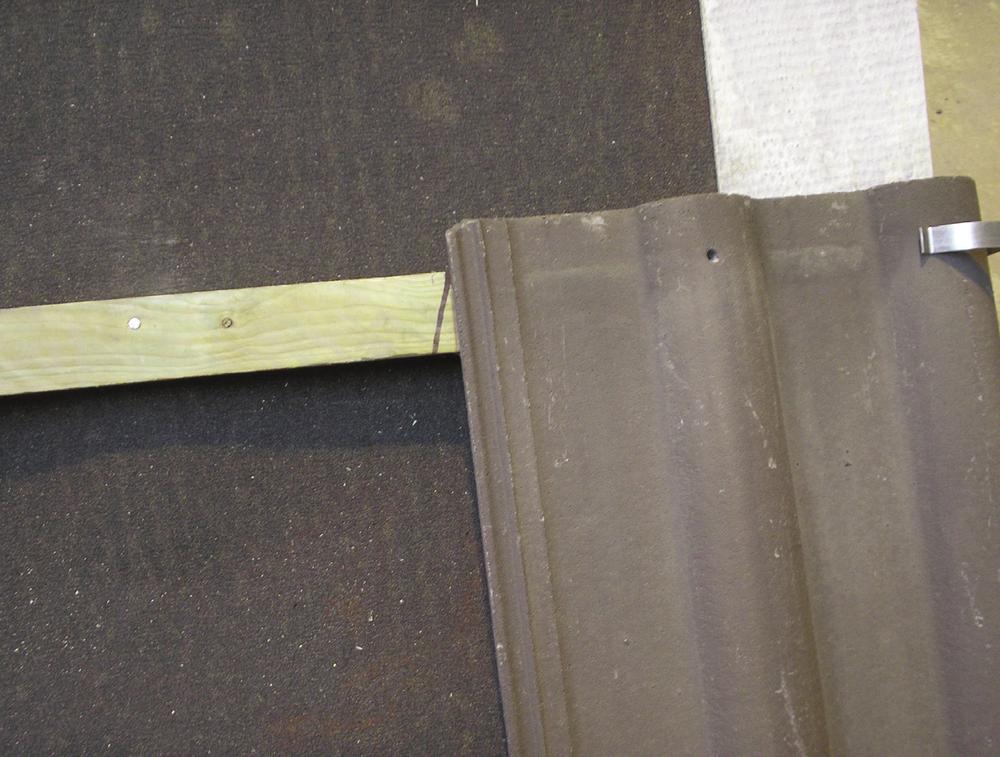
When cutting to a chimney or some other penetration in the roof you will probably have to cut and fix the tiles. Below the penetration you should cut the heads off the tiles rather than the tails, and re-hole them with a drill. If the tile is less than about three-quarters of its original length then it is likely to need more support at the head, so check this before fixing the tiles and, if necessary, increase the thickness of the batten using additional timber (normally a double batten will do the trick).
Sides
When you are cutting to the sides of a chimney the cut should be as close as possible to the wall and at least half a tile wide; however, in reality there is little you can do about how the tiles fall so you can end up with small cuts. If the nail holes have been cut off you will need to drill new ones and ensure that the tiles are securely fixed.
Back
If the tiles are too long to fit behind the chimney you have the choice of cutting something off the tails or of raising the batten behind the chimney slightly to pick them up a little. It is important not to get too tight behind the chimney (leave a gap of at least 100mm) since this can lead to blockages and water may then back up into the roof.

Tiles behind chimneys can be cut or raised.
VERGES
Dry Verge
As with all proprietary systems, the manufacturer will provide a fixing guide with the materials, which must be adhered to. All the systems are designed to be quicker and easier to use than mortar bedding and, provided the instructions are followed, the installer should have few problems.

Typical dry verge in progress.
Bedding and Pointing
It is important to bed the mortar high enough so that the tile compresses it when it is placed. The general technique for bedding is to turn the mortar over several times with a trowel in a bucket or on a hand board so that it can be delivered in smooth and compacted shape. Start by bedding up a short run, say two or three tiles, to make sure that you are bedding to the right depth and, once you are sure, then continue to bed the rest of the verge. Note that the first tile may need more mortar than those that come after it because there is often a slight kick at the eaves. For deeper beds, packing material such as broken tiles should be used to reduce slump and shrinkage.

Bedding for first tile.

Mortar compacted when pressed by tiles.
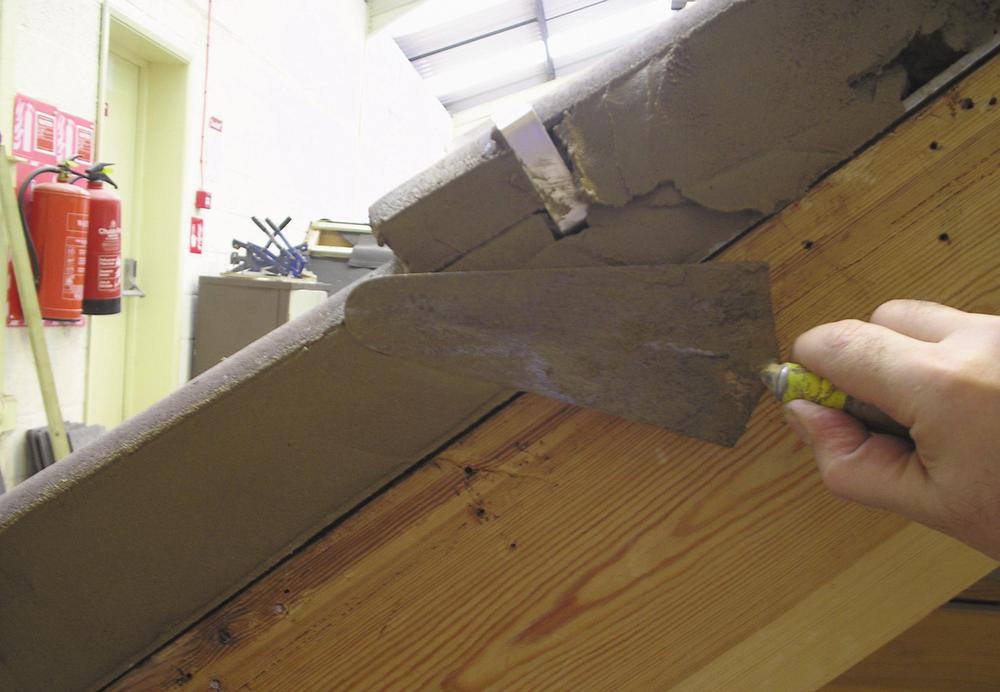
Pointing to verge, general technique.
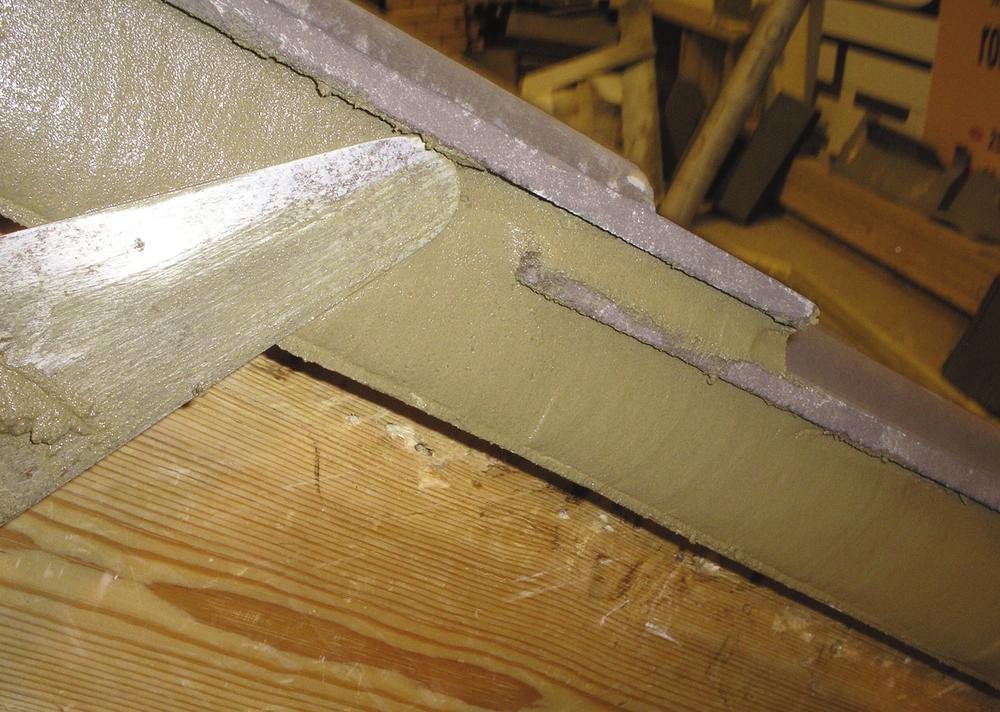
Shadow pointing.
Normally, if you try to point the verge straightaway the mortar will sag, so it is better to leave it to harden (go off ) for a while and then come back to it. How long you should leave it depends on the depth of the bed, the weather conditions and how firm the mortar was to start with; but, in general, you should allow at least one hour, and you must ensure that bedding and pointing for verges or any other details are completed in the same day. Failure to do so may result in poor adhesion and the pointing may eventually crack and fall out.
The key to good verge pointing is to try and smooth the mortar out by using a steady, continuous motion with a slightly angled trowel (as shown). Normally, it is a good idea to use upwards strokes to prevent sagging.
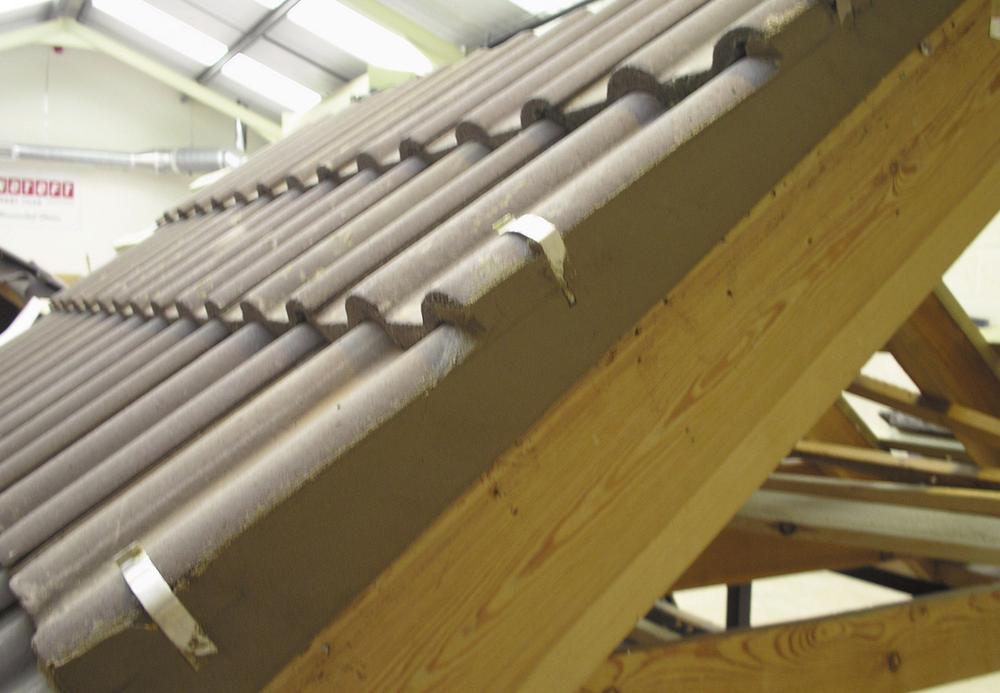
Flush pointing or parging.
Pointing Styles
Styles of pointing may vary, depending on regional differences, client requirements or simply personal preference. Perhaps the most widely accepted style is to run the trowel just underneath the tiles at a slight angle to leave the edges of the tile clean. This is commonly known as ‘shadow pointing’.
‘Flush pointing’ (or parging), on the other hand, covers the whole tile. This is perhaps the most common method of pointing because it is arguably quicker and easier to do than shadow pointing. However, the drawbacks with this method are that it tends to crack around the covered parts of the tile, especially around the interlocks, so it may be less aesthetically pleasing than shadow pointing.
‘Brush pointing’ is an old, traditional way of finishing the mortar in certain areas with extreme weather conditions. As the name suggests, the mortar is brushed to leave a textured finish, which is thought to be more durable and less prone to cracking than smooth pointing.
Tiling
A column of tiles not less than two tiles wide (normally to the first full perp line) should be taken all the way up the verge. From this point the tiles can be laid to the marks until the roof has been completed.
HIP AND RIDGE TILES
Before we look at the actual techniques of bedding ridge and hip tiles there is one important piece of information that you should be aware of: it is advisable to mechanically fix some, and in some cases all, of the bedded tiles. Since September 1997, the guidance from the British Standards has stated that in the end 900mm of ridge tiling (e.g. two standard 450mm ridge tiles) at gables, abutments and over party walls should be mechanically fixed (i.e. nailed, screwed, etc) to prevent them from becoming dislodged through differential movement. The rest of the tiles then rely on the tensile strength of the mortar, plus the weight of the hip or ridge tile, to keep them in place.
However, testing in recent years has shown that the tensile strength of mortar and the actual bond with the hip or ridge tile cannot be fully relied upon and, increasingly, the trend is now to mechanically fix all bedded hip and ridge tiles to reduce the risk of failures. Indeed, since January 2012, the mechanical fixing of all bedded hip and ridge tiles has become compulsory on most new homes.
Mechanically Fixing Bedded Ridge and Hip Tiles
Where mechanical fixing of bedded hip and ridge tiles is a requirement, there are several options open to the installer. Security ridge/hip tiles are produced with pre-formed holes at each end so that drive screws or screws can be used to fix the tiles. Alternatively, the ridge/hip tiles can be secured by small metal plates that are fixed between the joints to hold the ridge/hip tiles in place. In some cases, it may be possible to fix directly into the hip rafter/board, but normally an additional piece of timber (normally 25-50mm deep) will need to be fixed during the battening stage. In all cases, it is advisable to contact the manufacturer to ensure you are fixing to their recommendations.
BEDDED RIDGE TILES
General
Perhaps the most important thing to remember is to get the mortar consistency and strength right before you start. Remember, the mortar needs to be firm enough to support the ridge tile but wet enough to be workable and to create good adhesion with the roof tiles. The only real difference between bedding ridge tiles and hip tiles is that the former are significantly easier because you are bedding on to a consistent height, as opposed to a hip which has changing levels as you bed over cut tiles and overlaps.
One problem with bedding ridge tiles is that they have a tendency to wander if you bed them freehand. This is not necessarily serious unless the line of the ridge is going to be overlooked, but, all the same, I would recommend inexperienced roofers strike lines on the tiles as you would on a hip. This will not only keep the ridge tiles straight, it will also ensure that sufficient lap is maintained (from ridge tile to roof tile) and provide a consistent guide for accurate bedding.
Keeping the ridge tiles level horizontally should be done by eye, not as you might think by spirit level. However, you may, of course, use a straight edge if you feel that it helps. One of the main things is to retain a consistent bed height so that the ridge tile sits just slightly higher (say 10 to 15mm) than the required finishing position. If you can achieve this consistently it means that the amount of ‘knocking-down’ is kept to a minimum and levelling becomes much easier.
The basic technique for bedding ‘butt-jointed’ ridge tiles is as follows:
- Position the first ridge tile so that it is central, with equal lap on to the tiles on both sides, and mark the edges with a trowel to provide the bedding lines
- Work the mortar in the bucket or on the hand board so that it is delivered in a neat, compacted shape, slightly inside the lines.
- Place a full trowel of mortar at the end, press a piece of broken tile on to it and then bed on to this again so that the shape matches (and is slightly higher than) the ridge tile.
- Knock the ridge tile down until the clearance (about 10mm) above the roof tiles is consistent on both sides; some roofers knock the ridge tiles right down to the surface of the roof tiles, but this is a mistake because, if there are any slight lumps or bumps in the roof tiles, then they will show up in the ridge tiles; it may well be that the end ridge tile sweeps up slightly at the verge, this is often a result of the slight tilt caused by the insertion of an undercloak and is perfectly acceptable.
- Once you are happy with the first ridge tile, insert a piece of broken tile in readiness for the next mortar joint; fill the mortar joint to a consistent width of about 12 to 15mm and place the edge bedding for the next ridge tile.
- The next step is to position the ridge tile on to the bed and up to the edge of the mortar joint; you should find that one hand under the back of the ridge tile and the other at the side (near the front edge) will give you the control you need and will also help you to avoid trapping your fingers between the ridge tiles; push the ridge tile into the mortar joint and begin to knock it into place, you should alternate between knocking down and knocking across (into the joint) until you reach the desired position and the width of the joint has been squeezed to 10mm or less.
- Creating this solid joint means that it should be much more durable and, as an added bonus, you will find it much quicker and easier to point; if you have done the joint correctly all you should need to do now is to trim off the surplus mortar with a trowel and run the nose of the blade over it to finish it off; try to smooth the mortar up from either side and finish on top of the joint as this will hide any troublesome trowel marks.
- If mechanically fixing the ridge tiles, this should be done before the pointing.
- To point the edges of the ridge tiles, first transfer any surplus mortar that has oozed out to areas where it is needed and add more if required, then smooth the mortar out with as few strokes as possible (that is, a continuous motion where possible) across the length of the ridge tile, but, if the pointing is sagging slightly, use upwards strokes to correct it and, if this does not work, then you may need to leave it to go off slightly; another method is to press some small broken tile pieces into the bed to create more support; with regard to trowel techniques, some roofers use the front of the trowel and some the back, some use the same standard gauging trowel for bedding and pointing while others may have a smaller pointing trowel specifically for this task; this is really a matter of personal preference and, provided a smooth finish is achieved, then, by and large, anything goes.
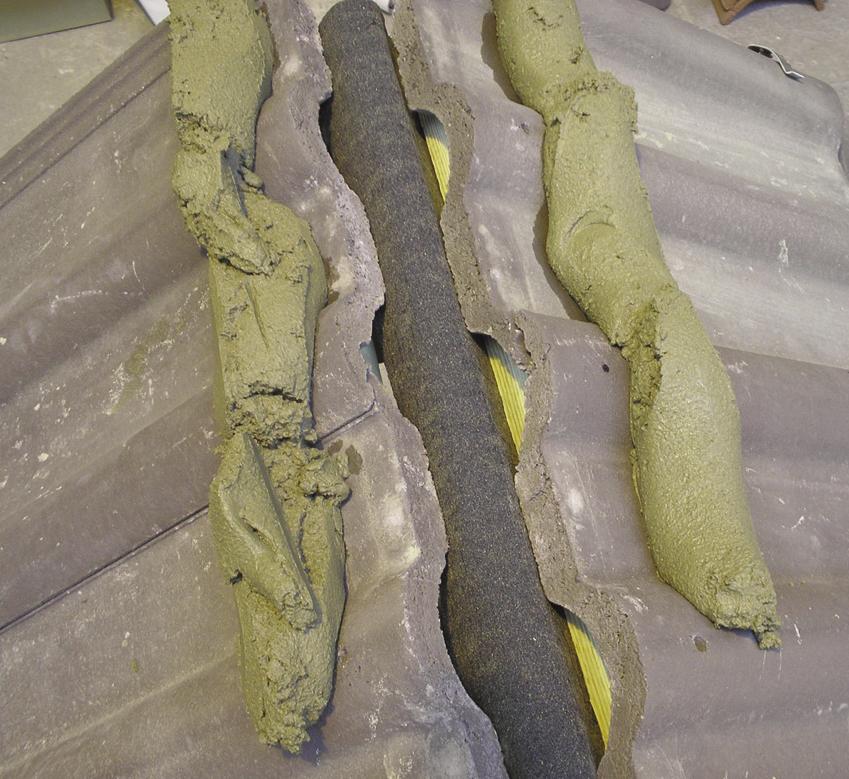
Marking and edge bedding the first ridge tile.
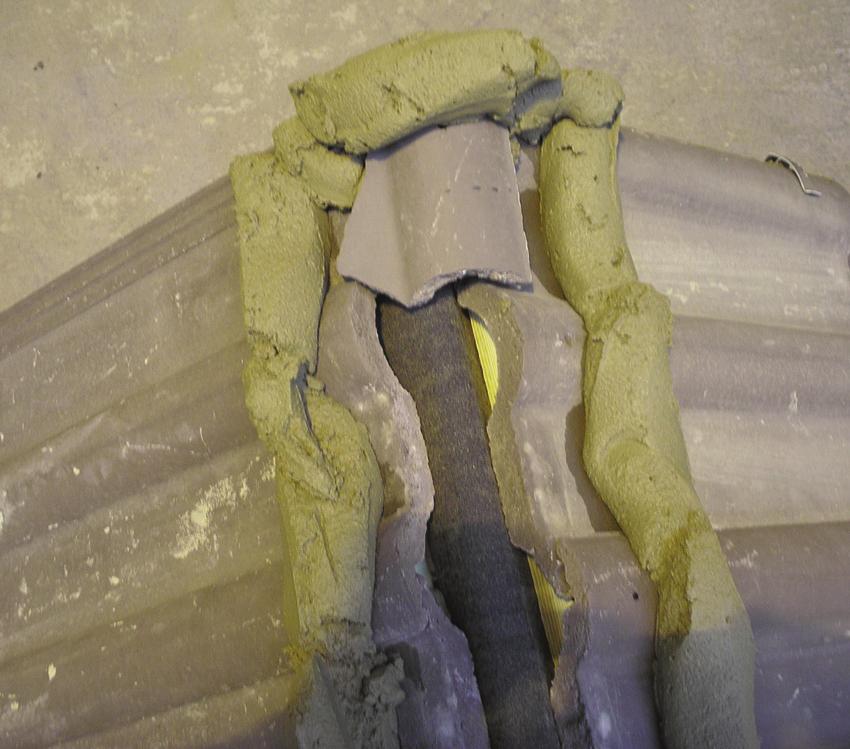
End bedding with packing.
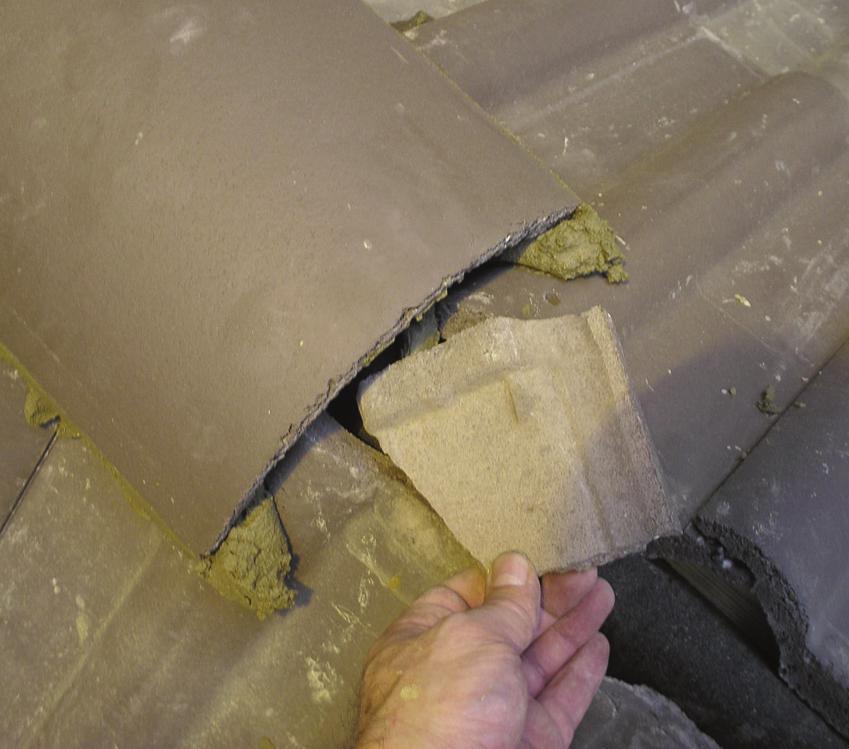
Packing materials inserted into joints.
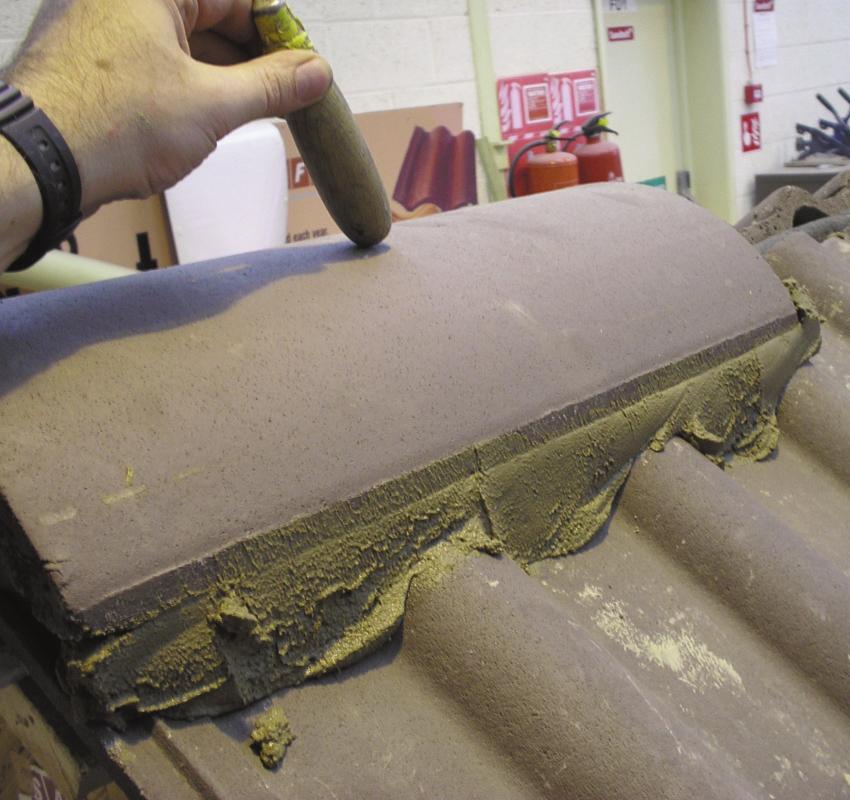
First ridge tile knocked down into position.

Mortar joints should be solid and even.

Handling and placing subsequent ridge tiles.
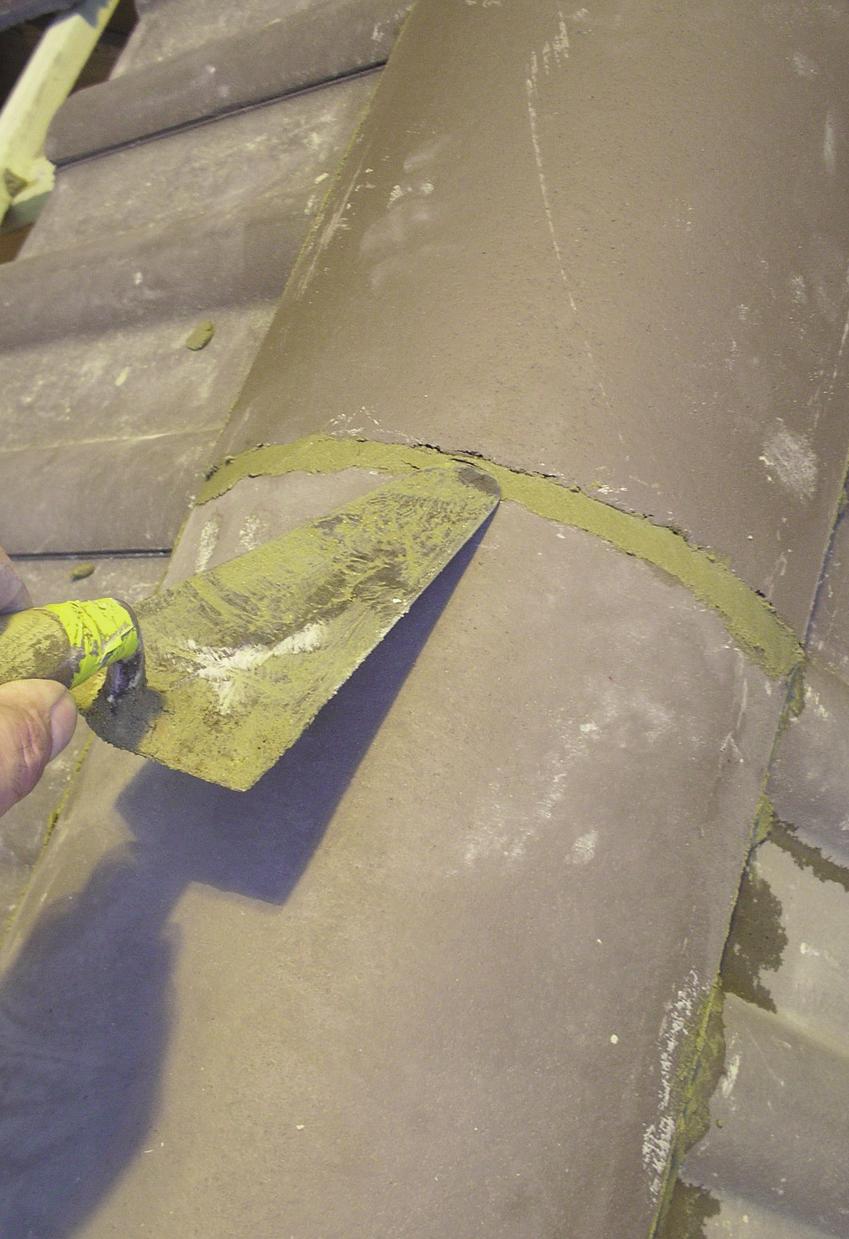
Pointing the joints.
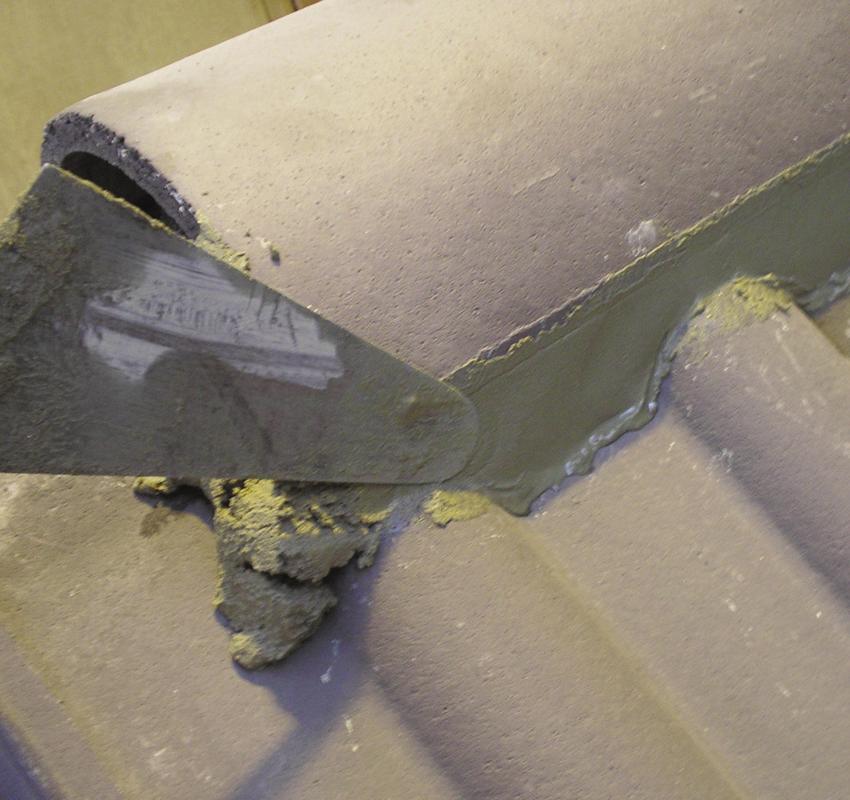
Pointing to the sides.
Dry Ridge
As with all proprietary systems, the manufacturer will provide a fixing guide with the materials, which must be adhered to. While there are many different types of dry ridge available, they divide quite neatly into those which use an adhesive roll and those which use plastic rails. When using the former, it is important to make sure that the tiles are clean and dry so that the adhesive sticks properly. All the systems are designed to be quicker and easier to use than mortar bedding and, provided that the instructions are followed, the installer should have few problems.
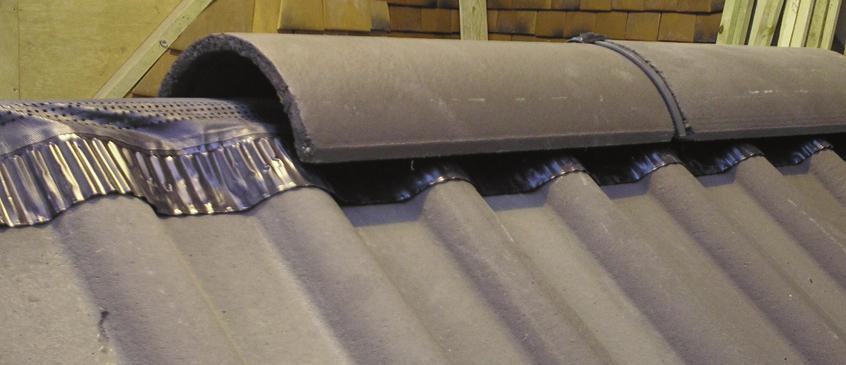
Typical adhesive roll-type dry ridge system.

Typical interlocking rail-type dry ridge system.
HIPS
General
The cut tiles at the hip do not have to be particularly straight or neat, as in the valley, because they will be covered and so are not going to be seen. However, they should be cut close enough to the hip rafter to ensure at least 75mm of coverage when the hip tiles are laid. Many roof tilers hand-cut the tiles to the hips, but this is an acquired skill, which, while considered quicker by some, does have its drawbacks. For instance, hand-cutting produces more waste than machine-cutting because, in the latter case, the off-cut part of the tile may be used in the valleys (if applicable). Also, some corner-to-corner cuts are difficult to do, so time and tiles can be lost trying to overcome this, and hand-cutting can, if not done properly, leave hairline cracks in the tiles, which may open up when laying the tiles or at a later date. My advice for new and present roofers would be to abandon the idea of the hand-cutting of concrete interlocking tiles unless it is absolutely necessary and to cut interlocking tiles with a disc cutter.

Small tile pieces at the hip should be mechanically fixed.
While it is still fairly common practice to bed small pieces in place, mortar alone cannot be relied upon to hold them there. ‘All cut tiles where the nibs have been cut off will need to be clipped, nailed or fixed with a suitable adhesive.’ The latter may entail drilling, in which case I would recommend a 3 or 4mm masonry bit and a high voltage, cordless drill. You will probably need to introduce more fixing points; short off-cuts of batten are ideal for this.
In the case of a wet hip, it is important to remember to fix a hip iron in place (preferably before the underlay) at the eaves. This should be positioned approximately 50mm over the fascia board and fixed with two non-corrosive screws or large nails. Furthermore, the mortar for a wet hip needs to be quite firm, with a consistency similar to that of a very soft clay.
You will notice that I refer to hip tiles and ridge tiles as separate items and the reason for this is that, wherever possible, they should indeed be different from each other. As mentioned in chapter 2, the hip tiles should, wherever possible, be shallower than the ridge tiles. By using a hip tile, plus a steeper ridge tile, you will find that the resulting junction at the three-way mitre will be much more in line and also the hips will be slightly easier to lay because they tend not to sink as much when you are bedding them.
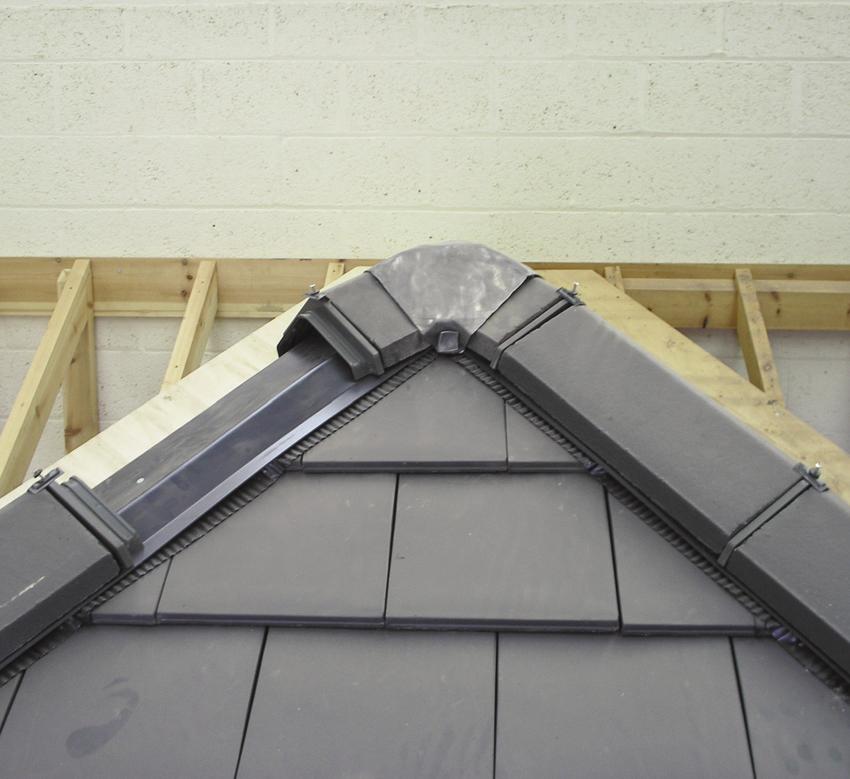
Typical dry hip system.
Dry Hips
Again, as with all proprietary systems, the manufacturer will provide a fixing guide, which should be followed. While there are many different types of dry hip about, they divide into those that use an adhesive roll and those that use plastic rails. When using the former it is important to make sure that the cut tiles at the hip are clean and dry so that the adhesive sticks properly. All the systems are designed to be quicker and easier to employ than mortar bedding and, provided that the instructions are followed, few problems should ensue.
Wet Hips (Butt-Jointed Hip Tiles)
If I had to ask a roofer to do one thing for me to prove that he could do the job, I would, without hesitation, ask him to bed and point a hip over some profiled tiles and finish off at the top with a three-way mitre (the junction at the top where two hips meet the ridge). While there are other roofing details that may look more difficult, most of these are knowledge- rather than skills-based. To put a hip up straight and true and to form a neat three-way mitre by using mortar is a true test of hand skills, which normally takes much practice and confidence. This, then, is something that is going truly to test the beginner, so if you are new to hips, always work to a line, make sure that the mortar is of the right consistency and take things slowly at first.
- Assuming that all the tiles are cut and fixed in place; rest the bottom hip tile on to the hip iron so it is central and parallel to the hip rafter. Mark the sides of the hip tile with a pencil, and also mark where the bottom corners will need to be cut off.
- Take a hip tile to the top of the hip and mark the edges, making sure that it is central and parallel to the hip rafter.
- By using a chalk or redline, strike lines between the corresponding points. Note that when you come to bed inside the lines bear in mind that at least one should be kept visible at all times as a guide for keeping the hip straight. Which one you chose is a personal preference, but it is normally the side of the hip you are most comfortable on.
- Cut the corners off the bottom hip tile and position the mortar just inside the lines. The bottom section should be solidly bedded with some tile packing to reduce shrinkage and cracking. Getting the correct bed height varies from one tile type to another and is just something that comes with experience, but, in general, you should bed higher than you expect to finish because hip tiles will normally sink a little, and it is much easier to knock a hip tile down than to lift it up. A little extra spot of mortar on either side on the back end of the bed where the end of the hip tile is expected to finish normally helps.
- Position the first hip tile and gently knock it down into position so that one edge is to a line and it clears the tiles at the highest point (this will be where the tiles overlap) by about 10mm. Scrape off any surplus mortar that has oozed out and transfer it to any areas that need to be filled.
- At the first joint, insert a piece of broken tile (about the size of your palm) to act as support for the mortar joint. Bed the mortar joint solidly, evenly and without any noticeable gaps.
- Bed and position the next hip tile, ensuring that the mortar joint is squeezed to leave gap of 10mm or less.
- Continue bedding and positioning the hip tiles as described until you are within a couple of hip tiles of the apex. Keep to the line and knock the hip tiles down into place so that the clearance above the tiles at the highest point (where two tiles overlap) remains consistent at around 10mm.
- The next step is to ensure that the hip is straight when viewed from the side and from the front. First, position yourself at the bottom at the hip (in line with the hip iron) and look up it to find any obvious bends that need to be straightened out. If you have kept to the line, you might not have to make any adjustments and, if you do, they should be fairly minor. But, if any adjustments do need to be made, do them gently and gradually, preferably with someone else guiding you until the hip is straight. Normally this is done by tapping the offending hip tiles with the handle of your trowel or the rubber butt of a hammer. Having achieved this, move down the scaffold a few metres to view the hip from the side and look for any high spots. Tap the hip down and into line (again, gradually, with someone guiding if possible) using a wooden straight edge 2 to 3m long to check the alignment.
- If there is a kick at the eaves then it is quite normal for the first ridge tile to tilt up slightly with the angle of the roof and, on a large sprocket, this may affect several of the bottom hip tiles. If this is the case, start levelling the hip once this break has finished taking effect.
- If mechanically fixing the hip tiles, this should be done before the pointing.
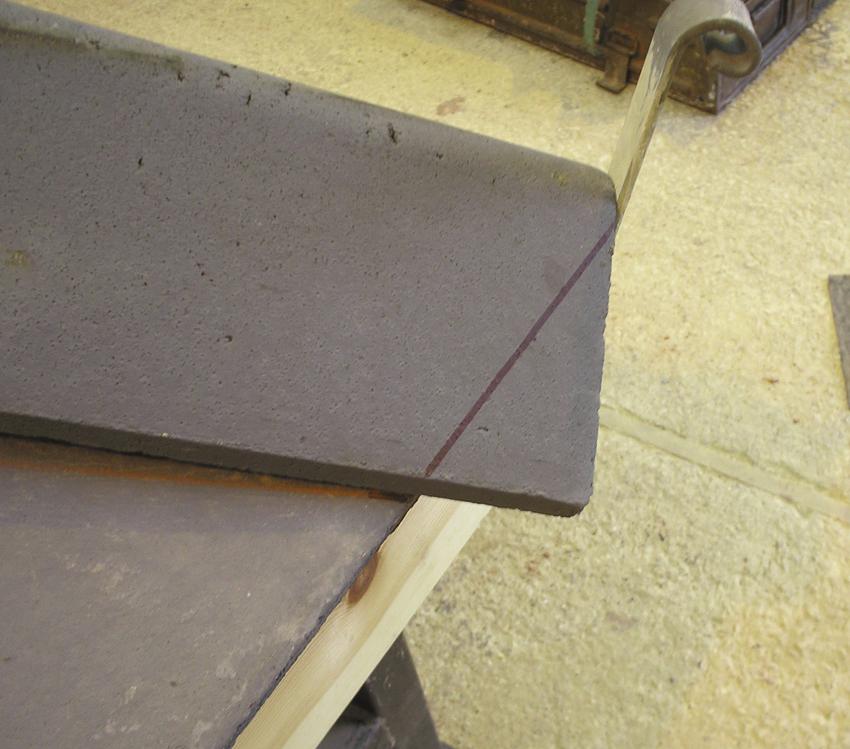
Placing and marking the first hip tile.
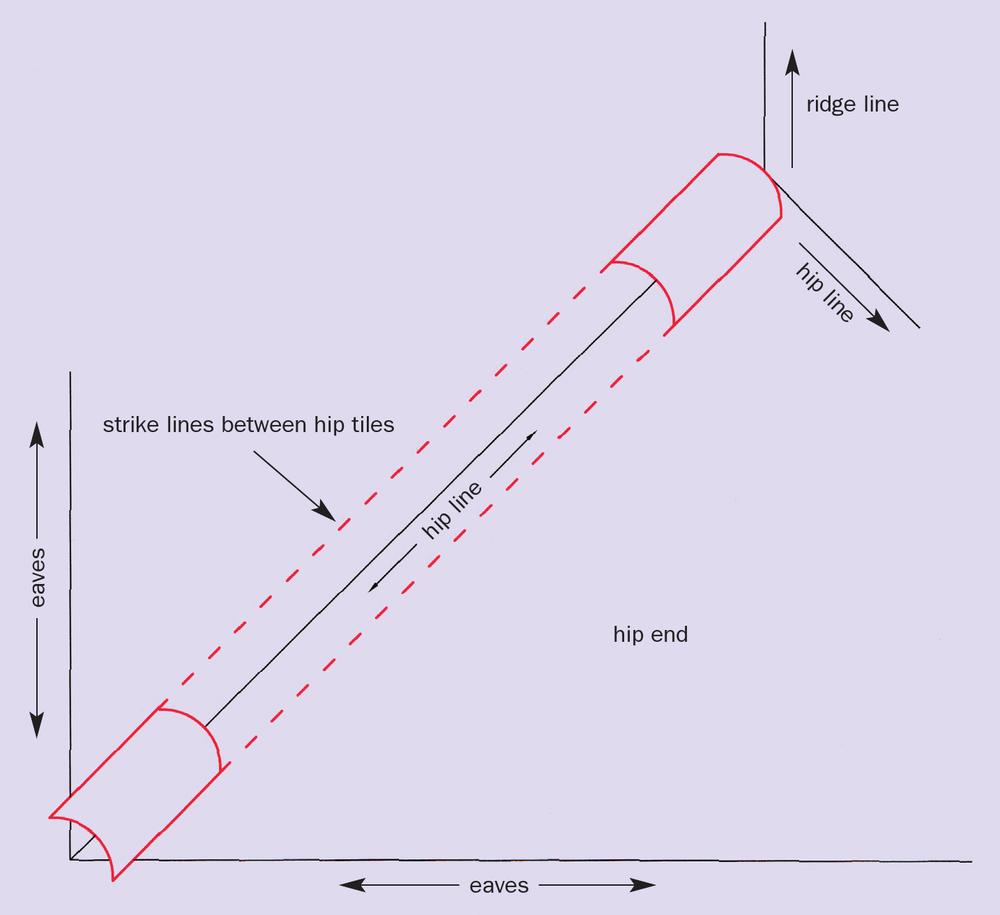
Striking lines for hip tiles.
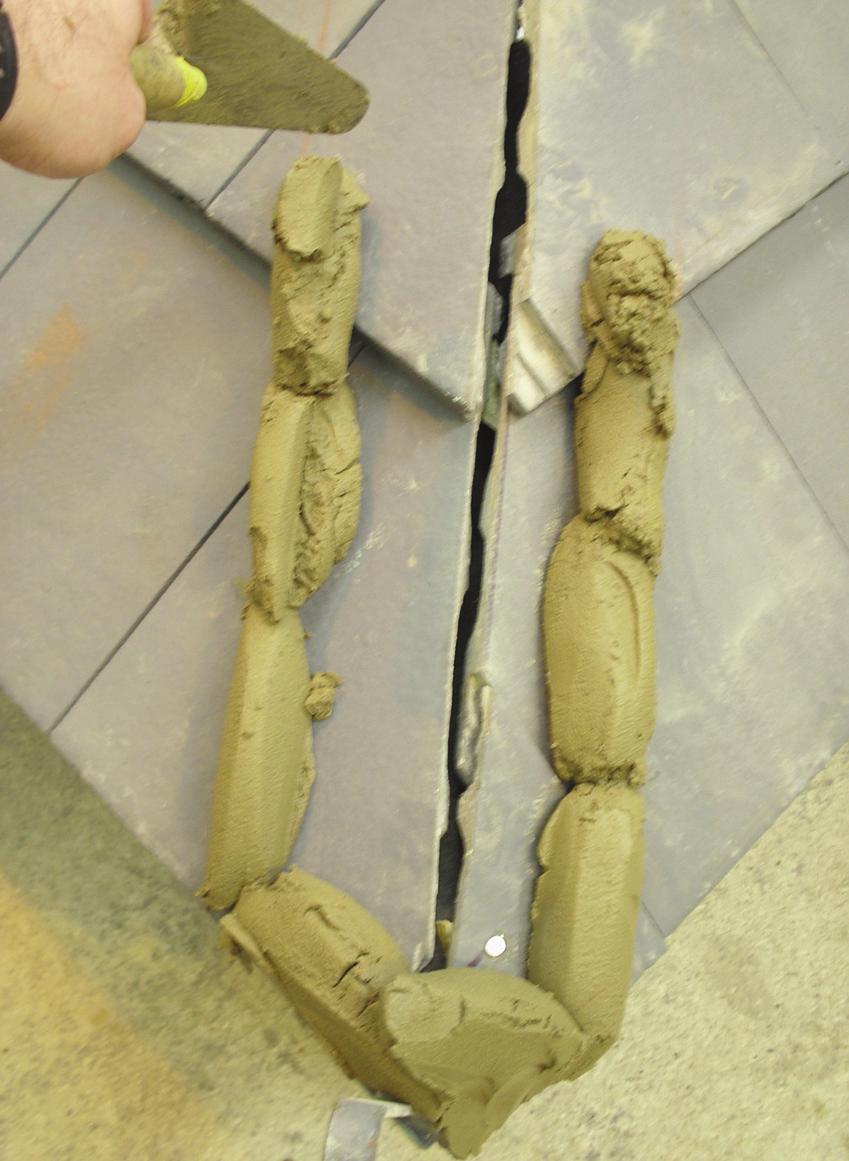
Bedding for the first hip tile.
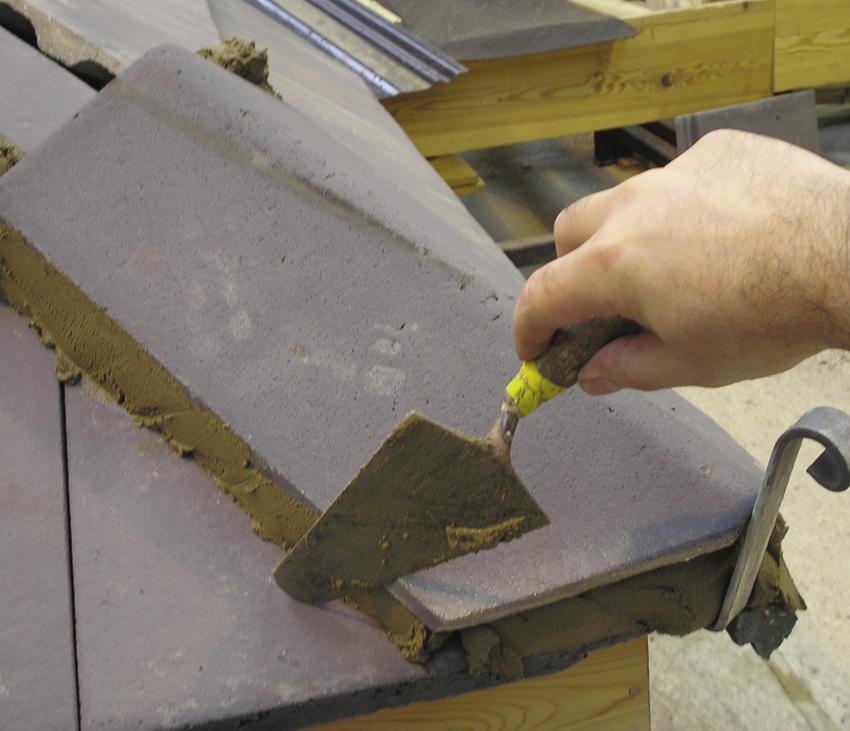
Positioning the first hip tile.
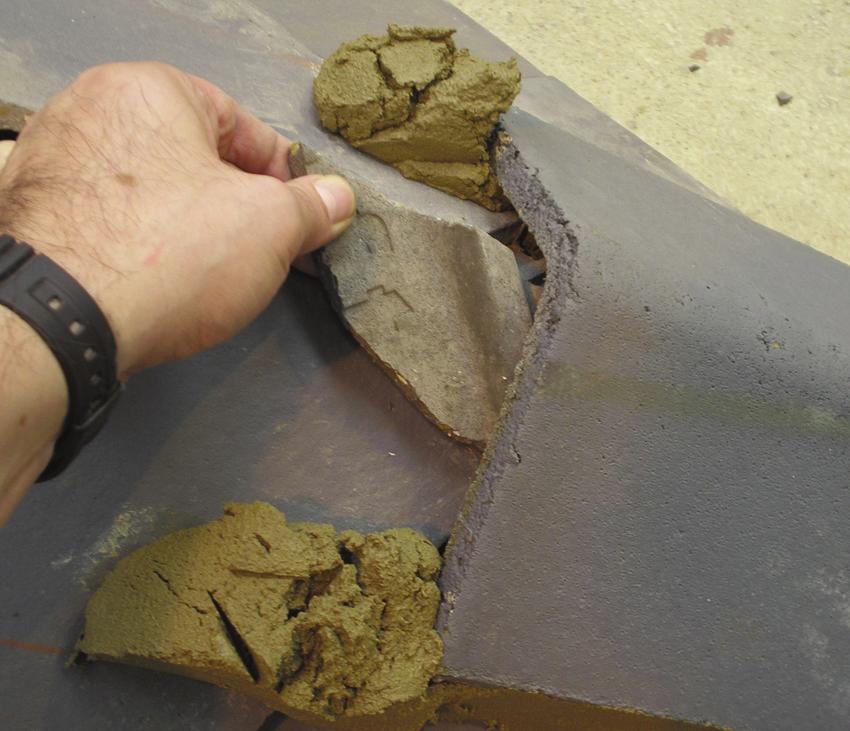
Packing materials inserted into joints.
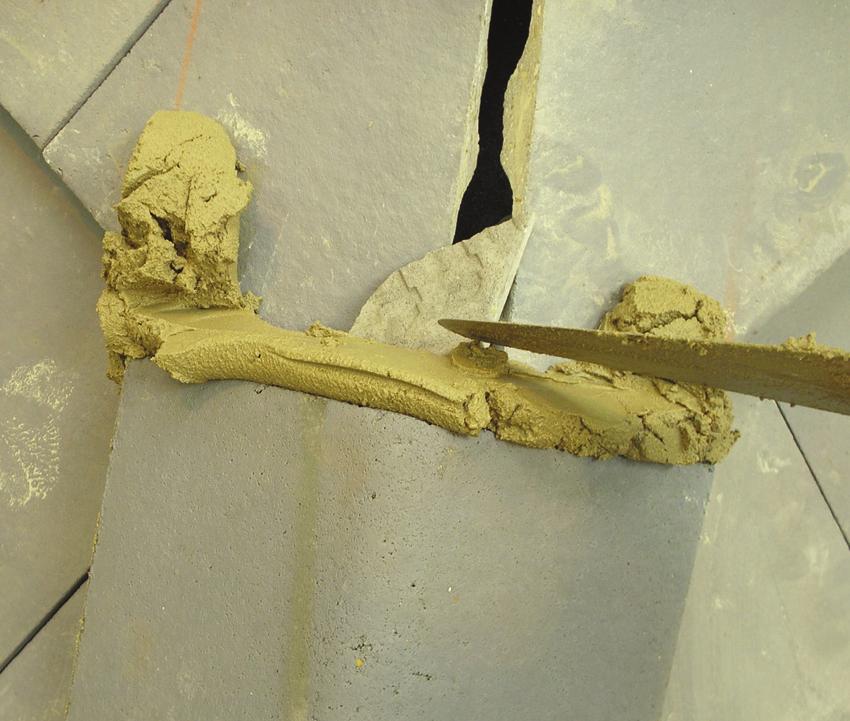
Mortar joints should be solid without gaps.

Straightening the hip.
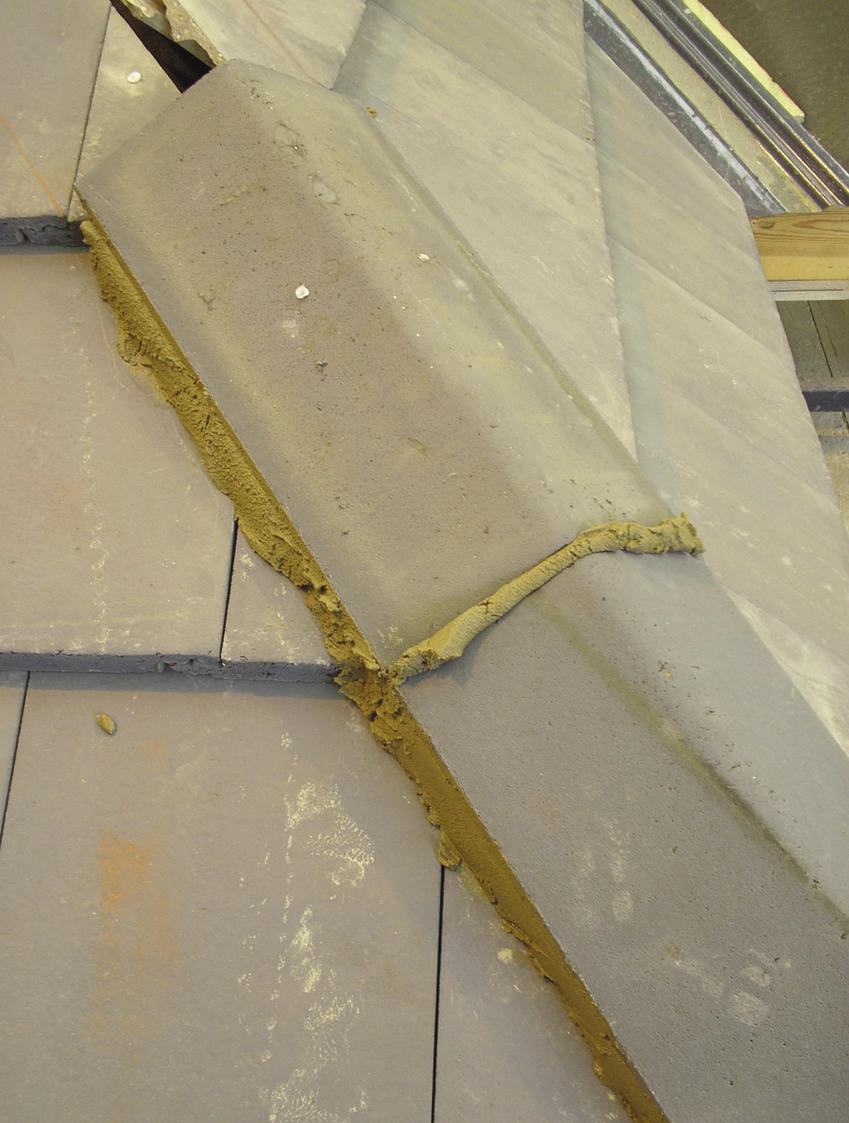
Bedding and positioning second hip tile.
Pointing
Once you are happy that the hip is straight you can point up the edges, the joints (see also ridge tiles) and the bottom edge where the hip iron is. Take care not to drop mortar on the tiles and ensure that you have a sound foothold on the roof wherever possible.
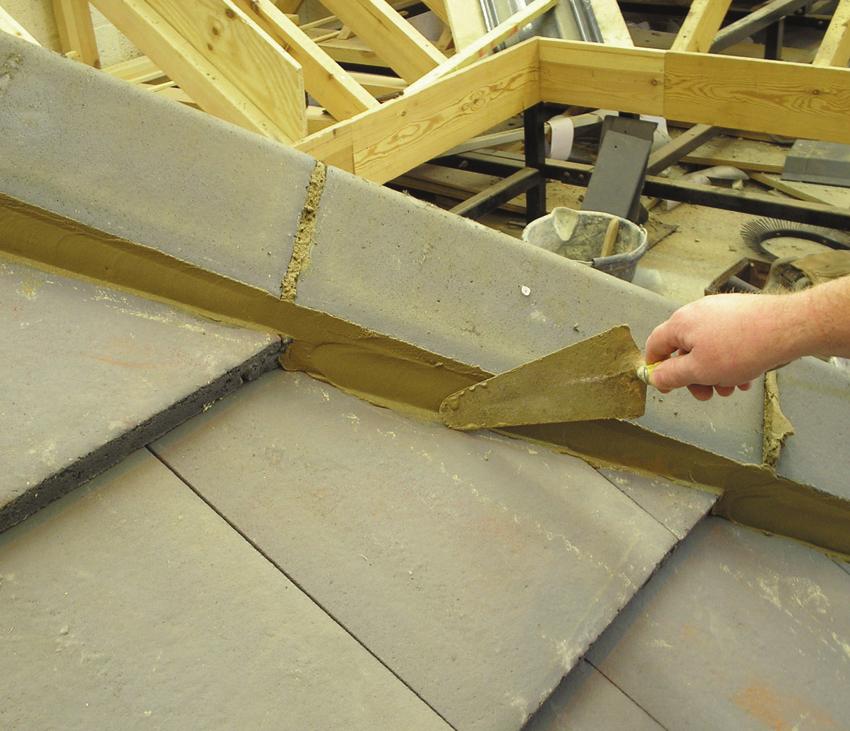
Pointing the edges.

Pointing the joints.

Pointing the bottom of the hip.
Using ‘Ridge/Hip’ Riders
‘Riders’ are brackets specifically designed to keep the hip (or ridge) straight both ways. They are simple to use and have become popular among many roofers, and, while some of those who learnt the ‘by line’ method (like me) might see the need for hip riders as a sign of weakness, my advice would be to give them a try, especially if you are inexperienced in bedding wet hips.
Riders work by trapping lengths of straight timber runners (normally slate or tile battens) at the top and the bottom to form a channel for the hip tiles to sit in. The width of this channel can be adjusted to suit different hip tiles by loosening and retightening a hinge located at the top of the rider. Once the riders are in place on the hip then the hip tiles are bedded, as before, keeping the edges of the mortar set just inside (but never on to) the timber runners. The hip tiles are kept straight (as viewed from the front) by the channel that has been created by the riders and timber runners, and in line (as viewed from the side) by tapping the hip tiles down to the desired height as the hip progresses, using the upper edges of the timber runners as a guide. Once the hip is complete, the hinges are loosened and the timber runners taken gently out, at which point the hip is ready for pointing.
Three-Way Mitre
This is the junction where the top two hip tiles meet the first ridge tile. All three cut tiles should be made from full length tiles where possible, so the mortar has a good area to adhere to and the tile retains as much dead weight as possible. If a smaller cut is required as a fitter between the main hip tiles and the top ‘cut’ tile, then it should be positioned first before the three-way mitre is formed.
There are many opinions and formulae on how to cut three-way mitres, but some can appear quite complicated while others require the hips to have been laid perfectly for them to work. Human error can often throw these theoretical methods askew, so, in my own experience, I have found that it is often better just to use your eyes and judgement. The following simple method has served me quite well over the years:
- Begin by positioning a piece of lead (code 3 will be sufficient) over the tiling at the junction of the three-way mitre; this is just insurance in case the mortar joints crack and allow water in at some point in the future.
- Next, position the first hip tile to be cut so that it is in line with the existing hip tiles and, starting from the mid-point, mark a line from the centre of the ridge down to the edge of the hip tile. This is the first cut line. Now measure this distance; for most pitched roofs this normally should be about 175mm to 200mm.
- From here, you take half the distance you have just measured (say 90mm) and mark this on the opposite side of the ridge. Then it is just a matter of joining up the points to mark the second cut line. The other hip tile may now be marked by using the same measurements on the opposite side of the tile.
- Cut the two hip tiles for the three-way mitre and move them into position (dry) to check the accuracy of your cutting. It is at this point that you may need to make some adjustments (that is, cut one of the lines again) to at least one of the hip tiles. Once you are happy that the cut angles are correct and the hip tiles are pointing straight down the line of the hip, then you are ready to mark and cut the third part of the arrangement, the main ridge tile.
- Position a ridge tile (dry) close to the hip tiles and mark cutting angles that will bring the tiles together. Cut the ridge tile and move it into position. The three-way mitre should fit snugly together, but, if it does not, then any adjustments should be fairly minor.
- Finally, bed the three-way mitre in place by using good firm mortar and tile packing to support the tiles while you knock them down into the desired position. You may find that the ridge tile slants up slightly, but this is normal and quite acceptable, even if you have used different hip and ridge tiles.

First mark for the three-way mitre.
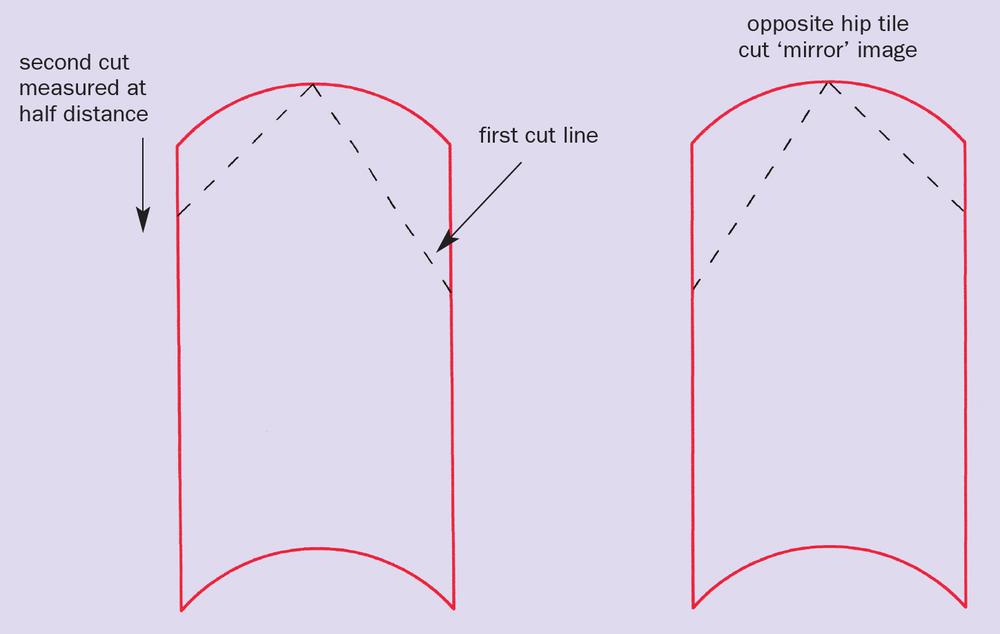
Cut lines marked for hip tiles.

Cut lines marked for the ridge tile.
The ‘Big-Top Effect’ and How to Avoid It
Despite the fact that you can get separate hip and ridge tiles, many concrete interlocking tile jobs are done by using ridge tiles for both the hips and the main ridge. In fact, I would say that this has probably become the norm. The main problem with this is that the hips will always finish significantly higher than the incoming ridge. This is a combination of geometry and the fact that, on the hips, you are bedding over two thicknesses of tile (at the overlaps), while, at the ridge, there is only one thickness of tile; thus the hip line is at least 25mm higher than the ridge when using most concrete interlocking tiles. The result of all this is that the ridge tiles often need to sweep up significantly to complete the three-way mitre, an effect which looks not dissimilar to the sweep at the ends of a circus tent. Hence (at least in some parts) this has become known as the ‘big-top’ effect.
If you must use ridge tiles for the hips and the main ridge, then I have a tip, which was shown to me as an apprentice and it works very well, but you need to be aware of it right at the outset, and ideally before you start tiling. First, this method works well with segmental ridge tiles (that is, part-round), but less well with angled ridge tiles and so, if you are using the latter, you need to be aware that the resulting cuts could look a little odd. Secondly, if you are going to use this method, then you need to make sure that the tiling to the hips is cut close to the hip rafter so that there is still sufficient cover, because we are going to shift the hips off centre slightly.
The idea is that, before you strike your lines or set up your ridge/hip riders, you move both top marks in towards the centre of the hip end by approximately 25mm. What this does is lower the point at which the three tiles meet, and so the sweep from the ridge tiles is either taken out altogether or is at least minimized to an acceptable level. ‘Rolling-in’ the hips in this way will alter the cutting angles for the three-way mitre and it is likely that you will have to cut more by eye than by any formal method.
But, whichever method you use, it is worth pointing out that you do not necessarily have to wait until you get to the three-way mitre to start marking and cutting the hip/ridge tiles. There is nothing wrong with cutting them all first, positioning them and, once you are happy with the fit and the angles, setting your lines ridge/hip riders to them. In fact, this can work very well, especially when it comes to four-way mitres on pyramid roofs.

A completed three-way mitre.
Capped Ridge and Hip Tiles
Capped ridge and hip tiles are edge-bedded and pointed just the same as butt-jointed ones, but are designed to overlap each at other with a cap, as the name suggests, so no mortar joint is needed between them. The cap is finished by applying a thin bed of mortar to provide a key and is then normally pointed up.
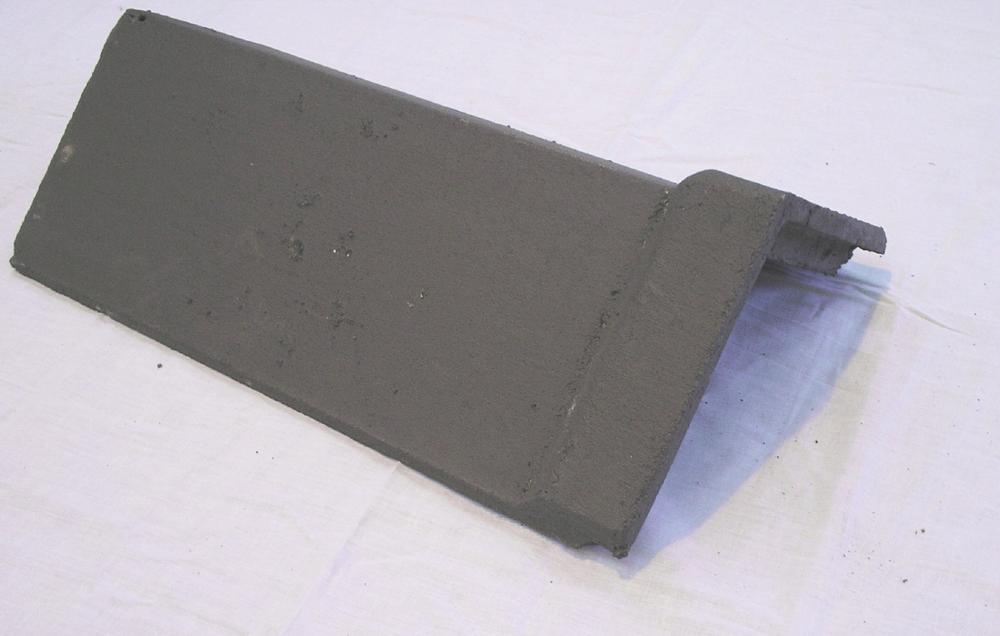
Capped ridge/hip tiles.
With a capped ridge you can, if you prefer, keep the hip straight by suspending a string line from the hip iron to the apex and use the spine of the tile to line it up. The first hip or ridge tile has the cap removed and it is considered good practice to turn the tile round so that the manufactured edge is seen and the cut edge is hidden.
VALLEYS
General
Tiles at the valley should be cut to the correct size and angle with a disc cutter and either bedded and mechanically fixed (that is, nailed or clipped) or installed to the manufacturer’s instructions in the case of a dry valley. In some instances, where the tile meets the raised channels at the sides of the valley liner, it may be necessary to remove one of the tile nibs to ensure that the tiles sit properly. If this is so, it is better to do it before cutting it because the tile is prone to break if it is done the other way around. Small cuts should be made from any breakages where possible to reduce waste and should always be mechanically fixed (nailed or clipped). Another excellent way to save tiles is to save and reuse the off cuts from the hips (if applicable).
Bedded Valleys
From 1 October 2012 all roof tiles need to be cut with dust suppression (i.e. using water) and so the practice of laying tiles in the valley and cutting in situ is now illegal. How the tiles are marked will vary depending on personal preference, but the most common method is to lay tiles (loosely) close to, but not in the valley, mark back one or tile ‘covering’ widths from the point at which they will be cut, cut them and re-install. Alternatively, each tile can be rough cut to sit in the valley and marked individually. Each tile should be cut individually and on a stable, level surface such as the scaffold (remembering to take any nibs off first) and bedded in place, just as you would do at the verge.
This one-at-a-time method is probably the only way to ensure that the tiles are properly bedded in place (that is, so that the tile compresses the mortar). Most other methods rely on mortar being pushed in later on and are therefore incorrect on that basis alone. If tiles are bedded individually and the mortar is quite firm to start with, then you should be able to point the valley more or less straightaway. Use mainly upwards strokes to smooth the mortar out where it has squeezed out during bedding and transfer it to places where there are gaps. Add fresh mortar where it is needed and smooth out in short sections with mainly upwards strokes, taking care to keep the interlocks clear of mortar where two cut tiles meet. If the pointing continues to sag you may have to leave the mortar to stiffen for an hour or so before trying again; it may also be helpful to press home some small broken tile pieces for packing into the deeper beds. Always remember to clean down the valley after pointing.
The one-at-a-time method is, of course, quite slow and it can make it more difficult to get the valley straight, which is why many roofers lay the tiles straight in the valley, strike a line and cut the whole thing in situ with a disc cutter. Often the rough-cut tiles are bedded in place, but this is largely ineffective because the vibration of the disc cutter often destroys any bond between mortar and tile. You should avoid using a disc cutter on a sloping surface at all costs because it is a highly dangerous practice and, in this situation, there is a real risk that the saw blade will go straight through the liner, which will then have to be patched or, worse still, the slit will be ignored or go unnoticed and the result will be a leaking roof.
On GRP valley liners the tiles are cut on to the sanded strip, which should be straight and consistent enough to work to, but you may find it more beneficial to strike your own line to work to instead. The finished channel should be approximately 125mm wide.
If you intend to use lead-lined valleys for interlocking tiles, then they will need an undercloak (about 50 to 75mm wide) fixed along each side to give the mortar something to key to. If this is not done then the mortar will crack and separate from the lead lining as it expands and contracts as the temperature changes. It is better to attach the undercloak with a suitable adhesive (such as a silicone-based, gun-applied adhesive) rather than by nailing because holes increase the risk of leaks.
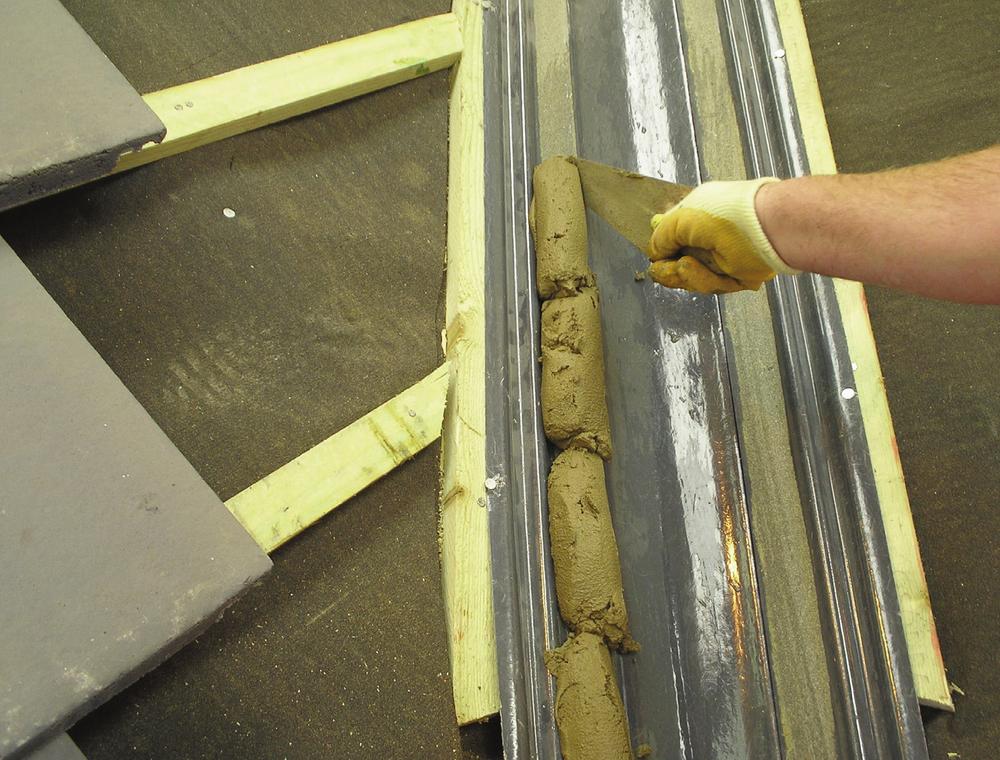
Bedding the valley.

Installing the first course.
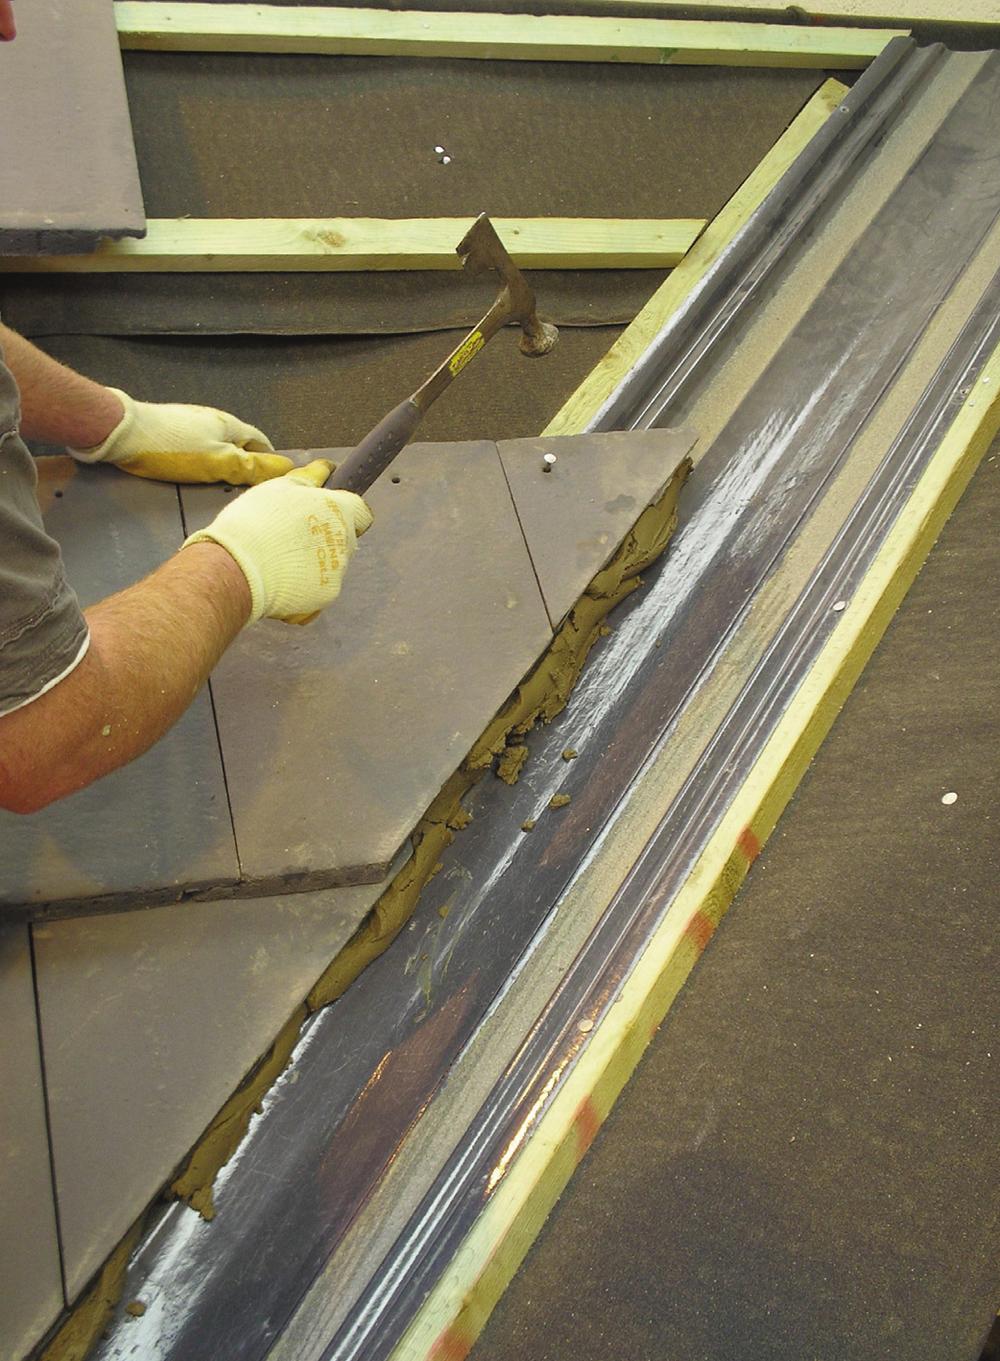
Working up the valley.

Pointing the valley.
Dry Valleys
‘The tiles for a dry valley should be marked and cut as described under ‘Bedded Valleys’ (i.e. set back, marked one or two covering widths, cut and then installed).’
As with all proprietary products, and as we have noted before, dry valleys need to be fixed to the individual manufacturer’s instructions. In general though, it is important to ensure that each tile is either nailed or clipped and that small pieces are fixed and supported with the special valley clips or some other fixing provided.
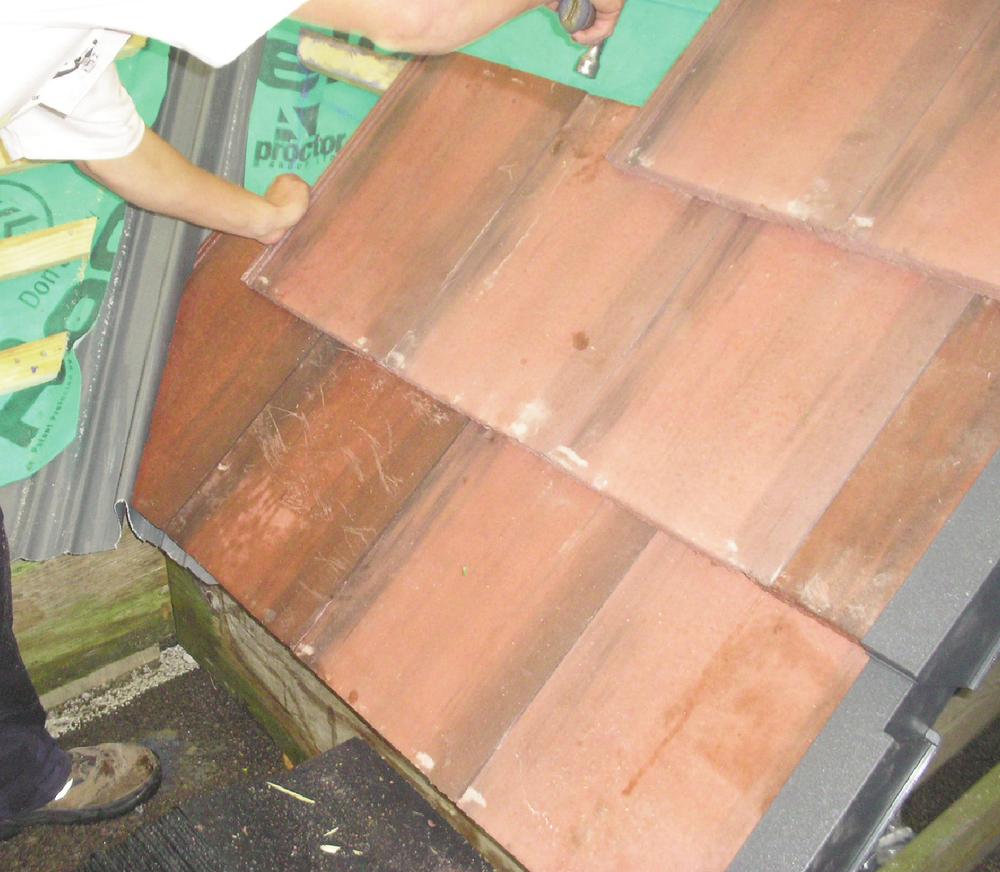
Typical dry valley in progress.