With a few photos of your item and a little JavaScript code, you can wow your customers with that snazzy showroom feel.
One of JavaScript's greatest strengths is its ability to manipulate images on a web page, allowing you to turn an otherwise static auction page into an interactive selling tool. In addition to being much cooler than eBay's built-in slide show feature, it's completely free and limited only by the amount of time you want to spend preparing your images.
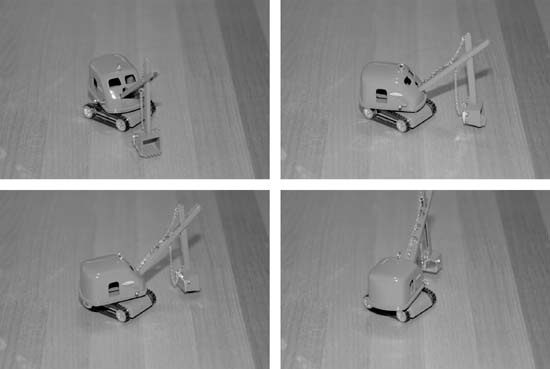
The most challenging part of creating an interactive 360-degree view of your item is taking the photos, which really isn't all that difficult. The goal is to take photos of all sides of an item so that when they're viewed consecutively, like frames in a movie, it looks like the object is spinning. In most cases, you won't need more than four or five images. Having more frames will produce a smoother effect, but will also take a little longer to load.
There are two basic approaches to taking the photos:
To produce a "spinning" effect, simply mount your camera on a tripod and point it at your item. Take a photo, rotate the item 30 degrees, take another photo, rotate it again, and so on. For a smoother effect, place your item on a turntable or lazy susan, commonly available at hardware and houseware stores.
If you're photographing a large item, like a car or piece of furniture, or if you simply want that "walkaround" effect, then you can literally walk around your item and photograph it from each angle. For the best effect, use a tripod to keep the height and angle consistent, and use a ruler or measuring tape to maintain a consistent distance from the edge or center of the object.
Either way you do it, you'll want your photos to be as evenly spaced as possible. If you're taking only four frames, each photo should be 90 degrees apart (72 degrees for five frames, 60 degrees for six frames, 45 degrees for eight frames, and so on). Figure 5-14 shows four sides of an object photographed with a stationary camera.
If you don't have a tripod, do your best to keep the angle, height, and distance from the object as consistent as possible—otherwise, your object will "jump," and the rotation will look sloppy. Also, don't mix portrait and landscape shots.
The more consistent your images are, the better the animation will look. For instance, the object you're photographing must appear to be the same size in each photo. If you use a tripod to take the photos, this will be a snap; otherwise, you may have to crop and resize the photos to make them all proportional.
The lighting [Hack #72] should also be consistent; you can correct slight aberrations in exposure by using your image editor's Auto Levels tool (in Photoshop, go to Image → Adjustments → Auto Levels). If you're doing a walkaround, attach your lighting equipment to the camera so that your object is always lit from the same angle.
All your images must have the same pixel dimensions. To allow the animation to run smoothly, your images should be small, so that they load quickly. Don't bother making them bigger than 400 pixels wide (for the larger dimension); 300 pixels is even better. See "Doctor Your Photos" [Hack #74] for an easy way to resize a batch of pictures.
When you're done, upload all the photos to your web server [Hack #76] .
Simply place this code in your auction description to include an interactive 360-degree view of your object:
<script language="JavaScript"><!- var lastimg = "1"; var width = 300; var height = 225;view1 = new Image(width, height); view2 = new Image(width, height); view3 = new Image(width, height); view4 = new Image(width, height); view5 = new Image(width, height); view6 = new Image(width, height); view7 = new Image(width, height);
view8 = new Image(width, height); filenameprefix = "http://www.ebayhacks.com/pictures/view";
slider = new Image(20,20); thumb = new Image(20,20); slider.src = "http://www.ebayhacks.com/pictures/slider.gif";
thumb.src = "http://www.ebayhacks.com/pictures/thumb.gif"; function rotate(img) {
document.images['view'].src = filenameprefix + img + ".jpg";
document.images[lastimg].src = slider.src;
document.images[img].src = thumb.src;
lastimg = img; } // --></script> <table width=300 cellpadding=10 cellspacing=0 border=1> <tr><td>
<img src="http://www.ebayhacks.com/pictures/view1.jpg" width=300 height=225 border=0 name="view"> </td></tr> <tr><td align=center> <nobr>
<img src="http://www.ebayhacks.com/pictures/slider.gif" width=20 height=20 name="1" onMouseOver="rotate('1');"><img src="http://www.ebayhacks.com/pictures/slider.gif" width=20 height=20 name="2" onMouseOver="rotate('2');"><img src="http://www.ebayhacks.com/pictures/slider.gif" width=20 height=20 name="3" onMouseOver="rotate('3');"><img src="http://www.ebayhacks.com/pictures/slider.gif" width=20 height=20 name="4" onMouseOver="rotate('4');"><img src="http://www.ebayhacks.com/pictures/slider.gif" width=20 height=20 name="5" onMouseOver="rotate('5');"><img src="http://www.ebayhacks.com/pictures/slider.gif" width=20 height=20 name="6" onMouseOver="rotate('6');"><img src="http://www.ebayhacks.com/pictures/slider.gif" width=20 height=20 name="7" onMouseOver="rotate('7');"><img src="http://www.ebayhacks.com/pictures/slider.gif" width=20 height=20 name="8" onMouseOver="rotate('8');"> </nobr><br> Move the slider to rotate the object </td></tr> </table>
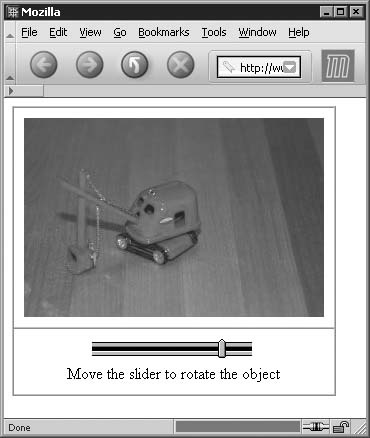
A two-cell table holds the first frame of the animation
![]() and, beneath it, a series of identical images
and, beneath it, a series of identical images
![]() that make up the slider bar. As the mouse is
moved across each section of the slider bar, the JavaScript code
replaces the big image with the corresponding view of the object, as
shown in Figure
5-15.
that make up the slider bar. As the mouse is
moved across each section of the slider bar, the JavaScript code
replaces the big image with the corresponding view of the object, as
shown in Figure
5-15.
The bulk of the JavaScript code simply preloads the images: the
eight frames in this example appear (lines ![]() to
to ![]() ), followed by the two images used for the
slider bar (lines
), followed by the two images used for the
slider bar (lines ![]() to
to ![]() ). You'll need to replace the URLs in these
lines with the addresses of your own images, and then change the
). You'll need to replace the URLs in these
lines with the addresses of your own images, and then change the
width and height variables at the beginning of the
script to match the dimensions of your frames. If you have fewer or
more than eight frames, you'll need to adjust lines ![]() to
to ![]() accordingly, as well as change the number of
slider bar segments on line
accordingly, as well as change the number of
slider bar segments on line ![]() .
.
The rotate() function does
all the work. First, on line ![]() , a new photo is placed into the
, a new photo is placed into the view image (so named on line
![]() ). The script knows which photo to use because
of the
). The script knows which photo to use because
of the img variable, passed to the
function from the onMouseOverevent
in each slider bar section on line ![]() .
.
Further down, on line ![]() , the current section of the slider bar is
"highlighted" by replacing the "empty" slider bar section
(slider.gif) image with a "full" slider image
(thumb.gif). Finally, the current position is
recorded into the
, the current section of the slider bar is
"highlighted" by replacing the "empty" slider bar section
(slider.gif) image with a "full" slider image
(thumb.gif). Finally, the current position is
recorded into the lastimg variable
![]() so that the next time the function runs, it can
make this section "empty" again, as it does on line
so that the next time the function runs, it can
make this section "empty" again, as it does on line ![]() .
.
Ultimately, the photo album produced by this code is similar to the one in "Construct an Interactive Photo Album" [Hack #79] . The only things that make the image "rotate" are the collection of photos you use and the fact that the images are preloaded for more responsiveness. If you want a photo album instead, but prefer the approach in this hack to the aforementioned photo album hack, you can simply replace the slider bar segments with thumbnails.
The sample code rotates the object as the mouse moves over the
slider. If you prefer to have the slider move only when clicked,
replace each instance of onMouseOver on line ![]() with
with onClick, like this:
<img src="http://www.ebayhacks.com/pictures/slider.gif" width=20
			height=20 name="3" onClick="rotate('3');">
To have the image rotate automatically, add this code
immediately above line ![]() :
:
setTimeout('autorotate()', 500);

function autorotate() {
	img = lastimg + 1;
	if (img > 8) { img = 1; }
	rotate(img);
	setTimeout('autorotate()', 500);
}
where 500 is the number of
milliseconds to wait between frames (about a half second). Specify
200 for a fifth of a second,
1000 for a full second, and so
on.