
METHOD 19
Paper and Interactive Prototypes
METHOD 20
Black Hat Session
METHOD 21
Quick-and-Dirty Usability Test
METHOD 22
Five-Second Test
METHOD 23
UX Health Check
If You Only Do One Thing...
Testing and validation methods help you figure out if your design will actually work. Will people be able to use the product or service as intended? Does it trigger positive emotional responses? How fluid and seamless does the user experience feel overall? Sometimes this kind of work is referred to as “usability” or “usability testing”—where the emphasis is clearly on whether you can use the product without error. Usability is part of it, but it’s not the whole story. You’ll also want to validate the emotional impact created by the experience, the fluidity of the product or service, and how well the overall product paradigm matches the mental models that people bring to it.
There’s a popular misconception that this kind of research has to take a lot of time and effort to be done right. That’s not the case. Whatever enables you to validate designs quickly with real people and gain confidence that the design is moving in the right direction is fair game. The testing and validation methods in this chapter can be done on the quick and on the cheap. In this chapter, we’ll cover:
• Paper and Interactive Prototypes. Does it work and feel as intended?
• Black Hat Session. What areas of the design could be improved?
• Quick-and-Dirty Usability Test. Can people use this product as intended?
• Five-Second Test. What impression is created by a specific screen, step, or moment within the product?
• UX Health Check. Can you measure the baseline quality of a user experience and assess changes in quality over time?
Does it work and feel as intended?
Prototypes are semi-functional models of a product that help you test how it will work and feel. Prototypes can vary widely from the crudest paper-based explorations to highly realistic, functional models. This basic approach—idea first, then prototype, and then further improvement based on what you learn—is a powerful and time-endorsed method for any type of new product development. And it’s an excellent practice for you to get into as a team of one because people expect UX practitioners to drastically improve the product design. Some skilled UX practitioners just naturally know how to do that, but if you’re (like me) not always exactly sure of what needs to happen to make a killer design, prototyping and iterating give you a method where you can comfortably trust your gut and still give yourself space to learn and improve as you go.
Varies based on format of prototype. You can turn wireframes into a paper prototype in just a few hours or less. Building a more functional prototype with working code can take multiple days.
You want to validate the direction prior to investing the time and resources to make it fully real. Often, you’ll discover that an idea doesn’t work quite as well as you originally imagined. Discovering this information early on enables you to modify your design in a relatively cheap and efficient way, and to evolve the design with real-time feedback.
1. Think about the purpose of the prototype.
Different points in the process argue for different types of prototypes. Ask yourself what type of validation you are trying to do and select the appropriate tool. Here are some different forms a prototype might take, depending on your goal:
• To validate early concepts, a paper prototype (just static pictures or sketches representing a few select screens or moments in the product) should be enough.
• To get a sense of how a sequence of screens or moments flow together, a dummy clickable prototype usually suffices to illustrate how a discrete experience will unfold. A “dummy” clickable prototype includes the bare minimum of interactivity. These types of prototypes are often created by putting static pictures together in some software that enables you to create simple hyperlinks or hotspots to simulate the sense of interactivity. Fireworks does this well, but you can also use simple tools like PowerPoint, Keynote, or Adobe Acrobat to create a dummy clickable prototype.
• To simulate intended interactions as realistically as possible more robust prototyping tools may be needed. You may need prototyping tools that enable you to integrate basic conditional logic. Popular tools for this include Balsamiq, Axure, iRise, Flash Catalyst (from Adobe), and good old-fashioned HTML. If you have technical knowledge, you can also prototype directly in whatever the target technology is, which is arguably the most efficient because you may be able to repurpose the prototype into production code. This type of prototype can be useful when you want to do rigorous usability testing before actually building the product, or when you want your colleagues or potential clients to get a realistic sense of what it will be like to use the product.
2. Make your prototype.
This is the fun part. Depending on your prototype fidelity and tool, this may be as simple as cleaning up some wireframes and printing them out, like the paper prototype in Figure 8.1, or it may require more time for writing code or setting up software to behave as you intend.

FIGURE 8.1
Here, wireframes have been repurposed as a quick-and-dirty paper prototype.
A couple of things to think about as you work on your prototype:
• Typically, a prototype shows a sequential experience. There is a beginning, middle, and end that correspond to how somebody would (ideally) move through the product. To structure your prototype, plan out your beginning, middle, and end on paper, and think about the states or screens that make up this sequence. Think about how minutely you want to illustrate the subtle transitions that take someone from one moment to the next in your product. For example, do you want to show how a user might move from field to field in an online form and what validation messages might appear, or is it enough to just show an empty form, followed by whatever screen people would see after they filled it out? The answer depends on what you’re trying to validate. If the purpose of the prototype is to show how form errors should be handled, then field-by-field is probably the way to go. If it’s to show how someone can create a profile and then get started using an app, maybe form-level interactivity is overkill. The main thing is to think carefully about which states you will need.
• A design is the content and information within it, so it’s great if you can test the comprehensibility and usefulness of the information—the content, the data, and so on—just as much as you’re assessing the flow and functionality. Put a little thought into the placeholder content you’ll be including in your prototype. While people are remarkably flexible in looking at and responding to in-progress designs, it turns out that with more realistic content, you can more easily make sense of what you’re seeing. If possible, seed the prototype with reasonably realistic data to enable observers to see how information will unfold as they progress through the experience.
3. Validate the prototype with yourself and others.
Use the prototype to observe how someone would really interact with the design if unaided and left to his own devices. To do this, put the prototype in front of a volunteer or a representative user and give him a task. Start at the beginning of the experience that you’ve prototyped and ask him to show you what he would do in order to complete the task. What would he interact with? What would he touch or click on to complete his task? Remind him that his only goal is to complete the task you’ve given him. Ask him to explain what he thinks he is seeing at each step along the way. Undoubtedly, you will see things that surprise you once you see people interacting with the design. From this, either one of two wonderful things happens. Either you learn that the design works as intended, which is great. Or you learn what’s not working well yet, and you get some ideas for how to improve it—and that’s great, too.
• Know when to prototype and when not to. Not everything you design has to be prototyped. Prototyping can save you time, but making a prototype takes time, too. You want to be sure that you’re investing the time to validate something that really needs to be validated. In general, prototypes are ideal for validating new or nonstandard interactions or products, or for testing parts of the product that are simply too important to get wrong. To figure out what parts of the product are good candidates for prototypes, you can plot features and functions on a Critical/Complex graph like the one shown in Figure 8.2.

FIGURE 8.2
A Critical/Complex graph helps you identify which parts of the product are most important to prototype.
• If you work remotely... Prototypes are almost by definition incomplete. (If they were fully complete, they’d be the finished product.) That means that with any prototype, there’s always a certain degree of imagination required to envision how the rest of the product functions beyond what has been prototyped in detail. If the viewer isn’t familiar with how the prototype is meant to work, confusion can ensue. For that reason, unless the prototype is very functional and self-explanatory, schedule time to review it with the team—by phone, if not in person. Don’t just release the prototypes into the wild and ask people to send feedback. If you are doing usability testing with the prototype, invite the team to observe remotely using video conferencing or screen-sharing software.
What areas of the design could be improved?
Black Hat sessions are inspired by Edward DeBono’s Six Thinking Hats. “Six thinking hats” is a facilitative framework where teams adopt deliberate mental attitudes in order to make group work more dynamic and directed. With a group discussion using six thinking hats, each individual figuratively puts on a hat of a certain color. Each color signifies a particular point of view. For example, there’s a hat for optimism (the yellow hat), one for emotion (the red hat), one for creativity (the green hat), etc. There’s also a hat for judgment, negativity, and skepticism, and that is the black hat. A person wearing the black hat is obliged to point out weaknesses or risks, and to be frank about what’s confusing or seems like it could be further improved.
All of the hats are interesting, but for the purposes of design critique, the black hat is especially powerful. It’s a quick framework that can put your teammates in a state of mind that enables candid and productive feedback on designs. This is valuable for several reasons:
• People don’t necessarily know how to give critical design feedback. This can be even truer for your non-UX partners. When presented with a set of wireframes, it can often be hard to know where to start in evaluating them. For someone who is unaccustomed to the experience design process, it may be difficult to know if what you’re looking at has issues or not. A Black Hat session gives a group of people permission to call things as they see them, which can release them from any worry about whether their feedback is relevant or even correct. Black Hat sessions provoke honest and constructive conversations.
• Because a Black Hat session is all about pointing out the hard things, it does a few very important things. First, it gives anyone who is unhappy with certain aspects of the design a constructive forum for sharing his concerns and instills confidence that he is being heard. Second, it creates a safe place where people who are less comfortable giving negative feedback can express their concerns as well. Third, it puts all of these data points into a format that you can see, track, manage, and take charge of.
• By running a Black Hat session, you show that you are not protective and defensive about the designs that you are creating, and that you are serious about doing what needs to be done to make a great product. It also shows that you are the driver of a process where designs get better and better through continuous input and iterative improvement. Figure 8.3 shows what a typical Black Hat session looks like.
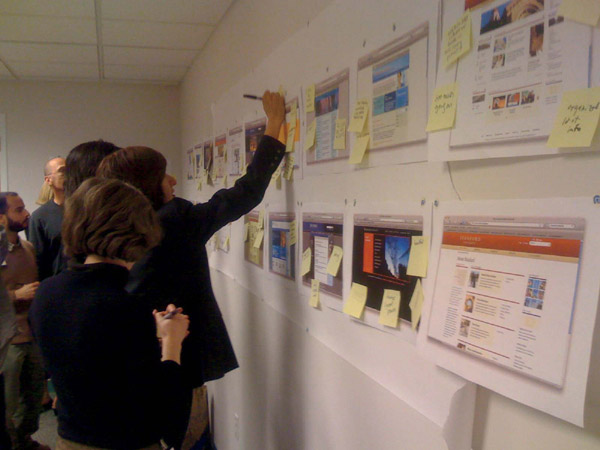
FIGURE 8.3
A cross-functional team conducting a Black Hat session.
30–60 minutes
• You’re very close to the designs, and you need honest feedback on what’s working and what isn’t.
• You sense that the team is holding back or not fully engaging in design reviews.
• You want to do targeted reviews with subject matter experts (for example, technical feasibility reviews with the engineering team).
1. Make time for a group work session.
Once you have designs in a shareable form, schedule a Black Hat session. Block off an hour on the calendar, find a room or area with large, usable wall space, and assemble a group of people to help you critique the designs. It’s ideal if this group is actually the cross-functional team that works on the product together, but barring that, even a group of friends or uninvolved colleagues should be able to provide feedback on potential stumbling blocks from an end-user perspective.
2. Explain the rules.
With the group assembled, tape to the wall any designs you want to critique. Explain the rules of the Black Hat session. Everyone has one job and one job only: to assume the most critical, judgmental perspective they can muster, and look at the designs from that point of view. Ask participants to write down every problem or issue they see on a sticky note (one issue per sticky note) and place the note on the designs near where they spotted the problem. One easy way to “put on” the black hat is to pretend that you are a grumpy and skeptical user who is short on time and trying to do four different things simultaneously. Or pretend that you’re a tough and very senior leader who will be approving these designs before they are considered final.
3. Start the clock.
Give the group 15 to 20 minutes to walk through all of the designs, reflect on what they notice, and write their sticky notes. You can have participants do this as a silent exercise, or you can invite them to discuss what they’re seeing as a group. You can participate as well, writing your own sticky notes. Either way, make sure that everyone is writing lots of sticky notes. If they seem hesitant, you can give them some guidance as they go. Ask them things like:
• When you look at each screen or step, do you understand its fundamental purpose?
• What jumps out at you? Is it what should jump out at you?
• Do you know what you would click on or touch to advance to the next step?
• What questions do you have about the information and functionality that you’re seeing?
• Are you satisfied that this is a reasonable number of steps?
• Is there anything that feels too complicated or cumbersome?
• Is there any language that doesn’t make sense? Instructions? Labels on buttons? Anything else?
4. Review and look for themes.
After all the sticky notes have been written, invite the team to step back and look at other people’s sticky notes, looking for themes and issues they might have missed.
5. Discuss and synthesize.
Now, engage the group in a discussion about the big themes that emerged. You may find that the issues identified run the gamut from language, flow, and ease-of-use, all the way to core assumptions about the design concept. That’s great. You’ve just gotten a lot of help to make the design even better. During the group discussion, record the points on a flipchart or white board. That list effectively becomes the synthesis of all the individual sticky notes. Close with a discussion about what’s most successful in the designs, in order to end the session on a positive note. Or close by discussing the top areas that need to be improved and what the next steps for making those improvements are.
6. Update the designs.
After the meeting, revisit the designs to address the issues that the group identified. Some may be simple, quick fixes. Some may require more thought and rework to the designs.
Can people use this product as intended?
A quick-and-dirty usability test is a natural output to many of the design methods described in Chapter 7, “Design Methods.” The essence of the quick-and-dirty usability test is that you do it quickly—like the name says. With this method, you’ll forego rigor and perfectionism to make it possible to get rapid feedback on designs. You’ll let go of recruiting and scheduling time with real users and just test the designs with anyone who’s available. Think of it as putting the design in front of the first person you find (who is unfamiliar with the product) and seeing if they can make sense of it.
Of course, ideally you should test designs with people who truly represent the intended end-user, and if you have the time and team support, you should go that route. But if you’re just trying to get a gut check on whether a design direction works or doesn’t, a fresh pair of eyes can help you see things from a new perspective and settle wavering questions.
As little as 10 or 15 minutes per person, whenever you need it.
• At any point during the design process when you want to do a quality check on the designs.
• As often as possible to check your work along the way.
1. Find someone, anyone.
As you’re working on a design, when you want to see if it makes sense to others, print out the design or grab your laptop and wander over to anyone who hasn’t seen it yet. This could be someone who sits in the desk next to yours, someone you encounter walking down the hall or in the cafeteria, or if you truly work alone, a friend or family member.
2. Ask them what they’re seeing and how they think it works.
Think about the purpose of the page, screen, or section of the design that you’re working on. What are the main things people should be able to use it for? With this list of primary tasks in mind, show your design to your volunteer. Ask her how she thinks she could interact with this design to accomplish a particular task. If there are multiple screens or steps that you’re designing, proceed through each screen, asking her to explain what she’s seeing and what she would do to advance to the next step. That may only take 5 minutes, or it might take 20.
3. Find a few more volunteers.
Once you’ve shown your design to one person, try to find a few more people to run through the same process. Your colleagues may enjoy getting involved, since it’s a break from their normal routine and shows that you value their perspective.
4. Iterate the designs.
If you identify anything that’s especially confusing to people or that they interpreted differently than you had intended, go back and revise the design.
What impression is created by a specific screen, step, or moment within the product.
First popularized by Christine Perfetti at User Interface Engineering, a five-second test is a lightning fast but surprisingly insightful method to quickly assess the information hierarchy in a product. Read more at www.uie.com/articles/five_second_test/. A five-second test helps you see how clear and memorable a given moment in the product or service is to users (see Figure 8.4).
FIGURE 8.4
In a five-second test, show a design to a user for five seconds, and then remove it from sight and ask her what she remembers about the design.
Like a quick-and-dirty usability test, a five-second test can and should be done regularly to check your work as you progress through the design process. You can even combine a quick-and-dirty usability test with a five-second test for a rapid but rich round of validation. In a five-second test, you basically expose the user to a screen or moment in a product, ask her to look at it for five seconds, and then remove the screen from view. Once the screen has been removed, ask her what she remembers seeing, and what she thought the overall purpose of the page or screen was. Considering that people often use products in a distracted, multitasking state, the five-second test is actually a pretty good indicator for how people really experience your products.
5–10 minutes per screen
• You want to test the information hierarchy of a page, screen, or state.
• As often as possible to check your work along the way.
1. Find a volunteer.
Find someone to test your designs on. This can be anyone who is handy (as in the quick-and-dirty usability test) or representative users. Explain that you are going to show your volunteer a screen in a product, but only for five seconds, after which you’ll take it away and ask her some questions about it.
2. Commence the five-second countdown.
Show your participant the design that you are testing and silently count off five seconds. You can do this in person by showing her a printout or a design on the screen of your computer, mobile device, or tablet. If you’re doing this remotely, you can do it through screen sharing software, such as WebEx, Skype, or Adobe Connect.
3. Ask the volunteer what she remembers.
After five seconds have passed, remove the picture from view. Now ask your research participant what she remembers seeing on the page or screen. Also ask her what she thinks the purpose of the page was, and, if she is unfamiliar with your product, what she thinks the product was.
4. Did she get it right?
Did she notice the most important messages or information that you’re trying to convey in that moment? If not, your information hierarchy may be off. Did she correctly interpret the purpose of the product and the screen? If not, the balance of messaging and basic affordances (or, what it looks like you can do with that page) may need more work. Could she correctly identify the type of product this is? If not, you may need to think about navigation, branding, or messaging.
5. Repeat regularly.
Repeat as many times as needed to vet key screens or moments in the product.
A UX health check measures baseline quality of a user experience and assesses changes in quality over time.
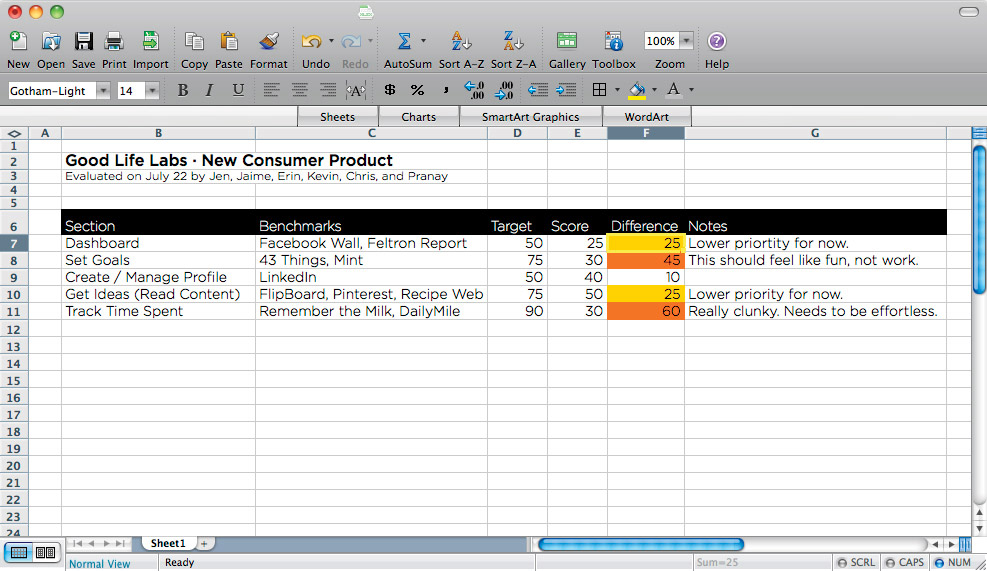
In a UX health check, you regularly assemble a cross-functional team to do an audit on the quality of the product’s user experience. This technique was developed by Livia Labate and Austin Govella while at Comcast. It’s a way to quickly figure out how well the team feels the product is currently measuring up against user experience expectations (see Figure 8.5). This is a quick, rather unscientific method, but it has the benefit of inclusivity; you are establishing and measuring this baseline with the help of your colleagues. If you conduct this process regularly, it enables you to demonstrate and agree collectively on changes in quality over time.
FIGURE 8.5
An example of a UX health check spreadsheet.
1 hour on a recurring basis (could be weekly, monthly, quarterly, and so on)
You want to start tracking the quality of UX over time and don’t have other formal measures in place.
1. Designate a team.
Identify a cross-functional group of people to be the health check team, and set up a recurring meeting: monthly, quarterly, weekly, or whatever duration makes sense for your product. Ideally, this is the team who is responsible for the product on a day-to-day basis.
2. Break the product into sections.
Looking at your overall offering, break it down into sections or areas of focus. This could correspond to the sections of the product from a navigational perspective (for example, registration, account, homepage, etc.). Or, alternately, this could be layers of the experience (content, brand, interactivity, cross-channel consistency, etc.)
3. Set competitive benchmarks.
For each section or area of focus, pick a relevant competitive benchmark to serve as an inspiration. For example, you want your product suggestions to be as good as Amazon’s. Or you want your cross-channel consistency to be as good as Apple’s, and so on.
4. Set a target.
Next, for each of those sections, decide how good your product actually needs to be, compared to its competitive benchmark. You may not be able to make your cross-channel consistency 100% as good as Apple’s, but maybe 50% as good would be pretty great. As a team, assign a target percentage for each section and its benchmark. As you discuss why you’ve chosen the target percentage that you have, note and document your rationale. This is so that you and the team can remember your thought process in the future and explain it if anyone asks.
5. Measure yourself against the benchmarks.
Now, for each of these sections, give the product a rating. You might want to be 50% as good as Apple, but after discussion, you decide that you are presently only 25% as good. Discuss how well each section measures up against its competitive benchmark, and give each section a percentage number that reflects where you think you are today. The team may need to have a bit of discussion to arrive at a number that everyone can agree on. That’s good! The discussion is the most valuable part.
6. Spot the biggest opportunities for improvement.
Once you’ve agreed on your rankings, identify the biggest gaps between your target and where you stand today, and then discuss how you’re going to improve it.
7. Repeat regularly.
As you continue to evolve the product, keep checking back and measuring yourself against your benchmark. Where your product is improving, congratulate yourselves. Where your product is underperforming relative to your baseline, focus on your next round of improvements.