It’s always a bit of a shock when, once again, the school year begins, along comes a hint of a chill in the air, and pretty soon the leaves are blazing with color, blowing down from the trees, and piling up everywhere. Every year for as long as I can remember, whether trudging to school with my sister, Rosie, or picking my way through a pumpkin patch with Rich and the kids, I can hear and smell the holidays coming when I walk through drifts of fallen leaves, amid the rustling sounds and in the woodsy aroma of the drying foliage.
As I sadly kiss summer good-bye, I savor all the colors and smells and flavors of autumn and take great pleasure in the gradual transition from outside to indoors. I love how the season forms a bridge from days that are bright and breezy and still fairly long to times when darkness comes sooner, cold takes hold, and so do cozier cravings. By early October it has usually become chilly enough that I’m no longer all about avoiding using the oven. Quite the opposite: keeping the house warm and full of roasty-toasty smells is such a delight—a great consolation prize for losing the superlong days of summer when it stays light till eight or nine o’clock. No more pool parties and barbecues, but here come the holidays!
Aside from all of the traditional celebrations, fall is full of everyday joys like kids coming in from running around kicking leaf piles, with rosy cheeks and noses. I vividly remember being one of those kids and how good it was to come in to a nice baked treat, and I have loved doing the same with my own children.
This chapter focuses on four of my favorite key ingredients to cook with in the fall. Two of them are pretty obvious: apples and pumpkin (of course!). The other two are equally seasonal, but maybe more particular to my Mediterranean background: figs and nuts.
Growing up back in the old neighborhood in Paterson, New Jersey, we had a fig tree in our backyard (we actually lived in three different houses and dug up and brought the tree with us each time we moved), and the annual fig harvest was one of the joys of late summer. The same was true (and still is) for many immigrants from the Mediterranean. Anyone with a patch of dirt grew a fig tree, and many of the trees were started from cuttings brought over from the Old Country—literally branches from the family tree back home, snipped off and carried in a pocket or baggage on the long boat trip to America. So it came to be that, half a world away from the Mediterranean, a treasured seasonal tradition has carried on for generations. Every year, just as summer began to fade, we loved to eat the figs as they ripened, straight off the tree and still warm from the sun.
Throughout the cold months, the tree was lovingly swaddled in burlap. I’m sure my American friends (as absurd as it may seem coming from a Jersey girl like me, everyone not Italian was referred to as “the American”—pronounced “Ameri-GAN”) wondered what on earth it was, looking like a huge mummy sticking straight up out of the ground. I, of course, being young and American myself, thought everyone had a prized fig tree in their backyard.
My best beloved memory of those figs is from October of 1990, when Rich and I got engaged in the midst of the most gorgeous Indian summer Jersey ever had. He popped the question and presented me with a ring (in his parents’ driveway–very gallant) on the fifth, which was a Friday. So that Sunday my parents had my future in-laws over for a celebratory meal, a traditional Italian Sunday lunch for about fourteen people—brothers, sisters, both sets of parents. Mom served up a beautiful feast: Sunday Sauce (yes, we call it sauce!), which is loaded with meatballs, sausage, braciole (yum!), plus antipasti, lasagna, veal Milanese, various verdure (veggies), and salad. It was such a happy occasion and of course everyone enjoyed the great meal Mom had prepared, but my parents and Rich’s parents really didn’t know one another yet, and there was a bit of a language and culture gap, since Rich’s parents had come over from Lebanon when he was little, while my parents had both grown up in Italy. I’m sure both sets of parents were still trying to figure it all out.
But then, after dinner, my parents and my future in-laws walked outside to the backyard deck and my father presented them with a big basket of figs. The late heat had brought on the most bountiful harvest we’d ever had from our tree. This humble gift made such a connection between our families and our shared roots in the Mediterranean. Italians weren’t the only ones bringing fig cuttings over from the motherland. Fig trees are growing all over America that started from branch tips carried over from Lebanon, Greece, Spain, Portugal, Turkey–all over the Mediterranean. Rich’s mother and father’s faces lit up. I could see it in their eyes: These people are like us.
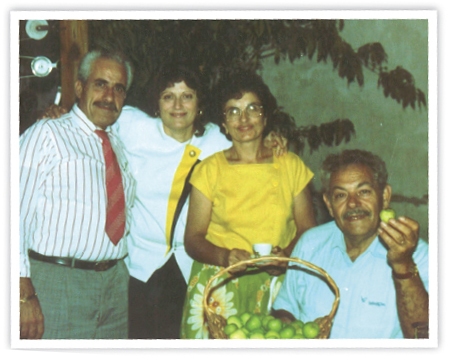
Richie and I treasure this snapshot of our parents with the big basket of engagement celebration figs.
This is a great way to enjoy one of the most luscious crops of the fall season. The do-it-yourself element—everyone topping their own crust however they like—makes it fun for any casual gathering. You can go all out and have a big spread, with lots of different cheeses and nuts and syrupy toppings, plus a variety of figs if you are in an area where they are plentiful. But it’s no less delightful if you keep it simple—a platter of sliced figs, a single spreadable cheese, a little dish of toasted chopped nuts, and a little jar of honey (or even jam). Either way, it’s a lovely intermezzo (if you want to serve a more conventional dessert later) or dessert itself—a wonderful, relaxed way to end a meal and finish off the last of the wine.
MAKES ABOUT 3 DOZEN
CRUST
1 egg white (reserved from pastry), for brushing
Coarse sugar or cinnamon sugar, for dusting
TOPPINGS
2 dozen fresh figs, stemmed and sliced
Cheeses, such as Orange Mascarpone to spread; creamy fresh ricotta or goat cheese; crumbled Gorgonzola or feta; thin slices of fontina; a wedge of softened Brie; shavings of Asiago; the possibilities are endless
Nuts, such as toasted and chopped walnuts, pistachios, hazelnuts, almonds, pecans
Infused Honey Syrup, Orange Blossom Syrup (or whatever honey you like—light floral ones like orange blossom honey are especially nice with figs)
Sprigs of tender-leaved fresh herbs, such as spearmint; basil (scented ones such as lemon, cinnamon, or pineapple basil would be great if you happen to grow them or know someone who does); fennel frond; marjoram.
equipment
3½-inch round cutter, or a glass, can, or bowl with an opening of that diameter
Two large baking sheets
Preheat the oven to 350°F with two racks positioned in the upper and lower thirds of the oven. Line 2 large baking sheets with parchment paper.
On a smooth, lightly floured work surface roll out 1 disk of dough between 2 pieces of parchment paper to a thickness of between ⅛ and ¼ inch. Use a 3½-inch cutter to cut about 18 rounds, rerolling scraps as needed. Set the rounds on the prepared baking sheets, spacing the rounds about ½ inch apart, and use a fork to pierce each round all over. Repeat the process with the second disk of dough.
Beat the reserved egg white with 1 teaspoon water. Lightly brush the rounds with the egg wash and sprinkle with the sugar. (The rounds can be double-wrapped in plastic and frozen for up to 3 months. Thaw at room temperature before baking.)
Bake 10 to 15 minutes or until lightly browned.
If you are using cheese that’s best served soft (such as Gorgonzola or Brie), set out 30 minutes before serving.
Arrange everything on platters and let everyone make their own pizzette—like a taco bar. Everyone takes a crust, spreads it with whatever cheese(s) they like, tops with nuts, figs, herbs, and a drizzling of honey (that’s the order that works best for the toppings to stay on, so it’s a good idea to arrange your bar in that sequence).
shortcut: Use store-bought pizza dough, flatbread, or pita, brushed with butter and sprinkled with cinnamon sugar and baked.
note: The crusts are crisp, almost like tea biscuits, and they keep quite well. I keep them in a cookie jar or cracker tin and everyone in the house loves snacking on them. Some of my favorite ways to enjoy leftovers are to spread the crusts with whatever jam is on hand, or dip in milky tea, coffee, Nutella, etc. You can also opt to bake a half batch and freeze the remainder for other uses.
The crusts can also be cooked on a pizza stone on a medium-low grill.
Pan-Roasted Fresh Figs with Infused Honey Syrup and Orange Mascarpone
This sophisticated treat—on the savory end of the dessert spectrum—is popular with serious fig lovers. It’s best served in very small dishes, like an amuse-bouche, and the toasted pistachios are essential to bringing the flavors and textures together.
MAKES 12 SMALL SERVINGS
ORANGE MASCARPONE
One 8-ounce tub mascarpone cheese, at room temperature
2 teaspoons finely grated Valencia orange zest (zested orange reserved to juice for Infused Honey Syrup)
INFUSED HONEY SYRUP
¾ cup honey
3 cinnamon sticks
2 star anise
2 cloves
2 teaspoons finely grated Valencia orange zest
¾ cup freshly squeezed orange juice from 2 to 3 good-quality Valencia oranges (one of them reserved from zesting)
1 dozen small fresh, firm but ripe figs, quartered
1 tablespoon unsalted butter
2 tablespoons Grand Marnier
½ cup unsalted pistachios, toasted and chopped
equipment
Electric mixer
Twelve 3- to 4-ounce serving dishes
To make the orange mascarpone, drain any watery liquid from the top of the mascarpone, then put the cheese in a bowl, add the orange zest, and beat the mixture with an electric mixer on low speed just until creamy and light. (Can be made up to 2 days ahead and kept in an airtight container in the refrigerator.)
To infuse the honey, combine the honey, cinnamon sticks, star anise, and cloves in a medium, heavy-bottom saucepan and cook gently over medium-low heat for 15 to 20 minutes. Remove the saucepan from the heat and allow the honey to cool and infuse for at least 1 hour. (The infused honey can be made a few days ahead; remove spices and keep in an airtight container at room temperature.)
To make the honey syrup, use a slotted spoon to remove and discard the spices from the infused honey, then add the orange zest and juice to the saucepan. Bring the mixture to a simmer over medium heat, then lower the heat and continue simmering until the syrup is thickened and reduced to about ¾ cup, about 20 minutes. Take the pan off the heat and let the syrup cool to room temperature. (The honey syrup can be made a day ahead and kept in an airtight container at room temperature.)
To cook the figs, pour ¼ cup of the honey syrup onto a rimmed plate or small baking dish. Add the figs to the dish and turn to coat with the syrup. Melt the butter in a large nonstick skillet over medium heat. Cook the figs cut-sides down until golden brown, 1 to 2 minutes. Turn and cook 1 to 2 more minutes per side, or until the figs are tender and slightly softened. As the figs cook, they will release a lot of moisture that will quickly become a thick syrup; take care not to let them cook so long that they collapse and lose their shape. Use tongs to lift the cooked figs out of the skillet, leaving their syrupy liquid behind. Add the Grand Marnier to the skillet and cook 2 to 3 minutes, stirring often, to reduce by half. Pour the reduction into the reserved honey syrup and whisk to combine.
To serve, center a dollop (generous tablespoon) of orange mascarpone in each of 12 small serving dishes. Arrange a few fig quarters in each dish, drizzle lightly with the syrup, sprinkle with pistachios, and serve, with additional honey syrup in a small pitcher on the side (leftover figgy syrup keeps in the refrigerator for weeks—and it’s delicious with vanilla ice cream or custard).
tip: Note that grating the zest of one orange should provide all the zest you’ll need for both the mascarpone and the syrup, but it is nice to have additional zest for garnish. So use a zester to make long thin strips of zest from a second orange. Make sure you do your grating and zesting before you do any cutting or juicing (if you haven’t already made this mistake, trust me, you do not want the hassle of trying to get the zest of any citrus fruit that isn’t whole and unsqueezed). And make sure you take off only the thin, colored layer of peel—none of the bitter white pith. You’ll need 2 to 3 good-quality Valencia juicing oranges for zest and juice.
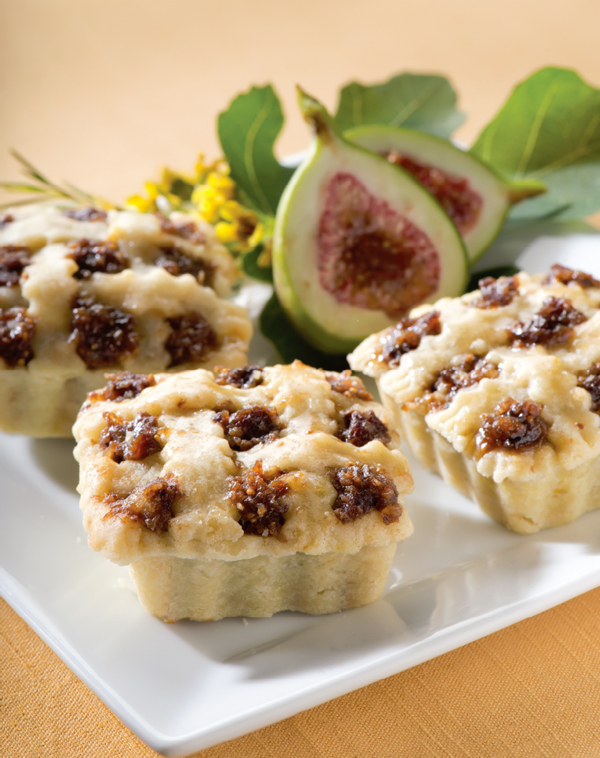
Borsettini is Italian for purse and is often used in names for filled pastas. I think the purse reference is to the money pouches from centuries past, because the pastas look like little bags that have been cinched at the top. Here, we have pastries that look more like elegant little clutches and—packed with aromatically spiced figs, drizzled with dark, figgy syrup, and sprinkled with toasted pistachios—taste amazing.
MAKES ABOUT 2 DOZEN
FIG FILLING
1 cup packed dark brown sugar
1 teaspoon cinnamon
½ teaspoon freshly grated nutmeg
½ teaspoon cardamom
Pinch fine sea salt
2 dozen small fresh figs, stemmed and quartered
4 tablespoons (½ stick) unsalted butter
½ cup fresh orange juice, plus more as needed
CHEESE FILLING
8 ounces chèvre, softened
¼ cup heavy cream
½ teaspoon finely grated lemon zest
Pinch fine sea salt
2 tablespoons honey, optional
1 large egg yolk (white reserved for brushing dough)
1 teaspoon vanilla extract
PASTRY
1 recipe Basic Pastry Single Crust
1 large egg white, for brushing
¼ cup coarse raw sugar, for sprinkling
½ cup pistachios, pecans, or walnuts, toasted and chopped, for serving
equipment
4-inch round cutter with plain or scalloped edges, or a glass, can, or bowl with an opening of that diameter
Two large baking sheets
To make the fig filling, combine the sugar, cinnamon, nutmeg, cardamom, and salt in a large mixing bowl and stir with a fork to mix thoroughly. Add the figs to the bowl and mix to coat.
Melt the butter in a large heavy skillet over medium heat, tilting the skillet to distribute the butter evenly. Add the figs to the skillet, using a spoon or flexible rubber spatula to scrape all of the sugar-and-spice mixture off the sides of the bowl and into the skillet. Add the orange juice and stir gently. Bring to a simmer over medium heat and cook the figs, stirring occasionally, for about 20 minutes, or until the liquid is very thick and gooey. Be sure to stir more frequently toward the end of the cooking time when the liquid is becoming thick enough to stick to the skillet and scorch. Turn off the heat under the pan and leave the figs to cool to room temperature. (The figs can be made ahead and kept in an airtight container in the refrigerator for up to 2 days.)
To make the cheese filling, combine the chèvre, cream, lemon zest, salt, honey, egg yolk, and vanilla in a mixing bowl and beat with an electric mixer until creamy, 1 to 2 minutes. (The cheese filling can be made up to 2 days ahead and kept in an airtight container in the refrigerator.)
To prepare the dough, lightly dust a smooth countertop with flour and roll each disk of the dough out to an even thickness of about ⅛ inch (not too thin, or it will become difficult to handle and fall apart). Tightly wrap each sheet of dough with plastic and return to the refrigerator for 15 minutes or until you are ready to cut the dough into rounds for the pastries. (Dough can be kept in the refrigerator overnight or double-wrapped and frozen at this stage for up to 3 months. Defrost for 1 hour before using.)
Preheat the oven to 375°F with two racks positioned in the upper and lower thirds of the oven. Line 2 large baking sheets with parchment paper.
Use a 4-inch cutter to cut each sheet of the chilled dough into about a dozen rounds, rerolling any scraps. (The cut rounds can be tightly wrapped and refrigerated overnight or double-wrapped and frozen for 1 month.)
Divide the dough rounds between the two parchment-lined baking sheets. Onto the bottom half of each round drop 1 scant teaspoonful of cheese filling and top with 2 fig quarters, using a fork to lift the figs out of their gooey syrup and reserving the syrup (for serving). Fold the top half of the dough over and seal the edge by pressing gently with a fork. Use the tip of a small sharp knife to make a teeny X in the top of each pouch.
Beat the egg white with 1 tablespoon water. Lightly brush the pastries with egg wash and sprinkle with coarse sugar. (Can be frozen on baking sheets, then transferred to freezer bags and kept frozen for up to 1 month. Bake without defrosting, adding about 5 minutes to the baking time.)
Bake the pastries until lightly browned, about 15 minutes, rotating halfway through the baking time. Let cool 5 minutes before serving, or serve at room temperature.
To serve, gently rewarm the reserved fig syrup in a small saucepan (or in a heatproof bowl on low heat in the microwave), whisking in orange juice 1 tablespoon at a time to reach a pourable consistency. Lightly drizzle the borsettini with syrup and sprinkle with toasted nuts before serving.
shortcut: Use premade pastry dough.
I created these using a very specific type of baking pan: Chicago Metallic Lift & Serve Single Squares Pans. I don’t know of any pans that give the same size and shape, which are totally perfect for this treat, providing just the right ratio of pastry to filling. Figs are earthy, rich, and dense—overly so if the balance isn’t right. At the same time, you don’t want too much crust, either. These little goodies have just the right amount of each. A perfect two-bite treat—great with coffee.
MAKES 2 DOZEN
FIGS
1 cup soft dried figs, stemmed and coarsely chopped
⅔ cup water
½ cup fresh orange juice
¼ cup packed light brown sugar
4 tablespoons (½ stick) unsalted butter, melted and cooled
2 large eggs, lightly beaten
1 teaspoon vanilla extract
¾ cup coarsely chopped walnuts, optional
BASKETS
1 recipe Rustica Pastry
1 egg white (reserved from making pastry), for brushing
Coarse sugar, for dusting
equipment
3½-inch round cutter or a glass, can, or bowl with an opening of that diameter
Two 12-cavity Chicago Metallic Lift & Serve Single Squares pans
Food processor
Pastry tamper, optional (very handy—especially if you have Jersey nails!)
To make the filling, combine the figs, orange juice, sugar, and ⅔ cup water in a medium heavy-bottom saucepan and simmer over low heat, stirring occasionally, until the figs soften, 10 to 15 minutes. Let the mixture cool slightly, then pour it into the bowl of a food processor and pulse just until finely chopped (do not purée). (At this point, the fig mixture can be transferred to an airtight container and refrigerated overnight. Bring to room temperature before continuing with the recipe.) Transfer the mixture to a large bowl and stir in the butter, eggs, vanilla, and walnuts. Mix well.
Preheat the oven to 350°F with a rack positioned in the center. Lightly coat the baking pans with nonstick cooking spray or vegetable oil from an oil mister.
To form the pastry baskets, on a smooth, lightly floured work surface roll out 1 disk of dough between 2 pieces of parchment paper to a thickness of ⅛ inch. Use a 3½-inch cutter to cut 12 rounds, rerolling scraps as needed to make all 12 rounds. Carefully transfer each round to the baking pan, using a pastry tamper or your fingertips to neatly mold each circle into the pan. Use scissors or a small sharp knife to cut away any excess dough. If the dough tears when you are fitting it into the pan, no worries. You can easily patch it back together; it will hold and not show. (Gather up the dough scraps, pat together, wrap tightly, and reserve in the refrigerator; you will use it for the basket weave tops.) Repeat the process to make 12 more rounds, gathering up the dough scraps and adding to the packet of reserved dough in the refrigerator. Transfer the pans to the refrigerator to keep the dough cool while you roll and cut the strips for the basket weave tops.
To cut the dough for the basket weave tops, roll out the reserved trimmings into a large rectangle about 6 inches across and about 12 inches long, with an even thickness of ⅛ inch. Then use a knife, pastry cutter, or pizza wheel (and a ruler or straight edge if you like) to cut the rectangle in half crosswise and into thirds lengthwise. This will give you 6 rectangles of dough. Cut each rectangle crosswise into 16 strips each, about ¼ inch wide and 4 inches long.
Scoop about ¼ cup of fig filling into the chilled pastry shells (I like to use a mini scoop to keep things neat).
To weave the lattice tops, lay 2 strips parallel across each tartlet, spacing evenly. Lay a third pastry strip across the middle of the tartlet, perpendicular to the first strips. Weave it over and under the first two strips, then add a fourth strip and weave it in the opposite direction. Fold back the rim of the shell over the edge of the lattice strips and crimp to secure.
Whisk together the egg white and 1 tablespoon water. Lightly brush the egg wash onto the tops of the pastries. Sprinkle with coarse sugar and bake 10 to 15 minutes, or until the edges begin to turn light golden brown and the fig filling is bubbly. Rotate the pans halfway through baking time.
Set the pans on wire racks and cool to room temperature. Use a small spatula or a fork to carefully ease the pies out of the pans. Serve at room temperature.
shortcut: Use store-bought puff pastry, premade pie dough, or shallow premade pastry shells.

Apples. So all-American. So wholesome. So plentiful and varied. So underappreciated! Maybe it’s because apples are one of the first fruits we eat as kids and they become a fixture in our diets early on, but it seems to me that apples end up being taken for granted, and apple desserts are often thought of as nothing particularly special.
But apple desserts can so easily be made very special. I could write a whole book of apple treats, but here I’ve put together four of my family’s top favorites. First come the crumblekins—so perfectly delicious and so easy you can throw them together in the middle of making dinner most any evening or otherwise multitasking, as we all seem to do way too much these days. In my first season as one of The Real Housewives of New Jersey, I was making apple crumblekins in one of my many kitchen scenes and I have received so many requests for the recipe. So here you go—”Sharing is caring.” Then there’s the zeppolini—aka fritters—to die for. Put in a bit more (but not a whole lot more) time and effort, and you can make a simple piecrust, cut it to fit muffin pans, load them up with the same filling as for the crumblekins, and you have darling apple pies. Last up is my tribute to one of the great joys of childhood, the caramel apple—in the form of a pastry pocket that I’m calling a “ravioli” filled with apple and drizzled with caramel.
Putting the ultimate homespun dessert in little individual ramekins brings the humble crumble a little elegance (it doesn’t get shoveled out of a big casserole dish and piled on the plate). I like to overfill the ramekins ever so slightly so that just a little of the sugary-appley-cinnamony juices bubble down the sides (I line the baking sheets with parchment so I don’t have to scrub them). If you leave a bit too much room—because you didn’t have quite as many apples as you thought, you’re stretching the recipe to make more servings, or you’re experimenting with baking dishes of different dimensions than called for—don’t despair. Top the crumblekin with a scoop of your favorite ice cream or gelato! Vanilla always works but maple walnut, caramel butter pecan, and rum raisin are fine choices, too. If ice cream isn’t your thing, Chantilly Cream is also great.
MAKES ABOUT 1 DOZEN
APPLE FILLING
4 medium crisp, tart apples
½ lemon
¾ cup packed light brown sugar
1 tablespoon all-purpose flour
¾ teaspoon cinnamon
¼ teaspoon nutmeg
¼ teaspoon fine sea salt
2 tablespoons cold unsalted butter, cut into 12 pieces, for dotting tops of crumbles
CRUMBLE TOPPING
½ cup all-purpose flour
½ cup rolled oats
½ cup packed light brown sugar
6 tablespoons cold unsalted butter, cut into small cubes
1 teaspoon cinnamon
½ cup chopped walnuts
½ cup raisins or sweetened dried cranberries
equipment
Twelve 3-ounce ramekins, custard cups, or other baking dishes
Preheat the oven to 350°F with a rack positioned in the center. Generously grease the ramekins.
To make the filling, peel, core, and chop the apples into ¼ to ½ inch pieces and transfer them to a large mixing bowl (you should have about 6 cups of chopped apples). Squeeze the lemon over the top and toss lightly to combine. Add the sugar, flour, cinnamon, nutmeg, and salt to the apples and mix thoroughly. (At this point the apple filling can be stored overnight in an airtight container in the refrigerator.)
To make the crumble topping, combine the flour, oats, sugar, butter, and cinnamon in a large mixing bowl. Blend with your fingers until the mixture resembles coarse crumbs. Add the nuts and raisins and mix lightly with your fingers to incorporate.
Spoon a few tablespoons of apple filling into each ramekin, filling about ¾ of the way up to the rim and packing firmly with the back of the spoon. Top the filling with a piece of butter, then spoon on a heaping tablespoon of topping and pat gently to settle it down onto the apples, mounding up the topping a bit as the apples will shrink as they cook.
Set the ramekins on a rimmed baking sheet. (This will make the ramekins easier to handle and catch any drippings that bubble over during baking; or go a step further and line the sheet with foil or parchment paper to make for really easy cleanup.) Bake on the middle rack for 20 to 30 minutes, or until nicely browned and bubbling, rotating the tray midway through the baking time. Let cool 10 minutes before serving.
tip: In a pinch, you could use a muffin pan with foil cup liners or doubled paper liners instead of the ramekins. It makes for a less charming presentation, but it works.
These knobbly little pillows of apple deliciousness are not impressive to look at. I think of them as the Cabbage Patch dolls of my dessert repertoire—so ugly they’re incredibly cute. But here’s what you need to know: Whatever these easy-to-make treats may lack in elegant looks, they more than make up for in flavor—delicioso! A huge hit with eaters of all ages.
MAKES ABOUT 3 DOZEN
1 cup all-purpose flour
2 teaspoons baking powder
4 tablespoons (½ stick) unsalted butter
¼ teaspoon fine sea salt
¼ cup granulated sugar
1 cup whole-milk ricotta
1½ teaspoons vanilla extract
3 large eggs
1 large crisp apple, peeled and grated
1 teaspoon lemon zest
4 to 6 cups canola or vegetable oil, for frying
CINNAMON SUGAR
½ cup granulated sugar
1 generous tablespoon cinnamon
Sift together the flour and baking powder into a large mixing bowl; set aside.
In a medium saucepan combine the butter, salt, sugar, and ricotta. Mix gently over low heat and warm thoroughly.
Take the saucepan off the heat and stir in the vanilla and the flour mixture, stirring continuously until a ball is formed.
Transfer the mixture back to the large mixing bowl and with an electric mixer or by hand beat in the eggs one at a time, making sure each egg is incorporated before adding the next. Beat until smooth. Add the grated apple and lemon zest and stir to combine.
Pour the oil into a large, deep, heavy-bottom skillet or pot. Heat over medium heat to bring the oil to 325°F on an instant-read thermometer.
Working in batches (this is important: crowding will lower oil temperature and cause the zeppolini to absorb too much oil), use two small spoons to carefully drop teaspoon-size blobs of zeppolini dough into the oil. The zeppolini will float to the top as they cook. Cook, turning once or twice, until puffed and evenly golden brown all over, 4 to 5 minutes total.
Remove zeppolini with a slotted spoon and drain on paper towels.
Whisk together the sugar and cinnamon. Toss the warm zeppolini in the cinnamon sugar and serve, still warm.
In the unlikely event of leftovers reheat in a 350°F oven to recrisp.
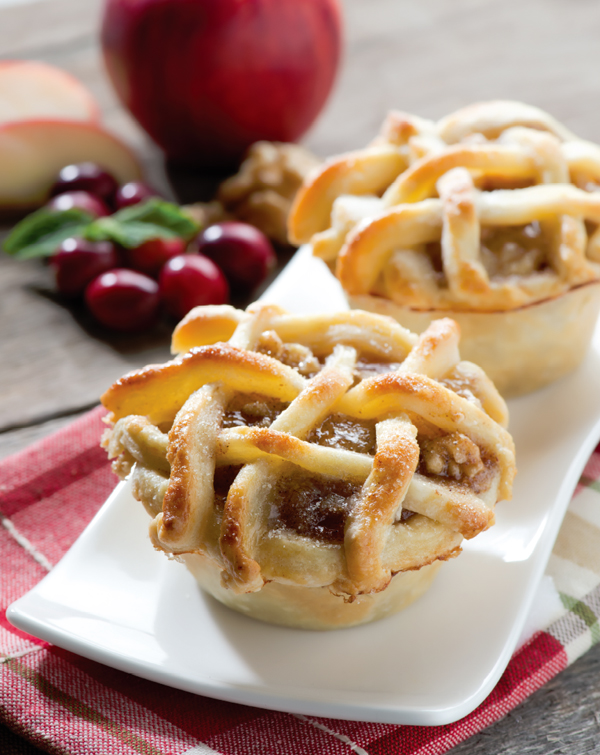
What could be more classic, more delightful than a freshly baked, homemade, lattice-top apple pie? Little individual ones that everyone gets to enjoy all to themselves! Be sure to grease the pans generously so the little pies pop out with their golden brown pastry crust intact. And set the muffin pans on a baking sheet before baking; this makes it easier to get the pies in and out of the oven without dinging the lovely crimped edges.
MAKES 1 DOZEN
Basic Pastry–Double Crust/Lattice Top
FILLING
1 recipe Apple Filling from Apple Crumblekins, butter omitted
1 egg white, for brushing
2 tablespoons coarse sugar
equipment
Heavyweight nonstick 12-cavity standard-size muffin pan
4½-inch round cutter, or a glass, can, or bowl with an opening of that diameter
Pastry tamper, optional
Generously grease the muffin cups with butter.
Prepare the pastry dough as instructed. Divide into thirds, wrap tightly, and chill thoroughly.
Prepare the apple filling as directed in the Apple Crumblekins recipe, omitting the butter.
On a smooth, lightly floured work surface, roll out 1 of the chilled disks of dough to an even thickness of about ⅛ inch. Use a 4½-inch cutter to cut out 6 circles of dough. (The dough circles can be layered with parchment or wax paper, wrapped tightly in plastic, and refrigerated for up to 2 days; or double-wrapped and frozen for up to 1 month.)
Carefully transfer the dough circles to the muffin pan, pressing gently with a pastry tamper or your fingers to mold the dough to the cup (it should overlap the edge of the cup by at least ¼ inch). Gather up the dough trimmings, wrap tightly, and set in the freezer to chill. Roll out the second disk of dough and cut it into 6 rounds, adding the trimmings to the reserved dough in the freezer. Fit the dough rounds into the remaining 6 cups in the muffin pan.
Transfer the muffin pan to the refrigerator.
Preheat the oven to 425°F with a rack positioned in the center.
To cut the dough for the lattice tops, add the reserved dough from the freezer to the third disk of dough, then divide in half. Put one half back in the refrigerator and roll the other half out into a rectangle about 6 inches across and about 12 inches long, using the flat edge of a large knife to straighten the edges as you roll the rectangle to an even thickness of ⅛ inch. Then use the knife, a pastry cutter, or a pizza wheel (and a ruler or straight edge if you like), to cut the rectangle crosswise into 24 strips. Repeat the process to roll and cut the other half of the dough into 24 more strips.
Fill the chilled pastry shells generously with apple filling. Use a spoon to mound the filling and pack it down fairly firmly in each muffin cup, as it will sink a little when it bakes.
To weave the lattice tops, lay 2 strips parallel across each tartlet, spacing evenly. Lay a third pastry strip across the middle of the tartlet, perpendicular to the first strips. Weave it over and under the first two strips, then add a fourth strip and weave it in the opposite direction. Fold back the rim of the shell over the edge of the lattice strips and crimp to secure.
Whisk the egg white with 1 tablespoon water. Lightly brush the pastry lattices with the egg wash, then sprinkle with the coarse sugar.
Set the muffin pan on a rimmed baking sheet and bake at 425°F for 15 minutes, then rotate the baking sheet, lower the temperature to 350°F and bake for another 15 minutes, until the filling is tender and bubbly and the pastry crust is nicely browned.
Set the tray on a wire rack and let the pies cool in the pan for about 10 minutes. Use a small spatula or a fork to carefully lift the pies out of the pan and transfer to a wire rack to cool to room temperature before serving. Best made at least 1 day ahead. Store at room temperature covered in foil (not in an airtight container, and don’t cover until completely cooled, as this will make the crust soggy).
shortcut: Use premade pastry dough.
Ravioli is one of the best-loved items in traditional Italian cooking. What’s not to love? Especially when you’re treated to homemade ones—tender dough pockets with tasty filling. They’re dumplings, for crying out loud! Yum! For my sweet spin on ravioli, I brought the all-American and superautumnal flavors of caramel apple into the mix. Fair warning: These take some time to make, but they are so worth it. I created them early on in the process of developing the idea for this book, and my family went bonkers for them. Joseph, who’s my all-American boy when it comes to desserts, insisted these were “keepers” for the book—can’t say no to that! Then I brought a batch with me when I went to meet my prospective publishers in New York City—knocked their socks off. (Seriously, I think these little delectables helped me land a book deal! Never underestimate the power of pastry, my friends.) So, yeah, they are a little labor intensive; I make the most of my efforts by making them in bulk—this recipe doubles (and triples!) really well, and the whole unbaked pastries can easily be frozen, so I always make extra to pop into the oven anytime.
MAKES 20
PASTRY
2½ cups all-purpose flour
1 teaspoon fine sea salt
½ teaspoon freshly grated nutmeg
½ teaspoon cardamom
8 ounces (2 sticks) unsalted butter, cold, cut into ½-inch cubes
⅓ cup ice water, plus more as needed
APPLE FILLING
2 medium crisp apples (about 1 pound)
2 teaspoons freshly squeezed lemon juice
½ teaspoon cinnamon
⅛ teaspoon nutmeg
1 tablespoon all-purpose flour
Pinch fine sea salt
2 tablespoons unsalted butter
¼ cup packed light brown sugar
CHEESE FILLING
4 ounces cream cheese, softened
2 tablespoons confectioners’ sugar
2 tablespoons whole-milk ricotta cheese
1 teaspoon finely grated lemon zest
Pinch fine sea salt
1 large egg yolk (white reserved for brushing dough)
½ teaspoon vanilla extract
¼ cup walnuts or pecans, lightly toasted and finely chopped, optional
1 large egg white, for brushing
Coarse raw sugar, for sprinkling
Caramel Drizzle, for serving
Toasted chopped walnuts or pecans for serving, optional
equipment
Food processor
Electric mixer
Large rimmed baking sheets
To make the pastry dough, combine the flour, salt, nutmeg, and cardamom in the bowl of a food processor fitted with the standard blade. Pulse to mix, then add the butter and pulse a few more times, just until the mixture resembles very coarse cornmeal. Add ⅓ cup ice water, then pulse the machine a few more times. Add more water, 1 tablespoon at a time, pulsing only enough to uniformly combine the ingredients—just until the mixture begins to gather together, but not long enough to allow it to form a ball.
Turn the dough out onto a large sheet of wax paper. Lightly press the pieces together through the paper. Then divide the dough in half and lightly pat each half into a rectangle about ¾ inch thick, wrap tightly in the wax paper, and refrigerate until well chilled, at least 1 hour.
To make the apple filling, peel, core, and finely dice the apples, transferring them to a large mixing bowl. Add the lemon juice, tossing to coat. Add the cinnamon, nutmeg, flour, and salt and mix well to combine.
Melt the butter in a large skillet over medium-low heat. Stir in the brown sugar until melted, then add the apple mixture to the pan, raise the heat to medium, and simmer, stirring occasionally, until the apples are tender and the liquid in the skillet has evaporated, 5 to 10 minutes. Set aside to cool to room temperature. (The apple filling can be made a day ahead and kept in an airtight container in the refrigerator.)
To make the cheese filling, combine the cream cheese, confectioners’ sugar, ricotta, lemon zest, and salt in a large mixing bowl and beat with an electric mixer until light and fluffy. Add the egg yolk and vanilla and beat to incorporate. Stir in the nuts. (The cheese filling can be made a day ahead and kept in an airtight container in the refrigerator.)
Preheat the oven to 375°F with a rack positioned in the center. Line 2 large baking sheets with parchment paper.
Lightly dust a smooth work surface with flour and roll out one portion of the dough as a 10 by 15-inch rectangle, with an even thickness of ⅛ to ¼ inch (not too thin or it will become difficult to handle and fall apart).
Use a pastry cutter or sharp knife to cut the dough lengthwise into 2½-inch-wide strips. Then cut each strip crosswise into 2½-inch squares. (You should end up with 20 squares.)
Arrange the first set of pastry squares on the parchment-lined baking sheets, spacing them about I inch apart. Spoon I scant teaspoon of cheese filling onto each square. Use the back of the spoon to spread the filling in an even layer, leaving a ½-inch border around the edge. Top the cheese with about I teaspoon of apple filling.
Roll out and cut the remaining rectangle of dough into 2½- by 2½-inch squares. (You should end up with another 20 squares, to top the filled ones.)
Lightly beat the egg white with I tablespoon water. Use a small brush to lightly coat the edges of the filled dough squares with egg wash. Lay a square of dough over the top of each and gently press the edges together with a fork to seal. Carefully use the tip of a very sharp paring knife to make a tiny, X-shaped vent in the top of each pouch (this will allow steam to release during baking).
Lightly brush the tops and edges of the little pouches with the remaining egg wash, then sprinkle the ravioli with coarse sugar. (The pastries can be frozen at this stage for up to 3 months. Freeze on the baking sheets, then transfer to heavyweight plastic freezer bags. Don’t thaw before baking; just add a few minutes to the baking time.)
Bake 25 to 30 minutes, or until tops and edges are golden brown, rotating the sheets halfway through the baking time.
Let cool 1 to 2 minutes, then carefully transfer the ravioli to a wire rack. Serve slightly warm, drizzled with caramel and sprinkled with toasted nuts.
Caramel Chocolate Walnut Tartlettini

Growing up, throughout every autumn there was a big bowl of whole, shell-on nuts on the kitchen table—most often walnuts, almonds, pecans, or hazelnuts. There were a couple of nutcrackers tucked in the bowl, and we’d crack open a few nuts to munch on whenever we wanted a snack (there was never, ever any packaged snack foods in the house). My Lebanese in-laws are the same, and it’s common in many Mediterranean households.
Nuts remain one of my favorite foods—on their own, in savory dishes, and most especially in desserts, where each type of nut brings a buttery earthy decadence all its own. Nuts are such a simple, smart food, with such great substance and crunch and texture. Plus they’re good for you! All right, all right, enough of all that … I love nuts, so they have an important place in my book! I hope you like them, too. Buon appetito!
Caramel Chocolate Walnut Tartlettini
The pastry for these teensy tartlets is really just a very thin lining for the mini muffin cups; it will warm up as you work with it and might become a little slippery and prone to tearing—if so, just park the whole pan in the fridge for a few minutes and let the dough firm back up. You can do this several times if need be; the little tarts will still bake up just fine. Also, the dough doesn’t need to come all the way to the rim of each cup, just don’t overfill when you put the filling in. When the tartlettini bake, the shell and the filling meld together beautifully into a swoony little confection that I’ve been told is like what would happen if a chocolate chip cookie and a walnut brownie had a baby—and drizzled it with caramel. You’re welcome!
MAKES ABOUT 3 DOZEN
CHOCOLATE PASTRY
4 ounces cream cheese, at room temperature
8 tablespoons (1 stick) unsalted butter, at room temperature
1 cup all-purpose flour
3 tablespoons cocoa powder
¼ cup confectioners’ sugar
¼ teaspoon fine sea salt
CHOCOLATE WALNUT FILLING
1 cup packed light brown sugar
4 tablespoons (½ stick) unsalted butter, melted and cooled
1 large egg
1 teaspoon vanilla extract
2 tablespoons heavy cream
2 cups coarsely chopped walnuts
¼ cup mini semisweet chocolate chips
Sea-salted Caramel Drizzle, for serving
equipment
Electric mixer
2½-inch round cutter, or a glass, can, or bowl with an opening of that diameter
Two heavyweight nonstick 24-cavity mini muffin pans
Small pastry tamper, optional
To make the pastry dough, combine the cream cheese and butter in a bowl and beat with an electric mixer for about 1 minute. Add the flour, cocoa, sugar, and salt and mix on medium speed just until a dough begins to form and the ingredients are incorporated. Use your hands to pat the dough together in the bowl, folding it over on itself a few times to mix in any flour that remains on the surface. Form it into a ball, then flatten it into a disk, wrap it tightly in plastic wrap, and chill it in the refrigerator for at least 1 hour. (The dough can be made 1 day ahead and kept tightly wrapped in the refrigerator. Let sit at room temperature for 10 to 20 minutes to soften.)
To form the pastry cups, lightly dust the dough with flour on both sides and roll it out between 2 sheets of parchment paper to a thickness of about ⅛ inch. Use a 2½-inch round cutter to cut about 3 dozen rounds. Carefully transfer the dough rounds to the muffin cups and use a small pastry tamper or your fingers to mold the dough into the cups (if you are using your fingers, use a light touch to press the dough evenly across the bottom of each cup and up the sides). Transfer the pans to the refrigerator to keep the dough cold while you prepare the filling. (You can do this 1 day ahead, wrap tightly, and keep refrigerated—or double-wrap and freeze for up to 1 month, then fill and bake without thawing, adding an extra minute or two to the baking time.)
Preheat the oven to 350°F with two racks positioned in the upper and lower thirds of the oven.
To make the filling, combine the sugar and melted butter in a medium bowl and beat with an electric mixer on medium-high speed until smooth and creamy. Add the egg and beat well. Stir in the vanilla and cream, then fold in the walnuts.
Sprinkle approximately ½ teaspoon mini chocolate morsels into each of the chilled pastry shells. Use a mini scoop, melon baller, or teaspoon to top the chocolate chips with enough nut-and-sugar mixture to come level with the edge of the dough. Lightly press the filling down to settle it into the shell and fill in any gaps with a little more of the walnut mixture (the thick filling will rise only slightly when it bakes; you want the cups full but not overflowing).
Bake 10 to 12 minutes, or until the filling is golden brown, rotating the pans halfway through the baking time.
Set the pans on wire racks. Cool for about 5 minutes. While the tartlettini are still slightly warm, run the tip of a very sharp paring knife around the top edge to make sure the pastry hasn’t adhered to the pan. Then let cool completely to room temperature before using the little knife to gently ease the tartlets out of the pan.
Transfer the tartlettini to a baking sheet or work surface lined with parchment and drizzle with the salted caramel. Serve at room temperature.
The tartlettini can be kept in an airtight container at room temperature for several days or frozen for up to 3 months (thaw at room temperature before serving).
Here’s my take on the traditional pecan pie: itty bitty tartlets with delicate crust and scrumptious-but-not-too-sweet filling that’s laced with Amaretto and orange. Puts un po ‘di qualcosa di qualcosa (a little somethin’-somethin’) Italiano in an all-American classic. And you won’t believe how easy it is to make.
MAKES ABOUT 3 DOZEN
CREAM CHEESE PASTRY
4 ounces cream cheese, at room temperature
4 ounces (1 stick) unsalted butter, at room temperature
1 cup all-purpose flour
¼ teaspoon fine sea salt
PECAN FILLING
4 tablespoons (½ stick) unsalted butter, melted and cooled to room temperature
¼ teaspoon fine sea salt
½ cup packed light brown sugar
½ cup light corn syrup
1 teaspoon vanilla extract
1 tablespoon finely grated orange zest
1 tablespoon Amaretto
1 large egg, beaten
1½ cups chopped pecans
36 pecan halves
equipment
Electric mixer
Two heavyweight nonstick 24-cavity mini muffin pans
2½-inch round cutter, or a glass, can, or bowl with an opening of that diameter
Small pastry tamper, optional
To make the pastry, combine the cream cheese and butter in a bowl and beat with an electric mixer for about 1 minute. Add the flour and salt and mix on medium speed just until a dough begins to form and the ingredients are incorporated. Flour your hands and pat the dough together in the bowl, folding it over on itself a few times to mix in any flour that remains on the surface. Form it into a ball, then flatten it into a disk, wrap it tightly in wax paper, and chill it in the refrigerator for at least 1 hour. (The pastry can be made 1 day ahead and kept tightly wrapped in the refrigerator. Let sit at room temperature for 10 to 20 minutes to soften.)
To form the pastry cups, on a lightly floured work surface roll the chilled dough out to a thickness of about ⅛ inch. Use a 2½-inch round cutter to cut about 3 dozen rounds (reroll scraps as needed). Carefully transfer the dough rounds to the muffin cups and use a small pastry tamper or your fingers to mold the dough into the cups (if you are using your fingers, use a light touch to press the dough evenly across the bottom of each cup and up the sides). Transfer the pans to the refrigerator to keep the dough cold while you prepare the filling. (You can do this 1 day ahead; wrap tightly, and keep refrigerated—or double wrap and freeze for up to 1 month, then fill and bake without thawing, adding an extra minute or two to the baking time.)
Preheat the oven to 350°F with two racks positioned in the upper and lower thirds of the oven.
To make the filling, in a large bowl combine the butter, salt, and sugar and beat with an electric mixer on medium-high speed until smooth. Add the corn syrup, vanilla, orange zest, and Amaretto and continue mixing on medium-high until uniformly blended. Beat in the egg. Transfer the filling to a large measuring cup with a spout.
Divide the chopped pecans evenly among the pastry shells. Pour in just enough of the filling so it comes not quite level with the top edge of the pastry shells. Top each pie with a pecan half.
Bake 10 to 12 minutes, or until the filling is golden brown.
Set the pans on wire racks. Cool for about 5 minutes. While the pies are still slightly warm, run the tip of a small sharp knife around the top edge to make sure any filling that has oozed out around the pastry doesn’t adhere to the pan. Then let cool completely to room temperature before using the little knife to gently ease the pies out of the pan.
Half-moons of tender pastry filled with a delectable combination of rich pistachios, tangy apricot, and fragrant spices, these are a nice little snack to nibble on anytime. Back in the day, my mom used to make little pockets like these and we’d munch away on them while we watched those great nighttime soaps we loved so much—Dallas, Falcon Crest, Knot’s Landing—all those shows that counted as nighttime drama before the days of The Real Housewives of New Jersey.
MAKES ABOUT 3 DOZEN
FILLING
1 cup diced dried apricot
¾ cup orange juice
⅓ cup honey
2 tablespoons diced crystallized or candied ginger
3 cinnamon sticks
½ teaspoon ground cinnamon
¾ cup chopped pistachios
One recipe Rustica Pastry
1 large egg white, for brushing
Coarse sugar, for sprinkling
Finely chopped pistachios, for sprinkling, optional
equipment
2 large baking sheets
3½-inch round cutter, or a glass, can, or bowl with an opening of that diameter
To make the filling, combine the apricots, orange juice, honey, ginger, and cinnamon sticks in a medium, heavy-bottom saucepan. Bring the mixture to a boil over medium-high heat, then immediately turn the heat down to low. Simmer until the apricots soften and all the liquid has been absorbed, 7 to 10 minutes. Carefully transfer the mixture to a bowl and let cool to room temperature, then remove the cinnamon sticks. In a separate, small bowl combine the ground cinnamon and chopped pistachios, tossing to coat, then mix in the apricot mixture until well combined. Set aside (or cover and store overnight in the refrigerator).
To roll out and cut the dough, lightly dust a smooth countertop with flour and roll each disk of the dough out to an even thickness of about ⅛ inch (not too thin or it will become difficult to handle and fall apart). Transfer each sheet of dough to a baking sheet, wrap tightly with plastic, and return to the refrigerator for 15 minutes or until you are ready to cut it into rounds for the pastries. (The dough can be kept in the refrigerator overnight or double-wrapped and frozen at this stage for up to 3 months. Defrost for 1 hour before using.)
Preheat the oven to 350°F with two racks positioned in the upper and lower thirds of the oven. Line 2 large baking sheets with parchment paper.
Use a 3½-inch cutter to cut each sheet of the chilled dough into about 12 rounds, rerolling any scraps. (The cut rounds can be tightly wrapped and refrigerated overnight or double-wrapped and frozen for 1 month.)
Divide the dough rounds between the two parchment-lined baking sheets. Onto the bottom half of each round, drop a rounded teaspoon of filling. Fold the top half of the dough over and seal the edge by pressing gently with a fork. Shape the little pouches into crescents or half-moons.
Beat the egg white with 1 tablespoon water. Lightly brush the pastries with egg wash and sprinkle with coarse sugar and chopped pistachios. (The pastry can be frozen on baking sheets, then transferred to freezer bags and kept frozen for up to 1 month. Bake without thawing, adding about 5 minutes to the baking time.)
Bake the pastries until lightly golden, about 12 to 15 minutes, rotating halfway through the baking time. Let cool 5 minutes before serving, or serve at room temperature.
I learned to make Lebanese baklawa (pronounced “bok-LAH-WAH” and similar to, but distinct from, Greek “baklava”) from Rich’s mom, in the traditional style, big trays of it cut into diamond shapes. It is hugely important for special occasions—no Lebanese Christmas would be complete without baklawa. For smaller, tidier portions, I adapted Rich’s mom’s recipe to make little rolls. And because pine nuts are my and Rich’s favorite, and a common ingredient in both Italian and Lebanese cooking, I use them rather than the more typical walnuts or pistachios. Pine nuts can be pricey, but for us they are the perfect buttery yet delicate nut for this buttery yet delicate dessert. Working with phyllo is a little tricky at first—keeping the papery dough covered at all times to prevent it from drying out, lightly brushing each piece with butter as you work with it to keep it pliable, rolling each cylinder tightly and placing them snugly together in the baking pan so they don’t puff and unfurl, and working quickly to get the whole batch assembled and into the oven—but you soon get the hang of it and find that it’s not difficult, just time-consuming. And the results are so worth it: a very generous batch of delicate, rich, and buttery but not overly sweet delights that keep for weeks and work a bit of magic on everyone you share them with.
MAKES ABOUT 4 DOZEN
PASTRY
One 1-pound box Apollo brand #7 phyllo pastry sheets, defrosted overnight in the refrigerator then brought to room temperature (important note: leave it in the package with the inner plastic wrapping intact while thawing)
1 pound (4 sticks) unsalted butter (to make clarified butter)
PIGNOLI FILLING
3 cups pine nuts
¼ cup granulated sugar
1 teaspoon mazaher (orange blossom water)
equipment
Food processor
Large rimmed baking sheet, or square or rectangular casserole (I use a 10- × 15-inch baking pan, but any pan with a 1-inch rim is fine, even if there’s extra room in the pan—just be sure to place the phyllo rolls together very snugly)
Pastry brush
To make the clarified butter, slowly melt the butter in a heavy-bottom saucepan over low heat. After about 5 minutes it will begin to bubble and foam. Skim off the foam. Take the pan off the heat and let the butter settle for 3 to 5 minutes. The milky solids will sink to the bottom of the pan. Carefully pour off the clear liquid into a container, leaving the solids behind (discard the solids). (The clarified butter can be made ahead; it will keep in an airtight container in the refrigerator for months.)
To make the nut filling, use a food processor fitted with the standard blade to finely grind the pine nuts. (Don’t over-grind to the point of liquefying into a nut butter—just to fine bits. Pine nuts are very oily, so they will stick together but not quite form a paste.) Transfer the ground nuts to a large bowl. Add the sugar and mix well until uniformly combined. Add the mazaher and mix well.
Preheat the oven 325°F with a rack positioned in the center. Line the baking pan with parchment paper.
Unwrap and unroll the phyllo dough, leaving the sheets stacked together on top of the plastic wrapping (even if you end up cutting through it, having the phyllo on the plastic makes it easier to move it around and helps keep it from drying out). Lay the sheets flat on a large cutting board. Use a ruler or straight edge and a large knife to cut the sheets in thirds lengthwise. (Different brands vary a bit in the number and size of sheets in each package. I use Apollo brand, which has 16 sheets about 14 by 18 inches, so when I cut the sheets in 3 equal strips I have 48 strips that are each about 4¾ inches wide. If your package has more or fewer sheets and/or they are a somewhat different size, the recipe will still work just fine—you’ll just get a different number of rolls of a somewhat different size.)
Immediately cover the stack of phyllo strips loosely with a sheet of plastic wrap topped with a slightly damp, clean kitchen towel and keep it covered until you have finished assembling the baklawa. (This is important: phyllo is paper-thin and tends to dry out very quickly, so it must always be covered.)
Carefully take a single phyllo strip at a time and lay it down on a flat surface, with one of the short sides facing you. Brush the phyllo strip lightly with clarified butter. Place a tablespoon of sugared nuts about 2½ to 3 inches above the bottom edge of the strip. Mound the nuts into a small rounded log approximately 2 inches wide and parallel to the bottom edge of the phyllo strip. Fold the bottom edge of phyllo up and over the nuts and roll tightly a few times, taking care not to tear the dough. Fold in the outer edges of the strip, tuck them in, and continue rolling the remaining length of the strip, brushing on a little more butter as needed to help the dough stay barely moist. (You will end up with a little cylinder about 3 inches long and 1 inch in diameter.) Set the roll seam-side down on the prepared baking sheet, placing it snugly in the corner of the pan. Repeat with the remaining 47 strips of phyllo, placing them tightly together in the baking pan (don’t leave space in between or they will puff and loosen—but if there is space in the pan the rolls on the outer edge will be just fine, so long as you roll them nice and tight, place them seam-side down in the pan, and snug them up against the other rolls on one side). Brush the rolls with the remaining butter (or just pour over top).
Bake 30 to 35 minutes, or just until lightly golden. Do not overbake.
Remove the pan from the oven and immediately—but slowly—pour the syrup all over the pastry, distributing it evenly.
Allow the baklawa to cool completely in the pan (it will absorb the syrup), then transfer to a serving tray; or store at room temperature, covered loosely with wax paper or foil (don’t wrap tightly or they will get soggy) and keep in a cool place for up to 2 weeks.
important: phyllo comes in a range of thicknesses. I use Apollo brand #7 sheets, which are a medium thickness. There is also a #10 thickness, which is extra thick. I’ve found that other brands vary widely in thickness and some are so thin that they’re difficult to work with, especially if you are new to phyllo.
note: Mazaher (orange blossom water) is distilled from the petals of orange blossoms and it is a key ingredient in Lebanese baklawa, giving the pastry an amazing, subtle, and uplifting perfume. Mazaher is sold at Middle Eastern markets and many large supermarkets. You can also order it online.
Petite Pumpkin Pies with Toasted Marshmallow Topping

Now That’s Using Your Googootz!
When Rosie and I were growing up, we always painted the faces on our jack-o’-lanterns. “Why,” my thrifty and practical mother would say, “would we waste a perfectly good pumpkin by cutting a face in it and putting it out to rot?” After Halloween we would wash the paint off the pumpkins, cut them up, and cook up all kinds of wonderful dishes. Mom certainly wasn’t depriving us, she was just using her googootz—literally! I should explain: googootz is an Italian-American term for various kinds of squash. Also, all my life I’d also hear my uncles and a lot of the older uncle-like guys who were always around use the word mockingly, when teasing someone for being empty-headed, as in “Don’t be a big googootz!” In other words, a big pumpkin head.
Having raised two kids in suburban New Jersey, I have carved many jack-o’-lanterns, and I long ago discovered the wonders of baking with canned pumpkin purée (though I do love cooking with fresh roasted pumpkin and by all means encourage you to use it in any of the following recipes—just be sure to purée it very finely).
If there’s an easier and tastier recipe for homemade cake than this, I haven’t found it yet. It’s the kind of treat you can throw together on the fly, without planning or shopping ahead, as long as you have the most basic baking staples and some pumpkin purée on hand (it’s one of those canned items that seems to take up residence in the cupboard, know what I mean?). The fragrant little cakes are so moist and delicious, you really could go without the mascarpone frosting. But don’t get me wrong; I’m not saying you should go without the frosting … it is divinely creamy, super-easy, and dresses up the quick little cakes beautifully.
MAKES ABOUT 3 DOZEN
PUMPKIN SPICE BABYCAKES
1½ cups all-purpose flour
1½ teaspoons pumpkin pie spice
¾ teaspoon baking soda
¼ teaspoon baking powder
½ teaspoon fine sea salt
6 tablespoons unsalted butter, at room temperature
¾ cup packed dark brown sugar
2 large eggs
¼ cup orange juice
1½ teaspoons vanilla extract
1 cup pure pumpkin purée
equipment
Two heavyweight nonstick 24-cavity mini muffin pans
Pastry bag and large star tip
Preheat the oven to 350°F with two racks positioned in the upper and lower thirds of the oven. Grease the mini muffin pans.
In a large bowl, sift together the flour, pumpkin pie spice, baking soda, baking powder, and sea salt.
In a separate large bowl, cream together the butter and sugar. Add the eggs, orange juice, and vanilla and beat to combine. Then add the pumpkin and mix well. (The batter will look very unappealing at this point—no worries!)
Stir in the flour mixture just until incorporated.
Spoon the batter into the pans, filling 36 of the cavities about two-thirds of the way to the rim.
Bake 8 to 10 minutes, or until the tops of the cakes are evenly browned and spring back when gently pressed with a finger, rotating the pans front to back and top to bottom halfway through the baking time. Set the pans on wire racks and let the cakes cool to room temperature before easing them out of the cups.
Cut the cakes in half crosswise and use a piping bag fitted with a star tip to fill with frosting. Pipe a little star of frosting onto the center of the tops to give them a pretty finishing touch. Chill to set, bout 1 hour, then let sit 30 minutes at room temperature before serving.
tip: One cup pure pumpkin purée is half of a 15-ounce can of pumpkin purée. You can double the recipe to use the entire can all at once, but you can also freeze the leftover purée: transfer it to a zip-top freezer bag and squeeze out as much air as possible before sealing. Thaw before using to make another round of babycakes—or step it up to the sticky buns!
Mascarpone Frosting Makes about 2½ cups
4 ounces cream cheese, at room temperature
4 ounces (1 stick) unsalted butter, cut into tablespoons and softened
2 cups confectioners’ sugar
1 teaspoon vanilla extract
One 8-ounce tub mascarpone, at room temperature
equipment
Electric mixer
Combine the cream cheese, butter, and sugar in a large bowl and blend with a mixer on low speed until the sugar is incorporated, then switch the machine to medium-high and beat until light and creamy, 2 to 3 minutes. Add the vanilla extract and beat to incorporate.
Pour off any water that has separated out of the mascarpone. Add the mascarpone to the bowl and beat on low just until incorporated (take care not to overbeat, or you’ll have grainy frosting).
Use immediately or refrigerate for up to 1 week (bring to room temperature before using).
Double the batter for the Pumpkin Spice Babycakes, add a layer of super simple filling, and you have a lovely seasonal treat. Add maple brown butter glaze and you have an even lovelier, even more perfectly autumnal treat—and you may also get a standing ovation.
MAKES 2 DOZEN
FILLING
1 cup sweetened dried cranberries, coarsely chopped
1 cup toasted walnuts, coarsely chopped
¼ cup packed light brown sugar
1 teaspoon cinnamon
½ teaspoon nutmeg
Double recipe Pumpkin Spice Babycakes batter
Maple–Brown Butter Glaze (below)
equipment
Two 12-cavity, heavyweight, nonstick mini Bundt pans (preferably fluted)
Preheat the oven to 350°F with two racks positioned in the upper and lower thirds of the oven. Grease two 12-cavity mini Bundt pans.
In a medium bowl, combine the cranberries, nuts, light brown sugar, cinnamon, and nutmeg and stir well to combine. Set aside.
Prepare the batter as directed for Pumpkin Spice Babycakes.
Spoon 3 tablespoons of the batter into each Bundt, spreading evenly. Top each with 2 tablespoons of the cranberry nut mixture followed by another 3 tablespoons batter, filling to about ¼ inch below of the rim of the pan.
Bake 12 to 15 minutes, or until the tops of the cakes are evenly browned and spring back when gently pressed with a finger, rotating the pans front to back and top to bottom halfway through the baking time. Cool to room temperature on wire racks.
Turn the cooled cakes out of the pans and set them on a parchment-lined baking sheet. Drizzle with the glaze and leave at room temperature (or refrigerate briefly) until the glaze is set.
Maple-Brown Butter Glaze Makes about 3 cups
4 ounces (1 stick) unsalted butter
1½ cups confectioners’ sugar
½ cup maple syrup
Heat the butter in a small saucepan over medium-high heat until it turns a deep golden brown color, about 5 minutes. Pour the browned butter through a fine-mesh strainer into a bowl, discarding any dark sediment. Whisk in the confectioners’ sugar until combined, followed by the maple syrup. Use immediately.
Pumpkin Ginger Pecan Sticky Buns
There is a reason that sticky buns are almost never homemade. All of the recipes I’ve ever tried for sticky buns (all the good ones anyway) require making a yeast dough that has to rise—twice. Now, I am a lady who makes her own cannoli, including the shells, from scratch, but I can’t hack double-rising dough (we all have our limits!). So how excited was I when my experiment with itsy bitsy upside-down pumpkin babycakes came out tasting for all the world like the best damn sticky buns I’ve ever had? What a happy surprise. And they are easy. Enjoy!
MAKES ABOUT 3 DOZEN
¼ cup crystallized ginger, very finely chopped
½ cup pecans, finely chopped
1 recipe Pumpkin Spice Babycakes batter
¾ cup Caramel Drizzle
equipment
Two heavyweight nonstick 24-cavity mini muffin pans
Preheat the oven to 350°F with two racks positioned in the upper and lower thirds of the oven. Generously butter the mini muffin pans.
Combine the ginger and pecans in a small bowl and use your fingers to mix until thoroughly combined. Set aside.
Prepare the batter as directed for Pumpkin Spice Babycakes.
Prepare the Caramel Drizzle.
Spoon (or better yet, use a squeeze bottle to dispense) about 1 teaspoon caramel into about 3 dozen of the wells in the prepared pans. Add 1 teaspoon of the ginger pecan mixture, then spoon in about 1 tablespoon of the batter, filling each cavity to within about ¼ inch of the pan rim.
Bake 8 to 10 minutes, or until the tops of the cakes are evenly browned and spring back when gently pressed with a finger, rotating the pans front to back and top to bottom halfway through the baking time. Cool on wire racks for a few minutes, then, while the sticky buns are still quite warm, use an offset spatula or a butter knife to ease the sticky buns out of the pan. (Turning the buns out before they’ve cooled off will help prevent the topping from adhering to the bottom of the pan, but if some does stick, don’t despair; just scoop it out and stick it back on top of the bun while still warm.)
Serve, gooey nutty sides up, at room temperature.
Petite Pumpkin Pies with Toasted Marshmallow Topping
For a lot of people it’s just not Thanksgiving without a casserole of candied sweet potatoes covered in marshmallows. That has never been my thing, maybe because I didn’t grow up having it. But I do adore pumpkin pie, and here’s my new favorite way to serve it: a simple, deliciously flaky crust (individual minis, of course) brimming with an ultra-classic filling (softly spiced and super silky), topped with a beautiful cloud of homemade marshmallow cream. Talk about a crowd-pleaser!
MAKES 2 DOZEN
CRUST
3⅓ cups all-purpose flour
½ teaspoon cinnamon
½ teaspoon ground ginger
¼ teaspoon freshly grated nutmeg
¾ teaspoon fine sea salt
11 ounces (2⅔ sticks) cold unsalted butter, cut into ½-inch cubes
⅓ cup ice water, plus more if needed
1 egg white, for brushing
Coarse sugar, for sprinkling
FILLING
One 15-ounce can pure pumpkin purée (2 cups)
4 large eggs
1 cup packed light brown sugar
½ teaspoon cinnamon
½ teaspoon ground ginger
½ teaspoon freshly grated nutmeg
1 cup evaporated milk
TOPPING
equipment
Food processor
Fluted mini tart pans measuring 3½ inches across the top, 2 inches across the bottom, and 1 inch deep, or as close to these dimensions as possible
4¾- to 5-inch round cutter, or a glass, can, or bowl with an opening of that diameter
Small pastry tamper, optional
Two large rimmed baking sheets
Combine the flour, cinnamon, ginger, nutmeg, and salt in the bowl of a food processor fitted with the standard blade and pulse to combine. Add the butter and pulse until the mixture resembles very coarse cornmeal (just a few 1-second pulses). Add ⅓ cup ice water, then pulse the machine a few more times. Add more ice water 1 teaspoon at a time, pulsing only enough to combine the ingredients—just until the mixture begins to gather together, but not long enough to allow it to form a ball.
Turn the dough out onto a large sheet of plastic wrap. Lightly pat the pieces together through the paper. Split the dough into 2 equal portions, pat each into a thick flat disk, wrap tightly, and refrigerate until well chilled, at least 2 hours. (The dough can be tightly wrapped and refrigerated overnight or double-wrapped and frozen for 1 month.)
On a smooth, lightly floured work surface, roll out 1 of the chilled disks of dough to an even thickness of about ⅛ inch. Use a 4¾- to 5-inch cutter to cut out 6 circles of dough, rerolling the scraps as needed. (The dough circles can be layered with parchment or wax paper, wrapped tightly in plastic, and refrigerated for up to 2 days; or double-wrapped and frozen for up to 1 month.)
Carefully transfer the dough circles to the tartlet pans, pressing gently with a pastry tamper or your fingers to mold the dough to the pan. Each circle should have an overhang of about ¼ inch of dough above the edge of the pan. Roll out the second disk of dough and cut it into more rounds, rerolling scraps as needed to make all 12.
To make a fluted edge, turn the overhanging dough under to form a rolled edge, then crimp by pinching it at ½-inch intervals between your thumb and bent finger and pushing forward on a slant with your finger while pulling back with your thumb. Freeze until firm, about 15 minutes.
While the dough chills, preheat the oven to 425°F and cut twelve 5-inch circles of parchment. Line the chilled crusts with the parchment and fill with uncooked rice or dried uncooked beans (this will weigh down the crusts while they prebake and prevent them from shrinking). Set the tartlet pans on rimmed baking sheets and bake 10 minutes. Lift out the parchment and rice or beans (which can be kept in a jar and re-used for the same purpose), and bake 5 more minutes, or just until lightly browned all over. Set the trays of prebaked crusts aside to cool on wire racks.
Turn oven temperature down to 350°F.
To make the filling, combine the pumpkin, eggs, sugar, spices, and evaporated milk in a large bowl and whisk together until well combined.
Divide the filling among the prebaked crusts, filling each level with the top edge. Set the pans on rimmed baking sheets and bake for 25 minutes, or just until the edges are set but the center is still slightly jiggly, rotating from top to bottom and front to back halfway through the baking time.
Set the baking sheets on wire racks and let the pies cool completely to room temperature. (Best to make at least 1 day ahead and store at room temperature, loosely covered with foil. It’s important to cool before adding marshmallow topping, so it doesn’t melt from bottom up before getting toasted on top.)
Preheat the broiler to low, with a rack positioned in the center of the oven.
Top each pie with a generous dollop of marshmallow cream, swirling decoratively. Transfer the pies on the baking sheets back into the oven for about 1 minute, just until the marshmallow topping is lightly toasted.
Cool to room temperature before serving—best to make at least 1 day ahead (the same is true for all pies), and could be made up to 3 days in advance. If so, refrigerate, but not too tightly covered so crusts don’t get soggy, then bring to room temperature before serving.
I love the holidays and all the baking that comes with the territory. I enjoy putting a tray of home-baked goodies out after dinner and just sitting around talking over a cup of coffee or two. I also like taking things I’ve baked to people’s houses as gifts or as part of a potluck supper. Everybody loves them—I mean, who doesn’t like getting treats? There are many treats from this book that you could put on a holiday treat tray (I like to decorate my treat trays with sprigs of pine and holly, plus maybe a Christmas ornament to keep things festive). Below is a short list I’ve gathered based on a few rules I follow when I’m making up a holiday tray: All of the treats must be good make-aheads that keep well and/or can be frozen. There must be something festive about them. And, most important, they must be extraordinarily yummy. Here’s a list of some of my favorites that meet all of those criteria:
Caramel Chocolate Walnut Tartlettini
Pumpkin Ginger Pecan Sticky Buns