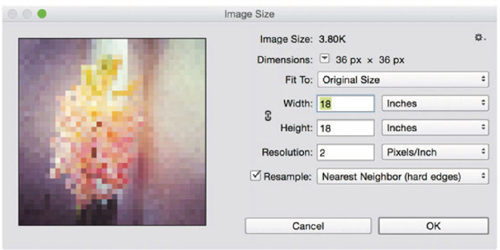
We made this cotton sateen pillow following the Portrait Pillow instructions on this page. Instead of printing a family photo, we printed a pixellated version of the hyacinth photo on this page.
DIG INTO DIGITAL
Some people feel intimidated when they hear the term “digital design.” We admit–it sounds kind of fancy and technical. But we’re here to break it down for you so that you understand how accessible it is to anyone with a computer. Put simply, digital design is the process you use to transfer an idea from your head to a computer screen and how you then manipulate it to make it look the way you want.
Your design may start on paper, from a photograph, or from a graphics program. No matter how it arrives on the screen in front of you, you have the power to transform it in a multitude of ways. In this chapter, we focus on the basic concepts that will help you as you get started. In the chapters that follow we explore the many techniques you can use to manipulate the design.
We made this cotton sateen pillow following the Portrait Pillow instructions on this page. Instead of printing a family photo, we printed a pixellated version of the hyacinth photo on this page.
Here are some important definitions for terms we use throughout the book. To get started, we keep these definitions pretty simple. At the end of most of the entries is a cross reference to another page where you can get more in-depth information when you’re ready.
PIXELS
Pixels are tiny bits of information that make up digital image files. Think of pixels as Legos or puzzle pieces—a collection of many units that work together to make a bigger design. On a computer monitor, they generally look like little squares but are often referred to as dots, too. (Read more about them on this page, because they’re really important!)
RESOLUTION
Resolution is the number of pixels or dots displayed per inch. It is often labeled ppi (pixels per inch) or dpi (dots per inch). We use dpi when we reference the printing process, which is customary. When you look at an image on a computer screen or as it is printed on a piece of paper or fabric, the pixels are represented by dots of light or ink. The more pixels you have in a digital image, the more versatility you have when changing its size or printing it (see the Pixel Equation on this page for more detail).
FILE
A computer file is a collection of data. While “file” is often used to describe a text file, an image is stored in a file, too.
There are different file types (such as .jpg or .tif) because there are different ways to organize that information so the computer can store and understand it. (Learn more about file types on this page.)
CANVAS
In the digital sense, we use the term “canvas” to describe the new file that we create to start a design in a graphics program. A canvas is defined in terms of pixels, so you create a new file that is x number of pixels tall by y number of pixels wide.
RESIZE
Resizing a design involves changing its dimensions; in the book, we use this term when we are making an image smaller. By contrast, we use the term “scaling” to describe making an image larger, although you may see these terms used interchangeably elsewhere. We resize images in the projects in Chapter 7.
SCALE
Scaling is a technique used to make a design larger without compromising its quality; it involves some easy math that is based on the Pixel Equation (this page). We scale images in the projects in Chapter 6.
SCAN
Scanning is the method used to convert a hand-drawn image or other object to a digital format using a tool called a scanner.
RASTER IMAGE
Raster images are made up of pixels arranged in a grid or pattern. When you look at a raster image up close, you will see each individual pixel. A digital photograph is a familiar example of a raster image.
VECTOR IMAGE
Instead of a grid of pixels, vector images are based on lines, curves, and other geometric shapes created from mathematical formulas in a computer program. (Read more about vector images, and the difference between vector and raster images, on this page.)
Digital images on your computer or your camera are essentially big collections of those little dots of data, pixels. Although your eye views it as a whole, a digital image is actually made up of hundreds, thousands, millions of dots even, depending on how big the image is. The more dots per inch, the sharper the image.
When you scan a piece of artwork, create a raster image (this page) in a graphics program, or take a photograph with a digital camera, you are creating a file with an exact number of pixels. An 8-megapixel iPhone camera creates a file with 8,000,000 pixels every time you click the button. When you make a new file in a graphics program, you can choose the number of pixels wide and the number of pixels tall you want that file to be.
PIXELS AND PRINTING
When you look at pixels on your computer or tablet screen, you see little dots of colored light. Your printer translates pixels into dots of ink, just as our big printers do at Spoonflower. The number of pixels in your image can have a big influence on the printed result, both in terms of quality and size.
If you don’t know it already, it’s easy to find out the number of pixels in your image, because you can open it in a graphics program and use the Image Size or Resize tool to see its size; you can also look at the information about the file in the Finder (Mac) or Explorer (Windows).
For many smooth printing surfaces such as photographic paper, 300 dpi (dots per inch) is the desired resolution. But Spoonflower uses a default resolution of just 150 dpi because our textured surfaces take less ink; this means your file sizes can be smaller and your design will upload faster, too.
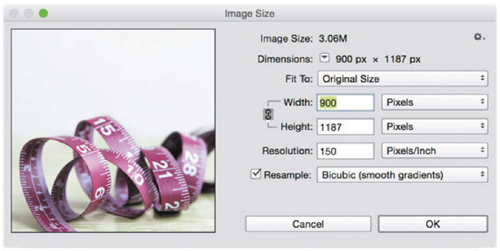
Let’s use a scenario to explore the relationship between pixels, image size, and resolution that is so important when you print: Let’s say you have a photo of a tape measure that is 900 pixels wide and you would like to print one large image of it at 36 inches, to fill a yard of fabric. To determine if you have enough pixels to print it clearly at that size we use the Pixel Equation (see left).
Since we know the number of pixels in the image and the resolution needed, let’s do the math using version 1 of the equation (Figure 1):
900 PIXELS ÷ 150 DPI = 6 INCHES
But 6 inches is not what you had in mind. Don’t despair; here’s how the formula can help you. Since you need your design to be larger, you need to start with more pixels. This is the key to working with pixels—you must think before you scan, snap, or create, because you can’t manufacture more pixels. It would be great if you could simply enlarge your 900-pixel image and have it print clearly at the size you want … but you can’t, even though it may appear otherwise.
If you play around with your photo-editing program, you may come across a little box where you can type in any number of pixels you want to seemingly make an image bigger. But it’s really an illusion, because to do so, the editing program pulls all of your original pixels apart and then tries to fill in the gaps between them by guessing what color should go where. That’s why your image could end up looking blurry or jagged, the quality described as “pixelated.” So while it is easy to delete pixels to make an image smaller, you can’t reliably create pixels to make an image larger if pristine clarity is what you’re seeking.
FIGURE 1 The tape measure photo is 900 pixels wide. Remember the pixel equation shows us that 900 pixels at 150 dpi will give us an image that is 6 inches (15 cm) wide.
All that said, let’s use version 2 of the Pixel Equation to determine how many pixels the tape measure image needs to be printed at 36 inches, which is your goal.
36 INCHES X 150 DPI = 5400 PIXELS
So to get the result you want for this giant tape measure design, you would need to start with an image that is 5400 pixels wide. There are lots of ways to make an image suitable for printing when you know what size you need. You can start by creating a new file exactly to your specifications—by designing it with software, taking a photo at a high-quality setting, creating original artwork, or cropping and resizing a larger image—and you will learn all of those techniques step-by-step as you work through the projects in the coming chapters.
As you read through the book, you will see that we use one of the variations of the Pixel Equation in almost every project. Sometimes it makes sense to approach a design through intuition and trial-and-error, but sometimes you need to have a little more control. Understanding the Pixel Equation lets you make intentional artistic choices to help you create the design you really want.
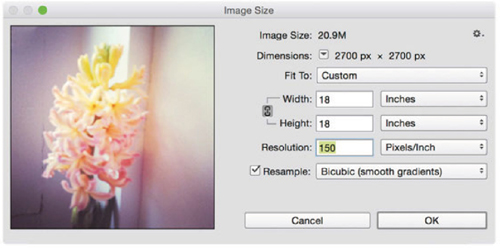
FIGURE 2 The original hyacinth photo is 2700 pixels × 2700 pixels. If we print it at 150 pixels per inch, it will be 18 inches (46 cm) square.
FIGURE 3 When we reset the resolution to 2 pixels per inch, we create a pixellated effect because each pixel appears as a large square.
Raster Images vs Vector Images
Raster and vector images are both considered digital images, but vector images are not based on pixels. Vector images are based on points, lines, curves, and polygons defined by the graphics program and described as mathematical formulas. When you are ready to print a vector-based image, you choose the size you want to print, and the program (such as Adobe Illustrator) translates the vectors, lines, and shapes into a collection of pixels that the printer can understand. Unlike raster images, vector images are scalable up and down to almost any size without affecting how they look, because you only create the pixels when you need to use them, so to speak.
Many designers work with both kinds of images, depending on what they are trying to accomplish. Neither is better than the other: They are just used differently to accomplish different looks and effects.
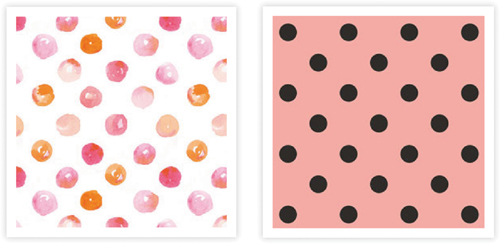
Though both of these designs feature polka dots, they were created in very different ways. Emily Sanford’s Polkadots in Water (above left) is a raster image: the original artwork was done in watercolor and scanned. By contrast, Andrea Whalen’s Polkas in Sheer Stockings (above right) is a vector image, created entirely on the computer in a graphics program.
ABOUT RASTER IMAGES
+ Photographs or scans are raster images.
+ Raster images allow much more fine detail. Because you can set every pixel to a different color, you have a lot more control over shading, texture, and depth. You can reproduce effects like watercolor painting or shiny chrome through manipulation of the colors, pixel by pixel.
+ Adobe Photoshop, PicMonkey, and Gimp all work primarily with raster images.
ABOUT VECTOR IMAGES
+ Vector images are best for producing precise shapes and smooth lines and curves. Geometric patterns are easy to do with vector-based images.
+ Vector images deal with color much more simply than raster images. Each line or shape can be filled with a color or gradient and it is easy to change colors. However, it is much more difficult to create effects like shadows or organic textures.
+ Business logos are often created using vector graphics so they can be scaled to any size without losing quality.
+ Adobe Illustrator and Inkscape work primarily with vector images.
The last topic in our digital overview involves file type, which describes the way that the computer organizes and saves the millions of pixels it has to keep track of in a digital file. Each graphics program uses different file types, and each works a little differently.
When you are working on a new design in a graphics program, you will be prompted to choose a file type when you save it. You will have many options, depending on the program, and you can save versions of your design in a variety of file formats. Spoonflower is set up to accept several different kinds (described below), but we recommend uploading your designs as a .jpg or a .png file.
Some programs, like Photoshop and Illustrator, also have their own file formats that are designed to preserve all of your working layers, history, and color palettes. These .psd or .ai files are not directly uploadable to Spoonflower because they contain too much extra information for the printers; however, they are a great way to save your design as you are editing and working on it. Once you have the design finished, you can save it or export it as a .jpg file (or any of the others listed below) and upload to Spoonflower.
Here is an overview of some of the file types we accept:
+ .jpg or .jpeg is probably the most universal file type. It is a standard format for images and graphics. Most cameras and scanners are set up to create .jpg files by default.
+ .png is also a common file type that is capable of preserving sharpness and fidelity; it can be better for line art designs.
+ .tif or .tiff is also a standard format for images and graphics. File sizes tend to be larger than other formats due to less compression of data.
+ .gif files are often used for web design, as they can support transparency and animation, but they can be desirable for computer-generated images with a limited color palette.