Go Beyond Basic Messages
Now that you know the basics of messaging in Slack, it’s time to look at more sophisticated options: message attachments and two special kinds of text you can insert via the Messages field: snippets and posts. In Insert Snippets, I discuss how to insert structured text such as color-coded programming code or Markdown, and in Create Posts, I look at posts, which are essentially documents that can be commented on and edited by other people.
Finally, for those times when only a voice conversation will do, I talk about how to Place Calls, a feature that works somewhat differently from Slack’s usual approach.
Work with Attachments
With its treatment of attachments, Slack moves beyond being just a messaging tool to also being a simple file server. By attachments, I mean files that any team member brings into the team, either privately just for themselves or more publicly in a channel or direct message conversation.
Attachments can be uploaded and stored centrally on Slack’s servers, or they can be linked to from several outside services, including Dropbox, Google Drive, and Box.
Upload a File
You can add a file to a Slack team in any channel or conversation, or you can upload it to just your private file storage area:
- Click the Add File
 button next to the message field, and:
- In a desktop app or the Web app, choose Upload a File and then navigate to and open the file you want to upload. (If you see a command like Import from Dropbox, you can choose it to link to a file on that service. For more details, see the sidebar Quick Primer on Attachments and Integrations, ahead.)
- The desktop and Web apps also let you drag and drop a file onto the Slack window (Figure 59). Yes, this even works with the Web app! Hold down Shift to bypass the details dialog.
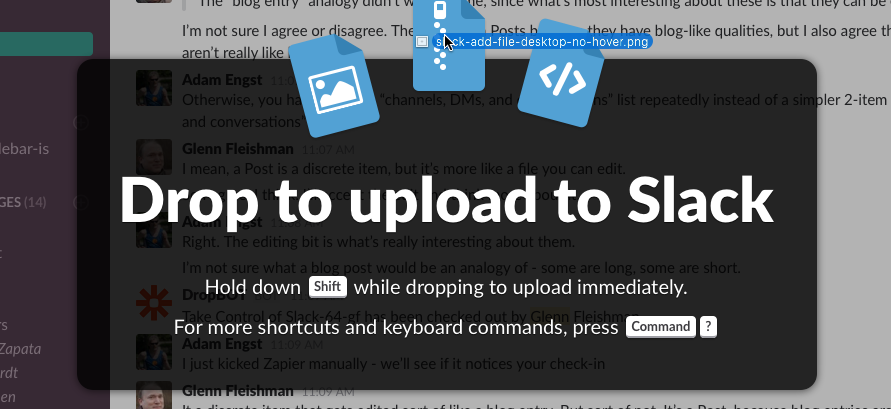
Figure 59: You can drag and drop images directly into Slack. - In iOS, you can upload any file, but it has to come from either the Camera or Photos app, iCloud Drive, or an installed extension that lets you connect to cloud storage or other servers. Tap Import File From (Figure 60, left), and then you see lists of appropriate matches; in my case, that’s iCloud Drive, Dropbox, and the file-transfer app Transmit (Figure 60, right).

Figure 60: Slack for iOS lets you import photos along with files from iCloud Drive and any installed extensions for file-transfer apps. At left, the photo and file option; at right, the Import File services. - In Android, tap Pick a File to select and import a file, regardless of origin. Depending on your setup, you can select from Google Drive, Images, Google Photos, and more (Figure 61).
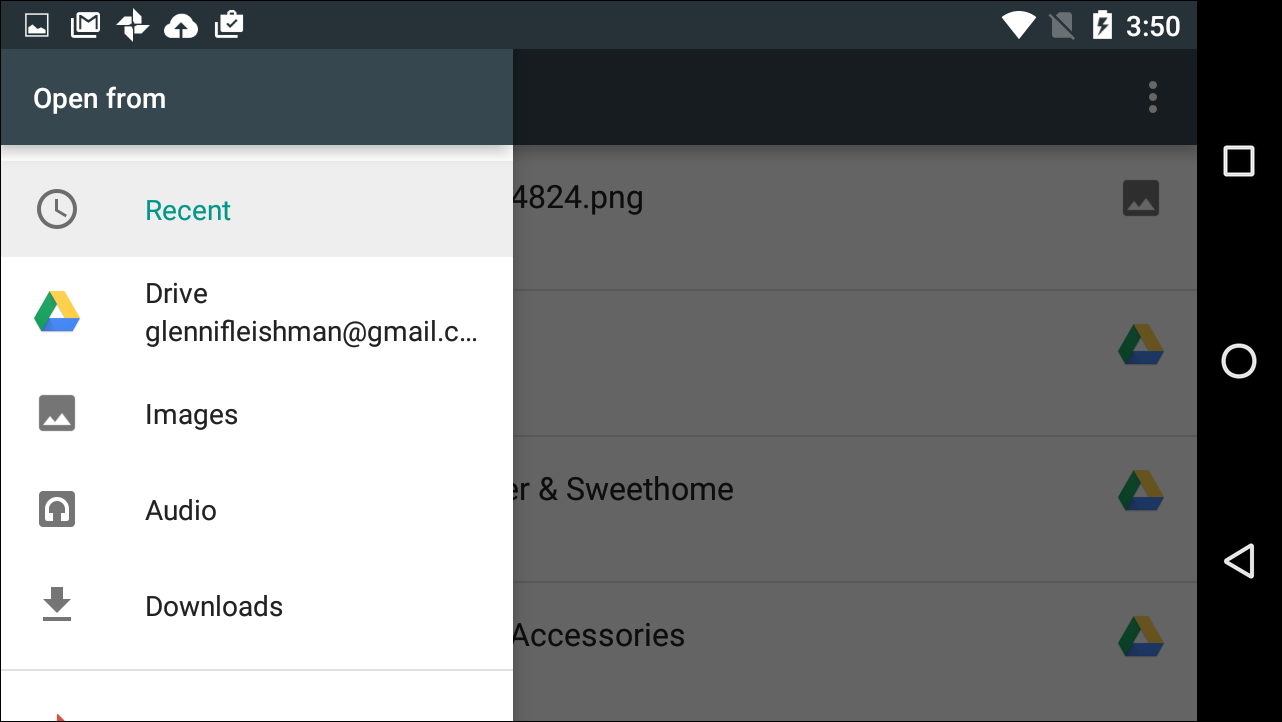
Figure 61: In Android, Slack allows fewer types of file uploads than it does in iOS.
- In the dialog that appears, either keep the default filename or enter a new title (Figure 62).
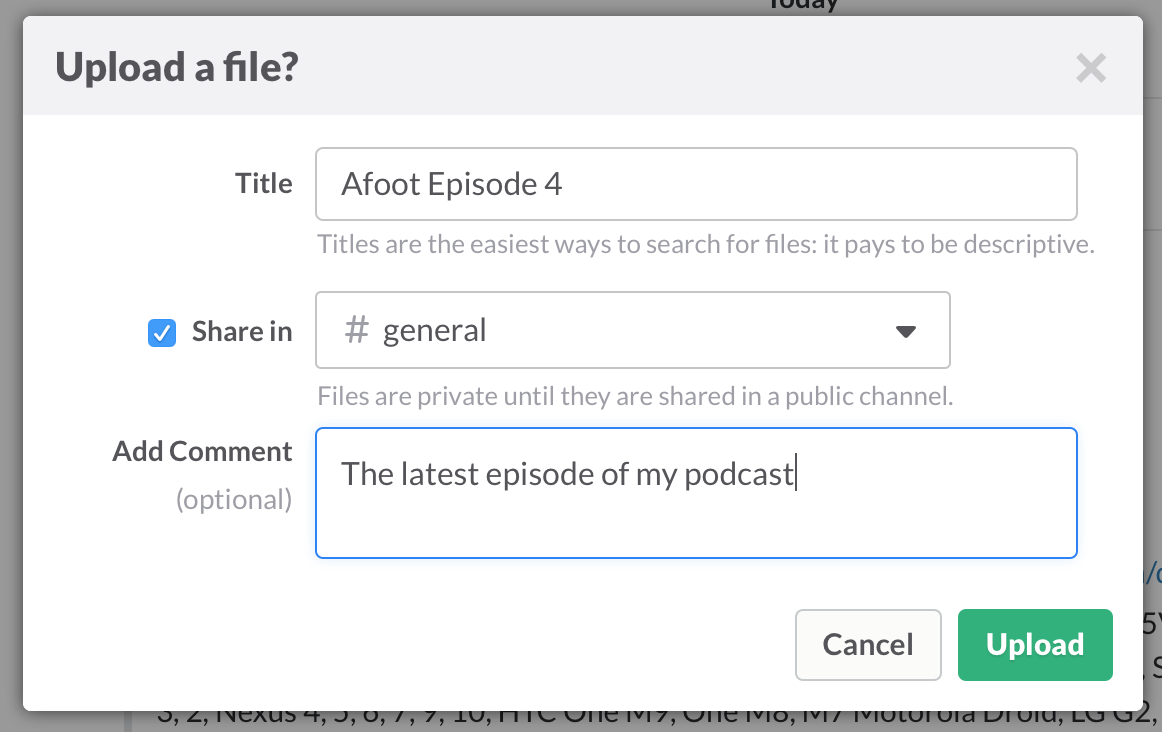
Figure 62: Enter a title, choose an upload location, and add a comment. (If a conversation is chosen in the Share In pop-up menu, your dialog will look slightly different.) - If you want the file to appear in just your private file list in the Slack team, deselect the Share In checkbox. Otherwise, to share the file with others, keep the Share In checkbox selected and pick a channel or conversation from the pop-up menu.
- Optionally, add a comment.
- Click Upload.
Regardless of whether you selected the Share In box, to see the uploaded file, open the More Items ![]() menu and choose Your Files (in iOS, tap the More Items
menu and choose Your Files (in iOS, tap the More Items  button and tap Files > Just You; the Android app lacks this feature). If you left the Share In box selected, the file appears inline in the message list. In either case, an uploaded image appears as a thumbnail that you can click or tap to see a larger preview. Other types of files display icons instead of thumbnails (Figure 63).

You can’t delete an uploaded file by deleting the message that references it. For help, see Manage Uploaded Files.
Link a Box, Dropbox, or Google Docs Item
Although an integration may connect Google Drive (including Google Docs), Box, or Dropbox to your team, you can bring files from any of these services into your team even if the integrations have not been set up. Start by finding a link to a file that you want to attach, and then paste the link into a Slack message. Slackbot asks how it should import the link (Figure 65).

You’re prompted with four choices; Just This Once and Not Now are good options for Slack beginners, because they are one-time selections:
- Just This Once: This option adds the equivalent of an indexed link to the Slack channel or conversation, allowing the file to be searched for, commented on, reacted to, and so on. It isn’t imported and doesn’t count against your Slack storage limits. If the source file changes and then you manually “refresh” it in Slack (or wait for it to happen automatically), the file’s text view in Slack refreshes too, and is re-indexed for Slack’s search function.
- Not Now: This option puts a clickable version of the link in the message list, but Slack treats it as just a Web link, and does not attach the file.
The Yes and Never choices are for when you are certain how you want to handle all future links that you paste in from this service:
- Yes: Yes is like Just This Once, applied automatically to all future links pasted in from the service being used.
- Never: Never is like Not Now, applied automatically to all future links pasted in from the service being used.
The first time you pick Yes or Just This Once, Slack brings up an authentication page for the service.
There’s no simple way to change Yes and Never to other answers, but you can disconnect this category of service using the Connected Accounts page in the Slack App Directory (to view that page, in your Web browser’s address field, enter team-name.slack.com/apps/manage/connections). Then make a different choice on your next link or import.
Manage Uploaded Files
Before you can do anything with an uploaded file (or a snippet or post), you need to find it in Slack. To find a file, try one of the following:
- Look in the message list: This is the most obvious method, but unless the file was uploaded recently, it is also the least efficient.
- Search for it: I say more about searching in Search Effectively.
-
Look in the Files pane: Click or tap the More Items
 button in the upper right, and select Files, All Files, or Your Files (Figure 66, left). (Android lacks these options.) Whatever you select, you’ll see a pop-up menu that reads All File Types (or All Files), and just below that Everyone and Just You (Figure 66, right). Everyone shows all the files in the team; Just You lists just those that you added.
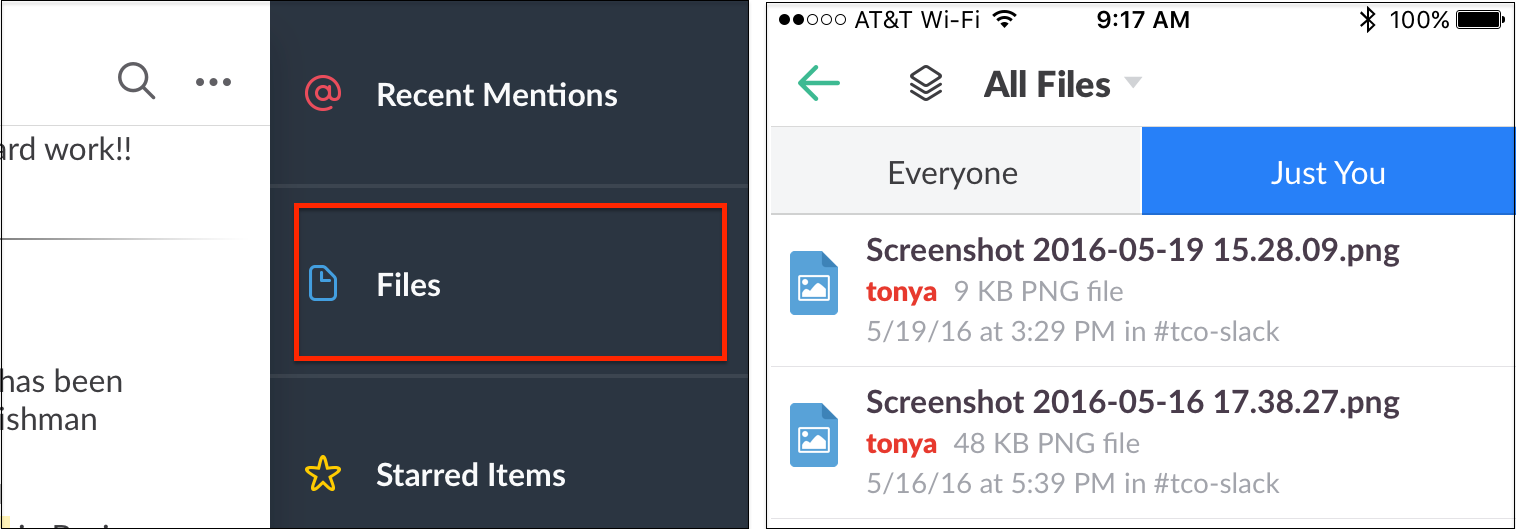
Figure 66: In iOS, tap the More Items button at the upper right to open the More Items sidebar and then tap Files (left) to view uploaded files (right). To filter which files are shown in either Everyone or Just You, open the pop-up menu and choose an option such as Posts, Snippets, Images, PDF Files, or (if connected) Google Docs.
Once you’ve found a file, you can see a preview or more information about it and access controls for working with it. Some of the options, like editing or reacting, are the same as those for any message.
The interface is a bit inconsistent between apps and between the message list and the Files pane, so I encourage you to hover over (or tap or click) all the icons—look for the More Actions ![]() button in the desktop and Web apps—and view any menus to become familiar with what’s where.
button in the desktop and Web apps—and view any menus to become familiar with what’s where.
In the lists below, I focus on what you can do in the Files pane and on explaining details that are more tightly related to attachments.
Basic file management:
- Refresh a linked file: The Refresh File command appears for documents linked from Box, Dropbox, and Google Docs. Choose it to update the local search index with the current contents of the remotely stored document.
- Rename a file: The Rename command appears only for your uploaded files, not for other people’s.
- Delete a file: Choose Delete File to remove a file from your team, or choose Delete File from Slack to remove the link to an item from Box, Dropbox, and Google Docs.
Viewing and downloading:
- Download a file to your device: Available only in the desktop and Web apps, the Download command transfers a copy of the file to your device.
- Transfer a file to another online service: For every integrated file-storage service, a Save To Service Name (like Save to Dropbox) command appears. This lets you take any uploaded file and make a copy elsewhere as an alternative to downloading.
- See the original file on the Web: If the Open Original command appears, choose it to bring up the file in a Web browser.
Sharing and collaborating:
-
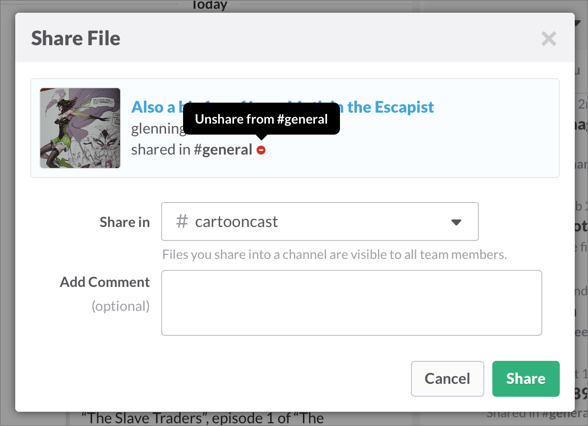
Share the file in another channel or conversation: Use the Share
 button or command to drop a reference elsewhere, with an optional comment (Figure 67).
-
Unshare a file: If you’ve shared a file as in the bullet item just above, use the Files pane in the desktop and Web apps to stop sharing it in any channel or conversation by clicking the corresponding tiny minus
 button that appears below its name. The button turns red when you hover over it.
 - Comment on a file: The comment buttons are fairly obvious, but their appearance varies by app, context, and more. Click one to add or view comments on an attached file.
-
Make a download URL for non-team members: Choose Create Public Link. Slack pops up a dialog containing a public Web URL, with the URL selected so you can easily copy it (Figure 68). Click Revoke to cancel the URL or click Done to save it. Once you click Done, the Create Public Link command changes to View Public Link.

Figure 68: You can create publicly available links and revoke them. View Public Link brings up the dialog shown in the figure above. Choose the command to remind yourself what the link is or to revoke it.
Insert Snippets
Although messages can be fairly long, and can include basic formatting, Slack offers another kind of message, called a snippet, for pasted-in chunks of text. Snippets are useful for two reasons. First, they let team members post large chunks of viewable and editable text without having to upload a file or clog the message list. Second, Slack automatically formats snippets with styles and syntax coloring for a variety of programming languages and a couple of text formats.
By my count, Slack offers 59 formats right now, plus pure Plain Text and an auto-format option. These include:
- A huge number of programming languages (like C++ and Swift) and scripting languages (like perl, JavaScript, AppleScript, and PHP)
- Formatting languages like HTML and XML
- Data structures like JSON
- Markdown, a common formatting approach for content-management systems
To post a snippet:
- Working in a desktop app or the Web app, click the Add File
 button next to the Message field and choose Create a Snippet. (Or, in the Files pane, click Add New File and choose Create a Snippet.)
 - In the Create Snippet dialog, give your snippet a title, choose the desired format (choose Auto Detect Type if you like), and then paste or type the snippet.
Even in the dialog, the snippet text has formatting applied (like bold and italics) and colors that correspond to the syntax of the particular language or format. Programmers who like this sort of thing really like it (count yours truly among them) because errors in coding or structure become obvious (Figure 69).
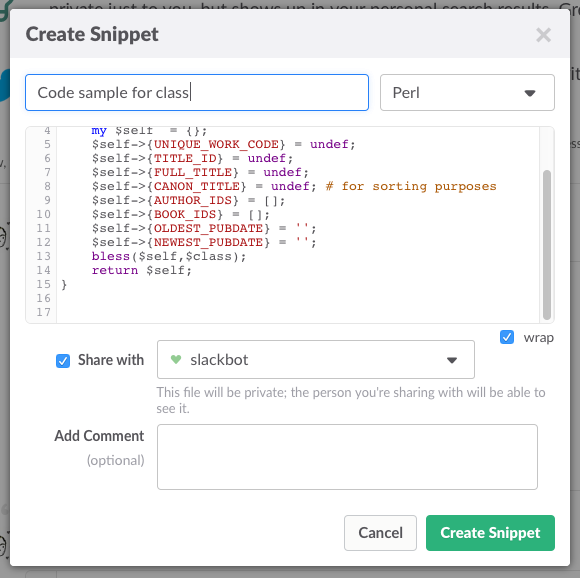
Figure 69: Code appears with color and other formatting that helps readers more easily parse the text and spot errors. With Markdown, you can’t see the formatted HTML results, but you can make sure that all the formatting you applied shows up where you think it ought (Figure 70).
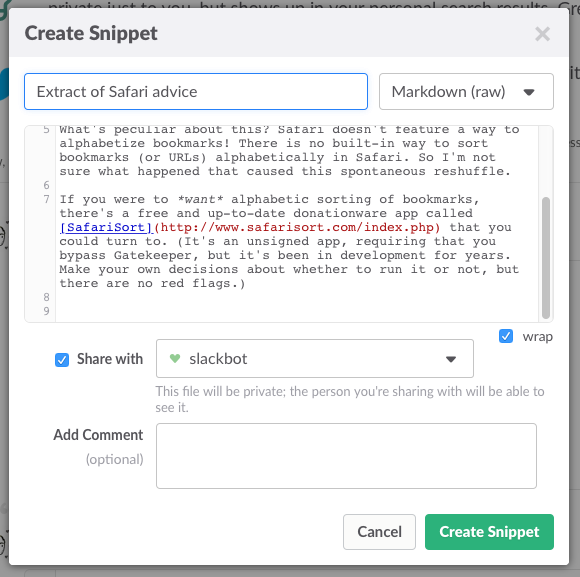
Figure 70: Markdown in a snippet uses a combination of colors and styles to call out your formatting codes. - Select the Wrap checkbox to soft-wrap the text to the column width instead of having it remain on a single line.
- Select the Share With checkbox if you want to share the snippet right away, and choose the location where you want to share it.
- Click Create Snippet.
Slack adds the snippet to your team and, if the snippet is shared as in Step 4 above, it posts it into the conversation or channel.
When added, a snippet is shown in a brief form by default; to expand it, click or tap it. Any member can collapse or expand it in their own view.
In the desktop and Web apps, clicking a snippet’s title shows it in context in the Files pane. In a mobile app, tapping a snippet’s title brings up a preview. At present, the mobile apps don’t show coloring and formatting, just the raw text.
In Slack’s desktop and Web apps, you aren’t limited to just viewing snippets you’ve created; you can also edit them; hover over one and click the Edit ![]() button. That could be useful for tweaking a snippet in response to comments, without having to make a whole new one. See Manage Uploaded Files, earlier in this chapter, if you need help with other options.
button. That could be useful for tweaking a snippet in response to comments, without having to make a whole new one. See Manage Uploaded Files, earlier in this chapter, if you need help with other options.
Create Posts
If what you want to say is too long for a normal Slack message, you can write a post instead. Posts have a lot of neat features:
- They appear inline in the message list and can behave much like normal messages, so they can be reacted to, pinned, and so forth.
- Posts appear in the Files pane and act like attachments and snippets, so they can be shared among conversations, given a public URL, and commented on.
- They can include formatting (Figure 71).

Figure 71: Posts allow blog-like formatted entries. - You can let others on your team edit them collaboratively, at least within the desktop and Web apps.
- Posts count against your team’s file-storage total, but not your message count, so in a free team, you don’t have to worry about a post disappearing.
To add a post, in a desktop app or the Web app, click the Add File  button adjacent to the Message field and choose Create a Post. Slack opens a window into which you can type or paste your post.
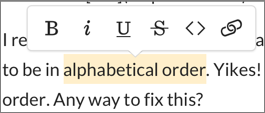
When you type a post, you can use the text-formatting options discussed earlier in Write a Message—like putting asterisks around text you want to appear as bold type—and Slack formats the text instantly as you finish typing them. Or you can just type and then select some text to format it with bold, italics, underline, and strikethrough (Figure 72); turn it to code formatting; or add a hypertext link (Figure 73).

Slack lets you add paragraph formatting too. Put the insertion point in a paragraph to see a paragraph ![]() icon at the left of the paragraph. Click the icon to choose a format (Figure 74).
icon at the left of the paragraph. Click the icon to choose a format (Figure 74).

Inline text formatting works here too, as long as you put a space after it: one, two, or three hash marks (#, ##, or ###) for H1, H2, or H3; or you can type an asterisk (*) or a number to start list formatting.
When you’re done typing and formatting your post, click Share to open the Share Post dialog. Choose the channel or conversation in which you want to place the post, select whether you want to let other people edit it, optionally give it a name and comment, and click Share.
If you forgot to select “Let others edit this Post” while sharing, you can do so afterward, at least in the desktop and Web apps. Open the post, click the More Actions ![]() button in the post window, and select Let Others Edit This Post (Figure 75).
button in the post window, and select Let Others Edit This Post (Figure 75).

Either way, team members can now modify the post one at a time. Any member editing the post (including you) must click Done Editing to push out changes (if any) and free up the post for another person to edit.
Slack’s mobile apps show an accurate preview of a post, but you can edit only the title in those versions.
You can further share and manage the post in the Files pane; see Manage Uploaded Files, earlier in this chapter, for more information.
Place Calls
People make an estimated 200 billion minutes worth of “audio phone calls” each year over voice over IP (VoIP) systems like Skype, Google Hangouts, FaceTime, WhatsApp, and hundreds of others—including Slack.
Members of paid teams can make group calls with up to 15 participants, and initiate calls in channels. Members of free teams can make only one-on-one calls in direct message conversations.
Configure Your Call Hardware
Make sure you have the right headset, earbuds, or microphone in place before you get started.
Desktop Call Hardware
Slack doesn’t let you configure microphone and headset options until you’re engaged in your first call. Slack defaults to your system preferences; for instance, on the Mac it uses the input and output chosen in System Preferences > Sound.
When your first call starts, click the gear ![]() icon at the bottom of the call window right away to open the Audio Settings popover and specify which input and output you want; you can do this even before the other party connects (Figure 76).
icon at the bottom of the call window right away to open the Audio Settings popover and specify which input and output you want; you can do this even before the other party connects (Figure 76).
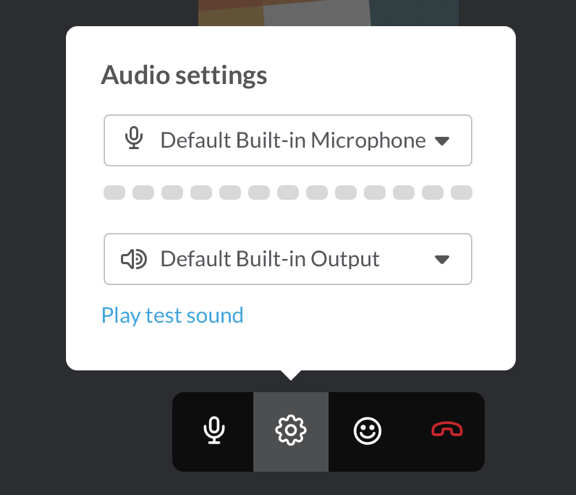
To confirm that your mic works, speak into it while watching the volume in the Audio Settings popover, which appears as a dashed line. The more green dashes that appear as you talk, the louder you’re speaking. (These dashes are supposed to look like rectangular green LEDs, typical on audio equipment, but they aren’t sufficiently skeuomorphic enough to make that clear.)
To check that you’ve chosen the right headphones, earbuds, or speakers, click “Play test sound.”
Web and Mobile Call Hardware
Slack doesn’t let you configure what your input and output options are when you place a call using the Web app or a mobile app. If you’re using an external device, plug it in and make sure any relevant audio system settings are in place, ideally before you start the call.
Start a Call
You start a call in one of two ways:
- In the desktop and Web apps, in the sidebar, select the conversation or channel where you want to start the call and click the Call
 button in the toolbar (Figure 77).

- In a mobile app, open a channel or conversation, and either tap the channel name in the toolbar or tap the person’s name in the toolbar and tap Call handle. (Or tap a person’s avatar in any view to see their profile, and then tap Call.)
- Type
/callin any conversation or channel. (This command currently isn’t recognized in the Android Slack app.)
After being invoked, calls start differently in one-on-one conversations, multi-party conversations, and channels.
For a one-on-one conversation, if the other person doesn’t pick up, Slack eventually tells you they missed the call (Figure 78). They get a similar message on their end telling them the same.

In a conversation, the call begins immediately. In a channel, however, Slack pops up a warning before you proceed (Figure 79).
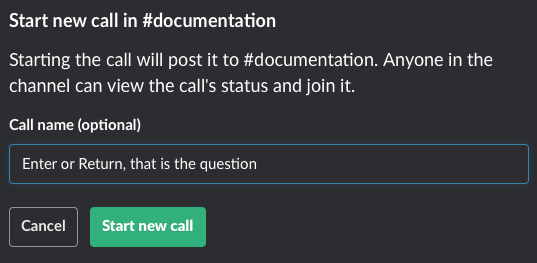
Once a channel call is created, a message about it appears in the channel’s message list. Up to 15 people can join.
Join a Call
Conversation calls appear in a separate window in the Slack app. You can accept (click the green phone handset icon) or decline (click the red phone-on-base icon).
Channel calls appear in the message list with a “Join this call” link. Any user in the channel can just click that link to join (Figure 80). The person who started the call sees a message saying, “Waiting for people” or “Waiting for some nice people to join” until someone else joins.

If you’ve called just one person, once the call is accepted, you see a large version of their profile avatar in the call window; with a group, all the avatars appear in the window, but the one in the center is the current speaker.
Interact on a Call
During the call, a few commands are available in the call window, with some variation by app:
-
Mute: Click the Mute Microphone button or tap Mute, which then appears with a slash through it (Figure 81). Unmute by clicking or tapping it again.
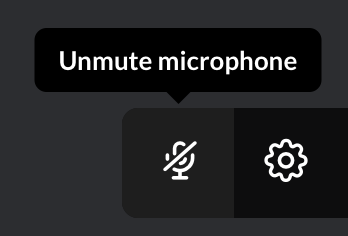
Figure 81: If you need to cough, mute the mic first. -
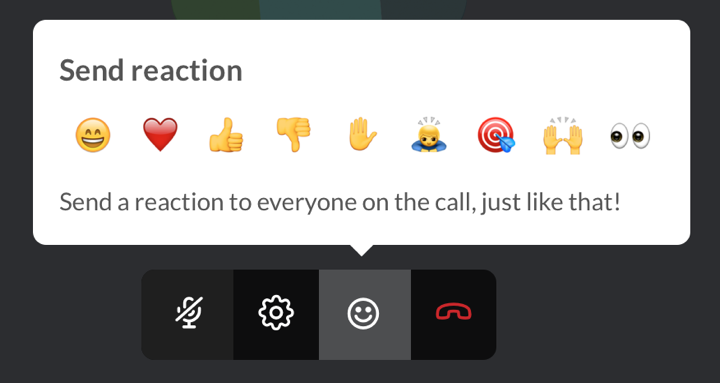
React (all but mobile): Click the Send Reaction
 button at the bottom of the call window and select a reaction (Figure 82). The recipient sees it as a replacement of their avatar in the upper-right corner of their window. The replacement appears for a few seconds and then disappears, with the avatar resuming its spot. This is a good way to express approval or disapproval without interrupting the speaker.
-
Invite more people to a channel call (paid teams): Click the Invite People
 button to invite specific team members in the desktop and Web apps, or tap Invite in a mobile app (Figure 83).

- Turn on speaker phone: In the mobile apps, tap Speaker to shunt audio to the device’s built-in speaker.
-
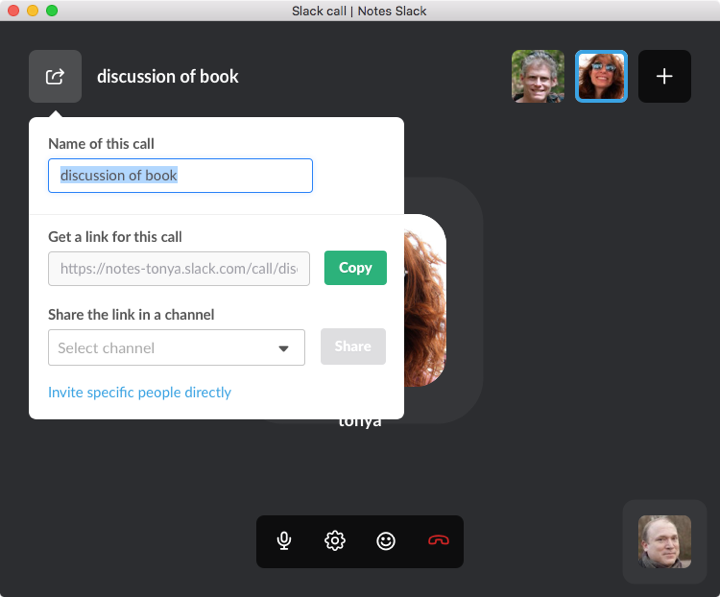
Call details (paid teams): You can name a channel call when you create it, or you can name any call afterward. In the desktop and Web apps, click the Share Call
 button, and in iOS, tap the participants/call name at the top of the screen. (Android doesn’t have this feature.)
In Call Settings, you can change the call’s name and share a link to the call in another channel. In the desktop and Web apps, it also gives you a call link to share and is; that can be another way to invite more participants (Figure 84).
- End the call: Hang up by clicking the red Leave Call icon.
Switch Out of a Slack Call
You might want to switch out of a call or minimize the call window in order to view something else on your computer or mobile device, like a calendar or document—or your Facebook feed.
In the desktop apps, if you switch to another app, a small floating panel reminds you of the other parties in the call, lets you mute audio, and allows you to hang up (Figure 85).

Interactions are more complex in the mobile apps:
- In iOS, you can minimize a call within Slack by tapping the minimize
 icon in the upper-left corner. When minimized, it floats above the rest of the Slack interface (Figure 86).

- In iOS, if you switch away from Slack, iOS displays a red bar (because the microphone is in use). Tap the bar to return to Slack (Figure 87).

- In Android, navigating away from the call within Slack made the call interface disappear! There was no way to recover it in the beta version I tested. However, you can get back to the call via the navigation bar technique explained in the next bullet point.
- In Android, the telephone icon in the notification bar shows that a call is in progress. Swipe down from the bar, find the call in the notifications list, and tap it to return to Slack with the call frontmost (Figure 88).
