21
CHAPTER
Automatic Gas Dryers
Gas and electric dryers are similar in operation, with the exception of how the air is heated for drying the clothes. The electric components in a gas dryer will operate on 120 volts only. They use liquefied petroleum gas (LP or LPG) or natural gas as a fuel, air (oxygen), and an ignition source to produce a flame. The gas burner can produce between 18,000 and 30,000 BTU/hr of heat, whereas the electric dryer produces between 17,000 and 19,000 BTU/hr of heat. All of the mechanics of the electric dryer, with the exception of the electric heater, are incorporated into the gas dryer.
The dryer will circulate the air, apply heat, and tumble the clothes to increase the surface exposure to remove water from the clothes by evaporation, and then vent the combustion by-products to the outside of the residence. The gas burner assembly includes a gas shutoff valve, burner, automatic solenoid gas control valve, pressure regulator, an ignition system, temperature controls, and safety limit controls.
The operating controls will prevent the burner from coming on if certain conditions are not met. Before the dryer can start, the door must be closed (closing the door switch), and then the consumer will set the timer and press the start button, starting the cycle. If for any reason the motor does not start, the burner operation will not commence. On some models, a belt switch is incorporated into the circuitry to prevent the burner from operating if the dryer belt breaks.
The safety switches will prevent burner operation if the temperature exceeds their pre-set limit. These safety switches are located on the burner chamber, bulkhead, and exhaust passages.
Top-of-the-line models offer electronic controls, moisture sensors to sense how much water is remaining in the clothes, and automatic cycles designed for custom drying a variety of fabrics and load sizes.
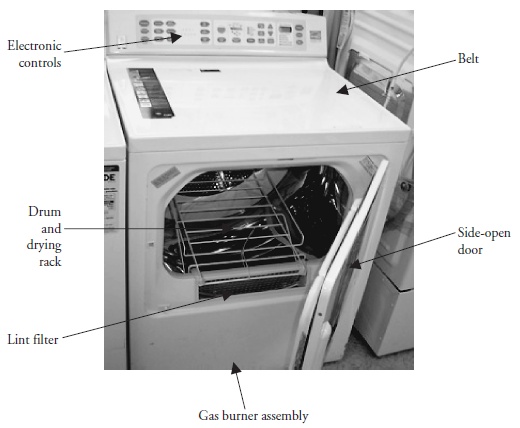
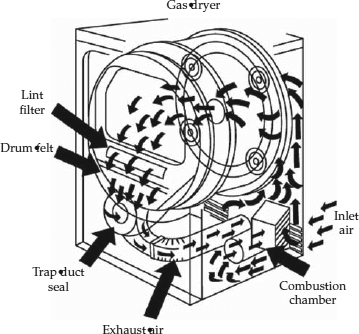
This chapter will provide the basic skills needed to diagnose and repair automatic gas dryers. Figure 21-1 identifies where the components are located within the automatic gas dryer. However, this illustration is used as an example only. The actual construction and features might vary, depending on what brand and model you are servicing.
FIGURE 21-1 The location of components in a typical automatic gas dryer. The consumer has a choice between a drop-down or side-open door.
Safety First
Any person who cannot use basic tools or follow written instructions should not attempt to install, maintain, or repair any automatic dryers. Any improper installation, preventive maintenance, or repairs could create a risk of personal injury or property damage.
If you do not fully understand the installation, preventive maintenance, or repair procedures in this chapter, or if you doubt your ability to complete the task on the automatic dryer, please call your service manager.
Do not store any flammable materials near a gas dryer, and avoid ignition sources in the event you smell gas leaking. Make sure you have proper ventilation when servicing the gas dryer to prevent carbon monoxide (CO) poisoning.
The following additional precautions should also be followed:
• Never bypass (or interfere with) the operation of any switch, component, or feature.
• Be careful of sharp edges when working on the dryer.
• The dryer produces combustible lint, and the area should be kept clean.
• Never remove any ground wires from the dryer or the third (grounding) prong from the service cord.
• Never use an extension cord to operate a dryer.
• The wiring used in dryers is made with a special heat-resistant insulation. Never substitute it with ordinary wire.
• Always follow the use and care guide instructions from the dryer manufacturer.
• Always keep combustible products away from the gas dryer.
• Keep the dryer clean of soot, grease, and food spillages.
• Teach your children not to play near or with the dryer.
• Always have a fire extinguisher nearby just in case of mishaps that might lead to a fire.
• Have a smoke detector and a carbon monoxide detector installed in the home, and check the batteries yearly.
• Make sure the gas dryer is properly vented according to the manufacturer’s recommendations. Never exhaust the dryer into a chimney, a common duct, an attic, or a crawl space.
Before continuing, take a moment to refresh your memory of the safety procedures in Chapter 2.
Automatic Gas Dryers in General
Much of the troubleshooting information in this chapter covers automatic gas dryers in general, rather than specific models, in order to present a broad overview of service techniques. The illustrations that are used in this chapter are for demonstration purposes only to clarify the description of how to service dryers. They in no way reflect upon a particular brand’s reliability.
Gas Supply Requirements
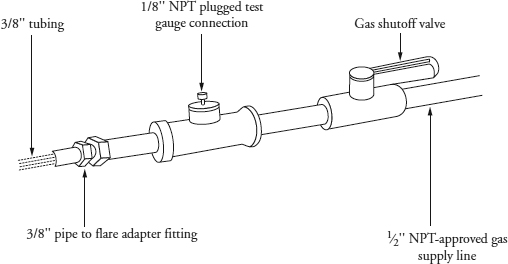
The gas dryer is manufactured and shipped for natural gas installation. If the gas supply to the home is liquefied petroleum gas (LP or LPG), the dryer will then have to be converted. When installing the gas supply line to the dryer, the shutoff valve must be within six feet of the product. This will make it easier to locate and shut off the supply of gas to the product for servicing. The recommended gas supply line size should be ½-inch IPS pipe; it is acceptable to use ⅜-inch tubing for less than 20 feet to connect to the shutoff valve, only if it is approved by the local codes in your area. The gas supply line must include a ⅛-inch NPT-plugged connection between the dryer and shutoff valve for testing the gas pressure (Figure 21-2).
FIGURE 21-2 A typical gas supply line to the dryer. The plugged test gauge connection will be used for testing the gas pressure.
For more information regarding gas appliance installations and gas supply line installations, refer to the following sources:
• National Fuel Gas Code
• International Fuel Gas Code
• The local gas codes in your area
• The manufacturer’s recommendations
• The AGA (American Gas Association)
Gas Tests for Gas Dryers
The following testing procedures should be carried out on every service call after repairing the gas dryer:
• To test the manifold pressure on the dryer, connect a manometer to the pressure tap on the gas valve. During the burner operation, the manometer reading should be between 2.5 and 4.0 inches water column.
• Inspect the flames entering the drying chamber, block off the exhaust vent, and inspect the flame length. The flames should not be entering the drying chamber.
• Inspect for flashback into the burner, block off the exhaust vent, and inspect for flashback into the burner during ignition.
• Checking for power interruption, interrupt the power momentarily for two seconds. The motor should not continue to run when the power is restored. The gas valve should not open when the power is restored until the ignitor is re-energized.
• Check for carbon deposit, and inspect the heater housing and burner assembly for carbon deposits.
• Inspect the ignition time of the ignitor (glow-bar); the time required for the glow-bar to light the gas burner should be between 50 and 90 seconds depending on the model serviced. Check with the technical data sheet.
• Check the ignition power; this is the power required for the glow-bar to light the gas (300 to 850 watts depending on which glow-bar ignitor is used in the dryer).
• Check the static pressure of the air flow in the dryer. With the dryer exhaust 100 percent blocked, measure the static pressure with a manometer. The minimum reading should be 1.6-inch water column.
Principles of Operation
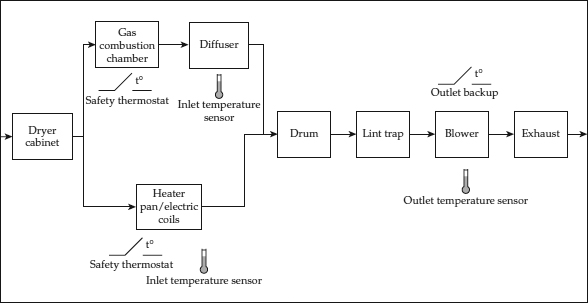
The clothes are placed into the dryer according to the manufacturer’s recommendation for proper loading. Next, the proper cycle is selected, and the dryer start button is pressed. The combination of the timer, the switches, thermistors, and/or the thermostats regulates the air temperature within the drum and the duration of the drying cycle. During the drying cycle, room air is pulled into the dryer drum from the lower rear (or sometimes the front) of the cabinet, depending on which model the consumer owns (Figures 21-3 and 21-4). The air is pulled through the gas burner assembly (combustion chamber), the drum, the lint screen, down through the lint chute, and through the fan housing. It is then pushed out of the exhaust duct. The drive motor, blower wheel, belt, and pulleys cause the drum to turn in a clockwise rotation at 40 to 60 RPM, and the air to move through the dryer. The belt wraps around the drum, motor pulley, and idler pulley. The blower wheel is secured to one end of the drive motor shaft, or there may be a separate motor to turn the blower wheel. As the drive motor turns, the drum rotates, moving the clothes. At the same time, the blower wheel turns, moving the air. The gas burner assembly will cycle on and off, according to the temperature selected.
FIGURE 21-3 Typical air flow pattern in an automatic gas dryer.
FIGURE 21-4 Gas dryer air flow system.
Functions and Cycles
Gas automatic dryers use three basic functions to operate:
• Heat is supplied by a gas burner.
• Air is drawn into the dryer. It is heated and circulated through the tumbling clothes. Then the warm, moisture-laden air is drawn through the lint screen and is vented through the duct system to the outside.
• Tumbling of the clothes is accomplished with a motor that drives a belt, which rotates the drum.
The cycles of a gas automatic dryer are as follows:
• Timed dry cycle The timed dry cycle is controlled by the amount of time selected on the timer. The temperature in the dryer is controlled by a thermostat or a thermistor, which turns the gas burner on and off throughout the timed cycle.
• Automatic dry cycle The automatic dry cycle is not controlled by the timer. This cycle is controlled by the cycling thermostats or thermistors. Heat is supplied to dry the clothes, and it will continue until the temperature in the drum reaches the selected cutout setting of the thermostat or thermistor. When the thermostat or thermistor is satisfied, the gas burner shuts off and the timer motor is activated. However, certain variables can control the cycle, which will cause the cycling of the thermostat or thermistor before the end of the cycle. (You may want to check the service manual for the model you are servicing.)
• Permanent press and knit cycles The permanent press and knit cycles are controlled by the amount of time selected on the timer. The temperatures of these cycles are controlled by the temperature rating of the cycling thermostats or by the thermistors that are located within the cabinet, on the exhaust duct, and in the air supply. On some models, the user can select the desired type of heat setting with the temperature selector switch, located on the control panel.
• Air dry The air-dry cycle is controlled by the amount of time selected on the timer. This cycle uses the air to dry the clothes. The gas burner is not used at all during this cycle.
Electrical Requirements and Tests for Gas Dryers
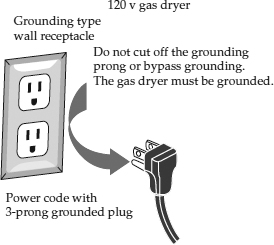
The dryer must be grounded. In the event of a malfunction, grounding will reduce the risk of electrical shock by a path of least resistance for electrical current. The dryer is equipped with a 120-volt power supply cord having an equipment-grounding conductor and a grounding three-prong plug. The plug must be plugged into a three-prong receptacle (120 volts) that is properly grounded in accordance with all local codes and ordinances (Figure 21-5). Never remove the grounding prong from the power cord.
FIGURE 21-5 This figure illustrates the proper way to plug in a gas dryer power cord.
While performing a service call on a gas dryer the following electrical tests should be performed:
• Continuity Use your multimeter and set it on the ohms scale. When measuring resistance between the terminal block ground and any exposed unpainted metal cabinet component, including control shafts and switches, there should be no more than 0.1 ohms resistance reading.
• Motor power Perform an audit on the motor (power required after 20 seconds with no load, and the motor is turning in the clockwise direction, and the electric heater is turned off). The reading should be between 200 and 280 watts. Next, perform a line test (power required after 1 to 5 seconds with no clothes in the dryer, the motor is turning in a clockwise direction, and the electric heater is turned off). The reading should be between 210 and 290 watts. If you do not have a wattmeter, use the Ohm’s Law formula to convert to watts.
• Low voltage start The minimum voltage needed to start the dryer motor is 100 VAC, 60 Hz (200 volts for 230 VAC, 50 Hz dryers). Place about 25 pounds of clothing with 100 percent moisture into the dryer and set the dryer at its maximum heat setting. Turn on the dryer and measure the voltage at the start of the dryer cycle. The voltage should not be below the listed voltage for any part of the cycle.
• Drum temperatures The following test will be run with the exhaust duct vent disconnected from the dryer. Take your multimeter temperature thermal couple and place it in the lint grill about 1 to 2 inches. You will need to set the dryer timer as needed for this test. The recordable temperature is to be the maximum temperature reading after the third cycle when the heater cycles off. There should not be any clothes in the dryer for this test. Each time the thermostat or thermistor cycles open, there should be equal to or higher than opening temperature for the next lower temperature setting.
• Maximum heating temperature when the heater cycles off is 120 to 180 degrees Fahrenheit.
• Medium heating temperature when the heater cycles off is 105 to 145 degrees Fahrenheit.
• Low heating temperature when the heater cycles off is 95 to 130 degrees Fahrenheit.
Gas Dryer Maintenance
Automatic dryers must be cleaned periodically. The excess lint must be removed to prevent the possibility of a fire and the possibility of the dryer not functioning properly. Most models have a service panel on the front of the dryer for accessibility. On other models, the front panel will have to be removed. The outside of the cabinet should be wiped with a damp cloth. It is recommended that the components be inspected for wear and tear; if repairs are needed, they should be made as soon as possible. The gas burner assembly must be inspected and cleaned yearly. The dryer gas line must also be inspected and checked for gas leaks yearly—sooner if you suspect a gas leak.
Vent System
A clogged or restricted vent system can cause the dryer not to function properly. The following symptoms can occur:
• The clothes take too long to dry.
• The clothes are too hot at the end of the cycle.
• Unusual noises coming from the dryer.
• At the end of the cycle, the clothes are damp and hot.
• The sensors and thermostats fail to operate properly.
• Complications in the burner assembly.
Proper Exhausting of the Dryer
Proper exhausting instructions for the model being installed are available through the manufacturer. Each manufacturer has its own specifications for the size and the length of the ductwork needed to run its dryer properly. The maximum length of the exhaust system depends upon the type of duct, the number of elbows, and the type of exhaust hood used. Figure 20-8 illustrates a typical dryer exhaust installation.
The following guide is recommended for the exhausting of a dryer:
• Keep the duct length as short as possible.
• Keep the number of elbows to a minimum to minimize the air resistance.
• Never reduce the diameter of round ductwork below 4 inches.
• Install all exhaust hoods at least 12 inches above ground level.
• The exhaust duct and exhaust hood should be inspected periodically and cleaned, if necessary.
• All duct joints should be taped. Never use screws to join the duct joints together. Screws protruding into the duct will cause lint buildup, and this will eventually clog the duct.
• Never exhaust the dryer into any wall, ceiling, attic, or under a building.
• Accumulated lint could become a fire hazard, and moisture could cause damage.
• If the exhaust duct is adjacent to an air conditioning duct, the exhaust duct must be insulated to prevent moisture buildup.
Exhaust Ducting
The more that the dryer is used, the more the exhaust ducts and vent hood must be inspected to prevent duct blockages and lint fires. The exhaust ducting and vent hood must be cleaned at least once a year for peak performance in drying.
When installing ductwork, separate all turns by at least 4 feet of straight duct, including the distance between the last turn and the dampened wall hood. If a turn is 45° or less, it can be ignored in figuring out duct distance. If you have two 45° turns, count it as one 90° turn. Also, each turn over 45° should be counted as one 90° turn (see Figures 20-9, 20-10, 20-11, 20-12, and 20-13).
When sealing the joints of the exhaust ducts with duct tape, the male end of each section of duct must point away from the dryer to prevent lint buildup. Also, never use screws to connect the ducts together; this will cause lint buildup. Any ductwork that runs through an unheated area or is near air conditioning must be insulated to prevent condensation and lint buildup (check with your local codes and ordinances).
Safety note: All exhaust ductwork must exhaust to the outside of a building to prevent lint buildup and fire. Do not terminate exhaust ductwork in a chimney, any gas vent, under enclosed floor (crawl space), common duct with a kitchen exhaust, or into an attic because the lint accumulation will cause a fire. Finally, never block incoming or exhausted air supplies; this will cause the dryer to run inefficiently and may cause a fire.
Step-by-Step Troubleshooting by Symptom Diagnosis
In the course of servicing an appliance, don’t overlook the simple things that might be causing the problem. Step-by-step troubleshooting by symptom diagnosis is based on diagnosing malfunctions, with possible causes arranged into categories relating to the operation of the dryer. This section is intended only to serve as a checklist to aid you in diagnosing a problem. Look at the symptom that best describes the problem that you are experiencing with the dryer, and then correct the problem.
Gas Odors
• Check the pilot light and gas valve.
• Check for a gas leak in the supply line.
• Check the ventilation system.
Dryer Will Not Run
• Do you have 120 volts at the dryer?
• Test the door switch for continuity of the switch contacts. In addition, make sure the dryer door closes properly.
• Test for continuity of the motor windings. Also check for a grounded motor.
• Test the timer for continuity of the switch contacts.
• Test the “push to start” switch for continuity of the switch contacts.
• Check for broken or loose wiring. Also check the wire terminal connections that connect to the different components.
• Check the thermal fuse.
• On electronic models, check for unusual display readouts and/or error codes.
No Heat
• Check the controls setting.
• Do you have 120 volts at the dryer?
• Check the gas valve. Is the gas turned on?
• Check the thermal fuse.
• Check the thermostats.
• Check the ignitor. Does it light up?
• Check the flame sensor.
• Check for proper ventilation.
• On electronic models, check for unusual display readouts and/or error codes.
Dryer Will Not Turn Off
• Check the control settings. Does the timer advance?
• Check the electronics. Run the self-diagnostic test mode.
• Check the thermistor. Is it open or shorted?
• Check the thermostats. Check continuity.
• On electronic models, check for unusual display readouts and/or error codes.
Dryer Runs and Heats, but the Clothes Won’t Dry
• Check for a defective thermostat or thermistor. Use a thermometer to check the duct temperatures during the cycling of the dryer.
• Check for a loose pulley or blower wheel. Inspect and tighten the blower wheel.
• Check for restricted air flow in the dryer.
• Check the vent system. Is the vent hose behind the dryer kinked?
• Check the thermostats and thermistors.
• Check the lint filter. Does the lint filter need cleaning?
• On electronic models, check for unusual display readouts and/or error codes.
The Burner Will Not Ignite
• Make sure that the gas supply to the dryer is turned on.
• Check the gas line for debris.
• Check the line to the burner for a blockage. If blocked, locate the source and correct.
• Test the value of the thermocouple; replace if necessary.
• Test the thermostat; replace if necessary.
• Check the installation and fresh air supply.
• Check the ignition components.
• On electronic models, check for unusual display readouts and/or error codes.
The Burner Flame Is Too High
• Check the dryer installation. Is the orifice too large? You can change the orifice and retest the burner.
• Check for sufficient secondary air supply.
• Check the venting system.
• Check the burner air shutter. Is it adjusted correctly?
The Pilot Flame Is Too Small
• Check the pilot line and orifice for debris.
• Check the gas pressure to the dryer.
• Test the gas pressure at the regulator.
A Yellow Burner Flame
• Check for sufficient secondary air supply.
• Check the gas pressure.
• Check the venting system.
• Check the burner line for debris.
• Check the dryer installation.
• Check the burner orifice for obstruction.
The Burner Flame Floats and Lifts Off the Ports
• Check the dryer installation. Is the orifice too large? You can change the orifice and retest the burner.
• Check for high gas pressure.
• Check the vent system and burner. Locate the source and correct the problem.
• Check for drafts that can blow the flame off the burner.
The Formation of Soot (Smoke and Carbon)
• Check for sufficient secondary air supply.
• Check the ventilation system.
• Check for a yellow burner flame.
• Check for low gas pressure to the dryer.
• Is the dryer installed in a confined space?
Combustion Odors
• Check for sufficient secondary air.
• Check the ventilation system and the burner.
• Is the dryer installed in a confined space?
Repair Procedures
Each repair procedure is a complete inspection and repair process for a single dryer component, containing the information you need to test a component that might be faulty and to replace it, if necessary.
Any person who cannot use basic tools should not attempt to install, maintain, or repair any electric dryer. Any improper installation, preventative maintenance, or repairs will create a risk of personal injury, as well as property damage. Call the service manager if installation, preventative maintenance, or the repair procedure is not fully understood.
Electronic Control Board and User Interface Controls
On some models the electronic control board and user interface controls replace the electromechanical timer and rotary selection switches (see Figures 21-1 and 20-18). The electronic control board is located behind the control panel.
The typical complaints associated with the electronic control board or the user interface controls are:
• The dryer won’t run or power up.
• Unable to program the dryer.
• The display board will not display anything.
• One or more key pads will not accept commands.
• Unusual display readouts and/or error codes.
To prevent electrostatic discharge (ESD) from damaging expensive electronic components, follow the steps in Chapters 6 and 11.
To handle these problems, perform the following steps:
1. Verify the complaint. Verify the complaint by operating the dryer. Turn off the electricity to the appliance and wait for two minutes before turning it back on. If a fault code appears, look up the code. If the dryer will not power up, locate the technical data sheet behind the control panel or for diagnostics information. On some models you will need the actual service manual for the model you are working on to properly diagnose the dryer. The service manual will assist you in properly placing the dryer in the service test mode for testing the dryer functions.
2. Check for external factors. You must check for external factors not associated with the appliance. Are there 120 volts of electricity to the dryer? The voltage at the receptacle is between 108 volts and 132 volts during a load on the circuit. Do you have the correct polarity? (See Chapter 6.)
3. Disconnect the electricity. Before working on the dryer, disconnect the electricity. This can be done by pulling the plug out of the wall receptacle. Or disconnect the electricity at the fuse panel or circuit breaker panel. Turn off the electricity.
WARNING Some diagnostic tests will require you to test the components with the power turned on. When you disassemble the control panel, you can position it in such a way that the wiring will not make contact with metal. This act will allow you to test the components without electrical mishaps.
4. Shut off the gas supply. Before you begin servicing any gas components, shut off the supply of gas to the appliance. The shutoff valve should be within 6 feet of the gas appliance.
5. Remove the console panel to gain access. Begin by removing the screws from the dryer top (for front-loading models only) to gain access to the electronic control board. Remove the console panel screws to gain access to the user interface controls (see Figure 20-18). On top-loading models, the console will roll upwards or toward you after you remove the console screws.
6. Test the electronic control board and user interface controls. If you are able to run the dryer diagnostic test mode, check the different functions of the dryer. Use the technical data sheet for the model you are servicing to locate the test points from the wiring schematic. Check all wiring connections and wiring. Using the technical data sheet, test the electronic control or user interface controls, input voltages, and output voltages. On some models, fuses are soldered to the printed circuit board (PCB). These fuses must be tested first before condemning the component.
7. Remove the electronic control board and user interface control. To remove the defective component, remove the screws that secure the board to the control panel or dryer frame. Disconnect the connectors from the electronic control board or user interface control.
8. Install the new component. To install a new electronic control board or user interface control, read the parts data sheet that comes with the part for the proper installation process, and just reverse the disassembly procedure and reassemble. Reinstall the console panel, and restore the electricity and gas supply to the dryer. Make sure that the dryer is not in the service mode. Test the dryer operation. Make sure to take the dryer out of the service test mode when the repair is completed.
Dryer Motor
The dryer motor on most models is a dual-shaft, single-speed, ¼-horsepower, 1725 RPM motor with an automatic thermal reset protector. One side of the motor shaft is threaded to hold the blower wheel, and the opposite end of the shaft holds the belt pulley, which is pressed onto the shaft. Inside the motor is a centrifugal switch, which serves three purposes. It disengages the motor start winding when the motor reaches 75 percent of its rated speed, it engages the run winding, and it also closes the circuit for the heater element. On other models, there are dual motors (see Figure 20-2): one is dedicated to the drum and the other one is dedicated to the blower assembly. The purpose of the dedicated motor for the blower assembly is to be able to alter the blower wheel speed whenever necessary to optimize air flow within the dryer.
The typical complaints associated with motor failure are:
• Fuse is blown or the circuit breaker trips.
• Motor will not start; it only hums.
• The dryer will not run.
• On electronic models, check for unusual display readouts and/or error codes.
To handle these problems, perform the following steps:
1. Verify the complaint. Verify the complaint by operating the dryer through its cycles. Listen carefully, and you will hear if there are any unusual noises or if the circuit breaker trips. On electronic models, turn off the electricity to the appliance and wait for two minutes before turning it back on. If a fault code appears, look up the code. If the dryer will not power up, locate the technical data sheet behind the control panel or for diagnostics information. On some models you will need the actual service manual for the model you are working on to properly diagnose the dryer. The service manual will assist you in properly placing the dryer in the service test mode for testing the dryer functions.
2. Check for external factors. You must check for external factors not associated with the appliance. Is the appliance installed properly? Does the appliance have the correct voltage? The voltage at the receptacle is between 108 volts and 132 volts during a load on the circuit. Do you have the correct polarity? (See Chapter 6.)
3. Disconnect the electricity. Before working on the dryer, disconnect the electricity. This can be done by pulling the plug from the electrical outlet. Or disconnect the electricity at the fuse panel or at the circuit breaker panel. Turn off the electricity.
WARNING Some diagnostic tests will require you to test the components with the power turned on. When you disassemble the control panel, you can position it in such a way that the wiring will not make contact with metal. This act will allow you to test the components without electrical mishaps.
4. Think safety. Shut off the gas supply. As a precaution before you begin servicing the dryer, shut off the supply of gas to the dryer. The shutoff valve should be within 6 feet of the gas appliance.
5. Gain access to the motor. In order to gain access to the motor, the top must be raised (see Figure 20-19) by removing the screws from the lint screen slot. Insert a putty knife about 2 inches from each corner; then disengage the retaining clips and lift the top. On some models, the top is held down with screws (see inset in Figure 20-19). Remove the screws and lift the top. Now the front panel of the dryer must be removed (see Figure 20-20). To remove the top panel, insert a putty knife and disengage the retaining clip (see Figure 20-20a).
On some models, the top panel is held in place with two screws. Figure 20-20b shows the removal of the screws that hold the lower part of the front panel in place. Next, remove the screws that hold the upper part of the front panel in place (see Figure 20-20c), and then disconnect the door switch wires (label them). With the front panel out of the way, you can now disconnect the drive belt (see Figure 20-21). Push on the idler pulley to release the tension from the drive belt, and remove the belt from the motor pulley. Grab the drum and remove it from the cabinet (see Figure 20-22). On some models, you will have to remove the back panel because the drum comes out through the rear of the cabinet.
6. Disconnect the motor wire leads. Disconnect the motor wire leads from the wiring harness. Set the ohmmeter on R x 1. Figure 20-23 illustrates testing the motor windings and the centrifugal switch for continuity. When testing for resistance on the motor, test from the common wire lead to the run winding. Then test for resistance from the common wire lead to the start winding. Next, test for resistance from the start winding to the run winding. To test for a grounded winding in the motor, take the ohmmeter probes and test from each motor wire lead terminal to the motor housing. The ohmmeter will indicate continuity if the windings are grounded. If the ohmmeter reading shows no resistance between the motor windings, then replace the motor. If the motor checks out okay, then check the timer.
7. Remove the motor. To remove this type of motor, you must first disconnect the blower assembly by holding the motor shaft stationary and then turning the blower wheel to remove it from the rear of the motor shaft (see Figure 20-24). Then remove the spring clamps that hold the motor in the motor bracket (see Figure 20-25). On some models, the motor pulley must be removed (new motors come without the pulley attached) by loosening the allen set screw.
8. Install the new motor. To install the new motor (see Figure 20-26), just reverse the disassembly procedure and reassemble. Then reassemble the dryer in the reverse order of its disassembly. Restore the electricity and gas supply to the dryer and test the motor. Make sure to take the dryer out of the service test mode when the repair is completed.
Drive Belt
The drive belt extends from the motor pulley, past the idler pulley, and around the perimeter of the dryer drum. The tension on the belt is maintained by the idler pulley and driven by a pulley attached to one end of the motor shaft.
The typical complaints associated with belt failure are:
• The drum will not turn.
• Dryer motor spins freely.
• It smells like something is burning.
• On electronic models, check for unusual display readouts and/or error codes.
To handle these problems, perform the following steps:
1. Verify the complaint. Verify the complaint by operating the dryer through its cycles. Listen carefully, and you will hear if there are any unusual noises. Then, with the door open, press the door switch and start the dryer. The drum should rotate. On electronic models, turn off the electricity to the appliance and wait for two minutes before turning it back on. If a fault code appears, look up the code. If the dryer will not power up, locate the technical data sheet behind the control panel or for diagnostics information. On some models you will need the actual service manual for the model you are working on to properly diagnose the dryer. The service manual will assist you in properly placing the dryer in the service test mode for testing the dryer functions.
2. Check for external factors. You must check for external factors not associated with the appliance. Is the appliance installed properly? Does the appliance have the correct voltage? The voltage at the receptacle is between 108 volts and 132 volts during a load on the circuit. Do you have the correct polarity? (See Chapter 6.) Check for foreign objects lodged between the drum and bulkhead, etc.
3. Disconnect the electricity. Before working on the dryer, disconnect the electricity. This can be done by pulling the plug from the electrical outlet. Or disconnect the electricity at the fuse panel or at the circuit breaker panel. Turn off the electricity.
4. Think safety. Shut off the gas supply. As a precaution before you begin servicing the dryer, shut off the supply of gas to the dryer. The shutoff valve should be within 6 feet of the gas appliance.
WARNING Some diagnostic tests will require you to test the components with the power turned on. When you disassemble the control panel, you can position it in such a way that the wiring will not make contact with metal. This act will allow you to test the components without electrical mishaps.
5. Gain access to the drive belt. To gain access to the drive belt, the top must be raised (see Figure 20-19) by removing the screws from the lint screen slot. Then insert a putty knife about 2 inches from each corner, disengage the retaining clips, and lift the top. On some models, the top is held down with screws (see the inset in Figure 20-19). Remove the screws and lift the top. Now the front panel of the dryer must be removed (see Figure 20-20). To remove the top panel, insert a putty knife and disengage the retaining clip (see Figure 20-20a). As shown in Figure 20-20b, remove the screws that hold the lower part of the front panel in place. Next, remove the screws that hold the upper part of the front panel in place (see Figure 20-20c), and then disconnect the door switch wires.
6. Remove the drive belt. To remove the drive belt on this type of dryer, you can disconnect the belt (see Figure 20-21). Push on the idler pulley to release the tension from the drive belt. Now remove the belt from the motor pulley and from around the drum (see Figure 20-27). If the drive belt is broken, just remove the belt.
7. Install a new drive belt. To install the new drive belt, just reverse the disassembly procedure, and reassemble. Then reassemble the dryer in the reverse order of its disassembly. Restore the electricity and gas supply to the dryer and test. Make sure to take the dryer out of the service test mode when the repair is completed.
Door Switch
The door switch is a normally open switch wired in series with the dryer motor. When the dryer door is closed, the door switch contacts will close, completing the circuit through the run winding of the drive motor. The door switch is located behind the front panel.
The typical complaints associated with switch failure are:
• Dryer will not operate at all.
• Dryer light does not work when the door is open.
• On electronic models, check for unusual display readouts and/or error codes.
To handle these problems, perform the following steps:
1. Verify the complaint. Verify the complaint by operating the dryer through its cycles. Open the door to see if the light is working. On electronic models, turn off the electricity to the appliance and wait for two minutes before turning it back on. If a fault code appears, look up the code. If the dryer will not power up, locate the technical data sheet behind the control panel or for diagnostics information. On some models you will need the actual service manual for the model you are working on to properly diagnose the dryer. The service manual will assist you in properly placing the dryer in the service test mode for testing the dryer functions.
2. Check for external factors. You must check for external factors not associated with the appliance. Is the appliance installed properly? Does the dryer have the correct voltage supply? The voltage at the receptacle is between 108 volts and 132 volts during a load on the circuit. Do you have the correct polarity? (See Chapter 6.)
3. Disconnect the electricity. Before working on the dryer, disconnect the electricity. This can be done by pulling the plug from the electrical outlet. Or disconnect the electricity at the fuse panel or at the circuit breaker panel. Turn off the electricity.
4. Think safety. Shut off the gas supply. As a precaution before you begin servicing the dryer, shut off the supply of gas to the dryer. The shutoff valve should be within 6 feet of the gas appliance.
WARNING Some diagnostic tests will require you to test the components with the power turned on. When you disassemble the control panel, you can position it in such a way that the wiring will not make contact with metal. This act will allow you to test the components without electrical mishaps.
5. Gain access to the door switch. You must gain access to the door switch. On this model, the top must be raised (see Figure 20-19) by removing the screws from the lint screen slot. Then insert a putty knife about 2 inches from each corner, disengage the retaining clips, and lift the top. On some models, the top is held down with screws (see the inset in Figure 20-19). Remove the screws and lift the top.
6. Test the door switch. The door switch is located in one of the upper corners of the inside of the front panel (see Figure 20-34a). Once you have located the door switch, disconnect the wires from the terminals. Set the ohmmeter on R x 1, attach the probes of the ohmmeter to the terminals of the door switch, and then close the door. With the door closed, there should be continuity. With the door open, the ohmmeter should not show continuity. Some dryer models have a light inside the drum. This light circuit is also part of the door switch circuitry. Three terminals are located on the door switch. Take your ohmmeter probe and place it on the common terminal of the door switch. To locate the common terminal, read the wiring diagram. It will indicate which terminal is the common, which is the light, and which is for the motor circuit. Take your probe and place it on the switch terminal (the light circuit); then close the dryer door. The reading should indicate no continuity. Now open the dryer door—you should have a continuity reading on the meter.
7. Remove the door switch. To remove the lever-type door switch (see Figure 20-34b), remove the screws that hold the switch in place. Now lift the switch out from behind the front panel. To remove the cylindrical type of door switch (see Figure 20-34c), squeeze the retaining clips on the back side of the front panel, and pull out the switch. To remove the hinge type of door switch (see Figure 20-34d), the front panel must be removed. Next, remove the screws that hold the switch assembly in place.
8. Install the new door switch. To install the new door switch, reverse the disassembly procedure, and reassemble. Reassemble the dryer, and install the wires on the new switch terminals. Restore the electricity and gas supply to the dryer and test. Make sure to take the dryer out of the service test mode when the repair is completed.
Thermostat
Thermostats can be mounted on the heater assembly (see Figure 20-2 and Figure 20-29) and/or on the blower assembly (see Figures 20-2 and 20-35), or in the inlet filter screen (see Figure 20-37). The thermostats monitor the air temperatures within the dryer drum, exhaust vent, and the incoming air supply. The thermostats are bimetal switches that are automatic reset, one-time use, or manual reset.
The typical complaints associated with thermostat failure are:
• The clothes are not drying.
• The dryer will not shut off.
• The dryer will not heat at all.
• The drying temperature is too high.
• Moisture retention (of fabrics) is unsatisfactory.
• On electronic models, an error code appears.
To handle these problems, perform the following steps:
1. Verify the complaint. Verify the complaint by operating the dryer through its cycles. On electronic models, turn off the electricity to the appliance and wait for two minutes before turning it back on. If a fault code appears, look up the code. If the dryer will not power up, locate the technical data sheet behind the control panel or for diagnostics information. On some models you will need the actual service manual for the model you are working on to properly diagnose the dryer. The service manual will assist you in properly placing the dryer in the service test mode for testing the dryer functions.
2. Check for external factors. You must check for external factors not associated with the appliance. Is the appliance installed properly? Does the dryer have the correct voltage supply? The voltage at the receptacle is between 108 volts and 132 volts during a load on the circuit. Do you have the correct polarity? (See Chapter 6.) Is the exhaust vent blocked?
3. Disconnect the electricity. Before working on the dryer, disconnect the electricity. This can be done by pulling the plug from the electrical outlet. Or disconnect the electricity at the fuse panel or at the circuit breaker panel. Turn off the electricity.
4. Think safety. Shut off the gas supply. As a precaution before you begin servicing the dryer, shut off the supply of gas to the dryer. The shutoff valve should be within 6 feet of the gas appliance.
WARNING Some diagnostic tests will require you to test the components with the power turned on. When you disassemble the control panel, you can position it in such a way that the wiring will not make contact with metal. This act will allow you to test the components without electrical mishaps.
5. Gain access to the thermostat. You must gain access to the thermostat through the back on this model. Remove the screws from the back panel (see Figure 20-30). On other models you will have to remove the drum to gain access to the thermostats.
6. Test the thermostat. To test the thermostat for continuity, remove the wires from the thermostat terminals. With a continuity tester or an ohmmeter, test the thermostat for continuity (see Figure 20-36). Do this to all of the thermostats in the dryer. On some models, the thermostats might be located on the heater housing, behind the drum, or in the lint screen opening (see Figure 20-37). If they all check out okay, then reassemble the dryer and test for temperature operation. Note: Do not reinstall the back panel at this point. Take a piece of paper and write down the temperature ratings of the thermostats. These ratings are printed on the thermostats (L140, L290, etc.) or on the wiring schematic. To test for temperature operation, you will need a voltmeter and a temperature tester.
First, set up the instruments for testing the thermostatic operation. Take the temperature tester thermocouple lead and insert it between the thermostat mounting ear (see Figure 20-38) and the plate against which it mounts. Then connect the voltmeter probes across the thermostat terminals. Use alligator clips attached to the probe tips. This will allow you freedom of movement. Do not disconnect the wires from the thermostat. Set the voltmeter range to AC voltage and the selector switch on 300 volts. Remember: If there is more than one thermostat (in series with other thermostats), the thermostats not under test must be electrically isolated and jumped out with an insulated jumper wire with alligator clips attached. Review the wiring schematic to determine which wires to remove and which ones to isolate and jump out.
With the test meters in place, you are now ready to remove the exhaust vent duct from the dryer. Seal off 75 percent of the exhaust opening from the dryer (see Figure 20-39). This will simulate a load of clothing in the dryer. On some models, you do not have to block off the exhaust opening. Check the technical data sheet or the service manual for the model you are servicing.
Restore the electricity and gas supply to the dryer. This test requires that the electricity be turned on for its duration. Always be cautious when working with live wires. Avoid getting shocked. Set the controls on the dryer to operate at a high heat. Turn on the dryer and let it cycle. When the voltmeter is reading voltage, the thermostat has opened. When there is no voltage reading on the voltmeter, the thermostat is closed. As the dryer is cycling via the thermostat, record the temperature.
The thermostat should open at the preset temperature listed on the thermostat. Table 20-1 illustrates the types of thermostats, along with their opening and closing temperature settings. The temperature range of the thermostat should be within ±10 percent of the printed setting. If not, replace the thermostat.
CAUTION Turn off the electricity and gas supply before replacing any parts of the dryer.
On some models, the thermostat will have four wires attached to it. Two wires are for the bimetal switch contacts and the other two wires are for the bias heater. The purpose of the bias heater is to apply a small amount of heat to the bimetal switch contacts when the timer or fabric temperature switch is set to a lower temperature setting. This will allow the bimetal switch contacts to open up sooner to maintain a lower drum temperature. To test the bias heater, remove the wires from the thermostat, set your multimeter to the ohms scale, and test across the bias heater terminals. The resistance of the bias heater should be between 7000 and 28,000 ohms.
7. Replace the thermostat. Remove the screws that hold the thermostat in place. Replace the thermostat with an exact replacement with the same temperature rating. Reconnect the wires to their correct terminal positions. Then reverse the disassembly procedure to reassemble the dryer, and test the thermostat.
8. Test the new thermostats. To test the new thermostats, repeat step 6. Restore the electricity and gas supply to the dryer and test. Make sure to take the dryer out of the service test mode when the repair is completed.
Thermistor
The thermistor (see Figure 20-2) monitors the incoming and outgoing air temperatures and relays that information back to the electronic control board. Check the technical data sheet for the location of the thermistors.
The typical complaints associated with thermistor failure are:
• The clothes are not drying.
• The dryer will not shut off.
• The dryer will not heat at all.
• The drying temperature is too high.
• Moisture retention (of fabrics) is unsatisfactory.
• On electronic models, an error code appears.
To handle these problems, perform the following steps:
1. Verify the complaint. Verify the complaint by operating the dryer through its cycles. On electronic models, turn off the electricity to the appliance and wait for two minutes before turning it back on. If a fault code appears, look up the code. If the dryer will not power up, locate the technical data sheet behind the control panel or for diagnostics information. On some models you will need the actual service manual for the model you are working on to properly diagnose the dryer. The service manual will assist you in properly placing the dryer in the service test mode for testing the dryer functions.
2. Check for external factors. You must check for external factors not associated with the appliance. Is the appliance installed properly? Does the dryer have the correct voltage supply? The voltage at the receptacle is between 108 volts and 132 volts during a load on the circuit. Do you have the correct polarity? (See Chapter 6.) Is the exhaust vent blocked?
3. Disconnect the electricity. Before working on the dryer, disconnect the electricity. This can be done by pulling the plug from the electrical outlet. Or disconnect the electricity at the fuse panel or at the circuit breaker panel. Turn off the electricity.
4. Think safety. Shut off the gas supply. As a precaution before you begin servicing the dryer, shut off the supply of gas to the dryer. The shutoff valve should be within 6 feet of the gas appliance.
WARNING Some diagnostic tests will require you to test the components with the power turned on. When you disassemble the control panel, you can position it in such a way that the wiring will not make contact with metal. This act will allow you to test the components without electrical mishaps.
5. Gain access to the thermistor. To gain access to the thermistor on this model, you will have to remove the top panel, control panel (see Figure 20-40), front panel (see Figure 20-41), and dryer drum (see Figure 20-2).
6. Test the thermistor. To test the thermistor for resistance, remove the wires from the thermistor terminals. Set your multimeter on the ohms scale and place the test leads on the thermistor’s terminals. Match the reading to the technical data sheet or the service manual values. If you are reading an open or infinity, replace the thermistor. Another way to test the thermistor is by placing the dryer into the service mode. On some models, the thermistor might be located on the heater housing, behind the drum, or in the lint screen opening (see Figures 20-2 and 20-37). If they all check out okay, then reassemble the dryer and test for temperature operation.
7. Replace the thermistor. Remove the screws that hold the thermistor in place. Replace the thermistor with an exact replacement with the same temperature rating. Reconnect the wires to their correct terminal positions. Then reverse the disassembly procedure to reassemble the dryer, and test the thermistor.
8. Test the new thermistor. To test the new thermostats, repeat step 6. Restore the electricity and gas supply to the dryer and test. Make sure to take the dryer out of the service test mode when the repair is completed.
Start Switch
The start switch is a rotary or push button momentary contact switch used to start the dryer and to energize the start winding in the drive motor. This switch is located in the control panel on the dryer. The dryer door must be closed for the dryer to operate. If and when the dryer door is opened, the start switch must be turned on to restart the dryer operation.
The typical complaints associated with the start switch are:
• The dryer will not start.
• On electronic models, check for unusual display readouts and/or error codes.
To handle these problems, perform the following steps:
1. Verify the complaint. Verify the complaint by operating the dryer. Before you change the start switch, check the other components that are in the start circuit. On electronic models, turn off the electricity to the appliance and wait for two minutes before turning it back on. If a fault code appears, look up the code. If the dryer will not power up, locate the technical data sheet behind the control panel for the diagnostics information. On some models you will need the actual service manual for the model you are working on to properly diagnose the dryer. The service manual will assist you in properly placing the dryer in the service test mode for testing the dryer functions.
2. Check for external factors. You must check for external factors not associated with the appliance. Is the appliance installed properly? Does it have the correct voltage? The voltage at the receptacle is between 108 volts and 132 volts during a load on the circuit. Do you have the correct polarity? (See Chapter 6.) Check the fuses or circuit breaker.
3. Disconnect the electricity. Before working on the dryer, disconnect the electricity. This can be done by pulling the plug from the electrical outlet. Or disconnect the electricity at the fuse panel or at the circuit breaker panel. Turn off the electricity.
4. Think safety. Shut off the gas supply. As a precaution before you begin servicing the dryer, shut off the supply of gas to the dryer. The shutoff valve should be within 6 feet of the gas appliance.
WARNING Some diagnostic tests will require you to test the components with the power turned on. When you disassemble the control panel, you can position it in such a way that the wiring will not make contact with metal. This act will allow you to test the components without electrical mishaps.
5. Remove the console panel to gain access. Begin by removing the console panel to gain access to the start switch. With this type of dryer, remove the screws from the console (see Figure 20-14a). On some models, the console will be able to lie flat (see Figure 20-14b).
6. Test the start switch. Remove the wires from the start switch terminals. Set the ohmmeter on R x 1. Begin testing the start switch for continuity by placing one probe of the ohmmeter on the common terminal (C) of the switch; then connect the other probe to the normally open (NO) terminal. There should be no continuity. With the ohmmeter probes attached to the switch, press the start switch button. You should have continuity (see Figure 20-42). If the switch fails the test, replace it.
7. Remove the start switch. To remove the start switch, pull the knob off the switch stem, remove the start switch mounting screws, and remove the switch.
8. Install a new start switch. To install a new start switch, just reverse the disassembly procedure, and reassemble. Replace the wires on the switch. Reinstall the console panel, and restore the electricity and gas supply to the dryer and test. Make sure to take the dryer out of the service test mode when the repair is completed.
Temperature Selector Switch
The temperature selector switch is located in the console panel. This switch allows the consumer to select different temperature settings for drying.
The typical complaints associated with the temperature selector switch are:
• Inability to select a certain temperature setting.
• No heat.
• The switch is stuck.
• On electronic models, check for unusual display readouts and/or error codes.
To handle these problems, perform the following steps:
1. Verify the complaint. Verify the complaint by operating the dryer through its cycles. Before you change the temperature selector switch, check the other components controlled by this switch. On electronic models, turn off the electricity to the appliance and wait for two minutes before turning it back on. If a fault code appears, look up the code. If the dryer will not power up, locate the technical data sheet behind the control panel or for diagnostics information. On some models you will need the actual service manual for the model you are working on to properly diagnose the dryer. The service manual will assist you in properly placing the dryer in the service test mode for testing the dryer functions.
2. Check for external factors. You must check for external factors not associated with the appliance. Is the appliance installed properly? Does it have the correct voltage? The voltage at the receptacle is between 108 volts and 132 volts during a load on the circuit (see Chapter 6).
3. Disconnect the electricity. Before working on the dryer, disconnect the electricity to it. This can be done by pulling the plug from the electrical outlet. Or disconnect the electricity at the fuse panel or at the circuit breaker panel. Turn off the electricity.
4. Think safety. Shut off the gas supply. As a precaution before you begin servicing the dryer, shut off the supply of gas to the dryer. The shutoff valve should be within 6 feet of the gas appliance.
WARNING Some diagnostic tests will require you to test the components with the power turned on. When you disassemble the control panel, you can position it in such a way that the wiring will not make contact with metal. This act will allow you to test the components without electrical mishaps.
5. Gain access to the temperature selector switch. To access the temperature selector switch, remove the console panel. On this type of dryer, remove the screws in the console (see Figure 20-14a). On some models, the console will be able to lie flat (see Figure 20-14b). On other models, your access is through the rear panel on the console.
6. Test the temperature selector switch. To test the temperature selector switch, locate the selector switch circuit on the wiring diagram. Identify the terminals that are regulating the temperature setting to be tested. Set the ohmmeter on the R x 1 scale. Next, place the ohmmeter probes on those terminals. Then select that temperature setting by either rotating the dial or by depressing the proper button on the switch (see Figure 20-46). If the switch contacts are good, your meter will show continuity. Test all of the remaining temperature settings on the temperature selector switch. Remember to check the wiring diagram for the correct switch contact terminals (those that correspond to the setting that you are testing).
7. Remove the temperature selector switch. To remove the temperature selector switch, remove the screws that hold the switch to the console base, and remove the switch.
8. Install the new temperature selector switch. To install the new temperature selector switch, just reverse the disassembly procedure and reassemble it. Then reattach the wires to the switch terminals according to the wiring diagram. Reassemble the console panel. Be sure when reassembling the console panel that the wires do not become pinched between the console panel and the top of the dryer. Restore the electricity and gas supply to the dryer and test. Make sure to take the dryer out of the service test mode when the repair is completed.
Belt Switch
The belt switch is located on the drive motor baseplate (see Figure 20-47) and held in place with two Phillips-head screws. The belt switch is activated by the movement of the idler pulley assembly. If the belt breaks or comes off the pulley, the belt switch disconnects the power to the motor, shutting down the dryer.
The typical complaints associated with the idler pulley are:
• The dryer will not run.
• The clothes are wet.
• On electronic models, check for unusual display readouts and/or error codes.
To handle these problems, perform the following steps:
1. Verify the complaint. Verify the complaint by operating the dryer through its cycles. On electronic models, turn off the electricity to the appliance and wait for two minutes before turning it back on. If a fault code appears, look up the code. If the dryer will not power up, locate the technical data sheet behind the control panel or for diagnostics information. On some models you will need the actual service manual for the model you are working on to properly diagnose the dryer. The service manual will assist you in properly placing the dryer in the service test mode for testing the dryer functions.
2. Check for external factors. You must check for external factors not associated with the appliance. Is the appliance installed properly? Does the dryer have the correct voltage supply? The voltage at the receptacle is between 108 volts and 132 volts during a load on the circuit (see Chapter 6).
3. Disconnect the electricity. Before working on the dryer, disconnect the electricity. This can be done by pulling the plug from the electrical outlet. Or disconnect the electricity at the fuse panel or at the circuit breaker panel. Turn off the electricity.
4. Think safety. Shut off the gas supply. As a precaution before you begin servicing the dryer, shut off the supply of gas to the dryer. The shutoff valve should be within 6 feet of the gas appliance.
WARNING Some diagnostic tests will require you to test the components with the power turned on. When you disassemble the control panel, you can position it in such a way that the wiring will not make contact with metal. This act will allow you to test the components without electrical mishaps.
5. Gain access to the belt switch. To gain access to the belt switch, in this type of dryer, remove the top panel, insert a putty knife, and disengage the retaining clip (see Figure 20-20a).
6. Remove the idler pulley. Before removing the belt switch, you must first remove the idler pulley and drive belt. To disconnect the belt on this model (see Figure 20-21), push on the idler pulley to release the tension from the drive belt. Now remove the belt from the motor pulley and from around the idler pulley. If the drive belt is broken, just remove the belt. Next remove the two Phillips-head screws from the belt switch (see Figure 20-47).
7. Testing the belt switch. Remove the two wires from the belt switch. Place your multimeter test leads on the terminals and turn your meter to the ohms scale. When activating the belt switch, the meter reading will indicate continuity. When deactivating the belt switch, the meter reading will indicate an infinity reading. If the meter indicates infinity when the belt switch is activated and deactivated, replace the switch.
8. Install the new belt switch. To install the belt switch, just reverse the disassembly procedure, and reassemble it. Reassemble the dryer in the reverse order of its disassembly, and test it for proper operation. Restore the electricity and gas supply to the dryer and test. Make sure to take the dryer out of the service test mode when the repair is completed.
Burner Assembly
The heating system for a gas dryer is composed of four main components: the burner, the ignitor, the flame sensor, and the gas valve. The burner assembly is located on the baseplate of the dryer.
The typical complaints associated with the burner assembly are:
 Burner will not light.
 The burner goes on and off.
 Soot buildup.
 The ignitor will not glow.
 The burner trips on the high-limit thermostat.
 On electronic models, check for unusual display readouts and/or error codes.
To handle these problems, perform the following steps:
1. Verify the complaint. Verify the complaint by operating the dryer through its cycles. Then open the dryer door, and place your hand inside to see if it is warm in the drum. On electronic models, turn off the electricity to the appliance and wait for two minutes before turning it back on. If a fault code appears, look up the code. If the dryer will not power up, locate the technical data sheet behind the control panel or for diagnostics information. On some models you will need the actual service manual for the model you are working on to properly diagnose the dryer. The service manual will assist you in properly placing the dryer in the service test mode for testing the dryer functions.
2. Check for external factors. You must check for external factors not associated with the appliance. Is the appliance installed properly? Is the exhaust vent clogged? Check the voltage and gas supply to the dryer. Does the dryer have the correct voltage supply? The voltage at the receptacle is between 108 volts and 132 volts during a load on the circuit (see Chapter 6).
3. Disconnect the electricity. Before working on the dryer, disconnect the electricity. This can be done by pulling the plug from the electrical outlet. Or disconnect the electricity at the fuse panel or at the circuit breaker panel. Turn off the electricity.
4. Shut off the gas supply. Before you begin servicing any gas components, shut off the supply of gas to the dryer. The shutoff valve should be within 6 feet of the gas appliance.
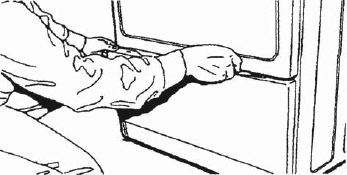
5. Gain access to the burner assembly. To gain access to the burner assembly, you must remove the top panel (or lower panel or access panel). The panel is held in place with two retaining clips or screws, depending on the model. Using a flat-blade screwdriver, insert it about 4 inches from each side (Figure 21-6). Depress the clips, pull the panel toward you, and remove the panel.
FIGURE 21-6 To open the top panel, insert a flat-blade screwdriver, depress the retaining clips, and remove the panel.
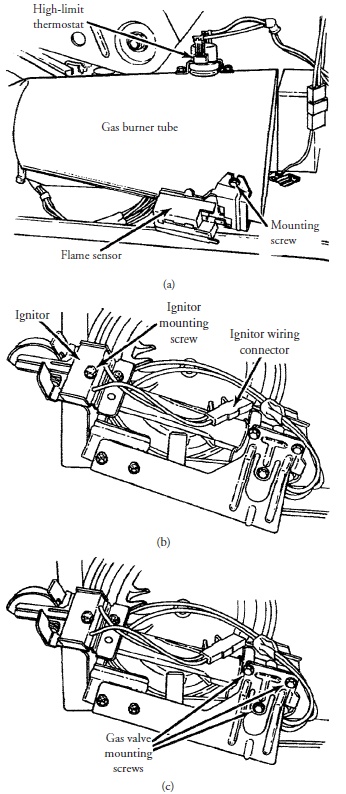
6. Remove the burner assembly. The burner assembly is located on the lower-front side of the cabinet on the right. Some models place the burner assembly on the lower-front side on the left. Remove the wires from the flame sensor (Figure 21-7a), and then disconnect the wiring harness connector from the burner assembly (Figure 21-7b). Disconnect the gas line from the gas valve. Locate the two screws that secure the burner assembly to the dryer frame, and remove the screws. Remove the burner assembly by pulling it toward you carefully (Figure 21-7c). With the burner assembly removed from the cabinet, you can now inspect and access the burner, high-limit thermostat, ignitor, gas valve, pilot assembly (older models), and flame sensor. Before you reinstall the burner assembly, do the maintenance on the burner assembly and the lower cabinet, removing lint and debris.
FIGURE 21-7 Removing a typical gas burner assembly.
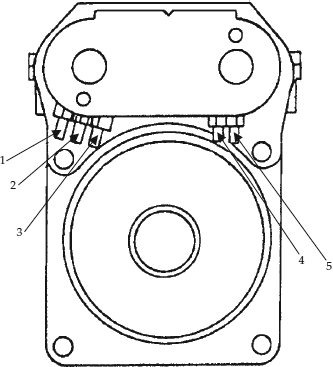
7. Test the gas valve solenoid coils (Type 1 gas valve). This gas valve solenoid assembly is located on top of the gas valve. This part is a separate replaceable component. The solenoid coils consist of a double coil (safety and booster coils combined) and a single main solenoid coil. In order to check the solenoid coils on the gas valve, remove the wire leads (and label them) that connect to the coils from the wiring harness. These are slide-on terminal connectors attached to the ends of the wire. Set your ohmmeter on R x 100, and attach the meter probes as follows (Figure 21-8):
• Terminals 1 and 2 (safety coil): The resistance will be between 1340 and 1390 ohms.
• Terminals 1 and 3 (booster coil): The resistance will be between 535 and 585 ohms.
• Terminals 4 and 5 (main coil): The resistance will be between 1170 and 1270 ohms.
FIGURE 21-8 Type 1 gas valve. The test points on the solenoid coils, which are mounted on the gas valve. Terminals 1 and 2 are the safety coil, terminals 1 and 3 are the booster coil, and terminals 4 and 5 are the main coil.
If the meter readings differ, replace the solenoid coils.
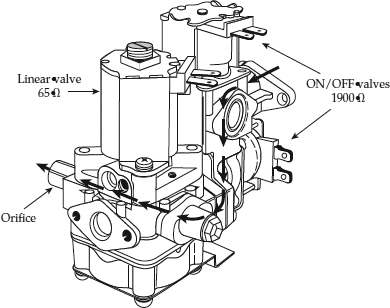
8. Test the gas valve solenoid coils (Type 2 gas valve) (Figure 21-9). This type of gas valve consists of three valves that are operated by 12 VDC solenoid coils. Two of the gas valves are either in an open or closed state, depending on whether the solenoid coils are energized by the electronic control board. The third gas valve is a linear valve.
FIGURE 21-9 Type 2 gas valve. This type of gas valve has three separate solenoid coils and operates on 12 volts DC.
To open this gas valve, the voltage will vary depending on the amount of voltage it receives from the electronic control board. The voltages are based on clothes load and temperature settings. This is why it is difficult to determine specific voltages at the linear solenoid coil. The voltages are derived from the software algorithms built into the electronic control board program chip.
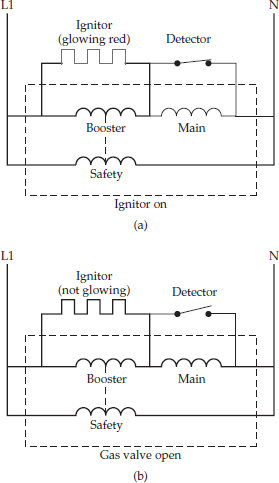
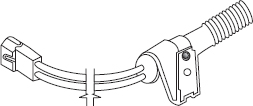
9. Test the ignitor. The ignitor is made of silicon carbide. The ignitor is very fragile and it is susceptible to damage by skin oils. Hold the ignitor by the insulated support when handling to prevent damage. Electrically the ignitor is in parallel with the booster solenoid coil on the gas valve (see Figure 21-8). The parallel circuit of the ignitor and booster solenoid coil on the gas valve is in series with the main solenoid coil on the gas valve. The series-parallel circuit of the ignitor, booster solenoid coil, and main solenoid coil is, in turn, in parallel with the safety solenoid coil on the gas valve (Figure 21-10). Both the booster solenoid coil and the main solenoid coils are needed to open the gas valve. Once energized, the safety solenoid coil alone will hold the gas valve open allowing the gas to flow to the burner. Disconnect the ignitor wiring connection, and measure the resistance between the terminals on the ignitor. Set your ohmmeter on R × 100— the resistance, depending on room temperatures, will be between 50 and 400 ohms. If the meter readings differ, replace the ignitor (Figure 21-11). Another way to test the ignitor is by turning on the dryer and measuring the amperage of the ignitor. The amperage should be between 2½ and 4 amps to open the gas valves. If the amperage is less, the ignitor is defective and must be replaced.
FIGURE 21-10 A wiring schematic of a dual solenoid gas valve with an ignitor. (a) Indicates the ignitor is on. (b) Indicates the gas valve is open.
FIGURE 21-11 The gas flame ignitor.
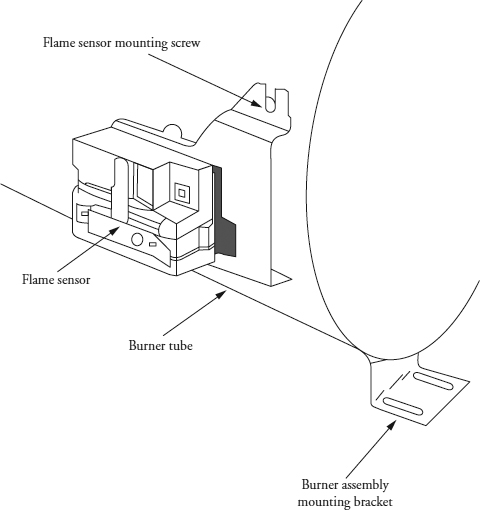
10. Test the flame sensor. A flame sensor (Figure 21-12) is a thermostatically controlled single-pole, single-throw, normally closed switch. This device is mounted over a window cut out in the burner tube. The switch will open within 15 to 90 seconds, when the switch senses the radiant heat from the ignitor, and once open, the flame sensor will be held open by the radiant heat produced by the gas flame. The temperature of the ignitor will be at 1800 to 2500 degrees Fahrenheit. To test the flame sensor, set the ohmmeter on R × 1, remove the wire terminals from the sensor, and measure the resistance between the terminals. The flame sensor should measure zero ohms, indicating that the sensor is good. If the meter readings differ, replace the flame sensor.
FIGURE 21-12 The flame sensor is mounted over a slot opening in the side of the burner tube.
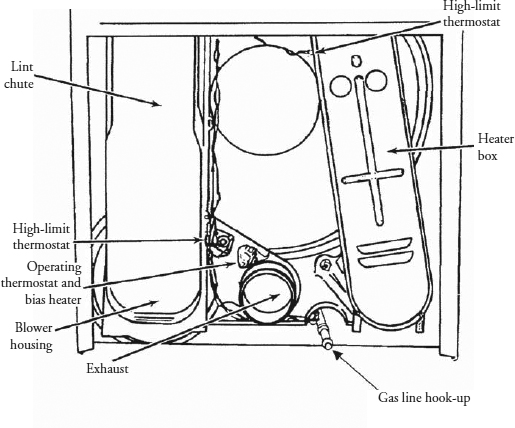
11. Test the high-limit thermostat. The high-limit thermostat is located on the burner tube (see Figure 21-7a) or in the rear of the dryer (Figure 21-13); or there may be two high-limit thermostats mounted in both places, depending on the model. If the temperature exceeds the pre-set limit, the high-limit thermostat will open to shut down the gas burner. To test the thermostat, remove the wire terminals from the high-limit thermostat. Set the ohmmeter on R × 1, and measure the resistance between the thermostat terminals. The ohmmeter will read continuity, indicating that the high-limit thermostat is good. If the meter readings differ, replace the thermostat.
FIGURE 21-13 The rear view of a dryer, illustrating the location of the high-limit thermostat and the location of the other components.
12. Install the burner assembly. To install the burner assembly (see Figure 21-7), just reverse the disassembly procedure, and reassemble. If you are replacing the gas valve, make sure that you use approved pipe joint compound or yellow Teflon tape on the pipe connections (according to local codes) and on the threads of the gas valve before you install the valve. Turn on the gas supply. Check for gas leaks by using a chloride-free soap solution. Do not use a flame to check for gas leaks. The soap solution will begin to bubble if a leak is present. Restore the electricity and the gas supply to the dryer, and test the burner assembly. Check the burner flame for proper operation. Then reinstall the top panel (see Figure 21-6) in the reverse order of its disassembly. Make sure to take the dryer out of the service test mode when the repair is completed.
Diagnostic Charts
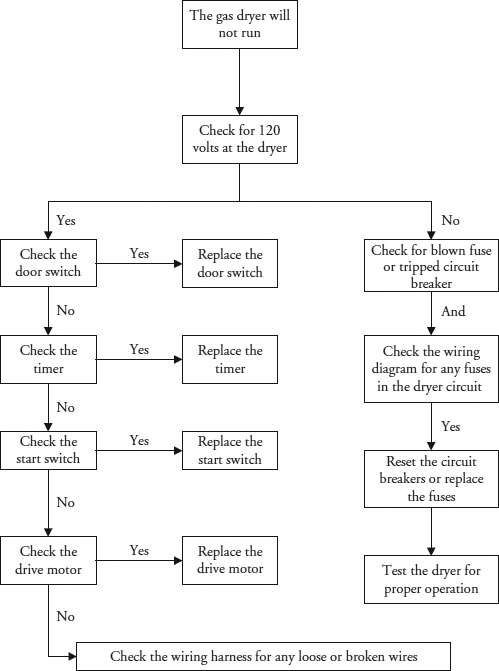
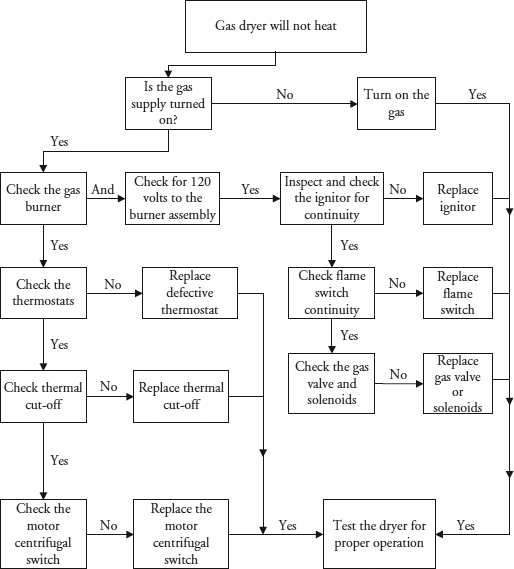
The following diagnostic flowcharts will help you to pinpoint the likely causes of various dryer problems (Figures 21-14 and 21-15; see also Figure 20-52).
FIGURE 21-14 Diagnostic flowchart: The gas dryer will not run.
FIGURE 21-15 Diagnostic flowchart: The gas dryer will not heat.
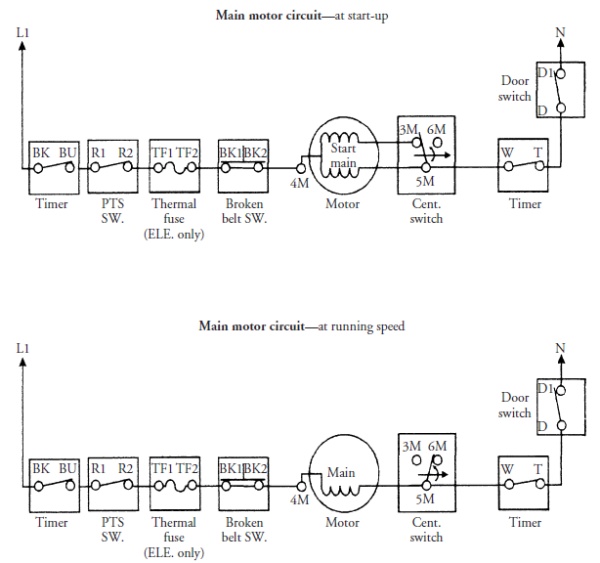
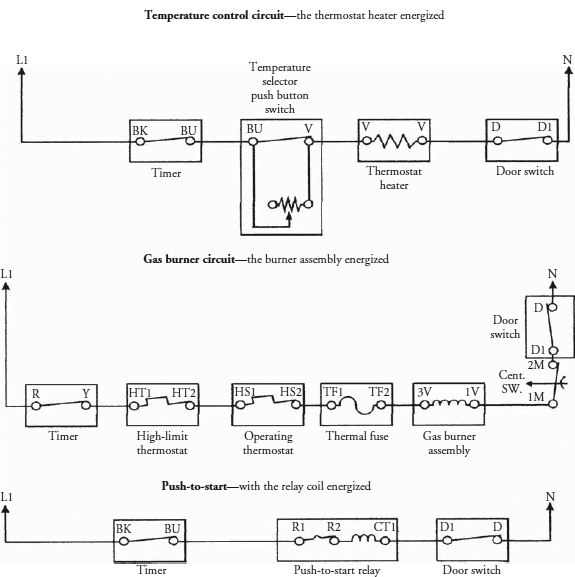
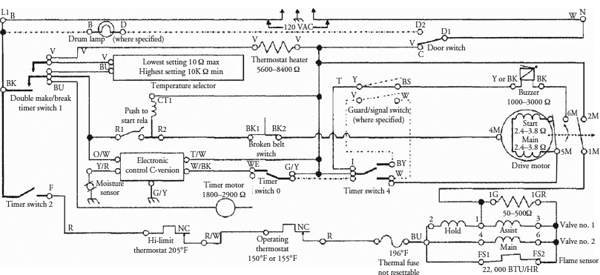
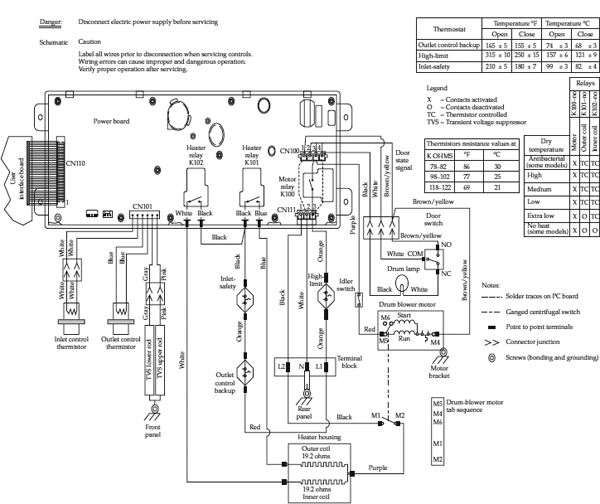
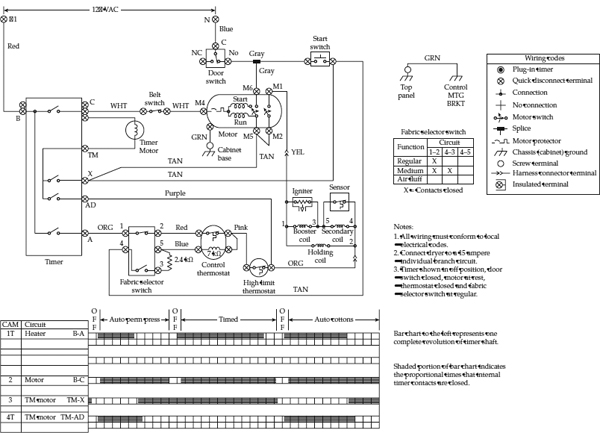
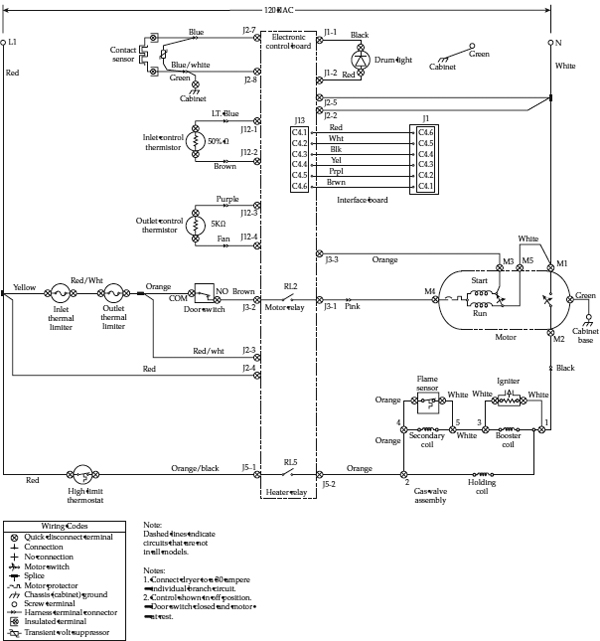
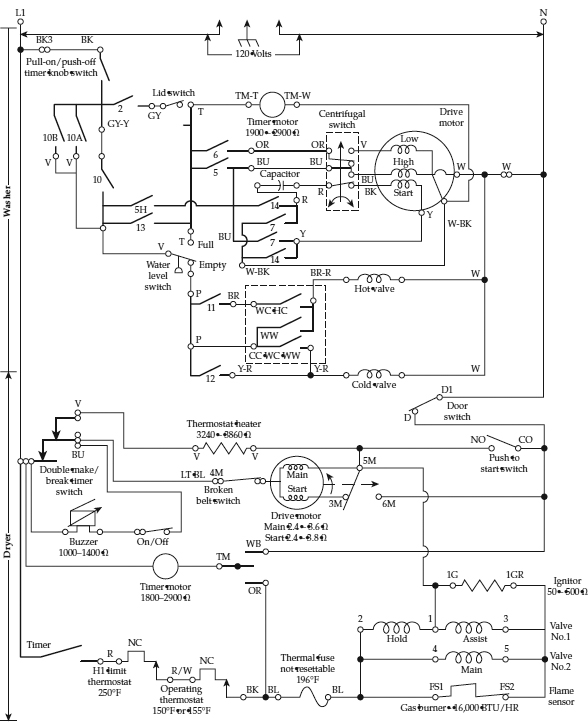
The wiring diagram in this chapter is only an example. You must refer to the actual wiring diagrams on the dryer that you are servicing. Figures 21-16, 21-17, and 21-18 depict actual strip circuit diagrams. The strip circuit diagram is simpler, and it is usually easier to read. Figures 21-19, 21-20, 21-21, 21-22, and 21-23 depict actual wiring schematic diagrams.
FIGURE 21-16 Typical strip circuits illustrating the drive motor circuit.
FIGURE 21-17 Typical strip circuits illustrating the temperature control circuit, heating circuit, and the push-to-start circuit.
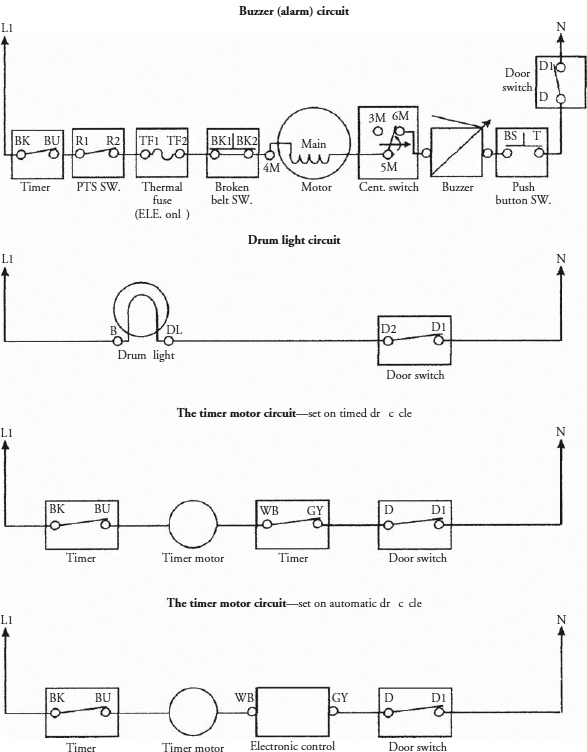
FIGURE 21-18 Typical strip circuits illustrating the buzzer circuit, drum lamp circuit, and the timer circuit.
FIGURE 21-19 A typical gas dryer wiring schematic with electronic components.
FIGURE 21-20 A typical gas dryer wiring schematic for the new-style front load dryer.
FIGURE 21-21 A typical gas dryer wiring schematic with a timer sequence chart with a mechanical timer.
FIGURE 21-22 A typical gas wiring schematic with an electronic control board.
FIGURE 21-23 A typical washer and gas dryer wiring schematic for a stack washer and dryer combination.

 Burner will not light.
 The burner goes on and off.
 Soot buildup.
 The ignitor will not glow.
 The burner trips on the high-limit thermostat.
 On electronic models, check for unusual display readouts and/or error codes.