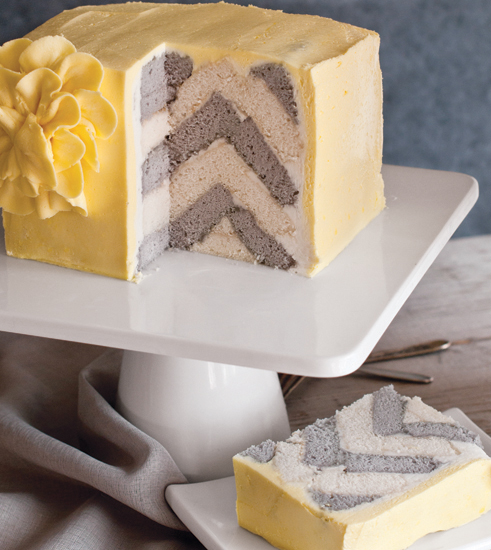
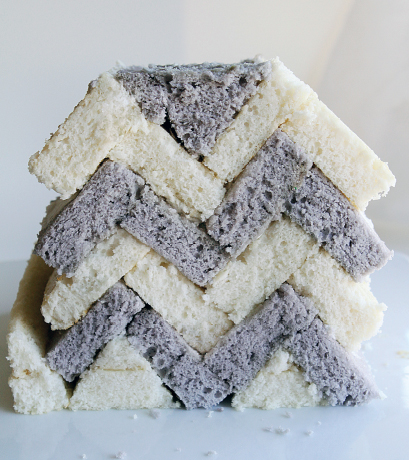
I’m totally smitten with the yellow and gray color concept of this cake. It’s so classic and versatile, lending itself to any season or style. Add in the simple complexity (yeah, I said simple complexity) of the herringbone pattern and this cake shoots right up to the top of my favorites list.
I have to admit that this cake is totally inspired by the large flower boutonniere trend that was popular years ago. But that’s me . . . typically a few years behind trend!
Special note: I’d consider this one of the more challenging cakes in the book due to the level of math and precision involved. I highly recommend reading through all the instructions prior to starting. You’ll want to make sure you have all the tools and equipment necessary to ensure a fun and creative experience. Rest assured, I’ve made this cake a number of times and it gets easier every time. It’s a great cake to make once, get the feel for, then experiment with. Use your favorite colors, different flavors . . . create a rainbow design! But most of all, have fun with it!
2 recipes White Cake
1½ recipes Basic Buttercream
Black and yellow gel food coloring
SPECIAL EQUIPMENT:
2 11 × 16-inch sheet pans; long, serrated knife; offset spatula; ruler; disposable plastic pastry bags; #104 decorating tip
DIFFICULTY: Challenging
1. Bake 1 white cake in a well-prepared 11 × 16-inch sheet pan.
2. Prepare the batter for the other white cake and mix in 1 or 2 drops of black gel food coloring. Bake a gray cake in the same size sheet pan. Let both cakes cool completely.
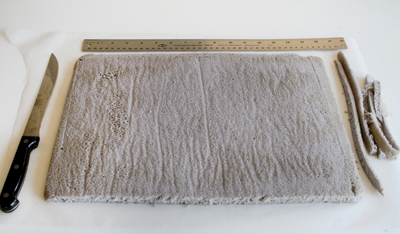
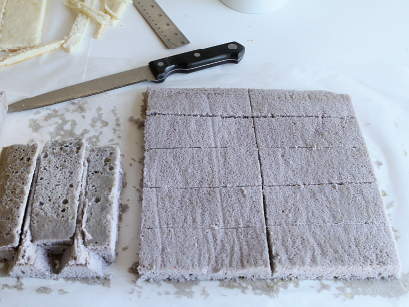
3. Carefully remove the gray cake from the pan and place it on a large piece of parchment. Using a long serrated knife, cut off the edges so that you have a perfect rectangle.
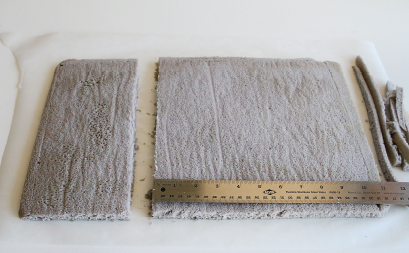
4. Cut one 10-inch square out of the sheet cake. You’ll have a 6-inch piece remaining.

5. Cut the 10-inch square into ten 2 × 5-inch sections.
6. Trim the 6-inch piece so that it’s 5 × 10 inches.
7. Cut the 5 × 10-inch section in half and place the layers on top of each other. You should now have a double-thickness 5 × 5-inch piece.
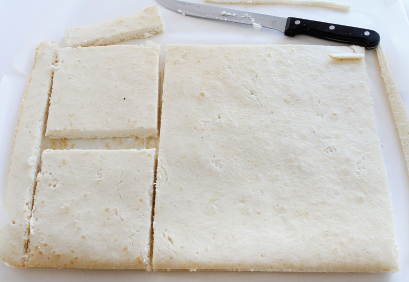
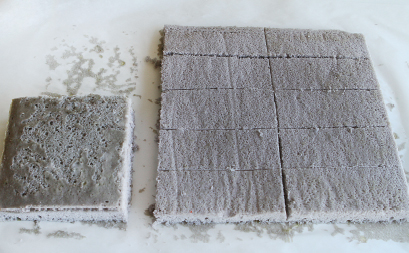
8. Remove the white cake from its pan and repeat the cuts.
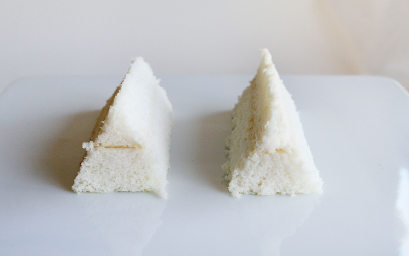
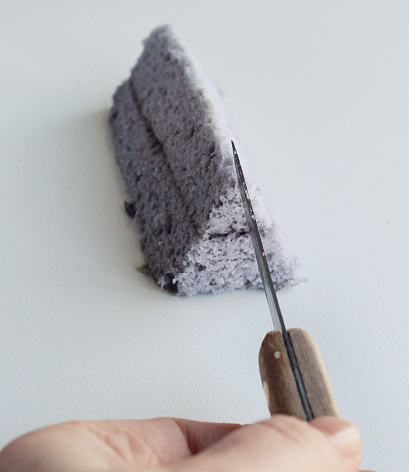
9. On the 5 × 5-inch section, measure in 1 inch and place the knife on the cake at a 45-degree angle. Cut down, facing out, to form a triangle.
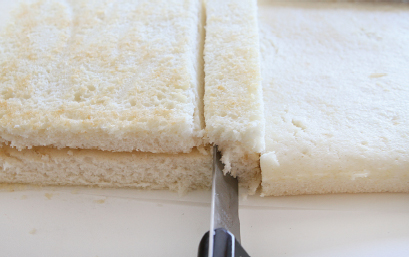
10. Now face the knife in the other direction, and cut down at a 45-degree angle.
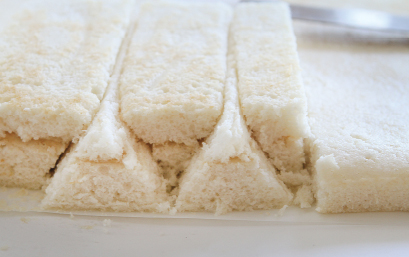
11. You have now made two cuts that create a single three-dimensional triangle from the cake. Moving down the cake 1 inch, make the cuts again to give you two of these sections.
12. Repeat the cuts on the 5 × 5-inch gray cake. Pop your cake back into the freezer if it starts to get crumbly. This process works best if your cake is very chilled.
13. Prepare the buttercream. You will want a very soft and spreadable consistency of buttercream. To achieve this, add more liquid than the recipe calls for, 1 tablespoon at a time.
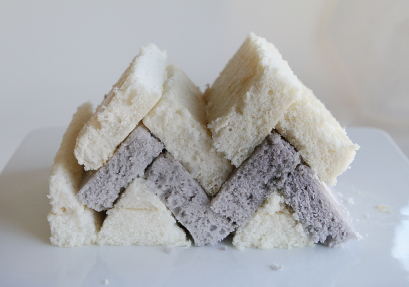
14. Place 2 white triangle sections on a cake stand about an inch apart. Cut a white triangle down the middle and use it to fill in the ends.
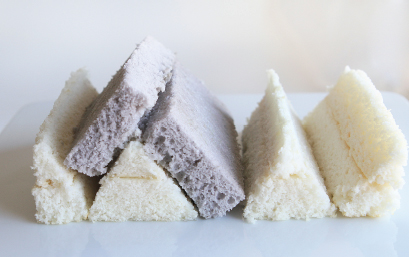
15. Lay 2 small gray rectangles flat on the right sides of the 2 white triangles.

16. Next, lay 2 small gray rectangles on the left side of the triangles to make a classic herringbone pattern. This is the bottom layer of your cake.
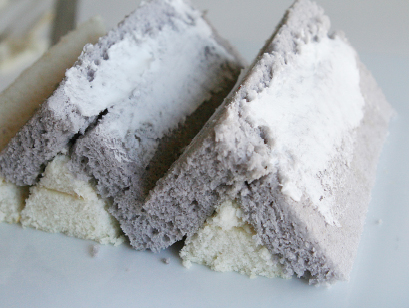
17. Using an offset spatula, place a thin layer of buttercream on the seams of the gray pieces to act as glue.
18. Lay 4 pieces of white cake in the same pattern on top of the gray layer, and seal the seams with a thin layer of buttercream. Repeat, alternating gray and white layers of cake, until the cake reaches your desired height.
19. Lay a triangle into the center of the cake (use the opposite color of the top layer). If it doesn’t fill the space for any reason, simply fill in with scraps.
20. Cut another triangle piece down the middle and invert the 2 pieces to create the edges of the top layer.
21. Next, use a dab of frosting or a piece of tape to mark the front of the cake so you know where to place your buttercream flower. Aside from being beautiful, the flower will remind you where to make your first cut for serving, since the herringbone design is best seen when you cut crosswise into the pattern.
22. Freeze the cake for at least 6 hours.
23. Fill in the open notches, creating even sides, with room-temperature buttercream. Smooth out the buttercream to create a crumb coat.
24. Freeze the cake until it has set.
25. Tint the remaining buttercream yellow and, using an offset spatula, cover the cake in a smooth coat.
26. Insert a #104 decorating tip into a pastry bag, then fill it with the yellow buttercream. To make the flower at the front of the cake, pipe out petals (see the method for Ombre Cake), starting with the outer circle and moving in.
27. Chill the cake until serving. Cut the cake as shown in the first photo to reveal the pattern.