I went to cooking school in Paris, but it wasn’t from my toque-clad teachers that I learned to make crêpes. It was from my junior high school friend Tanni Young, when we lived in Arlington, Virginia. We would restore ourselves after a long day of being fourteen-year-old girls by making crêpes filled with cheddar cheese as an after-school snack. I’m sure those crêpes were short on finesse, but I still remember how satisfying it was to turn and tilt the pan, watch the liquid batter travel across its surface until no more pan was visible, and then wait until the steam rising from the crêpe slowed down, the signal that it was time to flip it. A few seconds of cooking on the second side, a shower of grated cheese, a flick of the spatula to fold the crêpe in half, and we had an awesome snack, ready to eat in all its gooey, cheesy goodness.
While our peers were enjoying Cheetos, we were eating crêpes. We felt special because crêpes were special. Even though they’re related to the homey pancake, crêpes have an allure that I think is about more than the way they taste. Depending on what your first crêpe experience was, they can feel elegant, exotic, nostalgic, sophisticated, indulgent, or comforting.
As you’ll see when you look at the recipe list in this book, crêpes fit the bill for almost every eating occasion: breakfast, brunch, a quick afternoon treat, an hors d’oeuvre to serve with a glass of sparkling crémant de Loire, a plated hors d’oeuvre for a fancy dinner, a main course for a family (or fancy) dinner, and desserts galore. If you tried, you could work crêpes into the soup and salad courses, too (a chiffonade of crêpes in consommé is a famous soup, but for the purposes of this book, we’re not ranging that far.
In other words, crêpes are versatile. And the place where “versatile,” “special,” and “easy” intersect is the place every smart cook wants to be.
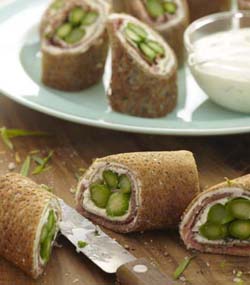
The crêpes in this book are simply ones that I think are delicious, fun, and worth the effort to make. The recipes make use of a broad range of ingredients—cheeses, meat and chicken, fresh vegetables, seafood, fruit, and, of course, chocolate. And they also give a nod to the seasons: Asparagus and Prosciutto Crêpes with Lemon-Caper Dipping Sauce in spring, Mixed Berry Crêpes with Ginger and Mascarpone in summer. You’ll find cocktail crêpes and brunch crêpes and main dish crêpes, but sometimes how and when you serve the crêpes just depend on you. Many of the recipes can suit more than one type of meal.
There’s only room for about four dozen recipes in the book, so I’ve left out a lot of classic crêpe recipes. You won’t find your Hungarian grandmother’s palacsinta nor an authentic Brittany galette complète with a fried egg plopped in the center (I never did like those fried-egg crêpes!), but I hope you will find many recipes to love and to fold into your repertoire of favorite things to cook.
I’ve arranged the recipes so that you start with the basic crêpe recipes themselves. Versatile Crêpes is the workhorse of the book and serves as a good choice for just about any of the recipes. But you have five other basic crêpe recipes to choose from, depending on the flavor or texture you would like to bring to your dish.

Let me start by telling you that you don’t need a fancy crêpe pan to make beautiful crêpes. You can use just about any pan—an actual crêpe pan, an omelet pan, or a plain old skillet—as long as it has a heavy, flat bottom surface. It’s okay if the sides of the pan are curved, but the base of the pan should have the same diameter that you want for your crêpes. For most of the recipes in this book, you’ll need 8-in/20-cm crêpes. But don’t worry if you don’t have a pan with an 8-in/20-cm bottom on hand. If your best pan for the job will make 7-in/17-cm crêpes, or even 9-in/23-cm crêpes, it’s going to be okay. Adjust the fillings in the recipes accordingly, and your crêpes will still be delicious.
Nonstick or not? For years, I used a beat-up nonstick crêpe pan that had a lovely 1970s “harvest gold” enamel exterior; my mom must have gotten it as a gift. But that pan bit the dust ages ago, and all of my recent crêpes have slid with ease from my go-to skillet: a Calphalon stainless-steel model. It’s not nonstick; it simply has a nicely seasoned surface that allows me to cook eggs, fish, or whatever I want without the food sticking. The heavy base delivers even heat, which is very important for frying crêpes.
A nonstick surface does forgive a multitude of sins, however, so if you want a foolproof option, look for a good-quality nonstick skillet that feels heavy and well made. Even with nonstick, good heat distribution is important. Some nonstick crêpe pans on the market feel more like novelty pans than hardworking cookware, so be judicious.
Another option is a real French crêpe pan made of blue steel (also sometimes called black steel). Making crêpes with one is a lovely experience. This type of pan is inexpensive and makes you feel quite Parisian as you produce perfect, lacy crêpes from this timeless-looking, bare-bones pan, the design of which probably hasn’t changed in 150 years. I bought an 8-in/20-cm blue steel pan for developing the recipes in this book and got good-looking crêpes with ease, right from the start. But you do need to season this type of pan before you start to cook, so read the instructions that come with it. And these pans will rust in a heartbeat, so be sure to dry them thoroughly after a gentle washing with hot water and a drop of dish soap. No dishwasher, please.
One of the many joys of crêpes (aside from how delicious and satisfying they are to eat) is that their manufacture is so simple—the right pan is key, but beyond that, a bowl and a whisk will do it.
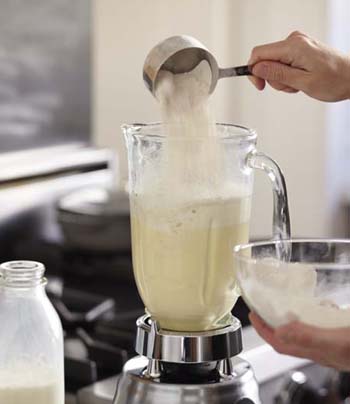
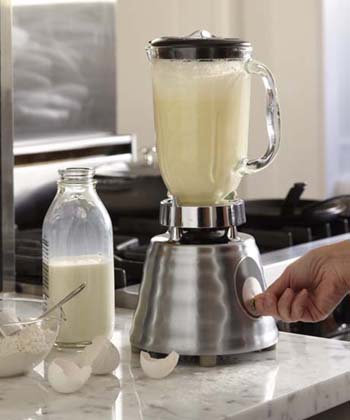
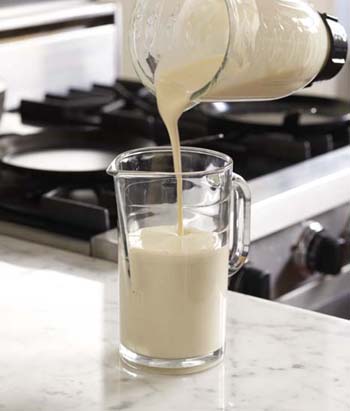
For blending: Now that I’ve said that a bowl and a whisk are all you need, let me also tell you that a blender is a crêpe-maker’s best friend—it’s brilliant at mixing the batter, with not a lump in sight. I like to make a batch of crêpe batter in the blender, and let it rest in the fridge right in the blender jar. When I’m ready to cook, I pour the batter into a shorter, wider measuring cup, from which I dip out my portion of batter as I make the crêpes.
For measuring: It’s very important that you use the right quantity of batter for each crêpe, and the best way to do that is to use a utensil that will give you a measured amount. I use a ¼-cup/60-ml metal measuring cup with a nice, long handle. I can dip it into the batter and pour the batter into the crêpe pan with a nice amount of control. A small ladle works well, too—anything that helps you deliver a consistent amount of batter to the pan and keeps your fingers clean.
For flipping: You need something to flip your crêpes, of course, unless you’re the type who likes to show off and flip food in the air. I use a thin-bladed table knife, at first to lift up an edge of the crêpe and peek at the underside to see if it’s browned and ready to be flipped. When it’s ready, I gently slip the knife under the center of the crêpe and lift it up (the crêpe drapes over the sides of the knife), and then I flip it over and back into the pan.
It’s simpler than it sounds, and on the occasions when my crêpe lands a little off center, it’s easy to just coax it into place with my fingers. A long metal offset spatula would work well, too. Just be careful not to scrape the surface of your pan with your flipping utensil, especially if the pan is nonstick.
Knives: I can cook a meal just about anywhere—a campsite, a motel kitchenette, the back of a pickup—as long as I’ve got a good knife. And by “good,” I mean sharp. You will instantly become a better cook if you switch from using a dull or substandard knife to a good-quality knife with a sharp edge.
At a minimum, you should have a chef’s knife—that’s the knife with the wide, tapered blade that allows you to “rock chop,” or hold the tip of the knife down on the cutting board while you lift and lower the handle to guide the blade across the pile of whatever you’re chopping. You don’t need a huge chef’s knife, however. If you’re slightly uncomfortable with the thought of wielding a blade that looks like it could eviscerate a large watermelon, try a 6-in/15-cm chef’s knife; I get a lot of use out of mine. A small paring knife is also a good thing to have around. Think of it as the chef’s knife’s lieutenant; it’s useful for the smaller tasks, like cutting away citrus peel and slicing fruit.
Rasp grater: Who knew that getting a new style of grater would change my life so drastically? When the rasp-style graters came on the market a dozen or so years ago (Microplane is the main manufacturer), my pastas instantly became cheesier, my orange muffins zestier, and my Caesar salads more garlicky, all because the rasp grater is so much more efficient and pleasant to use than the old box grater. So if you don’t already have one, get one! All the Parmigiano-Reggiano in this book was grated with a rasp grater before measuring, and the same goes for the citrus zests.
Baking parchment and silicone baking mats: In several recipes I suggest using parchment, which is a coated paper that can withstand the heat of the oven (it does turn golden brown when the oven’s up above 450?F/230?C/gas 8, but the beauty of it is that it won’t burn). It’s used to line baking sheets so your food doesn’t stick, and to facilitate cleanup. The best parchment to use are the precut sheets that come flat in a box. Unfortunately, they’re hard to find in stores (you can order them from the King Arthur Flour Web site at www.kingarthur.com), and you need a wide shelf to store them. I prefer them because they lie flat and fit perfectly in a standard baking sheet. If you can’t find this kind or don’t have room, your grocery story will carry parchment in a roll near the foil and plastic wrap. You’ll need to smooth out the curled-up edges as you work your way through the roll, but that’s no big deal.
A reusable option is a silicone baking mat. Once you try baking with these mats, you’re likely to get hooked on them because they won’t get soggy from bubbling juices the way parchment does, and they make cleanup a breeze. The baking mats come in several sizes, including round ones designed for cake pans.
If you looked, I’d bet you could find a thousand recipes for making basic crêpes, each of them a little different. But all of them would call for essentially the same ingredients: eggs, milk, flour, salt, and butter. These are all ingredients you’re likely to have on hand, which is one more reason why I love crêpes—they can be spur-of-the-moment treats.
In the recipes in this book, the quantities of the eggs, milk, salt, and butter are pretty much the same, but the choice of flour gives the crêpe its distinctive character.
All-purpose flour: All-purpose is the flour typically used because it has enough protein to give a crêpe some structure without being tough. I’ve seen recipes that call for cake flour, but I think the results are too delicate. Plus, cake flour really has no flavor or nutritional value, so for me, it’s not an option.
Whole-wheat pastry flour: This whole-grain flour is delicate enough to use for many pastries. The flour is milled from soft, low-protein wheat (usually around 9 percent protein), which helps keep the texture of the crêpe light while still delivering a whole-grain flavor.
Buckwheat flour: The Buckwheat Crêpes call for buckwheat flour, which is something you probably don’t have in your cupboard. The seeds of the buckwheat plant, which is related to rhubarb, are ground into an earthy, nutty flour. This is the traditional flour used for crêpes in Brittany, which are called galettes de sarrasin, and it definitely adds a note of authenticity to your crêpes. That said, it only works in dishes where a hearty flavor and texture are welcome. You can find buckwheat flour easily at stores where whole grains are sold.
Rice flour: So many people are avoiding gluten these days, either because they’ve discovered they have a true intolerance or because they’re exploring ways to improve their diets, so I wanted to be sure to have at least one gluten-free option: crêpes made with rice flour. Rice flour is just what it sounds like—rice that’s been ground into flour. It looks and behaves a lot like wheat flour, though I’ve noticed that as the rice flour crêpe batter sits, it tends to separate. So you need to stir it back together often. Rice flour makes truly delicious, delicate crêpes, so the extra stirring is well worthwhile. The flour is available at most grocery stores, in the whole-grains section.
Chickpea flour: One recipe in the book calls for chickpea flour, which is quite common in India but is not so well known in the United States. Sometimes called garbanzo flour, chickpea flour can be found at Indian grocery stores. It’s also popping up these days at regular grocery stores, in the same aisle as the buckwheat and rice flours. Chickpea flour is not as fine and floury as the others. Like rice flour, it’s gluten-free, and the flavor is addictive.
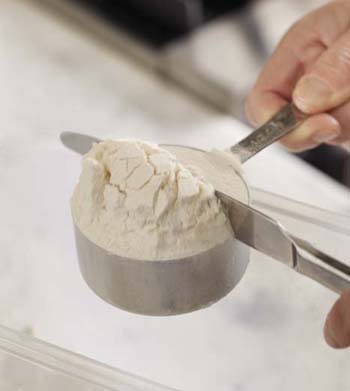
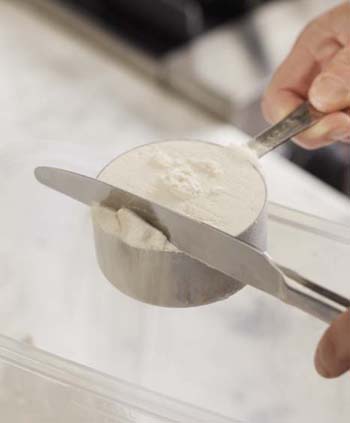
Note that no matter what type of flour you use, if you’re measuring it by volume (in a measuring cup) rather than by weight, please use the following method: spoon the flour from the bag into your measuring cup, then sweep the back of a knife across the cup to level off the flour. This is how I’ve measured all the flours in these recipes. Some people like to scoop the flour directly from the bag and then sweep. But if you measure flour that way, you may compact the flour in your cup, thus adding more flour to the batter than I do with my method. And too much flour will make your crêpes heavy.
Almond paste: Almond paste appears in the batter for Almond-Brown Butter Crêpes, which is a dessert recipe. Almond paste is simply very finely ground almonds and sugar made into a paste, and it’s used in all types of confections. Don’t buy marzipan by mistake; it’s similar in that it’s made from almonds, but it won’t work in this recipe. It contains more sugar and a few other ingredients that we don’t want here. A good grocery store will carry almond paste, as will online baking sources such as King Arthur Flour.
Eggs: I use large eggs in all the recipes, and whether they’re cold or at room temperature doesn’t matter—I’m way too lazy a cook to pay attention to that kind of thing, though my baker colleagues assure me that it matters in some circumstances. But please use fresh eggs (check the dates when you buy your next carton, and choose the one with the latest date). And please use eggs that come from humanely raised chickens, if you can. Look for “Certified Humane” on the label for some assurance about how the chickens are treated.
Milk: I alternate between whole milk and 2 percent milk, using whatever I have in the fridge. Crêpes made with whole milk will be a touch richer and more tender because there’s a smidge less protein in whole milk, but the difference is hardly noticeable. Again, choosing milk that comes from humanely raised cows is a nice idea.
Butter: I love salted butter because I love salt, but for control purposes, I’ve used unsalted butter in the recipes, unless otherwise specified. In most of the crêpe batter recipes, butter plays a big role, so please use something nice (meaning butter that hasn’t sat in the fridge for a month oxidizing).
The only way to make a perfect crêpe is to first make about a hundred not-so-perfect crêpes. How come? Because it’s really a matter of practice makes perfect and getting to know how your batter cooks in your pan on your stove. Plus, you need to decide what features you like in a crêpe. An evenly browned surface? Use a nonstick pan with minimal butter. A lacy, crêpe-y surface? Use more butter and a really hot pan. A super-delicate texture? Add a bit more milk to the batter. As you work with the recipes in this book, you’ll learn how to adapt them to your taste.
It may require making a hundred crêpes in order to achieve perfection. Or it may only take you a few tries to produce a crêpe that you’re not only proud of but that you want to eat the moment it slides from the pan, glossed with a dab of salted butter drizzled with a bit of honey or maple syrup. At least, that’s what happens to me every time I cook crêpes.
The real key to mastering crêpes is patience. You’re trying to juggle four variables: the consistency of the batter, the amount of batter, the amount of butter, and the heat of the pan. You may need a few tries to understand how everything fits together, so don’t get frustrated if your first few crêpes are a touch wonky-looking (they’ll still be delicious and will make a perfect cook’s treat!).
Consistency of the batter: The recipes in this book make crêpes that are tender and delicious but not super-delicate. I like to have enough substance in my crêpe so it can stand up to the fillings and toppings without getting soggy. For a more delicate crêpe, just reduce the amount of flour by 1 tbsp or so.
You can cook your crêpes immediately after you’ve blended the batter, but it’s much better if you let the batter rest for at least 30 minutes (and ideally overnight). In doing so, you’re allowing the starch in the flour—whatever flour you’re using—to fully hydrate and swell. Once the starch is hydrated, you can adjust the amount of milk to give your batter the ideal consistency, which is about as thick as heavy cream. If your batter seems thicker—more like pancake batter—add more milk and whisk to blend. If it’s too thin for some reason, whisk in a touch more flour and give it another rest.
Amount of batter: The amount of batter you pour into the pan will determine the size and thickness of your crêpe. I’ve specified the amount that works to create an 8-in/20-cm crêpe, but you’ll need to experiment to see what works with your pan. If you find you’ve added too much batter to the pan, just tip the pan to pour the batter back into your batter bowl. Your crêpe will have a little “tail,” which you can just cut off after cooking; no worries.
Amount of butter: Determining the right amount of butter to use in the crêpe pan is more of an art than a science, and to be honest, I can’t tell you exactly how much I use for each crêpe. I put a bit of butter into a small bowl and then fold a paper towel to use for spreading a slick of the butter in the pan. After cooking each crêpe, I give the pan a swipe with the towel, which seems to deposit the right amount of butter.
With a regular (not nonstick) pan, you need enough butter to prevent the batter from sticking. Too much butter, however, and the batter won’t “grab” the surface of the pan as you tilt it; instead, the batter will just slide around and get gloppy. This is even more true with a nonstick pan. When you use a nonstick, the butter isn’t there to help the crêpe release; it’s there to add flavor and to help brown the crêpe. So for nonstick, be judicious with the butter.
Temperature of pan: The heat of the pan is perhaps the most important element in making crêpes. If the pan’s not hot enough, the underside of the crêpe won’t brown, and your crêpe will look anemic. If the pan’s really too cold, you risk the batter sticking to it.
If the pan is too hot, the batter will bubble furiously and your crêpe will have lots of holes in it. And of course, you risk burning the crêpe. A well-fried crêpe will have a lacy brown pattern to it with quite a few speckles, which should be a tawny brown, not black.
So, the perfect pan temperature is one that produces a satisfying sizzle when the batter hits the pan and yet allows the batter to flow freely to all areas of the pan before it completely sets up into a crêpe.
Which batter to use: This book includes recipes for six different types of crêpes. In each filled crêpe recipe, I suggest one or two types of crêpes that I think are an ideal match for the filling, but you should feel free to use whichever type you like. There’s only one that wouldn’t work for savory dishes—the Almond-Brown Butter Crêpes. And likewise there’s only one that would be truly awful in a dessert—the Chickpea Flour Crêpes.
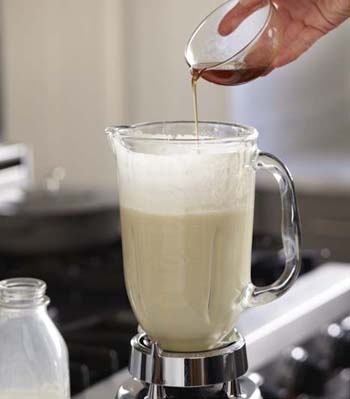
Lumps can be a problem if you make your crêpe batter by hand, but this method will minimize that threat: Put the eggs, about ½ cup/120 ml of milk, and the salt in your bowl and whisk until nicely blended. Dump in about half the flour and whisk like mad to make a thick paste. Whisk in a little bit more milk, and then add the rest of the flour and whisk again until you have a smooth, thick batter. Begin whisking in the remaining milk, a little at a time, making sure the milk is incorporated each time before adding more. If you add too much too fast, the batter will be lumpy. Whisk in the melted butter as the final step.
Every recipe assumes that you’ve already made the crêpes suggested in the list of ingredients and are ready to tackle the rest of the dish. You may have made them 5 minutes ahead, in which case they’ll still be nicely warm. But if you’ve made them hours or days ahead, they’ll need to be reheated, or at least refreshed until pliable. In some recipes, you’ll accomplish this by laying the crêpes in a hot skillet and heating them, one by one. In others, you’ll heat the entire stack. To do this, preheat the oven to 300°F/150°C/gas 2. Put the crêpes on a large plate, cover the plate with foil, and warm the crêpes until they’re hot, about 10 minutes. You’ll also be reheating filled crêpes in the oven in a baking dish. Each recipe will suggest the best way to reheat the crêpes.
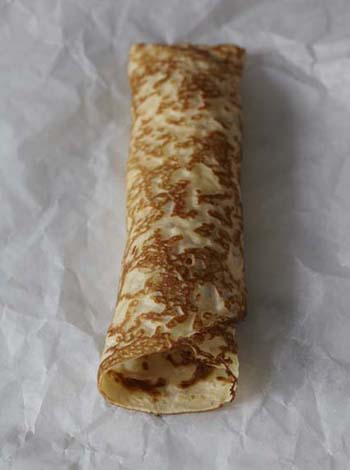
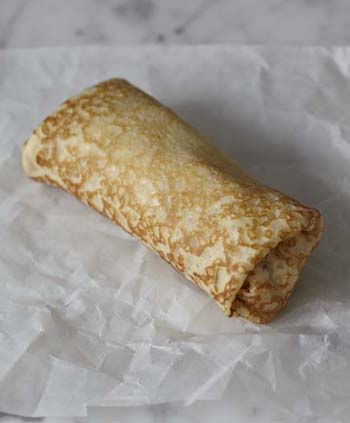
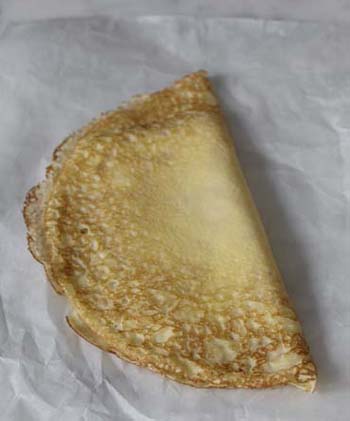
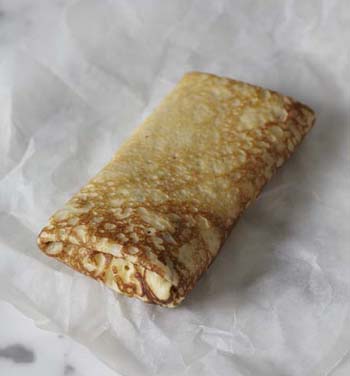
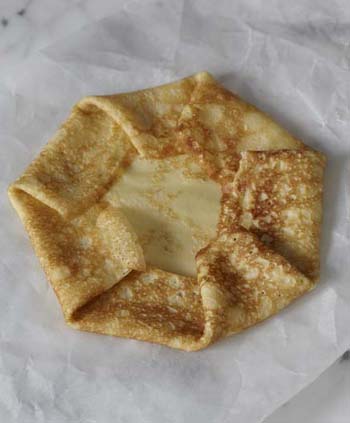
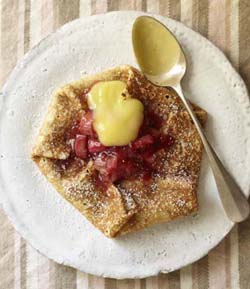
The recipes in this book suggest seven ways to fold your crêpes, each one showcasing the fillings and toppings to their best advantage: (1) rolled into a simple cylinder, (2) rolled and folded like a burrito, (3) pleated like a galette, and folded into (4) a half-moon, (5) a triangle, (6) a rectangular flat packet, or (7) a cone.
There are also two recipes in which you don’t fold the crêpes at all, but rather stack them into a cake with filling in between each layer. The cake is then cut into gorgeous stripe-y wedges.