Versatile Crêpes
This is the standard batter that I use for so many of my crêpe dishes, both savory and sweet. The incredible flavor in these crêpes comes from the addition of brown butter, or beurre noisette in French, which means “hazelnut butter.” It is an apt name because the milk solids in the butter get toasted into a lovely mellow nuttiness. To boost the “dessertiness” of the crêpes, I’ll add about 2 tsp sugar and 1 tsp pure vanilla extract to the batter.
I always use the blender to make crêpe batter (it’s one of the few things I think a blender is good for!), but you can, of course, whisk together the batter by hand, if you like.
If you’re new to crêpe-making, prepare to mess up the first crêpe (or even more) as you get the hang of swirling the batter into the pan, having your pan at the right temperature, and the timing.
My advice is to make a double or triple batch of these crêpes. Spend 45 peaceful minutes making them, and then tuck them into your freezer in packets of around eight crêpes each. Then you’ll have the best fast-food option on the planet at your fingertips.
Makes fifteen to eighteen 8-in/20-cm crêpes (depending on how many you mess up at first!)
1¾ to 2¼ cups/420 to 540 ml whole milk
4 large eggs
½ tsp kosher salt
1½ cups/190 g all-purpose flour
6 tbsp/85 g unsalted butter, melted (preferably brown butter; see recipe), plus regular unsalted butter for the pan
Put 1¾ cups/420 ml of the milk, the eggs, and salt into a blender. Whiz for a few seconds to blend everything together. Remove the lid and add the flour. Cover and blend until very smooth, about 20 seconds. Remove the lid, pour in the melted butter, cover, and whiz until combined, 10 seconds more.
Transfer the batter to a large glass measuring cup with a spout (or a bowl that’s large enough to easily dip a ¼-cup/60-ml measuring cup into). Let the batter rest for at least 5 minutes and up to 24 hours. (If resting for more than 30 minutes, store in the fridge.) When you’re ready to make the crêpes, test the batter’s consistency; it should be as thick as heavy cream but not as thick as pancake batter. If it feels too thick, whisk in up to ½ cup/120 ml of the remaining milk.

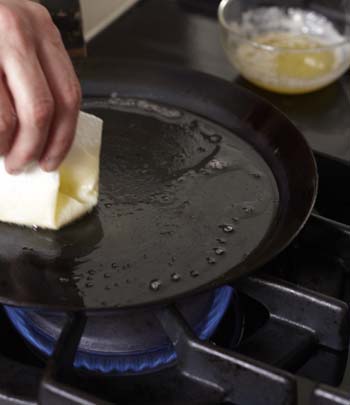
Heat an 8-in/20-cm crêpe pan or nonstick skillet over medium-high heat until it’s hot enough to make a drop of water sizzle upon contact. Using a folded paper towel, spread about ½ tsp butter around the interior of the pan. The butter should sizzle upon contact but not instantly turn brown. You don’t want the pan to be so hot that the butter burns.
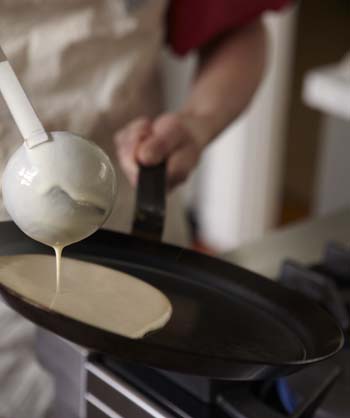
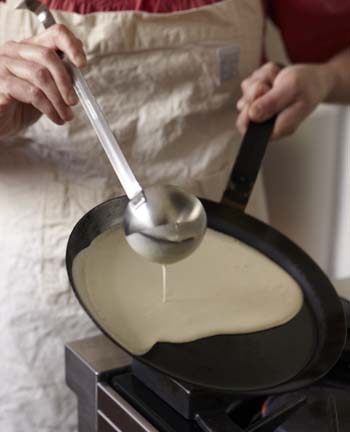
Pour about ¼ cup/60 ml of the batter into the center of the pan, and at the same time lift the pan from the heat, tilting and turning it in all directions so the batter spreads evenly across the bottom of the pan in a thin circle. If the crêpe has any holes in it, quickly add a few drops of batter to fill them in. Or, if you have too much batter and the crêpe looks too thick, immediately pour the excess back into the measuring cup or bowl of batter. You can always trim off the “tail” that’s left behind later.
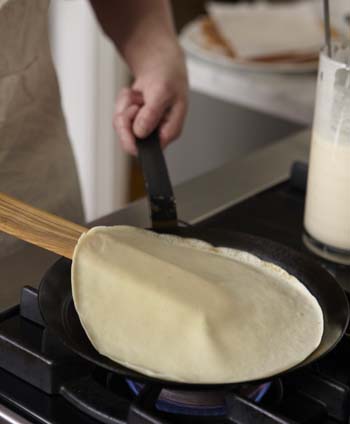
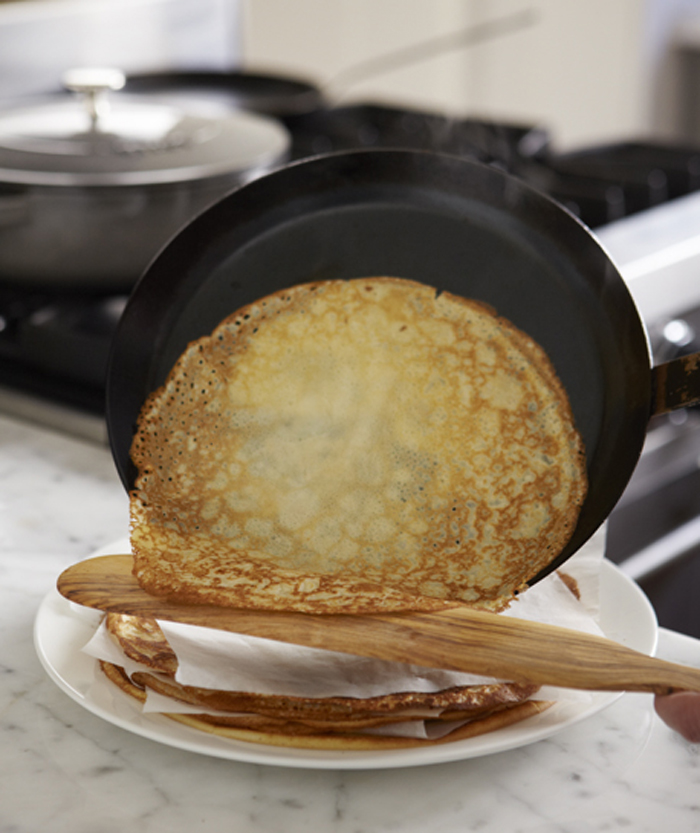
Cook the crêpe until the edges begin to dry and lift from the sides of the pan, and the bottom is nicely browned, about 1 minute. To check for color, use a table knife, slim offset spatula, or your fingers to lift up an edge of the crêpe and look underneath. When the first side is ready, use the knife, spatula, or your fingers to lift the crêpe and quickly flip it over. Smooth out any folded edges or pleats and then cook until the center is firm and the second side is browned, too, about 20 seconds more. The first side is almost always much prettier and more evenly browned (in these recipes, we’ll call it the presentation side), while the second side tends to be more spotty.
Slide the crêpe from the pan onto a large plate or cooling rack. Repeat with the remaining batter, adjusting the heat and wiping the pan with more butter as you cook. You can stack thecrêpes on the plate as they’re done. If you’re going to store them in the freezer, lay pieces of waxed or parchment paper between them so they don’t stick together. To keep in the fridge, just stack them neatly; no need for the paper separators. (Keep the stacks small if you usually cook for a few people, or make the stack larger if you find yourself cooking for a crowd most nights.) The crêpes will soften as they cool.
To store, wrap the stack in plastic wrap, and then slide it into a large zip-top freezer bag. The crêpes will keep in the fridge like this for up to 3 days, or in the freezer for 2 to 3 months.
To thaw, let the stack sit at room temperature until the crêpes are pliable, about an hour, and then peel them apart and proceed with your recipe.

MAKING BROWN BUTTER
For most recipes, I not only melt the butter, but I cook it until the water has boiled off and the milk solids are starting to turn golden and take on a toasty flavor. At this stage, it’s called beurre noisette in French (“hazelnut butter”) or brown butter in English. I’ve been making my crêpes this way since learning the trick from food writer and fellow alum of La Varenne cooking school in Paris, Charles Pierce. I think it’s such a clever way to add a depth of flavor to the crêpes.
Melt 7 tbsp/100 g of unsalted butter in a small saucepan or skillet over medium heat. Cook the butter, swirling the pan every few seconds, until all of the water inside the butter has sizzled off and the milk solids at the bottom of the pan begin to turn a pale golden color, 2 to 4 minutes. Continue cooking the butter until it turns golden brown and smells nutty and delicious, another few seconds. Immediately pour the brown butter into a bowl to stop the cooking. Let it cool to room temperature before using. When you add the butter to your crêpe recipe, be sure to include the delicious toasty brown milk solids. Makes about 6 tbsp/90 ml brown butter.