Appendix C
Beaver-management techniques
This section covers current best-practice recommendations for beaver-management techniques regularly employed across Europe and North America. The regulatory framework for beavers in Britain is likely to alter significantly in the future, so the advice here should be checked against current recommendations by the appropriate statutory agencies.
Additional sources of information
http://www.beaverdeceivers.com.
http://www.beaversww.org/
http://www.beaversolutions.com/
http://www.vtfishandwildlife.com/.../Best_Management_Practices_for_HumanBeaver_Conflicts.pdf
http://www.kingcounty.gov/environment/animalsAndPlants/beavers/solutions.aspx
www.biberhandbuch.de/
www.clemson.edu/psapublishing/PAGES/AFW/AFW1.PDF
http://www.snh.gov.uk/protecting-scotlands-nature/beavers/
It must be emphasised that in the following descriptions of management devices, competent and robust construction from good-quality materials is necessary, which will make them more cost-effective in the long term. Experience from other parts of the world has established that the construction of a poor-quality device which soon fails, leads to the erroneous conclusion that the method itself is ineffective. Seeking advice and assistance from experienced personnel is recommended.
C.1 Flow devices – dam piping
| Issue |
raised water levels due to beaver damming activity. |
| Basic principle |
pipe inserted through the dam and positioned to allow the water level to be lowered. |
| Result |
control of water level behind beaver dams, or regulation of water levels at sites vulnerable to damming activity. |
Materials
•25–40 cm diameter ‘soft’ polyethylene (PE) plastic pipe, double-walled (more hydrodynamically effective than single-walled as they are not corrugated internally), PVP pipes may also be used, ideally 10–15 m in length (the further the inflow is from the dam, the more likely it will not be noticed by beavers).
•Pipe connectors.
•Heavy (~6.25 mm), large-mesh (<15 × 15 cm) steel netting/welded wire fabric/mesh (e.g. ASTM A185 and A497). If used (Square Fence™ filters), wooden frames may be constructed with suitable timber and associated fixtures.
Method
Pipe:
•To ensure a double-walled pipe sinks insert small holes through the ribs of the PE pipe all the way along the length to allow water in and air out. This can be done with a circular saw set to the correct depth of cut, so each raised corrugation is perforated.
•Perforate the pipe at intervals all the way through to the inside. This allows any bubbles to escape, which otherwise might accumulate and cause the pipe to rise in an inverted ‘U’.
Mesh filter – this is a 3D mesh basket, traditionally known as ‘filter’. This can be square or round, and is used to prevent beavers from accessing inflow:
•Bend mesh into shape, so that it forms a 3D oval shape, with mesh covering top and bottom; alternatively form a square filter which is cuboidal, and mesh supported by a wooden form.
•Bend the cut ends of the mesh back on themselves to hold the filter together.
•Cut a hole in one side, to match the diameter of the pipe used.
Installation:
•Create a breach in the dam and dig a trench down to the desired water level.
•Place the drainage pipe through the breach, with the outflow ~50 cm downstream of the dam.
•Insert the end of the pipe into the filter.
•Position the attached pipe and filter upstream of the dam.
•Secure the pipe to the stream bed at both ends and in the middle to prevent water current from altering the desired positioning.
Tips
•Pipe diameter must be sufficient to deal with the site’s water flow; pipes <25 cm in diameter are not recommended (unless used in continually low-flow sites). More than one pipe can be used if required.
•Hard plastic pipes made from polyvinylchloride (PVC) are more difficult to work with in larger sizes (30 cm and above) given their weight, but are often used in Germany.
•If the water is allowed to run freely out of the pipe at a height above the ground (forming a low waterfall), cover the outlet area with a horizontal, slightly arching piece of weld mesh so beavers cannot physically stop the flow by obstruction.
•If using mesh without plastic or epoxy coating, thicker mesh wire diameter may be required, especially in acidic waters. In waters with a pH of 7 or above, thinner mesh can be used; but, due to many other stressors (ice, floods, dam weight, etc.), it is advantageous to use heavier-gauge mesh. A larger mesh pattern collects less floating debris, which also contributes to the filter’s effectiveness.

Figure C.1 Piped beaver dam (Castor MasterTM) with mesh filter (Round Fence™) to discourage beavers from blocking the inflow pipe. This is often submerged to mask the sound of running water. Note that braces (not depicted) should be used to hold the pipe down in place. (Rachael Campbell-Palmer)

Figure C.2 Polyethylene (PE) pipe. Insertion of holes through both walls to let any trapped air inside the pipe escape. (R. Campbell-Palmer)
•Mesh-square dimensions of 15 × 15 cm excludes beavers (although kits may be able to pass through – a double layer can be created if this is an issue) while allowing most other animals to pass through.
•If properly designed, the filter should not need regular cleaning, though this should be monitored and debris cleared if required.

Figure C.3 Round Fence™ filter (left) before placement below water level (note green pontoon to manoeuvre frame before submerging). Square Fence™ filters (right) have wooden frames that can be decked over for recreational purposes, or left open in permanently shallow water where beavers have no opportunity to enter the mesh unit and plug. (R. Campbell-Palmer and S. Lisle)
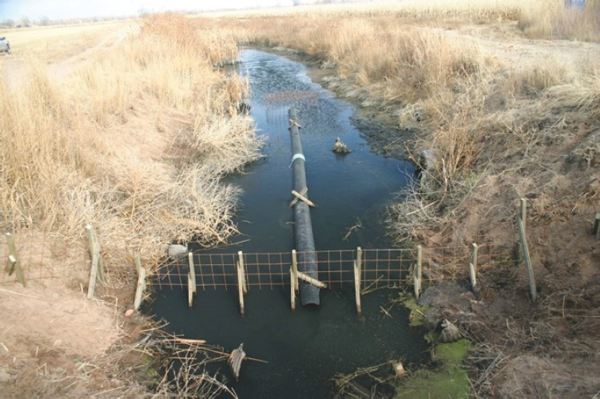
Figure C.4 Flow device in an arable area where beavers have repeatedly attempted to dam. Though not visible here this flow device is also a Swept-Wing Fence™, in which fencing extends further onto the land, to discourage beavers from entering a vulnerable agricultural canal. By allowing beavers to dam along the fence line, any resultant dam will be effectively piped. Note the Round Fence™ filter to prevent the pipe from blocking at the intake. (S. Lisle)
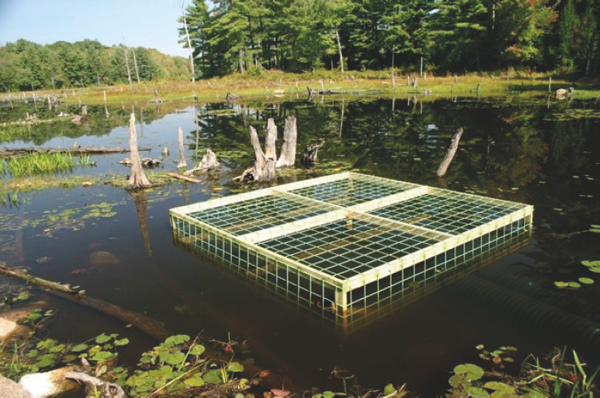
Figure C.5 Square Fence™ filter, with pipe submerged and not visible. A roof has been fitted as the site experiences changing water fluctuations enabling beavers to enter and block pipe inflow during periods of high water flow if left unprotected. (S. Lisle)
C.2 Flow devices – culvert protection
| Issue |
blockage of culverts by beaver activity. |
| Basic principle |
fencing constructed around a culvert to prevent beavers from accessing and blocking the culvert. |
| Result |
beavers unable to directly block culvert.. |
Materials
•Heavy (~6.25 mm), large-mesh (10–15 × 15 cm) steel netting/welded wire fabric/mesh (e.g. ASTM A185 and A497), wooden fence posts, screws, staples.
Method
•Place fence posts in a square with the side against the culvert open. The form can be varied to fit the contours of the stream. The sides of the fence should not touch the bank, if possible.
•Fix mesh to the fence posts. The fence should cover the area from the bottom to about 50 cm over water level.
•Build a second fence (at least 60 cm high) on the inside between the culvert inlet and the road, so that beavers cannot gain access from the land.
•To control water levels in the event of damming, a pipe and mesh filter should be inserted in addition (see Appendix C.3 above). The pipes should be placed as low as possible so that water behind the culvert is kept shallow enough for the beavers to feel too exposed to use it.
Where it is desired that the beavers (and otters and other animals) can use the culvert for passage (e.g. to reduce the chances of road accidents when beavers have to cross the road), this can be done as follows:
(a)Include a polyethylene pipe T-joint (~20 cm in diameter), placed in the fence a little under water level. The size permits passage but makes it difficult/uneconomical for beavers to pull branches or various debris through. NB: the ribs of the pipe must be double punctured prior to installing the device so that water is allowed in and pushes air to out, so that the pipe sinks. Positioning is important.
(b)To build a Turtle-Beaver DoorTM in a flow device (Lisle 1996, 2003). The beavers swim in through a hole cut in the mesh (~25 × 25 cm), below water level and through a channel (~30 cm wide), and then swim out. The U-shape with two right angles prevents beavers from taking sticks or other debris through. Note that fish can easily pass through the fencing. This design may be vulnerable to blocking if beavers build a dam against the fence.
(c)Where the terrain permits, a ‘beaver port’ can be constructed by simply lengthening the fence against the culvert, enabling beavers to walk along a narrow path between the road embankment and the fence, and into the culvert. This requires a fairly steep road embankment, so that the beavers cannot carry sticks down the path.
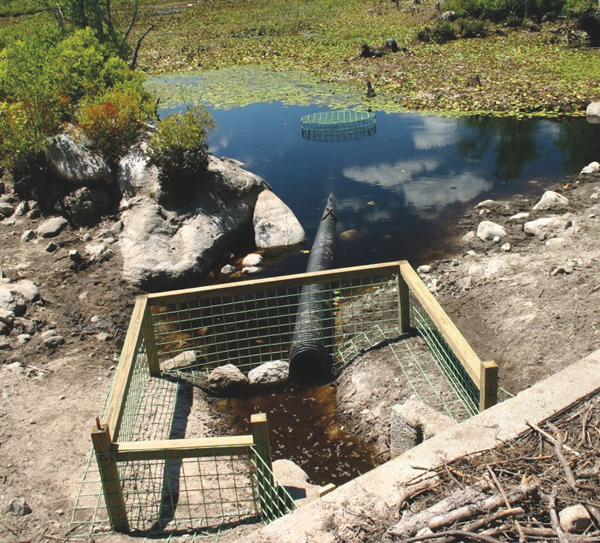
Figure C.6 Flow device to protect a culvert. (S. Lisle)

Figure C.7 T-pipe mounted in a flow device (Turtle-Beaver DoorTM) to permit passage of beavers (and other animals) while preventing sticks and other materials from being carried in. (S. Lisle)
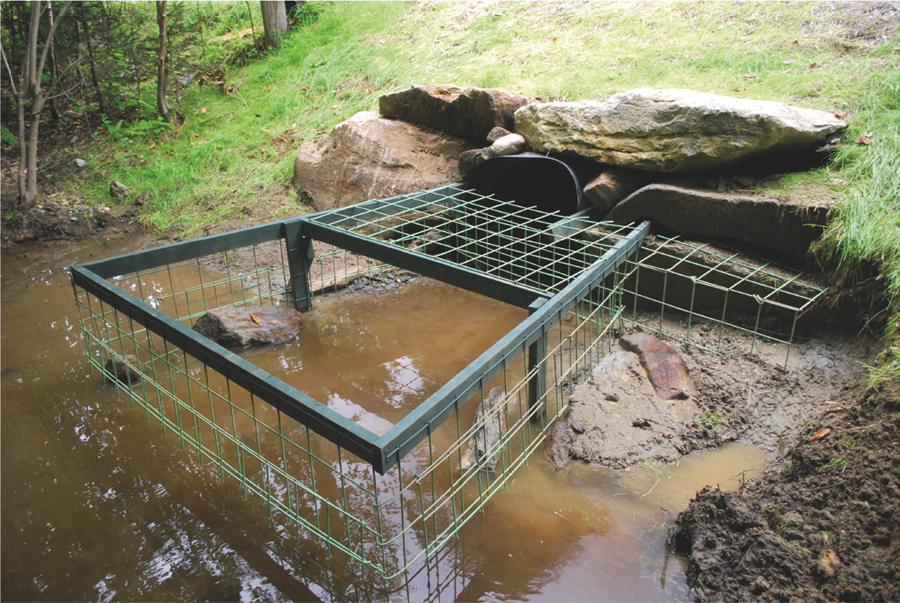
Figure C.8 Beaver Deceiver™ with beaver door to allow animal passage but making dragging of branches very difficult. Steel mesh is strong enough to be self-supporting, so the number of support posts is reduced. This management technique has made use of features associated with this road culvert to be effective against damming and to prevent beavers from carrying building materials. Note: the fencing mesh has been staggered in order to prevent entry of smaller beavers. (S. Lisle)
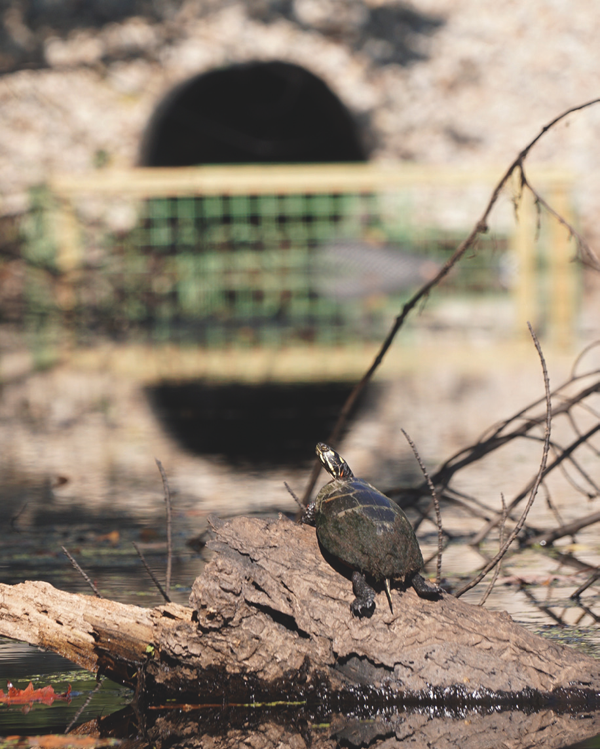
Figure C.9 Any beaver mitigation should ensure the passage of other animals; otter and turtle doors have been created using appropriate mesh size. (S. Lisle)
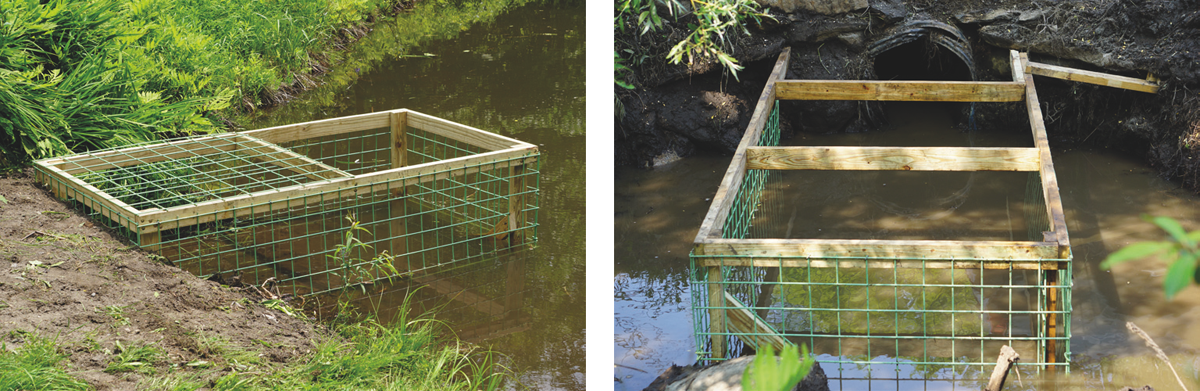
Figure C.10 Examples of Beaver Deceivers™ protecting culverts. (S. Lisle)
Tips
•Depending on the location it may be easier to construct the fencing on land adjacent to the site.
•Culvert fencing flow devices are often the most long-lasting and effective solution against beaver blockage of culverts, or when it is desired to prevent this from happening.
•Fitting the form to the contours of the stream is often more aesthetically pleasing.
•A robust structure of quality materials is much more cost effective not only because it lasts longer, but because beavers often build dams against the structure, it must be strong enough to bear such a load.
•The shape of the flow device can vary to fit the form of the stream and (so long as function is not compromised) for purely aesthetic considerations.
•A culvert fence combined with a pipe system represents a general strategy called a Double Filter System’ (DFS).
Culvert structure and design are important factors in reducing the impact of beaver blockages and so reducing the need for management. Larger, wider culverts (~5.5 m), the width of which is equal to or greater than the watercourse, may reduce the potential for beavers to alter the flow of the water body. When installing culverts, the creation of a depression at the inlet should be avoided, as the existence of shallow pools can encourage beavers to expand these features by potentially damming.
Many of these system were originally developed in the USA by Skip Lisle (Beaver Deceivers International Inc. www.beaverdeceivers.com), it has been an evolving process that has been replicated and further developed across North America and Europe. Each case can be variable and site specific, with the basic principles of flow devices presented here. Taking time to discuss with those with previous experience can save time and resources.
C.3 Dam-removal/dam-notching
| Issue |
raised water levels due to damming activity/passage of fish affected. |
| Basic principle |
removal of all/part of the dam structure. |
| Result |
water level returned to previous status/reduced flow over dam created. |
Materials
•Forks, pick axe, grapple ropes
or
•Mechanical excavator.
Method
•Manually dismantle and remove the desired amount of material from the watercourse.
•Mechanically remove the desired amount of material from the watercourse.
•Leave material on bankside above high-water level (beavers will not re-use older material).
Considerations
If a dam is protecting a lodge, the time of year is a consideration in its removal. During the breeding season, females and young are vulnerable to sudden changes in water levels; and during winter, dams protecting lodges and food caches should be left in situ to avoid abandonment of lodges and loss of food caches.
Dam-notching and removal in Scotland can currently occur on watercourses without prior authorisation from the Scottish Environment Protection Agency (SEPA), using hand tools, rope or grapnels, providing that such work is undertaken without causing pollution, including the escape of ‘silty water’ downstream (SEPA 2014).
C.4 Burrow management
| Issue |
bank collapse/bank instability due to beaver burrowing. |
| Basic principle |
preventing access to current burrows. |
| Result |
beavers unable to access previously excavated burrows. |
Materials
•Heavy (~6.25 mm), large-mesh (~15 × 15 cm) steel netting/welded wire fabric/mesh (e.g. ASTM A185 and A497).
Method (only to be undertaken on burrows that are empty)
•Open the burrows mechanically along their course.
•Backfill with stone, or fill sandbags with a dry cement/aggregate mix and place them back up the opened burrow to a depth of ~2 m from its point of contact with the watercourse. The sandbags will readily mould themselves to the contours of the burrow and then set rapidly within 24 h.
•Cover entrance holes with wire fabric/mesh pushed down into the bed of the watercourse and extending to at least 2 m on either side of the burrow entrance.
Considerations
Extreme care must be taken to ensure burrows are empty. These techniques are only dissuasive, and it is quite probable that other burrows will be excavated elsewhere.
C.5 Bank and flood-bank wall protection
| Issue |
bank collapse/bank instability due to beaver burrowing. |
| Basic principle |
preventing burrowing activity with hard reinforcements. |
| Result |
prevention of all mammal burrowing activity. |
Materials
•Heavy (~6.25 mm), large-mesh (~15 × 15 cm) steel netting/welded wire fabric/mesh (e.g. ASTM A185 and A497) (4 × 4 cm mesh is used in Germany to help prevent against other burrowing animals).
•Pea shingle.
•Sheet piling.
•Rocks/stone gabions.
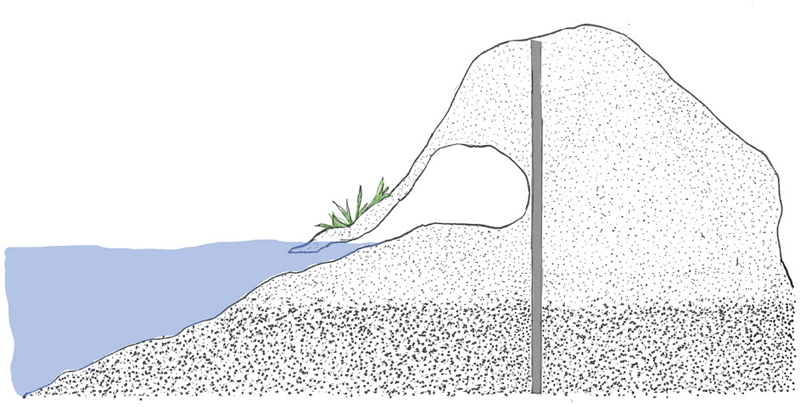
Figure C.11 Sheet-metal plates or heavy-duty wire mesh inserted into the centre of a flood bank. In relation to beavers, this has been employed on limited sections of flood banks to surround or enclose an existing lodge to prevent further burrow and lodge expansion. (Rachael Campbell-Palmer)
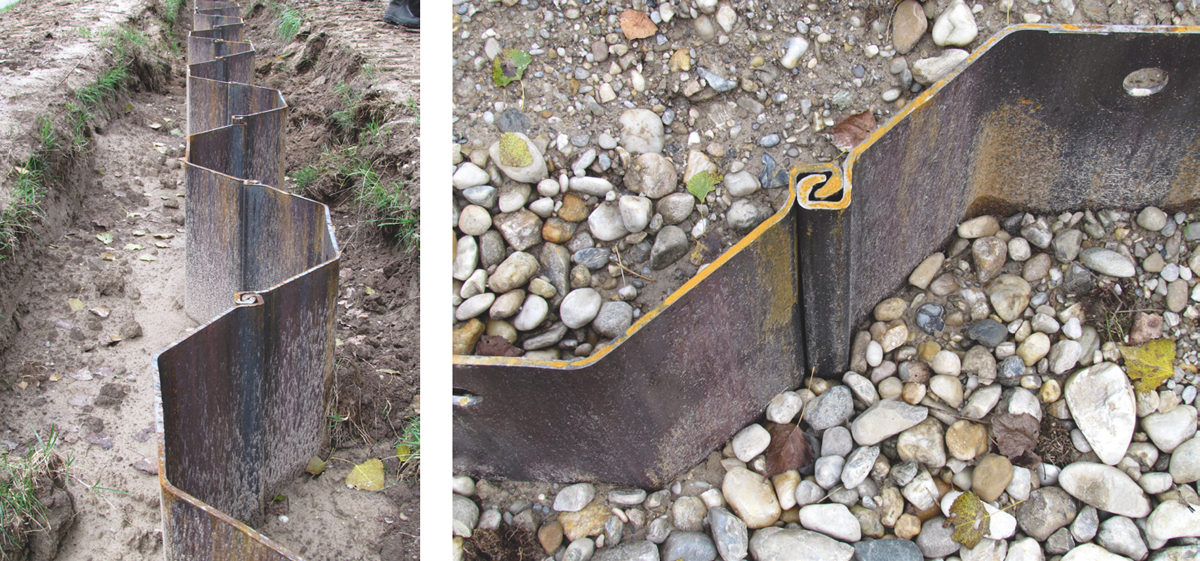
Figure C.12 Flood enforcement of interlocking metal sheets on the River Danube; these have the additional benefit of protecting against beaver (and other animal) burrowing. (R. Campbell-Palmer)
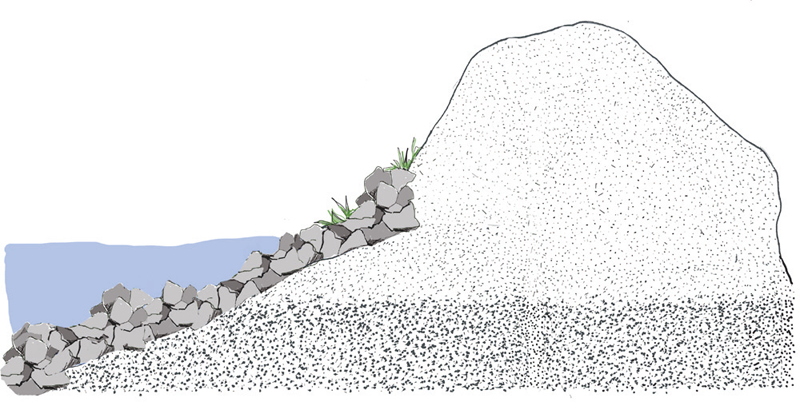
Figure C.13 Stone facing of river, canal or flood banks to discourage burrowing. (Rachael Campbell-Palmer)

Figure C.14 Heavy-duty wire-mesh-lined trench, filled with gravel, to discourage burrowing. Note that just wire mesh or just a trench filled with gravel would work as well. (Rachael Campbell-Palmer)
Method
•Excavate narrow trenches with a mini-digger along the top of the retaining bank-head to a depth of ~0.5–1 m below the normal water level, to prevent beavers digging underneath.
•Insert sheets of wire fabric/mesh square concrete-reinforcing mesh.
•Backfill with pea shingle.
•When beavers attempt to excavate burrows, pea shingle constantly collapses into their holes, and the mesh prevents them from proceeding any further (see Figure C.14). Obvious collapses in the pea-shingle trench can then be backfilled.
or
•Insert an interlocking system of sheet-metal piling through the centre of the main flood structure to a depth that is equal to that of the watercourse.
or
•Face the river bank with large rocks or stone gabions to the bottom of the watercourse.
or
•Insert 5 cm square welded wire fabric into a narrow excavated trench 0.5–1 m below the normal water level.
Tips
•Conventional livestock netting to prevent burrowing is not advisable. This method, although cheap, is generally ineffective, especially if the underwater environment is already pitted by beaver excavations or burrows.
•While the best mesh type to use for natural contours is chainlink, the wire utilised in this mesh is soft and pliable, and beavers can rapidly open large holes in this material by pulling it with their teeth or paws. Even when it is plastic-coated, submerged mesh will corrode at different speeds, and lighter mesh gauges can be bitten through by beavers with relative ease. Mesh designs with unlocked joints can also be easily distorted by pulling.
•Other trialled techniques, such as the use of various geotextiles in new construction sites, have not proven to be effective against burrowing mammals.
•Isolating of visible lodges on the river bank with sheet piling to prevent their extension can be undertaken; but this is only temporary ‘fix’ for individual nuisance structures, and cannot be applied as a mitigation strategy along extensive lengths of watercourse.
C.6 Individual tree protection
C.6.1 Mesh protection
| Issue |
beaver browsing and felling of trees in undesirable circumstances (specimen/ornamental trees, trees by roads etc.). |
| Basic principle |
wire mesh used to protect trees from beaver activity. |
| Result |
beavers unable to target protected trees. |
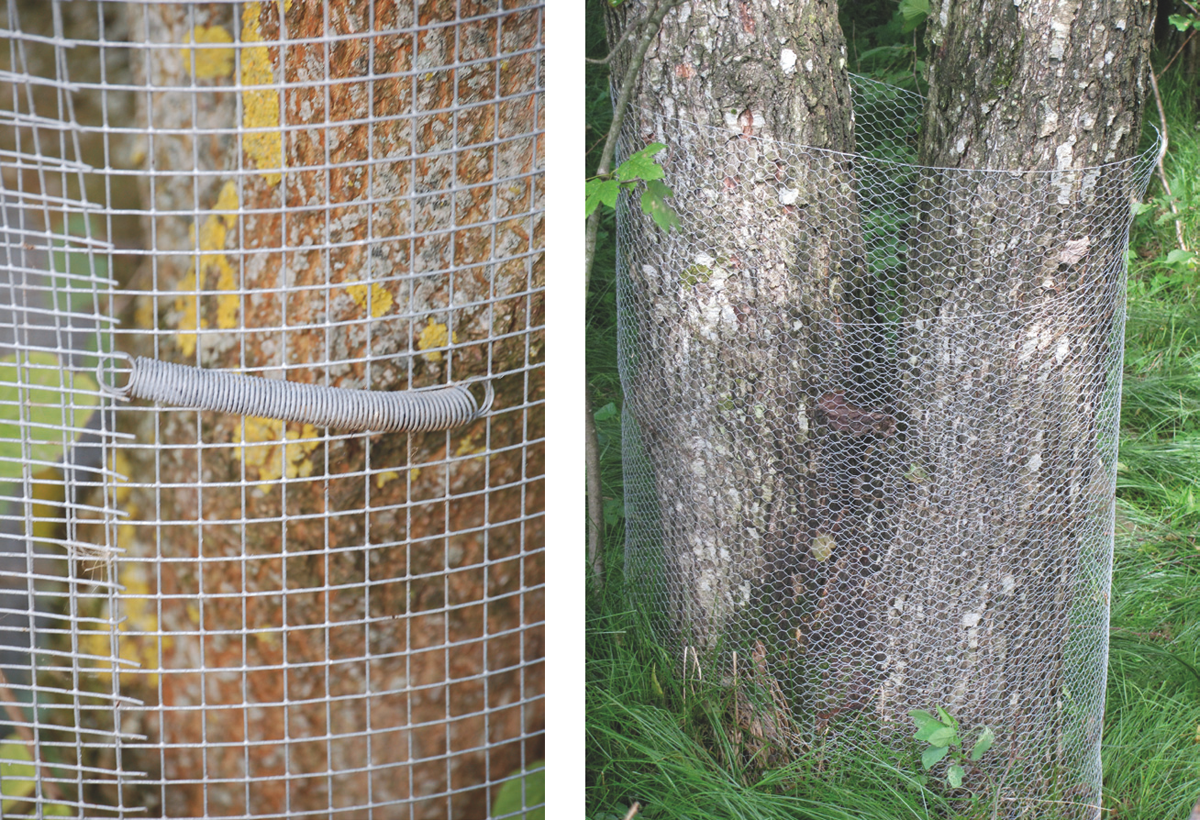
Figure C.15 Mesh tree guards to deter beaver gnawing, with expansion capabilities to allow for growth and ensure mesh is not flush against the trunk. (D. Gow and R. Campbell-Palmer)
Materials
•Light 16-gauge 0.5 in (~1.2cm) weldmesh.
or
•~15 cm mesh in 8-gauge wire.
or
•2.5 × 5 cm weldmesh.
Method
•Cut mesh to desired size, wide enough to wrap round the tree once and to a minimum of ~1 m height (higher in areas with heavy snowfall).
•Wrap mesh around the tree and fix at the top, middle and bottom, keeping around 15 cm away from the trunk (if flush beavers can still gnaw at the trunk)
•Cover any buttresses with mesh.
•If the nesh is not self-supporting install posts.
Tips
•Standard chicken/rabbit wire can be used at sites where the beavers have an alternative food resource; however, in general this is not recommended as if a beaver is determined to gnaw on a particular tree they have the strength to pull down this malleable material.
•Wrapping a tree in double the length required and using a system of three springs with small hooks on either end can easily deal with tree growth. As the trees expand in girth over time, the springs pop off and the guard can be replaced/expanded.
•If mesh is too light or lose, a beaver can pull it down to expose the trunk, or push underneath to access the trunk.
C.6.2 Paint protection
| Issue |
beaver browsing and felling of trees in undesirable circumstances (specimen/ornamental trees, trees by roads, etc.). |
| Basic principle |
abrasive paint applied to trees to protect trees from beaver activity. |
| Result |
beavers dissuaded from targeting protected trees. |
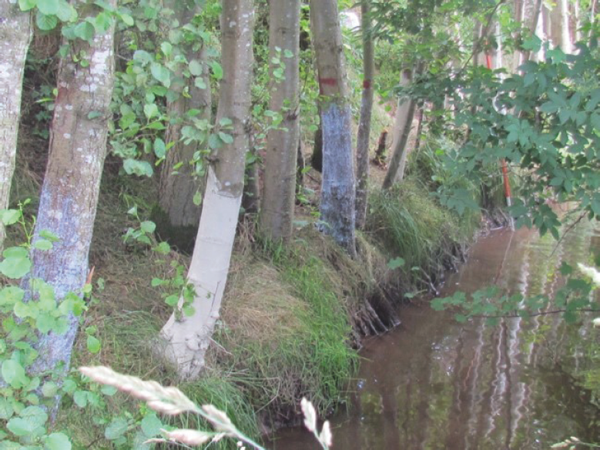
Figure C.16 Experimental site trialling Wöbra® (nearest tree and fourth tree) and sand–paint blend (second tree) vs. untreated (third tree). (R. Campbell-Palmer)
Materials
•Abrasive anti-game paint Wöbra® (https://www.fluegel-gmbh.de/media///fluegel/hochgeladen/absatz/biber-201009-engl.pdf)
or
•Exterior latex based paint
•Fine sand (0.75–1.0 mm grain size). See http://www.beaversolutions.com/tree_protection.asp.
Method
•Mix 140–225 g of sand in 1 litre of paint.
•Apply paint to height of a minimum of 90 cm (higher in areas with heavy snowfall).
Tips
•Make small batches, and stir frequently.
•Colour matching the tree bark as far as possible, can give a more natural effect.
•Exclude painting trees which are less than 2 m high to avoid damaging them.
•Check the paintwork occasionally and add a new coat as necessary (experience suggests this would be about every 5–10 years on average for Wöbra® paint, whereas the sand-paint version should be checked annually).
Considerations
This method is not always 100% effective, especially in comparison to protecting trees with wire, but may be useful in sites where wire protection is not deemed suitable.
C.7 Electric fencing
| Issue |
beavers accessing undesirable areas/crop foraging/raising dam height/damming above a flow device. |
| Basic principle |
temporarily deterring beavers from accessing an area/site/building dam height using electric current. |
| Result |
beavers dissuaded from accessing the area/site/position. |
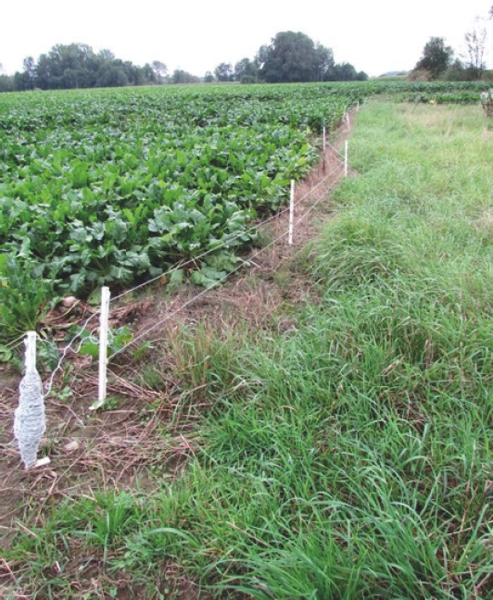
Figure C.17 Electric fence arranged to deter beavers. (R. Campbell-Palmer)
Materials
•Standard electric fencing system, length as required.
•Single-strand nylon wire or electrified tape have both been used successfully.
Method
•Place 75 cm long fence poles about 1.5 m apart, depending on terrain requirements (every 5 m is sufficient in completely flat terrain; in very uneven terrain up to every 1 m).
•Place two fence wires at 15 cm and 25 cm above ground level.
•If preventing dam-building, string across the watercourse above the normal water level.
Tips
•Ensure lower fence wire is neither in contact with the ground nor over 15 cm above it at any point.
•Electric fences are ineffective where the animals can walk or swim underneath, but beavers do not normally attempt to burrow under them.
•This method has proven useful for protecting gardens and trees, and for example in hindering beavers moving from an area in which they are established to a nearby pond where beavers are unwanted.
•Beavers usually take the shortest route from water to the food source, and avoid areas lacking a direct ‘emergency exit’ to the water.
•It has been shown that in 90% of cases, deploying a fence for 1 week will protect crops for a further 2–3 weeks. One unit can therefore be used to protect several areas.
Considerations
Use with caution, as beavers have been known to clasp power wires with their teeth, resulting in a number of deaths.
C.8 Permanent exclusion fencing
| Issue |
beaver activity in an undesirable area, or retaining beavers within a captive setting. |
| Basic principle |
installation of fencing to exclude/retain. |
| Result |
beavers unable to access/leave an area. |
Materials
•Galvanised high-tensile mesh, or similar – with a mesh dimension of no more than 10 cm.
•Locked-joint or weldmesh.
Method
•Install fences to a minimum of 120 cm above ground.
•Extend a ~40 cm skirt of mesh, and peg into the ground facing towards the side which beavers will approach.
•Bury a section of fencing vertically underground.
•Fit one single-strand electric-fence wire on the beaver side of the fence ~30 cm from the ground to prevent it from shorting out on vegetation.
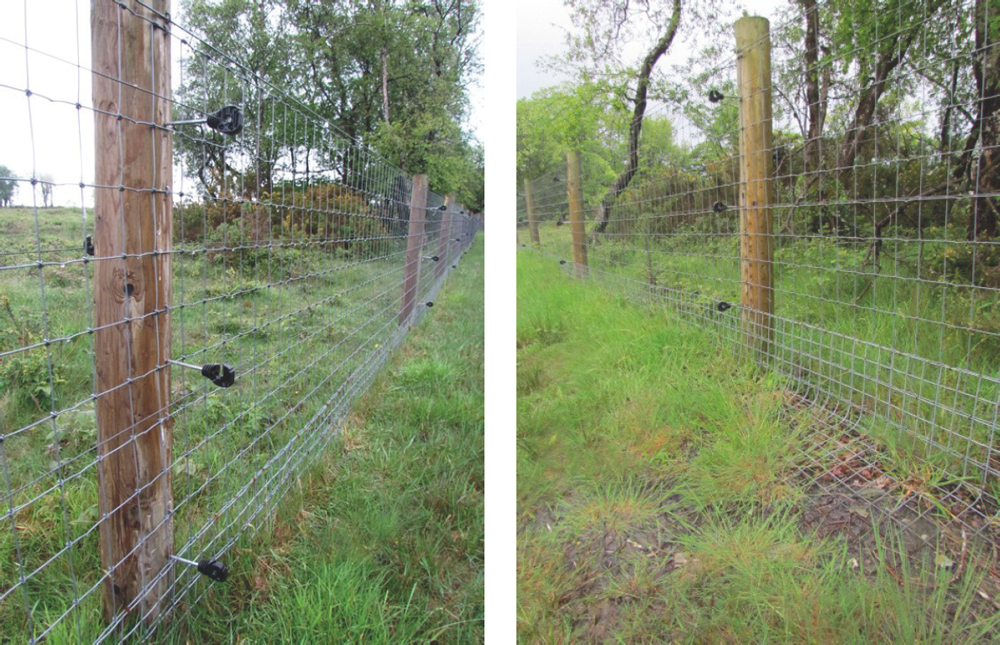
Figure C.18 Permanent fencing specifically designed to retain beavers. Note hotwire fencing and mesh under-skirting (Devon). (R. Campbell-Palmer)
Tips
•To protect a grove of trees within a riparian zone, a fence parallel to the water body may be enough to deter feeding, although it should be noted that if this is the only area of suitable feeding resources in the area, beavers may be more determined to access these resources, and so more robust fencing will be required.
•It is important to ensure there are no gaps or weak points in the fence line that the beavers could exploit; and, if beavers do access such an area, investment against burrowing under fences should be made.
•Fences are most effective when they are positioned well back (~20–30 m) from the edge of a watercourse.
•Hinge-joint netting or chainlink should be avoided, as the verticals can be easily pushed out of alignment. Similarly, mild-steel netting is not desirable, as it is easily distorted and the mesh bent out of shape.
•Any electric fencing must be checked regularly to ensure it is functioning effectively.
Considerations
Use electric fencing with caution, as beavers have been known to clasp power wires with their teeth, resulting in a number of deaths.
C.9 Deterrent fencing – ditches and small streams
Building a deterrent fence of this type isolates the watercourse upstream or downstream from the rest of a beaver population in the area. Although the isolation effect is not 100%, it considerably reduces the chances that a beaver will move into the upstream section, and it considerably reduces the chance that two beavers of the opposite sex will do so at about the same time.
| Issue |
potential beaver dispersal into an undesirable area. |
| Basic principle |
installation of fencing to dissuade beavers from dispersing past a set point via ditches and streams. |
| Result |
beavers unable to move past a certain point. |
Materials
•Strong steel mesh of about 10 × 10 cm mesh size in the stream itself.
•If movement of larger fish (e.g. large spawning salmon) is expected, 15 × 15 cm can be used
•Normal chicken-wire (or similar) fencing, preferably of good quality, for use on land.
Method
•Build a 1 m high fence (higher in areas with deep snow levels) downstream of the area to be protected, preferably in terrain that is not in itself suitable as beaver habitat (so that, if possible, no beavers are resident immediately downstream of the fence).
•Bury the mesh in the streambed to prevent beavers swimming underneath.
The inner ‘sock’ runs downstream on both sides from the ‘wings’, with a slight inward taper towards the stream (this ‘guides’ beavers on land back towards the stream). The minimum distance at the outlet to the ‘sock’ should be at least 5 m (otherwise there is a danger that beavers established just downstream of the installation may burrow from the stream under the fence). The ‘wings’ of the installation extend from the stream grille, on both sides of the stream, ~80°, slightly in the downstream direction. An extension at right angles, pointing downstream, is added at the ends.
This design guides any dispersing beaver moving up the stream and encountering the grille back to the water downstream, should it get out of the water at this point. To go around this device requires swimming or walking about 100 m back downstream, then walking 100 m away from the water when the beaver has no way of knowing that this would allow it to pass the grille. Moving such a distance from water, especially in unfamiliar terrain, would make the animal highly vulnerable to predation in a natural situation, and as such is instinctively avoided.
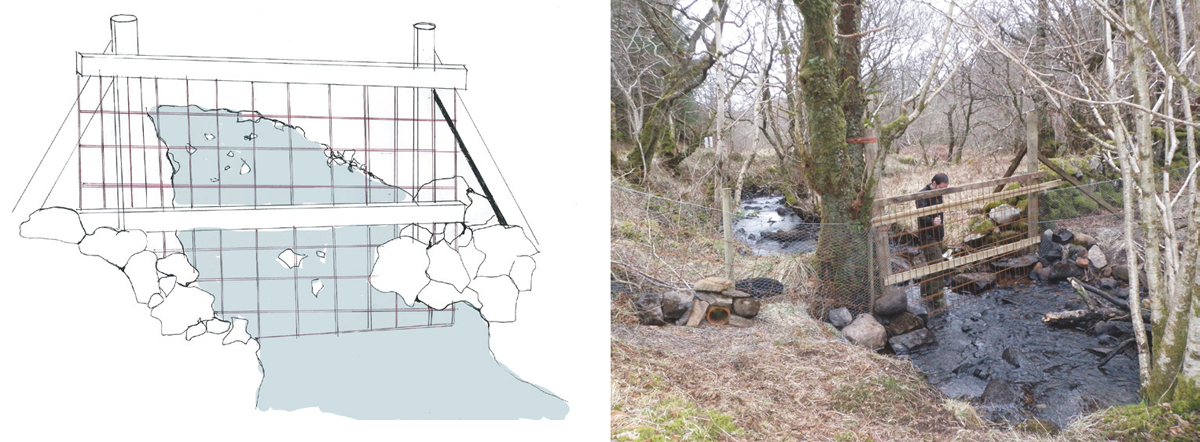
Figure C.19 Deterrent fencing across a small stream at the Scottish Beaver Trial, note weld mesh used across water and partially sunk into stream bed. Size selected so as not to impede fish passage, with standard stock fencing used for terrestrial components. (Rachael Campbell-Palmer, Scottish Beaver Trial)
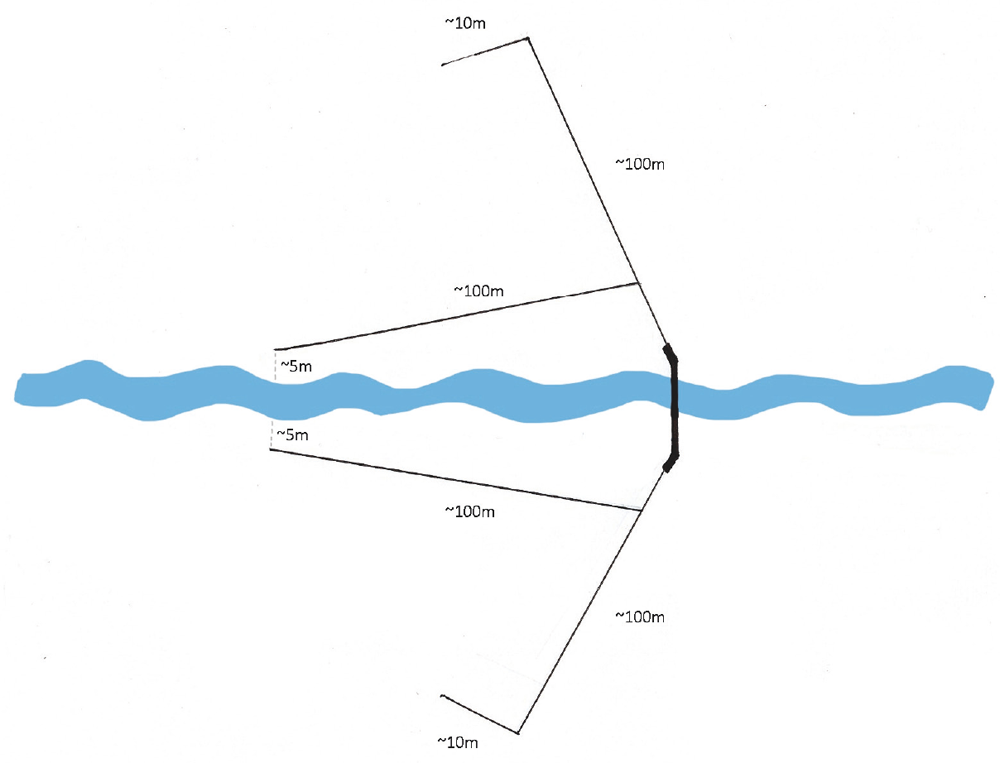
Figure C.20 Fence on stream/ditch to hinder beaver dispersal upstream. (Rachael Campbell-Palmer)

Figure C.21 Beaver-deterrent fencing, including narrow ceramic piping to encourage otter passage but excluding beavers (apart from young kits). Note that such features should be located next to the watercourse and be well secured to ensure that beavers cannot dig around or push through these passages. (Rachael Campbell-Palmer)
Tips
•The lower end of the fence needs to be stiff enough to prevent beavers from forcing it up, and themselves through.
•Young beavers may be able to pass through larger mesh; however, they do not normally attempt to disperse from the natal colony.
•This method relies on the normal behaviour of beavers, and as a result will never be 100% effective, this method should reduce the intervals between colonisation events upstream of the installation, and so the requirement for other measures.
•The design can be adapted to integrate with existing fencing: for example, fencing that excludes rabbits will also exclude beavers, or fencing can also include features that allow otter passage but exclude beavers (Figure C.21).
C.10 Trapping and translocation
It is essential that any requirement to trap beavers is discussed with the appropriate authority and undertaken with highly experienced personnel.
C.10.1 Bavarian beaver traps
Beaver traps should be positioned on foraging trails in areas where fresh field signs are present. Trap use can also be encouraged through appropriate pre-baiting. Care should be taken to ensure that, when in position, the traps are both level and stable, and cannot fall into the water. Traps which are not set on a level surface may not lock properly. Trappers must be aware of any likely fluctuations in the adjacent water levels which would endanger any captured beavers, and must ensure that traps are set away from public interference. Doors and locking mechanisms should be checked and lubricated regularly, especially because asynchrony in the dropping of the doors due to poor lubrication could cause injury to the beaver as it attempts to escape. Commercial vegetable oil is good for this purpose, as it offers less of a scent-deterrent than artificial lubricants. It is advised that latex gloves are worn when handling and setting traps, or the traps should be left, unset, in the elements for a few days to diminish human odours.
Once in position, traps should be set and doors dropped several times to ensure they lock before a trap is set and left. The mesh floor of the trap and treadle should be gently covered with detritus (leaf litter, substrate or bark) from a source nearby to try to cover mesh flooring, as beavers tend to be reluctant to step onto uncovered mesh. Care should be taken that none of this substrate impedes the trap doors’ descent or interferes with the locking mechanisms. To increase trapping efficiency, a funnel made from nearby branches or wire-mesh panels can be formed to guide the beaver into the trap. Traps should be checked once a day when in operation, ideally being set in the early evening and then checked the following morning. Trap mechanisms and joints can freeze or become stiff, so should be checked regularly and lubricated with vegetable oil as required. A range of trap alarms exist, from simple mobile phones available online to more sophisticated systems (with prices per trap ranging from €10/15 to €100/250 for commercial alarm systems).

Figure C.22 Set Bavarian trap. Note covered trap floor and bait set in middle of treadle. (R. Campbell-Palmer)
Overall, injury rates through this trapping method are very low, and no deaths have been reported in more than 3,000 trappings in Bavaria. However, serious injuries and deaths have been recorded from the use of these traps in captive settings, caused by the door falling down on the beaver’s back/neck. Individuals have received nose, claw and teeth injuries while trying to bite and dig their way out of the trap. To reduce this risk, the food, scent or lure must be placed on the trap treadle in the very centre of the trap. None should fall down either side, as beavers may reach in for bait rather than having to enter the trap completely. Animals should not be moved while in the trap, as body parts may become trapped on the floor mesh when setting down the trap.
Potential issues
•Trap placed in an inappropriate location.
•Traps tripping but not latching.
•Traps placed on uneven ground, or at an angle, so that more pressure is required to set off trap.
•Treadle set too high, so that trap is not set off.
•Mesh on trap is too wide, or gauge of wire too light, causing teeth and claw injuries.
•Vegetation, especially on trap floor or side of trap, preventing complete latching.
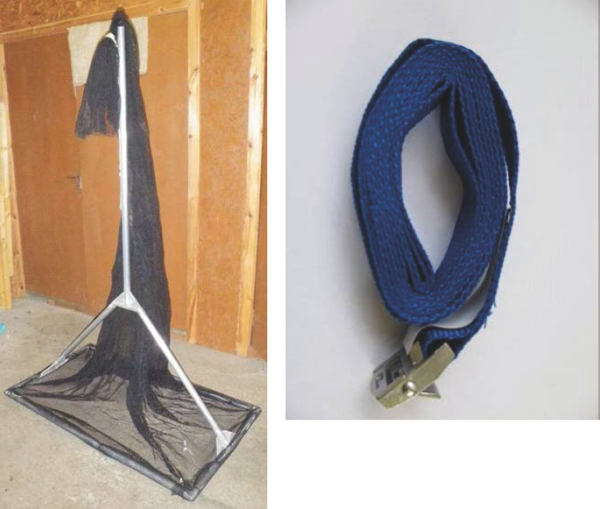
Figure C.23 (Left) Landing net specially designed for boat trapping. Note extending net length to allow beaver to swim upwards into the net; the mouth of the net is then tied behind so that the trapped beaver can be lifted into the boat or onshore. (Right) Quick-release strips or securely tied, non-slip rope can be used to tie nets closed and secure beavers within. (Scottish Beaver Trial)

Figure C.24 Scoop net being used to lift trapped beaver onto shore. This type of net can be used over the side of a boat to scoop up kits. (Scottish Beaver Trial)
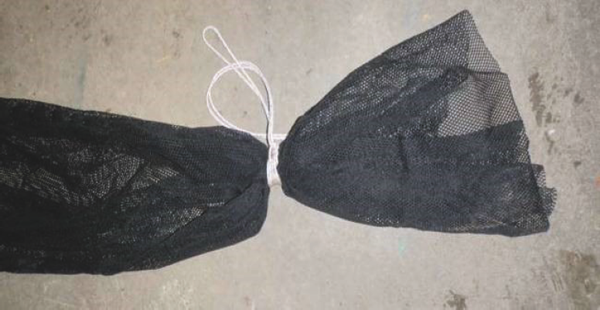
Figure C.25 Finer mesh used on landing net to prevent injuries; heavy-duty fishing net, open end tied with non-slip rope. (Scottish Beaver Trial)

Figure C.26 A boat-trapped beaver still within landing net (lying horizontally across boat); the beaver has been covered with hessian to keep it calmer and to keep the torchlight out of its eyes. Note blue quick-release straps have been tied before and after the beaver so it is securely held in the net, so that the animal can be lifted out of boat without biting trappers. (Scottish Beaver Trial)
•Trap-shy animals (those that are very wary or reluctant to enter traps) can be difficult to trap.
•Carnivores, e. g. pine martens, scenting near trap may discourage beavers from entering.
•Interference from people.
C.10.2 Boat trapping
Beavers can be trapped at night from a boat using spotlights and a specially designed landing net to capture adults; long-handled scoop nets can be used for younger animals (<15 kg). Nets with a mesh gauge of ~0.5 cm are recommended to prevent ear tags and claws from becoming snagged. Beavers are spot-lamped from a boat which is then manoeuvred so that the animals can be captured with a net on land or in water of <1 m deep. When appropriate, the trapper at the bow of the boat jumps over the side, directing the landing net over the animal. The landing net must be pushed downwards and contact made with the river bed/ enclosure bottom to ensure that the beaver does not escape. If contact is incomplete, the beaver will often squeeze or dig its way under the net and escape. Care should be taken not to strike the beaver with the net frame in the process. Once secured, the tied end of the net should be let out to allow the beaver to swim to the end, where it often comes to the surface. The open end of the net (mouth end) can then be tied behind the beaver to prevent escape. Care should be taken to avoid possible bite or claw injuries, particularly to the legs and hands. The netted beaver can then be carefully carried to shore or placed in the boat. The beaver’s eyes should be covered with a hessian sack or blanket while the animal is being processed and/or crated.
An important modification of these beaver nets is that the end of the net is open. During capture, this is held closed, tied with non-slip rope or fastened with a quick-release buckle tie-down (Figure C.23) which can easily be released, enabling the net to be opened to allow the beaver to be transferred to travel crates or hessian sacks for processing (Rosell and Hovde 2001).

Figure C.27 (Left) Bavarian trap with isolation slide and transport crate lined up, removing the slide then allows the beaver to move itself into the darkened transport crate. (Right) Beavers can also be removed from traps using secured open-ended scooping nets. (R.Campbell-Palmer and Scottish Beaver Trial)
Potential issues
•Damage to boat engine from submerged objects (e.g. rocks, branches).
•Attempted use of method in inappropriate water bodies/use limited to appropriate water bodies.
•Injury of beaver through hitting with net rim.
•Inexperienced trappers may exhibit low trapping success.
•Requires greater consideration of health and safety.
Animal movement
Bavarian traps have option of an internal isolation slide which can confine a captured beaver to one half of the trap. This allows the door at the other end to be opened safely and a capture crate to be inserted, ensuring the easy and safe transport of a captured beaver. Beavers can also be removed from traps using secured open-ended scooping nets. Beaver and net can be placed into the transport crate, and the quick-release or rope tie then released and the net removed from the crate.
C.11 Humane dispatch
Trapped individuals may be released from traps or transported to ‘killing pens’ (sheet-metal or solid wooden open square pens with sides of ~1 m and 80 cm high). For humane dispatch at close range in a killing pen (or similar), a .22 rim-fire rifle is recommended, for use by experienced operators. It should be noted that rifles are firearms in the UK and as such their use is strictly controlled. Any person using a firearm should ensure that their licence allows them to dispatch beavers.
It is recommended that the shot is administered directly from above, close to perpendicular to a horizontally standing beaver, aiming for between the shoulder blades, so that the shot is likely to disrupt the heart and associated vital structures in proximity (spine, major vessels and airways) at point-blank range without actually making contact with the skin. Head shots with .22 rim-fire rifles should be avoided, as bone here is thick and the brain cavity small, with a risk of small-calibre non-jacketed ammunition such as .22 rim-fire deflecting off the cranium without penetrating the skull and/or totally missing the brain. A .410 shotgun may be used at point-blank range, without actually making contact with the surface of the skin, with the aiming point as described above or alternatively firing from behind, aiming from the ear towards the opposite eye. Shot size should be a minimum of BB/No. 1 shot (4.06 mm).
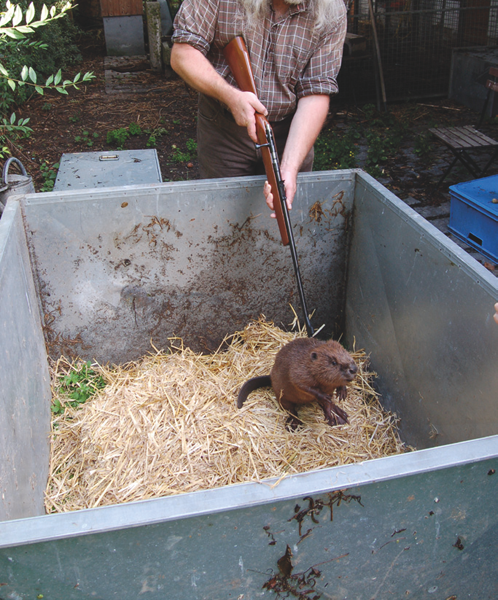
Figure C.28 Simulated beaver cull with .22 rifle in specifically designed ‘killing pens’ to show target position point between shoulder blades (Bavaria). (R. Campbell-Palmer)
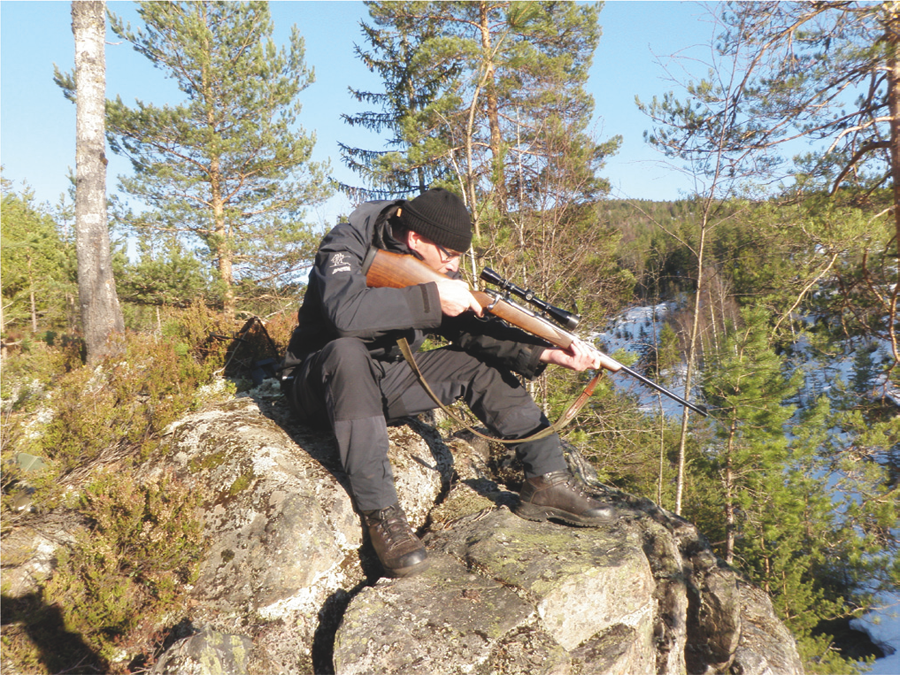
Figure C.29 Norwegian beaver-hunter. (S. Jones)
Where dam creation is an issue with a particular family, then the removal of an actively maintained dam structure during the day will often result in a sudden water-level drop which the beavers are likely to attempt to repair at night. They can then be shot by experienced individuals, preferably by centre-fire rifle with a minimum bullet weight of 50 grains (3.24 g), minimum muzzle velocity of 2,450 ft/s (746.76 m/s), minimum muzzle energy of 100 ft/lb (1,356 joules) (SNH 2014) or with a 16-, 20- or 12-bore shotgun with AAA shot (5.16 mm pellets) or larger at a range of 20 m or less. Distances beyond this are not recommended, as, given their thick skin and dense fur, beavers may receive significant injuries which may not be immediately fatal, and they may try to enter water, where they may drown or die later from wounds and/or infection. Shot smaller in diameter than BB/No. 1 shot is not a reasonable or humane method of killing beavers unless used at point-blank range for humane dispatch as described above.
Euthanasia can also be achieved through humane injection by a qualified veterinary surgeon, using sodium pentobarbitone as with other mammals (80–160 mg/kg intravenously via the ventral tail, cephalic or saphenous vein).