
Backyard photo: Great Nebula in Orion as photographed by time exposure through telescope pictured here. (Clarence P. Custer, M.D.)
The human eye is definitely limited as to the faintness of the sky objects it can detect. But as photographic film is exposed longer and longer, it can register the images of fainter and fainter objects. This is the main reason why astronomers today can probe far deeper into space than could astronomers of a century ago.
Pictures of stars, Moon, and other objects can be made with any kind of camera—even an old box Brownie. For more striking pictures, use a camera with a long-focus portrait lens or a telescopic lens. Advanced work demands a telescope and film holder, or telescope and camera.
Backyard photo: Great Nebula in Orion as photographed by time exposure through telescope pictured here. (Clarence P. Custer, M.D.)
THE ASTRO-CAMERA Objects such as planets are mere specks in pictures taken with a camera alone. A telescope must therefore be used, with either an astro-camera or an ordinary camera. An astro-camera, which can be bought or made at home, is essentially a light-tight box a few inches long, painted flat black inside, with a film holder at the rear. At the front it has a movable adapter tube which fits into the eyepiece holder. The telescope objective serves as the camera lens.
To find the proper position for the film holder, remove it and substitute a ground-glass holder (ground side toward objective). Adjust the camera so as to get the best obtainable image on the glass (wear your eye glasses, if you use them, while adjusting). Then replace the film holder. For a larger image use an eyepiece in the adapter. Focus with a ground glass.
If the astro-camera lacks a regular shutter, control the exposure by using the slide that protects the film in the film holder. But exposures of less than a few seconds cannot be made in this way. For pictures of Sun and Moon, which require very short exposures, a shutter from an old camera can be built into the astro-camera. Or a makeshift shutter can be made out of a large piece of cardboard. In this, cut a slit about ¼ or ½ inch wide, longer than the diameter of the objective. With the cardboard, mask the telescope while the slide is removed from the film holder (carefully, so as not to move the telescope tube). Then the slit is moved across the open end of the tube to expose the film, and the cardboard again masks the telescope while the slide is replaced. Obviously this method requires experimenting for proper exposures.

How it was done: For picture on next page, camera was mounted on equatorial telescope. In final phase, photographer watched guide star through small telescope on the mounting, turning a micrometer screw to keep the object sighted. Thus stars did not trail. (John Stofan)
In an astro-camera that has a lens, focus the lens as you would an eyepiece, using a ground glass.

Star trails: Canstellation Orian was photographed by letting stars trail for 2½ hours, then interrupting exposure for 5 minutes, and finally exposing film again for 30 minutes with camera “following.”
TELESCOPE AND CAMERA A camera used to take pictures through a telescope should be of the reflex type, which can be focused by looking through the lens, or it should be a model which uses a film holder and thus can be focused with a ground glass.
In the telescope eyepiece holder insert a low-power eyepiece and focus it as if for ordinary viewing (using your glasses if you wear them). Attach the camera to the telescope by means of some sort of camera holder (see picture here). Set camera for infinity and full aperture, and focus through lens or with ground glass. To keep out extraneous light, connect eyepiece and camera lens with a sleeve of black paper.

Camera holder on a telescope: Devices such as this one are available from commercial sources. Some observers make their own.

Mounting for camera: This simple type of equatorial mounting, hand- or clock-driven, is suitable for a camera used without a telescope.
First efforts at photographing objects through the telescope are likely to have poor success. With careful experimenting excellent results become possible.
FOLLOWING THE OBJECT Earth’s rotation makes little difference in exposures of 8 seconds or so made with camera alone, or in exposures of about Vi second or less made through the telescope. In the longer exposures needed for faint objects, these objects will blur or trail unless there is a compensating motion of the camera. An equatorial mounting can give this needed motion. With camera or astro-camera attached to an equatorial telescope, the photographer can keep his instrument sighted on the object by keeping some chosen guide star centered in the finder. (This is done more easily if a high-power eyepiece is used in the finder.) If an equatorial telescope is not available, a simple mounting can be made for a camera (see picture above). It should be equipped with a finder or sights.
If the equatorial mounting has a clock drive, the observer does not need to move the tube by hand except for an occasional corrective touch. A clock drive makes exposures up to several hours practicable.
FILMS AND EXPOSURES A plateholder for a small telescope usually takes 2¼ × 3¼ or 3¼ × 4¼ film; for 6- to 12-inch telescopes, 4 × 5 film. In cameras, use roll film.
For black-and-white photography, panchromatic film is recommended. Since few commercial firms develop and print black-and-white well, the amateur might learn to do this himself. For color, commercial lab work is usually acceptable. Films range from low-speed (ASA 25), with high color intensity, to ASA 1000 or higher, which is grainier. Color prints can be interesting, but slides show more detail.
The faster the film, the shorter the exposure can be at a given magnification. (If using an eyepiece that enlarges two times, multiply exposure time by four; if three times, by nine; and so on.) With a lens up to 135 mm on a camera, pictures of Sun, Moon, constellations, auroras, and comets are practicable, exposing about 8 seconds, without guiding. Small objects — planets, nebulas, globular clusters — require a telescope, with high magnification, long exposure, and guiding.
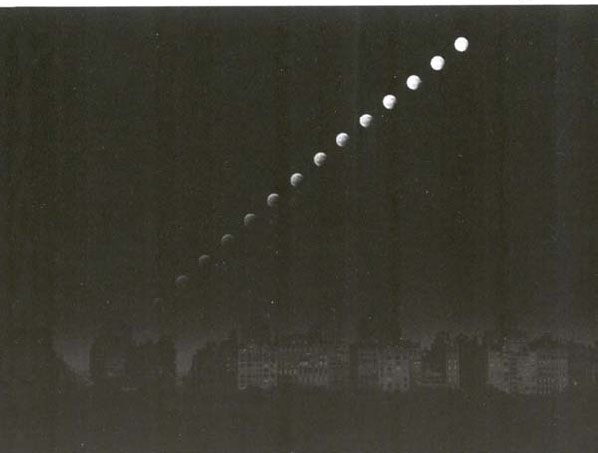
Partial lunar eclipse: Successive exposures show Moon rising partially eclipsed, then gradually emerging from shadow of Earth. Exposures were made at 5-minute intervals. (American Museum of Natural History)
STAR TRAILS On a moonless night, load camera with ASA 100 or 200. Using tripod, point camera at a group of bright stars. Open diaphragm wide; set at infinity; take series of pictures at 1 second, 5 seconds, 10 seconds, and so on. Then expose about 5 minutes. Meanwhile, don’t advance film; allow 1 or 2 minutes between exposures.
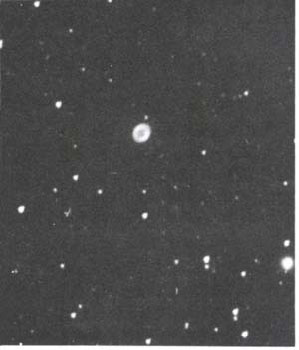
Ring Nebula in Lyra: Time exposure was made through a small telescope. (Hans Pfleumer)
When the film is developed, place it over an opal glass viewer. Each star will appear on the film as a chain of images of increasing size. The longer the exposure, the longer the trails. This experiment will teach you about exposures for stars, the power in your lens, and the field of view of your camera.
Now fix the camera on a tripod. Point it at a bright star group near the celestial equator. Expose 20 minutes. In this time the stars will move 5°. Thus the lengths of the trails on your negative will indicate the field of view of your camera. Next, point the camera toward the celestial pole. On a clear night, expose 2 or 3 hours to record the apparent motion of stars around the pole.
AURORAS AND METEORS For auroras any camera is useful. The 35mm cameras with fast lenses and fast films give results with short exposures. Try color as well as black and white, exposing from 1/25 second up to 30 minutes, depending on the brilliance of the aurora, aperture, and film type. For an average aurora, try 2 seconds on Ektachrome 400 film, with full aperture. Still faster film may show auroral patterns that billow and flicker.
Plan to photograph meteors when a shower is due (see here). Keep camera pointed a little to the side of the radiant point. Use ASA 200, exposing 10 to 30 minutes.
CLUSTERS AND NEBULAS The brighter open star clusters, such as the Pleiades and the Double Cluster in Perseus, can be photographed by camera, using fast film (such as Ektachrome 400), telescopic lens, and tripod. Most globular clusters and nebulas require a telescope with a good equatorial mounting, preferably with setting circles. A hand slow-motion drive is usable; a clock drive is better. With high-speed film, try 15 minutes or more. With a superfast Schmidt-type telescopic camera, amazing results are possible with a 10-minute exposure. In general, the faster the film, the fainter the object that can be registered. With small telescopes, only the brighter globular clusters and nebulas can be photographed satisfactorily.

Comet Arend-Roland in 20-second exposure with a Speed Graphic. (Charles Cuevas)
THE SUN CAUTION! Read see here.
When using camera alone, place a gray filter over the lens. When the Sun is in full eclipse, no filter is necessary. With ASA 100 color film, expose 1/25 second at f/8 for prominences; ½ second to 3 seconds at f/8 for the corona. Any exposure over 1 second will require guiding.
For the full Sun, slow film, small apertures, and short exposures are called for. Exposures vary, but a good guide is 1/1000 second at f/64 for the primary image on an ordinary day. This would mean an aperture of only ¾ inch for a small telescope. For sunspots, photograph the enlarged image. Use the telescope with a diaphragm (see here) to reduce the aperture to 2 inches or less. Experiment with different apertures.
MOON, PLANETS, AND COMETS The Moon is bright enough for slow panchromatic film and color. Expose 1/100 to 10 seconds at f/12, depending on phase of the Moon, equipment, and enlargement attempted. For a starter, try the Moon at first quarter on ASA 100 film at 1/50 through the telescope.
Mars, Jupiter, Saturn, and Venus are the most photogenic planets. Use the telescope with an eyepiece. Try fast and panchromatic film — 2 seconds and longer. Guiding is necessary. It is almost impossible to get a good photo of Mercury, but Uranus, Neptune, Pluto, and the asteroids can be photographed like stars.
All photos of the heavens should be carefully examined for any trace of a comet. Faint comets usually appear on film as a more or less shapeless haze. To shoot a comet with your camera, use full aperture with fast color or panchromatic film, and expose several minutes. Guiding is necessary. For a small, faint comet, use the telescope and increase exposure time.

Comet Bennett 1961i, showing secondary tail. Photographed on April 8, 1970, with a 135mm lens at f/4.7, using Royal X Pan film. Exposure: 10 seconds. (Dennis Milon)

Aurora: A remarkable photograph of a corona taken on August 16, 1970. The exposure was 5 seconds at f/2.8 on Tri-X film. (Richard Berry and Robert Burnham. Sky and Telescope)

Meteor shower: This photograph of the 1966 Leonid meteor shower was taken from Kitt Peak, Arizona, on November 17 at about 12h Universal Time. This shower is the greatest for which there are accurate records, with a peak rate of 40 meteors per second for a single observer. The shower had a sharp peak but the rate was over 1,000 meteors per minute for a single observer for one hour. On the original print, 70 Leonid meteors are seen on this 3½-minute exposure. Two point meteors are seen right at the radiant in the Sickle of Leo. The brightest star is Regulus. This photograph was taken with a 105mm lens at f/3.5, using 120 size Tri-X film that was developed for 12 minutes in D-19. (Dennis Milon)