Chapter Eight
Make a Swarm-Catching Kit
At some point during your beekeeping adventures, you will probably either have a hive that swarms, or you’ll get a call from someone who has a spotted a swarm of bees. If you are like I used to be, you will be totally unprepared to deal with it, but after making these projects, you’ll be sitting by the phone waiting for that swarm call, or letting your hive get overcrowded, just so you can try out your new tools. Okay, maybe you won’t go to those extremes, but you will be prepared when the opportunity arises, and when you remove the bees from someone’s backyard after their panicked phone call, you’ll be their hero.
Swarm Catching
One time, my friend Becca called to say her hive had swarmed and was in a nearby tree, about 15 or 20 feet up. I ran around trying to gather the things I thought we would need to retrieve them. Baling wire and duct tape almost always fit into this kind of scenario. I had some long aluminum tubes, and we bent a coat hanger to form a frame and taped it to one tube. Then, we attached a grocery sack to this frame with baling wire, lifted it up under the swarm, and shook the branch. The swarm dropped into the grocery sack and we quickly lowered it to the ground and shook it into an empty hive. That got me thinking that I should have something ready-made for the next time the situation arose.
Sometimes the bees are a few feet off the ground and sometimes they are totally out of reach, or in a dangerous location. Before you even think about catching a swarm, you need to know what you will do with the bees once you have them. You should bring an 8- or 10-frame hive box with some drawn frames, if you have them. The bottom board should be attached with hive staples. Have a piece of screen to block the entrance. A screened inner cover (see chapter 4) can be screwed to the top once the bees are inside. A ratchet strap is good insurance to hold things together. Now let’s make something to catch them in.
Simple Bucket Swarm Catcher
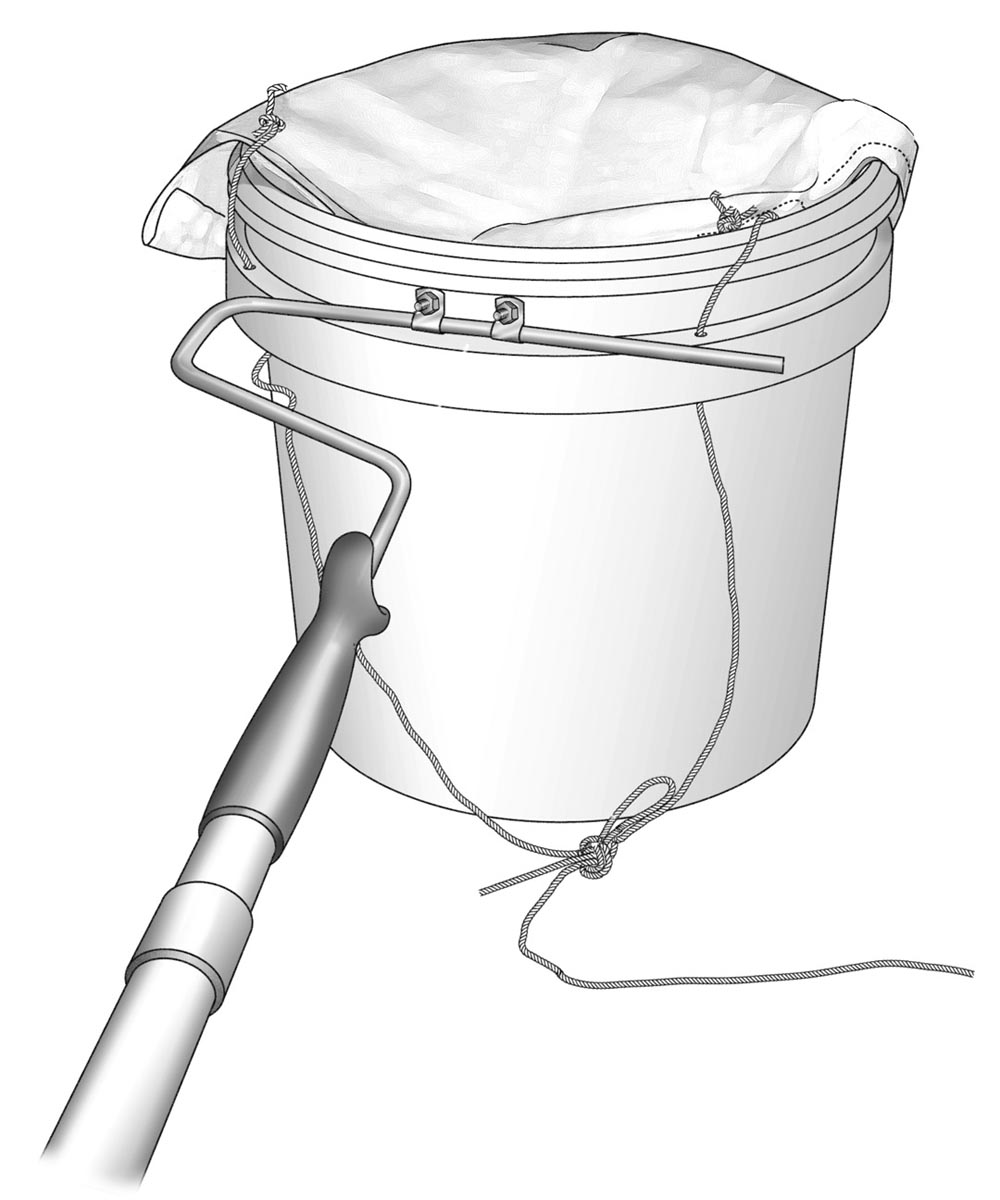
You can make this basic swarm catcher with readily available materials, some of which you probably have on hand already. For my version, I used a bucket obtained for free from the bakery department of a local supermarket — the same type of bucket I use for storing honey. Depending on what you have for materials, you may have to vary the plans a little.
Note about materials: I chose these materials because I had many of them hanging around. The extension handle is one that twists to lock and extends from 6 feet to 12 feet. The outside diameter measures just 1". To go higher, I can extend it with 1" EMT metal electrical conduit, which is made for running wires and readily available at hardware stores and home centers. The inside diameter is a little over 1".
Tools
- Hacksaw
- File
- Drill and small drill bits for wood and metal, including 3⁄16" and 1⁄4" bits
- Screwdriver and small sockets or adjustable wrench
- Scissors
- Sewing machine or hand-sewing supplies
Materials
- One plastic bucket, 4- or 5-gallon (often available at bakeries for free)
- One paint roller with extension pole (used or new)
- Two cable clips with fastening hardware (see step 3)
- One 18" × 18" piece cloth (any type of sturdy yet workable cloth is suitable)
- Two grommets for 1⁄8" rope, with grommet tool (optional)
- 1⁄8" braided nylon rope (or similar material; about 48" length plus the length of the extension handle[s]; see note, below)
- One 10-foot length 1"-diameter EMT metal electrical conduit
- One 1⁄4"-diameter hitch pin, 11⁄2" minimum length
1. Remove the bucket handle.
Some bucket handles are all plastic, while others are metal. A hacksaw will make quick work of removing either type. Be sure to recycle the handle rather than add it to the landfill. I saved up a few metal handles and used them to create a mini hoop-house over my lettuce seedlings.
2. Disassemble the paint roller.
First you have to remove the paint roller cage (the spinning part that holds the roller cover) from the roller handle. Rollers are made in a number of different ways. Some have crimped shafts, while others have a spring clip that secures the roller. My shaft was crimped so I cut off the end with a hacksaw, removed the roller, and filed the end smooth.
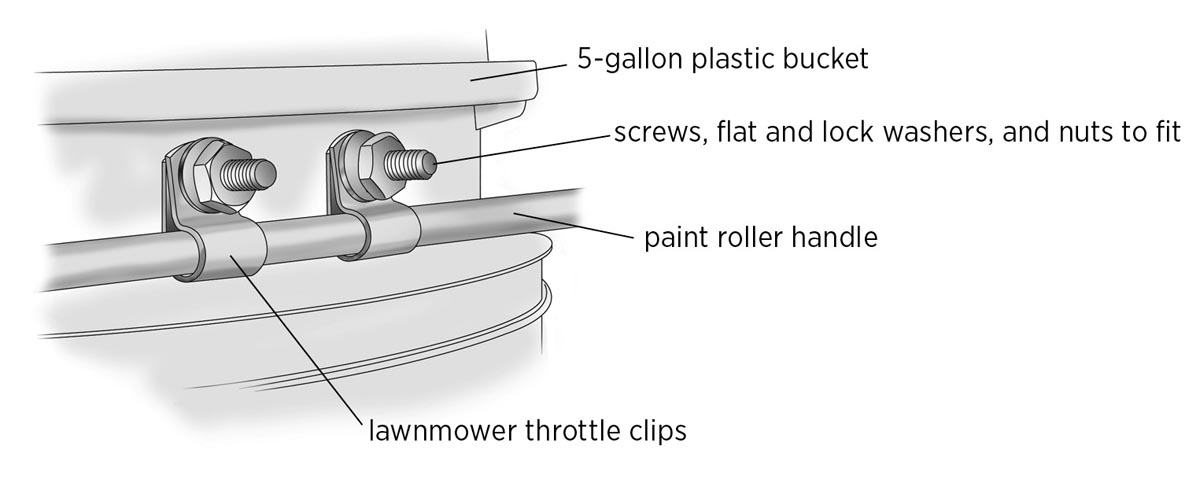
3. Attach the roller handle.
Next up is attaching the roller handle to the bucket. I took a quick trip to the hardware store and found a couple of clips that fit the bill. They were in a drawer listed as lawnmower parts, for holding the throttle cable to the handle, and they fit nicely between the two ridges on the bucket. I spaced them about 11⁄2" apart, marked and drilled clearance holes through the side of the bucket, and attached them using screws, flat washers, lock washers, and nuts, as shown.
4. Sew the cloth cover.
Cut a piece of cloth about 18" square. Create a hem on two opposing edges by folding each twice, about 3⁄4" wide, and sewing the hem on a sewing machine or by hand; this gives the edges strength. Hem the other two sides by folding the edges once, about 11⁄4" wide, before sewing.
5. Attach the cover.
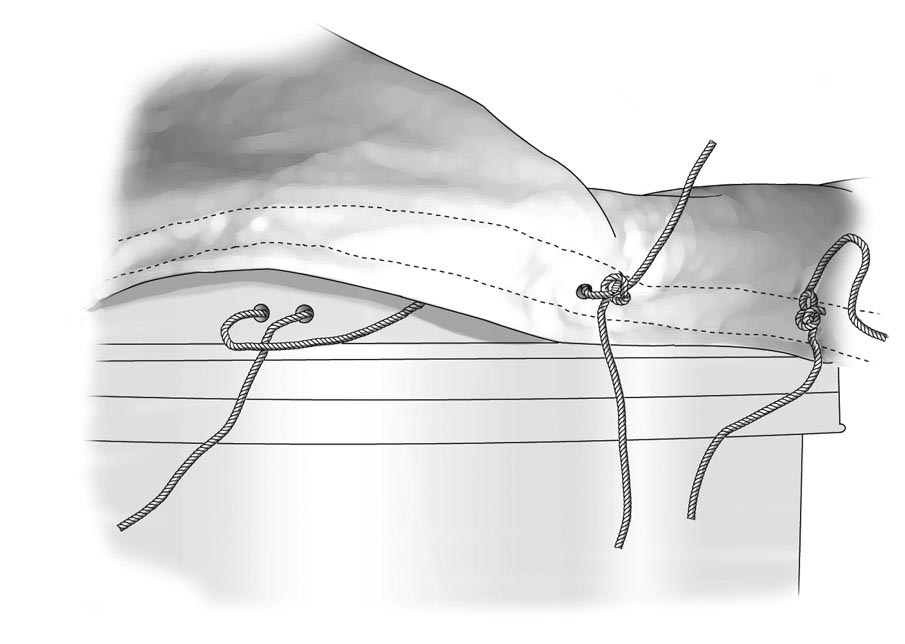
On the back side of the bucket (opposite the roller handle) drill three pairs of 3⁄16" holes, spaced about 1⁄2" apart; locate one pair directly opposite the clips holding the roller to the front of the bucket, and position the other pairs about 4" to the left and right of the first pair.
Center the cloth over the bucket left-to-right, with the wide hems toward the front and back. Now center the hem in the back, over the holes and transfer the hole locations to the cloth (I used an awl to punch through the holes and cloth). Using three short pieces of 1⁄8" rope, tie loops through the holes in the bucket and holes in the cloth and tie each in a double knot (see Attaching The Roller Handle, above).
6. Attach the cover loop.
On the front side of the bucket, drill two 3⁄16" holes down through the rim (my bucket has a double rim, and I used the lower one). Center the holes in relation to the front brackets and space them 9" apart. Transfer the hole locations to the hem of the cover. If desired, add grommets to these holes for strength.
Cut a piece of the 1⁄8" rope about 30" long. Thread one end up through each hole in the rim, then through the holes in the cloth, and knot the ends so they won’t pull back through, creating a loop that hangs down at the front side of the bucket, as shown on page 104.
7. Add the pull rope.
Tie a long piece of rope to the center of the loop hanging down from the cover; this pull rope should be as long as the pole when fully extended so you can pull on the rope to pull the cover over the top of the bucket. Screw the handle extension into the end of the paint roller handle to complete the swarm catcher.
Work tip: My initial setup reaches 12 feet high, but often you need to go higher than that. I don’t recommend using a long extended pole while standing on a ladder. The awkward length and weight can easily throw you off balance, especially if your swarm catcher is fully extended at an angle and 4 or 5 pounds of bees suddenly drop in. It’s better to make a pole extension (see next step) so you can get the height you need from the ground.
8. Make a pole extension.
EMT conduit comes in 10-foot lengths, and 1" conduit measures 11⁄6" inside, so a 1"-diameter handle will slide right in. Drill two 1⁄4" holes all the way through the conduit, one at 24" from one end and another at 60". Use a prick punch and center drill to start the holes, and use a drill press if available. The holes are for adjusting the range of the bucket.
To use the extension pole, pop a hitch pin through one of the holes in the conduit, depending on how much height you need to add to your reach. The pin will act as a stop for your extension handle to rest on. These pins have a spring-loaded ball that keep them from falling out, but they can easily be pulled out. You can also use a 1⁄4" bolt and nut instead of a hitch pin. Slide the roller handle into the conduit, and you’re good to go.
It’s best not to extend your pole any longer than it needs to be for the situation. The shorter it is, the easier it is to handle. This setup will get you up about 20 feet. If you have to go higher, you could use a coupling and another length of conduit.
Warning!
Never try to catch a swarm near any kind of power lines. Metal poles are excellent conductors, and if you’re holding one when it contacts an electrical wire, your friends and family will be attending your funeral. Even using a 20-foot pole when a power line is 30 feet away is still way too close. Always look up and around very carefully before raising your swarm catcher. If you get called to a swarm and see electrical wires, say, “No, thank you,” and walk away. I can’t stress this enough.
Variation: Swiveling-Bucket Swarm Catcher
My original idea for a bucket-style swarm catcher included a swiveling bucket, but this required some simple welding, and I didn’t think many people would have access to a welder, so I changed the design. But one day, as I was driving to the lumberyard, I passed the local vocational school where I studied machine shop many moons ago and remembered we used to help people who walked in with small projects. (If you have a trade school in the area, it’s a great source of help and knowledge.) I returned to the school later with my parts in hand, and the next day I was on my way with a welded piece.
I’ve seen the swarm catchers you can buy that use straight EMT pipe mounted to a flange or bracket on the bottom of a bucket. The problem with these is that as the pole is raised or lowered, the bucket tilts at an angle along with the pole. The beauty of my swiveling design is that the bucket full of bees stays upright, regardless of the pole’s angle as you lower the bucket to the ground.
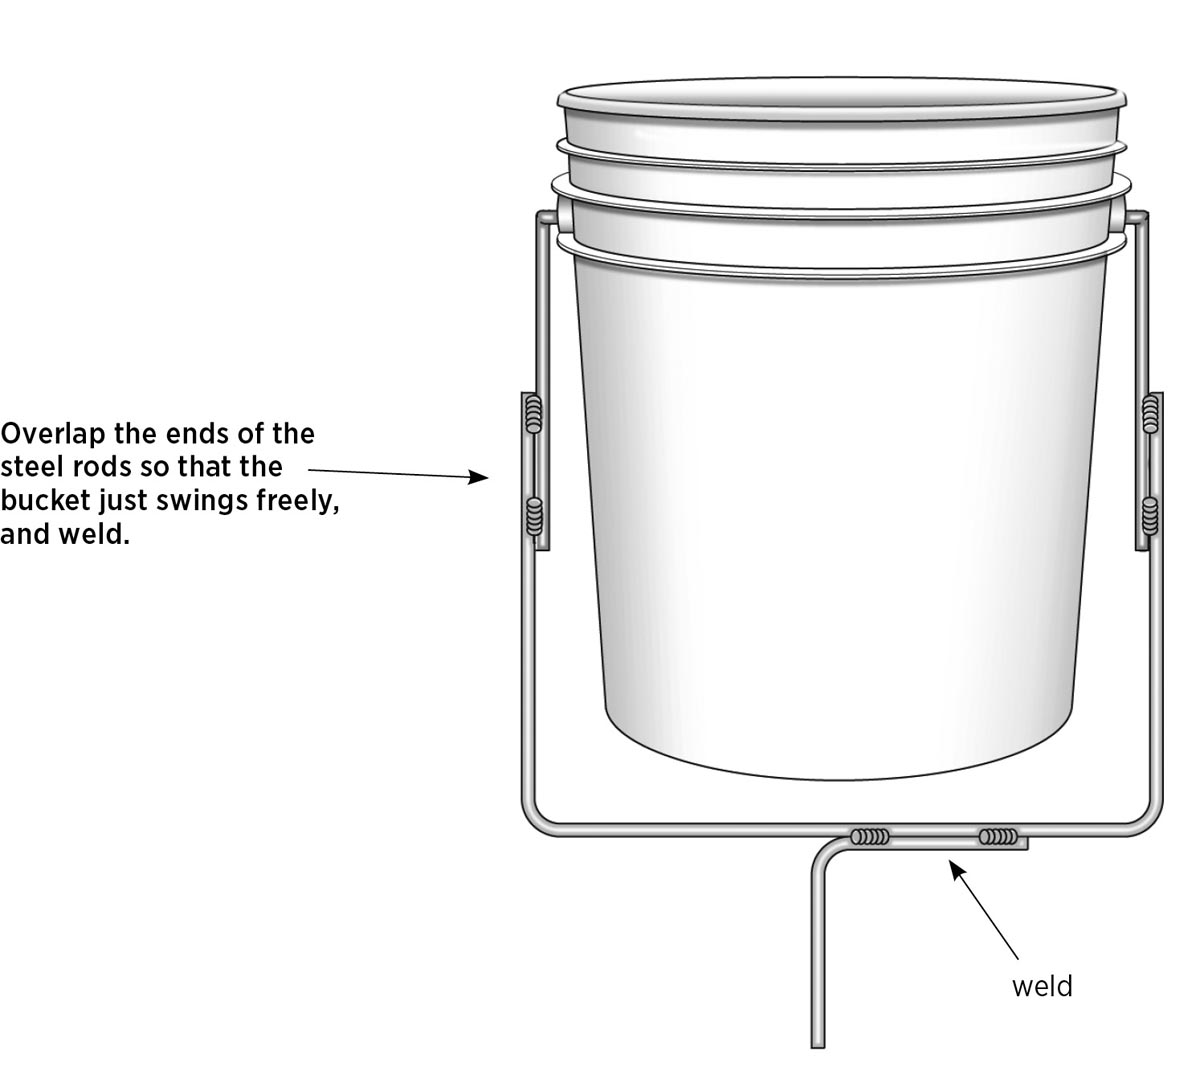
The tools, materials, and steps required for making the swiveling-bucket catcher are much the same as for the Simple Bucket Swarm Catcher (page 104), except you don’t need the clips for attaching the roller handle to the bucket. You do need a 36" length of 1⁄4"-diameter steel rod to create a welded bracket that holds the bucket. This size of rod is big enough to be strong yet small enough to bend without heating. It turned out that it also was the same size as the other roller handle I had.
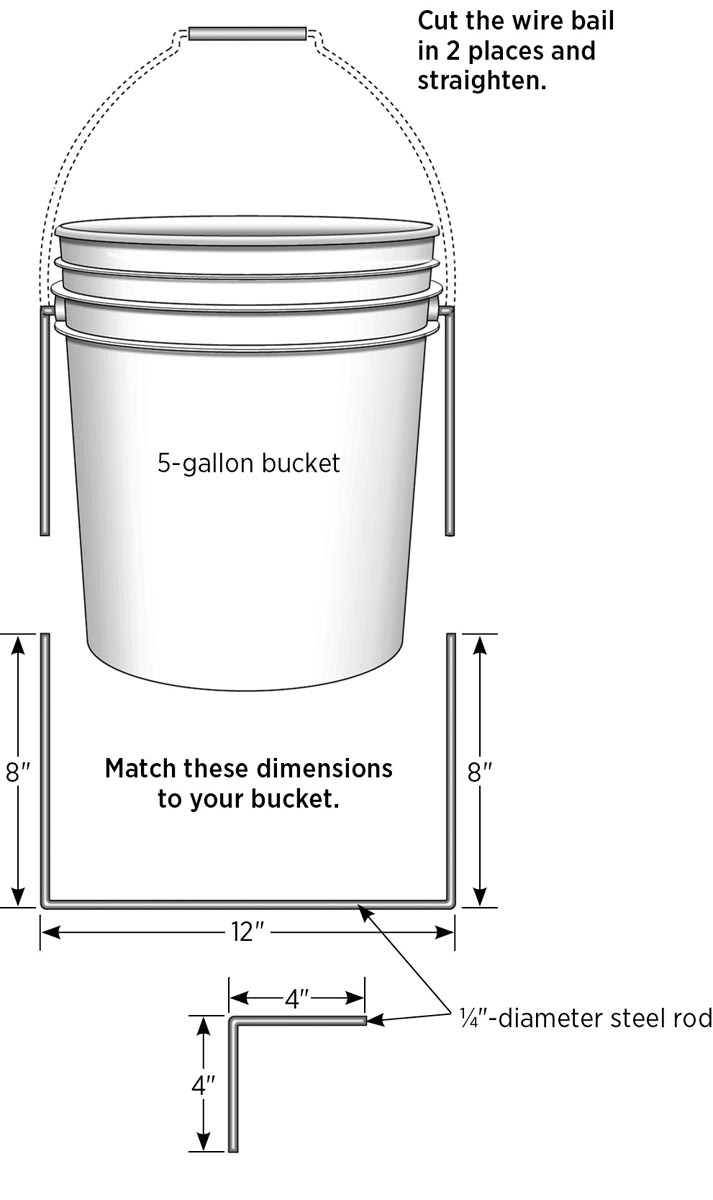
1. Remove the handle.
Start by cutting off the handle part at the center of the bail, leaving the long, curved wire sections of the bail connected to the bucket. Using a vise or pliers, or both, straighten out the bail sections as best you can so they hang down fairly straight on the sides of the bucket.
2. Make the bracket.
Cut one piece of 1⁄4" steel rod to length at 28". Mark off 8" from each end, then bend the rod into a U shape with 90-degree bends. The distance between the sides should match the distance between the bails hanging on the side of the bucket (mine was 12"). The bracket arms are long enough to allow overlap of the bails for welding while being able to pivot around the entire bucket. This way, no matter what position your extension pole is in, the bucket will pivot and remain upright. The remaining piece of steel rod is about 8" long; bend this in the center at 90 degrees.
3. Weld the bracket parts.
A wire-feed welder is perfect for this step. If you don’t do any welding yourself, visit the local vocational school to have it done. Lay the U-bracket and the 4 × 4 bracket on a flat surface. Weld the two together so that the one leg of the angle bracket extends below the U-bracket and is centered on the U-bracket. Next, let the ends of the bail and the ends of the U-bracket overlap each other enough so the bracket will just swing freely around the bottom of the bucket.
4. Add the paint roller handle.
Separate the handle from a paint roller, using any means necessary. Once removed, fit and/or attach the handle to the straight 4" end of the welded bucket bracket. Follow the steps of the Simple Bucket Swarm Catcher to add a cover and extension pole, if desired.
My roller handle was molded onto the shaft. A lot of twisting and tapping persuaded them to part, and the handle fit nicely on my welded bracket. I decided not to glue the handle on the new shaft. This allows me to use it for more than one purpose.
Wire-Frame Swarm Catcher
I have to confess that I love a good, hotly contested local election. It’s not that I’m into politics in a big way. It’s because an interesting election means lots of lawn signs, and lawn signs are a great source of free metal after the election is over. The type of sign I’m talking about has metal frames made from about 3⁄16"-diameter steel. You can usually get all you want for free, and they’re great for all sorts of projects, such as garden tunnels and making hooks, as well as what we’re going to use it for: a frame for our swarm catcher.
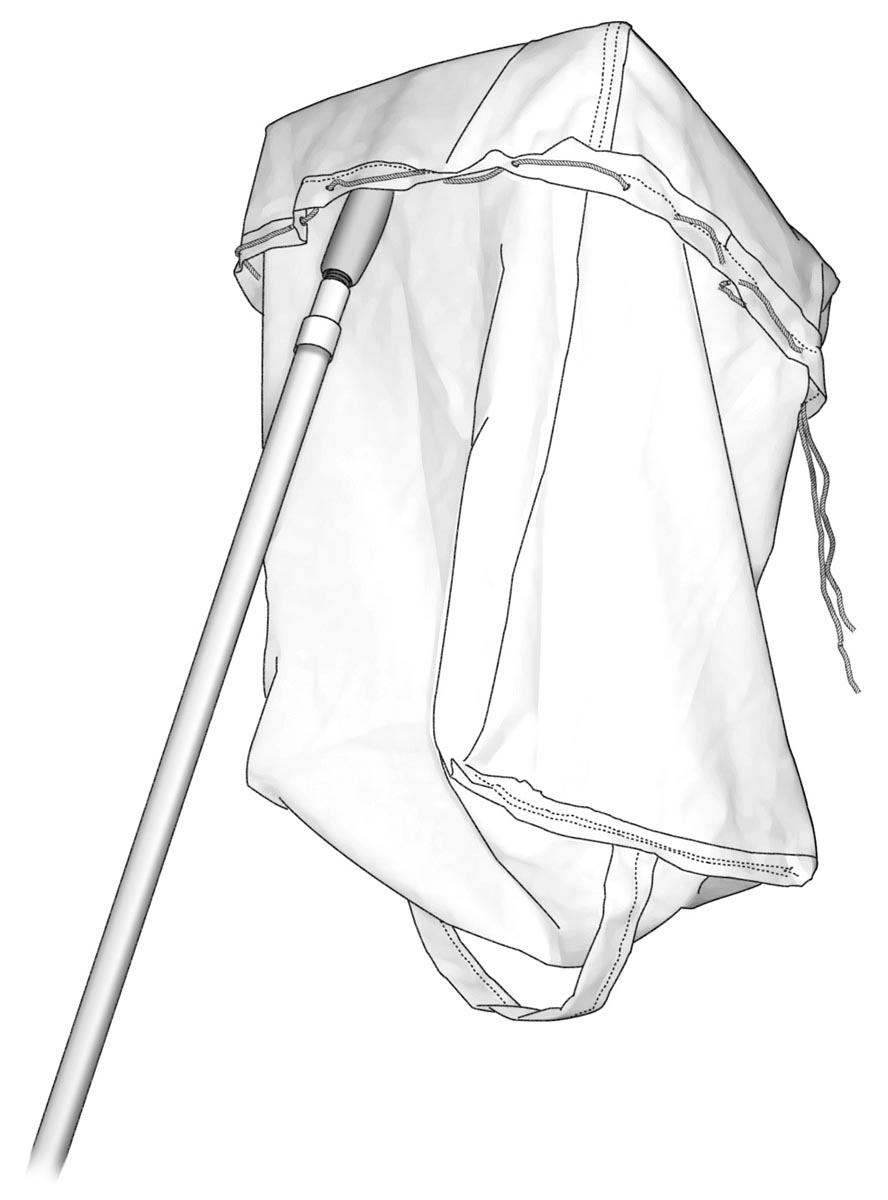
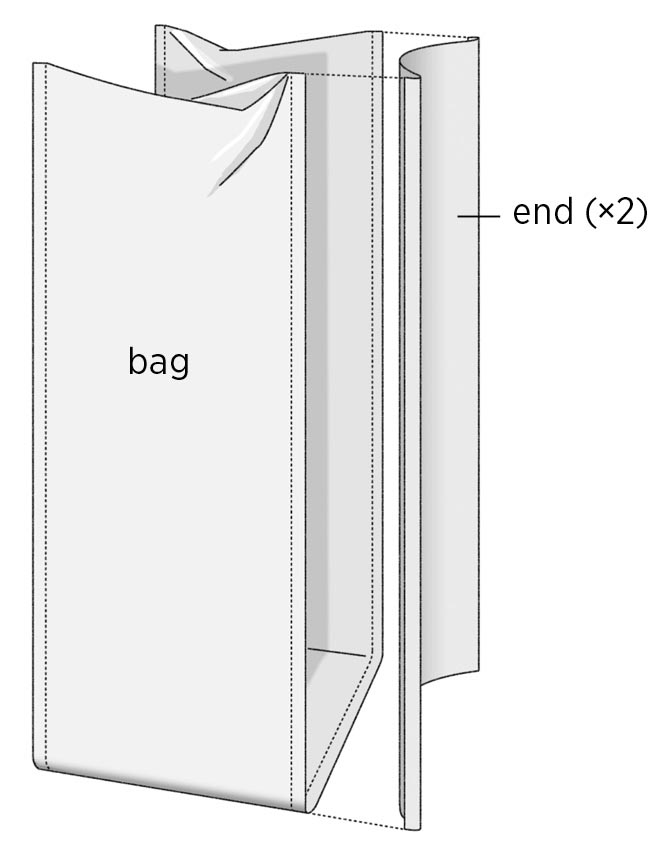
The advantages of this type of swarm catcher are its light weight and ability to fit behind the seat of a truck. There are a couple of ways you can make this. One way is to use an old pillowcase or laundry bag and make the frame to fit it. I had a lot of cloth left over from another project, so I based my size on the pieces of metal I had, and the catcher bag came out to about 12" × 15" and 30" deep. This is large enough to transport the bees in. A pillowcase or large cloth grocery bag is okay if you have a waiting hive box to dump the bees into once you get them to the ground.
Some of the tools and materials listed for this project are “optional,” depending on how you want to make your swarm catcher. The metal pieces I had on hand were about 27" and 42" long; two pieces at about 35" or any combination in between would work just as well. I used muslin to make the bag. It’s thin but strong, and the bees can breathe through it.
Sewing looks so easy when you watch someone who is an expert at it, like my wife. I got out the sewing machine and ironing board and went to work, and it took me the entire afternoon to make a bag. (I guess it isn’t as easy as it seems, or is that seams?) If you decide to use a premade bag, you might want to read through the sewing steps anyway, just to see how much trouble you saved yourself. However, I do want to point out that this handmade bag, which is wider and deeper than a standard tote, is likely to give you a better chance of getting the bees all the way down to the ground.
Tools
- Vise
- Hacksaw
- File
- Scissors
- Marking pen (for cloth)
- Steam iron
- Sewing machine
Materials
- Two metal rods, about 5⁄32" to 3⁄16" in diameter
- Duct tape
- 3 yards 44"-wide muslin fabric
- Grommets for 1⁄8" rope, with grommet tool (optional)
- One 8-foot length 1⁄8" braided nylon rope (or similar material)
- Four or more binder clips (see step 6)
- Paint roller handle and extension pole
- Automotive hose clamps or duct tape (optional)
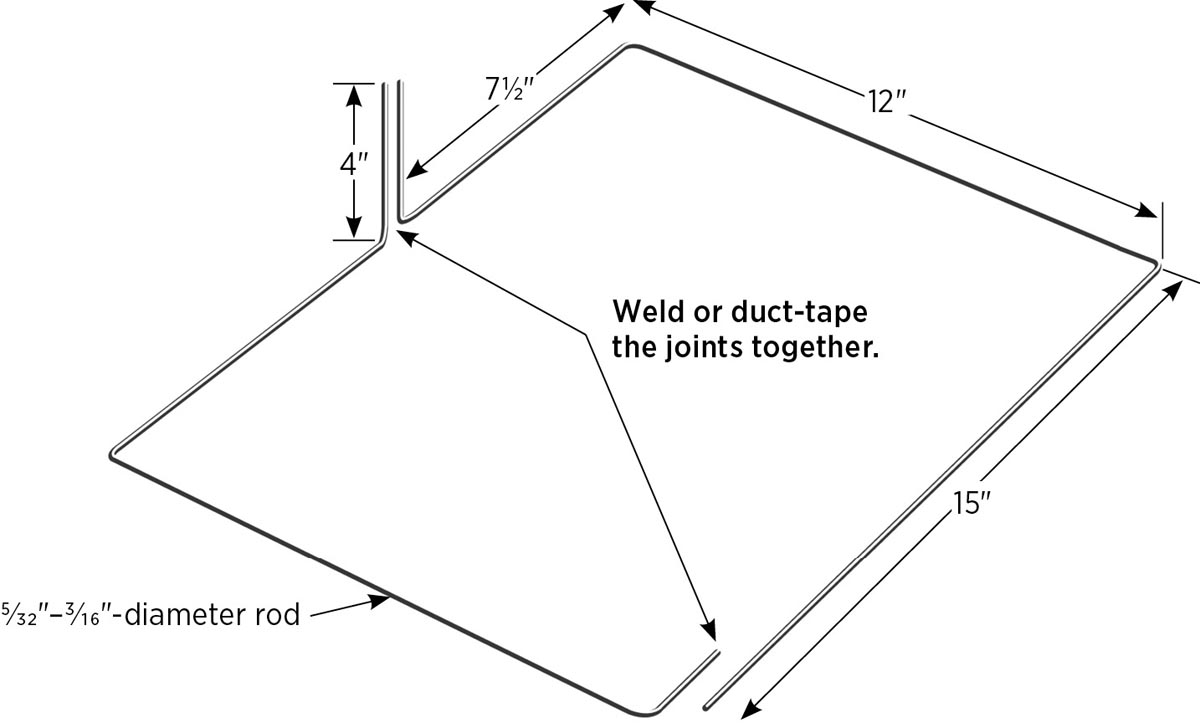
1. Create the metal frame.
Secure the two metal rods in a vise (and put on gloves and safety glasses) and make a 90-degree bend 4" from one end on each piece; this is the part that will attach to your pole. With these ends sticking up in the vise, make a 90-degree horizontal bend in each piece at 71⁄2", with one bend going to the left and one going to the right, to begin the side runs of the frame. Again with the 4" ends facing up, make a 90-degree bend 12" from the 71⁄2" bends.
Lay the parts down on a flat surface with the 4" ends together; you should have a rectangular frame with overlapping ends. Tweak your bends so that the frame lays flat and is fairly square (has 90-degree corners). Trim off the ends if they stick out past the frame, but be sure to maintain some overlap for taping the pieces together.
File any cut ends to remove sharpness. Join the frame parts with duct tape (or you can weld them yourself or have this done at a local metal shop; see Variation: Swiveling-Bucket Swarm Catcher, on page 107).
2. Cut the bag parts.
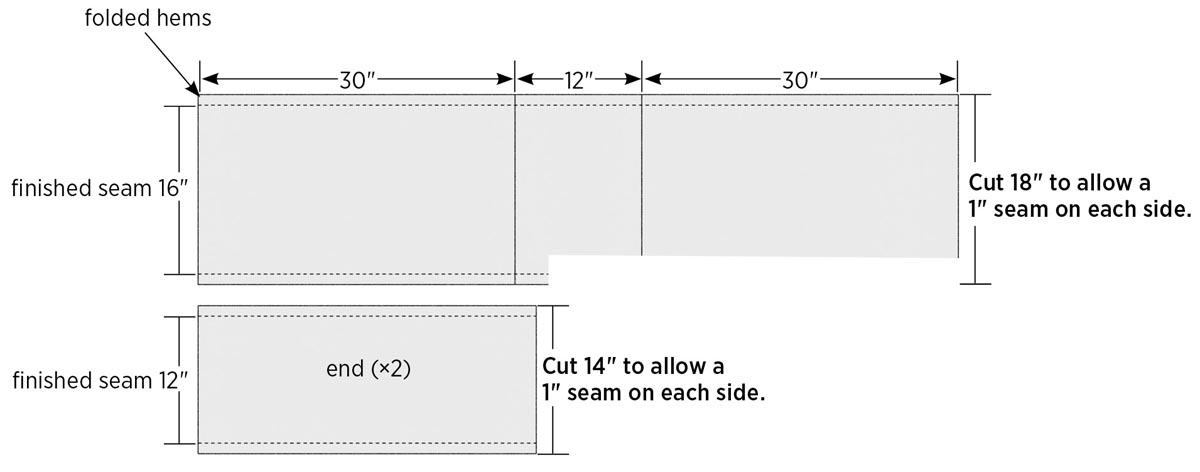
Cut a strip of fabric to size at about 72" long × 18" wide; this will form the two wide sides and the bottom of the bag, leaving about 12" to hang over the sides of the frame. (The extra overhanging length can be cinched with rope if you don’t have something to put the bees into right away.) Make two lines across the cloth strip, 30" from each end, leaving 12" in the center for the bottom. Fold over the cloth at the lines and crease them with a steam iron to create clear guidelines. Then, fold and press a 1"-wide hem down each long side of the strip.
Cut two more pieces of fabric at 14" wide × 30" long for the sides. Fold and press a 1" hem along each long edge of both pieces.
3. Sew the bag.
Overlap and pin the edges of an end piece to the sides of the bag, and stitch them as shown. Repeat to attach the other end to the other side of the bag. Turn the bag inside out, fold a little of the fabric over the bottom edges and pin, then stitch the seam twice for good luck.
Work tip: I found out, after the first try, that my wife uses pins for a reason. I had tucked my folded seams together, then ran a stitch the full 30", only to find that they had pulled away enough so that my thread never touched the piece that was tucked in.
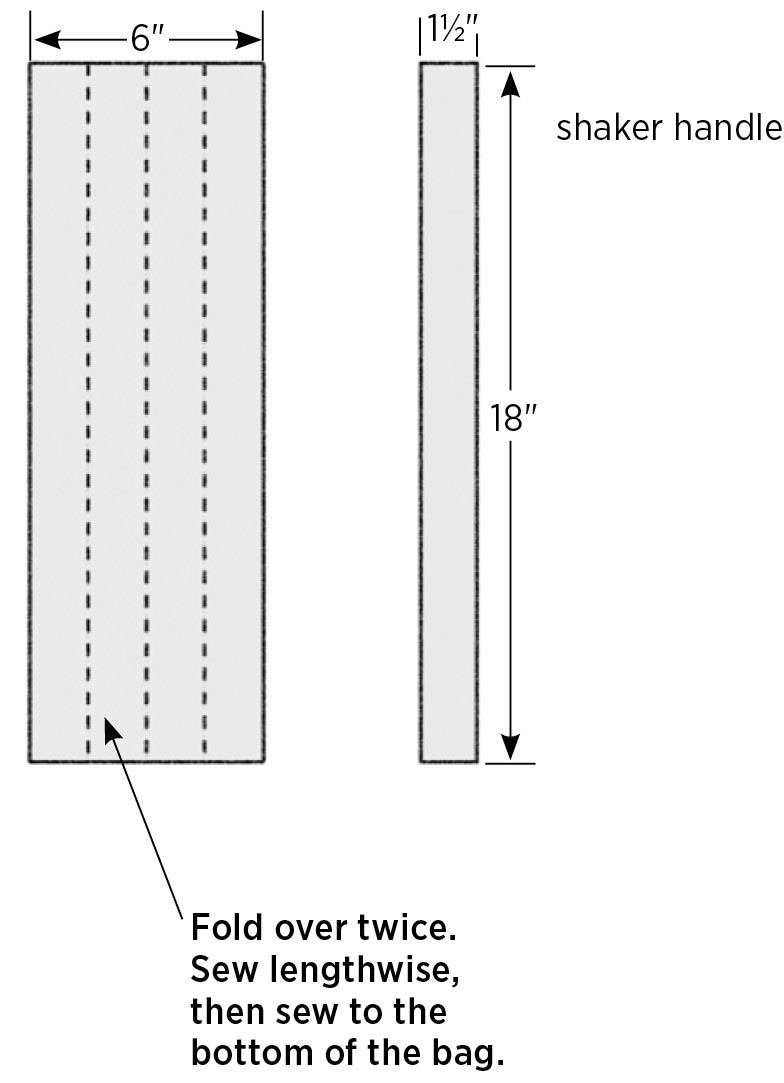
4. Make a shaker handle.
A fabric handle on the bottom of the bag comes in really handy when it’s time to shake out the bees. To make the handle, cut a strip of fabric about 6" wide and a little longer than the length of the bottom (I made mine 18"). Fold the strip in half twice along its length to make a 11⁄2"-wide strip of fabric, then sew along its length to secure everything. Sew the ends of the handle to the end-panel seams at the bottom of the bag.
5. Sew the top.
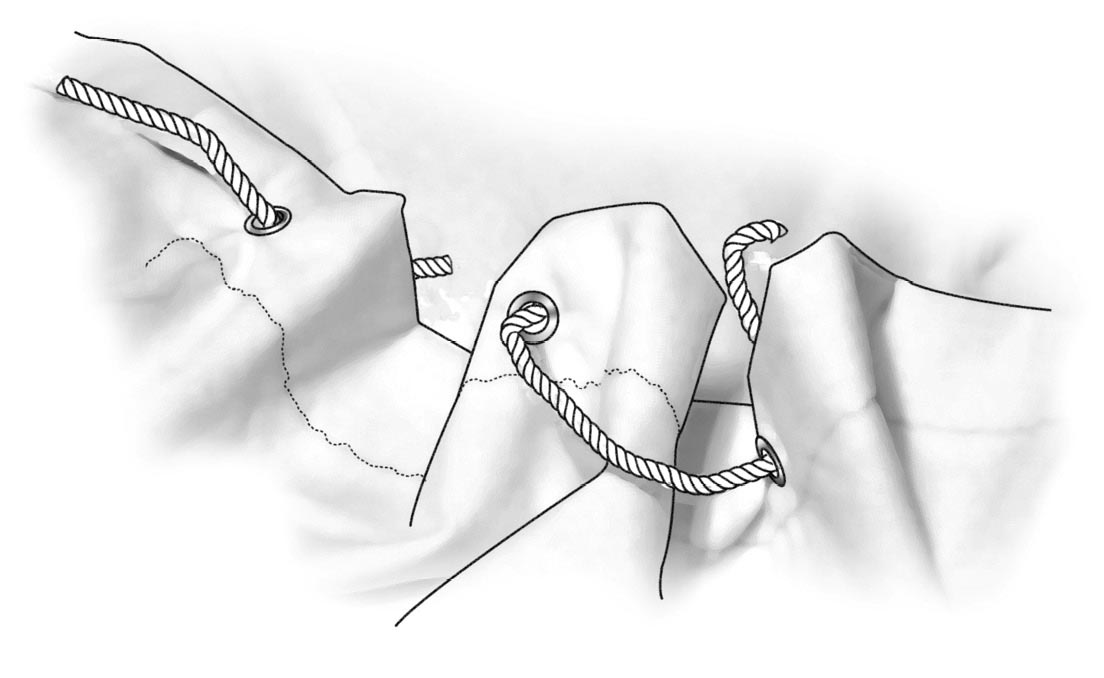
Fold over the top edge of the bag twice by 1" and stitch it all the way around. If you want to add a rope for cinching the bag shut, punch holes around the hem every 3" to 4", and install grommets in the holes, following manufacturer’s directions. Thread a 1⁄8" nylon rope in and out through the grommets, as shown below.
6. Complete the assembly.
To attach the bag to the frame, wrap about 6" of the top of the bag over the frame and secure it to the frame with binder clips. If you plan on transporting the bees in the bag, use four large clips, which you can quickly remove to take the bag off the frame. If you are going to shake the bees into a box right away, eight smaller clips will work fine.
To attach the frame to your pole, you can use a variety of methods, depending on the type of roller handle you have. If the ends of your bag frame fit snugly into the handle (that’s how mine works), you might not need fasteners. Otherwise, you might use automotive hose clamps or duct tape to secure the frame.
Because the handle is removable from the extension pole, once you’ve captured a swarm, you can unscrew the pole and use both the roller handle and the cloth handle on the bag to easily handle the bag full of bees while you dump it into a waiting hive box.