Chapter Four
Put a Lid on It
There are two covers typically used on a hive: an outer cover and an inner cover. The standard outer cover found here is used all year round. It’s heavy and protects the hive from the elements. It extends over all four sides, can be made of solid wood or plywood, and has a metal top for long life.
Inner Cover Design
The inner cover, while being a simple piece of beekeeping equipment, can be made in many different ways to serve many purposes. First of all, it acts as the top of the brood chamber and defines the space in which the bees live and work. Bees don’t usually build comb above it unless they are really cramped for space. It also creates an insulating air space between the top of the frames and the outer cover, which can get pretty hot in the afternoon sun.
Standard inner covers usually come with a center slot that is made to fit a bee escape. When it comes time to remove honey supers, a bee escape is placed in the slot. This contraption allows the bees to go back down into the hive through two channels that have flexible spring wire at the ends. The bees can go through the springs into the hive, but not in the other direction to get back up into the supers. While this type of bee escape is still available, and manufacturers still make slotted inner covers, many other methods have been devised for getting the bees out of the supers faster and more efficiently. For our purposes, this also gives us more flexibility with slots or holes in our inner covers. Inner covers can have several special features, including:
- Screening for ventilation
- Holes for feeding
- Insulation for keeping the hive warmer and drier in wintertime
- Built-in upper entrance — handy when there is snow piled up but the temperature is warm enough for a cleansing flight; also provides air circulation
Basic Inner Cover
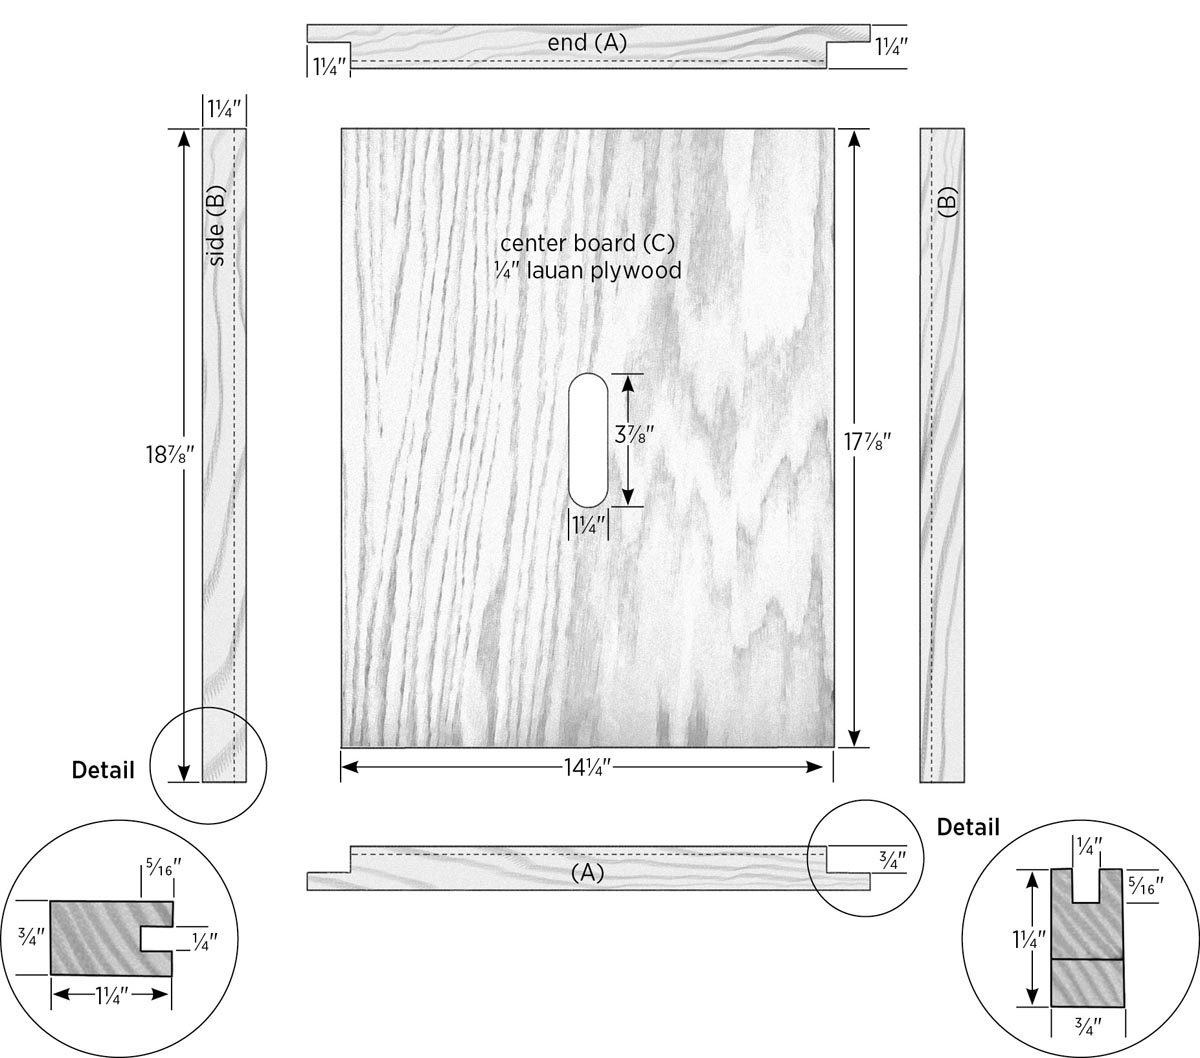
Inner covers are very easy to make, and you’ll get a sense of satisfaction when you assemble yours and feel how solid they are. You can build this cover with almost any type of wood. Some cover designs have a center board made of hardboard, but this material can sag under the weight of a feeder placed on top. I prefer to use plywood for the center board and regular pine for the frame. I usually save strips of wood from other projects and use them for the inner cover frames. Lauan plywood is fairly strong and inexpensive, and it works well for the center board.
Tools
- Table saw
- Drill with bits:
- Combination drill/countersink bit
- 11⁄4" or 1⁄2" drill bit (see step 3)
- Jigsaw
Materials
- One 3-foot pine 1×4
- One piece 1⁄4" lauan (or other) plywood, 177⁄8" × 141⁄4" minimum
- Waterproof glue
- Four 15⁄8" deck screws
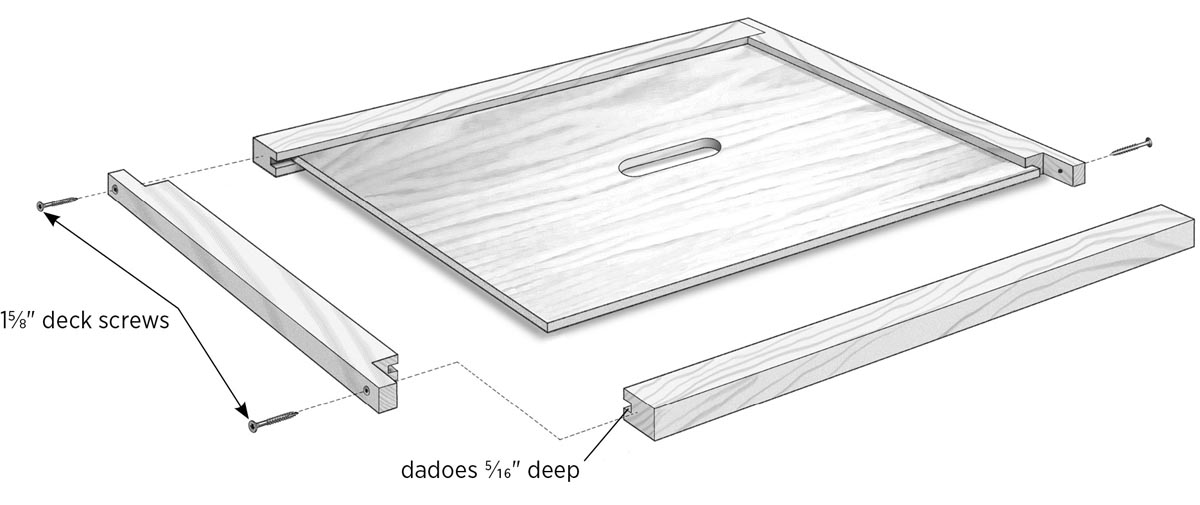
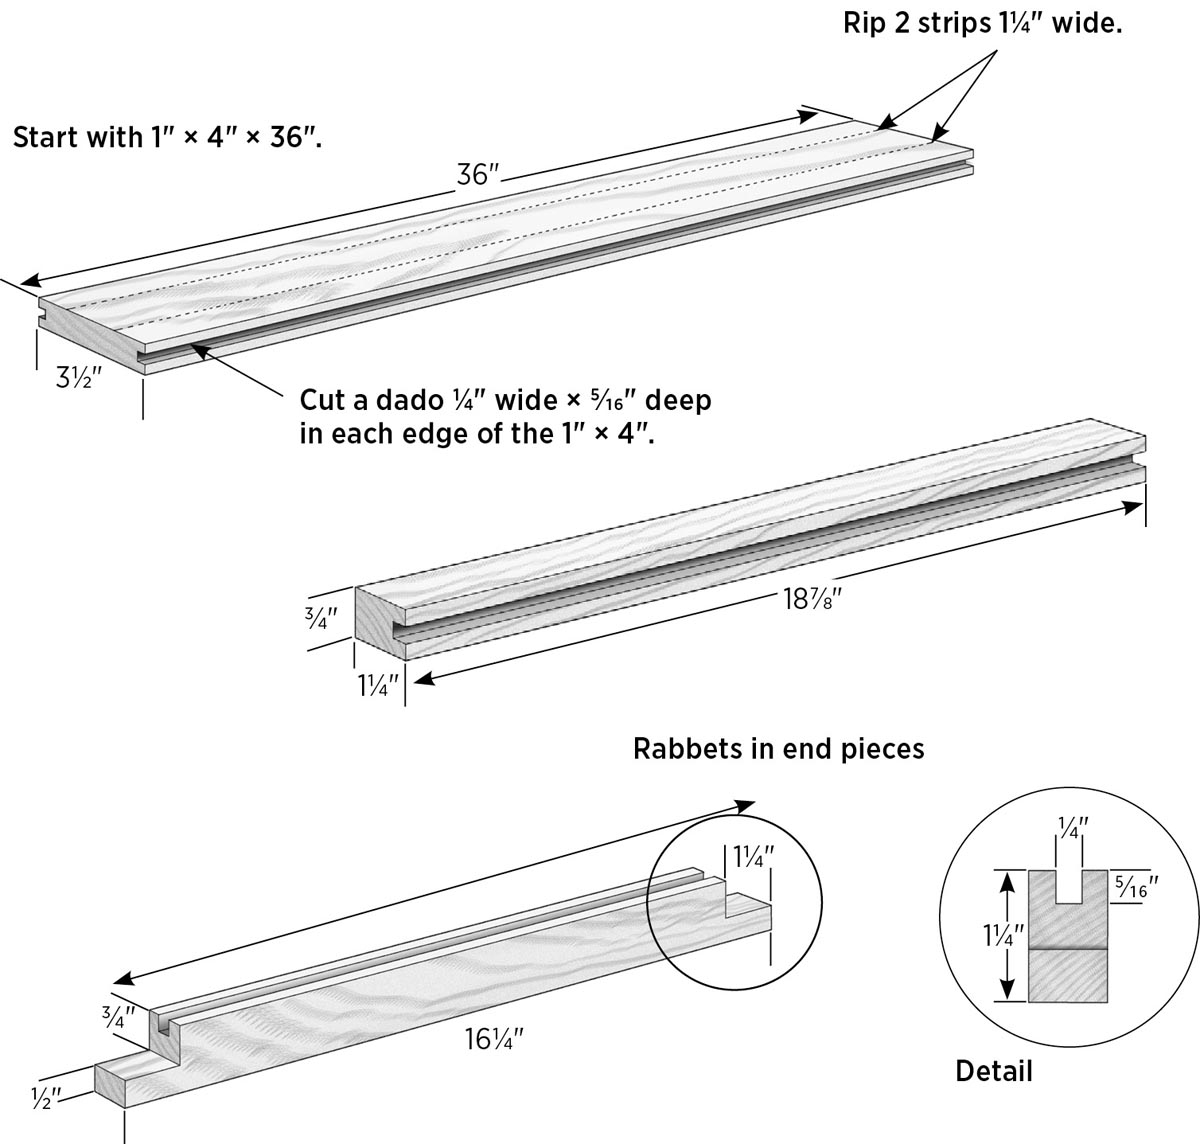
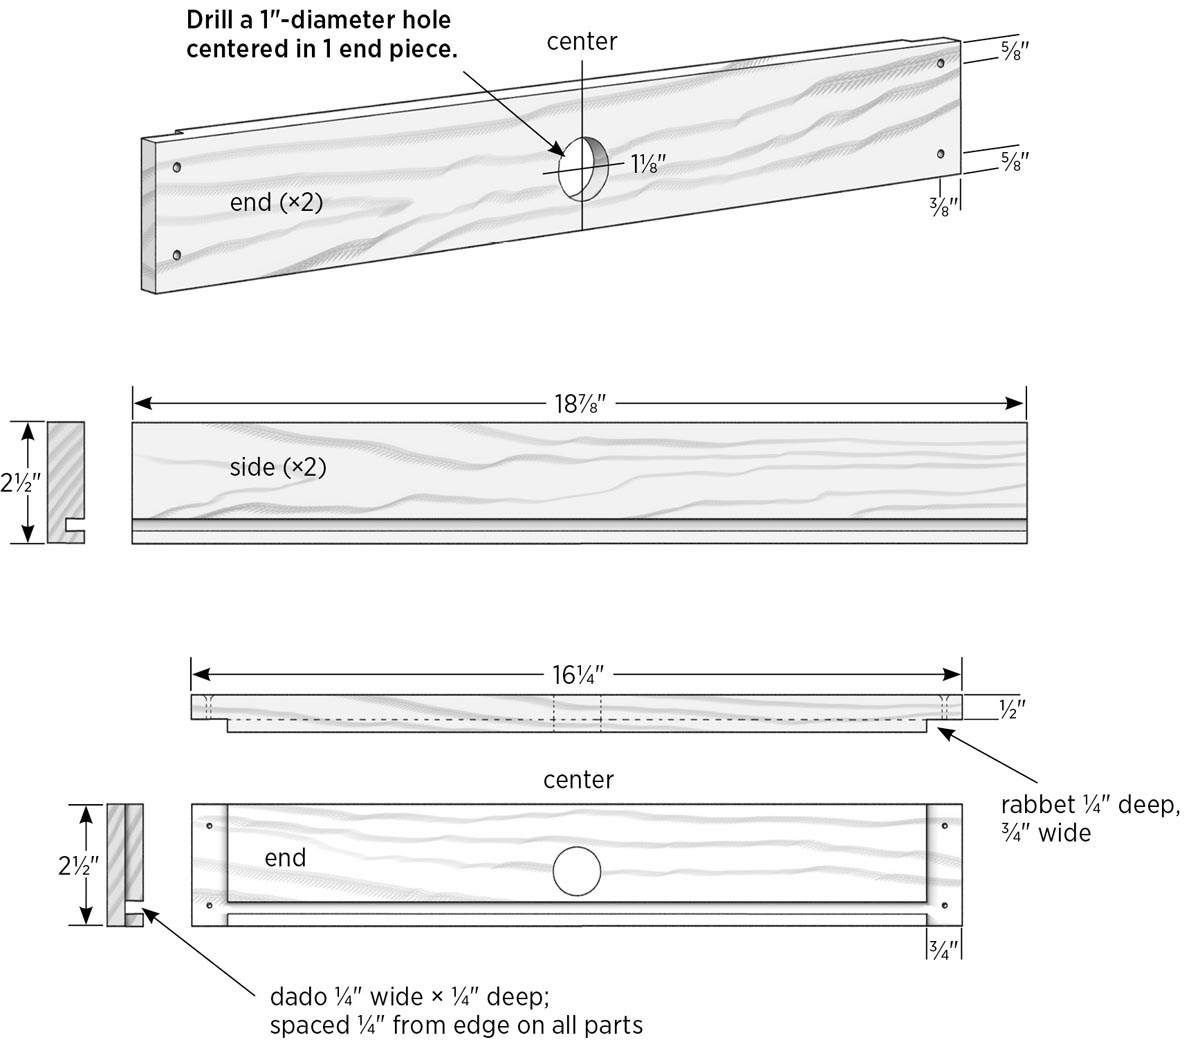
1. Dado and cut the side and end pieces.
The center board is captured in dadoes cut into the frame’s end and side pieces, all of which are cut from the single piece of 1×4. First, you’ll mill a dado on each long edge of the board, then you’ll rip the side and end pieces to width.
Set the blade height on the table saw to 5⁄16", and position the fence away from the blade a distance equal to one-half the thickness of the 1×4 minus one-half the thickness of the lauan plywood. Cut one side of the dado, then flip the board end-to-end and cut the other side. (If your blade’s kerf — the width of its cut — is at least 1⁄8", you can complete the dado with these two passes; otherwise, you’ll have to move the fence out a bit to clean up the middle of the dado.) Make sure the plywood fits nicely into the dado, then repeat the process to dado the other long edge of the 1×4.
Set the saw fence to 11⁄4" and rip one strip from each side of the board. From each of these strips, cut one piece to length at 161⁄4" (the end pieces, A) and one piece at 187⁄8" (the side pieces, B).
2. Rabbet the end pieces.
Each of the 161⁄4" end pieces gets a 3⁄4"-deep × 11⁄4"-wide rabbet on both ends; these are on the same side as the dado for the center board. You can cut the rabbets with a router table, a radial arm saw, or a table saw (with a standard or dado blade). Here’s the process for using a table saw with a standard blade:
Set the blade height at 3⁄4", and set the fence so it measures 11⁄4" from the fence to the far side of the blade.
Using the miter gauge, make a test cut in a piece of scrap and check your dimensions.
Cut each rabbet starting with the board’s end against the fence, then gradually move your piece away from the fence with each successive pass, taking small cuts until your rabbet is complete.
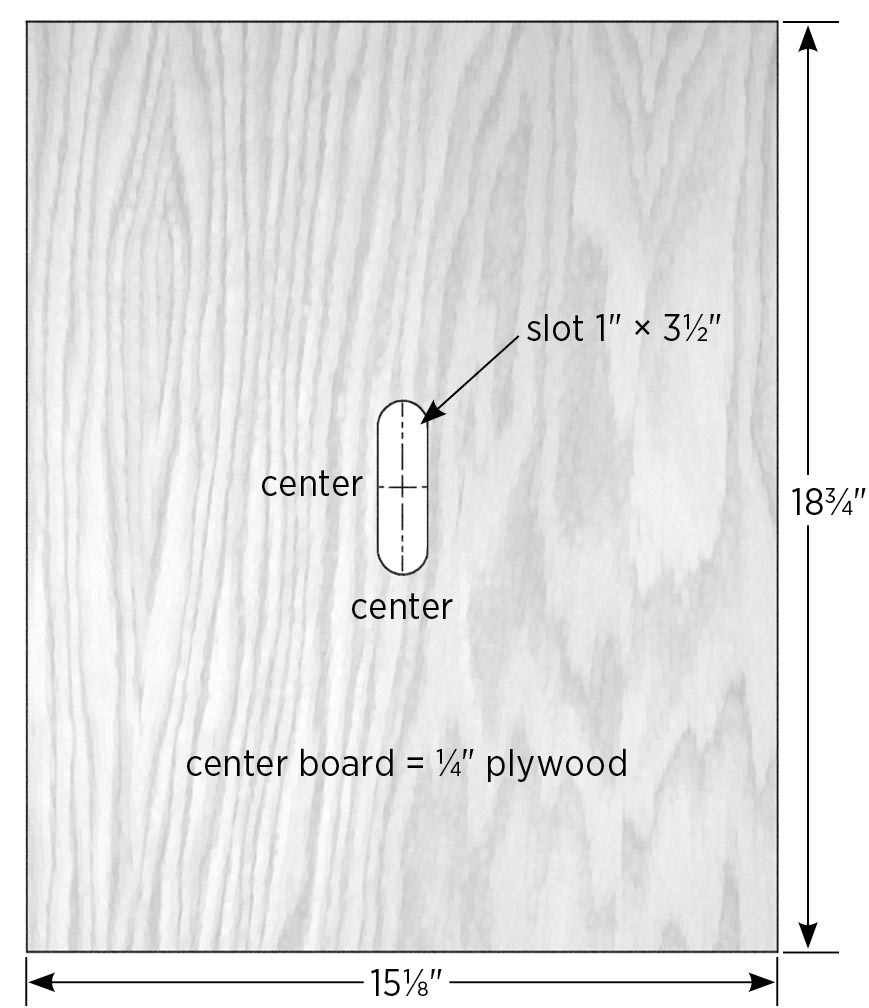
3. Prepare the center board.
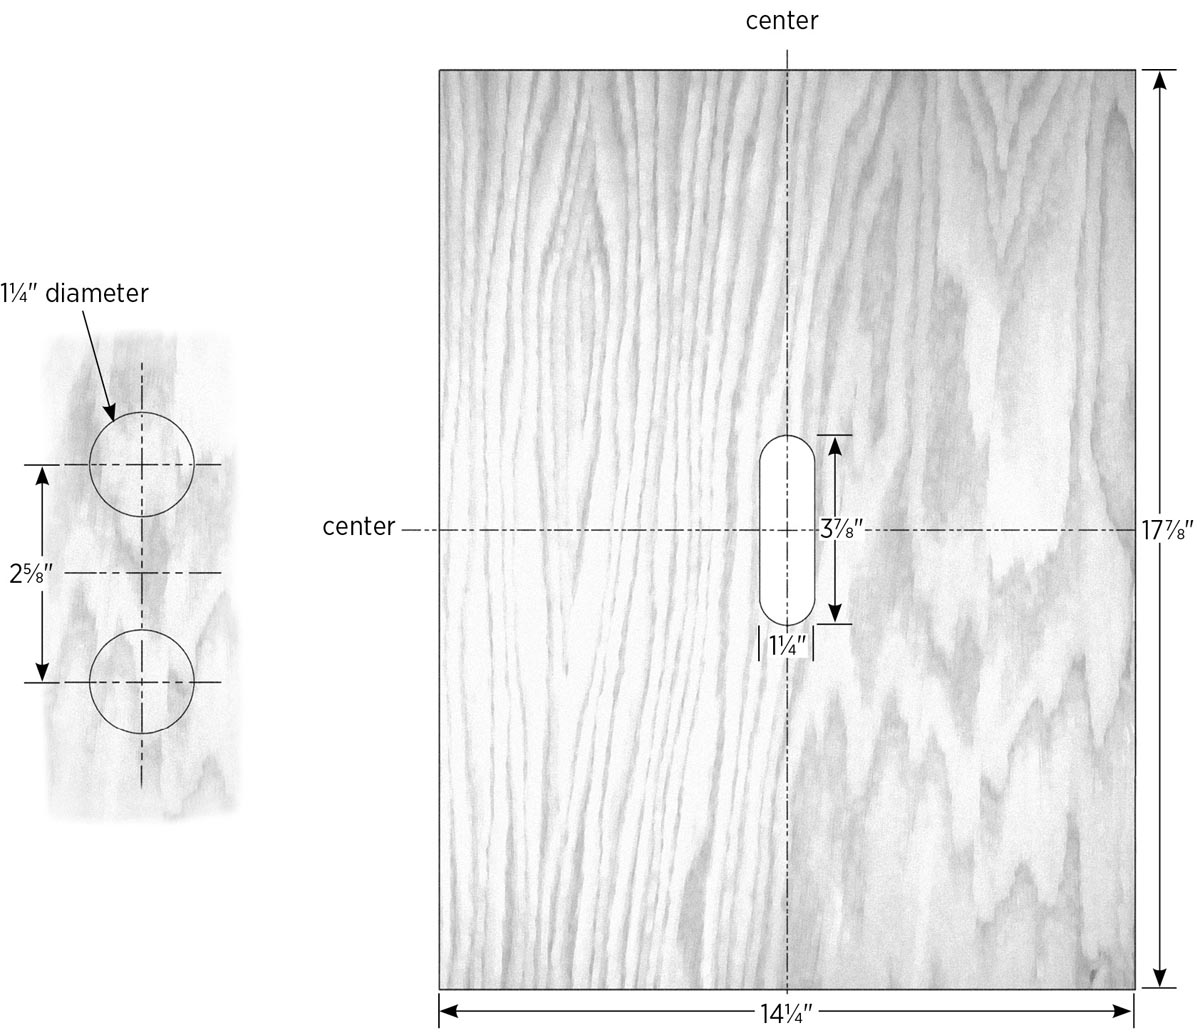
Cut the plywood to size at 177⁄8" long × 141⁄4" wide. The standard size of slot in the center is 11⁄4" wide × 37⁄8" long.
Work tip: These slot dimensions follow the traditional size for fitting “Porter-style” bee escapes, which are seldom used today. If you’re planning to build an escape board, which is much more effective for getting supers off (see Escape Boards on page 83), the size of this slot isn’t critical.
To make the slot, draw centerlines and layout marks on the plywood as shown. Drill two 11⁄4" holes, then use a jigsaw to cut straight lines between the outsides of the holes to complete the slot. Alternatively, you can drill a starter hole inside the marked slot area (using a bit that’s bigger than your jigsaw blade; 1⁄2" works for most blades), then cut out the slot entirely with the jigsaw. To prevent excessive tearout (splintering caused by the bit exiting the backside of the plywood), clamp the center board to a sacrificial scrap of wood before drilling, especially if you’re using the 11⁄4" bit.
4. Assemble the cover.
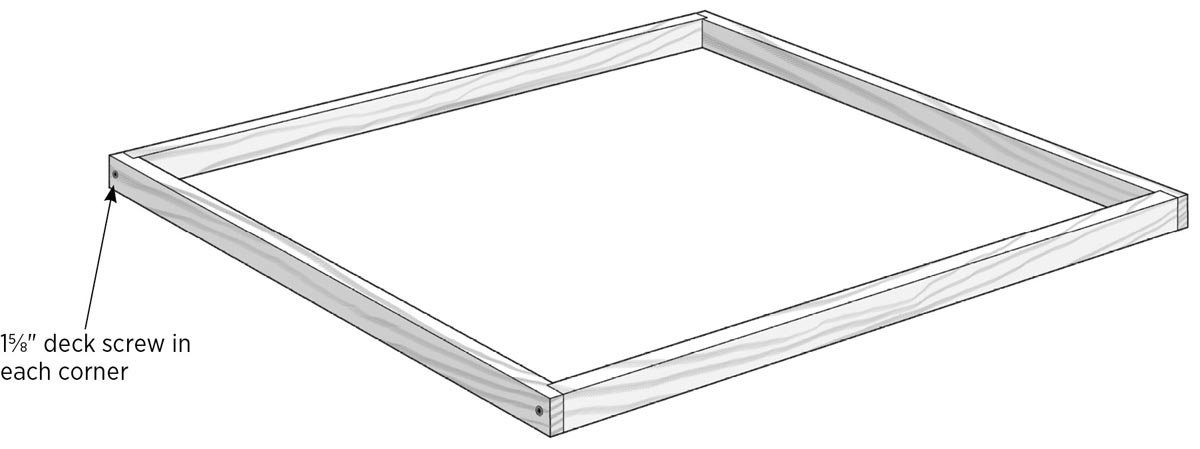
Dry-assemble the project to make sure everything fits before the glue-up. Drill countersunk pilot holes in the end pieces as shown in Basic Inner Cover — Exploded View, on page 42. Disassemble the pieces, apply glue to the rabbet joints, reassemble the cover, clamp the assembly, and check that the frame is tight and square. The plywood does not get glued so it can “float” in the dadoes. Secure the frame with 15⁄8" deck screws, and let the glue cure as directed. You’re done. That was easy.
Insulated Inner Cover for Winter
Northeast winters bring lots of snow, extended periods of cold, and icy winds, and my area of western Massachusetts gets all of that. Houses here have thick layers of insulation, and heavy sweaters abound. While you can’t knit sweaters for each of your bees, you can insulate their “attic.” Besides preserving heat, the main reason for insulating a hive is to prevent moisture from condensing inside the hive and killing the bees.
If you live in a cold climate, you may want to build this insulated inner cover, which allows moist air to escape. It also provides an upper entrance that’s handy on those occasional warm winter days when the hives may be mostly buried in snow. This project includes a spacer that can be used for queen introduction, feeding, or medicating your hive (see chapter 6 for more information on using spacers).
Beekeeping advice: When I fell through the ice on the river by our house, my clothes were frozen almost solid by the time I got back indoors. As quickly as I could, I got out of the wet clothes and into a hot shower. If bees get cold and wet in the wintertime, they will die.
Tools
- Table saw
- Drill and 1" Forstner, brad point, or spade bit
- Utility knife
- Jigsaw
- Router and straight bit with at least 1" cutting depth
Materials
- One 6-foot pine 1×4
- One piece 1⁄4" lauan plywood, 15" × 19" minimum
- Waterproof glue
- Twelve 15⁄8" deck screws
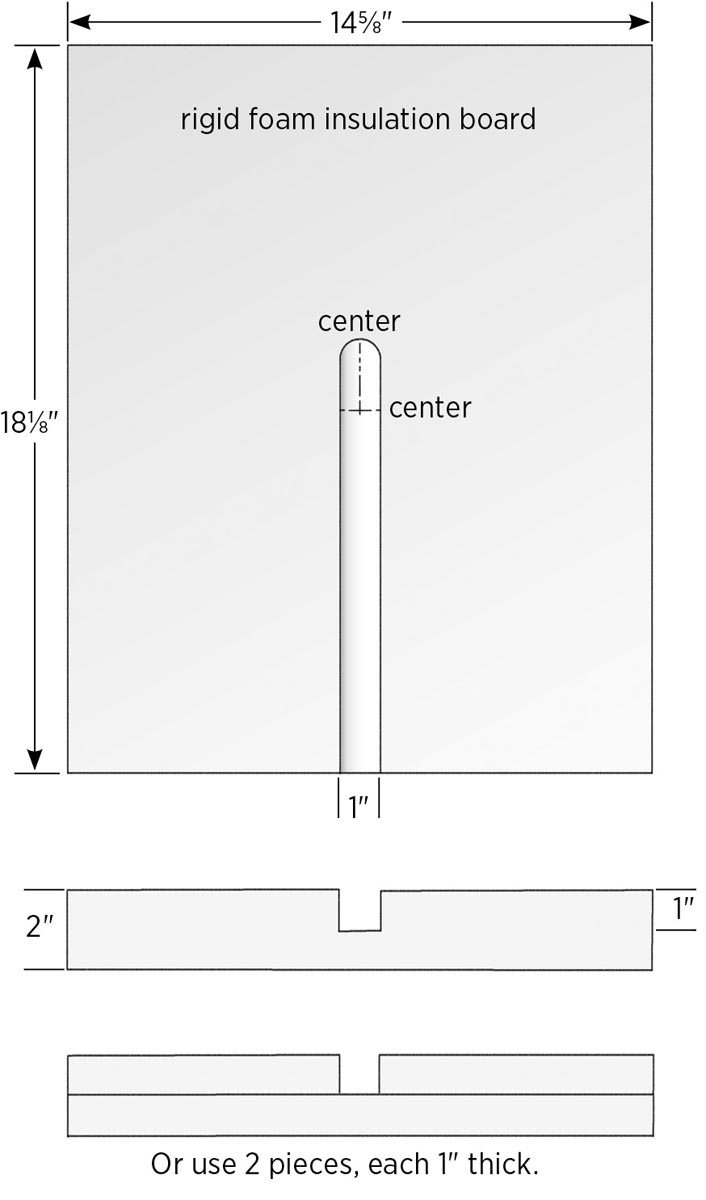
- One piece 2"-thick rigid foam insulation board, 15" × 19" minimum (or two pieces of 1"-thick board; see step 7)
- One piece 1⁄2" galvanized hardware cloth, 2" × 2" minimum
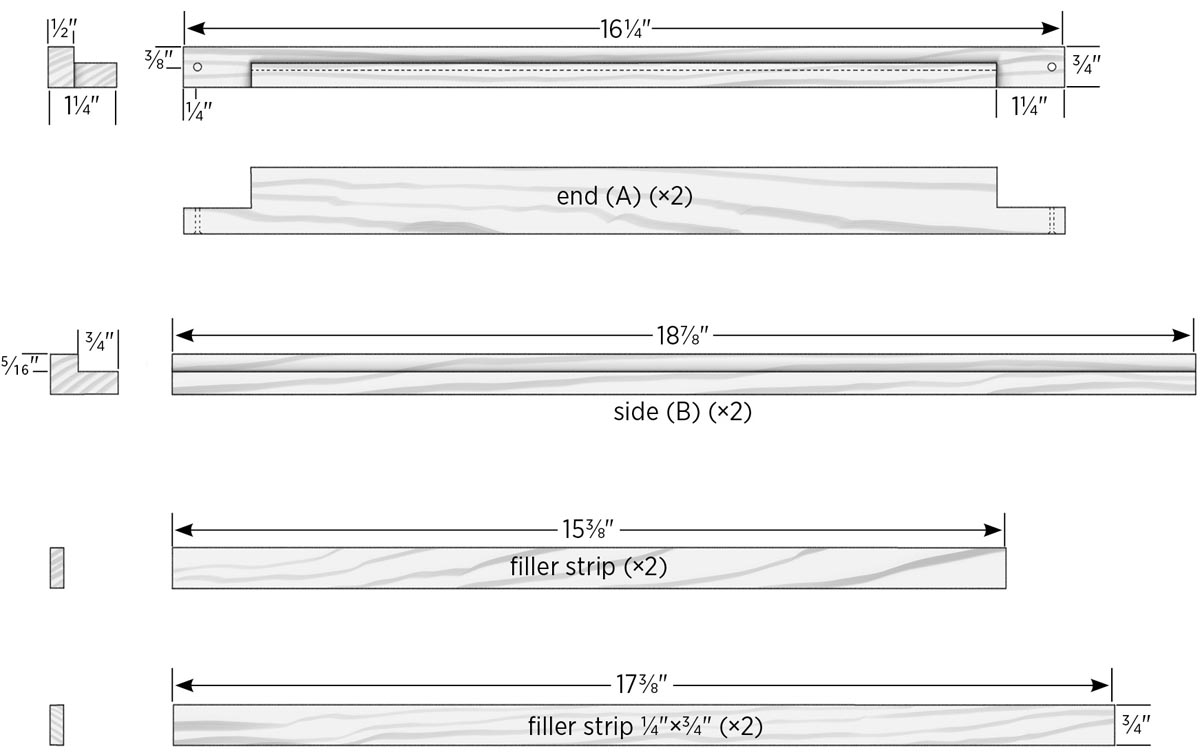
1. Cut and dado the frame sides and ends.
Cut two pieces of 1×4 to length at 161⁄4" (for the ends) and two pieces at 187⁄8" (for the sides). Set the table saw fence and the blade height to 1⁄4" (as in previous projects, you can also use a dado blade or router table, but a standard blade on a table saw works fine). Cut a 1⁄4"-wide × 1⁄4"-deep dado into each piece, with the bottom of the dado 1⁄4" from the bottom edge of the piece, as shown in Insulated Cover Frame Parts, on facing page. Test-fit the plywood in the dadoes; a little bit of play is fine.
2. Rabbet the end pieces.
With the saw blade still set to 1⁄4", reset the fence and cut a 3⁄4"-wide rabbet on each end of the two 161⁄4" end pieces.
3. Rip the frame pieces to width.
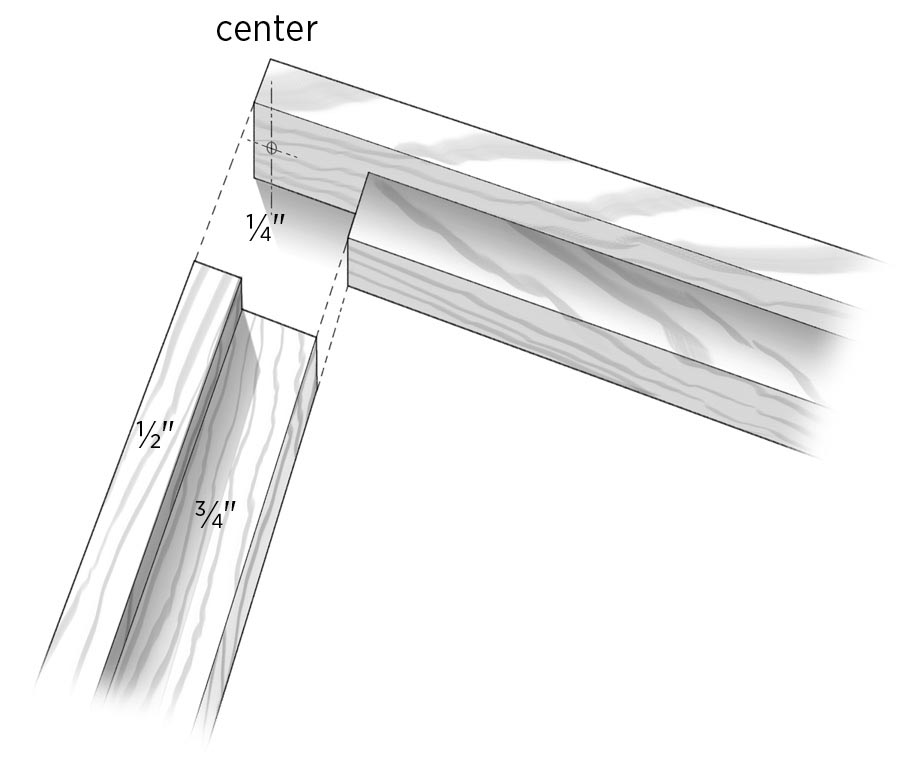
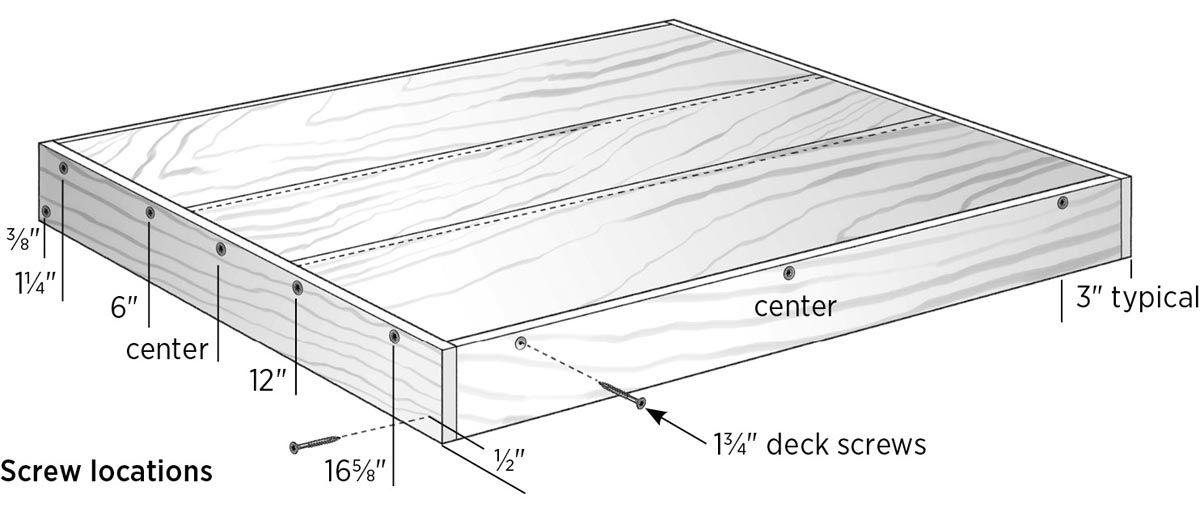
Set the saw fence at 21⁄2". Rip all four frame pieces to this width, making sure the dadoed edge is against the fence. Save the leftover pieces; you’ll use them for making the hive spacer (step 9). On each end piece, mark 3⁄8" in from the ends and about 5⁄8" from the top and bottom edges for screw holes, then drill countersunk pilot holes.
4. Drill the upper entrance/vent hole.
Mark the location of the upper entrance/vent hole onto one of the end pieces by drawing a center line at 81⁄8", then measuring up 11⁄8" from the bottom edge (closest to the dado) and marking a cross line (see Insulated Cover Frame Parts, facing page). Drill a 1" hole at the mark. You can use a Forstner, brad point, or spade bit. To prevent tearout with a spade bit, drill though from one side just until the tip of the bit comes through the other side, then flip the board over and finish the hole from the other side.
5. Cut and slot the center board.
Cut a piece of 1⁄4" lauan plywood to size at 183⁄4" long × 151⁄8" wide. Mark the center of the width and length of the piece. Draw a centered line lengthwise and lay out a 1" × 31⁄2" slot, as shown. Drill 1" holes at each end of the slot layout, then connect the holes with a jigsaw to complete the slot.
6. Assemble the cover frame.
Dry-assemble the frame and center board to make sure all of the pieces fit well. Apply waterproof glue to the rabbets of the end pieces, and fasten the pieces with 15⁄8" deck screws. There’s no need glue the center board in place; it just floats in the dadoes. Let the glue dry as directed.
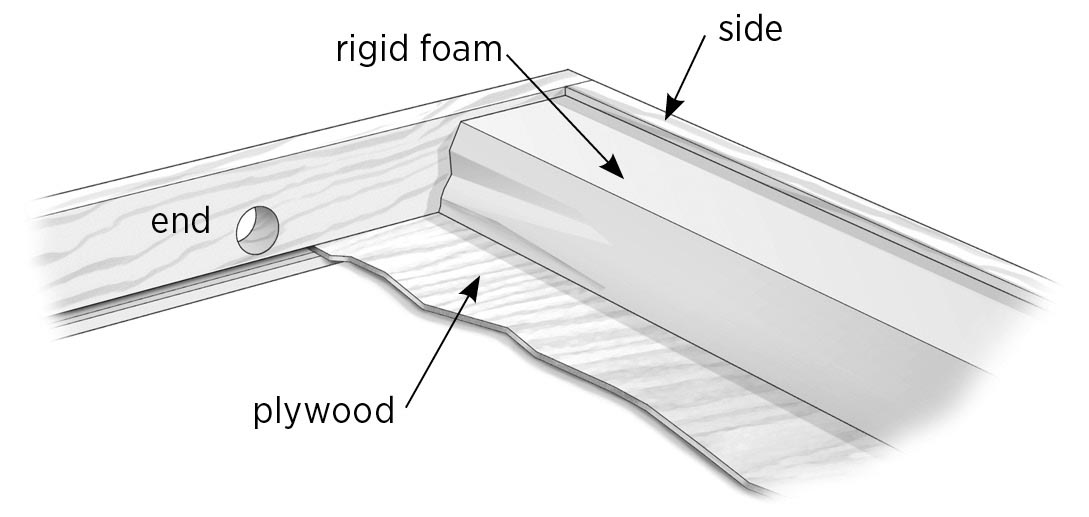
7. Add the insulation board.
Cut a piece of 2" rigid foam insulation to size at 181⁄8" × 145⁄8", using a utility knife (mark and cut from both sides of the board, then snap off the waste pieces). Set the cut foam into the assembled frame, and use a marker to trace around the slot in the center board and the hole in the end piece. Remove the foam and extend the slot lines all the way to the end-hole. Clamp a straightedge to the foam as a guide, and use a router to cut a 1"-deep channel along the marked slot lines (you might want to make this cut in two passes).
Alternatively, you can use two pieces of 1"-thick foam board: Cut the pieces to size, then set one piece into the frame and trace the slot, extend the lines, and cut out the slot with a utility knife. The nice thing about using 1" board is that you don’t need a router to make the slot — a very messy process.
Place the rigid foam into the frame with the slot facing the center board. The foam board doesn’t have to be tight-fitting and doesn’t get glued down; it just sits in place.
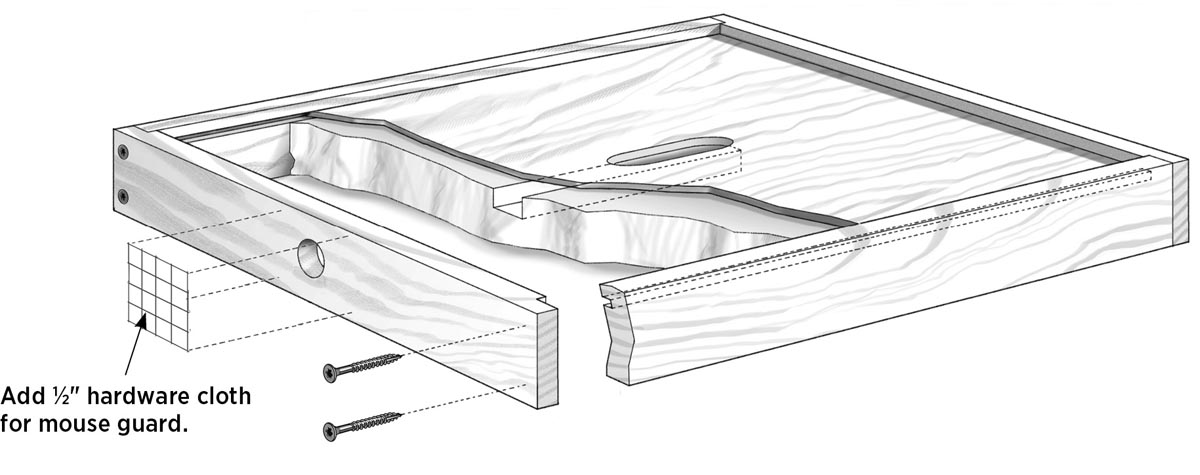
8. Install the screen and cover.
Cut a piece of 1⁄2" galvanized hardware cloth to size at about 2" square and staple it over the hole in the end piece of the frame. Position it so the bees have the most access. Its purpose is to keep those pesky mice from entering the hive and building a nice winter home.
Now that your cover is completed, you can install it on the hive. Remove the regular inner cover, and position your winter cover with the plywood side facing down. Set the outer cover back on and be sure to put your stone or other weight back on top to keep the outer cover from blowing off in the strong winter wind. Your bees will now be cozy and warm, plus they’ll have ventilation, and an upper entrance if needed.
9. Build the spacer.
Clamp leftover pieces from step 3 together as shown in Insulated Cover Frame Parts, on page 46, and drill a countersunk pilot hole 3⁄8" from each end and centered over the board’s thickness. Reassemble the frame with glue and 15⁄8" deck screws, and let the glue dry. You now have a handy spacer.
Screened Inner Cover
Someone once gave me a box of bees that had a screened inner cover, and it was screwed down for transportation. I don’t remember exactly how it was made, but I think the screen was just sandwiched between the boards. I know I had planned on taking it off and replacing it with a regular inner cover, but the only time I thought of it was when I stopped to check the hives in that yard, and I never remembered to bring one. Well, late fall came and I found myself there again with no replacement, so the hive went through the winter with a screened inner cover, and came through with flying colors.
I’m not endorsing overwintering with a screen on the top of your hive, but screened covers do have their uses. For one, you can pop off the telescoping cover and see more of what’s going on inside with a quick peek through the screen. It’s easy to see how many frames the bees are working on without really disturbing them. And you can prop up the outer cover for ventilation and not worry about other bees getting into the honey stores and robbing the hive.
Following is my design for a screened cover. If you’ve already done some of the projects in this book, you’ll be familiar with the steps required. I start with the same frame that I make for my Basic Inner Cover (page 41) and modify it to take the screen and slats that hold the screen in place.
Tools
- Table saw
- Drill and combination drill/countersink bit
- Tin snips
- Electric brad nailer (optional but helpful)
Materials
- One 3-foot pine 1×4
- One piece #8 galvanized hardware cloth, 15" × 183⁄4" minimum
- Waterproof glue
- Four 11⁄4" deck screws
- 1" (or longer) brads or wire nails (see step 5)
Safety note: On my table saw, there is too much clearance between the blade and the removable insert plate to safely cut a 1⁄4"-wide strip between the fence and blade without the cut-off wood getting pulled down inside the table. One way around this is to cut a strip from the outside edge of a wider board. Instead, I created zero-clearance slot (not to be confused with the zero-clearance fence on page 16) around my blade as follows: I set the fence to 1⁄4" and lowered the blade, then clamped a piece of 1⁄4" lauan plywood to the table. I turned on the saw and slowly raised the blade to cut through the plywood until it was high enough to rip my 1⁄4" strips. After cutting, I shut off the saw, lowered the blade, and removed the plywood.
1. Cut the frame rabbets.
Start by cutting two 5⁄16"-deep × 3⁄4"-wide rabbets into one face of the 1×4 board. Set up a zero-clearance fence on a table saw (see page 16), and position the wood fence at 3⁄4" to the far side of the saw blade. Set the blade height at 5⁄16". Make the first cut, then turn the board end-for-end, with the same face down, and make the same cut. If you’re using a standard blade, continue to move in the fence a little with each successive pass to complete both rabbets.
2. Rip the side and end pieces
Set the saw fence at 11⁄4" and the blade height at 1". Rip both sides of the board. Save the scrap piece for the filler strips. From each of your two ripped pieces, cut one piece to length at 161⁄4" (for the ends, A) and one at 187⁄8" (for the sides, B).
3. Notch the end pieces.
The two end pieces are notched out to accept the side pieces. Set the saw blade height at 3⁄4" and set the fence at 11⁄4" to the far side of the blade. Test-cut a scrap piece, using the miter gauge to guide the piece. Notch both ends of each end piece as shown in Screened Inner Cover Parts, above. When the sides and ends are fitted together they form a channel for the screen and filler pieces to rest in.
Test-fit the sides and ends to confirm a good fit as shown here, then drill countersunk pilot holes into the ends, 1⁄4" from each end and centered on the 3⁄4" thickness, as shown in Screened Inner Cover Parts.
4. Cut the filler strips.
Set your saw fence at 1⁄4", and carefully rip two strips from the leftover 1×4 material; the ripped pieces should measure 1⁄4" × 3⁄4".
From the ripped strips, cut two pieces to length at 153⁄8" and two at 173⁄8".
5. Assemble the cover.
Cut a piece of #8 hardware cloth to size at 151⁄4" wide × 183⁄4" long. Dry-assemble the frame pieces and check the fit of the screen and filler strips in the frame recesses. Apply glue generously to one end of each side piece, position the mating end piece over the sides, and fasten the pieces with 11⁄4" deck screws, being careful not to overtighten the screws. Turn the frame around and repeat for the other end, making sure the frame remains flat and square.
Apply a good bead of glue on the bottom and sides of the recess. Put the screen in place and install one end filler strip. Fasten the strip with 11⁄4" brads, spaced about every 3"; the brads will protrude through the back side of the frame, so set the assembly on a scrap piece of insulation board or other material before nailing. Place and nail off the remaining strips one at a time, keeping the screen flat as you go. When all pieces are nailed, flip the cover over and use a hammer to bend over the nails and pound them flat to cinch them down for a secure (and safe) connection.
If desired, drill a couple of countersunk holes on each side of the frame to give yourself the option of screwing it down on the hive body or super.
Telescoping Outer Cover
When I first heard the term “telescoping cover,” I envisioned something that could be adjusted to be big or small, like a telescoping tripod. Come to find out, this was not the case at all. It simply meant that the cover extends over the sides of the hive. I told you that beekeeping terms could be confusing.
The nice thing about telescoping covers, and this design in particular, is that there’s room for substitution of materials. The frame is made from 1-by pine lumber, but you can use plywood, tongue-and-groove boards, or solid boards for the top. You can cover it with aluminum coil stock, like that used for flashing and gutter making. If you come across some of the old newspaper plates that are thin aluminum, those also work.
You can buy preformed pans from places like Betterbee or other supply houses, or even just caulk and paint. One time, in a pinch, when I didn’t have any metal and needed a cover for a swarm hive, I simply stapled a plastic garbage bag over a piece of plywood and nailed a couple of cleats on the ends to get by until I had time to make a proper cover.
Telescoping covers typically are pretty heavy. They provide the outermost and uppermost protection for the hive. They have to stand up to all of the elements, such as snow, wind, and rain. Yet even with their weight, you still need to put a heavy rock or some other kind of weight on them to prevent their blowing away in high winds.
The dimensions of this outer cover fit the hive bodies we have been building in this book. The cover’s frame also fits a preformed metal pan from Betterbee, allowing you to use the prefab pan rather than make a custom metal top (described in steps 6 through 8). The one thing I don’t like about the prefab pans is their small lips; I prefer to have the metal extend over more of the telescoping cover frame, but as long as it keeps the top of the frame covered, paint will keep the sides of the frame dry.
I used aluminum for the metal top of my cover, bending it by hand and with a rubber mallet, which works just fine. This project includes a simple setup for bending the metal top right to the completed cover, or you can use the Simple Bending Jig (page 89). You can find 24"-square pieces of aluminum at home centers and lumberyards; barring that, check with local roofers or siding contractors. Okay, let’s get going and get a roof on our hive.
Tools
- Table saw
- Bar or pipe clamps (at least 24" long)
- Drill and combination drill/countersink bit
- Tin snips
- Two scrap boards at least 22" long (see step 7)
- Rubber mallet or hammer and wood block
- Screwdriver with flat, wide blade
Materials
- One 42"-long pine 1×5 (see step 1)
- Material for 21" × 173⁄8" finished top (see step 4)
- Twenty 13⁄4" deck screws
- Waterproof glue
- One 24" × 24" × 0.016" aluminum sheet (or use a preformed metal top)
- Sandpaper
- Twenty 3d galvanized box nails
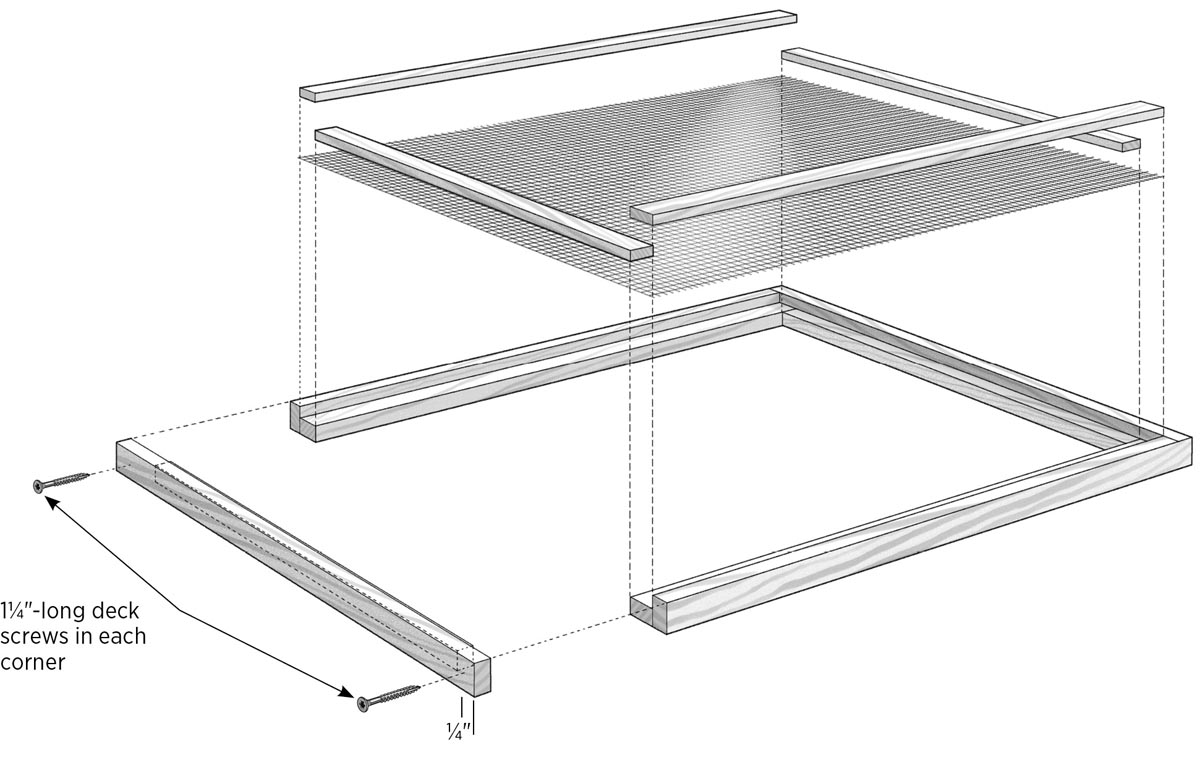
1. Cut and rabbet the side and end pieces.
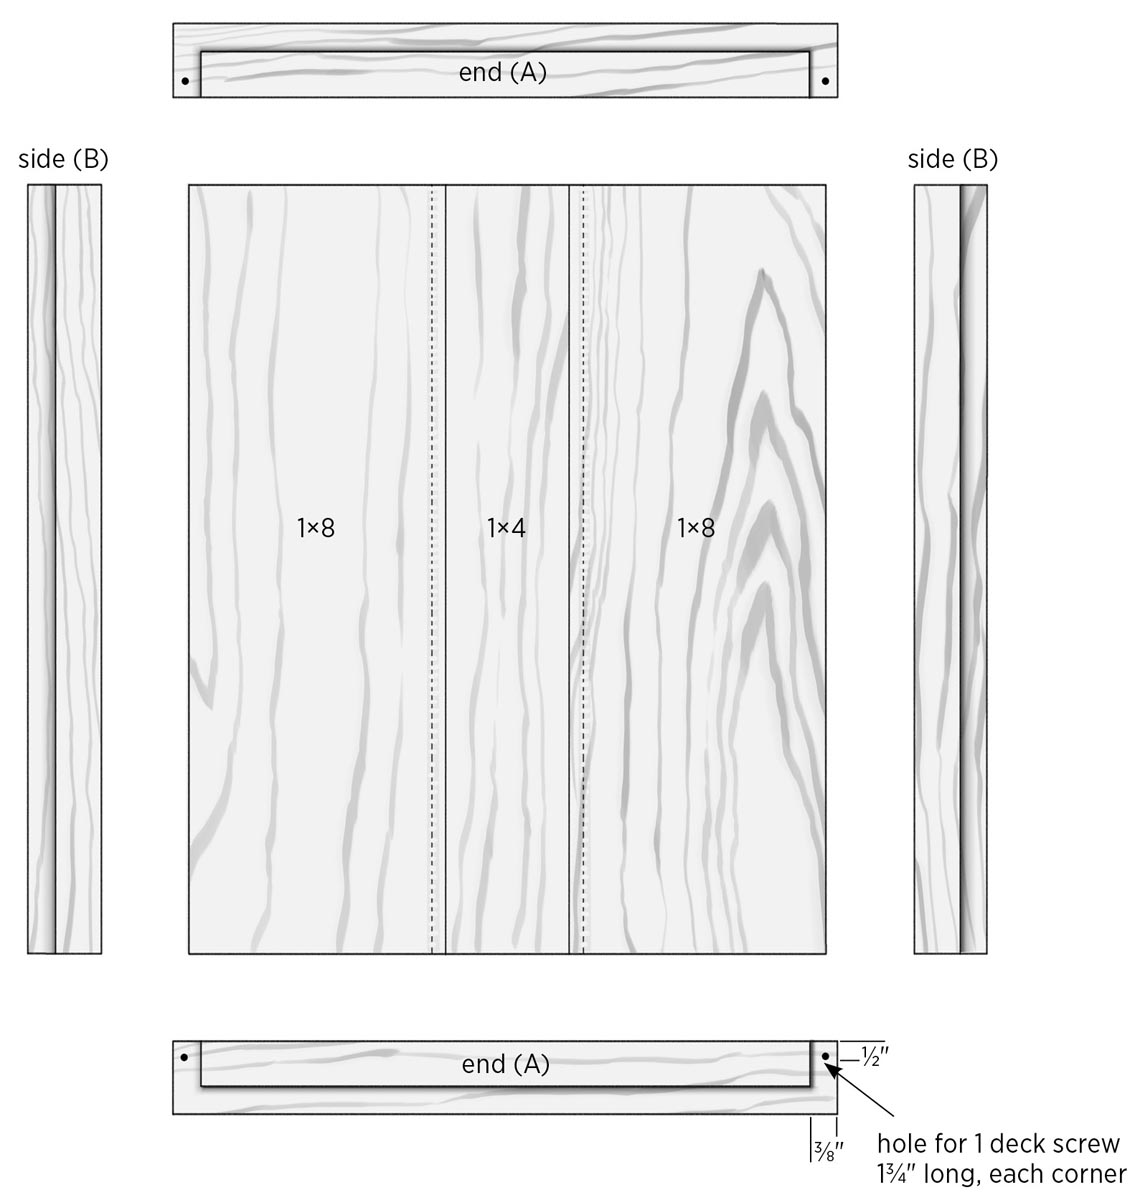
Cut two pieces to length from the 1×5 pine board, one at 181⁄8" (for the ends, A) and one at 21" (for the sides, B). Each of these will be ripped into two pieces later. If you can’t find 1×5 at your local lumber supplier, you can use 1×6; you’ll just have a bit more waste.
Set up a zero-clearance fence on a table saw (see page 16), and set the blade height to 3⁄8", or half the thickness of the frame boards. The wood of the zero-clearance fence should partially cover the blade so you can cut the very edge of your workpiece. Test-cut a piece of scrap wood, then make a cut on one face of each 1×5 board, running the full length. Turn each board end-for-end and make another cut on each board with the same side facing down. Move the fence away a little less than the thickness of the blade, cut again, and keep moving the fence until the width of your rabbet is 3⁄4".
Work tip: If you’re using a material other than 1-by pine for the top board(s), make the width of your rabbet match the thickness of your top.
2. Rabbet the ends for the corner joints.
The 181⁄8" (A) piece gets a 3⁄4"-wide rabbet at each end to accept the side piece. The height of the saw blade remains the same at 3⁄8". Set the fence at 3⁄4" to the far side of the blade (this is already done if you’re using 1-by material for the top). Using the miter gauge, rabbet both ends of the piece, with the same side facing down. After making the shoulder cuts at 3⁄4", gradually move the fence closer to the blade until your rabbet is complete.
3. Rip frame pieces and check the fit.
Raise the saw blade height to just over 3⁄4", and set the fence at 2". Rip two pieces from each board, leaving the center as waste. Dry-assemble the sides and ends, and temporarily clamp the frame together. They should form a box with outside dimensions of 181⁄8" × 213⁄4", with a recess that matches the thickness of the top material.
4. Cut the top pieces.
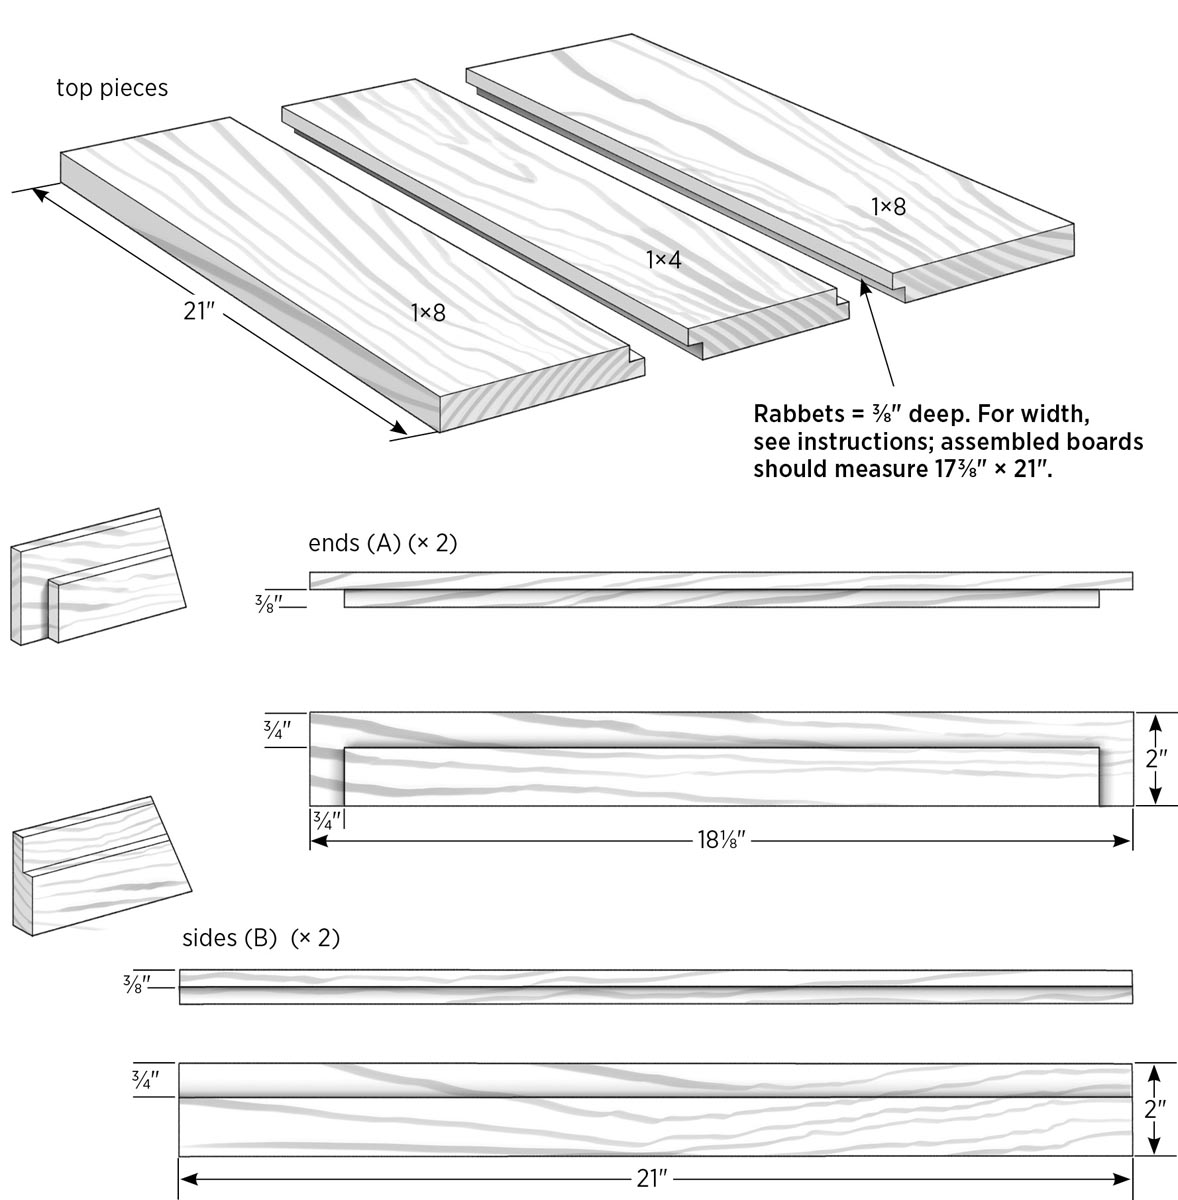
Note: If you’re using plywood for the top, cut it to size at 21" long × 173⁄8" wide, and skip ahead to step 5. My top is made with two pieces of 1×8 pine and one piece of 1×4 pine, all joined with half-lap joints. The following is how I cut the top pieces.
Cut two pieces of 1×8 and one piece of 1×4 to length at 21". Set the boards edge-to-edge on a flat surface and measure the total distance across; it should be around 18". The finished width for the top is 173⁄8", so the assembly is 5⁄8" oversize. With three boards, there are two half-lap joints; dividing 5⁄8" by two gives you the width of each half-lap joint: 5⁄16".
To cut the rabbets for the half-lap joints, set the saw blade height at 3⁄8" (one-half the board thickness). Use the zero-clearance fence set at 5⁄16" to the far side of the blade. Cut the rabbets as before, gradually moving the fence to complete the waste removal. Each 1×8 gets one rabbet, and the 1×4 gets two. Test-fit the three boards in the frame recess.
5. Assemble the wood parts.
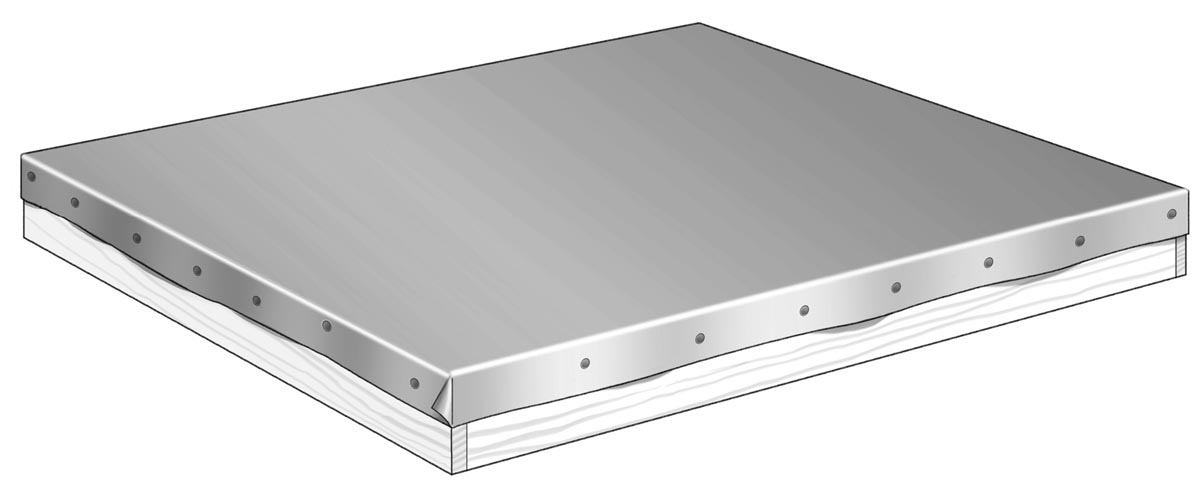
Drill countersunk pilot holes into the frame sides and ends as shown. Apply glue to the joints for the side and end pieces. Assemble and clamp the box frame, and check it for square. Drive one 13⁄4" deck screw at each corner joint. Spread some glue on the half-lap joints, place the boards in the frame recess, and add screws. Once the glue is dry, you can paint the outside rim of the cover before or after installing the metal top.
6.Cut the metal top.
Note: If you’re using a preformed pan for the metal top, attach it with 3d galvanized box nails, four or five to a side. You may have to predrill the metal. Otherwise, follow the remaining steps to make your own top.
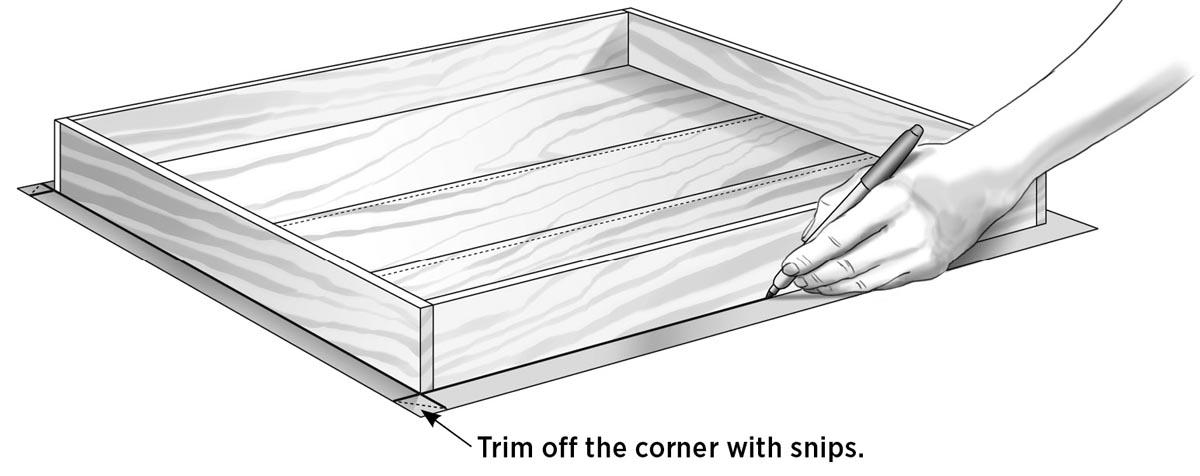
Always wear gloves and safety glasses while handling sheet metal. Cut a piece of aluminum flashing to size at 201⁄4" wide × 24" long, using tin snips. This allows for about 11⁄8" of overhang on the sides. Carefully sand the edges lightly to remove burrs. Lay the metal sheet on a flat surface with the top side (the one you want to show) facing down. Center the cover frame top-down over the flashing and draw a line around the outside of the cover. Extend these lines to the edges, and then trim off the corners at a 45-degree angle up to the ends of your lines, as shown.
7. Bend and nail the first side of the metal top.
Place one scrap board underneath and one on top of the cover, lining up the edges, and clamp both ends with bar or pipe clamps (2×4s will work for the scrap boards, but something with a square edge is better for getting a sharp bend). Bend up the overhanging edge of aluminum a little at a time, going back and forth across the full length of the edge. You can use your gloved hands or press a block of wood on the metal and slide it back and forth. When you get close enough to 90 degrees, use a rubber mallet and tap along the very edge of the angle to bring the metal up tight to the cover.
When the first side is bent, start from the center and nail toward the ends, using 3d galvanized box nails. Use five nails, spacing them evenly by eye and making sure they’re going into the solid boards (or plywood panel) of the top.
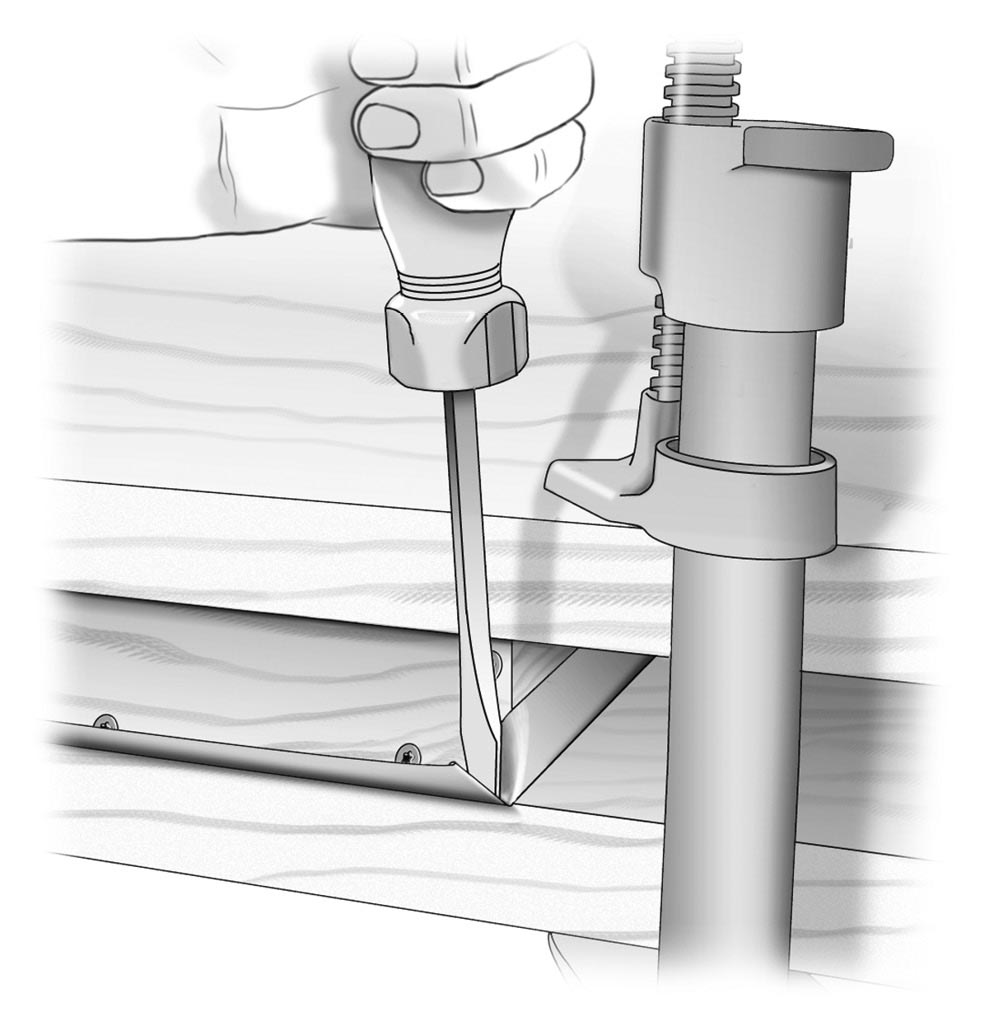
8. Complete the cover.
Remove the clamps and rotate the setup 90 degrees. Repeat the bending and nailing on each side. To deal with the little dog-ear at the corners, use a wide-bladed flathead screwdriver to tuck the wrinkle into the corner. You can also use pliers to help squeeze and bend over the flap.
Try to keep the metal top fairly flat, but if your lines get off a little, don’t worry. The top’s purpose is to shed rain, and if the flaps are a little crooked, they’ll work just as well.
With the last nails in place and the clamps removed, it’s time for the crowning moment when you place the cover on your newly built hive. You’re almost ready for some bees. If no one is around to give you a pat on the back, reach around and give yourself one. You deserve it.