Chapter Six
It’s All in the Details
Now that you have your hive and stand built, there are a few other items that I would consider necessities. Some you should have right away, and others can wait a while. If you live in bear country, you’ll want to have your electric fence set up before your bees arrive. A hive spacer, entrance reducer, and feeder are useful if you’re getting package bees. Escape boards won’t be needed until it’s time to harvest honey.
Electric Fences
I’ll never forget my introduction to our local beekeeping club. It was my first meeting, and when I arrived there was a bunch of guys sitting in rows of chairs and two guys up front at a table. I assumed they were the club leaders. I took a seat toward the back. The meeting hadn’t officially started yet. The old guy sitting in front of me turned around, and I expected him to introduce himself, but instead the first words out of his mouth were, “You got bees?” I said, “No, but I’m getting some. I have them ordered.” Then he asked, “You got an electric fence?” I said, “No, I don’t.” His reply was, “Well, you might as well get up and go home, ’cause you ain’t gonna have no bees.”
I was a little overwhelmed by the “warm friendly welcome” I was receiving. If I hadn’t been brought to the meeting by a beekeeping friend, I probably would have gotten up and left. It took just a couple of meetings to realize that that was just old Charlie’s way, and I soon learned to take everything he said with a grain of salt. And looking back, there was much truth to what he was saying.
I live in the hills of Berkshire County, Massachusetts, and this is black bear country. Even if you live in town, there are occasional bears that wander unexpectedly into the neighborhoods, and with changes in the hunting laws, the bear population has steadily increased over the years. Everyone knows that Winnie-the-Pooh loves honey, but black bears are more interested in the brood as a great source of protein. If you haven’t seen a hive that has been damaged by a bear, it can look like something that has come through a tornado, with broken boxes and frames all over the place, not to mention some very angry bees.
I had one hive get hit by bears. It was on the farm where my son lives. It was springtime and I had just reversed the boxes. A mother and two cubs pulled the top deep box off and dragged it out into the field, and did some chewing on the frames. Luckily, the bees were all in the bottom box that they left behind. My son scared the bears away, and I put up a proper fence that day. Bears have very good memory and will return to a good source of food. I must have done something right with that new and improved fence, because the bears have been spotted in the field by the hives many times in the last few years, but the electric fence has kept them at bay.
Beekeeping advice: I can attest to the shock provided by a solar charger. I was once putting an extra strand on a fence I had set up, and made the mistake of not turning off the system first. As I was screwing on an insulator, I had one hand on the post and reached around and accidentally touched an unseen wire with my other hand. It felt like someone had put the paddles on my chest and yelled, “Clear!” And it hurt. I don’t want to imagine what putting a wet nose on the wire feels like.
Fence Components
There are plenty of product options for setting up an electric fence, and lots of advice and opinions out there on chargers, posts, and fencing (as well as whether or not to bait your fence). For example, I heard a few people on a beekeepers’ forum recommend not buying a particular brand of fence charger, saying it doesn’t last a year, while I’ve used the exact brand in three bee yards for seven years without a single problem. I can only speak from the experience I’ve had with the bears and what works for me.
Here’s a brief rundown on the components you’ll need to set up an electric fence. It’s a good idea to shop at a reliable business where knowledgeable staff can help you match all the pieces and give you some helpful tips and advice.
Charger. A fence charger, also called a “fencer,” is by far the most expensive component of your system. While it may seem costly, consider what you have invested in the way of hive equipment, the cost of bees, and the value of any honey you might lose if a hive were destroyed. A fence charger that runs on household current is far less expensive than one that runs on solar power, and can give you a higher output for less money. The disadvantage is that if the power goes out, your fence is down. Depending on the location of your hives, a solar charger may be the only option. Do some research before buying a charger.
The power rating you normally see for fence chargers is in joules. The higher the rating in joules, the stronger the shock, but even this can be a little misleading. One joule is equal to one watt for a 1-second duration, and since fence chargers pulse on and off, the duration of on-time also contributes to the strength of the shock.
Another consideration is that many chargers are listed according to length of fencing they will adequately charge. Read the specs for various chargers telling you what they are designed for. If a charger is designed to keep rabbits penned in, it probably isn’t what you want to keep bears out.
Solar chargers do work. I know because I have beehives in five locations that use solar chargers to power the fences. You can go online or talk to your local ag salesperson, find the specifications for various brands and models of fence chargers, and make your choice.
Posts. You’ll need some kind of posts to string your wires to. You can buy formed metal posts, but I prefer the heavy metal T-posts available at better farm supply stores. You can also use round wooden posts.
Insulators. There are a variety of insulators available. They come in different lengths, and the type you buy will be dictated more by the type of post you’re using. Some are two-piece screw-on types, while others are clip-on, and yet others nail directly to the post.
Wire. Fence wire comes in different materials and diameters, or gauges. The lower the number, the bigger the diameter. Fence wire is generally galvanized steel or solid aluminum. Steel is physically stronger and costs less, while aluminum is a better conductor, is easier to work with, and won’t rust. Most fence chargers are rated for charging at least 3 miles of wire, so either choice will work. You can also buy electric fence netting, and I’ve seen a company that sells a quick-setup portable electric fence for use when camping in grizzly bear country. I doubt there’s a better test of an electric fence’s performance than that.
Gates. You’ll need some way of getting into and out of your bee yard. All you really need are the spring-type gate handles that will keep tension on the wires. Get one for each strand of wire you plan on installing. The wire attaches directly to these handles. You can make loops in your wire to hook them to, or buy handle hookups that attach to the T-post and have a hole that your gate handle fits into.
Connectors. You can buy a variety of connectors to join the hot wire to the rest of the wire fencing. Some crimp on, while others require no tools and are reusable. With one type, the wire slides into them and the tension holds the wire in place. There is also a U-clamp type where you slide a couple of wires into it and tighten the nut to secure them. Another connector you’ll need is one for connecting your ground wire to the ground post. You can buy battery-type clamps for this purpose.
Ground post. Don’t overlook the value of a good ground post. Without a good ground, the fence will be pretty useless, since the whole concept depends on current traveling from the fence, through the predator, and into the earth, where it returns to the charger via the ground post to complete the circuit. The number of ground posts you’ll need depends on the size of area you’re covering and, to a great extent, the type of soil and its moisture content.
Tester. So, you get your fence all set up and wonder if it works. How do you tell? Take your shoes off and grab the wire? NO! Don’t try that! If you unhook a gate and let the wire touch the earth, you should hear the click and maybe even see the spark, but the proper way to test it is to get a tester. You can buy a simple type that hooks on the fence wire and has a probe that you push into the ground. They usually have four or five lights that indicate the voltage, up to about 5,000 or 6,000 volts. There is also a digital tester (around $30 at the time of writing) that measures voltage up to 9,000 volts and is more accurate than the hook-type tester.
Every so often, I happen to bend over in the bee yard and my back end accidentally touches the fence. Both my eyes light up, and I know that the fence does indeed work. Keep your tester in whatever box or bucket you have your hive tools in, and make it a point to test your fence often.
Other considerations. Undoubtedly, grass and weeds will grow up along your fence and touch the wires, reducing its effectiveness. There are a few things you can do to help. One is to put down landscape fabric or some kind of material to stop the growth of vegetation. I had some old pieces of scrap sheet aluminum that I used in one location. Also trim around the fence often. You can use a string trimmer, if your bees have a good temperament and don’t mind the noise. You’ll know the first time you try it (it’s probably a good idea to wear your veil). I keep a sickle in my truck and use a combination of that and pulling. I don’t really like the noise and exhaust of a string trimmer any more than the bees do.
Some beekeepers lay down a layer of chicken wire along the outside of their fences and connect it to the ground to ensure anything standing on the chicken wire and touching a fence wire will surely make a complete circuit and feel the zap, even if there’s a lot of grass in the way.
Setting Up Your Fence
The fence I put up after the bears got my hive has been called a “fortress” by some other beekeepers. Well, I’m not sure if it’s overkill, but it works, and I believe the extra money spent for more posts and strands of wire was well worth it. The 82 pounds of honey that came from one hive there this year, at a market price of over $7 a pound, makes it an investment worth protecting.
Making space. My bee yard is approximately 20 feet long and 10 feet deep and holds up to four hives. When setting up your fence, be sure to leave enough room around the hive (or hives) so that a bear can’t reach through the fence and get it, and also be sure you have plenty of room to work. You’ll be setting outer covers, boxes, and other pieces of equipment on the ground. You may want to roll a garden cart in to stack full supers on, or you might decide to add a hive or two in the future, so make it as big as you think you might need it in a year or two. It’s also nice to have room for a lawn chair where you can sit and take a break on a hot summer day, or maybe just go out with a cup of coffee to sit and watch the bees going about their business.
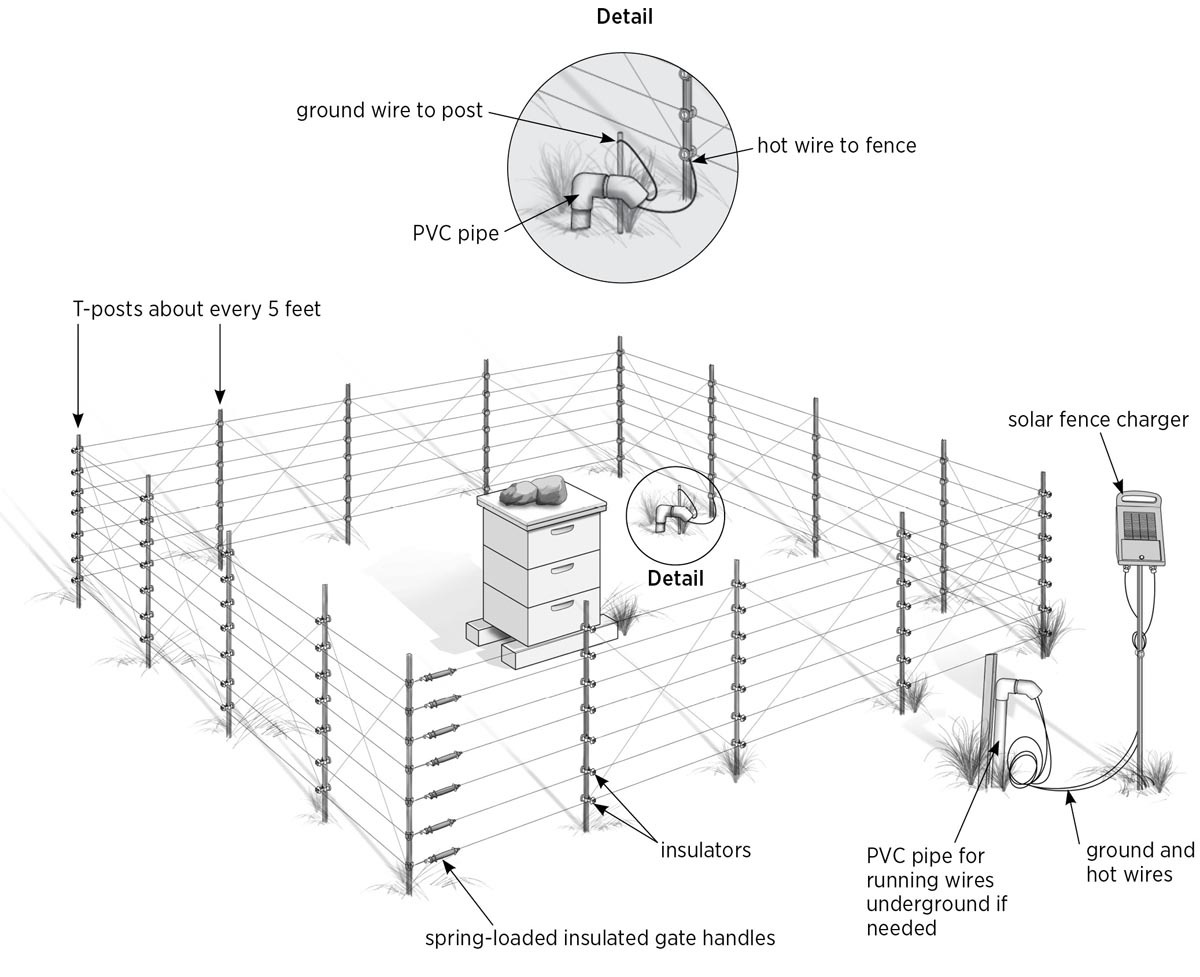
Posts and wiring. I like to space my T-posts about every 5 feet. That way I know my fence is sturdy and there won’t be much sagging of wires between the posts. I use six to eight strands of wire on my fence. Okay, I’ve been laughed at, and maybe it is a little much, but it keeps the bears out. Some people put alternating hot and ground wires on their fences, the idea being if an animal sticks its head through, it will touch two wires and be sure to get shocked. One potential problem I see with this setup is that a bear could touch its nose to one of the ground wires alone and, not receiving a shock, be emboldened to plow through.
It’s said that if a bear gets shocked on the head, it will back up. If it makes it in past the head and gets shocked on the shoulders, it will move forward. I’ve made my fences with all strands hot, and made sure they have good grounds. That way, if they touch any wire, they will get a shock. I start with my first wire about 6" above the ground, and then run a wire about every 6" to 8" up after that.
Using solar. The bee yard behind my house doesn’t receive full sunlight all day, and I needed to place the solar charger in a better location in full sun. To solve this problem, I found a good spot for the charger and dug a shallow ditch from there to the inside of the fence area. I laid lengths of PVC pipe glued together to run the wire through. At each end I used a few short pieces and elbows so the openings would be above the ground and facing down to keep out rain.
I ran two lengths of 121⁄2-gauge electric fence wire (made for controller hookup and rated for underground use) through the PVC pipes and mounted my charger on a fence post. The solar panel gets full sun, and I can look outside my window at night, see the red light flashing on the panel that indicates that the charger is working, and sleep with peace of mind.
Hive Spacer
A spacer is just a frame with the same dimensions as the outside of the hive. It can vary in thickness depending on the need. Spacers have a number of uses, such as installing queens in a package, feeding pollen patties, treating for mites, or creating an upper entrance.
You can make use of a spacer right away if you’re starting with package bees: After trying a few of the recommendations on where to hang or wedge a queen cage when installing a package and not being crazy about any of them, I thought, “Why not just use a spacer and set the queen cage right on top of the frames?” If it’s chilly out, the bees will keep her warm, and when it comes time to check on her, you only need to lift the cover to see if she made it out. Plus, if you’re feeding a pollen patty, there’s room for that too. It’s the only way I do it now.
I always keep several spacers around and make them from whatever strips of scrap I have on hand. If you made the Insulated Inner Cover for Winter in chapter 4 (page 45), you’ve already made a spacer (or at least cut the parts for it). So let’s make a few different sizes.
Tools
- Table saw
- Drill with combination drill/countersink bit
Materials
- 3-foot pine 1×5 (or scrap pieces)
- Waterproof glue
- 13⁄4" deck screws
1. Cut the frame parts.
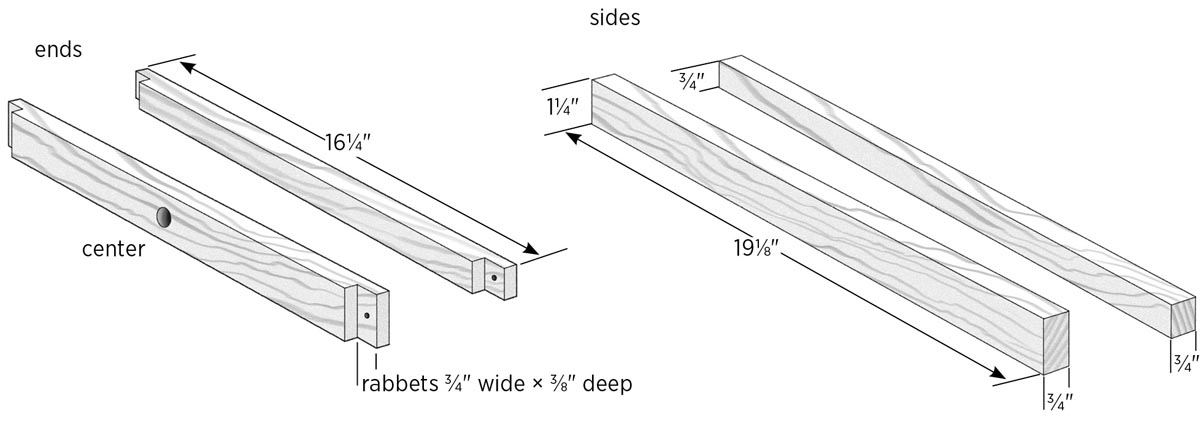
Cut a piece of 1×5 or other material to length at 161⁄4" for the frame ends. Cut another piece to length at 191⁄8" for the frame sides.
2. Rabbet the end pieces.
The frame ends get a 3⁄8"-deep × 3⁄4"-wide rabbet at each end to accept the side pieces. You’ll cut the rabbets on the one end piece, then rip that piece down to create the two finished end pieces. Set the blade height on the table to saw to 3⁄8" and set the fence at 3⁄4" to the far side of the blade. With a standard blade on the saw, use a miter gauge to make the rabbet cuts, starting with the 3⁄4" shoulder cut, then moving the workpiece out a bit with each successive cut to remove the remaining material. Rabbet both ends of the 1×5.
3. Rip the frame pieces to width.
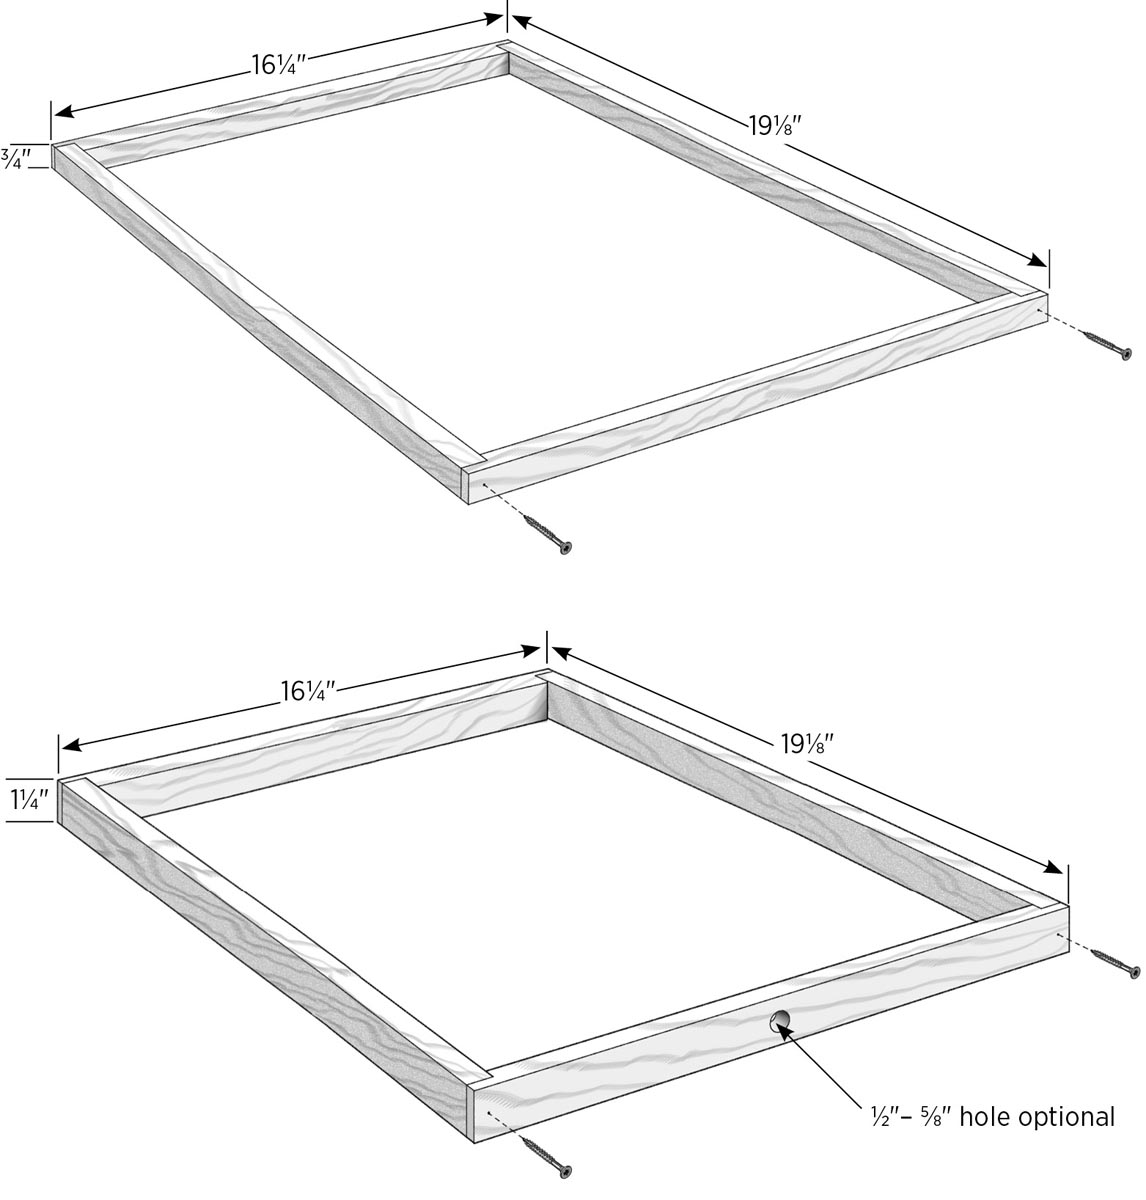
Raise the saw blade to rip the 1×5, and set the fence to ¾". Cut two strips 16¼" long and two strips 191⁄8" long. Move fence to 1¼" and cut two strips 16¼" long and two strips 191⁄8" long. You can use the leftover pieces to make entrance reducers.
4. Assemble the spacer.
Drill a countersunk pilot hole at the end of each end piece, centered over the rabbet, as shown. Glue and screw the frames together, using 13⁄4" deck screws. As an option, you can create an upper entrance by boring a 1⁄2" to 5⁄8" hole centered on one of the end pieces.
Entrance Reducer
As you may know, a honey bee hive has guard bees whose job it is to protect the entrance, letting sister bees into the hive and keeping intruders out. The hives we just made have a bottom entrance that is about 14" wide. When you first install a package of bees, they don’t have the girlpower to easily protect an entrance that large.
You can help them by providing an entrance reducer. It serves to shorten the usable width of the bottom entrance. You could liken it to narrowing the width of a soccer goal, making it easier to defend. Other occasions when you might use a reducer are when you are using an entrance feeder, when you first move a hive to a new location, or if you want to reduce the entrance in the wintertime.
Inevitably, you will have plenty of scrap material for making entrance reducers. You can simply use a piece of 3⁄4"-square × 13"-long wood placed in the bottom entrance to the hive. When traffic starts to get crowded, cut a few inches off or just replace it with a shorter piece of wood to make the entrance opening wider.
Here’s a simple plan for making two multisize entrance reducers. No matter how you place the reducer, only one entrance can be used. It’s a good idea keep the entrance opening on the same side of the hive when you switch sizes.
Tools
- Table saw (or router table)
Materials
- One 30" pine 1×1 or larger lumber (or any 3⁄4"-thick scrap lumber)
1. Cut and mark the reducer strips.
Cut two strips of 3⁄4" × 3⁄4" pine to length at 145⁄8". Mark two notches on each piece as shown. One strip gets 1" and 2" notches; the other strip gets 3" and 4" notches.
2. Cut the notches.
Set the table saw blade height at 7⁄16", and cut the notches using a miter gauge. You can use the fence for accuracy, but it’s not necessary; you can simply notch the ends up to the lines.
Feeders
One way to make a new beekeeper’s head spin is to run through all the different choices of feeders. Styles include entrance, hive-top, division board, bucket, baggie, and more. New and complicated ways are always being developed to do a simple thing: give the bees some sugar syrup.
I out-and-out don’t like the Styrofoam hive-top feeders. Yes, they hold a lot of syrup, but you have to take them off to check the bees, and that can be very awkward. If you don’t believe me, fill up a roasting pan with water and try walking around the kitchen table with it.
You can make a variety of feeders, some at no cost at all, using materials you probably have on hand. Entrance feeders don’t hold as much syrup as some other types, but you can check the level just by looking at the front of the hive. New paint can feeders are simple to make using only a hammer and nail, and they hold a gallon of syrup each. You have to open them or at least lift them to check the syrup level.
Bucket feeders require a purchased insert and are a little more work to make. If you have a lot of feeding to do, I’d suggest one of the feeders that sits on the inner cover. You can use several at one time. Keep in mind that you will also need an empty deep super to cover them. If you are using a top-bar hive, any of the feeders that will fit can be placed right inside the hive to feed your bees.
Beekeeping advice: In the spring, fill your feeder with a ratio of 1:1 sugar to water. In the fall, use a ratio of 2:1 sugar to water.
Package-Bee Feeders
If you’ve ever gotten package bees, you know they come with a can of sugar syrup. The can has a few tiny holes poked in it where the bees access the syrup. (Entrance feeders work on the same principle.)
When I get a package of bees, usually there’s still plenty of syrup left in the can, and why let it go to waste? Just set a couple of 3⁄8" or thicker pieces of scrap wood on the inner cover to create a space, and set the can on top. Use an empty super to cover it, and the bees will take the syrup.
Paint Can Feeder
A gallon-size paint can is a great way to supply a good amount of syrup to the bees. And you can fit up to four on top of an inner cover. You can cut extra holes in the inner cover, but it isn’t really necessary. The bees will access it easily enough through the regular slot.
Tools
- Hammer
- Small nail (such as a 3d box nail)
Materials
- One-gallon paint can (with coated/lined interior)
- Wood scraps, approximately 6" long
1. Prepare the can lid.
Place the inside of the lid of the can on a block of wood for support, and use a hammer and a small nail to punch a dozen or so very tiny holes near the lid’s center, driving the nail from the top side of the lid. Make the holes just big enough to barely show light through. To test your holes, fill the can with water, pop on the top, and invert the can. After a few seconds no water should drip out of the holes. If it does, the holes are too big. You can remedy this by removing the cover and tapping lightly on the protruding edges of the holes to close them up a bit. Replace the cover and test again. If the holes pass the water test, they will work with the sugar syrup, which is thicker.
2. Fill and set the feeder.
Fill the can with syrup (see Beekeeping Advice on facing page). Fit the lid onto the can and tap it with the hammer to secure it. Set the wood scraps on the inner cover, invert the can on the sticks, and call up the bees. Cover the feeder with an empty super, followed by the telescoping outer cover. Chances are by the time you get the super in place the bees will already have found their new source of food.
Bucket Feeder with Screened Plug Insert
Another way to make a feeder is to use screened feeder plugs, available at some bee supply houses. You mount them in the lids of 2-gallon plastic buckets that often are available for free at bakeries. Buckets with O-ring seals are the best. The lid has to seal well to maintain the surface tension needed at the holes to keep the sugar syrup from draining out quickly.
Tools
- Clamps
- Scrap wood
- Drill and 2" hole saw (see step 1)
- Pliers
Materials
- 2-gallon plastic bucket
- Screened plug insert
- Silicone caulk or other sealant
- One 7d or 8d finish nail
1. Cut the lid.
Mark the approximate center of the bucket lid, then clamp the lid to a solid surface with a piece of scrap wood underneath. Using a drill and hole saw, cut a 2"-diameter hole through the lid at the center mark. Alternatively, you could mark the hole with a compass and make the cut with a utility knife, but you have to be accurate.
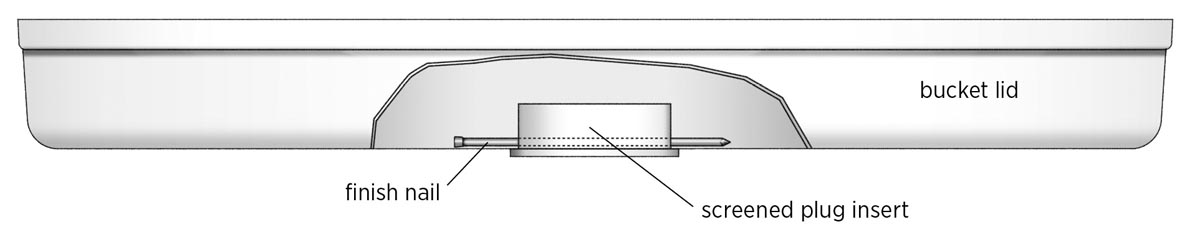
2. Install the screen.
Apply a bead of silicone caulk around the rim of the screened insert, then set the insert in the hole. Push a finish nail through the insert, just inside the cover as shown in Bucket Feeder — Cutaway View, below, to hold the insert in place (without the nail, an insert can work loose and leak the sugar syrup).
3. Fill and set the bucket.
Fill the bucket with syrup (see syrup ratios in Beekeeping Advice on page 76) and snap on the lid securely. It works best if the bucket is filled almost to the top. As with the paint can feeder, invert and set it on top of two pieces of scrap wood over the inner cover, place an empty deep box on top followed by the telescoping outer cover, and you will have happy bees.
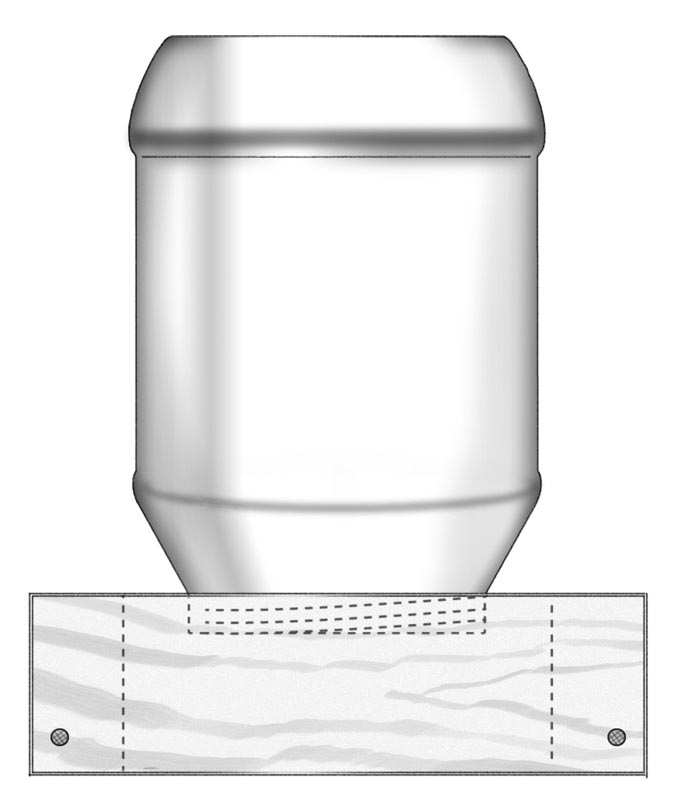
Traditional Boardman-Style Entrance Feeder
Now we’ll make a Boardman-style feeder. I’m not sure where the name came from or when the feeder was invented. Entrance feeders are particularly appealing to new beekeepers because you can stand outside the hive and see how much sugar syrup is left, and you can top up or replace it without opening the hive. Use this type of feeder on a Langstroth-style hive, along with an entrance reducer (see page 75) that restricts the entrance opening at the far end of the hive to help prevent robbing. I designed this feeder around a plastic quart-size mayonnaise jar and used scraps of wood I had lying around. The materials listed are for making two feeders.
Tools
- Table saw
- Gloves and safety glasses
- Vise or homemade bending jig (see page 89)
- Drill and 1⁄2" (or larger) brad-point bit (see step 5)
- Tin snips
- Staple gun and 3⁄8" staples
Materials
- One 13"-long pine 1×6
- Waterproof glue
- Four 5d galvanized box nails
- Two 5" × 141⁄2" pieces aluminum flashing
- Emery cloth or sandpaper
- Twenty-six 3d galvanized box nails
- One 1-quart mayonnaise or mason jar
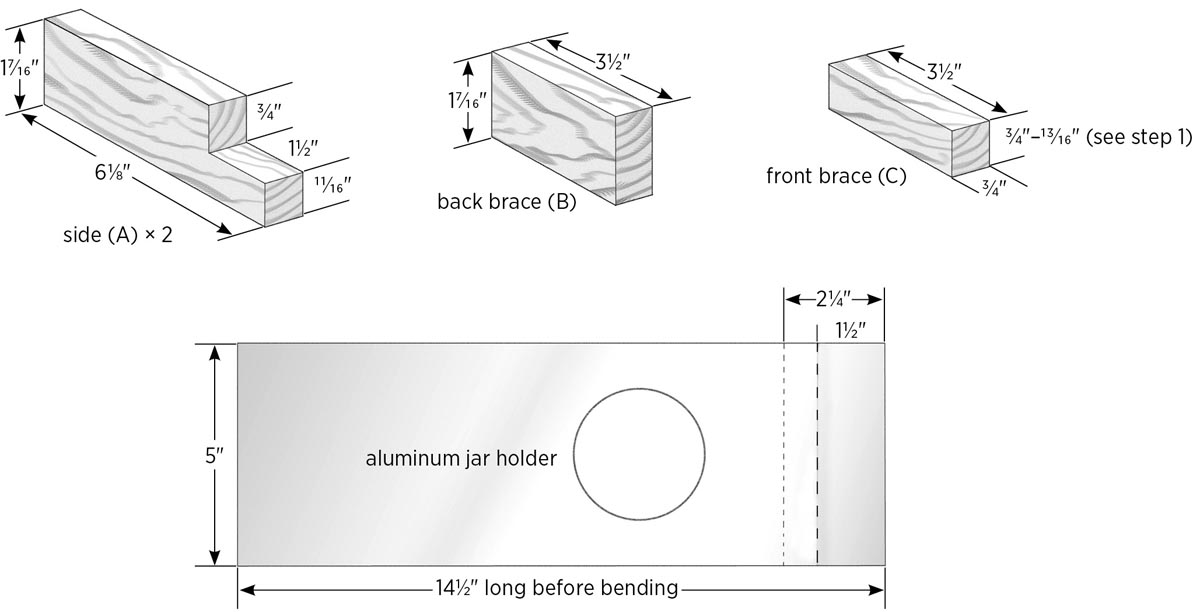
1. Cut the wood frame pieces.
Cut three strips from the 1×6 at 17⁄16" wide. Two of these will be used for the sides (A); set them aside. From the remaining strip, cut two pieces to length at 31⁄2"; these are the back braces (B).
The leftover 1×6 material should be around 13⁄16" wide. Cut two pieces to length from this at 31⁄2"; these are the front braces (C).
2. Rabbet the side pieces.
Each side (A) gets a 3⁄4"-deep × 11⁄2"-wide rabbet at each end before being cut to length. Set the table saw blade height at 3⁄4" and set the fence at 11⁄2". Cut the rabbets using a miter gauge, moving the workpiece away from the fence a bit with each pass to remove the waste. When the rabbets are done, cut each finished side piece to length at 61⁄8".
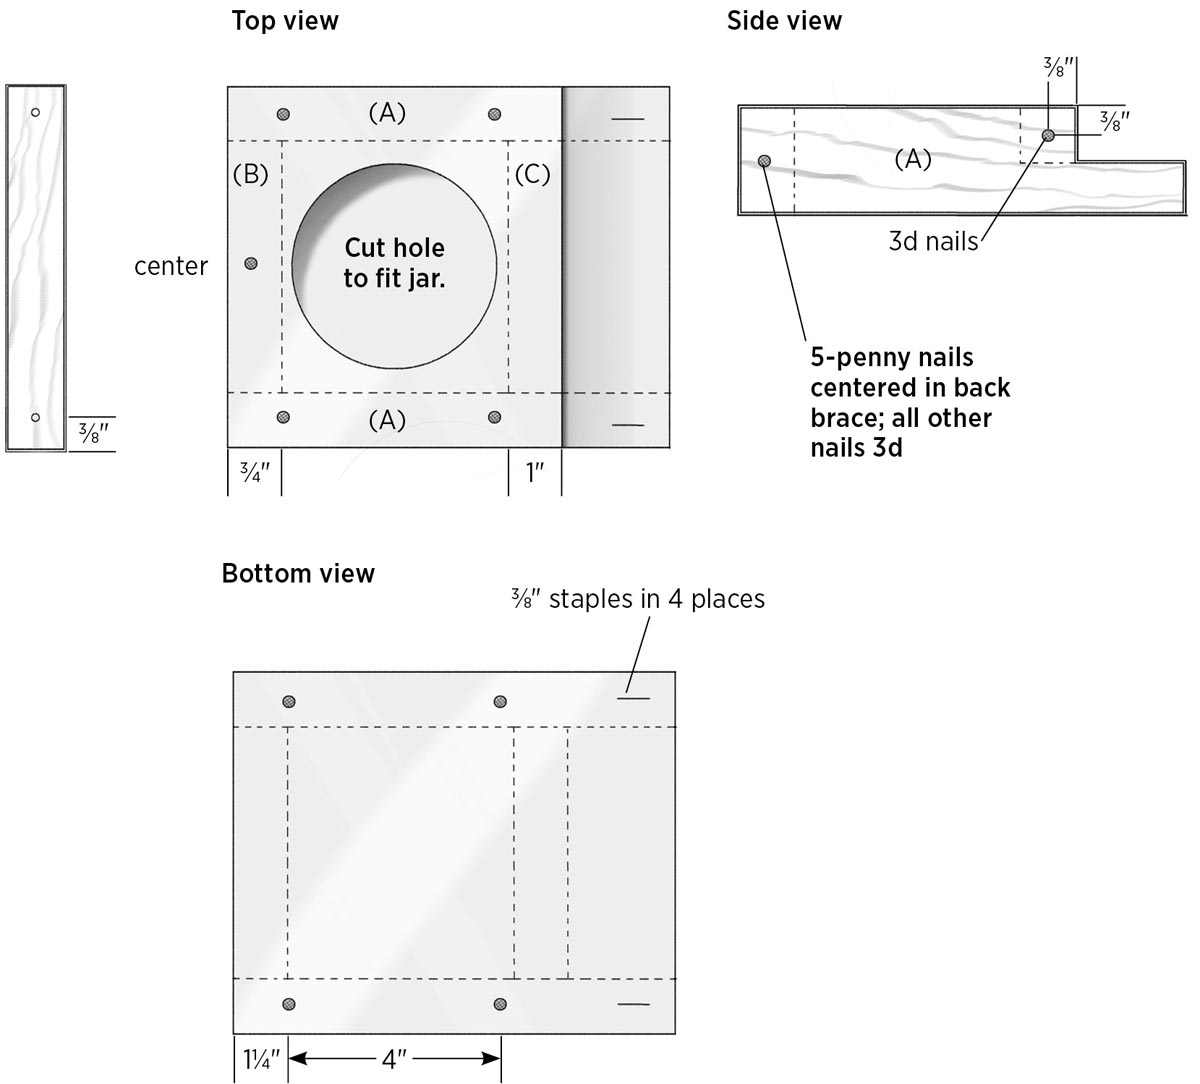
3. Assemble the feeder frames.
To assemble each frame, spread some glue on the ends of the braces and assemble the frame as shown. Fasten the pieces with 5d nails on the back brace and 3d nails on the front brace, as shown. Set these assemblies aside to dry.
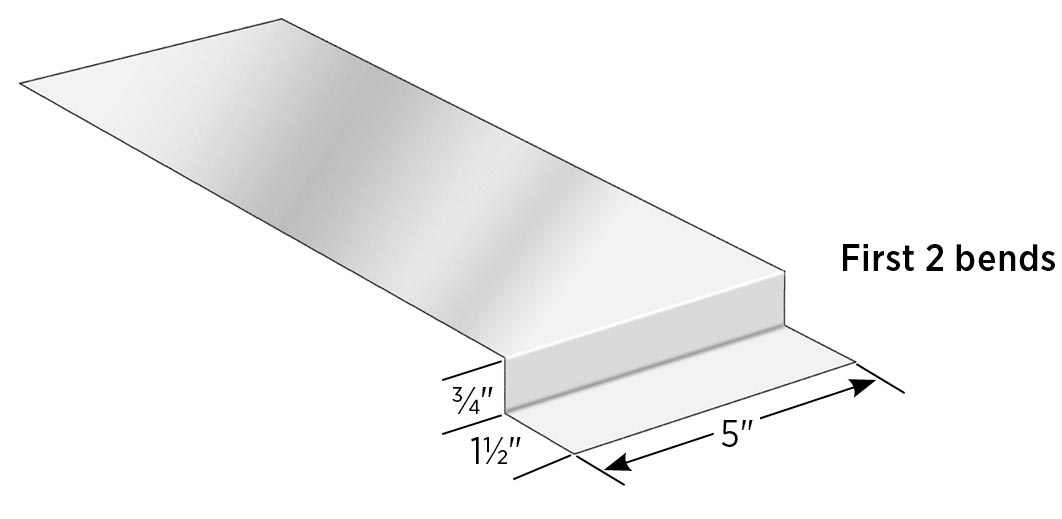
4. Bend the aluminum jar holders.
Cut two pieces of aluminum flashing to size at 5" wide × 141⁄2" long (be sure to wear gloves while working with sheet metal). Touch the edges with emery cloth to remove any burrs.
Decide which face of each piece will be the top, then draw a line across the width of each piece (on the top face) at 11⁄2" from one end. Flip the piece over and draw another line on the bottom face at 21⁄4" from the same end. Clamp each piece into the bending jig from page 89, or into a vise, and bend the metal at 90 degrees along the 21⁄4" line. It’s easy to bend by hand, but try to keep your bends sharp and square. Make the second bend along the 11⁄2" line as shown.
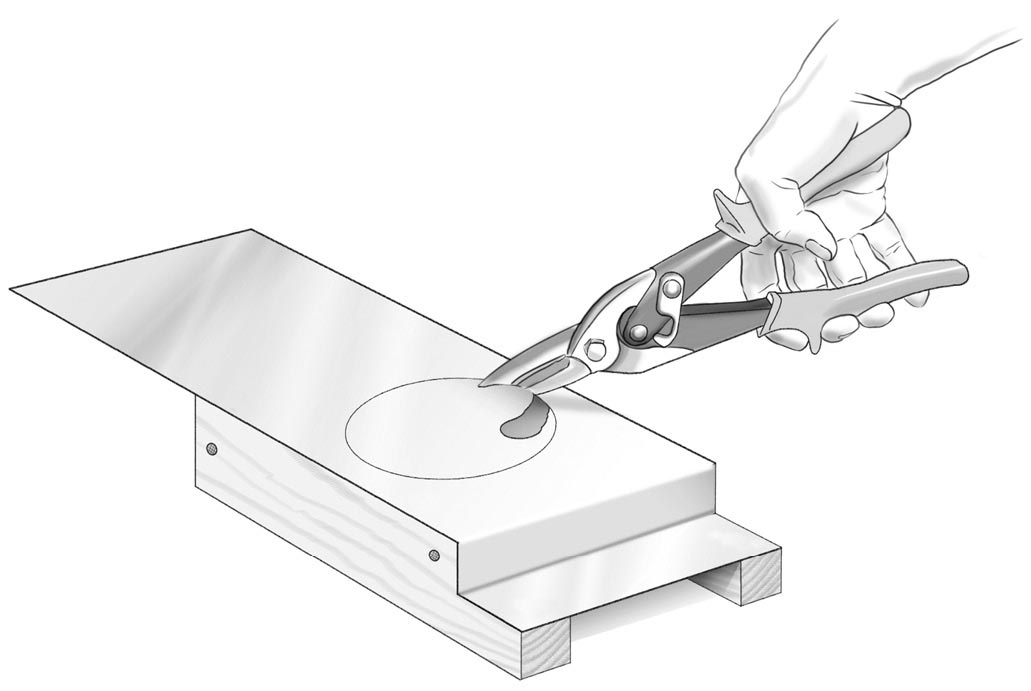
5. Cut the jar holes.
Nail each aluminum sheet to one of the wood feeder frames with two 3d nails, about 1" from the inner bend. With the lid screwed on, center the inverted jar over the opening in the wood frame, and trace around the rim of the jar onto the metal. Using a 1⁄2" brad-point bit, drill a starter hole in the metal, then carefully cut along the traced circle with tin snips — staying inside the line. Test-fit the jar in the hole; the lid should fit through the metal, and the jar should stand straight up. There should also be at least a 5⁄16" space below the lid for the bees to access the food. Keep in mind that you can make the hole bigger once you cut it, but you can’t make it smaller.
6. Complete the feeder assembly.
Add three more 3d nails in the top of each feeder, across the back brace. Bend the aluminum around the back and bottom of the wood frame and nail it to the bottom edges of the sides (it’s okay if the end of the metal overhangs or comes up short a little). Staple the metal to the top and bottom of the entrance end with 3⁄8" staples as shown.
8. Load and install the feeder.
Punch 10 or 12 tiny holes in the lid of the feeder jar from the top side, using the tip of a 3d nail; they should be very tiny, just big enough to see a little light through. Pour water in the lid and hold it steady; if water drips out, the holes are too big. If you have a hole or two that drip, try tapping the protruding inside edges of them lightly with the hammer to close them a little. If you’re using a two-piece canning jar lid, you’ll have to do the water test with the lid screwed onto the jar.
If you don’t have any drips, your feeder is ready. Fill the jar with syrup (see Beekeeping Advice, page 76), then add the lid and tighten it securely. Invert the jar and set it into the feeder. Slip the front of the feeder into the hive entrance.
Escape Boards
There are many ways to get bees out of the supers once they are full and capped off, and ready for you to harvest. One way that has been practiced probably as long as movable frames have been used is simply to pull one frame out at a time and use a bee brush to gently remove the bees. If the frame is entirely capped, the bees are very easy to remove. On the other end of the spectrum are methods I’ve never used, such as fume-boards that employ a chemical the bees don’t like to drive them out of the super. Pretty harsh, eh?
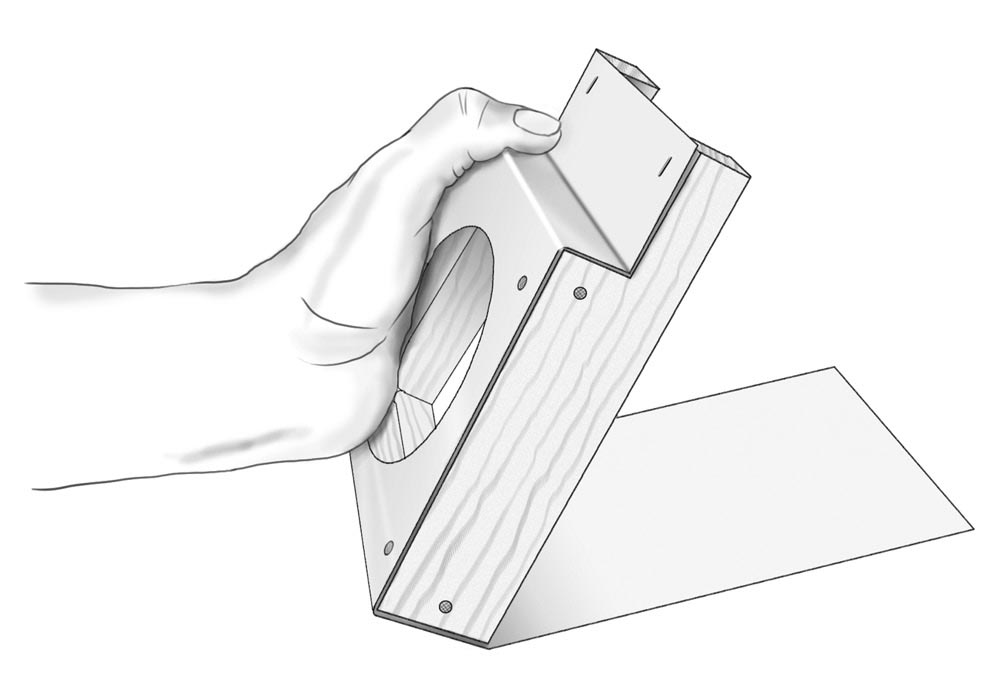
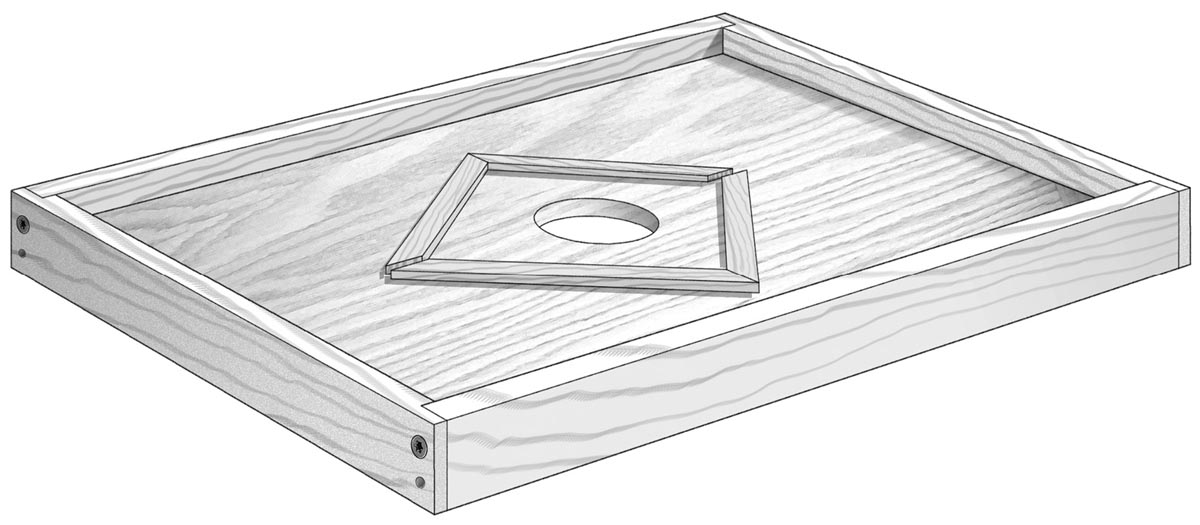
What we’re going to build here falls in between those two extremes. Escape boards work as one-way gates. They allow bees down into the hive, but they can’t seem to find their way back in. It’s a very low-impact way of emptying supers. The only drawback is that you have to pull the supers off to place the escape board below them, then return the next day to remove them for extracting. But it works very well, and it’s the method I use.
If you built 10-frame hives, make the 10-frame escape board, and likewise with the 8-frame version. To use it, you take off the super of capped honey that still has bees in it, install the escape board on the hive with the screen side down, put the super on top of the escape board, and replace the inner and outer covers. Make sure there aren’t any openings in or between supers that would allow bees into the supers from the outside of the hive (duct tape works well for covering holes).
Come back the next day and the honey super will be free of bees, save a few possible stragglers. Remove the super and enjoy the bounty. The escape board will also work if you have several supers on the hive. Just put it under the bottom super. (See photos on page 160.)
Tools
- Table saw
- Drill and combination drill/countersink bit
- 21⁄4" hole saw (see step 5 on page 86)
- Miter saw or small handsaw and protractor
- Brad nailer (optional)
- Marker
- Tin snips
- Staple gun and 3⁄8" or 1⁄2" staples
- One piece cardboard, 6" square minimum (for 10-frame board only)
Materials
- One 4-foot 1×4 (for 8-frame escape board)
- One 6-foot 1×4 (for 10-frame escape board)
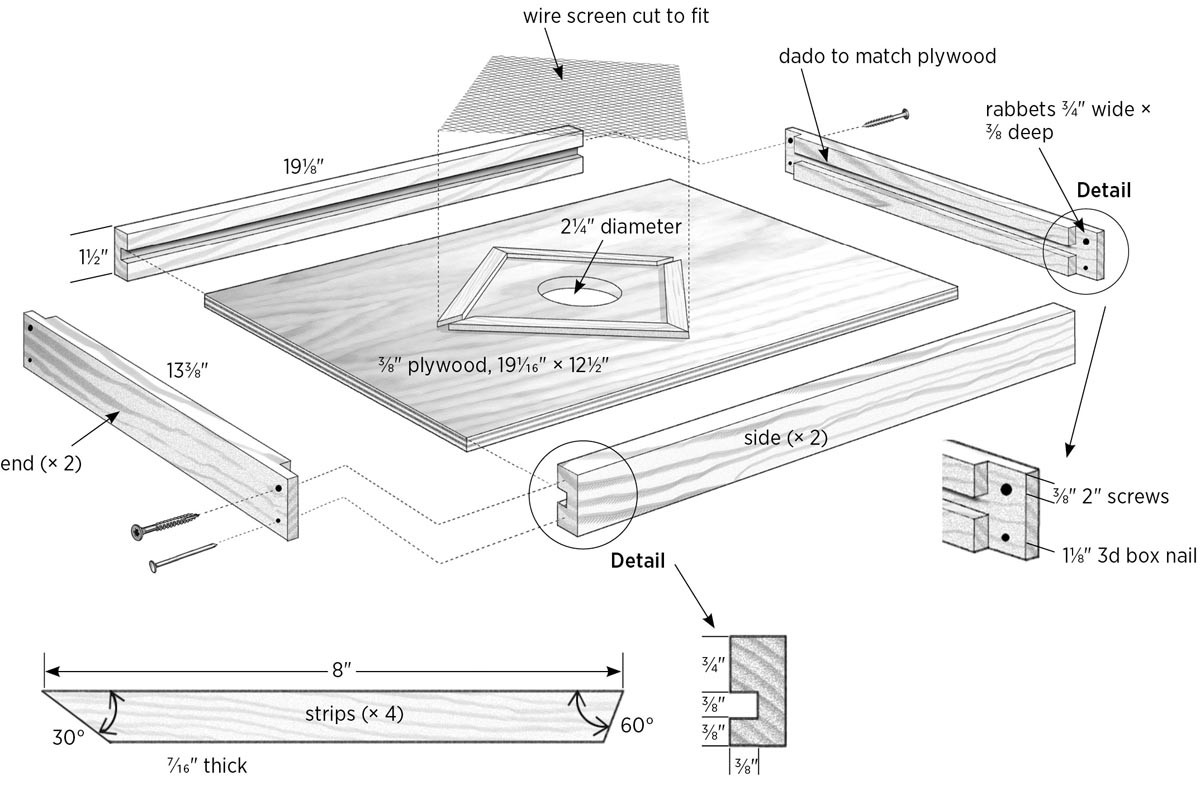
- One piece 3⁄8" plywood:
- size for 8-frame: 191⁄16" × 121⁄2"
- size for 10-frame: 191⁄16" × 157⁄16"
- Waterproof glue
- Four 2" deck screws
- One piece #8 galvanized hardware cloth:
- size for 8-frame: 8" × 141⁄2"
- size for 10-frame: 12" × 15"
- Six 1" deck or drywall screws (for 10-frame)
- 1" brads
- 3d nails
Construct the Boards
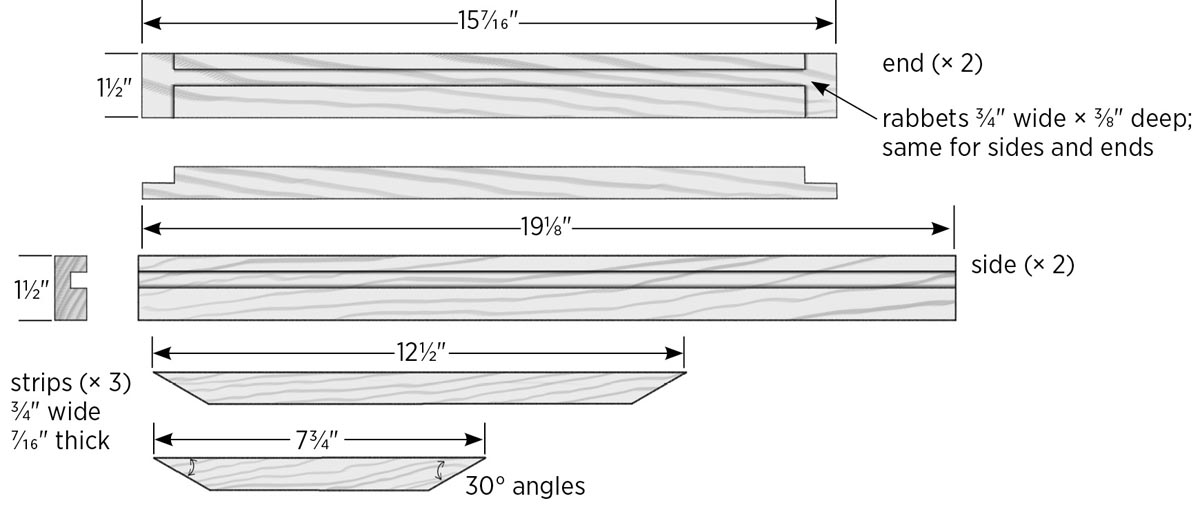
1. Cut the frame parts.
For the 8-frame board: Cut one piece of 1×4 to length at 191⁄8" for the sides, and cut one piece at 133⁄8" for the ends. Also cut one piece at 8"; you will use this to make screen strips for the escapes.
For the 10-frame board: Cut one piece of 1×4 to length at 191⁄8" for the sides, and cut one piece at 161⁄4" for the ends. The leftover piece will be used for screen strips.
2. Dado the frame sides and ends.
Each of the frame sides and ends gets a 3⁄8"-wide × 3⁄8"-deep dado, 3⁄8" from each long edge of the board (later, you’ll rip these pieces lengthwise to get the four frame pieces). The dadoes will accept the plywood panel. With a standard blade on the table saw, set the blade height at 3⁄8". Start with the fence at 3⁄8" and move it over a little with each pass until the dado fits snugly over the plywood (test fit as you go).
3. Rabbet the frame ends.
While the saw blade depth is still 3⁄8", cut a 3⁄4"-wide rabbet in each end of the end piece, using a miter gauge to guide the workpiece.
4. Rip the frame pieces.
Set the blade height at about 1" and set the fence at 11⁄2". Rip the four frame pieces to width, keeping the edge nearest the dado next to the fence.
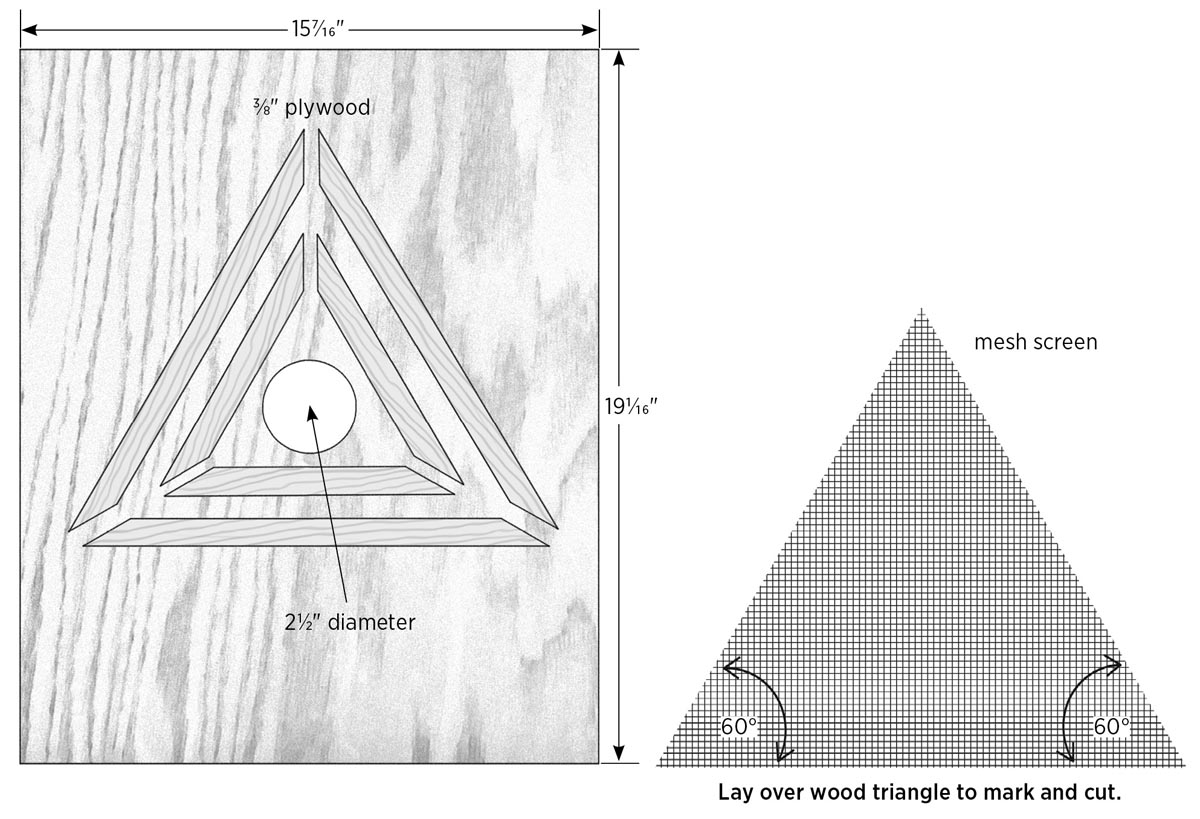
5.Prepare the plywood.
Cut the plywood to size: 191⁄16" × 121⁄2" for the 8-frame or 191⁄16" × 157⁄16" for the 10-frame. Measure and draw horizontal and vertical centerlines across the full length and width of the panel for the 8-frame escape board. You only need to go from corner to corner to mark the centerpoint of the 10-frame panel. At the intersection of the lines, drill a 21⁄4" hole, using a hole saw. Alternatively, you can draw a 21⁄4" circle with a compass, drill a 1⁄2" or larger starter hole inside the hole, then cut out the hole with a jigsaw.
6. Assemble the board.
Dry-fit the frame around the plywood, clamp the assembly, and make sure the frame is square. Drill a countersunk pilot hole at the end of each end piece, as shown in 8-Frame Escape Board — Exploded View, on page 84. Apply glue to the frame joints and assemble the board with 2" deck screws and four 3d nails.
Make the Escapes
8-Frame
1. Cut the screen strips.
Rip six 7⁄16"-thick strips from the 8" piece of 1×4. On each strip, cut a 30-degree angle on one end and a 60-degree angle on the other end, as shown in 8-Frame Escape Board — Exploded View, on page 83. You can make these cuts on a miter saw or mark them with a protractor or rafter square and cut them with a handsaw.
2. Install the strips.
Working in the deep side of the board (where the plywood panel is 3⁄4" from the frame edges), glue and nail four of the strips to the plywood, using the centerlines and following the layout shown below. Use the two extra strips, each placed on-edge lengthwise along the centerline, as spacers. Nail the strips with three 1" brads, then cinch the nails over on the back side of the plywood. Make sure the spaces between strips are 3⁄8" to 7⁄16" wide; if they get too wide, some bees will find their way back in.
3. Add the screen.
Lay the #8 hardware cloth over the strips, and mark the outline of the strips with a marker. Cut the screen with tin snips, and secure it to the strips with 3⁄8" staples. Now you’re all set to get some bees out of those supers.
10-Frame
1. Cut the screen strips.
Using leftover 1×4 material, which should be about 36" long, rip four 7⁄16"-thick × 3⁄4"-wide strips on the table saw. Cut six strips to length at 121⁄2" and three at 73⁄4", making 30-degree angle cuts on both ends of each strip. You can make these cuts on a miter saw or mark them with a protractor or rafter square and cut them with a handsaw. From the remaining strip, cut three pieces approximately 6" long to be used as spacers.
2. Install the inner strips.
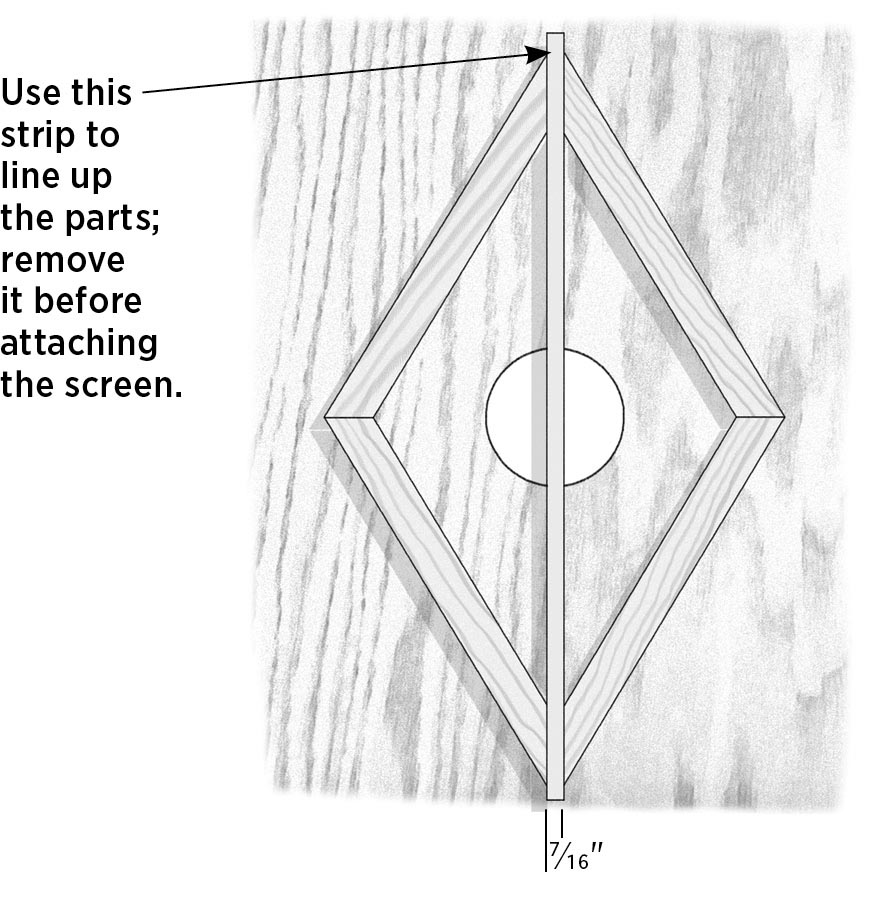
Create a layout template from cardboard, cutting it into a triangle with three 6" sides; the angles will be 60 degrees. Center the template over the hole in the board’s plywood panel (the placement doesn’t have to be perfect). Spread glue on the short strips, position them around the template, using the spacers placed on-edge to create 7⁄16" openings at the three triangle points, and nail the inner strips to the plywood with three 1" brads. (See layout on page 85.)
3. Install the outer strips.
Leave the three spacer strips on-edge in the spaces between the inner strips and use them to line up 121⁄2" strips for the outer triangle. Make sure the openings where the bees will exit are 3⁄8" to 7⁄16" wide. If they get too wide, some bees will find their way back in. Attach the outer strips with brads, remove the spacers and cardboard template, then flip the board over and cinch all of the nails over with a hammer.
4. Add the screen.
Lay a piece of #8 hardware cloth over the outer strips and trace along the outside of the outer strips with a marker. Cut the mesh along the lines, using tin snips. Fasten the screen to the outer strips with 3⁄8" staples.
5. Install the top strips.
Drill and countersink two pilot holes in the three remaining 121⁄2"-long strips about 4" from each end and centered. Place these on the screen, in line with the attached strips, and attach them with the 1" screws. Your escape board is ready to use.