Chapter 16
Stepping Up Your Customer Engagement
IN THIS CHAPTER
 Using real-time communication with online customers
 Utilizing chatbots to provide responsive customer service
 Creating engaging streaming broadcasts with Facebook Live
Mark Zuckerberg’s announcement of News Feed changes in January of 2018 puts customer engagement at the center of your marketing efforts. (See more about News Feed changes in Chapter 3). To engage prospects and customers, online marketers need to focus on the advances in technology that make communicating with customers easier and with less friction than ever before. Enter Facebook Messenger and Facebook Live. Using these apps, both small and large companies can provide excellent customer service and develop stronger relationships with their customers. As the technology develops, marketers find new ways to monetize them.
In this chapter, you look at two technologies that add direct interactivity to Facebook Pages and help businesses more effectively engage their customers, develop leads, and sell products.
Using Facebook Messenger to Communicate with Customers
Did you know that as of this writing, more than 1.3 billion people use Messenger each month? Also, according to Business Insider, in 2015 the “combined user base of the top four chat apps (WhatsApp, Facebook Messenger, WeChat, and Viber) was larger than the combined user base of the top four social networks (Instagram, Facebook, Twitter, and LinkedIn).” This trend toward using chat apps shows no signs of abating.
Facebook added Messenger to its business Pages in 2017 in recognition of the fact that real-time and two-way communication help businesses more effectively find and convert customers. Messenger, with its near instant gratification and self-serve features, provides a more satisfying customer experience than calling tech support or emailing with questions. We all know from first-hand experience that calling customer support and sitting on hold is deadly. In fact, according to a survey done by Nielsen in 2016, 56 percent of people would rather message than call customer service. We’re sure that you agree.
Benefitting from Messenger
So how can your business benefit from using Messenger? Here are several ways for both you and your customers to benefit:
- Offers a better customer experience: Direct messaging gets customers quick answers that make the customer experience more satisfying.
- Differentiates your company: You stand out when your customer responses are top notch. Competitors with lackluster performance will fall behind.
- Provides a one-stop shop for purchases: Customer can place orders and you can accept payment right from your Facebook Page, which is great for impulse buys.
- Supplies better information for customers: Customers can engage with Messenger to get product information when they need it.
Understanding guidelines for Messenger
To protect customer privacy, Facebook set down some guidelines for using Messenger to communicate with fans. Here are some things you can’t do with Messenger:
- Initiate a messenger conversation: You may communicate only with someone who makes a comment, either privately or publicly.
- Download customer email addresses: When someone communicates through Messenger, you won’t be able to download the person’s email address.
- Send messages if your Page is blocked: If someone has chosen to block you or your Page, you can’t communicate using Messenger.
Enabling Messenger
To use Messenger, you need to enable it from your Facebook Page, as shown in Figure 16-1. Enabling Messenger is straightforward and takes only five steps:
- Click Settings at the top of your Facebook Page.
- Choose General from the list of links on the left.
- Click the edit link next to the word Messages.
- Select the Allow People to Contact My Page Privately by Showing the Message Button box.
- Click Save Changes.

FIGURE 16-1: Enabling Messenger.
In the following sections, you see how using chatbots creates a great customer experience, and how to set chatbots up.
Developing a Better Customer Experience
As many online marketers look at their newly available customer data from a variety of sources, they realize that their customer experience is sorely lacking. Becoming more customer-centric is the mantra of savvy executives who understand that the companies who make it easy to find and use their products will prevail.
Providing customer service with chatbots
One of the best ways to differentiate yourself from your competitors is to provide outstanding customer support. Stellar customer service encourages people to become repeat buyers and sales advocates. Messenger excels in its capability to provide you with easy tools to wow your customers. What can it do for your business?
Here are five ways it can enhance your customer service. Messenger is
- Two-way and real-time: Customers can get immediate answers instead of putting in a support ticket or waiting for an email reply.
- Private: Customers who are dealing with sensitive matters can opt to make their communications private.
- An aid to solving problems: Customers can immediately communicate their concerns and get answers. This helps keep the emotional temperature down when things go awry.
- Self-serve: Customers can place orders or get critical logistics questions answered.
- Expands channel communication: The website Messenger plug-in allows people to contact you privately from your FB Page. For more information about this plug-in, go to
https://developers.facebook.com/docs/messenger-platform/discovery/customer-chat-plugin.
Using Messenger chatbots
You may have heard the term chatbot and wondered what it is. A chatbot is a piece of interactive software that uses artificial intelligence (AI) to respond to chat in a conversational way. If you have created a chatbot for your Facebook Page, your customers will be able to type questions into a chat window and receive preprepared content that answers their questions. The content can include text, video, links, and images.
One good example of a chatbot used to educate and entertain a company’s users appears on the Food Network Facebook Page. If you click the Send Message button (shown in Figure 16-2), you see preset text saying that a company representative will instantly respond. It asks you to click the Get Started button. When you click that button, you are asked whether you want fun food facts sent to you; you can also ask for a recipe. This entire exchange is done by the chatbot.

FIGURE 16-2: Food Network’s Messenger chatbot provides recipes and fun facts.
Another great example is the chatbot used by 1-800 Flowers (shown in Figure 16-3). Its chatbot lets customers order right from the Messenger app on their Facebook Page. You can see how this encourages people to make a simple order.

FIGURE 16-3: Ordering with Messenger on 1-800 Flowers.
Facebook has built-in settings that you can use to provide two-way customer service to your users. There are two Settings links that you need use to configure Messenger:
- Messenger Platform: Select this radio button to go to the page where you set up how your chatbot will look (see Figure 16-4).
- Subscribed Apps: The Apps that are connected to your Page will be automatically displayed here.
- Link Your App to Your Page: You need to enter an Apple ID to connect native apps.
-
Whitelisted Domains: These are third-party domains that you say can be used with Messenger.
Discover Settings — Discover Visibility: This setting allows your bot to be searched along with other bots. The default is Show. Unless you have a reason to make your bot harder to find, leave the default setting.
 We recommend that you consult your webmaster or developer to ensure that your Messenger app performs correctly. You can find documentation here:
 https://developers.facebook.com/docs/messenger-platform. - Messaging: This section lets you set up how people can message your business Page and what messages they will receive in return.

FIGURE 16-4: Messenger Platform settings.
To set up Messaging, go to Settings at the top of your Facebook Page and follow these steps:
- Click the Messaging link, shown in Figure 16-5.
- Go to General Settings and click Yes or No to the following choices:
- Use the Return Key to Send Messages: The default is Yes. Leave the default choice if you’re used to hitting the Return key after typing a line and want to do this when using the chatbot.
- Prompt Visitors to Send Messages: The default is No. If you click Yes, Page visitors will see indications that you are responsive to their messages.
- Go to Response Assistant and click Yes or No to the five choices shown in Figure 16-6.
-
Send Instant Replies to Anyone Who Messages Your Page: The default is No. If you click Yes, you see a prewritten message that says, “Thanks for messaging us. We try to be as responsive as possible. We’ll get back to you soon.” You can choose to edit this message by clicking the Change button.
When you click the Change button, a window pops open (see Figure 16-7), showing you how your message will look on a mobile device. You can refine the message and click the Add Personalization link, which gives you the option to insert the person’s first name, last name, or full name, as well as your Facebook URL into your reply. When you’re done editing, click the Save button.
-
-
 (Optional) Personalize the name for each of the following settings.
The name is pulled from the person’s profile. Displaying people’s real names may make them feel more welcome. Decide what you think your target audience would prefer:
- Stay Responsive When You Can’t Get to Your Computer or Phone: The default is No. If you click Yes, you see a message that says, “Hi [customer name], thanks for your message. We are not here right now, but we’ll get back to you soon!” You can choose to edit this message by clicking the Change button. If you do, a window pops open, showing you how your message will look on a mobile device. You also see a Schedule link (see Figure 16-8) that lets you set up the days and times on which the message will show when you are Away or Available. When you’re done editing, click the Save button.
-
Show a Messenger Greeting: The default is No. If you click Yes, you see a message that says, “Hi [customer name]! Thanks for getting in touch with us on Messenger. Please send us any questions you may have.” You can choose to edit this message by clicking the Change button. If you click Change, a window pops open, showing you how your message will look on a mobile device. The greeting message is displayed and then the visitor’s question appears (see Figure 16-9). When you’re done editing, click the Save button.
Pre-Appointment Reminders: The default is No. If you click Yes, you will see a message that says, “We’re looking forward to your next appointment.” You can choose to edit this message by clicking the Change button. If you do, a window pops open, as shown in Figure 16-10, showing you how your message will look on a mobile device. When you’re done editing, click the Save button.
Send Follow Up to Anyone Who Books an Appointment: The default is No. If you click Yes, you see a message that says, “Hi [customer name]! It’s been a while since we last saw you. We’d love to have you back!” You can choose to edit this message by clicking the Change button. If you do, a window pops open, showing you how your message will look on a mobile device. If you click the Schedule link, shown in Figure 16-11, you can choose the number of times and the hour, day, week, month, or year that the follow-up message is shown after the previous appointment is booked. For example, if you’re a dentist, you may choose to have the message pop up 3–4 months after a person’s last appointment. When you’re done editing, click the Save button.
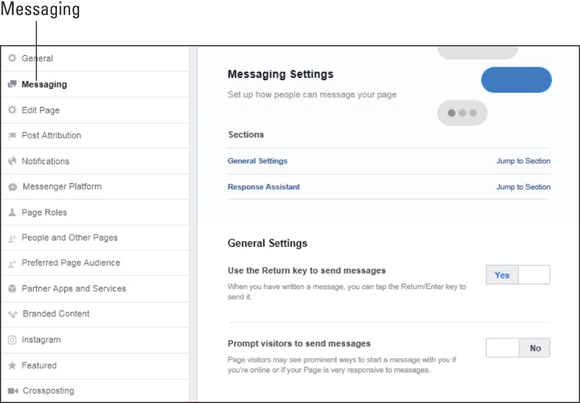
FIGURE 16-5: The Messaging link.
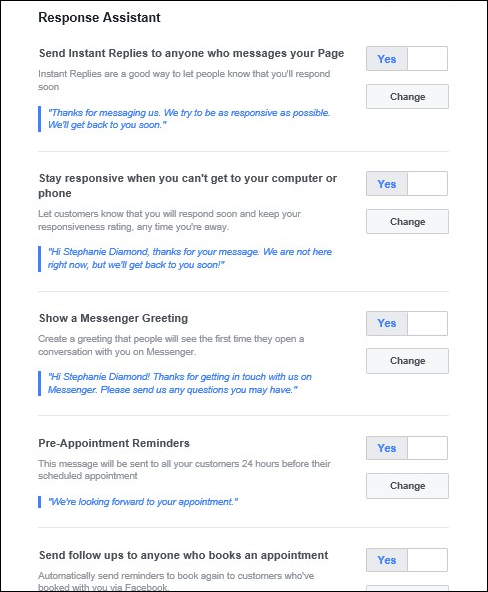
FIGURE 16-6: Creating settings for the Response Assistant.
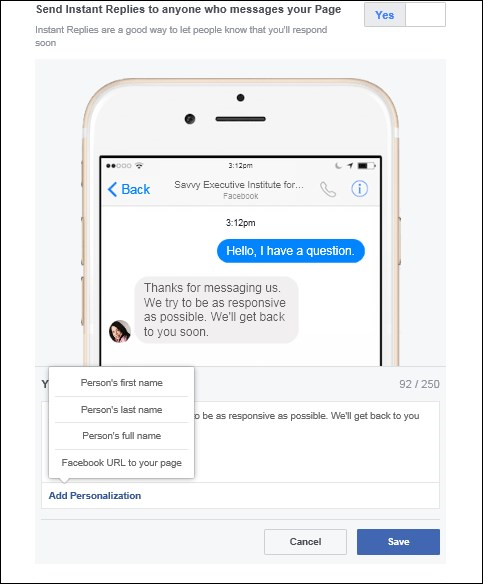
FIGURE 16-7: Editing your Instant Replies message and choosing Add Personalization.

FIGURE 16-8: Editing your Away response and scheduling when it will appear.

FIGURE 16-9: Your greeting message pops up when the visitor comes in.
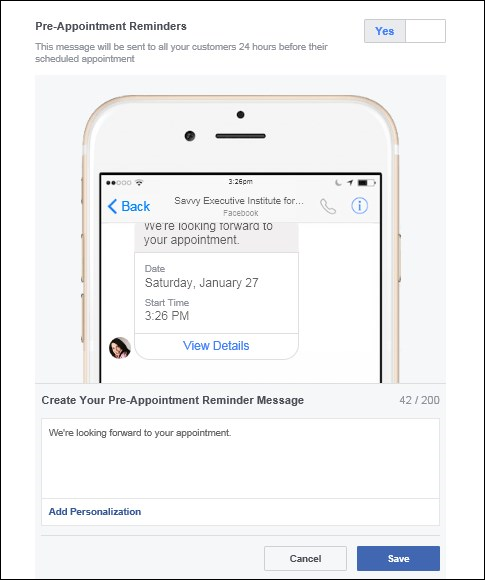
FIGURE 16-10: Setting Up your Greeting.
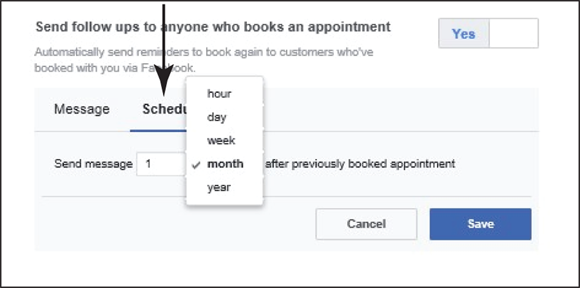
FIGURE 16-11: Scheduling your Follow Up message.
Developing chatbots
As you can see from the previous examples, chatbots help you serve your customers in a way that you never could by phone and email. Think about how you might use them to step up your engagement. In case you want to build one yourself, Facebook provides online documentation at (https://developers.facebook.com/docs/messenger-platform) that will help your company create its own chatbot. If you want to go outside your company for assistance, you can find several third-party vendors who specialize in creating Facebook chatbots. These vendors include:
- Botisfy (
http://botsify.com): Botsify provides an app that requires no coding. It offers tiered pricing with a free tier for those with fewer than 100 users. - ChatFuel (
http://chatfuel.com): ChatFuel’s app also requires no coding and does not charge for its app. If you want advanced features, you can pay a fee. - Conversable (
http://conversable.com): This app is scaled for the enterprise and used by companies (such as Sony and Whole Foods) that need more robust features. It can be set up to work across multiple social media platforms.
Advertising with Messenger
We’re well past the time when online marketers debate about the value of mobile Facebook Ads. TechCrunch reports that 85 percent of Facebook’s ad revenue now comes from mobile ads. The key is to present ads on mobile that load fast and look good.
You have several types of Messenger ads to consider:
-
News Feed Messenger ads: These ads are shown in your audience’s Timeline and contain one or more call to action (CTA) buttons. If a user clicks an ad, a Messenger conversation starts.
To set up this type of ad, go to
https://www.facebook.com/advertising. Click the Create an Ad button in the top-right corner and choose one of two ad objectives that give you Messenger options. In the Consideration column, you choose Messages; in the Conversion column, you choose Conversions (see Figure 16-12). - Sponsored messages: You can set up sponsored messages to communicate with users who have previously held conversations with your business. Again, go to
https://www.facebook.com/advertisingand click the Create an Ad button. The objective to choose for this is Messages. Then choose the Click to Messenger button and, from the drop-down menu, choose Sponsored Message (see Figure 16-13). Then input your message where prompted. - Messenger home placement: This type of ad is related to placement and can be set for any ad objective. It allows you to set up an ad objective (in this example, we chose Traffic) and have it show up in Messenger as one of your choices, as shown in Figure 16-14.
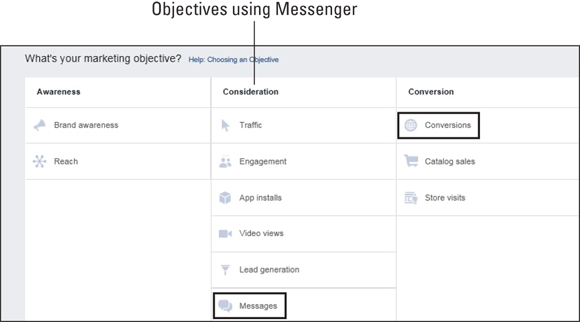
FIGURE 16-12: News Feed Ad objectives that involve using Messenger.

FIGURE 16-13: Choosing to create a Sponsored Message with Messenger.
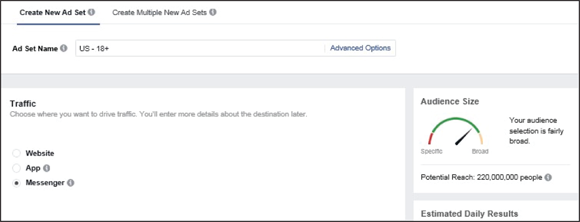
FIGURE 16-14: Choosing Messenger as an ad placement for an ad.
Getting Started with Facebook Live
Another great way to engage fans and find new customers is to broadcast with Facebook Live. Imagine the great opportunity to speak directly to fans and prospects in real time. You can directly answer their questions and find out what they think. It’s your very own focus group of real people who are interested in learning more about you and your business.
If you already have a Facebook account, a business Page, or a public profile, you are halfway there! The following sections consider some of the significant benefits Facebook Live affords you.
Looking at the benefits of live streaming
Live streaming and its replays on viewers desktop or mobile can reward you with several substantial benefits. When you think about live broadcasts, you may feel uneasy about performing in front of your customers. But focusing on how your business can help you overcome your fear. Here are several benefits to consider:
- Easy content creation: Live streaming helps you develop video content both easily and inexpensively. You can then replay it on your Page and repurpose it for your website or other channels and platforms.
- Increased brand awareness: Gain attention for your business by promoting your broadcast and educating your customers, which in turn can help create advocates who spread your message.
- Increased Loyalty: Develop better relationships with fans, resulting in more loyal customers.
- Deeper conversations: Tell your company story your way and see whether it resonates with viewers. You’ll get both positive and negative comments that will help you hone your message. Telling your story also increases the likelihood that you’ll show up in your users’ News Feed — a worthy goal!
- More engagement: Providing information and interactions helps build community. You can broadcast directly to a Facebook Group and strengthen interaction between members.
- More conversion: Providing demos and product information can affect conversions, sell more products, and grow your customer list.
- Better feedback: Receiving direct comments about the use of your products and services helps you build and improve your offerings.
Understanding the guidelines
Before you start broadcasting, you should understand what settings you can control in Facebook Live so that you can make better decisions about your broadcast. We cover the setup details in the next section, but first, here are some settings that you control:
- Who sees it: If you’re broadcasting from your profile, you can choose who sees your broadcast. You can opt to exclude specific people, show it to only a select group, or show it to everyone. (See the next section for details about broadcasting from a Page.) If you’re broadcasting from a Page, you can restrict your audience by age, gender, and location.
- Whether it is public or private: You can determine whether you want to do a private or public live stream just as you can with any other Facebook post.
- Whether you can delete it: You can delete any broadcast after you have completed it if you choose to do so. You can also delete it at any time in the future.
- Who can comment: You control who can comment, and you can delete comments during or after your broadcast.
- Where it can be viewed: If it’s public, it can be seen on the desktop, iOS, and Android devices.
Setting up Facebook Live
Talking directly to your fans and prospects will help you maximize your attempt to build a stronger customer base. Lots of interesting things are happening during your workday, and new products and services are being developed and introduced. Pick something you feel passionate about and stream it live to your audience. To get started, you need to set up Facebook Live. This section describes the setup from your computer.
Go to https://www.facebook.com/live/create. On the page that appears, you’re prompted to give Facebook access to your camera and microphone. (Facebook requires this only the first time you set it up.) If you don’t use a Chrome or Firefox browser, you see a message that says, “Please try broadcasting on the latest desktop version of Chrome or Firefox to go live with your camera.” Next, a screen called Go Live With Your Gear shows you settings for your broadcast, as shown in Figure 16-15.

FIGURE 16-15: Accessing the Facebook Live screen.
When broadcasting from your profile, follow the three items listed on the screen under Getting Started (refer to Figure 16-15) and explained in the following sections.
Set up
Follow these steps to select the live streaming software you intend to use:
- Click one of the three choices, OBS, Wirecast, or XSplit (or your own choice).
- Follow the instructions to download and install the software and then return to the broadcast screen.
-
Click the Create Live Stream button (refer back to Figure 16-15).
A screen pops up, as shown in Figure 16-16.
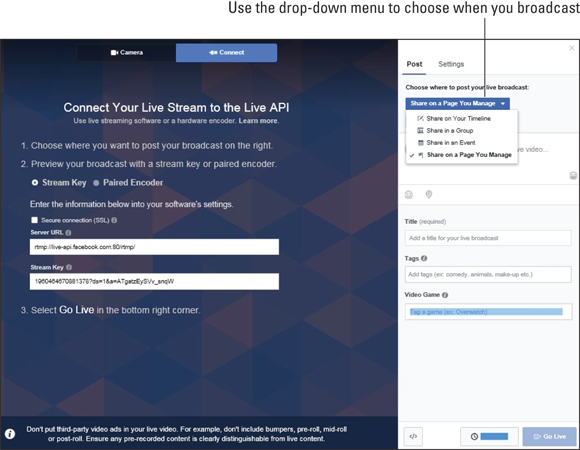
FIGURE 16-16: Settings for Facebook Live stream from your Page.
Connect
Facebook asks you to choose where to post your live broadcast. From the drop-down menu on the right, the choices are as follows:
- On your Timeline: You can choose to broadcast directly from your News Feed.
- In a Group: If you have an ongoing group, you can create a broadcast directly for them.
- In an Event: Broadcasting live from an event is a great way to generate excitement. It also lets you interview participants and show engagement.
- On a Page You Manage: If you have more than one Page, you can choose the one you want here, as shown in Figure 16-17:
- Public: This includes anyone on desktop or mobile who tunes in.
- Friends: You can choose those listed as Friends on Facebook to show your broadcast to.
- Friends except… : You can eliminate some friends from the broadcast.
- Specific friends: You can select individual friends who will see the broadcast.
- Only Me: You can use the Only me setting to practice your broadcast. It’s a good idea to give yourself a practice run to smooth out all the wrinkles.
- Custom: This setting allows you to mix together several of the preceding options.
- Acquaintances: The acquaintance list is one that you set up separately that allows you to see less from these people but doesn’t unfriend them. Choose this to include them.
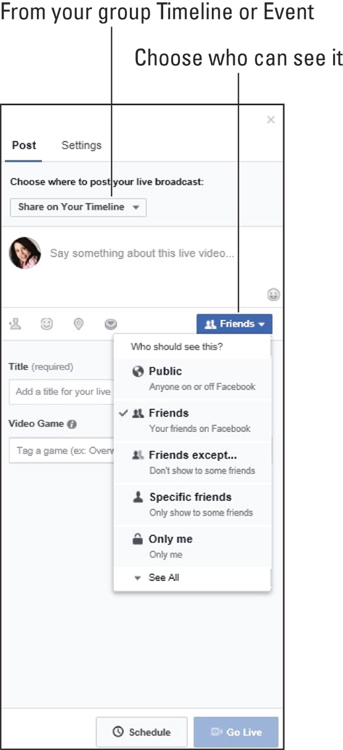
FIGURE 16-17: Choices for who can see your broadcast Timeline.
Next you are asked to add a description, title, and the choice of several icons, as shown in Figure 16-18. The fields are as follows:
-
Say something about this live video: In this field, enter a description of your broadcast that tells viewers what benefit they will get from watching the broadcast. You can edit it after the broadcast if you want.
Beneath the description, you see icons to insert an emoji, add a tag, insert your mood, and let people know your location. Don’t overlook tagging as a way to help people find your broadcast.
- Title: You are required to create a title for your broadcast. Make sure to include keywords that your audience cares about.
- Video Game: In this field, you can tag the name of a video game, if applicable.
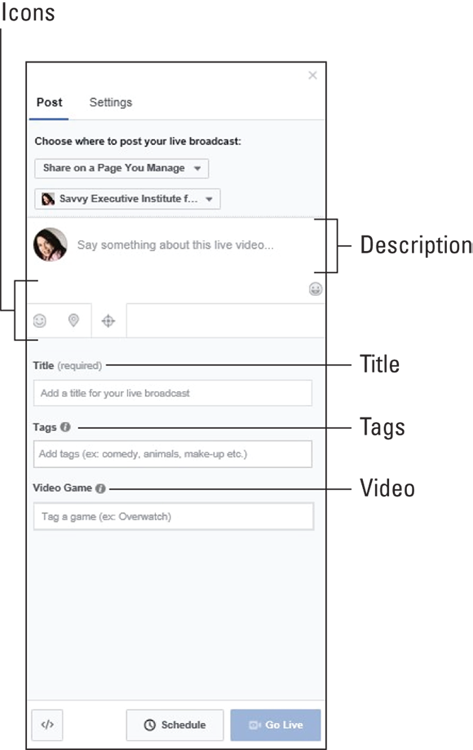
FIGURE 16-18: Adding a description, title, and icons for your broadcast.
Broadcast
Copy and paste the Stream Key and URL into the settings of the streaming software that you chose previously, in the “Set up” section. After copying, you see a preview of your screen with your choices.
Schedule
If you want to schedule an upcoming date instead of going live right now:
-
Click the Schedule button next to the Go Live button.
A schedule screen appears (see Figure 16-19) with important instructions and tips. Make sure you read them. They include two important caveats:
- Make sure to verify your live feed 20 minutes before the broadcast to ensure that everything is ready to go.
- The broadcast starts at the time you scheduled it. If you are not there 10 minutes before the start, your broadcast will be canceled.
- Choose the Scheduled Start Time by selecting a date on the drop-down calendar and setting a time in the Time field.
-
If you have a Custom Image that you want to use for the broadcast, click Upload Image and choose an image.
After you have chosen your image, you see a preview of your broadcast on the right side of the screen. Make sure everything is correct.
-
Click the Schedule button when you are finished.
Your broadcast announcement post will be published when the Schedule button is clicked.
 You can choose to boost your broadcast announcement post as an ad if you want to ensure a larger audience. You can also boost your content after a broadcast. Experiment with your most important broadcasts.
 -
Click the Go Live button when you are ready.
When you have completed all your tasks, you can click the Go Live button. As noted above, if you have scheduled the broadcast for a later date and time, your broadcast will go live at that time and you need to be there 10 minutes before the broadcast starts.

FIGURE 16-19: Scheduling options for your Facebook Live broadcast.
Creating Broadcasts That Connect with Customers
Now that you’re ready to create your broadcast, you need to pick topics that are timely and popular with your audience. You should have an ongoing list of topics (and keywords) that come from an analysis of all your channels and social platforms.
You can broadcast for up to four hours at a time. This gives you the leeway to create virtually any kind of live stream broadcast you want. Although you’re not likely to use the full four hours, you should mix things up with a variety of formats and running times.
Here are some issues to consider before you broadcast:
- Format: Your choices are limitless. For example, you can do a product demo, an interview, a workshop that educates people about a topic, a heart to heart with your group, or a behind-the-scenes broadcast. Try experimenting to see what resonates with your audience.
- Desktop recording: If you’re recording on the desktop, you need to consider your lighting and microphone. If your broadcast is dark or can’t be heard, you are wasting your time.
- Content: Visuals are an important component. If you aren’t doing a demo, you should consider using slides or other graphics to make the broadcast more interesting. Think about the broadcast from the viewers’ perspective and try to see what they see. Look at your setting. Are you sitting against a blank wall?
- Promotion: Promoting your business is a key component of fostering engagement. If possible, schedule an announcement ahead of time (and consider boosting it), as discussed in the “Schedule” section. (For more about boosting, see Chapter 11). You want to reach new viewers and generate some excitement. Also during your broadcast, try to get repeat viewers by asking viewers to click the Live Subscribe button during your broadcast to be alerted to your live videos.
- Mobile recording: When using your mobile phone to record, be careful how you move your phone. Avoid fast movements so that you don’t make your viewers dizzy by wobbling the image back and forth. Go slower than you think you should when panning the site.
- During the broadcast: You want to get discussions going with your viewers. Remember that Facebook is looking for meaningful interaction. Ask questions and respond to comments. Keep your broadcast lively and positive.
A great example of a Facebook Live broadcast was done by Amy Porterfield in January 2018 called “How to Make BETTER Decisions in Your Business (to see BIGGER Profits).” She sent out an announcement before the broadcast to get viewers interested, and during and since that broadcast, she has garnered thousands of views.
The following figures show the broadcast as it looked live from a mobile phone and after the broadcast was completed and appeared in her News Feed.
The broadcast on a mobile phone shows you the Live button in the upper left along with the number of viewers (see Figure 16-20). The comments and reactions are shown in the center, and the Comments field is at the bottom.
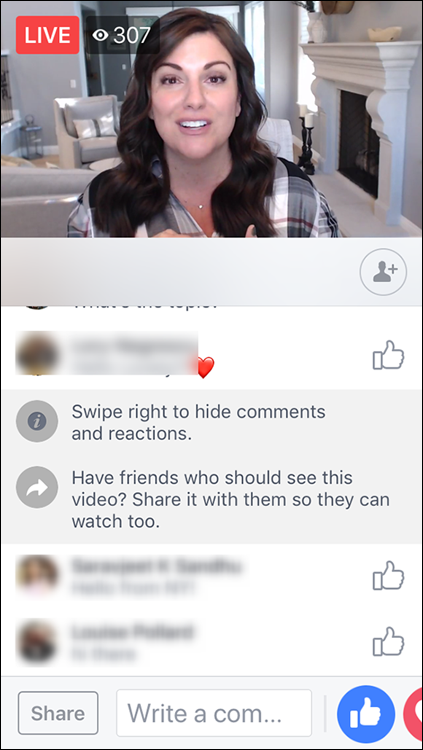
FIGURE 16-20: A Facebook Live broadcast viewed on a mobile phone.
After the broadcast, viewers will see the topic and several ways to share and comment. The broadcast also appears in Amy Porterfield’s News Feed, as shown in Figure 16-21. Under the topic and to the right is a Follow button, which helps to get more subscribers. You can also see the Share button, which viewers can click. This is a great way to get more engagement, so don’t forget to mention using that button.
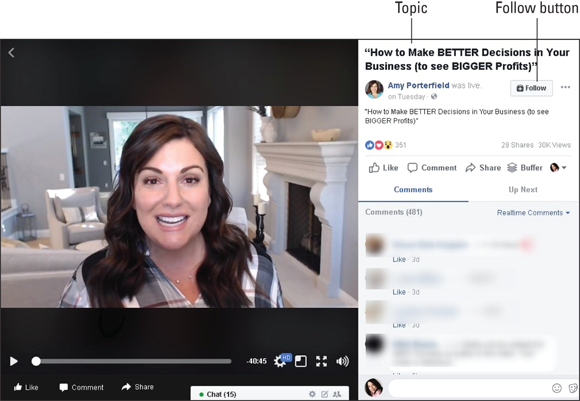
FIGURE 16-21: After the live stream, you see the replay on her Page.
 These settings may look different depending on the entity you are broadcasting from — profile, Page, or public profile.