Chapter 11
Using Facebook Advertising to Promote Your Business
IN THIS CHAPTER
 Planning your Facebook Ad campaign
 Designing compelling ads
 Creating your ad
 Defining your landing page
 Managing and measuring your Facebook Ads with Ads Manager
With more than 2 billion Facebook users worldwide, Facebook Ads can reach an audience 18 times bigger than a Super Bowl’s television audience. If you’re not looking to go global (which is most likely the case), you can target Facebook Ads to specific demographics (location, gender, relationship status, education, brand preferences, musical tastes, and so on). You can even target specific segments within your customer base!
Facebook’s ad platform makes it easy to create your ad, select your target audience, set your budget, set a start and end date, and measure results. Ads can be purchased based on cost per impression (CPM) or cost per click (CPC). And unlike Google Ads, Facebook Ads allow advertisers to leverage Facebook’s social graph — a massive collection of every Page, group, app, and interest liked by Facebook fans.
Facebook also lets advertisers target customers, segments of email subscribers, and even people who visit specific pages on their websites.
In this chapter, we show you how to use Facebook Ads to drive traffic to your website, increase your Facebook Page fan base, and increase engagement on your Page posts. We introduce you to the available advertising options and how to use them. You can find tips on determining your advertising budget, targeting your audience, writing ad copy, uploading an effective image, and designing an ad. Finally, you get help creating your landing-page strategy and evaluate your ad’s effectiveness in fulfilling your marketing goals.
Introducing Facebook Ads
According to Facebook, the social network giant had 1.74 billion mobile monthly active users as of February 2017. These consumers spend more time using Facebook than any other social network, Google, or Yahoo!. This makes sense when you remember that Facebook has become the most popular way for people to connect with their friends.
Facebook Ads also allows you to form a sustained relationship with potential customers. By linking the ads to your Facebook Page, you can keep the user engaged within the Facebook environment.
To help advertisers, Facebook provides an overview of how to use Facebook Ads, a Facebook Ad guide, and a series of case studies at https://www.facebook.com/business/products/ads (see Figure 11-1).
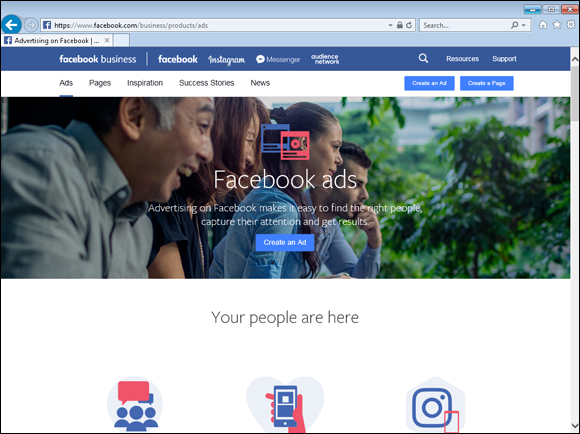
FIGURE 11-1: Facebook Advertising’s home page with resources for advertisers.
Consider AARP, which offers a great example of using Facebook Ads to build sustained relationships. AARP’s goal with Facebook Ads was to increase awareness of its brand and offerings. The organization wanted to change how people perceive AARP as a brand. Its core audience is people between 45 and 64 years old with interests including travel, finance, and sports. AARP used Facebook Ads to deliver compelling photo and video ads to 11.2 million Americans ages 45 to 64, leading to a double-digit increase in brand relevance among its core audience.
The content highlighted people doing inspirational things.
According to Nielsen, 14 percent of 45- to 64-year-old Americans saw AARP’s ads in their News Feeds. Nielsen also reported a 29 percent increase in this group’s desire to find out more about AARP and a 24 percent increase in willingness to recommend AARP to a friend. Pretty amazing results! (See Figure 11-2.)
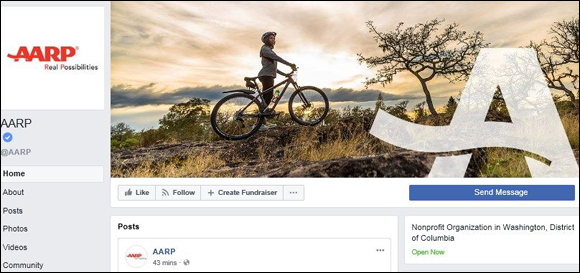
FIGURE 11-2: AARP used Facebook Ads to increase awareness and brand loyalty among people ages 45 to 64.
Using Facebook Ads as part of your overall marketing mix
The worst possible way to use Facebook Ads is to use them as the sole tactic within your marketing strategy. It may be tempting to think that because you’re paying for ads, you’ll automatically get a good return. But lacking a plan that incorporates all of your marketing channels usually creates less-than-satisfactory results.
In other words, you have to include other channels — such as email marketing, in-store promotions, and radio ads — in your marketing strategy. The more you combine all channels in a cohesive ad strategy, the more results you’ll get from each channel. All this ties back to having a clear objective and a clear understanding of your audience, which we talk about in Chapter 3. An email marketing campaign to promote your Facebook Page, for example, will be more effective if it’s combined with a Facebook Ad for your Page that’s geographically targeted to where most of your email subscribers are located. A Facebook user who isn’t a Page connection (fan) but is on your email list will be more likely (pun intended) than someone who isn’t a newsletter subscriber to like your Page because she gets twice the exposure to your campaign.
You’ve heard the phrase “A rising tide lifts all boats”? Well, integration is the tide that lifts each boat within your marketing arsenal. A Facebook Ad is just one type of boat in the harbor.
Understanding how Facebook Ads differ from other online ads
Facebook Ads leverage relationships and connections between friends, which makes Facebook Ads different from almost every other type of Internet ads. Banner ads target the assumed audience of a specific website. SportsIllustrated.com has banner ads that target mostly men who like sports, for example, and Google Ads target people based on what people search for online. The great thing about Google Ads is that they target people who are looking for something they need. But those ads can’t target people before they express that desire by searching for it on Google.
Facebook Ads, however, target people based on their precise interests and also on people’s connections to your business. A hair salon, for example, can target an ad to the Facebook friends who liked that salon’s Facebook Page. This second feature — connections — is what sets Facebook Ads apart from any other kind of ad. Facebook calls this extremely complex network of connections the social graph.
Understanding Facebook’s targeting options
Targeting your audience is as important as the ad itself, and Facebook allows you to specifically target only the audience you desire. To understand exactly whom you should target, start developing personas, or personality characteristics, to represent your target audience. Personas are simply imaginary prospects or clients with entire back stories, quirks, challenges, and needs for what you offer. The real value of personas is in how you imagine each of them reacting to your products or services. Well-developed personas can make it easier to target your ads on Facebook effectively. Take Jane as an example. She’s a 30-year-old professional who works in downtown Boston. She doesn’t have a car because she wants to lower her carbon footprint, but she loves meeting up with friends on Cape Cod to go surfboarding. She’s smart and very selective about what she shares online. Jane would be a persona for Zipcar, Zappos, and REI because these companies cater to customers who are environmentally conscious. For more on personas, see Chapter 2.
You can also use Facebook Graph search to research the interests and Pages liked by your Facebook fans. Entering the phrase Pages liked by women who like [name of your page] in Facebook’s search box gives you a list of the most popular Pages with your female Facebook fans (see Figure 11-3).
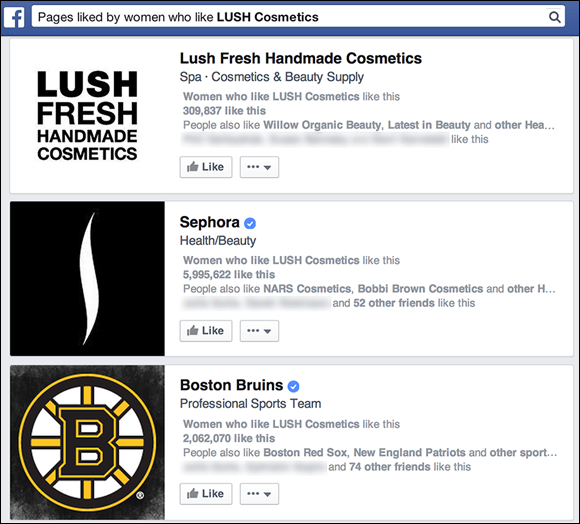
FIGURE 11-3: Facebook Graph allows you to research interests and Pages liked by your Facebook fans.
Here are some ways that you can target ads in Facebook:
- Targeting by location: Facebook allows for precise location targeting based in part on your profile data and the IP address of the computer that users log in with or their precise country, state/province, city, or postal code. Most cities in the United States, Canada, and the United Kingdom allow you to expand the targeting to surrounding areas of 10, 25, and 50 miles if you target specific cities.
- Targeting by interests: Facebook lets you define your target audience by using terms people include in their Facebook profiles. These terms may be drawn from people’s interests, activities, education, and job titles; Pages they like; or groups to which they belong.
- Targeting by connections: You can target people who are already connected to your Facebook Page or people who aren’t already connected to your Page so that your existing fans aren’t shown your ad. You can also target the friends of people who are already connected to your Page, which is a powerful feature because friends of fans are more likely to become fans themselves. (Birds of a feather flock together.)
- Targeting by email: You can target specific people within an email list — for example, customers who made a purchase in the past year. People on your email list are interested in you by definition. Being on your email list is a very conspicuous expression of their interest in your product or service.
- Targeting by website visits: You can target people who visited a specific page on your website, such as a page promoting a product or service. As you can imagine, this feature can be highly effective. Many visitors won’t purchase a product right away, but a Facebook Ad reminding them to return to your page often encourages them to complete the purchase.
Setting your budget
Facebook employs a bidding structure for its advertising inventory based on supply and demand. If there’s greater demand to reach a specific demographic, the ad typically has higher bids.
For most ads, you pay for impressions — that is, the number of people who see your ad. Facebook optimizes your ad so that it’s shown to the people who are most likely to help you reach your goal. If you want more people to like your Page, for example, your ad will be shown to the people who are most likely to become fans of your Page.
Facebook has advanced options that provide a suggested bid for you based on what other ads that reach this demographic historically cost. For these options, Facebook offers two types of pricing:
- Cost per click (CPC): With CPC, you pay each time a user clicks your ad. If your goal is to drive traffic to a specific Page, paying based on CPC is probably the best performer for you. Ask yourself how much you’re willing to pay per click.
- Cost per impression (CPM): With CPM, you pay based on how many users see your ad. If your objective is to get as many people within your target demographic to see the ad but not necessarily click through, ads based on a CPM basis may be your best option. Ask yourself how much you’re willing to pay per 1,000 impressions.
Facebook also provides two specific payment choices under the following conditions:
- Cost per action (CPA): With CPA, you pay only if a specific action is taken if someone sees your ad. You can employ this method only if you define your ad result at the time of purchase.
- Cost per like (CPL): With CPL, you pay only if someone likes your page after clicking your ad. You have to choose Page Likes as your ad result. You can monitor your campaign to see whether the ad performs at your given bid. You can also set a daily maximum budget. (For details, see “Managing and Measuring Your Ad Campaigns with Ads Manager,” later in this chapter.)
Creating Winning Ads
Before we go into detail about how to create an ad on Facebook, we want to tell you how to create compelling ads that drive clicks. In the following sections, we discuss ways to write effective ad copy and choose the optimal image. We also discuss the importance of knowing your audience and delivering incentives that are right for them. Finally, it’s important to know the restrictions that govern Facebook Ads so that you create ads that are more likely to get approved.
Writing effective copy
Each Facebook format has its own limits and specs, but be assured that you can’t waste a whole lot of words. Be direct, straightforward, and honest about your objective. Keep in mind that Facebook is also about building trust, and your copy must show openness and willingness to share and connect with your audience. Also note that when you use Sponsored Stories, your ad copy is provided by the update.

FIGURE 11-4: This ad uses a specific call to action to increase click-through rates.
Following are four guidelines on Facebook Ad copy:
- Pose a question in your headline or in the body of the ad. Don’t be afraid to use a question mark where appropriate.
- Reference your target audience. By relating to your audience, you’re more likely to grab their attention. Consider giving shout-outs such as “Hey, housewives …”
- Be direct. Tell your target audience explicitly what you want them to do, such as “Click here to receive your free T-shirt.”
- Use influencers’ testimonials. To establish credibility, consider highlighting an endorsement, such as “Voted South Jersey’s best pizza.”
Choosing the right visuals
A picture is worth a thousand words. This is why ads accompanied by images or videos overwhelmingly perform better than text-only ads. Facebook provides five different visual formats for you to choose from when creating your ads. We discuss them in the section “Creating a Facebook Ad,” later in this chapter.
However, a good rule is to use images that are easily recognizable, aren’t too intricate in detail, and feature bright colors without the use of the blue that’s so strongly identified with the Facebook logo and navigational color scheme.
Here are four tips for selecting the right visuals to get your Facebook Ad noticed:
- If your visual includes people, they need to reflect the demographic you’re targeting. People like to see people who look like them.
- Test different images with the same copy. When you test a single factor, such as the ad’s image, you can easily identify the stronger-performing image.
- An amateur video or photo style sometimes works better than stock photography. A more personalized approach can help you stand out in the crowd. (See Figure 11-5.)
- Make your image stand out with a decorative border. Consider adding a branding element around the image or making the ad current. (During the holiday season, for example, add a decorative holiday border.)
FIGURE 11-5: The image is one of the most important elements in your ad.
Simplifying your offer
Because you have only a small amount of space to communicate your offer via your Facebook Ad, don’t waste words or overcomplicate things. Your call to action needs to be direct, clear, and easy to follow. Cleverness and wit aren’t as effective as the simplest words possible.
Devising a Landing-Page Strategy for Your Ads
If you’re familiar with online marketing, you understand the importance of making a good first impression with your ad link. Your landing page (as it’s known in advertising) is the page that opens when users click your ad. It can be an internal Facebook Page or an external website. All engagement begins on the landing page.
Successful landing pages provide an easy path to conversion, or realizing your goal. A conversion can include capturing user data via an input form, driving membership for your Page, getting people to sign a petition, or simply making a sale. Regardless of your objective, if your landing page doesn’t deliver the desired result, your campaign is worthless.
Facebook allows you to create ads that link to an internal Facebook location or an external website (URL). The following sections explain how to choose a URL destination for your ad.
Landing on a Facebook location
As a best practice when running a Facebook Ad campaign, link your ads to an internal Facebook location as opposed to an external website. For internal Facebook Ads, you can link to a Facebook Page, a Facebook Page update, an app Page, or an event Page.
If you’re advertising a Facebook Page, you can send users to a customized landing tab within your Page. Figure 11-6 shows the Post Planner landing page, which features a live training session.
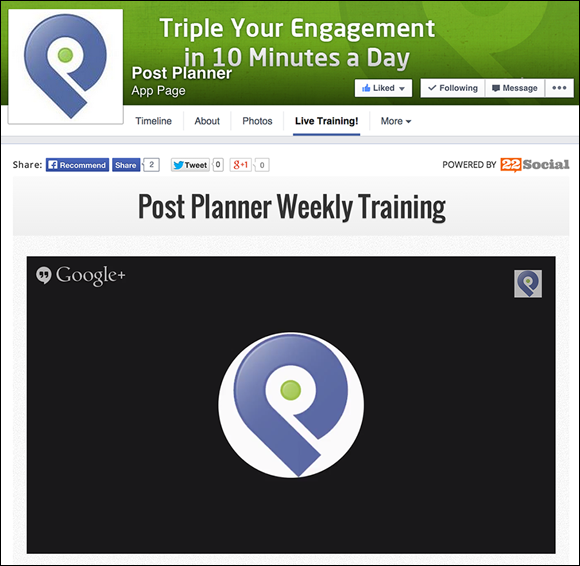
FIGURE 11-6: The landing page for Post Planner.
Chapter 6 goes into more detail about creating custom tabs. For now, keep these three things in mind to increase conversions on your custom tab:
- Include only one call to action. Present users too many options, and they’re less likely to take the action you want them to take. If you want them to join an email list, don’t also ask them to follow you on Twitter.
- Use as few words as possible. Most of the time, you should be able to cut your copy by 50 percent, which is easy to do when you think about what users need to know versus information that’s peripheral to that action. If users are entering their email addresses as a way to join a contest, for example, email them later with the less-important details about that contest.
- Measure conversions. If you’re focusing on acquiring emails on your custom tab, make sure that you create a unique web form for the tab. Most quality email marketing services allow you to track how many people are joining a list via each web form (see Figure 11-7).

FIGURE 11-7: AWeber is email marketing software that tracks how well each web form is converting new subscribers.
Landing on a website
Facebook allows you to refer your ad visitors to an external web address (URL), provided that it adheres to the company’s advertising policies and guidelines at https://www.facebook.com/policies/ads/.
Linking to an outside website offers you greater control of your landing page’s content, technology, and design. You may already have a finely tuned landing page that you prefer to drive ad traffic to, regardless of where the traffic originated, and you can employ much more sophisticated web analytics on your site that are presently available on Facebook.
Because ads can be purchased on a CPC basis, you can opt to pay only when a user clicks through to your Page, regardless of whether it’s an internal Facebook Page or a page on an outside website.
Making sure that your website is responsive
On a responsive website, the content (pages, text, videos, and photos) automatically resizes in response to the particular device that a viewer is using. Any website that you can easily view on both a mobile device and a web browser is responsive.
These days, having a responsive design is more important than ever, and it will continue to be important as an increasing percentage of Facebook users access the site on their mobile devices. As of February 2017, 1.74 billion Facebook users were accessing the site from a mobile device each month according to Facebook (https://s21.q4cdn.com/399680738/files/doc_presentations/FB-Q316-Earnings-Slides.pdf). If a user clicks over to your website and it isn’t responsive, he will be more likely to leave your website instead of buying your product or service or joining your email list.
Creating a Facebook Ad
The process of creating Facebook Ads can seem daunting, but Facebook walks you through a process of steps that we detail in turn.
Take the following first steps to begin creating a Facebook Ad:
- Go to the Facebook Ads home page at
https://www.facebook.com/advertising. -
Click the blue Create an Ad button in the top-right corner.
The Ads Manager page appears, displaying the steps required to create an ad, as shown in Figure 11-8.
 You can click a step in the list to move to that section if you’re not following the steps in order.
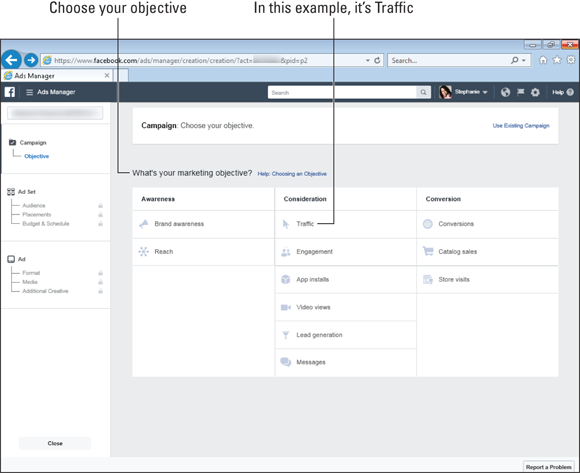
FIGURE 11-8: Choosing your campaign objective.
Here’s an overview of the sections:
- Campaign: In this section, you choose your objective from 11 different choices.
- Ad Set: Here, you set up the parameters of your ad, which includes:
- Naming your ad set
- Determining where you want your traffic to go
- Creating your offer
- Targeting your audience
- Selecting your placement
- Setting your budget and schedule
- Ad: In this section, you design and finalize your ad by doing the following:
- Choosing your identity (Page) to display
- Determining your format
- Selecting your media
- Adding your links
Step 1: Developing your campaign
The first step in creating a Facebook Ad is to select your objective. Facebook provides 11 objectives to choose from (see Figure 11-8).
If you want to promote awareness, you have the following choices for objectives:
- Brand awareness: Helps people recognize your brand
- Reach: Shows your ad to the greatest amount of prospective fans
If you want people to put your business under consideration as their choice to buy or support, you can choose one of these:
- Traffic: Drives people to visit a venue of your choice; for example, it can send them to your website.
- Engagement: Helps more people to become aware of you and engage with your Page. For example, this could encourage people to comment or like your Page.
- App Installs: Helps you get more people to install your app on their mobile devices.
- Video views: Helps you get more views for a video that you post on your Page.
- Lead generation: Helps you get information about people who want to know more about what you do.
- Messages: Prompts people to engage in Messenger with your business to get more information or answer questions.
If you want to effect a conversion that causes people to buy your product or service, you can choose the following objectives:
- Conversions: Helps encourage specific actions on your website, such as making a purchase or joining your email newsletter.
- Product catalog sales: Applicable if you have created a catalog from which people can view products. The catalog will display these products to encourage sales.
- Store visits: Encourages people who are nearby to visit your location.
To select an objective, simply click one of the 11 objectives. For this example, we chose Traffic.
When you click the Traffic objective, Facebook displays content at the bottom of the page, as shown in Figure 11-9.
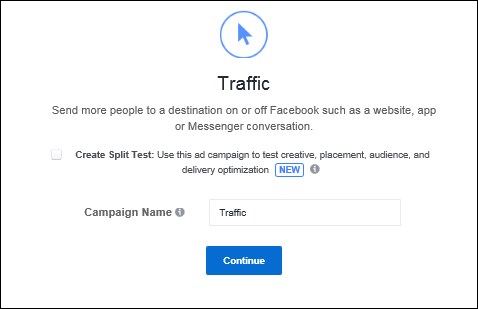
FIGURE 11-9: Creating and naming your Traffic campaign.
To set up the Traffic objective, follow these steps:
-
Select Create a Split Test to create a split test.
 A split test allows you to create different versions of your ad variables, such as images or target audience, and test them against each other to see which is more effective.
 - Input the name of the campaign.
-
Click the Continue button.
If you’re setting up a new account, the Continue button may say Set Up Ad Account.
Step 2: Creating your ad set
An ad set is a Facebook Ad feature that allows you to organize your ads more easily. After you have named your campaign, you need to input information to create an ad set. Campaigns and ad sets are like folders, and the largest folder is a campaign, which contains ad sets. Each ad set contains several Facebook Ads.
To the right of the Facebook Ad Set, you see an Audience Size estimator that represents the approximate number of people who will be exposed to your ad (see Figure 11-10.)
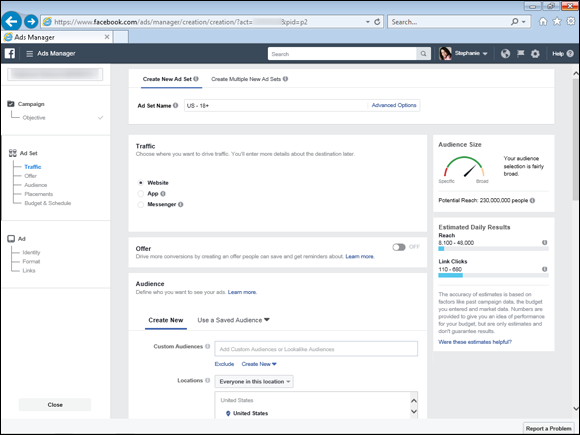
FIGURE 11-10: The estimated reach in Facebook’s Ad tool provides real-time numbers.
The audience size shown changes as you add or remove targeting factors in the following steps as you create your ad set.
To create an ad set, follow these steps:
-
Input your name in the Ad Set Name field.
 Name your ad set so that it describes the audience, campaign, or type of ads contained within the ad set. You could name an ad set Moms in Boston, for example, to differentiate it from an ad set targeting moms in New York City.
 -
Choose where you want your traffic to go in the Traffic section.
Decide where to send the traffic generated from this ad. Your choices are your website, an app, or Messenger. Click one of these options. You can define this destination more fully later in the process, but you should be clear about your intention now. Each choice has its own distinct characteristics.
-
Set up the details for your offer in the Offer section.
You are prompted to create an offer only if you have chosen one of three objectives: Traffic, Conversions, or Store Visits. If you want to create an offer, click the Off button to On. When you click it to On, a screen pops up that displays your profile name. To proceed, click the Create the Offer button. A screen pops up that displays what your offer will look like and walks you through the process.
Next, you need to target your audience by selecting the targeting criteria (see Figure 11-11).
 Think of targeting in terms of a bull’s-eye: The closer you get to the center, the narrower the circles are; the farther out you go, the wider the circles are. (For more information on targeting your ad, see “Understanding Facebook’s targeting options,” earlier in this chapter.)
 -
In the Audiences field, choose Create New.
You are presented with two options.
-
Select Custom Audiences or Use a Saved Audience.
If you choose Create New to create a new audience, you can choose one of the two default options, Target Ads to People Who Know Your Business or Reach New People on Facebook Who Are Similar to Your Most Valuable Audiences, by clicking the drop-down link under the Create New text box. If you want to create a saved audience, click that link and choose one of the options offered. To learn more about custom audiences, see Chapter 2.
-
In the Locations field, choose an option from the drop-down menu.
The menu options are Everyone in This Location; People Who Live in This Location; People Recently in This Location; and People Traveling in This Location. If you have a physical location, choosing a Location option lets you hone in on those who live near your location. Next, you can choose among nearly 100 countries to target, and each ad can reach up to 25 countries. You can also drill down to the state or province, or to the city level. For many cities, you can even specify up to 10, 25, or 50 miles surrounding the city.
-
From the Age drop-down list, choose the age range of the audience you want to see the ad.
If you know your audience’s approximate age range, this step is a great way to target them. If you sell retirement homes, for example, you can target people 55 and older. To reach the widest possible audience, accept the default setting: Any.
 If you reach too small an audience, your ad may not generate any click-throughs. Widen some factors, such as age range, or add surrounding locations to your targeting.
Keep in mind that Facebook doesn’t allow you to target members younger than 13.
-
In the Gender section, you can select All, Men, or Women as the gender of your audience.
You can target just men, just women, or both. By default, All is selected, making the ad available to the widest number of members possible.
- In the Languages section, select the specific languages you want to target.
-
In the Detailed Targeting section, you see Include People Who Match at Least One of the Following. Click Browse to see several options, as shown in Figure 11-12.
To see the choices within each category, click the left arrow next to the name. From there, you can click again to drill down to choose specific options. They include the following:
- Demographics: This category includes general demographics such as Education, Income, Home, and more.
- Interests: Refers to Pages people have liked hobbies, activities, and so on.
- Behaviors: You can target people based on their consumer behavior, the mobile devices they use, and other behavior collected by companies that Facebook partners with.
- More Categories: These categories include your Facebook Partners and others with whom you do business.
- Exclude People Who Match at Least One of the Following Categories: Click the Exclude People link and choose the Browse button if you want to see categories of people whom you do not want to see your ad.
- Expand Interests When It May Increase Link Clicks at Lower Cost Per Link Click: Select this check box if you want Facebook’s algorithm to determine whether expanding chosen interests will result in reducing the cost of your clicks.
-
In the Connections section, shown in Figure 11-13, select one of the following options from the drop-down menu to add a connection type:
- Facebook Pages: This option allows you to target people and friends of those people who like your Facebook Page, or to exclude people who like your Page.
- Apps: This connection type gives you the option to target people and friends of those people who used your app, or to exclude people who used your app.
- Events: This option allows you to target people who responded to your event, or to exclude people who already responded to your event.
- Advanced Combinations: Select this option if you want to create a mix of the preceding options.
When you have completed your Connections choices, click the Save This Audience Button.
 Pay close attention to what options you select to see whether they align with your advertising goals. Targeting users who aren’t fans of your Page, event, group, or app makes sense, for example, if your goal is to acquire new fans.
 -
In the Placements section, select the radio button for Automatic Placements or Edit Placements (see Figure 11-14).
Unless you have specific devices or platforms that you want to remove, we recommend that you select Automatic Placements to let Facebook determine placement.
-
In the Budget area of the Budget and Schedule section, use the drop-down menu to select either a Daily Budget or a Lifetime Budget.
Your budget is the maximum amount of money you want to spend. You can set your maximum budget for a daily expense or for the lifetime of the campaign. Selecting a daily amount to spend gives you the most control throughout your campaign because it ensures that your ad will run every day during your ad schedule.
-
Set your Ad Schedule.
You have two options:
- If you want the campaign to start today and run indefinitely: Select the Run My Ad Set Continuously Starting Today radio button. This option is not recommended, especially for new advertisers.
- If you want to choose a specific date range: Deselect the Run My Campaign Continuously Starting Today check box and enter the starting and ending date and time.
 If you are a Facebook Ad novice, select start and end dates for your ads that are no further apart than five days. Keeping the duration short prevents you from wasting money while allowing you to maintain tight control of your Facebook Ad. You would rarely select Run My Ad Set Continuously Starting Today.
 -
Click the Show Advanced Options link if you want to set additional options for bidding optimization.
If you click Show Advanced Options, you see options described in the following Steps 16–21.
-
Click Optimization for Ad Delivery for ways to optimize how you deliver your ad.
You see a drop-down menu with the following choices (shown in Figure 11-15):
- Link Clicks: If you choose to optimize your ads for clicks, your ad is served to the Facebook users who are likely to click the ad. You’re still charged each time your ad is served, but Facebook serves that ad to people who are most likely to click the ad.
- Landing Page Views: If you choose to optimize your ad for Landing Page Views, your ad is served to the Facebook users who are likely to click the ad and load the Landing Page. For this option, you need to install the Facebook Pixel so that you can track views.
- Impressions: If you choose to optimize your ad to receive the most impressions, you’re charged each time your ad is served, based on your bid.
- Daily Unique Reach: If you choose to optimize your ad for reach, people see the ad once a day.
- Click Bid Strategy to choose one of two bidding strategies:
- Lowest Cost: If you use the default, Lowest Cost, you will get as many clicks as come with the budget you set.
- Target Cost: If you select the Set a Bid Cap check box, you’re asking Facebook to optimize clicks based on your target (bid cap) budget. This choice is available only to those who choose the Ad Objectives — App installs (Consideration), Conversions, or Catalog Sales (Conversions).
-
Click When You Get Charged to determine when you will be charged for ads.
Your choice will depend on the objective you have chosen. You have two options:
-
Impression: This is the default option. You are charged based on impressions (CPM), which means that your bid represents every 1,000 impressions, or ad views.
 Facebook requires that if you are creating a new ad account, you must spend $10 for impressions before switching to Link Clicks.
 - Link Clicks: Click the link More Options and you’ll be given the ability to select Link Clicks (CPC), which means that you’re charged on a cost per click (CPC) basis.
-
- Click Ad Scheduling to choose the schedule on which your ads run. You have two choices:
- Run Adds All the Time: Facebook chooses when to serve your ads.
- Run Ads on a Schedule: If you set a lifetime budget, you can pick the days and times when your ad will be seen.
- Click Delivery Type to choose from two delivery options if you click More Options (see Figure 11-16):
- Standard: This choice ensures that your spending occurs at a pace that doesn’t exhaust your budget too soon. We recommend choosing this option.
- Accelerated: Choose this option if you are experimenting and want results quickly. You must set a bid cap for this option.
- After you have completed all your ad set choices, click the Continue button to move to the next step, creating your ad.
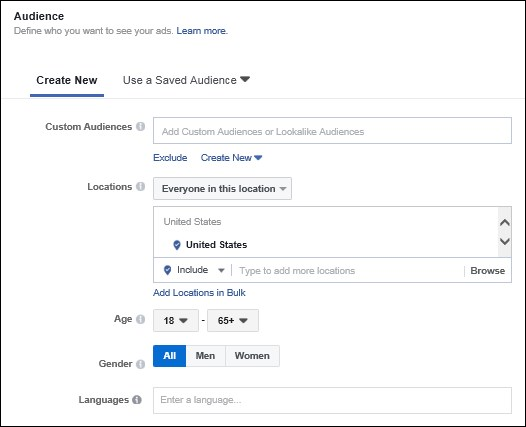
FIGURE 11-11: Targeting your audience for your ad campaign.

FIGURE 11-12: Facebook allows you to target your ad to various broad categories and then drill down to specific options.
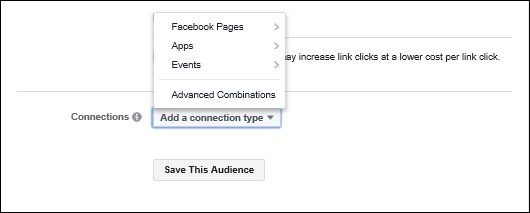
FIGURE 11-13: Choosing to connect to people who like your Page, Apps, Events, or a combination of those.
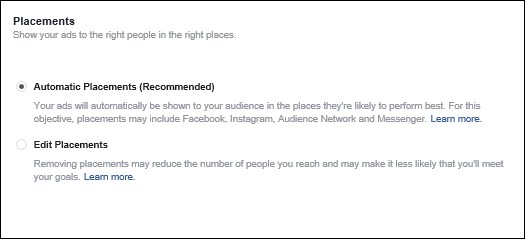
FIGURE 11-14: You can choose to let Facebook determine where to show your ads or choose specific places yourself.
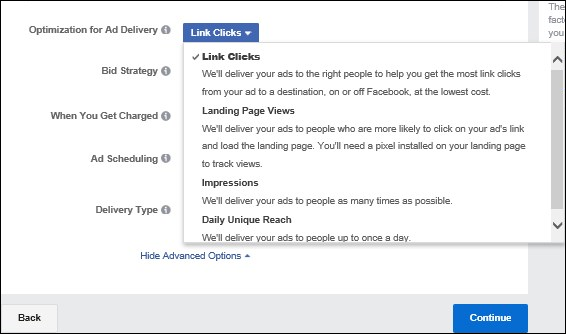
FIGURE 11-15: Picking the metric you want to optimize.

FIGURE 11-16: Deciding the pace at which your ad will be served.
Step 3: Creating your ad
You’re now at the third and final step in the ad process. In this section, you select your content, finalize your ad design, and confirm your order.
-
In the Ad Name text box, type the name of your campaign or keep the default name that appears in that text box.
If you want to rename the Ad, click the Advanced Options link and enter a new name.
-
Keep the default link, Create New Ad, to create a new ad from scratch.
(We devote a separate section, “Using an Existing Post to Create Your Ad,” later in this chapter, to the other option that appears here.)
For the Create New Ad link, you see the Identity and Format choices (see Figure 11-17).
-
In the Identity section, select the business Page (or other account, such as Instagram) that the ad is for.
If you have more than one business Page, use the drop-down menu to select the one associated with this ad. If you have an Instagram account, you see it listed also.
-
In the Format section, select the format for your ad:
- Carousel: Scrolls two or more selected videos or images in your ad.
- Single Image: Presents one image in your ad.
- Single Video: Presents one video in your ad.
- Slideshow: Presents up to ten images on a loop in your ad.
- Collection: The most robust option, this format presents both images and video in your ad. On a mobile device, it opens to a full-screen display.
 Collections may not be available for all Objectives.
 -
Select the Add a Fullscreen Experience check box (below the Format section) if you want to create a landing page that will open to a full screen on a mobile device.
Facebook provides you with prebuilt templates to choose your design, as shown in Figure 11-18. You can also click the link for Use the Advance Canvas Builder if you want additional design options.
 The options you are given to select images or video will be different depending on which format you choose and whether you add the Fullscreen Experience. Follow the individual instructions for selecting your images or video based on the format you have chosen.
In the Ad Preview section, you see a preview of your ad layout (see Figure 11-19). As you move through the Links section on the left of your screen, you see your ad change.
The drop-down menu (the default is Mobile News Feed) gives you 12 choices for where you want your ad to appear, as shown in Figure 11-20. Not all choices are visible in this figure.
 Obviously, you want to determine where your ad will appear when you are making your plan and considering your objectives. If you wait until you’re creating your ad, you may make the wrong choice and waste your money.
 - In the Links section (see Figure 11-21), enter the key content that will determine whether your ad will be successful:
- Destination: Where your viewers will go when they view your ad.
- Text: Explain your promotion and make it sound enticing.
- Headline: The headline is all-important. If you don’t grab readers with your headline, they may not read further.
- Call to Action: Facebook provides you with a drop-down menu of suggested calls to action that have been successful.
- Multiple Languages: You have the choice of creating an ad in a language different from your own.
-
If you click the Advanced Options link (refer to Figure 11-21), a screen pops up with additional items. You can add an optional link and a News Feed description, as well as review and confirm your ad, as shown in Figure 11-22.
In the next section, Advanced Options, you can also set up conversion tracking and view performance data (covered in the next section) which is very valuable.
If you click the Advanced Options link, you can add your URL Parameters (optional) and choose to set up Conversion Tracking (see Figure 11-23).
 URL Parameters gives you additional information about the performance of your ad. Check with your webmaster if you want to configure it.
In the next section, you see three tracking options:
-
Facebook Pixel: To set up the Facebook Pixel (see Figure 11-24), click the Confirm button. A check mark appears on the screen. Another screen then appears that says, “Let’s make it work by creating some code” and asks you to read instructions to create it.
 Adding this pixel to the back end of your website is beyond the scope of this book. To complete this setup, contact your webmaster.
 The Facebook Pixel is an important piece of code that you put in the header of your website. After that code is in place, it records the actions of your visitors (who are also Facebook users) so that you can target them in future ads.
 - App Events: This setting lets you add events to your analytics tracking. When you click Set Up, you receive the following link to learn more:
https://developers.facebook.com/docs/app-ads#register-your-app. -
Offline Events: This setting lets you add offline events to your analytics tracking. When you click Set Up, you receive the following link to learn more:
https://business.facebook.com/offline_events/. To learn more about Events, see Chapter 13.
-
-
Click the Review button after you finish creating your ad to see the completed ad.
The Order page appears, recapping your ad’s creative elements, targeting, type of bid (CPC or CPM), bid price, daily budget, and duration of ad flight (the time period that an ad runs).
 If this is your first time creating an ad, you will be asked to complete your payment.
 You may see a message saying “Your Ad May Not Run” if the ad is not fully in compliance. For example, your ad may contain too much text, preventing it from reaching a larger audience. Make the changes requested. If you are unsure about what to do, click the Request Manual Review button.
 -
Click the Confirm button if everything looks correct.
When you click the Confirm button, you are agreeing to comply with Facebook’s Rights and Responsibilities.
On the following page, a message from Facebook appears, confirming the creation of your ad and providing some other information about its approval status and more.
After your ad is approved, you receive an email from Facebook, notifying you of the approval and including a link to the Ads Manager.
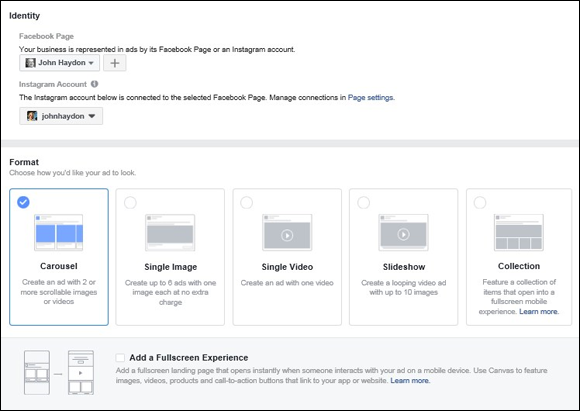
FIGURE 11-17: Choosing the link Create New Ad.
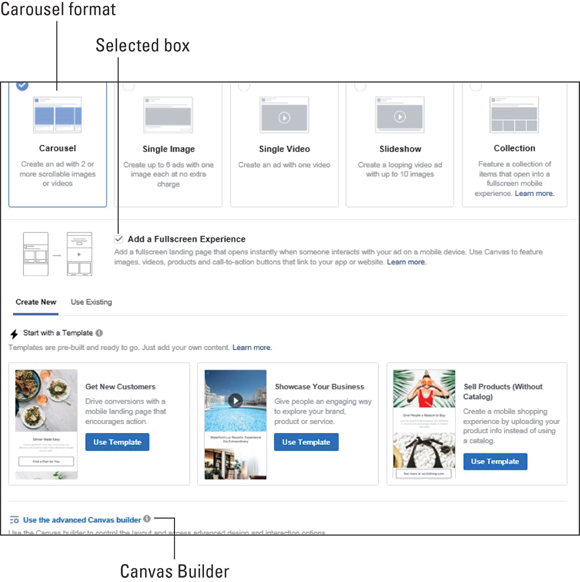
FIGURE 11-18: Selecting the Fullscreen Experience check box with the example of the Carousel choice.

FIGURE 11-19: A preview of how your ad will look.
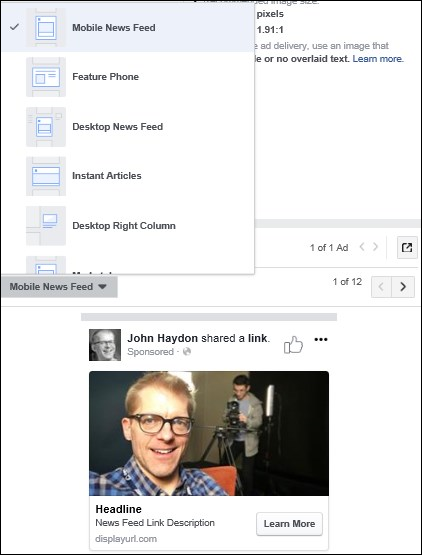
FIGURE 11-20: Selecting where you want your ad to appear.
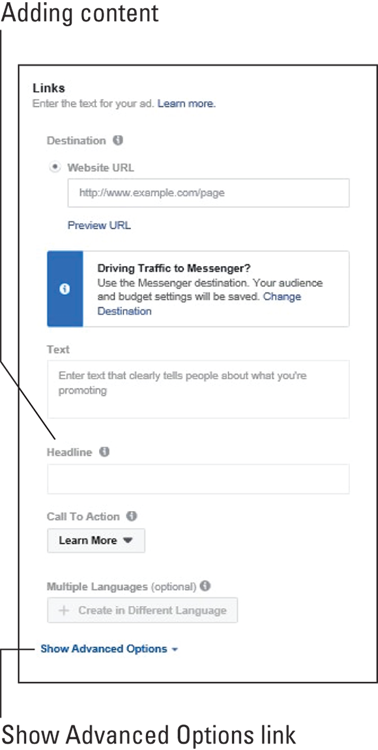
FIGURE 11-21: Setting up your content including your headline and call to action.
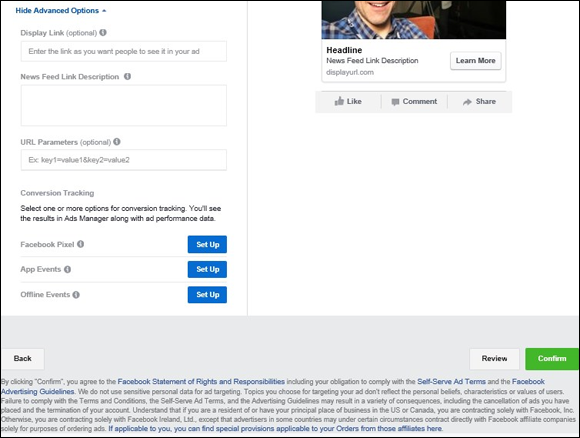
FIGURE 11-22: Setting up advanced options and reviewing and confirming your ad.
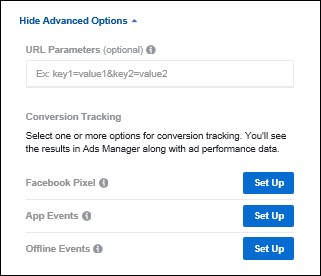
FIGURE 11-23: Setting up Conversion Tracking.
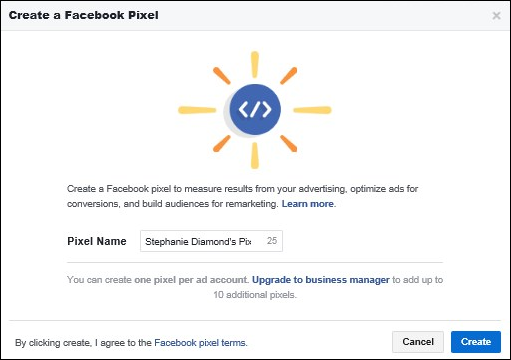
FIGURE 11-24: Setting up your Facebook Pixel.
Using an existing post to create your ad
A great way to increase your visibility with your existing audience and possibly reach new audience members is to create an ad from an already published post. It’s easy and can be set up quickly.
To create an ad from an existing post, follow these steps:
- Click the Use Existing Post link to create an ad from a post you have already published (see Figure 11-25).
-
In the Identity section, select the business Page (or other account, such as Instagram) that the ad is for.
If you have more than one business Page, use the drop-down menu to select the one associated with this ad.
-
In the Creative section, select the post you want to use from the drop-down menu.
If you also want to set up Advanced Options, click the Show Advanced Options link (see Figure 11-26).
After you select your post, Facebook shows you an ad preview and asks you to select where you want the ad to run from the drop-down menu (see Figure 11-27).
-
Click the Review button after you finish creating your ad to see the completed ad.
A screen pops up, asking you to review the campaign name, the ad set parameters, including placement, budget, and schedule, and the ad name.
-
Click the Confirm button if everything looks correct.
When you click the Confirm button, you are agreeing to comply with Facebook’s Rights and Responsibilities.
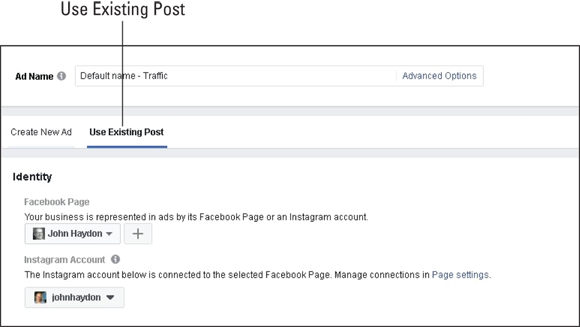
FIGURE 11-25: Selecting the Use Existing Post link to create your Ad.
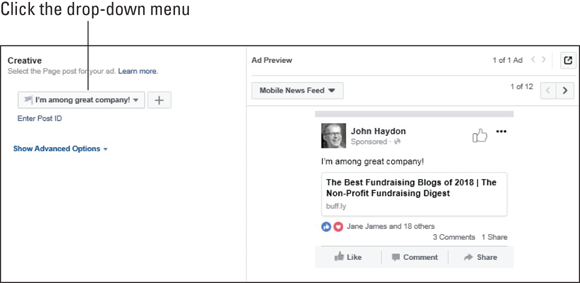
FIGURE 11-26: Selecting the post you want to use for your ad.

FIGURE 11-27: Previewing your ad and choosing where it will run from the drop-down menu.
Creating Boosted Posts
A Boosted Post is a type of Facebook Ad that creates exposure for specific posts on your Facebook Page. The types of posts that can be promoted include status updates, photos, videos, events, and milestones.
Promoted posts are labeled Sponsored and show up only in the News Feeds of people who like your Page (and those people’s friends). Promoted posts aren’t shown in the right column of Facebook. Promoted posts also show up in mobile News Feeds, which is huge considering that nearly 2 billion mobile users are on Facebook.
Creating a Boosted Post from your Facebook Page
Unlike other Facebook Ads, Boosted Posts are easy to create directly from your Page. To create a Boosted Post, follow these steps:
-
Click the Boost Post button in the bottom-right corner of any Facebook Page post.
This button appears as long as you have admin status.
A Boost Post window with several choices pops open (see Figure 11-28).
-
In the Objective section, click the Change link on the right and choose one of the following options:
- Website visits: Encourage people to visit your website.
- Engagement: Ask for reactions, comments, and shares.
Click Save when you’re finished.
-
In the Audience section, choose among these options:
- People You Choose Through Targeting
- People Who Like Your Page
- People Who Like Your Page and Their Friends
The last two of these are pretty self-explanatory. When you select the first choice, People You Choose Through Targeting, and click the Edit button, the People You Choose through Targeting Audience dialog box appears. Here, you can enter any of four different criteria for targeting your audience:
- Gender: Male or female.
- Age: You can specify any range of people as young as 13 and as old as 65+.
- Locations: You can be as specific as cities or as broad as countries, and you can choose to add more than one location.
- Detailed Targeting: You see an option called Include People Who Match at Least One of the Following. Click the browse link to see suggestions for Demographics, Interests, and Behaviors. You can also click the Exclude People link to see the same options.
-
Finally, before you leave the Create Audience dialog box, consider giving your target audience a name.
This saves your selections for use in a future post. To name your target audience, enter a name for your audience in the Name field; then click Save.
-
In the Budget and Duration section, decide what your budget will be, as well as the number of days you want your ad to run (see Figure 11-29):
- Budget: Set your desired budget for the promotion. The drop-down menu options vary depending on where you are running the ad and the size of the ad.
- Duration: Select the run dates for your Boosted Post. Your choices are 1 to 14 days. Depending on your selection, you are shown the date your ad will cease running and the amount you will spend per day. You also see the estimated number of people you will reach.
 The budget you set to use this option is a lifetime budget, not a daily budget.
 - In the Tracking Conversions section, move the Facebook Pixel button to On to use the code you created previously.
-
In the Payment section, when you see the account to which your payment will be charged (see Figure 11-30), enter your credit card information at the prompt.
 You have to enter your credit card information if you haven’t purchased a Facebook Ad before. This information will be saved as a payment option in your Facebook Ads account.
 -
Click Boost.
When you click Boost, you are agreeing to Facebook’s Terms and Conditions. A pop-up window appears, informing you that Facebook has to review the ad. (The review period usually takes 15 minutes.)

FIGURE 11-28: Choices that are available when you boost a post.
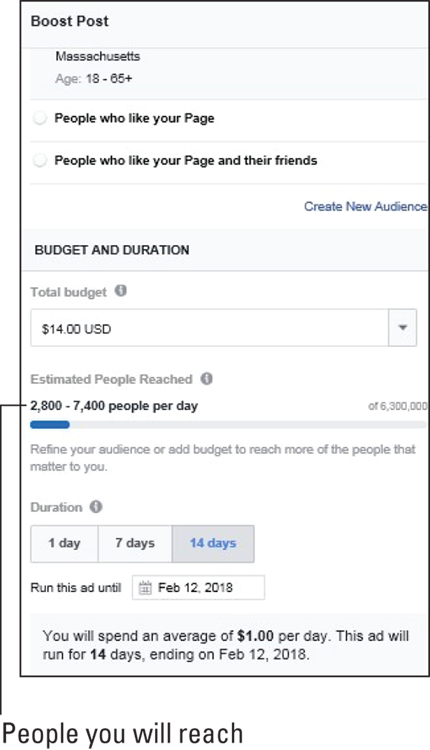
FIGURE 11-29: Setting your budget and the number of days you want to run it.
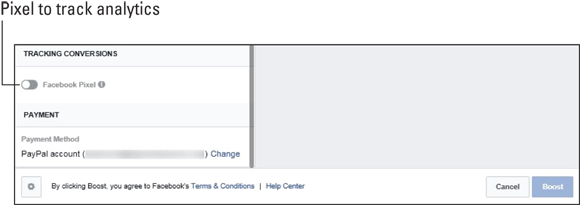
FIGURE 11-30: Using the Facebook Pixel for tracking and setting the account to which your payment is charged.
Viewing real-time analytics for Boosted Posts
You can see real-time stats on how your ad is performing. To do so, click the See Results (dollar amount) button below the post that you boosted. The resulting data (see Figure 11-31) is explained in more detail later in this chapter.
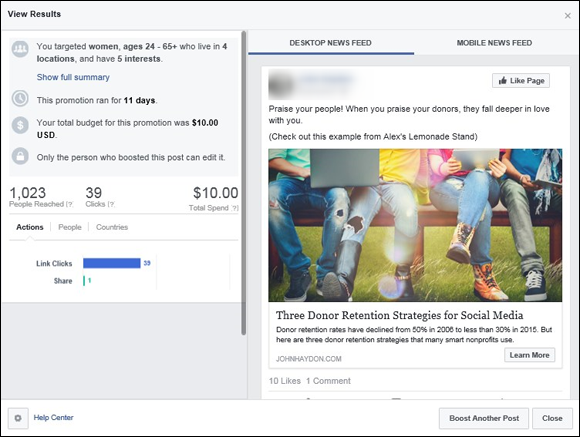
FIGURE 11-31: View real-time analytics for each Boosted Post.
Creating Multiple Campaigns
Facebook makes it easy for you to duplicate an existing ad, change variables, and launch multiple multifaceted ad campaigns. An advertiser has several reasons for duplicating ads, including the following:
- Reach multilingual audiences: You can use Facebook’s language targeting on an ad-by-ad basis.
- Test which variables in ads perform best: By changing variables, you can optimize the campaign to the better-performing ads.
- Test different bids and models (CPC versus CPM): This setting enables you to determine which model is most economically efficient.
You can easily pattern a new ad from an existing one. When designing your new ad (as we describe in the section, “Step 3: Creating your ad,” earlier in the chapter), you can copy an existing ad by selecting that ad in the Ads Manager and clicking the Create a Similar Ad link, which opens a new window.
Managing and Measuring Your Ad Campaigns with Ads Manager
After you create an ad with Facebook, you want to keep tabs on that ad’s performance. Facebook’s Ads Manager is your personalized hub where you can view all your ad activities and edit ad campaigns. To access Ads Manager, visit www.facebook.com/ads/manager (see Figure 11-32).
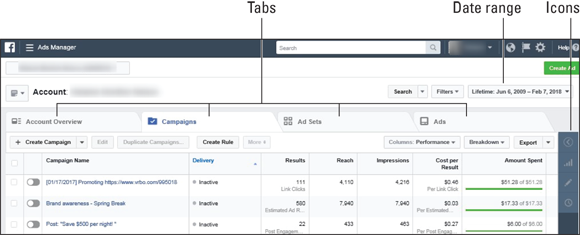
FIGURE 11-32: The Ads Manager screen.
On this screen, you see how Ads Manager is organized. It has four tabs:
- Account Overview: This tab gives you a big-picture look at how all your ads are doing.
- Campaigns: At the campaign level, you can see how a particular campaign is performing.
- Ad sets: The ad sets level shows you a summary of the performance of your ad sets (the ads you grouped together).
- Ads: This tab shows you how a specific ad is performing.
In the top-right corner of this page, you can select the date range for which you’d like to view data. You can also pause the ad, edit the budget, or change the dates for the ad in the top-left corner of this page using the icons on the right.
Looking at your account overview
Click the Account Overview tab, shown in Figure 11-33. (You have to scroll down to see all the screens in this view.)
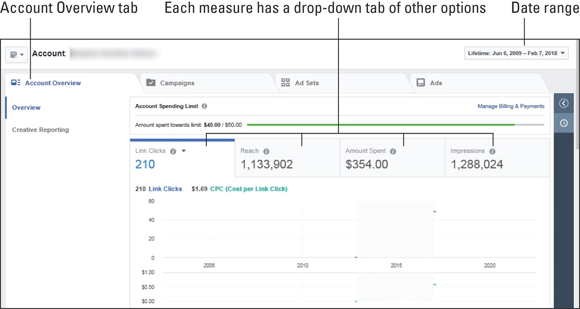
FIGURE 11-33: Account Overview screen with drop-down menus to select data you want to view.
In the upper-right corner, this screen shows you the overall ad performance based on the time frame you chose.
Here you see charts for four measures. In this case, the measures are Link Clicks, Reach, Amount Spent, and Impressions. If you click each section, you see a drop-down menu that lets you choose other options related to that measure. In this way, you can choose exactly what metrics you want to see, giving you an easy way to customize your data.
As you scroll down to the next screen, you see an accounting of your ads by objective. As you may recall, when you set up your ads, you had to select an objective. This screen gives you a good idea as to how well you reached your objective based on the money you spent.
Next, you see how your ads performed with regard to age and gender. You can also see age and gender separately broken out. Notice that the drop-down menus allow you to change the measures by which you analyze this data.
To the right of the age and gender charts, you see a time analysis that tells you what time your metric occurred. Note that you can click the two drop-down menus to select other measures to track on a timeline.
Next, you see data broken out by location. You can use the radio buttons to select data by the categories of Country, Region, or DMA Region (Designated Market Area regions, which are used by Nielsen to map U.S. regions based on television viewing). This data gives you a very clear idea of where in the world your ads are viewed.
Viewing performance data
You can view your data for each campaign. Facebook does a good job of balancing the Ads Manager’s ease of use with powerful sorting features.
The Campaigns tab (shown in Figure 11-34) features the most important data on your ad’s performance. You can view the following information:
- Campaign name: The name you created for your ad(s).
- Delivery: Tells you whether the ad is running.
- Results: The number of actions as a result of your ad. The action will be based on the objective that you choose.
- Reach: The number of people you can reach.
- Impressions: The number of times your ads were shown.
- Cost per Result: The average price paid for each action based on your objective.
- Amount Spent: The estimated total amount you spent on an ad.
- Ends: The date your campaign ends.

FIGURE 11-34: The Facebook Ads Manager shows your latest ad campaigns.
Viewing campaign details
To view campaign details, simply click the chart icon under the campaign name. On the resulting screen, you see graphs and other details about that campaign.
On the left side of the page, you see the Performance data in the following categories: Link Clicks, People Reached, and Amount Spent. Clicking the Demographics link shows you your audience with regard to age and gender. Note that you can click the drop-down menus to view other metrics categorized by age and gender.
If you click the Placement link, you see what platform the ad was shown on. In this case, the ad was shown on Facebook. To the right of the screen is a drop-down menu that shows you the device type your ad appeared on.
Understanding Other Facebook Ads Manager Features
The Facebook Ads Manager also includes several features and resources that help you save time and get more out of your Facebook Ads. This section provides a summary of these features and resources for marketers.
Accessing your Facebook Page from Ads Manager
To access a single page listing of all your Facebook Pages, go to (https://www.facebook.com/ads/manage/pages.php). There, you can view Insights for your Page, view Page notifications, and log in as your Page.
Creating and scheduling Facebook Ad reports
You can create reports and get them delivered by email from the following Ads Manager tabs: Campaigns, Ad Sets, and Ads. To create and schedule a report, follow these steps:
-
Choose the measures you’d like to track from within one of the three tabs.
After you have the report the way you’d like to see it, you can set up a report to be sent to you on a regular basis.
-
Click the Reports icon to see a drop-down menu on the upper-left side of the screen (see Figure 11-35).
A text box opens.
- Click the Save New Report link and input the name of your report.
-
Select the Schedule Email box if you want to schedule an email to be sent to you.
A new screen opens.
- Choose your preferred schedule and click Save.

FIGURE 11-35: Create and schedule reports in Facebook’s Ads Manager.
Adding other users to your Facebook Ad account
You can give other Facebook users access to your Facebook Ad account. Additional users can have general access to the account or only view reports. Added users won’t have access to your personal Facebook profile or to any other ad account.
-
Go to
https://www.facebook.com/ads/manager/account_settings/.You may have to log in again. On the right side of the page, see Add Account Roles.
-
Click the Add People button.
Enter any additional user’s name and choose the person’s role from the drop-down menu on the right side.
- Click the Confirm button.
Tracking payment transactions
Click the Billing & Payments link at the upper right of the Account Overview tab in Ads Manager to view details about your payment transactions for each of your campaigns (see Figure 11-36). On that page, you can also click the Payment Settings button to change the way you pay for your ads.

FIGURE 11-36: Facebook Ads Manager’s Billing & Payments Summary section.
Finding out about your business resources
The Learn More icon takes you to an overview of all of Facebook’s resources available to businesses: Pages, Ads, Sponsored Stories, and Developer Platform at https://www.facebook.com/business/resource.