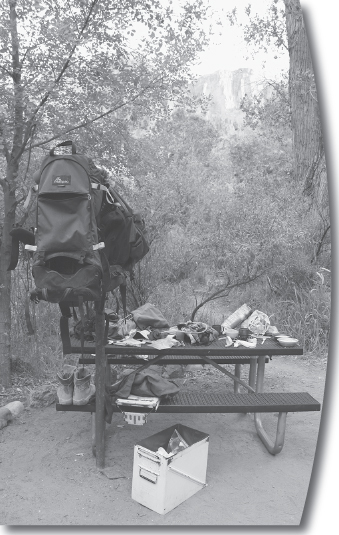
Above: Food lockers, a backpack pole, and a picnic table are present at each campsite in the corridor trail campgrounds.
3
Preparations and Planning
Above: Food lockers, a backpack pole, and a picnic table are present at each campsite in the corridor trail campgrounds.
3
Preparations and Planning
Because of permit quotas, the decision to camp inside the Grand Canyon cannot (usually) be spontaneous. Instead, you must begin the process of applying for an overnight permit more than four months in advance. This time delay, although frustrating if you like having flexibility, means that you have ample time to make sure you are planning exactly the hike you wish to take and are well prepared to make it a success. Dayhikers do not require a permit and can therefore make a spur-of-the-moment decision to descend. And if you haven’t planned ahead, a few last-minute permits are available—keep reading.
Choosing an Itinerary
A glance at a map of the Grand Canyon indicates that numerous trails descend to the Colorado River. However, only the three corridor trails—the Bright Angel, South Kaibab, and North Kaibab trails—are maintained to a “high” standard, indicating a more moderate grade, a wider trail that is generally easy to follow and walk along, and that the trails mostly have piped water, bathrooms, and emergency phones along their length. The National Park Service recommends that first time Grand Canyon visitors begin by backpacking along one of them.
This book further simplifies your decision-making, by focusing on (and recommending) a single loop that can be hiked in either direction: down the South Kaibab Trail and up the Bright Angel Trail or vice versa. The total distance is 16.1 miles. Either direction will result in you camping along the Colorado River at the Bright Angel Campground at the mouth of Bright Angel Creek and possibly at the Indian Garden Campground halfway up the Bright Angel Trail. (Dayhiking with a detour to the Bright Angel Campground for water cuts 0.4 mile from the distance. Dayhiking and taking the River Trail, cuts 0.8 mile from your distance. The latter is not recommended, since you must carry sufficient water from the canyon rim to reach Indian Garden.)
Overall, I recommend a three- to four-day trip, descending the South Kaibab Trail, spending two nights at the Bright Angel Campground, and ascending the Bright Angel Trail. If time permits or you feel you need to split the ascent over two days, spend a night at Indian Garden and take a side trip to Plateau Point. Of course if you have only two free days, by all means descend one day and head back up the next. The trail descriptions are written assuming you descend the South Kaibab and ascend the Bright Angel, but since the text is divided into short trail segments, you can easily reserve the order you read the sections.
Some considerations you might use to select your exact itinerary are:
When to Go
The trails descending from the South Rim of the Grand Canyon can be hiked year-round. And they are, for permits to camp at the Bright Angel Campground are nearly fully booked year-round—with an occasional spare slot midsummer or in winter.
However, the climate information indicates your experience will vary greatly across the year. Most people’s foremost consideration is avoiding or learning how to endure the sizzling temperatures in the Inner Gorge during the summer months (mid-May through mid-September, and especially June through August), but day length, the possibility of icy trails just below the rim, overly cold temperatures, rainfall, and the chance to enjoy wildflowers may also influence your decision.
Most people consider spring (mid-March through April) or fall (late September through October) the preferred time for a visit. During these seasons, you are unlikely to experience freezing temperatures below 4000 feet (the elevation of the Indian Garden Campground) and the Inner Gorge will not be uncomfortably hot. These are also the driest months (see page), when winter storms and afternoon thundershowers are less likely to interfere with your adventure. In April or May you may be treated to a beautiful display of wildflowers. Spring and fall are the most difficult times of year to get overnight permits, and they’re the only times it is somewhat sensible to dayhike, as temperatures are less extreme.
In winter, expect chilly temperatures during the morning and evening hours, especially if you camp at Indian Garden. You will need to navigate icy sections of trail, especially the top of the Bright Angel Trail and the first switchbacks on the South Kaibab Trail. The air will be cool and crisp and the sun’s low angle produces both beautiful lighting and lots of shadows. And, while the backcountry campgrounds may still be full, you will encounter far fewer dayhikers on your journey and have more solitude. Dayhiking is not recommended, for although you can hike throughout the day, you do not want to be approaching the upper, icy sections of trail while exhausted, much less in the dark. Instead of heat exhaustion, you are vulnerable to hypothermia.
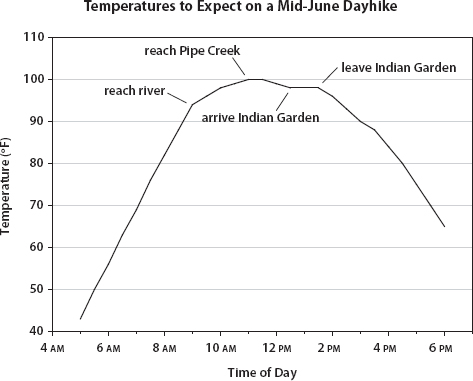
I usually avoid the desert during the summer months, but the land is still beautiful and captivating—the extreme climate can even be enticing. And of course this is vacation time and maybe your only chance to visit the Grand Canyon. During summer, start hiking by dawn, so that you can climb above the Inner Gorge before the sun climbs far into the sky. During these months, you are likely to choose to exit via the Bright Angel Trail and spend midday planted in the shade of Indian Garden, continuing upward only in the late afternoon. The extreme temperatures make dayhiking very impractical in summer, since you will want to avoid the Inner Gorge from quite early in the morning until the sun is setting, leaving insufficient daylight to climb back to the rim. Consider the figure (previous page), showing possible temperatures you will encounter in mid-June, if you require 12 hours hiking time, an additional hourlong lunch break, and leave at 5 A.M.
Wilderness Permits
Permits are required for anyone camping below the canyon rim overnight, but not for dayhikes and stays at Phantom Ranch (see page for more about the ranch). Only 10 percent of permits are available first-come, first-served at the Backcountry Information Center, so it is best to reserve your permit, as described below.
Backcountry camping regulations are quite different for the three corridor trails (those described in this book and the North Kaibab Trail) versus other regions in the backcountry; along the corridor trails, camping is permitted only in the three established campgrounds: Indian Garden, Bright Angel, and Cottonwood. (The rest of the park is divided into “use areas” with “at large” camping.)
Each of these campgrounds has specific campsites, some explicitly for small groups (1–6 people) and others for large groups (7–11 people). The table below shows the breakdown of sites at each campground. One group of the appropriate size is allowed at each campsite. In addition, there is a maximum number of people allowed in the campground each night, and that number indicates that all campsites cannot be filled to capacity each night—indeed many will be filled with small parties. Overall, smaller groups have a better chance at procuring a site.

From March 1 until November 14, a group may spend only two nights at each campsite (consecutive or nonconsecutive) per trip. It is illegal for a large group to split into subgroups to get multiple permits for the same campground for the same night. This regulation was a response to large groups of Boy Scouts camping in many adjacent campsites but functioning as a “single” group.
PERMIT RESERVATIONS
Permits can be requested from the Grand Canyon National Park Backcountry Information Center beginning on the first of the month, four months before your entry date. For instance, requests for the month of March begin on the previous November 1 and requests for the month of October begin on June 1. You can download the permit request form from the overnight hiking and backcountry permit section of the park’s website: www.nps.gov/grca/planyourvisit/overnight-hiking.htm.
Submit this form in one of three ways:
1. |
Fax your request to: Backcountry Information Center, 928-638-2125. |
2. |
Mail your request to: Backcountry Information Center, P.O. Box 129, Grand Canyon, AZ 86023 |
3. |
Hand deliver your request to the Backcountry Information Center. |
On your permit request form, list acceptable alternative dates and itineraries. Being flexible increases your likelihood of receiving a permit. At times of the year, especially October, the most popular month, the park may receive up to three times as many permit requests as they have slots.
If your request is successful, your permit and a CD titled Hiking Grand Canyon will be sent to you in the mail within a month. The permit you receive in the mail is all you need to embark on your walk; you do not need to visit the Backcountry Information Center before beginning your descent. The content from the CD, as well as podcasts and videos on all manner of Grand Canyon topics, are available on the multimedia section of the National Park Service website: www.nps.gov/grca/photosmultimedia/grca_pod.htm. For additional information, you can also call the Backcountry Information Center at 928-638-7875 between 1 P.M. and 5 P.M.
LAST-MINUTE PERMITS
Approximately 10 percent of permits can be obtained first-come, first-served at the Backcountry Information Center. To obtain these permits, show up on a given morning before 8 A.M. During popular hiking seasons (almost always!), you will be assigned a number. At 8 A.M., the rangers call hikers up in numerical order and begin issuing permits for the next day. If the permit you request is not available, you can select a different hike, get a new number for the next morning, or give up. The new number you receive will be smaller, since some of the people ahead will likely have obtained a permit and others run out of time and headed home. If you have many days, you will probably get a permit eventually, but if you have only a few days you may very well end up empty-handed, especially if you wish to hike the corridor trails.
This method can be especially frustrating, for even if you have spare time for dayhikes, you can never start a dayhike until well after 8 A.M. Moreover, there might never be permits for the day you want, since groups might have shown up several days earlier and claimed the first-come, first-served sites for a whole string of days.
There is a little quirk in what is happening at the Backcountry Information Center each morning, especially at the end of the month. In addition to the people waiting to get the unreserved permits, a line of locals (including local guide services) wait until the first of the month to turn in their reservation requests; by handing them over in person first thing in the morning, they are virtually assured of the trip itinerary they want.
FEES
Regardless of how you get your wilderness permit, there are fees. The permit itself costs $10. (This fee is waived if you purchase a yearly $25 frequent hiker membership.) In addition there is a $5 per person per night fee. These fees apply both for reserved and first-come, first-served permits.
Staying at Phantom Ranch
Not everyone who “backpacks” into the Grand Canyon stays at the Bright Angel Campground; some stay at Phantom Ranch, the backcountry lodge just upstream of the campground (see page for the long history of this beautiful location). Some guests at the ranch arrive on mules, but many others hike down themselves. Phantom Ranch guests need to carry only a daypack; a bed and served meals await them at the ranch, making it an excellent choice if you want to spend a night in the Grand Canyon but are hesitant about camping or carrying a large pack. The 11 private cabins and 4 dormitory bunkhouses can accommodate 92 people, with the private cabins generally allocated to visitors arriving on mules. Reservations are taken 13 months in advance.
Phantom Ranch offers other services that may be tempting for campers. Quite a few campers traipse up to Phantom Ranch for one or more of their meals (breakfast, sack lunch, and your choice of a steak dinner or the hiker’s stew). In addition they offer a duffle service: Up to 30 pounds of your gear descends on a mule, while you walk.
See www.grandcanyonlodges.com/lodging-704.html for rates and additional information.
Training
Once you have your coveted backcountry permit, you must begin preparing for your hike. As you train, remember you are training to ensure you reach the river, return unaided to the rim, and have a good time in the process. After all, an odd corollary of “descending first” (see page) is that there is a high success rate; most people who decide to hike to the Colorado River reach their goal. But it also means that there are a lot of overextended people attempting to extricate themselves from the canyon—it is especially essential to be adequately conditioned, physically and mentally, for your adventure.
PHYSICAL TRAINING
You need to be in sufficiently good physical condition that you can cover the necessary distance on downhill and uphill trails. To successfully hike to the bottom of the Grand Canyon and back up again, you will need to be able to hike at least 6 miles carrying a pack on three consecutive days, climb 4500 feet (over one to two days, depending on your route and itinerary), and tolerate dry and hot (or cold) conditions.
Any aerobic exercise will help you get in shape, but the muscles used extensively for walking down and up hills can really be conditioned only by walking down and up hills. If you live somewhere with hills, the best form of training is, unsurprisingly, to take long walks. However, if your surroundings are flatter, or you don’t have time to hike hills regularly, cities are full of training opportunities: Walk up and down staircases in a tall building, walk up and down bleachers in a local stadium, or use a stair machine at a gym. Do not underestimate the descent into the canyon; sore muscles and most importantly, knee injuries are less likely if the muscles you need to descend gracefully are strong.
Testing your endurance ahead of time ensures that you are physically and mentally ready to walk for many hours. If you are able to complete a 10-mile hike in hilly terrain, you are physically capable of a multiday trip. If you plan to approach it as a dayhike, you should be able to hike 15 miles in hilly terrain stopping for only 10 minutes each hour, plus a couple longer “lunch” breaks.
An added reason for training hikes is to break in a pair of hiking boots or shoes (see more on footwear). You will better be able to enjoy your hike out of the canyon if you’re not focused on painful feet.
MENTAL PREPARATION
In addition to physical training, there are two mental challenges, both very important and in slight opposition to one another. The first is knowing how your body performs in both “easy” and adverse environmental conditions and understanding “messages” your body sends. To avoid many of the conditions described in Precautions and Considerations (see page), you should be familiar with how you feel when you are simply tired, so you can recognize symptoms not attributed to your normal exhaustion. The ability to perceive when your body no longer feels “good” or “normal” can only be gained by exercising frequently and paying attention to your body. You should be especially attentive to your body’s warning signs if you have a history of heart problems or if you were relatively inactive until the inspiration to backpack the Grand Canyon grabbed you. Quite a few people—especially men in their 50s and 60s—die of cardiac arrest on these trails, probably because they pushed themselves too hard in the hot, dry conditions.
The second mental challenge is finding the motivation to keep moving toward your destination when you are tired. If you have read about all the possible dangers waiting to befall you, you may be convinced that if you are tired on a hot day, you should hide in the shade, but it is important to know the difference between “tired” and “body malfunctioning”—almost everyone hiking up 4500 feet will be tired. And all those tired people need to take the recommended breaks (see page) and then keep hauling themselves up the hill at a steady pace. The mental games required to motivate yourself to continue are individualistic, and determining the right pace for your body can only be established through practice hikes (see page for more about pacing yourself).
ACCLIMATIZING TO DESERT HEAT
Heat acclimatization is a very important part of preparing to hike in the Grand Canyon during the hot months. Only people who live in an equally hot environment can truly acclimatize to the heat, as complete acclimatization requires two to three weeks of daily (or near daily) exercise in hot conditions. Physiologically, heat acclimatization includes increased sweating, increased blood volume, increased blood flow to the skin (which promotes cooling), and increased water intake.
However, limited heat acclimatization occurs after only four to seven days, so visitors from cooler climes can acclimatize by scheduling their Grand Canyon descent for the end of a Southwest vacation. First spend at least a week visiting and taking shorter hikes in nearby—and equally hot—national parks, to acclimatize to the desert climate.
What to Contemplate Before Descending
By the time you reach Grand Canyon Village, you will have spent many hours planning, training, and assembling your gear. This section covers a few more considerations: reminders about pace, breaks, group dynamics, and what it means to descend first—topics to read about before you leave home and to have firmly etched in your mind during your hike. For each of these I can provide advice but no tangible rules. How you implement these suggestions is affected by individualistic factors: what pace and break schedule works best for you and your judgment and attitudes about pushing yourself, safety, and group etiquette.
DESCENDING FIRST, ASCENDING SECOND
The National Park Service at the Grand Canyon is very insistent that hiking the Grand Canyon is much more strenuous than most people expect it to be—and they are correct. Most likely, on the majority of steep hikes you have taken you have parked your car at a relatively low elevation and begun your day with an ascent. Canyons turn everything upside down: You begin by going downhill and then have to complete the arduous ascent. Think about what this means:
PACE
If you manage to establish and maintain an appropriate pace for this hike, you will have greater endurance and find the walking much more enjoyable. Although this advice is given often, only considerable hiking experience in similar conditions will help you fine-tune your exact pace. I have learned that a range of paces feel “good” to me, but if I have to move more quickly, I need far too many breaks and my legs get tired prematurely. Alternately, if I hike more slowly than my normal pace, my legs and breathing never settle into a sustainable rhythm, and both my endurance and motivation are much reduced. For this reason some groups may decide it is OK for the faster hikers to go ahead and then take longer rests every few miles, allowing everyone to regroup.
Think about your choice of pace even while walking downhill. It is very easy to race downhill when you are fresh, oblivious to the fact that you are expending calories, using your muscles, baking in the sun, and pounding your feet. However, you will need energy, muscles, and functional feet for the ascent and should slow your pace to more of a plod than a brisk walk—absolutely essential if you are attempting a long dayhike, but still true if you are spending a night along the river because sore muscles and feet will not heal overnight.
On the ascent, remember the old mantra that slow and steady wins the race. Or rephrase this to slower and steady wins the race. At the bottom of a long climb, whatever pace I can do, going a little slower and having a steadier pace will get me up most efficiently. Observations and experience have taught me that most people start up a hill at a pace too fast to sustain for long. You should actually go more slowly than your “sustainable” pace for the first half mile to mile, because your muscles need some time to warm up.
On your training hikes, you can identify your ideal range of paces. Try different walking paces on different days, to learn how your lungs and legs feel under different conditions. Over time you will discover a pace that feels good. There are two tricks to converting that knowledge into a successful hike into and out of the Grand Canyon. First, take enough training hikes so that you know exactly how your lungs and legs feel when your pace is sustainable for a long climb, rather than how fast you were going on a given day. After all, the actual distance covered and elevation gained per time can be wildly different on different trails and at different temperatures, but you’ll have the same pairs of legs and lungs. Second, on a very long hike, such as this, force yourself to go about 80 percent of your good pace. I have hiked with many very fit, gung-ho hikers who sped past me during the first hours of the walk, but ran out of reserves long before the top and ended up dragging.
Ingrain in your mind that neither backpackers nor dayhikers need to hike quickly to complete this hike. The distance from Bright Angel Campground to the South Rim via the Bright Angel Trail is 9.3 miles and the distance down and up is 16.1 miles. A backpacker, given an early start, will have ample time. A dayhiker should average about 1.5 miles per hour. These are steady plodding paces!
Members of a group will likely modify their paces somewhat to stick together. While it is appropriate for fast walkers to slow down, slow walkers should not feel obliged to quicken their pace; that approach is more likely to lead to a much slower pace or even medical problems before the end of the day.
GROUP DYNAMICS
When group members have different expectations, a hike is more likely to be remembered as unsuccessful—either because it was aborted or you harbor negative memories. Even if your companions are regular hiking partners, discuss goals and hiking styles before beginning your descent. Topics for discussion include:
BREAKS
While it is important to establish that slower and steady pace that propels you to the canyon rim, you should still take many breaks on your ascent. Your breaks should include quick breathers, drink breaks, 10-minute food and rest breaks each hour, and longer rest breaks a few times during your ascent, especially if you are hiking on a hot day.
The shortest breaks are quick breathers—all but the best-trained individuals will need a few of these on the steeper sections. You will also want to take 30-second water stops every five to ten minutes, either to gulp water from your hydration tube or to grab that handy bottle of water and slurp some down. But be careful not to let these half-minute breaks take up more than that; you don’t want your leg muscles to cool down or to lose the good walking rhythm you have established.
Next, take a ten-minute break each hour to refuel on food, drink extra water, and patch blisters, if possible in a shady spot, such as at the resthouses, at Indian Garden, under the rock overhang in the Tapeats Narrows along Garden Creek, under a pinyon at Cedar Ridge, or any other little spot you can find. If you are the fastest member of a group, remember that the break begins, not ends, when the last person arrives. Make sure the stragglers also get 10 minutes to rest their legs and eat some food. If you are antsy to get going, pull out this book and read about the area’s geology and vegetation.
Finally, most individuals will take one or two longer breaks for lunch or a midafternoon siesta. If you are ascending midsummer, take a much longer midday break in the shade of Indian Garden, to minimize hiking between the hours of 10 A.M. and 4 P.M.
DAYHIKING
As described in the introduction, this book is aimed at hikers spending two or more days completing their descent into and ascent from the Grand Canyon—both because the National Park Service strongly urges people not to complete the hike in a day and because you miss a lot of the experience when hiking at the fast, often rushed pace of a dayhiker or trail runner. This is a location hike, in contrast to a destination hike (see page for an explanation), meaning that this is not a hike where most people’s most gratifying moment is crossing the Colorado River, but where they will be equally awed by the experience at many points along the way. The first time I hiked the South Kaibab and Bright Angel loop was as a very quickly paced dayhike. Although I have an uncanny ability to remember most hikes I’ve taken nearly step by step, when I revisited the trails some years later, I realized I barely remembered the scenery. I’d pushed myself too hard to take it in.
With that preamble, my brief counts on the trail suggest that during all but the hottest and coldest months, people dayhiking to the Colorado River outnumber people backpacking. Most of these people clearly hike a lot, are in very good shape, and many are very used to desert conditions. If you’re not sure you fit into all three of these categories, think hard about following the park service’s recommendations of dayhiking no farther than Plateau Point on the Bright Angel Trail. If you know you fit into these categories, you have only a day (or no permit), and the high temperature at Phantom Ranch is supposed to be less than 85°F, you could attempt this endurance test.
If you decide to descend and ascend the entire canyon, read the summary table of how to avoid hazards, carry plenty of water, eat plenty of food, and take frequent breaks, even on the way down.
Familiarizing Yourself with the Landscape
In addition to acclimatizing to the heat (see page), arriving at the Grand Canyon a few days before the start of your hike lets you become familiar with the landscape. Staring down on the Bright Angel and South Kaibab trails before you descend helps put your hike in perspective. You can see the big picture more clearly while on the rim. Go to Trailview Overlook or Yavapai Point (and the adjacent visitor center) to see where these two trails descend through the rock layers. Take note of how the Bright Angel Trail descends a broad gully, the Bright Angel Fault line (see page for more about geology and trail location). Notice how the distance from the South Rim to the Colorado River is shorter than from the North Rim to the bottom, a consequence of streams on the South Rim flowing away from the canyon and those on the North Rim flowing to the canyon (see more about the rim elevations). The Grand Canyon is overwhelming—in the most wonderful way—and having a day or two to enjoy it before you put on a big pack will enhance your hike.
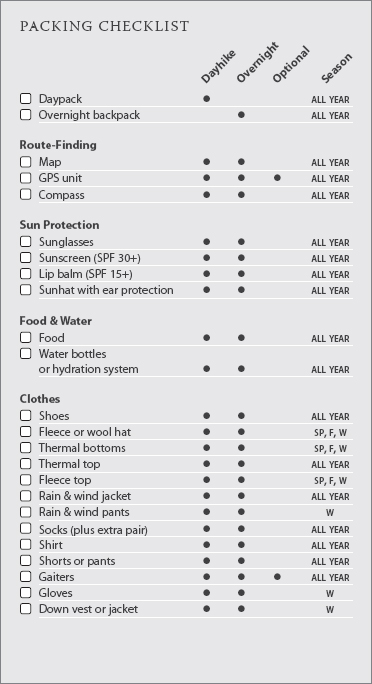
What to Bring
The water, food, first-aid kit, and other essentials you carry to the Colorado River and back ensure that you have a safe and enjoyable journey. Deciding what is required is a delicate balance between being encumbered by an excessively heavy backpack and neglecting to bring the required items. My basic rule is to carry sufficient gear to spend an unplanned night on the trail. Most importantly, that means you must always be carrying several liters of water, while in winter a dayhiker must also have sufficient clothing to sit through a very cold night.
I have divided my recommendations on what to pack into water, food, footwear, the 10 essentials, additional gear for a dayhike, and additional gear for a backpacking trip. (Backpackers will need to read through all lists, but can omit a daypack.) A checklist of the items in each of the sections is provided.
WATER
Consuming sufficient water and food—and in the proper ratio is difficult for many people, especially if the heat, dry air, or simply exertion makes eating unappealing. Dehydration, caused by drinking less water than you are losing through sweating, breathing, and urination, is one problem. Hyponatremia, or having too few salts (specifically sodium) in your blood, is a second problem, and actually the greater risk while hiking in the Grand Canyon. Hyponatremia is caused by drinking copious quantities of water and can be exacerbated by eating insufficient food. After all, the dry desert air and exertion make people thirsty, and as long as water is available, most people will drink regularly. If you are hot and tired, however, it is much more difficult to remember to stop and eat.
To consume sufficient water on your hike, you must carry and drink enough. The first requires planning in any desert environment, since water is available in limited locations. While most Grand Canyon hikes require hikers to carry water for the entire day, purified water is available along the Bright Angel Trail, allowing you to refill at several locations: 1.5-Mile Resthouse, 3-Mile Resthouse, and Indian Garden. Purified water is also available at the Bright Angel Campground, including a tap a little west of the lower campground bridge. The latter is useful knowledge if you are dayhiking and wish to take the shortest detour from the River Trail. (Note that water is not available at the 1.5-Mile and 3-Mile resthouses during the winter months. Ask the rangers about water availability before beginning your hike.) If you plan to get water from side streams or the Colorado River, you will need to treat or filter it (see page for a description of possible devices).
To ensure you have sufficient water to reach the next tap, you should have enough container(s) to carry at least 3 liters—a gallon if you plan to ascend the South Kaibab Trail. Either carry it in water bottles or use a bladder-and-tube hydration system. Carrying a water bottle lets you efficiently gulp large quantities of water, but you need to be disciplined enough to stop frequently to drink. Alternatively, a bladder-and-tube hydration system allows you to drink as you are walking, letting you slowly and steadily consume water throughout your hike. I recommend the latter: I nearly doubled my water consumption when I switched to this system, because I drank a few sips every five minutes, whereas I’d previously procrastinated about taking out my water bottle until I was really thirsty, once every half hour at best. If you use a bladder-and-tube hydration system, carry a liter of spare water in a bottle in case you are too efficient at drinking water and don’t realize you are running out.
About 5 to 8 quarts of water should be adequate for most people on a full dayhike. If you are hiking more than eight hours, this suggestion is lower than the oft-stated “drink a quart an hour,” but research on soldiers exerting themselves in desert environments indicates that, even with all-day exertion, 8 quarts a day is adequate. (If you feel like your body needs more water than this, limit the number of hours you are active, especially if you are not well acclimatized to desert conditions.)
FOOD
On a two-day trip descending to the Colorado River and climbing back to the South Rim with a moderately sized backpack, you will expend somewhere in the vicinity of 8,000 calories. A dayhiker will expend about 5,000. Although you are unlikely to replenish all calories consumed—after all part of the joy of hiking is weighing less at the end of your trip—carry at least 3,000 calories per day and eat throughout the day.
Both dayhikers and overnight hikers should eat a 200- to 500-calorie snack (or “lunch”) every hour or two. Eat plenty of salty foods, such as salted nuts, chips, or jerky. Energy bars, granola bars, dried fruit, and cookies also make excellent snacks. Easily digestible snacks, like Gu, provide your body with an easily accessible supply of energy and are also generally still appealing when you are exhausted. I always bring one larger “snack” (bread or crackers with toppings) that I call lunch and eat as I take a longer midday break in the shade, but hearty snacks throughout the day provide sufficient calories and salts. It is a good idea to bring a variety of snack food and treats, so that you always find something appealing.
In addition to lunch and snacks, overnight hikers need to carry hearty breakfasts and dinners. Bring any lightweight, flavorful food that appeals to your palette. Instant oatmeal and granola with powdered milk are two backpacker breakfast favorites. Add a handful of dried fruit or nuts to your bowl for extra energy and flavor.
I always begin my dinners with a cup of instant soup. During cold-weather months it provides welcome warmth, and year-round it delivers an infusion of salt. For dinner itself, either freeze-dried backpacking meals or your own creations are good alternatives, but make sure the freeze-dried meals contain sufficient calories for you (they don’t for me) and that your own creations are appealing—you have to eat. One of my favorite concoctions that includes all food groups and is very compact to carry is something I call “5-C couscous”: couscous, curry powder, dried cranberries, cashews, and powdered coconut milk. Check your local outdoor store for wilderness cuisine cookbooks. The store in Grand Canyon Village carries a good selection of freeze-dried backpacking meals.
Some hikers staying at Bright Angel Campground opt to eat breakfast and dinner at Phantom Ranch, eliminating the need to carry a camping stove and making their food bags much lighter. Their dinner stew is delicious! Once you have a backpacking permit, contact Phantom Ranch to determine their availability of “meals only” slots (see page for more information).
FOOTWEAR
Each person’s feet (and ankles and knees) have different needs in footwear. The only consensus among people I’ve hiked with is to wear a pair of comfortable, well broken-in, but not worn-out shoes on a long hike. These shoes could be full leather hiking boots, lightweight cloth-and-leather hiking boots, trail runners, or lightweight running shoes. On trails in the Grand Canyon shoes with good tread are essential since sections of the trail have a surface deposit of small rocks overlying a layer of compacted soil, creating a slippery surface.
These few footwear suggestions should transcend the “lightweight” versus “lots of support” debate:
In the interest of full disclosure, I’m biased toward heavy hiking boots, which provide the ankle and foot support that I require. In lighter shoes, I end up with very sore feet. The downside is that I often get blisters, but I successfully combat them with multiple layers of sports tape, applied before I start walking. Many others prefer the discomfort of sore feet to hauling extra weight around, or their feet are content in lightweight shoes.
Only you can determine what pair of shoes is right for your feet. Experiment with different choices on your practice hikes, ensuring that they are comfortable in rocky terrain, uphill, downhill, when your feet are sweaty, and after many hours of walking. Moreover, if no pair of shoes is perfect—which is likely the case—after a few test walks, you will be aware of their shortcomings and be able to combat problems as they occur.
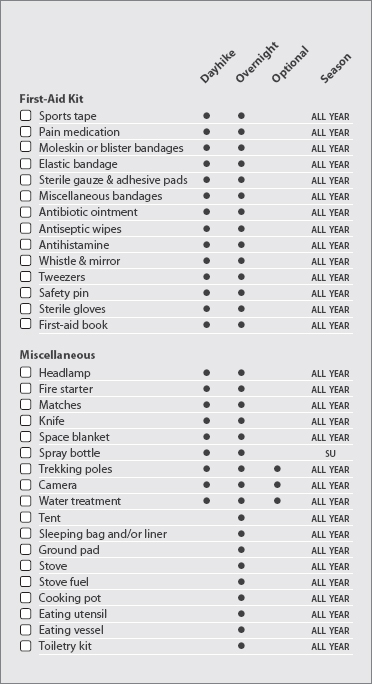
TEN ESSENTIALS
Packing the 10 essentials is an excellent way to start organizing your gear for a long hike. As you place them in your pack, remind yourself why it is essential that you carry each of them. The official list is: map, compass, sunglasses and sunscreen, extra food and water (discussed above), extra clothes, headlamp or flashlight, first-aid kit, fire starter, matches, and a knife.
1. |
Map: Simply put, it is dangerous to enter the wilderness without a map. This warning is especially appropriate for hikers in the Grand Canyon, where contorted canyons and desert landscape can be particularly disorienting and appear repetitive, making it difficult to determine where you came from. The corridor trails in the Grand Canyon are well signed, but if you stray from the trail or mistakenly wander onto a different trail (such as the Tonto Trail), you need to determine where you are and how to navigate back to the trail. |
The maps in this book show the trail and some of the surrounding landscape, but their limited geographic extent will not help you relocate yourself if you deviate from the corridor trails. Trail maps of the entire national park produced by Trails Illustrated and Sky Terrain include a much greater area than you need, but they give you a good sense of the relative location of trails and landforms if you need to orient yourself. (While a GPS unit can provide the same information, it’s a secondary navigation tool, since it runs on batteries, might stop working if dropped, and often picks up insufficient satellites near tall walls.) |
|
2. |
Compass: The only time you are likely to use a compass is if you become lost and disoriented and need to orient your map, identify some basic landmarks, and thereby determine the direction to the trail or which direction to follow the trail. (Many GPS units do not include a compass.) |
3. |
Sunglasses and sunscreen: As you descend into the Grand Canyon, you can only escape the sun under riparian trees, in rest shelters, against a tall rock wall or overhang, and maybe pressed tightly against the trunk of a pinyon or juniper tree. As you walk you must protect yourself from the sun with sunglasses, sunscreen, and a wide-brimmed hat. If you ignore these essentials, you could get more than a nasty burn; repeated exposure can lead to skin cancer and cataracts. Your sunscreen and sunglasses should protect you against both UVA and UVB, and your sunscreen should be at least SPF 30. To avoid chapped or split lips, bring lip balm that is at least SPF 15. Apply sunscreen every two to four hours during your hike—or as recommended on the sunscreen container—research indicates it becomes ineffective over time. |
4. |
|
5. |
6. |
Extra clothes: Every hiker needs sufficient warm clothing to spend a night on the trail at any elevation. However, the type of clothing varies greatly by season. At one extreme, in winter, you should have thermal tops and bottoms, a warm hat, a fleece jacket, and a waterproof jacket at minimum, and probably gloves, fleece pants, waterproof pants, and a down vest or jacket. The Grand Canyon is chilly in winter. But even midsummer, nighttime temperature near the rim dip into the 40s. During the summer months complement the clothes you hike in (a shirt and shorts or hiking pants) with a thermal top and a windbreaker (or lightweight rain jacket if rain is forecast). |
The backcountry rangers in the Grand Canyon report that in summer people wearing cotton clothing stay cooler than those wearing other fabrics, explaining that this is because water evaporates more slowly from cotton. I have a difficult time understanding the physics behind this recommendation, since the same amount of sweat evaporates through either, creating the same cooling effect. Maybe it applies only when you soak your clothes in water, since a cotton T-shirt holds more water? |
7. |
Headlamp or flashlight: Backpackers will choose to carry a flashlight or headlamp for use around camp, but dayhikers should also include one in their packs so they can begin their hike predawn and (perhaps unintentionally) continue their hike after dark. Plus, in an emergency, a light can be used to attract the attention of other visitors. |
The widely available light-emitting diode (LED) headlamps are so tiny, weigh only a few ounces, and continue to run on the same set of AAA batteries for up to 50 hours—there is no excuse for not carrying one. While less useful as a light beacon to be observed from a distance, the dimmer, diffuse light from the LEDs is better for night walking than the brighter, more directed light from incandescent bulbs; your pupils remain sufficiently dilated to see the edge of the trail, and irregularities in the trail surface stand out better. For this reason I prefer half-used batteries for night walks. |
8. |
First-aid kit: Your first-aid kit will most likely be used to prevent and treat blisters, ease a headache, and dull pain from sore knees. If you sustain a serious injury, it also needs to keep you comfortable and medically stabilized, in case you need to wait to be evacuated. |
A basic first-aid kit for a dayhike or short backpacking trip should contain: |
|
|
|
|
|
|
|
|
|
|
|
|
|
|
|
|
|
|
|
|
|
|
|
|
|
|
|
|
|
|
|
9. |
Fire starter and matches: You should always carry these. In the Grand Canyon, other than for lighting a camp stove, they should be used only in an emergency, and then only to create a small smoke signal to help rescuers pinpoint your location. Burn only your fire starter and light it in the middle of the trail-the National Park Service prohibits fires below the canyon rim to protect vegetation and avoid a wildfire, a very real danger. |
10. |
Knife: A small pocketknife, especially one with a pair of scissors, is important for cutting first-aid supplies—and probably for preparing your lunch. |
DAYHIKE GEAR LIST
In addition to the 10 essentials, dayhikers should carry the following:
Optional items include:
OVERNIGHT GEAR LIST
In addition to the 10 essentials and the aforementioned dayhiking gear, backpackers should carry the following:
Getting to Grand Canyon Village
The Grand Canyon is located in northern Arizona. The extensive national park runs 277 river miles, from Lees Ferry a little downstream of Lake Powell, near the Utah state border, to Lake Mead at the Nevada border. Most visitors, however, are restricted to a much smaller piece of the landscape by the limited road access. In fact, nearly all visitors gaze at the canyon from Grand Canyon Village on the South Rim, from where the two trails described in this book depart. Many web searches for Grand Canyon information will point you to Tusayan, a community that is a collection of hotels, restaurants, and other tourism-related industries 2 miles south of the national park boundary—a 10-minute drive from the South Rim.
BY CAR
Approaching from the south or east and passing through Flagstaff, Arizona: If you are approaching the Grand Canyon from southern Arizona (e.g., Phoenix or Tucson), take US 17 north to Flagstaff. Flagstaff is 140 miles north of Phoenix and 260 miles north of Tucson. If you approach from the east (e.g., Albuquerque, New Mexico), take Interstate 40 to Flagstaff. Flagstaff is 320 miles west of Albuquerque.
In Flagstaff, turn onto US 180 north toward the Grand Canyon. Follow this small road 42 miles northwest to the small town of Valle. Turn right onto AZ 64 north and follow it 27 miles to Grand Canyon Village, passing through Tusayan en route.
Approaching from the west and passing through Williams, Arizona: If you are approaching from the west (e.g., Las Vegas or Los Angeles), you will reach the town of Williams (on US 40), and then head north to the Grand Canyon.
From Las Vegas, head toward the intersection of Interstate 215 and Interstate 515 (also posted as US 93 and NV 95) in southeastern Las Vegas. (From the airport you will take I-215 10 miles east to this location.) Continue for 90 miles, crossing into Arizona at Lake Mead and then reaching Interstate 40 in Kingman, Arizona. Continue east on I-40 for 112 miles to Williams, Arizona.
From Los Angeles, head toward I-15 in northeastern Los Angeles, near San Bernardino. (From the Los Angeles International Airport, turn onto Interstate 105 east, following it for 17 miles to Interstate 605. Turn onto I-605 north and follow it 12 miles to Interstate 10. Turn onto I-10 north and follow it for 27 miles to I-15.) From the intersection of I-10 and I-15, head north on I-15 for 73 miles to the intersection with Interstate 40 in Barstow, California. Continue east on I-40 for 315 miles to Williams, Arizona.
In Williams, take exit 165 onto AZ 64. Follow it north 58 miles to Grand Canyon Village, passing Valle and Tusayan en route.
Approaching from the north and passing through Cameron, Arizona: From locations to the north including Zion National Park (St. George, Utah) and Arches National Park (near Moab, Utah), you will enter the Grand Canyon by driving south on US 89 to Cameron, Arizona. In Cameron, turn right onto AZ 64 and head west along the South Rim of the Grand Canyon for 56 miles to Grand Canyon Village. (This road is also called the Desert View Drive.) As there are many different approaches to US 89 at Cameron, consult a map for the best approach from your previous location.
BY AIR
Flagstaff: US Airways Express and Horizon/Alaska Airlines have flights to Flagstaff, approximately one hour southeast of Grand Canyon Village. Once in Flagstaff, you can rent a car or take one of the shuttle services (described below).
Las Vegas and Phoenix: Las Vegas and Phoenix have the closest airports serviced by all major airlines.
Tusayan: If you do not need to have a car once you arrive in the Grand Canyon, flying into the Grand Canyon Airport in Tusayan is a good choice. Four small airlines currently provide service to this small airport, located 10 minutes south of the entrance to Grand Canyon National Park. They depart from destinations including Las Vegas, Nevada, and Long Beach, California. See www.grandcanyonairport.net for current contact information. In summer, the national park provides a free shuttle service from Tusayan into the park. In addition, Xanterra South Rim provides a taxi service (see opposite page).
BY TRAIN
The Grand Canyon Railway travels daily between Williams, Arizona, and the South Rim of the Grand Canyon, departing Williams midmorning and returning in the evening. The 84-mile journey takes two hours and fifteen minutes each direction. As the schedule varies by season, visit www.thetrain.com for details and packaged rates that include hotel stays in Williams or Grand Canyon Village. Since your starting point is unlikely to be Williams, visit the Amtrak website (www.amtrak.com) for information about connections. (Williams lies on the Amtrak route Southwest Chief that travels from Los Angeles to Flagstaff to Albuquerque and eastward to Chicago.)
SHUTTLE, BUS, AND TAXI SERVICES
Open Road Tours (928-226-8060 or 877-226-8060) offers morning and afternoon bus service from Flagstaff to Williams and then on to Grand Canyon Village. Buses run between Phoenix and Flagstaff five times a day. Visit www.openroadtours.com for additional information.
Arizona Shuttle (928-266-8060 or 877-226-8060) offers three trips daily from Flagstaff direct to Grand Canyon Village. Buses run between Phoenix and Flagstaff seven times a day. Visit www.arizonashuttle.com for additional information.
Greyhound Bus Lines (800-231-2222 or 928-774-4573 for the Flagstaff office) has stops in Flagstaff and Williams, and both shuttle services listed above stop at the Greyhound depot in Flagstaff. Visit www.greyhound.com for additional information.
Xanterra South Rim (928-638-2822), the South Rim concessionaire, offers a taxi service to Tusayan, including the Grand Canyon Airport. (However, from mid-May to mid-September, the national park provides a free shuttle line, the Purple Line.)
Visit www.nps.gov/grca/planyourvisit/publictransportation.htm for additional information on public transportation.
Getting Around Grand Canyon Village
Several free shuttle lines operate out of Grand Canyon Village, allowing you to travel around the area without a car. Indeed, you must leave your car at the Backcountry Information Center when you embark on your walk and either walk (for the Bright Angel Trail) or take a shuttle (for the South Kaibab Trail) to the trailhead. See centerfold of The South Rim Guide, the newspaper you receive when you enter the park for a map of shuttle routes.
If you do have a car with you, you will likely decide to take it to your campsite or hotel and park it at the Backcountry Information Center just before beginning your walk. However, if you have days before or after your hike to tour the South Rim, park it for the day at the Backcountry Information Center and take the shuttles; the frustration of trying to find one of the limited number of parking spots is not worth the convenience of having a car.
The Blue Line, or Village Route, circles Grand Canyon Village itself, including the Backcountry Information Center, campgrounds (see below), and Yavapai Point with stops at Market Plaza, Mather Campground, and the various lodges. If you are descending the Bright Angel Trail, leave your car at the Backcountry Information Center and either walk a half mile or take the Blue Line to the start of the hike. (Walking is faster in this case.)
The Green Line, or Kaibab Trail Route, is the only way to reach the South Kaibab Trailhead, as cars are not permitted there from March to November. It departs from the Canyon View Information Plaza (also called the Grand Canyon Visitor Center), the eastern extent of the Blue Line. You should park at the Backcounty Information Center and take the Blue Line to this location. (Note that the roads accessing the Canyon View Information Plaza and a large parking lot at this location are currently under construction. The shuttles used to stop at Mather Point, a five-minute walk north of the Information Plaza.)
In addition there is the early morning Hiker’s Express Shuttle from the Bright Angel Lodge and Backcountry Information Center to the South Kaibab Trailhead, the most efficient option for reaching that trailhead. Departure times, which change monthly to match the changing sunrise and temperature conditions, are listed below.

Grand Canyon Village and Tusayan Services
LODGING AND CAMPING OPTIONS
There are a multitude of lodging options in the vicinity of the South Rim of the Grand Canyon. Those inside the national park offer the advantage that on the day of your departure you can just hop on a shuttle bus or walk down a trail, but there are far more rooms in Tusayan and beyond. Tusayan has several large hotels, but rooms tend to be pricey. Williams and Flagstaff, an hour from the South Rim, offer considerably cheaper accommodation. If you plan to drive into the park the morning you begin your walk, these can be good alternatives. Look through their chamber of commerce websites to find local lodging choices: www.williamschamber.com and www.flagstaffchamber.com.
Grand Canyon Village Hotels
There are six lodges and hotels in Grand Canyon Village, all run by Xanterra Parks & Resorts, the concessionaire at the South Rim. For reservations call 888-297-2757 (in advance) or 928-638-2631 (same day). In order of cost, they are: Bright Angel (and cabins), Maswik, Yavapai, Kachina, and Thunderbird lodges, and El Tovar Hotel. See www.grandcanyonlodges.com for additional information.
Tusayan Hotels and Motels
There are five large hotels in Tusayan. Since the U.S. Postal Service name for Tusayan is “Grand Canyon,” they all have “Grand Canyon, AZ” addresses. The Tusayan chamber of commerce website (www.grandcanyonchamber.com) includes lodging options outside Tusayan—if you look at these listings, make sure your reservation is for a Tusayan (Grand Canyon) location.
Best Western Grand Canyon Squire Inn
928-638-2681 or 800-622-6966
www.grandcanyonsquire.com
Grand Canyon Plaza Resort
928-638-2673 or 800-995-2521
www.grandcanyonplaza.com
The Grand Hotel
928-638-3333 or 888-634-7263
www.grandcanyongrandhotel.com
Holiday Inn Express 928-638-3000
www.gcanyon.com
Red Feather Lodge 928-638-2414 or 866-561-2425
www.redfeatherlodge.com
RV Facilities
Grand Canyon National Park:
Trailer Village
Located between Mather Campground and the Marketplace, Trailer Village is run by the concessionaire, Xanterra Parks & Resorts. For reservations call 888-297-2757 (in advance) or 928-638-2631 (same day). The cost is $32 for two adults and $2 for each additional adult.
Tusayan:
Camper Village
Located near the north end of Tusayan, this private campground has 294 sites. Tents are welcome, although it is targeted to RVs. There are showers, laundry, and a small on-site store. Reservations can be made online at www.grandcanyoncampervillage.com or by calling 928-638-2887 or 800-638-2887. The cost is $20 for tents and $30–43 for RVs depending on hookups at the site (water, sewer, and electricity).
Camping
Grand Canyon National Park:
Mather Campground
Located near Market Plaza, this lovely campground has 327 sites. Reservations are recommended and can be made at www.recreation.gov or by calling 877-444-6777. The cost is $18 for single sites ($15 in winter). Amenities include water, flush toilets (and heated bathrooms with power outlets), free dump station, showers, and laundry (both at an additional cost). RV hook-ups are not available.
Desert View Campground
Located 25 miles (a 45-minute drive) east of Grand Canyon Village near the Desert View vista and the Watchtower, this summer-only campground has 50 first-come, first-served sites. They cost $12 per night, and amenities include water and flush toilets, but RV hook-ups are not available.
Kaibab National Forest:
Ten-X Campground
Located 4.3 miles south of the national park entrance station (2 miles south of Tusayan), this campground has 70 first-come, first-served sites and two group campsites that can be reserved. The cost is $10 for single sites per night, and amenities include water and pit toilets (there aren’t RV hook-ups). See www.fs.fed.us/r3/kai/recreation/campgrounds/TenX.shtml for additional information.
Dispersed camping (camping in unimproved sites, i.e., by the side of a dirt road) is allowed in Kaibab National Forest, as long as you are a quarter mile from water. The ranger station just north of Tusayan can provide a map with suggested locations.
RESTAURANTS
Several places inside Grand Canyon National Park serve food. These restaurants’ seasonal hours are given in The Guide, the newspaper handed out at the park entrance. At Market Plaza, check out Canyon Café (in Yavapai Lodge) or Delicatessen (in the General Store). In Grand Canyon Village, you can choose from Maswik Cafeteria (in Maswik Lodge, across the train tracks from the Backcountry Office), Bright Angel Restaurant (in Bright Angel Lodge), The Arizona Room (also in Bright Angel Lodge), and El Tovar Dining Room (in El Tovar Hotel and requires reservations for dinner).
Tusayan has many additional choices. If you are camping, the General Store at Market Plaza has a very good selection of food.