
Most of the supplies you need to make paper, with the exception of a mold, deckle, or press, are already in your kitchen. In the case of tin can papermaking, however, you can construct a mold and deckle for free from a few recycled tin cans. The only other things you need are curiosity, willingness to experiment, and a basic understanding of how paper is made. Read on!

Paper is one of the easiest waste products to recycle. The possibilities for creating one-of-a-kind recycled paper are right there in your home recycling bin — newspapers, magazines, junk mail, coupons, and grocery store flyers. Collect some labels from bottles and cans, old letters and envelopes, concert or theater programs and tickets, flyers and pamphlets, and you have a breadth of choice that is beyond comprehension!
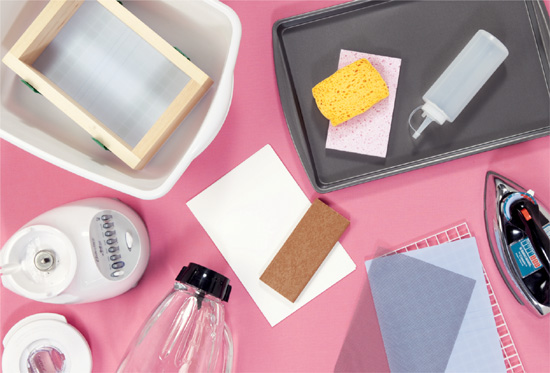
Papermaking can be done at home or in a classroom, in just about any place where you have sources for water and power nearby. A kitchen counter is great, so you don’t have to worry about water spattering around. The following list of basics will get you started. Or, if you prefer, you can purchase ready-to-use kits or individual items such as papermaking screens at many craft stores. Some kits contain everything except the vat, tray, iron, and blender (see Resources, page 196).
Blender. This basic item is what you’ll use for preparing pulp slurry. Any kitchen blender will do; the more basic, the better. It’s best to have a blender you can devote exclusively to papermaking, unless you want to spend a lot of time scrubbing out all the pieces after each use. So, if you don’t have a spare blender already, you might want to pick up one at a yard sale or secondhand shop.
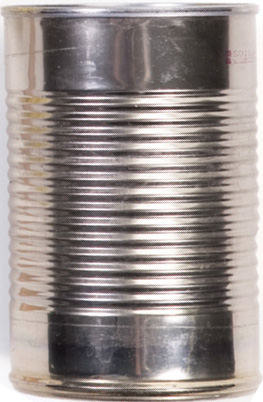
Molds and deckles. We’ll talk about molds in detail in the next chapter and even tell you how to make your own (see page 50). If you want to try tin can papermaking, all you need are two containers: one large one on the bottom to catch the water runoff and one of equal size or smaller for the top (see page 42 for details).
Vat. For home papermaking, all you need is a dishpan large enough to accommodate the hand mold.
Drain pan. This can be a tray, cookie sheet, or similar item with sides to catch the water.
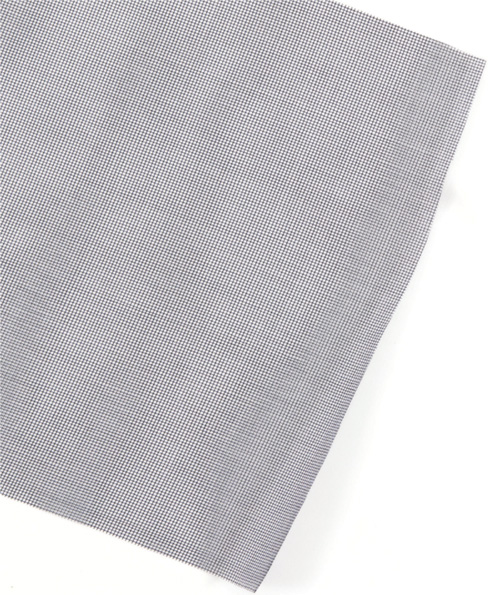
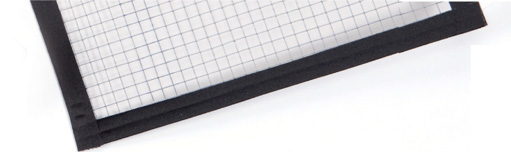
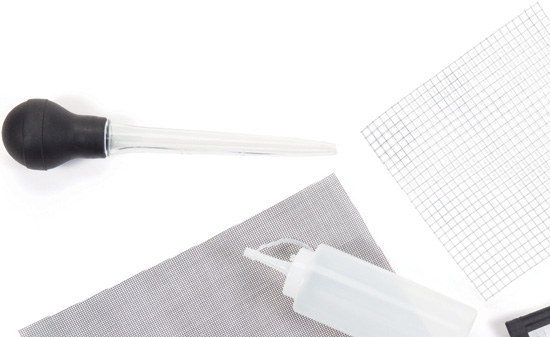
Screens. These will be explained later in detail, but essentially, you will need fine nonmetallic mesh for the papermaking screen, to catch the fibers while allowing the water to drain. You also will need a stiffer support screen, which may or may not be attached to a frame that can double as a drain rack. A selection of screens can be found in local craft supply or hardware stores.
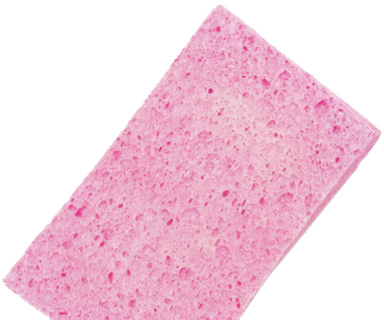
Sponge. A couple of good cellulose sponges that fit your hand and are easy to grab are useful for soaking up excess water on your new sheet of paper.
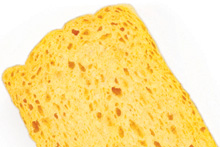
Couch sheets. For pressing and drying your sheets, you can use thick paper toweling, blotter sheets, or other absorbent material in pieces larger than the sheet of paper being made (see page 26).
Press bar. Used to press out water, this can be any piece of flat metal, wood, or plastic, or a book encased in a plastic zip-top bag.
Iron. An iron comes in handy for drying paper quickly. You just need one with a basic, high-heat setting. Be sure the steam is turned off!
Pulp gun. Any container, such as a turkey baster or mustard bottle, can be used to dispense pulp (see page 27).
Pressing equipment. There are a number of creative ways to press your paper (see page 27). You don’t need a full-blown press. However, if you’re really interested in pursuing papermaking, we provide instructions for making your own press (see page 34).
Q: What kind of blender is best for papermaking?
A: No type of special blender is needed to recycle paper; however, V-shape blenders that are narrower at the bottom (where the blade is) are more efficient. The paper can’t stay away from the blade as it can with U-shape blenders that are wide at the bottom. Often, the older the blender, the more sturdy it is, although some old blenders do have weak motors. “Bells and whistles” are not necessary. The fewer speeds a blender has, the better. Actually, a single-speed blender is as good as a 15-speed, and usually less expensive. Presoaking paper can help poor blenders.
Q: Do I need a paper press?
A: Stacking weights on top of newly formed sheets makes paper dry smoothly. For this reason, many papermakers use pressure for drying. A press can apply more pressure than weights can. It is especially good for paper that has had something transplanted to its surface. Paper dried under a lot of pressure has flat and smooth edges. Its surface is also smoother than paper dried under little pressure.
When paper was made by hand, paper mills had huge presses built especially for them. Today, hand papermakers sometimes can find old presses used by other trades, such as printing and bookbinding. But the easiest and cheapest way to get a press is to build one. With a small jack, like those used for changing tires on cars, you can build an economical press (see page 34).
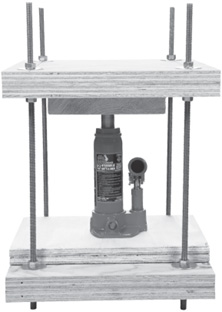
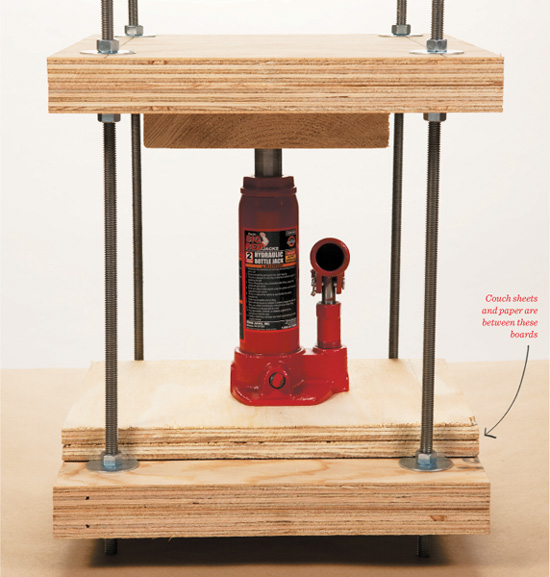
I designed this do-it-yourself, 2-ton hydraulic press especially for hand papermakers.
In papermaking, couching means taking the new wet sheet off the papermaking screen. Too weak to be lifted off by hand, the sheet must be coaxed off with the aid of absorbent material called a couch sheet, which acts like a blotter. In the past, felts of a special wool and weave were used in hand papermaking mills. These are no longer available, nor is the training on how to use them. You can use any stable material that is absorbent, including thick paper towels or cloth.
Blotter paper is perhaps the most efficient, easiest, and surest material to work. It is inexpensive and can be dried and reused. Precut professional papermakers’ blotter couch sheets also are available (see Resources, page 196). General desk blotters might be found at office supply stores. These will have to be cut and might not be as satisfactory for papermaking. If colored, they might bleed onto wet sheets. Interestingly, new sheets can be couched off the screen onto almost any solid surface, as shown in board drying on page 114.
A pulp gun is vital in making art and decoration with fibers. In this book, a pulp gun is any container from which pulp slurry can be squirted (shot), poured, or shaken in bursts or in a sprinkle. A turkey baster is a good choice, as are plastic containers with spouts or nozzles, such as mustard dispensers, plastic cosmetic containers, plastic shaving lotion bottles, syrup or honey dispensers, and plastic laboratory bottles with spouts that can be snipped off for smaller or larger openings. Another easily made solution is a plastic soda bottle with a hole drilled in the cap.
Keep your eyes open for any kind of dispensing container and try it. Different effects can be produced by varying the thickness of the pulp slurries, the squirting force, and the angle at which the pulp is shot into or onto pulp or onto a bare screen (see chapter 5).
Pressing handmade paper is simply a matter of applying pressure to sheets to remove water. This process can be simple and inexpensive or more complicated and very expensive. The method doesn’t have much effect on the final result, as long as it’s done right. But the more pressure that is applied, the more some sheet characteristics are enhanced.
Simple. After placing the wet sheet of paper between couching materials, add weight, such as a stack of books, concrete or stone building blocks, or pieces of metal.
Expensive. Commercial presses can range from a two-ton, easily portable, screw press with a price around $300, to hydraulic presses costing $3,000 or more. Watch for presses made for other purposes that also can be used for paper. A prime example is the coveted and now costly bookbinder’s press.
Another option is to build your own drying press. See the instructions on page 34, which show an easily built, inexpensive press frame. It uses a two-ton hydraulic auto jack available from any discount store. It works beautifully.
People, Pressure, and Paper
What’s the difference between people and paper? People don’t like pressure; paper does.
What the press is particularly good for — besides sheet hardening, stabilization, and causing more internal bonding area — is getting botanicals into or onto sheets, as well as embedment of various things in or on sheet surfaces.
Less pressure limits the papermaker to mostly smaller, flat, flexible botanicals, such as individual flower petals, leaves, segments of delicate stems, ferns, blades of grass, and other flat and thin items. With two tons of pressure, I’m tempted to say you can throw in most anything: whole blooms, barley beards, bulky stem segments, the works. (Don’t try a whole sapling!)
Nothing can make a multi-element sheet into a cohesive whole the way a couple hours of continuous two-ton pressure will do. Can you make good paper without it? Certainly, but the press lets you climb a bit higher on the ladder.
It seems every vocation has a list of words with meanings specific to that endeavor. Papermaking is no exception. Read through this glossary and refer back to it if you run across an unfamiliar term while completing one of the projects.
casting
Making a copy of a form or dimensional surface by applying wet pulp, then letting the pulp dry.
couch (say it: “koosh”)
To remove a newly formed paper sheet (wet mat of fibers) from a papermaking screen. Too weak to be lifted off by hand, the new sheet is placed against a flat surface to which it will transfer when pressure is applied.
couch materials
Any materials with a surface that will cause a new sheet to transfer from a papermaking screen when the new sheet is pressed against it.
couch sheet
In papermaking, a reusable blotter sheet made especially for couching new sheets from papermaking screens.
cover screen
A piece of window screen or other suitable material laid over a newly formed paper sheet to protect the sheet during water removal with a sponge.
curl and cockle
The result of uneven shrinkage when a sheet of paper is not dried uniformly, such as when using an iron. Uneven drying means uneven shrinkage, pulling different parts of the sheet in different directions, causing either general curl or localized cockling, or both.
deckle
The removable top part of a hand mold. The deckle sits on or fits around the papermaking screen and prevents pulp from running off the screen. Because it creates the outer limits to which pulp can flow on the screen, the deckle determines the sheet’s shape and size.
drain pan
Any tray, cookie pan, or similar container on which to lay a papermaking screen and newly formed sheet for initial water removal.
drain rack
Any gridlike structure placed in the drain pan upon which a screen and newly formed sheet can be placed to facilitate water drainage from the sheet. In some kits, the hand mold’s screen support also serves as the drain rack.
dry lap
Dry pulp in sheet form.
fiber
Cellulose strands produced by a plant. It will bond naturally to other cellulose fibers when it touches them in water. Also sometimes used as a synonym for pulp.

A tendency of fibers to gather in bunches during sheet formation, instead of dispersing evenly as individuals. Flocking is visible when a sheet is held up to light.
furnish
Pulp that consists of fibers plus all additives (sizing, opacifiers, fillers, etc.) required to make a specific type of paper.
hand mold
A device for making paper by hand. It consists of a screen, screen support, and a deckle.
pulp
The raw material for making paper. It consists of individual fibers. Dry pulp is generally a sheet of fibers called “dry lap.” Wet pulp is fibers in water. Papermakers generally begin with fibers in dry form.
release agent
A substance applied to a surface or form before wet pulp is applied in making a casting. When the pulp has dried, its removal from the surface or form is eased by the release agent.
screen
Material woven or formed into a sievelike fabric which will let water flow through but trap papermaking fibers on its surface. Previously, strands woven or laid side-by-side were primarily metal. Today, screens are primarily specially formulated plastic.
slurry
In this book, water with fibers in it.
vat
A container into which pulp is placed when a dip mold is used, and into which water is placed when a pour mold is used. The vat must be large enough to accommodate the hand mold and the papermaker’s hands simultaneously.
Once you’ve collected your supplies, you will of course need some pulp. One of the great benefits of making recycled paper is that almost every type of pulp is instantly available at the mere whirl of a blender. There’s a treasure trove of free fiber just sitting in the recycling bin! Recycling is by far the simplest and most accessible means of obtaining pulp.
If you wish, though, you can find other sources for pulp fibers. Today’s “start from scratch” papermakers are experimenting with fibers from many traditional and new plants. Traditional ones include Asian plants, such as gampi, mitsumata, and kozo, whose fibers require special formation aids and sheet forming techniques. Also traditional are hemp, abaca, and cotton rag. The easiest pulp to use and obtain is cotton linter (see page 125), available in convenient packages at art and craft stores and from papermaking suppliers (see Resources, page 196).
Wood fibers are most readily available to hand papermakers by recycling. Though tested by the commercial paper industry years ago, abaca (banana plant fiber) is gaining popularity with hand papermakers. A variety of special pulps are available from papermaking suppliers (see Resources). Some are produced from discarded fabrics. White cotton rag pulp may have formerly been bed sheets, and blue denim pulp was likely blue jean material. Discarded T-shirts are sorted by hue to make brightly colored pulps. Linen pulp might have been a tablecloth or article of clothing. Specialty pulps might include some synthetic and cellulose fiber blends. These pulps will make waterleaf (blotter) paper unless sizing is added (see page 33).
When preparing the pulp, a paper mill almost always adds something to the fibers to make the end paper have desirable qualities, depending on how it’s going to be used. There are hundreds of additives that will make the paper brighter, bulkier, colorful, water-resistant, fire-retardant, able to hold ink without feathering, or whatever fits the desired use. Each additive costs money and time to insert into the pulp, and often requires special equipment, as well as specialized knowledge and expertise.
But the home papermaker who recycles gets all of this for free, in practically no time: the fibers (refined or unrefined), additives, cost of equipment, and cost of salaries of professional and scientific personnel required to assemble the pulp. Whether your dream is to create paper that is wild and exotic or tame and standard, single color or multicolored, smooth or textured, recycling offers the chance to fulfill this dream. Experiment and you’ll be amazed by the magical trash-to-treasure paper transformation you can make right in your kitchen.
recycling is the simplest means of obtaining pulp
Where to Find Pulp (the easy answer)
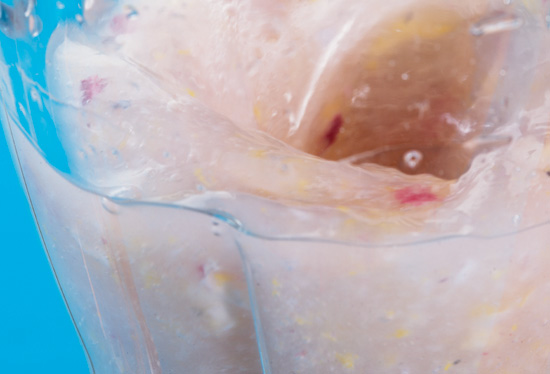
1. Tear up paper and put it in a blender with water.
2. Run the blender for 30 seconds or less, turning the paper into pulp.
how much paper? how much water? see page 48.
There are, of course, no circumstances under which any paper is permanent. Regardless of how permanent or archival a paper is said to be:
 a single spark can obliterate it
a serious heat surge nearby can damage it
light can age it
water can dissolve it
cars passing your open window can reduce its longevity
insects in your house can eat it
mold and fungi can grow on it
All of the above paper predators don’t give two hoots as to whether paper is said to be permanent, archival, or pure groundwood (lignin-loaded). So the first thing to understand is that the frame of reference for these terms is relative.
For keeping memories, papers offer more hope of longevity if they are acid-free (i.e., permanent or archival). Essentially, this means the pH level, which is a measurable quality, is in the immediate vicinity of 7.5. Readings lower than 7.0 are acidic; those with higher readings are alkaline. Papermaking conditions that would normally lead to an acidic reading (below 7.0 pH) can be treated by adding an acid buffer to the pulp. The buffer, usually calcium carbonate, also will provide protection from possible acid contamination after the sheet is made.
But note this: Even if you have never heard of acid-free, permanence, archival, or lignin, the paper you make is not going to fall apart tomorrow, next week, or even probably for years. Indeed, much of such paper will outlast the people who made it.
How to Make Memories-Safe Paper
Can you make your handmade paper safe for memories? Yes. It helps to have a pH testing pen or tape to keep track of the pH of your paper and the paper you are planning to recycle. Here are three methods for making your paper last.
Method 1. Using recycled or new pulp, make paper as you always do. When the paper is dry, spray it with a commercial buffering solution. Your paper is then within the pH range usually ascribed to permanent or archival paper. Solutions are available from archival catalogs and papermaking suppliers (see Resources, page 196).
Method 2. When using recycled paper or new pulp that is not acid-free, add calcium carbonate to the pulp, in the blender or in the vat. Make sure that your supplier includes directions with the calcium carbonate and follow them exactly. Calcium carbonate will automatically adjust your papermaking system to the correct pH level.
Method 3. Buy acid-free pulp. But then make sure your water, couch sheets or felts, and any additives are all acid-free (ask suppliers about the pH of their products). You can use distilled water, which is generally not in the acidic pH range.
Sizing helps fibers (individually or as a paper structure) resist moisture and liquids. If not sized, fibers and the paper made with them are hydrophilic, like sponges and blotters. Try to write or draw on them with ink, and the ink will run and go fuzzy. When recycling, some of the paper you use may already have sizing in it. How do you know? Try writing on it with a felt-tip pen and see if the ink spreads. Or place a small drop of water on the surface of a sheet; the longer it takes the drop to absorb into the sheet, the better the sizing.
Fibers can be sized individually as part of the pulp before the sheet is made (internal sizing), or en masse as a formed sheet (external sizing). Sizing can be soft (adding just a bit of moisture resistance), hard, or somewhere between. In the commercial paper industry, sizing is costly and is therefore introduced into paper in just the amount the paper’s use demands. It is not a simple process, because when put into pulp, most of it washes off the fibers during water drainage. To prevent this, scientists add a second agent that chemically bonds the sizing to the fibers.
Fortunately, there are simpler ways for you to size your paper (see How to Size Your Handmade Paper, below). Sources for commercial sizing are listed in Resources.
How to Size Your Handmade Paper
There are a number of products you can use to size your paper, available through paper suppliers. The most commonly found sizing materials are wax, starch, and gelatin. No matter which you use, always follow the manufacturer’s instructions on the labels.
Wax makes excellent sizing and is easy to use, effective, and easy to get for free. To make your own, collect some waxed paper sacks (they look and feel waxy), like the ones bakeries use to send pastries home with customers. To reuse the wax for sizing, here’s what you do:
1. Tear up the waxed sack and soak it in hot water for 15 minutes. You also can use waxed paper, but it’s a little harder to pulp in the blender.
2. Run the soaked pieces in a blender with hot water. For a waxed sack equal to ¾ of an 8½″ × 11″ sheet of paper, use 2½ to 3 cups of water. Run the blender until there are no paper chunks visible.
Now you have about 3 cups of excellent liquid sizing. Using it is easy. Put some into the pulp (when using a pour mold) or into the vat (when using a dip mold) and mix well. You can use a little or a lot.
• For soft sizing, add one part waxed sack pulp to five parts general recycled pulp.
• For hard sizing, add equal parts waxed sack pulp and general recycled pulp.
• For even harder sizing, add three parts waxed sack pulp to one part general recycled pulp.
• For new pulp, and especially cotton pulp (rag or linters), sizing will be a bit softer. The more pure a fiber, the harder it is to size.
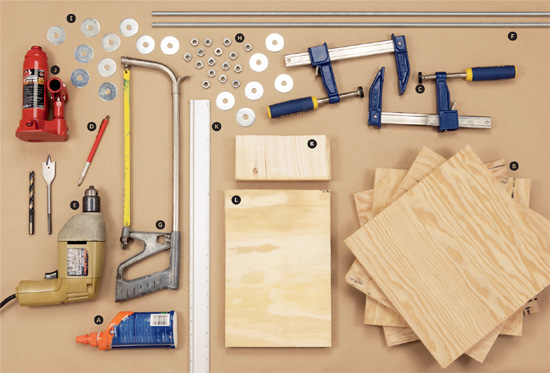
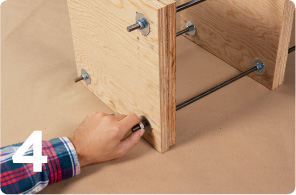
In this home-built press, the platforms are held in place on rods with washers and nuts. Pressure is applied by pumping the hydraulic jack up against the top platform, which holds wet sheets absolutely flat while they dry. The press built in this project is big enough for up to 8″ × 12″ sheets of paper. If you are not accustomed to working with power tools, ask someone experienced to help you.
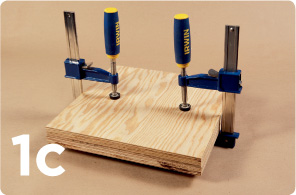
1. Glue 2 of the plywood pieces together, making a platform 1½″ thick. Clamp the pieces together or put weights on them until the glue has dried. Do the same with the other 2 plywood pieces. (The platforms will last longer if you put a waterproof paint or varnish on them.)
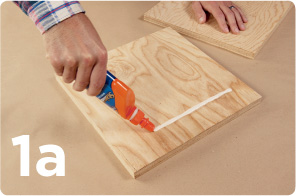
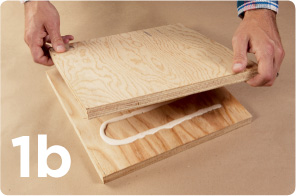
Wood glue 
Four pieces of ¾″ plywood, 1 foot square 
Two wood clamps or weights 
Waterproof paint or varnish (optional)
Pencil 
Drill and 3/8″, 13⁄32″, 7⁄16″, and 1″ bits 
Two threaded rods, 3/8″ diameter and 36″ long 
Hacksaw 
16 nuts, 3/8″ 
16 washers, 1½″ wide with 3/8″ hole 
2-ton hydraulic jack 
One 6″ length of 2″ × 4″ lumber  Two 8″ × 12″ boards
Ruler
You can use this press for any 5½″ × 8½″ sheets made with the molds featured in this book, as well as any papers you make with the Tin Can Papermaking method. If you make paper sheets larger than 8″ × 12″, however, you will need a larger press. Adapt the design by using plywood pieces that are at least 4″ larger than the paper you want to press.
Opposite: Place paper and couch sheets between the 8″ × 12″ boards to press papers flat.
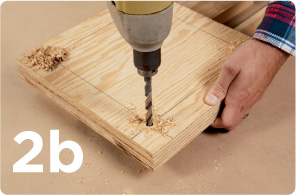
2. Draw a line across each platform 1½″ in from each edge. Where the lines cross at each corner, drill a 3/8″ hole.
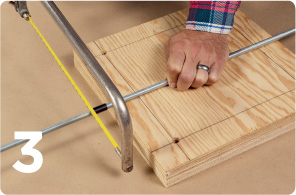
3. Cut the 2 threaded rods in half, making 4 threaded rods, each 18″ long.
4. Assemble the platforms on both ends of the 4 rods with a nut and washer above and below each of the 4 rods as shown. If it is difficult to thread the rods through the holes, drill the holes again with a 13⁄32″ or 7⁄16″ drill bit.
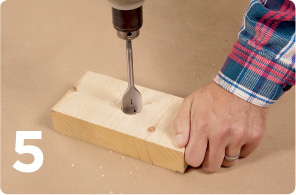
5. The top of the jack’s piston is small, and the pressure it puts against the press’s top platform must be distributed over a greater area. To address this, measure to find the center of the 6″ length of 2″ × 4″ lumber, and drill a 1″ hole that is about ⅜″ deep. Insert the tip of the piston into the hole. This will put the block of wood between piston top and the bottom of the press’s top platform.
1. When a sheet has been couched from the screen, remove enough water so it can be lifted from the couch sheet. Place the wet sheet between dry couch sheets and put them between two 8″ × 12″ boards.
2. Place the boards on the bottom platform of the press and set the jack on top of the boards.
3. Pump the jack’s piston up against the bottom of the top platform. If the piston does not reach the top platform, put more boards under the jack. Apply pressure for 10 to 15 minutes. To keep water from running back into the sheet when the pressure is released, brush the edges of the pressing boards with a damp sponge.
4. Release the jack. Replace the damp couch sheets with dry ones, and put the papers back into the press. Apply pressure for 1 to 2 hours.
5. Change the couch sheets. Apply pressure for about 3 hours (overnight is good).
6. Continue changing couch sheets until the paper is dry. The thicker the paper, the more changes will be required.